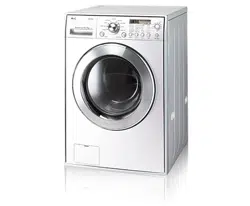
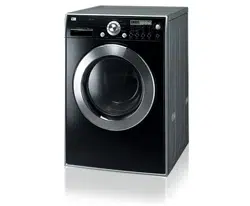
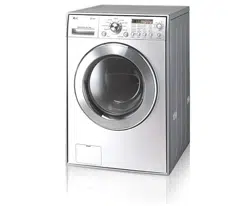
USER MANUAL WASHING MACHINE
INSTALLATION
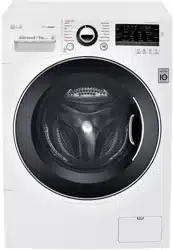
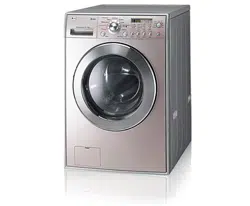
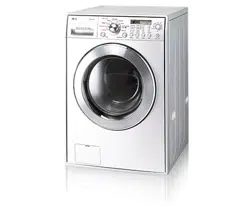
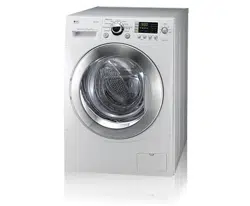
Specifications
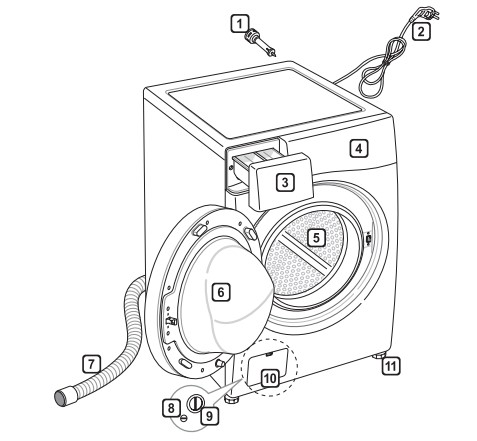
- Transit bolts. (Must be removed before use)
- Power plug
- Drawer
- Control panel
- Drum
- Door
- Drain hose
- Drain plug
- Drain pump filter
- Cover cap (Location may vary depending on products)
- Adjustable feet
- Power supply : 220‒240 V~, 50 Hz
- Size : 600 mm (W) X 640 mm (D) X 850 mm (H)
- Product weight : 71 kg
- Wash Capacity : 9 kg (Wash) / 5 kg (Dry)
- Permissible water pressure : 0.1 - 0.8 MPa (1.0 - 8.0 kgf / cm2 )
- The external hot water supply MUST NOT exceed 65°C
- Permissible cold water temperature : 4 - 25°C
- No further backflow protection required for connection to the water supply.
- The appearance and specifications may be varied without notice to improve the units quality.
- Specifications subject to change by manufacturer.
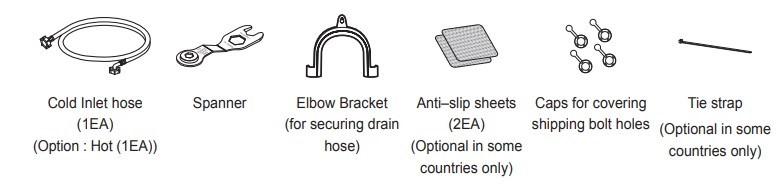
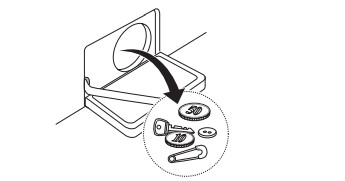
Accessories
Installation Place Requirements
Location
Level floor : Allowable slope under the entire washing machine is 1°.
Power outlet : Must be within 1.5 meters of either side of the location of the washing machine.
- Do not overload the outlet with more than one appliance.
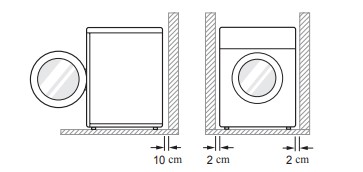
Additional Clearance : For the wall, 10 cm: rear /2 cm: right & left side
- Do not place or store laundry products on top of the washing machine at any time.
- These products may damage the finish or controls.
Positioning
- Install the washing machine on a flat hard floor.
- Make sure that air circulation around the washing machine is not impeded by carpets, rugs, etc.
- Never try to correct any unevenness in the floor with pieces of wood, cardboard or similar materials under the washing machine.
- If it is impossible to avoid positioning the washing machine next to a gas cooker or other heat sources, an insulation (85x60 cm) panel covered with aluminum foil on the side facing the cooker or heat source must be inserted between the two appliances
- Do not install your washing machine in rooms where freezing temperatures may occur. Frozen hoses may burst under pressure. The reliability of the electronic control unit may be impaired at temperatures below freezing point.
- Please ensure that when the washing machine is installed, it is easily accessible for an engineer in the event of a breakdown.
- With the washing machine installed, adjust all four feet using the transit bolt spanner provided to ensure the appliance is stable, and a clearance of approximately 20 mm is left between the top of the washing machine and the underside of any work-top
- This equipment is not designed for maritime use or for use in mobile installations such as caravans, aircraft etc.
Electrical Connection
- Do not use an extension cord or double adapter.
- Always unplug the washing machine and turn off the water supply after use.
- Connect the washing machine to an earthed socket in accordance with current wiring regulations.
- The washing machine must be positioned so that the plug is easily accessible.
- Repairs to the washing machine must only be carried out by qualified personnel. Repairs carried out by inexperienced persons may cause injury or serious malfunctioning. Contact your local service centre.
- If the washing machine is delivered in winter and temperatures are below freezing, place the washing machine at room temperature for a few hours before putting it into operation.
Unpacking and Removing Shipping Bolts (Transit bolts)
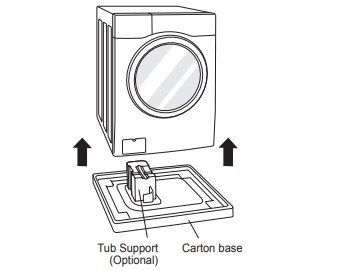
- Lift the washing machine off the foam base. After removing the carton and shipping material, lift the washing machine off the foam base. Make sure the tub support comes off with the base and is not stuck to the bottom of the washing machine. If you must lay the washing machine down to remove the carton base, always protect the side of the washing machine and lay it carefully on its side. DO NOT lay the washing machine on its front or back.
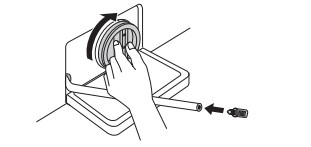
- Remove the bolt assemblies. Starting with the bottom two shipping bolts, use the spanner (included) to fully loosen all shipping bolts by turning them counterclockwise. Remove the bolt assemblies by wiggling them slightly while pulling them out.
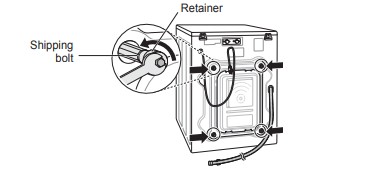
- Install the hole caps. Locate the hole caps included in the accessory pack and install them in the shipping bolt holes.
Using Non-Skid Pads (Optional)
If you install the washing machine on a slippery surface, it may move because of excessive vibration. Incorrect leveling may cause malfunction through noise and vibration. If this occurs, install the non-skid pads under the leveling feet and adjust the level.
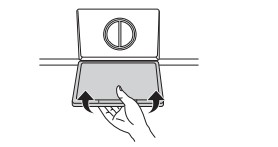
- Clean the floor to attach the non-skid pads. Use a dry rag to remove and clean foreign objects and moisture. If moisture remains, the non-skid pads may slip.
- Adjust the level after placing the washing machine in the installation area.
- Place the adhesive side of the non-skid pad on the floor. It is most effective to install the non-skid pads under the front legs. If it is difficult to place the pads under the front legs, place them under the back legs.
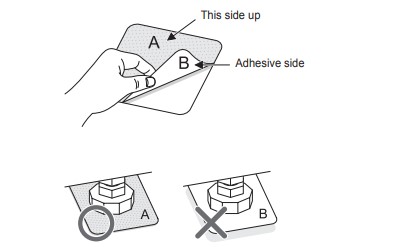
- Ensure the washing machine is level. Push or rock the top diagonal edges of the washing machine firmly to make sure that the washing machine does not rock. If the washing machine rocks, level the washing machine again.
Leveling the Washing Machine
If the floor is uneven, turn the adjustable feet as required (Do not insert pieces of wood etc. under the feet). Make sure that all four feet are stable and resting on the floor and then check that the appliance is perfectly level (Use a spirit level).
- Once the washing machine is level, tighten the lock nuts up towards the base of the washing machine. All lock nuts must be tightened.
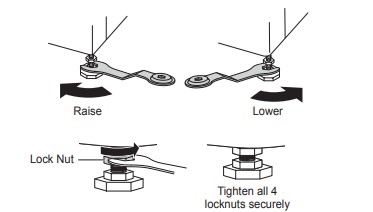
- Diagonal Check. When pushing down the edges of the washing machine top plate diagonally, the washing machine should not move up and down at all (Check both directions). If the washing machine rocks when pushing the machine top plate diagonally, adjust the feet again.
Connecting Inlet Hose
- Water supply pressure must be between 0.1 MPa and 0.8 MPa (1.0‒8.0 kgf/cm2 ).
- Do not strip or crossthread when connecting inlet hose to the valve.
- If the water supply pressure is more than 0.8 MPa, a decompression device should be installed.
- Periodically check the condition of the hose and replace the hose if necessary
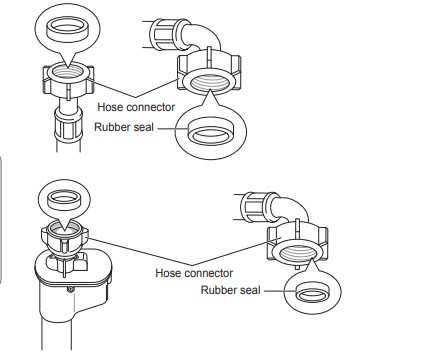
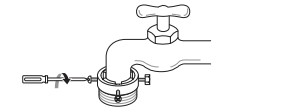
Checking the Rubber Seal on the Inlet Hose
Two rubber seals are supplied with the water inlet hoses. They are used for preventing water leaks. Make sure they are present when connecting the inlet hoses. Firmly hand tighten the inlet hoses. Do not overtighten or use and mechanical devises to tighten the inlet hoses.
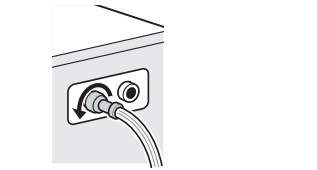
Connecting Hose to Water Tap
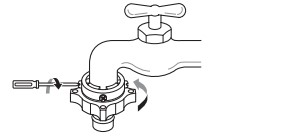
Connecting screw-type hose to tap with thread
Screw the hose connector onto the water supply tap.
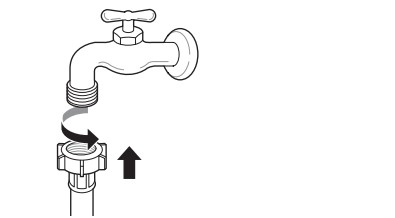
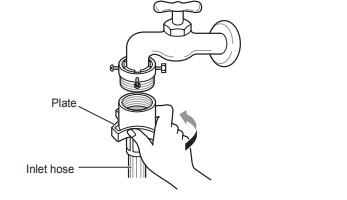
Connecting screw-type hose to tap without thread
- Loose the four fixing screws
- Remove the guide plate if the tap is too large to fit the adapter.
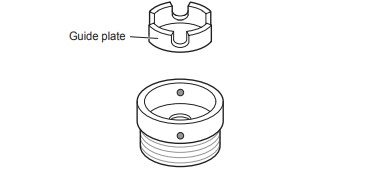
- Push the adapter onto the end of the tap so that the rubber seal forms a watertight connection. Tighten the four fixing screws.
- Push the inlet hose vertically upwards so that the rubber seal within the hose can adhere completely to the tap and then tighten it by screwing it to the right.
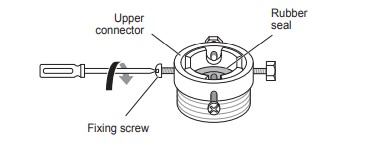
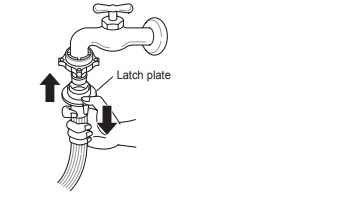
Connecting one touch type hose to tap without thread
- Unscrew the adapter ring plate and loose the four fixing screws
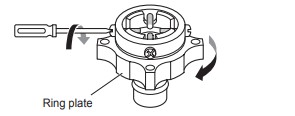
- Remove the guide plate if the tap is too large to fit the adapter.
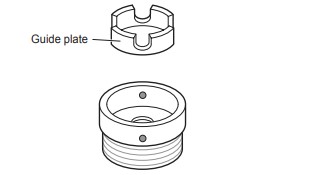
- Push the adapter onto the end of the tap so that the rubber seal forms a watertight connection. Tighten the adapter ring plate and the four fixing screws
- Pull the connector latch plate down, push the inlet hose onto the adapter, and release the connector latch plate. Make sure the adapter locks into place.
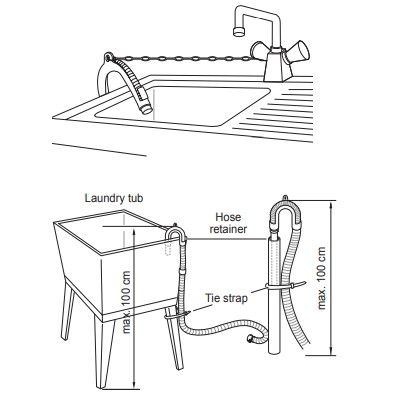
Installation of Drain Hose
- The drain hose should not be placed higher than 100 cm above the floor. Water in the washing machine may not drain or may drain slowly.
- Securing the drain hose correctly will protect the floor from damage due to water leakage.
- If the drain hose is too long, do not force it back into the washing machine. This will cause abnormal noise.
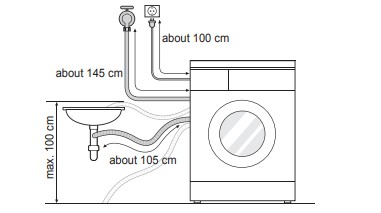
- When installing the drain hose to a sink, secure it tightly so that it cannot fall out due to the water forces when draining.
- Securing the drain hose correctly will protect the floor from damage due to water leakage.
Electrical Connections (In the UK Only)
The wires in the mains lead are coloured in accordance with the following code:
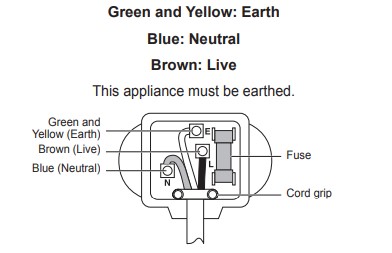
As the colours of the wires in the mains lead of this apparatus may not correspond with the coloured markings identifying the terminals in your plug, proceed as follows:
- The green and yellow wire must be connected to the terminal in the plug which is marked with the letter E or by the earth symbol (
 ) or coloured Green or Green and Yellow.
- The blue wire must be connected to the terminal which is marked with the letter N or coloured Black.
- The brown wire must be connected to the terminal which is marked with the letter L or coloured Red.
- If a 13 amp (BS 1363) plug is used, fit a 13 amp BS 1362 fuse.
OPERATION
Using the Washing Machine
Before the first wash, select a cycle (Cotton 60 °C, add a half load of detergent), allow the washing machine to wash without clothing. This will remove residue and water from the drum that may have been left during manufacturing. Use Front Loader Detergent only.
- Sort laundry and load items. Sort laundry by fabric type, soil level, colour and load size as needed. Open the door and load items into the washing machine.

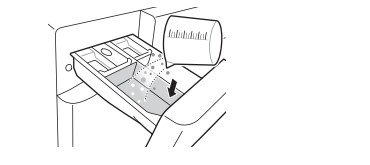
- Add cleaning products and/or detergent and softener. Add the proper amount of detergent to the detergent dispenser drawer. If desired, add bleach or fabric softener to the appropriate areas of the dispenser.
- Turn on the washing machine. Press the Power button to turn ON the washing machine.

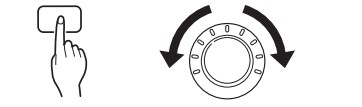
- Choose the desired washing cycle. Press the Cycle button repeatedly or turn the cycle selector knob until the desired cycle is selected.
- Begin cycle. Press the Start/Pause button to begin the cycle. The washing machine will agitate briefly without water to measure the weight of the load. If the Start/Pause button is not pressed within 5 minutes, the washing machine will shut off and all settings will be lost.

- End of cycle. When the cycle is finished, a melody will sound. Immediately remove your clothing from the washing machine to reduce wrinkling. Check around the door seal when removing the load for small items that may be caught in the seal.
Adding Cleaning Products
Detergent Dosage
- Detergent should be used according to the instruction of the detergent manufacturer and selected according to type, colour, soiling of the fabric and washing temperature.
- If too much detergent is used, too many suds can occur and this will result in poor washing results or cause heavy loading on the motor and a potential malfunction.
- If you wish to use liquid detergent follow the guidelines provided by the detergent manufacturer.
- You can pour liquid detergent directly into the main detergent drawer if you are starting the cycle immediately.
- Do not use liquid detergent if you are using Time delay, or if you have selected Pre Wash, as the liquid may harden.
- If too many suds occur, reduce the detergent amount.
- Detergent usage may need to be adjusted for water temperature, water hardness, size and soil level of the load. For best results, avoid oversudsing.
- Refer to the label of the clothes, before chooseing the detergent and water temperature:
- When using the washing machine, use designated detergent for each type of clothing only:
– General powdered detergents for all types of fabric
– Powdered detergents for delicate fabric
– Liquid detergents for all types of fabric or designated detergents only for wool
- For better washing performance and whitening, use detergent with the general powdered bleach.
- Detergent is flushed from the dispenser at the beginning of the cycle.
Control Panel
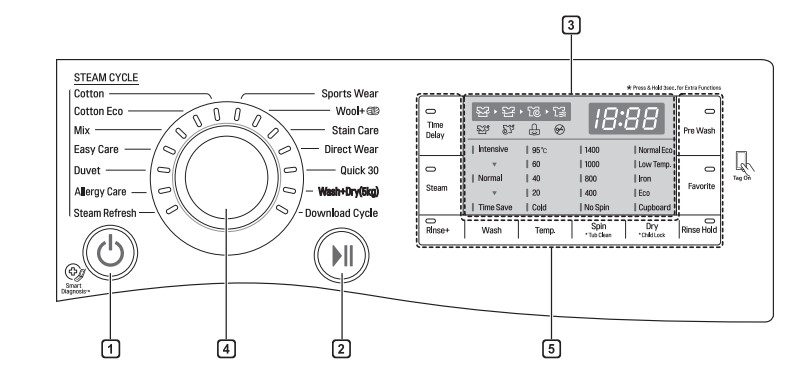
1. Power button
- Press the Power button to turn the washing machine on.
- To cancel the Time Delay function, the power button should be pressed.
2. Start/Pause button
- This Start/Pause button is used to start the wash cycle or pause the wash cycle.
- If a temporary stop of the wash cycle is needed, press the Start/Pause button. If the wash is not resumed within 5min the machine will automatically turn off.
3. Display
- The display shows the settings, estimated time remaining, options, and status messages. When the product is turned on, the default settings in the display will illuminate.
- The display will show the estimated time remaining after it has calculated the load size. While the size of the load is being calculated automatically, blinking
 or ‘Detecting’ appears.
4. Programme dial
- Programmes should be appropriately selected to suit the laundry type.
- Lamp will light up to indicate the selected programme.
5. Options
- This allows you to select an additional option and will light when selected.
- Use these buttons to select the desired cycle options for the selected cycle. Not all Options may be available with all cycles.
Programme Table
Washing Programme
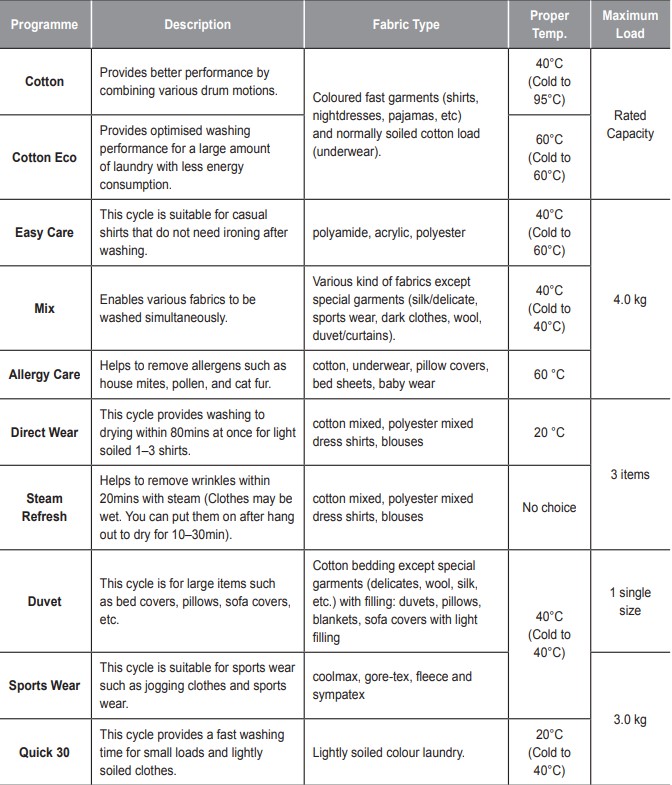
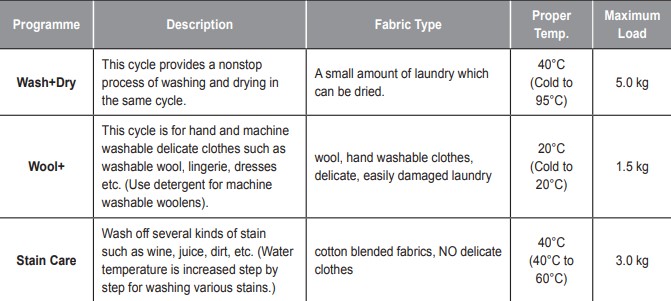
- Water Temperature: Select the appropriate water temperature for chosen wash cycle. Always follow garment manufacturer’s care label or instructions when washing.
Drying Programme
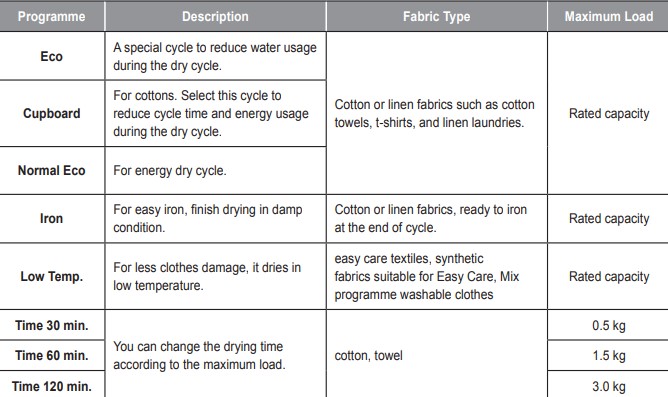
- Set program at “Cotton Eco, 40°C, Normal Wash, 1400RPM” is for normally soiled load and test in accordance or in conformity with AS/NZS 2040.1.
- Set program at “Normal Eco, 1400 RPM” option for test in accordance or in conformity with AS/NZS 2442.1.
- The test results depend on water pressure, water hardness, water inlet temperature, room temperature, type and amount of load, degree of soiling utilized detergent, fluctuations in the main electricity supply and chosen additional options.
Extra Options
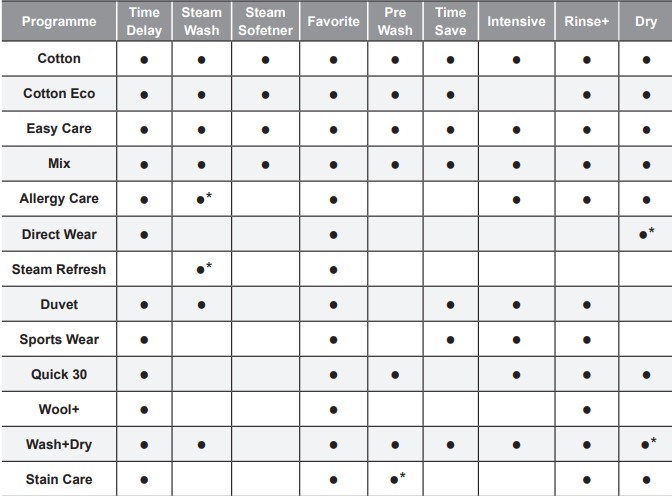
* : This option is automatically included in the cycle and can not be deleted.
Operating Data
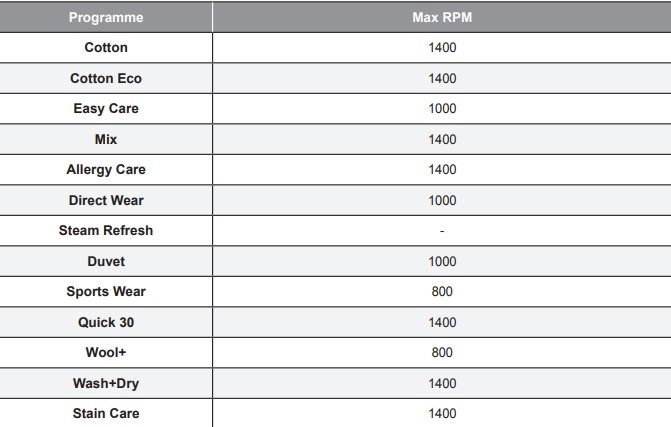
Option Cycle
Time Delay
You can set a time delay so that the washing machine will start automatically and finish after a specified time interval.
- Press the Power button.
- Select a washing programme.
- Press the Time Delay button and set time required.
- Press the Start/Pause button.
Steam (Optional)
Steam Wash features enhanced washing performance with low energy consumption. Steam Softener sprays steam after a spinning cycle to reduce creases and make the laundry fluffy.
1 Press the Power button.
2 For Steam Wash option, select steam cycles. For Steam Softener option, select Cotton or Cotton Eco, Mix, Easy Care.
3 The following cycle is selected depending on the number of times you press the Steam button.
- Once: Steam Wash
- Twice: Steam Softener
- Three times: Steam Wash and Steam Softener
4 Press the Start/Pause button.
Favorite
Favorite programme allows you to store a customized wash cycle for future use.
- Press the Power button.
- Select a washing programme.
- Select the cycle (Washing method, number of rinses, spin speed, water temperature etc.).
- Press and hold the Favorite button for 3 seconds.
The favorite programme is now stored for future use. To reuse the programme, select favorite programme and press the Start/Pause button.
Pre Wash
If the laundry is heavily soiled, the Pre Wash cycle is recommended.
- Press the Power button.
- Select a washing programme
- Press the Pre Wash button.
- Press the Start/Pause button.
Wash
Time Save
- This option can be used to reduce the time of a wash programme. It is best used on lightly soiled loads.
Intensive
- If the load is normal and heavily soiled, the Intensive option is effective.
Temp.
The Temp. button selects the wash temperature for the selected cycle. Press this button until the desired setting is lit. All rinses use the water from the cold water hose connection.
- Select the water temperature suitable for the type of load you are washing. Follow the garment fabric care labels for best results.
Rinse
Rinse+
- Adds an additional rinse.
Rinse Hold
- The cycle is paused until start button is pressed again when rinse is finished.
Spin
- Spin speed level can be selected by pressing the Spin button repeatedly.
- Spin Only
- Press the Power button.
- Press the Spin button to select RPM.
- Press the Start/Pause button.
Child Lock ( )
)
Select this function to lock the buttons on the control assembly to prevent tampering
Locking the control panel
- Press and hold the Child Lock (Dry) button for 3 seconds
- A beep will sound, and
 will appear on the display. When the child lock is set, all buttons are locked except the Power button.
Unlocking the control panel
Press and hold the Child Lock (Dry) button for 3 seconds.
- A beep will sound and the remaining time for the current programme will reappear on the display.
Beep On / Off
- Press the Power button.
- Press the Start/Pause button.
- Press and hold the Steam and Pre Wash button simultaneously for 3 seconds to set the Beep on/off function.
MAINTENANCE
Cleaning your Washing Machine
Care After Wash
- After the cycle is finished, wipe the door and the inside of the door seal to remove any moisture.
- Leave the door open to dry the drum interior.
- Wipe the body of the washing machine with a dry cloth to remove any moisture.
Cleaning the Exterior
Proper care of your washing machine can extend its life.
Door:
- Wash with a damp cloth on the outside and inside and then dry with a soft cloth.
Exterior:
- Immediately wipe off any spills.
- Wipe with a damp cloth.
- Do not press the surface or the display with sharp objects.
Care and Cleaning of the Interior
- Use a towel or soft cloth to wipe around the washing machine door opening and door glass.
- Always remove items from the washing machine as soon as the cycle is complete. Leaving damp items in the washing machine can cause wrinkling, colour transfer, and odour.
- Run the Tub Clean cycle once a month (or more often if needed) to remove detergent buildup (Scrud) and other residue.
Cleaning the Water Inlet Filter
- Turn off the supply taps to the machine if the washing machine is to be left for any length of time (e.g. holiday), especially if there is no floor drain (gully) in the immediate vicinity.
 icon will be displayed on the control panel when water is not entering the detergent drawer.
- If water is very hard or contains traces of lime deposit, the water inlet filter may become clogged. It is therefore a good idea to clean it occasionally
- Turn off the water tap and unscrew the water inlet hose
- Clean the filter using a hard bristle brush.

Cleaning the Drain Pump Filter
- The drain filter collects threads and small objects left in the laundry. Check regularly that the filter is clean to ensure smooth running of your washing machine.
- Allow the water to cool down before cleaning the drain pump, carrying out emergency emptying, or opening the door in an emergency.
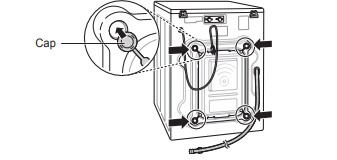
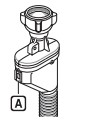
- Open the cover cap and pull out the hose.
- Unplug the drain plug to drain out all the residual water into a vessel, and then open the filter by turning it to the left.
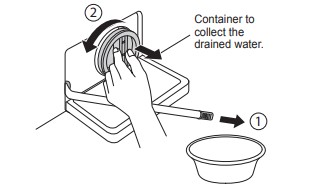
- Remove any extraneous matter from the pump filter.
- After cleaning, refit the drain cap by turning it clockwise and then insert the drain plug.
- Close the cover cap.
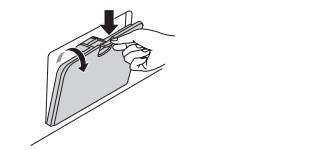
Cleaning the Dispenser Drawer
Detergent and fabric softener may build up in the dispenser drawer. Remove the drawer and inserts and check for buildup once or twice a month.
- Remove the detergent dispenser drawer by pulling it straight out until it stops. Press down hard on the disengage button and remove the drawer.

- Remove the inserts from the drawer. Rinse the inserts and the drawer with warm water to remove buildup from laundry products. Use only water to clean the dispenser drawer. Dry the inserts and drawer with a soft cloth or towel.
- To clean the drawer opening, use a cloth or an old toothbrush brush to clean the recess. Remove all residue from the upper and lower parts of the recess.
- Wipe any moisture off the recess with a soft cloth or towel.
- Return the inserts to the proper compartments and refit the drawer.
TROUBLESHOOTING
- Your washing machine is equipped with an automatic error-monitoring system to detect and diagnose problems at an early stage. If your washing machine does not function properly or does not function at all, check the following before you call for service:
Diagnosing Problems
Rattling and clanking noise
- Foreign objects such as coins or safety pins may be in drum or pump.
- Stop washing machine, check drum and drain filter.
- If noise continues after washing machine is restarted, call your authorised service centre.
Thumping sound
- Heavy wash loads may produce a thumping sound. This is usually normal.
- If sound continues, washing machine is probably out of balance. Stop and redistribute wash load.
Vibrating noise
- Have all the transit bolts and tub support been removed?
- If not removed during installation, refer to Installation guide for removing transit bolts.
- Are all the feet resting firmly on the ground?
- Wash load may be unevenly distributed in drum. Stop washing machine and rearrange wash load.
Water leaks
- Inlet hoses or drain hose are loose at tap or washing machine.
- Check and tighten hose connections.
- House drain pipes are clogged.
- Unclog drain pipe. Contact plumber if necessary.
Oversudsing
- Too much detergent or unsuitable detergent may cause excessive foaming which may result in water leaks.
Water does not enter washing machine or it enters slowly
- Water supply is not adequate in that location.
- Check another tap in the house.
- Water supply tap is not completely open.
- Water inlet hose(s) are kinked.
- The filter of the inlet hose(s) clogged.
- Check the filter of the inlet hose.
Water in the washing machine does not drain or drains slowly
- Drain hose is kinked or clogged.
- Clean and straighten the drain hose.
- The drain filter is clogged.
Washing machine does not start
- Electrical power cord may not be plugged in or connection may be loose.
- Make sure plug fits tightly in wall outlet.
- House fuse blown, circuit breaker tripped,or a power outage has occurred.
- Reset circuit breaker or replace fuse. Do not increase fuse capacity. If problem is a circuit overload, have it corrected by a qualified electrician.
- Water supply tap is not turned on.
- Turn on water supply tap.
Washing machine will not spin
- Check that the door is firmly shut.
- Close the door and press the Start/Pause button. After pressing the Start/Pause button, it may take a few moments before the washing machine begins to spin. The door must be locked before spin can be achieved. Add 1 or 2 similar items to help balance the load. Rearrange load to allow proper spinning.
Door does not open
- Once washing machine has started, the door cannot be opened for safety reasons. Check if the ‘Door Lock’ icon is illuminated. You can safely open the door after the ‘Door Lock’ icon turns off.
Wash cycle time delayed
- The washing time may vary by the amount of laundry, water pressure, water temperature and other usage conditions. If an imbalance is detected or if the suds removing programme is on, the wash time will increase.
Fabric softener overflow
- Too much softener may cause an overflow.
- Follow softener guidelines to ensure appropriate amount is used. Do not exceed the maximum fill line.
Softeners dispensed too early
- Close the dispenser drawer slowly. Do not open the drawer during the wash cycle.
Dry problem
- Does not dry
- Do not overload. Check that the washing machine is draining properly to extract adequate water from the load. Clothes load is too small to tumble properly. Add a few towels.
Error Messages

- Water supply pressure may not adequate in area.
- Check another tap in the house.
- Water supply taps are not completely open.
- Water inlet hose(s) are kinked.
- The filter of the inlet hose(s) are clogged.
- Check the filter of the inlet hose.
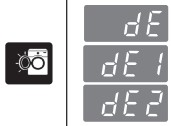
- if a water leak occurs within the inlet hose body, indicator
 will become red
 May vary depending on the model.

- Drain hose is kinked or clogged.
- Clean and straighten the drain hose.
- The drain filter is clogged.

- Load is too small.
- Add 1 or 2 similar items to help balance the load.
- Load is out of balance.
- Add 1 or 2 similar items to help balance the load.
- The appliance has an imbalance detection and correction system. If individual heavy articles are loaded (e.g. bath mat, bath robe, etc.) this system may stop spinning or even interrupt the spin cycle altogether.
- Rearrange load to allow proper spinning.
- If the laundry is still too wet at the end of the cycle, add smaller articles of laundry to balance the load and repeat the spin cycle.
- Rearrange load to allow proper spinning.
- Ensure door is not open.
- Close the door completely. If
 is not released, call for service.

- Possible Heating Thermistor Error
- Unplug the power plug and call for service.

- Water has overfilled in the tub.
- Close the water tap.
- Unplug the power plug.
- Call for service.

- Water level sensor has malfunctioned.
- Close the water tap.
- Unplug the power plug.
- Call for service.

- Over load in motor.
- Allow the washing machine to stand for 30 minutes to allow the motor to cool, then restart the cycle.


- The washer experienced a power failure.

- Does not dry (only on combo dryer models)

- Is Inlet/outlet hose or drainage pump frozen?
- Supply warm water into the tub and unfreeze outlet hose and drainage pump. Wet a towel in warm water and apply to inlet hose.