AJB3552
Register your product and get support at
www.philips.com/support
EN User manual

2
English
EN
7 Product information 16
Specications 16
8 Troubleshooting 17
9 Notice 18
Recycling 18
Contents
1 Important 4
2 Your DAB+ clock radio 5
Introduction 5
What’sinthebox 5
Overviewofthemainunit 6
3 Get started 8
PrepareFM/DAB+antenna 8
Connectpower 8
Setclock 8
Turnradioon/off 8
4 Listen to Digital Audio Broadcasts
(DAB+) 9
TunetoDAB+radiostations 9
StoreDAB+radiostationsautomatically9
StoreDAB+radiostationsmanually 9
SearchforDAB+radiostationmanually 9
ListentoapresetDAB+radiostation 10
ShowDAB+information 10
RemoveinvalidDAB+station 10
SelectDRCsetting 10
5 Listen to FM radio 11
TunetoFMradiostations 11
StoreFMradiostationsautomatically 11
StoreFMradiostationsmanually 11
ListentoapresetFMradiostation 11
DisplayRDSinformation 11
SelectFMradiosearchingscope 11
6 Other features 12
Adjustsystemsettings 12
Setdateandtimeformat 12
Selectbacklightsettings 12
Updatesoftware(ifavailable) 13
Setalarmtimer 13
Setthesleeptimer 14
Enhancebass 15

3
1 Important
• Theapparatusshallnotbeexposedto
drippingorsplashing.
• Donotplaceanysourcesofdangeron
theapparatus(e.g.liquidlledobjects,
lightedcandles).
• Neverinsertobjectsintotheventilation
slotsorotheropeningsontheapparatus.
• Protectthepowercordfrombeing
walkedonorpinched,particularlyat
plugs,conveniencereceptacles,andthe
pointwheretheyexitfromtheapparatus.
• Unplugthisapparatusduringlightning
stormsorwhenunusedforlongperiods
oftime.
• Referallservicingtoqualiedservice
personnel.Servicingisrequiredwhen
theapparatushasbeendamagedinany
way,suchaspower-supplycordorplug
isdamaged,liquidhasbeenspilledor
objectshavefallenintotheapparatus,the
apparatushasbeenexposedtorainor
moisture,doesnotoperatenormally,or
hasbeendropped.
• WheretheplugoftheDirectPlug-in
Adapterisusedasthedisconnectdevice,
thedisconnectdeviceshallremainreadily
operable.
EN

4
English
2 Your DAB+
clock radio
Congratulationsonyourpurchase,and
welcometoPhilips!Tofullybenetfromthe
supportthatPhilipsoffers,registeryourproduct
atwww.philips.com/support.
Introduction
Withthisunit,youcan:
• listentoFMorDAB+(DigitalAudio
Broadcasting)radio
• knowthetime
• bewakenupbyDAB+/FMradioor
buzzeralarm.
TheunitoffersDynamicBassBoost(DBB)to
enrichsound.
What’s in the box
Checkandidentifythecontentsofyour
package:
• Mainunit
• Poweradaptor
• Usermanual
EN

5
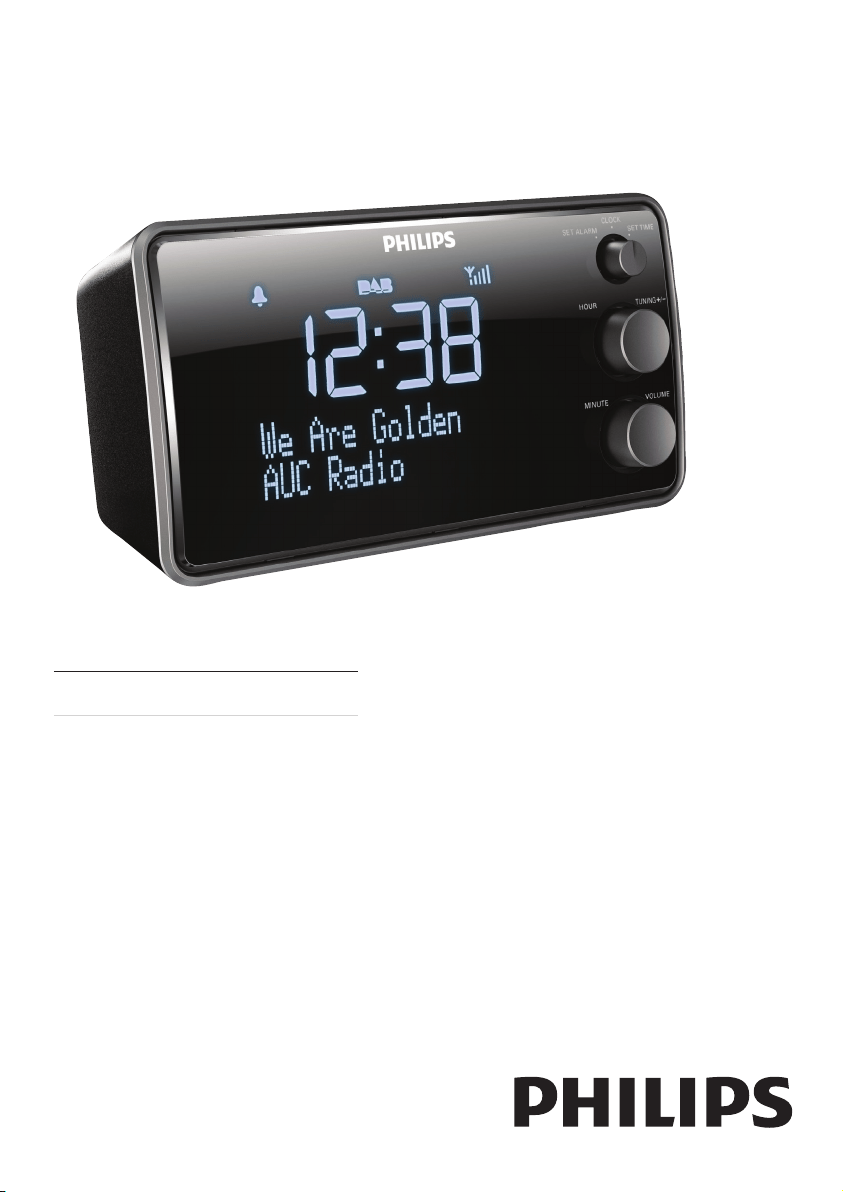
Overview of the main unit
a
b
c
d
e
m
n
o
l
k
j
i
h
g
f
pq
EN

6
English
o AUTOSCAN
• Scanradiostations.
• Storefavoriteradiostationsin
memory.
p DC IN
• Connectpower.
q FOR SOFTWARE UPDATE ONLY
• UpdatesoftwareviaUSBconnector(if
available).
a BACK
• Returntopreviousmenu.
• Cancelaselection.
b INFO/MENU
• AccessDAB+/FMmenu.
• DisplayDAB+/RDSinformation.
c DBB
• Turnon/offdynamicbass
enhancement.
d SLEEP
• Setsleeptimer.
e
/
• NavigatethroughtheDAB+/FMmenu.
• Selectapresetradiostation.
• Scanforprevious/nextradiostation.
f Display panel
• Showstatus.
g Light sensor
• Forbacklightbrightnessadjustment.
h MINUTE/VOLUME
• Setminute.
• Adjustvolume.
i HOUR/TUNING +/-
• Sethour.
• Tunetoaradiostation.
j SET ALARM/CLOCK/SET TIME
• Setalarm/time.
• Switchtoclockscreen.
k REPEAT ALARM•SELECT
• Repeatalarm.
• Conrmselection.
l ALARM ON/OFF
• Turnon/offalarmtimer.
m RADIO ON/OFF
• Turnon/offradio.
n SOURCE
• SelectDAB+/FMsource.
EN
7
Note
•
Thetypeplateislocatedonthebottomofthe
mainunit.
Set clock
1
Instandbymode,rotateSET ALARM/
CLOCK/SET TIMEtotheSET TIME
position.
» Thehourandminutedigitsbeginto
blink.
2 RotateHOURtosetthehour.
3 RotateMINUTEtosettheminute.
4 RotatetheSET ALARM/CLOCK/SET
TIMEtotheCLOCKpositiontoconrm.
Turn radio on/off
Instandbymode,pressRADIO ON/OFFto
turnontheradio.
» ThelastlistenedDAB+orFMstation
broadcastsautomatically.
Tip
•
Youcanalsoturnontheradiobypressing
SOURCErepeatedly.
• Toturnofftheradio,pressRADIO ON/OFF
again.
3 Get started
IfyoucontactPhilips,youwillbeaskedforthe
modelandserialnumberofthisapparatus.The
modelnumberandserialnumberareonthe
bottomoftheapparatus.Writethenumbers
here:
ModelNo.__________________________
SerialNo.___________________________
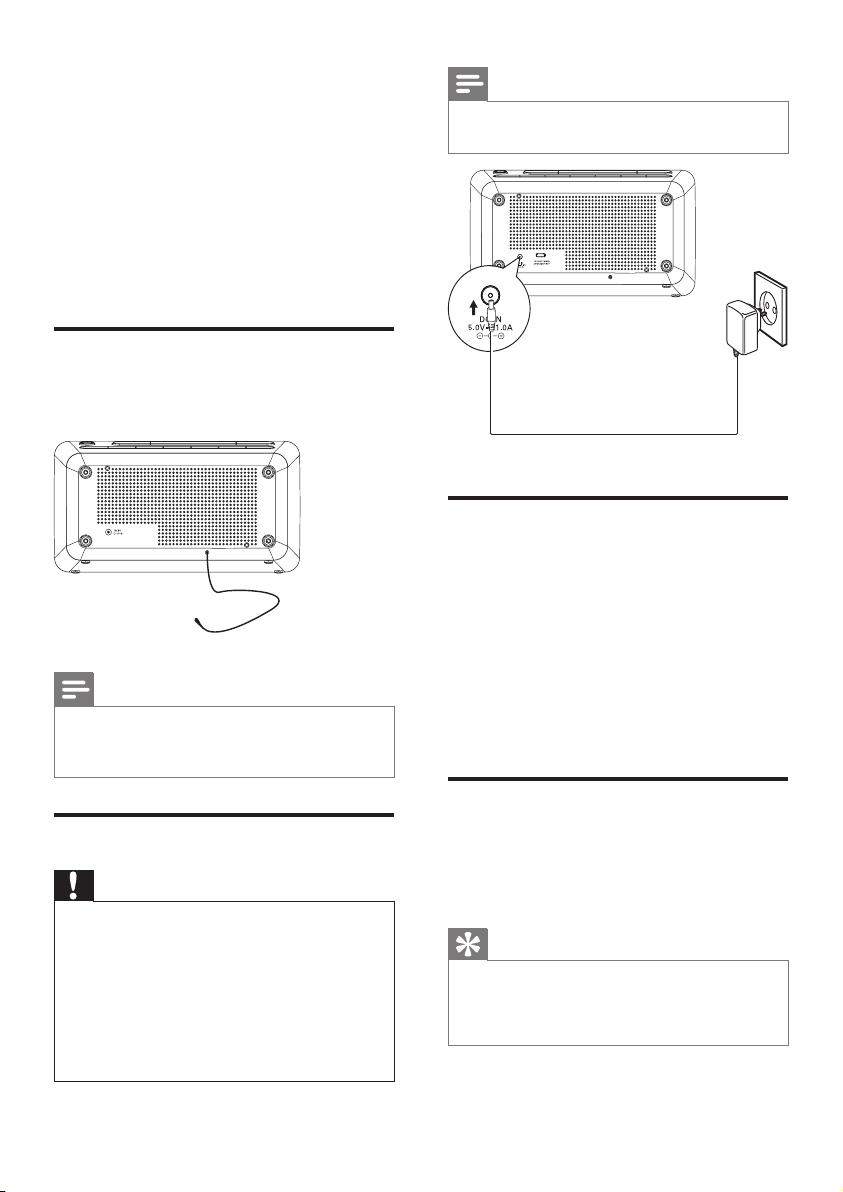
Prepare FM/DAB+ antenna
Forbetterreception,fullyextendandadjustthe
positionofthepig-tailantenna.
Note
•
Topreventinterference,positiontheantenna
asfaraspossiblefromanyotherradiation
sources.
Connect power
Caution
•
Riskofproductdamage!Ensurethatthepower
voltagecorrespondstothevoltageprintedon
thebackorundersideoftheapparatus.
• Riskofelectricshock!Whenyouunplugthe
ACadaptor,alwayspulltheplugfromthe
socket.Neverpullthecord.
• BeforeconnectingtheACadaptor,ensurethat
youhavecompletedallotherconnections.
EN

8
English
Store DAB+ radio stations
automatically
Tip
•
Newstationsandserviceswillbeaddedin
theDAB+broadcast.TomakenewDAB+
stationsandservicesavailable,performfull
scanregularly.
InDAB+mode,pressandholdAUTO SCAN
for3seconds.
» TheunitscansalltheavailableDAB+
radiostationsandbroadcaststherst
availablestation.
Store DAB+ radio stations
manually
Youcanstoreupto20DAB+radiostationsin
presetchannel.
1 TunetoaDAB+radiostation.
2 PressAUTO SCAN.
» Thepresetchannelnumberis
displayed.
3 Press / repeatedlytoselecta
number:1-20.
4 PressSELECTtoconrm.
5 Repeatsteps1-4tostoreotherstations.
Note
•
Toremoveapre-storedDAB+radiostation,
storeanotherstationinitsplace.
Search for DAB+ radio
station manually
1
InDAB+mode,pressandholdMENU
for3seconds.
2 Press / toselect[Manual tune],
thenpressSELECT.
3 RotateTUNING +/-tonavigateDAB+
radiofrequency.
4 Listen to
Digital Audio
Broadcasts
(DAB+)
DigitalAudioBroadcasting(DAB+)isaway
ofbroadcastingradiodigitallythrougha
networkoftransmitters.Itprovidesyouwith
morechoice,bettersoundquality,andmore
information.
Tune to DAB+ radio stations
Note
•
Makesurethattheantennaisfulledextended.
1 PressSOURCErepeatedlytoselectDAB
mode.
» [FULL SCAN](fullscan)isdisplayed.
2 PressSELECTtostartfullscan.
» TheunitstoresalltheavailableDAB+
radiostationsandthenbroadcaststhe
rstavailablestation.
» Thestationlistismemorizedinthe
unit.Whenyouturnontheunitnext
time,thestationscandoesnottake
place.
» IfnoDAB+serviceisavailable,[No
DAB Station](noDAB+station)
appears,then[FULL SCAN](fullscan)
isdisplayed.
To tune to a station from the available station
list:
1 InDAB+mode,rotateTUNING +/-to
navigatetheavailableDAB+stations.
2 PressSELECTtoconrm.
EN

9
Select DRC setting
WhilelisteningtoDAB+radio,youcanchange
DRC(DynamicRangeControl)settingstoadd/
removeadegreeofcompensationforaudio
performance.
1 InDAB+mode,pressandholdMENU
forover3seconds.
2 Press / until[DRC]isdisplayed.
3 PressSELECTtoconrm.
4 Press / repeatedlytoselectan
option:
• [DRC off]:DRCisswitchedoff.
• [DRC high]:DRCisswitchedon.
Recommendusingthissettinginnoisy
environment.
• [DRC low]:DRCissettohalfnormal
level.
5 PressSELECTtoconrmtheselection.
4 PressSELECTtoconrm.
» Searchingstarts.
5 Whensearchingiscomplete,press
SELECTagaintostartplaying.
Listen to a preset DAB+
radio station
1
Press / toselectapresetDAB+
radiochannel.
2 PressSELECTtoconrm.
Show DAB+ information
WhilelisteningtoDAB+radio,pressINFO
repeatedlytoscrollthroughthefollowing
information(ifavailable):
» DynamicLabelSegment(DLS)
» Signalstrength
» Programtype(PTY)
» EnsembleName
» Channelandfrequency
» Signalerrorrate
» Bitrateandaudiostatus
» Date
Remove invalid DAB+ station
Youcanremoveallinvalidstationsfromthe
availableDAB+stationlist.
1 InDAB+mode,pressandholdMENU
for3seconds.
2 Press / repeatedlyuntil[Prune]is
displayed.
3 PressSELECTtoconrm.
» [No][Yes]isdisplayed.
4 Press / toselect[Yes].
5 PressSELECT.
» Allinvalidstationsareremoved.
EN

10
English
Note
•
Toremoveapre-storedFMradiostation,
storeanotherstationinitsplace.
Listen to a preset FM radio
station
Press / toselectapresetnumber.
» Thestationstartsbroadcastinafew
seconds.
Display RDS information
RadioDataSystem(RDS)isaservicethat
sendsadditionalbroadcastinformationalong
withFMstations.IfyoulistentoanFMstation
withRDSsignal,“RDS”isdisplayed.
PressINFO/MENUtodisplayRDSinformation
suchasPTY(programtype)andstationname.
Select FM radio searching
scope
BeforeyoustarttosearchforFMradiostations,
youcanselectsearchingscope.
1 PressINFO/MENUforover3seconds.
2 Press or until[Scan setting]is
displayed,thenpressSELECT.
3 Press or toselectanoption:
• [Strong stations only]:Onlystations
withstrongsignalscanbesearched.
• [All stations]:Stationswithboth
strongandweaksignalscanbe
searched.
4 PressSELECTtoconrm.
5 Listen to FM
radio
Tune to FM radio stations
Tip
•
Positiontheantennaasfaraspossiblefrom
TV,VCR,orotherradiationsource.
• Foroptimalreception,fullyextendandadjust
thepositionoftheantenna.
1 PressSOURCE repeatedlytoselectFM
tuner.
2 Pressandhold or .
» Theradiotunestoastationwith
strongreceptionautomatically.
» Totunetoaweakstation,rotate
TUNING +/-untilyoundoptimal
reception.
Store FM radio stations
automatically
1
InFMradiomode,pressandholdAUTO
SCANfor3seconds.
» Upto20FMstationswithstrongsignal
arestoredinchannel1-20.
» Thestationstoredinchannel1starts
broadcasting.
Store FM radio stations
manually
1
TunetoanFMradiostation.
2 PressAUTO SCAN.
» Thepresetchannelnumberis
displayed.
3 Press / toselectachannel:1-20.
4 PressSELECT.
» TheselectedFMradiostationissaved
inthechannel.
5 Repeatsteps1-4tostoreotherstations.
EN

11
Options Sub-menu Description
[Set 12/24
hour]
[Set 12
hour]
Timeisdisplayedin
12-hourmode.
[Set 24
hour]
Timeisdisplayedin
24-hourmode.
[Set date] Setdate.
[Auto
update]
[Update
from
DAB]
Tosynchronizetime
fromDAB+stations.
[No
update]
Timewillnotbe
synchronized.
[Set date
format]
[DD-MM-
YYYY]
Thedateisdisplayed
inday,month,year
sequence.
[MM-DD-
YYYY]
Thedateisdisplayed
inmonth,day,year
sequence.
4 Toexit,pressBACK.
Select backlight settings
1
Entersystemsettingmenu.
2 Press / repeateduntil[Backlight]is
displayed,thenpressSELECT.
3 Press / toselectanoption,then
pressSELECTtoconrm.
6 Other features
Adjust system settings
1
InDAB+orFMmode,press
INFO/MENUfor3secondstodisplay
systemmenu.
2 Press / repeatedlyuntil[System]is
displayed.
3 PressSELECTtoconrm.
4 Repeatsteps2-3toselectanoption.
5 PressBACKtoexit.
[Time] [Set
12/24
hour]
Select12-hourmode
or24-hourmode.
[Set date] Setdate.
[Auto
update]
Selecthowtoupdate
time.
[Set date
format]
Selectdisplayformat
ofdate.
[Backlight] [Time
out]
Selectwhentoturn
offthebacklight.
[On
level]
Selectbacklightlevel.
[Factory
Reset]
[Yes] Resetallthesettings
tofactorydefault.
[No] Cancel.
[SW
version]
Displaysoftware
version.
[Software
Upgrade]
[Yes] Selecttoupdate
software
[No] Cancel.
Set date and time format
1
Entersystemsettingmenu.
2 Press / repeatedlyuntil[Time]is
displayed,thenpressSELECT.
3 Press / toselectanoption,then
pressSELECTtoconrm.
EN
12
English
5 PressSELECTtoconrm.
6 Followtheinstructionsonthescreento
completeupgrade.
Note
•
Ifyouselect[Software upgrade] without
downloadingthelatestsoftwareorconnecting
toPCviaUSBport,youneedpoweroffand
restarttheradio.
• Ifupgradeisinterruptedbyaccident,youmust
powerofftheradioandreinstallthesoftware,
otherwiseyourradiocannotworknormally.
Set alarm timer
1
Makesurethatyouhavesettheclock
correctly.
2 Instandbymode,rotateSET ALARM/
CLOCK/SET TIMEtotheSET ALARM
position.
» Thealarmiconblinks.
3 RotateHOURtosetthehour.
4 RotateMINUTEtosettheminute.
5 RotatetheSET ALARM/CLOCK/SET
TIMEtotheCLOCKpositiontoconrm.
Adjust alarm setting
Note
•
Youneedtosetdatebeforeselectingalarm
mode.
1 PressRADIO ON/OFFtoenterstandby
mode,ifnecessary.
2 PressINFO/MENUforover3seconds.
» [Alarm Wizard]isdisplayed.
3 Press / repeatedlytoselect:
• [Source Buzzer]:Selectbuzzeras
alarmsound.
• [Source DAB]:Selectlastlistened
DAB+radioasalarmsound.
• [Source FM]:SelectlastlistenedFM
radioasalarmsound.
Options Sub-
menu
Description
[Time out] [OFF] Thebacklightis
alwayson.
[10 sec] Thebacklightturns
off10secondsafter
operation.
[30 sec] Thebacklightturns
off30secondsafter
operation.
[60 sec] Thebacklightturns
off60secondsafter
operation.
[120 sec] Thebacklightturns
off120secondsafter
operation.
[On level] [Auto] Thebacklight
isautomatically
adjusted.
[High] Thebacklightis
bright.
[Medium] Thebacklightisat
mediumlevel.
[Low] Thebacklightisdim.
4 Toexit,pressBACK.
Update software (if available)
Softwareupgradeforyourradiomaybe
availableinfuture.Ifyouregisteryourproduct
atPhilipswebsite(www.philips.com/support)
withavalidemailaddress,youmayreceive
softwareupdatenotication.Oryoucan
visitPhilipswebsiteconstantlytocheckifthe
updatinginformationisprovided.
To update software of your radio, follow these
steps strictly:
1 Readsoftwareupdateinstructionson
Philipswebsitecarefully.
2 Downloadthelatestsoftwaretoyour
PC,thenconnectittoyourradioviaUSB
port.
3 InFM/DAB+mode,entersystemsetting
menu.
4 Press / repeatedlyuntil[Software
Upgrade](softwareupgrade)isdisplayed.
EN
13
Repeat alarm
Whenalarmsounds,pressREPE AT
ALARM•SELECTrepeatedlytoselectsnooze
interval:
• [Snooze 5 minutes]:Thealarmrepeatsin
5minuteslater.
• [Snooze 10 minutes]:Thealarmrepeats
in10minuteslater.
• [Snooze 15 minutes]:Thealarmrepeats
in15minuteslater.
• [Snooze 20 minutes]:Thealarmrepeats
in20minuteslater.
• [Snooze 25 minutes]:Thealarmrepeats
in25minuteslater.
• [Snooze 30 minutes]:Thealarmrepeats
in30minuteslater.
Note
•
Onlywhenalarmdurationissetas45minutes
or60minutes,thereistheoptionof[Snooze
30 minutes].
• Whenthetimeisselected,snoozecountdown
isdisplayed.
Stop alarm sound
Whenthealarmsounds,pressALARM ON/
OFF.
» Thealarmstopsbutthealarmsettings
remain.
Set the sleep timer
Thisunitcanswitchtostandbyautomatically
afteraperiod.
1 PressSLEEPrepeatedlytoselecttime
period:
• [15 minutes]
• [30 minutes]
• [45 minutes]
• [60 minutes]
• [90 minutes]
• Whenthesleeptimerisactivated,
isdisplayed.
4 PressSELECTtoconrm.
» Sub-menuisdisplayed.
[Daily] Thealarmisactivated
everyday.
[Weekends] Thealarmisactivated
onSaturdayand
Sunday.
[Weekdays] Thealarmis
activatedfrom
MondaytoFriday.
[Once] [xx-xx-
xxxx]
(Set
date)
Thealarmisactivated
onlyonce.Needto
setdate.
» If[Source DAB]or[Source FM]is
selected,[last listened]isdisplayed.
PressSELECTtoconrm.
5 Press / toselectanoption,then
pressSELECT.
» Avolumebarisdisplayed.
6 Press / toselectthevolumeof
thealarmsound,thenpressSELECTto
conrm.
7 Press / toselectduration,then
pressSELECTtoconrm.
• [15 minutes]:Thealarmsoundsfor15
minutes.
• [30 minutes]:Thealarmsoundsfor30
minutes.
• [45 minutes]:Thealarmsoundsfor45
minutes.
• [60 minutes]:Thealarmsoundsfor60
minutes.
• Theunittakesafewminutestosave
thealarmsetting.Waituntilitissaved.
Activate or deactivate the alarm
timer
1 PressALARM ON/OFFrepeatedlyto
activateordeactivatethealarmtimer.
» [Alarm On]or[Alarm Off]is
displayed.
EN

14
English
Tip
•
Todeactivatethesleeptimer,pressSLEEP
repeatedlyuntil[Sleep off](sleepoff )is
displayed.
Enhance bass
PressDBBrepeatedlytoturnon/offdynamic
bassenhancement.
EN
15
General information
AC/DC
adaptor
(Input) 100-240V~,50/60
Hz,0.5A
(Output) 5V
1.0A
(Brand
name)
Philips
(Model
number)
AS100-050-AE100
Operation
Power
Consumption
2W
Standby
Power
Consumption
<1W
Dimensions 172x92x72mm
Weight 0.5kg
7 Product
information
Note
•
Productinformationissubjecttochange
withoutpriornotice.
Specications
Amplier
RatedOutputPower 1.5WRMS
Tuner
TuningRange FM:87.5-108MHz
DAB+:174.92-
239.20MHz
Tuninggrid(FM) 50KHz
Sensitivity
-Mono,26dBS/N
Ratio
<22dBf
SearchSelectivity <28dBf
TotalHarmonic
Distortion
< 2%
SignaltoNoiseRatio >55dB
Numberofpresets 20(FM)
20(DAB+)
EN

16
English
8 Troubleshooting
Warning
•
Neverremovethecasingofthisapparatus.
Tokeepthewarrantyvalid,nevertrytorepair
thesystemyourself.
Ifyouencounterproblemswhenusingthis
apparatus,checkthefollowingpointsbefore
requestingservice.Iftheproblemremains
unsolved,gotothePhilipswebsite(www.
philips.com/support).WhenyoucontactPhilips,
ensurethattheapparatusisnearbyandthe
modelnumberandserialnumberareavailable.
No power
• EnsurethattheACpowerplugofthe
unitisconnectedproperly.
• EnsurethatthereispowerattheAC
outlet.
No sound
• Adjustthevolume.
No response from the unit
• DisconnectandreconnecttheACpower
plug,thenturnontheunitagain.
Poor radio reception
• Increasethedistancebetweentheunit
andotherelectricalappliances.
• Fullyextendandadjustthepositionof
thepig-tailantenna.
Timer does not work
• Settheclockcorrectly.
• Switchonthetimer.
Clock/timer setting erased
• Powerhasbeeninterruptedorthepower
plughasbeendisconnected.
• Resettheclock/timer.
EN

17
GibsonInnovationsmayvoidtheuser’s
authoritytooperatetheequipment.
2015GibsonInnovationsLimited.Allrights
reserved.
Specicationsaresubjecttochangewithout
notice.Gibsonreservestherighttochange
productsatanytimewithoutbeingobligedto
adjustearliersuppliesaccordingly.
9 Notice
Hereby,GibsonInnovationsdeclaresthatthis
productisincompliancewiththeessential
requirementsandotherrelevantprovisions
ofDirective2014/53/EU.Youcanndthe
DeclarationofConformityonwww.philips.com/
support.
Recycling
Yourproductisdesignedandmanufactured
withhighqualitymaterialsandcomponents,
whichcanberecycledandreused.
Whenyouseethecrossed-outwheelbin
symbolattachedtoaproduct,itmeansthe
productiscoveredbytheEuropeanDirective
2012/19/EC:
Neverdisposeofyourproductwithother
householdwaste.Pleaseinformyourselfabout
thelocalrulesontheseparatecollectionof
electricalandelectronicproducts.Thecorrect
disposalofyouroldproducthelpsprevent
potentiallynegativeconsequencesonthe
environmentandhumanhealth.
Environmental information
Allunnecessarypackaginghasbeenomitted.
Wehavetriedtomakethepackagingeasyto
separateintothreematerials:cardboard(box),
polystyrenefoam(buffer)andpolyethylene
(bags,protectivefoamsheet.)
Yoursystemconsistsofmaterialswhichcan
berecycledandreusedifdisassembledby
aspecializedcompany.Pleaseobservethe
localregulationsregardingthedisposalof
packagingmaterials,exhaustedbatteriesandold
equipment.
Anychangesormodicationsmadetothis
devicethatarenotexpresslyapprovedby
EN

Copyright © 2011 Gibson Innovations Limited. Revised Edition © 2017
This product has been manufactured by, and is sold under the responsibility of Gibson Innovations Ltd.,
and Gibson Innovations Ltd. is the warrantor in relation to this product.
Philips and the Philips Shield Emblem are registered trademarks of Koninklijke Philips N.V. and are used
under license.
AJB3552_UM_12_V3.0