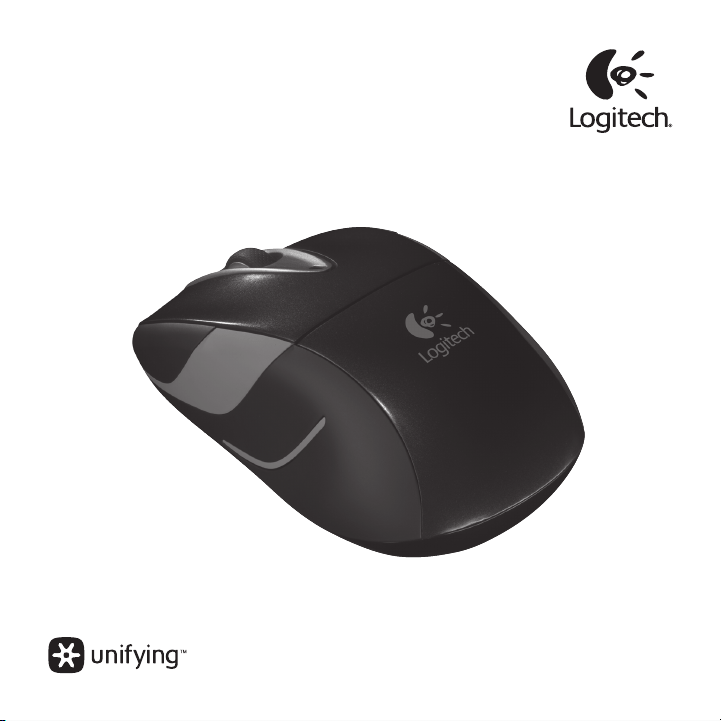
m525
Getting started with
Logitech® Wireless Mouse M525
Logitech® Wireless Mouse M525
2
m525
Getting started with
Logitech® Wireless Mouse M525

Logitech® Wireless Mouse M525
3
Contents
English. . . . . . . . . . . . . . . . . .4
Deutsch . . . . . . . . . . . . . . . . . 8
Français . . . . . . . . . . . . . . . . 12
Italiano. . . . . . . . . . . . . . . . . 16
Español . . . . . . . . . . . . . . . . 20
Português . . . . . . . . . . . . . . . 24
Nederlands . . . . . . . . . . . . . . 28
Svenska . . . . . . . . . . . . . . . . 32
Dansk . . . . . . . . . . . . . . . . . 36
Norsk . . . . . . . . . . . . . . . . . 40
Suomi . . . . . . . . . . . . . . . . . 44
Ελληνικά . . . . . . . . . . . . . . . . . 48
Türkçe . . . . . . . . . . . . . . . . . 52
59 . . . . . . . . . . . . . . . . . .
www.logitech.com/support . . . . . . . . . . . . . . . . . . . . . . . . . . 63

Logitech® Wireless Mouse M525
44 English
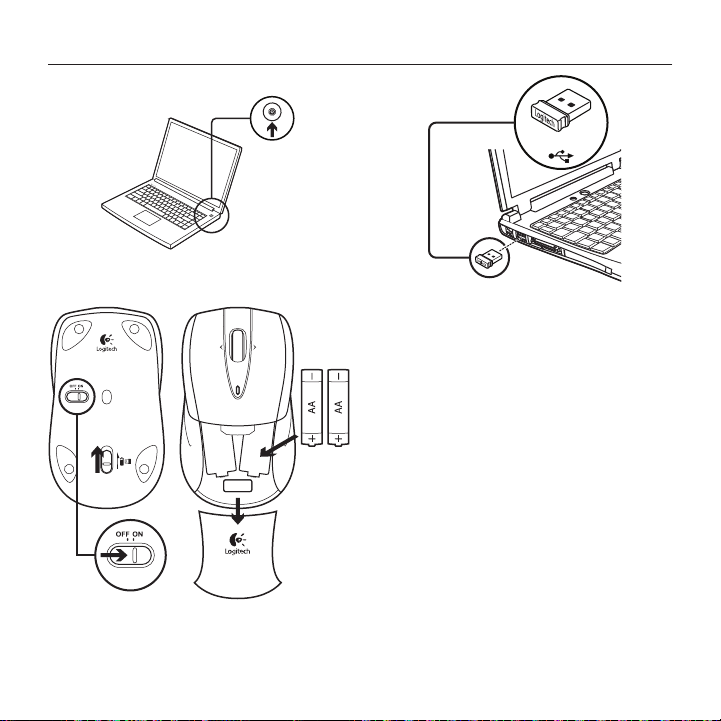
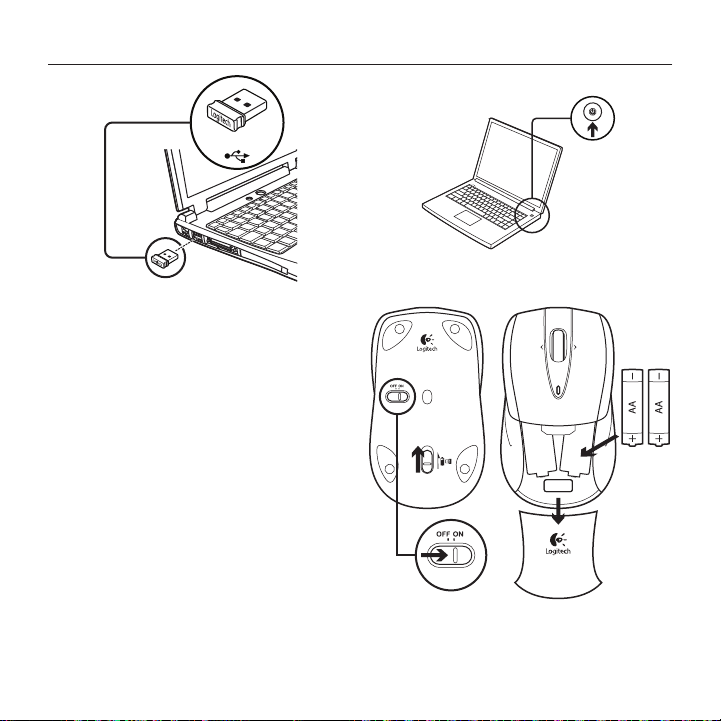
1
2
3
Mac® OS X Users: When plugging
in the Unifying receiver, the Keyboard
Assistant window may appear.
Please close this window.
Advanced features: Software is optional
for this mouse! Download the free
mouse software for Windows® only
(Logitech® SetPoint® for Windows®)
at www.logitech.com/downloads
to enable side-to-side scrolling
and middle button features.
On
1
2
3
4
USB

Logitech® Wireless Mouse M525
5English 5
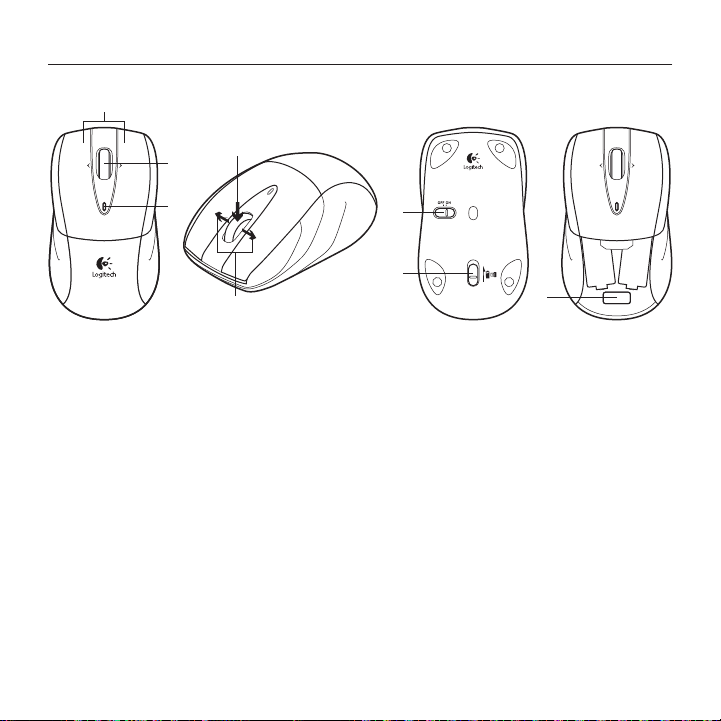
Features
1. Left and right mouse buttons
2. Battery LED—Flashes green when mouse
is powered on, and it flashes red when
the battery power is low.
3. Scroll wheel
4. Middle button—The function of
this button depends on your operating
system and the application being
used. For example, if you are browsing
the Internet in Windows® and click on
a link using the Middle button, typically
the link opens in a new tab.
5. Internet back/forward—Tilt the scroll
wheel right to move forward one page.
Tilt the scroll wheel left to move back
one page.*
6. On/O slider switch
7. Battery door release
8. Unifying receiver storage—When the
mouse is not in use, you can store
the Unifying receiver inside the mouse.
*On a Mac® the Internet back/forward feature
is not supported. You can assign Dashboard,
Exposé, Spaces, or other functions to the tilt
wheel feature using System Preferences.
6
7
8
2
1
4
5
3

Logitech® Wireless Mouse M525
66 English
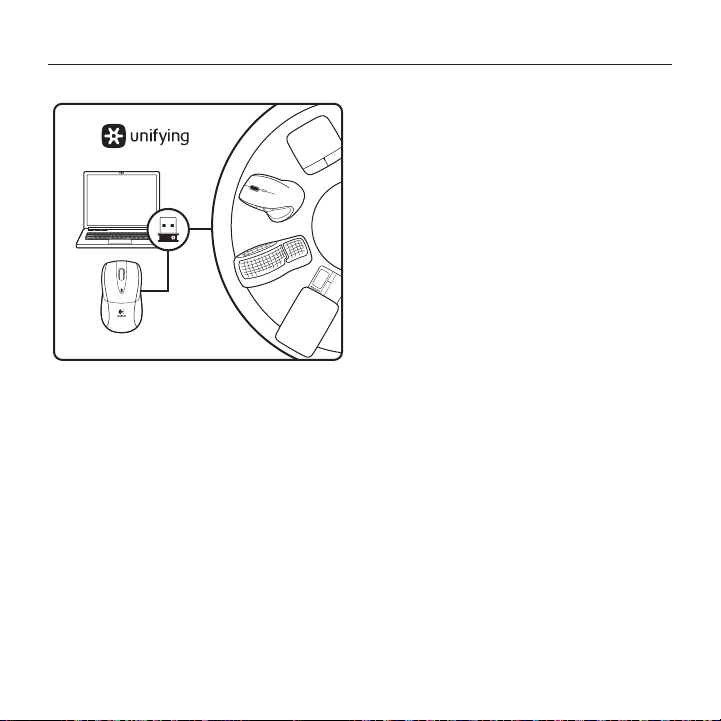
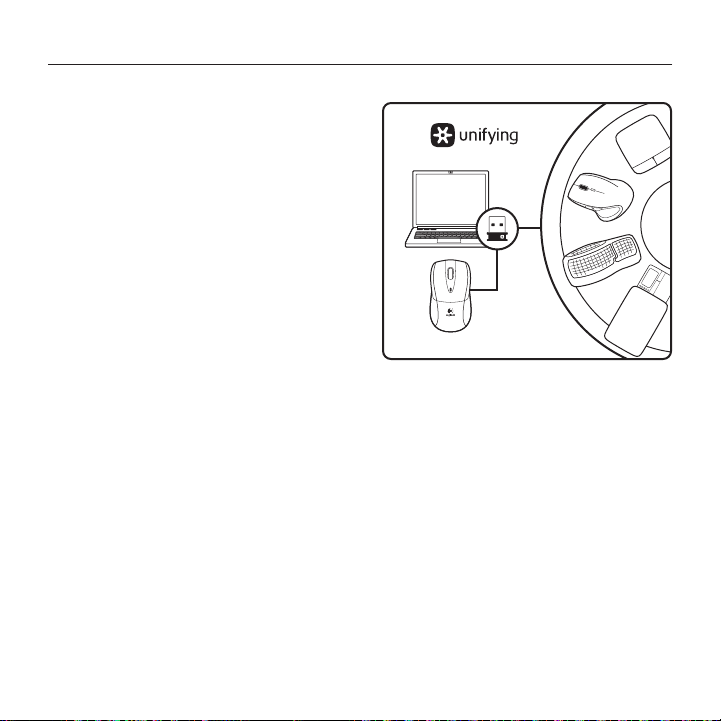
The Logitech® Unifying receiver
Plug it. Forget it. Add to it.
Your new Logitech product ships with
a Logitech® Unifying receiver. Did you know
you can add a compatible Logitech wireless
device that uses the same receiver as
your current Logitech Unifying product?
Are you Unifying-ready?
If you have a Logitech wireless device
that’s Unifying-ready, you can pair it with
additional Unifying devices. Just look for
the orange Unifying logo on the new device
or its packaging. Build your ideal combo.
Add something. Replace something.
It’s easy, and you’ll use only one USB port
for up to six devices.
Getting started is easy
If you’re ready to pair your device(s)
via Unifying, here’s what you need to do:
1. Make sure your Unifying receiver
is plugged in.
2. If you haven’t already, download the
Logitech® Unifying software from
www.logitech.com/unifying.
3. Start the Unifying software* and follow
the onscreen instructions to pair the
new wireless device with your existing
Unifying receiver.
*Go to Start / All Programs / Logitech /
Unifying / Logitech Unifying Software

Logitech® Wireless Mouse M525
7English 7
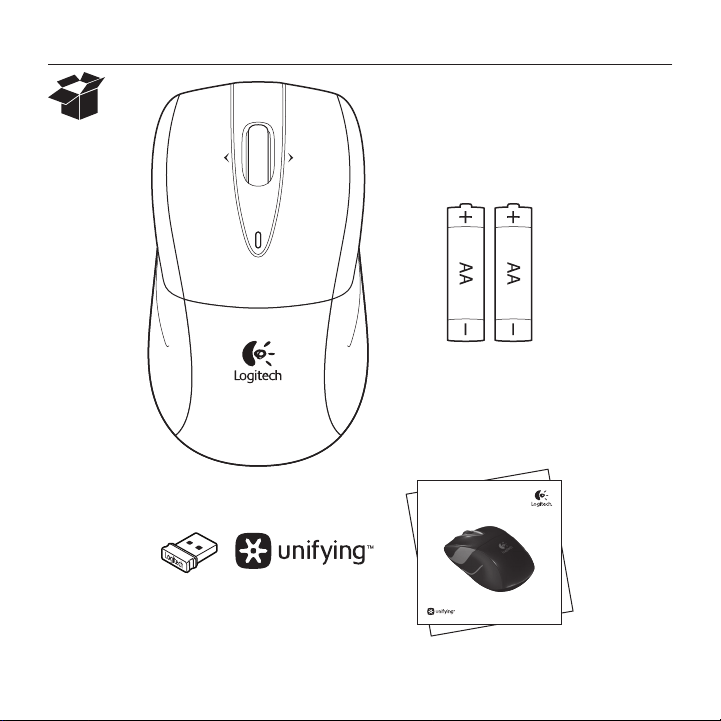
Help with setup: Mouse not working
• Is the mouse powered on?
• Is the Unifying receiver securely plugged
into a computer USB port? Try changing
USB ports.
• If the Unifying receiver is plugged
into a USB hub, try plugging it directly
into a USB port on your computer.
• Check the orientation of the batteries
inside the mouse. Replace the batteries
if necessary. The mouse uses two AA
alkaline batteries.
• Remove metallic objects between
the mouse and the Unifying receiver.
• Try moving the Unifying receiver to
a USB port closer to the mouse.
• Try reconnecting the mouse and
Unifying receiver using the Logitech
Unifying software. (Refer to the Unifying
section in this guide.)
What do you think?
Please take a minute to tell us. Thank you for purchasing our product.
www.logitech.com/ithink

Logitech® Wireless Mouse M525
88 Deutsch
1
2
3
Mac® OS X-Benutzer: Beim Einstecken
des Unifying-Empfängers wird möglicher-
weise das Fenster des Setup-Assistenten
für die Tastatur angezeigt. Schließen Sie
dieses Fenster.
Erweiterte Funktionen: Für diese Maus
ist optionale Software verfügbar!
Laden Sie die kostenlose Maus-Software
nur für Windows® (Logitech® SetPoint® für
Windows®) unter www.logitech/downloads
herunter, um den horizontalen Bildlauf
und die Funktionen für die mittlere Taste
zu aktivieren.
On
1
2
3
4
USB

Logitech® Wireless Mouse M525
9Deutsch 9
Funktionen
1. Linke und rechte Maustaste
2. Batterie-LED: blinkt bei eingeschalteter
Maus grün und bei niedrigem
Batteriestand rot
3. Scrollrad
4. Mittlere Taste: Die Funktionen
dieser Taste hängen vom Betriebssystem
und der verwendeten Anwendung
ab. Wenn Sie z. B. unter Windows®
im Internet surfen und mit der mittleren
Taste auf einen Link klicken,
wird der Link normalerweise auf
einer neuen Registerkarte geönet.
5. Vor-/Zurück-Funktion: Kippen Sie
das Scrollrad nach rechts,
um eine Seite vorzublättern.
Kippen Sie das Scrollrad nach links,
um eine Seite zurückzublättern.*
6. Ein-/Ausschalter
7. Batteriefachdeckel-Entriegelung
8. Unifying-Empfängerfach:
Wenn Sie die Maus nicht nutzen,
können Sie den Unifying-Empfänger
in der Maus verstauen.
* Die Vor-/Zurück-Funktion wird auf einem
Mac® nicht unterstützt. Stattdessen können
Sie dem Scrollrad in den Systemeinstellungen
die Funktionen Dashboard, Exposé, Spaces usw.
zuweisen.
6
7
8
2
1
4
5
3

Logitech® Wireless Mouse M525
1010 Deutsch
Der Logitech® Unifying-Empfänger
Empfänger anschließen.
Eingesteckt lassen.
Geräte hinzufügen.
Im Lieferumfang Ihres neuen Logitech-
Produkts ist ein Logitech® Unifying-
Empfänger enthalten. Wussten Sie schon,
dass Sie über denselben Empfänger ganz
einfach weitere kompatible kabellose
Logitech-Geräte anschließen können?
Sind Sie bereit für Unifying?
Wenn Sie ein kabelloses Logitech-Gerät
haben, das die Unifying-Technologie
unterstützt, können Sie es mit anderen
Unifying-Geräten pairen. Achten Sie auf
das orangefarbene Unifying-Logo auf
dem neuen Gerät oder der Verpackung.
Stellen Sie Ihre ideale Kombination
zusammen. Fügen Sie ein Gerät hinzu.
Ersetzen Sie ein anderes. Die Einrichtung
ist unkompliziert und Sie benötigen
nur einen USB-Anschluss für bis zu
sechs Geräte.
Es ist ganz einfach
Wenn Sie eines oder mehrere Geräte
über Unifying einrichten möchten,
führen Sie folgende Schritte durch:
1. Vergewissern Sie sich, dass Ihr Unifying-
Empfänger eingesteckt ist.
2. Laden Sie die Logitech® Unifying-
Software unter www.logitech.com/
unifying herunter, wenn Sie dies nicht
bereits getan haben.
3. Starten Sie die Unifying-Software*
und folgen Sie den Anweisungen auf
dem Bildschirm, um das neue kabellose
Gerät mit Ihrem vorhandenen Unifying-
Empfänger zu pairen.
* Wählen Sie „Start/Programme/Logitech/
Unifying/Logitech Unifying Software“.

Logitech® Wireless Mouse M525
11Deutsch 11
Probleme bei der Einrichtung: Maus funktioniert nicht
• Ist die Maus eingeschaltet?
• Ist der Unifying-Empfänger fest in
einen USB-Anschluss Ihres Computers
eingesteckt? Verwenden Sie einen
anderen USB-Anschluss.
• Wenn der Unifying-Empfänger an
einen USB-Hub angeschlossen ist,
stecken Sie ihn direkt in einen USB-
Anschluss des Computers ein.
• Überprüfen Sie die Ausrichtung
der Batterien in der Maus.
Tauschen Sie die Batterien bei
Bedarf aus. Die Maus benötigt
zwei Alkalibatterien vom Typ AA.
• Entfernen Sie metallische Gegenstände
zwischen der Maus und dem Unifying-
Empfänger.
• Stecken Sie den Unifying-Empfänger
in einen USB-Anschluss, der sich näher
bei der Maus befindet.
• Stellen Sie die Verbindung zwischen
Maus und Unifying-Empfänger mithilfe
der Logitech Unifying-Software erneut
her. (Weitere Informationen finden Sie
in diesem Handbuch im Abschnitt zum
Unifying-Empfänger.)
Ihre Meinung ist gefragt.
Bitte nehmen Sie sich etwas Zeit, um einige Fragen zu beantworten.
Vielen Dank, dass Sie sich für unser Produkt entschieden haben.
www.logitech.com/ithink

Logitech® Wireless Mouse M525
1212 Français
1
2
3
Utilisateurs Mac® OS X: lorsque vous
branchez le récepteur Unifying, la boîte
de dialogue de l'assistant de configuration
du clavier peut s'acher. Veuillez fermer
cette fenêtre.
Fonctions avancées: le logiciel
de cette souris est disponible en
option. Téléchargez-le gratuitement
pour Windows® uniquement
(Logitech® SetPoint® pour Windows®)
sur le site www.logitech.com/downloads
pour activer l'utilisation du défilement
horizontal et du bouton central.
On
1
2
3
4
USB

Logitech® Wireless Mouse M525
13Français 13
Fonctionnalités
1. Boutons gauche et droit de la souris
2. Témoin lumineux des piles: il clignote
en vert lorsque la souris est sous tension
et en rouge lorsque le niveau de charge
des piles est faible.
3. Roulette de défilement
4. Bouton central: la fonction de ce bouton
dépend de votre système d'exploitation
et de l'application utilisée. Par exemple,
si vous naviguez sur Internet sous
Windows® et que vous cliquez sur un lien
à l'aide du bouton central, le lien s'ouvre
généralement dans un nouvel onglet.
5. Fonction Internet page précédente/
suivante: inclinez la roulette vers
la droite pour passer à la page suivante.
Inclinez la roulette vers la gauche pour
revenir à la page précédente.*
6. Commutateur Marche/Arrêt
7. Bouton d'ouverture du compartiment
des piles
8. Rangement du récepteur Unifying:
lorsque vous n'utilisez pas la souris,
vous pouvez ranger le récepteur
Unifying à l'intérieur.
* Sur un ordinateur Mac®, la fonction Internet
page précédente/suivante n'est pas prise
en charge. Vous pouvez aecter les tâches
Dashboard, Exposé ou Spaces à la roulette
multidirectionnelle dans les Préférences système.
6
7
8
2
1
4
5
3
Logitech® Wireless Mouse M525
1414 Français
Récepteur Logitech® Unifying
Branchez-le. Oubliez-le.
Ajoutez des dispositifs.
Votre nouveau produit Logitech est livré
avec un récepteur Logitech® Unifying.
Saviez-vous qu'il est possible d'ajouter
un dispositif Logitech sans fil compatible
utilisant le même récepteur que
votre produit Logitech Unifying actuel?
Etes-vous compatible Unifying?
Si vous possédez un dispositif Logitech
sans fil compatible Unifying, vous
pouvez le coupler à d'autres dispositifs
Unifying. Recherchez la présence du logo
orange Unifying sur le nouveau dispositif
ou sur son emballage. Créez votre
combinaison parfaite. Ajoutez un dispositif.
Remplacez-en un. C'est très simple,
et vous pouvez utiliser un seul port USB
pour six dispositifs.
L'installation est très facile.
Si vous êtes prêt à associer vos dispositifs
en utilisant le récepteur Unifying,
voici comment procéder:
1. Vérifiez que le récepteur Unifying
est correctement branché.
2. Si ce n'est déjà fait, téléchargez le
logiciel Logitech® Unifying à partir
du site www.logitech.com/unifying.
3. Lancez le logiciel Unifying* et
suivez les instructions à l'écran pour
coupler le nouveau dispositif sans fil
au récepteur Unifying existant.
*Cliquez sur Démarrer / Tous les programmes /
Logitech / Unifying / Logiciel Logitech Unifying

Logitech® Wireless Mouse M525
15Français 15
Aide à la configuration: la souris ne fonctionne pas
• La souris est-elle sous tension?
• Le récepteur Unifying est-il correctement
branché sur un port USB de l’ordinateur?
Réessayez en changeant de port USB.
• Si le récepteur Unifying est branché
sur un hub USB, branchez-le directement
sur un port USB de l'ordinateur.
• Vérifiez que les piles sont bien orientées
dans la souris. Changez les piles
si nécessaire. La souris utilise deux piles
alcalines AA.
• Retirez tout objet métallique se trouvant
entre la souris et le récepteur Unifying.
• Essayez de brancher le récepteur
Unifying dans un port USB plus proche
de la souris.
• Reconnectez la souris au récepteur
Unifying à l'aide du logiciel Logitech
Unifying (reportez-vous à la section
Unifying de ce guide).
Qu'en pensez-vous?
Veuillez prendre quelques minutes pour nous faire part de vos commentaires.
Vous venez d'acheter ce produit et nous vous en félicitons.
www.logitech.com/ithink

Logitech® Wireless Mouse M525
1616 Italiano
1
2
3
Utenti Mac® OS X: se viene visualizzata
la finestra dell'assistente di installazione per
la tastiera quando si inserisce il ricevitore
Unifying, chiudere la finestra.
Funzioni avanzate: per questo
mouse il software è facoltativo.
È possibile scaricarlo gratuitamente
(Logitech® SetPoint® for Windows®, solo per
Windows®) all'indirizzo www.logitech.com/
downloads per attivare lo scorrimento
laterale e le funzioni del pulsante centrale.
On
1
2
3
4
USB

Logitech® Wireless Mouse M525
17Italiano 17
Funzioni
1. Pulsanti sinistro e destro del mouse
2. LED della batteria: lampeggia di luce
verde quando il mouse è acceso o
di luce rossa quando il livello di carica
delle batterie è basso.
3. Scroller
4. Pulsante centrale: la funzione di questo
pulsante dipende dal sistema operativo
e dall'applicazione in uso. Ad esempio,
se si sta navigando su Internet con un
sistema Windows® e si fa clic su un link
con il pulsante centrale, il link viene
solitamente aperto in una nuova scheda.
5. Pagina precendente/successiva durante
la navigazione in Internet: inclinare lo
Scroller verso destra per passare
alla pagina successiva o verso sinistra
per passare alla pagina precedente.*
6. Interruttore scorrevole di accensione/
spegnimento
7. Rilascio del coperchio del vano batteria
8. Alloggiamento ricevitore Unifying:
quando il mouse non è in uso,
è possibile riporre il ricevitore Unifying
al suo interno.
* Nei computer Mac® la funzione
di visualizzazione della pagina Web successiva
o precedente non è supportata. È possibile
assegnare Dashboard, Exposé, Spaces o altre
funzioni allo Scroller inclinabile tramite Preferenze
di Sistema.
6
7
8
2
1
4
5
3

Logitech® Wireless Mouse M525
1818 Italiano
Ricevitore Logitech® Unifying
Collega. Dimentica. Aggiungi.
Il prodotto Logitech appena acquistato
viene fornito con un ricevitore
Logitech® Unifying. È possibile
aggiungere un dispositivo wireless Logitech
compatibile che utilizza lo stesso ricevitore
del prodotto Logitech Unifying in uso.
Prodotti predisposti per Unifying
È possibile eseguire il pairing dei dispositivi
wireless Logitech predisposti per Unifying
nuovi ed esistenti. È suciente controllare
che sul nuovo dispositivo o sulla confezione
sia impresso il logo Unifying arancione.
Per creare la combinazione ideale,
è suciente aggiungere nuovi dispositivi
o sostituire quelli esistenti. Nulla di più
semplice! È inoltre possibile collegare
fino a sei dispositivi utilizzando la stessa
porta USB.
Utilizzo facile e immediato
Per eettuare il pairing dei dispositivi
Unifying, eettuare quanto segue:
1. Verificare che il ricevitore Unifying
sia inserito.
2. Se necessario, scaricare il software
Logitech® Unifying da www.logitech.
com/unifying.
3. Avviare il software* Unifying e seguire
le istruzioni visualizzate per eettuare
il pairing del nuovo dispositivo wireless
con il ricevitore Unifying esistente.
*Selezionare Start / Programmi / Logitech /
Unifying / Logitech Unifying Software

Logitech® Wireless Mouse M525
19Italiano 19
Problemi di configurazione: il mouse non funziona
• Verificare che il mouse sia acceso.
• Verificare che il ricevitore Unifying sia
saldamente collegato a una porta USB
del computer. Provare a utilizzare
una porta USB diversa.
• Se il ricevitore Unifying è collegato
a un hub USB, provare a collegarlo
direttamente a una porta USB
del computer.
• Controllare il posizionamento
delle batterie all'interno del mouse.
Se necessario, sostituire le batterie.
Per il mouse sono necessarie
due batterie alcaline di tipo AA.
• Rimuovere eventuali oggetti metallici
presenti nella traiettoria tra il mouse
e il ricevitore Unifying.
• Provare a inserire il ricevitore Unifying
in una porta USB più vicina al mouse.
• Provare a riconnettere il mouse
e il ricevitore Unifying utilizzando
il software Logitech Unifying
(fare riferimento alla sezione Unifying
di questa guida).
Che cosa ne pensate?
Inviateci i vostri commenti.
Grazie per avere acquistato questo prodotto.
www.logitech.com/ithink

Logitech® Wireless Mouse M525
2020 Español
1
2
3
Usuarios de Mac® OS X: al conectar el
receptor Unifying, es posible que aparezca
la ventana del asistente para el teclado.
Debe cerrarla.
Funciones avanzadas: El software
es opcional para este ratón.
Descargue el software de ratón gratuito
sólo para Windows® (Logitech® SetPoint®
para Windows®) en www.logitech.com/
downloads para activar las funciones
de desplazamiento horizontal y de botón
central.
On
1
2
3
4
USB

Logitech® Wireless Mouse M525
21Español 21
Características
1. Botones izquierdo y derecho
2. Diodo de estado de pilas: destellos
verdes cuando el ratón está encendido,
destellos rojos cuando la carga de
las pilas es baja.
3. Botón rueda
4. Botón central: la función de este botón
varía según el sistema operativo y la
aplicación que se use. Por ejemplo,
si está navegando por Internet en
Windows y hace clic en un vínculo
mediante el botón central, normalmente
el vínculo se abre en una ficha nueva.
5. Avance/retroceso en Internet: incline
el botón rueda hacia la derecha para
avanzar una página. Incline el botón
rueda hacia la izquierda para retroceder
una página.*
6. Conmutador de encendido/apagado
7. Botón de compartimento de pilas
8. Almacenamiento de receptor Unifying:
puede guardar el receptor Unifying en
el ratón cuando no lo utilice.
* En los equipos Mac® no se admite la función
de avance/retroceso en Internet. Es posible
asignar Dashboard, Exposé, Spaces u otras
funciones a la función de botón rueda inclinable
en Preferencias del Sistema.
6
7
8
2
1
4
5
3

Logitech® Wireless Mouse M525
2222 Español
Receptor Logitech® Unifying
Conéctelo. Olvídese de él.
Agregue más.
Su nuevo producto Logitech se entrega
con un receptor Logitech® Unifying.
¿Sabía que puede agregar un dispositivo
inalámbrico Logitech compatible que
utiliza el mismo receptor que su producto
Logitech Unifying actual?
¿Está listo para Unifying?
Si tiene un dispositivo inalámbrico
compatible con Unifying, puede
emparejarlo con otros dispositivos
Unifying. Busque el logotipo naranja
de Unifying en el nuevo dispositivo o en
su embalaje. Cree la combinación ideal.
Agregue algo. Sustituya algo. Es sencillo:
sólo utilizará un puerto USB para hasta
seis dispositivos.
Es muy sencillo
Si está listo para emparejar los dispositivos
mediante Unifying, siga estos pasos:
1. Compruebe que el receptor Unifying
esté conectado.
2. Si no lo ha hecho aún,
descargue el software Logitech® Unifying
desde www.logitech.com/unifying.
3. Inicie el software* Unifying y siga las
instrucciones en pantalla para emparejar
el nuevo dispositivo inalámbrico con
el receptor Unifying existente.
*Vaya a Inicio / Todos los programas / Logitech /
Unifying / Software Logitech Unifying

Logitech® Wireless Mouse M525
23Español 23
Ayuda con la instalación: El ratón no funciona
• ¿Ha encendido el ratón?
• ¿Está el receptor Unifying conectado
correctamente a un puerto USB
del ordenador? Pruebe otros
puertos USB.
• Si el receptor Unifying está
conectado a un concentrador USB,
conéctelo directamente a un puerto USB
del ordenador.
• Compruebe la orientación de las pilas
dentro del ratón. Cambie las pilas en
caso necesario. El ratón usa dos pilas
alcalinas AA.
• Retire cualquier objeto metálico situado
entre el ratón y el receptor Unifying.
• Lleve el receptor Unifying a
un puerto USB más cercano al ratón.
• Vuelva a conectar el ratón y el receptor
Unifying mediante el software
Logitech Unifying. (Consulte la sección
Unifying de esta guía.)
¿Cuál es su opinión?
Nos gustaría conocerla, si puede dedicarnos un minuto.
Le agradecemos la adquisición de nuestro producto.
www.logitech.com/ithink
Logitech® Wireless Mouse M525
2424 Português
1
2
3
Utilizadores de Mac® OS X: Ao ligar
o receptor Unifying, pode aparecer a janela
Keyboard Setup Assistant (Assistente de
Configuração do Teclado). Feche a janela.
Funcionalidades avançadas.
O software é opcional para este
rato! Transfira o software gratuito
do rato, apenas para Windows®
(Logitech® SetPoint® para Windows®)
em www.logitech.com/downloads para
permitir o deslocamento horizontal
e funcionalidades do botão central.
On
1
2
3
4
USB

Logitech® Wireless Mouse M525
25Português 25
Características
1. Botões esquerdo e direito do rato
2. LED da pilha – Intermitente a verde
quando o rato está carregado
e intermitente a vermelho quando
a energia da pilha está baixa.
3. Roda de deslocação
4. Botão central – A função deste
botão depende do sistema operativo
e aplicação utilizados. Por exemplo,
se estiver a navegar na Internet no
Windows® e clicar numa hiperligação
com o botão central, a hiperligação
abre num novo separador.
5. Avançar/retroceder na Internet –
Incline a roda de deslocamento para
a direita para avançar uma página.
Incline a roda de deslocamento para
a esquerda para retroceder uma página.*
6. Interruptor Ligar/Desligar
7. Botão para desbloquear a porta
do compartimento das pilhas
8. Compartimento para receptor Unifying
– Quando não estiver a utilizar o rato,
pode guardar o receptor Unifying dentro
do rato.
* A funcionalidade retroceder/avançar da
Internet não é suportada em Mac. Pode atribuir
Dashboard, Exposé ou Spaces ou outras funções
à roda de inclinação nas Preferências do Sistema.
6
7
8
2
1
4
5
3

Logitech® Wireless Mouse M525
2626 Português
Receptor Logitech® Unifying
Ligue. Esqueça. Adicione.
O seu novo produto Logitech inclui
um receptor Logitech® Unifying.
Sabia que pode adicionar um dispositivo
sem fios Logitech compatível que utiliza
o mesmo receptor do actual produto
Logitech Unifying?
Está pronto para o Unifying?
Se tiver um dispositivo sem fios
Logitech compatível com Unifying,
pode emparelhá-lo com dispositivos
Unifying adicionais. Basta procurar
o logótipo cor-de-laranja Unifying no novo
dispositivo ou na respectiva embalagem.
Construa a combinação ideal. Acrescente
qualquer coisa. Substitua qualquer coisa.
É fácil, e necessitará de utilizar apenas
uma porta USB para um máximo de seis
dispositivos.
Começar é fácil
Se está pronto para emparelhar
o(s) dispositivo(s) através do Unifying,
basta fazer o seguinte:
1. Certifique-se de que o receptor Unifying
está ligado.
2. Se ainda não o fez, transfira o
software Logitech® Unifying
em www.logitech.com/unifying.
3. Inicie o software Unifying* e siga
as instruções no ecrã para emparelhar
o novo dispositivo sem fios com
o receptor Unifying existente.
*Vá a Iniciar / Todos os Programas / Logitech /
Unifying / Logitech Unifying Software

Logitech® Wireless Mouse M525
27Português 27
Ajuda com a configuração: O rato não funciona
• O rato está ligado?
• O receptor Unifying está correctamente
ligado a uma porta USB do computador?
Experimente mudar de porta USB.
• Se o receptor Unifying estiver ligado
a um concentrador USB, tente ligá-
lo directamente a uma porta USB no
seu computador.
• Verifique a orientação das pilhas do rato.
Substitua as pilhas, se necessário.
O teclado utiliza duas pilhas
alcalinas AA.
• Remova objectos metálicos entre o rato
e o receptor Unifying.
• Experimente deslocar o receptor
Unifying para uma porta USB mais
próxima do rato.
• Experimente voltar a ligar o rato e
o receptor Unifying utilizando o software
Logitech Unifying. (Consulte a secção
Unifying neste manual.)
Qual a sua opinião?
Despenda um minuto para nos dar a sua opinião.
Obrigado por adquirir o nosso produto.
www.logitech.com/ithink

Logitech® Wireless Mouse M525
2828 Nederlands
1
2
3
Gebruikers van Mac® OS X: Wanneer u
de Unifying-ontvanger aansluit, kan het
venster met de configuratie-assistent voor
het toetsenbord verschijnen. Dit venster
kunt u sluiten.
Geavanceerde functies: Software is
optioneel voor deze muis! Download de
gratis muissoftware alleen voor Windows®
(Logitech® SetPoint® voor Windows®)
van www.logitech.com/downloads om
horizontaal scrollen en de functies van
de middelste muisknop in te schakelen.
On
1
2
3
4
USB

Logitech® Wireless Mouse M525
29Nederlands 29
Functies
1. Linker- en rechtermuisknop
2. Batterij-led: knippert groen wanneer
de muis aanstaat, en rood wanneer
de batterij bijna leeg is.
3. Scrollwiel
4. Middelste knop: De functie van
deze knop hangt af van uw
besturingssysteem en de toepassing
die u gebruikt. Als u bijvoorbeeld in
Windows® op internet surft en met de
middelste knop op een koppeling klikt,
wordt deze koppeling doorgaans in
een nieuw tabblad geopend.
5. Internetknoppen Volgende/Vorige:
Kantel het wiel naar rechts om één
pagina verder te gaan. Kantel het wiel
naar links om één pagina terug te gaan.*
6. Aan/uit-schuifschakelaar
7. Vrijgaveknop voor batterijklepje
8. Unifying-ontvangeropslag:
wanneer de muis niet in gebruik is,
kunt u de Unifying-ontvanger in de muis
opbergen.
*Op een Mac® wordt de internetfunctie Volgende/
Vorige niet ondersteund. Via Systeemvoorkeuren
kunt u Dashboard, Exposé, Spaces of andere
functies aan het kantelwiel toewijzen.
6
7
8
2
1
4
5
3

Logitech® Wireless Mouse M525
3030 Nederlands
De Logitech® Unifying-ontvanger
Aansluiten. Vergeten. Toevoegen.
Uw nieuwe Logitech-product wordt
geleverd met een Logitech® Unifying-
ontvanger. Wist u dat u een compatibel
draadloos Logitech-apparaat kunt
toevoegen dat dezelfde ontvanger gebruikt
als uw huidige Logitech Unifying-product?
Bent u klaar voor Unifying?
Als u een draadloos Logitech-apparaat
hebt dat klaar is voor Unifying, kunt u
het koppelen aan andere Unifying-
apparaten. Kijk of u het oranje Unifying-
logo ziet op het nieuwe apparaat of de
verpakking. Stel uw ideale combinatie
samen. Voeg er iets aan toe. Vervang weer
eens iets. Het is heel eenvoudig en u
hebt maar één USB-poort nodig voor
zes apparaten.
U kunt binnen een handomdraai
aan de slag
Als u er klaar voor bent om uw apparaat
of apparaten via Unifying te koppelen,
gaat u als volgt te werk:
1. Zorg dat uw Unifying-ontvanger
is aangesloten.
2. Download de Logitech® Unifying-
software van
www.logitech.com/unifying als u dat nog
niet gedaan hebt.
3. Start de Unifying-software* en volg de
instructies op het scherm om het nieuwe
draadloze apparaat te koppelen aan
uw bestaande Unifying-ontvanger.
*Ga naar Start/Alle programma's/Logitech/
Unifying/Logitech Unifying-software

Logitech® Wireless Mouse M525
31Nederlands 31
Hulp bij de set-up: De muis werkt niet
• Staat de muis aan?
• Is de Unifying-ontvanger goed
aangesloten op de USB-poort
van uw computer? Probeer een andere
USB-poort.
• Als de Unifying-ontvanger op een
USB-hub is aangesloten, probeer deze
dan rechtstreeks op de USB-poort van
uw computer aan te sluiten.
• Controleer of de batterijen correct in
de muis zijn geplaatst. Vervang deze
indien nodig. Voor de muis hebt u
twee AA-alkalinebatterijen nodig.
• Verwijder metalen objecten tussen
de muis en de Unifying-ontvanger.
• Verplaats de Unifying-ontvanger
naar een USB-poort die zich dichter bij
de muis bevindt.
• Verbind de muis en de Unifying-
ontvanger opnieuw via de Logitech
Unifying-software. (Zie de sectie
Unifying in deze gids.)
Wat vindt u ervan?
Neem even de tijd om ons uw mening te geven.
Hartelijk dank voor de aanschaf van ons product.
www.logitech.com/ithink

Logitech® Wireless Mouse M525
3232 Svenska
1
2
3
Mac® OS X: När du ansluter Unifying-
mottagaren visas eventuellt
tangentbordshjälpen (Keyboard Assistant)
på skärmen. Stäng det fönstret.
Avancerade funktioner: Du behöver inte
installera någon programvara! Om du vill
aktivera musens mittknappsfunktioner
och rullning i sidled kan du ladda ner
ett kostnadsfritt musprogram endast
för Windows® (Logitech® SetPoint®
for Windows®) från www.logitech.com/
downloads.
On
1
2
3
4
USB

Logitech® Wireless Mouse M525
33Svenska 33
Funktioner
1. Vänster och höger musknapp
2. Batteriindikatorn blinkar grönt när
musen slås på, och rött när batteriet
börjar ta slut.
3. Rullningshjul
4. Mittknappen – Den här knappens
funktion beror på ditt operativsystem
och vilket program du använder.
Om du t.ex. klickar på en länk med
mittknappen när du surfar på Internet
i Windows®, så öppnas länken i en ny flik.
5. Framåt/bakåt på Internet –
Luta rullningshjulet åt höger för att
gå framåt en sida. Luta rullningshjulet
åt vänster för att gå bakåt en sida.*
6. Av/på-reglage
7. Spärr för batterilucka
8. Förvaring av Unifying-mottagaren
– När du inte använder musen
kan du förvara Unifying-mottagaren
inuti musen.
*Internetfunktionen för bakåt/framåt stöds
inte på Mac®-datorer. Rullningshjulets
tiltwheel-funktion kan tilldelas Dashboard,
Exposé, Spaces eller andra funktioner
i Systeminställningar.
6
7
8
2
1
4
5
3

Logitech® Wireless Mouse M525
3434 Svenska
Logitech® Unifying-mottagare
Koppla in. Glöm bort. Lägg till.
Din nya Logitech-produkt levereras
med en Logitech® Unifying-mottagare.
Visste du att du kan lägga till
en kompatibel, trådlös Logitech-enhet
som använder samma mottagare som din
nuvarande Logitech Unifying-produkt?
Är du Unifying-redo?
Om du har en trådlös Logitech-enhet
som är Unifying-redo kan du lägga
till ytterligare Unifying-enheter. Håll utkik
efter den orangefärgade Unifying-
logotypen på din nya produkt eller
på dess förpackning. Välj den perfekta
kombinationen. Lägg till. Byt ut. Så enkelt
är det! Och du behöver bara en USB-port
för upp till sex enheter.
Kom igång på nolltid
Så här gör du när du är redo att ansluta
dina enheter via Unifying:
1. Se till att Unifying-mottagaren
är ansluten.
2. Om du inte har gjort det redan laddar du
ner Logitech® Unifying-programmet från
www.logitech.com/unifying.
3. Starta Unifying-programmet* och
anslut nya trådlösa enheter till
Unifying-mottagaren genom att följa
anvisningarna på skärmen.
*Gå till Start/Alla program/Logitech/Unifying/
Logitech Unifying Software

Logitech® Wireless Mouse M525
35Svenska 35
Installationshjälp: Musen fungerar inte
• Är musen påslagen?
• Är Unifying-mottagaren ordentligt
ansluten till en USB-port på datorn?
Prova att ansluta till en annan port.
• Om Unifying-mottagaren är ansluten till
en USB-hubb kan du prova att ansluta
den direkt till en USB-port på datorn.
• Kontrollera att batterierna har
satts i på rätt sätt. Byt batterier
om det behövs. Musen drivs med
två alkaliska AA-batterier.
• Ta bort metallobjekt mellan musen och
Unifying-mottagaren.
• Flytta Unifying-mottagaren till en USB-
port närmare musen.
• Försök att ansluta musen och Unifying-
mottagaren igen med Logitech Unifying-
programmet. (Se avsnittet om Unifying
i den här guiden.)
Vad tycker du?
Berätta gärna för oss. Det tar bara någon minut.
Tack för att du valde vår produkt.
www.logitech.com/ithink

Logitech® Wireless Mouse M525
3636 Dansk
1
2
3
Mac® OS X-brugere: Når du tilslutter
Unifying-modtageren, vises vinduet med
installationsguiden til tastaturet muligvis.
Luk vinduet.
Avancerede funktioner: Du kan selv
bestemme om du vil installere software
til musen. Du skal kun hente den
gratis software til musen til Windows®
(Logitech® SetPoint® til Windows®)
på www.logitech.com/downloads hvis
du vil bruge vandret scrolning og den
midterste knap.
On
1
2
3
4
USB

Logitech® Wireless Mouse M525
37Dansk 37
Oversigt
1. Venstre og højre museknap
2. Batteriindikator – Indikatoren blinker
grønt når musen er tændt, og rødt
når batteriet er ved at være fladt.
3. Scrollehjul
4. Midterste knap – Denne knaps funktion
afhænger af hvilket styresystem
og program du bruger. Hvis du fx
bruger en internetbrowser i Windows®
og klikker på et link med den midterste
knap, åbnes linket typisk under en
ny fane.
5. Frem- og tilbageknapperne til
webbrowsing – Når du skubber
hjulet til højre, kan du gå én side frem.
Når du skubber hjulet til venstre,
kan du gå én side tilbage.*
6. Afbryder/On/O-skydeknap
7. Knap til at åbne dækslet til batterihuset
8. Opbevaringsrum til Unifying-
modtageren – Når musen ikke bruges,
kan du opbevare Unifying-modtageren
i musen.
* Frem- og tilbageknapperne til webbrowsing
understøttes ikke på Mac®. Du kan knytte
vippehjulet til funktionerne Dashboard,
Exposé, Spaces eller andre funktioner
i Systemindstillinger.
6
7
8
2
1
4
5
3

Logitech® Wireless Mouse M525
3838 Dansk
Logitech® Unifying-modtageren
Slut den til, glem alt om den,
og tilføj flere enheder.
Der følger en Logitech® Unifying-modtager
med dit nye Logitech-produkt. Vidste du
at du kan tilføje en kompatibel trådløs
enhed fra Logitech, der bruger samme
modtager som dit nuværende Logitech
Unifying-produkt?
Er du klar til Unifying?
Hvis du har en trådløs enhed fra Logitech
som understøtter Unifying-modtageren,
kan du knytte den til yderligere Unifying-
enheder. Du skal bare kigge efter det
orange Unifying-logo på den nye enhed
eller dens emballage. Byg dit ideelle sæt.
Tilføj noget. Udskift noget. Det er nemt,
og du skal kun bruge én USB-port til op
til seks enheder.
Det er let at komme i gang
Du skal gøre følgende, hvis du vil tilknytte
din(e) enhed(er) via Unifying:
1. Kontrollér at Unifying-modtageren
er tilsluttet.
2. Hvis du ikke allerede har gjort det,
skal du hente Logitech® Unifying-
softwaren på www.logitech.com/
unifying.
3. Start Unifying-softwaren*, og følg
anvisningerne på skærmen for hvordan
du knytter den nye trådløse enhed til
din Unifying-modtager.
*Klik på Start/Alle programmer/Logitech/
Unifying/Logitech Unifying-software

Logitech® Wireless Mouse M525
39Dansk 39
Hjælp til installationen: Musen virker ikke
• Er musen tændt?
• Er Unifying-modtageren sat korrekt
i en USB-port på computeren?
Prøv at bruge en anden USB-port.
• Hvis Unifying-modtageren er sluttet
til en USB-hub, kan du prøve at
sætte den direkte i en USB-port
på computeren.
• Sørg for at batterierne vender rigtigt
i musen. Udskrift dem hvis det er
nødvendigt. Der skal bruges to alkaliske
AA-batterier til musen.
• Fjern eventuelle metalgenstande som
er placeret mellem musen og Unifying-
modtageren.
• Prøv at slutte Unifying-modtageren til
en USB-port der er tættere på musen.
• Prøv at genoprette forbindelsen
mellem musen og Unifying-modtageren
via Logitech Unifying-softwaren.
(Du kan læse mere i afsnittet
om Unifying.)
Hvad synes du?
Vi vil bede dig bruge et par minutter på at fortælle os hvad du synes.
Tak fordi du købte vores produkt.
www.logitech.com/ithink

Logitech® Wireless Mouse M525
4040 Norsk
1
2
3
Mac® OS X: Når du setter inn Unifying-
mottakeren, kan det hende at vinduet
Tastaturoppsettassistent kommer opp.
Lukk dette vinduet.
Avanserte funksjoner: Det finnes
programvare til denne musen, men du
kan bruke den uten. Hvis du laster ned
den gratis Windows®-programvaren
(Logitech® SetPoint® for Windows®)
fra www.logitech.com/downloads,
kan du bruke sidelengs rulling og ulike
funksjoner for midtknappen.
On
1
2
3
4
USB

Logitech® Wireless Mouse M525
41Norsk 41
Funksjoner
1. Venstre og høyre museknapp
2. Batterilampe: Blinker grønt når musen er
på, og rødt når batteriet er nesten tomt.
3. Rullehjul
4. Midtre knapp: Funksjonene til denne
knappen avhenger av operativsystemet
og hvilket program den brukes i.
Hvis du for eksempel surfer på Internett
i Windows®, og klikker på en lenke
ved å bruke den midterste knappen,
vil denne siden som oftest åpnes
i en ny fane.
5. Forover/bakover i nettleser:
Vipp rullehjulet til høyre for å gå én side
framover. Vipp rullehjulet til venstre for
å gå én side tilbake.*
6. Av/på-glidebryter
7. Knapp for å åpne batteriluken
8. Lagringsplass for Unifying-mottakeren:
Når du ikke bruker musen, kan Unifying-
mottakeren lagres inni den.
* Mac® støtter ikke fram/tilbake-funksjon
til Internett. Du kan tilordne Dashboard,
Exposé, Spaces eller andre funksjoner til
vippehjulfunksjonen i Systemvalg.
6
7
8
2
1
4
5
3

Logitech® Wireless Mouse M525
4242 Norsk
Logitech® Unifying-mottakeren
Plugg den inn. Glem den.
Bruk den til alt.
Det nye Logitech-produktet ditt leveres
med en Logitech® Unifying-mottaker.
Visste du at du kan legge til en kompatibel
trådløs Logitech-enhet som bruker
samme mottaker som dette Logitech
Unifying-produktet?
Er du klar for Unifying?
Dersom du har en trådløs Logitech-enhet
som støtter Unifying, kan du kople den
sammen med andre Unifying-enheter.
Se etter den oransje Unifying-logoen
på enheten eller emballasjen. Sett sammen
din egen kombinasjon. Legg til noe.
Bytt ut noe. Det er enkelt, og du kan bruke
opptil seks enheter fra bare én usb-port.
Det er enkelt å komme i gang
Gjør følgende for å kople enheten(e) din(e)
til Unifying-mottakeren:
1. Sørg for at Unifying-mottakeren er satt
i datamaskinen.
2. Last ned Logitech® Unifying-
programvaren fra www.logitech.com/
unifying (hvis du ikke har gjort
det allerede).
3. Start Unifying-programmet* og følg
instruksjonene på skjermen for å kople
den nye trådløse enheten til Unifying-
mottakeren.
*Gå til Start / Alle programmer / Logitech /
Unifying / Logitech Unifying Software

Logitech® Wireless Mouse M525
43Norsk 43
Hjelp med konfigureringen: Musen fungerer ikke
• Er musen slått på?
• Er Unifying-mottakeren satt ordentlig inn
i en usb-port? Prøv en annen usb-port.
• Hvis Unifying-mottakeren er koplet
til en usb-hub, kan du prøve å kople
mottakeren direkte til datamaskinen
i stedet.
• Kontroller at batteriene i musen er satt
inn riktig. Bytt ut batteriene ved behov.
Musen bruker to alkaliske AA-batterier.
• Flytt metallobjekter som befinner seg
mellom musen og Unifying-mottakeren.
• Prøv å flytte Unifying-mottakeren til
en usb-port som er nærmere musen.
• Prøv å kople musen og Unifying-
mottakeren sammen på nytt, ved hjelp
av Logitech Unifying-programvaren.
(Se avsnittet om Unifying i denne
veiledningen.)
Hva synes du?
Fortell oss det, det tar ikke lang tid.
Takk for at du handlet hos oss.
www.logitech.com/ithink

Logitech® Wireless Mouse M525
4444 Suomi
1
2
3
Mac® OS X -käyttäjät: Kun liität Unifying-
vastaanottimen tietokoneeseen,
näppäimistön apuohjelman
viestiruutu saattaa ilmestyä näyttöön.
Sulje tämä ikkuna.
Lisäominaisuudet: Ohjelmiston käyttö
tämän hiiren kanssa on valinnaista.
Lataa ilmainen hiiriohjelmisto Windows®-
tietokoneille (Logitech® SetPoint®
Windows®-käyttöjärjestelmään),
ja saat käyttöösi sivuttaisvierityksen
ja keskipainiketoiminnon. Voit ladata
ohjelmiston seuraavalta sivulta:
www.logitech.com/downloads.
On
1
2
3
4
USB

Logitech® Wireless Mouse M525
45Suomi 45
Toiminnot
1. Hiiren ykkös- ja kakkospainike
2. Pariston merkkivalo–Vilkkuu vihreänä,
kun virta on päällä, ja punaisena,
kun paristojen jännite laskee alhaiseksi.
3. Vierityspyörä
4. Keskipainike–Tämän painikkeen toiminto
vaihtelee käyttöjärjestelmän ja käytetyn
sovelluksen mukaan. Jos esimerkiksi
napsautat linkkiä keskipainikkeella
selatessasi internetiä Windowsin
välityksellä, linkki aukeaa tavallisesti
uudessa välilehdessä.
5. Internetissä edellinen ja seuraava
sivu–Voit siirtyä seuraavalle sivulle
kallistamalla pyörää oikealle.
Voit siirtyä edelliselle sivulle kallistamalla
pyörää vasemmalle.*
6. On/O-liukukytkin
7. Paristolokeron kannen vapautin
8. Unifying-vastaanottimen säilytyspaikka–
Unifying-vastaanotinta voi säilyttää
hiiren sisällä, kun hiirtä ei käytetä.
*Mac®-tietokoneissa internetin edellinen
ja seuraava sivu -ominaisuutta ei tueta.
Voit määrittää kojelaudan, paljastamisen,
välit tai muut toiminnot pyörän kallistus
-toimintoon Järjestelmäasetuksissa.
6
7
8
2
1
4
5
3

Logitech® Wireless Mouse M525
4646 Suomi
Logitech® Unifying -vastaanotin
Liitä. Unohda. Lisää.
Uuden Logitech-tuotteesi mukana
toimitetaan Logitech® Unifying
-vastaanotin. Tiesitkö, että voit ottaa
käyttöön toisen langattoman Logitech-
laitteen, joka voi hyödyntää samaa
Logitech Unifying -vastaanotinta kuin
nykyinen laitteesi?
Oletko Unifying-valmiudessa?
Jos sinulla on Logitechin langaton laite,
joka toimii Unifying-vastaanottimen
välityksellä, voit ottaa käyttöön myös muita
Unifying-laitteita. Tarkista, että uudessa
laitteessasi tai sen pakkauksessa on oranssi
Unifying-logo. Yhdistä haluamasi tuotteet.
Lisää. Korvaa. Se on vaivatonta, ja voit
käyttää jopa kuutta laitetta yhden USB-
portin välityksellä.
Aloittaminen on helppoa
Jos haluat yhdistää laitteesi Unifying-
vastaanottimeen, noudata seuraavia
ohjeita:
1. Varmista, että Unifying-vastaanotin
on kytkettynä.
2. Lataa tarvittaessa Logitech®
Unifying -ohjelmisto osoitteesta
www.logitech.com/unifying.
3. Käynnistä Unifying-ohjelmisto*
ja yhdistä uusi langaton laitteesi
Unifying-vastaanottimeen noudattamalla
näyttöön tulevia ohjeita.
*Siirry kohtaan Käynnistä / Kaikki ohjelmat /
Logitech / Unifying / Logitech Unifying
-ohjelmisto

Logitech® Wireless Mouse M525
47Suomi 47
Vinkkejä käyttöönottoon: Jos hiiri ei toimi
• Onko hiireen kytketty virta?
• Onko Unifying-vastaanotin kytketty
tietokoneen USB-liitäntään tukevasti?
Kokeile toista USB-liitäntää.
• Jos Unifying-vastaanotin on liitetty USB-
keskittimeen, yritä liittää vastaanotin
suoraan tietokoneen USB-liitäntään.
• Tarkista, että paristot on asetettu
hiireen oikein päin. Vaihda paristot
tarvittaessa. Hiiressä käytetään
kahta AA-alkaliparistoa.
• Poista hiiren ja Unifying-vastaanottimen
välillä olevat metalliesineet.
• Siirrä Unifying-vastaanotin lähempänä
hiirtä olevaan USB-liitäntään.
• Yritä yhdistää hiiri ja Unifying-
vastaanotin uudelleen Logitech Unifying
-ohjelmiston avulla. (Katso lisätietoja
tämän oppaan Unifying-vastaanotinta
käsittelevästä kohdasta.)
Mitä mieltä olet?
Käytä hetki ja kerro mielipiteesi. Kiitos, että ostit tuotteemme.
www.logitech.com/ithink

Logitech® Wireless Mouse M525
4848 Ελληνvικά
1
2
3
Χρήστες Mac® OS X: Όταν συνδέετε στον
δέκτη Unifying, ενδέχεται να εμφανιστεί
το παράθυρο «Βοηθός πληκτρολογίου».
Κλείστε αυτό το παράθυρο.
Προχωρημένες λειτουργίες: Το λογισμικό
είναι προαιρετικό για αυτό το ποντίκι!
Κάντε δωρεάν λήψη του λογισμικού του
ποντικιού μόνο για Windows® (SetPoint® από
τη Logitech® για Windows®) από τη διεύθυνση
www.logitech.com/downloads για να
ενεργοποιηθεί η πλάγια κύλιση και οι λειτουργίες
του μεσαίου κουμπιού.
On
1
2
3
4
USB

Logitech® Wireless Mouse M525
49Ελληνvικά 49
Λειτουργίες
1. Αριστερό και δεξί κουμπί ποντικιού
2. Η μπαταρία αναβοσβήνει με πράσινη ένδειξη
όταν το ποντίκι είναι ενεργοποιημένο και με
κόκκινη ένδειξη όταν η ισχύς της μπαταρίας
είναι χαμηλή.
3. Τροχός κύλισης
4. Μεσαίο κουμπί—Η λειτουργία αυτού
του κουμπιού εξαρτάται από το λειτουργικό
σας σύστημα και την εφαρμογή που
χρησιμοποιείται. Για παράδειγμα, εάν εκτελείτε
περιήγηση στο Διαδίκτυο στα Windows®
και κάνετε κλικ σε σύνδεσμο χρησιμοποιώντας
το μεσαίο πλήκτρο, ο σύνδεσμος ανοίγει
συνήθως σε καινούρια καρτέλα.
5. Εμπρός/πίσω στο Διαδίκτυο—Κινήστε τον
τροχό κύλισης προς τα δεξιά για να μεταβείτε
στην επόμενη σελίδα. Κινήστε τον τροχό
κύλισης προς τα αριστερά για μεταβείτε στην
προηγούμενη σελίδα.*
6. Κινητός διακόπτης Ενεργοποίησης/
Απενεργοποίησης
7. Απελευθέρωση θήκης μπαταριών
8. Χώρος αποθήκευσης δέκτη Unifying—
Όταν το ποντίκι δεν είναι ενεργοποιημένο,
μπορείτε να αποθηκεύσετε τον δέκτη Unifying
στο ποντίκι.
*Η λειτουργία εμπρός/πίσω στο Διαδίκτυο δεν
υποστηρίζεται από τον Mac®. Μπορείτε να αναθέσετε
τις λειτουργίες Dashboard, Exposé, Spaces και άλλες
στη λειτουργία του τροχού με δυνατότητα κύλισης
χρησιμοποιώντας τις Προτιμήσεις συστήματος.
6
7
8
2
1
4
5
3

Logitech® Wireless Mouse M525
5050 Ελληνvικά
Ο δέκτης Unifying της Logitech®
Συνδέστε το. Ξεχάστε το. Εμπλουτίστε το.
Το νέο σας προϊόν Logitech συνοδεύεται από
έναν δέκτη Unifying της Logitech®. Γνωρίζατε ότι
μπορείτε να προσθέσετε μια συμβατή ασύρματη
συσκευή Logitech που χρησιμοποιεί τον ίδιο
δέκτη με το παρόν προϊόν Unifying της Logitech?
Διαθέτετε υποστήριξη Unifying?
Εάν έχετε μια ασύρματη συσκευή της Logitech
που υποστηρίζει Unifying, μπορείτε να την
αντιστοιχίσετε με πρόσθετες συσκευές Unifying.
Απλώς αναζητήστε το πορτοκαλί λογότυπο
Unifying πάνω στη νέα συσκευή ή στη
συσκευασία της. Δημιουργήστε τον ιδανικό
συνδυασμό. Προσθέστε κάτι. Αντικαταστήστε
κάτι. Είναι εύκολο και θα χρησιμοποιήσετε μία
μόνο θύρα USB για έξι συσκευές.
Η διαδικασία είναι πολύ εύκολη
Εάν είστε έτοιμοι να αντιστοιχίσετε τις συσκευές
σας μέσω Unifying, θα πρέπει να κάνετε τα εξής:
1. Βεβαιωθείτε ότι ο δέκτης Unifying είναι
συνδεδεμένος.
2. Εάν δεν το έχετε κάνει ήδη, κάντε λήψη
του λογισμικού Logitech® Unifying από τη
διεύθυνση www.logitech.com/unifying.
3. Ξεκινήστε το λογισμικό Unifying*
και ακολουθήστε τις οδηγίες που
εμφανίζονται στην οθόνη για να αντιστοιχίσετε
τη νέα ασύρματη συσκευή με τον υπάρχοντα
δέκτη Unifying.
*Μεταβείτε στο μενού Έναρξη /
Όλα τα προγράμματα / Logitech / Unifying /
Λογισμικό Unifying της Logitech

Logitech® Wireless Mouse M525
51Ελληνvικά 51
Βοήθεια με την εγκατάσταση: Το ποντίκι δεν λειτουργεί
• Έχετε ενεργοποιήσει το ποντίκι?
• Έχετε συνδέσει σωστά τον δέκτη Unifying
σε μια θύρα USB του υπολογιστή?
Δοκιμάστε να αλλάξετε θύρα USB.
• Εάν ο δέκτης Unifying είναι συνδεδεμένος
σε έναν διανομέα USB, δοκιμάστε να τον
συνδέσετε απευθείας σε μια θύρα USB στον
υπολογιστή σας.
• Ελέγξτε τον προσανατολισμό των μπαταριών
στο ποντίκι. Αντικαταστήστε τις μπαταρίες εάν
κριθεί απαραίτητο. Το ποντίκι χρησιμοποιεί
δύο αλκαλικές μπαταρίες AA.
• Απομακρύνετε τυχόν μεταλλικά αντικείμενα
ανάμεσα στο ποντίκι και τον δέκτη Unifying.
• Προσπαθήστε να μετακινήσετε τον
δέκτη Unifying σε μια θύρα USB πιο κοντά
στο ποντίκι.
• Δοκιμάστε να επανασυνδέσετε το ποντίκι
και τον δέκτη Unifying χρησιμοποιώντας
το λογισμικό Unifying της Logitech.
(Ανατρέξτε στην ενότητα Unifying σε αυτόν
τον οδηγό.)
Ποια είναι η γνώμη σας?
Θα θέλαμε να την ακούσουμε.
Ευχαριστούμε για την αγορά σας.
www.logitech.com/ithink

Logitech® Wireless Mouse M525
5252 Türkçe
1
2
3
Mac® OS X Kullanıcıları: Unfyng
alıcı takıldığında, Keyboard Assstant
(Klavye Yardımcısı) letşm kutusu
görüntüleneblr. Lütfen bu pencerey
kapatın.
Gelşmş özellkler: Bu fare çn yazılım
steğe bağlıdır! Yana doğru kaydırma
ve orta düğme özellklern etknleştrmek
çn ücretsz fare yazılımını (Wndows® çn
Logtech® SetPont®) yükleyn.
On
1
2
3
4
USB
Logitech® Wireless Mouse M525
53Türkçe 53
Özellkler
1. Sol ve sağ fare düğmeler
2. Pl LED ışığı. Fare açıldığında yeşl renkte
ve pl azaldığında kırmızı yanıp söner.
3. Kaydırma tekerleğ
4. Orta düğme — Bu düğmenn şlev
şletm sstemnze ve kullanılan
uygulamaya bağlıdır. Örneğn,
Wndows®’da İnternet’te geznyorsanız
ve Orta düğmey kullanarak br
bağlantıyı tıklatırsanız bağlantı genellkle
yen br sekmede açılır.
5. İnternet’te ler/ger geznme. Br sayfa
ler gtmek çn kaydırma tekerleğn
sağa doğru eğn. Br sayfa ger gtmek
kaydırma tekerleğn sola doğru eğn.*
6. Açma/Kapama kaydırma anahtarı
7. Pl kapağını serbest bırakma düğmes
8. Unfyng alıcıyı saklama —
Fare kullanılmadığında Unfyng alıcıyı
farenn çnde saklayablrsnz.
*Mac®’te Internet ler/ger özellğ desteklenmez.
Sstem Terchler’n kullanırken eğk tekerlek
özellğne Dashboard, Exposé, Spaces veya dğer
şlevler atayablrsnz.
6
7
8
2
1
4
5
3

Logitech® Wireless Mouse M525
5454 Türkçe
Logtech® Unfyng alıcı
Takın. Unutun. Ekleyn.
Yen Logtech ürününüzde Logtech®
Unfyng alıcı bulunmaktadır.
Logtech Unfyng ürününüzle aynı alıcıyı
kullanan uyumlu br Logtech kablosu aygıt
ekleyebleceğnz blyor muydunuz?
Unfyng kullanmaya hazır mısınız?
Unfyng kullanımına hazır br Logtech
kablosuz aygıtınız varsa başka Unfyng
aygıtlarıyla eşleştreblrsnz. Yen aygıtın
veya ambalajının üzernde turuncu Unfyng
logosu olup olmadığına bakın. İdeal
kombnasyonunuzu oluşturun. Br şeyler
ekleyn. Br şeyler değştrn. Çok kolay.
Altı aygıta kadar tek br USB bağlantı
noktası kullanablrsnz.
Başlamak kolay
Aygıtlarınızı Unfyng le eşleştrmeye
hazırsanız şte yapmanız gerekenler:
1. Unfyng alıcınızın fşe takılı olduğundan
emn olun.
2. Henüz yapmadıysanız www.logtech.
com/unfyng adresnden Logtech®
Unfyng yazılımını ndrn.
3. Unfyng yazılımını başlatın* ve yen
kablosuz aygıtı mevcut Unfyng
alıcınızla eşleştrmek çn ekrandak
talmatları uygulayın.
*Başlat / Tüm Programlar / Logtech / Unfyng /
Logtech Unfyng Software öğesne gdn

Logitech® Wireless Mouse M525
55Türkçe 55
Kurulum yardımı: Fare çalışmıyor
• Fare açık mı?
• Unfyng alıcı USB bağlantı noktasına
tam olarak takılı mı? Bağlantı noktalarını
değştrmey deneyn.
• Unfyng alıcı USB hub’ına takılıysa,
doğrudan blgsayarınızdak br
USB bağlantı noktasına takmayı deneyn.
• Farenn çndek pllern yönünün
doğru olup olmadığını kontrol edn.
Gerekrse pller değştrn. Fare k AA
alkaln plle çalışır.
• Fareyle Unfyng alıcı arasındak metal
nesneler kaldırın.
• Unfyng alıcıyı farenn yakınındak
br USB bağlantı noktasına taşıyın.
• Logtech Unfyng yazılımını
kullanarak farey ve Logtech Unfyng
alıcıyı yenden bağlamayı deneyn.
(Bu kılavuzun Unfyng bölümüne bakın.)
Ne düşünüyorsunuz?
Lütfen brkaç dakkanızı ayırarak düşüncelernz bzmle paylaşın.
Ürünümüzü satın aldığınız çn teşekkür ederz.
www.logtech.com/thnk

Logitech® Wireless Mouse M525
5656 ةيبرعلا
Unifying
USBUSB
Unifying
USB
AA
Unifying
USBUnifying
Unifying
LogitechUnifying
Unifying
www.logitech.com/ithink
Logitech® Wireless Mouse M525
57ةيبرعلا 57
®
Logitech
Logitech
Logitech
®
Unifying
Logitech
LogitechUnifying
Unifying
Logitech
UnifyingUnifying
Unifying
USB
Unifying
1 .Unifying
2 .
Logitech
®
Unifying
3 .Unifying
Unifying
LogitechUnifyingLogitech
LogitechUnifying

Logitech® Wireless Mouse M525
5858 ةيبرعلا
1 .
2 .
3 .
4 .
®
Windows
5 .
6 .
7 .
8 .Unifying
Unifying
Exposé
®
Mac
Spaces
6
7
8
2
1
4
5
3
Logitech® Wireless Mouse M525
59ةيبرعلا 59
1
2
3
:
®
Unifying
Assistant
Logitech
®
®
Windows
®
Windows
®
On
1
2
3
4
USB


Logitech® Wireless Mouse M525
63
www.logitech.com/support
België/Belgique Dutch: +32-(0)2 200 64 44;
French: +32-(0)2 200 64 40
Česká Republika +420 239 000 335
Danmark +45-38 32 31 20
Deutschland +49-(0)69-51 709 427
España +34-91-275 45 88
France +33-(0)1-57 32 32 71
Ireland +353-(0)1 524 50 80
Italia +39-02-91 48 30 31
Magyarország +36 (1) 777-4853
Nederland +31-(0)-20-200 84 33
Norge +47-(0)24 159 579
Österreich +43-(0)1 206 091 026
Polska 00800 441 17 19
Portugal +351-21-415 90 16
Россия +7(495) 641 34 60
Schweiz/Suisse D +41-(0)22 761 40 12
Svizzera F +41-(0)22 761 40 16
I +41-(0)22 761 40 20
E +41-(0)22 761 40 25
South Africa 0800 981 089
Suomi +358-(0)9 725 191 08
Sverige +46-(0)8-501 632 83
Türkiye 00800 44 882 5862
United Arab 8000 441-4294
Emirates
United Kingdom +44-(0)203-024-81 59
European, English: +41-(0)22 761 40 25
Mid. East., & Fax: +41-(0)21 863 54 02
African Hq.
Morges,
Switzerland
Eastern Europe English: 41-(0)22 761 40 25
United States +1 646-454-3200
Argentina +0800 555 3284
Brasil +0800 891 4173
Canada +1-866-934-5644
Chile +1230 020 5484
Latin America +1 800-578-9619
Mexico +001 800 578 9619

www.logitech.com
© 2011 Logitech. All rights reserved. Logitech, the Logitech logo, and other Logitech marks are owned by Logitech and
may be registered. Microsoft, Windows Vista, Windows, and the Windows logo are trademarks of the Microsoft group
of companies. Mac, Mac logo, Exposé, and Spaces are trademarks of Apple Inc., registered in the U.S. and other countries.
All other trademarks are the property of their respective owners. Logitech assumes no responsibility for any errors that
may appear in this manual. Information contained herein is subject to change without notice.
620-003602.003