Owner's Manual Washer Dryer Combo
OPERATION
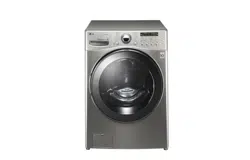
Using the Washing Machine
Before the first wash, select a washing programme, allow the washing machine to wash without clothing. This will remove residue and water from the drum that may have been left during manufacturing.
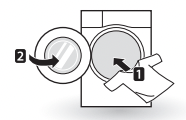
1 Sort laundry and load items.
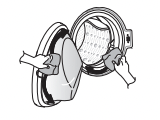
• Sort laundry by fabric type, soil level, colour and load size as needed. Open the door and load items into the washing machine.
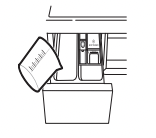
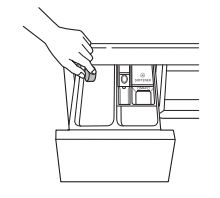
2 Add cleaning products and/or detergent and softener.
• Add the proper amount of detergent with the detergent measuring cup to the washing drum evenly.
• Add the proper amount of detergent to the detergent dispenser drawer. If desired, add bleach or fabric softener to the appropriate areas of the dispenser.
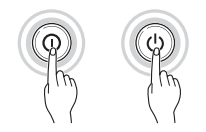
3 Turn on the washing machine.
• Press the Power button to turn on the washing machine.
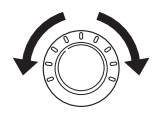
4 Choose the desired washing cycle.
• Turn the cycle selector knob until the desired cycle is selected.
• Press the cycle button repeatedly until the desired cycle is selected.
• Press the cycle button repeatedly or turn the cycle selector knob until the desired cycle is selected.
5 Begin cycle.
• Press the Start/Pause button to begin the cycle. The washing machine will agitate briefly without water to measure the weight of the load. If the Start/Pause button is not pressed within 15 minutes, the washing machine will shut off and all settings will be lost.

6 End of cycle.
• When the cycle is finished, a melody will sound. Immediately remove your clothing from the washing machine to reduce wrinkling. Check around the door seal when removing the load for small items that may be caught in the seal.
Sorting Laundry
1 Look for the care label on your clothes.
• This will tell you about the fabric content of your garment and how it should be washed.
• Symbols on the care labels.
 [Wash temperature]
 [Normal machine wash]
 [Permanent press]
 [Delicate]
 [Hand wash]
 [Do not wash]
2 Sorting laundry.
• To get the best results, sort clothes into loads that can be washed with the same wash cycle.
• Different fabrics need to be washed at varying temperatures and spin speeds.
• Always sort dark colours from pale colours and whites. Wash separately as dye and lint transfer can occur causing discolouration of white and pale garments. Do not wash heavily soiled loads in this Machine.
−Soil (Heavy, Normal, Light) : Separate clothes according to amount of soil.
− Colour (White, Lights, Darks): Separate white fabrics from coloured fabrics.
− Lint (Lint producers, Collectors): Wash lint producers and lint collectors separately
3 Caring before loading.
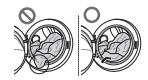
• Combine large and small items in a load. Load large items first.
• Large items should not be more than half the total wash load. Do not wash single items. This may cause an unbalanced load. Add one or two similar items.
• Check all pockets to make sure that they are empty. Items such as nails, hair clips, matches, pens, coins and keys can damage both your washing machine and your clothes.
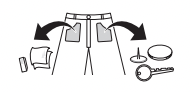
• Close zippers, hooks and strings to make sure that these items don’t snag on other clothes.
• Pre-treat dirt and stains by brushing a small amount of detergent dissolved water onto stains to help lift dirt.
• Check the folds of the flexible door gasket and remove any small articles.
CAUTION
• Check inside the drum and remove any items from a previous wash.
• Remove any clothing or items from the flexible gasket to prevent clothing and gasket damage.

Adding Cleaning Products
Detergent Dosage
• Detergent should be used according to the instruction of the detergent manufacturer and selected according to type, colour, soiling of the fabric and washing temperature.
• If too much detergent is used, too many suds can occur and this will result in poor washing results or cause a malfunction or the motor to overload.
• If you wish to use liquid detergent follow the guidelines provided by the detergent manufacturer.
• You can pour liquid detergent directly into the main detergent drawer if you are starting the cycle immediately.
• Do not use liquid detergent if you are using Time delay, or if you have selected Pre Wash, as the liquid may harden.
• If too many suds occur, reduce the detergent amount.Drum type detergent must only be used in Front loaders.excessive suds can be caused by using the wrong type of detergent.
• When using a combined Front & Top loader detergent,It is recommended to use only half the quantity of detergent that is recommended by the detergent manufacturer when washing normally soiled loads.
• Detergent usage may need to be adjusted for water temperature, water hardness, size and soil level of the load. For best results, avoid oversudsing.
• Refer to the label of the clothes, before choosing the detergent and water temperature.
• When using the washing machine, use designated detergent for each type of clothing only:
− General powdered detergents for all types of fabric
−Powdered detergents for delicate fabric
− Liquid detergents for all types of fabric or designated detergents only for wool
• For better washing performance and whitening, use detergent with the general powdered bleach.
• Detergent is flushed from the dispenser at the beginning of the cycle.
NOTE
• Do not let the detergent harden. Doing so may lead to blockages, poor rinse performance or odour.
• Full load : According to manufacturer’s recommendation.
• Part load : 3/4 of the normal amount
• Minimum load : 1/2 of full load
Adding Detergent and Fabric Softener
Adding Detergent
• Main wash only 
• Pre wash+Main wash 
NOTE
• Too much detergent, bleach or softener may cause an overflow or a malfunction.
• Be sure to use the appropriate amount of detergent.
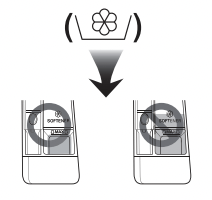
Adding Fabric Softener
• Do not exceed the maximum fill line. Overfilling can cause early dispensing of the fabric softener, which may stain clothes. Close the dispenser drawer slowly
• Do not leave the fabric softener in the detergent drawer for more than 2 days (Fabric softener may harden).
• Softener will automatically be added during the last rinse cycle.
• Do not open the drawer when water is being supplied.
• Solvents (benzene, etc.) must not be used.
NOTE
• Do not pour fabric softener directly on the clothes as it may stain the clothes.
Adding Water Softener
• A water softener, such as anti-limescale (e.g. Calgon) can be used to cut down on the use of detergent in extremely hard water areas. Dispense according to the amount specified on the packaging. First add detergent and then the water softener.
• Use the quantity of detergent required for soft water.
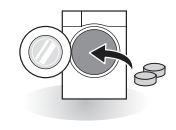
Using Tablet
1 Open the door and put tablets into the drum.
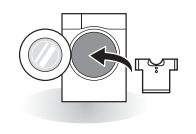
2 Load the laundry into the drum and close the door.
Control Panel
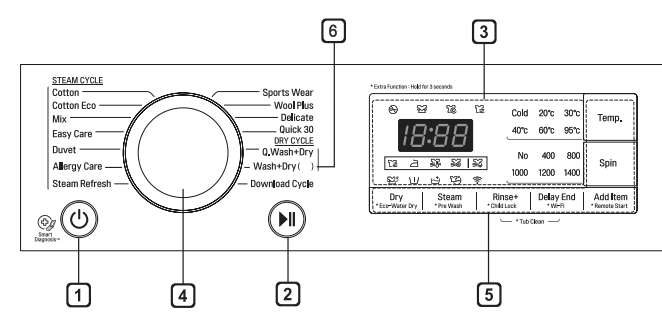
1 Power Button
• Press the Power button to turn the washing machine on, or off if washing hasn't commenced.
2 Start/Pause Button
• The Start/Pause button is used to start the wash cycle or pause the wash cycle.
• If a temporary stop of the wash cycle is needed, press the Start/Pause button.
3 Display
• The display shows the settings, estimated time remaining, options, and status messages. When the washer is turned on, the default settings in the display will illuminate.
• The display shows estimated time remaining. While the size of the load is being calculated automatically, the display will blink before displaying the estimated cycle time.
• The RPM may differ depending on the models.
4 Programme Knob
• Programmes are available according to the laundry type.
• The lamp will light up to indicate the selected programme.
5 Options
• This allows you to select an additional programme and will light when selected.
• Use these buttons to select the desired programme options for the selected cycle. Not all options are available with each programme cycle.
• In order to use the Remote Start function, refer to SMART FUNCTIONS.
6 Wash+Dry( )
• ( ) indicates the drying capacity, which varies on the models.
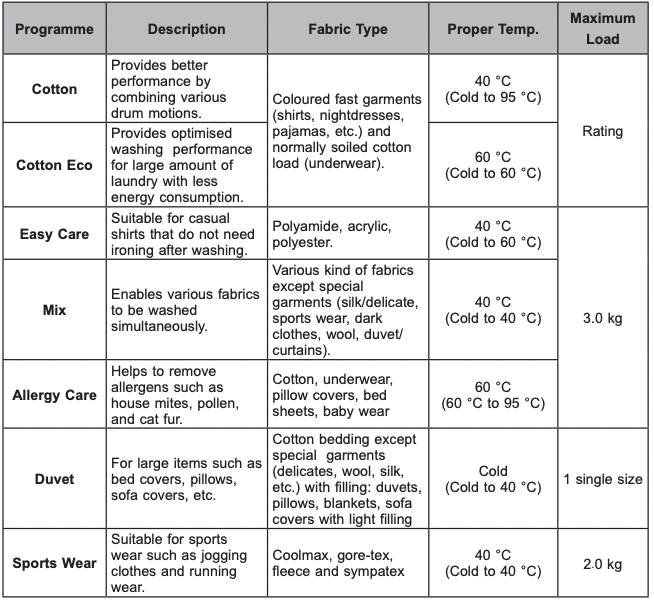
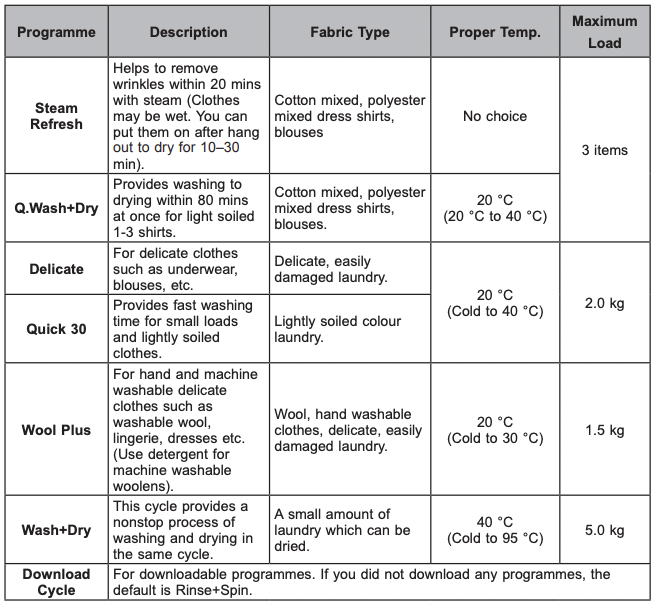
Programme Table
Washing Programme
Drying Programme

• Program setting with “Cotton Eco, 40 °C ,1400 Spin” option for test in accordance or in conformity with AS/NZS 2040.1 for 9 kg normally soiled cotton load.
• Set program at “Cotton, Normal Eco ” option for test in accordance or in conformity with AS/ NZS 2442.1. (Dry Energy program selection: Press the Power button and then press the Dry button to select the Normal Eco , then the washing machine will show that “Cotton, Normal Eco ” are selected.)
NOTE
• Select maximum selectable spin speed of washing programme to ensure drying results.
• Where the amount of laundry to be washed and dried in one programme does not exceed the maximum weight permitted for the drying programme, washing and drying in one continuous sequence is recommended.
Extra Options
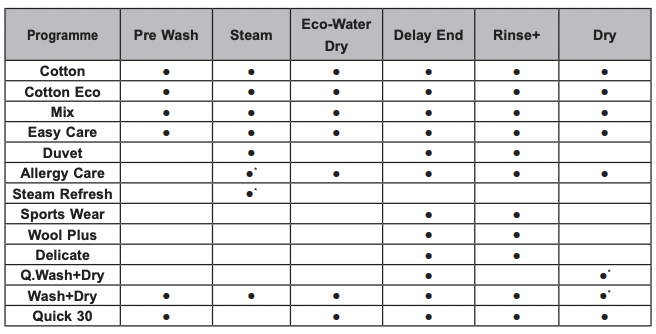
• *: This option is automatically included in the cycle and can not be deleted.
Operating Data
Option Programme
Delay End
You can set a time delay so that the washing machine will start automatically and finish after a specified time interval.
- 1 Press the Power button.
- 2 Select a washing programme.
- 3 Press the Delay End button to set time required.
- 4 Press the Start/Pause button.
NOTE
• The delay time is the time to the end of the programme, not the start. The actual running time may vary due to water temperature, wash load and other factors.
• To cancel the function, the power button should be pressed.
• Avoid using liquid detergent for this option.
Pre Wash ( )
)
If the laundry is heavily soiled, the Pre Wash programme is recommended.
- 1 Press the Power button.
- 2 Select a washing programme.
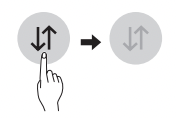
- 3 Press the Pre Wash button for three seconds.
- 4 Press the Start/Pause button.
NOTE
• Please refer to the 'Extra Options' for programmes.
Steam (Optional) (  )
)
Steam Wash features enhanced washing performance with low energy consumption.
- 1 Press the Power button.
- 2 For Steam Wash option, select steam programmes.
- 3 Press the Steam button.
- 4 Press the Start/Pause button.
NOTE
• Please refer to the 'Extra Options' for programmes.
Wi-Fi ( )
)
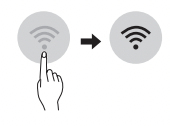
Set the Wi-Fi connection. When Wi-Fi is connected, the Wi-Fi icon on the control panel is lit.
Temp.
The Temp. button selects the wash and rinse temperature combination for the selected cycle. Press this button until the desired setting is lit. All rinses use cold tap water.
• Select the water temperature suitable for the type of load you are washing. Follow the garment fabric care labels for best results. Not all temperatures can be selected on all cycles.
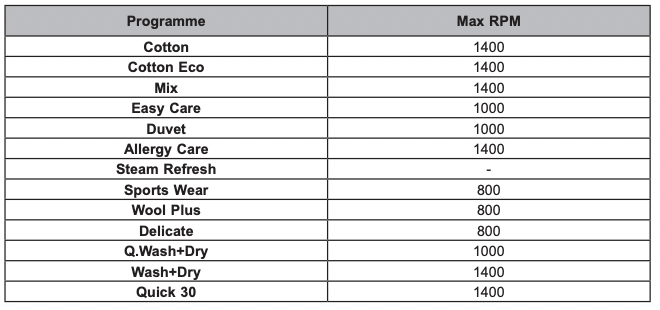
Spin
• Spin speed level can be selected by pressing the Spin button repeatedly. Higher spin speeds may not be available on some cycles.
• Spin Only
- 1 Press the Power button.
- 2 Press the Spin button to select RPM.
- 3 Press the Start/Pause button.
NOTE
• When you select No, it will still rotate slowly for a short time to drain quickly.
Rinse
Rinse+ ( 
Adds an additional rinse.
Eco-Water Dry (Optional) 
Use for air condensing dry without water consumption used for condensing.
- 1 Press the Power button.
- 2 Select a drying programme.
- 3 Press the Eco-Water Dry button for 3 seconds .
- 4 Press the Start/Pause button.
NOTE
• Available with the Normal or Iron programme.
Add Item 
Laundry can be added or removed after the washing programme is started.
- 1 Press the Add Item button when the LED is turned on.
- 2 Add or remove laundry.
- 3 Close the door and Press the Start/Pause button.
NOTE
• For safety reasons, the door remains locked when the water level or temperature is high. It is not possible to add laundry during this time.
• If the water temperature in the drum is high, wait until it cools down.
CAUTION
• When adding laundry, make sure to completely push it into the drum. If laundry gets stuck in the door latch hole, the rubber door seal may be damaged, causing water leakage and malfunction.
• Forcing the door open may cause part damage, destruction, or safety problems.
• when opening the door during a wash, caution should be taken to avoid scalding or water overflowing onto the floor.
Dry 
Use the automatic programmes to dry most loads. Electronic sensors measure the temperature of the exhaust to increase or decrease drying temperatures for faster reaction time and tighter temperature control.
• Cold water tap must be left on during drying cycles.
• This washing machine’s automatic process from washing to drying can be selected easily.
• For most even drying, make sure all articles in the clothes load are similar in material and thickness.
• Do not overload the washing machine by stuffing too many articles into the drum. Items must be able to tumble freely.
• If you open the door and remove the load before the washing machine has finished its cycle, remember to press the Start/Pause button.
• By pressing the Dry button, you can select: Normal-Time (30-60-120)-Iron-Low Temp.- Energy Dry.
• After the end of dry,  is displayed.
  means crease decreasing. The drying cycle is already done. Press any buttons and take out clothes. If you do not press the Start/Pause button, the programme ends after about 4 hours.
NOTE
• When you turn the washing machine off of the drying programme, the drying fan motor can be operated to save itself for 60 seconds.
• Be careful when removing your clothing from the washing machine, as the clothing or washing machine may be hot.
Woolen Articles
• Do not tumble dry woolen articles. Pull them to their original shape and dry them flat.
Woven and Loopknit Materials
• Some woven and loopknit materials may shrink, by varying amounts, depending on their quality.
• Always stretch these materials out immediately after drying.
Permanent Press and Synthetics
• Do not overload your washing machine.
• Take out permanent press articles as soon as the washing machine stops to reduce wrinkles.
Baby Clothes and Night Gowns
• Always check the manufacturer’s instructions.
Rubber and Plastics
• Do not dry any items made from or containing rubber or plastics, such as:
− aprons, bibs, chair covers
− curtains and table cloths
− bathmats
Fiber Glass
• Do not dry fiberglass articles in your washing machine. Glass particles left in the washing machine may be picked up by your clothes the next time you use the washing machine and cause skin irritation.
Drying Time Guide
• The drying time can be selected by pressing the Dry button.
• Drying programme can last up to about 7 hours.
• These drying times are given as a guide to help you set your washing machine for manual drying.
NOTE
• The estimated drying time varies from the actual drying time during the Automatic cycle. The type of fabric, size of the load, and the dryness selected affect drying time.
• When you select drying only, spinning runs automatically for energy efficiency
Child Lock
Use this option to disable the controls. This feature can prevent children from changing cycles or operating the appliance
Locking the Control Panel
- 1 Press and hold the Child Lock button for three seconds.
- 2 A beeper will sound, and
 will appear on the display. When the Child Lock is set, all buttons are locked except the Power button.
NOTE
• Turning off the power will not reset the child lock function. You must deactivate child lock before you can access any other functions.
Unlocking the Control Panel
Press and hold the Child Lock button for three seconds.
• A beeper will sound and the remaining time for the current programme will reappear on the display
Beep On / Off
- 1 Press the Power button.
- 2 Press the Start/Pause button.
- 3 Press and hold the Temp. and Spin button simultaneously for 3 seconds to set the Beep on/off function.
NOTE
• Once the Beep on/off function is set, the setting is memorized even after the power is turned off.
• If you want to turn the Beeper back on, simply repeat this process.
SMART FUNCTIONS
Using LG SmartThinQ Application
Things to check before using LG SmartThinQ
• For appliances with the or
or  logo
logo
- 1 Check the distance between the appliance and the wireless router (Wi-Fi network).
• If the distance between the appliance and the wireless router is too far, the signal strength becomes weak. It may take a long time to register or installation may fail.
- 2 Turn off the Mobile data or Cellular Data on your smartphone.
• For iPhones, turn data off by going to Settings → Cellular → Cellular Data.
- 3 Connect your smartphone to the wireless router.
NOTE
• To verify the Wi-Fi connection, check that Wi-Fi icon on the control panel is lit.
• The appliance supports 2.4 GHz Wi-Fi networks only. To check your network frequency, contact your Internet service provider or refer to your wireless router manual.
• LG SmartThinQ is not responsible for any network connection problems or any faults, malfunctions, or errors caused by network connection.
• If the appliance is having trouble connecting to the Wi-Fi network, it may be too far from the router. Purchase a Wi-Fi repeater (range extender) to improve the Wi-Fi signal strength.
• The Wi-Fi connection may not connect or may be interrupted because of the home network environment.
• The network connection may not work properly depending on the Internet service provider.
• The surrounding wireless environment can make the wireless network service run slowly.
• The appliance cannot be registered due to problems with the wireless signal transmission. Unplug the appliance and wait about a minute before trying again.
• If the firewall on your wireless router is enabled, disable the firewall or add an exception to it.
• The wireless network name (SSID) should be a combination of English letters and numbers. (Do not use special characters.)
MAINTENANCE
WARNING
• Unplug the washing machine before cleaning to avoid the risk of electric shock. Failure to follow this warning may result in serious injury, fire, electric shock, or death.
• Never use harsh chemicals, abrasive cleaners, or solvents to clean the washing machine. They may damage the finish.
Cleaning Your Washing Machine
Care After Wash
• After the cycle is finished, wipe the door and the inside of the door seal to remove any moisture.
• Leave the door open to dry the drum interior but only if there no unsupervised children in the home.
• Wipe the body of the washing machine with a dry cloth to remove any moisture.
Cleaning the Exterior
Proper care of your washing machine can extend its life.
Door:
• Wash with a damp cloth on the outside and inside and then dry with a soft cloth.
Exterior:
• Immediately wipe off any spills.
• Wipe with a damp cloth.
• Do not press the surface or the display with sharp objects.
Cleaning the Interior
• Use a towel or soft cloth to wipe around the washing machine door opening and door glass.
• Always remove items from the washing machine as soon as the cycle is complete. Leaving damp items in the washing machine can cause wrinkling, colour transfer, and odour.
• Run the Tub Clean programme once a month (or more often if needed) to remove detergent buildup and other residue
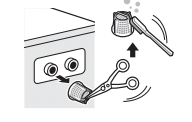
Cleaning the Water Inlet Filter
• Turn off the supply taps to the machine if the washing machine is to be left for any length of time (e.g. holiday), especially if there is no floor drain (gully) in the immediate vicinity.
•  icon will be displayed on the control panel when water is not entering the detergent drawer during the wash.
• If water hardness level is high, or contains traces of lime deposit, the water inlet filter may become clogged. It is therefore a good idea to clean it occasionally
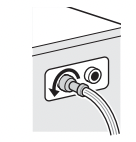
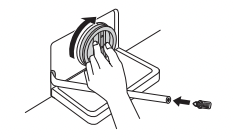
- 1 Turn off the water tap and unscrew the water supply hose.
- 2 Clean the filter using a medium bristle toothbrush.
Cleaning the Drain Pump Filter
• The drain filter collects threads and small objects left in the laundry. Check regularly that the filter is clean to ensure smooth running of your washing machine.
• Allow the water to cool down before cleaning the drain pump, carrying out emergency emptying, or opening the door in an emergency.
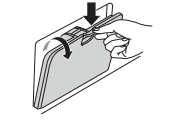
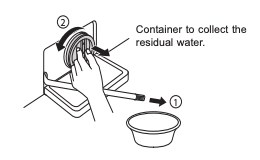
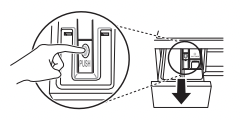
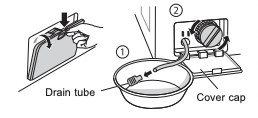
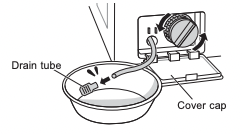
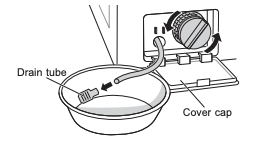
- 1 Open the cover cap and pull out the drain tube.
- 2 Unplug the drain tube plug to drain out any residual water, and then open the filter by turning it to the left.There may be up to 1.5 liters of residual water behind the filter cap
- 3 Remove any extraneous matter from the pump filter and cavity
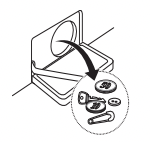
- 4 After cleaning, refit the pump filter and insert the drain tube plug.
CAUTION
• First drain using the drain tube and then open the pump filter to remove any threads or objects.
• Be careful when draining, as the water may be hot, and, not to cross thread the filter cap when refitting it.
Cleaning the Dispenser Drawer
Detergent and fabric softener may build up in the dispenser drawer. Remove the drawer and inserts and check for buildup once or twice a month.
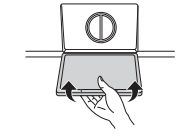
- 1 Remove the detergent dispenser drawer by pulling it straight out until it stops.
• Press down hard on the disengage button and remove the drawer.
- 2 Remove the inserts from the drawer.
• Rinse the inserts and the drawer with warm water to remove buildup from laundry products. Use water only to clean the dispenser drawer. Dry the inserts and drawer with a soft cloth or towel.
- 3 To clean the drawer opening, use a cloth or small, non-metal brush to clean the recess.
• Remove all residue from the upper and lower parts of the recess.
- 4 Wipe any moisture off the recess with a soft cloth or towel.
- 5 Return the inserts to the proper compartments and replace the drawer.
Tub Clean (Optional)
Tub Clean is a special programme to clean the inside of the washing machine. A higher water level is used in this programme and a higher spin speed. Perform this programme regularly. DO NOT add clothing when engaging the Tub Clean function.
- 1 Remove any clothing or items from the washing machine and close the door.
- 2 Open the dispenser drawer and add anti-limescale (e.g. Calgon) to the main wash compartment.
• For tablets put into the drum.
- 3 Close the dispenser drawer slowly.
- 4 Power on and then press and hold Rinse+ and Delay End button for 3 seconds. Then will be displayed on the display.
- 5 Press the Start/Pause button to start.
- 6 After the programme is complete, leave the door open to allow the washing machine door opening, flexible gasket and door glass to dry.
CAUTION
• Children should be supervised so that they do not play with the washer during this operation, or whilst the door is open at any time.
NOTE
• Do not add any detergent to the detergent compartment during the Tub Clean operation. Excessive suds may generate and leak from the washing machine.
Caution on Freezing During Winter
• When frozen, the product does not operate normally. Make sure to install the product where it will not freeze during winter.
• In case the product must be installed outside on a porch or in other outdoor conditions, make sure to check the following.
How to Keep the Product from Freezing
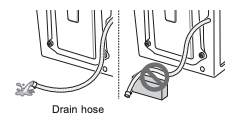
• After washing, remove water remaining inside the pump completely with the opening hose plug used for removal of residual water. When the water is removed completely, close the hose plug used for removal of residual water and cover cap.
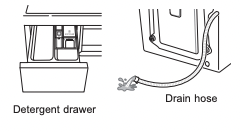
• Hang down drain hose to pull out water inside the hose completely
CAUTION
• When the drain hose is installed in a curved shape, the inner hose may freeze.
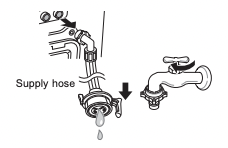
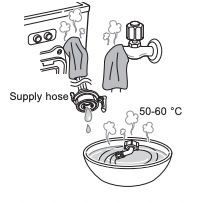
• After closing the tap, disconnect the cold supply hose from the tap, and remove water while keeping the hose facing downwards.
Check for Freezing
• If water does not drain when opening the hose plug used for removal of residual water, check the drainage unit.
• Turn the power on, choose a washing programme, and press the Start/Pause button.
• When  is shown in display window while the product is in operation, check water supply unit and drainage unit (Some models do not have an alarm function that indicates freezing).
NOTE
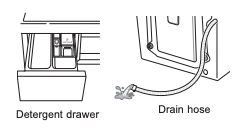
• Check that water is coming into the detergent drawer while rinsing, and water is draining through the drain hose while spinning.
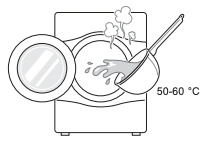
How to Handle Freezing
• Make sure to empty the drum, pour warm water of 50–60 °C up to the rubber part inside the drum, close the door, and wait for 1–2 hours.
CAUTION
• When the drain hose is installed in a curved shape, the inner hose may freeze.
• Open the cover cap and hose plug used for removal of residual water to extract water completely
NOTE
• If water does not drain, this means the ice is not melted completely. Wait more.
• When water is removed completely from the drum, close the hose plug used for removal of residual water, choose a washing programme, and press the Start/Pause button.
NOTE
• Check that water is coming into the detergent drawer while rinsing, and water is draining through the drain hose while spinning.
• When water supply problems occur, take the following measures.
− Turn off the tap, and thaw out the tap and both connection areas of inlet hose of the product using a hot water cloth.
− Take out inlet hose and immerse in warm water below 50–60 °C.
TROUBLESHOOTING
• Your washing machine is equipped with an automatic error-monitoring system to detect and diagnose problems at an early stage. If your washing machine does not function properly or does not function at all, check the following before you call for service:
Diagnosing Problems
Rattling and clanking noise
Foreign objects such as coins or safety pins may be in drum or pump.
• Check all pockets to make sure that they are empty. Items such as clips, matches, pens, coins, and keys can damage both your washer and your clothes.
• Close zippers, hooks, and drawstrings to prevent these items from snagging or tangling on other clothes.
Thumping sound
Heavy wash loads may produce a thumping sound. This is usually normal.
• If sound continues, washing machine is probably out of balance. Stop and redistribute wash load.
Vibrating noise
Have all the transit bolts and tub support been removed?
• If not removed during installation, refer to Installation guide for removing transit bolts.
Are all the feet resting firmly on the ground?
• Make sure the washing machine is level and tighten the lock nuts up towards the base of the appliance.
Have you ever laid down the appliance when moving or installing it?
• Please contact the customer information center.
Water leaks
Supply hoses or drain hose are loose at tap or washing machine.
• Check and tighten hose connections.
House drain pipes are clogged.
• Unclog drain pipe. Contact plumber if necessary.
Water does not enter washing machine or it enters slowly
Water supply is not adequate in that location.
• Check another tap in the house.
Water supply tap is not completely open.
• Fully open tap.
Water supply hose(s) are kinked.
• Straighten hose.
The filter of the supply hose(s) clogged.
• Check the filter of the supply hose.
Water in the washing machine does not drain or drains slowly
Drain hose is kinked or clogged.
• Clean and straighten the drain hose.
The drain filter is clogged.
• Clean the drain filter.
Washing machine does not start
Electrical power cord may not be plugged in or connection may be loose.
• Make sure plug fits tightly in wall outlet.
House fuse blown, circuit breaker tripped,or a power outage has occurred.
• Reset circuit breaker or replace fuse. Do not increase fuse capacity. If problem is a circuit overload, have it corrected by a qualified electrician.
Water supply tap is not turned on.
• Turn on water supply tap.
Washing machine will not spin
Check that the door is firmly shut.
• Close the door and press the Start/ Pause button. After pressing the Start/Pause button, it may take a few moments before the washing machine begins to spin. The door must be locked before spin can be achieved. Add 1 or 2 similar items to help balance the load. Rearrange load to allow proper spinning. '
Door does not open
Once washing machine has started, the door cannot be opened for safety reasons.
• Check if the ‘Door Lock’ icon is illuminated. You can safely open the door after the ‘Door Lock’ icon turns off.
Wash cycle time delayed
If an imbalance is detected or if the suds removing feature operates, the wash time will increase.
• This is normal. The time remaining shown in the display is only an estimate. Actual time may vary.
Fabric softener overflow
Too much softener may cause an overflow.
• Follow softener guidelines to ensure appropriate amount is used. Do not exceed the maximum fill line.
Softener dispensed too early
Too much softener may cause it to dispense prematurely.
• Follow the guidelines provided by the detergent manufacturer.
• Close the dispenser drawer slowly. Do not open the drawer during the wash cycle.
A shortage alert appears even after you filled the dispensers for the detergent and softener.
Are all the feet resting firmly on the ground and is the machine leveled?
• Make sure that all four feet are stable and that the machine is level.
Did you supplement the detergent and softener before you got the shortage notification?
• When a washing programme has ended, the washing machine detects whether it is necessary to refill the detergent. Therefore, no alarm appears until the next refill sensing check.
The buttons may not function properly.
The button cannot be recognized when the door is open.
• Press again after closing the door.
Odor
This odor is caused by the rubber attached to the washing machine.
• It is the normal odor of new rubber and will disappear after the machine has been run a few times.
If the rubber door gasket and door seal area are not cleaned regularly, odors can occur from mold or foreign substances.
• Be sure to clean the gasket and door seal regularly and check under the door seal for small items when unloading the washer.
Odors can occur if foreign substances are left in the drainage pump filter.
• Be sure to clean the drainage pump filter regularly.
Odors can occur if the drainage hose is not properly installed, causing siphoning (water flowing back inside the washing machine).
• When installing the drainage hose, be sure that it doesn’t become kinked or blocked.
Using the dry function, odors can occur from lint and other laundry matter sticking to the heater. (Dryer model only)
• This is not a malfunction.
A particular odor can occur from drying wet clothes with hot air. (Dryer model only)
• The odor will disappear after a short while.
Drying performance is too low or bad.
Water is not properly supplied. The water is used for auto-cleaning of lint-filter on drum during the drying.
• Make sure the water supply tap is open.
Water does not properly drain.
• Make sure the drain filter is not clogged.
The appliance is overloaded.
• Check the load capacity for the selected cycle. If necessary, add a Time Dry cycle.
The spin speed is too low.
• Select the highest spin speed allowed for the wash cycle.
Drying time is too long.
The ambient temperature is low.
• Make sure the temperature is allowable range. (Refer to 'Specifications' of installation page.)
Clothes are strong-wrinkled.
Clothes are over-dried.
• Select suitable drying course.
Clothes are left in the drum for a long time after drying.
• Remove laundry from the drum as soon as possible after the cycle ends.
Dry problem
Check water supply tap.
• Do not overload. Check that the washing machine is draining properly to extract adequate water from the load. Clothes load is too small to tumble properly. Add a few towels.
• Turn off water supply tap.
Error Messages
IE 
Water supply is not adequate in area.
• Check another tap in the house.
Water supply taps are not completely open.
• Fully open tap.
Water supply hose(s) are kinked.
• Straighten hose(s).
The filter of the supply hose(s) are clogged.
• Check the filter of the supply hose.
If water leakage occurred in the aqua stop supply hose, indicator will become red. May vary depending on the model.
• call LG for Service.
UE 
Load is too small.
• Add 1 or 2 similar items to help balance the load.
Load is out of balance.
• Add 1 or 2 similar items to help balance the load.
The appliance has an imbalance detection and correction system. If individual heavy articles are loaded (e.g. bath mat, bath robe, etc.) this system may stop spinning or even interrupt the spin cycle altogether.
• Rearrange load to allow proper spinning.
If the laundry is still too wet at the end of the cycle, add smaller articles of laundry to balance the load and repeat the spin cycle.
• Rearrange load to allow proper spinning.
OE 
Drain hose is kinked or clogged.
• Clean and straighten the drain hose. The drain filter is clogged.
• Clean the drain filter.
dE, dE1, dE2 
Ensure door is not open.
• Close the door completely. If dE, dE1, dE2, dE4 is not released, call for service.
dE4
Door sensor has malfunctioned.
• Close the door completely. If dE, dE1, dE2, dE4 is not released, call for service.
tE 
Control error.
• Unplug the power plug and call for service.
FE 
Water overfills due to the faulty water valve.
• Close the water tap.
• Unplug the power plug.
• Call for service.
PE 
Malfunction of water level sensor.
• Close the water tap.
• Unplug the power plug.
• Call for service.
LE 
Over load in motor.
• Allow the washing machine to stand for 30 minutes to allow the motor to cool, then restart the cycle.
FF 
Is supply/drain hose or drain pump frozen?
• Supply warm water into the drum and unfreeze drain hose and drain pump. Wet a towel in warm water and apply to supply hose.
AE 
Water leaks.
• Call for service.
dHE
Does not dry
• Call for service.