
Please read this owner's manual thoroughly before operating and
keep it handy for reference at all times.
WM3997H*A
MFL67737658
Rev.20_062118
ENGLISH
ESPAÑOL
OWNER’S MANUAL
WASHING
MACHINE
www.lg.com
Copyright © 2014 - 2018 LG Electronics Inc. All Rights Reserved.
MFL67737658_E_A5.indd 1 2018. 7. 2. 오전 10:12

2
TABLE OF CONTENTS
TABLE OF CONTENTS
3 PRODUCT FEATURES
4 IMPORTANT SAFETY INSTRUCTIONS
4 BASIC SAFETY PRECAUTIONS
5 GROUNDING INSTRUCTIONS
6
SAFETY INSTRUCTIONS FOR INSTALLATION
7 SAFETY INSTRUCTIONS FOR USE, CARE,
CLEANING, AND DISPOSAL
8
INTRODUCING YOUR WASHING MACHINE
8 Parts and Accessories
9 Control panel features
11 INSTALLATION INSTRUCTIONS
11 Preview installation order
12 Checking and choosing the proper location
13 Unpacking and removing shipping bolts
14 Connecting the water lines
15 Connecting the drain line
16 Leveling the washing machine
17 Plugging in the power cord and grounding
17 Test run
18 PREPARATION
18 Sorting wash loads
18 - Precautions for fabric care before wash cycle
19 - Fabric care labels
19 - Sorting laundry
20 Using detergent/fabric softener
20 - Recommended detergent
20 - Loading the dispenser
22 USING YOUR WASHING MACHINE
22 Basic operation
23 Cycle guide
24 Main cycle
24 - Reduce laundry allergens, Allergiene™
24 - Reduce laundry bacteria, Sanitary
24 - For white fabrics, Bright Whites™
24 - Blankets or bulky items, Bulky/Large
24 - Heavily soiled items, Heavy Duty
24 - Normal items, Cotton/Normal
24 - For towels, Towels
24 - Wrinkle free items, Perm. Press
24 - Items labeled wool or hand-washable, Hand
Wash/Wool
24 - Sheer items, Delicates
24 - Quick wash, Speed Wash
24 - For a few items, Small Load
24 - Drain and spin only, Drain+Spin
25 Cycle modifier buttons
25 Setting options before the cycle
25 - Setting the water temperature, Wash Temp.
25 - Setting spin speed, Spin Speed
25 - Setting soil level of laundry, Soil Level
26 - Set the drying time, Dry
26 - Prewashing, Pre Wash
26 - Rinse, drain and spin only, Rinse + Spin
27 - Adding extra rinse cycle, Extra Rinse
27 - Presetting the start time, Delay Wash
27 - High temperature, Steam
27 - Saving energy, Cold Wash™
27 - Saving time, Turbo Wash™
28 Setting options during the cycle
28 - Button lock feature, Child Lock
28 - Saving a customized wash cycle, PGM Save
28 -
Selecting your customized cycle, Custom PGM
28 -
Tumbling clothes to prevent Wrinkles, Fresh Care
28 -
Drum Lighting, Drum Light
29 MAINTENANCE
29 Care
29 - Care after wash
29 - Care in cold climates
30 Cleaning
30 - Cleaning the drum, Tub Clean
31 - Cleaning the detergent dispenser drawer
32 - Cleaning the water inlet filters
33 - Cleaning the drain pump filter
33 - Cleaning the door seal
34 TROUBLESHOOTING
34 Checking error messages
35 Before calling for service
36 SPECIFICATIONS
37 SMART DIAGNOSIS™ FUNCTION
38 WARRANTY
MFL67737658_E_A5.indd 2 2018. 7. 2. 오전 10:12

3
ENGLISH
PRODUCT FEATURES
PRODUCT FEATURES
INVERTER DIRECT-DRIVE MOTOR
The inverter direct drive motor, which is directly connected to the drum, is capable of producing multiple
distinct motions for optimal wash performance with very little noise and vibration. The motor assembly
also contains fewer moving parts, resulting in fewer repairs.
Smart Diagnosis™
Should you experience any technical difficulty with your washing machine, it has the capability of
transmitting diagnostic data to your smart phone via a free app or directly to the Customer Information
Center for quick and efficient troubleshooting (refer to page 37).
TUB CLEAN
Regular cleaning of the tub on a monthly basis using TUB CLEAN can help keep the tub clean and fresh.
MAGNETIC DOOR PLUNGER
Safely and conveniently secure the door slightly ajar with the magnetic door plunger. This will promote air
circulation and allow the interior of the machine to dry. To use this feature, remove the clean laundry then
position the door so that the door is almost closed. When the magnetic door plunger comes into contact
with the metal washer cabinet, it will secure the door slightly open allowing the interior of the washer to
dry.
LARGE CAPACITY STAINLESS STEEL DRUM
The large capacity stainless steel drum offers extreme durability and is tilted to improve efficiency and
allow easier access for large items.
CHILD LOCK
Use this option to disable the controls during a wash cycle. This option can prevent children from
changing cycles or operating the machine.
DETERGENT DISPENSER DRAWER
The four-compartment dispenser drawer makes it easy to separate the pre-wash detergent, the main
laundry detergent, liquid bleach, and fabric softener into different compartments and will be dispensed
automatically at the appropriate time.
HIGH TEMPERATURE STEAM CYCLES
During LG’s unique high-temperature steam cycles, the hot steam helps to remove tough stains.
MFL67737658_E_A5.indd 3 2018. 7. 2. 오전 10:12

4
IMPORTANT SAFETY INSTRUCTIONS
IMPORTANT SAFETY INSTRUCTIONS
READ ALL INSTRUCTIONS BEFORE USE
WARNING
For your safety, the information in this manual must be followed to minimize the risk of fire,
explosion, or electric shock, or to prevent property damage, injury to persons, or death.
Your safety and the safety of others are very important.
We have provided many important safety messages in this manual and on your appliance. Always read
and obey all safety messages.
This is the safety alert symbol.
This symbol alerts you to potential hazards that can kill or hurt you and others.
All safety messages will follow the safety alert symbol and either the word WARNING or CAUTION.
These words mean:
WARNING
You can be killed or seriously injured if you don’t follow instructions.
CAUTION
You may be slightly injured or cause damage to the product if you do not follow instructions.
All safety messages will tell you what the potential hazard is, tell you how to reduce the chance of
injury, and tell you what can happen if the instructions are not followed.
BASIC SAFETY PRECAUTIONS
WARNING
To reduce the risk of fire, electric shock, or injury to persons when using this appliance, follow basic
precautions, including the following :
• Use this appliance only for its intended purpose as
described in this owner’s manual.
• Before use, the washer must be properly installed as
described in this manual.
• Do not wash articles that have been previously cleaned
in, washed in, soaked in, or spotted with gasoline, dry
cleaning solvents, or other flammable or explosive
substances, as they give off vapors that could ignite
or explode.
• Do not add gasoline, dry cleaning solvents, or other
flammable or explosive substances to the wash water.
These substances give off vapors that could ignite or
explode.
• Under certain conditions, hydrogen gas may be
produced in a hot water system that has not been
used for 2 weeks or more. HYDROGEN GAS IS
EXPLOSIVE. If the hot water system has not been used
for such a period, before using the washer, turn on all
hot water faucets and let the water flow from each for
several minutes. This will release any accumulated
hydrogen gas. As the gas is flammable, do not smoke
or use an open flame during this time.
• Do not allow children to play on or in the washer. Close
supervision of children is necessary when the washer is
used near children.
• Before the washer is removed from service or
discarded, remove the lid to prevent children from
climbing inside.
• Do not install or store the washer where it will be
exposed to the weather or freezing temperatures.
• Do not tamper with controls.
• Keep the area underneath and around your
appliances free of combustible materials (lint, paper,
rags, etc.), gasoline, chemicals and other flammable
vapors and liquids.
• Do not repair or replace any part of the washer or
attempt any servicing other than as described in this
manual. We strongly recommend that any service be
performed by a qualified technician.
• See Installation Instructions for grounding requirements.
• ALWAYS follow the fabric care instructions supplied by
the garment manufacturer.
• Do not place items exposed to cooking oil in your
washer. Items contaminated with cooking oils may
contribute to a chemical reaction that could cause a
load to catch fire.
• Use fabric softeners or products to eliminate static only
as recommended by the manufacturer.
• This washer is not designed for maritime use or for
mobile installations such as in RVs, aircraft, etc.
• Turn off the water faucets and unplug the washer if the
machine is to be left for an extended period of time,
such as during vacations.
• Packaging material can be dangerous for children.
There is a risk of suffocation! Keep all packaging from
children.
• Always check the inside of the washer for foreign
objects before loading laundry. Keep the lid closed when
not in use.
• Do not reach into the appliance if the tub or agitator is
moving.
MFL67737658_E_A5.indd 4 2018. 7. 2. 오전 10:12

5
ENGLISH
IMPORTANT SAFETY INSTRUCTIONS
IMPORTANT SAFETY INSTRUCTIONS
READ ALL INSTRUCTIONS BEFORE USE
WARNING
For your safety, the information in this manual must be followed to minimize the risk of fire,
explosion, or electric shock, or to prevent property damage, injury to persons, or death.
GROUNDING INSTRUCTIONS
This appliance must be grounded. In the event of malfunction or breakdown, grounding will reduce the
risk of electric shock by providing a path of least resistance for electric current. This appliance is equipped
with a cord having an equipment-grounding conductor and grounding plug. The plug must be plugged
into an appropriate outlet that is properly installed and grounded in accordance with all local codes and
ordinances.
WARNING
Improper connection of the equipment-grounding conductor can result in risk of electric shock. Check with
a qualified electrician or servicer if you are in doubt as to whether the appliance is properly grounded. Do
not modify the plug provided with the appliance. If it does not fit the outlet, have a proper outlet installed
by a qualified electrician. Failure to follow these warnings can cause serious injury, fire, electric shock, or
death.
MFL67737658_E_A5.indd 5 2018. 7. 2. 오전 10:12

6
IMPORTANT SAFETY INSTRUCTIONS
IMPORTANT SAFETY INSTRUCTIONS
READ ALL INSTRUCTIONS BEFORE USE
WARNING
For your safety, the information in this manual must be followed to minimize the risk of fire,
explosion, or electric shock, or to prevent property damage, injury to persons, or death.
SAFETY INSTRUCTIONS FOR INSTALLATION
WARNING
To reduce the risk of fire, electric shock, or injury to persons when using this appliance, follow basic
precautions, including the following :
• Refer to the INSTALLATION INSTRUCTIONS for
detailed grounding procedures. Installation
instructions are packed with the washer for the
installer’s reference. If the washer is moved to a
new location, have it checked and reinstalled by
a qualified service technician. Failure to follow
this warning can cause serious injury, fire,
electric shock, or death.
• Do not, under any circumstances, cut or remove
the third (ground) prong from the power cord.
Failure to follow this warning can cause serious
injury, fire, electric shock, or death.
• For personal safety, this appliance must be
properly grounded. Failure to follow this warning
can cause serious injury, fire, electric shock, or
death.
• The power cord of this appliance is equipped with
a 3-prong (grounding) plug which mates with a
standard 3-prong (grounding) wall outlet to
minimize the possibility of electric shock from
this appliance.
• This washer must be plugged into a 120 VAC, 60
Hz grounded outlet. Failure to follow this
warning can cause serious injury, fire, electric
shock, or death.
• Have the wall outlet and circuit checked by a
qualified electrician to make sure the outlet is
properly grounded. Failure to follow this warning
can cause serious injury, fire, electric shock, or
death.
• Where a standard 2-prong wall outlet is
encountered, it is your personal responsibility and
obligation to have it replaced with a properly
grounded 3-prong wall outlet. Failure to follow
this warning can cause serious injury, fire,
electric shock, or death.
• Do not install on carpet. Install washer on a solid
floor. Failure to follow this warning can cause
serious leak damage.
• Do not remove ground prong. Do not use an
adapter or extension cord. Plug into a grounded
3-prong outlet. Failure to follow these warnings
can cause serious injury, fire, electric shock, or
death.
• The washer should always be plugged into its own
individual electrical outlet which has a voltage
rating that matches the rating plate. This provides
the best performance and also prevents
overloading house wiring circuits which could
cause a fire hazard from overheated wires.
• Never unplug your washer by pulling on the power
cord. Always grip the plug firmly and pull
straight out from the outlet. Failure to follow
this warning can cause serious injury, fire,
electric shock, or death.
• Repair or immediately replace all power cords
that have become frayed or otherwise damaged.
Do not use a cord that shows cracks or abrasion
damage along its length or at either end. Failure to
follow this warning can cause serious injury,
fire, electric shock, or death.
• When installing or moving the washer, be careful
not to pinch, crush, or damage the power cord.
Failure to follow this warning can cause serious
injury, fire, electric shock, or death.
• The washer must be installed and electrically
grounded by a qualified service person in
accordance with local codes to prevent shock
hazard and assure stability during operation.
• The washer is heavy. Two or more people may be
needed to install and move the appliance. Failure
to do so can result in back or other injury.
• Store and install the washer where it will not be
exposed to temperatures below freezing or
exposed to outdoor weather conditions. Failure to
follow this warning can cause serious leak
damage.
• To reduce the risk of electric shock, do not install
the washer in humid spaces. Failure to follow this
warning can cause serious injury, fire, electric
shock, or death.
• To reduce the risk of injury to persons, adhere to
all industry recommended safety procedures
including the use of long sleeved gloves and safety
glasses. Failure to follow all of the safety
warnings in this manual could result in property
damage, injury to persons or death.
MFL67737658_E_A5.indd 6 2018. 7. 2. 오전 10:12

7
ENGLISH
IMPORTANT SAFETY INSTRUCTIONS
IMPORTANT SAFETY INSTRUCTIONS
READ ALL INSTRUCTIONS BEFORE USE
WARNING
For your safety, the information in this manual must be followed to minimize the risk of fire,
explosion, or electric shock, or to prevent property damage, injury to persons, or death.
SAFETY INSTRUCTIONS FOR USE, CARE, CLEANING, AND DISPOSAL
WARNING
To reduce the risk of fire, electric shock, or injury to persons when using this appliance, follow basic
precautions, including the following :
SAVE THESE INSTRUCTIONS
• Unplug the washer before cleaning to avoid the
risk of electric shock.
• Never use harsh chemicals, abrasive cleaners, or
solvents to clean the washer. They will damage
the finish.
• Do not put oily or greasy rags or clothing on top of
the washer. These substances give off vapors
that could ignite the materials.
• Do not wash items that are soiled with vegetable
or cooking oil. These items may contain some oil
after laundering. Due to the remaining oil, the
fabric may smoke or catch fire by itself.
• Disconnect this appliance from the power supply
before attempting any user maintenance. Turning
the controls to the OFF position does not
disconnect this appliance from the power supply.
Failure to follow this warning can cause serious
injury, fire, electric shock, or death.
• Do not combine laundry products for use in one
load unless specified on the label.
• Do not mix chlorine bleach with ammonia or acids
such as vinegar. Follow package directions when
using laundry products. Incorrect usage can
produce poisonous gas, resulting in serious
injury or death.
• Do not reach into the washer while parts are
moving. Before loading, unloading, or adding
items, press the START/PAUSE button and allow
the drum to coast to a complete stop before
reaching inside. Failure to follow this warning
can cause serious injury, fire, electric shock, or
death.
• Do not allow children to play on or in the washer.
Close supervision of children is necessary when
the washer is used near children. As children
grow, teach them the proper, safe use of all
appliances. Failure to comply with these
warnings could result in serious injury to
persons or death.
• Destroy the carton, plastic bag, and other packing
materials after the washer is unpacked. Children
might use them for play. Cartons covered with
rugs, bedspreads, or plastic sheets can become
airtight chambers. Failure to comply with these
warnings could result in serious injury to
persons or death.
• Keep laundry products out of children’s reach. To
prevent injury to persons, observe all warnings on
product labels. Failure to comply with these
warnings could result in serious injury to
persons or death.
• Before your washer is removed from service or
discarded, remove the door to the washing
compartment to avoid the danger of children or
small animals getting trapped inside Failure to do
so can result in serious injury to persons or
death.
• Make sure the dispenser drawer is closed at all
times when not being filled with laundry products.
Failure to keep the drawer closed can result in
personal injury or flooding.
MFL67737658_E_A5.indd 7 2018. 7. 2. 오전 10:12
8
INTRODUCING YOUR WASHING MACHINE
NOTE
y
Contact LG Customer Service at 1-800-243-0000 (1-888-542-2623 in Canada) if any accessories are
missing.
y
For your safety and for extended product life, use only authorized components. The manufacturer
is not responsible for product malfunction or accidents caused by the use of separately purchased
unauthorized components or parts.
y
The images in this guide may be different from the actual components and accessories, and are subject
to change by the manufacturer without prior notice for product improvement purposes.
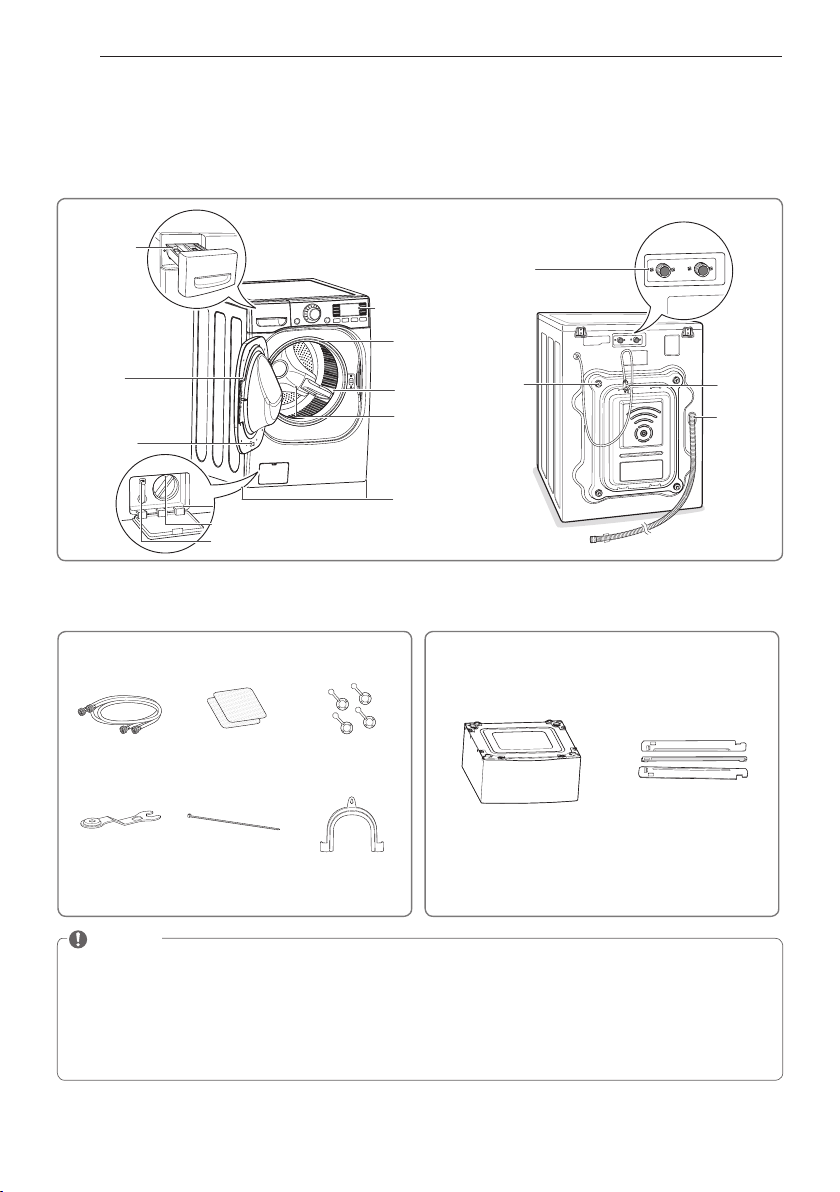
INTRODUCING YOUR WASHING MACHINE
Parts and Accessories
Parts
Accessories
Detergent
dispenser
drawer
(See page 20)
Door
Magnetic
door plunger
(See page 3)
Control panel
(See page 9)
Door seal
Tub
Leveling
feet
Drain pump filter cover
Drain pump filter
Drain hose
Water inlets
Shipping
bolts
Power cord
Drain
hose
Pedestal
(sold separately)
Stacking Kit
(sold separately)
Hot/cold water hoses Non-skid pads
Caps for covering
shipping bolt holes
Wrench Tie strap
Elbow bracket
(for securing drain hose)
Included Accessories Optional Accessories
TurboWash™
Upper Nozzle
MFL67737658_E_A5.indd 8 2018. 7. 2. 오전 10:12
9
ENGLISH
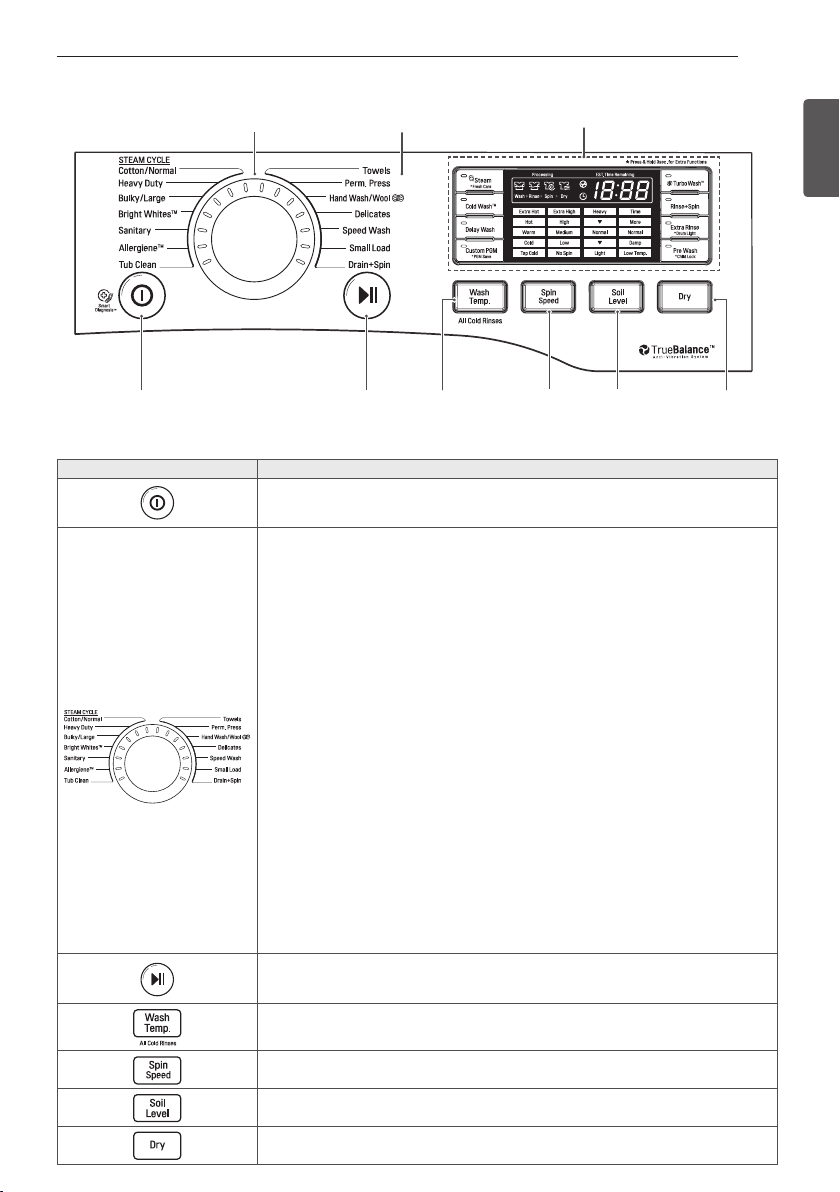
INTRODUCING YOUR WASHING MACHINE
Control Panel Features
Operation
Operation
Display
Cycle selector
Soil
Level
Selection
Button
Dry
Selection
Button
Spin
Speed
Selection
Button
Water
Temperature
Selection
Button
Start/
Pause
Button
Power
Button
Button Description
y
Turns the washing machine on and off.
y
(During the wash cycle) stops operation, and cancels the settings.
y
Tub Clean
- For tub clean. (see page 30.)
y
Allergiene™
- For cotton, underwear. (see page 24.)
y
Sanitary
- For underwear, diapers, etc. (see page 24.)
y
Bright Whites™
- For white fabrics. (see page 24.)
y
Bulky/Large
- For blankets or large, bulky items. (see page 24.)
y
Heavy Duty
- For heavily soiled cotton fabric. (see page 24.)
y
Cotton/Normal
- For general laundry, such as cotton T-shirts or towels. (see page 24.)
y
Towels
- For towels. (see page 24.)
y
Perm. Press
- For wrinkle-free fabrics. (see page 24.)
y
Hand Wash/Wool
- For wool or hand-wash fabrics. (see page 24.)
y
Delicates
- For sheer and delicate fabrics. (see page 24.)
y
Speed Wash
- For small quantities of lightly soiled items. (see page 24.)
y
Small Load
- For a few items. (see page 24.)
y
Drain+Spin
- For items that only require draining and spinning. (see page 24.)
y
Starts or pauses the wash cycle.
- If you do not press the Start/Pause button within 4 minutes of selecting a cycle, the
washing machine will turn off automatically and all settings will be lost.
y
(Press repeatedly) Selects the water temperature for the wash cycle. (see page 25.)
- Select water temperature from 5 settings.
y
(Press repeatedly) Selects the spin speed. (see page 25.)
- Selects spin speed from 5 settings.
y
(Press repeatedly) Selects a wash cycle by soil level. (see page 25.)
- Selects soil level from 5 settings.
y
(Press repeatedly) Selects a dry cycle. Pressing this button enables drying.
(See page 26.)
MFL67737658_E_A5.indd 9 2018. 7. 2. 오전 10:12
10
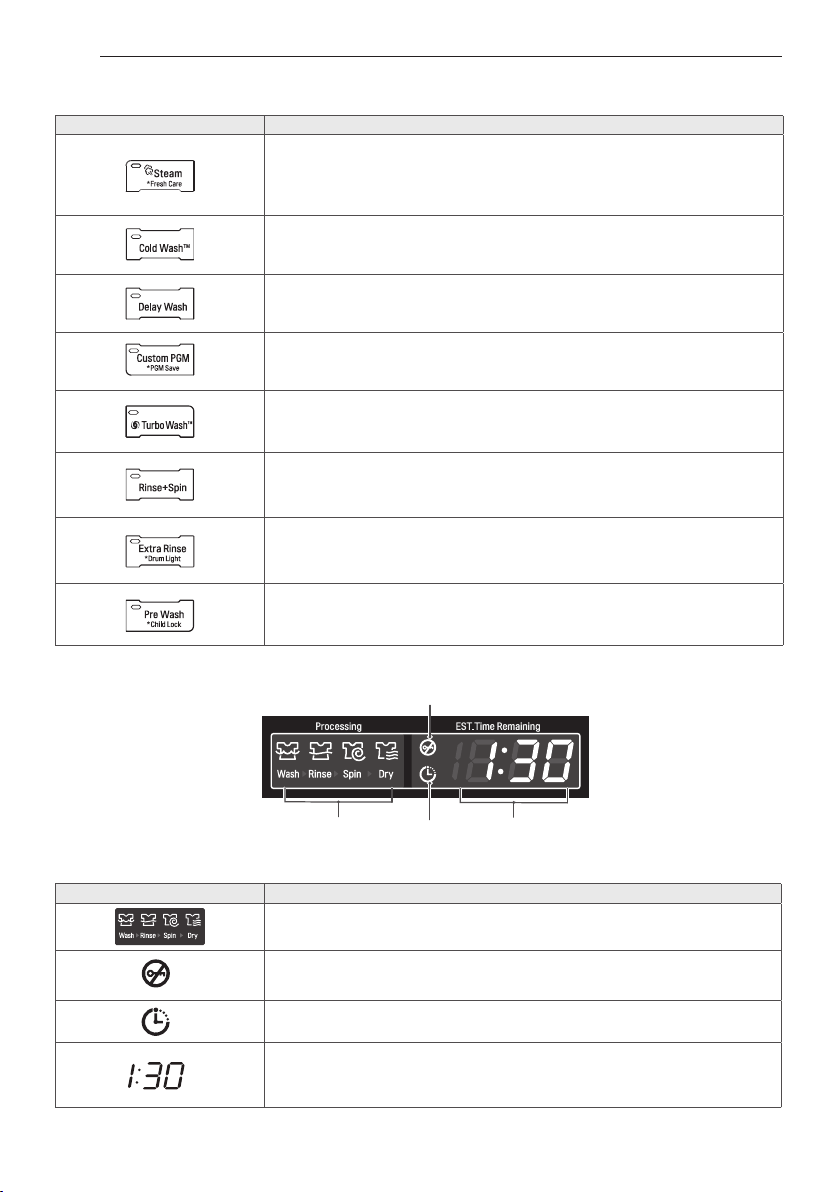
INTRODUCING YOUR WASHING MACHINE
Display
Operation (continued)
Button Description
y
(Press before starting wash cycle) Use this option to add steam for
extra cleaning power. (see page 27.)
y
(Press and hold before starting wash cycle) Tumbles clothes after
cycle finishes to prevent wrinkles. (see page 28.)
y
Use this option to save on energy consumption. (see page 27.)
y
Set the delay time of starting the cycle. (see page 27.)
y
Use this option to save a special combination of settings that you use
frequently. (see page 28.)
y
Use this option to save time. (see page 27.)
y
Use this option to rinse detergent from the load. (see page 26.)
y
(Press before wash cycle) Add an extra rinse to the selected cycle. (see page 27.)
y
(Press and hold during wash cycle) The drum is equipped with a white
LED light that illuminates when the washer is turned on. (see page 28.)
y
(Press before wash cycle) Pre-wash heavily soiled laundry. (see page 26.)
y
(Press and hold during wash cycle) Lock/Unlock the buttons. (see page 28.)
Display Icon Description
y
This portion of the display shows which stage of the wash cycle is
currently underway (Wash, Rinse, Spin, Dry).
y
This indicator shows that the door is locked. The washer door will lock while
the washer is operating. The door can be unlocked by pressing the START/
PAUSE button to stop the washer.
y
This indicator shows that the washer has been set for Delay Wash. The
washer will start automatically after the set delay time has passed.
y
When the START/PAUSE button is pressed, the washer automatically
detects the wash load (weight) and optimizes the washing time, based
on the selected cycle and options. The display will then indicate the
estimated time remaining for the selected wash cycle.
Door lock indicator
Estimated time remaining/
error message display
(See page 34)
Cycle
process
indicator
Delay
wash
indicator
MFL67737658_E_A5.indd 10 2018. 7. 2. 오전 10:12
11
ENGLISH
INSTALLATION INSTRUCTIONS
INSTALLATION INSTRUCTIONS
Preview Installation Order
WARNING
y
Washer is heavy! Two or more people are required when moving and unpacking the washer.
Failure
to follow this warning can result in back or other injury.
y
Store and install the washer where it will not be exposed to temperatures below freezing or exposed
to outdoor weather conditions.
Failure to follow this warning can cause serious injury, fire, electric
shock, or death.
y
Properly ground washer to conform with all governing codes and ordinances.
Failure to follow this
warning can cause serious injury, fire, electric shock, or death.
y
To reduce the risk of electric shock, do not install the washer in humid spaces.
Failure to follow this
warning can cause serious injury, fire, electric shock, or death.
y
The base opening must not be obstructed by carpeting when the washer is installed on a carpeted
floor.
y
Do not remove ground prong. Do not use an adapter or extension cord. Plug into a grounded 3-prong
outlet.
Failure to follow this warning can cause serious injury, fire, electric shock, or death.
y
Certain internal parts are intentionally not grounded and may present a risk of electric shock only during
servicing. Service personnel - Do not contact the following parts while the appliance is energized: pump,
valve, motor, control board.
Checking and choosing
the proper location
Unpacking and removing
shipping bolts
Connecting
the water line
Connecting
the drain line
Leveling the
washing machine
Plugging in the power
cord and grounding
Test run
MFL67737658_E_A5.indd 11 2018. 7. 2. 오전 10:12
12
INSTALLATION INSTRUCTIONS
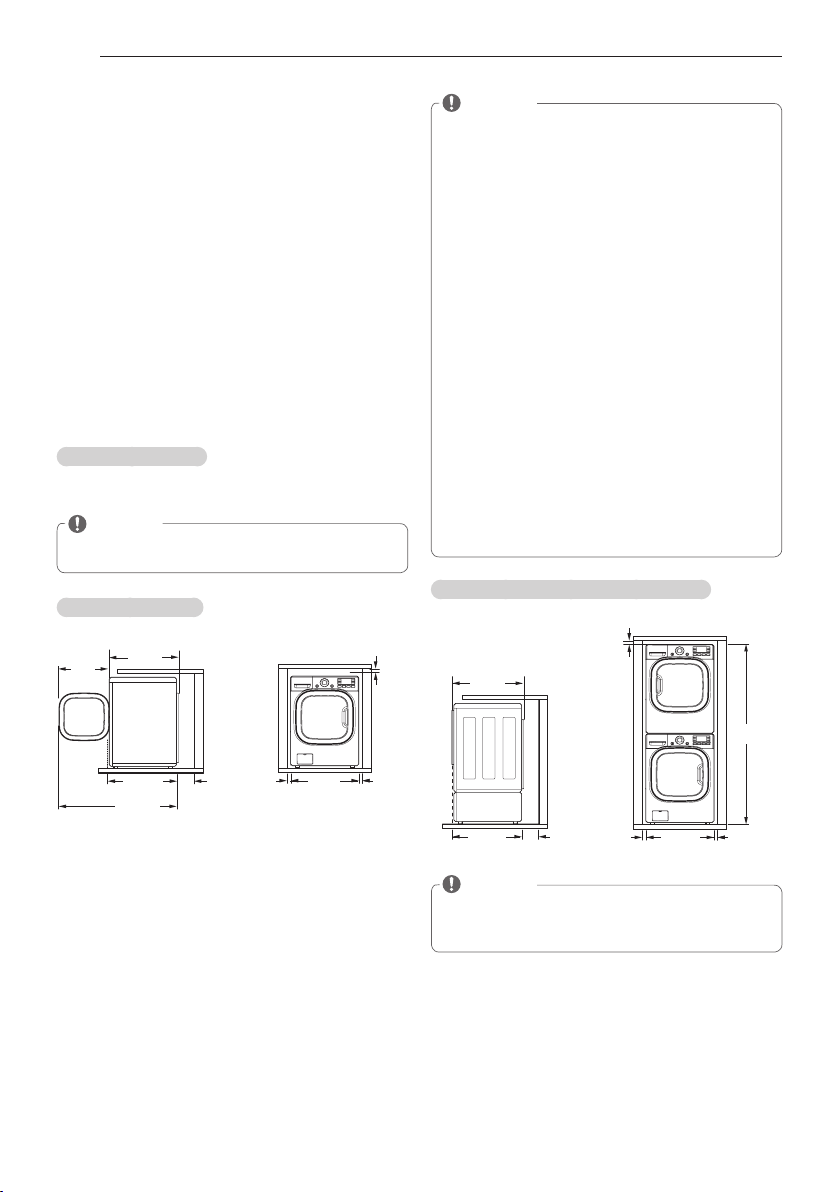
Checking and Choosing the Proper
Location
Install the washing machine on a solid floor that
is strong and rigid enough to support the weight
of the washing machine, even when fully loaded,
without flexing or bouncing. If the floor has too
much flex, you may need to reinforce it to make
it more rigid. If the floor is not solid, it may cause
severe vibration and noise.
1
Clean the floor before installation.
- Make sure to select solid and smooth ground.
2
Two or more people are needed for moving and
unpacking the washing machine.
3
Allow for sufficient space between the walls and
the washing machine for installation.
Space requirements
You must allow sufficient space for water lines,
the drain line, and airflow.
NOTE
y
Be sure to allow for wall, door, or floor
moldings that may incr he required clearances.
Installing on a floor
4"
(10 cm)
21 ¼"
(54 cm)
29 ¾"
(75.6 cm)
52 "
(132.2 cm)
30 ½"
(77 cm)
27"
(68.6 cm)
1"
(2.5 cm)
1"
(2.5 cm)
0.2"
(0.5 cm)
NOTE
y
The floor must be strong and rigid enough to
support the weight of the washer, when fully
loaded, without flexing or bouncing. If your
floor has too much flex,
you may need to reinforce it to make it more
rigid.
A floor that is adequate for a top-loading
washer may not be rigid enough for a front
loading washer, due to the difference in the
spin speed and direction. If the floor is not
solid, your washer may vibrate and you may
hear and feel the vibration throughout your
house.
y
Before installing the washer, make sure the
floor is clean, dry and free of dust, dirt, water
and oils so the washer feet can not slide easily.
Leveling feet that can move or slide on the
floor can contribute to excess vibration and
noise due to poor contact with the floor.
y
If a drip pan must be used, take extra care
to follow the instructions provided with the
drip pan and make sure the leveling feet are
adjusted for firm and even contact with the
pan. Use of drip pans and failure to properly
level the machine may result in increased
vibration and noise during operation.
Installing on a pedestal or stacking kit
29 ¾"
(75.6 cm)
4"
(10 cm)
30 ½"
(77 cm)
27"
(68.6 cm)
2"
(5 cm)
2"
(5 cm)
77
1
/2"
(196.8 cm)
0.2"
(0.5 cm)
NOTE
y
Refer to the instructions packaged with the
optional PEDESTAL or STACKING KIT before
installing with a PEDESTAL or a STACKING KIT.
MFL67737658_E_A5.indd 12 2018. 7. 2. 오전 10:12
13
ENGLISH
1
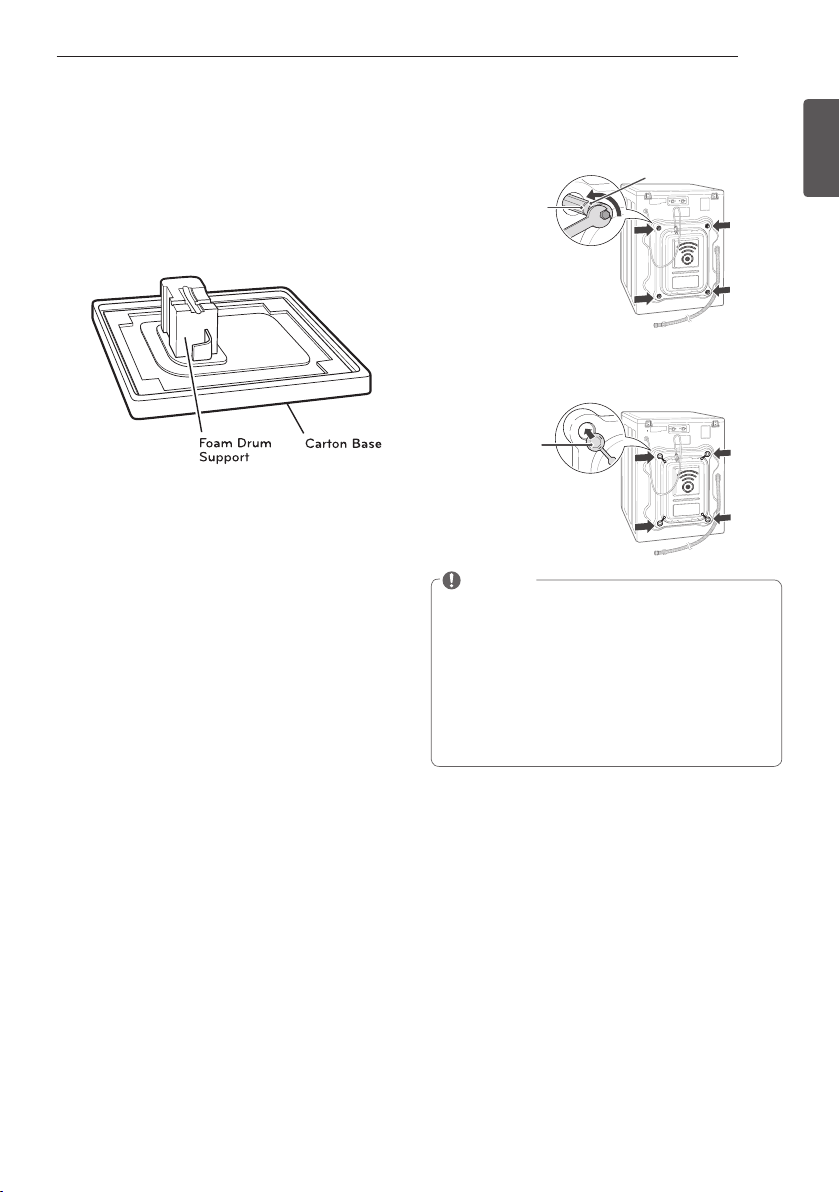
Remove the bottom two shipping bolts with the
wrench (included). Fully loosen all four shipping
bolts by turning them counterclockwise, and
then pull them out.
Shipping
bolt
Retainer
2
Locate the four hole caps included in the
accessory pack and install them in the shipping
bolt holes.
Cap
NOTE
y
Save the bolt assemblies for future use. To
prevent damage to internal components, do
not transport the washer without reinstalling
the shipping bolts.
y
Failure to remove shipping bolts and retainers
may cause severe vibration and noise, which
can lead to permanent damage to the washer.
The cord is secured to the back of the washer
with a shipping bolt to help prevent operation
with shipping bolts in place.
INSTALLATION INSTRUCTIONS
Unpacking and Removing Shipping
Bolts
When removing the washer from the carton base,
be sure to remove the foam drum support in the
middle of the carton base.
If you must lay the washer down to remove the
base packaging materials, always lay it carefully on
its side. Do not lay the washer on its front or back.
MFL67737658_E_A5.indd 13 2018. 7. 2. 오전 10:12
14
4
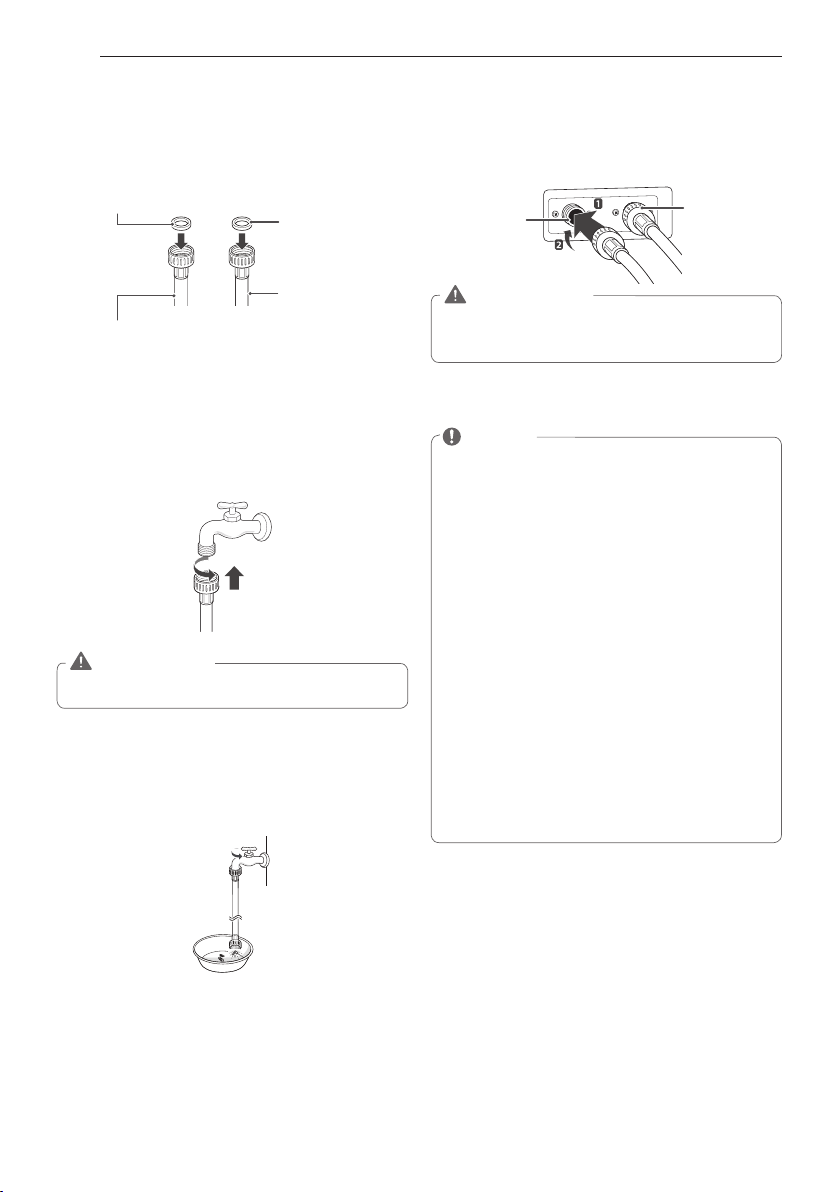
Connect the hoses to the water inlets tightly by
hand and then tighten another 2/3 turn with pliers.
- Connect the blue hose to the cold water inlet
and the red hose to the hot water inlet.
Cold
water
inlet
Hot
water
inlet
WARNING
y
Do not overtighten the hoses.
Overtightening
can damage the valves resulting in leaking
and property damage.
5
Check for leaks by turning on the faucets.
- If water leaks, check steps 1 to 4 again.
NOTE
y
For your safety, and for extended Product
life, we recommend using high-quality LG
components. LG is Not responsible for
product Malfunction or damage caused by
the use of separately purchased Non-LG
parts.
y
Use new hoses when installing the washing
machine. Do not reuse old hoses.
y
Contact LG Customer Service for Assistance
in buying hoses : 1-800-243-0000.
y
Periodically check the hoses for cracks,
leaks and wear, and replace the hoses every
5 years. Do not stretch the water hoses
intentionally, and make sure that they are
not crushed by other objects.
y
Water supply pressure must be between 20
psi and 120 psi (138 – 827 kPA). If the Water
supply pressure is more than 120 psi, a
Pressure reducing valve must be installed.
y
To provide optimum washing performance
the hot water temperature should be set at
120 – 135°C (48-57°C) and the cold at 60°C
(15°C).
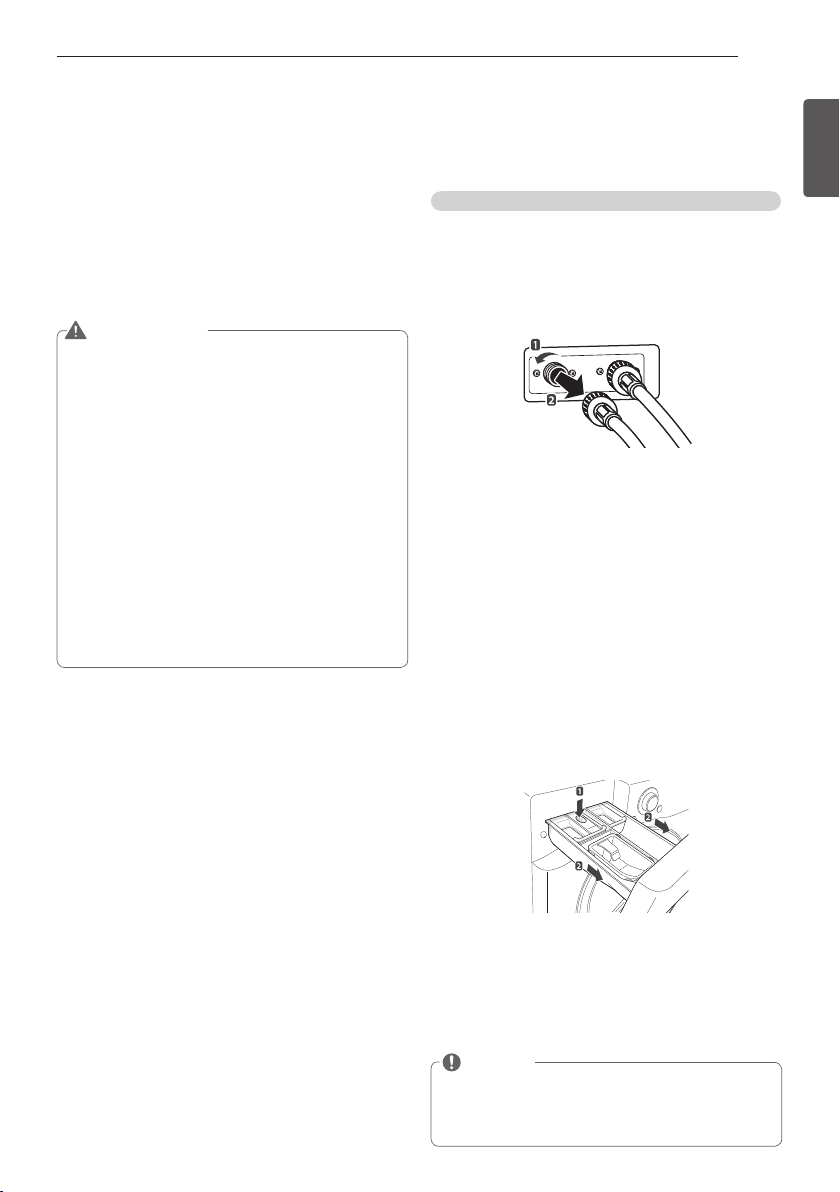
INSTALLATION INSTRUCTIONS
Connecting the Water Lines
1
Check the rubber seals on both sides of the hose.
- Insert a rubber seal into the threaded fittings on
each hose to prevent leaking.
Rubber seal
Water hose
(To water inlet on the
washing machine)
Rubber seal
Water hose
(To faucet)
2
Connect the water supply hoses to the HOT and
COLD water faucets tightly by hand and then
tighten another 2/3 turn with pliers.
- Connect the blue hose to a cold water faucet
and the red hose to a hot water faucet.
WARNING
y
Do not overtighten. Damage to the coupling
can result.
3
After connecting the inlet hoses to the water
faucets, turn on the water faucets to flush out
foreign substances (dirt, sand or sawdust) in the
water lines. Let the water drain into a bucket, and
check the water temperature.
MFL67737658_E_A5.indd 14 2018. 7. 2. 오전 10:12

15
ENGLISH
INSTALLATION INSTRUCTIONS
Connecting the Drain Line
Secure the drain hose in place to prevent moving
and leaking.
NOTE
y
The drain hose should be properly secured.
Failure to properly secure the drain hose can
result in flooding and malfunction.
y
Total height of the hose end should not exceed
96 inches (244.8 cm) from the bottom of the
washer.
y
The drain must be installed in accordance with
any applicable local codes and regulations.
y
Make sure that the water lines are not
stretched, pinched, crushed, or kinked.
Using a standpipe
1
Clip the end of the hose into the elbow bracket.
- Connect the elbow bracket within 4 inches (10
cm) of the end of the drain hose. If the drain
hose is extended more than 4 inches (10 cm)
beyond the end of the elbow bracket, mold or
microorganisms could spread to the inside of
the washer.
No more than
4 inches (10 cm)
Elbow bracket
2
Insert the end of the drain hose into the
standpipe.
Drain Hose
Elbow Bracket
3
Use a tie strap to secure the drain hose in place.
Using a laundry tub
1
Clip the end of the hose into the elbow bracket.
- Connect the elbow bracket within 4 inches (10
cm) of the end of the drain hose. If the drain
hose is extended more than 4 inches (10 cm)
beyond the end of the elbow bracket, mold or
microorganisms could spread to the inside of
the washer.
No more than
4 inches (10 cm)
Elbow bracket
2
Hang the end of the drain hose over the side of
the laundry tub.
Elbow Bracket
Drain Hose
3
Use a tie strap to secure the drain hose in place.
MFL67737658_E_A5.indd 15 2018. 7. 2. 오전 10:12
16
INSTALLATION INSTRUCTIONS
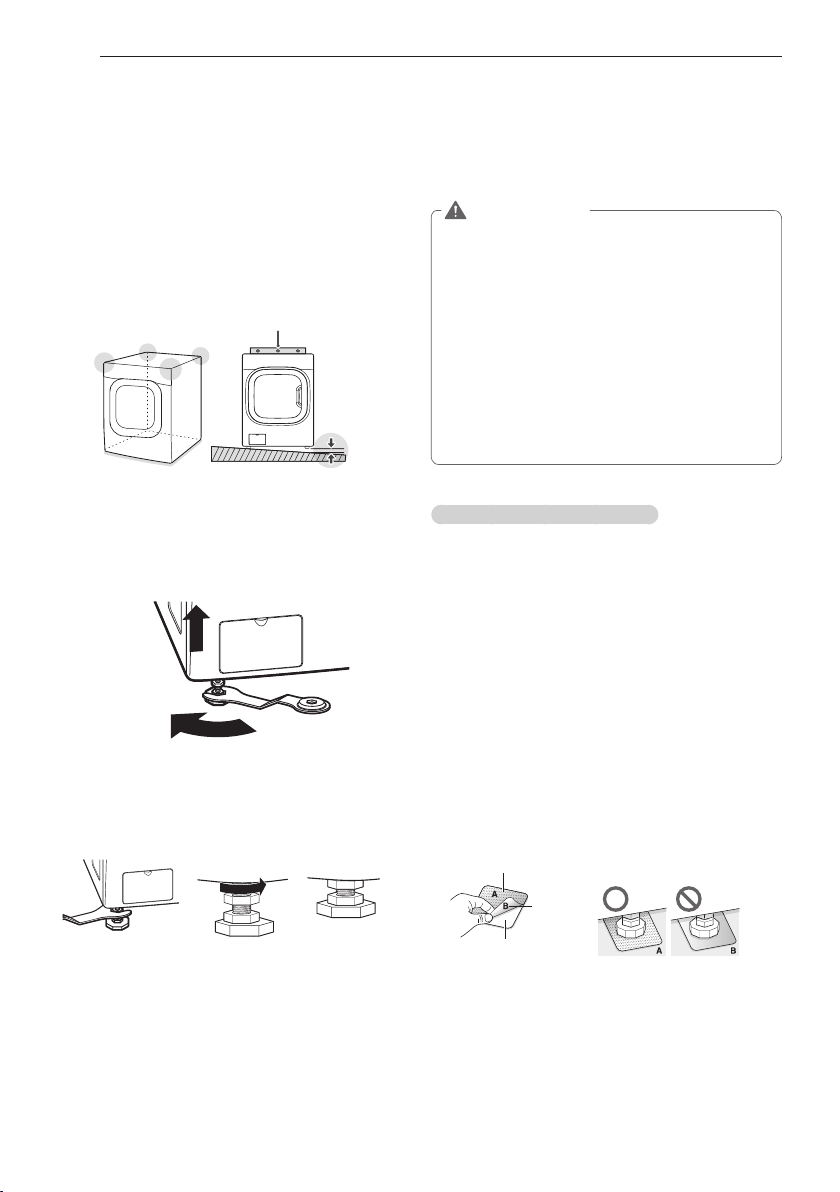
Leveling the Washing Machine
The washer tub of your new washing machine
spins at very high speeds. To minimize vibration,
noise, and unwanted movement, the floor must be
perfectly level and solid.
1
Check that the washing machine is level.
- Ensure it is level by rocking the top edges of
the washing machine or placing a level on
the washing machine. The slope beneath the
washing machine must not exceed 1°, and all
four leveling feet must rest firmly on the floor.
Level
1°
2
Turn the lower leveling feet clockwise to level
the washing machine.
- Turning the lower leveling feet clockwise
raises the washing machine.
Raise
3
Turn the locknuts counterclockwise and tighten
them when the washing machine is level.
Tighten all 4 lock
nuts securely using
the wrench.
4
Check again to make sure the machine is level.
- Push or rock the top edges of the washing
machine gently to make sure that the washing
machine does not rock.
-
If the washing machine rocks, repeat steps 1 to 3.
WARNING
y
Using the washing machine without leveling,
it may result in malfunction caused by the
production of excess vibration and noise.
y
If you are installing the washing machine
on the optional pedestal, you must adjust
the leveling feet on the pedestal to level the
washing machine. The washing machine´s
leveling feet should be minimized and the
locknuts turned counterclockwise to secure
them.
y
Use the leveling feet only when you level the
washing machine. If you raise the leveling feet
unnecessarily, it may cause abnormal vibration
of the washing machine.
Using non-skid pads (optional)
If you install the washing machine on a slippery
surface, it may move because of excessive vibration.
Incorrect leveling may cause malfunction through
noise and vibration. If this occurs, lay the non-skid
pads under the leveling feet and adjust the level.
1
Clean the floor to attach the non-skid pads.
- Use a dry rag to remove and clean foreign
objects or moisture. If moisture remains, the
non-skid pads may slip.
2
Adjust the level after placing the washing
machine in the installation area.
3
Place the adhesive side of the non-skid pad on
the floor.
- It is most effective to install the non-skid pads
under the front legs. If it is hard to place the
pads under the front legs, place them under the
back legs.
Remove
backing
This side up
Adhesive
side
4
Check the washing machine’s level again.
- Push or rock the top edges of the washing
machine gently to make sure that the washing
machine does not rock. If the washing machine
rocks, level the washing machine again.
MFL67737658_E_A5.indd 16 2018. 7. 2. 오전 10:12
17
ENGLISH
INSTALLATION INSTRUCTIONS
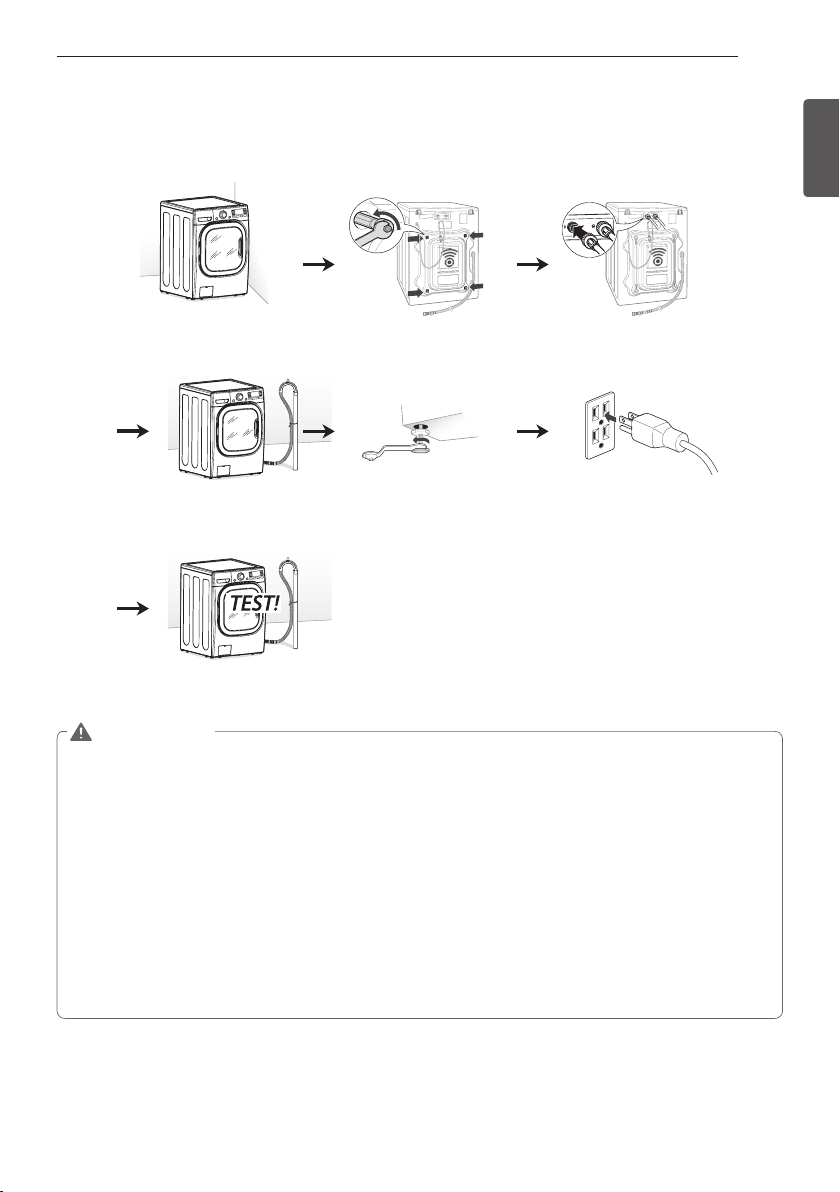
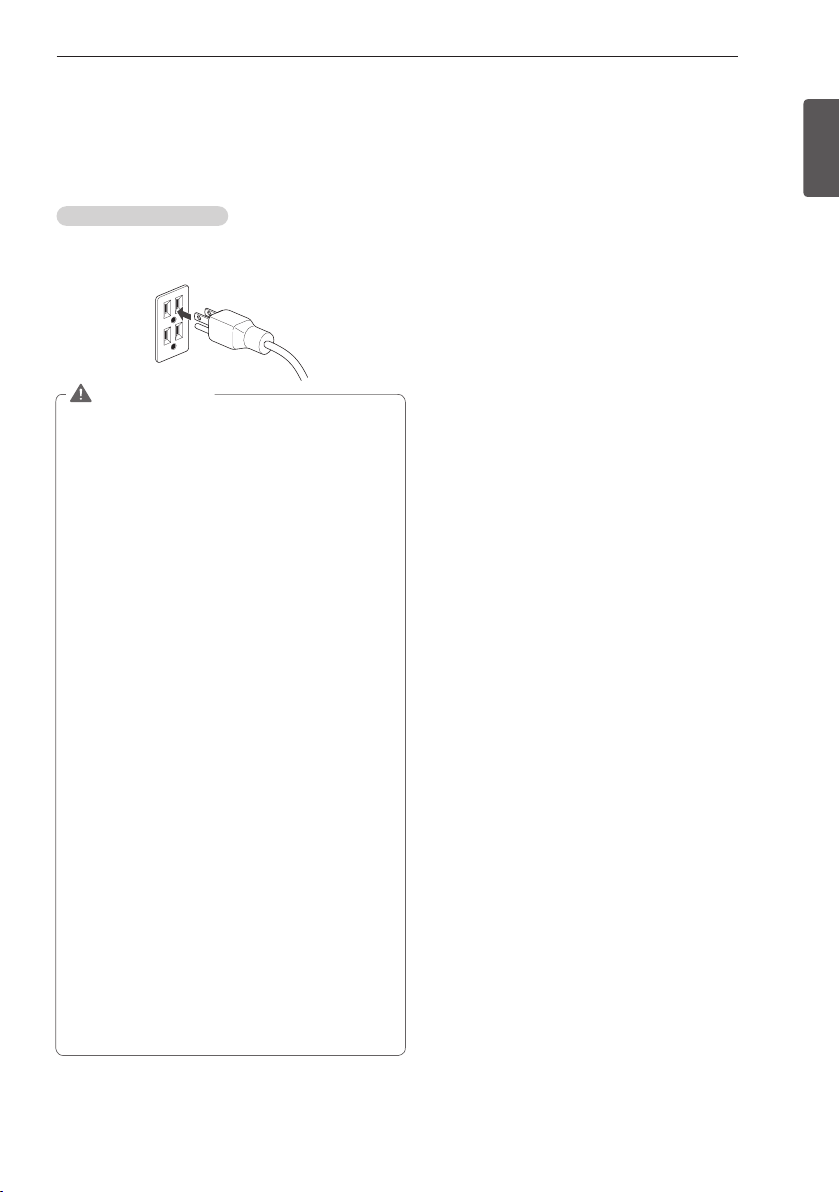
Plugging in the Power Cord and
Grounding
Make sure to ground the washing machine to
prevent a short circuit or an electric shock when
plugging in.
Using a 3-prong outlet
If plugged into a grounded, 3-prong outlet rated
for use with this appliance, no further grounding is
necessary.
WARNING
y
The power outlet must be within 60 inches (1.5
m) of either side of the washer.
y
The appliance and outlet must be positioned
so that the plug is easily accessible.
y
Do not overload the outlet with more than one
appliance.
y
The outlet must be grounded in accordance
with current wiring codes and regulations.
y
Time-delay fuse or circuit breaker is
recommended.
y
It is the personal responsibility and obligation
of the product owner to have a proper outlet
installed by a qualified electrician.
y
Do not use a worn or damaged power cord
or power plug. Replace or repair worn or
damages cords or plugs it immediately. Failure
to do so may result in death, fire, electric
shock, or malfunction.
y
Do not modify the power cord and take care
not to damage it when installing or moving
the washing machine. Failure to follow this
warning may result in death, fire, electric
shock, or malfunction.
y
Make sure that the washing machine is
grounded.
y
Connect this washing machine to a grounded
outlet conforming to the rating prior to use.
Failure to do so may result in fire, electric
shock, or malfunction.
y
Do not use adaptors or extension cords. The
washing machine should always be plugged
into its own individual electrical outlet which
has a voltage rating that matches the rating
plate. Failure to do so may result in fire, electric
shock or malfunction.
y
Do not damage or cut off the ground prong of
the power cord. Doing so may cause death,
fire, electric shock, or product malfunction.
Test run
Check if the washing machine is properly installed
and run a test cycle.
1
Load the washing machine with 6 pounds of
laundry (approximately 14 shirts).
2
Press the Power button and turn the cycle
selector knob to the right.
3
Press the Rinse+Spin button to select Rinse+Spin.
4
Press the Start/Pause button.
- The wash cycle starts.
5
Check if water is supplied, that the washing
machine does not rock or vibrate excessively,
and that it drains well during the spin cycle.
- If water leaks during water supply, see page 14,
Connecting the water lines, to connect them
properly.
- If the washing machine rocks and vibrates
excessively, see page 16, Leveling the washing
machine, to level it again.
- If the drain does not work, see page 15,
Connecting the drain line, to install it properly.
MFL67737658_E_A5.indd 17 2018. 7. 2. 오전 10:12
18
PREPARATION
u
Check all pockets to make sure that they are
empty.
-Items such as clips, matches, pens, coins, and
keys can damage both your washer and your
clothes.
u
Close zippers, hooks, and drawstrings to prevent
these items from snagging or tangling on other
clothes.
u
Pretreat heavily stained areas before washing.
- Doing so will produce clean, stain-free results.
u
Combine large and small items in a load. Load
large items first.
u
Large items should not be more than half of the
total washload.
u
The washer can be fully loaded, but the drum
should not be tightly packed with items.
-The door of the washer should close easily.
u
Do not wash single items, except for bulky items
such as blankets. Make sure to wash laundry in
similar types of loads.
- Washing a single small item may result in the
tub becoming unbalanced, vibrating and making
a noise.
u
Do not wash waterproof clothes.
- This may cause abnormal vibration, or may
cause the load
to bounce, which could damage the tub.
u
Check if there are any foreign objects in the door
seal and take extra care that clothes do not get
caught there.
- Foreign objects in the door seal may stain
clothes, and water may leak if clothes get caught
in the door seal.
u
Wash underwear or small, light items in a laundry
net (mesh bag).
- Small, light items may get caught in the door
seal, and a brassiere hook may damage other
items or the tub.
u
Brush heavy soil, dust, or hair off fabrics before
washing.
- Laundry may not wash clean if there is dirt or
sand on the fabrics, or items may be damaged
due to particles rubbing against sheer fabrics.
u
Wash blankets individually.
- Washing more than one blanket in a load may
produce inferior results due to tangling or an
unbalanced load.
u
Always separate fabrics according to their colors
and wash them separately to prevent colors from
running.
- Fabrics may be damaged or become stained due
to fabric dyes running, or due to foreign objects
transferring from one fabric to another.
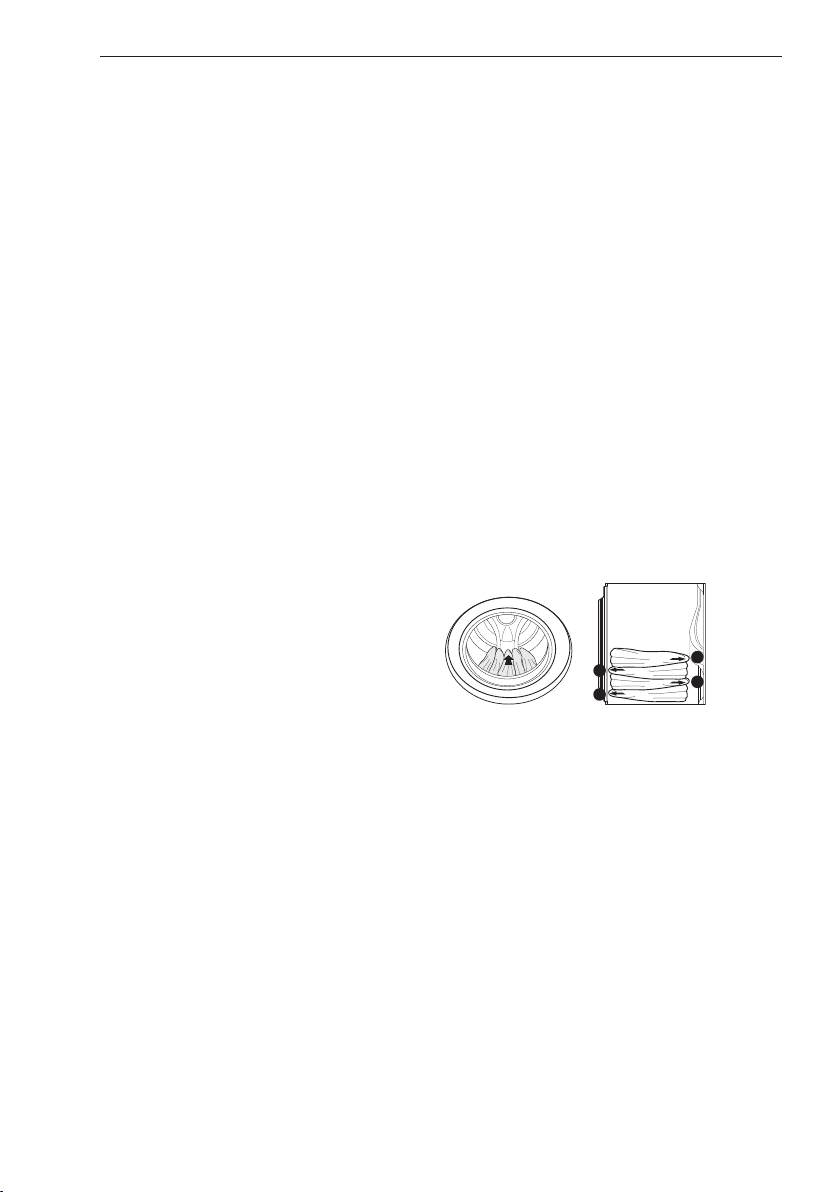
u For best performance, load clothes as shown.
1
3
2
4
- Load clothes loosely, and do not overfill the
drum. Clothes need room to circulate in order
to get clean.
- Do not press down on items while stacking
them in the drum.
PREPARATION
Sorting Wash Loads
Precautions for Fabric Care Before Wash Cycle
Read and observe the following to prevent shrinkage or damage to clothes.
MFL67737658_E_A5.indd 18 2018. 7. 2. 오전 10:12
19
ENGLISH
PREPARATION
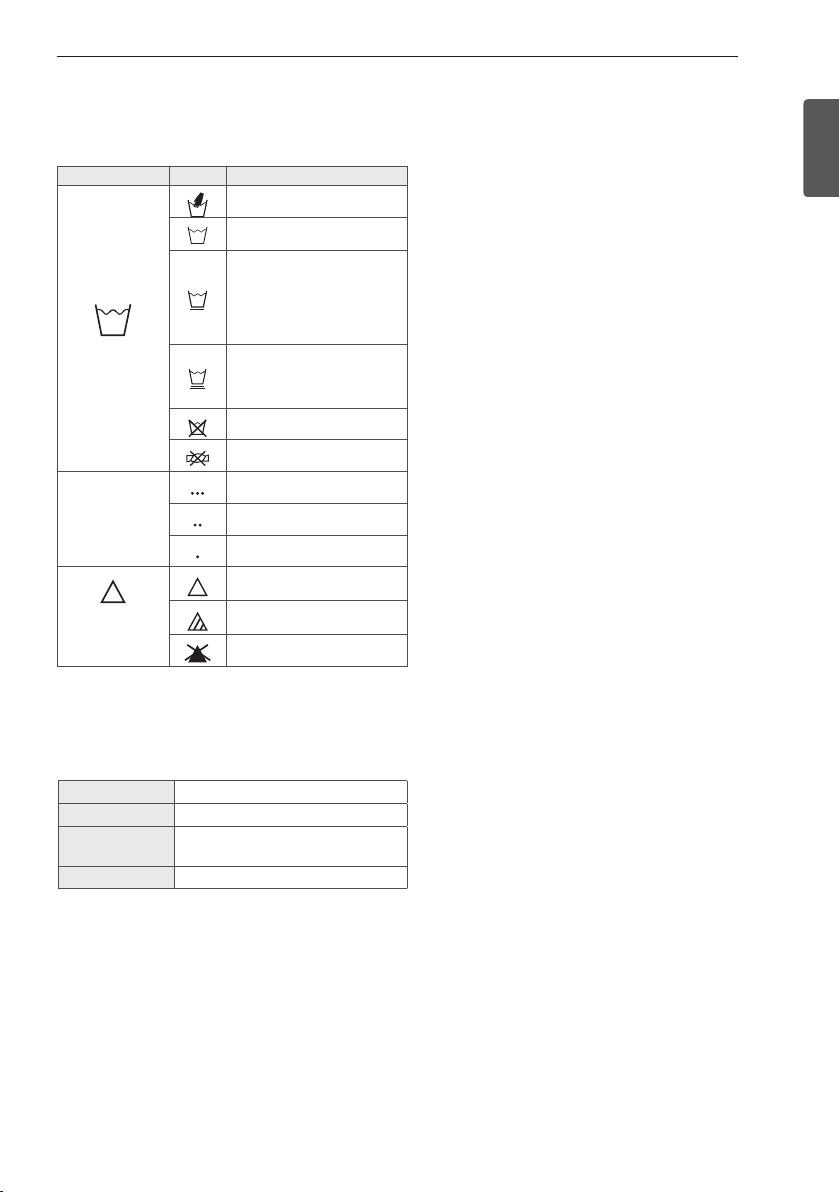
Category Label Directions
Washing
Hand Wash
Machine Wash, Normal
Cycle
Use Permanent Press/
Wrinkle Resistant
washing machine setting
(which has a cool down
or cold spray before the
reduced spin)
Use Gentle/Delicate
washing machine setting
(slow agitation and/ or
reduced wash time).
Do Not Wash
Do Not Wring
Water
Temperature
Hot
Warm
Cold/Cool
Bleach
symbols
Any Bleach (When
Needed)
Only Non-Chlorine
Bleach (When Needed)
Do Not Bleach
Colors Whites / Lights / Darks
Soil Heavy / Normal / Light
Fabric Delicates / Easy Care / Sturdy
Cottons
Lint Lint Producers / Lint Collectors
Fabric Care Labels
Most articles of clothing feature fabric care labels
that include instructions for proper care.
Sorting Laundry
It is recommended that you sort laundry into similar
loads that are washable in the same cycle.
Refer to the following chart for sorting clothes
MFL67737658_E_A5.indd 19 2018. 7. 2. 오전 10:12
20
PREPARATION
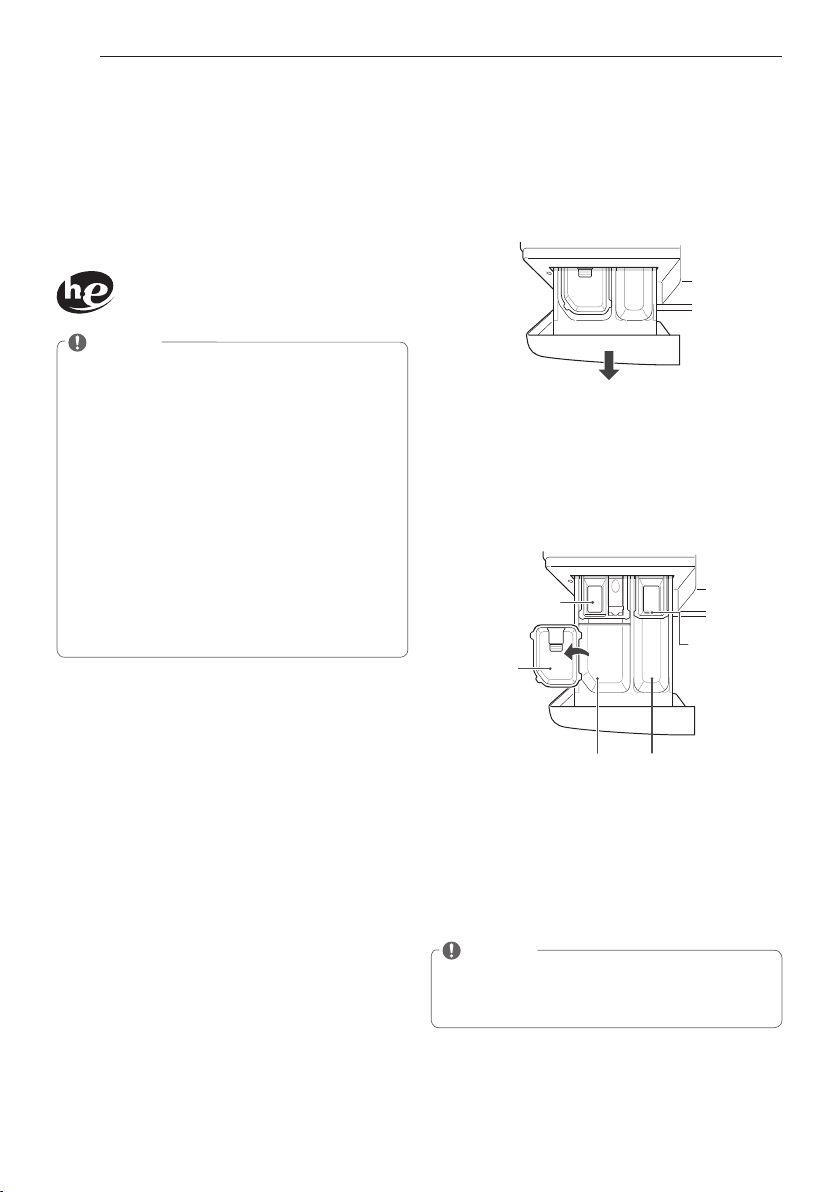
Loading the Dispenser
The detergent dispenser drawer of the washing
machine has a dispenser compartment for
each detergent type. Add each detergent to its
appropriate compartment.
1
Pull out the detergent dispenser drawer.
2
Add each detergent to its appropriate
compartment.
- If you use a liquid detergent, check if the liquid
detergent cup is in place.
- If you use a powdered detergent, remove the
liquid detergent cup and put the powder in the
main wash detergent compartment.
Liquid chlorine bleach
compartment
Liquid
detergent
cup
Main wash
detergent
compartment
Pre-wash
detergent
compartment
Liquid fabric
softener
compartment
3
Close the detergent dispenser drawer slowly.
- Slamming the detergent dispenser drawer
may result in the detergent overflowing into
another compartment or pouring into the tub
earlier than programmed.
NOTE
y
It is normal for a small amount of water to
remain in the dispenser compartments at the
end of the cycle.
Using Detergent/Fabric Softener
Recommended Detergent
Make sure to use HE (High-Efficiency) detergent
for front-loading washing machines. HE detergents
dissolve more efficiently and produce fewer suds
to ensure efficient washing and rinsing. Use the
correct amount of detergent as indicated on the
detergent packaging.
Specially designed to use only
HE (High-Efficiency) detergent
NOTE
y
Only use HE detergents, because using a
regular detergent may produce excessive suds.
y
HE detergents produce fewer suds, dissolve
more efficiently to improve washing and
rinsing performance, and help to keep the
interior of your washer clean.
y
Use less detergent for soft water.
y
Wipe up any spills immediately, as liquids
could damage the finish and the control panel
of the washing machine.
y
Using too much detergent can cause a build-
up in the tub resulting in unsatisfactory
performance and machine malfunction.
y
If you use a detergent that does not dissolve
easily or a detergent with high viscosity, it will
leave a residue on the tub, which may not rinse
properly.
MFL67737658_E_A5.indd 20 2018. 7. 2. 오전 10:12

21
ENGLISH
Liquid Bleach Compartment
This compartment holds liquid chlorine bleach,
which will be dispensed automatically at the proper
time during the wash cycle.
NOTE
y
Do not add powdered or liquid color-safe
bleach to this compartment.
y
Always follow the manufacturer’s
recommendations when adding bleach. Do not
exceed the maximum fill line. Using too much
bleach can damage fabrics.
y
Never pour undiluted liquid chlorine bleach
directly onto the load or into the drum. Fabric
damage can occur.
Fabric Softener Compartment
This compartment holds liquid fabric softener,
which will be automatically dispensed during the
final rinse cycle.
NOTE
y
Always follow the manufacturer’s
recommendations when adding fabric softener.
Do not exceed the maximum fill line. Using
too much fabric softener may result in stained
clothes.
y
Dilute concentrated fabric softeners with warm
water. Do not exceed the maximum fill line.
y
Never pour fabric softener directly onto the
load or into the drum.
Pre-Wash Detergent Compartment
Add liquid or powdered detergent to this
compartment when using the Pre-Wash option.
Always use HE (High-Efficiency) detergent with your
washing machine.
NOTE
y
When using the pre-wash option, if liquid
detergent is to be used for the main wash,
the liquid detergent cup accessory must be
used in the main wash dispenser, to prevent
the main wash liquid detergent from being
dispensed immediately.
y
The amount of detergent added for the Pre-
Wash option is 1⁄2 the amount recommended
for the main wash cycle. For example, if the
main wash cycle requires one measure of
detergent, add 1⁄2 measure for the Pre-Wash
option.
Main Wash Detergent Compartment
This compartment holds laundry detergent for
the main wash cycle, which is added to the load
at the beginning of the cycle. Always use HE
(High-Efficiency) detergent with your washing
machine.
Never exceed the manufacturer’s
recommendations when adding detergent. Using
too much detergent can result in detergent
buildup on clothing and the washer. Either
powdered or liquid detergent may be used.
NOTE
y
Liquid or powdered color-safe bleach may be
added to the main wash compartment with
detergent of the same type.
y
When using liquid detergent, make sure the
liquid detergent cup and insert are in place. Do
not exceed the maximum fill line.
y
When using powdered detergent, remove
the insert and liquid detergent cup from the
compartment. Powdered detergent will not
dispense with the liquid detergent cup and
insert in place.
PREPARATION
MFL67737658_E_A5.indd 21 2018. 7. 2. 오전 10:12
22
USING YOUR WASHING MACHINE
USING YOUR WASHING MACHINE
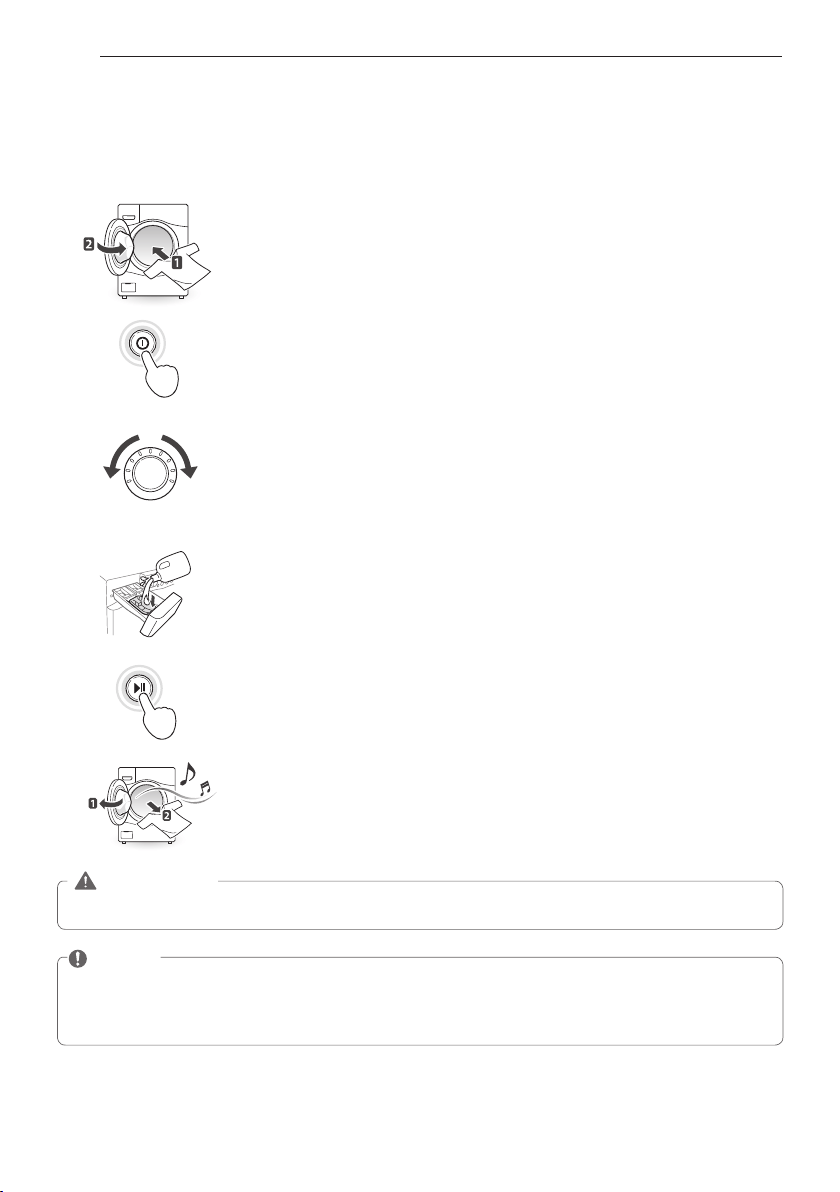
Basic Operation
Load the laundry into the washing machine and close the door.
1
2
3
4
5
6
The Power button.
- The lights around the cycle selector knob will illuminate and a chime will sound.
Turn the cycle selector knob in either direction to select the desired cycle.
- The proper default option is automatically set according to the wash cycle. See
page 23, Cycle Guide, for more detailed default options for each cycle.
- See page 24, Main Cycle, for details on the wash cycles.
- To change the options, press the option button and select the desired option.
See page 25, Setting options before cycle, for more details on options.
- Skip to step 4 to use the default setting without changing the options.
Add the proper amount of detergent and additions (bleach, softener) into the
detergent dispenser drawer.
-
See page 20, Using detergent/fabric softener, for more details on using detergent.
Pressthe Start/Pause button.
- The washing machine will start.
When the melody plays, the wash cycle is finished.
- When the washing cycle is finished, the door will unlock. Open the door and
remove the laundry immediately.
- Make sure to check around the door seal when taking out the finished load.
Small items may be caught in the door seal.
NOTE
y
The front-load washing machine rotates the laundry in a way that allows it to use less water while still
fully saturating your clothing. It is normal to not be able to see water during the wash cycle.
y
If the temperature or the water level inside the machine is too high, the door locks and cannot be
opened. To open the door while washing, use the Rinse + Spin feature.
WARNING
y
To reduce the risk of fire, electric shock, or injury to persons, read the IMPORTANT SAFETY
INSTRUCTIONS before operating this appliance.
MFL67737658_E_A5.indd 22 2018. 7. 2. 오전 10:12

23
ENGLISH
USING YOUR WASHING MACHINE
Cycle guide
The cycle guide below shows the options and recommended fabric types for each cycle.
= Available option
- Cycle time depends on water pressure, type and amount of load and chosen additional options.
-
To protect your garments, not every wash/rinse temperature, spin speed, soil level, or option is available with every cycle.
- If the Turbo Wash™ option is on, you cannot select “No Spin” as your Spin Speed.
(If the Turbo Wash™ option is off, you can select “No Spin” as your Spin Speed.)
CYCLE FABRIC TYPE
DISPLAY
TIME(MIN)
BASIC OPTION (
=DEFAULT)
ADDITIONAL OPTIONS
Wash
Temp.
Spin
Speed
Soil
Level
Pre
Wash
Extra
Rinse
Steam
Cold
Wash™
Turbo
Wash
™
Dry
Tub Clean Periodic use of
this cycle helps to
prevent mildew or
a musty smell.
89
Allergiene™ Cotton, underwear,
pillow covers,
bed sheets, baby
wear
99 ~ 132
Extra High
High
Medium
Low
No Spin
Sanitary Heavily soiled
underwear, work
clothes, diapers,
etc.
110~120
Extra
Hot
Extra High
High
Medium
Low
No Spin
Heavy
Normal
Light
Bright
Whites™
White Fabrics 66~76 Hot
Warm
Cold
Tap Cold
Extra High
High
Medium
Low
No Spin
Heavy
Normal
Light
Bulky/
Large
Large items such
as blankets and
comforters
56 Hot
Warm
Cold
Tap Cold
Medium
Low
No Spin
Heavy
Normal
Light
Cotton/
Normal
Cotton, linen,
towels, shirts,
sheets, jeans,
mixed loads
26~53 Hot
Warm
Cold
Tap Cold
Extra High
High
Medium
Low
No Spin
Heavy
Normal
Light
Heavy Duty Heavy soiled
Cotton
Fabrics
74~131 Hot
Warm
Cold
Tap Cold
Extra High
High
Medium
Low
No Spin
Heavy
Normal
Light
Perm.
Press
Dress shirts/pants,
wrinkle-free clothing,
poly/cotton blend
clothing, ablecloths
33~47 Hot
Warm
Cold
Tap Cold
High
Medium
Low
No Spin
Heavy
Normal
Light
Delicates
Dress shirts/blouses,
nylons, sheer or lacy
garments
41 Warm
Cold
Tap Cold
Medium
Low
No Spin
Heavy
Normal
Light
Towels Towels 55 ~ 65 Hot
Warm
Cold
Tap Cold
Extra High
High
Medium
Low
No Spin
Heavy
Normal
Light
Hand Wash/
Wool
Items labeled
“hand-washable”
55 Warm
Cold
Tap Cold
Low
No Spin
Normal
Light
Speed
Wash
Lightly soiled
clothing
and small loads
15 Hot
Warm
Cold
Tap Cold
Extra High
High
Medium
Low
No Spin
Heavy
Normal
Light
Small Load Normally soiled
and small loads.
45 Hot
Warm
Cold
Tap Cold
Extra High
High
Medium
Low
No Spin
Heavy
Normal
Light
Drain+Spin Drain, Spin Only 11 Extra High
High
Medium
Low
No Spin
MFL67737658_E_A5.indd 23 2018. 7. 2. 오전 10:12

24
USING YOUR WASHING MACHINE
For towels,
Towels
This cycle is for washing towels.
Wrinkle-free items,
Perm. Press
This cycle is for washing items such as wrinkle-free
clothes or tablecloths to minimize wrinkles.
Items Labeled Wool or Hand-Washable,
Hand Wash/Wool
This cycle is for washing shrinkable woolen or
hand-washable items requiring delicate care.
Only wash woolen items that are labeled machine
washable or hand-washable.
NOTE
y
Laundry weight should be less than 8 pound
(3.6 kg) to prevent damage to the fabric.
y
Use only natural or wool-safe detergent
harmless to fabrics and load 1/2 of the normal
amount of detergent.
y
The Hand Wash/Wool cycle uses a gentle
tumble rotation angle and low speed spin for
the ultimate fabric care.
Sheer items,
Delicates
This cycle is for washing lingerie or sheer and lacy
clothes which can easily be damaged.
Quick wash,
Speed Wash
Use the Speed Wash cycle to quickly wash lightly
soiled clothing and small loads. For high wash and
rinse efficiency, washing small loads of 2-3 lightly
soiled garments is recommended.
NOTE
y
Use only a little detergent in this cycle. If you
want more rinsing, you can add an extra rinse
by using the option button.
For a few items,
Small Load
This cycle is for normally soiled and small loads.
Drain and spin only,
Drain+Spin
This cycle is for draining and spinning without the
wash and rinse cycle, or for removing the load from
the washing machine in the middle of the cycle.
Main cycle
You can wash laundry items more thoroughly by
selecting the wash cycle that best suits the type
of items to be washed. Turn the cycle selector
knob in either direction to select the desired cycle.
When you select a wash cycle, the light for the
corresponding wash cycle will turn on. See page
22, Basic operation, for more details on operating
methods.
Reduce laundry allergen,
Allergiene™
This cycle is a powerful, high temperature cycle
designed specifically to reduce certain allergens.
NOTE
y
Selecting the Allergiene™ cycle automatically
incorporates steam into the wash cycle.
y
The Allergiene™ cycle can significantly reduce
allergens in bedding and clothing.
y
The Allergiene™ cycle helps reduce dust mite
populations and helps reduce allergens.
y
Due to the higher energy and temperatures
used, the Allergiene™ cycle is not
recommended for wool, silk, leather, or any
other delicate or temperature sensitive or non-
colorfast items.
Reduce laundry bacteria,
Sanitary
This wash cycle helps to remove heavily soiled on
laundry through high temperature.
For white fabrics,
Bright Whites™
This cycle is for washing white items only.
Blankets or bulky items,
Bulky/Large
This cycle is for washing blankets or bulky items.
Heavy soiled items,
Heavy Duty
This cycle is for washing heavily soiled laundry
through more powerful tub rotation.
Normal items,
Cotton/Normal
Use this cycle to wash all normal items, except
delicate fabrics such as wool or silk.
NOTE
y
If you press the Power button and the the Start/
Pause button without selecting another cycle,
the washing machine defaults to the Cotton/
Normal cycle.
MFL67737658_E_A5.indd 24 2018. 7. 2. 오전 10:12

25
ENGLISH
USING YOUR WASHING MACHINE
Cycle modifier buttons
Each cycle has preset settings that are selected
automatically. You may also customize the settings
using the cycle modifier buttons. Press the button
for that option to view and select other settings.
The washer automatically adjusts the water level for
the type and size of wash load for best results and
maximum efficiency. It may seem there is no water
inside the drum in some cycles, but this is normal.
NOTE
y
To protect your garments, not every wash/rinse
temperature, spin speed, soil level, or option is
available with every cycle. See the Cycle Guide
for details.
Setting options before the cycle
You can select and add the desired optional
functions before you start the washing machine.
Setting the water temperature,
Wash Temp.
Set the water temperature for the wash cycle. Set
the appropriate temperature, as specified in the
fabric care label.
1
Press the Power button and turn the cycle
selector knob in either direction to select the
desired cycle.
2
Press the Wash Temp button repeatedly to select
the desired water
temperature:
- When you press the button, an indicator light
for the corresponding selection will turn on in
the display.
3
You can now modify other cycle settings and add
options (see pages 25-28), or proceed to step 4 to
begin the cycle.
4
Press the Start/Pause button.
NOTE
y
Cold rinses use less energy.
y
Your washer features a heating element to
boost the hot water temperature for Extra
Hot settings. This provides improved wash
performance at normal water heater settings.
y
Select the water temperature suitable for the
type of load you are washing. Follow the fabric
care label for best results.
Setting spin speed, Spin Speed
You can set the desired spin speed.
Use this feature properly according to the
characteristics of the load.
1
Press the Power button and turn the cycle
selector knob in either direction to select the
desired cycle.
2
Press the Spin Speed button repeatedly to select
the desired spin speed.
- When you press the button, an indicator light
for the corresponding selection will turn on in
the display.
3
You can now modify other cycle settings and add
options (see pages 25-28), or proceed to step 4 to
begin the cycle.
4
Press the Start/Pause button.
NOTE
y
The Spin Speed button also activates the Drain
& Spin cycle to drain the tub and spin clothes;
for example, if you want to remove clothes
before the cycle has ended.
Setting soil level of laundry, Soil Level
You can wash your laundry more thoroughly
by setting the proper soil level on the washing
machine.
1
Press the Power button and turn the cycle
selector knob in either direction to select the
desired cycle.
2
Press the Soil Level button repeatedly to select a
soil level.
- When you press the button, an indicator light
for the corresponding selection will turn on in
the display.
3
You can now modify other cycle settings and add
options (see pages 25-28), or proceed to step 4 to
begin the cycle.
4
Press the Start/Pause button.
NOTE
y
This feature will add time time for heavily
soiled loads or subtract time for lightly soiled
loads.
MFL67737658_E_A5.indd 25 2018. 7. 2. 오전 10:12

26
USING YOUR WASHING MACHINE
Set the drying time, Dry
Drying options are easily selected with the
DRY button. For the most even drying,
make sure all articles in the clothes load
are similar in material and thickness. Do not
overload the washer by placing too many articles
into the drum. Items must be able to tumble freely.
If you open the door and remove the load before
the washer has finished the DRY cycle, remember
to press the START/ PAUSE button.
By pressing the DRY button, you can select:
1
LOW TEMP - For delicate fabrics
2
DAMP - For damp drying fabrics
3
NORMAL - For general drying
4
MORE - For heavier fabrics
5
30/60/90/120 - For timed drying
NOTE
y The capacity of the machine for washing
clothes is twice as much as when drying
clothes. If the machine is to be used to dry a
load, then the wash load must be reduced by
half for effective drying performance. If a full
load is washed, remove half the clothes prior
to starting the dry cycle.
Drying Guide–Automatic Dry
Electronic sensors measure the temperature of the
exhaust to increase or decrease the drying temperature
for faster reaction time and tighter temperature control.
Recommended DRY settings by fabric type:
a) Perm Press – LOW TEMP
b) If clothes are to be ironed – DAMP
c) Cotton/Towels – NORMAL
d) Diapers – MORE
NOTE
y
On Automatic Dry settings, the estimated
drying time may vary from the actual drying
time. The type of fabric, size of the load, and
the selected dryness level affect drying time.
Drying Guide–Timed Dry
• Press the Dry button repeatedly to select the
drying time in 30 minute increments:
30–60–90–120 minutes.
• Timed dry can last up to 120 min. When selecting
Dry only, drying will start after the final Spin cycle.
•
Drying times can vary greatly depending on dampness,
room temperature, and type of fabric. You may need to add
additional time. Your own experience will be your best guide.
Drying Tips
Woolen Articles
Do not tumble dry woolen articles. Pull them to
their original shape and dry them flat.
Woven and Loopknit Materials
•
Some woven and loopknit materials may shrink when dried.
• Always stretch them out immediately after
drying.
Permanent Press and Synthetics
• Do not overload your dryer.
• Take out permanent press articles as soon as
the dryer stops to reduce wrinkles.
Fiber or Leather Materials
Always check the manufacturer’s instructions.
Baby Clothes and Night Gowns
Always check the manufacturer’s instructions.
Rubber and Plastics
Do not dry any items made from or containing
rubber or plastics, such as:
a) Aprons, bibs, chair covers
b) Curtains and table cloths
c) Bathmats
Fiberglass
Do not dry fiberglass articles in your dryer. Glass particles
left in the washer could be picked up by your clothes the
next time you use the washer and irritate your skin.
Prewashing, Pre Wash
Pre-wash for 16 minutes when clothes are covered
in dirt or dust. This feature is suitable for heavily
soiled items.
1
Press the Power button and turn the cycle
selector knob in either direction to select the
desired cycle.
2
Press the Pre Wash button.
- The indicator light will turn on.
3
You can now modify other cycle settings and add
options (see pages 25-28), or proceed to step 4 to
begin the cycle.
4
Press the Start/Pause button.
Rinse, drain and spin only, Rinse+Spin
Use this cycle to rinse detergent from the load.
1 Press the Power button and turn the cycle
selector knob in either direction to select the
desired cycle.
2 Press the Rinse+Spin button.
3 Press the Spin Speed button repeatedly to set
the spin speed.
- The indicator light for the selected spin speed
will turn on.
4
Press the Start/Pause button.
MFL67737658_E_A5.indd 26 2018. 7. 2. 오전 10:12

27
ENGLISH
NOTE
y
The steam option cannot be used with all
cycles.
y
Steam may not be clearly visible during
the steam cycles. This is normal. Too much
steam could damage clothing.
y
Do not use steam with delicate fabrics such
as wool, silk, or non-colorfast fabrics.
Saving energy, Cold Wash
™
Adding the COLD WASH™ option reduces energy
usage and provides the same washing performance
as a warm water wash.
By using 6 different washing motion (Tumbling,
Rolling, Stepping, Scrubbing, Swing, Filtration),
fabrics get the cleaning benefits, without the energy
usage.
1
Press the Power button and turn the cycle
selector knob in either direction to select the
desired cycle.
2
Press the Cold Wash(TM) button. The washer will
automatically adjust the cycle settings.
3
Set any other desired options.
4
Press the Start/Pause button.
NOTE
y
When you select the Cold Wash™ option, wash
time will be increased up to 20 minutes.
y
For high wash efficiency, using this option
with less than 8 pounds (3.6kg) of laundry is
recommended.
Saving time, Turbo Wash™
Adding the Turbo Wash(™) option to normal cycles
reduces cycle time while providing the same wash
performance.
The option uses the Twin Spray and Optimization
features of the washer to save time without
sacrificing performance.
1
Press the Power button and turn the cycle
selector knob in either direction to select the
desired cycle.
2
Press the Turbo Wash(™) button. The washer will
automatically adjust the cycle settings.
3
Set any other desired options.
4
Press the Start/Pause button.
Adding extra rinse cycle, Extra Rinse
You can add an extra rinse cycle to the default rinse
cycle.
1
Press the Power button and turn the cycle
selector knob in either direction to select the
desired cycle.
2
Press the Extra Rinse button.
- The Extra Rinse indicator light will turn on.
3
You can now modify other cycle settings and add
options (see pages 25-28), or proceed to step 4 to
begin the cycle.
4
Press the Start/Pause button.
Presetting the start time, Delay Wash
You can set the desired start time.
1
Press the Power button and turn the cycle
selector knob in either direction to select the
desired cycle.
2
Modify the cycle settings and add other options
(see pages 25-28), if desired.
3
Press the Delay Wash button repeatedly to select
the desired start time.
- The Delay Wash indicator light will turn on.
- The set start time appears on the display panel.
- Each press of the button increases the delay
time by one hour, up to 19 hours.
4
Press the Start/Pause button.
High temperature, Steam
Adding the Steam option to these cycles help to
enhance washing performance.
By using a hot steam fabrics get the cleaning
benefits of a super hot wash.
1
Press the Power button and turn the cycle
selector knob in either direction to select the
desired cycle.
2
Press the Steam button. The washer will
automatically adjust the cycle settings.
3
Set any other desired options.
4
Press the Start/Pause button.
WARNING
y
Do not touch the door during steam cycles. The
door surface can become very hot. Allow the
door lock to release before opening the door.
y
Do not attempt to override the door lock
mechanism or reach into the washer during a
steam cycle. Steam can cause severe burns.
USING YOUR WASHING MACHINE
MFL67737658_E_A5.indd 27 2018. 7. 2. 오전 10:12

28
USING YOUR WASHING MACHINE
Setting options during the cycle
You can add the desired options during the wash
cycle.
Button lock feature, Child Lock
You can lock the washing machine to prevent
children or others from changing the cycle settings
by pressing the buttons during the cycle.
To enable child lock
Press and hold the Pre Wash button for 3 seconds
during the wash cycle.
- When the Child Lock is enabled, a message and
the remaining wash time are displayed, in turn, on
the display panel of the washing machine.
To disable child lock
(When the Child Lock is activated.)
Press and hold the Pre Wash button for 3 seconds
during the wash cycle.
NOTE
y
Child Lock lasts after the end of the cycle. If you
want to deactivate this function, press and hold
the Pre Wash button for 3 seconds.
Saving a customized wash cycle, PGM Save
You can save a cycle with all the settings and
options you use most frequently.
To save cycle
1
Press the Power button and turn the cycle
selector knob in either direction to select the
desired cycle.
2
Modify other cycle settings and add options (see
pages 25-28).
3
Press and hold the Custom PGM button for 3
seconds during the wash cycle.
- The cycle with your preferred settings and
options is saved.
Selecting your customized cycle,
Custom PGM
You can recall the customized wash cycle you had
previously saved.
To recall cycle
1
Press the Power button, then press the Custom
PGM button.
2
Press the Start/Pause button.
Tumbling clothes to prevent wrinkles, Fresh
Care
Use this function when you are not able to take out
your clothes as soon as the wash cycle ends.
1
Press the Power button and turn the cycle
selector knob in either direction to select the
desired cycle.
2
Press and hold the Steam button for 3 seconds
during the wash cycle.
- The light will turn on.
3
You can now modify other cycle settings and add
options (see pages 25-28), or proceed to step 4 to
begin the cycle.
4
Press the Start/Pause button.
NOTE
y
This function provides periodic tumbling for up
to about 19 hours to prevent wrinkles. If you
press the START/ PAUSE or ON/ OFF button,
you can unload your laundry at any time.
Drum Lighting, Drum Light
The drum is equipped with a white LED light that
illuminates when the washer is turned on. This light
automatically turns off when the door is closed and
the cycle starts. To turn on the light during a cycle:
1
Press the Power button and turn the cycle
selector knob in either direction to select the
desired cycle.
2
Press the Start/Pause button.
3
Press and hold the Extra Rinse button for 3
seconds during the wash cycle.
- The drum light will illuminate and then turn off
automatically after 4 minutes.
- It is normal for clothing and the gasket to
appear yellow under the LED light.
MFL67737658_E_A5.indd 28 2018. 7. 2. 오전 10:12
29
ENGLISH
MAINTENANCE
Care
Care after wash
After the cycle is finished, wipe the door and the
inside of the door seal to remove any moisture.
Leave the door open to dry the washer tub interior.
Wipe the body of the washing machine with a dry
cloth to remove any moisture.
WARNING
y
Unplug the washer before cleaning to avoid
the risk of electric shock.
Failure to follow
this warning can cause serious injury, fire,
electric shock or death.
y
Never use harsh chemicals, abrasive cleaners,
or solvents to clean the washer.
They will
damage the finish.
y
Do not use volatile substances (benzene, paint
thinner, alcohol, acetone, etc.) or detergents
with strong chemical components when
cleaning the washing machine.
Doing so
may cause discoloration or damage to the
machine, or it may cause a fire.
y
Certain internal parts are intentionally
not grounded and may present a risk of
electric shock only during servicing. Service
personnel - Do not contact the following
parts while the appliance is energized: pump,
valve, motor, control board.
MAINTENANCE
Care in cold climates
Storing the washing machine for an extended period of time
Follow these instructions for storing the washing machine, to
avoid damage when unused for long periods in cold climates
where it may be exposed to below-freezing temperatures.
1
Turn off the faucets connected with the water lines.
2
Unscrew the water lines from the back of the washer.
3
Empty any water out of the water lines.
4
Press the Power button.
5
Open the door and add 1 gallon (3.8 L) of
nontoxic recreational vehicle (RV) antifreeze to
the empty washer tub. Close the door.
6
Press the Spin Speed button for draining and
spinning.
7
Press the Start/Pause button.
- Drain the water from the washing machine for
1 minute. Not all of the RV antifreeze will be
expelled.
8
Press the Power button to turn off the washing
machine and pull out the power plug.
9
Dry the interior of the washer tub with a soft
cloth, and close the door.
10
Press down hard on the disengage button and
pull out the detergent dispenser drawer.
11
Drain the water from the detergent dispenser
drawer and dry out each compartment.
12
Store the washing machine in an upright
position.
NOTE
y
To remove the antifreeze after storing the
washing machine, add detergent to the
dispenser, and run one cycle. Do not load any
laundry at this time.
MFL67737658_E_A5.indd 29 2018. 7. 2. 오전 10:12

30
MAINTENANCE
When the water line is frozen
1
Turn off the faucets connected with the water
lines.
2
Pour hot water on the frozen faucets to thaw the
water lines and pull them out.
3
Immerse the water lines in hot water to thaw
them.
4
Connect the water lines with the water inlets of
the washing machine and faucets.
- See page 14, Connecting the water lines for
details.
5
Turn on the faucets.
6
Press the Power button.
7
Press the Rinse+Spin button.
8
Press the Start/Pause button.
- Verify the water fills properly.
When the Drain Line is Frozen
1
Pour hot water in the washer tub and close the
door.
- Leave it for 10 minutes.
2
Press the Power button after 10 minutes.
3
Press the Spin Speed button for draining and
spinning.
4
Press the Start/Pause button.
- Check if the water drains.
Cleaning
Periodically clean the washing machine to help
maintain its performance and to minimize the
chance of malfunction.
Cleaning the drum, Tub Clean
Improper installation or use of the washing
machine in a humid space for a long period of time
potentially could lead to a buildup of detergent
residue in the washing machine that may produce
mildew or musty smells. If you clean the washer tub
regularly on a monthly basis using Tub Clean it will
minimize the possibility that detergent residue will
build up and mildew or musty smells may occur.
1
Add tub cleaner or lime scale remover into the
detergent dispenser drawer.
- Do not exceed the maximum detergent limit
line when you add it. Detergent may remain
in the washer tub after cleaning.
-
When you use liquid chlorine bleach,
load it
into the liquid chlorine bleach compartment.
-
When you use a powdered cleaner,
pull out
the liquid detergent cup and add it into the
main wash detergent compartment.
-
When you use cleaning tablets,
place them
directly into the washer tub. (Do not add tablet
cleaner to the drawer.)
2
Press the Power button.
3
Turn the cycle selector knob to select Tub Clean.
- O message appears in the display.
- The indication light for Tub Clean turns on.
4
Press the Start/Pause button.
NOTE
y
Never load laundry while using Tub Clean. The
laundry may be damaged. Make sure to clean
the washer tub when it is empty.
y
Leave the door open after finishing the laundry
to help keep the tub clean.
y
It is recommended that Tub Clean be repeated
monthly.
y
If you notice mildew or musty smells, run Tub
Clean once a week for three consecutive weeks.
y
Safely and conveniently secure the door
slightly ajar with the magnetic door plunger.
This will promote air circulation and help the
machine to dry.
MFL67737658_E_A5.indd 30 2018. 7. 2. 오전 10:12
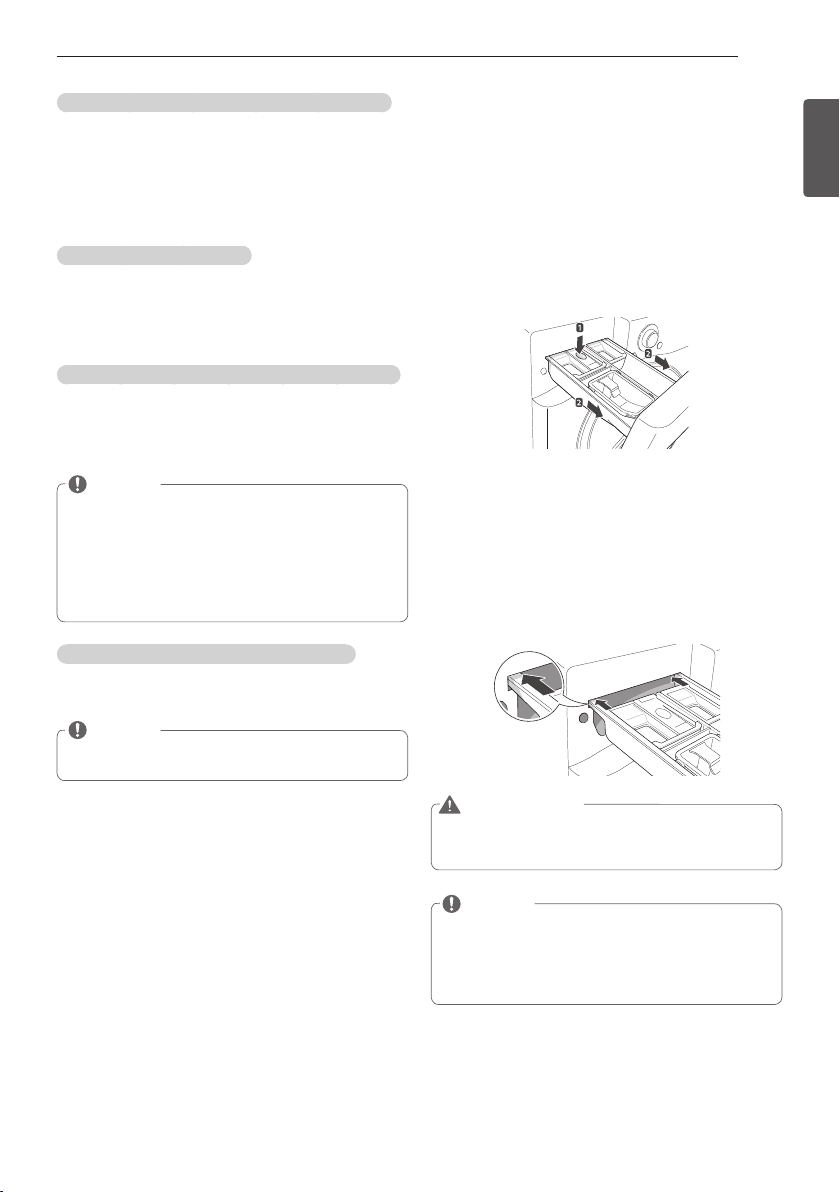
31
ENGLISH
MAINTENANCE
Automatic alert for cleaning washing machine
When the power is on and the O message blinks,
it means the washer tub needs cleaning. Use Tub
Clean to clean the washer tub. The automatic
indicator alert for cleaning the washer tub depends
on the frequency of use, however, the message will
generally blink every 1~2 months.
Removing mineral buildup
If you live in an area with hard water, mineral scale
can form on the internal components of the washing
machine. Take extra care to periodically clean the
mineral buildup on the internal components to
extend the lifespan of the washing machine.
Removing mineral buildup from the washer tub
Check if the descaler is suitable for cleaning the
washer tub before using it and run the Tub Clean
cycle. See page 30, Tub clean for details on tub
clean.
NOTE
y
In areas with hard water, use of a water
softener is recommended.
y
Make sure to remove all laundry from the
washer tub before cleaning the washer tub.
Cleaning the washer tub together with laundry
may result in contamination of or damage to
the laundry.
Removing lime buildup on stainless steel
Wipe lime buildup or other spots on stainless steel
with a soft cloth soaked in stainless steel cleaner.
NOTE
y
Never use steel wool or abrasive cleansers.
Doing so may damage the washing machine.
Cleaning the detergent dispenser
drawer
Leaving detergent in the detergent dispenser drawer
for an extended period of time or using the washing
machine for a long period of time may cause the
build-up of scales in the detergent dispenser drawer.
Pull out and clean the detergent dispenser drawer
once a week.
1
Pull out the detergent dispenser drawer.
2
Press down hard on the disengage button and
pull out the detergent dispenser drawer.
3
Remove the inserts from the drawer.
4
Clean them with warm water.
- Use a soft cloth or brush for cleaning and
remove any residue.
5
Wipe any moisture with a dry towel or cloth after
cleaning.
6
Replace the detergent dispenser drawer.
WARNING
y
Do not spray water inside the washing
machine.
Doing so may cause fire or electric
shock.
NOTE
y
Use only water when you clean the detergent
dispenser drawer. Make sure to use Rinse+Spin
to rinse the washer tub before the next wash
cycle when you use a cleaning detergent to
clean the washer tub.
MFL67737658_E_A5.indd 31 2018. 7. 2. 오전 10:12
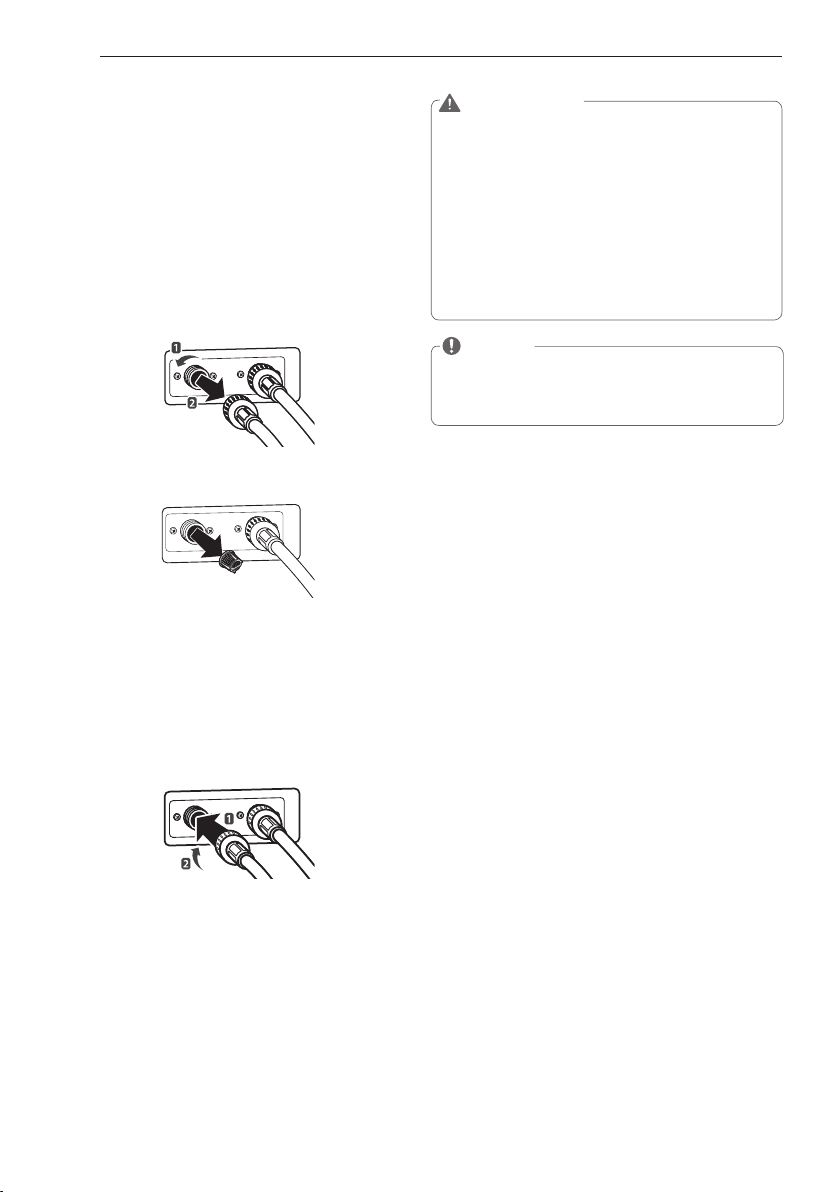
32
MAINTENANCE
WARNING
y
Unplug the power cord and turn off the faucets
before cleaning.
Failure to do so may cause
electric shock.
y
Do not use the washing machine without the
inlet filters.
If you use the washing machine
without the inlet filters it will cause leaks and
malfunction.
y
If you use the washing machine in an area
with hard water, the inlet filter may clog
due to lime buildup. Contact your nearest
LG customer service center if the inlet filter
cannot be cleaned or is missing.
NOTE
y
P
message will blink on the display when
the water pressure in the detergent drawer
is weak or an inlet filter is clogged with dirt.
Clean the inlet filter.
Cleaning the water inlet filters
Clean the water inlet filters periodically to prevent
clogging. Take extra care to clean the water inlet
filters in areas using hard water. Water may not be
supplied if there are foreign objects, such as rust,
sand, or stones in the water inlet filters.
1
Press the Power button to turn off the washing
machine and pull out the plug.
2
Turn off the faucets connected with the water
inlets.
3
Remove the water inlets.
4
Pull out the water inlet filter.
Inlet Filter
5
Remove foreign objects from the water filter
inlet.
- Soak the water filter inlets in white vinegar or
a lime scale remover or use a toothbrush to
remove foreign objects and rinse thoroughly.
6
Press the water filter inlets back into place.
7
Reattach the water lines to the washing machine.
MFL67737658_E_A5.indd 32 2018. 7. 2. 오전 10:12
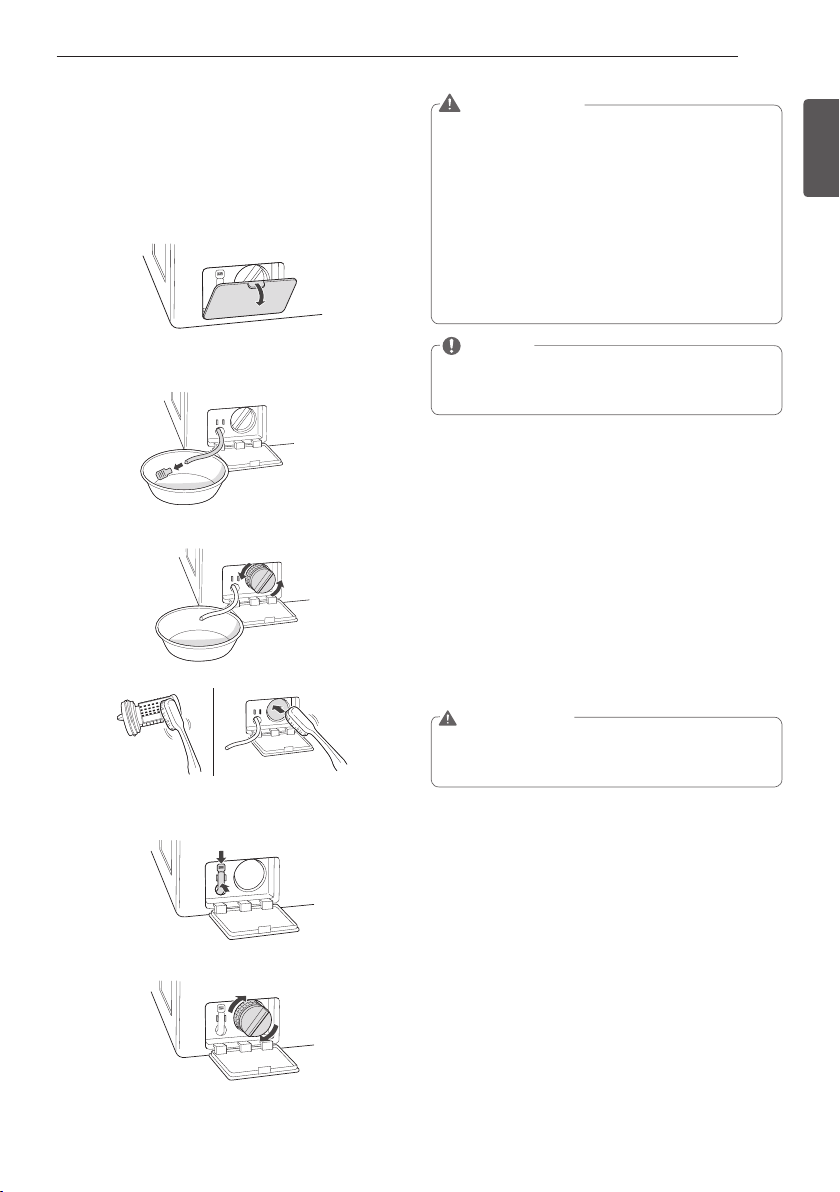
33
ENGLISH
MAINTENANCE
Cleaning the drain pump filter
The washing machine fails to drain if the drain
pump filter is clogged. Periodically clean the drain
filter to prevent clogging with foreign objects.
1
Press the Power button to turn off the washing
machine and pull out the plug.
2
Open the drain pump filter cover.
3
Unclip the drain hose and remove the plug from
the drain hose to drain the remaining water.
4
Twist the pump filter counterclockwise to remove it.
5
Clean the pump filter and opening.
6
Recap the plug onto the drain hose and reattach
the drain hose.
7
Insert the drain pump filter.
8
Close the drain pump filter cover.
WARNING
y
Make sure to pull out the plug before cleaning.
Failure to do so may cause electric shock.
y
Opening the drain filter will result in water
overflowing if there is water in the washer
tub.
Make sure to check if the water is
completely drained before opening the drain
filter.
y
If you use the washing machine with the
drain filter reassembled incorrectly after
cleaning it, or if you use the machine without
the filter, it may cause leaks or malfunction
of the washing machine.
NOTE
y
Q
message will blink when the drain pump
filter is clogged with dirt. Clean the drain
pump filter.
Cleaning the door seal
Clean the door seal once a month to prevent build-
up of dirt in the door seal.
1
Wear rubber gloves and protective goggles.
2
Dilute 3/4 cup (177 ml) of liquid chlorine bleach
in 1 gallon (3.8 L) of water.
3
Soak a sponge or a soft cloth in this diluted
solution and wipe down all around the door seal.
4
Wipe any moisture with a dry towel or cloth after
cleaning.
5
Leave the door open to allow the door seal to dry
completely.
CAUTION
y
Cleaning the door seal with an undiluted
solution may cause malfunction of the door
seal and washing machine parts.
MFL67737658_E_A5.indd 33 2018. 7. 2. 오전 10:12
34
MAINTENANCE
TROUBLESHOOTING
Checking error messages
If the following message appears on the display, check the following and take the appropriate corrective action.
Message
Possible Causes Solutions
Item of clothing has gathered on one side of the tub.
y
There are not enough items in the machine.
y
Have your items gathered in one area, or is
the load too small?
y
Did you wash a stuffed animal, a mat, or knitwear?
y
Did you wash two different blankets together?
y
Rearrange items to help balance the load.
y
Stuffed animals or mats can become unbalanced
during spinning and the washing machine may
fail to drain. Rearrange the knitwear to help
balance the load and drain it again.
y
Put one blanket in at a time.
Water is not supplied or the water pressure is low
y
Is the faucet turned off?
y
Is the water supply stopped or the faucet frozen?
y
Is the water pressure low or is an inlet filter clogged?
y
Is the water line properly connected with
the cold water inlet?
y
Is the water line pinched or bent?
y
Turn on the faucets.
y
If a faucet is frozen, thaw it with warm water.
y
If the inlet filter is clogged, clean it. (see page 32)
y
Connect the water line properly with the
cold water inlet. (see page 14)
y
Check that the water lines are not pinched
or bent. Take extra care that water lines are
not twisted or pinched by other objects.
Water line leaks in connection
y
Are the water lines connected with the faucets properly?
y
Connect the water lines properly with the
faucets. (see page 14)
The tub does not rotate
• Is the door secured?
y
Close and secure the door. If the message
keeps appearing, unplug the power and
contact your nearest LG service center.
The washing machine drains slowly or not at all
y
Is the drain hose installed over 3 1/4 feet (1
m) beyond the end of the elbow bracket?
y
Is the drain hose pinched or clogged inside?
y
Is the drain hose frozen?
y
Is the drain hose clogged with foreign objects?
y
Lower the drain hose within 3 feet below
the end of the elbow bracket.
y
Place the drain hose on a smooth surface
to prevent bending.
y
If the drain hoses are frozen, thaw them in warm water.
y
Open the drain pump plug cap and remove the dirt.
A power failure has occurred.
y
Press the Power button to turn off the washing
machine and press it again to turn it on.
Control Error.
y
Unplug the power cord and contact your
nearest LG service center.
The water supply does not stop
y
Do the water supply and the drain keep
repeating in turn?
y
Unplug the power cord and contact your
nearest LG service center
The water level is not controlled
y
Is the water level too low or high compared
with the size of the load?
y
The water level sensor is not working correctly.
y
Unplug the power cord and contact your
nearest LG service center.
The tub does not rotate
y
Is the washing machine overloaded?
y
Rearrange the load size and restart the
washing machine.
y
If the load size is big, the tub may not
rotate due to an overheated motor. Allow
the washing machine to stand for a while
and restart the cycle. Unplug the power
cord and contact your nearest LG service
center if the same error message appears.
y
To clean up the tub, please run the TUB
CLEAN cycle.
y
Please empty the tub and insert bleach into
the detergent dispenser and select the Tub
Clean cycle.
y
If you want to skip the Tub Clean, turn
the CYCLE SELECTOR KNOB or push
the option buttons to select a cycle. The
message will keep appearing until a few
wash cycles have been completed, then
it will disappear until the next scheduled
time to clean the tub.
MFL67737658_E_A5.indd 34 2018. 7. 2. 오전 10:12
35
ENGLISH
MAINTENANCE
Before calling for service
Check the following before calling for service.
Problem Possible Causes Solutions
Clicking sound
y
Do you hear a sound when you close or lock
and unlock the door?
y
This sound is normal and occurs when the
door is closed, locked or unlocked.
Spraying or hissing sound
y
Is water spraying in the tub?
y
This sound is normal as water is spraying or
circulating during the cycle.
Buzzing or gushing
sound
y
Is the washing machine draining water?
y
This sound is normal as the drain pump
drains water from the washing machine after
the cycle.
Splashing sound
y
Is the washing machine washing a load of
laundry?
y
This sound is normal as the load is moving up
and down during the wash and rinse cycles.
Rattling and clanking noise
y
Are there any foreign objects such as keys,
coins, or safety pins in the tub or drain filter?
y
Check if there are any foreign objects in the
tub and drain the filter after stopping the
cycle.
y
Unplug the power cord and contact your
nearest LG service center if the noise persists.
Thumping sound
y
Is the washing machine overloaded?
y
Is the load out of balance?
y
This sound is normal and occurs when the
load is out of balance. Stop the cycle and
rearrange the load for balancing.
Vibrating noise
y
Are the shipping bolts removed?
y
Is the load evenly distributed in the tub?
y
Is the washing machine level balanced?
y
Is the washing machine installed on a solid
and smooth surface?
y
See page 13,
Unpacking and removing shipping
bolts,
to remove the shipping bolts.
y
Stop the cycle and rearrange the load for
balancing.
y
See page 16,
Leveling the washing machine,
to
level the washing machine.
y
Check if the floor is solid and level.
Water leaking around washer
y
Is water leaking from a faucet or a water line?
y
Is a drain pipe or a drain hose clogged?
y
Check the faucets or water lines.
- If the water lines are loosely connected, see
page 14,
Connecting water lines,
to connect
them properly.
y
Unclog the drain pipe or drain hose. Contact a
plumber if necessary.
Excessive suds or failure to
rinse
y
Did you use more than the recommended
amount of detergent?
y
Is the soil level higher than the size of the
load?
y
Use the recommended amount of detergent
for the load.
y
If the soil level is low, reduce the detergent
quantity to less than the recommended level.
Only use detergent with the HE (High-
Efficiency) logo.
Staining
y
Did you add detergent directly to the tub?
y
Did you remove the load immediately after it
finished?
y
Did you sort and wash the clothes by color or
soil?
y
Make sure to load detergent into the detergent
dispenser drawer.
y
Remove the load immediately after it finishes.
y
Sort and separate dark colors from light or
white ones, and heavily soiled items from
lightly soiled ones. See page 19,
Sorting
laundry,
for details
Wrinkling
y
Items were not removed promptly at the end
of the dry cycle.
y
Drum was overloaded.
y
Hot and cold water inlets are reversed.
y
Remove items immediately after the cycle
finishes.
y
Wet clothing needs room to tumble freely
in order to dry effectively. If you plan to dry
a load of laundry, don’t load the drum more
than halfway, or split the wash load or remove
items before drying.
y
Hot water rinse can cause garments to
wrinkle. Check the inlet hose connections.
MFL67737658_E_A5.indd 35 2018. 7. 2. 오전 10:12
36
MAINTENANCE
SPECIFICATIONS
Model WM3997H*A
Description Front loading washing machine
Electrical requirements 120 VAC @ 60 Hz
Dimensions 68.6 cm(W) x 75.6 cm(D) x 98.3 cm(H), 132.2 cm (D, door open)
27
”
(W) x 29 ¾
”
(D) x 38
¹¹
/
16
”
(H) / 52
”
(D, door open)
Net weight 96 kg(211lbs)
Max. spin speed 1300 rpm max
Max. water pressure 20 – 120 psi (138 – 827 kPA)
Problem Possible Causes Solutions
Power will not turn on
y
Is the power cord plugged in properly?
y
Has a house fuse blown, a circuit breaker
tripped, or a power outage occurred?
y
Make sure that the plug is secured in a
grounded 3-prong, 120 V (60 Hz) outlet.
y
Reset the circuit breaker or replace the fuse.
Do not increase the fuse capacity. If the
problem is a circuit overload, have it corrected
by a qualified electrician.
The door does not open when
the cycle pauses or finishes
y
Is the temperature in the tub too high?
y
Is the water level in the washer high?
y
The washing machine has a safety lock built
into the door to prevent burning. Leave the
door closed and wait until the door lock icon
disappears from the display.
y
Allow the washer to complete the
programmed cycle, or press the SPIN button.
The wash cycle time is longer
than usual
y
Is the washing machine overloaded? Are
other options added to the wash cycle?
y
This is normal. The washing machine
automatically adjusts the cycle time for the
amount of laundry, water pressure, water
temperature, and other operating conditions.
It is musty or moldy in the tub
y
Has the incorrect detergent been used?
y
Did you clean the tub periodically?
y
Use only HE (High-Efficiency) detergent
recommended for a front-loading washing
machine.
y
See page 30, clean the inside and outside of
the washing machine periodically.
Banging noise when washer
is filling with water (Water
Hammer)
y
Plumbing in the home moves or flexes when
the water valves in the washer shut off.
y
Household water supply pressure is very
high.
y
Water hammer is not caused by a defect in
the washer. Install water hammer arrestors
(purchased separately at hardware or home
improvement store) between the fill hose and
the washer for best results.
y
Adjust household water supply regulator to a
lower pressure or contact a plumber to have a
regulator installed.
Odor
y
This odor is caused by the rubber attached to
the washing machine.
y
If the rubber door gasket and door seal area
are not cleaned regularly, odors can occur
from mold or foreign substances.
y
Odors can occur if foreign substances are left
in the drainage pump filter.
y
Odors can occur if the drainage hose is not
properly installed, causing siphoning (water
flowing back inside the washing machine).
y
Using the dry function, odors can occur from
lint and other laundry matter sticking to the
heater. (Dryer model only)
y
A particular odor can occur from drying wet
clothes with hot air. (Dryer model only)
y
It is the normal odor of new rubber and will
disappear after the machine has been run a few
times.
y
Be sure to clean the gasket and door seal
regularly and check under the door seal for
small items when unloading the washer.
y
Be sure to clean the drainage pump filter
regularly.
y
When installing the drainage hose, be sure that
it doesn’t become kinked or blocked.
y
This is not a malfunction.
y
The odor will disappear after a short while.
MFL67737658_E_A5.indd 36 2018. 7. 2. 오전 10:12
37
ENGLISH
SMART DIAGNOSIS™ FUNCTION
Smart Diagnosis™ Function
Should you experience any problems with the
appliance, it has the capability of transmitting
data via your telephone to the LG Customer
Information Center. NFC or Wi-Fi equipped
models can also transmit data to a smartphone
using the LG SmartThinQ application.
Smart Diagnosis™ through the
Customer Information Center
• For appliances with the or logo
This gives you the capability of speaking
directly to our trained specialists. The
specialist records the data transmitted from
the appliance and uses it to analyze the issue,
providing a fast and effective diagnosis.
1 Call the LG Electronics Customer Information
Center at:
(LG U.S.A.) 1-800-243-0000
(LG Canada) 1-888-542-2623
2 When instructed to do so by the call center,
place the mouthpiece of the phone close to the
Smart Diagnosis™ icon. Do not press any
other buttons.
3 Press and hold the Wash Temp. button for 3
seconds.
4 Keep the phone in place until the tone
transmission has finished.
5 Once the countdown is over and the tones
have stopped, resume your conversation with
the call center agent, who will then be able to
assist you using the information transmitted
for analysis.
NOTE
y
Smart Diagnosis™ cannot be activated
unless the appliance can be turned on using
the Power button. If the appliance cannot be
turned on, troubleshooting must be done
without using Smart Diagnosis™.
y
For best results, do not move the phone
while the tones are being transmitted.
y
If the call center agent is not able to get an
accurate recording of the data, you may be
asked to try again.
y
The Smart Diagnosis™ function depends on
the local call quality.
y
Bad call quality may result in poor data
transmission from your phone to the call
center, which could cause Smart Diagnosis™
to malfunction.
LG SmartThinQ Smart Diagnosis™
• For appliances with the or logo
Use the Smart Diagnosis feature in the LG
SmartThinQ application for help diagnosing
issues with the appliance without the
assistance of the LG Customer Information
Center.
Follow the instructions in the LG SmartThinQ
application to perform a Smart Diagnosis using
your smartphone.
NOTE
y
Smart Diagnosis™ cannot be activated
unless the appliance can be turned on using
the Power button. If the appliance cannot be
turned on, troubleshooting must be done
without using Smart Diagnosis™.
MFL67737658_E_A5.indd 37 2018. 7. 2. 오전 10:12

38
WARRANTY
THIS LIMITED WARRANTY DOES NOT COVER:
1. Service trips to deliver, pick up, or install the product or for instruction on product use.
2. Replacing house fuses or resetting of circuit breakers, correction of house wiring or plumbing, or correction of product
installation.
3. Damage or failure caused by leaky/ broken/ frozen water pipes, restricted drain lines, inadequate or interrupted water supply
or inadequate supply of air.
4. Damage or failure caused by accidents, pests and vermin, lightning, wind, fire, floods or acts of God.
5. Damage or failure resulting from misuse, abuse, improper installation, repair or maintenance. Improper repair includes use
of parts not approved or specified by LG.
6. Damage or failure caused by unauthorized modification or alteration to the product.
7. Damage or failure caused by incorrect electrical current, voltage, or plumbing codes.
8. Cosmetic damage, including scratches, dents, chips or other damage to the finish of the product, unless such damage
results from defects in materials or workmanship and is reported to LG within seven (7) calendar days from the date of
delivery.
9. Damage or missing items to any display, open box, discounted, or refurbished product.
10. Product where the original factory serial numbers have been removed, defaced or changed in any way.
11. Repairs when product is used in other than normal and usual household use (e.g. rental, commercial use, offices, or
recreational facilities) or contrary to the instructions outlined in the owner’s manual.
12. The removal and reinstallation of the Product if it is installed in an inaccessible location.
HOW SERVICE IS HANDLED: In-Home Service
In-home service will be provided, as available, during the warranty period subject to servicer availability within the U.S. To
receive in-home service, the product must be unobstructed and accessible to service personnel. If the in-home service repair
cannot be completed, it may be necessary to remove, repair and return the product. If in-home service is unavailable, LG may
elect, at its option, to provide for transportation of the product to and from an LG authorized service center.
THIS WARRANTY IS IN LIEU OF ANY OTHER WARRANTY, EXPRESS OR IMPLIED, INCLUDING AND WITHOUT LIMITATION
TO, ANY WARRANTY OF MERCHANTABILITY OR FITNESS FOR A PARTICULAR PURPOSE. TO THE EXTENT ANY IMPLIED
WARRANTY IS REQUIRED BY LAW, THIS WARRANTY IS LIMITED IN DURATION TO THE TERM PERIOD EXPRESSED ABOVE.
REPAIR OR REPLACEMENT AS PROVIDED UNDER THIS WARRANTY IS THE EXCLUSIVE REMEDY FOR THE CUSTOMER.
NEITHER THE MANUFACTURER NOR ITS U.S. DISTRIBUTOR SHALL BE LIABLE FOR ANY INCIDENTAL, CONSEQUENTIAL,
INDIRECT, SPECIAL, OR PUNITIVE DAMAGES OF ANY NATURE, INCLUDING AND WITHOUT LIMITATION TO, LOST REVENUES
OR PROFITS, OR ANY OTHER DAMAGE, WHETHER BASED IN CONTRACT, TORT, OR OTHERWISE.
SOME STATES DO NOT ALLOW THE EXCLUSION OR LIMITATION OF INCIDENTAL OR CONSEQUENTIAL DAMAGES OR
LIMITATIONS ON HOW LONG AN IMPLIED WARRANTY LASTS, SO THE ABOVE EXCLUSION OR LIMITATION MAY NOT APPLY
TO YOU. THIS WARRANTY GIVES YOU SPECIFIC LEGAL RIGHTS AND YOU MAY ALSO HAVE OTHER RIGHTS THAT VARY
FROM STATE TO STATE.
HOW TO OBTAIN WARRANTY SERVICE & ADDITIONAL INFORMATION: Write your warranty information below:
Call 1-800-243-0000 or visit our website at www.lg.com. Product Registration Information:
Mail to: LG Customer Information Center (ATTN: CIC) Model:
201 James Record Road, Huntsville, AL 35824 Serial Number:
Date of Purchase:
ARBITRATION NOTICE: THIS LIMITED WARRANTY CONTAINS AN ARBITRATION PROVISION THAT REQUIRES YOU AND
LG TO RESOLVE DISPUTES BY BINDING ARBITRATION INSTEAD OF IN COURT, UNLESS YOU CHOOSE TO OPT OUT. IN
ARBITRATION, CLASS ACTIONS AND JURY TRIALS ARE NOT PERMITTED. PLEASE SEE THE SECTION TITLED “PROCEDURE
FOR RESOLVING DISPUTES” BELOW.
WARRANTY:
LG Electronics U.S.A., Inc. (“LG”) warrants your LG Washing Machine (“product”) against defect in materials or workmanship
under normal household use, during the warranty period set forth below, LG will, at its option, repair or replace the product.
This limited warranty is valid only to the original retail purchaser of the product, is not assignable or transferrable to any
subsequent purchaser or user, and applies only when the product is purchased through an LG authorized dealer or distributor
and used within the United States (“U.S.”) including U.S. Territories.
Note: Replacement products and repair parts may be new or factory-remanufactured and are warranted for the remaining
portion of the original unit’s warranty period or ninety (90) days, whichever is longer. Please retain dated receipt or delivery
ticket as evidence of the Date of Purchase for proof of warranty (you may be required to submit a copy to LG or authorized
representative).
WARRANTY PERIOD:
LIMITED WARRANTY (USA)
Period
One (1) year from date of
original retail purchase:
Ten (10) years from date of
original retail purchase:
Lifetime from date of
original retail purchase:
Scope of Warranty
Any internal /functional
Parts & Labor
Drum Motor
(Stator, Rotor, and Hall Sensor)
Stainless Steel Drum
Remark
LG will provide parts & labor to
repair or replace defective parts.
Parts only. Customer will be responsible for any labor or in-home
service to replace defective parts.
MFL67737658_E_A5.indd 38 2018. 7. 2. 오전 10:12

39
ENGLISH
WARRANTY
PROCEDURE FOR RESOLVING DISPUTES:
ALL DISPUTES BETWEEN YOU AND LG ARISING OUT OF OR RELATING IN ANY WAY TO THIS LIMITED WARRANTY OR THE
PRODUCT SHALL BE RESOLVED EXCLUSIVELY THROUGH BINDING ARBITRATION, AND NOT IN A COURT OF GENERAL
JURISDICTION. BINDING ARBITRATION MEANS THAT YOU AND LG ARE EACH WAIVING THE RIGHT TO A JURY TRIAL AND TO
BRING OR PARTICIPATE IN A CLASS ACTION.
Definitions. For the purposes of this section, references to “LG” mean LG Electronics U.S.A., Inc., its parents, subsidiaries and affiliates,
and each of their officers, directors, employees, agents, beneficiaries, predecessors in interest, successors, assigns and suppliers;
references to “dispute” or “claim” shall include any dispute, claim or controversy of any kind whatsoever (whether based in contract,
tort, statute, regulation, ordinance, fraud, misrepresentation or any other legal or equitable theory) arising out of or relating in any way
to the sale, condition or performance of the product or this Limited Warranty.
Notice of Dispute. In the event you intend to commence an arbitration proceeding, you must first notify LG in writing at least 30 days
in advance of initiating the arbitration by sending a letter to LG at LG Electronics, USA, Inc. Attn: Legal Department- Arbitration 1000
Sylvan Ave, Englewood Cliffs 07632. You and LG agree to engage in good faith discussions in an attempt to amicably resolve your
claim. The notice must provide your name, address, and telephone number; identify the product that is the subject of the claim; and
describe the nature of the claim and the relief being sought. If you and LG are unable to resolve the dispute within 30 days, either party
may proceed to file a claim for arbitration.
Agreement to Binding Arbitration and Class Action Waiver. Upon failure to resolve the dispute during the 30 day period after sending
written notice to LG, you and LG agree to resolve any claims between us only by binding arbitration on an individual basis, unless you
opt out as provided below. Any dispute between you and LG shall not be combined or consolidated with a dispute involving any other
person’s or entity’s product or claim. More specifically, without limitation of the foregoing, any dispute between you and LG shall not
under any circumstances proceed as part of a class or representative action. Instead of arbitration, either party may bring an individual
action in small claims court, but that small claims court action may not be brought on a class or representative basis.
Arbitration Rules and Procedures. To begin arbitration of a claim, either you or LG must make a written demand for arbitration. The
arbitration will be administered by the American Arbitration Association (“AAA”) and will be conducted before a single arbitrator
under the AAA’s Consumer Arbitration Rules that are in effect at the time the arbitration is initiated (referred to as the “AAA Rules”)
and under the procedures set forth in this section. The AAA Rules are available online at www.adr.org/consumer. Send a copy of your
written demand for arbitration, as well as a copy of this provision, to the AAA in the manner described in the AAA Rules. You must
also send a copy of your written demand to LG at LG Electronics, USA, Inc. Attn: Legal Department- Arbitration 1000 Sylvan Avenue
Englewood Cliffs, NJ 07632. If there is a conflict between the AAA Rules and the rules set forth in this section, the rules set forth in this
section will govern. This arbitration provision is governed by the Federal Arbitration Act. Judgment may be entered on the arbitrator’s
award in any court of competent jurisdiction. All issues are for the arbitrator to decide, except that issues relating to the scope and
enforceability of the arbitration provision and to the arbitrability of the dispute are for the court to decide. The arbitrator is bound by
the terms of this provision.
Governing Law. The law of the state of your residence shall govern this Limited Warranty and any disputes between us except to the
extent that such law is preempted by or inconsistent with applicable federal law.
Fees/Costs. You do not need to pay any fee to begin an arbitration. Upon receipt of your written demand for arbitration, LG will
promptly pay all arbitration filing fees to the AAA unless you seek more than $25,000 in damages, in which case the payment of
these fees will be governed by the AAA Rules. Except as otherwise provided for herein, LG will pay all AAA filing, administration
and arbitrator fees for any arbitration initiated in accordance with the AAA Rules and this arbitration provision. If you prevail in the
arbitration, LG will pay your attorneys’ fees and expenses as long as they are reasonable, by considering factors including, but not
limited to, the purchase amount and claim amount. Notwithstanding the foregoing, if applicable law allows for an award of reasonable
attorneys’ fees and expenses, an arbitrator can award them to the same extent that a court would. If the arbitrator finds either the
substance of your claim or the relief sought in the demand is frivolous or brought for an improper purpose (as measured by the
standards set forth in Federal Rule of Civil Procedure 11(b)), then the payment of all arbitration fees will be governed by the AAA
Rules. In such a situation, you agree to reimburse LG for all monies previously disbursed by it that are otherwise your obligation to
pay under the AAA Rules. Except as otherwise provided for, LG waives any rights it may have to seek attorneys’ fees and expenses
from you if LG prevails in the arbitration.
Hearings and Location. If your claim is for $25,000 or less, you may choose to have the arbitration conducted solely on the basis of
(1) documents submitted to the arbitrator, (2) through a telephonic hearing, or (3) by an in-person hearing as established by the AAA
Rules. If your claim exceeds $25,000, the right to a hearing will be determined by the AAA Rules. Any in-person arbitration hearings
will be held at a location within the federal judicial district in which you reside unless we both agree to another location or we agree to
a telephonic arbitration.
Opt Out. You may opt out of this dispute resolution procedure. If you opt out, neither you nor LG can require the other to participate
in an arbitration proceeding. To opt out, you must send notice to LG no later than 30 calendar days from the date of the first consumer
purchaser’s purchase of the product by either: (i) sending an e-mail to [email protected], with the subject line: “Arbitration Opt Out”
or (ii) calling 1-800-980-2973. You must include in the opt out e-mail or provide by telephone: (a) your name and address; (b) the date
on which the product was purchased; (c) the product model name or model number; and (d) the serial number (the serial number can
be found (i) on the product; or (ii) online by accessing https://www.lg.com/us/support/repair-service/schedule-repair-continued and
clicking on “Find My Model & Serial Number”).
You may only opt out of the dispute resolution procedure in the manner described above (that is, by e-mail or telephone); no other
form of notice will be effective to opt out of this dispute resolution procedure. Opting out of this dispute resolution procedure will not
affect the coverage of the Limited Warranty in any way, and you will continue to enjoy the full benefits of the Limited Warranty. If you
keep this product and do not opt out, then you accept all terms and conditions of the arbitration provision described above.
MFL67737658_E_A5.indd 39 2018. 7. 2. 오전 10:12
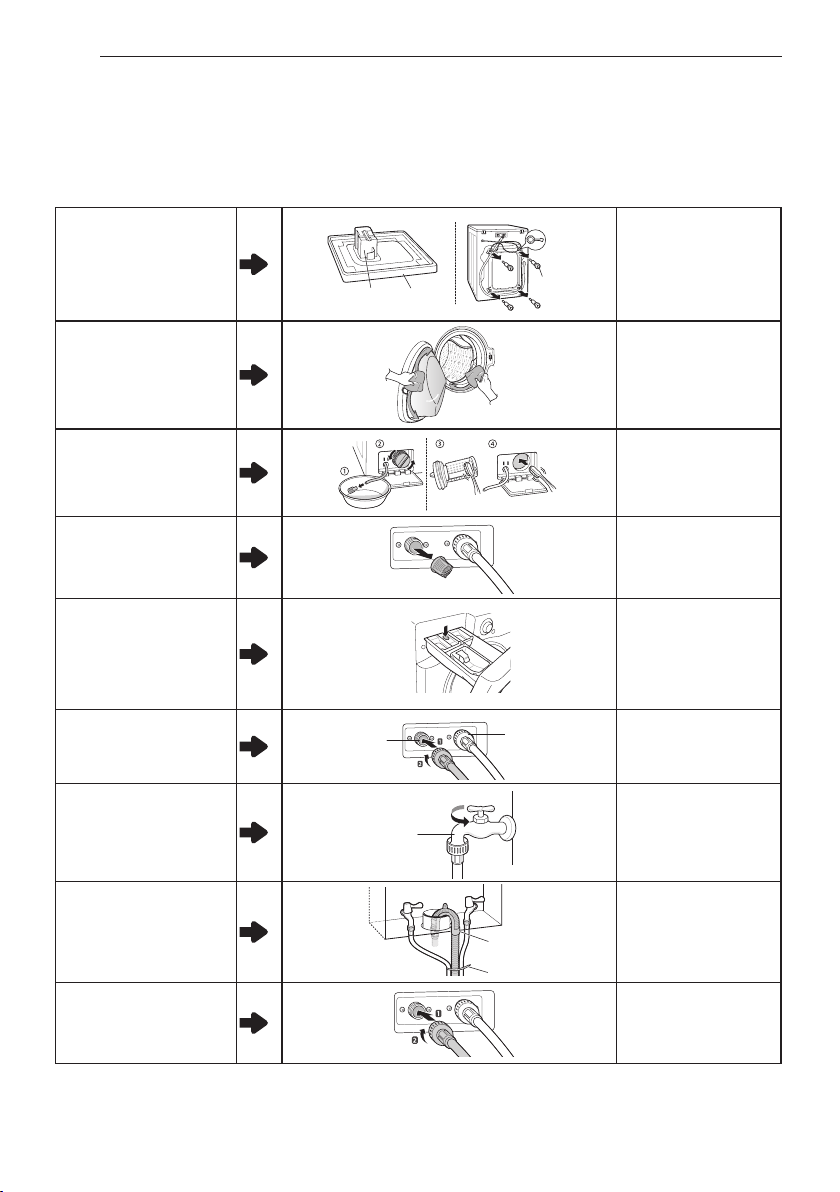
40
WARRANTY
With regard to damages or failures resulting from misuse, improper installation, maintenance, natural disaster or repair (unauthorized
technician or parts, as specified by LG), customer will be charged for the repair.
Strange vibration or noise
caused by not removing
shipping bolts or tub
support.
Tub
support
Carton
base
shipping
bolts
Inlet Filter
Dispenser
Cold
Water
Inlet
Hot
Water
Inlet
water tap
Elbow
Bracket
Tie Strap
High
Pressure
Water
Natural
Sudden
stopping
Loud noise
Hit!!
Level
1°
Remove the shipping
bolts and tub support.
Leakage caused by dirt (hair,
lint) on gasket and door
glass.
Tub
support
Carton
base
shipping
bolts
Inlet Filter
Dispenser
Cold
Water
Inlet
Hot
Water
Inlet
water tap
Elbow
Bracket
Tie Strap
High
Pressure
Water
Natural
Sudden
stopping
Loud noise
Hit!!
Level
1°
Clean the gasket & door
glass.
Not draining due to clogged
pump filter.
Tub
support
Carton
base
shipping
bolts
Inlet Filter
Dispenser
Cold
Water
Inlet
Hot
Water
Inlet
water tap
Elbow
Bracket
Tie Strap
High
Pressure
Water
Natural
Sudden
stopping
Loud noise
Hit!!
Level
1°
Clean the pump filter.
Water is not filling properly
because water inlet valve
filters are clogged or water
inlet hoses are kinked.
Tub
support
Carton
base
shipping
bolts
Inlet Filter
Dispenser
Cold
Water
Inlet
Hot
Water
Inlet
water tap
Elbow
Bracket
Tie Strap
High
Pressure
Water
Natural
Sudden
stopping
Loud noise
Hit!!
Level
1°
Clean the inlet valve
filter or reinstall the
water inlet hoses.
Water is not filling properly
because too much detergent
use.
Tub
support
Carton
base
shipping
bolts
Inlet Filter
Dispenser
Cold
Water
Inlet
Hot
Water
Inlet
water tap
Elbow
Bracket
Tie Strap
High
Pressure
Water
Natural
Sudden
stopping
Loud noise
Hit!!
Level
1°
Clean the detergent
disperser drawer.
Laundry is hot or warm after
finished washing because
the inlet hoses are installed
in reverse.
Tub
support
Carton
base
shipping
bolts
Inlet Filter
Dispenser
Cold
Water
Inlet
Hot
Water
Inlet
water tap
Elbow
Bracket
Tie Strap
High
Pressure
Water
Natural
Sudden
stopping
Loud noise
Hit!!
Level
1°
Reinstall the inlet hoses.
Water is not supplied
because the water tap is not
turned on.
Tub
support
Carton
base
shipping
bolts
Inlet Filter
Dispenser
Cold
Water
Inlet
Hot
Water
Inlet
water tap
Elbow
Bracket
Tie Strap
High
Pressure
Water
Natural
Sudden
stopping
Loud noise
Hit!!
Level
1°
Turn on the water tap.
Leakage caused by improper
installation of drain hose or
clogged drain hose.
Tub
support
Carton
base
shipping
bolts
Inlet Filter
Dispenser
Cold
Water
Inlet
Hot
Water
Inlet
water tap
Elbow
Bracket
Tie Strap
High
Pressure
Water
Natural
Sudden
stopping
Loud noise
Hit!!
Level
1°
Reinstall the drain hose.
Leakage caused by improper
installation of water inlet
hose or use of non-LG
hoses.
Tub
support
Carton
base
shipping
bolts
Inlet Filter
Dispenser
Cold
Water
Inlet
Hot
Water
Inlet
water tap
Elbow
Bracket
Tie Strap
High
Pressure
Water
Natural
Sudden
stopping
Loud noise
Hit!!
Level
1°
Reinstall the inlet hose.
THIS LIMITED WARRANTY DOES NOT COVER THE
FOLLOWING CASES
MFL67737658_E_A5.indd 40 2018. 7. 2. 오전 10:12
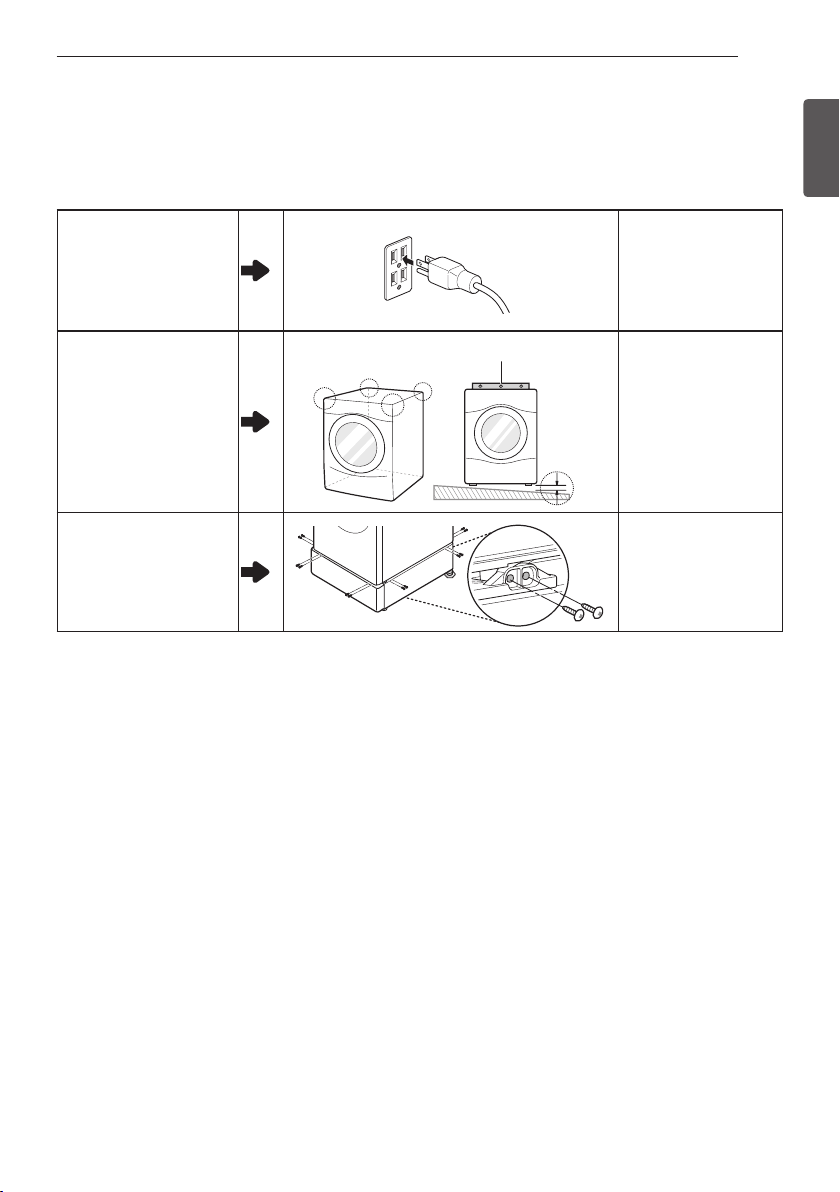
41
ENGLISH
WARRANTY
Lack of power caused by
loose connection of power
cord or electrical outlet
problem.
Tub
support
Carton
base
shipping
bolts
Inlet Filter
Dispenser
Cold
Water
Inlet
Hot
Water
Inlet
water tap
Elbow
Bracket
Tie Strap
High
Pressure
Water
Natural
Sudden
stopping
Loud noise
Hit!!
Level
1°
Reconnect the power
cord or change the
electrical outlet.
Service trips to deliver, pick
up, install the product or
for instruction on product
use. The removal and
reinstallation of the Product.
Tub
support
Carton
base
shipping
bolts
Inlet Filter
Dispenser
Cold
Water
Inlet
Hot
Water
Inlet
water tap
Elbow
Bracket
Tie Strap
High
Pressure
Water
Natural
Sudden
stopping
Loud noise
Hit!!
Level
1°
The warranty covers
manufacturing defects
only. Service resulting
from improper
Installation is not
covered.
If all screws are not
installed properly, it may
cause excessive vibration
(Pedestal model only).
Tub
support
Carton
base
shipping
bolts
Inlet Filter
Dispenser
Cold
Water
Inlet
Hot
Water
Inlet
water tap
Elbow
Bracket
Tie Strap
High
Pressure
Water
Natural
Sudden
stopping
Loud noise
Hit!!
Level
1°
Install 4 screws at each
corner (Total 16EA).
MFL67737658_E_A5.indd 41 2018. 7. 2. 오전 10:12

42
MEMO
MFL67737658_E_A5.indd 42 2018. 7. 2. 오전 10:12

43
ENGLISH
MEMO
MFL67737658_E_A5.indd 43 2018. 7. 2. 오전 10:12

44
MEMO
MFL67737658_E_A5.indd 44 2018. 7. 2. 오전 10:12

45
ENGLISH
MEMO
MFL67737658_E_A5.indd 45 2018. 7. 2. 오전 10:12

46
MEMO
MFL67737658_E_A5.indd 46 2018. 7. 2. 오전 10:12

Por favor lea atentamente este manual del usuario antes de operar
la máquina y consérvelo en un lugar a mano en todo momento en
caso de que necesite consultarlo.
WM3997H*A
ESPAÑOL
MANUAL DE
PROPIETARIO
LAVADORA
MFL67737658
www.lg.com
Copyright © 2014 - 2018 LG Electronics Inc. Todos los Derechos Reservados.
MFL67737658_S_A5.indd 1 2018. 7. 2. 오전 10:29

2
ÍNDICE
ÍNDICE
3 CARACTERÍSTICAS DEL PRODUCTO
4 INSTRUCCIONES IMPORTANTES DE
SEGURIDAD
4 PRECAUCIONES BÁSICAS DE SEGURIDAD
5 INSTRUCCIONES PARA LA CONEXIÓN A
TIERRA
6 INSTRUCCIONES DE SEGURIDAD PARA LA
INSTALACIÓN
7 INSTRUCCIONES DE SEGURIDAD PARA LA
UTILIZACIÓN, CUIDADO Y LIMPIEZA, Y LA
ELIMINACIÓN
8 INTRODUCCIÓN A LA LAVADORA
8 Partes y Accesorios
9 Características del panel de control
11 INSTRUCCIONES DE INSTALACIÓN
11 Vista previa del orden de instalación
12
Comprobación y elección de la ubicación adecuada
13
Desembalaje y retiro de los tornillos de transporte
14 Conexión de las tuberías de agua
15 Conexión del tubo de desagüe
16 Nivelación de la lavadora
17 Conexión del enchufe y la toma de tierra
17 Prueba de funcionamiento
18 PREPARACIÓN
18 Clasificación de las cargas de lavado
18 - Precauciones para el cuidado de los tejidos
antes del ciclo de lavado
19 - Etiquetas de cuidado de las telas
19 - Clasificación de la carga de ropa
20 Utilización del detergente/suavizante
20 - Detergente recomendado
20 - Cargando el dispensador
22 UTILIZACIÓN DE LA LAVADORA
22 Funcionamiento básico
23 Guía de ciclos
24 Ciclo principal
24 -
Reducir el alergeno en lavandería, Allergiene™
24 - Reducir las bacterias en la colada, Sanitary
24 - Para tejidos blancos, Bright Whites™
24 - Mantas o ropa voluminosa, Bulky/Large
24 - Muy sucias de algodón, Heavy Duty
24 - Ropa normal, Cotton/Normal
24 - Para toallas, Towels
24 - Ropa sin arrugas, Perm. Press
24 - Prendas de lana, Hand Wash/Wool
24 - Prendas delicadas, Delicates
24 - Lavado rápido, Speed Wash
24 - Para pocos articulos, Small Load
24 - Sólo desagüe y centrifugado, Drain+Spin
25 Botones de ajuste de ciclo
25 Opciones de ajuste antes del ciclo
25 -
Ajuste de la temperatura del agua, Wash Temp.
25 -
Ajuste de la velocidad de centrifugado, Spin Speed
25 -
Ajuste del nivel de suciedad de la colada, Soil Level
26 - Ajuste el tiempo de secado, Dry
27 - Prelavado, Pre Wash
27 -
Sólo enjuagar, escurrir y centrifugar, Rinse + Spin
27 -
Añadiendo ciclo de enjuague extra, Extra Rinse
27 - Preajuste del tiempo de inicio, Delay Wash
27 - Alta temperatura, Steam
27 - Ahorro de energía,
Cold Wash™
28 - Ahorro de tiempo, Turbo Wash™
28 Opciones de ajuste durante el ciclo
28 - Función de bloqueo de botones, Child Lock
28 -
Como guardar ciclo personalizado, PGM Save
28 -
Cómo seleccionar su ciclo personalizado,
Custom PGM
28 -
Gira la ropa para evitar arrugas, Fresh Care
28 -
Alumbrado tambor, Drum Light
29 MANTENIMIENTO
29 Cuidados
29 - Cuidados tras el lavado
29 - Cuidados en climas fríos
30 Limpieza
30 - Limpieza del tambor, Tub Clean
31 -
Limpieza del cajón dispensador de detergente
31 - Limpieza de los filtros de entrada de agua
32 - Limpieza del filtro de la bomba de desagüe
32 - Limpieza de la junta de la puerta
33 SOLUCIÓN DE PROBLEMAS
33 Comprobación de los mensajes de error
34 Antes de llamar al servicio técnico
35 ESPECIFICACIONES
36
FUNCIÓN SMART DIAGNOSIS™
(DIAGNÓSTICO INTELIGENTE)
37
GARANTÍA
MFL67737658_S_A5.indd 2 2018. 7. 2. 오전 10:29

3
ESPAÑOL
CARACTERÍSTICAS DEL PRODUCTO
CARACTERÍSTICAS DEL PRODUCTO
MOTOR DIRECT-DRIVE INVERTER
El motor inverter direct drive, montado en el tambor, puede producir diferentes movimientos para lograr
unos resultados de lavado óptimos, con muy poco ruido y vibraciones. El conjunto del motor también
contiene menos partes en movimiento, lo que supone menos reparaciones.
Smart Diagnosis™
Si experimenta alguna dificultad técnica con su lavadora, éste tiene la capacidad de transmitir información
por teléfono al Centro de Atención al Cliente. El agente de servicio al cliente guarda la información
transmitida de su máquina y la utiliza para analizar el problema, facilitándole un diagnóstico rápido y
efectivo. (Consulte la página 36)
TUB CLEAN
La limpieza regular del tambor, una vez al mes, utilizando TUB CLEAN ayudará a mantener el tambor
limpio y fresco.
RETENEDOR DE PUERTA (STOPER) MAGNÉTICO
Mantenga la puerta ligeramente abierta de manera segura y conveniente utilizando el retenedor
magnético. Ésto ayudará con la circulación del aire y mantendrá fresco el interior de la máquina. Para
utilizar esta función, retire la ropa limpia y luego coloque la puerta en una posición tal que esté casi
cerrada. Cuando el retenedor magnético entre en contacto con el metal del gabinete de la lavadora, se
mantendrá la puerta ligeramente abierta permitiendo que se seque el interior de la unidad.
TAMBOR DE ACERO INOXIDABLE DE GRAN CAPACIDAD
El tambor de acero inoxidable de gran capacidad ofrece máxima durabilidad y se inclina mejorando la
eficiencia y permitiendo acceso más facil para prendas grandes.
CHILD LOCK
Use esta opción para desactivar los controles durante un ciclo de lavado.Esta opción evita que los niños
puedan cambiar los ciclos o el funcionamiento de la máquina.
CAJÓN DISPENSADOR DE DETERGENTE
El cajón dispensador de cuatro compartimentos facilita la separación del detergente de prelavado,
detergente de lavado principal, blanqueador líquido, y suavizante en compartimentos diferentes.
CICLOS DE VAPOR DE ALTA TEMPERATURA
Durante los excepcionales ciclos de vapor de LG, la opción de vapor de alta temperatura ayuda a remover
las manchas más difíciles.
MFL67737658_S_A5.indd 3 2018. 7. 2. 오전 10:29

4
INSTRUCCIONES IMPORTANTES DE SEGURIDAD
INSTRUCCIONES IMPORTANTES DE SEGURIDAD
LEA TODAS LAS INSTRUCCIONES ANTES DE USAR
ADVERTENCIA
Por su seguridad, debe seguir la informacion indicada en este manual para minimizar el riesgo de incendio,
explosión o descarga eléctrica, o para prevenir danos a la propiedad, lesiones personales o muerte.
Su seguridad y la de otros es muy importante.
Hemos incluido muchos mensajes importantes de seguridad en este manual y en su electrodoméstico.
Lea y cumpla siempre con todos los mensajes de seguridad.
Éste es el símbolo de alerta de seguridad.
El mismo alerta sobre potenciales riesgos de muerte o heridas tanto para usted como para otras personas.
Todos los mensajes de seguridad estaran a continuacion del simbolo de alerta de seguridad y con la
palabra ADVERTENCIA o PRECAUCIÓN. Estas palabras significan:
ADVERTENCIA
Corre riesgo de muerte o de sufrir heridas serias si no sigue las instrucciones.
PRECAUCIÓN
De no seguir las instrucciones podría sufrir daños leves o causar daños en el producto.
Todos los mensajes de seguridad le indicarán cuál es el riesgo potencial, cómo reducir las
posibilidades de sufrir heridas y qué podría suceder si no se siguen las instrucciones.
PRECAUCIONES BÁSICAS DE SEGURIDAD
ADVERTENCIA
Para minimizar el riesgo de incendio, explosión o descarga eléctrica, o para prevenir lesiones personales
cuando use electrodomesticos, se deben seguir precauciones basicas de seguridad, incluyendo las siguientes:
• Utilice este electrodoméstico solo para los fines para los que
fue diseñado, según lo descrito en este manual del usuario.
N’utilisez votre laveuse qu’aux fins prevues decrites dans ce
manuel du proprietaire.
• Antes de usar, la lavadora debe estar correctamente
instalada como se describe en este manual.
• No lave artículos que han sido limpiados, lavados, remojados
o salpicados previamente con gasolina, disolventes de
limpieza en seco, u otras substancias inflamables o
explosivas, ya que emanan vapores que podrian
encenderse o explotar.
• No agregue gasolina, disolventes de limpieza en seco u otras
substancias explosivas al agua de lavado. Estas substancias
emanan vapores que podrian encenderse o explotar.
• Bajo ciertas condiciones, se puede producir gas
hidrogeno en un sistema de agua caliente que no se haya
usado por un plazo de 2 semanas o mas. EL GAS
HIDROGENO ES EXPLOSIVO. Si no se ha usado el sistema
de agua caliente durante tal periodo, antes de utilizar la
lavadora, abra todas las llaves de agua caliente y deje que el
agua fluya durante algunos minutos. Esto liberara cualquier
gas hidrogeno acumulado. Ya que el gas es inflamable, no
fume ni use ninguna llama abierta durante este periodo.
•
No deje que los niños jueguen en la lavadora o dentro de ella. Es
necesario supervisar de cerca a los niños si utiliza la lavadora cerca
de ellos.
• Antes de poner la lavadora fuera de servicio o de tirarla,
quite la puerta para prevenir que los ninos se metan dentro.
• No instale ni guarde la lavadora en lugares donde estará
expuesta a la intemperie o a temperaturas de
congelamiento.
• No toquetee los controles.
• Mantenga el área alrededor y bajo el dispositivo libre de
materiales combustibles, como pelusa, papel, trapos,
productos quimicos, etc.
• No repare ni cambie ninguna pieza de la lavadora ni intente
dar un mantenimiento diferente al descrito en este manual.
Recomendamos enfaticamente que el mantenimiento lo
brinde una persona calificada.
•
Vea las intrucciones de instalación para los requisitos de toma a
tierra.
• Siga SIEMPRE las instrucciones de cuidado de la tela
suministradas por el fabricante de las prendas.
• No coloque artículos expuestos a aceite de cocina en su
lavadora. Los articulos contaminados con aceites de
cocina podrian causar una reaccion quimica que cause
que la carga de lavado se incendie.
• Use suavizadores de tela o productos para eliminar estatica
unicamente del modo recomendado por el fabricante.
• Esta lavadora no está diseñada para uso marino o
instalaciones moviles tales como vehiculos recreativos,
aeronaves, etc.
•
Cierre las llaves de agua y desenchufe la lavadora si no utilizará la
unidad por un periodo prolongado de tiempo, como durante las
vacaciones.
• El material de empaque podría resultar peligroso para los
niños. Existe el peligro de sofocación! Mantenga todos los
materiales de empaque fuera del alcance de los niños.
• Antes de cargar la lavadora, siempre revise que no haya
objetos extranos en su interior. Mantenga la puerta cerrada
cuando no se use.
• No coloque las manos dentro del electrodoméstico si el
tambor o el agitador están en movimiento.
MFL67737658_S_A5.indd 4 2018. 7. 2. 오전 10:29

5
ESPAÑOL
INSTRUCCIONES IMPORTANTES DE SEGURIDAD
INSTRUCCIONES IMPORTANTES DE SEGURIDAD
LEA TODAS LAS INSTRUCCIONES ANTES DE USAR
ADVERTENCIA
Por su seguridad, se debe seguir la informacion indicada en este manual para minimizar el riesgo de
incendio, explosión o descarga eléctrica, o para prevenir danos a la propiedad, lesiones personales, o
muerte.
INSTRUCCIONES PARA LA CONEXIÓN A TIERRA
Este aparato debe ser conectado a tierra. En el caso de descompostura o mal funcionamiento, la conexion
a tierra reduce el riesgo de recibir una descarga electrica al proveer una via de menor resistencia a la
corriente electrica. Este aparato esta equipado con un cable que tiene un conductor de equipo a tierra y una
clavija de tierra. La clavija debe ser conectada en una toma de corriente adecuada que este apropiadamente
instalada y conectada a tierra de acuerdo con los codigos y ordenanzas locales.
ADVERTENCIA
Una conexion inapropiada del conductor de equipo a tierra puede resultar en riesgo de recibir una descarga
electrica. Verifique con un electricista calificado si tiene dudas sobre si el aparato esta correctamente
conectado a tierra. No modifique la clavija provista
con el aparato. Si no encaja con la toma de corriente, llame a un electricista calificado para que instale
una toma de corriente adecuada. Si no se cumple con esta advertencia se podran producir heridas graves,
incendios, descargas electricas, o muerte.
MFL67737658_S_A5.indd 5 2018. 7. 2. 오전 10:29

6
INSTRUCCIONES IMPORTANTES DE SEGURIDAD
INSTRUCCIONES IMPORTANTES DE SEGURIDAD
LEA TODAS LAS INSTRUCCIONES ANTES DE USAR
ADVERTENCIA
Por su seguridad, se debe seguir la informacion indicada en este manual para minimizar el riesgo de
incendio, explosión o descarga eléctrica, o para prevenir danos a la propiedad, lesiones personales o muerte.
INSTRUCCIONES DE SEGURIDAD PARA LA INSTALACIÓN
ADVERTENCIA
Para minimizar el riesgo de incendio o explosion, descarga electrica, o para prevenir lesiones personales
cuando use electrodomesticos, se deben seguir precauciones basicas de seguridad, incluyendo las siguientes:
• Consulte las INSTRUCCIONES DE INSTALACION para un
procedimiento detallado de conexion a tierra. Las
instrucciones de instalacion son incluidas con su
lavadora para ser utilizadas como referencia. Si mueve la
lavadora a una nueva ubicación, contrate a una persona
del servicio calificada para que la revise y reinstale. Si no
se cumple con esta advertencia se podran producir
heridas graves, incendios, descargas electricas, o
muerte.
• Bajo ninguna circunstancia deberá cortar o eliminar la
tercera punta (de toma a tierra) del cable de alimentación.
Si no se cumple con esta advertencia se podran producir
heridas graves, incendios, descargas electricas, o
muerte.
• Para su seguridad personal, este electrodomestico debe
estar adecuadamente conectado a tierra. Si no se cumple
con esta advertencia se podran producir heridas graves,
incendios, descargas electricas, o muerte.
• El cable de corriente de este electrodomestico contiene un
enchufe de 3 cables (conexion a tierra) que se conecta a un
tomacorriente de pared estandar de 3 cables (conexion a
tierra) para minimizar la posibilidad de riesgos de
descargas electricas por parte del mismo.
• La lavadora debera estar conectada a un tomacorriente con
conexion a tierra de 120VAC, 60 Hz. Si no se cumple con
esta advertencia se podran producir heridas graves,
incendios, descargas electricas, o muerte.
• Contrate a un electricista calificado para que revise el
tomacorriente y el circuito electrico con el fin de asegurar
que el enchufe este correctamente conectado a tierra. Si
no se cumple con esta advertencia se podran producir
heridas graves, incendios, descargas electricas, o
muerte.
• En caso de contar con un tomacorriente de pared de 2
cables, es su responsabilidad y obligacion reemplazarlo por
un tomacorriente de pared de 3 cables correctamente
conectado a tierra. Si no se cumple con esta advertencia
se podran producir heridas graves, incendios, descargas
electricas, o muerte.
• No instale la lavadora sobre una alfombra. Instale la
lavadora sobre un piso sólido. El incumplimiento de esta
advertencia puede causar daños provocados por fuga de
agua.
• No elimine el cable de conexion a tierra. No use un
adaptador o cable de extensión. Conecte la lavadora en un
tomacorriente con conexion a tierra de 3 cables. Si no se
cumple con esta advertencia se podran producir heridas
graves, incendios, descargas electricas, o muerte.
• La lavadora deberá estar siempre conectada a un enchufe
individual con un indice de voltaje equivalente al que figura
en su etiqueta de caracteristicas tecnicas. Esto garantiza el
mejor funcionamiento y ademas previene la sobrecarga
de los circuitos del hogar, lo cual podria ocasionar
riesgos de incendio debido al recalentamiento de cables.
• Nunca desenchufe su lavadora tirando del cable de
corriente. Siempre tome el enchufe firmemente y jale el
mismo hacia fuera para retirarlo. Si no se cumple con esta
advertencia se podran producir heridas graves,
incendios, descargas electricas, o muerte.
• Repare o reemplace de inmediato todos los cables de
corriente pelados o con cualquier tipo de dano. No use un
cable con cortaduras o abrasion sobre su extension o
extremos. Si no se cumple con esta advertencia se
podran producir heridas graves, incendios, descargas
electricas, o muerte.
• Al instalar o cambiar de lugar la lavadora, evite todo tipo de
cortes u otros danos en el cable de corriente. Si no se
cumple con esta advertencia se podran producir heridas
graves, incendios, descargas electricas, o muerte.
• La lavadora debe ser instalada y conectada a tierra por una
persona especializada del servicio tecnico cumpliendo con
los codigos locales para prevenir riesgos de descargas y
asegurar la estabilidad durante el funcionamiento.
• La lavadora es pesada. Se necesitan dos o mas personas
para instalar y trasladar el electrodomestico. Si esto no se
cumple se podran producir diversas heridas.
• Almacene e instale la lavadora donde no esté expuesta a
temperaturas bajo cero o a condiciones climáticas en áreas
exteriores. Si no se cumple con esta advertencia se
podrán producir daños por fugas de agua.
• Para reducir el riesgo de descargas eléctricas, no instale la
lavadora en espacios con humedad. Si no se cumple con
esta advertencia se podran producir heridas graves,
incendios, descargas electricas, o muerte.
• Para reducir el riesgo de lesiones personales, cumpla con
todos los procedimientos de seguridad recomendados por
la industria, incluyendo el uso de guantes con mangas
largas y gafas de seguridad. En caso de no cumplir con
todas las advertencias de seguridad de este manual se
podrán producir daños sobre la propiedad, lesiones
personales o la muerte.
MFL67737658_S_A5.indd 6 2018. 7. 2. 오전 10:29

7
ESPAÑOL
INSTRUCCIONES IMPORTANTES DE SEGURIDAD
INSTRUCCIONES IMPORTANTES DE SEGURIDAD
LEA TODAS LAS INSTRUCCIONES ANTES DE USAR
ADVERTENCIA
Por su seguridad, se debe seguir la informacion indicada en este manual para minimizar el riesgo de
incendio, explosión o descarga eléctrica, o para prevenir danos a la propiedad, lesiones personales o muerte.
INSTRUCCIONES DE SEGURIDAD PARA LA UTILIZACIÓN, CUIDADO Y LIMPIEZA, Y LA ELIMINACIÓN
ADVERTENCIA
Para minimizar el riesgo de incendio, explosión o descarga eléctrica, o para prevenir lesiones personales
cuando use electrodomesticos, se deben seguir precauciones basicas de seguridad, incluyendo las siguientes:
GUARDE ESTAS INSTRUCCIONES
• Desenchufe la lavadora antes de limpiar la misma
para evitar el riesgo de descargas electricas.
• Nunca utilice químicos fuertes, limpiadores
abrasivos o solventes para limpiar su lavadora. Los
mismos dañaran el acabado de la unidad.
• No coloque trapos con grasa o aceite encima de la
lavadora. Estas sustancias emiten vapores que
podrían prender fuego a los materiales.
• No lave prendas que esten sucias con aceite
vegetal o de cocina. Las mismas pueden quedar
con algo de aceite luego del lavado. Debido al
aceite que permanece, la tela puede despedir
humo o prenderse fuego por si sola.
• Desconecte este electrodomestico del
tomacorriente antes de realizar cualquier tipo de
mantenimiento. Colocar los controles en la
posicion OFF (apagado) no desconecta el
electrodomestico de la toma de corriente. No
cumplir con esta advertencia, podrá ocasionar
heridas graves, incendios, descargas electricas,
o muerte.
• No combine diferentes productos de lavanderia en
una misma carga a menos que esto se especifique
en la etiqueta.
• No mezcle cloro con amoníaco o ácidos como el
vinagre. Siga las instrucciones del paquete cuando
utilice productos de lavandería. El uso incorrecto
puede producir gases tóxicos, lo que podría
resultar en lesiones graves o la muerte.
• No coloque las manos dentro de la lavadora
cuando sus partes esten en movimiento. Antes de
cargar, descargar o agregar prendas, pulse el
boton de INICIO/PAUSA y espere hasta que el
tambor se detenga totalmente antes de colocar las
manos dentro. Si no se cumple con esta
advertencia se podran producir heridas graves,
incendios, descargas electricas, o muerte.
• No permita que los ninos jueguen sobre o dentro
de la lavadora. Si hay ninos cerca mientras la
lavadora esta en funcionamiento es necesario
supervisarlos de cerca. A medida que los ninos
crezcan, enseneles sobre el uso adecuado y
seguro de todos los electrodomesticos. Si estas
advertencias no se cumplen se podrian producir
heridas graves.
• Destruya la bolsa plastica y otros materiales de
embalaje una vez retirada la lavadora. Es posible
que los ninos deseen usarlas para jugar. Los
cartones cubiertos con alfombra, colchas o
laminas de plastico se pueden convertir en
camaras hermeticas. Si estas advertencias no se
cumplen se podrian producir heridas graves o
muerte.
• Mantenga los productos de lavanderia fuera del
alcance de los ninos. Para evitar heridas, cumpla
con todas las advertencias que figuran en las
etiquetas de los productos. Si estas advertencias
no se cumplen se podrian producir heridas
graves.
• Antes de retirar la lavadora para su reparación o
eliminación, suelte la puerta del compartimento de
lavado para evitar que los niños o animales
pequeños puedan quedar atrapados en el interior.
El no hacerlo puede ocasionar lesiones
personales graves o la muerte.
• Asegúrese que el cajón dispensador esté cerrado
en todo momento cuando no lo esté llenando con
productos para lavar. No mantener el cajón
cerrado puede causar heridas personales o
inundación.
MFL67737658_S_A5.indd 7 2018. 7. 2. 오전 10:29
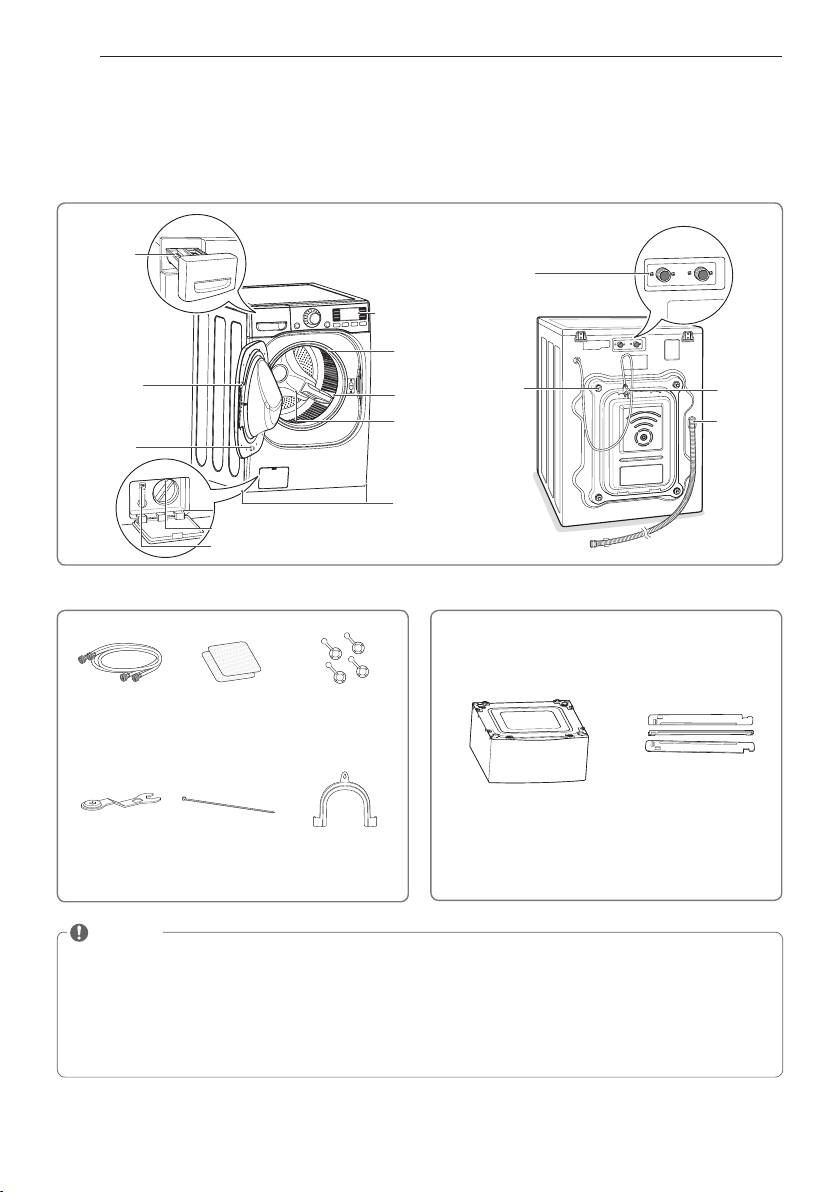
8
INTRODUCCIÓN A LA LAVADORA
NOTA
y
Póngase en contacto con el Departamento de atención al cliente de LG, en el número 1-800-243-0000
(1-888-542-2623 en Canadá) si falta alguno de los accesorios.
y
Para su seguridad, y con el fin de extender la vida útil de su lavadora, utilice sólo componentes
autorizados. El fabricante no se hace responsable de los fallos del producto o accidentes causados por
la utilización de piezas o componentes no autorizados.
y
Las imágenes de esta guía pueden no coincidir con los componentes y accesorios reales, y están
sujetas a cambios sin previo aviso para mejoras en el producto.
Accesorios
INTRODUCCIÓN A LA LAVADORA
Partes y Accesorios
Partes
Cajón
dispensador
de detergente
(véase página 20)
Puerta
Pasador de
puerta(stoper)
magnético
(véase página 3)
Panel de control
(véase página 9).
Sello de goma
de la puerta
TurboWash™ Boquilla superior
Tambor
Patas niveladoras
Tapa del filtro de bomba de desagüe
Filtro de bomba de desagüe
Manguera de desagüe
Entradas de
agua
Tornillos
de
transporte
Cable de
alimentación
Manguera
de desagüe
Pedestal
(Adquirido por separado)
Paquete de apilado
(Adquirido por separado)
Mangueras de
agua caliente/fría
Gomas
antideslizantes
Tapones para
cubrir los orificios
de los tornillos de
transporte
Llave Brida
Soporte de codo
(para fijar la
manguera de
desagüe)
Accesorios incluidos Accesorios opcionales
MFL67737658_S_A5.indd 8 2018. 7. 2. 오전 10:29
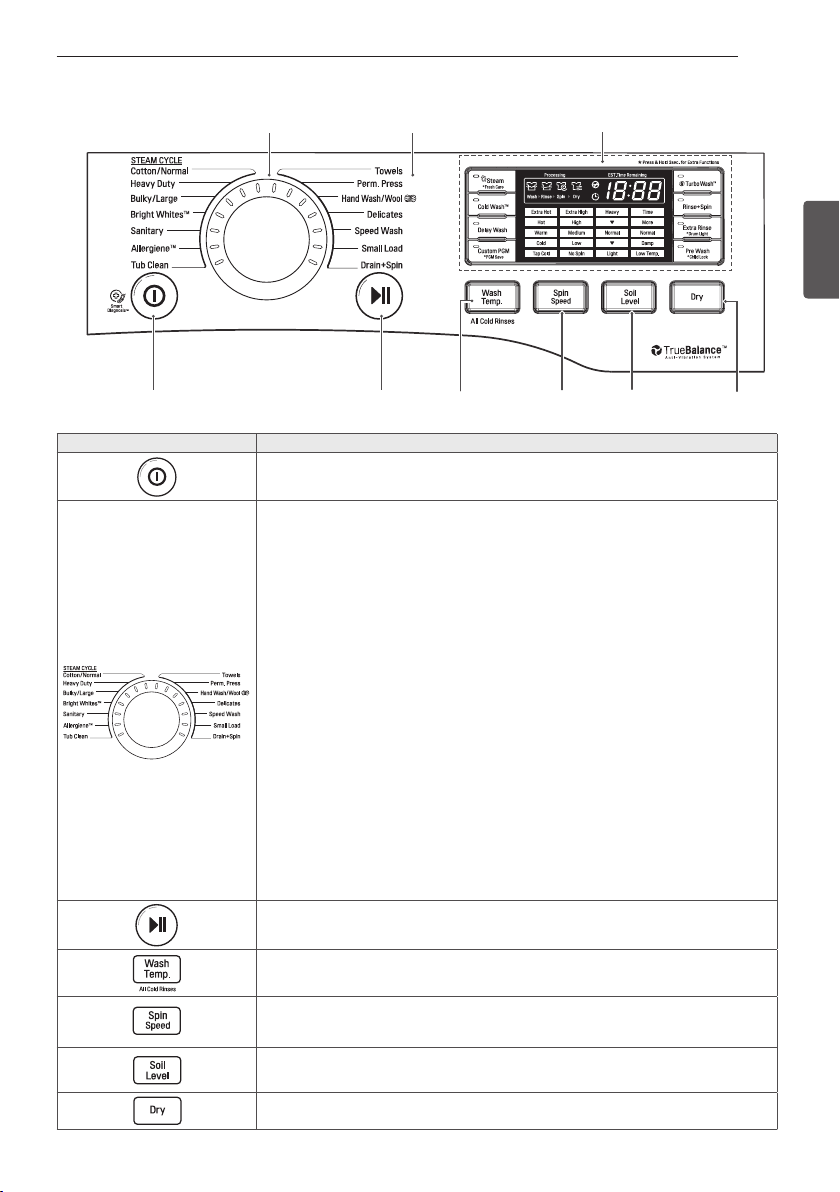
9
ESPAÑOL
INTRODUCCIÓN A LA LAVADORA
Botón Descripción
y
Enciende y apaga la lavadora.
y
(Durante el ciclo de lavado) Detiene el funcionamiento, y cancela los ajustes.
y
Tub Clean
- Para la limpieza de la cuba (véase página 30)
y
Allergiene™
- Para algodón, ropa interior (véase página 24)
y
Sanitary
- Para ropa interior, pañales, etc. (véase página 24)
y
Bright Whites™
- Para prendas blancas (véase página 24)
y
Bulky/Large
- Para mantas o prendas voluminosas (véase página 24)
y
Heavy Duty
- Para prendas de algodón muy sucias (see page 24)
y
Cotton/Normal
-
Para el lavado general, como camisetas de algodón o toallas (véase página 24)
y
Towels
- Para toallas (véase página 24)
y
Perm. Press
- Para tejidos sin arrugas (véase página 24)
y
Hand Wash/Wool
- Para tejidos de lana y que requieren lavado a mano (véase página 24)
y
Delicates
- Para tejidos delicados (véase página 24)
y
Speed Wash
- Para pequeñas cantidades de ropa poco sucia (véase página 24)
y
Small Load
- Para pocos artículos (see page 24)
y
Drain+Spin
- Para ropa que sólo necesita drenaje y centrifugado (véase página 24)
y
Inicia o pone en marcha el ciclo de la lavadora.
-
Si no pulsa el botón
C
en 4 minutos tras la selección de un ciclo, la lavadora se apagará automáticamente.
y
(Pulse repetidamente) Selecciona la temperatura del agua para el ciclo de lavado (véase página 25).
- Selecciona la temperatura del agua entre 5 niveles.
y
(Pulse repetidamente) Selecciona el nivel deseado de velocidad de
centrifugado (véase página 25).
- Selecciona la velocidad de centrifugado entre 5 niveles.
y
(Pulse repetidamente) Selecciona el nivel de suciedad (véase página 25).
- Selecciona un nivel de suciedad entre 5 niveles.
y
(Pulse repetidamente) Seleccionar secado ciclo , al presionar el botón
SECADO (véase página 26).
Características del panel de control
Funcionamiento
Selector de Ciclos
Botón de Selección
de Nivel de Suciedad
SECADO
selección del botón
Botón de Selección de
Velocidad de Centrifugado
Botón de Selección de
Temperatura de Agua
Botón de
Inicio/Pausa
Botón de Encendido
Funcionamiento Pantalla
MFL67737658_S_A5.indd 9 2018. 7. 2. 오전 10:29
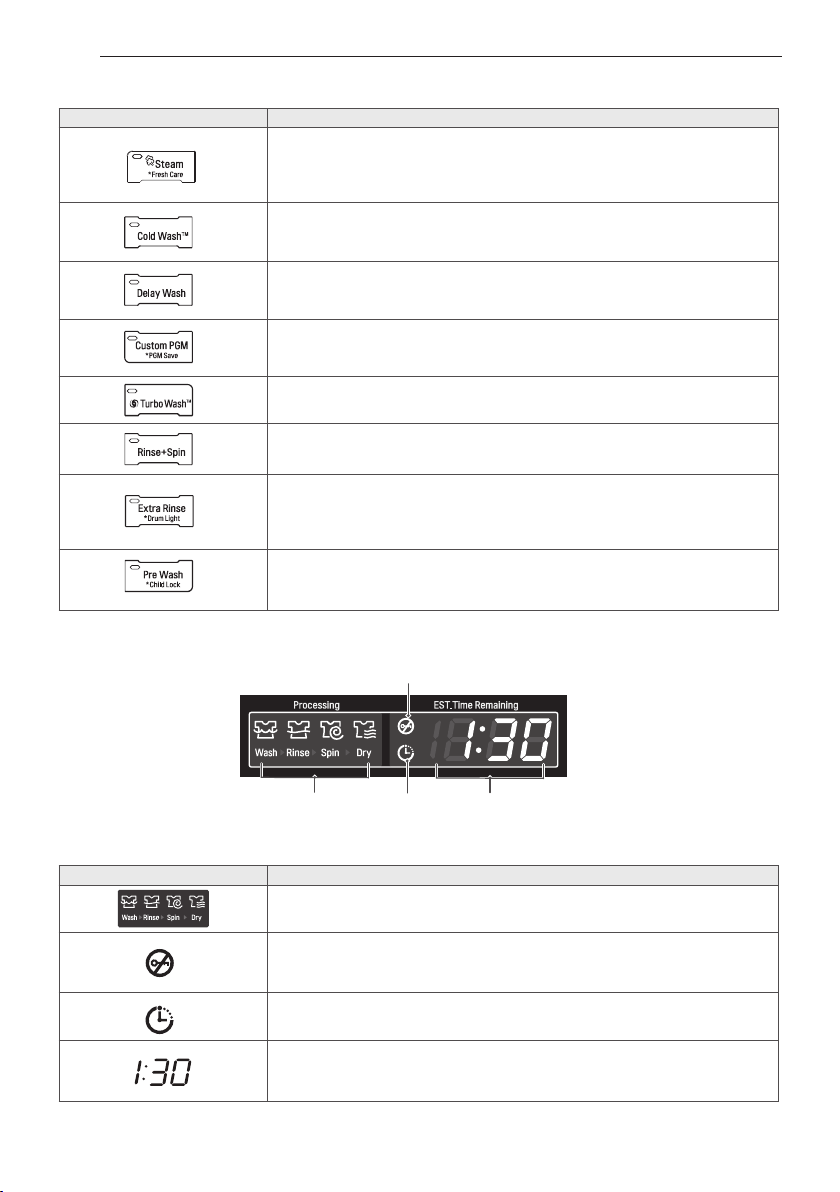
10
INTRODUCCIÓN A LA LAVADORA
Funcionamiento (continuación)
Pantalla
Botón Descripción
y
(Seleccione antes de iniciar el ciclo de lavado) Utilice esta opción para
agregar vapor para mayor potencia en el lavado (Véase página 27).
y
(Seleccione y mantenga pulsado antes de iniciar el ciclo de lavado)
Gira la ropa dentro del tambor después que se acabe el ciclo para
prevenir arrugas (Véase página 28)
y
Utilice esta opción para reducir su consumo de energía (Véase
página 27).
y
Programa el tiempo de retraso en la cual iniciará el ciclo (véase
página 27).
y
Utilice esta opción para guardar una combinación especial de ajuste
que utilice con frecuencia (Véase página 28).
y
Utilice esta opción para ahorrar tiempo (Véase página 28).
y
Use este opción para enjuagar el detergente de la carga (véase
página 27).
y
(Seleccione antes de iniciar el ciclo de lavado) Utilice esta opción para
agregar vapor para mayor potencia en el lavado (Véase página 27).
y
(Seleccione y mantenga pulsado antes de iniciar el ciclo de lavado)
Gira la ropa dentro del tambor después que se acabe el ciclo para
prevenir arrugas (Véase página 28)
y
(Seleccione antes del ciclo de lavado) Prelavar prendas bien sucias
(Véase página 27).
y
(Durante el ciclo de lavado, mantenga pulsado) Bloquear / Desbloquear
el botón (Véase página 28).
Icono desplegado Descripción
y
Esta parte de la pantalla muestra qué etapa del ciclo de lavado se
está realizando actualmente (Wash, Rinse, Spin, Dry)
y
Indica que la compuerta está asegurada. La compuerta de la lavadora
se asegurará mientras la lavadora se encuentra funcionando. Se
puede liberar la compuerta apretando el botón INICIO/PAUSA
ubicado en la parte superior de la lavadora.
y
Este indicador muestra que la lavadora ha sido programada para un
Delay Wash. La lavadora comenzará a funcionar automáticamente
después de que se ha completado el tiempo de espera fijado.
y
Cuando se aprieta el botón INICIO/PAUSA, la lavadora detecta
automáticamente la carga de lavado (peso) y optimiza el tiempo
de lavado, en base al ciclo y las opciones seleccionados. Luego la
pantalla indicará el tiempo restante estimado para dicho ciclo.
Indicador de
bloqueo de puerta
Pantalla de tiempo restante
estimado/mensaje de error
(Véase página 33)
Indicador
de proceso
de ciclo
Indicador del
programa de
inicio de lavado
MFL67737658_S_A5.indd 10 2018. 7. 2. 오전 10:29
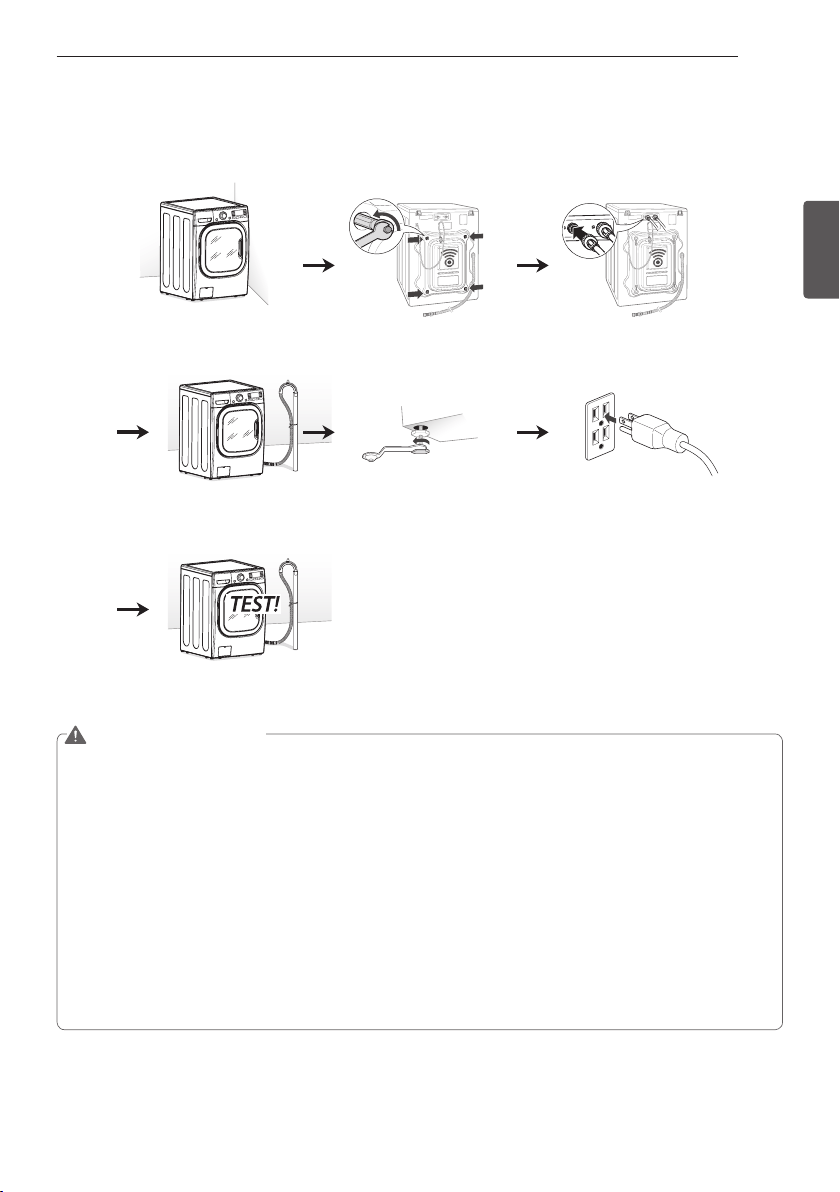
11
ESPAÑOL
INSTRUCCIONES DE INSTALACIÓN
INSTRUCCIONES DE INSTALACIÓN
Vista previa del orden de instalación
Comprobación y elección
de la ubicación adecuada
Desembalaje y retiro de los
tornillos de transporte
Conexión de los tubos
de agua
Conexión del tubo de
desagüe
Nivelación de la
lavadora
Conexión del enchufe y la
toma de tierra
Prueba de
funcionamiento
ADVERTENCIA
y
La lavadora es pesada. Se necesitan dos o más personas para instalar y trasladar el electrodoméstico.
El incumplimiento de esta advertencia puede causarle lesiones en la espalda o de otro tipo.
y
Almacene e instale la lavadora en un lugar no expuesto a temperaturas inferiores a las de congelación
ni a la intemperie. Si no se cumple con esta advertencia se podrán producir heridas graves, incendios,
descargas eléctricas o muerte
y
Para su seguridad personal, este electrodoméstico debe ser conectado a tierra adecuadamente.
y
Conecte a tierra la lavadora siguiendo todos los códigos y ordenanzas legales. Si no se cumple con
esta advertencia se podrán producir heridas graves, incendios, descargas eléctricas o muerte.
y
La apertura de la base no debe estar obstruida por una alfombra cuando la lavadora se instale en un
piso alfombrado.
y
No elimine el cable de conexión a tierra. No use un adaptador o prolongador. Enchufe en un
tomacorriente con conexión a tierra de 3 cables. Si no se cumple con esta advertencia se podrán
producir heridas graves, incendios, descargas eléctricas o muerte.
y
Ciertas piezas internas no tienen conexión a tierra en forma intencional y pueden presentar un riesgo
de descarga eléctrica sólo durante la reparación. Personal de servicio - No toque las siguientes piezas
cuando el aparato esté recibiendo energía: bomba, válvula, motor, tablero de control.
MFL67737658_S_A5.indd 11 2018. 7. 2. 오전 10:29
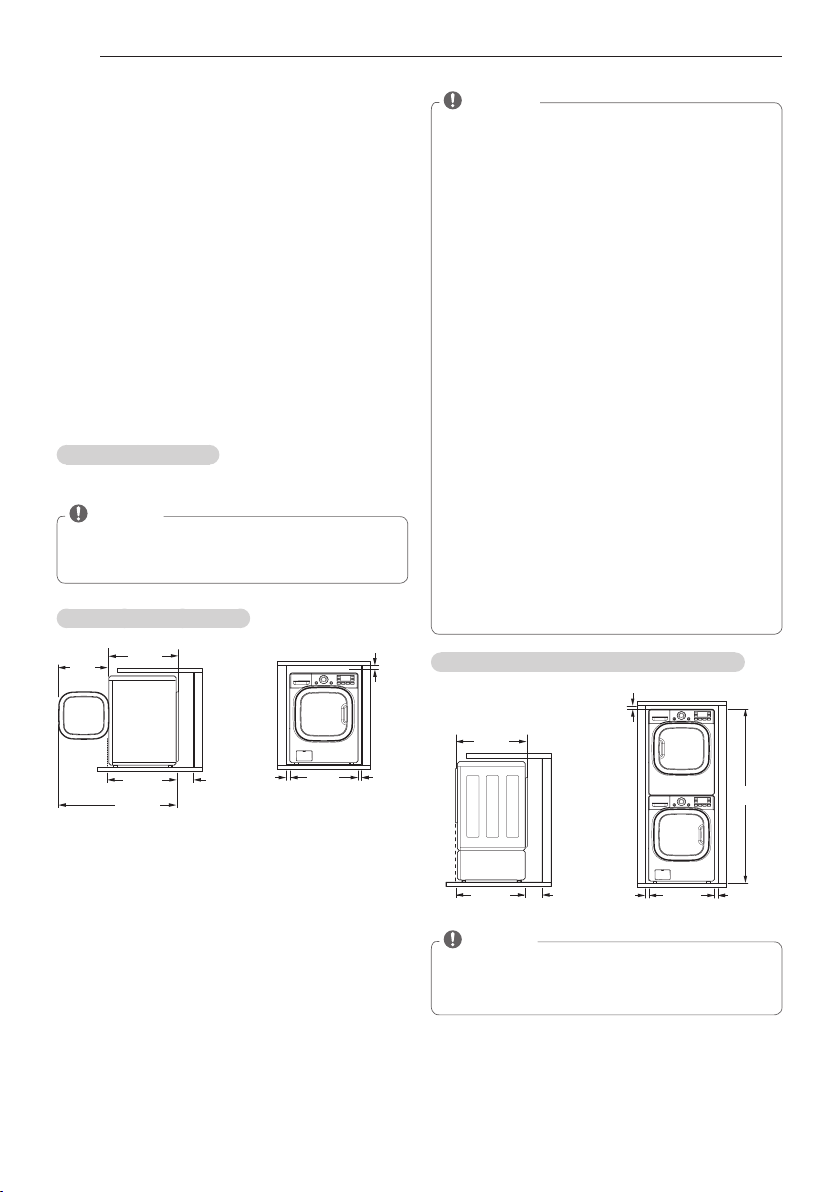
12
INSTRUCCIONES DE INSTALACIÓN
Comprobación y elección de la
ubicación adecuada
Instale la lavadora sobre un suelo con la resistencia
y rigidez suficiente para soportar el peso de la
máquina, incluso con la carga completa, sin que se
flexione o rebote. Si el suelo tiene una flexibilidad
excesiva, quizás deba reforzarse para hacerla más
rígida. Si el suelo no es resistente, puede causar
vibraciones y ruidos intensos.
1
Limpie el suelo antes de la instalación.
- Asegúrese de seleccionar un suelo resistente y
liso.
2
Se necesitan dos o más personas para mover y
desempacar la lavadora.
3
Deje espacio suficiente entre las paredes y la
lavadora para su instalación.
Requisitos de espacio
Deje espacio suficiente espacio para las tuberías de
agua, el tubo de desagüe y el flujo de aire.
NOTA
y
Asegúrese de permitir molduras de paredes,
puertas o suelo por si desea aumentar el
espacio0 requerido.
Instalación sobre un suelo
4"
(10 cm)
21 ¼"
(54 cm)
29 ¾"
(75,6 cm)
52 "
(132,2 cm)
30 ½"
(77 cm)
27"
(68,6 cm)
1"
(2,5 cm)
1"
(2,5 cm)
0,2"
(0,5 cm)
NOTA
y
El suelo debe ser lo suficientemente fuerte
y rígido como para soportar el peso de la
lavadora cuando esté completamente cargada,
sin que se combe o rebote. Si su suelo es
demasiado flexible, necesitará reforzarlo para
hacerlo más rígido. Un suelo adecuado para
una lavadora de carga superior no tiene porqué
ser lo suficientemente rígido para una lavadora
de carga frontal, debido a la diferencia de
velocidad y dirección de la rotación. Si el suelo
no es sólido, su lavadora vibrará y es posible
que escuche y sienta la vibración en toda la
casa.
y
Antes de instalar la lavadora, asegurese de
que el piso esté limpio, seco y libre de polvillo,
suciedad, agua y aceites para que las patas de
la lavadora no puedan deslizarse fácilmente. Si
las patas niveladoras se desplazan o deslizan
sobre el piso, pueden producirse vibraciones
y ruidos excesivos debido a un contacto
deficiente con el suelo.
y
Si debe utilizarse una bandeja colectora, tenga
especial cuidado de seguir las instrucciones
provistas con la bandeja colectora y verifique
que las patas niveladoras esten ajustadas
para lograr un contacto firme y nivelado con
la bandeja. El uso de bandejas colectoras y no
nivelar la maquina adecuadamente pueden
generar vibraciones y ruidos excesivos durante
el funcionamiento.
Instalación sobre un pedestal o kit de torre
29 ¾"
(75,6 cm)
4"
(10 cm)
30 ½"
(77 cm)
27"
(68,6 cm)
2"
(5 cm)
2"
(5 cm)
77
1
/2"
(196,8 cm)
0,2"
(0,5 cm)
NOTA
y
Consulte las intrucciones del PEDESTAL o
KIT DE TORRE opcional antes instalar con un
PEDESTAL o KIT DE TORRE.
MFL67737658_S_A5.indd 12 2018. 7. 2. 오전 10:29
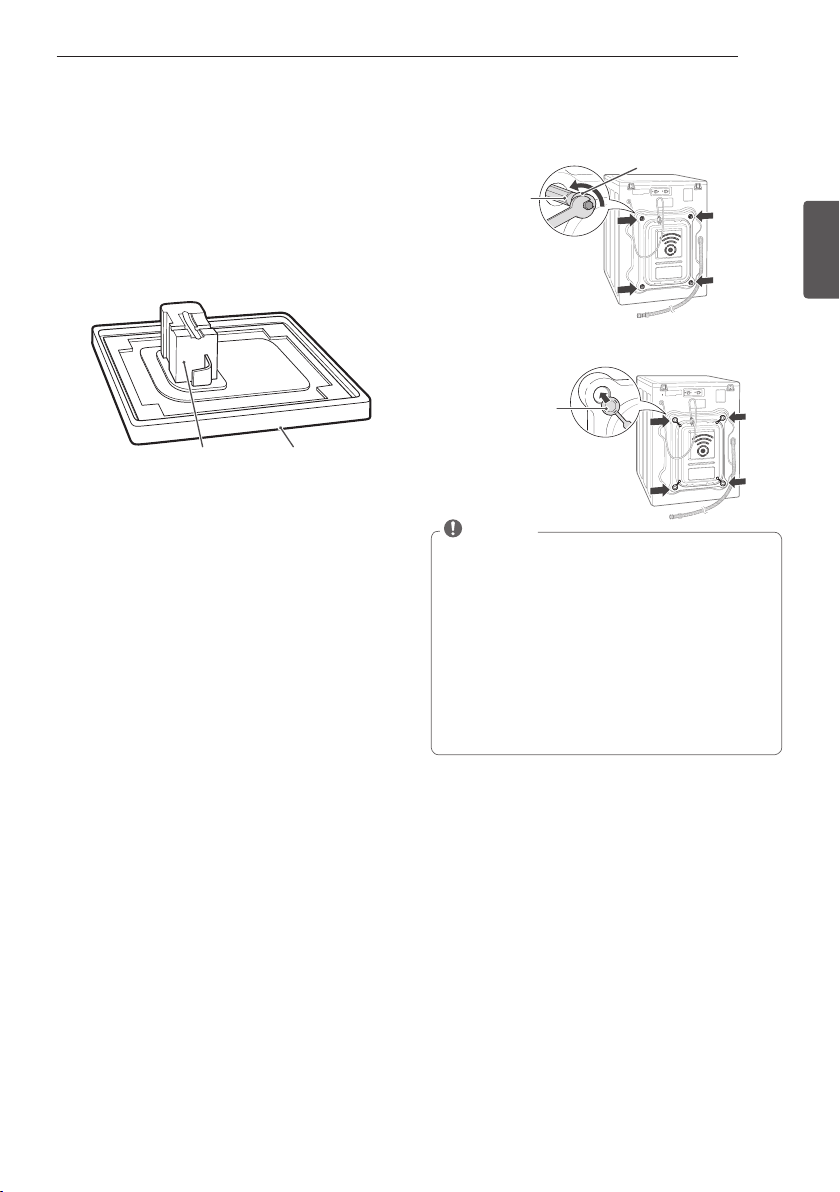
13
ESPAÑOL
INSTRUCCIONES DE INSTALACIÓN
Desempaque y retiro de los tornillos de
transporte
Al retirar la lavadora de la base de cartón, asegúrese
de quitar el soporte del tambor de foam colocado
en la mitad de la base de cartón.
Si debe acostar la lavadora para quitar los
materiales de empaque de la base, hágalo siempre
cuidadosamente sobre su parte lateral. NO acueste
la lavadora sobre la parte frontal o posterior.
Soporte de
tambor de
foam
Base
de
carton
1
Retire los dos tornillos de transporte con la llave
(incluida). Afloje totalmente los cuatro tornillos
de transporte girándolos en sentido antihorario y
retírelos.
Tornillos de
transporte
Sujetador
2
Empuje los tapones (incluidos) en los orificios de
los tornillos de transporte.
Tapa de
agujero
NOTA
y
Guarde los pernos para futuros usos. Para
prevenir daños en los componentes internos,
NO transporte la lavadora sin reinstalar los
pernos de transporte.
y
No remover los tornillos de transporte u
otros materiales de empaque puede causar
vibraciones y ruidos excesivos, lo cual puede
resultar en daños permanentes a la lavadora.
El cable está asegurado a la parte posterior de
la lavadora con un tornillo de transporte para
prevenir el uso de la lavadora con los tornillos
colocados.
MFL67737658_S_A5.indd 13 2018. 7. 2. 오전 10:29
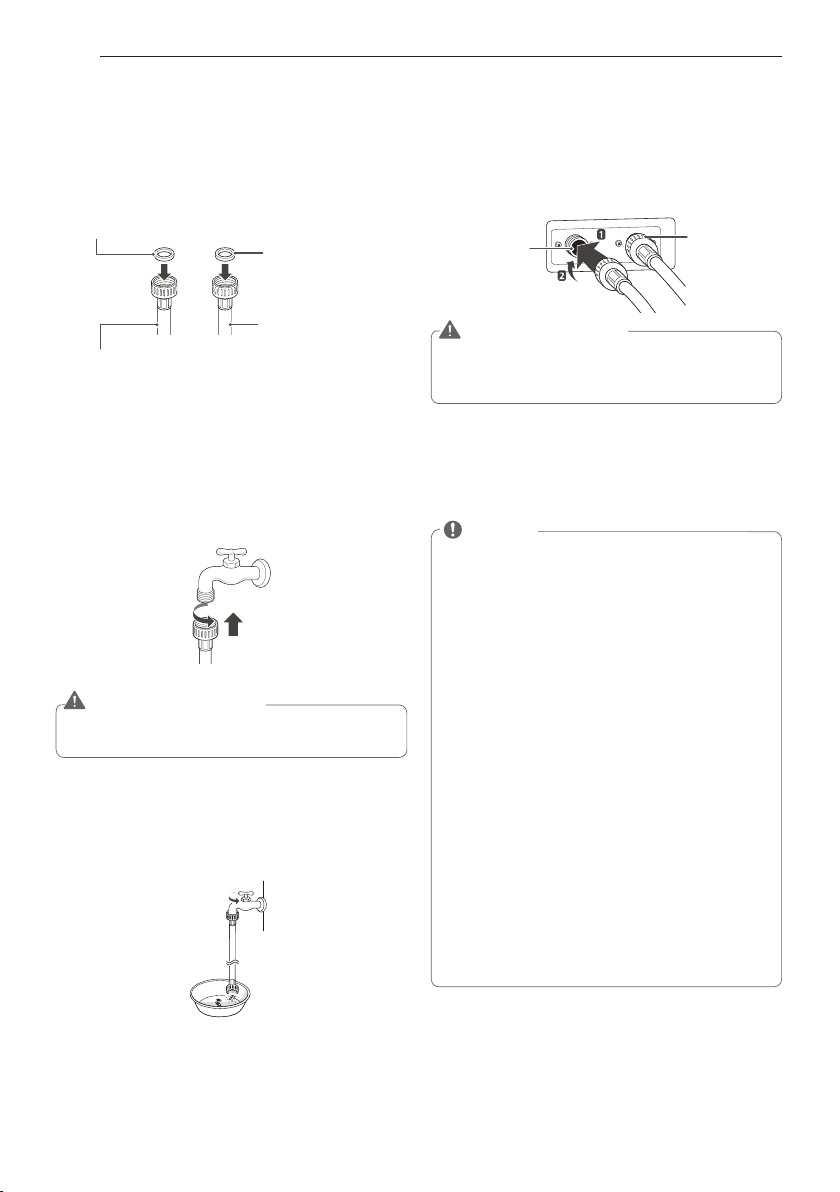
14
INSTRUCCIONES DE INSTALACIÓN
Conexión de las tuberías de agua
1
Revise las juntas herméticas de goma de ambos
extremos de la manguera.
- Inserte una junta de goma en los acoples
roscados de cada manguera para evitar fugas.
Junta hermética
de goma
Manguera de agua
(A entrada de agua de
la lavadora)
Junta hermética
de goma
Manguera de
agua (Al grifo)
2
Conecte las tuberias de agua a las llaves de paso
de agua caliente y fria y apriete las conexiones
con la mano. A continuacion, utilice unos alicates
para apretarlas otro 2/3 de vuelta.
- Conecte la manguera azul a un grifo de agua
fría y la manguera roja a un grifo de agua
caliente.
ADVERTENCIA
y
No tense en exceso.
El acoplamiento puede
resultar dañado.
3
Tras conectar las mangueras al grifo de agua,
abra las llaves de agua para eliminar sustancias
extrañas (suciedad, arena o serrín) de las
tuberías de agua. Drene el agua en un cubo y
revise la temperatura del agua.
4
Conecte las mangueras a las entradas de
agua con la mano a continuación, utilice unos
alicates para apretarlas otro 2/3 de vuelta.
- Conecte la manguera azul a la entrada de
agua fría y la manguera roja a la entrada de
agua caliente.
Entrada de
agua fría
Entrada
de agua
caliente
ADVERTENCIA
y
No ajuste las mangueras en exceso. Hacerlo
puede dañar las válvulas, causando fugas y
daños a la propiedad.
5
Compruebe que no haya fugas abriendo las
llaves de agua.
- Si hay fugas de agua, verifique de nuevo los
pasos 1 a 4.
NOTA
y
Para su seguridad, y para una vida útil pro-
longada del producto, recomendamos usar
componentes LG de alta calidad. LG no es
responsable por averías del producto o da-
ños causados por el uso de piezas ajenas a
LG compradas por separado.
y
Use mangueras nuevas al instalar la lavado-
ra. No reutilice las mangueras viejas.
y
Comuníquese con el Centro de Servicio al
Cliente de LG para obtener ayuda para la
compra de mangueras: 1-800-243-0000.
y
Compruebe periódicamente las mangueras
en busca de grietas, fugas y desgastes, y
reemplace las mangueras cada cinco años.
No estire las mangueras de agua a propósi-
to, y asegúrese de que no las estén aplastan-
do otros objetos.
y
La presión del suministro de agua debe estar
entre 20 psi y 120 psi (138 – 827 kPA). Si la
presión del suministro de agua es superior
a 120 psi, se deberá instalar una válvula de
reducción de presión.
y
Para lograr un rendimiento óptimo de lava-
do, la temperatura del agua caliente debe
ajustarse a 48-57°C (120-135°F) y el agua fría
a 15°C (60°F).
MFL67737658_S_A5.indd 14 2018. 7. 2. 오전 10:29
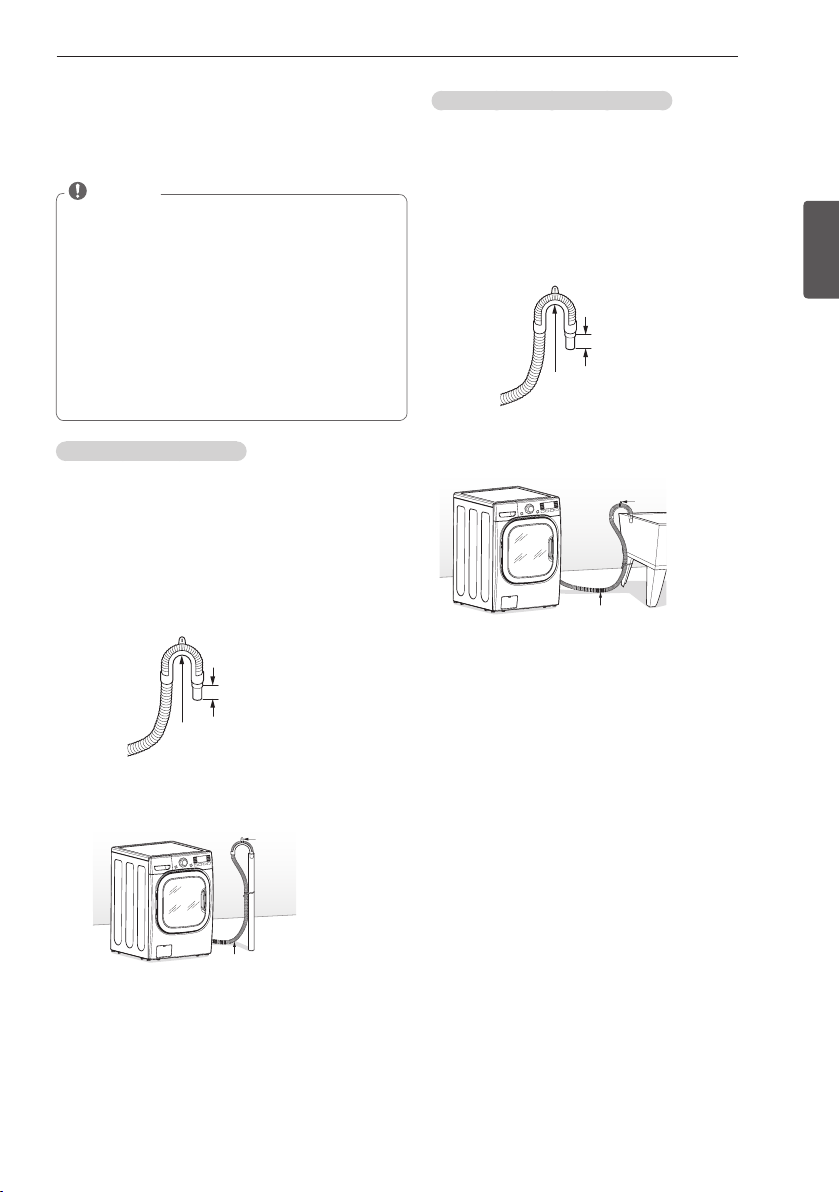
15
ESPAÑOL
Conexión del tubo de desagüe
Fije el tubo de desagüe para evitar que se mueva
y que se produzcan fugas.
NOTA
y
La manguera de desagüe debe fijarse
correctamente. En caso contrario, podría
resultar en inundación o funcionamiento
incorrecto
y
La altura total del extremo de la manguera no
debería sobrepasar las 96 pulgadas (244,8cm)
desde la base de la lavadora.
y
El desagüe debe instalarse de acuerdo con las
regulaciones nacionales y locales aplicables.
y
No estire las mangueras de agua
intencionalmente y asegúrese de que no
queden aplastadas por otros objetos.
Uso de un tubo de subida
1
Fije el extremo de la manguera en el soporte de
codo.
- Conecte el soporte en forma de codo a unas 4
pulgadas (10cm) del extreme de la manguera
de drenaje. Si el codo se coloca a una distancia
superior a 4 pulgadas(10 cm) del extremo de
la manguera de desagüe, podrían aparecer
hongos o microorganismos en el interior de la
lavadora.
No más de 4
pulgadas(10 cm)
Soporte de codo
2
Inserte el extremo de la manguera de desagüe
en el tubo de subida
Soporte de codo
Manguera de drenaje
3
Utilice una brida para fijar la manguera de
desagüe en su posición.
INSTRUCCIONES DE INSTALACIÓN
Utilización de una tina de lavado
1
Fije el extremo de la manguera en el soporte de
codo.
- Conecte el soporte en forma de codo a unas 4
pulgadas (10cm) del extreme de la manguera
de drenaje. Si el codo se coloca a una distancia
superior a 4 pulgadas
(10 cm) del extremo de la manguera de
desagüe, podrían aparecer hongos o
microorganismos en el interior de la lavadora.
No más de 4
pulgadas(10 cm)
Soporte de codo
2
Cuelgue el extremo de la manguera de desagüe
del lado de la tina.
Soporte de codo
Manguera de drenaje
3
Utilice una brida para fijar la manguera de
desagüe en su posición.
MFL67737658_S_A5.indd 15 2018. 7. 2. 오전 10:29
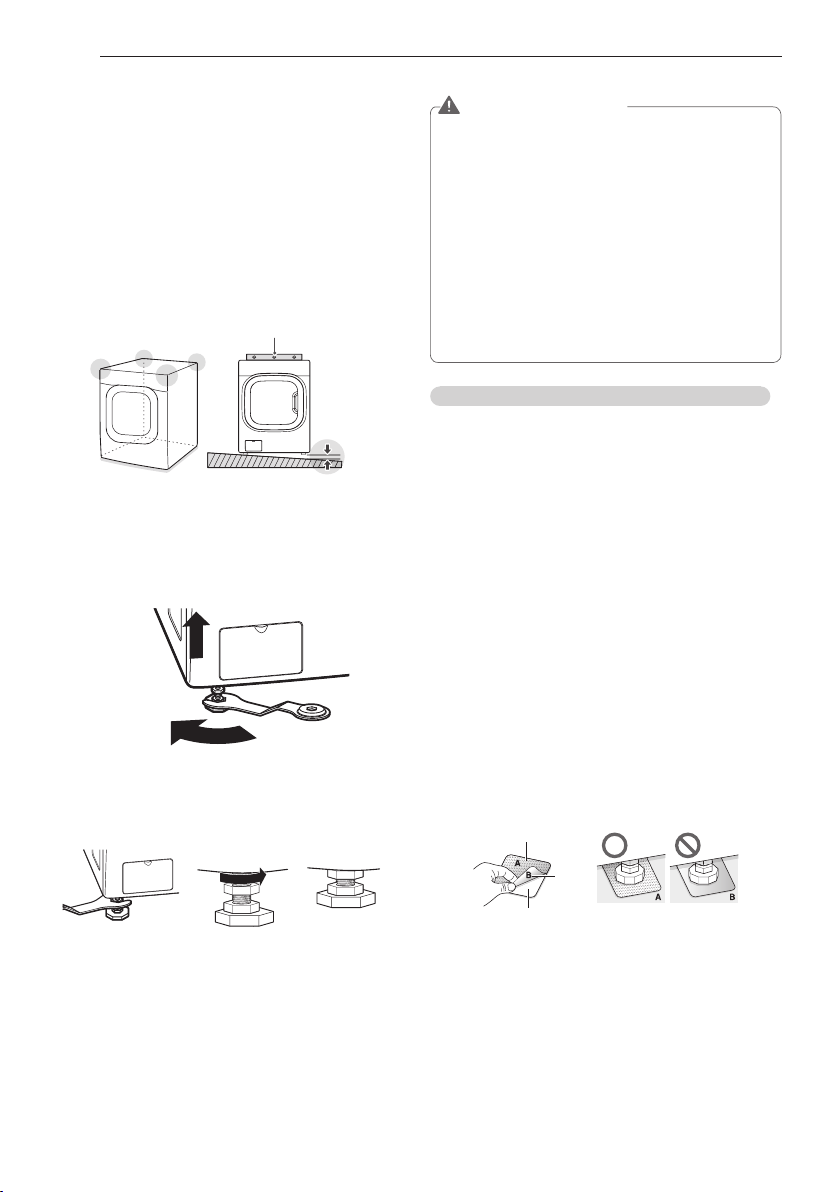
16
INSTRUCCIONES DE INSTALACIÓN
Nivelación de la lavadora
El tambor de su nueva lavadora gira a alta
velocidad . Para reducir las vibraciones, el ruido y
los movimientos no deseados, el suelo debe estar
nivelado y debe ser una superficie sólida.
1
Compruebe que la lavadora esté nivelada.
- Asegúrese de que esté nivelada sujetando los
extremos superiores de la lavadora o colocando
un nivel sobre la misma. La inclinación debajo
de la lavadora no debe ser superior a 1°, y las
cuatro patas deben estar firmemente apoyadas
en el suelo.
1º
Nivelador
2
Gire las patas de nivelación de la lavadora en
sentido de las manecillas del reloj para nivelarla.
- Gire las patas de nivelación de la lavadora en
sentido de las manecillas del reloj para levantar
la lavadora.
Para levantar
3
Gire las contratuercas en sentido contrario a
las manecillas del reloj y apriételas cuando la
lavadora esté nivelada.
Ajustar firmemente
las 4 tuercas
utilizando la llave
4
Compruébelo otra vez para asegurarse de que la
lavadora esté nivelada.
- Empuje o sacuda los extremos superiores de
la lavadora suavemente para asegurarse que la
máquina no esté meciéndose.
- En caso que la lavadora esté meciéndose, repita
los pasos 1 a 3.
PRECAUCIÓN
y
Si utiliza la lavadora sin nivelarla, pueden
producirse fallos de funcionamiento causados
por el exceso de vibraciones y ruido.
y
Si está instalando la lavadora sobre el pedestal
opcional, ajuste las patas de nivelación del
pedestal para nivelar la máquina. El nivelado
de las patas de la lavadora debería ser mínimo
y debería girarse las tuercas de fijación en el
sentido contrario a las agujas del reloj para
asegurarlas.
y
Utilice las patas de nivelación sólo para nivelar
la lavadora. Si eleva las patas de nivelación de
forma innecesaria, puede causar vibraciones
anómalas de la lavadora.
Utilización de apoyos antideslizantes (opcionales)
Si instala la lavadora sobre una superficie
resbaladiza, la misma podría moverse debido a
las vibraciones excesivas. La nivelación incorrecta
puede causar fallos de funcionamiento debido a
los ruidos y vibraciones. Si eso ocurre, deje las
almohadillas antideslizantes debajo de las patas y
ajuste el nivel.
1
Limpie el suelo antes de colocar los apoyos
antideslizantes.
- Utilice un trapo seco para eliminar y limpiar
los objetos extraños o la humedad. Si queda
humedad, podrían resbalar los apoyos
antideslizantes.
2
Ajuste el nivel tras colocar la lavadora en el área
de instalación.
3
Coloque el lado adhesivo del apoyo
antideslizante sobre el suelo.
- La forma más efectiva de instalación de los
apoyos antideslizantes es bajo las patas
delanteras. Si es difícil colocar los apoyos bajo
las patas delanteras, colóquelas bajo las patas
traseras.
Este cara
haica arriba
Retire la
protección
Adherir
al piso
4
Compruebe de nuevo que la lavadora esté
nivelada.
- Empuje o sacuda los extremos superiores de
la lavadora suavemente para asegurarse que
la máquina no esté meciéndose. Si la lavadora
está meciéndose, nivele de nuevo la lavadora.
MFL67737658_S_A5.indd 16 2018. 7. 2. 오전 10:29

17
ESPAÑOL
Conexión del enchufe y la toma de
tierra
Conecte a tierra la lavadora para evitar un
cortocircuito o descargas eléctricas durante la
conexión.
Utilización de una toma de 3 clavijas
Conecte el enchufe en la toma sin conexión a tierra
adicional.
PRECAUCIÓN
y
El tomacorriente debe estar dentro de un área
minima de 1,5 m (60 pulgadas) a cualquiera de los
lados de la lavadora.
y
El electrodoméstico y el tomacorriente deben
estar colocados de forma tal que se pueda acceder
al enchufe facilmente.
y
No sobrecargar el tomacorriente con más de un
electrodomestico.
y
El tomacorriente deberá estar puesto a tierra de
acuerdo con los codigos y las regulaciones de
cableado actuales.
y
Se recomienda utilizar un fusible de demora de
tiempo o disyuntor.
y
Es responsabilidad y obligacion personal del
dueno del producto pedir a un electricista
calificado que instale el tomacorriente adecuado.
y
No utilice un cable o enchufe desgastado o dañado.
Repárelos o sustitúyalos inmediatamente.
El
incumplimiento de esta advertencia puede
causar lesiones mortales, un incendio,
descargas eléctricas o fallos de funcionamiento.
y
No modifique el cable de alimentación y tenga
cuidado de no dañarlo durante la instalación o
cuando mueva la lavadora.
En caso contrario
podría haber peligro de incendio, descargas
eléctricas o fallos del aparato.
y
Asegúrese de que la lavadora esté conectada a
tierra.
y
La lavadora debe conectarse siempre en su
propia toma eléctrica individual, de capacidad
correspondiente a la indicada en la placa
de características. De lo contrario, podría
producirse un incendio, descargas eléctricas o
fallos de funcionamiento.
y
No utilice adaptadores o cables de extensión.
La
lavadora deberá ser conectada siempre en su
propia toma de alimentación, compatible con lo
indicado en la placa de características. En caso
contrario, podría haber peligro de descargas
eléctricas, incendio o fallos del aparato.
y
No dañe ni corte el conductor de tierra interno del
enchufe.
En caso contrario, podría haber peligro
de muerte, incendio, descargas eléctricas o
fallos del aparato.
INSTRUCCIONES DE INSTALACIÓN
Prueba de funcionamiento
Compruebe si la lavadora ha sido instalado
correctamente y realice una prueba de
funcionamiento.
1
Cargue la lavadora con 6 libras (3 kg) de ropa.
2
Pulse el botón Power.
3
Pulse el botón Rinse+Spin para
4
Pulse el botón Start/Pause.
- Se inicia el ciclo de lavado.
5
Compruebe si se suministra agua, que la
máquina no se esté meciendo ni vibre en exceso,
y que desagüe correctamente durante el ciclo de
centrifugado.
- Si se producen fugas de agua durante el
suministro de agua, consulte la página 14,
Conexión correcta de las tuberías de agua.
- Si la lavadora se mese y vibra excesivamente,
consulte la página 16, Nivelación de la lavadora,
para nivelarla de nuevo.
- Si el desagüe no funciona, consulte la página
15, Conexión del tubo de desagüe, para
instalarlo correctamente.
MFL67737658_S_A5.indd 17 2018. 7. 2. 오전 10:29
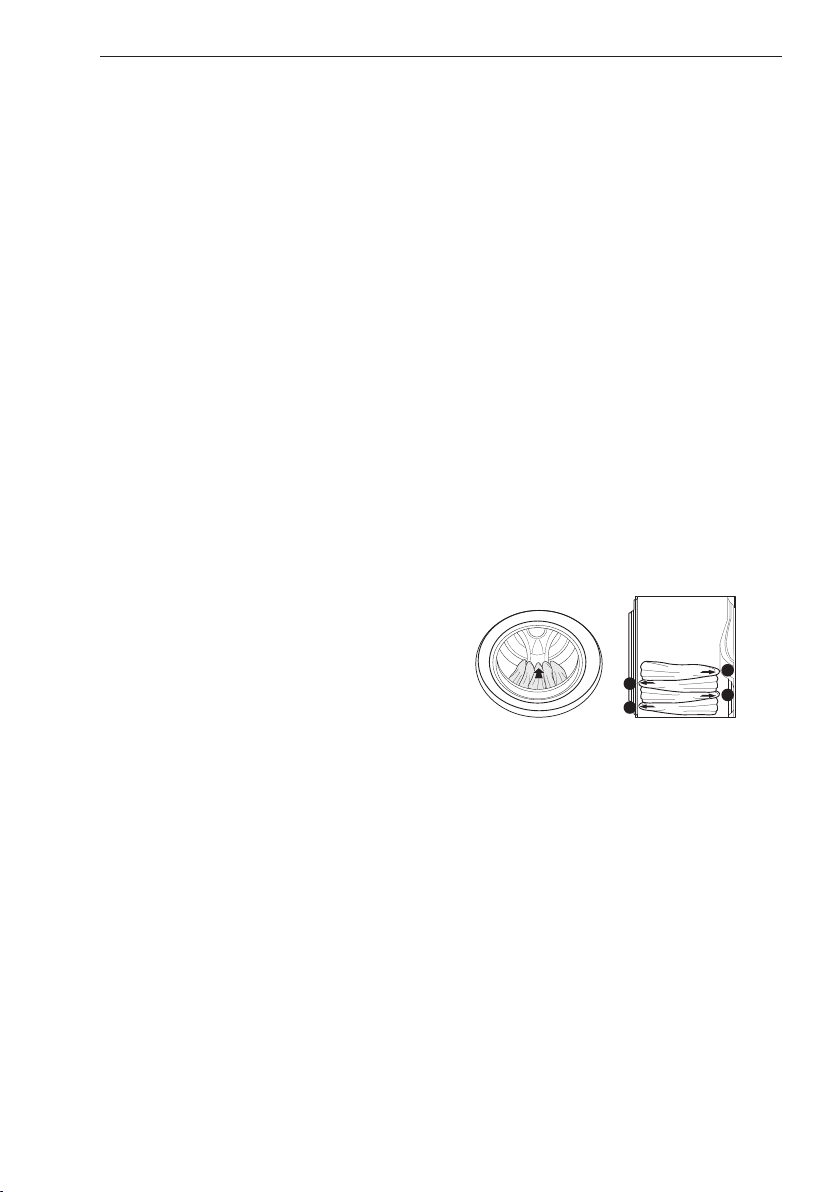
18
PREPARACIÓN
PREPARACIÓN
Clasificación de las cargas de lavado
Precauciones para el cuidado de los tejidos antes del ciclo de lavado
Lea y cumpla con las siguientes instrucciones para evitar que la ropa se encoja o se dañe.
u
Revise todos los bolsillos para asegurarse de que
esten vacios.
- Articulos como clips, cerillos, plumas, monedas
y llaves pueden danar su lavadora o sus
prendas.
u
Cierre las cremalleras, ganchos y cordones para
prevenir que estos articulos se enganchen o
enreden en otras prendas.
u
Realice un pretratamiento de las áreas más sucias
antes del lavado.
- De este modo, logrará mejores resultados.
u
Combine prendas grandes y pequeñas en una
carga. Cargue primero las prendas grandes.
u
Las prendas grandes no deberán ser más de la
mitad de la carga de lavado total.
u
Se puede cargar la lavadora completamente, pero
el tambor no puede quedar colmado de prendas.
- La compuerta de la lavadora debera cerrar con
facilidad.
u
No lave prendas individuales, a menos que se
trate de ropa voluminosa, como mantas o
similares. Asegúrese de lavar la ropa en tipos
similares de cargas.
- Si lava una sola prenda, puede desequilibrarse
el tambor y se producirán vibraciones y ruidos.
u
No lave prendas impermeables.
- Podría causar vibraciones anómalas o que la
carga rebotase y dañara el tambor.
u
Compruebe que no haya ningún otro objeto
extraño en la junta hermética de la puerta y tenga
mucho cuidado de que no queden enganchadas
las prendas.
- Los objetos extraños en la puerta pueden
manchar la ropa y podrían producirse fugas de
agua si la ropa queda enganchada en la junta
hermética de la puerta.
u
Lave la ropa interior u objetos pequeños y ligeros
en una malla de lavado.
- Las prendas pequeñas y ligeras podrían
engancharse en la junta de la puerta, y un
gancho de un sostén podría dañar otras
prendas.
u
Cepille la suciedad, polvo o cabello de los tejidos
antes del lavado.
- La ropa no se limpiará bien si hay suciedad o
arena en ella, o puede estropearse debido a
partículas que froten contra los tejidos finos.
u
Lave las mantas individualmente.
- El lavar más de una sábana en una carga puede
dar resultados inferiores debido a dobleces o
carga desequilibrada.
u
Separe las prendas por colores y lávelas por
separado para evitar que se corran los colores.
- Los tejidos pueden estropearse o mancharse
debido a que pueden desteñir o a cuerpos
extraños que puedan pasar de un tejido a otro.
Para un mejor rendimiento, cargue la ropa
como se muestra.
1
3
2
4
- Cargue las prendas sueltas y no llene el
tambor en exceso. Las prendas necesitan
espacio para circular y así limpiarse.
- No apriete las prendas al introducirlas en el
tambor.
MFL67737658_S_A5.indd 18 2018. 7. 2. 오전 10:29
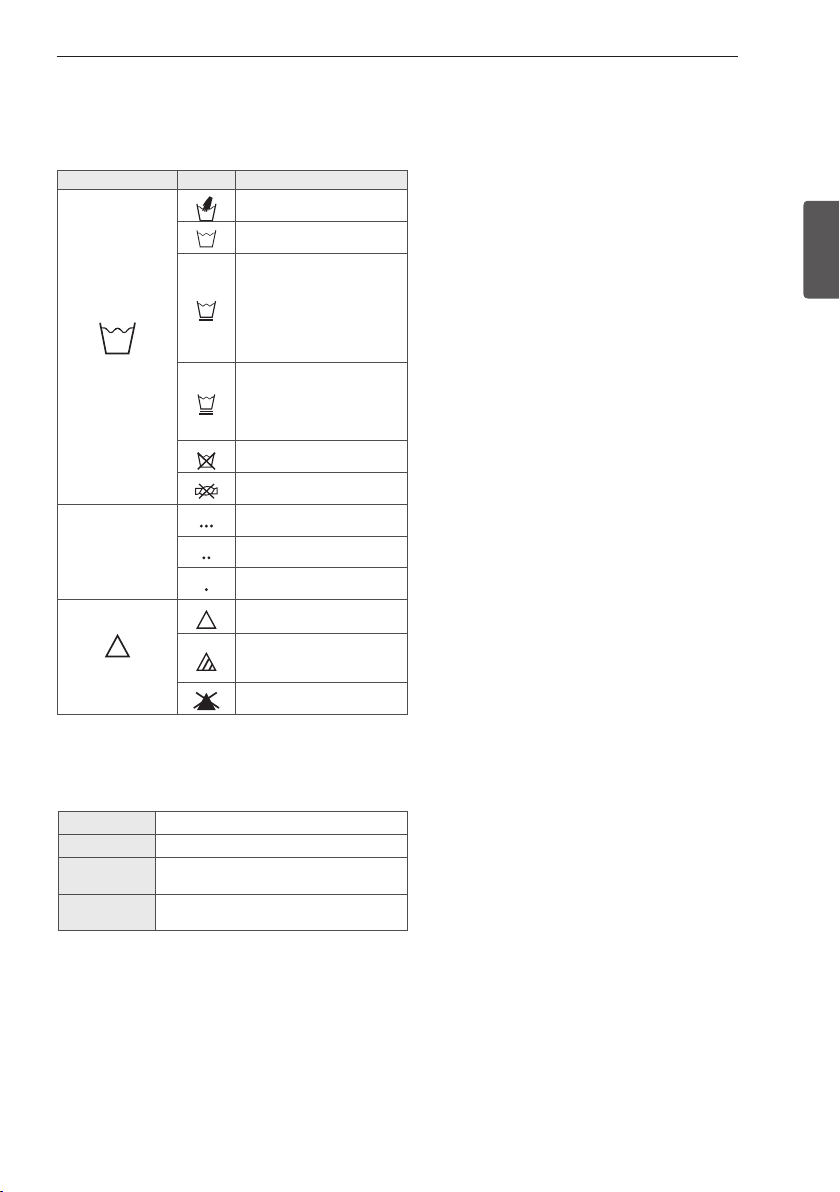
19
ESPAÑOL
PREPARACIÓN
Categoría
Etiqueta
Instrucciones
Lavado
Lavado a mano
Lavado a máquina,
ciclo normal
Utilice el ajuste de
planchado permanente/
resistente a las arrugas
(la cual tiene un
enfriado o rociado con
agua fría antes del
centrifugado reducido)
Utilice el ajuste de
prendas delicadas
(agitación lenta y/
o tiempo de lavado
reducido).
No lavar
No escurrir
Temperatura del
agua
Caliente
Tibia
Frio
Blanqueado
Cualquier blanqueador
cuando sea necesario
Sólo blanqueador
sin lejía cuando sea
necesario
No utilizar blanqueador
Colores
Blancos / Claros / Oscuros
Suciedad
Muy sucio / Normal / Poco sucio
Tejido
Delicados / Normales / Algodones
resistentes
Pelusa
Productores de pelusa / Recogen
pelusa
Etiquetas de cuidado de las telas
La mayoria de las prendas de vestir tienen etiquetas de
cuidado de las telas para lograr un cuidado adecuado.
Clasificación de la carga de ropa
Se recomienda clasificar la ropa en cargas
similares que puedan lavarse en el mismo ciclo.
Consulte el cuadro siguiente para clasificar la ropa.
MFL67737658_S_A5.indd 19 2018. 7. 2. 오전 10:29

20
PREPARACIÓN
Cargando el dispensador
El cajón dispensador de detergente de la lavadora
tiene un compartimento dispensador para cada
tipo de detergente. Ponga cada detergente en el
compartimento adecuado.
1
Saque el cajón dispensador de detergente.
2
Ponga cada detergente en el compartimento
adecuado.
- Si utiliza un detergente líquido asegúrese que
esté colocada la cajita del detergente líquido.
- Si utiliza detergente en polvo, retire la cajita
del detergente líquido y ponga el detergente en
polvo en el compartimento del detergente del
lavado principal.
Compartimento
del blanqueador
con lejía
Cajita del
detergente
líquido
Compartimento
del detergente
de lavado
principal
Compartimento
del detergente
de prelavado
Compartimento
del suavizante
líquido
3
Cierre el cajón dispensador lentamente.
- Si cierra el cajón con fuerza puede desbordarse
el detergente a otro compartimento o
dispensarse en el tambor antes de lo
programado.
NOTA
y
Es normal que una cantidad pequena de
agua permanezca en los compartimientos de
suministro al final del ciclo.
Utilización de detergente/
suavizante
Detergente recomendado
Asegúrese de usar detergente HE (Alta Eficacia)
para lavadoras de carga frontal. Los detergentes
de alta eficacia (HE) se disuelven mejor y producen
menos espuma para garantizar un lavado y aclarado
eficaz. Use la cantidad correcta de detergente tal
como se indica en el envase.
Especialmente diseñado para usar sólo
detergente de alta eficacia (HE)
NOTA
y
Use solo detergentes de alta eficacia, porque
si usa uno normal puede hacer demasiada
espuma.
y
Los detergentes de alta eficiencia producen
menos espuma, se disuelven de forma más
eficiente para mejorar el lavado y el enjuague,
y ayudan a mantener limpio el interior de la
lavadora.
y
Utilice menos detergente para agua blanda.
y
Limpie inmediatamente las salpicaduras de
detergente, ya que podrían dañar el acabado y
el panel de control de la lavadora.
y
La utilización de demasiado detergente puede
causar acumulación en el tambor y afectar el
funcionamiento de la lavadora.
y
Si utiliza un detergente que no se disuelve con
facilidad o un detergente de alta viscosidad,
éste dejará residuos en el tambor, los cuales
podrán no enjuagarse correctamente.
MFL67737658_S_A5.indd 20 2018. 7. 2. 오전 10:29

21
ESPAÑOL
Compartimiento de blanqueador líquido
Este compartimiento alberga blanqueador
liquido, que se dispensará automáticamente en
el momento adecuado del ciclo de lavado.
NOTA
y
No agregue blanqueador compatible con
la ropa de color liquido o en polvo a este
compartimiento.
y
Siga siempre las recomendaciones del
fabricante cuando agregue blanqueador. No
exceda la linea de llenado maximo. Usar
demasiado blanqueador puede dañar las
telas.
y
Nunca agregue blanqueador líquido no
diluido directamente en la carga o en el
tambor. Puede dañar las telas.
Compartimiento del suavizante
Este compartimiento alberga el suavizante liquido
de telas, que se dispensará automaticamente
durante el ciclo de enjuague final.
NOTA
y
Siga siempre las recomendaciones del
fabricante cuando agregue suavizante. No
exceda la linea de llenado maximo. Usar
demasiado suavizante puede causar que las
telas se manchen.
y
Diluya con agua caliente los suavizantes de tela
concentrados. No exceda la linea de llenado
maximo.
y
Nunca agregue suavizante de tela directamente
en la carga o en el tambor.
Compartimiento de detergente para prelavado
Agregue el detergente liquido o en polvo a este
compartimiento cuando se usa la opcion de
Prewash (prelavado). Use siempre detergente tipo
HE (Alta eficiencia ) con su lavadora.
NOTA
y
Si utiliza la opción de prelavado y va utilizar
detergente líquido para el lavado principal,
debe usar el accesorio del recipiente de
detergente líquido en el lavado principal para
evitar que el detergente líquido se dosifique
inmediatamente.
y
La cantidad de detergente agregado para la
opcion de prelavado debe ser la mitad de la
cantidad para el ciclo de lavado principal. Por
ejemplo, si el ciclo de lavado principal requiere
una medida de detergente, anada media
medida para la opcion de prelavado.
Compartimiento de detergente para el lavado principal
Este compartimiento alberga el detergente para el
ciclo de lavado principal, el cual se agrega a la carga
al principio del ciclo. Use siempre detergente tipo
HE (Alta eficiencia ) con su lavadora.
Cuando agregue detergente nunca sobrepase
las recomendaciones del fabricante. Si utiliza
demasiado detergente, podría acumularse en la
lavadora y en la ropa.
Se puede utilizar tanto detergente liquido como en
polvo.
NOTA
y
Se puede agregar blanqueador compatible
con la ropa de color, liquido o en polvo al
compartimiento de lavado principal junto con
detergente del mismo tipo.
y
Cuando utilice detergente líquido, asegúrese de
que la cajita e inserto se encuentren colocados
en su sitio. No exceda la linea de llenado
máximo.
y
Cuando utilice detergente en polvo, quite el
inserto y la cajita de detergente liquido del
compartimiento. El detergente en polvo no
se dispensará si están colocados la cajita de
detergente liquido y el inserto.
PREPARACIÓN
MFL67737658_S_A5.indd 21 2018. 7. 2. 오전 10:29
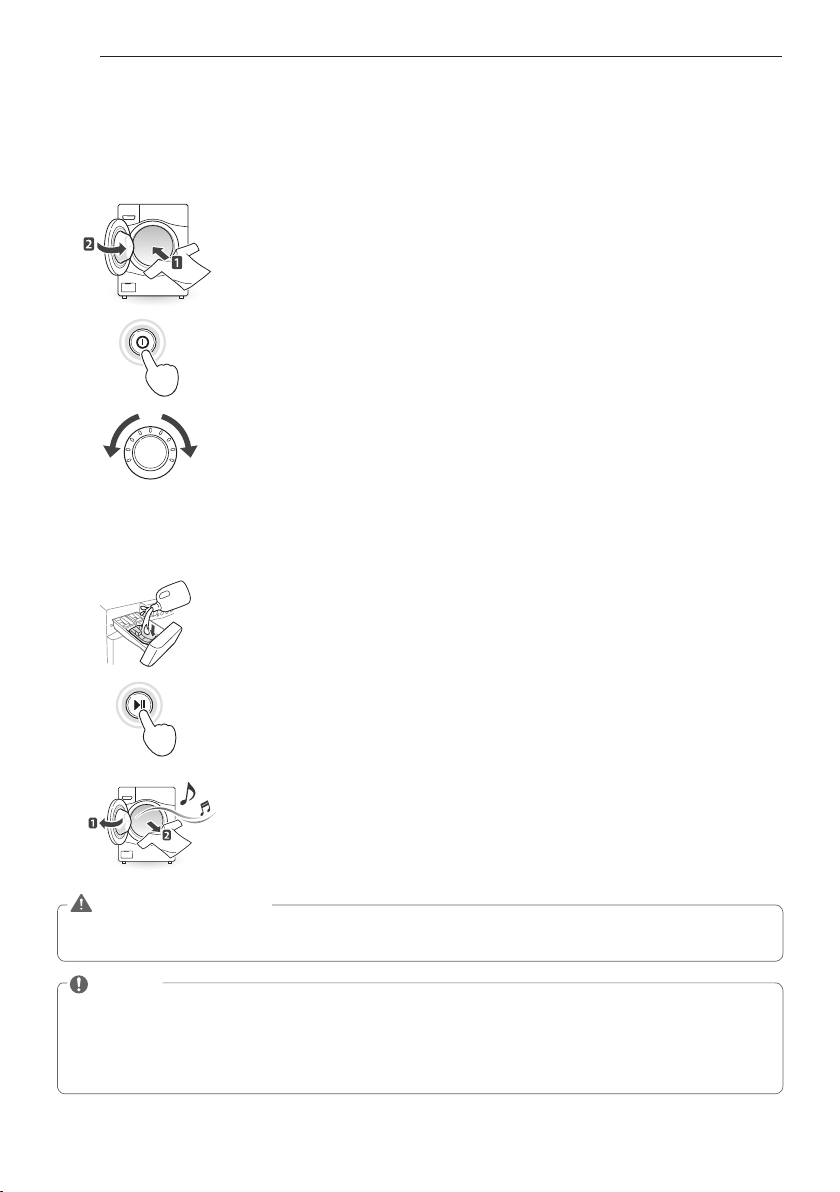
22
UTILIZACIÓN DE LA LAVADORA
UTILIZACIÓN DE LA LAVADORA
Funcionamiento básico
Cargue la ropa en la lavadora y cierre la puerta.
1
2
3
4
5
6
Pulse el botón Power.
- Las luces alrededor del dial selector de ciclos se iluminarán y sonará una señal
acústica.
Gire la perilla del selector de ciclo para seleccionar Limpiar Cuba.
- Se selecciona automáticamente la opción por defecto según el ciclo de lavado.
Consulte la página 23, Guía de ciclos, para más información sobre las opciones
por defecto de cada ciclo de lavado.
- Consulte la página 24, Ciclo principal, para más información sobre los ciclos de
lavado.
- Para cambiar las opciones, pulse el botón de opción y seleccione la opción
deseada. Consulte la página 25, Ajuste de opciones antes del ciclo, para más
información sobre las opciones
- Salte al paso 4 para utilizar los ajustes por defecto sin cambiar las opciones.
Añada la cantidad adecuada de detergente y aditivos (blanqueador, suavizante)
en el cajón dispensador de detergente.
- Consulte la página 20, Uso del detergente/suavizante, para más información
sobre la utilización del detergente.
Pulse el botón Start/Pause.
- La lavadora se pondrá en funcionamiento.
Cuando suene la melodía, habrá terminado el ciclo de lavado.
- Cuando haya terminado el ciclo de lavado, se desbloqueará la puerta.
Abra la puerta y retire la colada inmediatamente.
- Asegúrese de revisar alrededor de la junta hermética de la puerta cuando
retire la ropa. Pueden quedar atrapados objetos pequeños.
ADVERTENCIA
y
Para reducir el riesgo de fuego, descargas electricas o danos personales,
lea las INSTRUCCIONES
IMPORTANTES DE SEGURIDAD antes de utilizar el dispositivo.
NOTA
y
La máquina lavadora de carga frontal gira la ropa para mojarla lo suficiente y lavar con menos agua.
En particular, el nivel de agua es bajo cuando la lavadora está girando la ropa mojada. Es normal no
ver el agua durante un ciclo de lavado.
y
Si la temperatura o el nivel del agua dentro de la máquina es demasiado alto, la puerta se bloquea y
no puede abrirse. Para abrir la puerta durante el lavado, utilice la función Desagüe+Centrifugado.
MFL67737658_S_A5.indd 22 2018. 7. 2. 오전 10:29
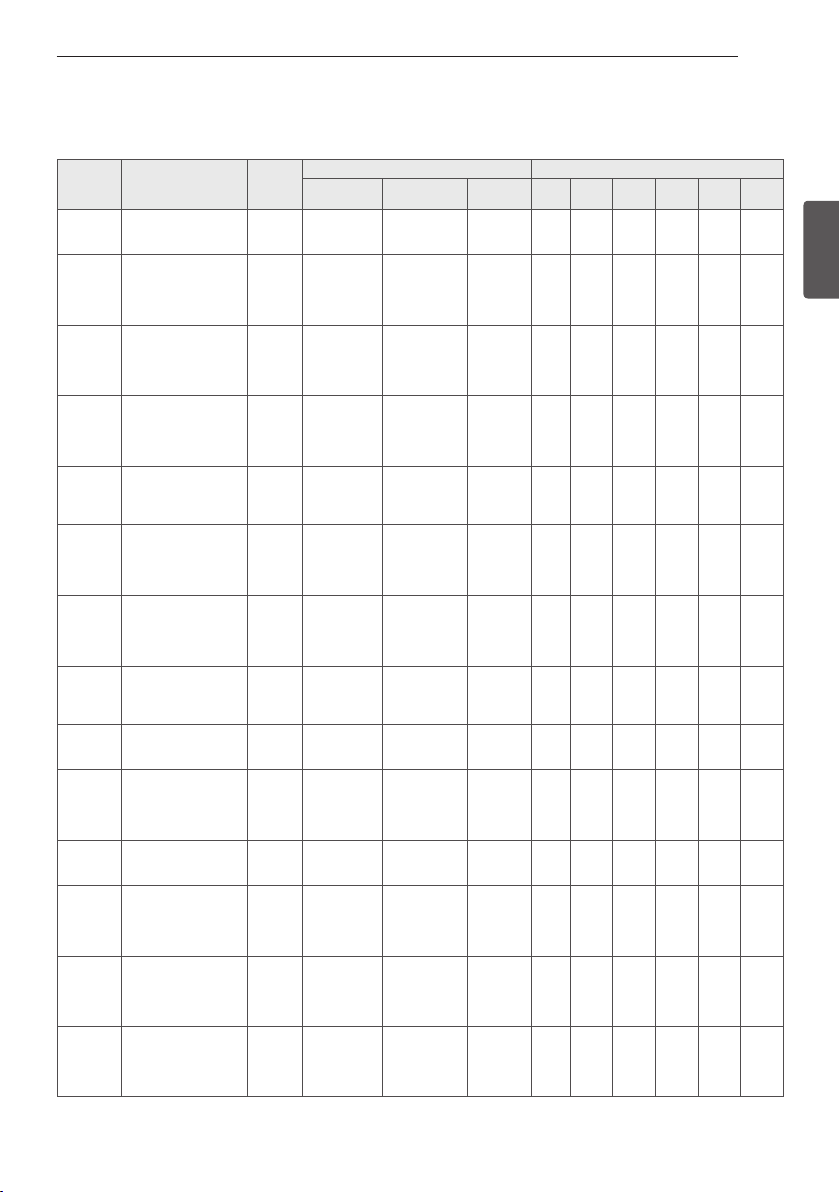
23
ESPAÑOL
UTILIZACIÓN DE LA LAVADORA
Guía de ciclos
La guía de ciclos indicada más abajo muestra las opciones y tipos de telas recomendadas para cada ciclo.
= Opcion
disponible
- Para proteger sus prendas de vestir, no todas las temperaturas de lavado/enjuague, velocidades de
centrifugado, niveles de suciedad u opciones están disponibles en cada ciclo.
-
Si la opción Turbo Wash™ está activada, no podrá seleccionar “No Spin” (Sin Centrifugado) como la velocidad de centrifugado.
(Si la opción Turbo Wash™ está desactivada, sí podrá seleccionar “No Spin” (Sin Centrifugado) como la velocidad de centrifugado.)
CICLO TIPO DE TEJIDO
TIEMPO
DESPLEGADO
(min)
OPCIÓN BÁSICA(
=DEFECTO) OPCION ADICIONAL
Wash
Temp.
Spin
Speed
Soil
Level
Pre
Wash
Extra
Rinse
Steam
Cold
Wash™
Turbo
Wash™
Dry
Tub
Clean
El uso periódico de este
ciclo ayuda a prevenir
olores rancios o a moho.
89
Allergiene™
Algodon, ropa
interior, fundas-
almohadas,
sabanas, ropa de
bebe
99 - 132
MUY ALTA
FUERTE
MEDIA
BAJO
NO CENTRIFUGAR
Sanitary
Ropa interior muy
sucia, ropa de
trabajo, panales,
etc.
110 - 120
EXTRA CALIENTE
MUY ALTA
FUERTE
MEDIA
BAJO
NO CENTRIFUGAR
MUY SUCIO
NORMAL
POCO SUCIO
Bright
Whites™
Prendas blancas 66 - 76
CALIENTE
TIBIA
FRÍA
LIGERAMENTE FRÍA
MUY ALTA
FUERTE
MEDIA
BAJO
NO CENTRIFUGAR
MUY SUCIO
NORMAL
POCO SUCIO
Bulky/
Large
Prendas grandes
tales como mantas
y
edredones
56 CALIENTE
TIBIA
FRÍA
LIGERAMENTE FRÍA
MEDIA
BAJO
NO CENTRIFUGAR
MUY SUCIO
NORMAL
POCO SUCIO
Cotton/
Normal
Algodón, lienzo,
toallas, camisas,
sábanas, jeans,
cargas mixtas
26 - 53 CALIENTE
TIBIA
FRÍA
LIGERAMENTE FRÍA
MUY ALTA
FUERTE
MEDIA
BAJO
NO CENTRIFUGAR
MUY SUCIO
NORMAL
POCO SUCIO
Heavy
Duty
Telas de algodon
muy sucias
74 - 131
CALIENTE
TIBIA
FRÍA
LIGERAMENTE FRÍA
MUY ALTA
FUERTE
MEDIA
BAJO
NO CENTRIFUGAR
MUY SUCIO
NORMAL
POCO SUCIO
Perm.
Press
Dress shirts/pants,
wrinkle-free clothing,
poly/cotton ble nd
clothing, tablecloths
33 - 47 CALIENTE
TIBIA
FRÍA
LIGERAMENTE FRÍA
FUERTE
MEDIA
BAJO
NO CENTRIFUGAR
MUY SUCIO
NORMAL
POCO SUCIO
Delicates
Camisas/ blusas de
vestir, nylon, prendas
con encaje
41 TIBIA
FRÍA
LIGERAMENTE FRÍA
MEDIA
BAJO
NO CENTRIFUGAR
MUY SUCIO
NORMAL
POCO SUCIO
Towels Towels 55 - 65 CALIENTE
TIBIA
FRÍA
LIGERAMENTE FRÍA
MUY ALTA
FUERTE
MEDIA
BAJO
NO CENTRIFUGAR
MUY SUCIO
NORMAL
POCO SUCIO
Hand
Wash/
Wool
Prendas etiquetadas
como “lavables a mano
(hand-washable)”
55 TIBIA
FRÍA
LIGERAMENTE FRÍA
BAJO
NO CENTRIFUGAR
NORMAL
POCO SUCIO
Speed
Wash
Ropa no muy
sucia y
cargas pequeñas
15
CALIENTE
TIBIA
FRÍA
LIGERAMENTE FRÍA
MUY ALTA
FUERTE
MEDIA
BAJO
NO CENTRIFUGAR
MUY SUCIO
NORMAL
POCO SUCIO
Small
Load
Ropa interior muy
sucia, ropa de
trabajo,panales,
etc.
45 CALIENTE
TIBIA
FRÍA
TAP FRÍA
MUY ALTA
FUERTE
MEDIA
BAJO
NO CENTRIFUGAR
MUY SUCIO
NORMAL
POCO SUCIO
Drain+Spin
Drenaje, giro
solanmente
11 MUY ALTA
FUERTE
MEDIA
BAJO
NO CENTRIFUGAR
MFL67737658_S_A5.indd 23 2018. 7. 2. 오전 10:29

24
NOTA
y
Si pulsa
A
y, luego,
C
sin seleccionar
otro
ciclo, la lavadora cambiará a
ALGODÓN/
NORMAL
.
Para toallas
Towels
Este ciclo se utiliza para el lavado de toallas
Ropa sin arrugas,
Perm. Press
Este ciclo se utiliza para lavar ropa sin arrugas o
manteles, para reducir la aparición de arrugas.
Prendas de lana,
Hand Wash/Wool
Este ciclo se utiliza para lavar ropa de lana que
puede encogerse o ropa delicada que necesita
lavarse con mucho cuidado. Utilícelo sólo para
prendas de lana que pueden lavarse en lavadora o
a mano.
NOTA
y
El peso de la carga debe ser inferior a 8
libras(3,6kg) para evitar dañar los tejidos.
y
Utilice sólo detergentes naturales o para ropa
delicada y añada ½ de la cantidad normal de
detergente.
y
El ciclo HAND WASH/WOOL(LAVADO A MANO/
LANA
) gira suavemente el tambor y utiliza un
centrifugado de baja velocidad para un mejor
cuidado de los tejidos.
Prendas delicadas,
Delicates
Este ciclo se utiliza para lavar lencería o ropa con
encajes que se pueda dañar fácilmente.
Lavado rápido,
Speed Wash
Use el ciclo de lavado de velocidad para lavado
rapido de ropa levemente sucia y carga pequena.
Para el lavado y enjuague de alta eficiencia se
recomiendan cargas pequenas de 2-3 prendas
levemente sucias.
NOTA
y
Use poco detergente en este ciclo. Si usted
desea mas enjuague, puede agregar suavizante
adicional utilizando el boton opcional para esta
funcion.
Para pocos artículos,
Small Load
Este ciclo sirve normalmente para cargas sucias y
pequeñas.
Sólo desagüe y centrifugado,
Drain+Spin
Este ciclo se utiliza para el desagüe y centrifugado
sin ciclo de lavado y enjuague, o para retirar la ropa
de la lavadora durante la ejecución de un ciclo.
UTILIZACIÓN DE LA LAVADORA
Ciclo principal
Puede lavar la ropa de forma más intensiva
seleccionando el ciclo de lavado más adecuado
para el tipo de prendas que se van a lavar. Gire
el
B
al ciclo deseado. Cuando seleccione un
ciclo
de lavado, se iluminará la luz para el ciclo
de lavado correspondiente. Consulte la página
22,
Funcionamiento básico
, para más información
sobre los métodos de funcionamiento.
Reducir el alergeno de lavandería,
Allergiene™
Este ciclo es un ciclo potente y de alta temperatura
diseñado para reducir específicamente ciertos
alérgenos.
NOTA
y
La selección del ciclo Allergiene™
automaticamente incorpora el vapor en el ciclo
del lavado.
y
El ciclo Allergiene™ puede apreciablemente
reducir alergenos en el ropa de cama y la ropa.
y
El ciclo Allergiene™ ayuda a reducir
poblaciones de acaros del polvillo y ayuda a
reducir alergenos.
y
Debido al uso de la alta energía y temperatura,
el ciclo Allergiene™ no es recomendado para la
lana, la seda, el cuero, ni cualquier otro articulo
delicado y sensible a la temperatura.
Reducir las bacterias en la colada,
Sanitary
Este ciclo elimina la suciedad resistente de la ropa a
altas temperaturas.
Para tejidos blancos,
Bright Whites™
Este ciclo de lavado es sólo para la ropa blanca.
Mantas o ropa voluminosa,
Bulky/Large
Este ciclo se utiliza para el lavado de mantas o
ropas voluminosas.
Muy sucias de algodón,
Heavy Duty
Este ciclo es para lavado de ropa muy sucia, a
través de rotación más potente del tambor.
Ropa normal,
Cotton/Normal
Utilice este ciclo para lavar prendas normales,
excepto tejidos delicados, como lana o seda.
MFL67737658_S_A5.indd 24 2018. 7. 2. 오전 10:29

25
ESPAÑOL
Ajuste de la velocidad de centrifugado,
Spin Speed
Puede seleccionar la velocidad de centrifugado que
desee. Utilice esta función correctamente, según las
características de la carga.
1
Pulseel botón Power y gire la perilla de selección
de ciclo para elegir el ciclo deseado.
2
Pulse el botón Spin Speed repetidamente
para seleccionar la velocidad de centrifugado
deseada.
- Al presionar el botón, se encenderá una
luz indicadora encima de la selección
correspondiente.
3
Ahora puede modificar otros ajustes del ciclo y
agregar opciones (consulte las páginas 25-28), o
pasar al paso 4 para comenzar el ciclo.
4
Pulse el botón Start/Pause.
NOTA
y
El boton de velocidad de centrifugado tambien
activa el ciclo desague y centrifugado a fin de
vaciar el tambor y centrifugar las prendas; por
ejemplo, si desea quitar la ropa antes de que el
ciclo haya finalizado.
Ajuste del nivel de suciedad de la colada,
Soil Level
Puede hacer un lavado más intensivo de la ropa
ajustando el nivel de suciedad en la lavadora.
1
Pulse el botón Power y gire la perilla de selección
de ciclo para elegir el ciclo deseado.
2
Pulse el botón Soil Level para seleccionar un
nivel de
suciedad.
- Al presionar el botón, se encenderá una
luz indicadora encima de la selección
correspondiente.
3
Ahora puede modificar otros ajustes del ciclo y
agregar opciones (consulte las páginas 25-28), o
pasar al paso 4 para comenzar el ciclo.
4
Pulse el botón Start/Pause.
NOTA
y
Esta función necesita más tiempo para la ropa
muy sucia, o menos tiempo para las prendas
menos sucias.
UTILIZACIÓN DE LA LAVADORA
Botones de ajuste de ciclo
Cada ciclo tiene ajustes preprogramables que se
seleccionan automaticamente. Tambien puede
personalizar los ajustes utilizando los botones de
programacion de ciclos. Apriete el boton para ver
esa opcion y seleccionar otros ajustes.
La lavadora ajusta automaticamente el nivel
de agua segun el tipo y tamano de la carga de
lavado para proporcionar los mejores resultados y
eficiencia maxima. Puede parecer que no hay agua
dentro del tambor en algunos ciclos, pero esto es
normal.
NOTA
y
Para proteger sus prendas de vestir, no todas las
temperaturas de lavado/enjuague, velocidades
de centrifugado, niveles de suciedad u opciones
estan disponibles en cada ciclo. Vea la Guia de
ciclos para obtener mas detalles.
Opciones de ajuste antes del ciclo
Usted puede seleccionar y agregar las opciones
deseadas antes de iniciar la lavadora.
Ajuste de la temperatura del agua,
Wash Temp.
Ajuste la temperatura del agua para el ciclo de
lavado. Seleccione la temperatura adecuada, según
lo especificado en la etiqueta de lavado de la ropa.
1
Pulse el botón Power y gire la perilla de selección
de ciclo para elegir el ciclo deseado.
2
Pulse el botón Wash Temp repetidamente para
seleccionar la
temperatura de a
gua deseada.
- Al presionar el botón, se encenderá una luz
indicadora encima de la selección
correspondiente.
3
Ahora puede modificar otros ajustes del ciclo y
agregar opciones (consulte las páginas 25-28), o
pasar al paso 4 para comenzar el ciclo.
4
Pulse el botón Start/Pause.
NOTA
y
Los enjuagues fríos utilizan menos energía.
y
Su lavadora cuenta con un elemento de
calentamiento que propulsa la temperatura
del agua caliente para ajustes extra calientes
(Extra Hot). Esto brinda un mejor desempeño
de lavado con configuración normal del
calentador de agua.
y
Seleccione la temperatura de agua adecuada
para el tipo de carga que se encuentra
lavando. Siga las instrucciones de la etiqueta
de mantenimiento de la tela para obtener los
mejores resultados.
MFL67737658_S_A5.indd 25 2018. 7. 2. 오전 10:29

26
UTILIZACIÓN DE LA LAVADORA
Ajuste el tiempo de secado, Dry
Las opciones de secado se seleccionan
fácilmente con el botón Dry. Para un
secado aún mayor, asegúrese que las
prendas a cargar sean de material y grosor similar.
No sobrecargue la lavadora colocando demasiadas
prendas en el tambor. Éstas deben circular sin
obstrucciones. Si desea abrir la puerta y retirar la
carga antes de que la lavadora haya finalizado el
ciclo de Dry, recuerde presionar el botón INICIO/
PAUSA.
Al presionar el botón Dry, puede seleccionar:
1
BAJA TEMPERATURA – Para telas delicadas
2
MENOS – Para un secado húmedo de la tela
3
NORMAL – Para un secado general
4
MÁS – Para telas más gruesas
5
30/60/90/120 – Para un secado cronometrado
NOTA
y
La secadora resiste una carga de hasta 8 kg de
prendas secas.
y
Cuando el ciclo de secado termina, se visualiza
en la pantalla de LCD “End Of Cycle” (fin del
ciclo).
y
Se pueden formar arrugas si las prendas no se
retiran en cuanto el ciclo de secado finaliza.
y
El mensaje “End Of Cycle” (fin del ciclo)
continuará en la pantalla hasta que se retire la
ropa o se presione el botón Inicio/Pausa.
Guía de Secado – Secado Automático
Los sensores electrónicos miden la temperatura del
vapor a fin de aumentar o disminuir la temperatura
del secado para un tiempo de reacción más rápido
y un control de temperatura más ajustado.
Ciclos de SECADO Recomendados Según el Tipo de
Prenda:
a) Planchado Permanente – BAJA TEMPERATURA
b) Si quiere planchar las prendas – MENOS
c) Algodón/Toallas – NORMAL
d) Pañales – MÁS
NOTA
y
Con la configuración de Secado Automático, el
tiempo estimado de secado puede variar con
relación al tiempo de secado normal. El tipo de
tela, el tamaño de la carga y el nivel de secado
configurado afectan el tiempo de secado.
Guía de Secado – Secado Cronometrado
• Presione el botón Dry en forma repetida para
configurar el tiempo de secado para que se
incremente cada 30 minutos: 30-60-90-120
minutos.
• El ciclo de secado puede durar hasta 120 minutos.
Si selecciona sólo Secado, el ciclo se iniciará
después del Centrifugado.
• Los tiempos de secado varían mucho
dependiendo de la humedad, la temperatura del
ambiente y el tipo de tela. Es posible que necesite
agregar más.
Su experiencia personal será la mejor guía.
Consejos de Secado
No enrolle prendas de lana secas. Acomódelas en
su forma original y séquelas de forma estirada.
Material Tejido
• Algunos materiales tejidos se pueden encoger
durante el secado.
• Siempre estírelos inmediatamente después del
secado.
Presión Permanente y Sintéticoas
• No sobrecargue la secadora.
• Retire las prendas con estampados
permanentes de forma inmediata después del
secado a fin de evitar arrugas.
Material de Fibra o Cuero
Siempre revise las instrucciones del fabricante.
Ropa de Bebé y Camisón de Noche
Siempre revise las instrucciones del fabricante.
Gomas y Plásticos
No seque prendas que contengan goma o
plásticos, tales como:
a) Delantales, baberos, cobertores de sillas
b) Cortinas y trapos de mesa
c) Batas de baño
Fibra de Vidrio
No seque prendas de fibra de vidrio en la
secadora. Es posible que las partículas de vidrio
que queden dentro de la secadora se adhieran a
la ropa en el siguiente lavado, lo cual irritará su
piel.
MFL67737658_S_A5.indd 26 2018. 7. 2. 오전 10:29

27
ESPAÑOL
UTILIZACIÓN DE LA LAVADORA
Prelavado, Pre Wash
Haga el prelavado por 16 minutos cuando la ropa tiene suciedad
o polvo. Esta función es adecuada para ropa muy sucia.
1
Pulse el botón Power y gire la perilla de selección
de ciclo para elegir el ciclo deseado.
2
Pulse el botón Pre Wash para seleccional el
PRELAVADO.
- Se iluminará la luz Pre Wash.
3
Ahora puede modificar otros ajustes del ciclo y
agregar opciones (consulte las páginas 25-28), o
pasar al paso 4 para comenzar el ciclo.
4
Pulse el botón Start/Pause.
Sólo enjuagar, escurrir y centrifugar, Rinse+Spin
Use este ciclo para lavar detergente de la carga.
1
Pulse el botón Power y gire la perilla de selección
de ciclo para elegir el ciclo deseado.
2
Pulse el botón Rinse + Spin.
3
Presione el botón Spin Speed repetidamente
para seleccionar la velocidad de centrifugado.
- Se encenderá la luz indicadora para la velocidad
de centrifugado seleccionada.
4
Pulse el botón Start/Pause.
Añadiendo ciclo de enjuague extra, Extra Rinse
Puede añadir un ciclo de enjuague extra al ciclo
de enjuague por defecto.
1
Pulse el botón Power y gire la perilla de
selección de ciclo para elegir el ciclo deseado.
2
Pulse el botón Rinse + Spin.
- Se iluminará la luz Extra Rinse.
3
Ahora puede modificar otros ajustes del ciclo
y agregar opciones (consulte las páginas 25-
28), o pasar al paso 4 para comenzar el ciclo.
4
Pulse el botón Start/Pause.
Preajuste del tiempo de inicio, Delay Wash
Puede ajustar el tiempo de inicio deseado.
1
Pulse el botón Power y gire la perilla de selección
de ciclo para elegir el ciclo deseado.
2
Modifique los ajustes del ciclo y agregue otras
opciones (consulte páginas 25-28), si así lo desea.
3
Pulse el botón Delay Wash repetidamente para
seleccionar el tiempo de inicio deseado.
- Se iluminará la luz Delay Wash.
-
Cada vez que se aprieta este boton se aumenta el
tiempo de demora en lapsos de 1 hora, hasta 19 horas.
4
Pulse el botón Start/Pause.
Alta temperatura, Steam
Agregar la opción de vapor (Steam) a estos ciclos
ayuda a mejorar el rendimiento del lavado.
Al usar vapor caliente, los tejidos obtienen los
beneficios de limpieza de un súper lavado caliente.
1
Pulse el botón Power y gire la perilla de selección
de ciclo para elegir el ciclo deseado.
2
Pulse el botón Steam. La lavadora ajustará
automáticamente las configuraciones del ciclo.
3
Programe cualquiera de las demas opciones
deseadas.
4
Pulse el botón Start/Pause.
ADVERTENCIA
y
No toque la compuerta durante los ciclos de
vapor.
La superficie de la compuerta puede
estar muy caliente. Permita que el seguro
de la compuerta se libere antes de abrir la
compuerta.
y
No intente forzar el mecanismo de seguro de
la compuerta o meter la mano dentro de la
lavadora durante un ciclo de vapor.
El vapor
puede causar quemaduras severas.
NOTA
y
No se pueden usar todos los ciclos con la
opcion Steam).
y
Puede que el vapor no sea claramente visible
durante los ciclos de vapor. Esto es normal.
Demasiado vapor podria danar las prendas.
y
No utilice el vapor en telas delicadas tales
como lana, seda o telas que se decoloren
facilmente.
Ahorro de energía, Cold Wash™
Agregar la opcion COLD WASH™ a estos ciclos brinda
una reduccion de energia y el mismo desempeno de
lavado que un lavado con agua tibia. Mediante el uso de
6 movimientos de lavado diferentes (rotacion, balanceo,
salto, refregado, oscilacion y filtracion), las telas obtienen
los beneficios del lavado sin el gasto de energia.
1
Pulse el botón Power y gire la perilla de selección
de ciclo para elegir el ciclo deseado.
2
Pulse el botón Cold Wash. La lavadora ajustará
automáticamente las configuraciones del ciclo.
3
Programe cualquiera de las demas opciones
deseadas.
4
Pulse el botón Start/Pause.
NOTA
y
Cuando seleccione la opcion Cold Wash™, el
tiempo de lavado se elevara hasta en 20 minutos.
y
Para una eficiencia de lavado elevada, se
recomienda utilizar menos de 8 libras (3,6kg).
MFL67737658_S_A5.indd 27 2018. 7. 2. 오전 10:29

28
UTILIZACIÓN DE LA LAVADORA
Ahorro de tiempo, Turbo Wash™
La opción de TurboWash™ reduce el tiempo del ciclo y logra
un buen rendimiento en el ciclo normal.Con TurboWash™ se
puede ahorrar tiempo sin sacrificar los resultados.
1
Pulse el botón Power y gire la perilla de selección
de ciclo para elegir el ciclo deseado.
2
Pulse el botón Turbo Wash. La lavadora regulará
automáticamente los ajustes del ciclo.
3
Ajuste cualquier otra opción deseada.
4
Pulse el botón Start/Pause.
Opciones de ajuste durante el ciclo
Puede añadir las opciones deseadas durante el ciclo de lavado.
Función de bloqueo de botones, Child Lock
Puede bloquear la lavadora para evitar que los niños u otras
personas cambien los ajustes del ciclo pulsando los botones.
Para activar el bloqueo infantil
Mantenga pulsado el botón Pre Wash tres segundos
durante el ciclo de lavado.
- Con el Child Lock activado, se mostrará un mensaje (N) y el
tiempo restante de lavado, a su vez, en la pantalla del panel de
la lavadora.
Para desactivar el bloqueo infantil
(Cuando está activado el Child Lock)
Mantenga pulsado el botón Pre Wash tres segundos
durante el ciclo de lavado.
NOTA
y
Child Lock se mantiene despues del fin del
ciclo. Si desea desactivar esta funcion, presione
y sostenga 3 segundos el boton Pre wash.
Como guardar ciclo personalizado, PGM Save
Puede guardar un ciclo con todos los ajustes y
opciones que usted utilice con mayor frecuencia.
Para guardar un ciclo
1
Para guardar el ciclo
2
Pulse el botón Power y gire la perilla de selección
de ciclo para elegir el ciclo deseado.
3
Haga los ajustes y agregue las opciones
deseadas.
- Mantenga pulsado el botón Custom PGM por
tres segundos durante el ciclo de lavado.
- El ciclo con sus ajustes y opciones preferidas
han sido guardados.
Cómo seleccionar su ciclo personalizado, Custom PGM
Puede seleccionar el ciclo de lavado personalizado
que había guardado previamente
Para recuperar el ciclo
1
Para seleccionar el ciclo.
2
Pulse el botón Power y luego pulse el botón
Custom PGM.
3
Pulse el botón Start/Pause.
Gira la ropa para evitar arrugas, Fresh Care
Utilice esta función cuando no pueda retirar la ropa
de la lavadora apenas se termina el ciclo de lavado.
1
Pulse el botón Power y gire la perilla de selección
de ciclo para elegir el ciclo deseado.
2
Mantenga pulsados el botón Steam por 3
segundos.
- La luz se encenderá.
3
Ahora puede modificar otros ajustes del ciclo y
agregar opciones (consulte las páginas 25-28), o
pasar al paso 4 para comenzar el ciclo.
4
Pulse el botón Start/Pause.
NOTA
y
Esta función hace que el tambor gire periódicamente
hasta aproximadamente 19 horas para prevenir arrugas.
Si presiona el botón de START/PAUSE (inicio/pausa) o el
boton de ON/OFF (encendido/apagado), puede retirar su
ropa de la lavadora en cualquier momento.
Alumbrado tambor, Drum Light
El tambor está equipado con una luz LED blanca que se
enciende cuando la lavadora se pone en marcha. La luz se
apaga automáticamente cuando se cierra la puerta y se
inicia el ciclo. Para encender la luz durante un ciclo.
1
Pulse el botón Power y gire la perilla de selección
de ciclo para seleccionar el ciclo deseado.
2
Pulse el botón Start/Pause.
3
Pulse y mantenga el botón Extra Rinse pulsado
durante 3 segundos el Botón de durante el ciclo
de lavado.
- La luz del tambor se encenderá y se apagará
automáticamente 4 minutos después.
-
La ropa y la junta pueden parecer amarillas
debido a las luces de la lámpara, pero es normal.
MFL67737658_S_A5.indd 28 2018. 7. 2. 오전 10:29
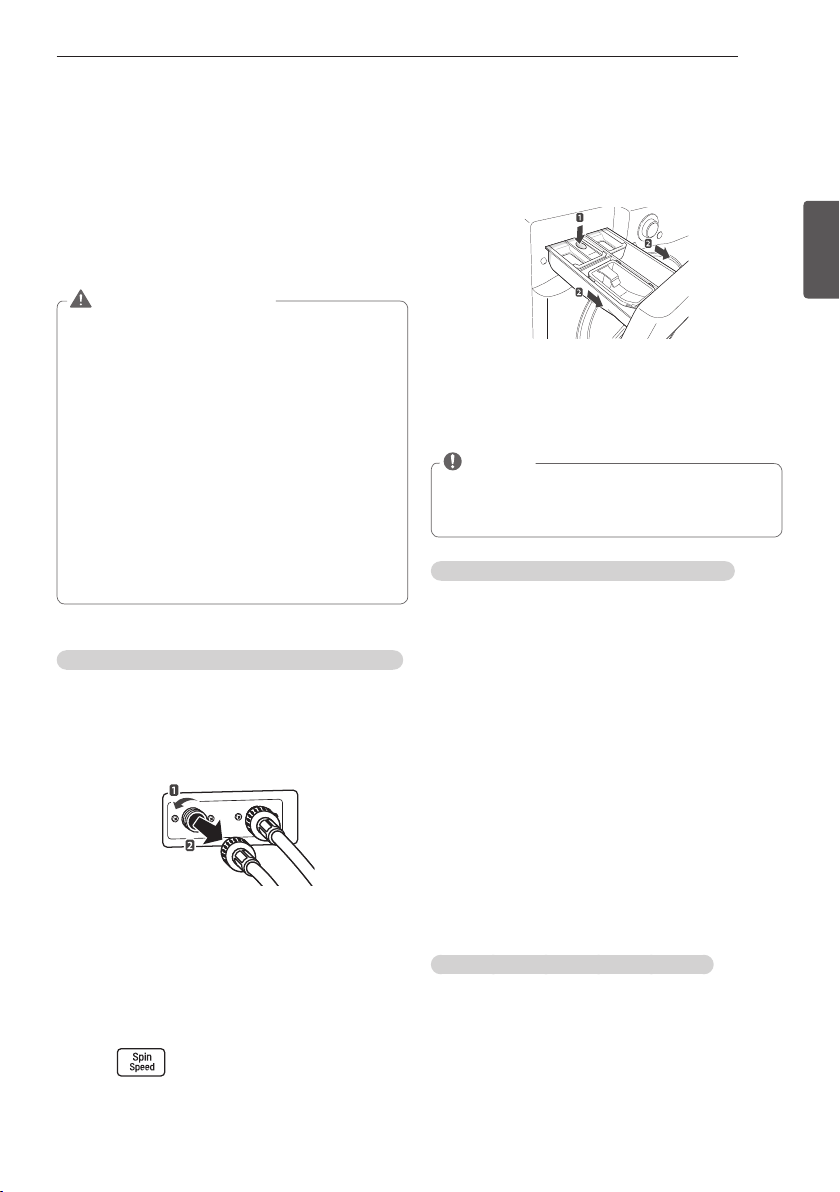
29
ESPAÑOL
MANTENIMIENTO
Cuidados
Cuidados tras el lavado
Una vez finalizado el ciclo, limpie la puerta y el interior
de la junta hermética de la puerta para eliminar la
humedad. Deje la puerta abierta para secar el interior
del tambor. Limpie el cuerpo de la lavadora con un
trapo seco para eliminar la humedad.
ADVERTENCIA
y
Desenchufe la lavadora antes de limpiar la misma para evitar
el riesgo de descargas electricas.
Si no se cumple con esta
advertencia se podran producir heridas graves, incendios,
descargas electricas o muerte.
y
Al limpiar la lavadora nunca utilice quimicos de corte,
limpiadores abrasivos o solventes.
Los mismos danaran su
aspecto.
y
No utilice sustancias volátiles (benceno, disolvente, alcohol,
acetona, etc.) o detergentes con componentes químicos
fuertes durante la limpieza de la lavadora.
Podría decolorar o
dañar la lavadora, o causar un incendio.
y
Ciertas piezas internas no tienen conexion a tierra en
forma intencional y pueden presentar un riesgo de
descarga electrica solo durante la reparacion. Personal
de servicio - No toque las siguientes piezas cuando el
aparato este recibiendo energia: bomba, valvula, motor,
tablero de control.
Cuidados en climas fríos
Almacenamiento de la lavadora durante un período de tiempo extendido
Siga las instrucciones para guardar la lavadora si no
la va a utilizar durante un largo período de tiempo
en climas fríos, con temperaturas bajo cero.
1
Cierre las llaves de paso conectadas a las
tuberías de agua.
2
Suelte las tuberías de agua de las llaves de agua.
3
Vacíe el agua de las tuberías.
4
Pulse el botón Power.
5
Abra la puerta y añada 1 galón (3,8 litros) de
anticongelante para vehículos recreativos (RV)
no tóxicos en el tambor vacío de la lavadora.
Cierre la puerta.
6
Pulse para el drenaje y spinning.
7
Pulse el botón Start/Pause.
- Vacíe el agua de la lavadora durante un minuto.
No se expulsará todo el anticongelante RV.
8
Pulse el botón Power para apagar la lavadora y
desconecte el enchufe.
9
Seque el interior del tambor con un trapo suave
y cierre la puerta.
10
Presione con fuerza el botón para desenganchar
el cajón dispensador de detergente y extráigalo.
11
Vacíe el agua del cajón y seque los compartimentos.
12
Guarde la lavadora en posición vertical.
NOTA
y
Para eliminar el anticongelante tras guardar la
lavadora, añada detergente al dispensador y
ejecute un ciclo. No introduzca ropa en la lavadora.
Cuando se congelan las tuberías del agua
1
Cierre las llaves de paso conectadas a las
tuberías de agua.
2
Vierta agua caliente en las llaves congeladas
para descongelar las tuberías y suéltelas.
3
Sumerja las tuberías de agua en agua caliente
para descongelarlas.
4
Conecte las tuberías de agua a las entradas de
la lavadora y las llaves de agua.
- Consulte en la página 14,
Conexión de las
tuberías de agua
, para información acerca de
las conexión de las tuberías de agua.
5
Abra las llaves de paso.
6
Pulse el botón Power.
7
Pulse la perilla Rinse + Spin.
8
Pulse el botón Start/Pause.
- Verifique que el agua se llene correctamente.
Cuando se congela el tubo de desagüe
1
Vierta agua caliente en el tambor de la lavadora
y cierre la puerta.
- Deje el agua adentro durante 10 minutos.
2
Pulse el botón Power después de 10 minutos.
3
Pulse el botón Spin Speed.
4
Pulse el botón Start/Pause.
- Verifique si se vacía el agua.
MANTENIMIENTO
MFL67737658_S_A5.indd 29 2018. 7. 2. 오전 10:29

30
MANTENIMIENTO
Limpieza
Periódicamente limpie su lavadora para ayudar
a mantener su rendimiento y para minimizar las
posibilidades de funcionamiento defectuoso.
Limpieza del tambor, Tub Clean
Instalación incorrecta o uso de la lavadora en un
espacio húmedo por períodos prolongados podría
resultar en la acumulación de residuo de detergente
en la lavadora y ésto podría causar moho u olores a
humedad. Si usted limpia su lavadora regularmente
una vez al mes utilizando LIMPIEZA DE TINA
minimizar á la posibilidad de que se acumule
residuo de detergente y que aparezcan olores a
moho o humedad.
1
Añada un limpiador para tambor o removedor
de cal en el cajón dispensador de detergente.
- Cuando lo añada, no exceda la línea del
nivel máximo para detergente. Puede quedar
detergente en el tambor tras la limpieza.
- Cuando utilice blanqueador con lejía, cárguelo
en el compartimento de la lejía.
- Cuando utilice un limpiador en polvo, saque
la cajita del detergente líquido y añádalo en
el compartimento del detergente de lavado
principal.
- Cuando utilice tabletas, colóquelas directamente
dentro del tambor.
2
Pulse el botón Power.
3
Gire la perilla de selección de ciclo hasta Tub Clean.
- Se muestra el mensaje (O) en la pantalla.
- Se iluminará la luz Tub Clean.
4
Pulse el botón Start/Pause.
NOTA
y
Nunca meta prendas dentro de la lavadora
cuando utilice Tub Clean. Las prendas pueden
dañarse. Asegúrese de limpiar su tambor
cuando el mismo esté vacío.
y
Se recomienda dejar la puerta abierta despues
de finalizado el lavado para mantener limpia la
cubeta.
y
Se recomienda usar el programa de Tub Clean
una vez al mes.
y
Si nota olor a moho o humedad, haga
funcionar Tub Clean una vez a la semana
durante 3 semanas consecutivas.
y
Fije de forma correcta la puerta dejándola
ligeramente abierta con un cierre magnético.
De este modo, circulará el aire y permitirá que
se seque el interior del aparato.
Alerta automática para la limpieza de la lavadora
Cuando se enciende la lavadora y se parpadea el
mensaje tcL, significa que el tambor de la lavadora
necesita ser limpiado. Utilice la Tub Clean. La
alerta de indicación automática para la limpieza del
tambor depende en la frecuencia de uso, pero el
mensaje generalmente parpadeará cada 1-2 meses.
Eliminación de la cal
Si vive en un área con agua dura, puede acumularse
la cal en los componentes internos de la lavadora.
Debe tener cuidado de limpiar periódicamente las
acumulaciones de cal en los componentes internos
para prolongar la vida útil de la lavadora.
Eliminación de la cal del tambor de la lavadora
Compruebe si el descalcificador es adecuado para
el tambor antes de utilizarlo y realizar el ciclo de Tub
Clean. Consulte la página 30, Limpieza del tambor,
para más detalles sobre su limpieza.
NOTA
y
En áreas con agua dura, se recomienda la
utilización de un suavizador de agua.
y
Asegúrese de retirar toda la ropa del tambor
antes de limpiar el tambor. Si limpia el
tambor con ropa en su interior, ésta podría
contaminarse o dañarse.
Eliminación de la cal acumulada en acero inoxidable
Limpie la acumulación de cal u otras manchas sobre
el acero inoxidable con un trapo suave empapado
en limpiador para acero inoxidable.
NOTA
y
No utilice lana metálica o limpiadores
abrasivos, ya que podría dañar la lavadora.
MFL67737658_S_A5.indd 30 2018. 7. 2. 오전 10:29

31
ESPAÑOL
MANTENIMIENTO
Limpieza de los filtros de entrada de
agua
Limpie periódicamente los filtros de agua para evitar
que se obstruyan.
Ponga especial cuidado en la limpieza de los filtros
si vive en áreas con agua dura. El agua podría no
suministrarse correctamente si hay objetos extraños,
como óxido, arena o piedras en los filtros de entrada
de agua.
1
Pulse el botón Power para apagar la lavadora y
desconecte el enchufe.
2
Cierre las llaves de paso conectadas a las
mangueras de agua.
3
Retire las mangueras de agua.
4
Extraiga el filtro de entrada de agua.
Filtro de entrada
5
Elimine objetos extraños de los filtros de entrada
de agua.
- Deje a remojo los filtros de entrada de agua
en vinagre blanco o antical o utilice un cepillo
dental para eliminar los objetos extraños y
aclárelas.
6
Vuelva a colocar los filtros de entrada de agua en su
posición
7
Vuelva a conectar las tuberías de agua a la
lavadora.
Limpieza del cajón dispensador de
detergente
Si deja detergente en el cajón dispensador durante
un período prolongado de tiempo o utiliza la
lavadora durante mucho tiempo, puede acumularse
cal en el cajón. Retire y limpie el cajón una vez por
semana.
1
Extraiga el cajón dispensador de detergente.
2
Presione con fuerza el botón para desenganchar
el cajón dispensador de detergente y extráigalo.
3
Retire las inserciones del cajón.
4
Límpielas con agua tibia.
- Utilice un trapo o un cepillo suave para limpiar
y eliminar cualquier residuo.
5
Limpie la humedad con una toalla o trapo seco.
6
Vuelva a colocar el cajón dispensador de
detergente.
ADVERTENCIA
y
No rocíe agua en el interior de la lavadora.
Podría causar un incendio o descargas
eléctricas.
NOTA
y
Utilice únicamente agua para limpiar el cajón
dispensador de detergente. Asegúrese de usar el
ciclo ENJUAGUE+CENTRIFUGADO (véase página
27) para enjuagar el tambor antes del ciclo de
lavado cuando utilice detergente para limpiar el
tambor.
MFL67737658_S_A5.indd 31 2018. 7. 2. 오전 10:29
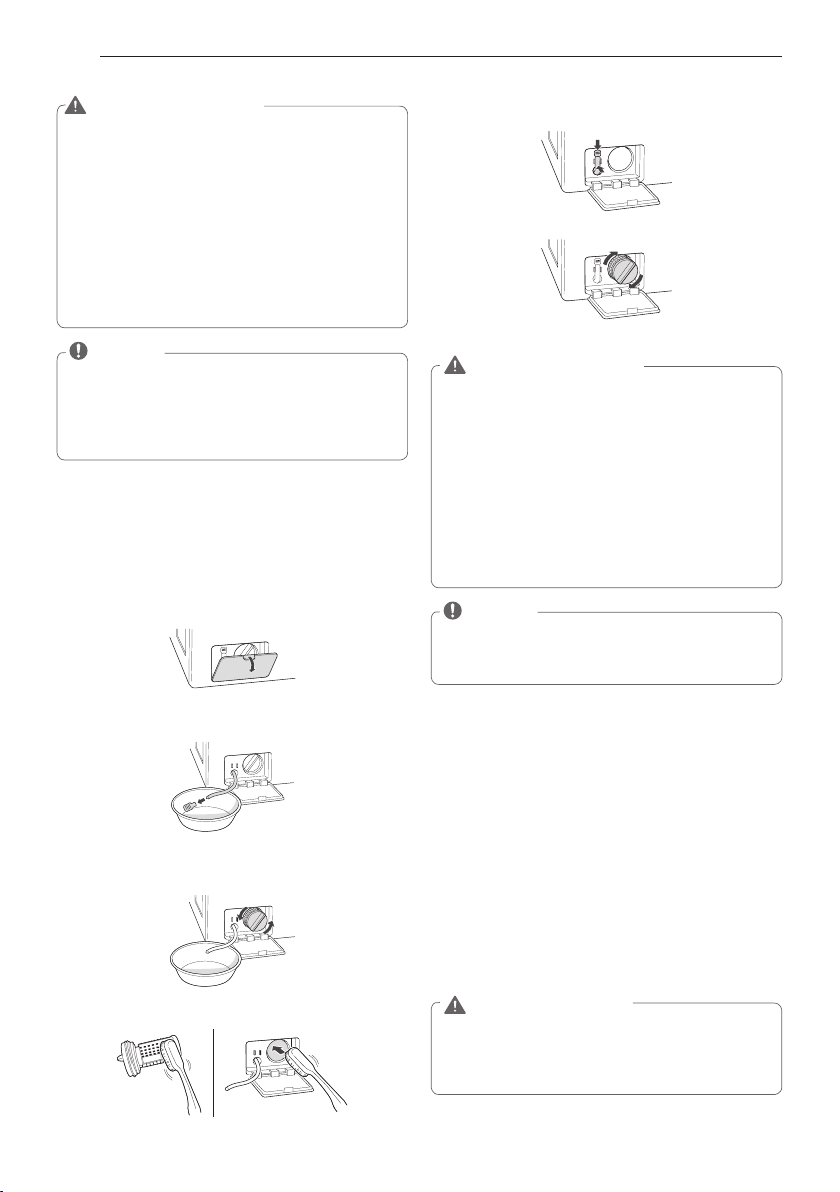
32
MANTENIMIENTO
ADVERTENCIA
y
Desconecte el enchufe y cierre las llaves de
paso antes de la limpieza.
En caso contrario,
pueden producirse descargas eléctricas.
y
No utilice la lavadora sin los filtros de entrada.
En caso contrario, podrían producirse fugas
y fallos de funcionamiento.
y
Si utiliza la lavadora en un área con agua
dura, el filtro podría obstruirse debido a la
acumulación de cal. Póngase en contacto
con el servicio de atención al cliente de LG si
no se puede limpiar correctamente el filtro o
se ha perdido.
NOTA
y
Parpadeará en la pantalla el mensaje (P)
cuando la presión de agua en el cajón del
detergente sea baja o si el filtro de entrada
está atascado con suciedad. Limpie el filtro de
entrada del agua.
Limpieza del filtro de la bomba de desagüe
La lavadora no se vaciará correctamente si el filtro de la
bomba de desagüe está obstruido. Limpie periódicamente
el filtro para evitar obstrucciones por objetos extraños.
1
Pulse el botón Power para apagar la lavadora y
desconecte el enchufe.
2
Abra la tapa del filtro de la bomba de desagüe.
3
Tire de la manguera de desagüe para extraerla y quite
el tapón de la manguera para vaciar el agua restante.
4
Gir
e el filtro en la dirección opuesta a las
manecillas del reloj para quitarlo.
5
Limpie el filtro de la bomba y la abertura.
6
Vuelva a colocar el tapón de la manguera e
introdúzcala en el alojamiento.
7
Introduzca el filtro de la bomba de desagüe.
8
Cierre la tapa del filtro de la bomba de desagüe.
ADVERTENCIA
y
Asegúrese de desconectar el enchufe antes
de la limpieza.
En caso contrario, pueden
producirse descargas eléctricas.
y
Al abrir el filtro de desagüe se desbordará el
agua si queda agua en el tambor.
Compruebe
que se haya vaciado el agua completamente
antes de abrir el filtro de desagüe.
y
Si utiliza la lavadora con el filtro de desagüe
colocado incorrectamente tras su limpieza,
o si utiliza la lavadora sin el filtro, pueden
producirse fugas de agua o fallos de
funcionamiento de la lavadora.
NOTA
y
Parpadeará el mensaje (
Q
) cuando la bomba
de desagüe esté obstruida con suciedad.
Limpie el filtro de la bomba de desagüe.
Limpieza de la junta de la puerta
Limpie la junta hermética de la puerta una vez al
mes para evitar la acumulación de suciedad.
1
Utilice guantes de goma y gafas de protección.
2
Diluya 3/4 de taza (177 mL) de blanqueador
líquido con lejía en 1 galón (3,8 litros) de agua.
3
Remoje una esponja o un trapo suave en esta
solución diluida y limpie toda la zona alrededor
de la junta de la puerta.
4
Seque la humedad con una toalla o trapo seco.
5
Deje la puerta abierta para que la junta se seque
completamente.
PRECAUCIÓN
y
La limpieza de la junta con una solución sin
diluir puede causar fallos de funcionamiento
de la junta de la puerta y de las piezas de la
lavadora.
MFL67737658_S_A5.indd 32 2018. 7. 2. 오전 10:29
33
ESPAÑOL
SOLUCIÓN DE PROBLEMAS
SOLUCIÓN DE PROBLEMAS
Comprobación de los mensajes de error
Si aparece el siguiente mensaje en la pantalla, compruebe lo siguiente y tome la acción correctiva apropiada.
Mensaje
Causas posibles Solución
No hay suficiente ropa en la lavadora.
y
¿Se ha acumulado la ropa en una zona o la
carga es demasiado pequeña?
y
¿Estaba lavando un peluche, una alfrombrilla o ropa de punto?
y
¿Estaba lavando dos mantas juntas?
y
Reorganice la ropa para equilibrar la carga.
y
Los peluches o alfombrillas pueden desequilibrarse durante el
centrifugado y la lavadora podría no vaciar el agua. Reorganice la
ropa de punto para equilibrar la carga y vacíe el agua de nuevo.
y
Lave sólo una manta.
No se suministra agua o la presión del agua es baja.
y
¿Está cerrada la llave de paso?
y
¿No hay suministro de agua o la llave de paso está congelada?
y
¿Es baja la presión del agua o hay un filtro de
entrada obstruido?
y
¿
Se ha conectado correctamente la tubería de
agua en la entrada de agua fría?
y
¿Las tubería de agua estan aplastadas o retorcidas?
y
Abra las llaves de paso.
y
Si la llave de paso está congelada,
descongélela con agua caliente.
y
Si el filtro de entrada está obstruido,
límpielo. (véase página 31).
y
Conecte correctamente la tubería de agua en
la entrada de agua fría. (véase página 14).
y
Compruebe que las tuberías de agua no estén aplastadas o
retorcidas. Tenga mucho cuidado de que las tuberías de agua
no estén retorcidas o aplastadas por otros objetos.
Fuga en la conexión de la tubería de agua
y
¿Están correctamente conectadas las
tuberías de agua en las llaves de agua?
y
Conecte correctamente las tuberías de agua en
las llaves de agua. (véase página 14).
El tambor no gira.
• ¿Se ha cerrado la puerta?
y
Cierre la puerta firmemente. Si sigue apareciendo
el mensaje, desconecte el enchufe y póngase en
contacto con el servicio técnico de LG más cercano.
La lavadora vacía el agua con lentitud o no lo hace
y
¿Se ha instalado la manguera de desagüe a
más de 1 metro del soporte de codo?
y
¿Está aplastada o atascada la manguera en el interior?
y
¿Está congelada la manguera de desagüe?
y
¿Está obstruida la manguera de desagüe con objetos extraños?
y
Baje la manguera de desagüe hasta 3 pies por debajo
del extremo del soporte de codo.
y
Coloque la manguera de desagüe sobre una superficie
suave para evitar que se doble.
y
Si las mangueras de desagüe están congeladas,
descongélelas en agua caliente.
y
Abra el tapón de la manguera de desagüe y elimine la
suciedad.
La alimentación eléctrica se ha interrumpido
durante el funcionamiento.
y
Pulse el botón Power para apagar la lavadora y
púlselo de nuevo para encenderla.
Error de control.
y
Desconecte el enchufe y póngase en contacto
con el servicio técnico de LG más cercano.
No se para el suministro de agua
y
¿Se repiten en secuencia el suministro de agua y el vaciado?
y
Desconecte el enchufe y póngase en contacto
con el servicio técnico de LG más cercano.
El nivel de agua no está controlado
y
¿Es el nivel de agua demasiado bajo o alto
comparado con el tamaño de la carga?
y
El sensor del nivel de agua no funciona correctamente.
y
Desconecte el enchufe y póngase en contacto
con el servicio técnico de LG más cercano.
El tambor no gira.
y
¿Está sobrecargada la lavadora?
y
Reorganice el tamaño de la carga y vuelva a poner
en funcionamiento la lavadora.
y
Si la carga es demasiado grande, la el tambor
podría no girar debido a una sobrecarga del motor.
Deje reposar la máquina unos minutos y póngala
en funcionamiento de nuevo. Si aparece de nuevo
el mensaje, desconecte el enchufe y póngase en
contacto con el servicio técnico de LG más cercano.
y
Para limpiar el tambor, seleccione el ciclo
de limpieza del tambor.
y
Vacíe el tambor e introduzca lejía en el cajón
dispensador y seleccione el ciclo LIMPIEZA DE TINA.
y
Si no desea hacer la limpieza del tambor, gire el selector
de ciclos o pulse los botones opcionales para seleccionar
el ciclo deseado. El mensaje seguirá reapareciendo hasta
haber completado algunos ciclos de lavado, después de
lo cual desaparecerá hasta la próxima vez en que está
programado que se debe limpiar la tina.
MFL67737658_S_A5.indd 33 2018. 7. 2. 오전 10:29
34
SOLUCIÓN DE PROBLEMAS
Antes de llamar al servicio técnico
Haga las siguientes comprobaciones antes de llamar al servicio técnico.
Problema Causas posibles Solución
Sonido de clic
y
¿Oye un sonido cuando cierra y bloquea o
desbloquea la puerta?
y
Este sonido es normal cuando se cierra, se
bloquea o desbloquea la puerta.
Sonido de silbido
y
¿Se está rociando agua en el tambor?
y
Este sonido es normal cuando el agua se está
rociando o circulando durante el ciclo.
Zumbido o sonido de
borbotones
y
¿Está vaciando agua la lavadora?
y
Este sonido es normal y se produce cuando la
bomba de desagüe vacía el agua de la lavadora
tras el ciclo.
Sonido de salpicaduras
y
¿Esta lavando una carga la lavadora?
y
Este sonido es normal cuando la carga se mueve
arriba y abajo durante los ciclos de lavado y
enjuague.
Sonido de traqueteo
y
¿Hay algún objeto, como llaves, monedas, o
alfileres en el tambor o el filtro de desagüe?
y
Compruebe si hay objetos extraños en el tambor
y el filtro de desagüe tras detener el ciclo.
y
Desconecte el enchufe y póngase en contacto
con el servicio técnico de LG más cercano.
Sonido de golpes
y
¿Está sobrecargada la lavadora?
y
¿Está equilibrada la carga?
y
Este sonido es normal y se produce cuando se
ha desequilibrado la carga. Detenga el ciclo y
reorganice la carga para equilibrarla.
Ruido de vibración
y
¿Se han quitado los tornillos de transporte?
y
¿Está la carga distribuida uniformemente en el
tambor?
y
¿Está bien nivelada la lavadora?
y
¿Se ha instalado la lavadora sobre una superficie
resistente y lisa?
y
Consulte la página 13,
Desembalaje y retiro de los
pernos de embalaje,
para más información sobre
la retirada de los tornillos de transporte.
y
Detenga el ciclo y reorganice la carga para
equilibrarla.
y
Consulte la página 16,
Nivelación de la lavadora,
para nivelar la lavadora.
y
Compruebe si el suelo es resistente y está
nivelado.
Fugas de agua alrededor de la
lavadora
y
¿Hay fugas de agua de una llave de paso o una
tubería?
y
¿Hay una manguera o tubo de desagüe
obstruido?
y
Revise las llaves de paso o las tuberías de agua.
- Si las tuberías de agua se han dejado sueltas,
consulte la página 14,
Conexión de las tuberías
de agua
, para conectarlas correctamente.
y
Desatasque el tubo de desagüe o la manguera
de desagüe. Si es necesario, póngase en
contacto con un fontanero.
Espuma excesiva o falta de
enjuague
y
¿Ha utilizado una cantidad de detergente superior
a la recomendada?
y
¿Es el nivel de suciedad superior al tamaño de la
carga?
y
Utilice la cantidad de detergente recomendada
para la carga.
y
Si el nivel de contaminación es bajo, reduzca
la cantidad de detergente y utilice menos
detergente del recomendado.
Utilice sólo detergente con el logotipo HE
(Alta Eficacia).
Manchas
y
¿Ha añadido el detergente directamente al tambor?
¿Ha retirado la carga inmediatamente después que
se acabó el ciclo?
y
¿Ha separado la ropa por colores o suciedad?
y
Asegúrese de cargar el detergente en el cajón
dispensador.
y
Retire la ropa inmediatamente cuando haya
acabado el ciclo.
y
Separe los colores oscuros de los claros y prendas
blancas, y la ropa muy sucia de las prendas poco
sucias. Consulte la página 19,
Clasificación de la
carga de ropa,
para más información.
MFL67737658_S_A5.indd 34 2018. 7. 2. 오전 10:29
35
ESPAÑOL
ESPECIFICACIONES
Problema Causas posibles Solución
Arrugas
y
Las prendas no se sacaron inmediatamente una vez
finalizado el ciclo de secado.
y
El tambor estaba sobrecargado.
y
Las entradas de agua caliente y fría están invertidas.
y
Saque las prendas inmediatamente una vez finalizado el
ciclo.
y
Las prendas mojadas necesitan espacio para dar vueltas
libremente a fin de secarse correctamente. Si tiene
previsto secar una carga de ropa, no cargue más de
la mitad del tambor, divida la carga de lavado o saque
algunas prendas antes del secado.
y
El aclarado con agua caliente puede provocar arrugas en
las prendas. Compruebe las conexiones de la manguera
de entrada.
La lavadora no se enciende
y
¿Se ha conectado correctamente el enchufe?
y
¿Tiene un fusible fundido, se ha disparado el interruptor
de circuito, o se ha producido un corte de suministro
eléctrico?
y
Asegúrese de que el enchufe esté conectado en una toma
de 3 clavijas con conexión a tierra de 120 V (60 Hz).
y
Restablezca el interruptor de circuito o cambie el fusible.
No coloque un fusible de mayor capacidad. Si el problema
es una sobrecarga del circuito, solicite la reparación a un
electricista cualificado.
La puerta no se abre cuando se hace
una pausa en el ciclo o cuando finaliza
y
¿Es demasiado alta la temperatura en el tambor?
y
¿Está lleno de agua el tambor?
y
La lavadora tiene un bloqueo de seguridad integrado en
la puerta para evitar quemaduras. Deje la puerta cerrada
y espere hasta que desaparezca el icono de bloqueo de la
puerta de la pantalla.
y
Deje que la lavadora finalice el ciclo programado o pulse
el botón SPIN.
El tiempo de lavado es más largo de lo
normal
y
¿Está sobrecargada la lavadora?
¿Se han añadido opciones al ciclo de lavado?
y
Esto es normal. La lavadora ajusta automáticamente el
tiempo de lavado para la cantidad de ropa, la presión del
agua, la temperatura del agua y cualquier otra condición
de funcionamiento.
Hay moho o humedad en el tambor
y
¿Se ha utilizado una cantidad incorrecta de detergente?
y
¿Se limpia el tambor periódicamente?
y
Utilice sólo detergente HE (alta eficacia) recomendado
para lavadoras de carga frontal.
y
Consulte la página 29, limpie el interior y el exterior de la
lavadora periódicamente.
Ruido estrepitoso cuando la lavadora
se llena de agua (golpe de ariete)
y
La fontanería del hogar se mueve o flexiona cuando las
válvulas de agua de la lavadora se apagan.
y
La presión del suministro de agua del hogar es muy alto.
y
El golpe de ariete no es causado por un defecto en la
lavadora. Instale supresores de golpe de ariete entre
la manguera de llenado y la lavadora para obtener
los mejores resultados (se compran por separado en
ferreterías o tiendas de artículos del hogar).
y
Ajuste el regulador de suministro de agua a una presión
inferior o comuníquese con un plomero para instalar un
regulador.
Olor
y
Este olor es causado por la goma adjunta a la lavadora.
y
Si la junta de goma de la puerta y la del area del sello de
esta no se limpian regularmente, pueden producirse olores
causados por moho o sustancias extrañas.
y
Pueden producirse olores si se dejan sustancias extrañas
en el filtro de la bomba de drenaje.
y
Pueden producirse olores si la manguera de drenaje no
está correctamente instalada, causando sifoneado (agua
desviándose hacia el interior de la lavadora).
y
Al usar la función de secado, puede que se produzcan
olores por la pelusa u otra materia de lavado que resulte
adherida al calentador. (Únicamente modelos de secado)
y
Un olor particular puede resultar al secar prendas húmedas
con aire caliente. (Únicamente modelos de secado)
y
Es el olor normal de la goma nueva y este desaparecerá
luego de haber utilizado la lavadora algunas veces.
y
Asegúrese de limpiar la junta y el sello de la puerta
regularmente, así como de revisar si hay artículos
pequeños debajo del sello al descargar la lavadora.
y
Asegúrese de limpiar el filtro de la bomba de drenaje
regularmente.
y
Al instalar la manguera de drenaje, asegúrese de que esta
no se retuerza o bloquee.
y
Esto no es un problema de funcionamiento.
y
El olor desapareceré luego de un corto tiempo.
ESPECIFICACIONES
Modelo WM3997H*A
Descripción Lavadora de carga frontal
Requisitos eléctricos 120 VAC @ 60 Hz.
Medidas 68,6 cm (An) X 75,6 cm (F) X 98,3 cm (Al), 132,2 cm (F con puerta abierta)
27” (An) X 29 ¾” (F) X 38
¹¹
/
16
” (Al), 52” (F con la puerta abierta)
Peso neto 96 kg(211lbs)
Velocidad máx. de centrifugado 1 300 r/min max
Presión máx. de agua 20 – 120 psi (138 – 827 kPA)
MFL67737658_S_A5.indd 35 2018. 7. 2. 오전 10:29
36
FUNCIÓN SMART DIAGNOSIS™ (DIAGNÓSTICO INTELIGENTE)
Función Smart Diagnosis ™
(Diagnóstico Inteligente)
En caso de experimentar algún problema con el
aparato, el mismo tiene la capacidad de
transmitir datos a través de su teléfono al Centro
de información del cliente de LG. Los modelos
equipados con NFC o Wi-Fi pueden también
transmitir datos a un teléfono inteligente usando
la aplicación LG SmartThinQ.
Smart Diagnosis™ a través del Centro
de información al cliente
• Para electrodomésticos con el o logo
Esto le da la oportunidad de hablar
directamente con nuestros especialistas
capacitados. El especialista registra los datos
transmitidos desde el aparato y los usa para
analizar el problema, así le brinda un
diagnostico efectivo y rápido.
1 Comuníquese con el Centro de información al
cliente de LG Electronics llamando al:
(LG EE. UU.) 1-800-243-0000
(LG Canadá) 1-888-542-2623
2 Cuando del centro de información le soliciten
que lo haga, coloque el micrófono del teléfono
cerca del ícono de Smart Diagnosis™. No
presione ningún otro botón.
3 Mantenga presionado el botón Wash Temp.
durante 3 segundos.
4 Mantenga el teléfono allí hasta que la
transmisión de tonos haya terminado.
5 Una vez que la cuenta regresiva haya
terminado y se hayan detenido los tonos,
reanude su conversación con el agente del
centro de atención, que podrá, entonces,
ayudarlo a usar la información transmitida
para un análisis.
NOTA
y
Smart Diagnosis™ no puede activarse a
menos que el electrodoméstico se encienda
usando el botón Power. Si no es posible
encender el electrodoméstico, entonces la
resolución de problemas debe llevarse a
cabo sin usar Smart Diagnosis™.
y
Para obtener resultados óptimos, no mueva
el teléfono mientras se transmitan los tonos.
y
Si el agente del centro de atención no
puede obtener una grabación precisa de los
datos, es posible que le pida que lo intente
nuevamente.
y
La calidad de la función Smart Diagnosis™
depende de la calidad de la llamada local.
y
Una llamada de mala calidad puede resultar
en la mala transmisión de los datos desde su
teléfono al centro de llamadas, lo que podría
hacer que Smart Diagnosis™ tenga un mal
funcionamiento.
LG SmartThinQ Smart Diagnosis™
• Para electrodomésticos con el o logo
Use la función de diagnóstico inteligente en la
aplicación LG SmartThinQ para ayudar a
diagnosticar problemas sin la ayuda del Centro
de información del cliente de LG.
Siga las instrucciones en la aplicación
LG SmartThinQ para realizar un diagnóstico
inteligente usando su teléfono inteligente.
NOTA
y
Smart Diagnosis™ no puede activarse a
menos que el electrodoméstico se encienda
usando el botón Power. Si no es posible
encender el electrodoméstico, entonces la
resolución de problemas debe llevarse a
cabo sin usar Smart Diagnosis™.
MFL67737658_S_A5.indd 36 2018. 7. 2. 오전 10:29
37
ESPAÑOL
GARANTÍA
ESTA GARANTÍA LIMITADA NO CUBRE:
1. Desplazamientos de servicio para el envío, recogida o
instalación del producto o para dar instrucciones sobre la
utilización del producto.
2. Sustitución de los fusibles de la vivienda o puesta en
funcionamiento de los disyuntores, corrección de la
instalación eléctrica de la casa o fontanería, o corrección de
la instalación del producto.
3. Daños o fallos causados por tubos de agua con fugas o
roturas, tubos de agua congelados, tubos de desagüe
atascados, suministro de agua inadecuado o con
interrupciones o suministro de aire inadecuado.
4. Daños al producto causados por accidentes, pestes e
insectos, rayos, viento, fuego, inundaciones o causas de
fuerza mayor.
5. Daños o fallos resultantes de un uso inadecuado, abusos,
instalación, reparaciones o mantenimiento incorrectos. Las
reparaciones incorrectas incluyen la utilización de piezas
no aprobadas o especificadas por LG.
6. Daños o fallos causados por la modificación u alteración
no autorizada del producto.
7. Daños o fallos causados por la corriente eléctrica, tensión
o códigos de fontanería incorrectos.
8. Daños cosméticos, incluidos arañazos, abolladuras u otros
daños en el acabado del producto, a menos que los daños
sean resultado de defectos de materiales o mano de obra y
se informe a LG en un plazo de siete (7) días calendarios a
partir de la fecha de entrega.
9. Daños o falta de elementos en cualquier producto de
exposición, caja abierta, de descuento o reacondicionado.
10. Productos en los que se haya borrado, desdibujado o
cambiado el número de serie original de fábrica.
11. Reparaciones cuando se esté dando al producto una
utilización diferente del uso doméstico normal (por
ejemplo, alquiler, uso comercial, oficinas e instalaciones
recreativas) o contraria a las instrucciones del manual del
propietario del producto.
12. La retirada y nueva instalación del producto si se ha
instalado en una ubicación inaccesible.
CÓMO SE PRESTA EL SERVICIO: Servicio a domicilio
El servicio a domicilio se prestará, según esté disponible, durante el período de garantía según la disponibilidad del personal de
servicio técnico en EE.UU. Para recibir servicio a domicilio el producto deberá estar accesible y sin obstrucciones para el personal de
servicio. Si no se puede prestar el servicio de reparación a domicilio, puede ser necesario retirar, reparar y devolver el producto. Si
no está disponible el servicio a domicilio, LG podrá decidir si facilitará transporte para el producto a y desde cualquier servicio técnico
de LG, según su elección.
ESTA GARANTÍA EXCLUYE CUALQUIER OTRA GARANTÍA, EXPRESA O IMPLÍCITA, INCLUYENDO Y SIN LIMITACIÓN A
CUALQUIER GARANTÍA DE COMERCIABILIDAD O ADECUACIÓN A UN FIN PARTICULAR. EN EL GRADO EN QUE CUALQUIER
GARANTÍA IMPLÍCITA SEA REQUERIDA POR LEY, ESTA GARANTÍA SE LIMITARÁ EN SU DURACIÓN AL PERIODO INDICADO
ANTERIORMENTE. LA REPARACIÓN O SUSTITUCIÓN
BAJO ESTA GARANTÍA ES LA ÚNICA SOLUCIÓN PARA EL CLIENTE. NI EL FABRICANTE, NI SUS DISTRIBUIDORES EN
EE.UU. SERÁN RESPONSABLES DE CUALQUIER DAÑO INCIDENTAL, CONSECUENCIAL, INDIRECTO, ESPECIAL O PUNITIVO
DE CUALQUIER TIPO, INCLUIDAS SIN LIMITACIÓN, PÉRDIDAS DE INGRESOS O BENEFICIOS, O CUALQUIER OTRO DAÑO
BASADOS EN CONTRATOS, RESPONSABILIDADES EXTRACONTRACTUALES O DE OTRO TIPO.
INCLUYENDO Y SIN LIMITACIÓN A, PERMITEN LA EXCLUSIÓN O LIMITACIÓN DE LOS DAÑOS INCIDENTALES O
CONSECUENCIALES O LAS LIMITACIONES SOBRE LA DURACIÓN DE UNA GARANTÍA IMPLÍCITA, POR LO QUE PUEDEN
NO SER APLICABLES A SU CASO LAS CITADAS EXCLUSIONES. ESTA GARANTÍA LE CONFIERE DERECHOS LEGALES
ESPECÍFICOS Y TAMBIÉN PUEDE TENER OTROS DERECHOS QUE VARÍAN DE UNOS ESTADOS A OTROS.
CÓMO OBTENER SERVICIO DE GARANTÍA E INFORMACIÓN ADICIONAL:
Llame al número 1-800-243-0000 o visite nuestro sitio web en www.lg.com.
Si desea ponerse en contacto por correo: Centro de información al cliente LG (ATT: CIC)
201 James Record Road, Huntsville, AL 35824
AVISO DE ARBITRAJE: ESTA GARANTÍA LIMITADA CONTINE UNA CLÁUSULA DE ARBITRAJE QUE LE DEMANDA A USTED Y A LG RESOLVER
CONFLICTOS A TRAVÉS DE UN ARBITRAJE VINCULANTE EN LUGAR DE HACERLO EN LA CORTE, A MENOS QUE USTED DECIDA NO PARTICIPAR.
EN EL ARBITRAJE NO ESTÁN PERMITIDAS LAS ACCIONES COLECTIVAS NI LOS JUCIOS CON JURADO. POR FAVOR, VEA A CONTINUACIÓN LA
SECCIÓN TITULADA "PROCEDIMIENTO PARA RESOLVER CONFLICTOS".
COBERTURA DE LA GARANTÍA:
LG Electronics U.S.A., Inc. (“LG”) garantiza su lavadora LG (“producto”) contra cualquier defecto en materiales o mano de obra bajo un uso
doméstico normal, durante el periodo de garantía indicado más adelante, y LG podrá reparar o sustituir el producto, bajo su exclusivo criterio.
Esta garantía limitada tiene validez sólo para el comprador minorista original del producto, no puede cederse o transferirse a cualquier comprador
o usuario posterior, y se aplica sólo cuando el producto se haya adquirido a través de un distribuidor LG autorizado y se haya utilizado en Estado
Unidos (“EE.UU.”), incluidos los Territorios de EE.UU.
Nota: Los productos de sustitución o piezas de reparación pueden ser nuevos o remanufacturados en fábrica y tendrán garantía para el tiempo
restante del período original de garantía o noventa (90) días, el que sea más largo. Guarde la factura o el justificante de compra como prueba de la
fecha de compra para la garantía (se le podría pedir que envíe una copia a LG o un representante autorizado).
PERIODO DE GARANTÍA:
GARANTÍA LIMITADA (EE.UU.)
Periodo
Un (1) año a partir de la fecha de
compra original:
Diez (10) años a partir de la fecha de
compra original:
Toda la vida útil desde la fecha de
compra original:
Alcance de la garantía
Cualquier pieza interna/funcional Motor del tambor
(estator, rotor y sensor Hall)
Tambor de acero inoxidable
Observación
LG suministrará las piezas y la
mano de obra para la reparación o
sustituirá las piezas defectuosas.
Sólo piezas. El cliente será responsable de la mano de obra o la
reparación a domicilio para la sustitución de las piezas defectuosas.
MFL67737658_S_A5.indd 37 2018. 7. 2. 오전 10:29

38
GARANTÍA
PROCEDIMIENTO PARA RESOLVER CONFLICTOS:
TODOS LOS CONFLICTOS ENTRE USTED Y LG QUE SURJAN FUERA DE O RELACIONADOS DE ALGUNA MANERA CON ESTA GARANTÍA
LIMITADA O CON EL PRODUCTO, SE RESOLVERÁN EXCLUSIVAMENTE A TRAVÉS DE UN ARBITRAJE VINCULANTE Y NO EN UNA CORTE DE
JURISDICCIÓN GENERAL. ARBITRAJE VINCULANTE SIGNIFICA QUE USTED Y LG RENUNCIAN AL DERECHO DE UN JUICIO CON JURADO Y
A REALIZAR O PARTICIPAR EN UNA DEMANDA COLECTIVA.
Definiciones. Para el propósito de esta sección, las referencias a “LG” significan: LG Electronics U.S.A., Inc., sus empresas matrices,
subsidiarias y filiales y cada uno de sus directivos, directores, empleados, agentes, beneficiarios, predecesores en interés, sucesores,
cesionarios y proveedores; las referencias a "conflicto" o "reclamación" incluirán cualquier conflicto, reclamo o controversia de cualquier
tipo, sin importar (ya sea basado en contrato, agravio, estatuto, regulación, ordenanza, fraude, falsa representación o cualquier teoría legal o
equitativa) que surja de o esté relacionada con cualquier forma de venta, condición o desempeño del producto o de esta Garantía Limitada.
Aviso de disputa. En caso de que usted desee iniciar un procedimiento de arbitraje, primero debe notificar a LG por escrito al menos 30 días
antes de iniciar el arbitraje enviando una carta a LG a LG Electronics, USA, Inc. Atención: Legal Department- Arbitration 1000 Sylvan Ave,
Englewood Cliffs 07632. Usted y LG aceptan participar en discusiones de buena fe en un intento de resolver su reclamo de manera amistosa.
En la carta debe proporcionar su nombre, dirección y número de teléfono; identificar el producto que es objeto de la reclamación; y describir
la naturaleza del reclamo y el remedio que busca. Si usted y LG no puede resolver la disputa dentro de 30 días, cualquiera de las partes puede
proceder a presentar una demanda de arbitraje.
Acuerdo de arbitraje vinculante y renuncia de demanda colectiva. En caso de no resolver la disputa durante el período de 30 días después
de enviar una notificación por escrito a LG, Usted y LG se comprometen a resolver cualquier reclamo entre nosotros, solamente a través de
arbitraje vinculante sobre una base individual, a menos que usted se excluya, conforme a lo dispuesto a continuación. Cualquier conflicto
entre usted y LG no estarán combinados o consolidados con una controversia relacionada con cualquier otro producto o reclamo de otra
persona o entidad. Más específicamente y sin prejuicio de lo anterior, no procederá bajo ninguna circunstancia cualquier disputa entre usted
y LG como parte de una acción colectiva o representativa. En lugar del arbitraje, cualquiera de las partes podrá iniciar una acción individual
en la corte de reclamos menores, pero tales acciones en la corte de reclamos menores no podrán ser realizadas en una acción colectiva o
representativa.
Normas y procedimientos de arbitraje. Para comenzar con el arbitraje de un reclamo, usted o LG deben realizar una demanda escrita para
arbitraje. El arbitraje será administrado por la Asociación Americana de Arbitraje (AAA) y se llevará a cabo ante un árbitro único bajo las
Normas de Arbitraje del Consumidor de la AAA, que tienen efecto al momento de inicio del arbitraje (en adelante "Normas de la AAA") y
bajo los procedimientos establecidos en esta sección. Las Normas de la AAA están disponibles en línea en www.adr.org/consumer. Envíe una
copia de su solicitud de arbitraje por escrito, así como una copia de esta disposición, a la AAA de la forma descrita en las Normas de la AAA.
También debe enviar una copia de su solicitud por escrito a LG en LG Electronics, USA, Inc. Atención: Legal Department- Arbitration 1000
Sylvan Ave, Englewood Cliffs 07632. Si hay un conflicto entre las Normas de la AAA y las reglas establecidas en esta sección, prevalecerán
dichas reglas de esta sección. Esta disposición de arbitraje se rige por la Ley Federal de Arbitraje. El juicio se puede introducir en el laudo
arbitral en cualquier tribunal de jurisdicción competente. Todos son temas para que el árbitro tome sus decisiones, excepto aquellos asuntos
relativos al alcance y aplicabilidad de la cláusula de arbitraje y de la capacidad de arbitraje de la controversia para que el tribunal decida. El
árbitro se regirá por los términos de esta disposición.
Legislación vigente. La legislación del estado de su residencia regirá esta Garantía Limitada, así como todas las disputas entre nosotros, salvo
que sea invalidada o inconsistente con leyes federales aplicables.
Tarifas / Costos. Usted no debe pagar ninguna tarifa para comenzar un arbitraje. Al recibir su solicitud de arbitraje por escrito, LG pagará
todos los gastos administrativos rápidamente a la AAA, a menos que usted solicite más de $25,000.00 por daños, en cuyo caso el pago de
estos gastos se regirá por las Normas de la AAA. Salvo disposición contraria prevista en el presente documento, LG pagará a la AAA todos
los gastos documentales, administrativos y de arbitraje para cualquier arbitraje iniciado, de conformidad con las Normas de la AAA y esta
disposición de arbitraje. Si usted prevalece en el arbitraje, LG pagará los honorarios y gastos de sus abogados, siempre y cuando sean
razonables, considerando factores que incluyen, entre otros, el monto de la compra y el monto del reclamo. No obstante lo anterior, si la ley
aplicable permite una adjudicación de honorarios y gastos razonables de abogados, un árbitro puede otorgarlos en la misma medida que lo
haría un tribunal. Si el árbitro considera que la sustancia de su reclamo o la reparación solicitada en la demanda es frívola o se utiliza para
un propósito inadecuado (calificado según las normas establecidas en la Norma Federal de Procedimiento Civil 11 (b)), el pago de todos
los honorarios de arbitraje se regirá por las Normas de la AAA. En tal situación usted se compromete a reembolsar a LG todos los fondos
erogados previamente por ella, cuyo pago es, por otra parte, su obligación, según las Normas de la AAA. Salvo disposición contraria, LG
renuncia a cualquier derecho que pudiera tener para solicitarle los honorarios y gastos de sus abogados, si LG prevalece en el arbitraje.
Audiencias y ubicación. Si su reclamo es por $25,000 o menos, usted puede optar que el arbitraje sea realizado únicamente sobre la base de:
(1) documentos presentados al árbitro, (2) a través de una audiencia telefónica o (3) por una audiencia en persona, según lo establecido por
las Normas de la AAA. Si su reclamo excede $25,000, el derecho a una audiencia estará determinado por las Normas de la AAA. Cualquier
audiencia de arbitraje en persona se realizará en un lugar dentro del distrito judicial federal en el cual resida, a menos que ambos acuerden
otra ubicación o estemos de acuerdo con el arbitraje telefónico.
Exclusión. Usted puede quedarse fuera de este procedimiento de resolución de la disputa. Si se excluye, ni usted ni LG pueden solicitar al
otro que participe en un procedimiento de arbitraje. Para excluirse usted debe enviar una notificación a LG, en un lapso de hasta 30 días
continuos, contados a partir de la fecha de la primera compra del consumidor del producto, ya sea por: (i) el envío de un correo electrónico
a [email protected] con el siguiente Asunto: "Exclusión del arbitraje" o (ii) llamada al 1-800-980-2973. Debe incluir en el correo electrónico de
exclusión o suministrar por teléfono: (a) su nombre y dirección; (b) la fecha en la cual el producto fue comprado; (c) el nombre o el número
del modelo del producto; y (d) el número del serial (el número del serial puede ser hallado (i) en el producto, o (ii) en la dirección de https://
www.lg.com/us/support/repair-service/schedule-repair-continued al hacer clic en “Find My Model & Serial Number”).
Sólo puede excluirse del procedimiento de resolución de conflictos en la forma descrita anteriormente (es decir, por correo electrónico o por
teléfono); ninguna otra forma de notificación será efectiva para hacerlo. Excluirse de este procedimiento de resolución de controversias no
afectará de ninguna manera la cobertura de la Garantía Limitada, por lo que usted continuará disfrutando de todos sus beneficios. Si conserva
este producto y no se excluye, usted acepta todos los términos y condiciones de la cláusula de arbitraje descrita anteriormente.
MFL67737658_S_A5.indd 38 2018. 7. 2. 오전 10:29
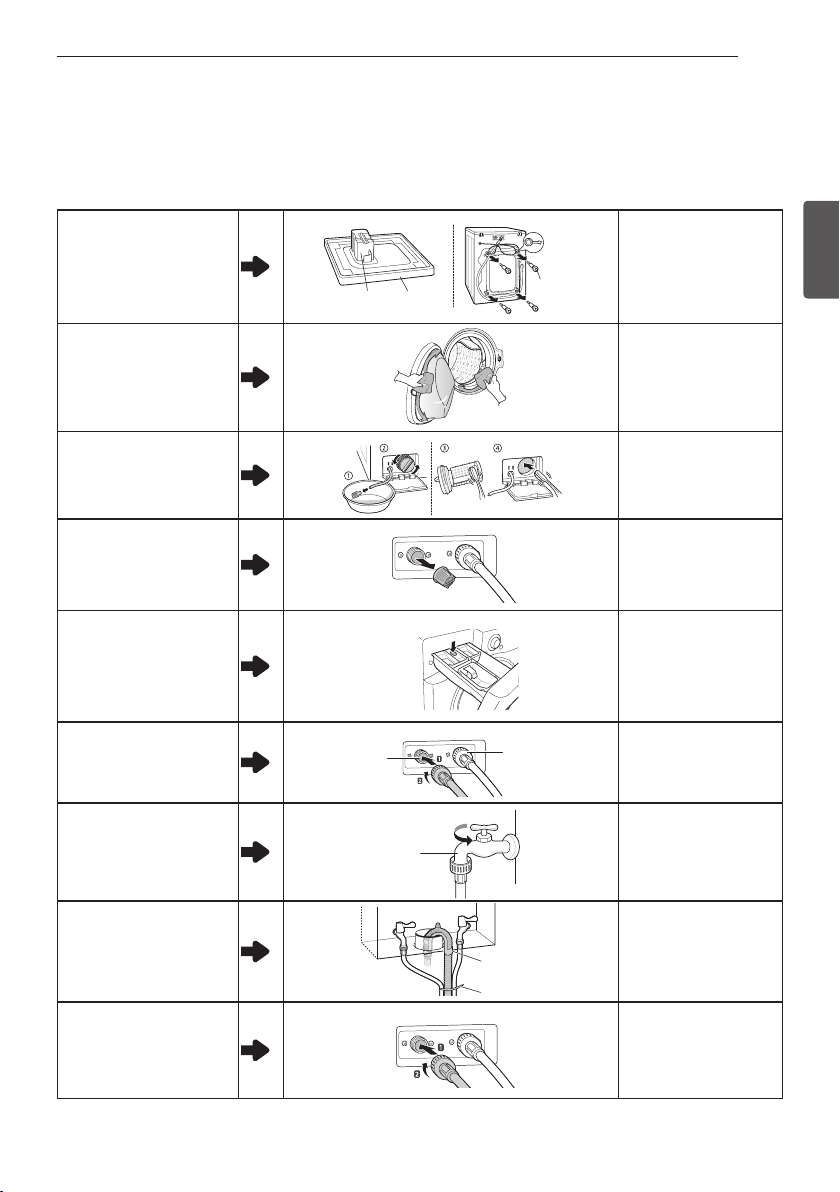
39
ESPAÑOL
GARANTÍA
Con respecto a los daños o fallas ocasionados por un uso indebido, una instalación inadecuada, mantenimiento, un desastre natural o
una reparación (realizados por un técnico no autorizado o con partes no autorizadas, tal como lo especifica LG), al Cliente se le cobrará
la reparación.
Vibración o ruidos
extraños ocasionados
por no haber extraído los
pernos de transporte o el
soporte de la cuba.
Soporte de
la cuba
Base de
cartón
Pernos de
transporte
Filtro de entrada
Dispensador
Entrada de
agua fría
Entrada
de agua
caliente
Grif
Code de
soporte
Correa de sujeción
Alta presión
de agua
Ruido fuerte
Flujo natural
de agua
Interrupción
repentina del
flujo de agua
Hit!!
Nivel
1°
Extraiga los pernos de
transporte y el soporte
de la cuba.
Filtración ocasionada por
suciedad (cabellos, pelusa)
en la junta y en el vidrio
de la puerta.
Soporte de
la cuba
Base de
cartón
Pernos de
transporte
Filtro de entrada
Dispensador
Entrada de
agua fría
Entrada
de agua
caliente
Grif
Code de
soporte
Correa de sujeción
Alta presión
de agua
Ruido fuerte
Flujo natural
de agua
Interrupción
repentina del
flujo de agua
Hit!!
Nivel
1°
Limpie la junta y el
vidrio de la puerta.
Falta de drenaje debido a
que el filtro de la bomba
está obstruido.
Soporte de
la cuba
Base de
cartón
Pernos de
transporte
Filtro de entrada
Dispensador
Entrada de
agua fría
Entrada
de agua
caliente
Grif
Code de
soporte
Correa de sujeción
Alta presión
de agua
Ruido fuerte
Flujo natural
de agua
Interrupción
repentina del
flujo de agua
Hit!!
Nivel
1°
Limpie el filtro de la
bomba.
No ingresa el agua porque
los filtros de la válvula de
entrada están atascados o
las mangueras de entrada
de agua están retorcidas.
Soporte de
la cuba
Base de
cartón
Pernos de
transporte
Filtro de entrada
Dispensador
Entrada de
agua fría
Entrada
de agua
caliente
Grif
Code de
soporte
Correa de sujeción
Alta presión
de agua
Ruido fuerte
Flujo natural
de agua
Interrupción
repentina del
flujo de agua
Hit!!
Nivel
1°
Limpie el filtro de la
válvula de entrada o
vuelva a instalar las
mangueras de entrada
de agua.
No ingresa el agua
porque se usó demasiado
detergente.
Soporte de
la cuba
Base de
cartón
Pernos de
transporte
Filtro de entrada
Dispensador
Entrada de
agua fría
Entrada
de agua
caliente
Grif
Code de
soporte
Correa de sujeción
Alta presión
de agua
Ruido fuerte
Flujo natural
de agua
Interrupción
repentina del
flujo de agua
Hit!!
Nivel
1°
Limpie el cajón
dispersador de
detergente.
La ropa está caliente o
tibia después del lavado
porque las mangueras de
entrada se instalaron al
revés.
Soporte de
la cuba
Base de
cartón
Pernos de
transporte
Filtro de entrada
Dispensador
Entrada de
agua fría
Entrada
de agua
caliente
Grif
Code de
soporte
Correa de sujeción
Alta presión
de agua
Ruido fuerte
Flujo natural
de agua
Interrupción
repentina del
flujo de agua
Hit!!
Nivel
1°
Vuelva a instalar las
mangueras de entrada.
No se suministra agua
porque el grifo no se
abrió.
Soporte de
la cuba
Base de
cartón
Pernos de
transporte
Filtro de entrada
Dispensador
Entrada de
agua fría
Entrada
de agua
caliente
Grif
Code de
soporte
Correa de sujeción
Alta presión
de agua
Ruido fuerte
Flujo natural
de agua
Interrupción
repentina del
flujo de agua
Hit!!
Nivel
1°
Abra e grifo.
Filtración ocasionada
por una instalación
inadecuada o un
atascamiento de la
manguera de drenaje.
Soporte de
la cuba
Base de
cartón
Pernos de
transporte
Filtro de entrada
Dispensador
Entrada de
agua fría
Entrada
de agua
caliente
Grif
Code de
soporte
Correa de sujeción
Alta presión
de agua
Ruido fuerte
Flujo natural
de agua
Interrupción
repentina del
flujo de agua
Hit!!
Nivel
1°
Vuelva a instalar la
manguera de drenaje.
Filtración ocasionada por
la instalación inadecuada
de la manguera de entrada
de agua o por el uso de
mangueras que no son de
marca LG.
Soporte de
la cuba
Base de
cartón
Pernos de
transporte
Filtro de entrada
Dispensador
Entrada de
agua fría
Entrada
de agua
caliente
Grif
Code de
soporte
Correa de sujeción
Alta presión
de agua
Ruido fuerte
Flujo natural
de agua
Interrupción
repentina del
flujo de agua
Hit!!
Nivel
1°
Vuelva a instalar la
manguera de entrada.
ESTA GARANTÍA LIMITADA NO CUBRE LOS
SIGUIENTES CASOS
MFL67737658_S_A5.indd 39 2018. 7. 2. 오전 10:29
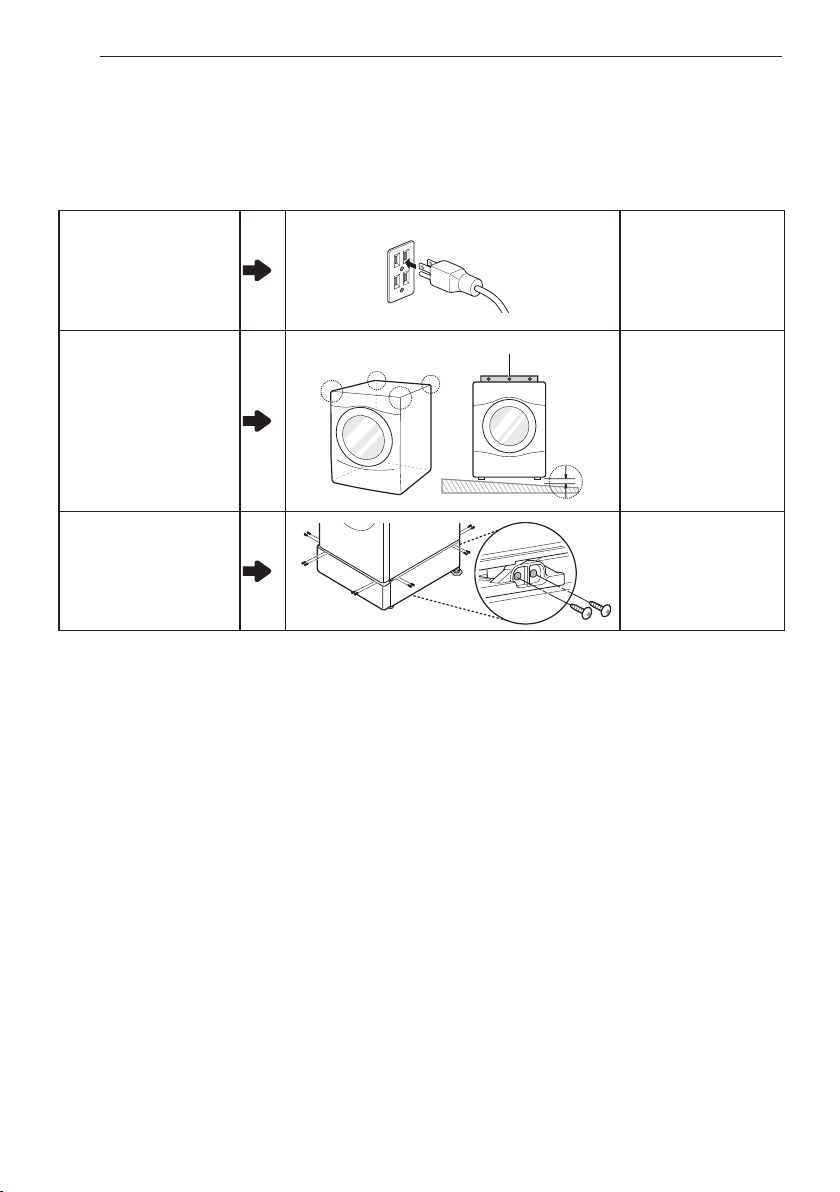
40
GARANTÍA
Problema de falta de
electricidad que se debe a
que la conexión del cable
de alimentación está floja
o a un problema con el
tomacorriente.
Soporte de
la cuba
Base de
cartón
Pernos de
transporte
Filtro de entrada
Dispensador
Entrada de
agua fría
Entrada
de agua
caliente
Grif
Code de
soporte
Correa de sujeción
Alta presión
de agua
Ruido fuerte
Flujo natural
de agua
Interrupción
repentina del
flujo de agua
Hit!!
Nivel
1°
Vuelva a enchufar el
cable de alimentación
o cambie el
tomacorriente.
Traslado del servicio
para entregar, ir a buscar,
instalar el producto o
recibir instrucciones
sobre el uso del producto.
Remoción y reinstalación
del producto.
Soporte de
la cuba
Base de
cartón
Pernos de
transporte
Filtro de entrada
Dispensador
Entrada de
agua fría
Entrada
de agua
caliente
Grif
Code de
soporte
Correa de sujeción
Alta presión
de agua
Ruido fuerte
Flujo natural
de agua
Interrupción
repentina del
flujo de agua
Hit!!
Nivel
1°
La garantía cubre
defectos de fabricación
solamente. El servicio
que resulta de una
instalación inadecuada
no está cubierto por la
garantía.
Si no se instalan
correctamente todos los
tornillos, puede generarse
una vibración excesiva
(solo en el modelo con
pedestal).
Soporte de
la cuba
Base de
cartón
Pernos de
transporte
Filtro de entrada
Dispensador
Entrada de
agua fría
Entrada
de agua
caliente
Grif
Code de
soporte
Correa de sujeción
Alta presión
de agua
Ruido fuerte
Flujo natural
de agua
Interrupción
repentina del
flujo de agua
Hit!!
Nivel
1°
Instale 4 tornillos en
cada esquina (16 en
total).
MFL67737658_S_A5.indd 40 2018. 7. 2. 오전 10:29

41
ESPAÑOL
MEMO
MFL67737658_S_A5.indd 41 2018. 7. 2. 오전 10:29

42
MEMO
MFL67737658_S_A5.indd 42 2018. 7. 2. 오전 10:29

43
ESPAÑOL
MEMO
MFL67737658_S_A5.indd 43 2018. 7. 2. 오전 10:29

44
MEMO
MFL67737658_S_A5.indd 44 2018. 7. 2. 오전 10:29

45
ESPAÑOL
MEMO
MFL67737658_S_A5.indd 45 2018. 7. 2. 오전 10:29

Register your product Online!
LG Customer Information Center
www.lg.com
For inquiries or comments,
visit www.lg.com or call:
1-800-243-0000 U.S.A.
1-888-542-2623 CANADA
MFL67737658_S_A5.indd 46 2018. 7. 2. 오전 10:29