

Read all safety rules and instructions carefully before operating this tool.
Owner’s Manual
TOLL-FREE HELPLINE: 1-888-90WORKS
(888.909.6757)
www.GreenWorksTools.com
40 V Lithium-Ion Brushless Mower
2500502

2
Contents .............................................................................................................................. 2
Product specications .......................................................................................................... 2
Safety information .............................................................................................................3-7
Symbols ............................................................................................................................8-9
Know your lawn mower ...................................................................................................... 10
Assembly .......................................................................................................................11-16
Operation ...................................................................................................................... 17-20
Maintenance ................................................................................................................. 21-22
Service .............................................................................................................................. 23
Environmentally safe battery disposal ............................................................................... 24
Troubleshooting ................................................................................................................. 25
Warranty ............................................................................................................................ 26
Exploded View ................................................................................................................... 27
Parts List.......................................................................................................................28-29
PRODUCT SPECIFICATIONS
40 V LITHIUM-ION BRUSHLESS MOWER
Battery type ............................................................................................ 40V Lithium-ion
No-load speed ........................................................................................29 0 0 ±10% RPM
Height adjustments ................................................................ 1 1/4 - 3 1/2” (3.2 - 8.9 cm)
Functions ......................................................... 3-in-1: Mulch, side discharge or rear bag
Unit weight (without battery) ....................................................................... 46 lbs (21 kg)
CONTENTS
3
SAFETY INFORMATION
GENERAL SAFETY RULES
READ ALL INSTRUCTIONS CAREFULLY
WARNING
This symbol indicates important safety instructions. If these instructions are not followed, it could
endanger the personal safety and/or property of the operator and others. Read and understand
all instructions in this manual before attempting to operate the mower. Failure to comply with
these instructions may result in personal injury.
DANGER
This mower was built to be operated according to the rules for safe operation that are contained
in this manual. As with any type of power equipment, carelessness or error on the part of the
operator can result in serious injury. This mower is capable of amputating body parts and
throwing objects. Failure to observe the following safety rules could result in serious injury or
death.
WARNING
Basic safety precautions should always be followed when using electric lawn mowers, in order to
reduce the risk of re, electric shock, and personal injury.
WARNING
Use of this mower should be restricted to individuals who have read and understoood and will
follow the warnings and instructions that are printed in this manual and on the mower.

4
SAFETY INFORMATION
• Carefully read all instructions on the mower and in the manual before attempting to assemble and
operate the mower. Keep this manual in a safe place for future reference, and consult it regularly.
• Become familiar with all controls and their proper operation. Know how to stop the mower and
how to disengage the power in an emergency.
• In order to avoid contact with the blade or injury caused by a thrown object, stay in the
operating zone behind the handles, and keep children and bystanders at least 50’ (15 m) away
from the mower while it is in operation. Stop the motor immediately if someone enters the
mowing area.
• Thoroughly inspect the area where the mower is to be used. Remove all stones, sticks, wire,
bones, toys, and other objects that could be tripped over or thrown by the blade. Thrown
objects can cause serious personal injury.
• Plan your mowing pattern in such a way as to avoid discharging material toward roads,
sidewalks, bystanders, etc. Do not discharge material against a wall or obstruction. Doing so
may cause the discharged material to ricochet back toward the operator.
• Always wear proper eye protection that complies with ANSI Z87.1 in order to protect your
eyes while operating or performing any adjustment or repair. Thrown objects that ricochet can
cause serious eye injury.
• Always wear a face mask or a dust mask when operating the mower in a dusty environment.
• Dress properly. Do not wear loose clothing or jewelry that can get caught in moving parts. The
wearing of protective gloves and safety footwear is recommended.
• Ground Fault Circuit Interrupter (GFCI) protection should be provided on the circuit(s) or
outlet(s) that will be used to charge the lawn mower battery. Outlets with built-in GFCI
protection are available, and may be used as an added safety measure.
• Many injuries occur as a result of the mower being pulled over the operator’s foot during a
fall caused by slipping or tripping. Do not operate this mower in bare feet, or while wearing
sandals or lightweight (e.g., canvas) shoes. Do not hold on to the mower if you are falling.
Release the handle immediately.
• Never pull the mower back toward you while you are walking. If you must back the mower
away from a wall or an obstruction, rst look down and behind in order to avoid tripping, and
then follow these steps:
• Step back from the mower in order to fully extend your arms.
• Be sure that you are well balanced.
• Pull the mower back slowly.
• Do not use the mower for any job except that for which it is intended. Do not force the mower.
• Do not operate the mower while under the inuence of alcohol or drugs.
• Stay Alert: Do not operate the mower when you are tired. Pay attention to what you are doing.
Use common sense.
• Do not put hands or feet near rotating parts or under the cutting deck. Contact with the blade
can amputate hands and feet.
• Do not attempt to adjust the wheels or the cutting height while the motor is running.
• Avoid dangerous environments. Do not operate the mower in the rain or in wet or damp grass.
• Mow only in daylight or in good articial light. Do not rush a mowing job.

5
SAFETY INFORMATION
• Stop the blade when crossing gravel driveways, walkways, or roads.
• If the mower starts to vibrate excessively, stop the motor and check for the cause immediately.
Vibration is generally a warning of trouble.
• Stop the motor and wait until the blade comes to a complete stop before removing the grass
catcher or unclogging the chute. The cutting blade will continue to rotate for a few seconds
after the motor is shut off. Do not place any part of your body in the blade area until you are
sure that the blade has stopped rotating.
• Never operate mower without a proper trail shield, discharge cover, grass catcher, switch
control, or other safety device in place and in working order. Do not operate the mower with
damaged safety devices. Doing so can result in injury.
• Don’t force lawn mower. It will do the job better and safer at the rate for which it was designed.
• Store idle lawn mower indoors. When not in use, lawn mower should be stored in an indoor
dry and look-up place, out of reach of children.
• Maintain lawn mower. Keep cutting edges sharp and clean for best and safety performance.
• If lawn mower strikes a foreign objects follow these steps:
• Stop lawn mower, release the switch.
• Remove the key and battery.
• Inspect for damage.
• Repair any damage before restarting and operating the lawn mower.
• Do not charge lawn mower in rain or in wet location.
• Remove or disconnect battery before servicing, cleaning or removing material from lawn
mower.
CHILD SAFETY
Tragic accidents can occur if the operator is not aware of the presence of children.
• Keep children out of the mowing area and under the watchful care of a responsible adult.
• Do not allow children under the age of 14 to operate this mower. Children who are 14 years
of age and older must read and understand the operating instructions and safety rules in this
manual, and must be trained and supervised by a parent.
• Stay alert, and turn the mower off if a child or any other person enters the mowing area.
• Look behind and down for small children before and while moving backwards.
• Use extreme care when approaching blind corners, doorways, shrubs, trees, or other objects
that may obscure your view of a child who may run into the path of the mower.
BATTERY & CHARGER
CAUTION
USE ONLY GREENWORKS APPROVED REPLACEMENT BATTERIES, OTHER BATTERIES
MAY CAUSE INJURY OR DAMAGE TO THE MOWER. Use with GREENWORKS 40V battery .

6
SAFETY INFORMATION
PROPER CARE FOR BATTERY
Off-season storage
To obtain the longest possible battery life, we suggest the following:
• Remove the battery pack from the charger once it is fully charged and ready for use.
BATTERY SAFETY RULES
• Battery tools do not have to be plugged into an electrical outlet; therefore, they are always in
operating condition. Be aware of possible hazards when not using your battery tool or when
changing accessories. Following this rule will reduce the risk of electric shock, re, or serious
personal injury.
• Do not place battery tools or their batteries near fire or heat. This will reduce the risk of
explosion and possibly injury.
• Do not crush, drop or damage battery pack. Do not use a battery pack or charger that has
been dropped or received a sharp blow. A damaged battery is subject to explosion. Properly
dispose of a dropped or damaged battery immediately.
• Batteries can explode in the presence of a source of ignition, such as a pilot light. To reduce
the risk of serious personal injury, never use any cordless product in the presence of open
flame. An exploded battery can propel debris and chemicals. If exposed, flush with water
immediately.Do not charge battery tool in a damp or wet location. Following this rule will
reduce the risk of electric shock.
• For best results, your battery tool should be charged in a location where the temperature is
more than 45°F but less than 104°F. To reduce the risk of serious personal injury, do not store
outside or in vehicles.
• Under extreme usage or temperature conditions, battery leakage may occur. If liquid comes
in contact with your skin, wash immediately with soap and water. If liquid gets into your eyes,
ush them with clean water for at least 10 minutes, then seek immediate medical attention.
Following this rule will reduce the risk of serious personal injury.
• When battery pack is not in use, keep it away from other metal objects like: paper clips, coins,
keys, nails, screws, or other small metal objects that can make a connection from one terminal
to another. Shorting the battery terminals together may cause sparks, burns, or a re.
• Always remove battery pack from your tool when you are assembling parts, making
adjustments, cleaning, or when not in use. Removing battery pack will prevent accidental
starting that could cause serious personal injury.
• Always remove battery pack before storing the device. When battery becomes fully charged,
unplug the charger from the power supply and remove the battery pack from the charger.
• Always wear eye protection with side shields marked to comply with ANSI Z87.1, along with
hearing protection. Failure to do so could result in objects being thrown into your eyes and
other possible serious injuries.
• Keep battery pack dry, clean, and free from oil and grease. Always use a clean cloth when
cleaning. Never use brake fluids, gasoline, petroleum-based products, or any solvents to
clean battery pack.

SAVE THESE INSTRUCTIONS
77
SAFETY INFORMATION
For battery pack storage longer than 30 days:
• Store the battery pack where the temperature is below 80°F and away from moisture.
• Store battery packs in a 30%-50% charged condition.
• Every two months of storage, charge the pack as normal.
CHARGER SAFETY RULES
• Charge the mower battery in a dry area that is protected from the weather. Do not expose the
mower or the charger to rain. Do not charge the battery in a wet location. Operate the battery
charger in temperatures between 45° and 104°F. In order to reduce the risk of electric shock,
use only the charger that is provided by the manufacturer to charge the battery.
• DO NOT ABUSE THE CHARGE CORD. Never carry the charger by the cord. Do not
disconnect the charger from the outlet or from the mower by pulling the charger cord.
• Do not use a damaged charger. Replace the charger cords or the charger immediately.
• Keep the mower and the charger away from water, heat sources (radiators, heaters, stoves,
etc.), ames, and chemicals.
• Make sure the battery pack is secured in the charger before beginning operation.
• The battery pack will become slightly warm to the touch while charging. This is normal and
does not indicate a problem.
• Do not place the charger and battery pack in an area of extreme heat or cold. They will work
best at normal room temperature.
• When batteries become fully charged, unplug the charger from the power supply and remove
the battery pack.
WARNING
When transporting or servicing unit, always remove the key and battery.
WARNING(PROPOSITION 65)
Some dust created by power sanding, sawing, grinding, drilling and other construction activities
contains chemicals known to the state of California to cause cancer, birth defects or other
reproductive harm. Some examples of these chemicals are:
• Lead from lead-based paints,
• Crystalline silica from bricks and cement and other masonry products, and
• Arsenic and chromium from chemically-treated lumber.
Your risk from these exposures varies, depending on how often you do this type of work. To
reduce your exposure to these chemical: work in a well ventilated area, and work with approved
safety equipment, such as those dust masks that are specially designed to lter out microscopic
particles.

8
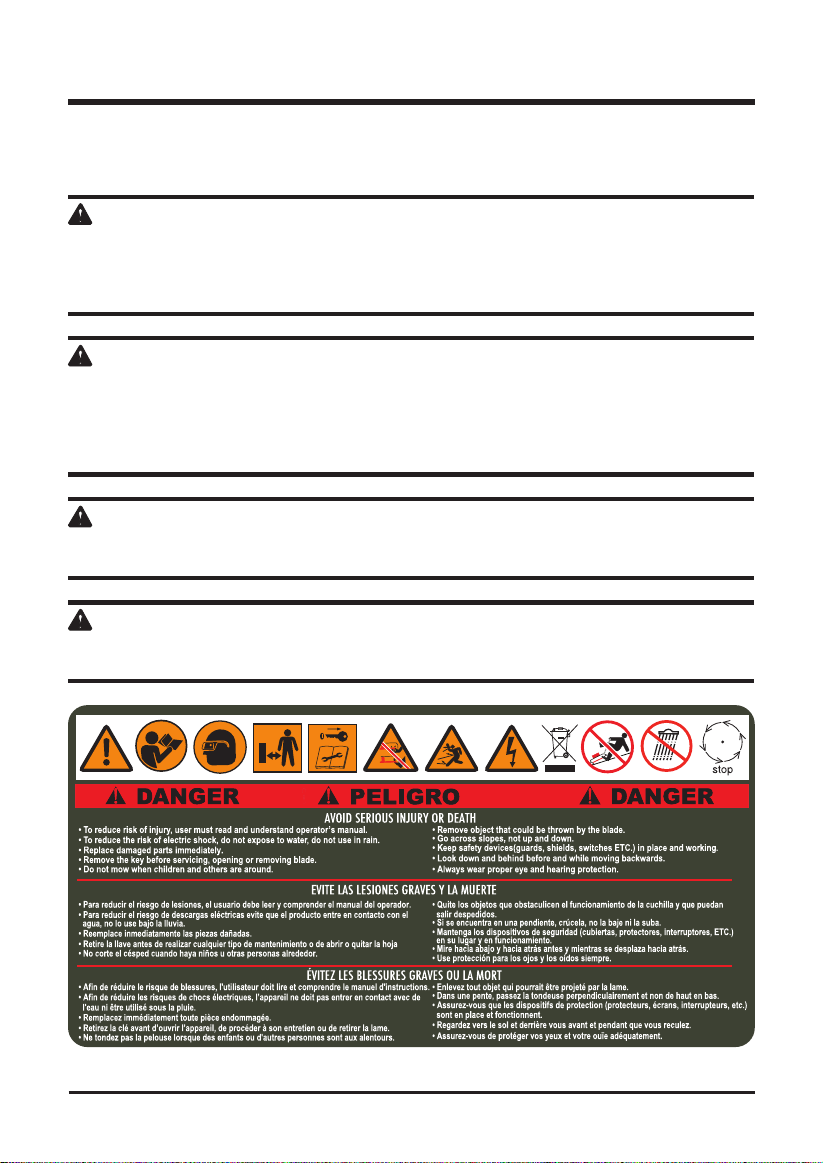
Some of the following symbols may be used on this product. Please study them and learn their
meaning. Proper interpretation of these symbols will allow you to operate the product better and safer.
SYMBOLS
SYMBOL DESIGNATION/EXPLANATION
V Volts
A Amperes
Hz Hertz
W Watts
Hrs Hours
Precautions that involve your safety.
To reduce the risk of injury, user must read and understand user’s manual before
using this product.
Wear eye and head protection when operating this equipment.
Do not expose machine to rain or wet conditions.
Pay attention that bystanders are not injured through foreign objects thrown from
the mower.
Keep all bystanders (especially children and pets) at least 15 m away from the
work area.
Keep hands and feet away from blade and cutting area.
Switch off and remove isolator key before adjusting, cleaning and before leaving the
product unattended for any period.
Do not operate on inclines greater than 15°. Mow across the face of slopes, never
up and down.
Beware of electric shock hazard.
Wait for all components of machine to have completely stopped before touching
them.
The charger is intended for indoor use only.
8
9
The following signal words and meanings are intended to explain the levels of risk associated
with this product.
ENVIRONMENTAL PROTECTION
Waste electrical products should not be disposed of with household waste. Please
recycle where facilities exist. Check with your local authority or retailer for recycling
advice.
The battery contains material which is hazardous to you and the environment. It must
be removed and disposed of separately at a facility that accepts lithium-ion batteries.
SERVICE
Servicing requires extreme care and knowledge and should be performed only by a qualified
service technician. For service we suggest you return the product to your nearest AUTHORIZED
SERVICE CENTER for repair. When servicing, use only identical replacement parts.
WARNING
To avoid serious personal injury, do not attempt to use this product until you have read this
Owner's Manual thoroughly and understand it completely. If you do not understand the warnings
and instructions in this Owner's Manual, do not use this product. Call the Toll-free Helpline (1-
888-909-6757) for assistance.
WARNING
The operation of any power tool can result in foreign objects being thrown into your
eyes, which can result in severe eye damage. Before beginning power tool operation,
always wear safety goggles or safety glasses with side shields and, when needed, a
full face shield. We recommend Wide Vision Safety Mask for use over eyeglasses or
standard safety glasses with side shields. Always use eye protection which is marked
to comply with ANSI Z87.1.
SYMBOL SIGNAL MEANING
DANGER Indicates an imminently hazardous situation, which, if not
avoided, will result in death or serious injury.
WARNING Indicates a potentially hazardous situation, which, if not avoided,
could result in death or serious injury.
CAUTION Indicates a potentially hazardous situation, which, if not avoided,
may result in minor or moderate injury.
CAUTION (Without Safety Alert Symbol) Indicates a situation that may
result in property damage.
SYMBOLS
SAVE THESE INSTRUCTIONS
10
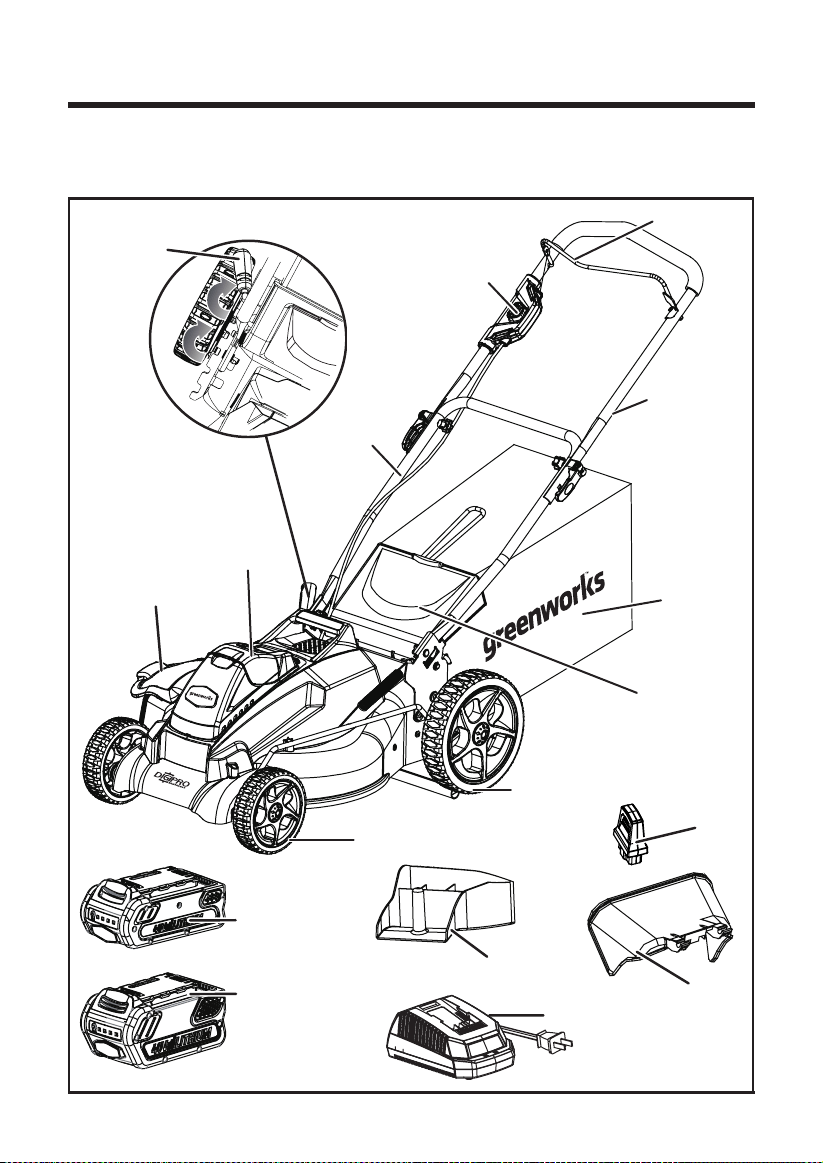
KNOW YOUR LAWN MOWER
Fig. 1
Safety
lock-out
button
Height
adjustment
lever
Bail switch
Upper
handle
Grass
catcher
bag
Lower
handle
40V
Charger
Mulching
plug
Side
discharge
chute
Rear chute
cover
Front wheel
Rear wheel
Read this operator's manual and safety rules before operating your lawn mower. Compare the
illustration in Figure 1 to your lawn mower in order to familiarize yourself with the location of
various controls and adjustments. Save this manual for future reference.
Battery door
Side discharge cover
Key
40V 73Wh Battery
(Model#:29462)
40V 146Wh Battery
(Model#:29472)

11
UNPACKING
• Carefully remove the product and any accessories from the box. Make sure that all items
listed in the packing list are included.
• Inspect the product carefully to make sure no breakage or damage occurred during shipping.
• Do not discard the packing material until you have carefully inspected and satisfactorily
operated the product.
• If any parts are damaged or missing, please call 1-888-909-6757 for assistance.
PACKING LIST
• Lawn mower
• Key
• Mulching plug
• Grass catcher bag
WARNING
If any parts are damaged or missing do not operate this product until the parts are replaced.
Using a product with damaged or missing parts could result in serious personal injury.
WARNING
Do not attempt to modify this product or create accessories not recommended for use with this
product. Any such alteration or modication is misuse and could result in a hazardous condition
leading to possible serious personal injury.
WARNING
Do not inser key until assembly is complete and you are ready to mow. Failure to comply could
result in accidental starting and possible serious personal injury.
WARNING
To prevent accidental starting that could cause serious personal injury, always remove the battery
pack from the product when assembling parts.
WARNING
Never operate the mower without the proper safety devices in place and working. Never operate
the mower with damaged safety devices. Operation of this product with damaged or missing
parts could result in serious personal injury.
ASSEMBLY INSTRUCTIONS
• Side discharge chute
• 40V 73Wh Battery + 40V 146Wh Battery
• 40V Charger
• Owner’s Manual
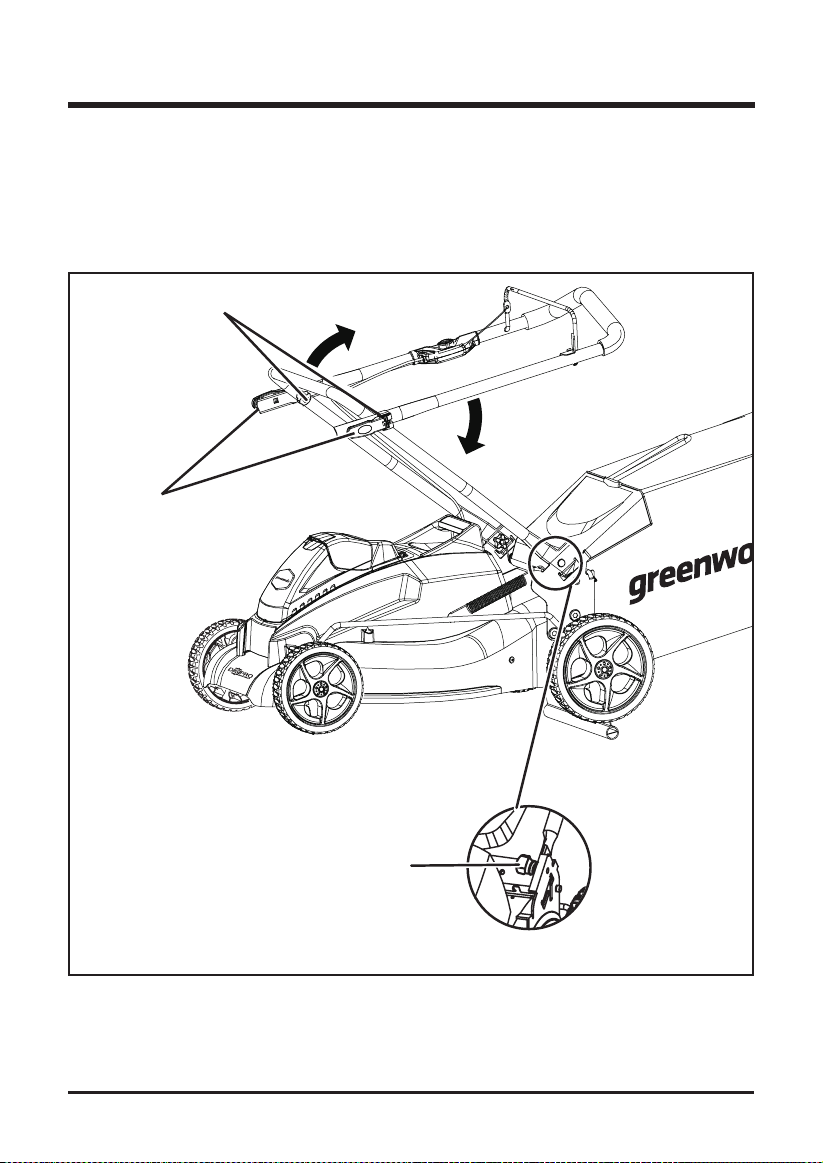
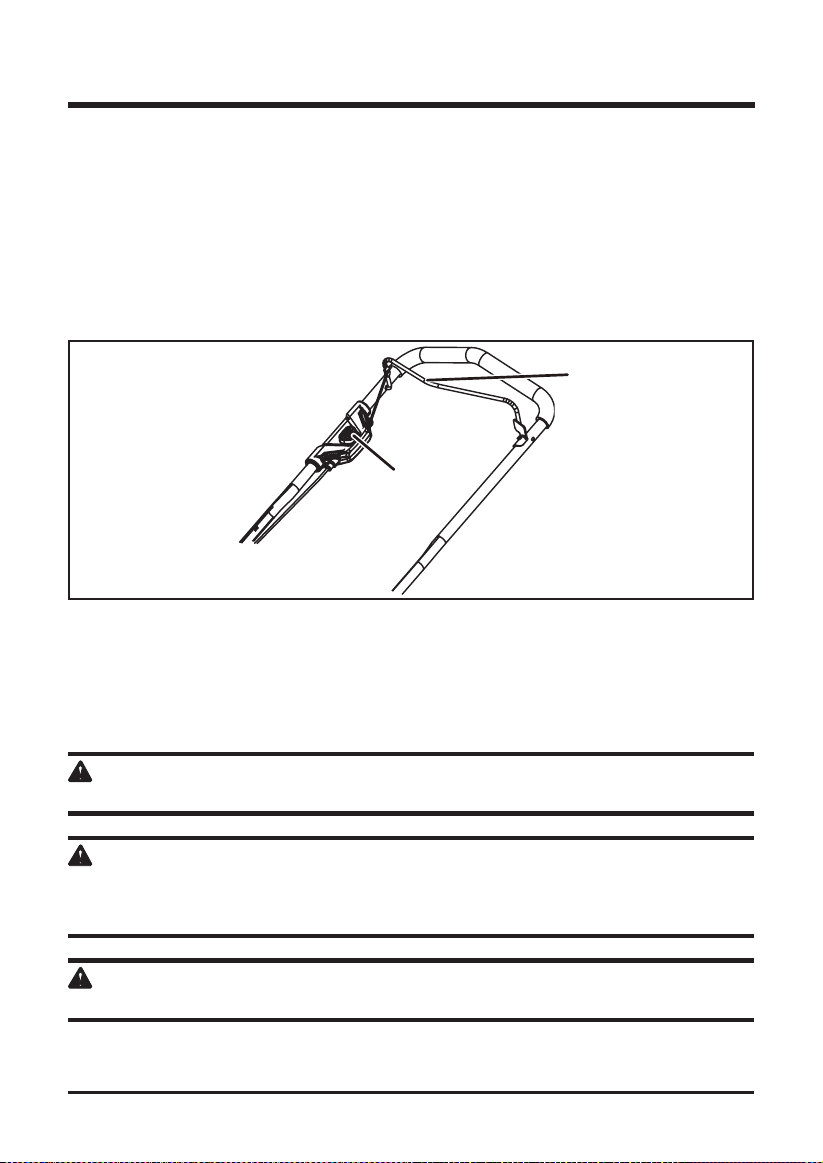
UNFOLDING AND ADJUSTING HANDLE (See Figure 2)
• Pull up and back on the upper handle to raise the handle into operating position. Make certain
the handles snap into place securely.
• Tighten the upper handle with the cam locks on both sides.
• Tighten the lower handle with the handle knobs on both sides.
ASSEMBLY INSTRUCTIONS
Fig. 2
12
Handle knob
Cam locks
Handle knob
13
ASSEMBLY INSTRUCTIONS
3
Slots
1
2
Fig. 3
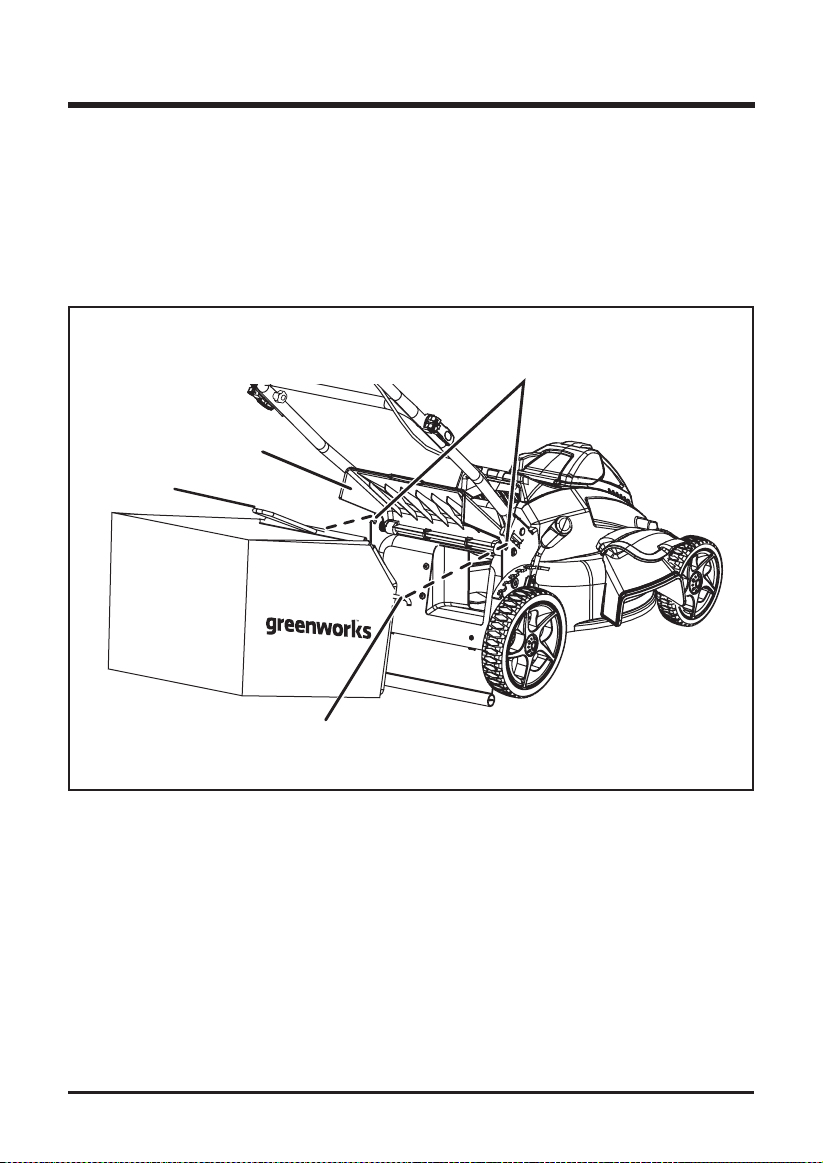
INSTALLING THE GRASS CATCHER BAG (See Figure 3)
• Lift the chute cover (1).
• Lift the grass catcher by its handle (2) and place under the chute cover so that the hooks (3)
on the grass catcher frame are seated into the slots in the handle bracket.
• Release the chute cover. When installed correctly, the hooks on the grass catcher will rest
securely in the slots on the handle brackets.
14
ASSEMBLY INSTRUCTIONS
Fig. 4
1
2
3
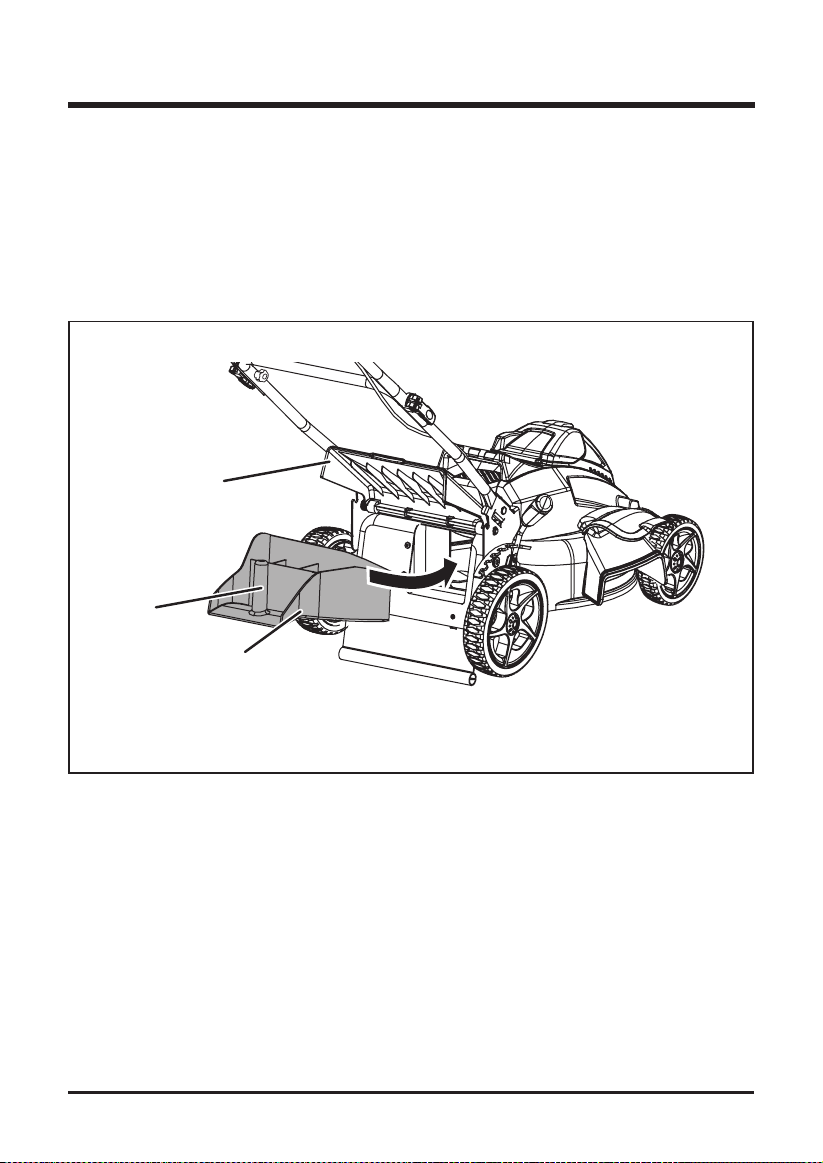
INSTALLING THE MULCHING PLUG (See Figure 4)
• To remove the mulching plug, lift the chute cover (1).
• Grasp the handle (2) of the mulching plug and pull the mulching plug out using the handle.
• The mulching plug (3) is inserted on an angle, so it requires some force to remove it.
• The mulching plug must be removed in order to install the grass catcher bag.
• The mulching plug must be re-installed when the grass catcher bag is removed.
INSTALLING SIDE DISCHARGE CHUTE (See Figure 5)
• Lift the side discharge cover (1).
• Align the grooves on the discharge chute (2) with the pins on the underside of the discharge
cover (1).
• Lower the discharge chute (2) until the hooks on the mower deck are secured in the openings
in the discharge chute (2).
• Release the side discharge cover (1).
ASSEMBLY INSTRUCTIONS
15
Fig. 5
2
1
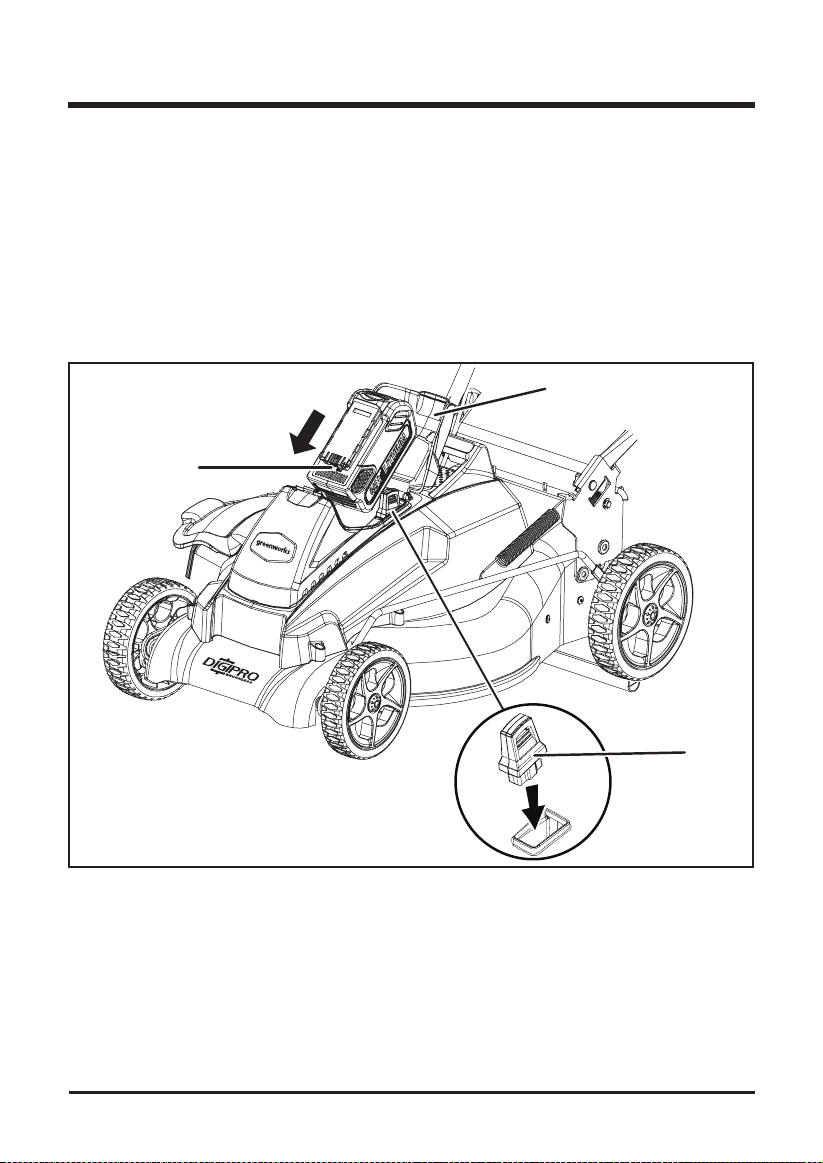
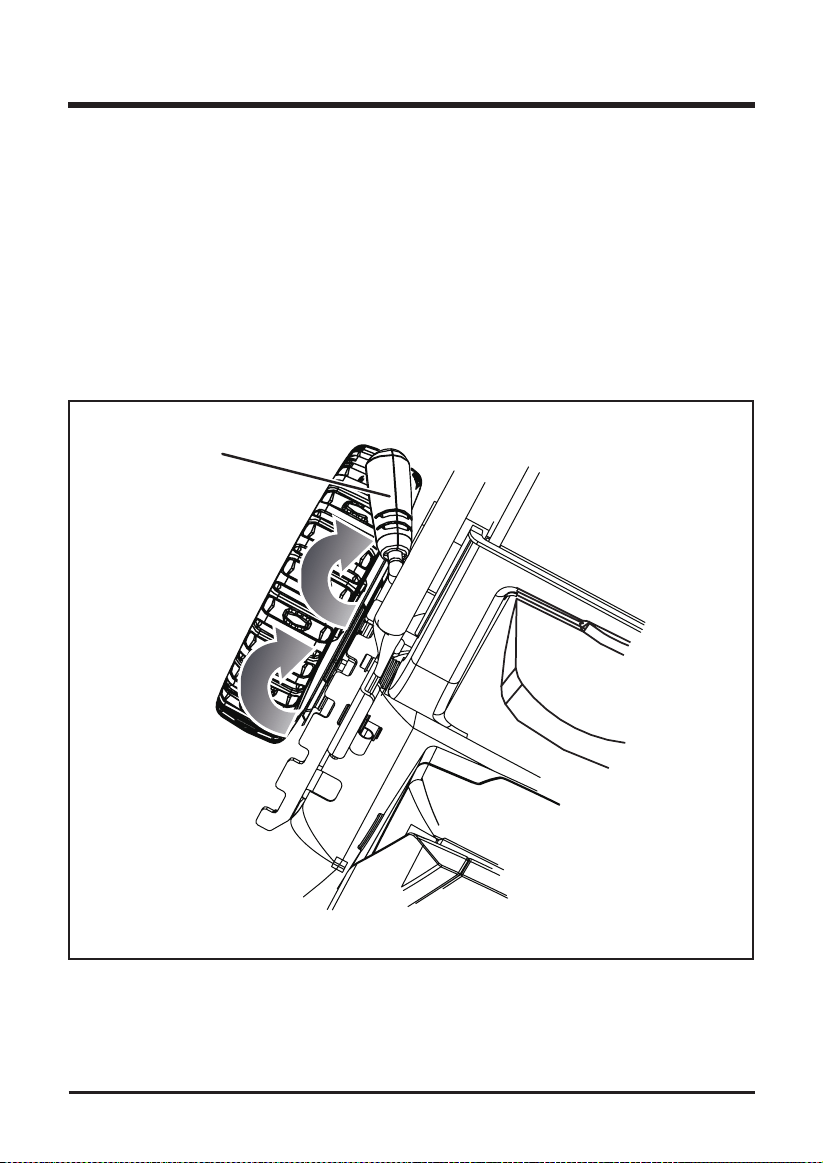
TO INSTALL BATTERY PACK (See Figure 6)
• Lift and hold up the battery door.
• Place the battery pack on the mower. Align guided ribs on battery pack with grooves in the
product’s battery port.
• Make sure the latch on bottom of the battery pack snaps in place and that battery pack is fully
seated and secure in the mower before beginning operation.
• Insert the key.
• If the machine is not going to be used immediately, do not insert the key.
• Close the door.
ASSEMBLY INSTRUCTIONS
Fig. 6
16
Key
Battery
Battery door
TO REMOVE BATTERY PACK (See Figure 6)
• Release the power lever to stop the product.
• Remove the key.
• Press and hold the battery latch button at the bottom of the battery pack.
• Remove battery pack from the product.
17
STARTING/STOPPING THE MOWER (See Figure 6-7)
To start the motor:
• Open the battery door and insert the key into the slot. (See Fig. 6)
• Press and hold the safety lock-out button (1). (See Fig. 7)
• Pull the bail switch (2) upward to the handle to start the mower and release the button.
To stop the motor:
• Release the bail switch.
SOFT-START
This LI-ION Mower is equipped with a “Soft-start” feature. When initially starting up, the mower will
take approx. 3 seconds to get up to full speed. If the mower does not initially start: Remove the
battery and check under the mower deck to ensure there is nothing obstructing the blade and that the
blade can spin freely by hand. Even a small amount of grass on start up will prevent the “soft-start”
from turning the mower on.
CAUTION
Do not attempt to override the operation of the safety lock-out button or bail lever.
WARNING
The operation of any mower can result in foreign objects being thrown into the eyes, which can
cause severe eye damage. Always wear safety glasses while operating the mower and while
performing any adjustments or repairs.
WARNING
Ensure that other people and pets remain at least 50 feet (15 m) away when the mower is in use.
INSPECT THE CUTTING AREA. Remove all stones, sticks, wire, bones, and other debris that
might be thrown by the rotating blades.
OPERATING YOUR LAWN MOWER
Fig. 7
Bail switch
Safety lock-out
button
18
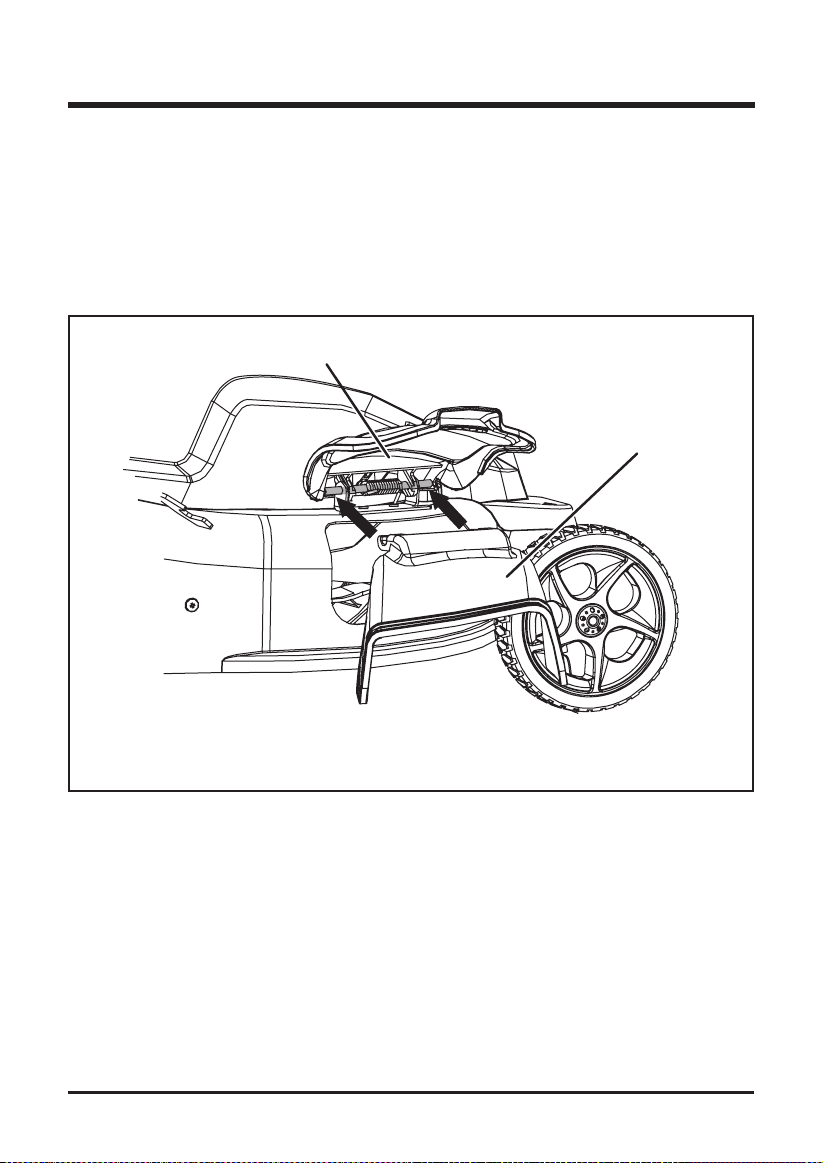
CUTTING HEIGHT ADJUSTMENT (See Figure 8)
When shipped, the wheels on the mower are set to a low-cutting position. Before using the
mower for the rst time, raise the cutting position to the height best suited for your lawn. The
average lawn should be between 1 1/2" to 2" (3.8 to 5 cm) during cool months and between 2"
and 3 1/2" (5 cm to 8.3 cm) during hot months.
To adjust the blade height:
• To raise the blade height, grasp the height adjustment lever (1) and move it toward the back of
the mower.
• To lower the blade height, grasp the height adjustment lever (1) and move it toward the front of
the mower.
OPERATING YOUR LAWN MOWER
Fig. 8
1
19
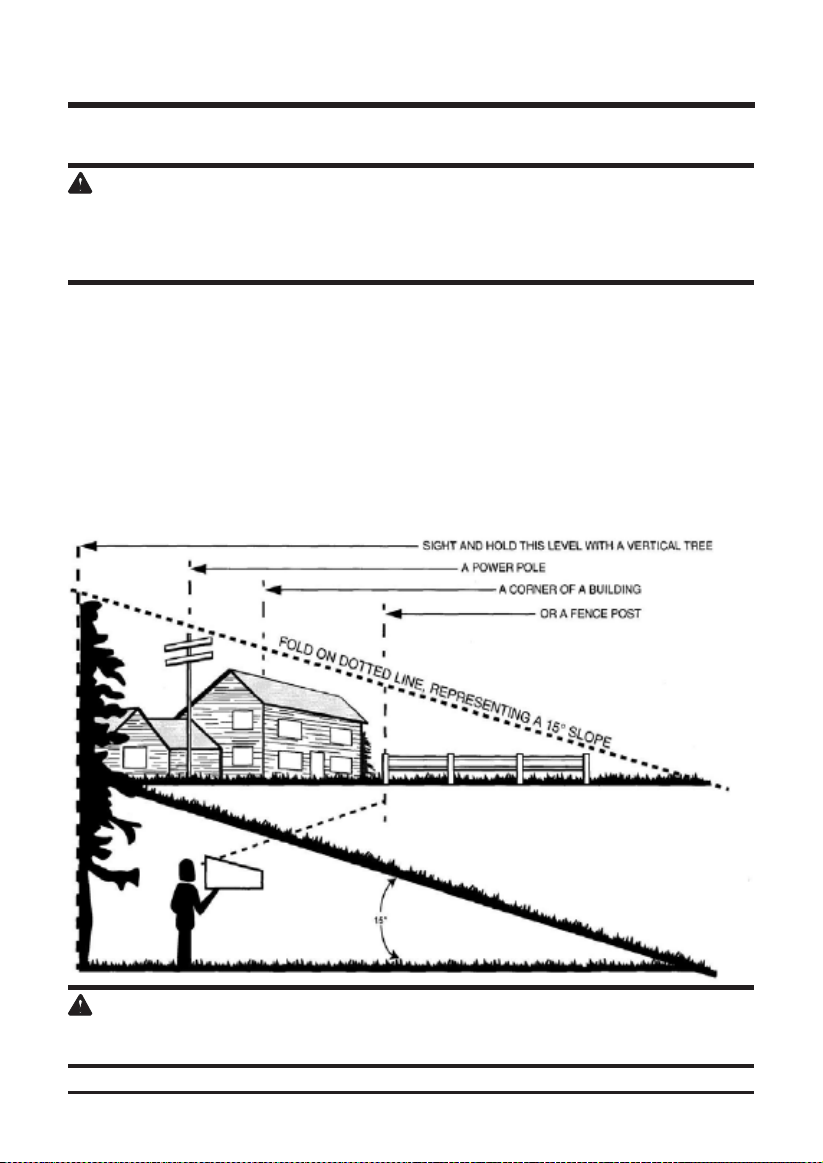
SLOPE GAUGE (See Figure 9)
WARNING
Slopes are a major factor related to accidents involving slips and falls, which can result in severe
injury. Operating the mower on a slope requires extra caution. If you feel uneasy on a slope,
do not mow it. For your safety, use the slope gauge that is included as part of this manual to
measure slopes before operating this unit on a sloped or hilly area.
• Mow across the face of a slope, and never up and down. Exercise extreme caution when
changing direction on a slope.
• Watch for holes, ruts, rocks, hidden objects, or bumps that may cause a slip or a trip. Tall
grass can hide obstacles.
• Always be sure of your footing. If you feel like you are losing your balance, release the blade/
motor control handle immediately. The blade will stop rotating within 3 seconds.
• Do not mow near drop-offs, ditches, or embankments, because you could lose your footing or
balance.
• Do not mow a slope that has an angle of greater than 15°, as determined using the slope gauge.
• Do not mow wet or damp grass. Unstable footing can cause slipping.
WARNING
Do not mow a slope that has an angle of greater than 15° (a rise of approximately 2 1/2 feet [.75 m]
every 10 feet [3 m]). Mow across the face of a slope, and never up and down.
OPERATING YOUR LAWN MOWER
Fig. 9

20
OPERATING YOUR LAWN MOWER
MOWING TIPS
NOTE: A sharp blade will greatly enhance the performance of the mower, especially when cutting high grass.
Be sure to check the blade and to sharpen it at least once per year, as described in the Maintenance section.
• Verify that the lawn is free of stones, sticks, wires, and other objects that could damage
the blades or the motor. These objects could be accidentally thrown by the mower in any
direction, and could cause serious personal injury to the operator and to others. In order to
prevent electric shock, do not operate the mower in damp or wet conditions.
• Do not mow in circles. Travel back and forth across the lawn.
• When cutting thick grass, reduce walking speed in order to allow for a more effective cut and
a proper discharge of the clippings.
• For a healthy lawn, always cut off one-third or less of the total length of the grass. The
average lawn should be approximately 1 1/2 to 2” (3.8 to 5 cm) long during cool months, and
between 2" to 3 1/4" (5 cm to 8.3 cm) long during hot months. If there is growth, the lawn
should be cut in the fall.
MULCHING TIPS
NOTE: INSPECT THE AREA WHERE THE MOWER IS TO BE USED, AND REMOVE ALL STONES,
STICKS, WIRE, BONES, AND OTHER DEBRIS THAT MIGHT BE THROWN BY THE ROTATING BLADE.
• Release the switch to turn the mower OFF when crossing any graveled area (stones can be
thrown by the blade).
• Set mower to the highest cutting height when mowing on uneven ground or in tall weeds.
• For effective mulching, do not cut wet grass, because it tends to stick to the underside of
the deck, preventing proper mulching of grass clippings. New or thick grass may require a
narrower cut. The ground speed should be adjusted to the condition of the lawn. If mowing
has been delayed and the grass has been allowed to grow longer than 4" (10 cm), mow the
lawn twice in order to reduce the grass height to a maximum of 3 1/4” (8.3 cm).
• Walk at a steady pace. Overlap the cutting rows. Do not let the grass get too tall. If the grass
gets too long, start at the highest cutting position and work down to the desired cutting height.
WARNING
If you strike a foreign object, stop the motor and remove the battery. Thoroughly inspect the mower
for any damage. Repair any damage before operating the mower. Excessive vibration of the mower
during operation is an indication of damage. Thoroughly inspect the mower and repair any damage
before operating the mower.
21
MAINTENANCE
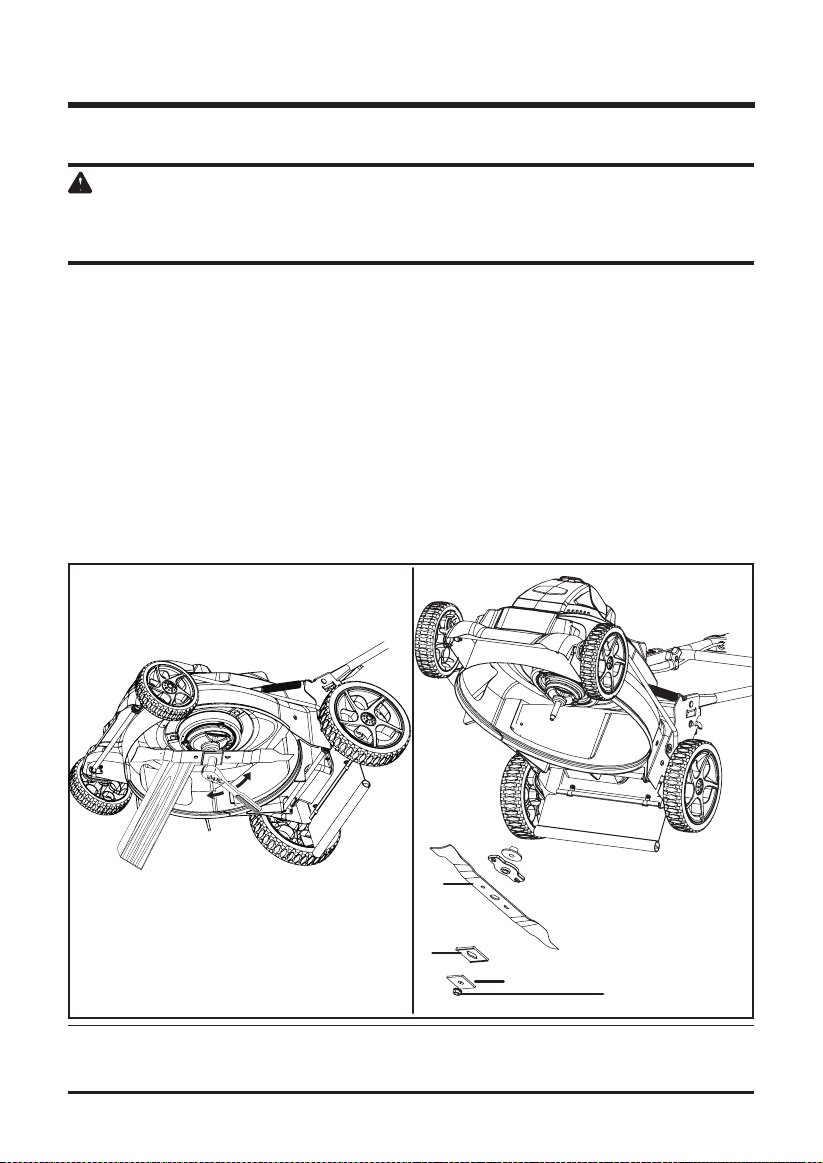
REPLACING THE CUTTING BLADE (See Figure 10-11)
WARNING
Always protect your hands by wearing heavy gloves and/or wrapping the cutting edges with rags or
other materials when performing any maintenance on the blades. ALWAYS remove the key when
servicing or transporting the mower.
Use only a GREENWORKS replacement blade.
• REMOVE BATTERY.
• While wearing leather padded gloves, wedge a block of wood between the blade and the
mower deck in order to prevent the blade from turning when the nut is being removed.
• Using a 15 mm wrench or socket, loosen the blade nut (1) and remove the blade (4). Turn the
nut “COUNTER-CLOCKWISE” to loosen it and “CLOCKWISE” to tighten it.
• Remove the blade nut (1), the square washer(2), the insulator washer(3), and the blade.
• To re-install the blade, position the blade with the cutting edges toward the ground. Assemble
the blade nut, the square washer, and the insulator washer as shown. Using a 15 mm socket
or wrench, turn the blade nut "CLOCKWISE” in order to secure the blade.
NOTE: Be sure to replace the parts in the exact order in which they were removed. When installing the cutting
blade, verify that it is installed with the curved ends pointing toward the mower deck, and not toward the
ground. Refer to the schematic drawing on page 27 of this manual.
Fig. 11Fig. 10
1
2
4
3

22
MAINTENANCE
CLEANING THE MOWER
WARNING
In order to reduce the risk of electric shock, do not expose the mower to water. The underside of
the mower deck should be cleaned after each use, because grass clippings, leaves, dirt, and other
debris will accumulate, which will cause rust and corrosion.
Remove any build-up of grass and leaves on or around the motor cover (do not use water).
Occasionally wipe the mower clean with a dry cloth. If debris builds up on the underside of the
mower during use, stop the motor, disconnect it from the battery, and then tilt the mower forward
or on its side, and scrape it clean using an appropriate tool.
STORING THE MOWER
The following steps should be taken in order to prepare the lawn mower for storage.
• Clean the mower as described in the previous section.
• Inspect the blade, and replace it or sharpen it, if required (refer to the Maintenance section).
• Lubricate the mower (refer to the Maintenance section).
• Store the mower in a dry, clean location. Do not store it next to corrosive materials, such as
fertilizer or rock salt.
• Store the mower indoors, in a cool, dry place, out of the reach of children. Do not cover the
lawn mower with a solid plastic sheet. Plastic coverings trap moisture around the mower,
which causes rust and corrosion.
The handle may be folded away completely for storage.
(See Figure 2)
• Lift up the cam locks on the sides of the handle to unlock, and fold the upper handle down.
• Loosen the handle knobs, pull outwards on each side of the lower handle, and lift the sides
of the lower handle past the edges of the handle mounting brackets. Fold the lower handle
forward. Make sure not to bend or kink the power cord.
• Remove the battery and store it in a cool dry location, if possible. Charge the battery every
two months when not in use in order to increase its life.
• Remove the key and store in a secure location out of the reach of children. Removal of the
battery is not required for storage.
WARNING
This battery must be charged when in storage to maintain running life.

23
SERVICE
• When servicing the mower, use only replacement parts that are available from the
manufacturer. In order to obtain replacement parts, call the toll-free helpline, at 1-888-909-
6757. The use of parts that do not meet the original equipment specifications may lead to
improper performance, and may compromise safety.
• Before cleaning, repairing, or inspecting, verify that the blade and all moving parts have come
to a complete stop. Remove the battery when making any adjustments or when any of the four
wheels must be lifted off the ground.
• Follow the instructions for lubricating and changing accessories.
• Keep the handles dry, clean, and free of oil and grease.
• In order to reduce the risk of re, keep the motor free of grass, leaves, and debris build-up.
• Check the blade and motor mounting bolts for proper tightness frequently. Visually inspect
blade for damage (e.g., bent, cracked, or worn).
• For best and safest performance, maintain the mower with care. Keep the mower blade sharp
and clean. Mower blades are sharp, and can cut. Wrap the blades or wear gloves, and use
extra caution when servicing.
• Keep all nuts, bolts, and screws tight in order to be sure that the equipment is in safe working
condition.
• Never tamper with safety devices. Check them regularly for proper operation.
• After striking a foreign object, stop the motor. Thoroughly inspect the mower for any damage.
Repair any damage before operating the mower.
• The grass catcher components, discharge cover, and trail shield are subject to wear and
damage, which could expose moving parts or allow objects to be thrown. As a safety
precaution, check these components frequently, and immediately replace any parts that show
signs of wear, or that are cracked or broken. Use original equipment manufacturer's (OEM)
parts only, as listed in this manual.
• When it is not in use, store the mower indoors in a dry area, and out of the reach of children.
WARNING
ALWAYS REMOVE KEY AND BATTERY WHEN SERVICING OR TRANSPORTING THE
MOWER.

24
ENVIRONMENTALLY SAFE BATTERY DISPOSAL
The batteries used in this mower's battery pack contain the following toxic and corrosive material:
LITHIUM-ION.
WARNING
Toxic materials must be disposed of in a specied manner in order to prevent contamination of the
environment. Before disposing of damaged or worn out Lithium-Ion battery packs, contact your
local waste disposal agency for information and specic instructions. Take the batteries to a local
recycling and/or disposal centre that is certied for disposal. If the battery pack cracks or breaks,
whether it leaks or not, do not recharge it and do not use it. Dispose of it and replace it with a new
battery pack. DO NOT ATTEMPT TO REPAIR IT!
Follow these instructions in order to avoid injury and the risk of re, explosion, or electric shock,
and to avoid damage to the environment:
• Cover the battery's terminals with heavy-duty adhesive tape.
• Do not attempt to remove or destroy any of the components of the battery pack.
• Do not attempt to open the battery pack.
• If a leak develops, the electrolytes that are released are corrosive and toxic. Do not get the
solution in the eyes or on the skin, and do not swallow it.
• Do not place batteries in regular household trash.
• DO NOT incinerate batteries.
• DO NOT place batteries where they will become part of any waste landll or municipal solid
waste stream.
• Dispose of batteries at a certied recycling or disposal centre.

25
PROBLEM POSSIBLE CAUSE SOLUTION
TROUBLESHOOTING
The mower does
not start.
The mower cuts
the grass unevenly.
The mower does
not mulch properly.
The mower is hard
to push.
The mower is
excessively noisy
and vibrates.
The battery is not charged.
The switch is defective.
Grass jammed at blade.
The battery is not attached to
the motor.
Battery may require service or
replacement.
Key is not installed.
The lawn is rough or uneven.
The cutting height is not set
properly.
Wet grass clippings are sticking
to the underside of the deck.
The mulching plug is missing.
The grass is too tall, or the
cutting height is too low.
The rear of the mower housing
and the blade are dragging in
thick grass.
The motor shaft is bent.
The blade is unbalanced.
Charge the battery.
Replace the switch (call the tollfree
helpline, at 1-888-909-6757
Remove battery; check under deck for
jams.
Check the connection between the motor
connector and the battery.
Call toll free helpline, at 1-888-909-6757
or replace battery.
Insert the key.
Check the mowing area.
Move the wheels to a higher setting.
Wait until the grass dries before mowing.
Install the mulching plug.
Raise the cutting height.
Empty the grass clippings from the grass
catcher bag.
Stop the motor, and inspect for damage.
Repair before restarting. If vibration
persists, call the toll free helpline (1-888-
909-6757)

26
GREENWORKS™ hereby warranties this product, to the original purchaser with proof of
purchase, for a period of four (4) years against defects in materials, parts or workmanship.
GREENWORKS™, at its own discretion will repair or replace any and all parts found to be
defective, through normal use, free of charge to the customer. This warranty is valid only for
units which have been used for personal use that have not been hired or rented for industrial/
commercial use, and that have been maintained in accordance with the instructions in the
owners’ manual supplied with the product from new.
Battery carries a two (2) years warranty against defects in workmanship and materials. Batteries
must be charged in accordance with the operator’s manuals directions and regulations in order
to be valid.
ITEMS NOT COVERED BY WARRANTY:
1. Any part that has become inoperative due to misuse, commercial use, abuse, neglect,
accident, improper maintenance, or alteration; or
2. The unit, if it has not been operated and/or maintained in accordance with the owner's
manual; or
3. Normal wear, except as noted below;
4. Routine maintenance items such as lubricants, blade sharpening;
5. Normal deterioration of the exterior nish due to use or exposure.
GREENWORKS HELPLINE (1 888 90WORKS):
Warranty service is available by calling our toll-free helpline, 9 a.m. to 5 p.m. EST. at 1 888 909
6757 (1 888 90WORKS).
TRANSPORTATION CHARGES:
Transportation charges for the movement of any power equipment unit or attachment are the
responsibility of the purchaser. It is the purchaser’s responsibility to pay transportation charges
for any part submitted for replacement under this warranty unless such return is requested in
writing by GREENWORKS.
LIMITED FOUR-YEAR WARRANTY
27
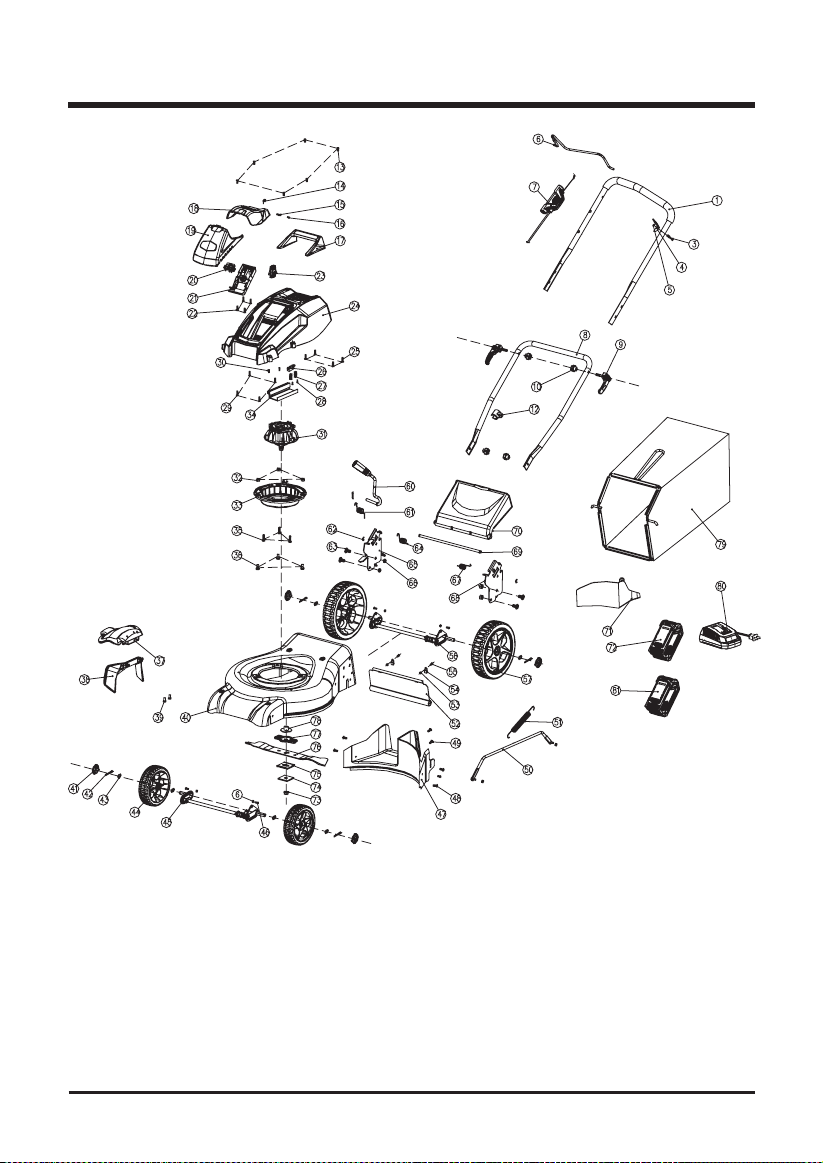
EXPLODED VIEW

28
PARTS LIST
ITEM NO. PART NO. DESCRIPTION QTY
1 311021165 Upper handle assembly 1
3 32208250 Screw M5x30 1
4 33323250-1 Bail stop 1
5 3220439 Lock nut M5 5
6 33305469-11 Bail switch 1
7 311011165 Switch box assy. 1
8 33302463-4A Lower handle 1
9 31101475 Cam lock assy. 2
10 34106467 Knob 4
12 341081165 Cable clamp 2
13 3220435 Screw M5x15 6
14 33905470 Torsion spring (battery door) 1
15 33904470 Pressure spring (battery door) 1
16 33203470 Axle (battery door) 1
17 34105488-3 40V handle 1
18 34103488 Battery door 1
19 34102488-4 Battery housing 1
20 34106976 Insert block 1
21 34104488 40V battery holder 1
22 32210302A Screw (ST3.5x12) 4
23 31201470 Key 1
24 34101487-4 Motor cover 1
25 3220245 Screw (ST5x20-C) 4
26 34107470 Key holder 1
27 36502487 Cord assy. 2
28 32201441 Screw (ST3.5x10-C) 2
29 32204113 Screw (ST4.2x20-C) 4
30 3220131A Screw M4x20 2
31 361011171 Motor 1
32 32208261 Nut M8 3
33 34105467-2 Motor holder 1
34 362011165A PCB board 1
35 32200135 Bolt and washer M6x25 3
36 3220406 Bolt M8x16 3
37 34104467 Side discharge cover assy. 1
38 34103467 Side discharge chute 1
39 33307250A Bolt M6x8 2
40 31301487-3 Deck 1

29
PARTS LIST
ITEM NO. PART NO. DESCRIPTION QTY
41 34106488-5 Wheel cover 4
42 3290135 Pin 5
43 3220898 Washer 8
44 34103486-1 7” wheel 2
45 33902487 Front wheel axle 1
46 32206250 Screw M5x12 4
47 34103238-1 Rear bafe 1
48 32210234 Screw ST6.3x12-F 3
49 32205234 Screw ST6.3*16-F 4
50 33302234-8 Link bar 1
51 33312234 Spring 1
52 34101467 Rear shield 1
53 3221237 Lock nut M4 2
54 3330490-1 Wire clip 2
55 3220518 Screw M4x12 2
56 33903487 Rear wheel axle 1
57 34102486-1 10” wheel 2
60 311041165 Height adjustment lever assembly 1
61 33401222 Torsion spring 1
62 3290506 C-clip 2
63 32207234 Bolt 4
64 33313234 Torsion spring (Right) 1
65 33904234-6 Height adjustment plate (Right) 1
66 32910131 Nut M10 4
67 33310234 Torsion spring (Left) 1
68 33905234-2 Height adjustment plate (Left) 1
69 33201234 Rear cover rod 1
70 34101234-2 Rear cover 1
71 34106463-2 Mulch plug 1
72 31104975 40V 146Wh Battery 1
73 3221037A Nut M10x1.25 1
74 3331435A Spacer 1
75 3410535 Blade insulator 1
76 33301487-1 Blade 1
77 34117470 Blade holder 1
78 3320238A-4 Spindle bushing 1
79 311031165 Catcher bag assembly 1
80 31102980 Charger 1
81 31103976 40V 73Wh Battery 1

TOLL-FREE HELPLINE: 1-888-90WORKS
(888.909.6757)
Rev: 01 (03-26-14) Printed in China on 100% Recycled Paper