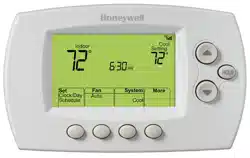
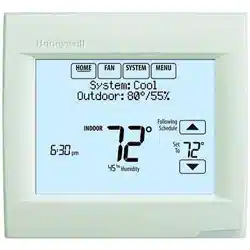
The screen lights when you press any button. It stays lit for 45 seconds after you complete changes. Depending on how your thermostat was installed, the screen light may always be on
Quick reference: commercial use
The screen lights when you press any button. It stays lit for 45 seconds after you complete changes. Depending on how your thermostat was installed, the screen light may always be on.
Connecting to Wi-Fi
1 Connect to the Wi-Fi network.
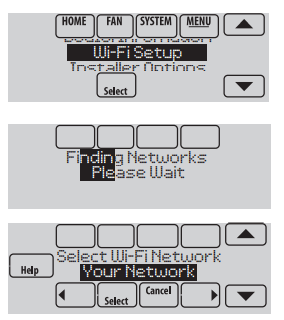
1.1 Touch MENU
1.2 Select Wi-Fi Setup. The thermostat will scan for available Wi-Fi networks.
1.3 The screen displays “Finding Networks Please Wait” after which it displays a list of all Wi-Fi networks it can find.
1.4 Find the name of the network you want to use by pressing the arrow buttons to scroll up/down or left/ right. Press the Wi-Fi network name, then press Select.
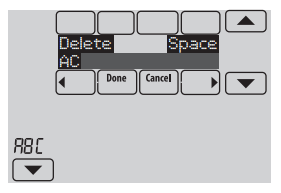
1.5 When prompted, press the screen to edit the password (if necessary).
1.6 Enter the password. Press the buttons to change the letter or number. Press the button to move to the next character, or the button to move to the previous character. Use the buttons at the bottom to change letter case. Press Done when complete.
1.7 The screen will let you know when the connection is successful. Press Done when the connection is successful. If the connection is not successful, the screen will explain why not. See “Unsuccessful connection”. Follow instructions on the screen to try again.
NOTE: Press the for more information about an unsuccessful connection.
1.8 If you want remote access to the thermostat, you must set up an account at mytotalconnectcomfort.com and add the thermostat to the account.
Registering your thermostat online
To view and set your Wi-Fi thermostat remotely, you must have a Total Connect Comfort account. Use the following steps.
1 Open the Total Connect Comfort web site.
2 Login or create an account.
If you have an account, click Login
– or –
click Create An Account
2a Follow the instructions on the screen.
2b Check your email for an activation message from My Total Connect Comfort. This may take several minutes.
NOTE: If you do not receive a response, check your junk mailbox or use an alternate e-mail address.
2c Follow activation instructions in the email.
2d Log in
3 Register your Wi-Fi thermostat.
After you are logged in to your Total Connect Comfort account, register your thermostat.
3a Follow the instructions on the screen. After adding your thermostat location, you must enter the thermostat’s unique identifiers:
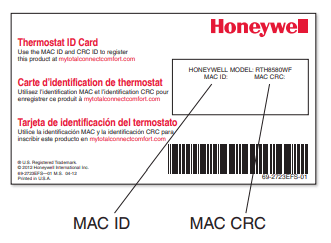
MAC ID
MAC CRC
NOTE: These IDs are listed on the Register Online screen or on the Thermostat ID Card included in the thermostat package. The IDs are not case sensitive.
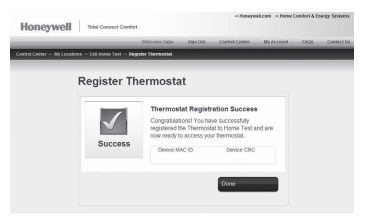
When the thermostat is successfully registered, the Total Connect Comfort registration screen will display a SUCCESS message.
You can now control your thermostat from anywhere through your laptop, tablet, or smartphone
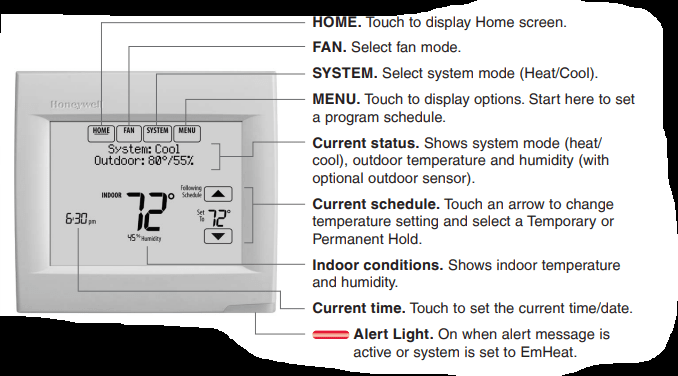
Setting the time/date
1 Touch the current time. The screen displays Select Option.
2 Touch Time or Date, then touch Select.
3 Touch until the proper time/date is displayed.
4 Touch Done to save or Cancel to ignore changes.
5 Touch Home to redisplay the Home screen.
NOTE: When registered to Total Connect Comfort, the thermostat automatically sets the time and adjusts for Daylight Saving Time.
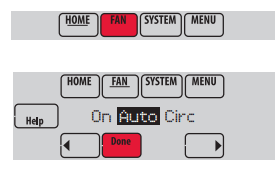
Setting the fan
1 Touch FAN to display fan settings.
2 Touch On, Auto, Circ, or Follow Schedule.
3 Touch Done to save and exit.
On: Fan is always on.
Auto: Fan runs only when the heating or cooling system is on.
Circ: Fan runs randomly about 35% of the time (residential use only).
Follow Schedule: Fan controlled by program
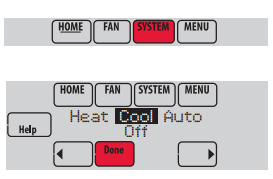
Setting system mode
1 Touch SYSTEM to display system settings.
2 Touch desired option:
Heat: Controls only the heating system.
Cool: Controls only the cooling system.
Off: Heating/cooling systems are off.
Auto: Selects heating or cooling depending on the indoor temperature.
Em Heat (heat pumps with aux. heat): Controls auxiliary/emergency heat. Compressor is locked out.
3 Touch Done to save and exit.
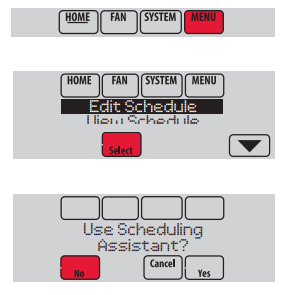
Adjusting program schedules
1 Touch MENU.
2 Select Edit Schedule to display Use Scheduling Assistant?
Touch Yes to create a schedule by answering simple questions.
Touch No to manually create a program schedule.
3 Select the days to schedule, touch Next.
4 Touch to set your Wake time for selected day(s).
5 Touch to set Heat and Cool temperatures for the Wake period.
6 Touch other time periods (Leave, Return, Sleep) to set time and temperatures for each.
7 Touch Done to save and exit (Touch Cancel to exit without saving changes)
Menu Options
Setting vacation hold: residential use
This feature helps you save energy while you are away, and restores comfortable settings just before you return home.
1 Touch MENU.
2 Select Vacation Mode.
3 Touch to select the date you leave, then touch Next for further scheduling details, including times of day, temperature settings, return date, and return settings.
4 Review your selections on the last display, and touch Done to save your settings. Touch Cancel to ignore the changes.
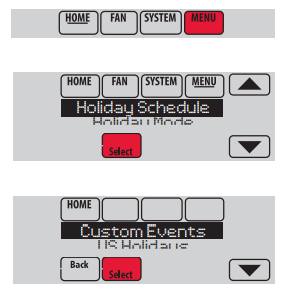
Setting holiday/event schedules: commercial use
This feature helps you conserve energy when the workplace is unoccupied for special events and holidays.
1 Touch MENU.
2 Select Holiday Schedule.
3 Select the item you want to schedule and touch Next for further scheduling details.
Custom Events lets you set up other days for special schedules.
US and Canadian Holiday options let you select from a list of holidays commonly observed in each country.
4 Make selections as prompted on each screen. For more information, see next two pages.
5 Touch Done to save your settings
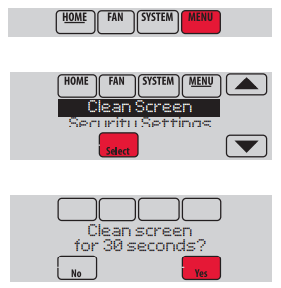
Cleaning the thermostat screen
When you select the Clean Screen option, the screen is locked so you don’t accidentally change settings while you clean.
1 Touch MENU.
2 Select Clean Screen. A prompt asks if you want to clean the screen for 30 seconds.
3 Touch Yes. A countdown timer displays elapsed time until the screen is reactivated.
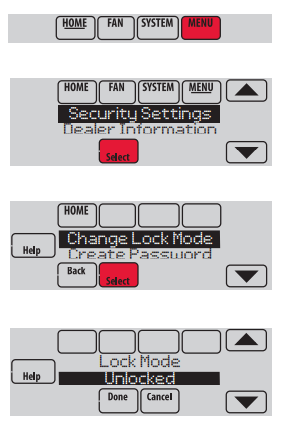
Adjusting security settings
You can adjust security options to prevent unauthorized changes to system settings.
1 Touch MENU and select Security Settings.
2 Select an option and follow prompts:
Unlocked: Full access allowed.
Partially locked: Only temperature can be changed.
Fully locked: No access allowed.
NOTE: If you choose to use a password for additional security, write it here for reference:
Advanced features
Adaptive Intelligent Recovery (residential use only)—Over time, the VisionPRO® thermostat “learns” how long it takes your system to reach the temperature you want. It turns on the heating or cooling system earlier to make sure you’re comfortable at the time you expect. The thermostat displays “In Recovery” when it turns the system on early.
Dehumidification Away Mode—Your system can be set to control indoor climate while your home is vacant during the humid season. Before you leave, touch MENU, then select Dehum Away Mode. Temperature and humidity will be kept at levels that protect your home and possessions. When you return, touch Cancel to resume normal operation.
Compressor Protection—The thermostat keeps the compressor off for a few minutes before restarting, to prevent equipment damage. During this “off” time, the message “Wait” is displayed on screen.
Pre-occupancy Purge (commercial use only)—This feature turns on the fan 1 to 3 hours before each “occupied” time period, to provide a comfortable work environment when you arrive
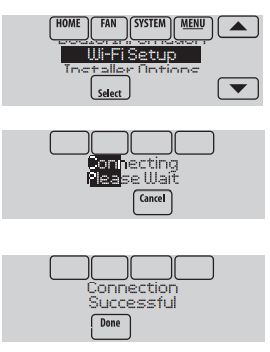
Reconnecting your Wi-Fi network
1 Touch MENU. Select Wi-Fi Setup.
2 Find the name of the network you want to use by pressing the arrow buttons to scroll up/down or left/right. Press the Wi-Fi network name, then press Select. The thermostat might display a password page.
3 Enter the password. Press Done when complete.
4 The thermostat displays “Connecting Please Wait” then a “Connection Successful” screen.
5 Touch Done.
If your thermostat is registered, you will see your signal strength and other status information. Touch Done.
If the screen displays “Register at Honeywell.com/TCC,” go to Honeywell.com/TCC and follow the instructions there
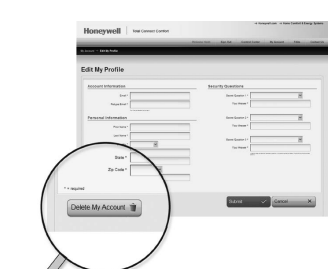
Unregistering your thermostat
If you remove the thermostat from your Total Connect Comfort website account (for example, you’re moving and leaving the thermostat behind), follow these steps:
1 On mytotalconnectcomfort.com log into your account.
2 Under My Account, select Edit My Profile.
3 Click the Delete My Account button.
Your thermostat will display an orange button that says Register Online.
Unsuccessful connection
If you are unsuccessful in connecting the thermostat to the Wi-Fi network, you will see a Connection Failed screen. Press button for other tips about this failed connection. Here are three specific reasons the connection might be unsuccessful. For all Connection Failed screens, pressing Done will return to the Menu screen.
Invalid Password
The password you entered is invalid. Check that you have the right password and try again.
No IP Address
The thermostat was unable to obtain an IP address from the router. Verify the router is correctly set up to automatically assign IP addresses. This connection can take several minutes. If there is still no connection, remove the thermostat from the wallplate for 10 seconds, then snap it back into place.
No Internet
Link The thermostat connected to the Wi-Fi network but was unable to establish a connection to the internet. Check the router settings and try again. Make sure the Ethernet cable is plugged into the router and try rebooting the router if necessary.
Connecting to a hidden Wi-Fi network
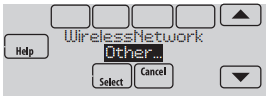
If the Wi-Fi network name is hidden and it doesn’t show up in the list in “Connecting to Wi-Fi” follow these steps to connect to it.
1 Press MENU, then Wi-Fi Setup.
2 Press Other, then press Select.
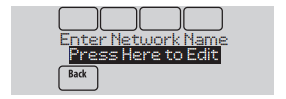
3 When prompted, press the screen to edit the network name.
4 Enter the network name.
Press the buttons to change the letter or number. Press the button to move to the next character, or the button to move to the previous character. Use the buttons at the bottom to change letter case. Press Done when complete.
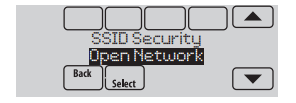
5 Select the appropriate network security setting, then press Select.
6 Enter the Wi-Fi network password as shown in “Connecting to Wi-Fi” step 1.6
Troubleshooting
If you have difficulty with your thermostat, try these suggestions. Most problems can be corrected quickly and easily.
Screen is blank
Check circuit breaker and reset if necessary.
Make sure power switch at heating and cooling system is on.
Make sure furnace door is closed securely.
Screen is difficult to read
Change screen brightness using Preferences menu.
Red light is on
If thermostat is in Emergency Heat mode, the red light is normal. It shows that the thermostat is in Emergency Heat mode.
If thermostat is not in Emergency Heat mode, an alert is active. Check message on the thermostat screen.
Heating or cooling system does not respond
Touch SYSTEM to set system to Heat. Make sure the temperature is set higher than the Inside temperature.
Touch SYSTEM to set system to Cool. Make sure the temperature is set lower than the Inside temperature.
Check circuit breaker and reset if necessary.
Make sure power switch at heating & cooling system is on.
Make sure furnace door is closed securely.
If “Wait” is displayed, the compressor protection timer is on. Wait 5 minutes for the system to restart safely, without damaging the compressor
No. CtK-04 has a special communication protocol with the indoor and outdoor units and also connect to wireless Redlink modules, neither of which this thermostat can do. If you are looking for wifi control of your thermostat I believe (we don't sell this and I am no expert on this) you need a redlink gateway.
 buttons to change the letter or number. Press the
 button to move to the next character, or the
  button to move to the previous character. Use the
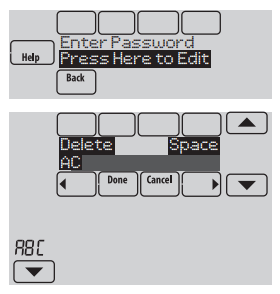
 for more information about an unsuccessful connection.
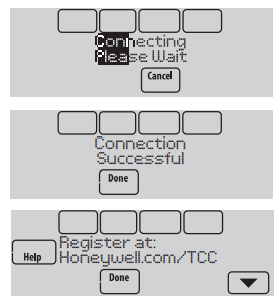


 until the proper time/date is displayed.
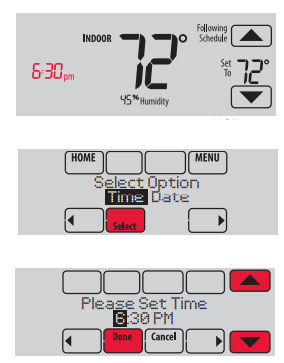
 to set your Wake time for selected day(s).
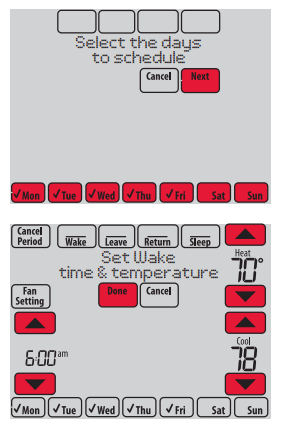
 to select the date you leave, then touch Next for further scheduling details, including times of day, temperature settings, return date, and return settings.
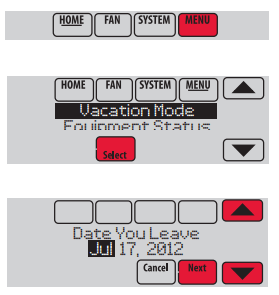
 button for other tips about this failed connection. Here are three specific reasons the connection might be unsuccessful. For all Connection Failed screens, pressing Done will return to the Menu screen.
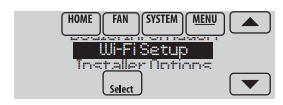
 buttons to change the letter or number. Press the
 button to move to the next character, or the
  button to move to the previous character. Use the