AF-Q100PX
AF-Q120PX
looC
otuA
naF
evaS ygrenE
Timer
▲
▲
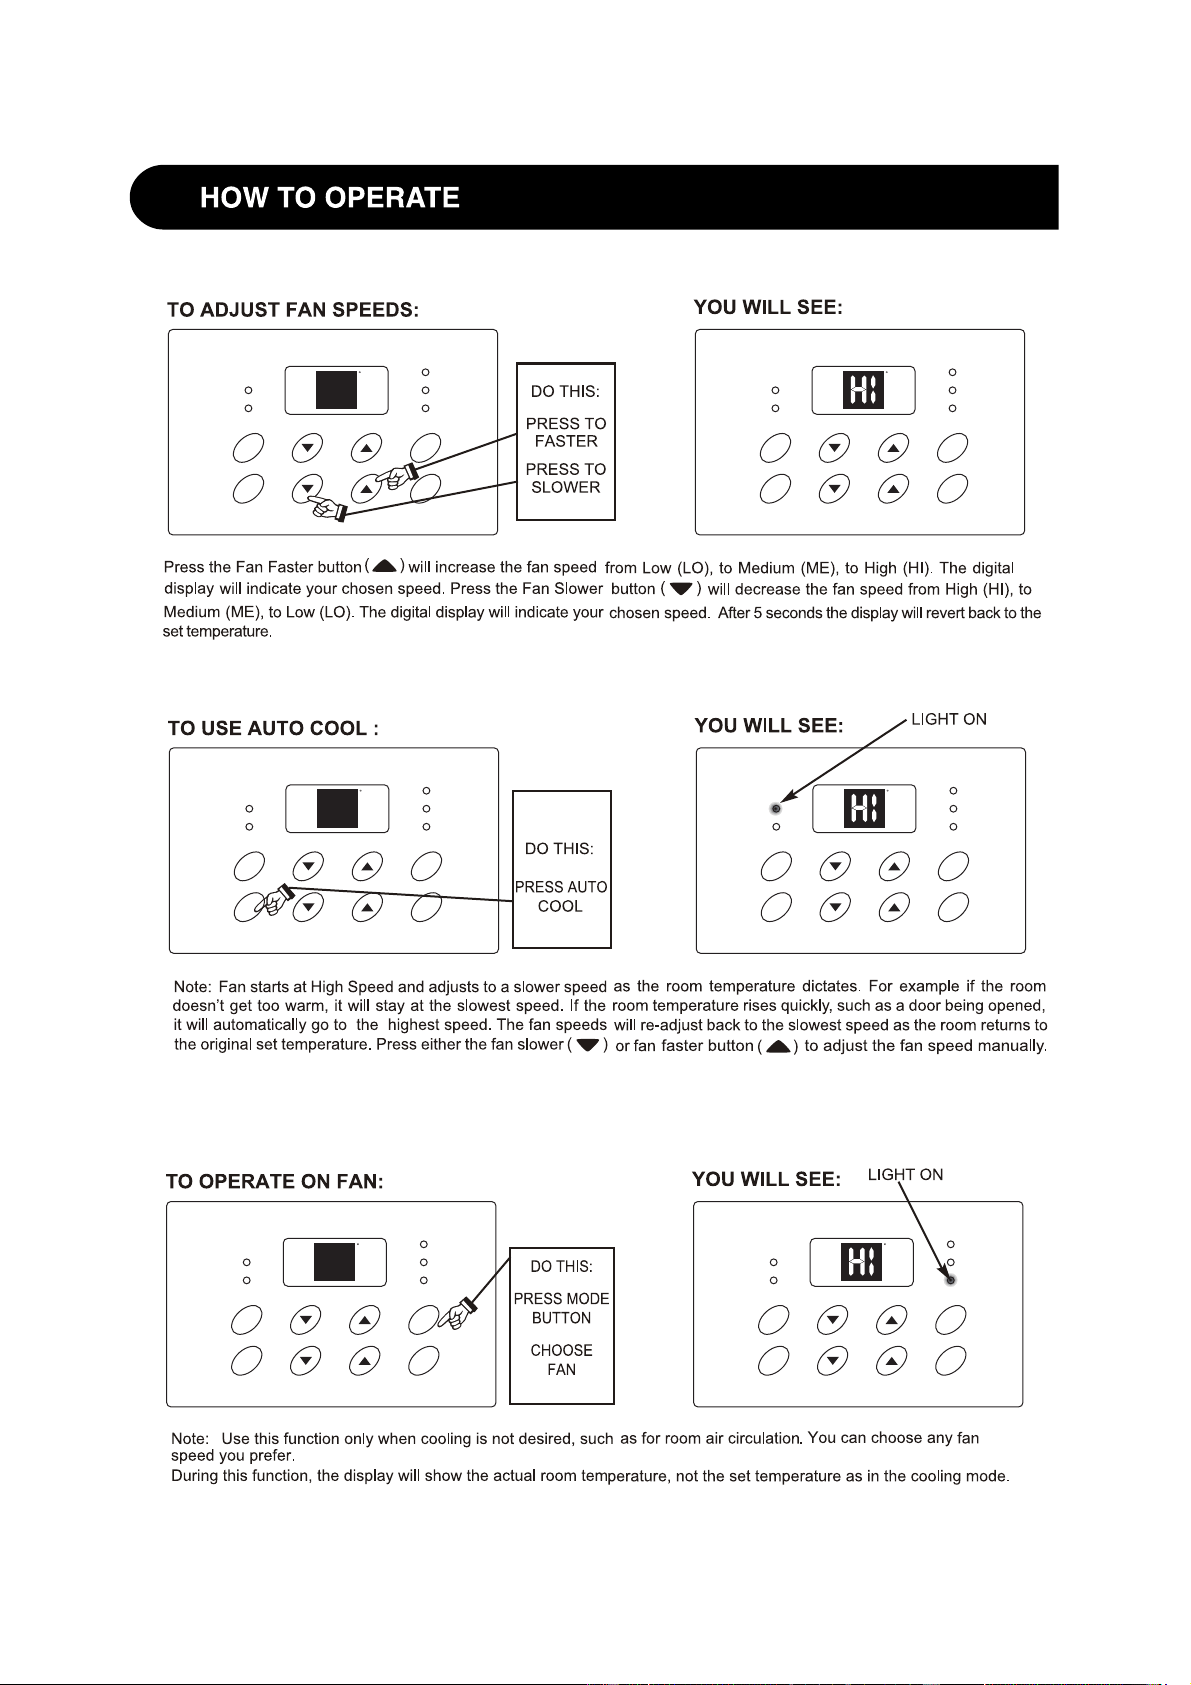
Fan
Slower
Fan
Faster
ON/OFF
10
10
11
11
12
13
13
14
14
14
15
15
20
15
16
17
18
20
AF-Q100PX,AF-Q120PX
THE
TO EXHAUST AIR FROM THE ROOM
16
PRECAUTIONS...................................
19
.........
....
.....
..
AF-Q100PX,AF-Q120PX
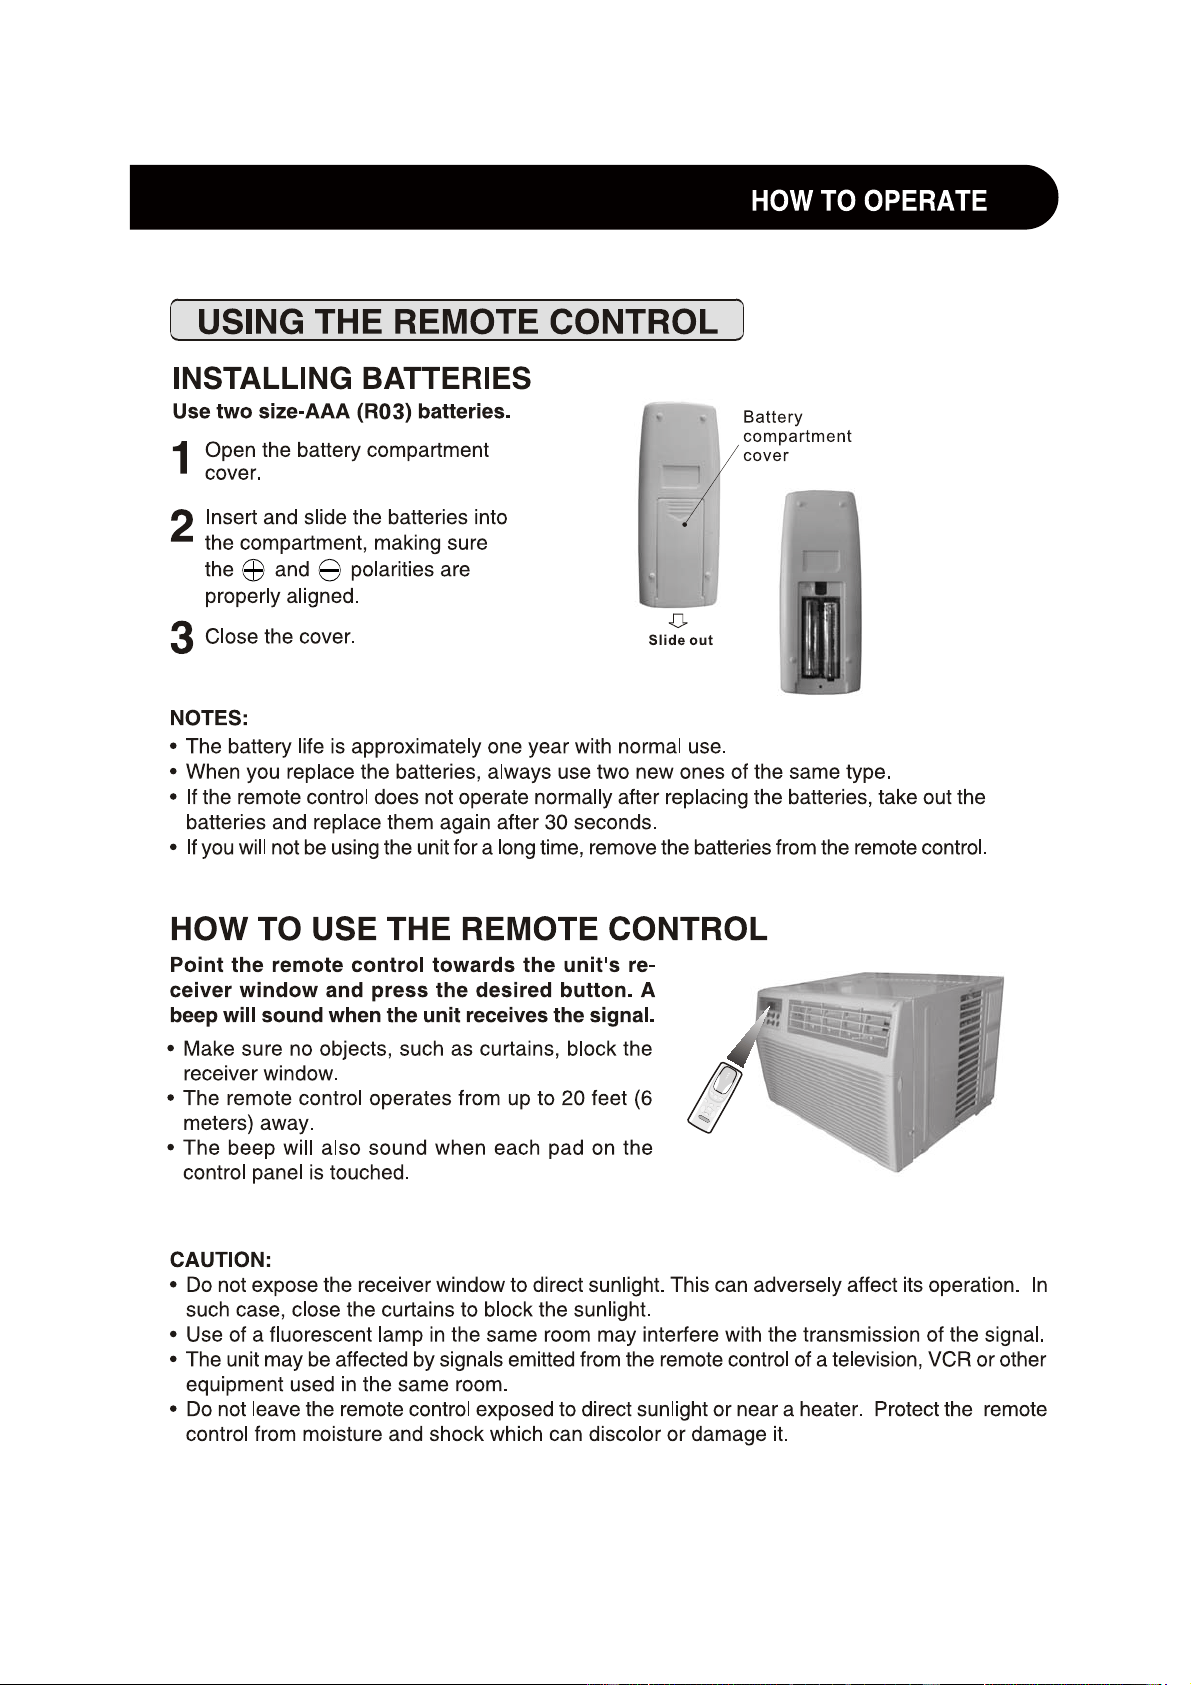
remote control
07495-1163
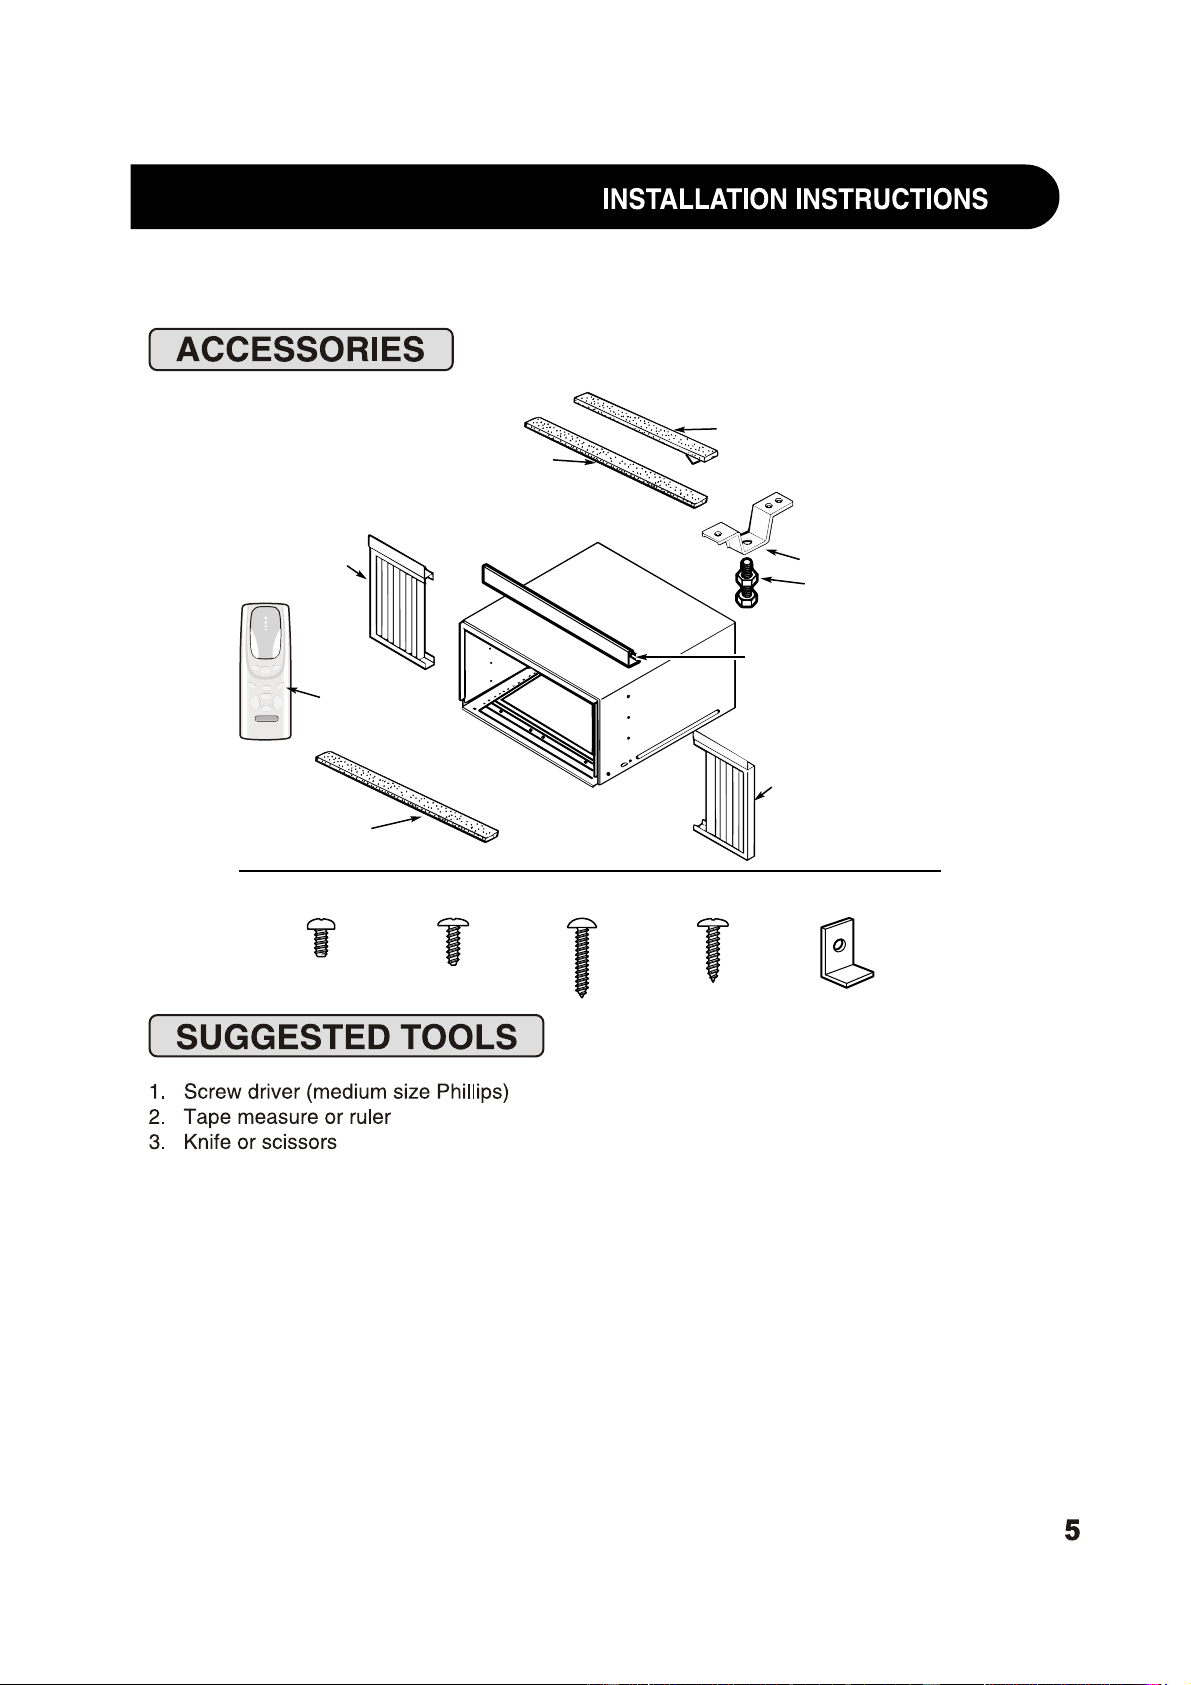
Type A (6)
Right
accordion
panel
Foam top
window gasket
Window sash seal
(thin, adhesive-backed)
Left
accordion
panel
Type B (7)
Top mounting rail
Window locking
bracket (2)
Sill support (2)
Nut (2)
Bolt (2)
Type C (6)
Type D (3)
Top mounting rail
seal strip
looC
otuA
naF
evaS ygrenE
Timer
▲
▲
Fan
Slower
Fan
Faster
ON/OFF
Remote control
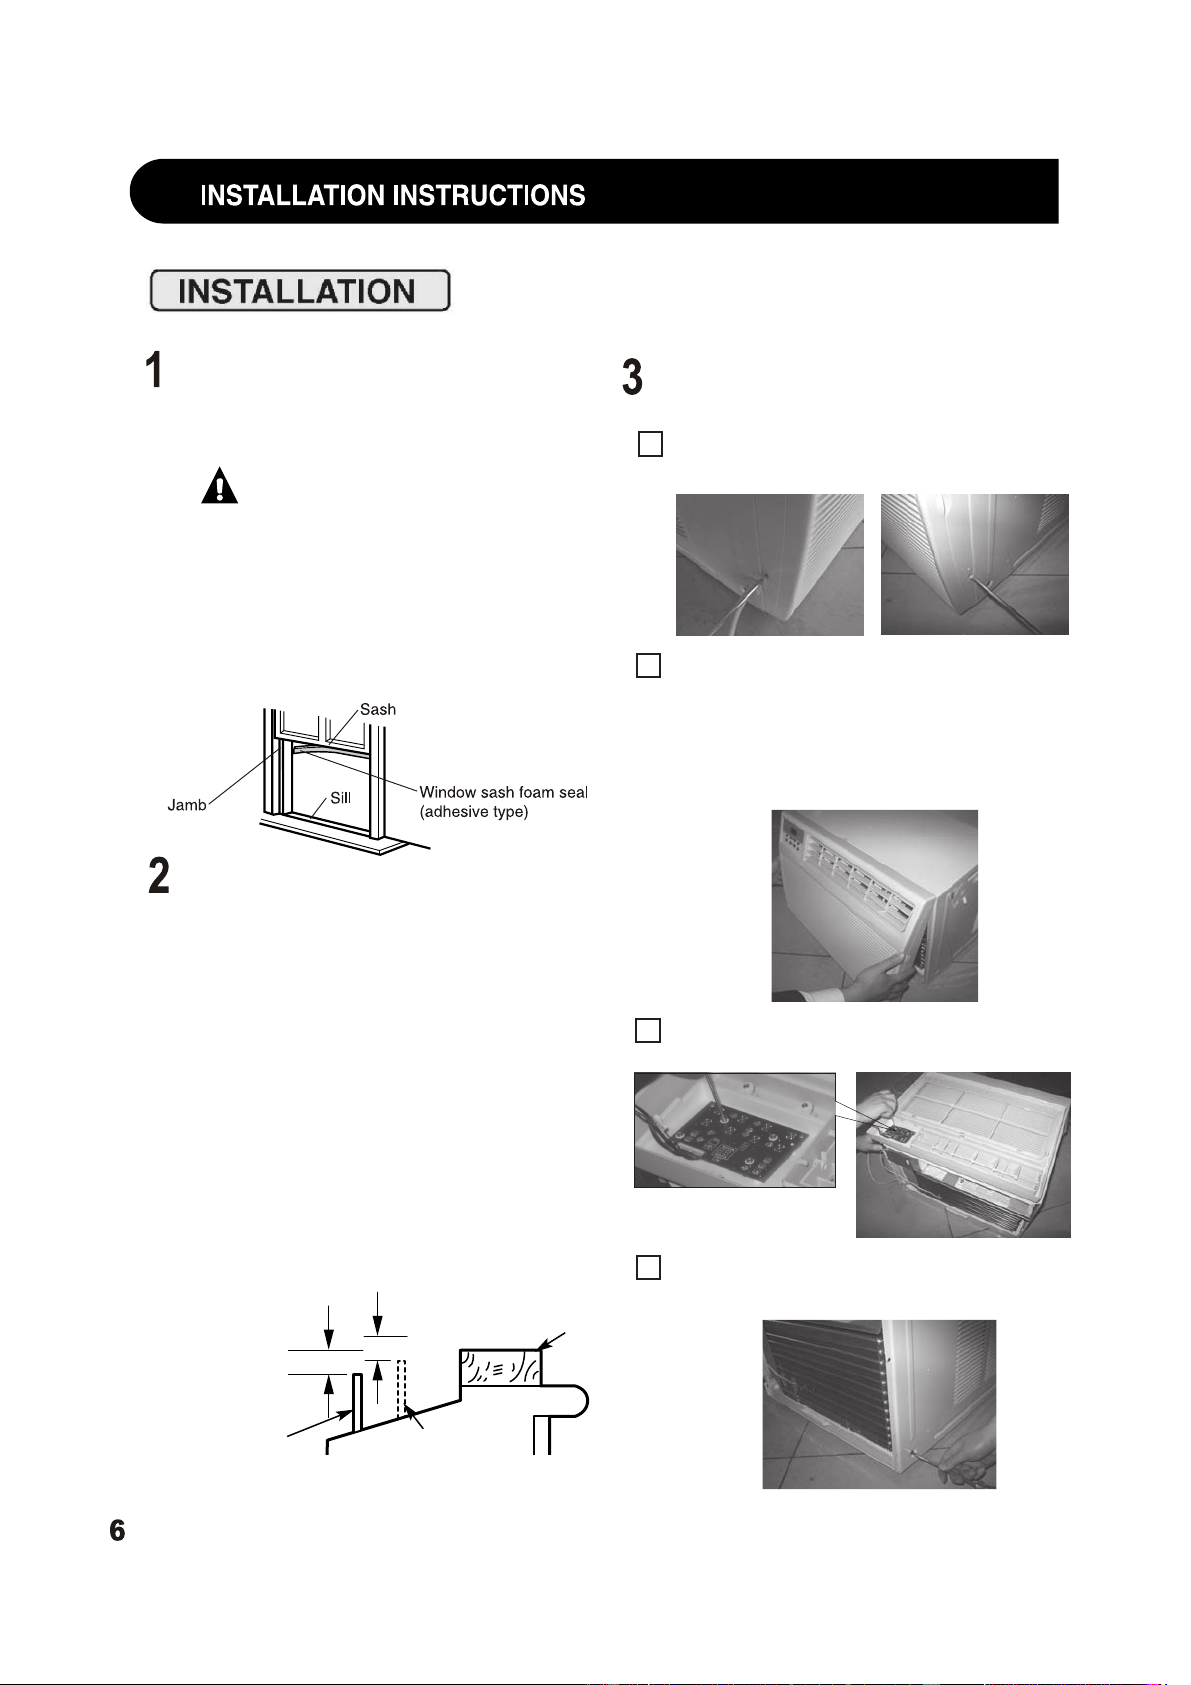
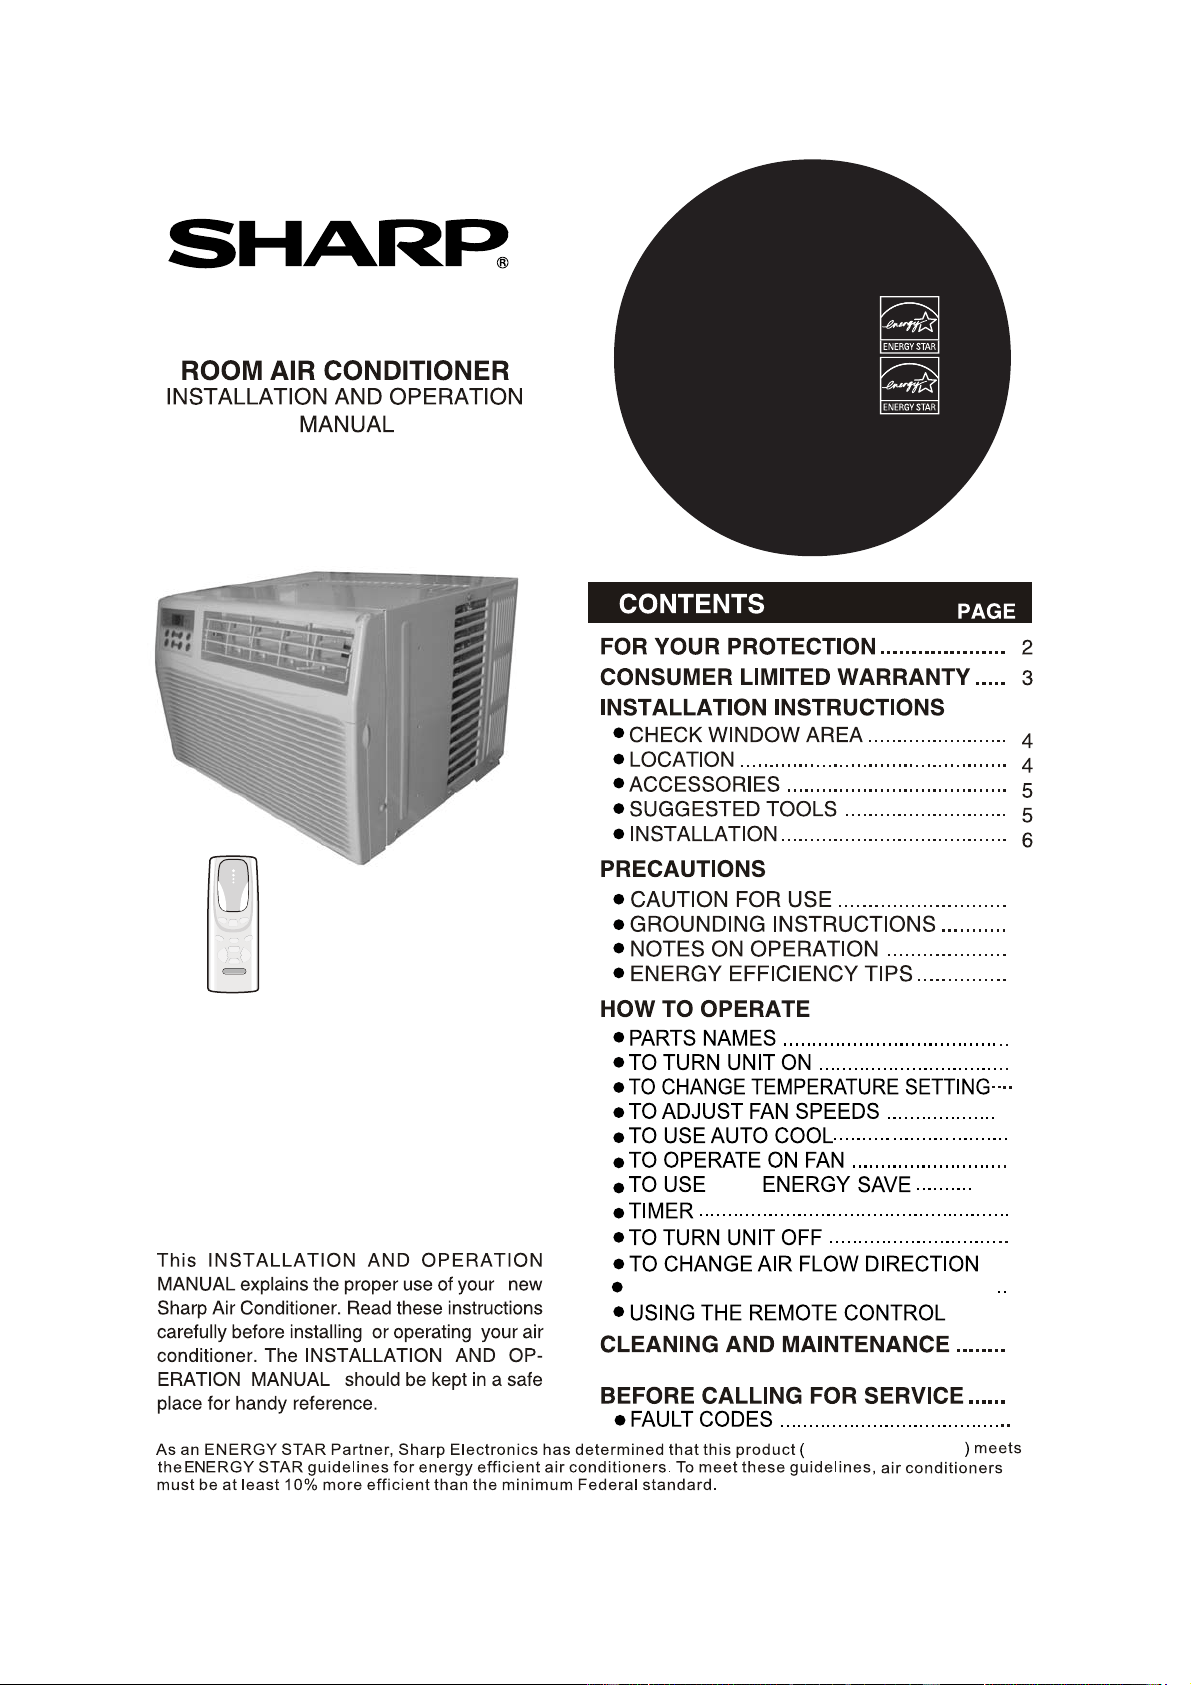
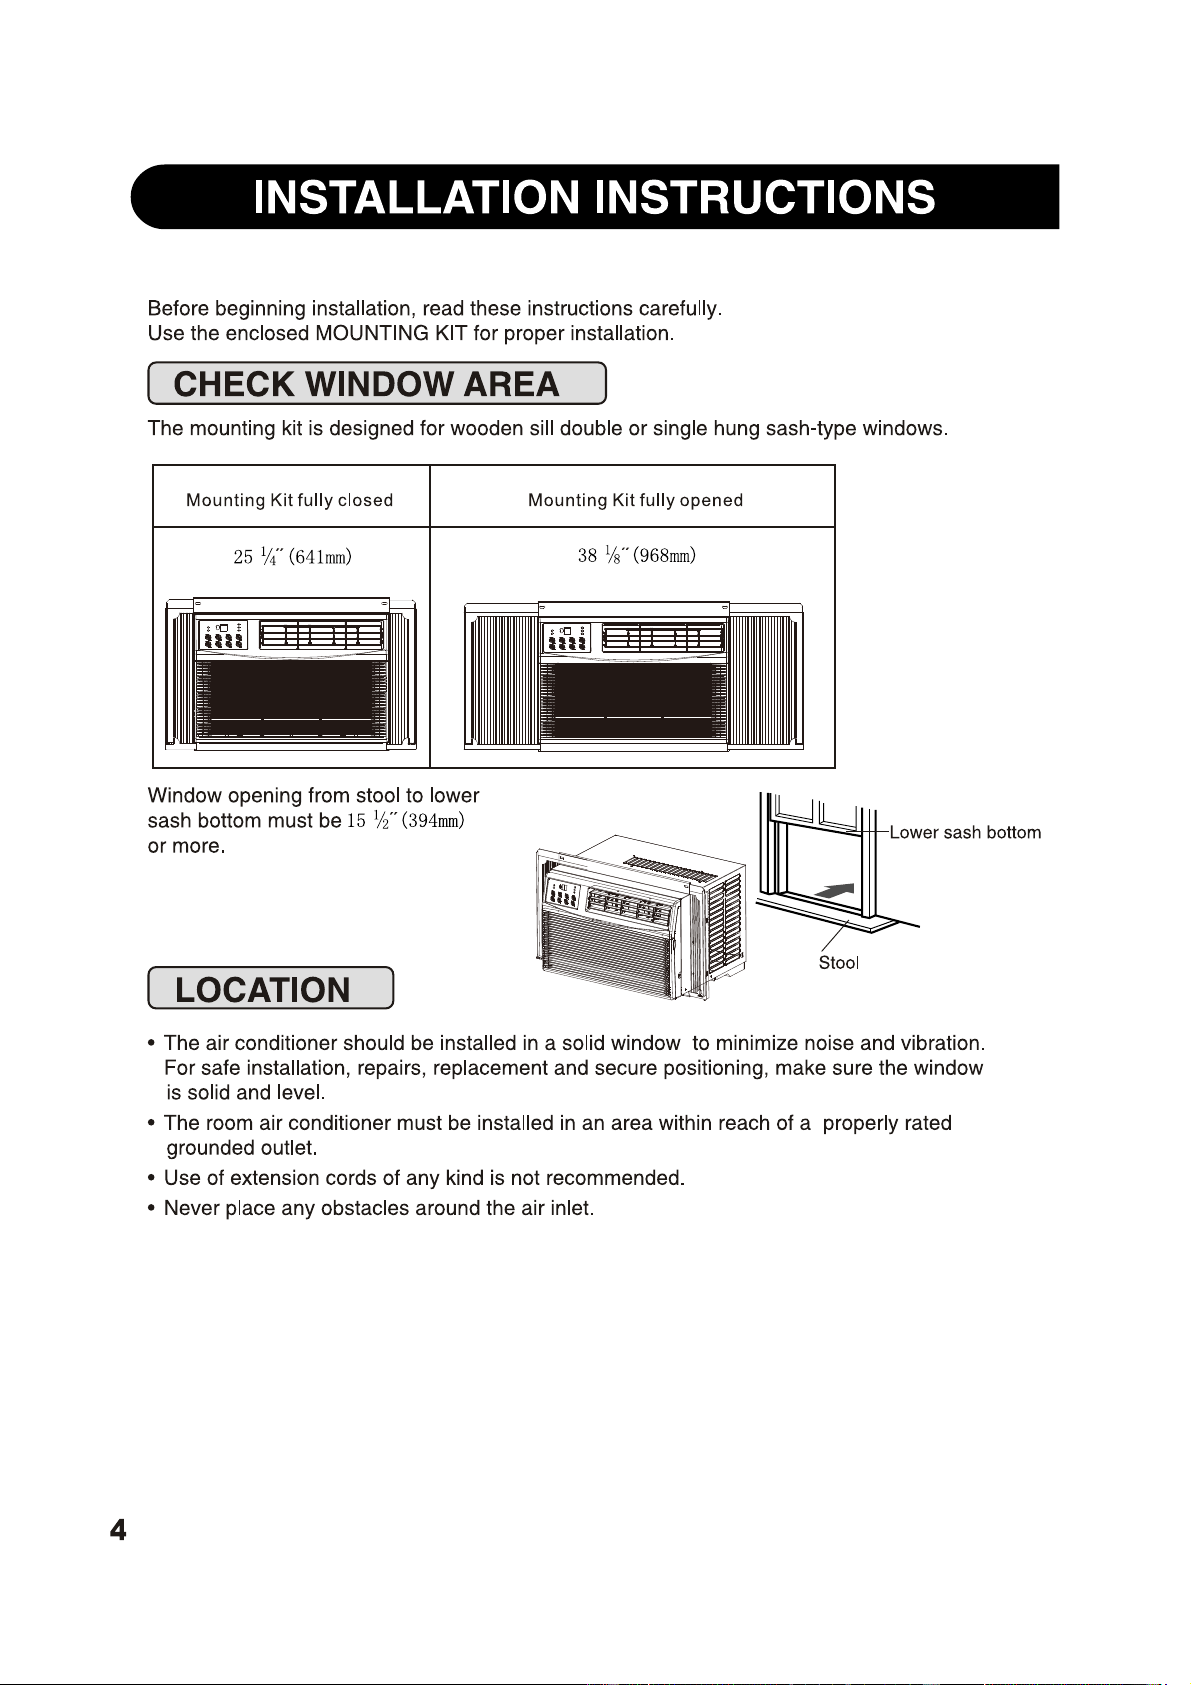
WINDOW REQUIREMENTS
• These instructions are for a standard
double-hung window. You will need to
modify them for other types of windows.
CAUTION:
If the sill support
bolts do not contact the window sill, or
if you have a window without a sill, you
must order accessory kit RAK87 to
properly install this air conditioner.
• All supporting parts must be secured
to firm wood, masonry or metal.
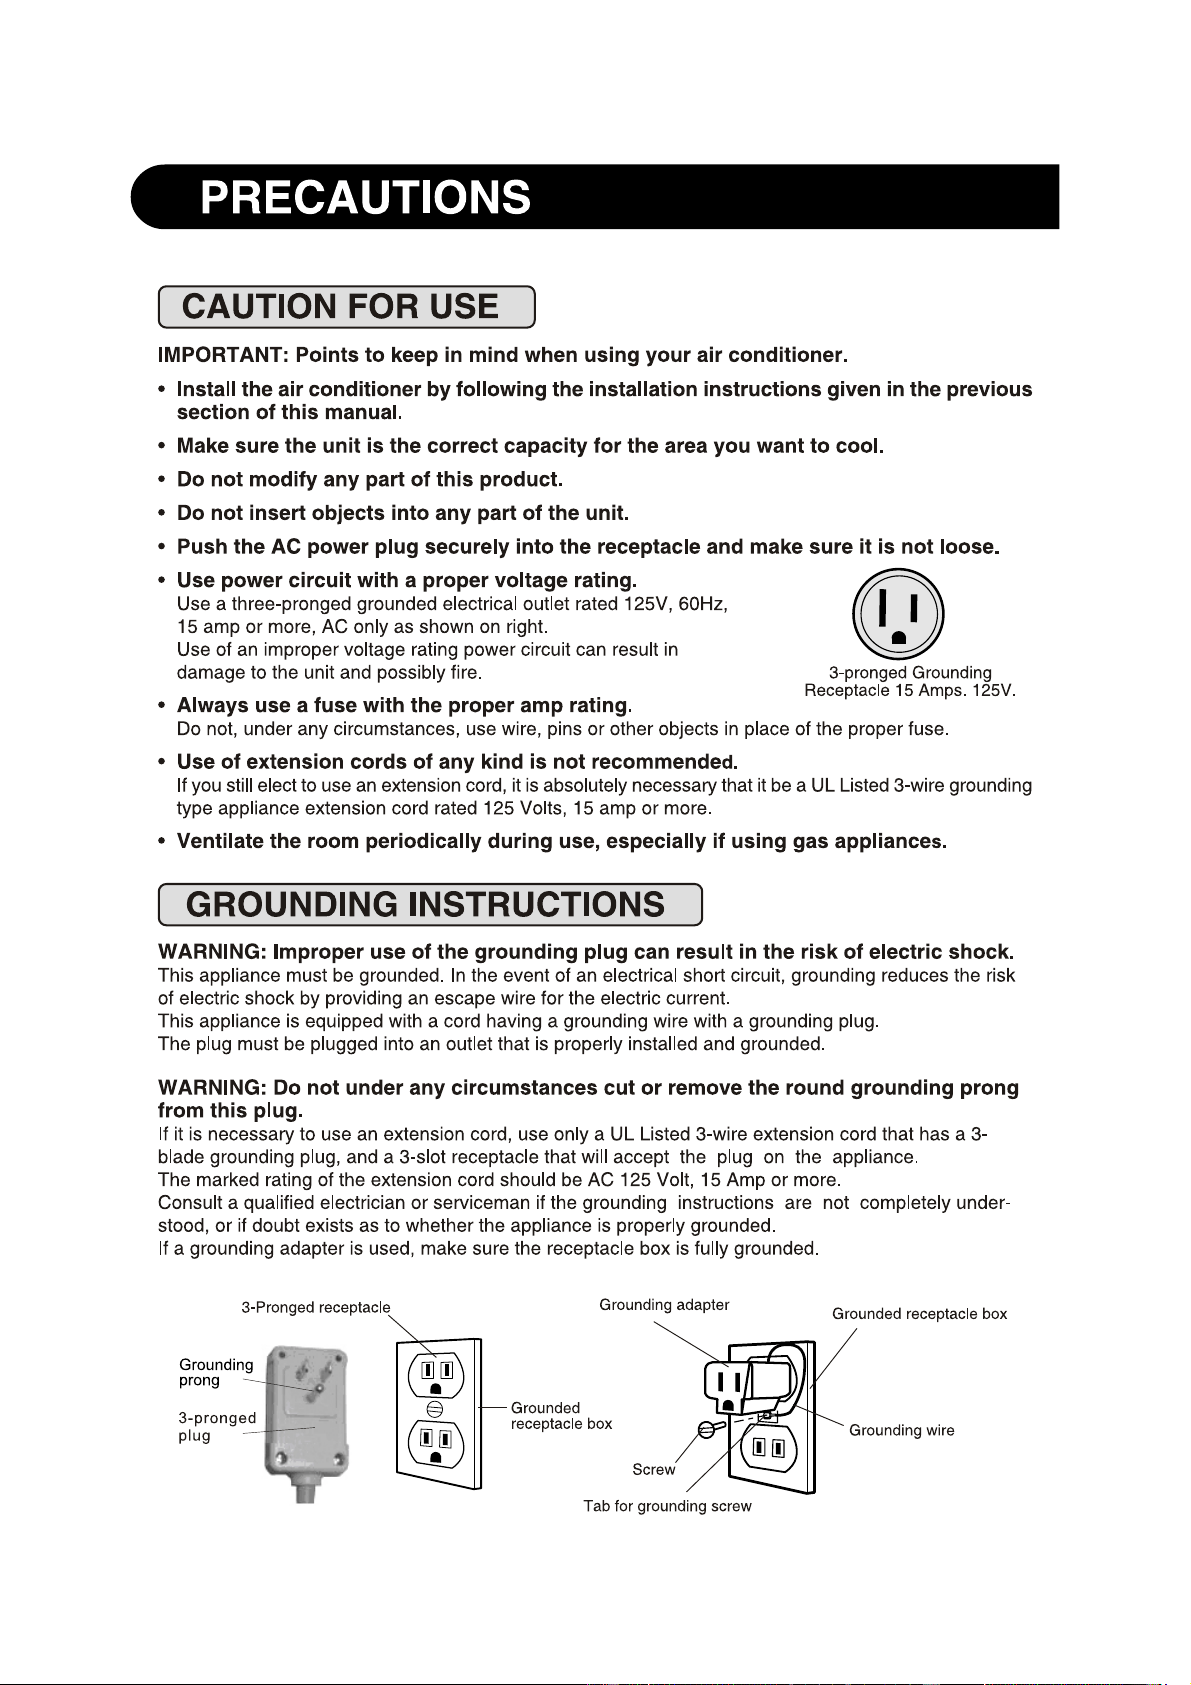
• The electrical outlet must be within
reach of the power cord.
STORM WINDOW REQUIREMENTS
A storm window frame will not allow the air
conditioner to tilt toward the outside, and
will keep it from draining properly. To adjust
for this, attach a piece of wood to the sill.
WOOD PIECES –
WIDTH: 2″
LENGTH: Long enough to fit inside the
window frame.
THICKNESS: To determine the thickness,
place a piece of wood on the sill to make
it 1/2″ higher than the top of the storm
window frame or the vinyl frame.
Attach securely with nails or screws
provided by the installer.
1/2″ higher
than storm
window
frame
Storm window
frame
Wood
Sill
1/2″ higher
than vinyl frame
(on some windows)
Vinyl frame
REMOVE THE AIR CONDITIONER
FROM THE CASE
Remove and save the 2 screws from the
lower sides of the front grille.
Grasp the lower corners of the grille while
pressing in on the case sides with your
finger tips. Pull out to release and lift it up.
NOTE: Do not pull the bottom edge
toward you more than 3 ″ or you may
damage the tabs of the grille.
Remove the ground screw from each side
of the case. Keep them in a safe location.
A
B
D
Remove 4 screws of control panel from
front panel.
C
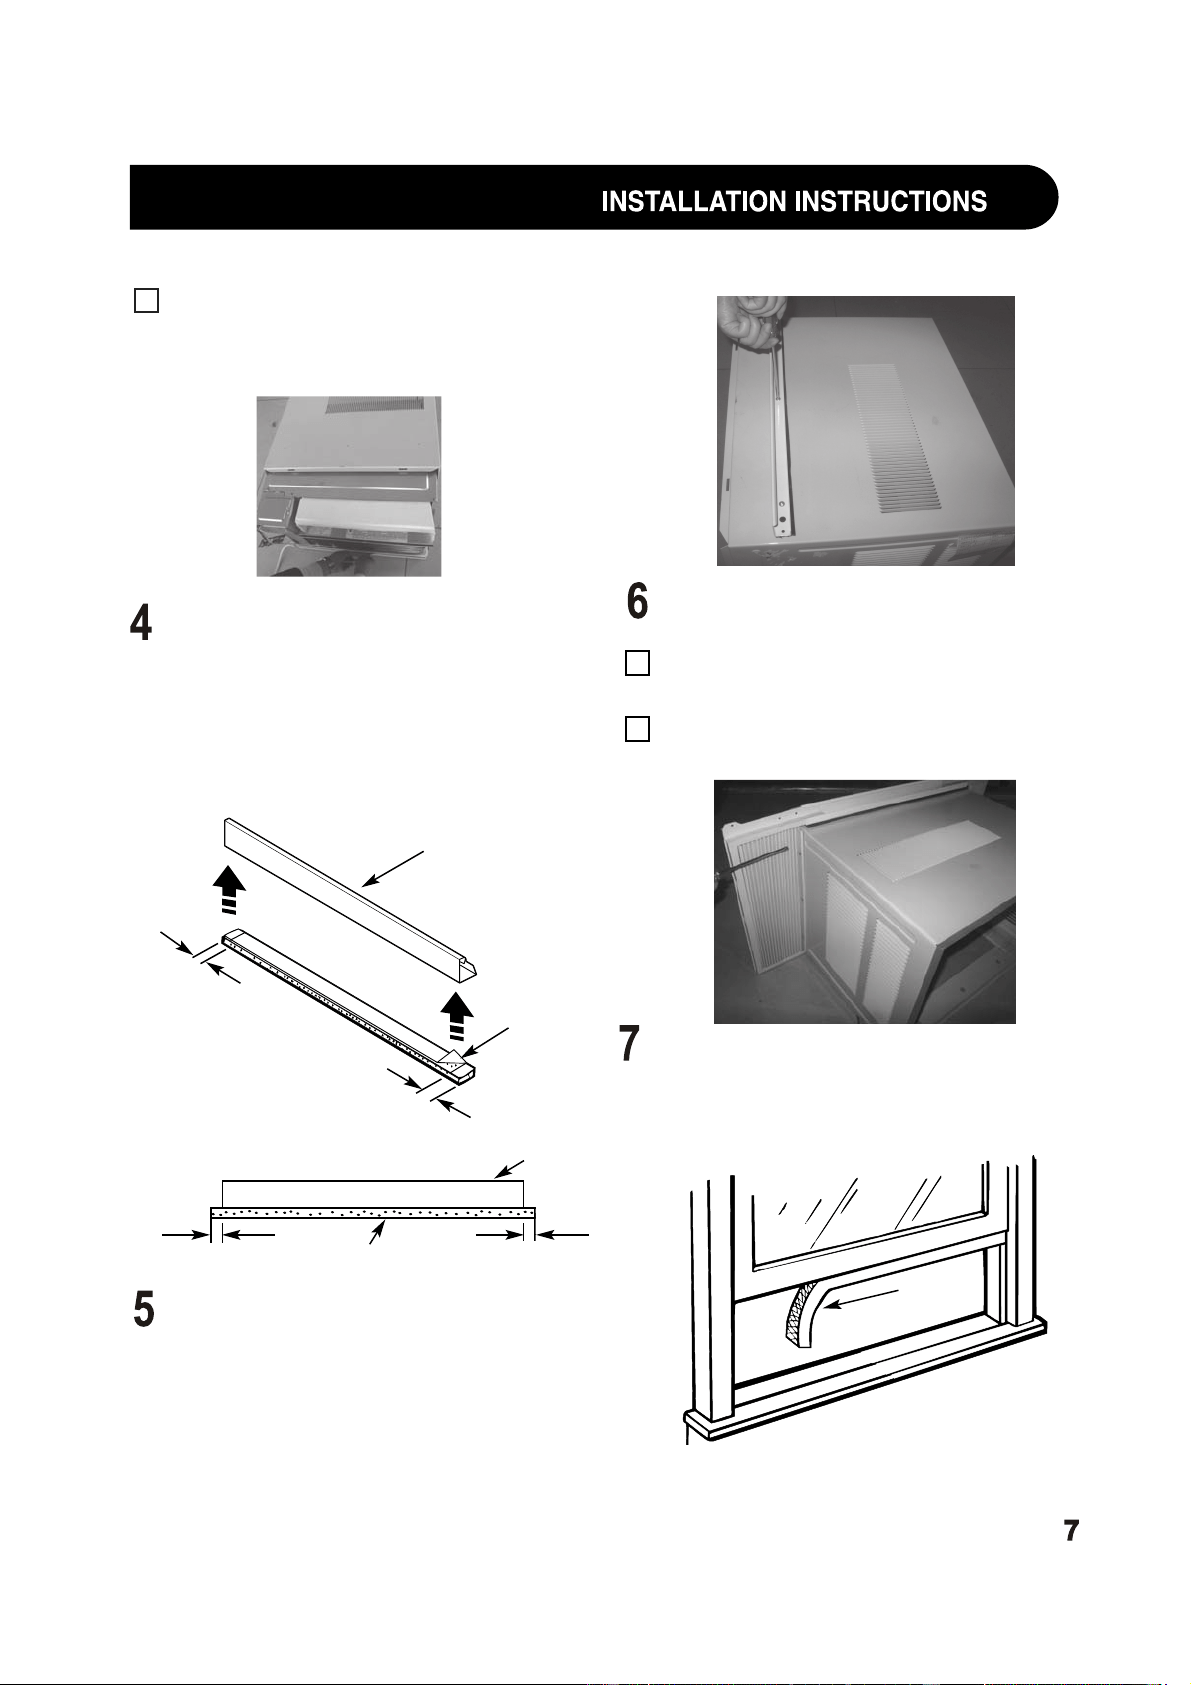
ATTACH THE TOP MOUNTING
RAIL SEAL STRIP
Remove the backing from the top mounting
rail seal strip and attach the seal strip to
the bottom of the top mounting rail, along
the front edge. Allow the seal strip to
overlap 3/8″ on each end.
INSTALL THE TOP MOUNTING
RAIL ONTO THE CASE
Attach the top mounting rail onto the top
of the case with 3 Type B screws.
INSTALL THE
SIDE ACCORDION PANELS
Slide the left and right accordion panels
into the top and bottom mounting rails.
Attach the accordion panels to the case
using 3 Type A screws on each side.
A
B
PREPARE THE WINDOW
• Cut the window sash seal to the window
width and stick the adhesive side to the
bottom of the sash.
Window
sash seal
INSIDE
Top mounting rail
Remove
backing
from seal
strip
3/8″
3/8″
3/8″ overlap 3/8″ overlap
Top mounting rail
Seal strip
FRONT VIEW
Slide the air conditioner from the case by
gripping the base pan handle and pulling
forward while bracing the case. Do not
pull or lift on the styrofoam discharge area.
E
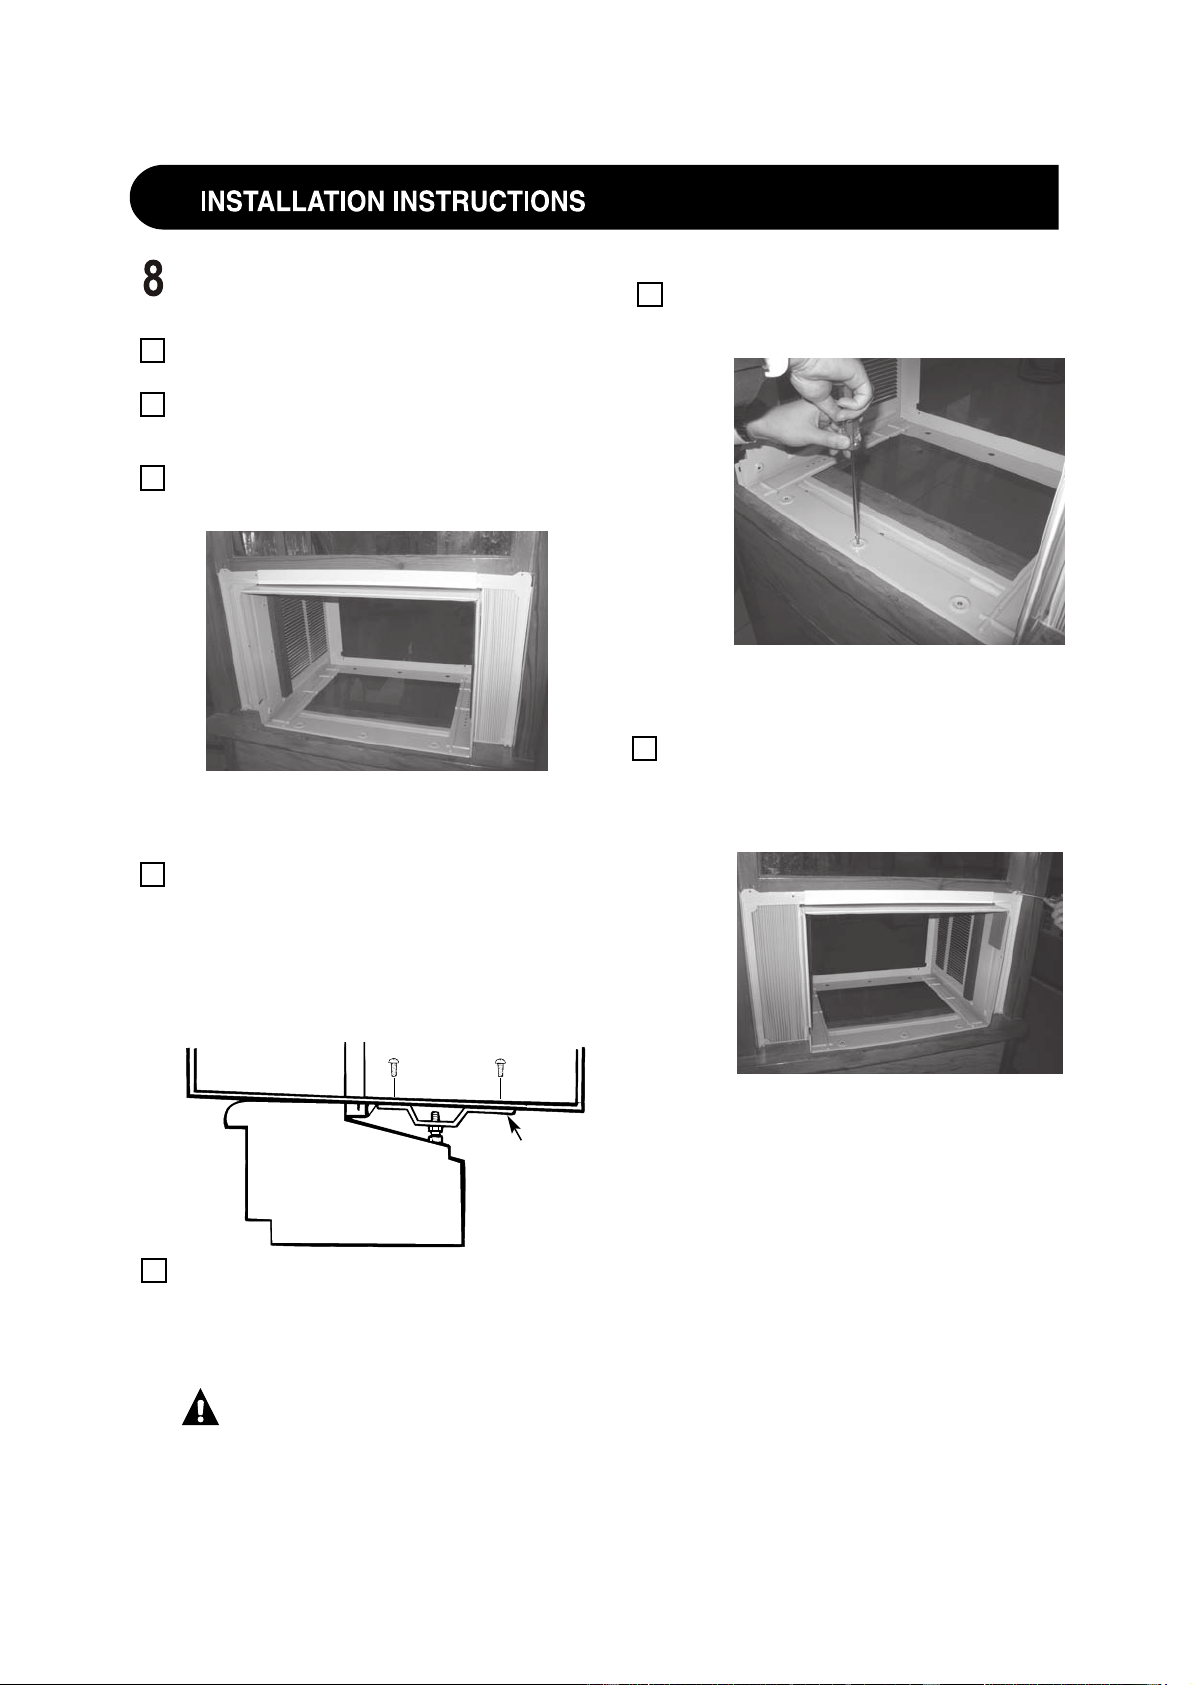
INSTALL THE CASE IN THE
WINDOW
Open the window and mark the centerline
of the window sill.
Carefully place the case on the window
stool and align the center mark on the
bottom front with the centerline of the sill.
Pull the window down behind the top
mounting rail.
NOTE: Do not shut the window so tightly that
movement of the accordion panels is
restricted.
Select the position that will place the sill
supports near the outermost point on the
sill. Place the short side of the sill supports,
on the case bottom, toward the window.
Attach the sill supports to the case track
hole in relation to the selected position
using 2 Type B screws in each support.
Adjust the bolt and the nut in each
support so that the case is installed with a
slight tilt to the outside. Use a level; about
1/2 bubble will be the correct case slant to
the outside.
CAUTION: If the sill support
bolts do not contact the window sill,
or if you have a window without a sill,
you must order accessory kit RAK87 to
properly install this air conditioner.
INSTALL THE CASE IN THE
WINDOW (CONT.)
Secure the case to the window sill by
using 3 Type D screws.
Pull the accordion panels to each window
sash track. Attach them on each side to the
window sash and the window sill using
4 Type C screws.
A
B
C
D
E
Long side
of sill
supports
OUTSIDE
Secure the case to the window sill by
using 3 Type D screws.
Pull the accordion panels to each window
sash track. Attach them on each side to the
window sash and the window sill using
4 Type C screws.
F
G
8
Screws
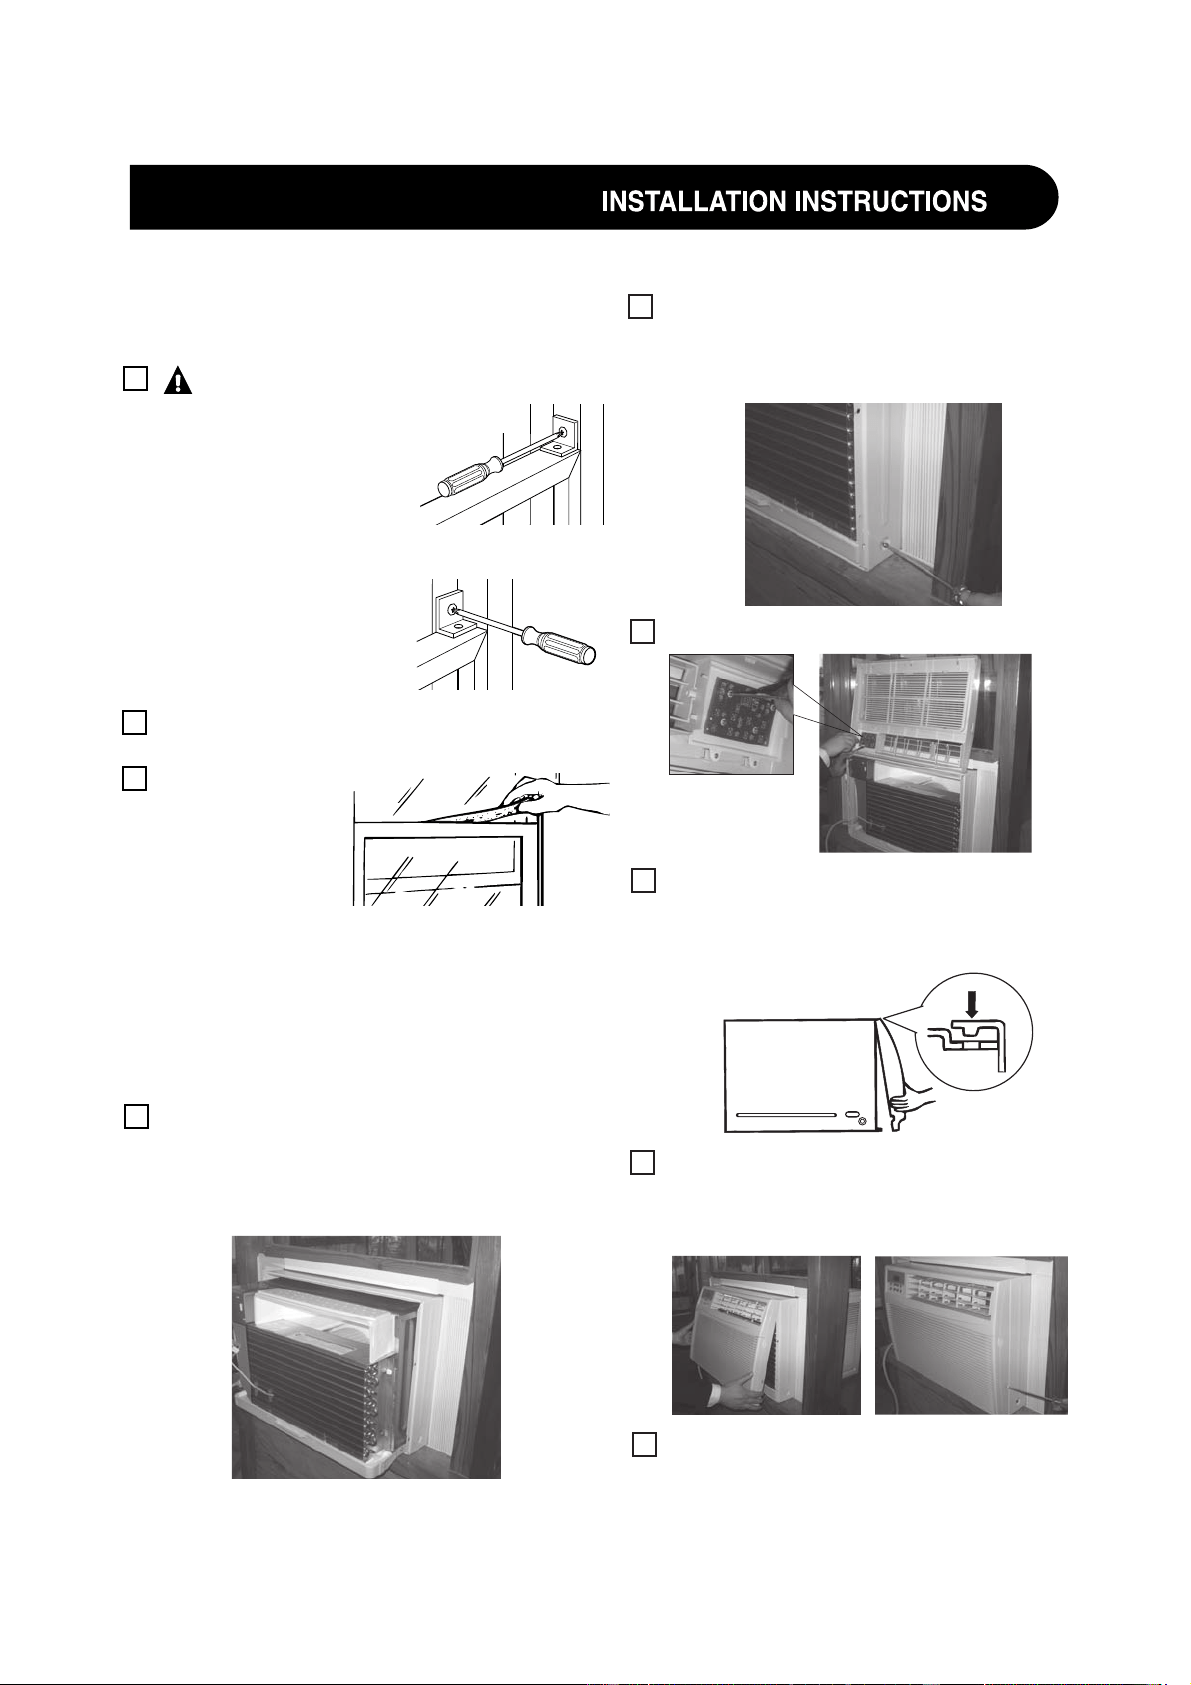
Install control panel back to the front panel.
C
Replace the 2 ground screws removed
earlier, one on each side of the case.
IMPORTANT: The ground screws must
be reinstalled to ensure a proper ground.
Attach the front grille to the case by
inserting the
tabs on the grille into the
slots on the front
top of the case. Push
the grille in.
Secure the front grille to the case by
replacing the
2 screws removed earlier.
Press on the top of
the grille to help with
side screw installation.
Connect power.
B
D
F
9
E
INSTALL THE AIR CONDITIONER
IN THE CASE
Slide the air conditioner into the case by
the base pan. Do not push on the controls,
styrofoam air discharge housing or the
finned coils. Make sure the air conditioner
is firmly seated.
A
SECURE THE CASE IN WINDOW AND
INSTALL FOAM TOP WINDOW GASKET
Attach the window
locking brackets (one
on each side) with
Type C screws.
Cut the foam top window gasket to the
window width.
Stuff the foam
between the
glass and the
window to
prevent air and
insects from
getting into the room.
NOTE: If the gasket supplied does not fit
your window, obtain appropriate material
locally to provide a proper installation seal.
A
CAUTION:
To prevent broken glass
or damage to windows,
on vinyl or other
similarly constructed
windows, attach the
support bracket to the
window side jam.
B
C
Wood
Vinyl
9
10
10
11
18
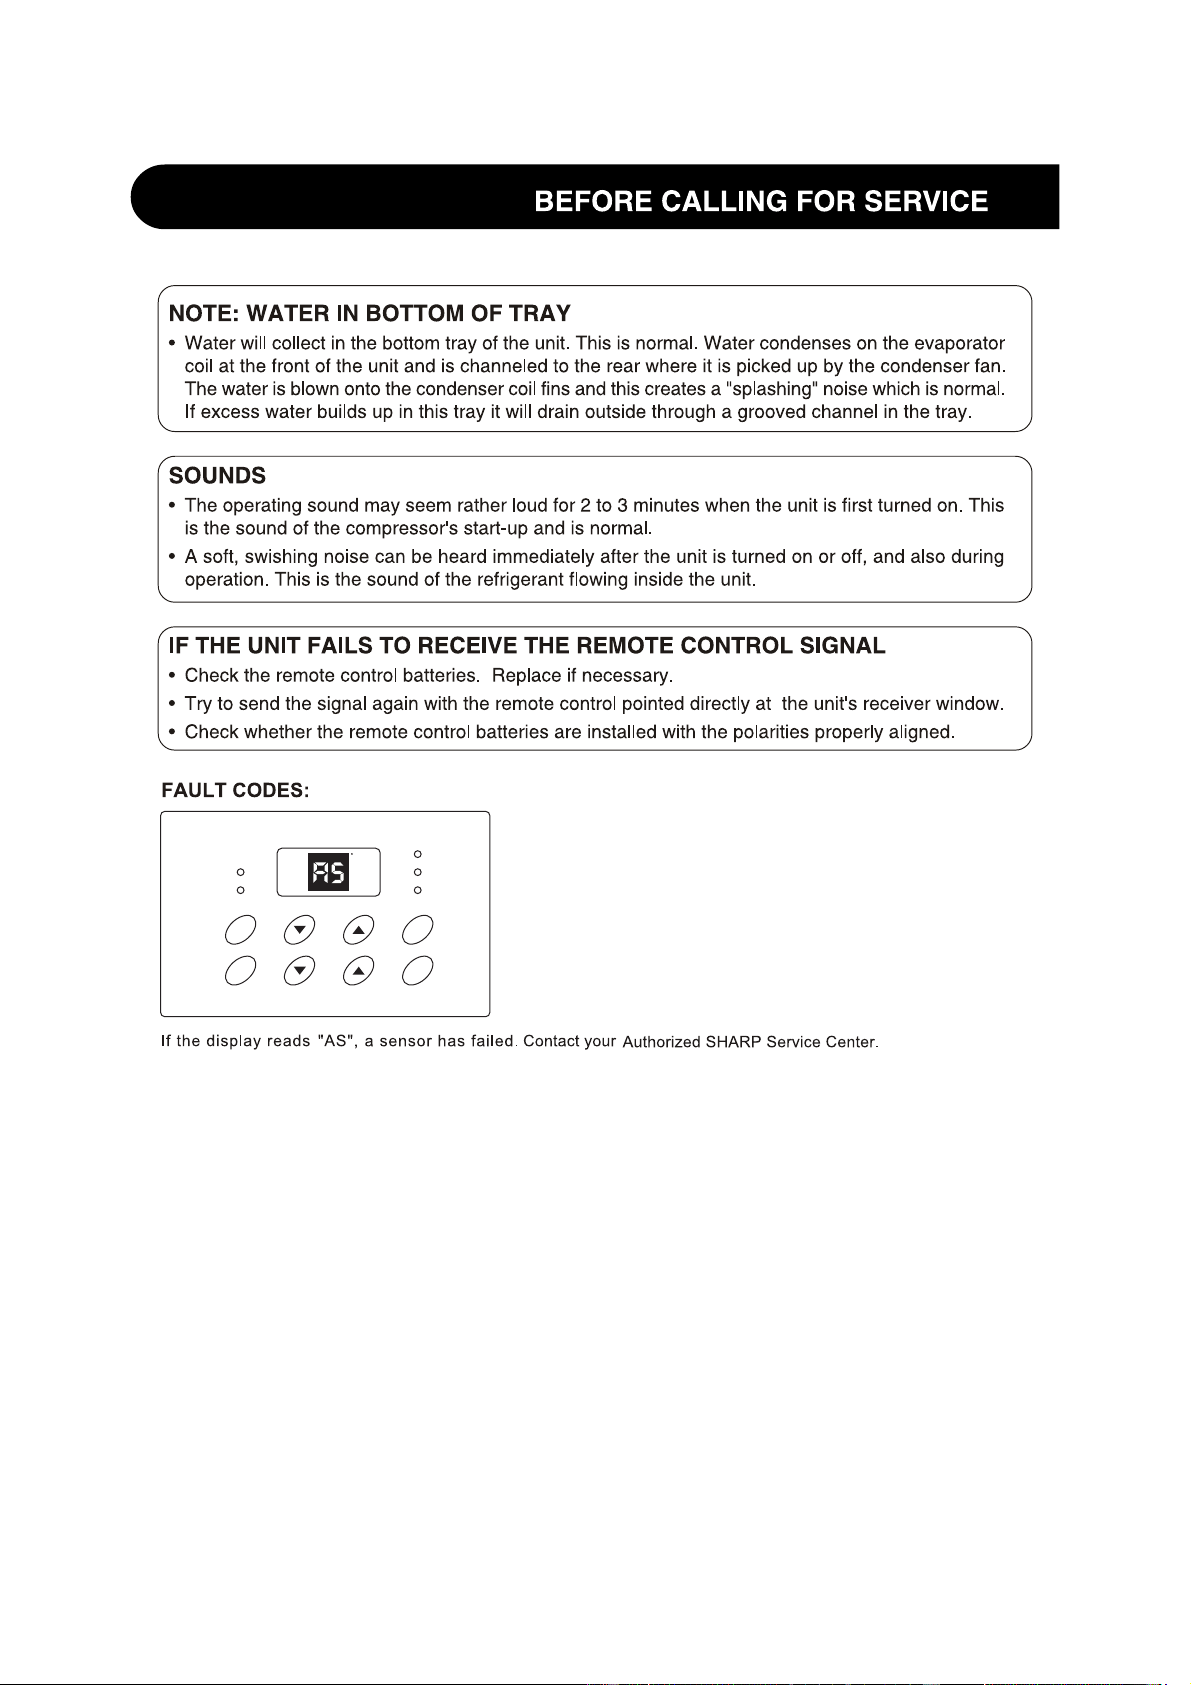
lights
INSTALL THE CASE IN THE
WINDOW (CONT.)
Secure the case to the window sill by
using 3 Type D screws.
Pull the accordion panels to each window
sash track. Attach them on each side to the
window sash and the window sill using
4 Type C screws.
12
COOL
TIMER
ENERGY
SAVER
FAN
F
Hr
COOL
AUTO
COOL
TIMER
ON/OFF
AUTO
FAN
TEMP/
MODE
POWER
ON/OFF
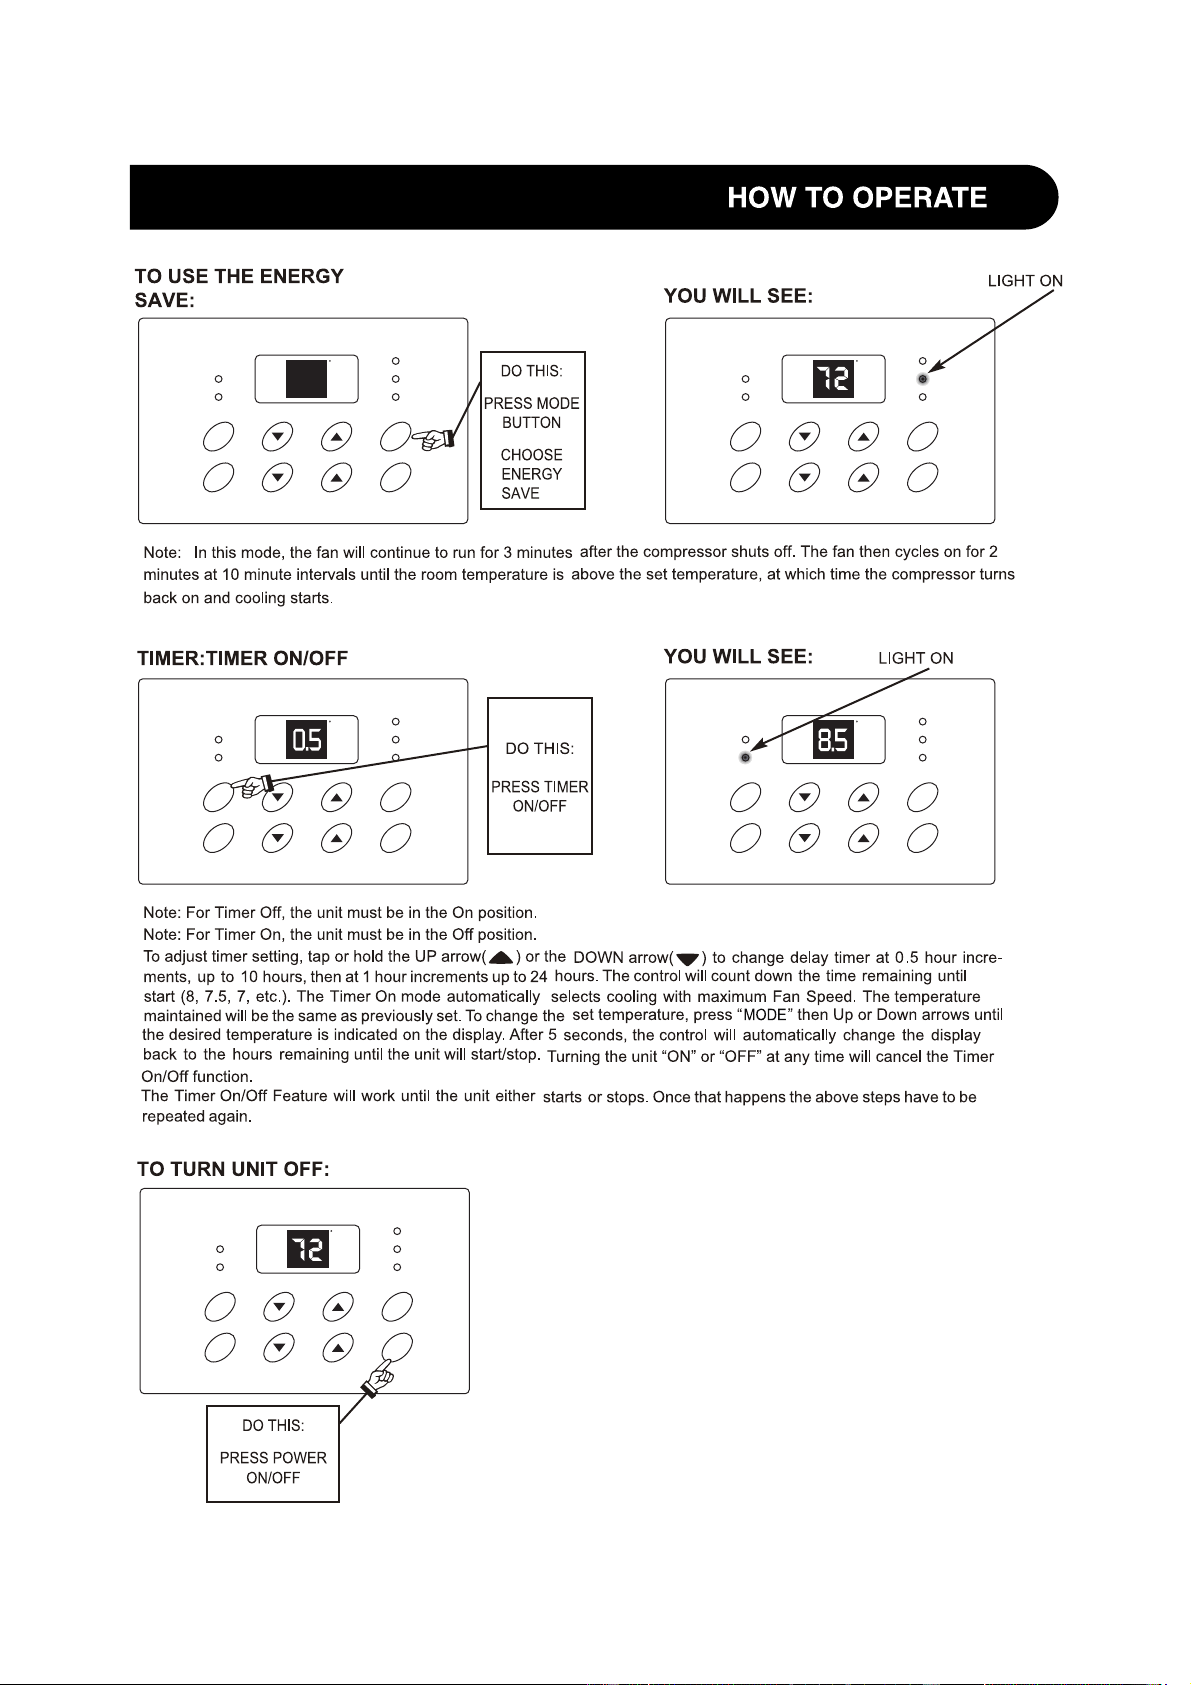
TIMER
SPEED
The display always shows the set
DISPLAYS
TEMPERATURE/TIME
FAN SPEED
ACTIVATES TIMER
ADJUSTS TEMPE-
RATURE OR TIME
AUTO COOL FEATURE
SETS MODE
TURNS UNIT
ON OR OFF
SETS FAN SPEED
temperature except when setting the
Delay timer.
COOL
TIMER
ENERGY
SAVER
FAN
F
Hr
COOL
AUTO
COOL
TIMER
ON/OFF
AUTO
FAN
TEMP/
MODE
POWER
ON/OFF
TIMER
l
o
o
C
o
t
u
A
n
a
F
e
v
a
S
y
g
r
e
n
E
Timer
▲
▲
Fan
Slower
Fan
Faster
ON/OFF
COOL
MODE
AUTO COOL
FEATURE
SETS FAN
SPEED
LOWERS
TEMPERATURE
OR TIME
TURNS UNIT
ON OR OFF
FAN
MODE
ACTIVATES
TIMER
ENERGY SAVE
MODE
RAISES
TEMPERATURE
OR TIME
SETS FAN
SPEED
COOL
TIMER
ENERGY
SAVER
FAN
F
Hr
COOL
AUTO
COOL
TIMER
ON/OFF
AUTO
FAN
TEMP/
MODE
POWER
ON/OFF
TIMER
COOL
TIMER
ENERGY
SAVER
FAN
F
Hr
COOL
AUTO
COOL
TIMER
ON/OFF
AUTO
FAN
TEMP/
MODE
POWER
ON/OFF
TIMER
COOL
TIMER
ENERGY
SAVER
FAN
F
Hr
COOL
AUTO
COOL
TIMER
ON/OFF
AUTO
FAN
TEMP/
MODE
POWER
ON/OFF
TIMER
COOL
TIMER
ENERGY
SAVER
FAN
F
Hr
COOL
AUTO
COOL
TIMER
ON/OFF
AUTO
FAN
TEMP/
MODE
POWER
ON/OFF
TIMER
13
COOL
TIMER
ENERGY
SAVER
FAN
F
Hr
COOL
AUTO
COOL
TIMER
ON/OFF
AUTO
FAN
TEMP/
MODE
POWER
ON/OFF
TIMER
COOL
TIMER
ENERGY
SAVER
FAN
F
Hr
COOL
AUTO
COOL
TIMER
ON/OFF
AUTO
FAN
TEMP/
MODE
POWER
ON/OFF
TIMER
COOL
TIMER
ENERGY
SAVER
FAN
F
Hr
COOL
AUTO
COOL
TIMER
ON/OFF
AUTO
FAN
TEMP/
MODE
POWER
ON/OFF
TIMER
COOL
TIMER
ENERGY
SAVER
FAN
F
Hr
COOL
AUTO
COOL
TIMER
ON/OFF
AUTO
FAN
TEMP/
MODE
POWER
ON/OFF
TIMER
14
COOL
TIMER
ENERGY
SAVER
FAN
F
Hr
COOL
AUTO
COOL
TIMER
ON/OFF
AUTO
FAN
TEMP/
MODE
POWER
ON/OFF
TIMER
COOL
TIMER
ENERGY
SAVER
FAN
F
Hr
COOL
AUTO
COOL
TIMER
ON/OFF
AUTO
FAN
TEMP/
MODE
POWER
ON/OFF
TIMER
15
COOL
TIMER
ENERGY
SAVER
FAN
F
Hr
COOL
AUTO
COOL
TIMER
ON/OFF
AUTO
FAN
TEMP/
MODE
POWER
ON/OFF
TIMER
COOL
TIMER
ENERGY
SAVER
FAN
F
Hr
COOL
AUTO
COOL
TIMER
ON/OFF
AUTO
FAN
TEMP/
MODE
POWER
ON/OFF
TIMER
COOL
TIMER
ENERGY
SAVER
FAN
F
Hr
COOL
AUTO
COOL
TIMER
ON/OFF
AUTO
FAN
TEMP/
MODE
POWER
ON/OFF
TIMER
COOL
TIMER
ENERGY
SAVER
FAN
F
Hr
COOL
AUTO
COOL
TIMER
ON/OFF
AUTO
FAN
TEMP/
MODE
POWER
ON/OFF
TIMER
COOL
TIMER
ENERGY
SAVER
FAN
F
Hr
COOL
AUTO
COOL
TIMER
ON/OFF
AUTO
FAN
TEMP/
MODE
POWER
ON/OFF
TIMER

16
17
Co
o
l
Auto
Fan
E
n
e
r
gy Sav
e
Timer
▲
▲
Fan
Slower
Fan
Faster
ON/OFF

18
19
20
COOL
TIMER
ENERGY
SAVER
FAN
F
Hr
COOL
AUTO
COOL
TIMER
ON/OFF
AUTO
FAN
TEMP/
MODE
POWER
ON/OFF
TIMER

66129901272
07495-1163