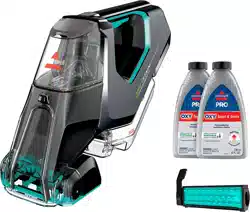
Bissell pet stain eraser powerbrush manual
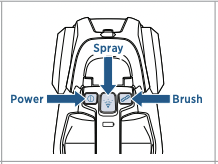
Product Overview
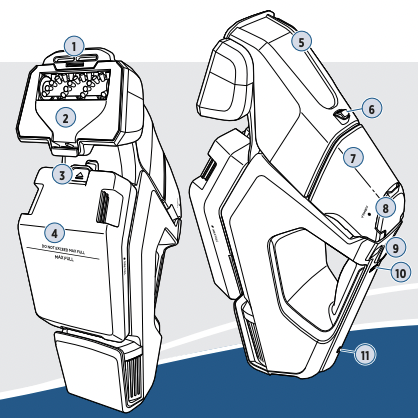
1. Suction Channel
2. Brush Roll Cover Plate
3. Dirty Water Tank Release Latch
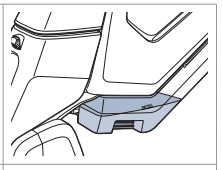
4. Dirty Water Tank
5. Removable Suction Lens
6. Spray Tip
7. Formula Tank
8. Formula Tank Cap
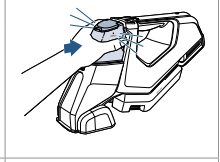
9. Control Buttons
10. Battery Status Indicator
11. Charging Port
Charging the Battery
1. Charge machine before use. Make sure the machine is OFF. Insert Charger into the Charging Port as shown.
Note: There is a door covering the Charging Port that slides out of the way once Charger is inserted.
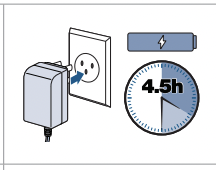
2. Plug the Charger into a wall outlet. The Battery Status Indicator lights will illuminate when charging.
Note: For maximum run time (up to 20 minutes), charge the machine for 4.5 hours prior to use.
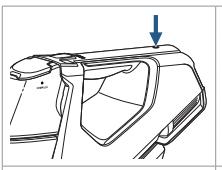
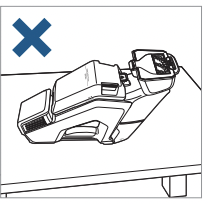
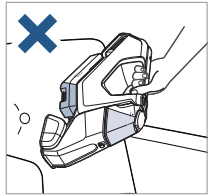
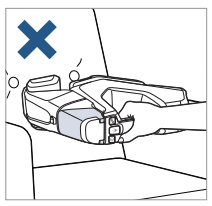
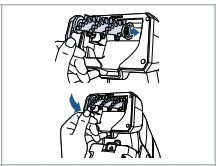
Positioning the Machine Correctly
To prevent leaking, ensure the machine is always in a horizontal or in an upright position.
Correct Positions
Incorrect Positions
Spot Cleaning Carpet & Upholstery
1. Flip the Formula Tank Cap up to open. Add formula to the formula dot. No need to add water! Click the Formula Tank Cap into place and make sure it’s secure.
Note: If desired, add 1/2 ounce of BISSELL BOOST Formula to 2X Pet Stain & Odor formula.
2. Turn machine ON by pressing the Power Button.
Note: The rotating brush automatically turns on when powering machine ON. Press the Brush Button to turn off.
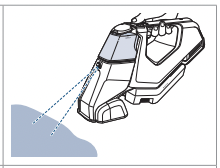
3. To remove the spot or stain, first tilt the machine down so the Spray Tip is pointing at the area. Press the Spray Button to dispense formula.

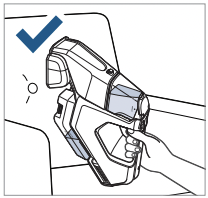
4. Scrub the area with the Rotating PowerBrush, keeping the nose of the machine flat on the ground, as shown.

5. For maximum suction, tilt the machine forward and firmly press the Suction Channel down on the cleaning surface.
6. Make sure to check the Dirty Water Tank for when it reaches the “MAX FULL” line. See next page on how to empty
 Note: The Pet Tool is an easy to clean brush for pet messes. See page 7 for steps on switching the tool.
 WARNING Keep spray away from face. Failure to do so may result in personal injury.
IMPORTANT: Check the manufacturer’s tag before cleaning upholstery. “W” or “WS” on the tag means you can use your Pet Stain Eraser™. If tag is coded with an “S” (with diagonal strike-through), or says “Dry Clean Only,” do not proceed. If manufacturer’s tag is missing or not coded, check with your furniture dealer.
Removing & Emptying the Dirty Water Tank
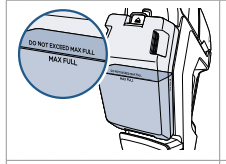
1. It is important to empty the Dirty Water Tank when it reaches the “MAX FULL” line as the machine is not intended for use above this point.
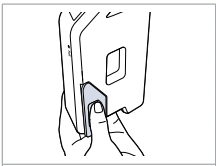
2. Ensure the machine is OFF. To remove Dirty Water Tank, sit the machine upright on a flat surface. Press up on the Dirty Water Tank Release Latch at the top and pull the tank out.
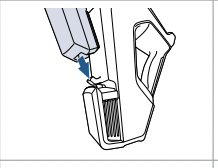
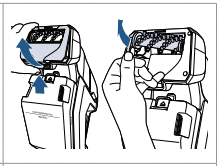
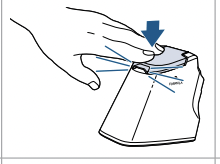
3. Pull the Dirty Water Tank plug open and empty into a sink or toilet. full MAX FULL DO NOT EXCEED MAX FULL
4. Ensure plug is secured back onto the tank by pressing firmly in the center of the plug.
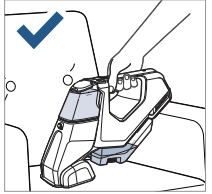
5. Return the Dirty Water Tank to the machine by aligning the bottom of the tank with the hook on the machine (as shown above).

6. Rotate the tank forward until the latch has secured it in place.
WARNING To reduce the risk of fire, electric shock or injury, turn power OFF and disconnect from charger before performing maintenance or troubleshooting.
After-Cleaning Care
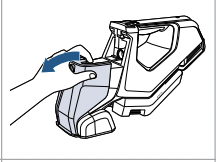
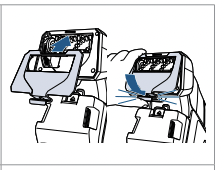
1. Remove the Formula Tank by grabbing the sides and pulling outward.
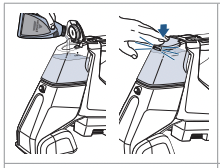
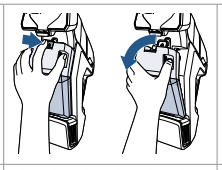
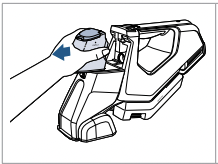
2. Release the Removable Suction Lens by raising the latch at the top and pulling outward. Note: Be sure to empty the Dirty Water Tank prior to removing the Brush Roll.
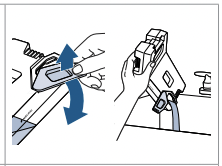
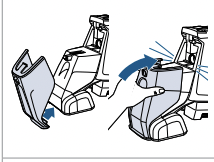
3. Sit machine upright on a flat surface. Pull the latch on the Brush Roll Cover Plate to open. Grab the brush by its handle and pull out.
Note: Pet Tool follows the same steps. MAX FULL FORMULA FORMULA
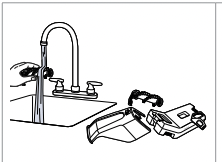
4. Rinse all components and allow to dry. See steps for “Removing & Emptying the Dirty Water Tank” on page 6.
5. Sit machine upright. Replace the Brush Roll by carefully lining up the opposite end as shown.
6. Replace Brush Roll Cover Plate by first sliding into the top and then rotating downward until “clicked” into place. full MAX FULL FORMULA MAX FULL FORMULA
7. To replace the Removable Suction Lens, attach the front lip to the front of the machine near the Brush Roll. Rotate the lens toward the machine until “clicked” into place.
8. Click the Formula Tank Cap back into place. Ensure it is secure.
9. Replace the Formula Tank back onto the machine until “clicked” into place.
NOTICE To reduce the risk of a leaking condition, do not store where freezing may occur. Damage to internal components may result.
WARNING To reduce the risk of fire, electric shock or injury, turn power OFF and disconnect from charger before performing maintenance or troubleshooting.
Storing Your Machine
Before storing your machine, ensure the Dirty Water Tank is empty. Machine should not be left on its side with water in the Dirty Water Tank. Store your machine in a protected, dry area.
Troubleshooting
Below are some of the issues you may run into. If you don’t see the issue you’re experiencing below, visit support.BISSELL.com.
Machine is not powering
Machine is not charged or needs to “wake up” before first use.
- Charge machine before use.
Machine is leaking
Formula Tank and Formula Tank Cap are not properly seated.
- Remove and replace Formula Tank and Formula Tank Cap until “clicked” into place, see page 7.
Dirty Water Tank and plug are not sealed properly.
- Remove and replace Dirty Water Tank and plug until secured into place, see page 6.
Dirty Water Tank is full.
- Empty tank. Machine should not be left on its side with water in the tank.
Machine is tilted on its side, back or pointed directly downward.
- Ensure machine is in horizontal or upright position.
Machine is not charging
Charger plug/cord not properly connected.
- Make sure charger cord is secured into back of machine and charger plug is inserted fully into a working wall outlet.
Reduced or no spray
Pump not primed.
- While the machine is turned ON, press and hold Spray Trigger for a few seconds.
Spray Tip clogged.
- Rinse Spray Tip with clean water.
Formula Tank not fully inserted or is empty.
- Ensure tank is full and securely seated by removing and then replacing, see page 7.
Machine is in vertical orientation.
- Use machine in horizontal orientation.
Reduced or no suction
Dirty Water Tank not properly installed.
- Reinstall Dirty Water Tank and confirm plug is secure, see page 6.
Removable Suction Lens not properly installed or is clogged.
- Remove, clean, and reinstall Removable Suction Lens, see page 7.
Removable Suction Lens not engaged with the carpet.
- Tilt machine forward and press down firmly on the carpet.
Brushes not rotating
Removable brush improperly installed.
- Remove and reinstall the brush, see page 7.
Brush power off.
- Press the brush button and ensure the brush LED is illuminated.
Brush chamber full of debris.
- Clear brush chamber of debris, see page 7.
Other maintenance or service not included in the manual should be performed by an authorized service representative.
WARNING To reduce the risk of fire, electric shock or injury, turn power OFF and disconnect from charger before performing maintenance or troubleshooting.