User Manual
Smart Box II
Revision: R00
(8/2016)
Trademarks
All brand and product names are trademarks or registered trademarks of their respective companies.
Disclaimer
Specifications and documents are subject to change without notice. Navman does not warrant this document
is error-free. Navman assumes no liability for damage incurred directly or indirectly from errors, omissions, or
discrepancies between the device and the documents.
Notes
Not all models are available in all regions.
Depending upon the specific model purchased, the colour and look of your device and accessories may not exactly
match the graphics shown in this document.
Regulatory information
For regulatory identification purposes, this product is assigned a model number of N467. Marking labels located on
the exterior of your device indicate the regulations that your model complies with. Please check the marking labels
on your device and refer to the corresponding statements in this section. Some notices apply to specific models
only. The user needs to switch off the device when exposed to areas with potentially explosive atmospheres such
as petrol stations, chemical storage depots and blasting operations.
WEEE
This product must not be disposed of as normal household waste, in
accordance with the EU directive for waste electrical and electronic
equipment (WEEE – 2012/19/EU). Instead, it should be disposed of
by returning it to the point of sale, or to a municipal recycling collection
point.
5 6 1 5 N 4 6 7 0 0 5 1 R 0 0
Introduction
Navman Smart Box II provides power to your Navman dash cam by connecting with the constant power of the fuse
terminal of your vehicle. It is very useful when you want to record video footage whilst parking. Smart Box II can
prevent the discharge of the vehicle battery by blocking the electric power automatically as it checks the preset
time and voltage.
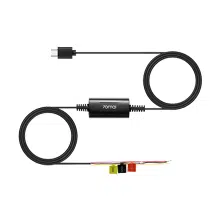
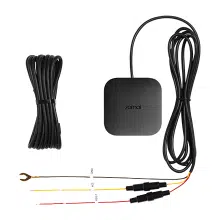
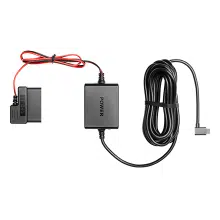
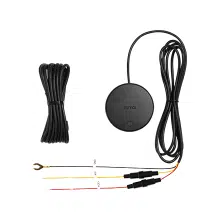
Parts and functions
1
Fuse cable
- ACC (red wire)
- B+ (yellow wire)
- GND (black wire)
2
Main unit of Smart Box II
- Time and voltage setting switches
- LED indicator
3
Mini-USB connector
Connects to the recorder.
1
2
3
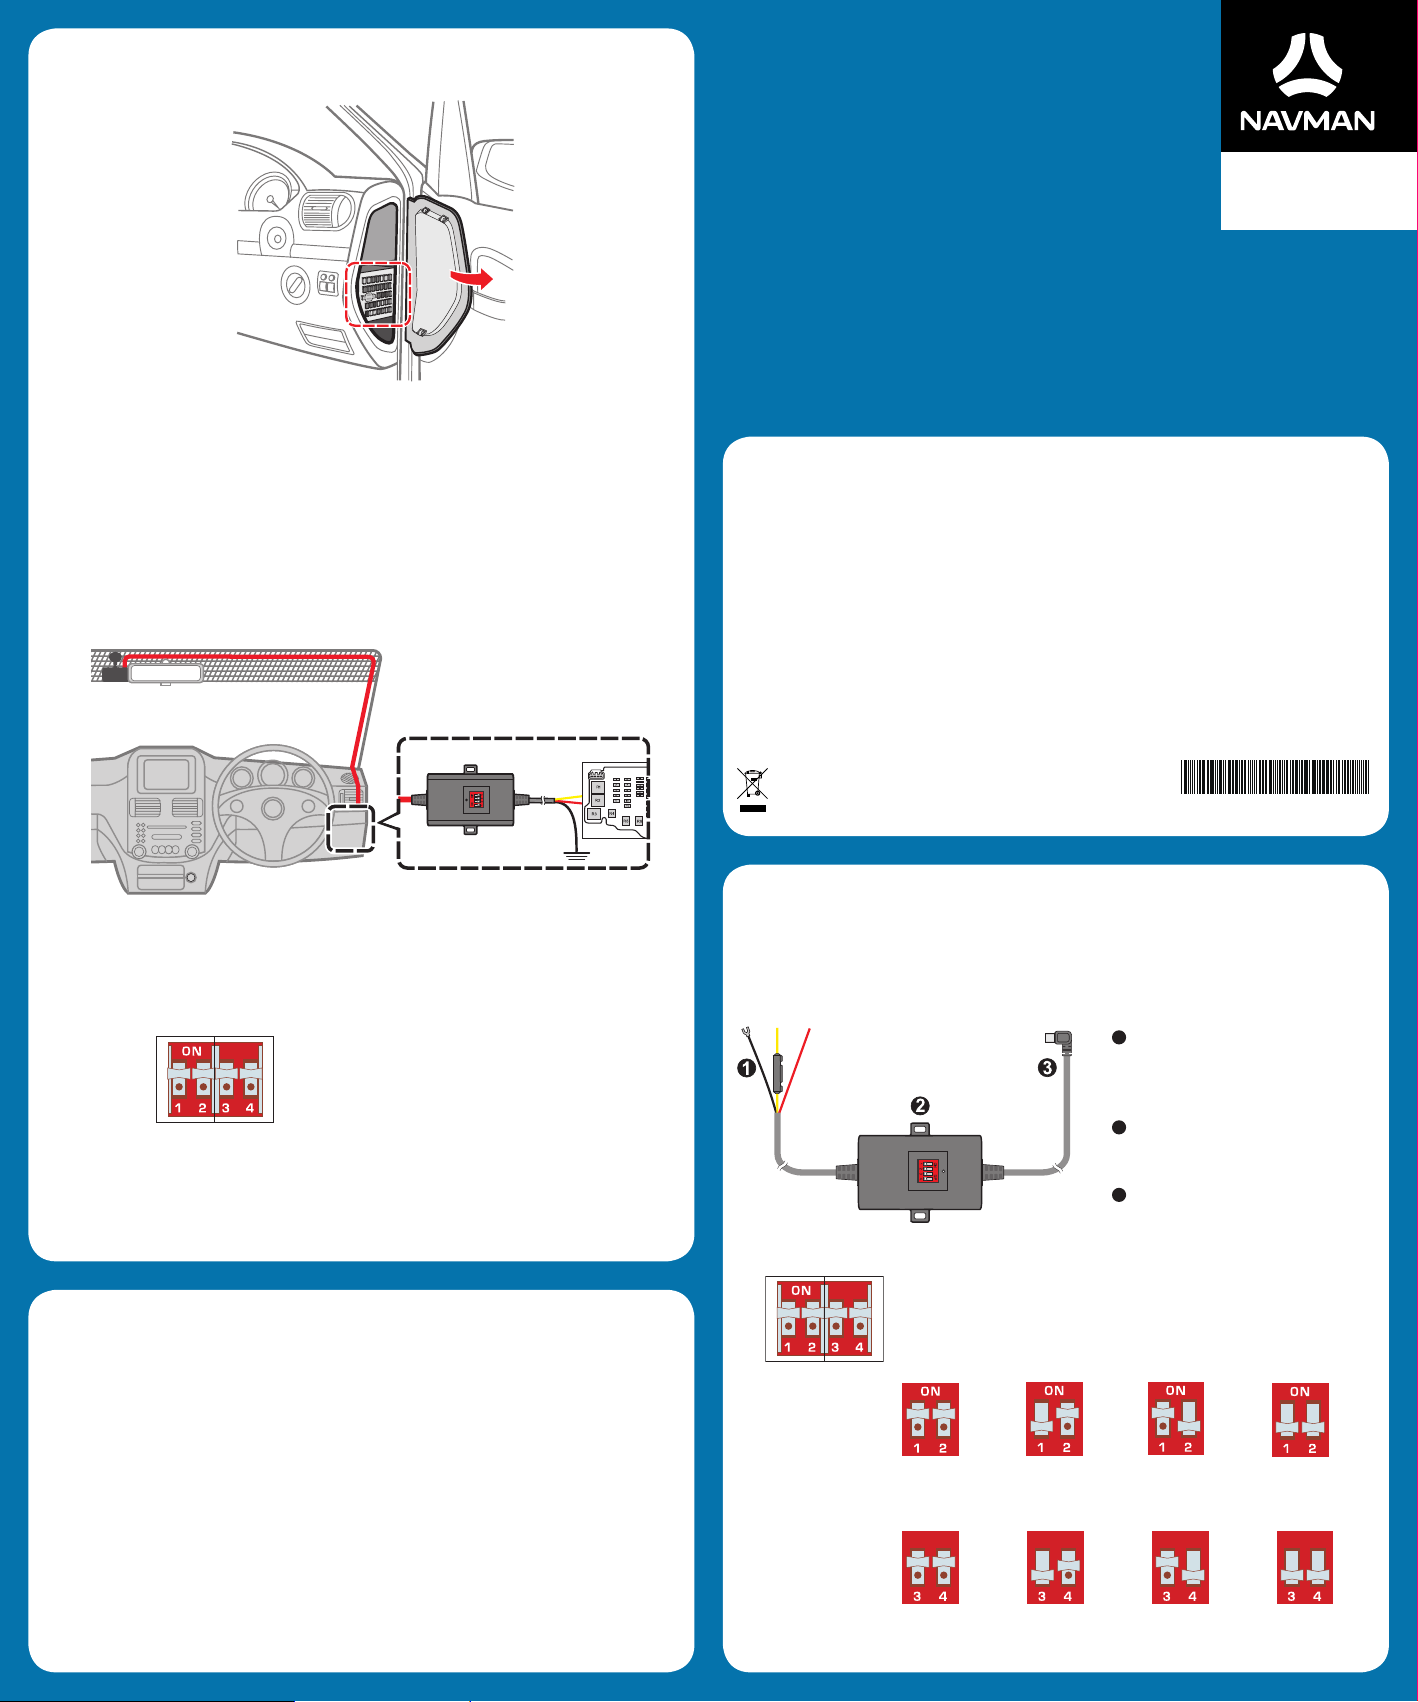
Time and voltage setting switches
Switch 1 and 2: Voltage setting switches
Switch 3 and 4: Time setting switches
1 ON / 2 ON
11.8V
23.6V
Passenger car/RV:
Truck/bus:
1 OFF / 2 ON
12.0V
24.0V
1 ON / 2 OFF
12.2V
24.4V
1 OFF / 2 OFF
11.6V
23.2V
3 ON / 4 ON
12 hours
3 OFF / 4 ON
24 hours
3 ON / 4 OFF
36 hours
3 OFF / 4 OFF
power off
Precautions and notices
Rated input voltage: DC 12 - 24V, output current: 2A maximum
WARNING! Do not use other than rated output voltage status. This product can only be used with the vehicles that
have DC 12 - 24V voltage. (Passenger car and RV: 12V; truck and bus: 24V)
Follow the installation instructions or ask a specialist technician for assistance.
There may be deviations in vehicle power voltages about vehicle battery status and usage environments.
Make sure to turn off to the dash cam if the vehicle will not be used for 2 days or more.
Never attempt to disassemble, repair or make any modifications to the product. Disassembling, modifying or
any attempt to repair could cause damage to your device, may inflict bodily harm or damage to property and
will void any warranty.
You must use the product as intended. Misuses, neglect, accident or abuse will not cover the warranty,
replacement or refund.
Do not drop the product or subject it to severe shock.
When installing, mounting and storing, please do so in a dry place.
Please check the installation and operation of the product regularly.
The manufacturer is not responsible for any damages caused by not observing the above warnings and
precautions.
Installation and setup
1. Locate and open the fuse box inside of the vehicle.
Please note that the installation illustrations are for your reference only. The placement of the fuse box may
vary depending on the vehicle model. If you encounter any problems during installation, it is recommended
that you contact a skilled installer (e.g. the service personnel of the vehicle) for assistance.
2. Check and confirm the vehicle's voltage by using the electricity tester as battery voltages varies by vehicle.
You must confirm your vehicle's voltage.
Use the electricity tester to locate the fuse from which the power is supplied even when the vehicle is turned
off, such as the emergency flashing hazard lights, interior and door lights etc. Connect the yellow wire (B+) to
the fuse.
Use the electricity tester to locate the fuse from which the power is not supplied when the vehicle is turned off,
such as the indicator lights. Connect the red wire (ACC) to the fuse.
The black wire (GND) must be connected to the metal part of the vehicle for grounding. If not grounded, this
product may not work properly. You can use a screw to attach the black wire to the vehicle (try to find a screw
hole on any metal part).
Connect the Smart Box II to the dash cam and confirm it is working properly by the LED indicator that glows in
red. Then you can arrange the cable and complete the installation.
The length of the provided cable is about 4.5 metres. You can route the cable through the top ceiling and the
A-pillar so that it does not interfere with driving. Make sure that the cable installation does not interfere with
the vehicle airbags or other safety features.
3. Set up the voltage and time by adjusting the switches.
Setting up the voltage: If the voltage of vehicle battery falls lower than the preset voltage value, the power
to the dash cam will be disconnected automatically.
Setting up the time: If the time passes the preset time (by checking the time after vehicle ignition is turned
off), the power to the dash cam will be disconnected automatically.

2
1-Year Limited Warranty
1. DEFINED TERMS.
In this document:
(a) "Australian Consumer Law" means the Australian Consumer Law set out in Schedule 2 to the Competition and
Consumer Act 2010 (Cth).
(b) "Consumer Guarantees" means the consumer guarantees which apply to the supply of products or services
under: (A) the Australian Consumer Law, as amended from time to time, or other similar legislation of a state
or territory of Australia; and (B) the New Zealand Consumer Law or other similar legislation.
(c) "Customer" means the purchaser of a Navman product.
(d) "Navman Warranty" has the meaning given in section 2 of this document.
(e) "New Zealand Consumer Law" means the Consumer Guarantees Act 1993 and Fair Trading Act 1986, as
amended from time to time.
2. NAVMAN WARRANTY.
(a) The Navman Warranty provides benefits which are in addition to other rights and remedies the Customer
has under law. This document does not limit, restrict or exclude any rights that a person has because of the
Consumer Guarantees.
(b) In addition to any rights that a Customer or any other person has because of the Consumer Guarantees, and
subject to section 5 of this document, MiTAC Australia Pty Ltd, in Australia, and Navman Technology NZ Ltd,
in New Zealand. (both "Navman") warrants that:
(i) The hardware device ("Hardware") will be free of defects in material and workmanship and will conform
to their published specifications; and
(ii) its software products and software provided with the Hardware (collectively, "Software") will be free
from media defects and will substantially conform to the thencurrent user documentation provided with
the Software (including updates thereto), in each case for a period of one year from the date of original
purchase ("Warranty Period") (the "Navman Warranty").
(c) Where Hardware or Software is repaired or replaced under this Navman Warranty, the Navman Warranty will
apply to the repaired or replaced Hardware or Software for the longer of:
(i) 90 days from the date of return shipment of that repaired or replaced Hardware; and
(ii) the balance of the original Warranty Period applying to that Hardware or Software (or the Hardware or
Software it replaces).
(d) Customers must make their own enquiries to determine whether the Software will meet their requirements,
and except where otherwise required by the Consumer Guarantees:
(i) Navman does not warrant that the Software will meet a Customer's requirements or that its operation will
be uninterrupted, error-free or virus-free; and
(ii) Customers assume the entire risk of using the Software.
3. CUSTOMER’S REMEDY.
(a) In addition to any rights under the Consumer Guarantees, if:
(i) the Hardware or Software is defective in contravention of the Navman Warranty or otherwise fails to
conform to the requirements of the Navman Warranty; and
(ii) on or before the last day of the Warranty Period, the Customer sends the affected product to Navman (and
retains proof of shipping),
Navman will (at Navman's option) repair or replace the affected product. This is a Customer's sole remedy for
contravention of the Navman Warranty, although you may have other rights or remedies under applicable
laws (including the Consumer Guarantees).
(b) You will be required to show proof of purchase when you return a product to Navman for repair or
replacement under the Navman Warranty. A complete and legible copy of the original sales receipt will be
required. Any repairs undertaken by a service centre which is not an Authorised Navman Service Centre will
void this warranty.
(c) Except to the extent that the Consumer Guarantees require otherwise:
(i) Navman may refuse to repair or replace products under the Navman Warranty if: (A) the sales receipt is
not provided; (B) the information contained in it is incomplete or illegible; or (C) the serial number of the
product has been altered or removed; and
(ii) Navman will not be responsible for any losses or damage to products incurred while the product is being
shipped by a Customer to Navman. Insurance is recommended.
(d) Navman recommends the use of a trackable shipping method when returning a product under the Navman
Warranty and that you retain proof of the date you ship, post or otherwise return a product under the Navman
Warranty.
(e) The repair or replacement of products may result in loss of data. Customers are responsible for creating back-
up copies of all of their data stored on a product before returning that product to Navman. If a Customer fails
to create adequate back-ups of their data, Navman will not be responsible for the loss of that data caused by
the repair, attempted repair or replacement of any product.
4. EXCLUSION OF IMPLIED WARRANTIES.
(a) Except for the Consumer Guarantees, Navman excludes all other guarantees, warranties and conditions
implied by statute, at law, in fact or otherwise (including, if applicable, implied warranties under Article 35 of
the United Nations Convention on Contracts for the International Sale of Goods).
(b) This section 4 does not exclude, restrict or modify the application of any condition, warranty, guarantee, right
or remedy conferred by or implied under any provision of any statute where to do so would:
(i) contravene that statute; or
(ii) cause any part of this section 4 to be void.
5. EXCLUSIONS.
(a) This section 5 sets out exclusions and limitations which apply to the Navman Warranty. It does not affect the
rights of any person under the Consumer Guarantees. The Navman Warranty does not cover:
(i) periodic maintenance and repair or replacement of parts due to normal wear and tear;
(ii) batteries;
(iii) finishes;
(iv) installations or defects resulting from installation;
(v) any damage caused by: (A) shipping, misuse, abuse, negligence, tampering, moisture, liquids, proximity
or exposure to heat, or improper use; (B) disasters such as fire, flood, wind, and lightning; or (C)
unauthorised attachments or modification;
(vi) service performed or attempted by anyone other than an authorised Navman Service Centre;
(vii) any products, components or parts not manufactured by Navman; or
(b) any claim in relation to infringement of any patent, trademark, copyright or other proprietary right, including
trade secrets. If the product was purchased for the purposes of a business, the provisions of the New Zealand
Consumer Law do not apply (in accordance with section 43(2) of the Consumer Guarantees Act 1993).
(c) The opening, dismantling or repair of this product by anyone other than an authorised Navman Service
Centre will void the Navman Warranty.
6. EXCLUSION OF INCIDENTAL OR CONSEQUENTIAL DAMAGES.
Except where otherwise required by the Consumer Guarantees, Navman shall not be liable to any Customer or
any other person for any indirect, incidental or consequential damages whatsoever, including but not limited
to lost profits, damages arising from a delay or loss of use, or out of the breach of the Navman Warranty or any
implied warranty, even if caused by the negligence or another fault of Navman or out of the negligent usage of a
product. In no event will Navman be held responsible for such damages (except where otherwise required by the
Consumer Guarantees).
7. APPLICABLE CONSUMER LAW
Our goods come with guarantees that cannot be excluded under the Australian Consumer Law and the New
Zealand Consumer Law (as applicable). You are entitled to a replacement or refund for a major failure and for
compensation for any other reasonably foreseeable loss or damage. You are also entitled to have the goods
repaired or replaced if the goods fail to be of acceptable quality and the failure does not amount to a major failure.
8. COMPLETE AGREEMENT.
This document is the complete, final and exclusive agreement setting out the terms of the Navman Warranty
between Navman and the Customer with respect to the quality and performance of the Customer's Navman
products. It does not affect the rights of any person under the Consumer Guarantees (other than as specified in
section 5(b) of this document).
9. GOVERNING LAW.
This document is governed by the laws of New South Wales (except where a Customer ordinarily resides in New
Zealand, in which case this document is governed by the laws of New Zealand), in each case without reference
to that jurisdiction's conflict of law provisions or the U.N. Convention on Contracts for the International Sale of
Goods, and shall benefit Navman, its successors and assigns. This warranty does not affect a person's statutory
rights under applicable laws in force in their jurisdiction, or rights against the dealer or reseller arising from their
sales/purchase contract.
10. NAVMAN'S CONTACT DETAILS. To obtain warranty service directly from Navman:
1. Contact Navman to obtain a Return Materials Authorization number. You can reach Navman using the Contact
Details outlined at 3 below or through your authorized Navman dealer.
2. Pack the product, a copy of your dated purchase receipt, your address and telephone number, and any other
information Navman requests as part of the return authorization process (such as any return authorization
form you receive) in sturdy packing material.
3. Ship the product and the other required items to Navman (Attention: Warranty Manager) at the address
specified in the Contact Details below, on or up to the end of the Warranty Period. You should retain proof of
shipping to evidence the date of shipment.
Contact Details:
In Australia:
MiTAC Australia Pty Ltd
1300 NAVMAN
(1300 628 626)
www.navmansupport.com.au
In New Zealand:
Navman Technology NZ Ltd
0800 GO NAVM
(0800 466 286)
www.navmansupport.co.nz
Contact address for returned products:
In Australia:
MiTAC Australia Pty Ltd
(Navman repairs)
Unit 5, 43-51 College Street
Gladesville NSW
2111
In New Zealand:
Service Plus (Navman repair)
690 Great South Road
Penrose
Auckland 1061
When returning products directly to Navman you must set out:
Sender's name:
............................................................................................
Sender's address:
............................................................................................
Sender's phone:
............................................................................................
Sender's email:
............................................................................................
RMA number (compulsory - please call the support number above for your RMA number)
If you claim under your warranty by returning the product directly to Navman, you must pay for shipping and
any insurance to get the product to Navman at the applicable address. Except where otherwise provided by
Consumer Guarantees (as defined below), you assume all risk of loss or damage to the product until it arrives at
Navman's facility. Navman will pay for ground shipping of the new or repaired product back to you at an address
in the applicable country or region and assume all risk of loss or damage to the product until it arrives at the
address you specify. You must request, and pay for, any different shipping method. Except where otherwise
required by Consumer Guarantees (as defined below), if Navman reasonably determines that the product has not
failed to meet the standards of the warranty, you will be liable for the cost of return shipment to you, Navman may
require payment of such costs before returning the product to you, and the risk of loss or damage will remain with
you notwithstanding Navman's possession of the product. The Warranty Period will stop running on the day you
send the product to Navman. The remainder of the Warranty Period will begin to run again when the repaired or
replacement product arrives at the address you specify.