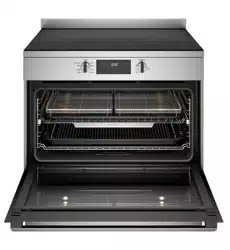
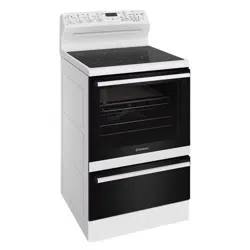
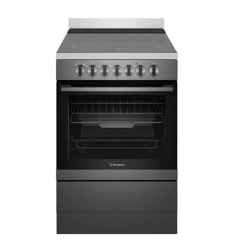
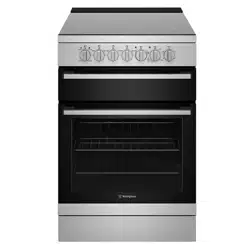
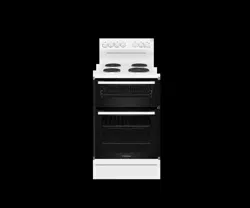
Freestanding cooker with electric ceramic hob and multi-function electric oven
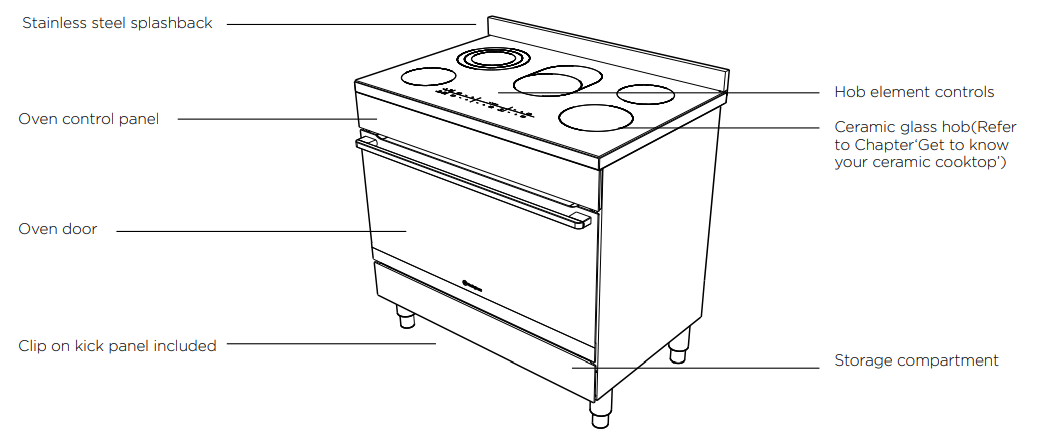
Control Panel
Testing the operation of the gas cooker
Checking gas supply
1. Check the manometer zero point is correct.
2. Connect the manometer to the cooker pressure test point. This is located on the regulator or LPG inlet fitting.
3. Turn on the gas supply and the electricity and try to ignite the gas.
NOTE: It will take additional time to light the gas for the first time as air needs to be purged from the pipes.
4. Check the operating pressure for the particular gas type.
Checking the function of the regulator
With the appliance operating check the outlet pressure:
when all burners of the appliance are operating at maximum,
when the smallest burner of the appliance is operating at minimum.
Under these conditions the outlet pressure should not vary from the nominal outlet pressure by more than ±20% of the nominal outlet pressure (ie ±0.20kPa for Natural Gas).
If the regulator appears to not be performing satisfactorily then check the following points.
1. If the outlet pressure is consistently too low then the inlet pressure may be too low and adjustment of an upstream regulator may be needed, or an upstream regulator or valve with insufficient flow capacity may be present in the gas supply line. If this is suspected then it may be necessary to repeat the checks whilst measuring both the inlet and outlet pressure to determine if the inlet pressure is in the range 1.13 – 5kPa.
2. Check that the regulator has been fitted to the gas supply line in the correct orientation, the arrow on the base of the body indicates the direction of gas flow.
Once these checks have been completed, if the regulator still fails to perform in a satisfactory manner it should be replaced.
Testing the cooker features
Observe the flame appearance on each burner. If it is much smaller or larger than expected, then the injector size needs checking.
NOTE: When flame is unsatisfactory, then refer to the Electrolux Technical Publications and correct the fault, if possible.
When maximum flame appearance is correct, then check the turn-down setting on each burner. If the settings appear to be incorrect, proceed as follows:
1. Adjust the bypass screw mounted on the body of each hotplate control cock. This is accessible when the control knob and the control panel are removed.
2. Check the ignition on all burners both separately and in combination.
3. Check the operation of the electrical components, if applicable.
4. If you are satisfied that the cooker is operating correctly, then turn it off and show the customer how to use it. Make sure you ask the customer to operate the clock and controls.
NOTE: If the cooker cannot be adjusted to perform correctly, then inform the customer of the problem and put a warning notice on the cooker. If the problem is dangerous, then disconnect the cooker. If there is a fault, then the customer should be advised to contact the manufacturer’s local service organisation or the retailer.
BEFORE OPERATING YOUR APPLIANCE FOR THE FIRST TIME
Preparing your appliance for the first time
Please remove all internal boxes and bags from the oven before operation.
Please wipe out the oven interior prior to operation with warm soapy water and polish dry with a soft clean cloth. Do not close the oven door until the oven is completely dry.
New appliances can have an odour during first operation. It is recommended to ‘run in’ your oven before you cook for the first time. Run the oven at 180°C for 2 hours and ensure that the room is well ventilated.
DO NOT line the oven with foil, it will damage the enamel.
Prior to installing accessories, remove all packaging and remove plastic film from external panels.
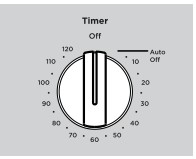
Auto Off timer
If your appliance is fitted with a mechanical “Auto Off” timer, make sure it is set to “Off” marker for manual operation.
Setting the time
If you have purchased a model fitted with an electronic or programmable timer, you must set the time of day before you can operate your appliance.
After electrically connecting the appliance, you must set the time of the day before you can operate your oven.
Touch control electronic clock model (WFE915SD, WFE946SD and WFE916DSD)
After the appliance has been electrically connected “12.00” will be displayed and the “clock” indicator will flash.
To set the time of day, press + or - . 5 seconds after the last change, the “clock” indicator will disappear, confirming the time has been set.
NOTE: The clock has a 24-hour display.
Electronic controller WFEP917DSD
When power is supplied to the oven the clock icon will be displayed. Along with the clock symbol the “12” will be flashing. This indicates that the ‘hour’ portion of the time is ready to be changed.
Toggle the temp selector - or + , then touch when the correct hour is displayed.
The minutes will then flash and can be set in the same manner as above. 5 seconds after the last change, the clock display will stop flashing, confirming that the time has been set.
NOTE: The clock has a 24-hour display
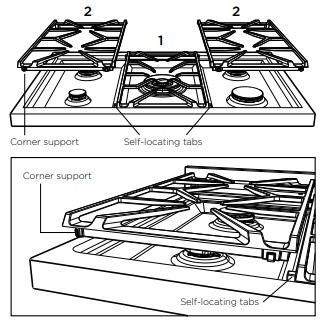
INSTALLING BURNERS AND TRIVETS
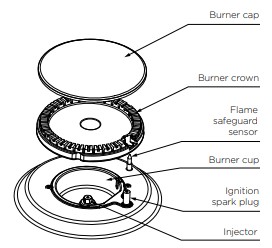
Installing burners
The burner crown must be fitted correctly into the burner cup or damage will occur during operation.
To do this, ensure that the 2 ribs on either side of the spark plug hole are positioned into the 2 slots on the burner cup.
The burner cap and burner crown must be clean and located correctly for the burner to light.
NOTE: When the burner is correctly fitted it will sit level on the hob.
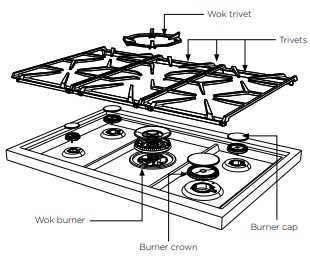
Installing trivets
The rubber feet on the trivets locate into the contours of the hob.
Take care when placing the trivets as dropping them may damage the hob or trivet.
The wok trivet sits on top of the trivet above the wok burner (WFE916DSD & WFEP917DSD only).
Trivet installation sequence
Install the middle trivet first by aligning the trivet with the wok burner and gently placing the trivet on hob.
The middle trivet is designed to guide the location of the side trivets. Gently place the side trivets in the orientation shown.
Flame safeguard
Models with flame safeguard require the knob to continue to be depressed after flame is established for approximately 5 seconds. If the flame goes out when the knob is released, simply depress the knob again, this time holding it down with slightly more force for the same length of time.
WARNING:
Keep hands clear of burners when lighting.
If burner does not light within 5 seconds, turn knob to ‘Off’ position, allow gas to disperse, then try lighting again.
Burners MUST be operated between ‘HIGH’ and ‘LOW’ settings only.
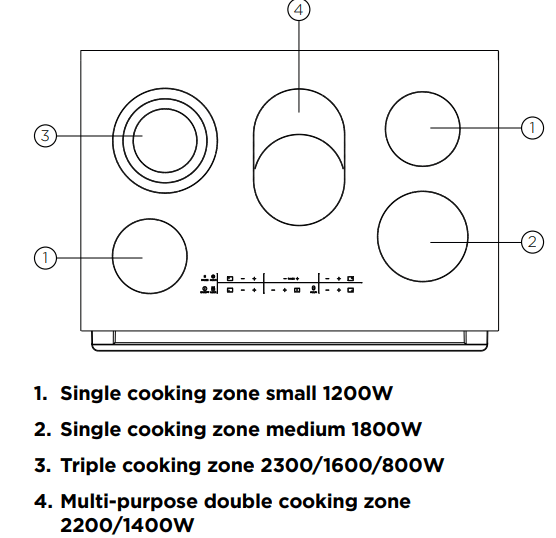
GETTING TO KNOW YOUR COOKTOP
Ceramic hotplates (WFE946SD)
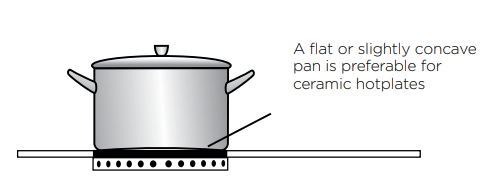
The cooktop is made from ceramic glass, a tough, durable material that withstands heating and cooling without breaking. It is strong enough to hold the heaviest utensils.
However, it must be remembered that as it is GLASS, it may break. Treat it accordingly! Should you have any questions about the glass in your new appliance, please contact the service centre by dialling 13 13 49
WARNING: If the ceramic glass is cracked, switch off the appliance to avoid the possibility of electric shock. The heating elements are concealed under the smooth glass surface which has a pattern to show the location of the elements.
Use pans with smooth, clean and dry bottoms to avoid scratching or burning residue into the glass.
Ensure the pan bottom is the same size as the working element.
We do not recommend ceramic glass pans because they do not conduct heat well.
Stainless steel or enamelled saucepans are best.
Do not use pans with copper or aluminium bottoms because they can leave traces which are difficult to remove from the glass.
If buying new utensils select enamelled steel pans with 2-3mm thick bottoms or stainless steel pans with sandwich bottoms 4-6mm thick. The pan bottom should be flat, or preferably, slightly concave at room temperature so that it lies flat on the glass surface when hot.
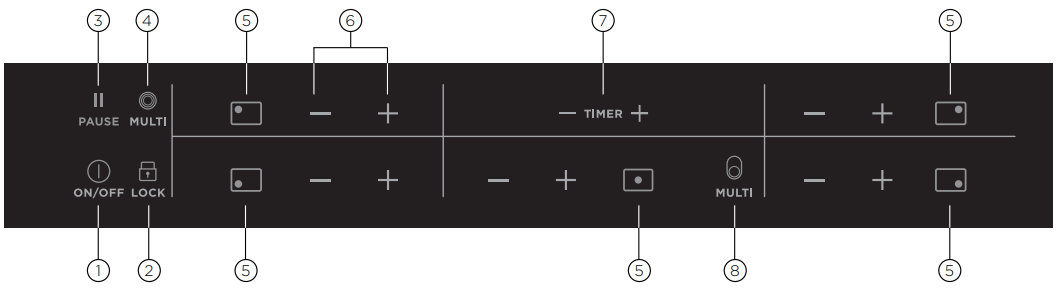
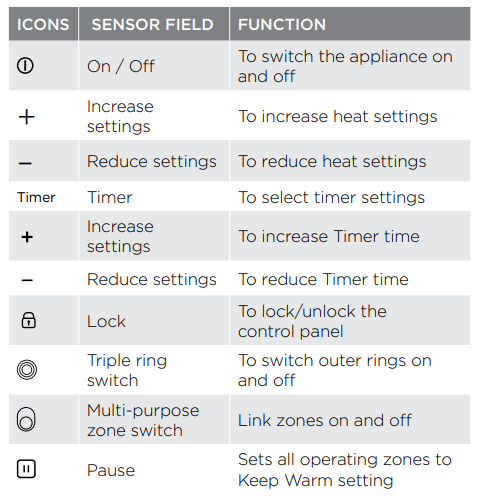
Ceramic cooktop controls
On/Off with power indicator
Lock with pilot light
Pause
Triple ring cooking zone
Zone indicator
Heat setting selection
Timer setting selection
Multipurpose cooking zone
The appliance is operated using Touch Control sensor fields. Functions are controlled by touching sensor fields and confirmed by displays and acoustic signals. Touch the sensor fields from below, without covering other sensor fields.
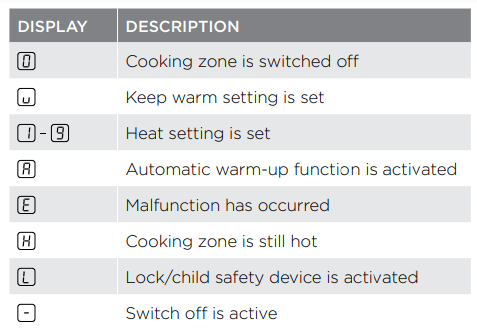
Displays
WARNING: Risk of burns from residual heat. After being switched off, the cooking zones need some time to cool down. Look at the residual heat indicator .
USING YOUR CERAMIC COOKTOP
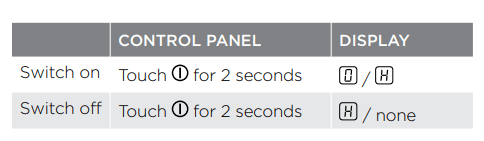
Switching the ceramic cooktop on and off
TIPS & INFORMATION: After switching on, within approx. 10 seconds a heat setting or a function must be set, otherwise the appliance automatically switches itself off.
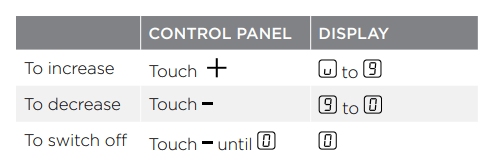
Setting the heat setting
TIPS & INFORMATION: The keep warm setting lies between and . It is used to keep food warm.
Switching the outside ring on and off
By switching the outside rings on or off, the effective heating surface can be matched to the size of the cookware.
TIPS AND INFORMATION: Before an outside ring can be switched on, the inside ring must be switched on.
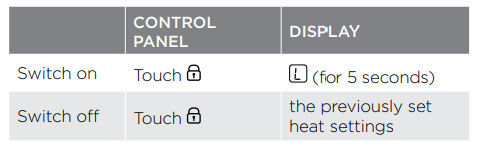
Locking/unlocking the control panel
The control panel, with the exception of the ‘On/Off’ sensor field, can be locked at any time in order to prevent the settings being changed eg. By wiping over the panel with a cloth.
TIPS AND INFORMATION: When you switch the appliance off, the locking function is automatically switched off.
Using the automatic warm-up function
All cooking zones are equipped with an automatic warm up function. When setting a heat setting using +, when starting from , the cooking zone switches to full power for a certain amount of time and then automatically switches back to the heat setting set.
TIPS & INFORMATION: If during the automatic warm up a higher heat setting is selected, e.g. from to , the automatic warm up is adjusted. If there is still residual heat on the cooking zone (display ), the automatic warm up is not performed.
The length of time that the automatic warm up function operates depends on the heat setting selected.
Using the child safety device
The child safety device prevents unintentional use of the appliance.
Switching on the child safety device
The child safety device is switched on
Switching off the child safety device
The child safety device is switched off
The child safety device can only be switched on or off, if no heat setting is set.
Overriding the child safety device
The child safety device can be switched off in this way for a single cooking session; it remains activated afterwards.
Until the appliance is next switched off, it can be used as normal. After switching off the appliance, the child safety device is active again.
TIPS AND INFORMATION: After overriding the child safety device, a heat setting or a function must be set within approx. 10 seconds, otherwise the appliance automatically switches itself off.
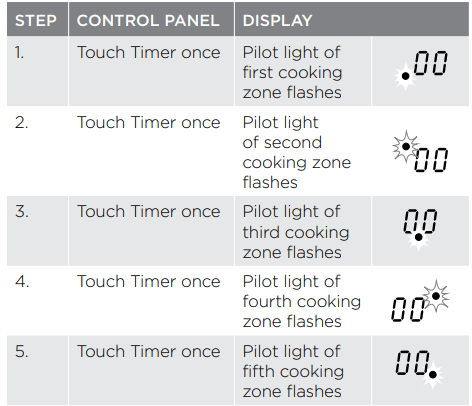
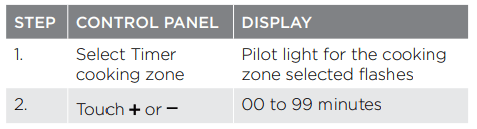
Using the timer
TIPS AND INFORMATION: If a heat setting is set on the cooking zone in addition to a countdown timer, the cooking zone is switched off after the time set has elapsed. If a cooking zone is switched off, the timer function set is also switched off
Selecting a cooking zone
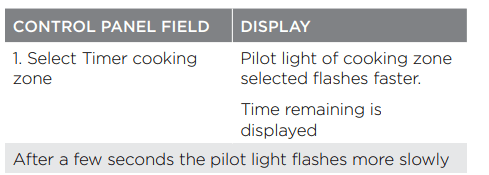
TIPS AND INFORMATION: If the pilot light is flashing more slowly, the heat setting can be set or modified. If other timer functions are set, after a few seconds the shortest remaining time of all the timer functions is displayed and the corresponding pilot light flashes.
Pause
The function sets all cooking zones that operate to the lowest heat setting . When operates, you cannot change the heat setting .
The function does not stop the timer function.
To activate this function touch The symbol comes on.
To deactivate this function touch . The heat setting that you set before comes on.
Setting the time
After a few seconds the pilot light flashes more slowly
The time is set
The time counts down
Switching off the timer function
The pilot light goes out
The timer function for the selected cooking zone is switched off
Changing the time
After a few seconds the pilot light flashes more slowly
The time is set
The time counts down
Displaying the time remaining for a cooking zone
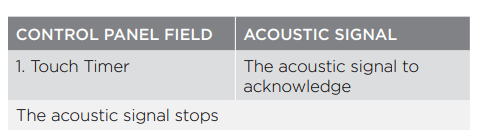
Switching off the acoustic signal
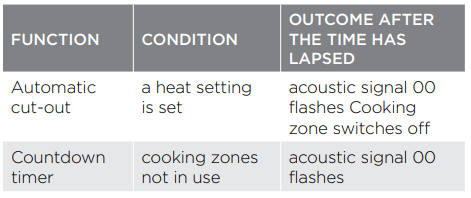
Automatic switch off
Cooking surface
If after switching on the cooking surface, a heat setting is not set for a cooking zone within approx. 10 seconds, the cooking surface automatically switches itself off.
If one or more sensor fields are covered by objects (a pan, cloths, etc.) for longer than approx. 10 seconds, a signal sounds and the cooking surface switches off automatically.
If all cooking zones are switched off, the cooking surface automatically switches itself off after approx. 10 seconds.
Control panel
When the appliance is switched off, if one or more of the sensor fields on the control panel are covered for more than 10 seconds, an acoustic signal sounds. The acoustic signal switches itself off automatically when the sensor fields are no longer covered.
Cooking zones
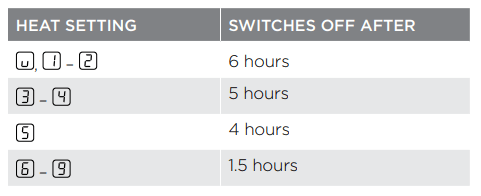
If one of the cooking zones is not switched off after a certain time, or if the heat setting is not modified, the relevant cooking zone switches off automatically and is displayed. Before being used again, the cooking zone must be set to .
USING YOUR OVEN
Understanding your oven functions
Rapid Heat
Heat comes from the element surrounding the fan as well as the smaller element above the food. This allows you to preheat your oven 30% quicker than the standard “Bake”. “Rapid Heat” is ideal for cooking frozen precooked foods such as savoury pastries, pizzas, mini meals (TV dinners), meat pies and fruit pies. Simply place the food in the oven straight from the freezer and heat - ideal for busy people
AirFry
AirFry enables advanced convection cooking function without having to turn the food, giving crispy great tasting results in a shorter time without all the oil. This is suitable for french fries, chicken wings, nuggets and similar products
Fan Bake/ Fan forced
Heat comes from the elements surrounding the fans. The fans circulate the hot air around the oven cavity so that you can put your food in different places in the oven and still cook them at the same time. You can use the “Fan Bake” function for multi-shelf cooking, reheating cooked foods, pastries and complete oven meals. It will cook at a lower temperature and be faster than baking. Please note that some variation in browning is normal.
Bake/Pizza
“Pizza” is a combination of “Base heat” and “Fan bake” and offers you the combined benefits of both functions. Heat comes from the element surrounding the fan as well as the clean heat element below the oven floor. The “Pizza” function is ideal for foods that require cooking and browning on the base. It is great for foods such as pizzas, quiches, meat pies and fruit pies. Simply place the food in the middle of the oven and set the desired temperature
Base Heat
Heat comes from the element below the floor of the oven. The Element is controlled by the thermostat and will turn on and off to maintain the set temperature. The “Base Heat” function can be used to add extra browning to the bases of pizzas, pies and pastries. Cook in the lower half of the oven when you are using only one shelf. For best results, use silver or shiny trays.
Defrost
The “Defrost” function uses low temperature air that is circulated by the fans. You can defrost (thaw) your food before you cook it. You can also use “Defrost” to raise your yeast dough and to dry fruit, vegetables and herbs.
Fan Grill
“Fan Grill” offers you the benefits of both “Bake” and traditional “Grill” functions. The grill element turns on and off to maintain the set temperature while the fans circulate the heated air. The oven door remains closed for fan grill. You can use “Fan Grill” for large cuts of meat to give you a result that is similar to “rotisserie” cooked meat. Put your food on a shelf in the second lowest shelf position. Put the grill dish on the lowest shelf position to catch any spills. When using “Fan Grill” it is not necessary to turn the food over during the cooking cycle. Set the temperature to 180°C.
Grill
The “Grill” directs radiant heat from the powerful upper element onto the food. You can use the “Grill” function for tender cuts of meat, steak, chops, sausages, fish, cheese toasties and other quick cooking foods. Grill with the oven door closed. Preheat your grill for 3 minutes to get the best results. This will help seal in the natural juices of steak, chops etc. for a better flavour. You can slide your grill dish into either of the 2 spaces within the upper pairs of support rails.
Maxi Grill
“Maxi Grill” directs radiant heat from 2 powerful upper elements onto the food. You can use the “Maxi Grill” function for tender cuts of meat, steak, chops, sausages, fish, cheese toasties and other quick cooking foods. Grill with the oven door closed. “Maxi Grill” allows you to take full advantage of the large grill dish area and will cook faster than normal “Grill”. For best results it is recommended to preheat your grill for 3 minutes. This will help seal in the natural juices of steak, chops etc. for a better flavour. You can slide your grill dish into either of the 2 spaces within the upper pairs of support rails.
Cooling/Venting fan
Your built-in appliance is fitted with a cooling fan. This prevents your kitchen cabinet from overheating and reduces the condensation inside the oven. It will operate whenever you are using your oven or grill and will blow warm air across the top of the oven door. In some appliances the cooling fan may continue to operate after the appliance is turned off. It will switch off by itself once oven is cool
Condensation
Excess condensation may fog the oven door. This may happen when you are cooking large quantities of food from a cold start. You can minimise condensation by:
Keeping the amount of water used whilst cooking to a minimum.
Making sure that the oven door is firmly closed.
Baking custard in a baking dish that is slightly smaller than the water container.
Cooking casseroles with the lid on.
NOTE: If you are using water in cooking, this will turn to steam and may condense outside your appliance. This is not a problem or fault with your oven.
Operating your oven temperature and function selectors (on selected models)
To set the oven, turn the function selector to the desired cooking function and then turn the temperature selector to the desired temperature. An indicator light above the temperature selector will come on. When the temperature is reached the heating source switches itself off and the indicator light goes out. When the oven temperature falls below the desired setting, the heating source switches on and the indicator light comes on again.
Once the food is cooked, turn the temperature selector off in an anti-clockwise direction. Do not force it right round in a clockwise direction as this will result in damage to the thermostat. Turn the multifunction selector off.
Preheating your oven with “Rapid Heat”
To preheat your oven select the “Rapid Heat” function. This function allows your oven to reach the preset temperature quicker than any other cooking function.
Turn the function selector to “Rapid Heat”.
Set the desired preheat temperature, by rotating your oven temperature selector. When the indicator light above the temperature selector goes out, the oven has reached the desired temperature. Select the oven function you require for cooking or baking and place the food in the oven.
On completion of cooking
The heat source will turn off, the timer will beep and the end time and/or cook time ‘indicators’ will flash.
Even though the heating element turns off the oven will still retain substantial heat. This will continue to cook the food until it is removed or the oven cools down. If you do not plan on being present when the oven turns off, you should take this extra heating time into account.
Turn the function and temperature controls to the off position.
Press any button to stop the timer beeping.
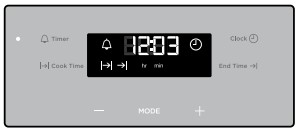
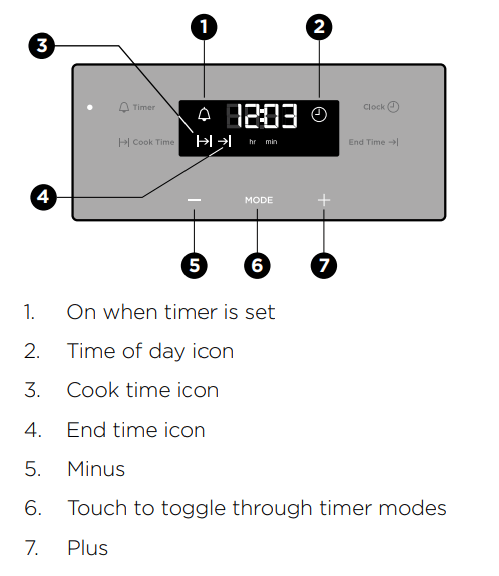
Operating the touch control clock models WFE915SD, WFE916DSD, WFE946SD
Setting the time of day
Before the appliance can be used, the time must be set.
After the appliance has been electrically connected, ‘12:00’ will be displayed and the clock icon will flash.
To set the time of day in hours and minutes touch the - or + symbols. Refer to the diagram above.
5 seconds after the last change, the clock icon will disappear, confirming the time has been set. Once the time has been entered, the clock advances minute by minute.
NOTE: The clock has a 24-hour display.
Changing the time of day (Daylight saving)
Press MODE until the clock icon begins flashing.
Press - or + to change the time. 5 seconds after the last change, the clock icon will disappear, confirming the time has been set.
Setting the timer
Touch the symbol until the timer icon begins flashing.
Set the countdown time you want by using - and +. 5 seconds after the last change the timer icon will stop flashing and the countdown will start in minutes.
To stop the beeper, touch any symbol.
Maximum countdown time is 2hrs 30mins.
Setting the cooking duration
Check the clock displays the correct time of day.
Select the desired oven function and temperature. The oven indicator light will glow and the heating source will come on.
Press MODE until the cook time icon begins flashing.
Set the cooking duration you want by using - or +. 5 seconds after the last change, the cook time icon will stop flashing, and the time of day will be displayed.
NOTE: Do not forget to add preheating time if necessary
Setting the cooking end time
Check the clock displays the correct time of day.
Select the desired oven function and temperature. The oven indicator light will glow and the heating source will come on.
Touch the MODE symbol until the end time icon begins flashing.
Enter the time of day you want the cooking to finish by using the - or + symbols. 5 seconds after the last change, the end time icon will stop flashing and the current time will be displayed.
NOTE: To stop the beeper, touch any symbol
Setting the delayed start cooking time
Program the cook time and end time as described in the relevant sections. Once both the cook time and end time have been set, the cook time and end time icons will stop flashing and the current time of day will be displayed.
To check or cancel settings
To check settings, touch the symbol until the desired setting is displayed. The relevant icon will flash
To cancel ‘delayed start’ touch the symbol until the end time icon flashes. Touch and hold the symbol until the clock no longer reverses (a beep will be heard). If temperature and function knobs are still at a setting, the oven will start once the end time icon stops flashing.
To cancel ‘auto shut off’, touch the symbol until the cook time icon flashes. Touch and hold the _ symbol until the clock no longer reverses (at 0:00 a beep will be heard). This automatically cancels ‘auto shut off’. If the temperature and function knobs are still at a setting, the oven will start once the cook time icon stops flashing. Because ‘auto off’ is cancelled the oven will continue to heat until it is manually turned off.
On completion of cooking
The oven will turn off, the timer will beep and the end time and/or cook time icons will flash.
Turn the function and temperature controls to the off position.
Press + or - or MODE to stop the timer from beeping.
Switching the clock display ON and OFF
Press together + and - for 2 seconds to switch ’off’ the display.
Press together + and - for 2 seconds to switch the clock display ’on’ again.
NOTE: If a timer mode is set, then it is not possible to switch the display off
Changing the oven temperature
Toggle the Temperature selector left (-) or right (+) as required to set the desired cooking temperature. The temperature setting changes in increments of 5°C.
The set temperature is displayed for 5 seconds from the last change.
NOTE: The temperature can be adjusted at any time. Oven temperature cannot be changed for the Defrost or Pyro function.
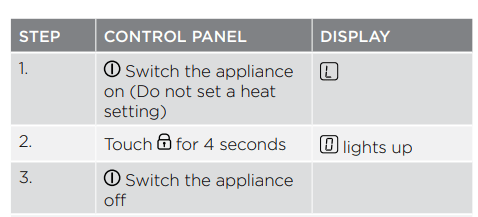
Activating the child-proof lock
When the child lock is engaged, the oven cannot be operated and the door cannot be opened.
Switch off the appliance using the function selector switch.
Touch and hold the and TEMP buttons at the same time until the word ‘SAFE’ is displayed and a double beep is sounded. The word SAFE will be replaced by a padlock symbol on the display after 5 seconds.
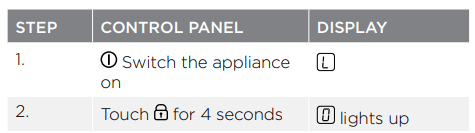
Releasing the child-proof lock
Touch and hold the and TEMP buttons at the same time until a double beep is sounded. This will commence to unlock the door and after 5 seconds the oven is ready for use.
Activating the function lock
The active function can be locked so it is not changed unintentionally.
The active function can be locked, to activate touch and TEMP together until ‘Loc’ is displayed.
If the oven is switched-off while in ‘Loc’ it will switch into Child lock mode and the display will show ‘SAFE’.
Oven can be released the same way as ‘Releasing the child proof lock’
DEMO Mode
The oven can be set to operate in a demo mode (e.g. in a retail store). In this mode the display works and functions can be set but the oven does not actually heat. When in this mode the text ‘DEMO’ will be lit. The following instructions show how to enter and exit ‘Demo’ mode.
Ensure the oven is in the off state. Toggle and hold the selector to + until a beep sounds. The ‘DEMO’ text will begin to flash.
Toggle the temperature selector to set the first digit of display to 2. Touch clock to set.
Repeat step 2 until display shows 24:68. 3 beeps sound and DEMO will be shown.
To disable DEMO mode repeat steps 1 - 3.
DEALING WITH COOKING PROBLEMS
PROBLEM
CAUSES
REMEDIES
Uneven cooking:
• Incorrect shelf position.
Select shelf that puts food in the centre of the oven.
• Oven tray too large.
Experiment with other trays or dishes.
• Trays not centralised.
Centre trays.
• Air flow in oven uneven.
Rotate food during cooking.
• Grill dish affecting thermostat.
Remove grill dish from oven on bake modes.
Baked products too brown on top:
• Oven not preheated.
Preheat the oven.
• Baking tins too large for the recipe.
Use correct size tins.
• Baking tins not evenly spaced.
Stagger baking tins at least 3cm between tins and the oven walls.
• Products not evenly sized or spaced on trays.
Make into same size and shape, & spread evenly over trays.
• Baking temperature too high.
Lower the temperature.
Baked products too brown on bottom:
• Baking tins too large for the recipe.
Use correct size tins.
• Baking tins are dark metal or glass.
Change to shiny, light tins or lower the temperature by 10°C.
• Food too low in the oven.
Cook one shelf higher.
• Oven door opened too frequently during baking.
Don't open the oven door until at least half the cooking time has passed.
• Baking temperature too high.
Lower the temperature.
• Grill dish affecting thermostat.
Remove grill dish from oven on bake modes.
Cakes have a cracked, thick crust:
• Baking temperature too high.
• Food too high in oven.
Lower the temperature.
Cook one shelf lower.
• Cake batter over mixed.
Mix just long enough to combine ingredients.
• Pan too deep.
Check size of pan and use recommended size.
• Baking pans dark.
Change to shiny pans.
Baked products are pale, flat and undercooked:
• Baking temperature too low.
• Food too low in oven.
- Raise the temperature.
- Cook one shelf higher.
• Baking time too short.
Increase cooking time.
• Incorrect tin size.
Use correct size tin.
Cakes fallen in the centre:
• Baking temperature too low.
Raise the temperature.
• Baking time too short.
Increase cooking time.
• Proportions of ingredients incorrect in the recipe.
Check recipe.
• Opening door too early in baking.
Do not open the door until the last quarter of cooking time.
Roast meat and potatoes not browning in fan oven:
• Poor hot air circulation.
Elevate food onto a rack to allow air circulation.
• Grill dish affecting thermostat.
Remove grill dish from oven on bake modes.
Juices running out of meat:
Do not pierce meat with fork, turn with tongs.
Grilled meats overcooked on outside and raw in the centre:
Grill at lower insert position.
Grilled chops and steaks curling:
Cut into fat every 2cm (1/2”).
CLEANING YOUR OVEN
WARNING
Always make sure that the oven is electrically isolated before cleaning. This can be done by the functional switch nearby.
Do not line the bottom of the oven with foil or cookware.
Do not use steam cleaners.
Stainless steel
WARNING: The oven door trim, the control panel and the storage compartment are decorated with a special stainless steel that resists finger marks and should only be cleaned with warm water and a mild detergent. Do not use stainless steel cleaners, abrasive cleaners or harsh solvents on these parts.
NOTE: Make sure you follow the polish or brushing lines in the stainless steel.
All grades of stainless steel can stain, discolour or become greasy. You must clean these regularly by following the procedures below if you want your appliance to look its best, perform well and have a long life.
Care must be taken when wiping exposed stainless steel edges, they can be sharp! • The stainless steel gas hob can be cleaned with stainless steel cleaners if it becomes soiled or discoloured.
A suitable cleaner can be purchased from Electrolux Customer Care Centres.
Glass
Glass surfaces on doors and control panels are best cleaned immediately after soiling.
A damp cloth may help remove baked on food deposits
WARNING
The door glass on this appliance is made from a tough, durable material that withstands heating and cooling without breaking. However, it must be remembered that it is GLASS, it may break. Treat it accordingly! Should you have any questions about the glass in your new appliance, please contact the customer care centre by dialling 13 13 49.
Do not use harsh abrasive cleaners or sharp metal scrapers to clean the oven door since they can scratch the surface, which may result in the shattering of glass.
Gas hotplate
The trivets can be removed for cleaning by carefully lifting them from the hob.
Clean by washing with warm soapy water.
The burner caps and crowns are also removable for cleaning.
If the caps, crowns and cups are heavily soiled, use a non-abrasive cleaning compound.
Flame port blockages should be removed by using a matchstick or brush.
Do not clean them with abrasive or caustic type cleaners, or clean them in a dishwasher.
Ceramic hotplate
Remove all spilt food and fat with the supplied razor blade scraper, while the ceramic glass is still warm but not hot. Wipe clean with dishwashing detergent on a damp cloth.
If aluminium foil, plastic items or high sugar content foods are allowed to melt on the ceramic glass, clean immediately with the supplied razor blade scraper before the surface has cooled down, otherwise pitting of the surface can occur.
NOTE: Items with high sugar content not only include jam and fruit, but also vegetables such as peas, tomatoes and carrots.
When the ceramic glass is cool, apply a suitable ceramic glass cleaner.
It is important to follow the cleaner manufacturer’s instructions. Remove any cleaning residue from the surface as staining of the cooktop may occur.
Do not use abrasive sponges or scourers, as they may scratch the surface.
Any pitting, staining, scratches or other surface deterioration is excluded from the warranty.
Sometimes surface stains appear to be ‘bubble’ marks under the ceramic glass. These can be cleaned off with a razor blade scraper and ceramic cleaner.
Oven
Always keep your appliance clean. Ensure that fats and oils do not accumulate around elements, burners or fans.
Always keep the oven dish, baking trays, grill dish and grill dish inserts clean, as any fat deposits may catch fire.
Always wrap your meats in foil or an oven roasting bag to minimise cleaning. Any polyunsaturated fats can leave a varnish-like residue which is very difficult to remove.
Grill
Always keep the grill dish and grill dish insert clean, as any fat deposits may catch fire
CLEANING YOUR OVEN ACCESSORIES
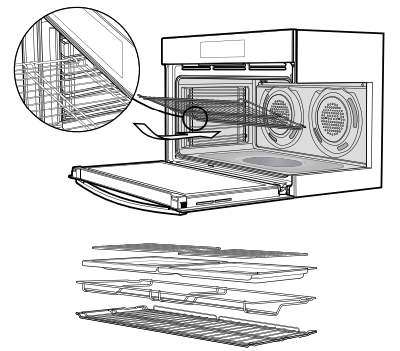
Removing the trays and shelves from your appliance
Slide the dish and grill tray towards you until they reach the front stop.
Tilt them up at the front to clear the side supports, taking care not to spill the contents.
Lift them clear.
Wash the tray and shelves in hot soapy water.
Reverse the above steps to put the grill tray and shelves back again.
Ensure that they are placed between the 2 support wires.
Removing the side racks or shelf supports
Grasp the shelf support at the front.
Pull it firmly inwards
Cleaning your oven door
The oven door has been designed to allow the two inner door glasses to be removed for cleaning without removing the door from the product. Removing the inner door glass for cleaning:
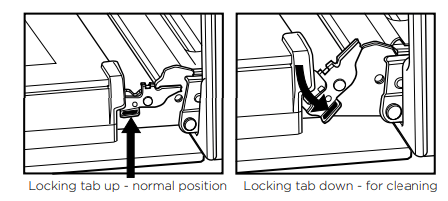
Open the door fully to gain access to the hinges.
Push down the hinge locking tab as shown in the diagram on both sides of door.
Gently close the door until it stops in partially open position on the locking tab (the door will not fully close with the locking tab in the down position).
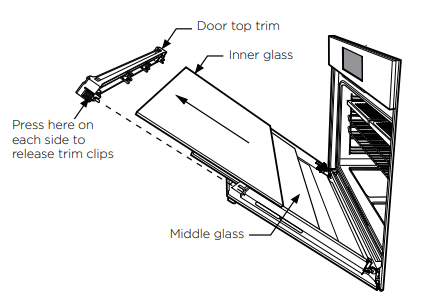
In this position the top door trim can be removed by pushing each side on the serrated surface to release the clips and lift the trim away from the door.
To remove the inner glass, tilt top of glass towards the oven and lift out.
The middle glass is removed in the same way.
The inner side of outer glass can be cleaned in-situ when inner and middle glass is removed. • Clean glass using detergent and warm water, wipe clean and dry thoroughly
Re-assembling the door glass panels:
Replace the middle glass back to the door. The middle glass is a clear pane and orientation of the glass is not important.
Replace the inner glass back to the door, ensuring the side with black ceramic paint faces away from the oven cavity when door is closed.
Fully open the door and return the locking tabs to their normal position and close the door.
Cleaning your oven door
DO NOT use the oven without the inner and middle door glass fitted.
NEVER spray any caustic cleaners on any surface of the door or damage to the surface coatings will result.
DO NOT use metal utensils, scrapers, scourers, or abrasive cleaners to clean the glass or any of the door trims. These will damage or scratch the surface coatings and degrade the finish and appearance.
DO NOT place glass in dishwasher.
Use only warm water and liquid detergent with a soft cloth to clean the glass or trims.
Before refitting the glass panes to the door ensure they are dried with a soft cloth.
The glass edges have been specially ground to remove any sharp edges. However it is glass, and should be handled carefully to avoid injury to your person and damage to the glass.
WARNING: Make sure the appliance power is switched off at the isolating switch before you remove or replace parts, to avoid the possibility of electric shock.
Changing the light globes
There are 2 light globes located in the top of the oven cavity towards the front. The light globe glass is accessible between the passes of the upper element.
To remove, turn oven light glass anti-clockwise.
A special high temperature resistant globe should be used. This can be purchased from the customer care centre.
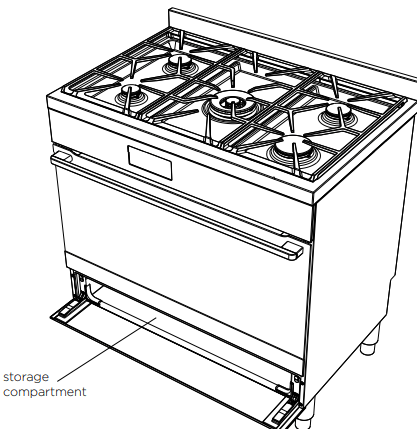
Storage compartment (selected models)
The storage compartment is accessible through the pivoting door. Unused oven racks and grill dishes can be stored here
WARNING: DO NOT store flammable or combustible items in the storage compartments. This is not a compartment for warming food.
TROUBLESHOOTING
Faults
If there is a problem with the oven and/or grill, please:
Check the points listed below before calling for service. It may be possible to avoid a call by fixing the problem yourself – and so continue cooking.
NOTE: We may charge for service even in the guarantee period if your problem is due to the causes listed below
#1 Can I clean the knobs without the black information decals coming off?
The decals or symbols are on the stoves facia panel, all these are easy to clean, and there is no need to use any harsh chemicals on the control knobs or facia panel, either use a microfibre cleaning cloth or hot soapy water will do the trick.

 clock icon will be displayed. Along with the clock symbol the “12” will be flashing. This indicates that the ‘hour’ portion of the time is ready to be changed.
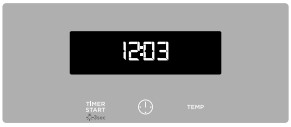
 .
.
 lies between
  and
and  . It is used to keep food warm.
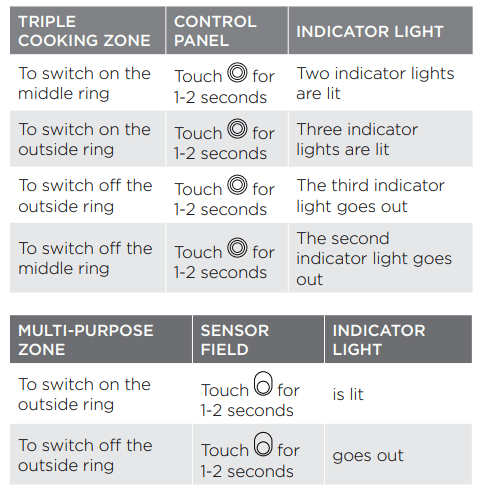
 , the cooking zone switches to full power for a certain amount of time and then automatically switches back to the heat setting set.
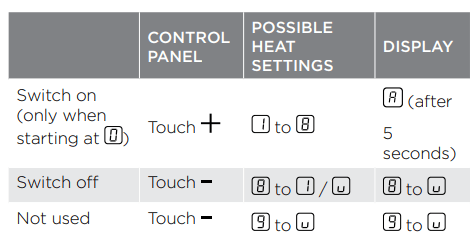
 a higher heat setting is selected, e.g. from
  to
to  , the automatic warm up is adjusted. If there is still residual heat on the cooking zone (display
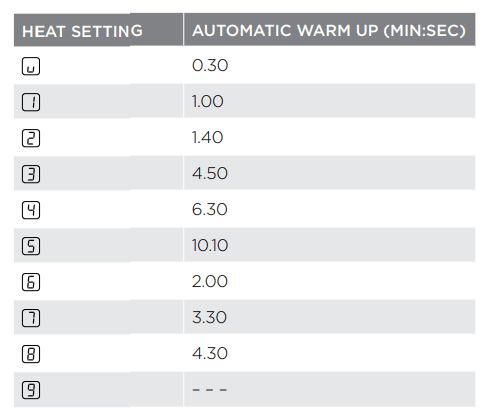

 function sets all cooking zones that operate to the lowest heat setting . When operates, you cannot change the heat setting
  .
.


 is displayed. Before being used again, the cooking zone must be set to
  .
.


 icon will flash.
 icon begins flashing.
 icon begins flashing.
 and TEMP buttons at the same time until the word ‘SAFE’ is displayed and a double beep is sounded. The word SAFE will be replaced by a padlock symbol on the display after 5 seconds.