Documents: Go to download!
- User Manual - (English)
- Operating for the first time
- INSTALLING OVEN ACCESSORIES
- USING THE GAS COOKER
- USING THE ELECTRIC COOKER
- 3 BUTTON PROGRAMMABLE CLOCK
- GENERAL HINTS AND TIPS
- CLEANING THE COOKER
- GENERAL HINTS AND TIPS
- GETTING TO KNOW YOUR OVEN
- OVEN GUIDE
- TROUBLESHOOTING
Table of contents
User Manual Upright Cookers
Operating for the first time
Choosing utensils for electric hotplates
Refer to the diagram below.

Choosing utensils for gas hotplates
Refer to the diagram below.
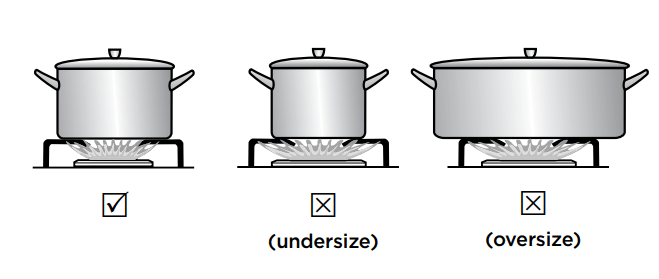
Do not use utensils which are too large or too small.
Installation and service warning
WARNING
- Only an authorised person must install and service this appliance (Certificate of Compliance to be retained).
- In order to avoid a hazard, the installation instructions MUST be followed.
- In order to avoid the appliance tipping, the anti-tilt plate MUST be installed.
- Appliances requiring connection to 230 – 240V MUST be earthed.
- An authorised person should inspect this appliance every 5 years.
- This appliance must NOT be installed on a base, box or in a closed cupboard.
- If the electrical supply cord is damaged, a qualified person MUST replace the cord to avoid a hazard or void your warranty
WARNING: Surrounding kitchen cabinets MUST WITHSTAND 85°C.
Before operating first time
- Read all the Warning and Safety information.
- Remove all internal boxes and bags from oven.
- Clean out the oven interior with detergent and warm water and polish with a soft cloth. DO NOT close oven door until the oven is completely dry.
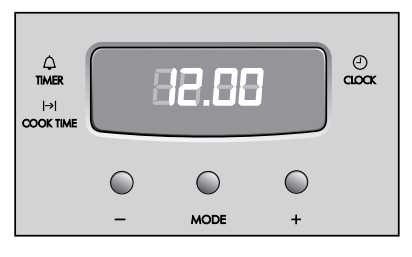
- Setting the time
- If you have purchased a model fitted with a 3 button programmable timer, you must set the time of day before you can operate your appliance.
- After the appliance has been electrically connected '12.00' will be displayed and the 'clock indicator' will flash.
- To set the time of day, press the – or + buttons. 5 seconds after the last change, the 'clock' indicator will disappear, confirming the time has been set.
- NOTE: The clock has a 24-hour display.
5. New appliances can have an odour during first operation. It is recommended to ‘run in’ the oven before you cook Run the oven at 180°C for 30 minutes and ensure that the room is well ventilated.
6. For products with a separate grill compartment, run grill on maximum for 15 minutes with grill door open.
7. If your appliance is fitted with solid hotplates, turn heat setting to high for 3 minutes to fully harden the hotplate coating.
INSTALLING OVEN ACCESSORIES
FITTING OVEN SHELVES
- Ensure shelf orientation is correct (refer to diagram below).
- Slide oven shelves onto oven supports (side runners) at an angle until raised back of shelf is past the stop on oven supports (side runners).
- Lower front of shelf and push in until stop is reached.
- To remove oven shelves, withdraw to the stop and raise the front of shelf to clear the stop.
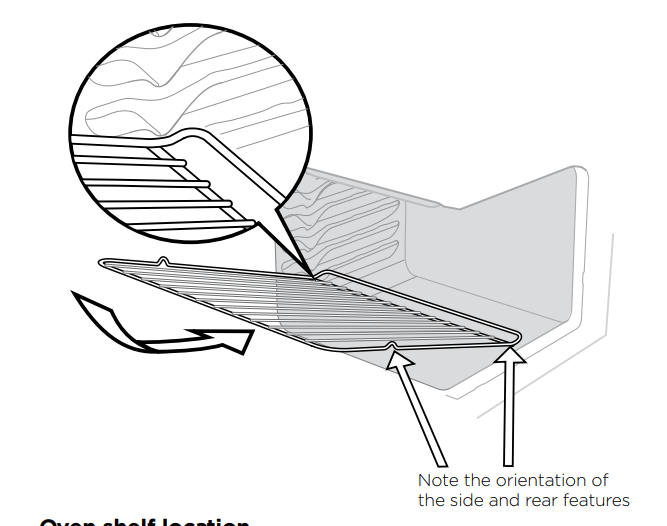
Oven shelf location
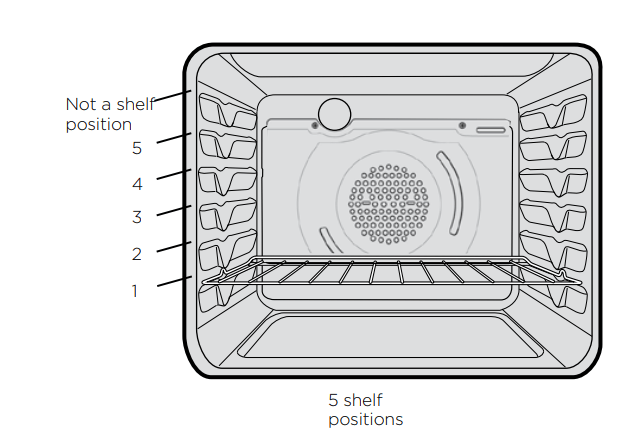
NOTE: the top ledge is not a shelf position. There are no stops for shelf withdrawal.
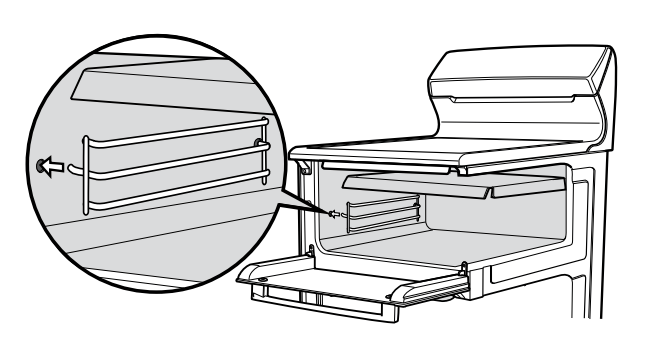
Fitting the grill dish supports
- Insert the rear hook into the rear hole.
- Align the front peg to the front hole and push in firmly
FITTING THE GRILL DISH
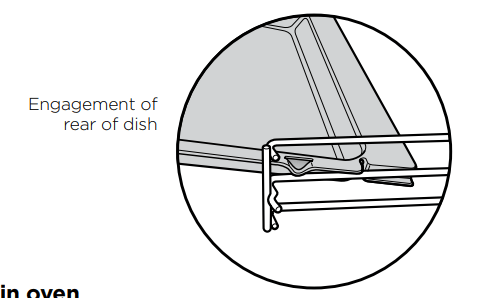
Separate grill
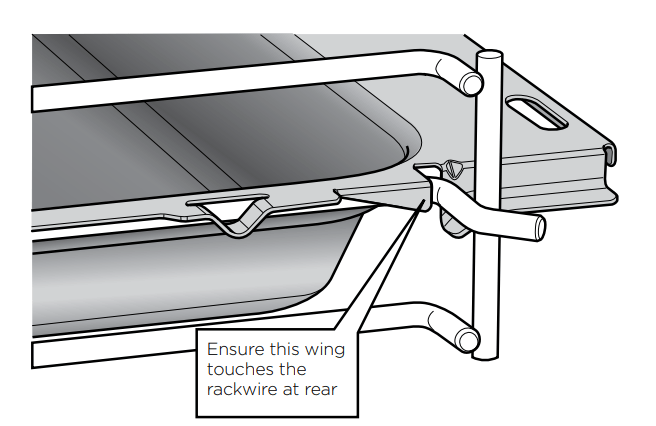
Ensure rear of the dish is engaged with the side support before sliding backwards. To remove, simply pull forwards and upwards.
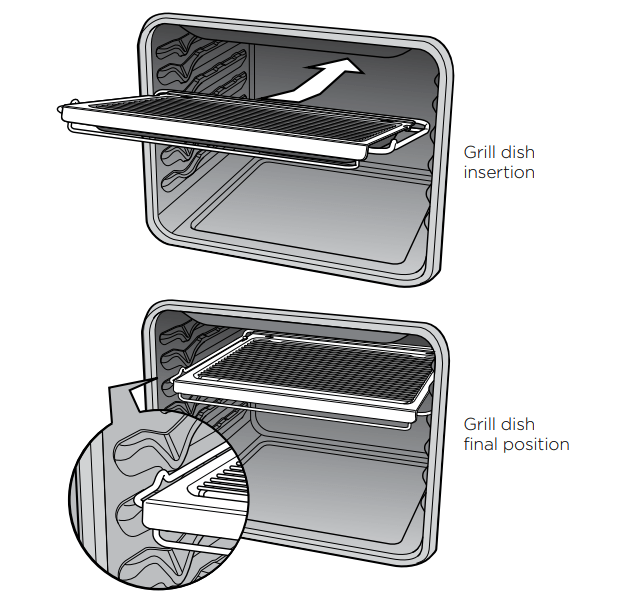
Grill in oven
(refer to Fitting Oven Shelves)
The grill dish with wire insert can be used in any of the two upper height positions (shelf positions 4 and 5) between the runners.
NOTE: You must remove the grill dish when baking in the oven
USING THE GAS COOKER
Gas oven features and descriptions
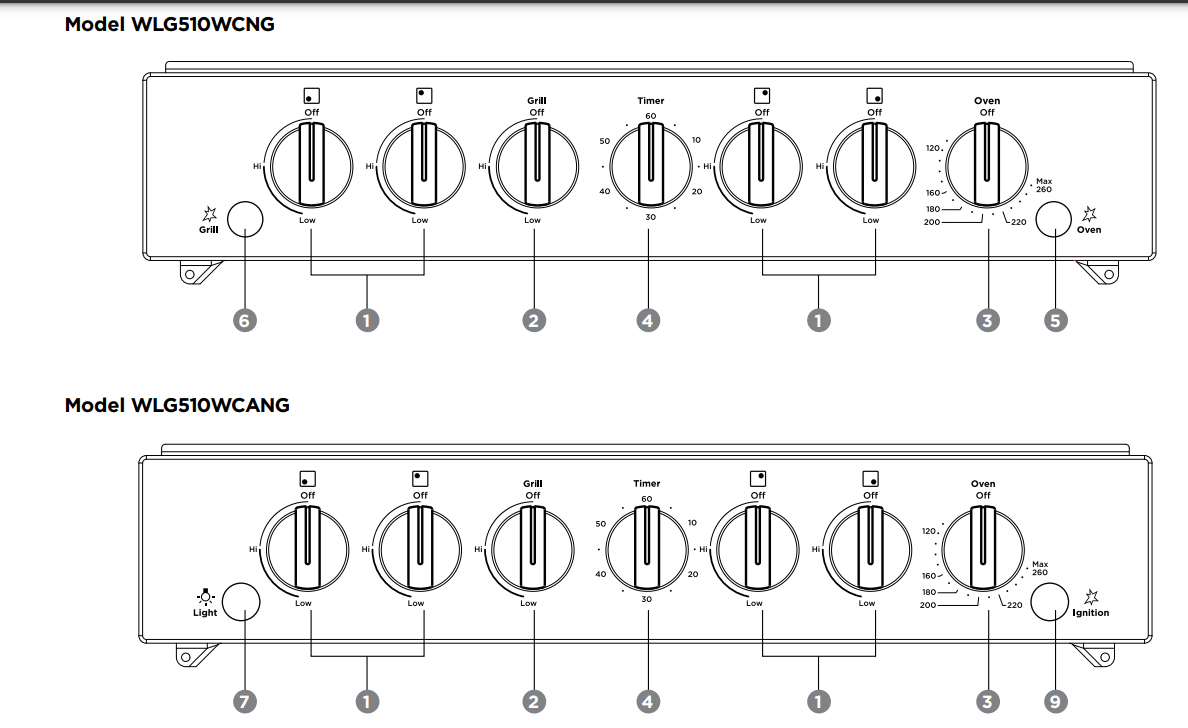

- Burner Control Knob – sets burner temperature.
- Grill Control Knob – sets grilling temperature.
- Oven Control Knob – sets oven temperature.
- Timer 60 Minute (where fitted) – sets reminder time. When timer returns to zero, timer gives a short ring.
- NOTE: for any time below 15 minutes, turn knob past 15 minutes, then back to required time setting
- Oven Piezo Ignitor – ignites oven burner when appropriate control knobs are set.
- Grill Piezo Ignitor – ignites grill burner.
- Light Switch (where fitted) – turns oven light on/off.
- Fan Switch (where fitted) – turns fan on/off.
- Electronic Ignition Switch – ignites hotplate burners, grill burner and oven burner.
Gas oven conventional baking
The heat comes from the bottom oven burner. The temperature at the centre of the oven is the same temperature set on the control knob. When oven is used on this mode, shelf position is important, (refer to ‘Oven Guide’).
As hot air naturally rises, the upper half of the oven will be approximately 10°C higher and the lower half approximately 10°C cooler than the set temperature. For best results from your gas oven use dark coloured trays and baking dishes on a single shelf. Refer to ‘General Hints and Tips’ section for more information. For best baking results preheat oven for 30 minutes.
Gas oven fan forced baking
Fan Forced baking generally requires lower temperatures than conventional baking. Most recipe books, unless stated, are for conventional oven temperatures. It is recommended when using the fan forced mode to reduce the oven temperature by 10°C. In a fan forced gas oven the heat comes from the bottom burner. Hot air is distributed by an electrically operated fan located behind the rear wall of the compartment, providing an even temperature on all shelf levels.
This means batches of the same food can be baked using multiple shelf positions simultaneously.
Fan Forced operation can be used for single shelf baking with equal success. For best baking results preheat oven for 30 minutes.
Cookware
For best baking results with gas ovens, dark coloured trays and baking dishes are recommended.
Gas hotplate
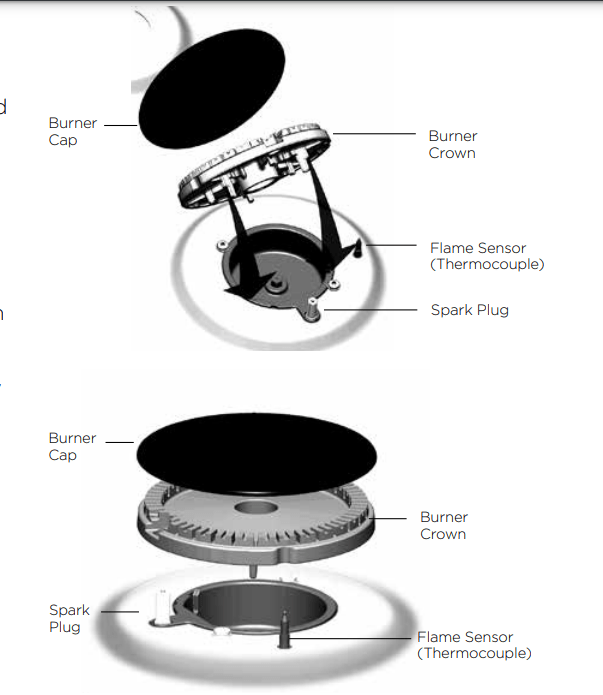
Ensure burner caps, crowns and trivets are properly assembled. For wok ONLY use the trivet and burner dedicated for wok cooking. Burner cap and burner crown must be clean and located correctly for the burner to light.
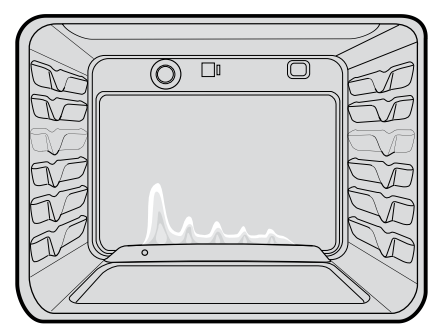
Gas oven burner flame
From a cold start the oven burner flame will be higher on the left hand-side. After reaching the set temperature, the flame will become even. This does not affect cooking results.
LIGHTING GAS HOTPLATE, GRILL AND OVEN
Electronic ignition with flame safeguard
This hob is fitted with mains powered electronic ignition. When the appliance has been connected and the power is on, depressing ignite button will release sparks to all burners. To light a burner, depress the corresponding knob fully and while continuing to depress knob for approximately 5 seconds, turn anticlockwise to ‘HI’ position. The flame sensor must warm-up in order for the flame to stay alight.
The knob may be released once the flame is established, and turned further anticlockwise to reduce the flame height as desired.
- Before releasing the knob, ensure the knob is fully depressed.
- If the flame goes out when the knob is released, simply repeat the ignition procedure again.
Hotplate Ignition – (Manual)
To light a burner, depress the corresponding knob fully and while continuing to depress the knob approximately 5 seconds, turn anti-clockwise to 'HI' position. At the same time, hold hand-ignitor next to the burner and ignite (hand-ignitors not supplied). The flame sensor must warm up in order for the flame to stay alight
Grill Ignition – Electronic
While pressing the electronic ignitor switch, depress the corresponding knob fully and while continuing to depress the knob for approximately 5 seconds, turn anti-clockwise to 'HI' position. The flame sensor must warm up in order for the flame to stay alight.
Grill Ignition – Piezo
Depress the grill control knob fully and while continuing to depress the knob for approximately 5 seconds, turn anticlockwise to 'HI' position. The flame sensor must warm up in order for the flame to stay alight.
Grill – in Oven
Grill is electric and is operated by control knob only.
Oven Ignition – Electronic
While pressing the Electronic Ignitor Switch, push turn and hold the Oven Control Knob to the desired temperature. Hold Control Knob in for 15 seconds after ignition
Oven Ignition – Piezo
With the left hand push and hold the Oven Control Knob in and turn it a quarter of the way anti-clockwise. Keep the oven Control Knob pushed in firmly and at the same time push the Oven Piezo Ignitor button on the right hand side of the control panel (several times if necessary). It will make a loud ‘clack’ noise as the Piezo mechanism creates a spark. Hold control knob in for 15 seconds after ignition.
WARNING
- Keep hands clear of burners when lighting.
- If burner does not light within 5 seconds, turn knob to ‘Off’ position, allow gas to disperse, then try lighting again.
- Burners MUST be operated between ‘HIGH’ and ‘LOW’ settings only.
USING THE ELECTRIC COOKER
ELECTRIC OVEN FEATURES AND DESCRIPTIONS
Grill in Oven Models
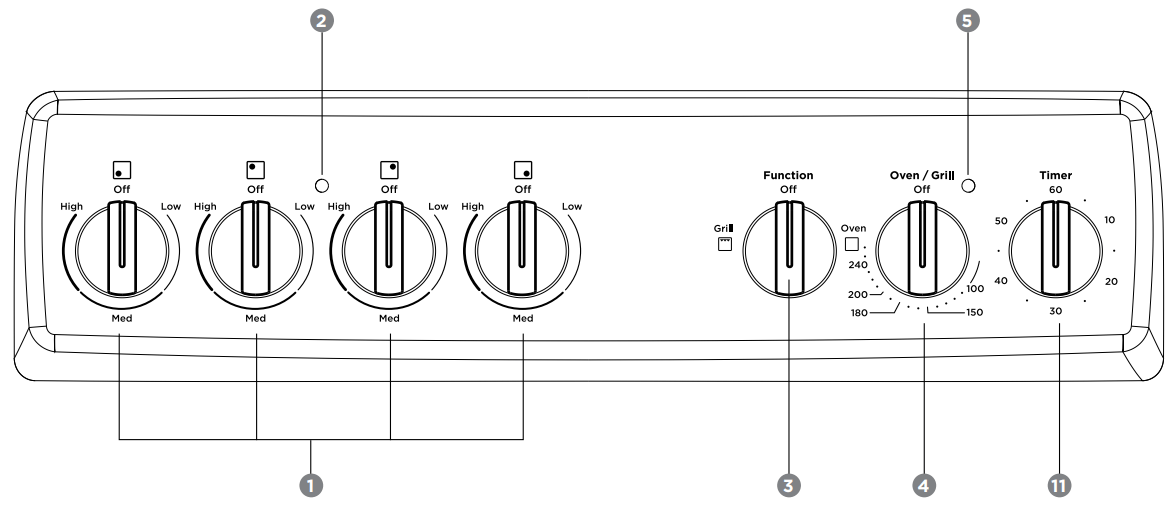
Separate grill models – conventional oven
WLE530WCA
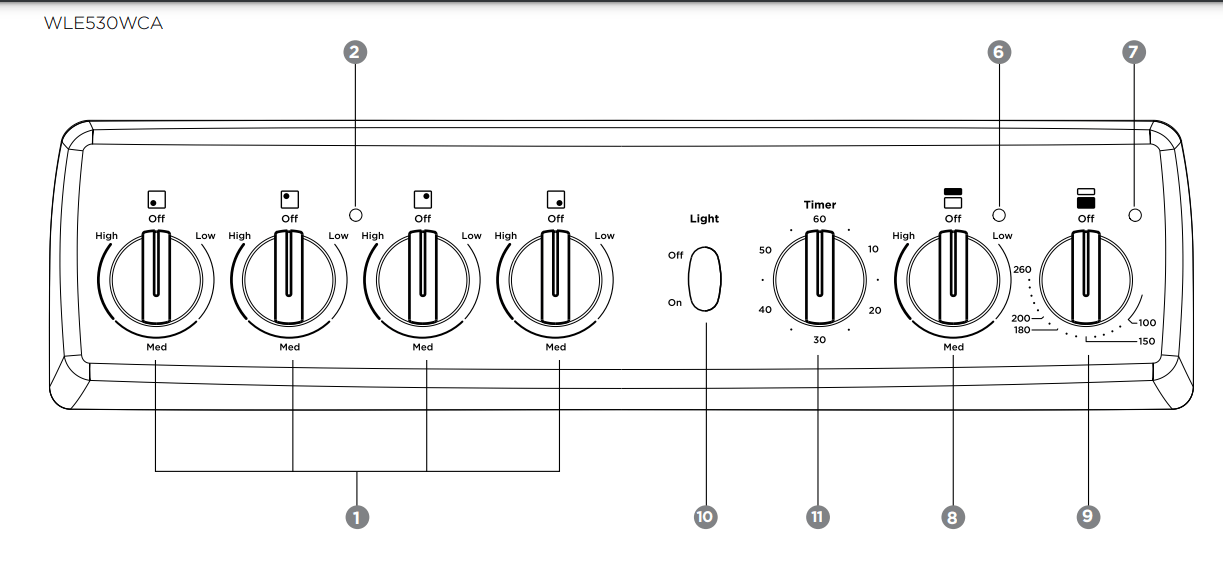
Separate grill models - fan-forced oven
WLE522WC/WLE532WC
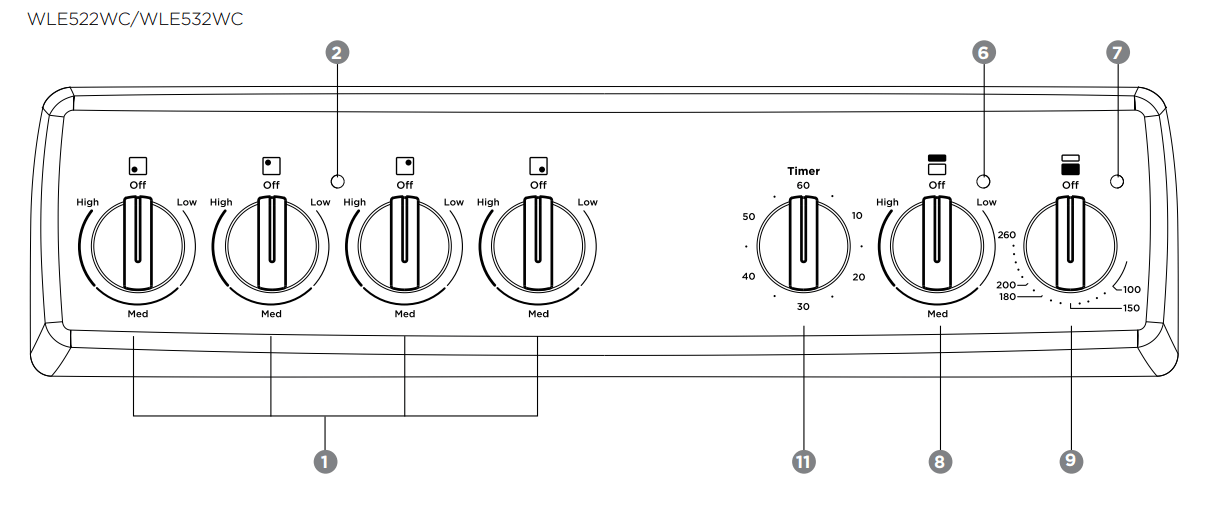
Separate grill models - fan-forced oven
WLE543WC
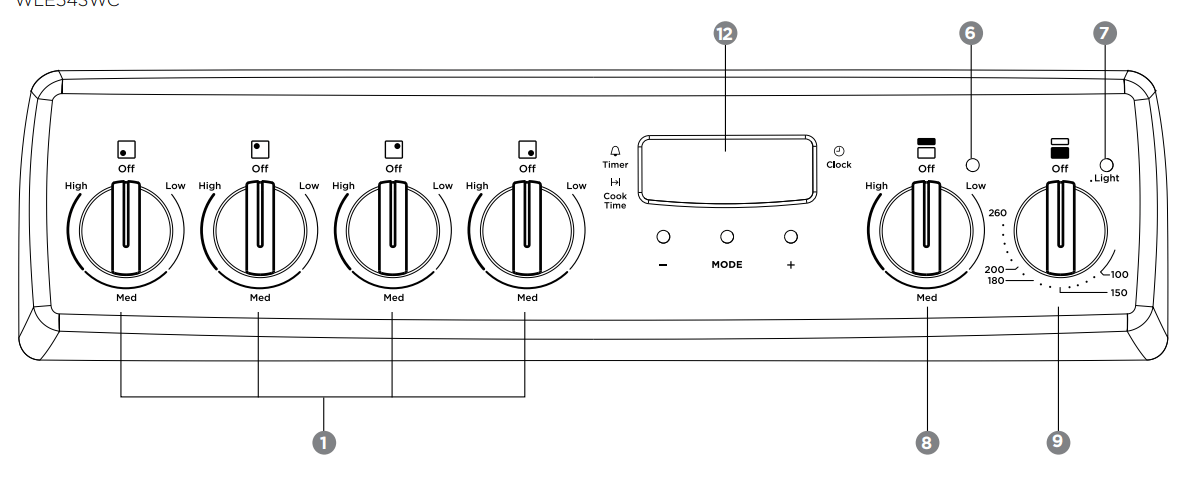
- Radiant/Solid/Ceramic Hotplate Control Knob – sets hotplate temperature.
- Hotplate Indicator Light – comes on when a hotplate control knob is operated.
- Grill/Oven Function Control Knob – sets grill or oven function.
- Grill/Oven Control knob – sets grill/oven temperature.
- Grill/Oven Indicator Light – comes on when grill/oven temperature knob is operated. Oven indicator light cycles on and off when temperature is reached.
- Grill Indicator Light – comes on when grill control knob is operated.
- Oven Indicator Light – comes on when oven control knob is operated.
- Grill Control Knob – sets grilling temperature.
- Oven Control Knob – sets oven temperature.
- Oven Light Switch – turns oven light on/off.
- Timer 60 Minute – (where fitted) sets reminder time. – When timer returns to zero, timer gives a short ring.
- NOTE: For any time below 15 minutes, turn knob past 15 minutes, then back to required time setting.
- Programmable Clock – sets baking/grilling reminder times – sets automatic cooking duration and stop time.
- NOTE: Clock time must be set before operating oven.
Radiant hotplates
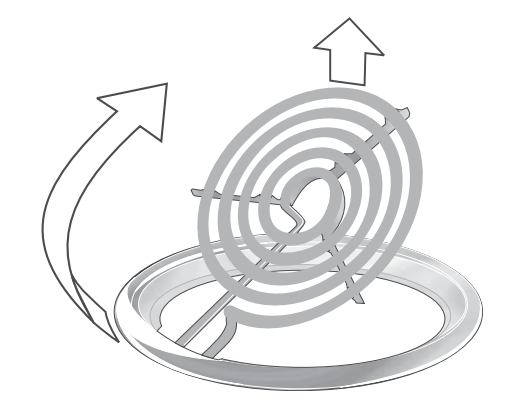
The high-speed radiant hotplates heat rapidly from a cold start. This saves power. The hotplates have a tray underneath the hob which collects spilt liquids. This tray can be removed by sliding it out through the open grill door (except model WLE524WC). Radiant elements also swivel for easy cleaning
Solid hotplates
The strong solid-cast hotplates give wide contact for fast efficient cooking. Hotplates are sealed to prevent spilt liquids from running under the hotplates. If there is a red dot present in the centre of hotplate, this indicates it is a high power hotplate.
When necessary, apply a coating of hotplate protector to solid plates to maintain them.
Ceramic hotplates
WARNING: If the surface is cracked, switch off the appliance to avoid the possibility of electric shock.
- The ceramic cooktop is made from ceramic glass, a tough, durable material that withstands heating and cooling without breaking. However, it must be noted that as it is glass, it may break, and must therefore be treated with care. Should you have any questions about the glass in your new appliance, please contact the service centre by dialling 13 13 49.
- The smooth glass surface has a pattern to show where the elements under the glass are located.
- When a hotplate is on, the hot surface warning light will come on. After switching off, this light will continue to glow until the temperature of the hotplate drops below 60°C.
Electric oven conventional baking
Heat comes from two elements, one above and one below the food. The bottom element is hidden below the floor of the oven. As hot air rises naturally, the upper part of the oven will be approximately 10°C higher than the set temperature and the lower part of the oven approximately 10°C cooler.
For grill in oven models, the grill dish must be removed when baking. For best baking results, preheat oven for 30 minutes, also refer to ‘General Hints and Tips”.
Electric oven fan forced baking
In a fan forced electric oven the heat comes from the rear oven element. Hot air is distributed by a fan behind the rear wall of the compartment, providing an even temperature on all shelf levels. This means, batches of food can be baked using multiple shelf positions simultaneously. Fan forced operation can be used for single food baking with equal success.
Fan Forced baking generally requires lower temperatures than conventional baking.
Most recipe books, unless stated, are typically for conventional oven temperatures. It is recommended that when using the fan forced mode, reduce the oven temperature by 10 degrees (refer to ‘Oven Guide’). For best baking results preheat oven for 30 minutes.
Cookware
For best cooking results with electric ovens, silver or shiny trays are recommended.
NOTE: Three button timer models MUST have clock set after a power outage to operate oven.
3 BUTTON PROGRAMMABLE CLOCK
Your oven is equipped with a 3 button timer that has the following features:
- Timer
 – you can set a countdown time that will beep when the set time has elapsed.
 - Cook time
 – you can set cooking duration. A timer will count down the preset cooking time, beep when the time has elapsed and turn the appliance off.
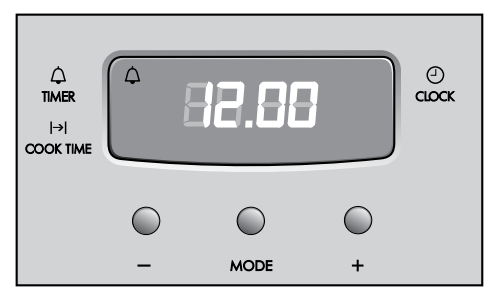
Selecting the timer 
- Press the MODE button until the timer ‘indicator’ begins flashing.
- Set the countdown time you want by using the - and + buttons. 5 seconds after the last change the timer ‘indicator’ will stop flashing and the countdown will start in minutes.
- To stop the beeper, press any button.
- Maximum countdown time is 2hrs 30mins.
Setting the cooking duration 
- Select the desired oven function and temperature.
- The oven indicator light will glow and the heating source will come on.
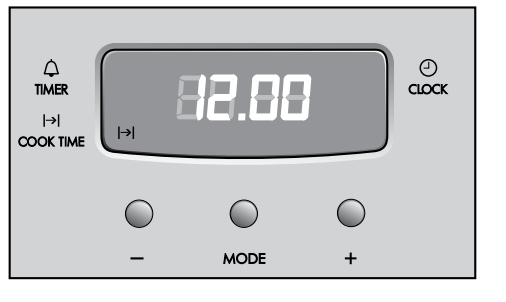
- Press the MODE button until the cook time
 ‘indicator’ begins flashing.
 - Set the cooking duration you want by using the - and + buttons. 5 seconds after the last change the cook time ‘indicator’ will stop flashing, and the time of day will be displayed.
NOTE: Remember to add pre-heating time if necessary
To check or cancel settings
- To check your settings, press the MODE button until the indicator you want is flashing.
- To cancel ‘auto shut off’ press the mode button until the ‘cook time’
 indicator flashes. Press and hold the - button until the clock no longer reverses (at 0:00 you will hear a beep). If you have left the temperature and function knobs at a setting, the oven will start once the ‘cook time’
  indicator stops flashing. Because you have cancelled ‘auto off’ the oven will continue to heat until you manually turn it off.
On completion of cooking
- The heat source will turn off, the timer will beep and cook time indicator will flash.
- Even though the heating element turns off the oven will still retain substantial heat. This will continue to cook the food until it is removed or the oven cools down. If you do not plan on being present when the oven turns off, you should take this extra heating time into account.
- Turn the function and temperature controls to the off position.
- Press any button to stop the timer beeping.
Adjusting the clock 
- Press the MODE button until the clock
 ‘indicator’ begins flashing.
 - Press the - or + buttons to change the time of day. 5 seconds after the last change, the clock ‘indicator’ will disappear, confirming the time has been adjusted.
GENERAL HINTS AND TIPS
CAUTION:
Using the grill

General hints
For best baking results preheat oven for 30 minutes.
The material and finish of baking trays and dishes used will affect the way foods are baked, especially base browning.
- Enamelware, anodised aluminium, dark bakeware or non-stick interiors and coloured exteriors will assist in maintaining or reducing the baking time and increase base browning.
- Ovenproof glassware or ceramics are poor conductors of heat. The shiny surface of aluminium or polished steel utensils and trays also reflects the heat rather then passing it through to the food being baked.
- Always place dishes in the centre of the shelf to ensure even browning.
- Stand casserole dishes on a baking tray to prevent food from spilling onto the base of the oven.
- Use ovenproof cookware, which will withstand temperatures of 250°C.
- Use shallow casserole dishes in preference to deeper ones as this shortens cooking time in the oven.
CAUTION:
- DO NOT place dishes, trays or baking pans directly on the oven base as they become very hot and will crack and craze the oven liner.
- DO NOT use baking trays larger than 30 x 35cm (12 x 14 inches) as they will restrict the circulation of the heat and may affect cooking performance of the oven.
Conventional Oven
- The shelf position is critical. The temperature in centre of the oven is the temperature shown on the oven control knob. Single shelf baking gives optimal cooking results.
- DO NOT place baking trays, oven dishes or foil directly on the base of oven, as trapped heat will crack and craze the floor of the oven liner.
Fan Forced
- Make sure shelves are evenly spaced.
- When baking more than one dish in fan forced oven, place dishes centrally on shelves rather than several dishes on one shelf.
- When the oven is full you may need to allow a slightly longer baking time.
- When using different size trays or cooking different types of food, cooking times may vary for each dish.
CAUTION
- DO NOT place baking trays and oven dishes directly against the grid covering the fan at the back of the oven.
- DO NOT place oven dishes directly on the oven base.
TIPS & INFORMATION
Condensation and steam
- During cooking steam may be produced which can be released when opening the oven door. This is quite normal.
- If there is any build-up of condensation on the oven door it is recommended that it be carefully wiped away either during or after cooking.
WARNING Always stand back from heated oven when opening oven door to allow any build-up of steam or heat to release.
SEPARATE Grill dish insertion
 WARNING Door glass is a tough and durable material designed to withstand heating and cooling without breaking. However it must be remembered that it is glass and may break, therefore must be treated with care. If you have any questions about the glass in the oven please contact the Service Centre on 13 13 49.
CLEANING THE COOKER
Ovens and hotplates are made from steel and enamel. Do not use abrasives and harsh scourers as they may scratch the surface
Enamel
- Keep enamel clean by wiping it with a soft cloth dipped in warm soapy water.
- Rub difficult stains with a nylon scourer or cream powder cleanser.
- DO NOT use abrasive cleaners, powder cleaners, steel wool or wax polishes.
- If you use an oven cleaner, follow the instructions on the product carefully
Stainless Steel
- All grades of stainless steel can stain, discolour or becomes greasy. Clean the cooker regularly, using the procedures outlined below, to maintain the function and appearance of your appliance.
- Care must be taken when wiping exposed stainless steel edges as they can be sharp.
- The front frame around the oven can be cleaned with stainless steel cleaners if it becomes soiled or discoloured.
- A suitable cleaner can be purchased from Electrolux Customer Care Centres.
- Always clean the stainless steel in the direction of the grain. Going against the grain may scratch the surface.
Oven Shelves
- Chrome shelves: use detergent and hot water. If very dirty use a non-abrasive nylon scourer.
Oven – Grill Dish and Insert
- After every use and while still warm, wash pan and grill with warm soapy water and a suitable oven cleaner. Rinse and dry before replacing in position.
Oven
- Use detergent, warm water (and household cloudy ammonia if necessary) and a soft cloth. Dry thoroughly.
- Remove shelves when the cleaning oven.
- If there is a build-up of grease use a suitable oven cleaner, following the instructions on the cleaning product carefully. Heat oven to 110°C and turn oven off when 110°C is reached. Leave over-night. The fumes will loosen stubborn grease and stains. Remove bowl, wash with hot, soapy water and dry well before closing oven door again. Ensure oven is thoroughly rinsed and dried before subsequent use.
CAUTION DO NOT remove the oven door.
Ceramic hotplates
Remove all spilt food with a razor blade scraper while the hotplate is still warm – NOT HOT.
- If aluminium foil, plastic items or foods with a high sugar content melt onto glass, use a razor blade scraper to remove immediately before the hotplate has cooled, otherwise pitting of the surface may occur. High sugar content foods include jam, fruit, carrots, tomatoes and peas.
- Sometimes SURFACE stains appear to be ‘bubble’ marks under the ceramic glass. These can be cleaned off with a razor blade scraper and ceramic cleaner.
- When the ceramic hotplate has cooled, wipe clean with dishwashing detergent and a damp cloth.
NOTE: DO NOT use abrasive sponges or scourers, oven sprays or stain removers on ceramic hotplates. These may damage, scratch or stain the ceramic cooktop. Any pitting, staining or scratching WILL NOT be covered by warranty
Solid hotplates
Solid hotplates are fitted with stainless steel trim rings, which after initial use, change colour to light brown. This is a normal characteristic of stainless steel and will not affect the operation or performance of your hotplates.
- Clean off any spillage after hotplate has cooled down.
- At regular intervals, clean hotplate with a nylon scouring pad and soapy water. Wipe clean then warm hotplate for 30 seconds to dry the surface.
- Apply ‘hotplate protector'. Set hotplate on high for 3 minutes to allow coating to harden.
Radiant hotplates
These plates are self cleaning. Any liquid which boils over will burn to ash and can be wiped off when the hotplate has cooled. To clean the trim rings, lift front of element and remove, then wash in warm, soapy water. To clean any spillage that falls through the element, remove the spillage tray and wash in warm soapy water.
Gas burners
- Flame port blockages should be removed with a small metal cake skewer or nylon brush.
- Clean dirty spark plugs very gently with a nylon scourer. Do not use steel wool. Do not bend spark plug as it may break.
- If the caps, crowns and cups are heavily soiled, use a nonabrasive cleaning compound.
- Do not clean these parts with abrasive or caustic type cleaners, or clean in a dishwasher as they will be damaged.
GENERAL HINTS AND TIPS
Cleaning the oven door
Cool air circulates through the door to lower the surface temperature on the outside of the oven door.
CAUTION Do not remove the outer oven door. This product has a removable inner glass insert for ease of cleaning.
To remove the inner door glass for cleaning
- Open the door fully to access the hinges then rotate the 'stirrups' on both hinges fully towards the door.
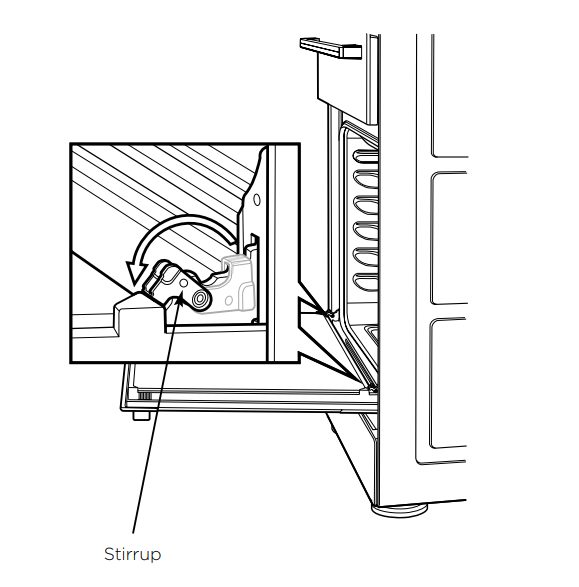
- Slowly close the door until it stops against the ‘stirrups’.
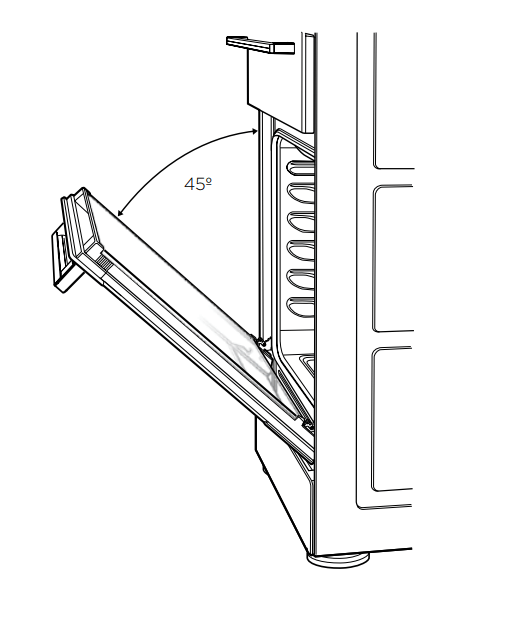
- To remove the top caps, press the ribbed release clips at each end and lift top cap away from the door.
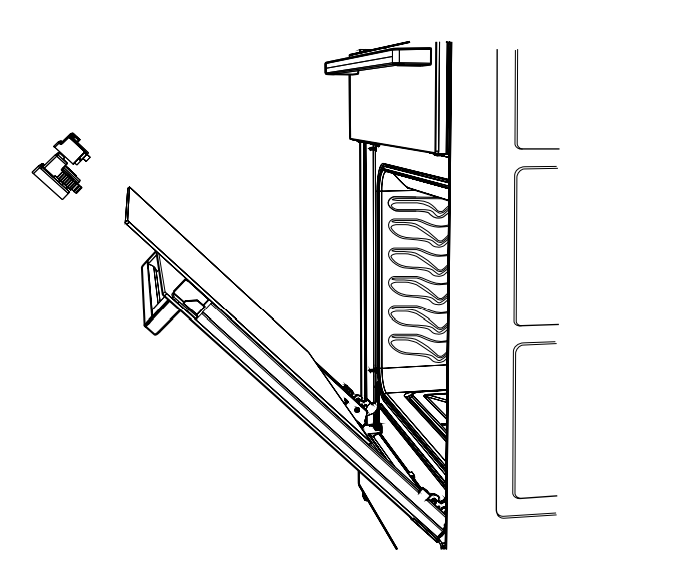
- Using both hands, gently remove the inner glass by sliding out and lifting away from the door.
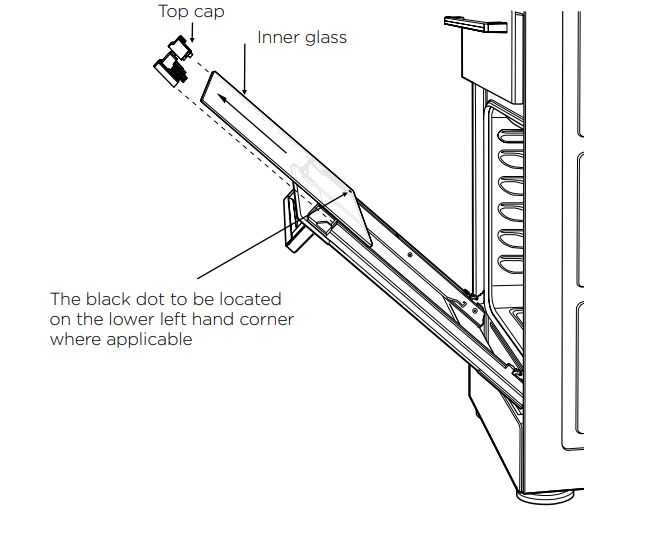
- Hand wash only with a soft cloth and warm soapy water. When dry, polish with a soft cloth and ensure the glass is dry before re-assembly.
- Wipe inner and outer glass gently with detergent and warm water.
- Wipe clean and dry thoroughly.
Re-Assembling the oven door inner glass
- Replace the top caps ensuring the clips snap back into position.
- Fully open the door, rotate the stirrups back to their original position and close the door.
- When replacing the door inner glass, make sure the black dot is positioned as shown in the image (where applicable).
WARNING
- DO NOT use the oven without the inner door glass fitted.
- DO NOT use harsh abrasives on glass as this may damage the glass.
- DO NOT place glass in dishwasher.
SAFETY WARNINGS ABOUT CLEANING
WARNING ALWAYS make sure that the cooker is turned off before cleaning.
CAUTION
- ALWAYS clean cooker immediately after use.
- DO NOT use steam cleaners. These may cause moisture build-up, especially in the glass door.
- DO NOT use caustic based cleaners or harsh abrasives. These will damage your oven.
Door glass
- DO NOT use harsh abrasive cleaners or sharp metal scrapers to clean glass since they can scratch the surface, which may result in shattering of the glass.
GETTING TO KNOW YOUR OVEN
Getting to know your new oven with this simple ‘Test Cake’
When baking, it is normal to experience some slight variation in temperature throughout the oven, resulting in minor differences in colour of the items being baked. You may need to rotate items whilst cooking to ensure an even colour.
SIMPLE ‘Test Cake’
- 125g butter, softened to room temperature
- 1 cup caster sugar
- 1 teaspoon pure vanilla essence
- 4 large eggs
- 2 cups self-raising flour
- Pinch of salt
- 4 tablespoons (80ml ) full-cream milk
Method:
- Butter base and sides of two, 20cm straight-sided round or square cake pans. Then line the base with grease proof paper or baking paper.
- Preheat oven to moderate 180˚C (170˚C fan forced) for 30 minutes and ensure oven shelf is in position 2 of the oven.
- Cream softened butter and sugar until light in colour.
- Add vanilla essence.
- Add eggs one at a time, beating well after each addition.
- Sift flour and salt into the mixture and beat until well combined.
- Add milk and beat or stir to combine.
- Spoon mixture equally between prepared cake pans.
- Bake in preheated oven, position 2 for about 25 to 35 minutes.
- Tip: Insert a fine cake skewer into the cake mix. If it comes out clean, or if the edges of the cake have come away slightly from the sides of the cake pan, the cake is ready.
- Remove from oven and place on wire cake rack and rest for 5 minutes before removing from cake pans. Cool completely.
To Serve: sandwich together with your favourite jam or conserve, and dust top with pure icing sugar.
NOTE: if desired, substitute butter for either margarine or olive oil spread. Recipe is based on the Australian standard metric 250ml cup and 20ml tablespoon sets.
OVEN GUIDE
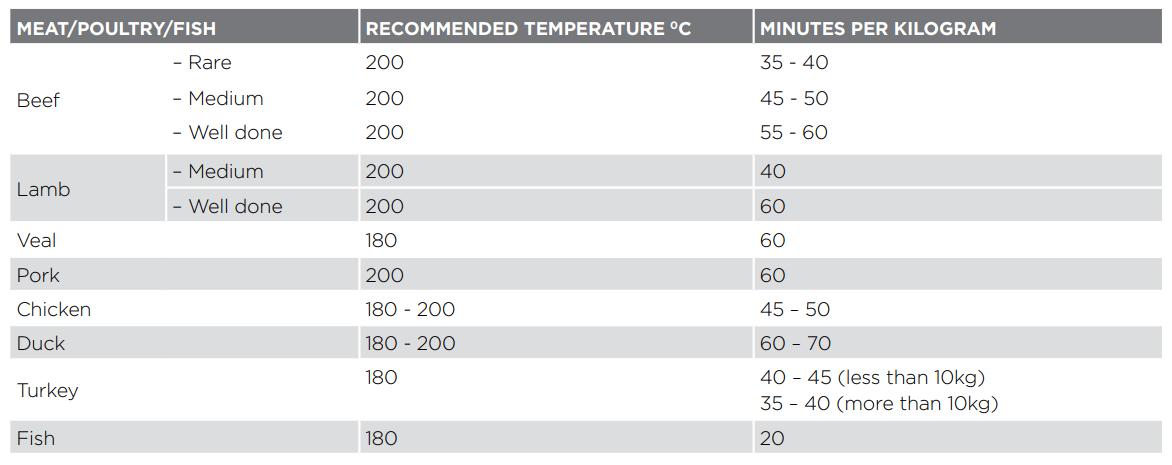
The following is intended as a guide. Cooking variation is natural and to be expected. You should experiment with times, temperatures and recipes to obtain the best results to your own taste. Get to know your oven before making a service call. Where the gas models vary from the electric models, details for gas cooking is shown in brackets. For best results when baking, preheat your oven for 30 minutes.
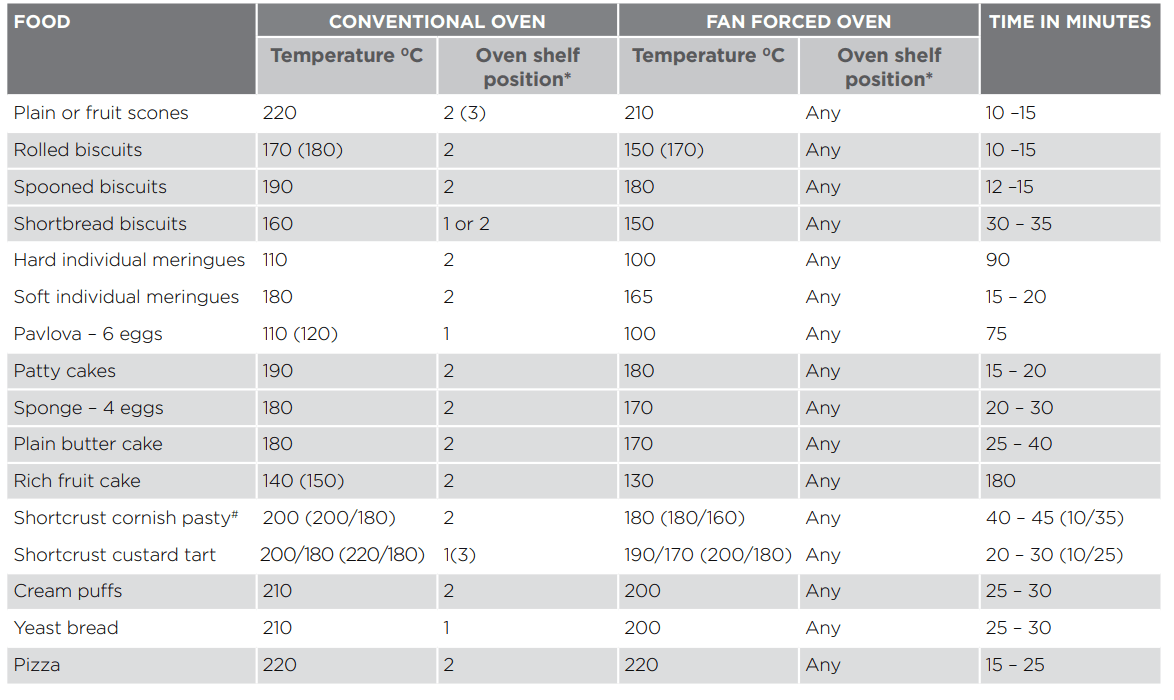
* Shelf position is counted from the bottom shelf up. Bottom shelf position is 1.
# Turn down temperatures shown.
TROUBLESHOOTING
| PROBLEM | CAUSES | WHAT TO DO |
| Uneven cooking |
|
|
| Baked products too brown on top |
|
|
| Baked products too brown on bottom |
|
|
| Cakes have a cracked thick crust |
|
|
| Baked products are pale, flat and undercooked |
|
|
| Cakes fallen in centre |
|
|
| Roast meat and potatoes not brown in fan oven |
|
|
| Juices running out of meat | Do not pierce meat with fork, turn with tongs | |
| Grilled meats overcooked on outside and raw in the centre | Grill at lower insert position | |
| Grilled chops and steaks curling | Cut into fat every 2cm (¾") | |
| Excess grill smoke | Build-up of fats in gril | Clean grill |
| Stains appear to be under ceramic glass | These marks are on the surface of the ceramic glass | Clean marks off with a razor blade scraper and ceramic glass cleaner. |
If you have a problem with your appliance check the following before you ring the call service.
| PROBLEM | WHAT TO DO |
| Operational problems i.e. Oven, grill or hob not working |
|
| Heat up problems |
|
| Unit smoking odours |
New appliances can have an odour during first operation. It is recommended to ‘run in’ the oven before you cook. Run the oven at 180ºC for two hours and ensure room is well ventilated For products with separate grill compartment, run the grill on for full for 15 minutes with grill door open Persistent gas smell – do not operate appliance. Call service 131349 |
|
Condensation NOTE: some condensation is normal and is to be expected during cooking |
|
| Timer not audible | Turn Timer knob past 15 minute mark then to the required number of minutes |
| Oven shelf tight | Remove shelf and insert as per diagram |
| Oven or grill not working (Electric cooker only) | Set time on clock |
| Oven not working | Clock program set. Cancel program |
| Oven light not working | Lamp blown or loose in socket. Replace or tighten globe |
| Electronic clock flashing on display or off (Electric cooker only) | Check household power supply, fuses and reset time of the day |
| Powerpoints not working (NZ model Electric cooker only) | Check the fuse at rear and replace if blown |
| Gas oven burner uneven flame | This does not affect cooking results. From cold start the oven burner flame will be higher on the left-hand side. After reaching the set temperature, the flame will then be even. |
| The oven seal is loose | The oven seal is attached at each corner. It may seem like a loose fit, but when the oven door is closed it will function correctly |
tips and information
When you need information, service or replacements please quote:
- Model Number.
- Serial Number: You can find these on the data plate, which can be seen when the oven door is open. If you need more information, please contact the Customer Care Centre on 1300 363 640 (Australia – Centre is open 8.00am to 5.00pm Monday to Friday EST
Or 09 573 2384 (New Zealand – Centre is open 8.00am to 5.00pm Monday to Friday).
Only authorised service centres should carry out servicing or warranty may be voided. If you have a warranty or spare parts enquiry, you should call the numbers listed on the back page.
See other models: WLE530WCA WLE543WC WLE622WC WDE132WC WLE522WC
