321 4 5 6 7
14 15
9 108 1311 12
3-YEAR LIMITED WARRANTY
Valid in U.S.A. Only
If your Wahl product fails to operate satisfactorily within three (3)
years from the date of original purchase or receipt as a gift, Wahl
will, at our option, repair or replace the product and return it to
you FREE OF CHARGE. Do not return this product to store where
purchased. Products needing repair under this warranty should
be returned with postage pre-paid to the following address or call
1-800-767-9245 for assistance:
Wahl Clipper Corp.
Attn: Repair Department
3001 Locust Street
Sterling, Illinois 61081
When mailing, please include a note describing the defect and
the date of original purchase or receipt as a gift. Products out of
warranty will be repaired at our standard repair charges.
This warranty does not cover products damaged by:
1. Modification or repair by anyone other than Wahl Clipper
Corporation or a Wahl authorized service center;
2. Commercial (non-consumer) use or unreasonable use.
This warranty gives you specific legal rights, and you may also
have other rights which vary from state to state. No other written
express warranty is given. No responsibility is assumed for
incidental or consequential damages of any type or for the use
of unauthorized attachments. Some states may not allow the
exclusion or limitation of incidental or consequential damages, so
the limitation may not apply to you. Warranty valid in U.S.A. only.
Outside U.S.A., check with store for Wahl authorized distributor’s
warranty.
Quick
U
U
45° 45°
Quick
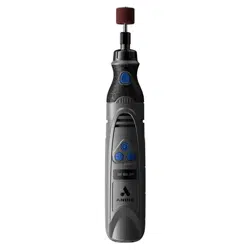
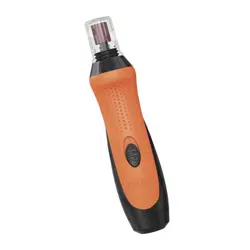
Operating Instructions
for 2-Speed Battery
Trimmer Nail Grinder
and Rechargeable
Nail Grinder
Grind, Trim,
Smooth
Understanding Your
Wahl
®
Nail Grinder
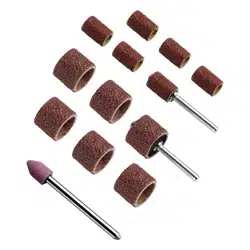
Stones & Bands
Getting Started - Quick Start Guide
WahlUSA.com
For more information or Product Registration, visit WahlUSA.com
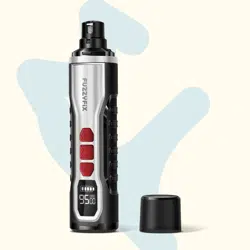
Safety Nail Guard
Collet
Collet lock button
Nail Wrench
Safety Nail
Guard
2-Speed On/Off Switch
Use to tighten/
loosen Collet
Use to tighten/loosen
Grinding Drum
Grinding Stone with Concave Top - Long lasting grinding
attachment. Ideal for grinding and rounding of nails.
Course Grinding Bands - Quickly grind down bulk of nail
Fine Grinding Band - Smooths rough edges
For replacement attachments call 800-767-WAHL (9245) or visit
www.WahlUSA.com
Battery Chamber
Port for power transformer
on rechargable units
TOY
BREED
LARGE
BREED
Prepping the Nail Grinder
Make sure unit has a set of fresh batteries or if
rechargeable, unit is fully charged
Install Grinding Drum & Band
- Pressing Collet Lock Button found on
back, while using the wrench supplied
in kit, turn wrench counter clockwise
to loosen Collet.
- Insert Grinding Drum or Stone all the way down.
- Tighten the Collet (turning wrench clockwise) until
it is tight. Check to make sure drum is secured in
the Collet. Do not overtighten.
- Select either the 60 or 120 grit sanding band (60
grit medium sanding band for quick and efficient
grinding down of your pet’s nail; 120 grit fine
sanding band for smoothing uneven rough nails.)
- Place the sanding band over the grinding drum
until it is in place (please note, you will find it sits loosely
over the grinding drum). While pressing the collet lock
button to keep shaft from turning, use a screw driver at
the top of the grinding drum. Screwing it in a clockwise
direction will allow the drum to expand, creating the
perfect fit fot the band.
- Verify Grind Band is pushed down all the way to eliminate
rubbing on the safety guard preventing it from spinning
MAINTENANCE
-After each use, remove any debris and dust from grinder by using
a soft brush.
-To clean housing, use a soft, dry cloth.
Note: Certain cleaning agents and solvents can damage plastic parts.
Use only a water-moisened cloth when wiping plastic housing.
-For maximum efficiency, ensure grinding attachments and sanding
bands are properly replaced when worn or blunt.
-Periodically examine tool for any wear or damage. See Service and
Repair.
-To order replacement accessories, please contact Wahl at
1-800-767-9245 or purchase from our website www.WahlUSA.
com
SERVICE AND REPAIR
-This appliance contains no user-serviceable parts.
-Any servicing should be done by Wahl Service and Repair or by an
Authorized Service Center.
-Do not return this product to the store where purchased. If
you have problems with your unit, send it prepaid with a note
explaining the problem to:
Wahl Clipper Corporation
Attn: Service Department
3001 Locust Street
Sterling, Illinois 61081
1-800-767-9245 or visit www.wahlUSA.com
- Position the grinder under the nail.
- Trim off a little of each nail. Be sure to avoid trimming into the
‘quick’.
-If bleeding occurs, use styptic powder or cornstarch to stop the
bleeding.
NAIL ANATOMY:
- Before you begin trimming your pet’s nails, you will need to
identify the ‘quick’ of the nail. The diagram (FIG.1) will help you
identify the basic nail anatomy. The outer nail is hard and has no
nerve endings and protects the inner soft part of the nail, known
as the ‘quick’. The quick has nerve endings, tiny blood vessels and
is very sensitive should you accidently cut or grind into it.
With lighter colored nails, the quick can usually be seen which will
make it easier to avoid while grinding. Dark colored nails may not
allow you to see where the quick is. While grinding, keep checking
the nail and watch for a dark spot in the middle of the grinding
area. This spot will indicate the start of the quick and that you
should not grind any further.
Please also reference the diagram for the appropriate angle for
trimming the nail.
WHAT TO DO IF ACCIDENTALLY HIT THE
QUICK:
If by chance you happen to hit the quick of a nail and the
nail starts to bleed, don’t allow your dog to wrench away
from you and run around. Hold him firm and reassure him
that you know it hurts, your pet trusts you. You also need
IMPORTANT SAFEGUARDS
When using an electrical appliance, basic
precautions should always be followed,
including the following: Read all instructions
before using this appliance.
READ ALL INSTRUCTIONS AND SAFEGUARDS
BEFORE USING THIS GRINDER.
DANGER
To reduce the risk of death or injury by
electric shock:
1. Do not reach for nail grinder if it has fallen
into water.
2. This appliance can be used by children
aged from 14 years and above and
persons with reduced physical, sensory
or mental capabilities or lack of experience
and knowledge if they have been given
supervision or instruction, by a person
responsible for their safety, concerning
the use of the appliance in a safe way and
understand the hazards involved. Children
shall not play with the appliance. Cleaning
and user maintenance shall not be made by
children without supervision.
SAVE THESE INSTRUCTIONS
THIS PRODUCT IS INTENDED
FOR HOME USE
OPERATING INSTRUCTIONS:
- Using your thumb, apply light to moderate pressure to the
animal’s pads in order to separate their toes. Hold paw firmly.
- Turn grinder “ON”. The “ON/OFF” switch is located on the front of
the grinder.
- For best results, start grinding from the bottom of the nail, slowly
moving toward the tip. Apply consistent pressure, moving the
grinder from side to side of each nail
- To avoid tangling of hair on long-haired breed dogs, push hair
away from pet’s paw before applying the grinder. (Tip: Use a small
nylon stocking or sock over the pet’s paw and push the nails
through a hole at the end to ensure only the nails are exposed.)
- For larger dogs, position the front paw forward in order to grind
nails.
- For smaller dogs, hold their paw up and position it below their
body. Pay extra caution not to entangle hair.
HOW TO TRIM
Keep your pet’s nails trimmed properly for greater comfort and well being
- Make sure the dog is relaxed and
comfortable.
- Have the dog sit and talk to him/her softly
to keep them calm.
- Always include a favorite treat during the
session and at the end.
- Have a styptic powder or cornstarch readily available in plentiful
amount.
- Grasp the foot from the ankle up in the palm of your hand, firmly
but gently.
may accumulate inside the grinder and cause
electrical failure.
9. Always wear safety glasses when using nail
grinder. Do not wear loose jewelry or clothing
when in use. Keep long hair pulled back out of
work area.
10. Do not allow animal to lick or touch the nail
grinder during use.
11. Make sure attachments are securely in
place before use. Before each use, check that
the sanding drum is sufficiently expanded
to secure the sanding band during use. If
sanding band is loose during operation, it may
be ejected from grinder and cause injury.
12. During use, do not place or leave appliance
where it may be (1) damaged by an animal or
(2) exposed to the weather.
13. Do not over-grind or apply excessive
pressure. (See FIG.1 ‘Nail Anatomy’ for further
information to safely grind your pets nails.)
14. Keep this appliance dry.
15. With the exception of attachments (grinding
drum sanding bands & stone), nail grinder
does not have user-serviceable parts. Any
maintenance not explained in this manual
should be preformed by Wahl Repair Service
& Repair.
3. Do not place or store nail grinder where it
can fall or be pulled into a tub or sink. Do not
place in or drop into water or other liquid.
WARNING
To reduce the risk of burns, electrical shock or
injury to persons:
1. Use this appliance only for its intended
use as described in this manual. Do not
use attachments not recommended by the
manufacturer.
2. Turn unit off before adding or removing
attachments
3. Never operate nail grinder if it is not working
properly, if it has been dropped or damaged,
or dropped into water. Return to an Authorized
Service Center for examination or repair.
5. Do not use outdoors or operate where aerosol
(spray) or other flammable products are being
used or where oxygen is being administered.
6. Do not touch the collet or attachment after
use. These may be hot and cause burns to the
skin.
7. Move the switch to the off, or “O” position,
then remove the batteries.
8. Clean the nail grinder’s air vents with
compressed air on a regular basis. Material
to get styptic or corn starch onto the end of the nail. Simply
keep the original grasp you had on the paw and press the
powder to the end of the nail until the bleeding stops. You
may have to keep packing powder for two to three minutes,
but the longer you are able to apply steady pressure,
the more effectively you will stop the bleeding. Don’t be
concerned if your dog wants to lick the wound after initial
bleeding stops. Do keep him from prancing about for
at least fifteen minutes. Bleeding should stop within 15
minutes, if the nail is bleeding freely after 30 minutes of
applying pressure and powder call your veterinarian.
CHANGING ATTACHMENTS:
-Ensure grinder is in the “OFF” or “O” position before changing
attachments.
-Unscrew the protective cap
- Press Collet Lock and use provided wrench turning it counter
clockwise. Doing so will open up collet. If there is already an
attachment (Drum or stone) in collet, opening it will allow it to be
easily removed by gently pulling on stem. Insert stem of grinding
stone or sanding drum into collet and tighten by turning wrench
clockwise.
APPLYING SANDING BANDS TO GRINDING
DRUM:
-Select either the 60 or 100 grit sanding band (60 grit medium
sanding band for quick and efficient grinding down of your pet’s
nail; 100 grit fine sanding band for smoothing uneven rough nails.)
-While pressing the collet lock to keep shaft from turning,
firmly, loosen the single screw on the top of the grinding
drum by turning the screw counter clockwise.
-Slide off the sanding band and replace with a new
sanding band.
-Retighten the screw on top of the grinding drum. This will
allow the drum to expand, creating the perfect fit.
-Screw on the protective cap
- Screw Safety Nail Guard back on top. This is only used
with the Grinding Bands
Trimming Pet’s Nails
1. Run unit on first speed around the animal until they are
comfortable with the sound and vibration before making
contact with nail.
Take pets paw and gently squeeze
the nail between the thumb and
pointer finger to extract nail.
Turn grinder “ON”. The “ON/OFF”
switch is located on the front of the
grinder. Start with 1st Speed.
Pull hair back from hair area.
Always keep hair away from
spinning parts. If hair is
accidentally caught in spinning
drum, immediately turn power OFF
and untangle hair.
2. Slide nail into hole on safety
guard according to where it
fits best.
It is possible to not use the guard
but caution must always be taken.
- Begin filing each nail for no more than 2-4 seconds at a time.
Alternate between each nail - NEVER trim a nail completely
at a time.
- Checking the nail each time you file to be sure you are taking
off one layer at a time.
- Stop when you get close to the Quick. You will see the Quick
begin to appear when you look at the nail
head on.
4. To round the tip of hte nail, us the Grinding
Stone. Gently run the nail in the top
concave area as shown to round out edges
and ridges.
Please register your Wahl Clipper online at: WahlUSA.com
Purchase Confirmation-
With the information you provide, we confirm the date of
purchase of your product. This confirmation is of benefit to
you, especially if your original proof of purchase is lost.
Proof of Ownership-
Your UPC number, item number and other information will be
kept in our files for up to ten years.
Question? contact us at:
www.WahlUSA.com
or 1-800-767-9245
© 2019 WAHL CLIPPER CORPORATION
P.O. Box 578, Sterling, Illinois 61081 USA
Printed in China
Part #55542
v.2019.01
HOW TO CHANGE THE
BATTERIES
-When the battery is low, the speed of the unit will be slower. This
means it is time to change your batteries.
-Please make sure the grinder is in the “OFF”, or “O”, position before
changing batteries.
-The battery door is located on the bottom of the grinder. Hold the
unit with one hand and unscrew the bottom cap (battery door) with
the other hand. Twist door counter clockwise, lining up the arrow
and the symbol. You will feel it click into place, then pull two
pieces apart.
-Once 4AA Alkaline batteries are placed within the shaft of the
grinder, replace the bottom cap by screwing clockwise and line up
the arrow with the .
-To place batteries in correctly, look for the + and - symbols on the
bottom of the unit.