ENGLISH
1
E
IMPORTANT INFORMATION
PN-455
LCD MONITOR
ENGLISH
IMPORTANT:
To aid reporting in case of loss or theft, please
record the product’s model and serial numbers in
the space provided. The numbers are located in
the rear of the product.
Model No.:
Serial No.:
U.S.A. ONLY
WARNING: TO REDUCE THE RISK OF FIRE OR ELECTRIC SHOCK, DO NOT
EXPOSE THIS PRODUCT TO RAIN OR MOISTURE.
RISK OF ELECTRIC
SHOCK
DO NOT OPEN
CAUTION
CAUTION: TO REDUCE THE RISK OF
ELECTRIC SHOCK, DO NOT
REMOVE COVER.
NO USER-SERVICEABLE
PA RTS INSIDE.
REFER SERVICING TO QUALI-
FIED SERVICE PERSONNEL.
The lightning flash with arrowhead
symbol, within an equilateral triangle, is
intended to alert the user to the pres-
ence of uninsulated “dangerous voltage”
within the product’s enclosure that may
be of sufficient magnitude to constitute a
risk of electric shock to persons.
The exclamation point within a triangle
is intended to alert the user to the
presence of important operating and
maintenance (servicing) instructions in
the literature accompanying the product.
2
E
IMPORTANT INFORMATION (Continued)
WARNING: FCC Regulations state that any unauthorized changes or modifications to this equip-
ment not expressly approved by the manufacturer could void the user’s authority to
operate this equipment.
U.S.A. ONLY
CAUTION: Use the supplied AC cord as it is.
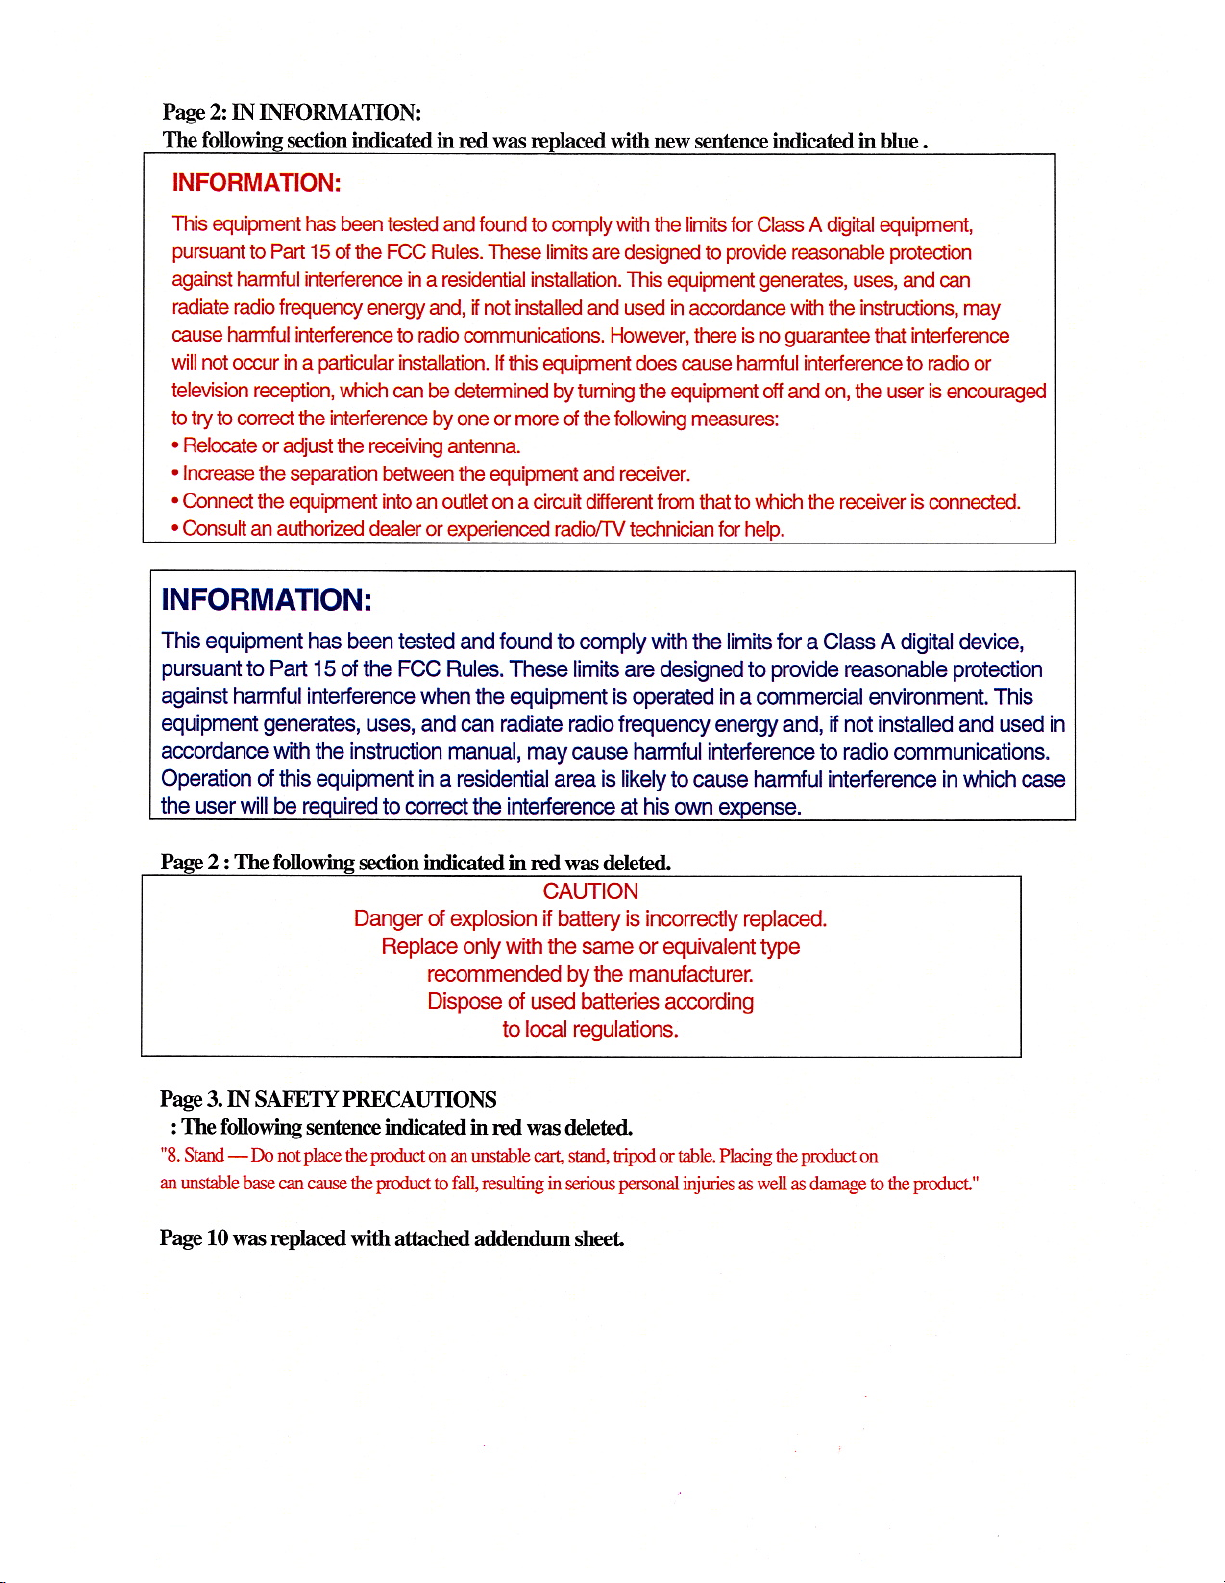
INFORMATION:
This equipment has been tested and found to comply with the limits for Class A digital equipment,
pursuant to Part 15 of the FCC Rules. These limits are designed to provide reasonable protection
against harmful interference in a residential installation. This equipment generates, uses, and can
radiate radio frequency energy and, if not installed and used in accordance with the instructions, may
cause harmful interference to radio communications. However, there is no guarantee that interference
will not occur in a particular installation. If this equipment does cause harmful interference to radio or
television reception, which can be determined by turning the equipment off and on, the user is encour-
aged to try to correct the interference by one or more of the following measures:
• Relocate or adjust the receiving antenna.
• Increase the separation between the equipment and receiver.
• Connect the equipment into an outlet on a circuit different from that to which the receiver is con-
nected.
• Consult an authorized dealer or experienced radio/TV technician for help.
U.S.A. ONLY
CAUTION
Danger of explosion if battery is incorrectly replaced.
Replace only with the same or equivalent type
recommended by the manufacturer.
Dispose of used batteries according
to local regulations.
This product utilizes fluorescent tubes containing a small amount of mercury.
Disposal of these materials may be regulated due to environmental considerations. For disposal or
recycling information, please contact your local authorities or the Electronic Industries Alliance:
www.eia.org

ENGLISH
3
E
Thank you for your purchase of a SHARP LCD product. To ensure safety and many years of
trouble-free operation of your product, please read the Safety Precautions carefully before using
this product.
SAFETY PRECAUTIONS
Electricity is used to perform many useful functions, but it can also cause personal injuries and property
damage if improperly handled. This product has been engineered and manufactured with the highest
priority on safety. However, improper use can result in electric shock and/or fire. In order to prevent
potential danger, please observe the following instructions when installing, operating and cleaning the
product. To ensure your safety and prolong the service life of your LCD product, please read the following
precautions carefully before using the product.
1. Read instructions — All operating instructions must be read and understood before the product is
operated.
2. Keep this manual in a safe place — These safety and operating instructions must be kept in a safe
place for future reference.
3. Observe warnings — All warnings on the product and in the instructions must be observed closely.
4. Follow instructions — All operating instructions must be followed.
5. Cleaning — Unplug the power cord from the AC outlet before cleaning the product. Use a damp cloth
to clean the product. Do not use liquid cleaners or aerosol cleaners.
6. Attachments — Do not use attachments not recommended by the manufacturer. Use of inadequate
attachments can result in accidents.
7. Water and moisture — Do not use the product near water, such as bathtub, washbasin, kitchen sink
and laundry tub, swimming pool and in a wet basement.
8. Stand — Do not place the product on an unstable cart, stand, tripod or table. Placing the product on
an unstable base can cause the product to fall, resulting in serious personal injuries as well as dam-
age to the product.
9. Ventilation — The vents and other openings in the cabinet are designed for ventilation.
Do not cover or block these vents and openings since insufficient ventilation can cause
overheating and/or shorten the life of the product. Do not place the product on a bed,
sofa, rug or other similar surface, since they can block ventilation openings. Do not
place the product in an enclosed place such as a bookcase or rack, unless proper
ventilation is provided or the manufacturer’s instructions are followed.
10. Power cord protection — The power cords must be routed properly to prevent people
from stepping on them or objects from resting on them.
11. The LCD panel used in this product is made of glass. Therefore, it can break when the product is
dropped or applied with impact. Be careful not to be injured by broken glass pieces in case the LCD
panel breaks.
12. Overloading — Do not overload AC outlets or extension cords. Overloading can cause fire or electric
shock.
13. Entering of objects and liquids — Never insert an object into the product through vents or openings.
High voltage flows in the product, and inserting an object can cause electric shock and/or short
internal parts.
For the same reason, do not spill water or liquid on the product.
14. Servicing — Do not attempt to service the product yourself. Removing covers can expose you to high
voltage and other dangerous conditions. Request a qualified service person to perform servicing.
15. Repair — If any of the following conditions occurs, unplug the power cord from the AC outlet, and
request a qualified service person to perform repairs.
a. When the power cord or plug is damaged.
b. When a liquid was spilled on the product or when objects have fallen into the product.
c. When the product has been exposed to rain or water.
d. When the product does not operate properly as described in the operating instructions.
Do not touch the controls other than those described in the operating instructions. Improper
adjustment of controls not described in the instructions can cause damage, which often requires
extensive adjustment work by a qualified technician.
DEAR SHARP CUSTOMER
4
E
e. When the product has been dropped or damaged.
f. When the product displays an abnormal condition. Any noticeable abnormality in the product
indicates that the product needs servicing.
16. Replacement parts — In case the product needs replacement parts, make sure that the service
person uses replacement parts specified by the manufacturer, or those with the same characteristics
and performance as the original parts. Use of unauthorized parts can result in fire, electric shock
and/or other danger.
17. Safety checks — Upon completion of service or repair work, request the service technician to per-
form safety checks to ensure that the product is in proper operating condition.
18. Wall or ceiling mounting — When mounting the product on a wall or ceiling, be sure to install the
product according to the method recommended by the manufacturer.
19. Heat sources — Keep the product away from heat sources such as radiators, heaters, stoves and
other heat-generating products (including amplifiers).
20. Power source —This product must operate on a power source specified on the specification label. If
you are not sure of the type of power supply used in your home, consult your dealer or local power
company.
For units designed to operate on batteries or another power source, refer to the operating instruc-
tions.
WARNING:
This is a class A product. In a domestic environment this product may cause radio interference in
which case the user may be required to take adequate measures.
WARNING:
To reduce the risk of fire or electric shock, do not expose this product to rain or moisture.
SAFETY PRECAUTIONS (Continued)

ENGLISH
5
E
- The TFT color LCD panel used in this monitor is
made with the application of high precision
technology. However, there may be minute
points on the screen where pixels never light or
are permanently lit. Also, if the screen is viewed
from an acute angle there may be uneven colors
or brightness. Please note that these are not
malfunctions but common phenomena of LCDs
and will not affect the performance of the moni-
tor.
- Do not display the same image on the screen
for a long period of time, as this may cause an
afterimage to remain.
- The quality of the computer signal may influ-
ence the quality of the display. We recommend
using a computer able to perform high quality
video signals.
-Never rub or tap the monitor with hard objects.
- Please understand that Sharp Corporation
bears no responsibility for errors made during
use by the customer or a third party, nor for any
other malfunctions or damage to this product
arising during use, except where indemnity
liability is recognized under law.
- This monitor and its accessories may be up-
graded without advance notice.
- Do not use the monitor where ventilation is poor,
where there is a lot of dust, where humidity is
high, or where the monitor may come into
contact with oil or steam, as this could lead to
fire.
- Ensure that the monitor does not come into
contact with water or other fluids. Ensure that no
objects such as paper clips or pins enter the
monitor as this could lead to fire or electric
shock.
- Do not place the monitor on top of unstable
objects or in unsafe places. Do not allow the
monitor to receive strong shocks or to strongly
vibrate. Causing the monitor to fall or topple
over may damage it.
- Do not use in places where the monitor will be
subject to direct sunlight, near heating equip-
ment or anywhere else where there is likelihood
of high temperature, as this may lead to genera-
tion of excessive heat and outbreak of fire.
The Power Cord
- Do not damage the power cord nor place heavy
objects on it, stretch it or over bend it. Also, do
not add extension cords. Damage to the cord
may result in fire or electric shock.
- Use only the power cord supplied with the
monitor.
- Insert the power plug directly into the AC outlet.
Adding an extension cord may lead to fire as a
result of overheating.
- Do not remove or insert the power plug with wet
hands. Doing so could result in electric shock.
Manual Scope
- In this manual, Microsoft Windows XP will be
referred to as “Windows XP”, and Microsoft
Windows 2000 as “Windows 2000”.
When there is no need to distinguish between
programs, the term “Windows” will be used.
- Microsoft and Windows are registered trade-
marks of Microsoft Corporation.
- All other brand and product names are trade-
marks or registered trademarks of their respec-
tive holders.
- Language of OSD menu used in this manual is
English by way of example.
- Illustrations in this manual may not exactly
represent the actual product or display.
Fluorescent Tubes
● The fluorescent tubes in this product have a
limited lifetime.
* If the screen gets dark, flashes, or does not turn on,
change the fluorescent tubes with new exclusive ones.
*For more information, please contact your product
dealer.
● Because of the property of fluorescent tubes,
the screen may flash during the initial period of
use. If this happens, please turn off the main
power switch on the top of the monitor and turn
on again to confirm operation.
TIPS AND SAFETY PRECAUTIONS

6
E
Contents
Introduction
IMPORTANT INFORMATION.................................................................................... 1
DEAR SHARP CUSTOMER ..................................................................................... 3
SAFETY PRECAUTIONS ......................................................................................... 3
TIPS AND SAFETY PRECAUTIONS ........................................................................ 5
Features.................................................................................................................... 7
Supplied Accessories ............................................................................................. 8
Part Names - Display ............................................................................................... 9
Front view.............................................................................................................. 9
Rear view ............................................................................................................ 10
Part Names - Remote Control Unit ....................................................................... 11
Removing the battery cover ................................................................................ 12
Remote control operation range ......................................................................... 12
Connection and Installation
Connecting Peripheral Equipment ....................................................................... 13
Connecting External Speakers............................................................................. 18
Connecting the AC Cord ....................................................................................... 19
Connecting Multiple Monitors .............................................................................. 20
Mounting Precautions ........................................................................................... 21
Mounting the Temporary Stands .......................................................................... 22
Bundling Cables .................................................................................................... 22
Attaching the Carrying Handles ........................................................................... 23
Basic Operation
Turning on Power................................................................................................... 24
Main power switch ............................................................................................... 24
Tu r ning power on/off using remote control .......................................................... 24
Remote Control Unit .............................................................................................. 25
Menu Items ............................................................................................................. 26
Menu option selection ......................................................................................... 26
Menu screen explanation .................................................................................... 28
Initialization (Reset)/Functional Restriction Setting .......................................... 29
Settings and Adjustments .................................................................................... 30
Screen display for adjustments (INPUT2) ........................................................... 36
Set-up information (INPUT1 / INPUT2) ............................................................... 37
PC Operation
PC Operation .......................................................................................................... 38
PC connection..................................................................................................... 38
Communication conditions .................................................................................. 39
Communication procedure .................................................................................. 40
RS-232C command table .................................................................................... 47
Troubleshooting and Specifications
Troubleshooting ..................................................................................................... 52
Specifications ........................................................................................................ 54
Appendix
PC Digital/Analog Signal Input Compatibility Chart ........................................... 56
Connector Compatibility Charts .......................................................................... 57
Dimensional Drawings .......................................................................................... 58
Menu Option Reference Chart .............................................................................. 59

ENGLISH
7
E
Features
● HIGH-DEFINITION (HD) LCD PANEL
•A large, flat LCD panel with 1920 x 1080 pixels lets you enjoy a detailed, high-definition picture.
● ASV*LOW-REFLECTION BLACK TFT LCD PANEL
• SHARP’s unique ASV* low-reflection BLACK TFT LCD panel provides higher luminance, higher
contrast, and a wider viewing angle. This reduces reflection in the monitor when it is placed near a
window, and ensures brighter, more vivid image reproduction. With a wide viewing angle of 170
degrees, both horizontally and vertically, the image is beautiful, even when viewed off axis.
* ASV: Advanced Super View
● EQUIPPED WITH A VARIETY OF TERMINALS
• PC digital RGB input terminal (See pages 10 and 13.)
• PC analog RGB input terminal (See pages 10 and 14.)
• Component input terminal (See pages 10 and 15)
• Composite Video input terminal (See pages 10 and 16.)
• S-video input terminal (See pages 10 and 16.)
• RS-232C input terminal (See pages 10 and 21.)
● ENLARGEMENT FUNCTION
• Allows output of enlarged images for 4- or 9-screen (“2 x 2” or “3 x 3”) setups, without using special-
purpose external equipment. (See page 33.)
● CHAIN CONNECTION OF MULTIPLE MONITORS
• Enables chain connection of monitors using PC analog RGB output terminal. (See page 20.)
• Enables individual control via PC of multiple sets connected in a daisy chain using RS-232C cables.
(See pages 21 and 39.)
● EXTERNAL CONTROL AND STATUS MONITORING FROM A PC
• The monitor can be controlled in various ways from a PC. (See page 38.)
• Multiple monitors can be individually controlled by connecting them in a daisy chain. (See pages 21
and 39.)
● EXTERNAL SPEAKERS CAN BE CONNECTED
• Compatible speakers: L/R, 6 Ω, 10W or larger (See page 18.)
● CONTROL LOCK FUNCTIONS
• The monitor is equipped with various operation lock functions to prevent unintended operation or
mischief. (See page 29.)
8
E
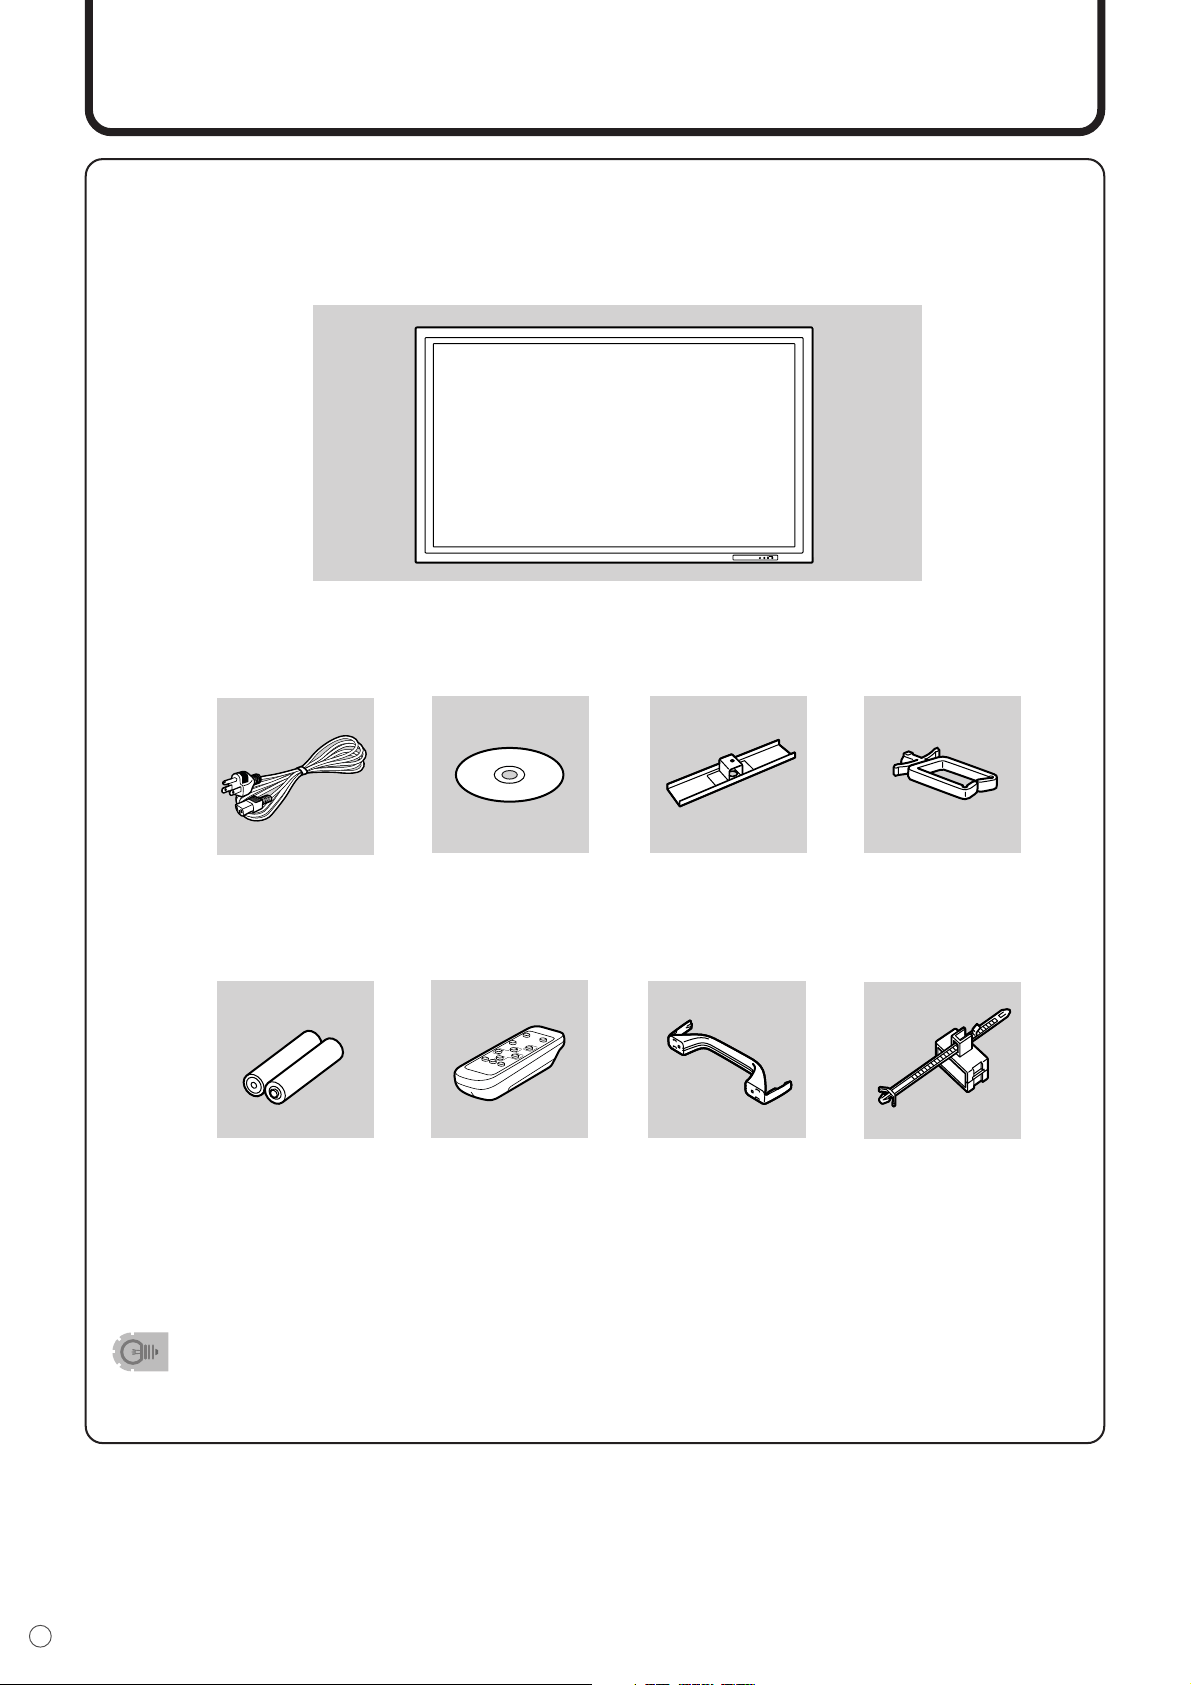
Supplied Accessories
P
O
W
E
R
IN
P
U
T
M
E
N
U
M
U
T
E
D
IS
LA
Y
S
IZ
E
M
O
D
E
REMOTE CONTROL
LC-450F
RRMCG1004MPPZ
B
R
IG
H
T
+
B
R
IG
H
T
-
INPUT
Make sure the following accessories are provided with the product.
AC cord (1) CD-ROM (1)
(Utility Disk for
Windows)
Temporary stand (2)
●Temporary stand
mounting screw (2)
Cable clamp (2)
“AA” size battery (2) Remote control unit (1) Carrying handle (2)
●Carrying handle
mounting screw
(4) / Spacer (4)
AC cord clamp (1)
● Operation manual (1) ● Video connection cable (1)
(0PE1S8022411/)
Liquid Crystal Display (1)
● Component connection cable (1)
(0PEQCNW-1165M)
•You are advised to retain the carton in case the monitor needs to be transported.
• Sharp Corporation holds authorship rights to the Utility Disk program. Do not reproduce it without
permission.
(0PEQACCU1026M)
ENGLISH
9
E
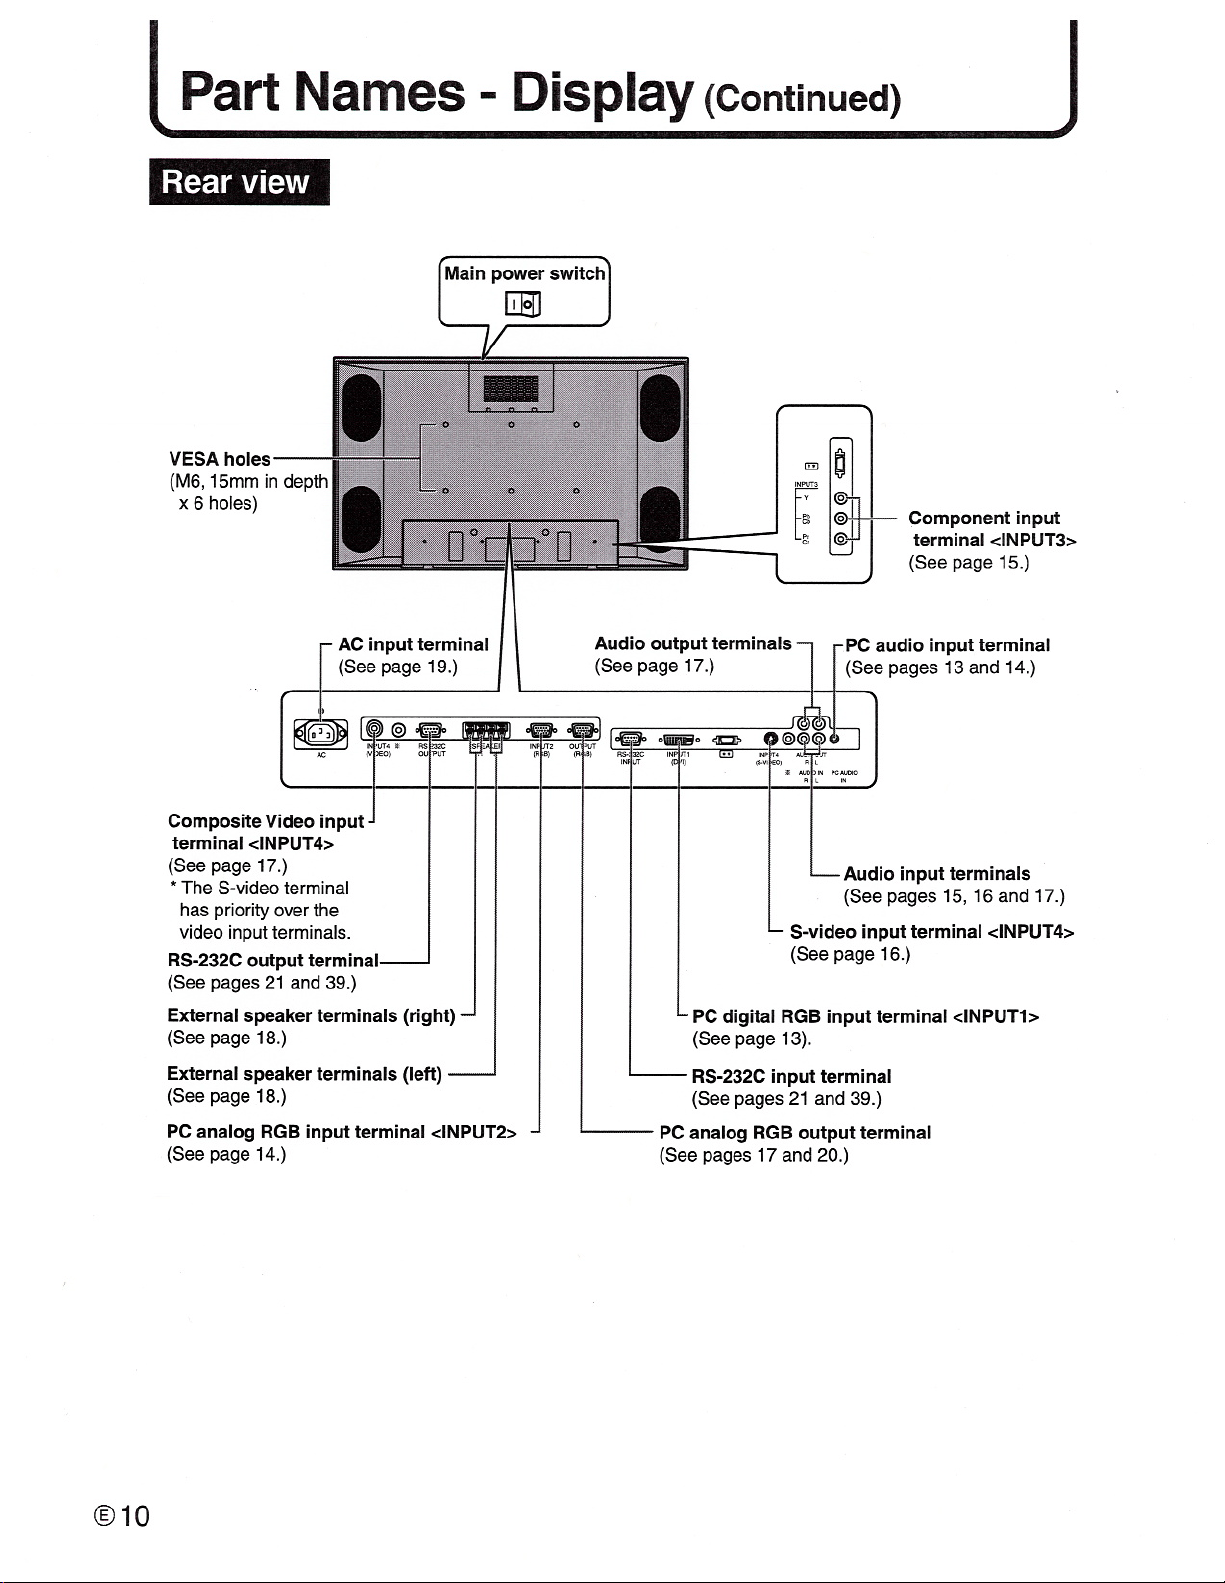
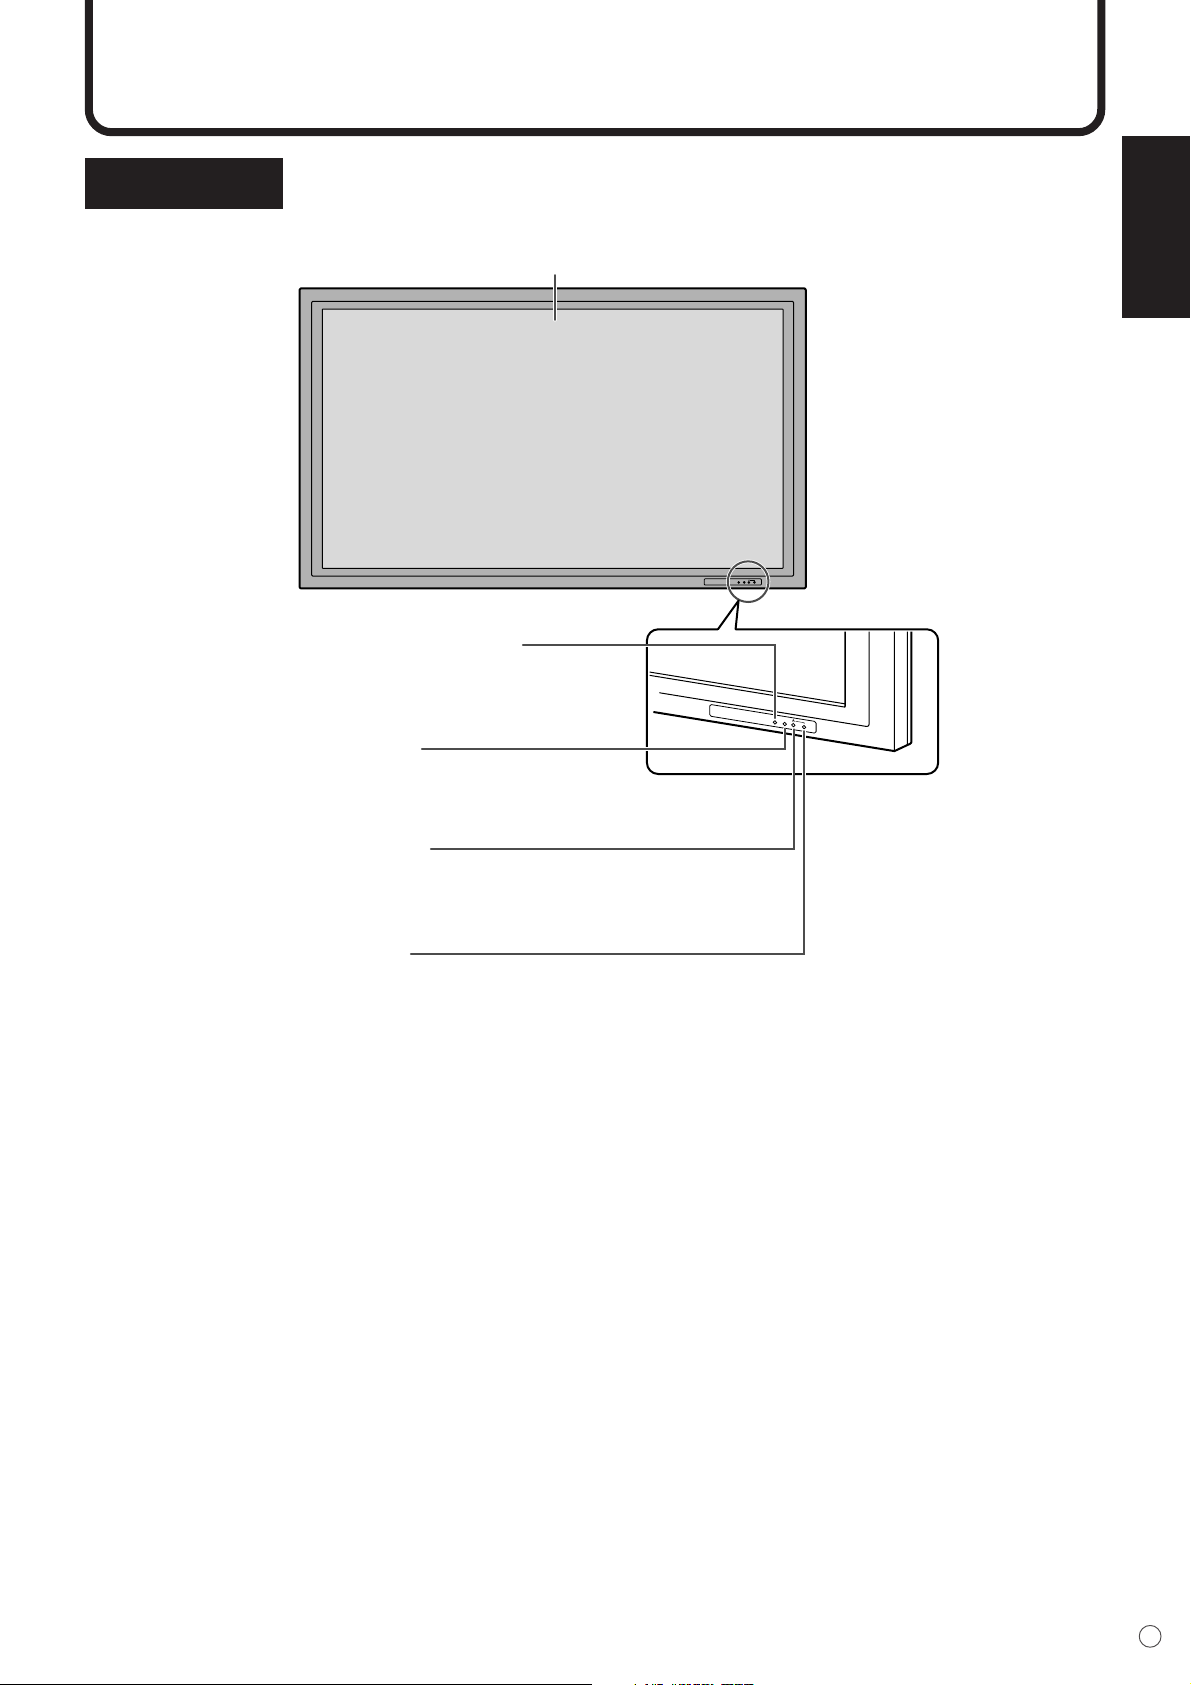
Part Names - Display
Front view
INPUT
INPUT
Power LED
(See page 24.)
Liquid Crystal Display panel
Remote control sensor
(See page 12.)
* When using the remote control,
point it towards here.
Input button
(See page 25.)
* Press with a sharp object such as a pen.
Power button
(See page 24.)
* Press with a sharp object such as a pen.
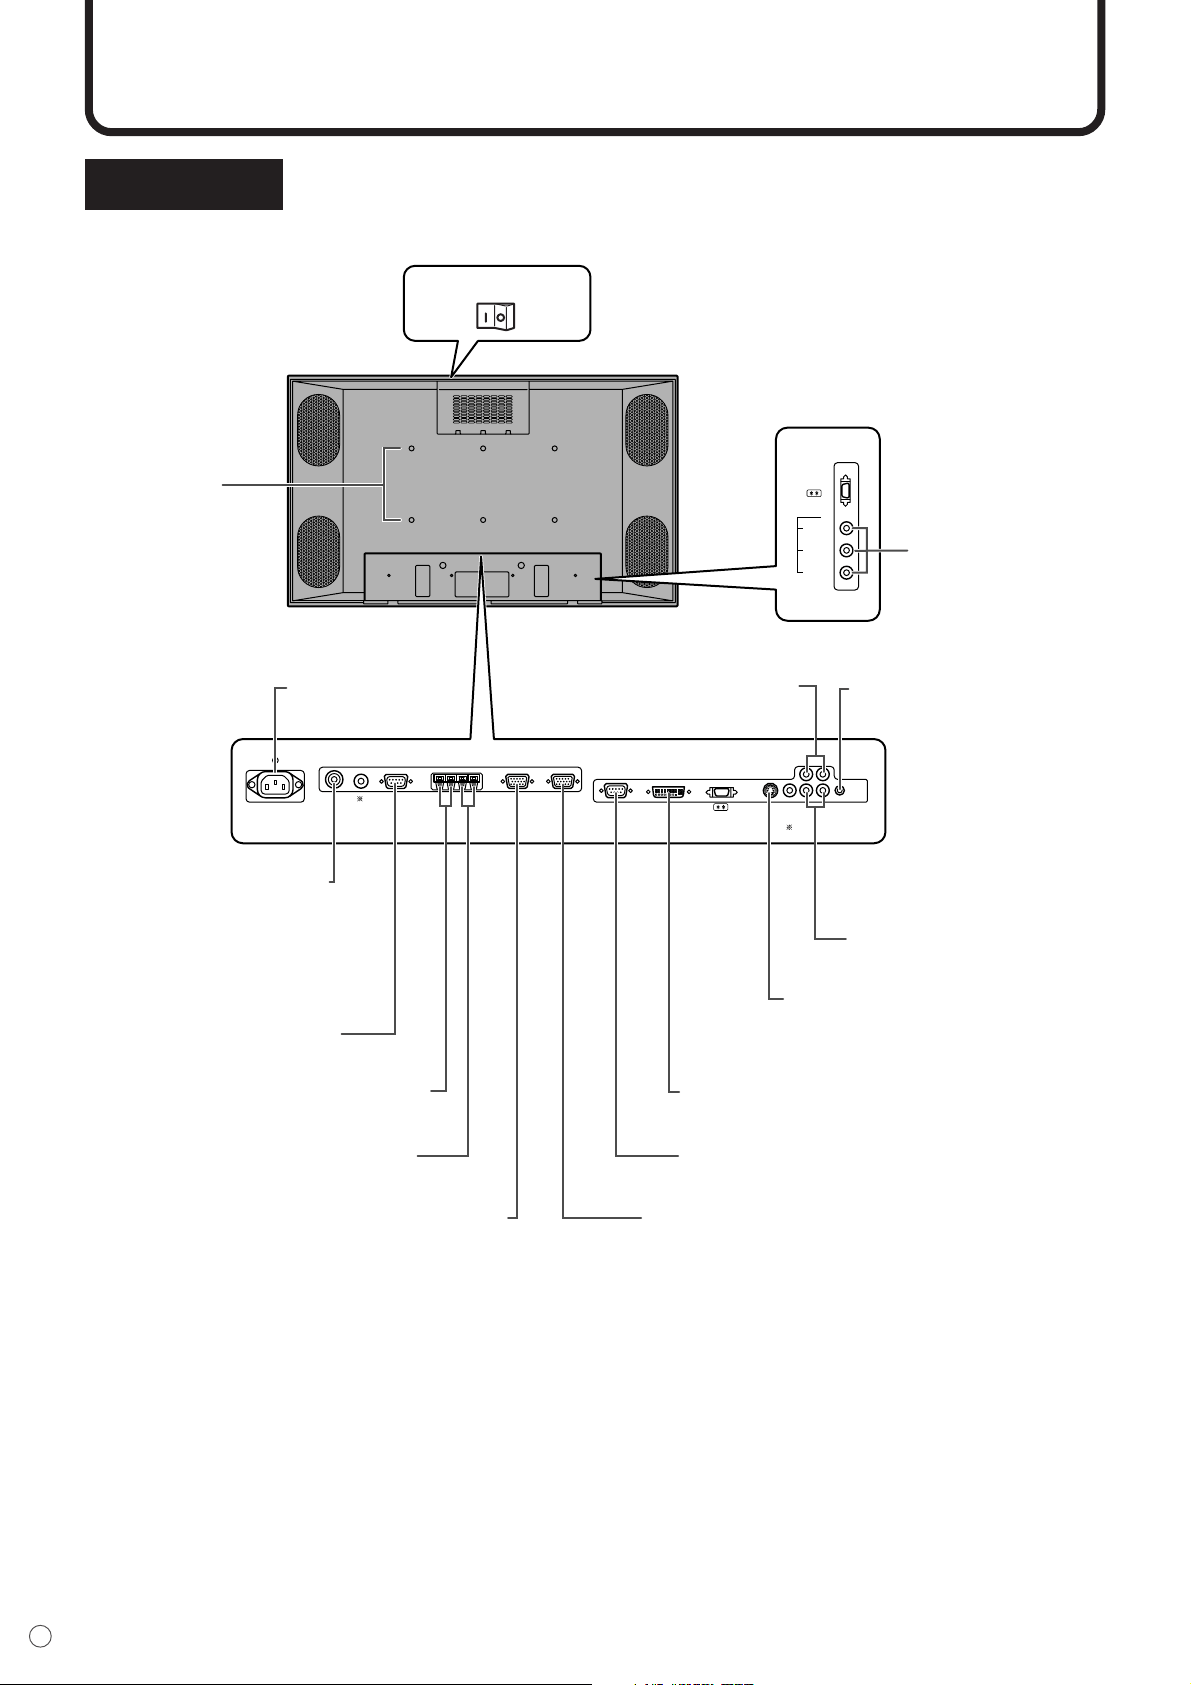
10
E
INPUT2
(RGB)
OUTPUT
(RGB)
RS-232C
OUTPUT
RS-232C
INPUT
SPEAKER
R L
AUDIO IN
R L
AUDIO OUT
R L
INPUT4
(VIDEO)
AC
INPUT1
(DVI)
INPUT4
(S-VIDEO)
PC AUDIO
IN
Pb
Cb
INPUT3
Y
Pr
Cr
AC input terminal
(See page 19.)
RS-232C input terminal
(See pages 21 and 39.)
Main power switch
Composite Video input
terminal <INPUT4>
(See page 17.)
RS-232C output terminal
(See pages 21 and 39.)
External speaker terminals (right)
(See page 18.)
External speaker terminals (left)
(See page 18.)
PC analog RGB input terminal <INPUT2>
(See page 14.)
PC analog RGB output terminal
(See pages 17 and 20.)
PC digital RGB input terminal <INPUT1>
(See page 13).
S-video input terminal <INPUT4>
(See page 16.)
Audio input terminals
(See pages 15, 16 and 17.)
PC audio input terminal
(See pages 13 and 14.)
VESA holes
(M6, 15mm in depth
x 6 holes)
Audio output terminals
(See page 17.)
* The S-video terminal
has priority over the
video input terminals.
Component input
terminal <INPUT3>
(See page 15.)
Rear view
Part Names - Display (Continued)
ENGLISH
11
E
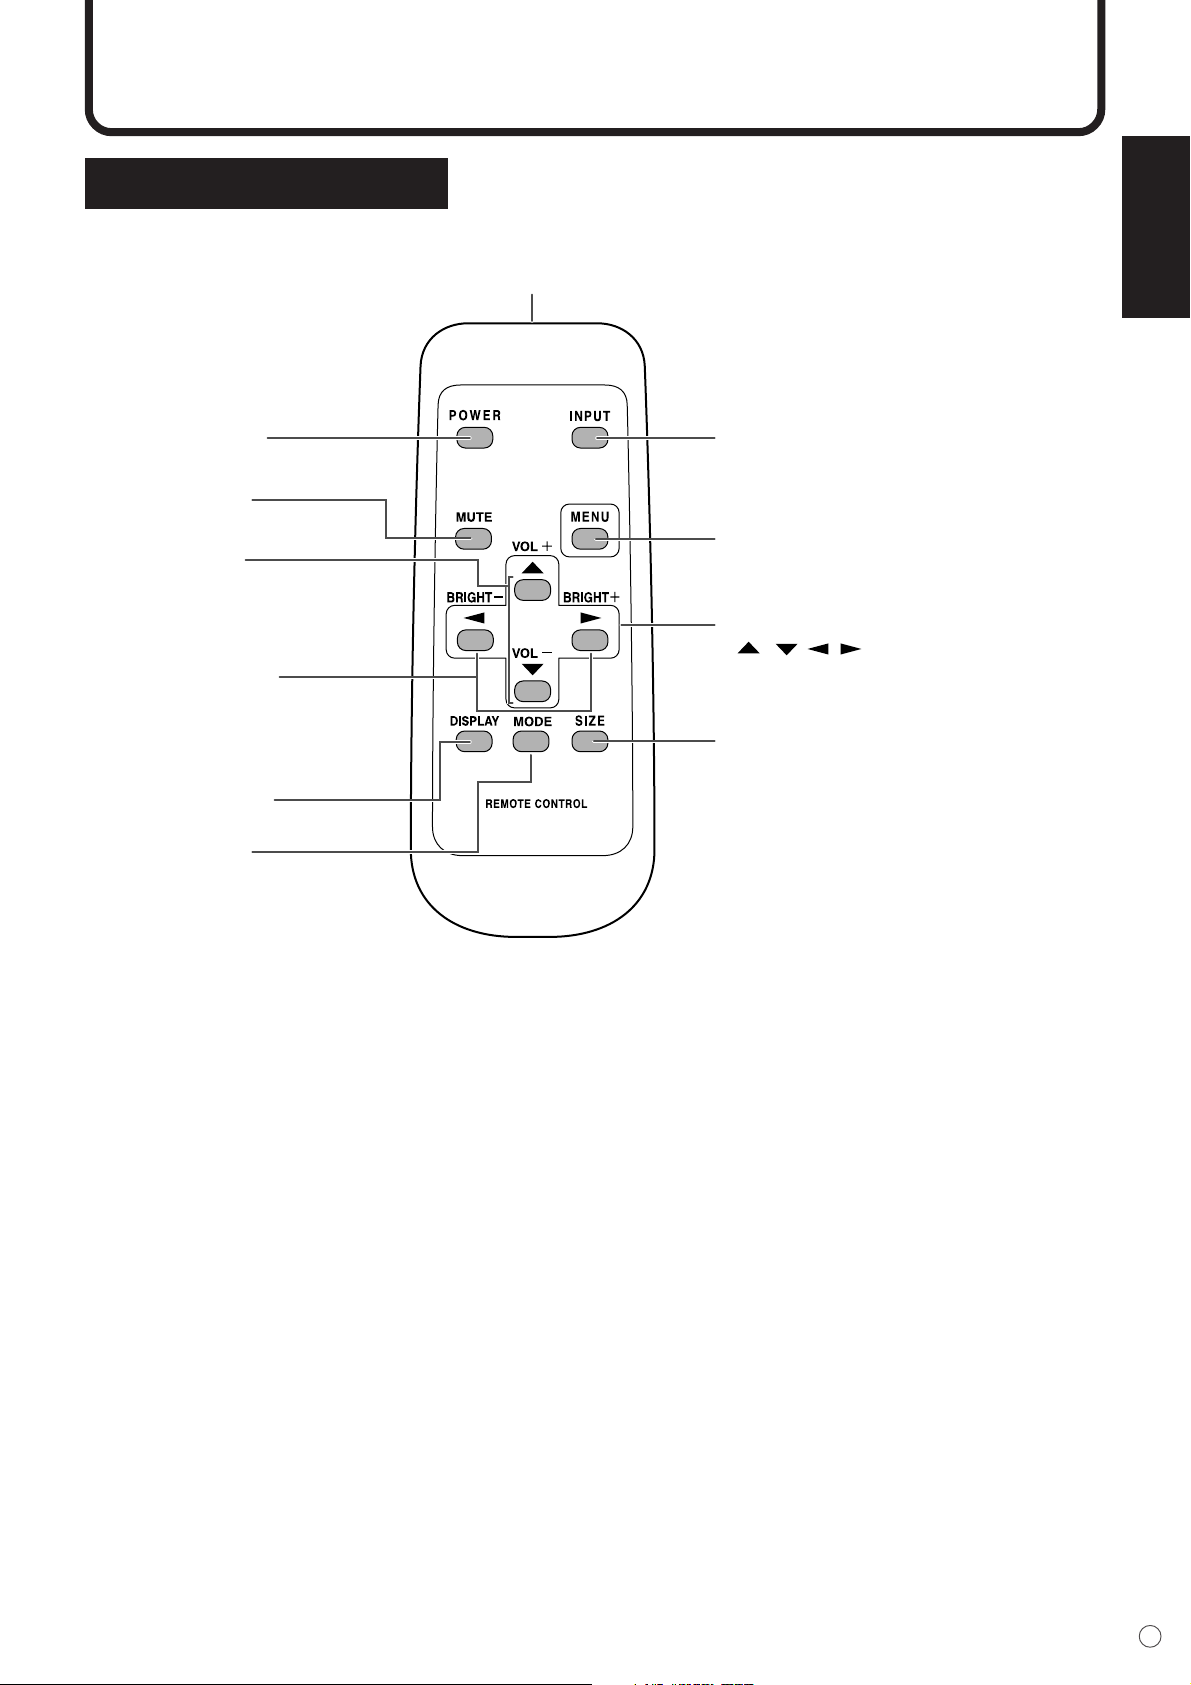
Part Names - Remote Control Unit
POWER button
(See page 24.)
MUTE button
(See page 25.)
DISPLAY button
(See page 25.)
MODE button
(See page 25.)
VOL buttons
(See page 25.)
BRIGHT buttons
(See page 25.)
INPUT button
(See page 25.)
Signal transmitter
MENU button
(See page 26.)
SIZE button
(See page 25.)
Cursor control
( / / / ) buttons (See page 26.)
* You can use this button when
the menu is not displayed.
* You can use this button when
the menu is not displayed.
* You can use this button when
the menu is displayed.
Remote control unit
12
E
Cautions regarding remote control unit
• Do not expose the remote control unit to shock. In addition, do not expose the remote control unit to
liquids, and do not place it in an area with high humidity.
• The remote control unit may not work properly if the remote control sensor is under direct sunlight or
strong lighting. In such cases, change the angle of the lighting or the monitor, or operate the remote
control unit closer to the remote control sensor.
• The batteries supplied with this product may have a shorter life expectancy due to storage conditions.
Replace with new batteries at the earliest opportunity.
• If you will not use the remote control for a long time, remove the batteries.
• If the remote control does not work, even with new batteries, take the batteries out, check whether they
are facing the right way, then replace them.
• Do not use rechargeable (Nickel-metal-hydride) batteries.
Remote control operation range
Operation range of the remote control unit is approx. 7 m (23 ft.) and an angle of approx. 10° from the
center to the top/bottom/right/left of the remote control sensor.
If the remote control unit does not work well:
• Objects between the remote control unit and the remote control sensor may prevent proper operation.
• Replace the batteries when they run low as this may shorten the remote control’s operation range.
• If a fluorescent light is illuminated near the remote control unit, it may interfere with proper operation.
• Do not use it with the remote control of other equipment such as air conditioner, stereo components, etc.
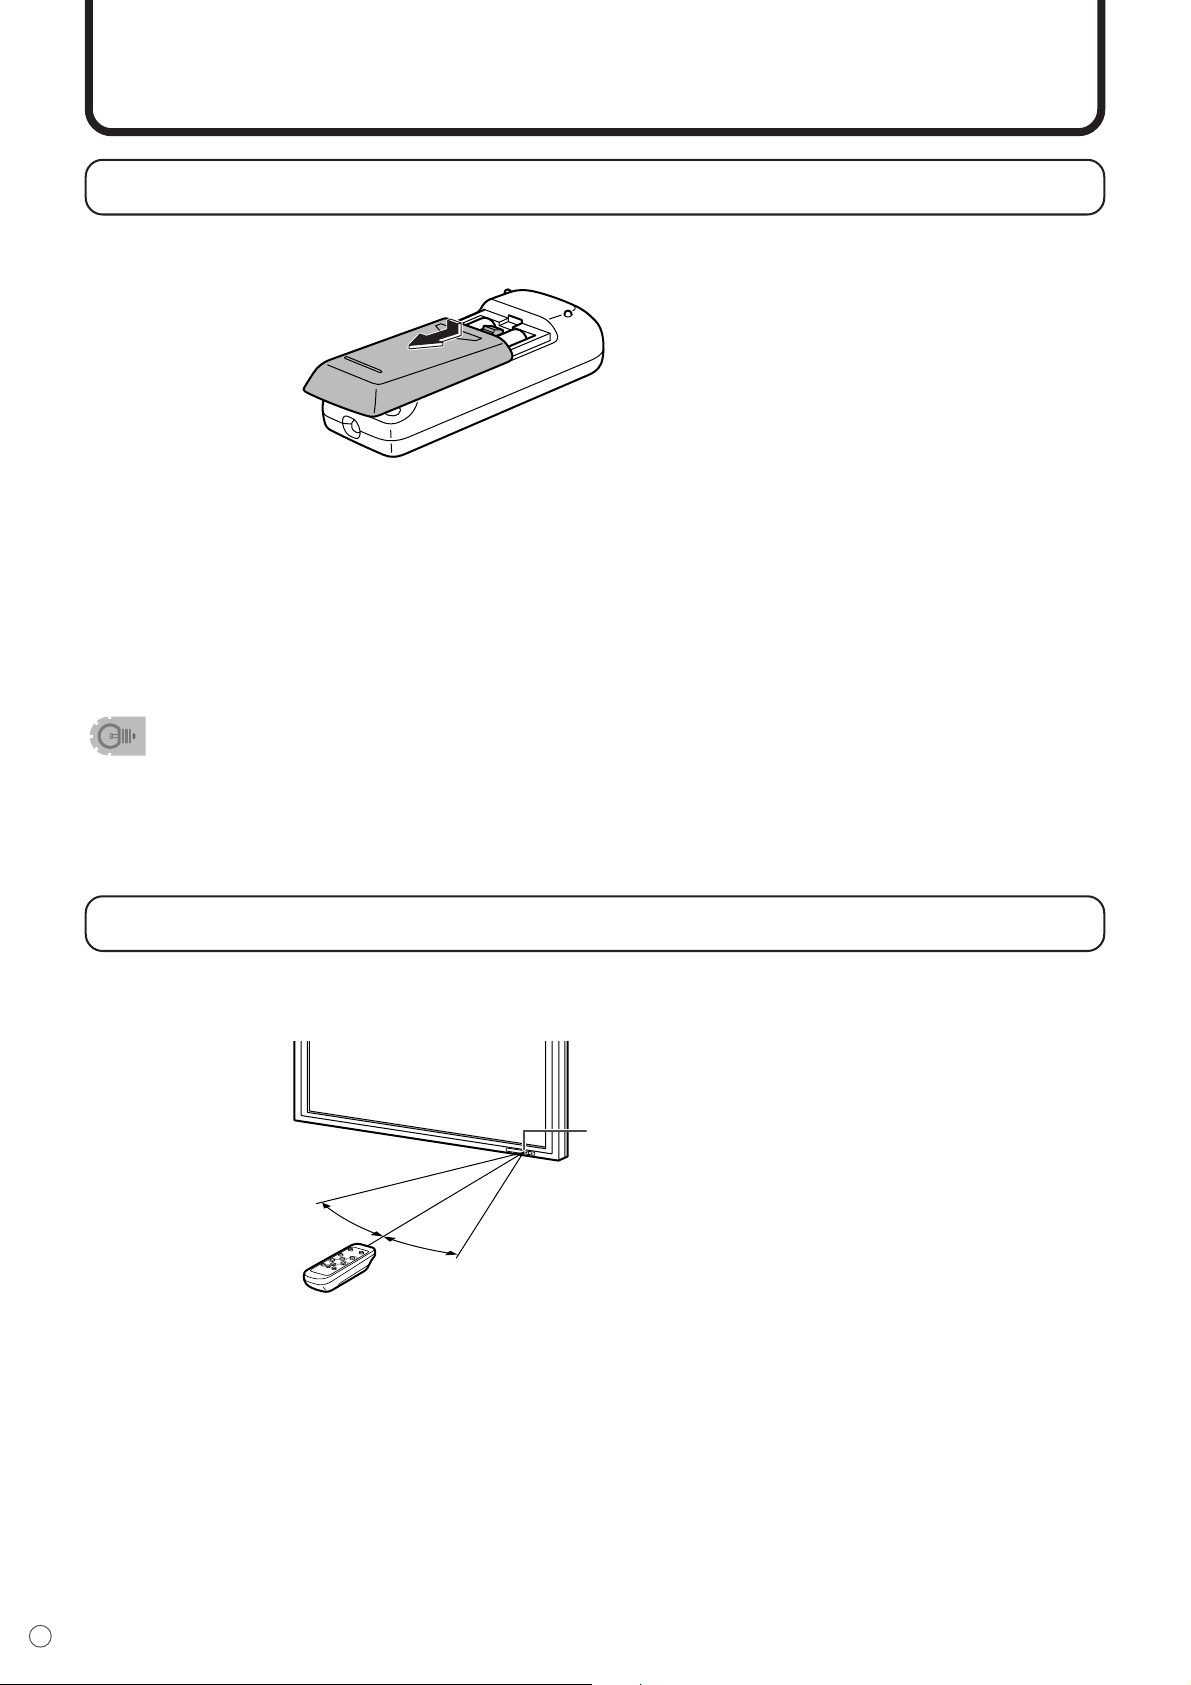
Removing the battery cover
Gently hold down and press in
the arrow direction.
PO
W
ER
IN
P
U
T
M
EN
U
M
U
T
E
SIZ
E
R
E
M
O
T
E
C
O
N
T
R
O
L
B
R
IG
H
T
+
BR
IG
H
T
-
DISPLA
Y
MODE
V
O
L
+
V
O
L
-
10°
10°
13.1 feet (4 m)
13.1 feet
(4 m)
16.4 feet
(5 m)
Remote control sensor
Part Names - Remote Control Unit (Continued)
ENGLISH
13
E
Connecting Peripheral Equipment
The various terminals on the LCD panel are described below.
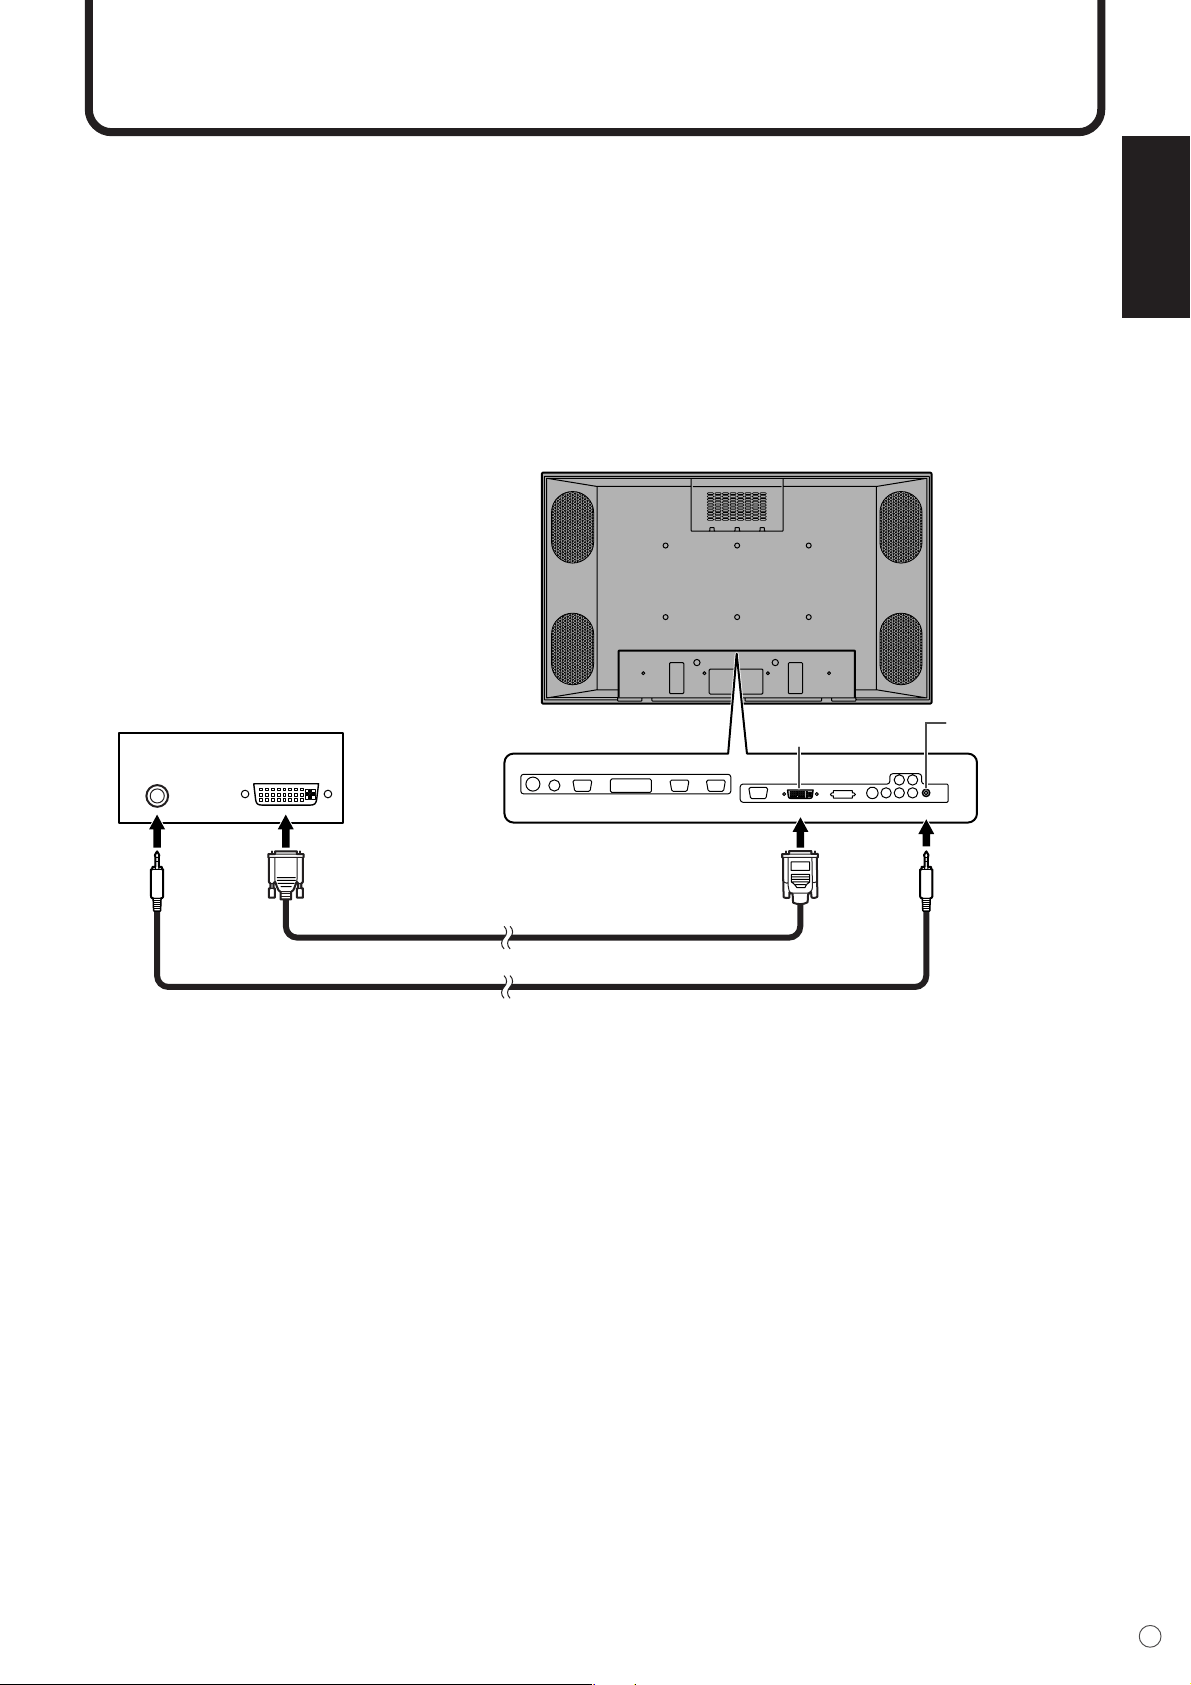
INPUT1 (PC DIGITAL)
• Connect with the digital RGB output terminal on your computer using a digital signal cable (commer-
cially available).
* Connection with computers that have an output terminal (DVI-D 24 pin or DVI-I 29 pin) conforming to DVI is
possible. (However, images may not display properly depending on the computer.)
• Connect with an audio output jack on your computer using a PC audio cable (commercially avail-
able).
Digital signal cable
PC audio cable
Audio Digital RGB
Output terminals on
connected equipment
INPUT1
(DVI)
PC audio input
terminal
PC digital
RGB input terminal
PC AUDIO
IN
▼ Rear view
* See page 56 for compatible signals.
14
E
Connecting Peripheral Equipment (Continued)
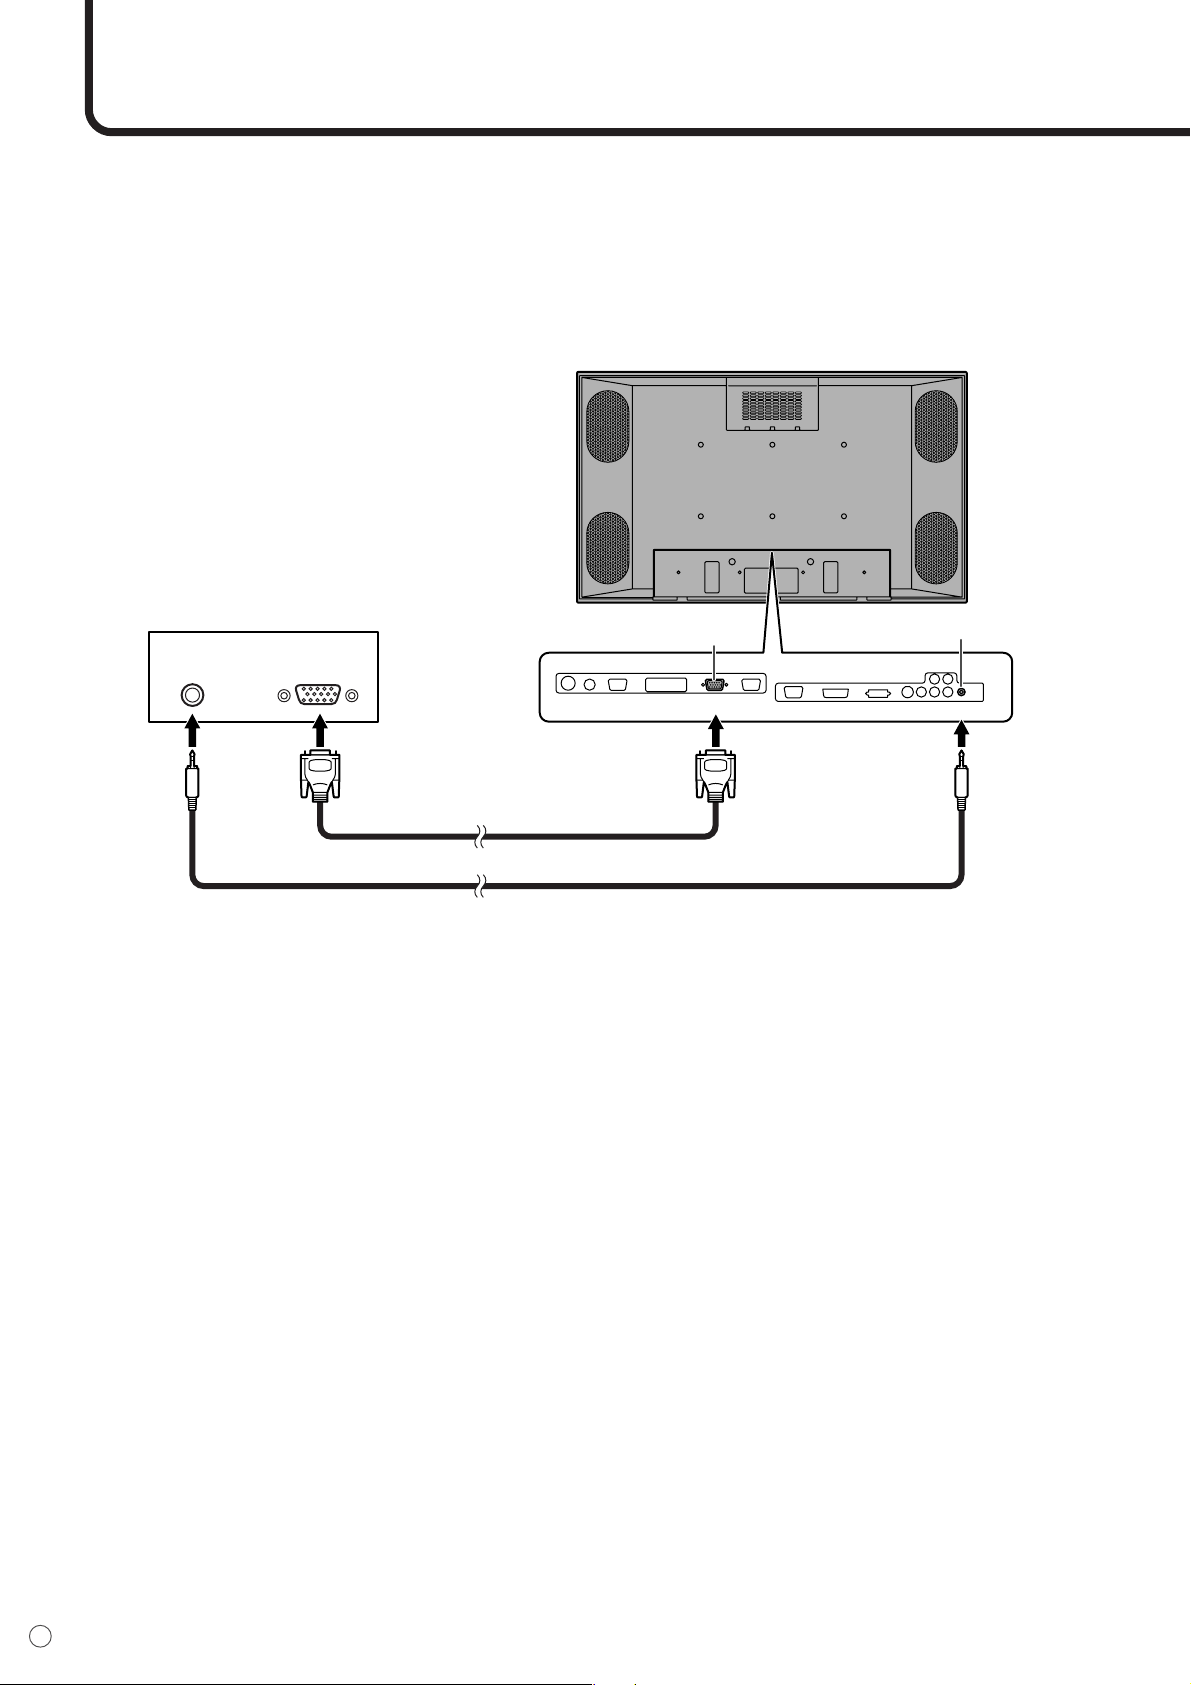
INPUT2 (PC ANALOG)
• Connect with the display connector on your computer using a RGB cable (commercially available).
• Connect with an audio output jack on your computer using a PC audio cable (commercially avail-
able).
RGB cable
PC audio cable
Audio
Display
connector
Output terminals on
connected equipment
PC AUDIO
IN
INPUT2
(RGB)
PC audio input terminal
PC analog
RGB input terminal
▼ Rear view
*1 Auto-detects sync signal type.
*2 Sync signal presence is detected in the order: Composite Sync, Separate Sync and Sync-on-green. If for
some reason Composite Sync and Separate Sync are not input, the system will operate assuming that the
signal is a Sync-on-green (i.e. that the sync signal is contained in the G signal of RGB). This may result in
an unstable image, depending on the video signal.
*3 See page 56 for compatible signals.
ENGLISH
15
E
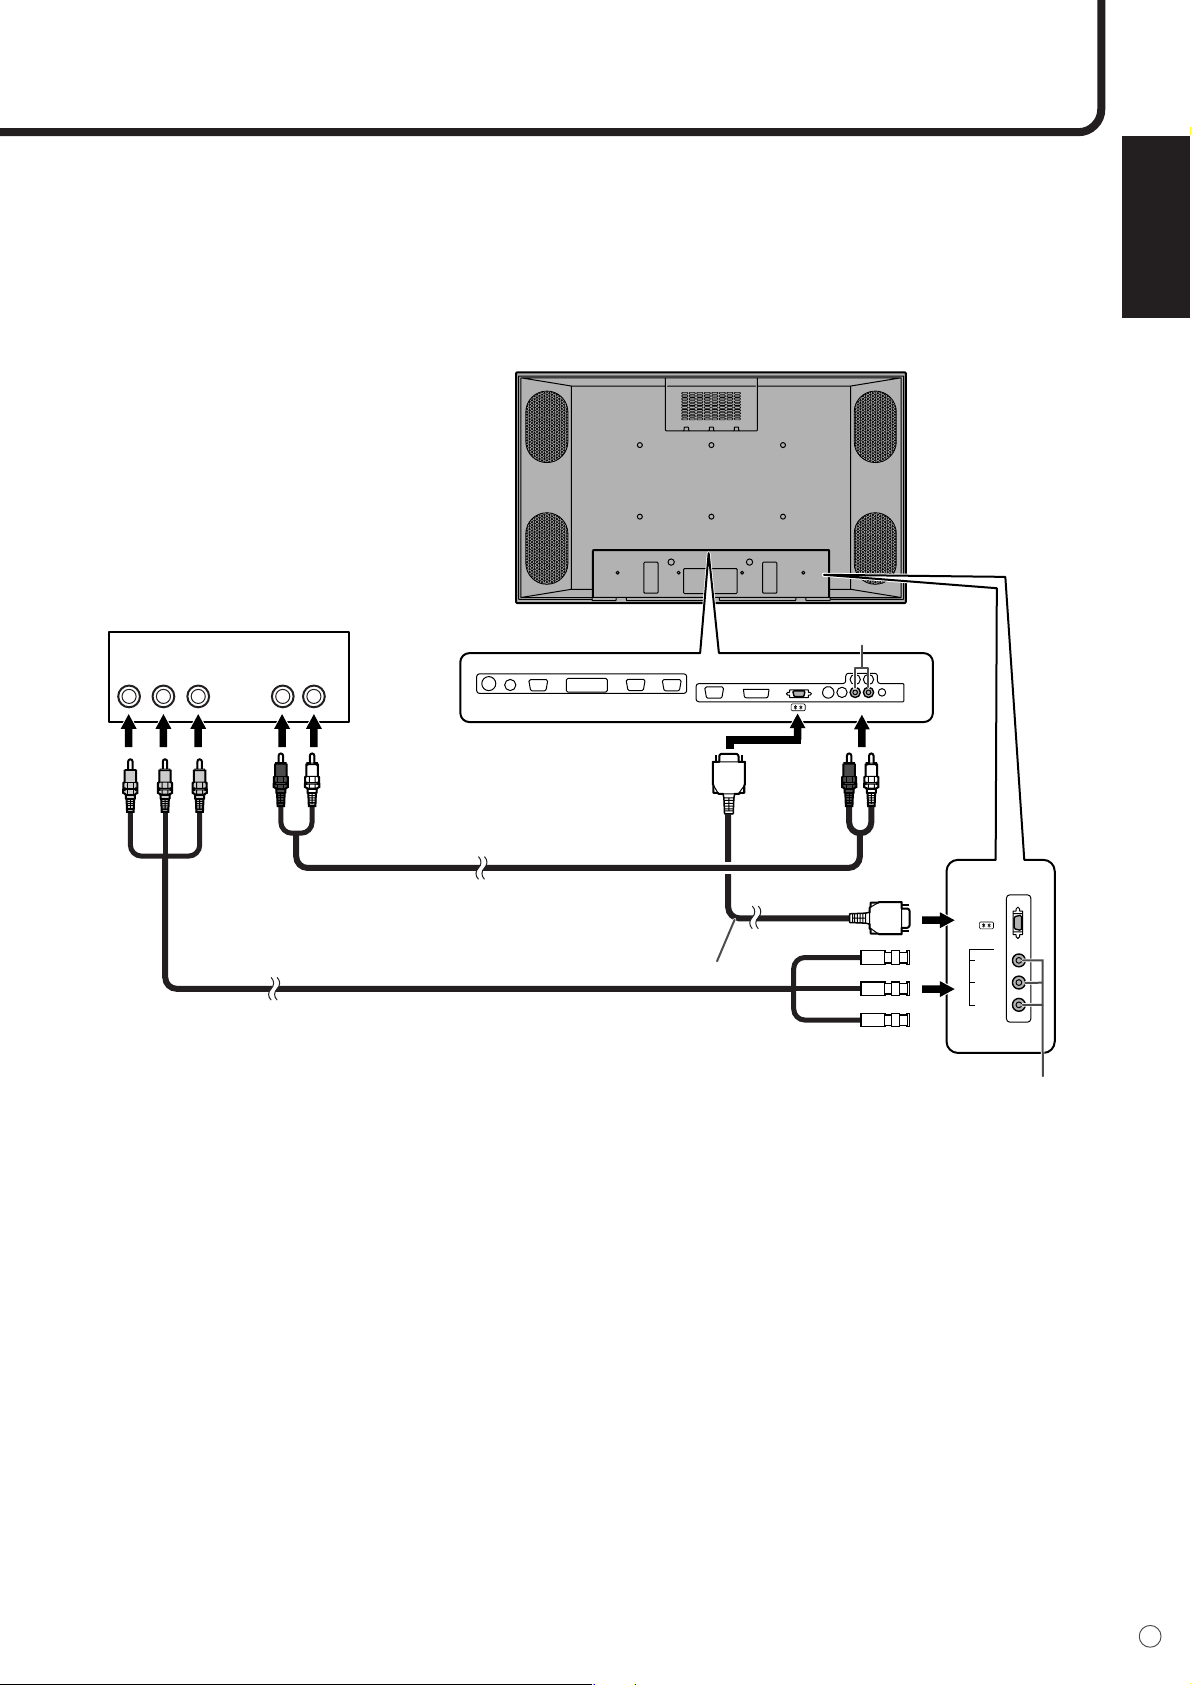
INPUT3 (COMPONENT)
• Connect with component output terminals using a component cable (commercially available).
• Connect with an audio output terminal using an audio (RCA) cable (commercially available).
▼ Rear view
Component cable
Component connection cable(*1)
(Red) (White) (Red) (White)
(Y)
(Pr/Cr)
(Pb/Cb)
(Y)
(Pr/
Cr)
(Pb/
Cb)
Audio cable
Output terminals on
connected equipment
Component
video
Audio - Right
Audio - Left
AUDIO IN
R L
Component
input terminal
Audio input
terminals
Pb
Cb
INPUT3
Y
Pr
Cr
*1 When you connect the monitor with equipment that has a component output terminal, you can use the
supplied component connection cable as shown in the illustration above.

16
E
INPUT4 (S-VIDEO/VIDEO)
• Connect with equipment that has an S-video output terminal using an S-video cable (commercially
available).*
• Connect with equipment that has a video output terminal using a video (BNC) cable (commercially
available).*
• Connect with an audio output terminal using an audio (RCA) cable (commercially available).
(Red) (White)(Red) (White)
Audio cable
S-video
Audio - Right
Audio - Left
S-video cable
Output terminals on
connected equipment
AUDIO IN
R L
INPUT4
(S-VIDEO)
Audio input
terminals
S-video
input terminal
Compatible S-video signal NTSC (3.58 MHz)
▼ Rear view
* S-video input will have priority over composite video when connected.
Connecting Peripheral Equipment (Continued)

ENGLISH
17
E
AUDIO IN
R L
INPUT4
(VIDEO)
Video connection cable (*2)
(Red) (White)
(Red) (White)
Audio cable
Video
Audio - Right
Audio - Left
Video cable
Output terminals on
connected equipment
Audio input
terminals
Composite video input terminal
Compatible video signal NTSC (3.58 MHz)
▼ Rear view
*1 S-video input will have priority over composite video when connected.
*2 When you connect the monitor with equipment that has a video output terminal, you can use the supplied
video connection cable as shown in the illustration above.
PC ANALOG RGB OUTPUT TERMINAL
• Video signal from INPUT2 (PC analog) is output. Use when connecting multiple monitors in a daisy
chain via RGB cables (commercially available). See page 20 for a detailed connection example.
AUDIO OUTPUT TERMINAL
•Audio from the equipment connected to the audio input terminal or PC audio input terminal is output.
Connect to the audio input terminal of the connected equipment using an audio (RCA) cable (com-
mercially available) or a PC audio cable (commercially available).
• The terminal for which audio is output differs by screen mode.
- When input mode is INPUT1 or 2, the audio from the PC audio input terminal will be output.
- When input mode is INPUT3 or 4, the audio from the audio input terminal will be output.

18
E
Connecting External Speakers
SPEAKER
R L
External speaker terminals (right)
Red
Red
Black
External speaker terminals (left)
Be sure to use external speakers with an impedance of 6 ohms and a rated input of at least 10 W.
Connecting the speaker cables
1. While pushing the tab, insert the tip of the cable.
2. Release the tab.
▼ Rear view
Make sure to connect the speaker jack and cable polarity ( , ) properly.
The speaker jacks have plus and minus polarity. Plus is red and minus is black.
The speaker cables are also divided into plus and minus.
When connecting the left/right speakers, be sure to connect the plus/minus jacks with the correct cables.
1.
2.
ENGLISH
19
E
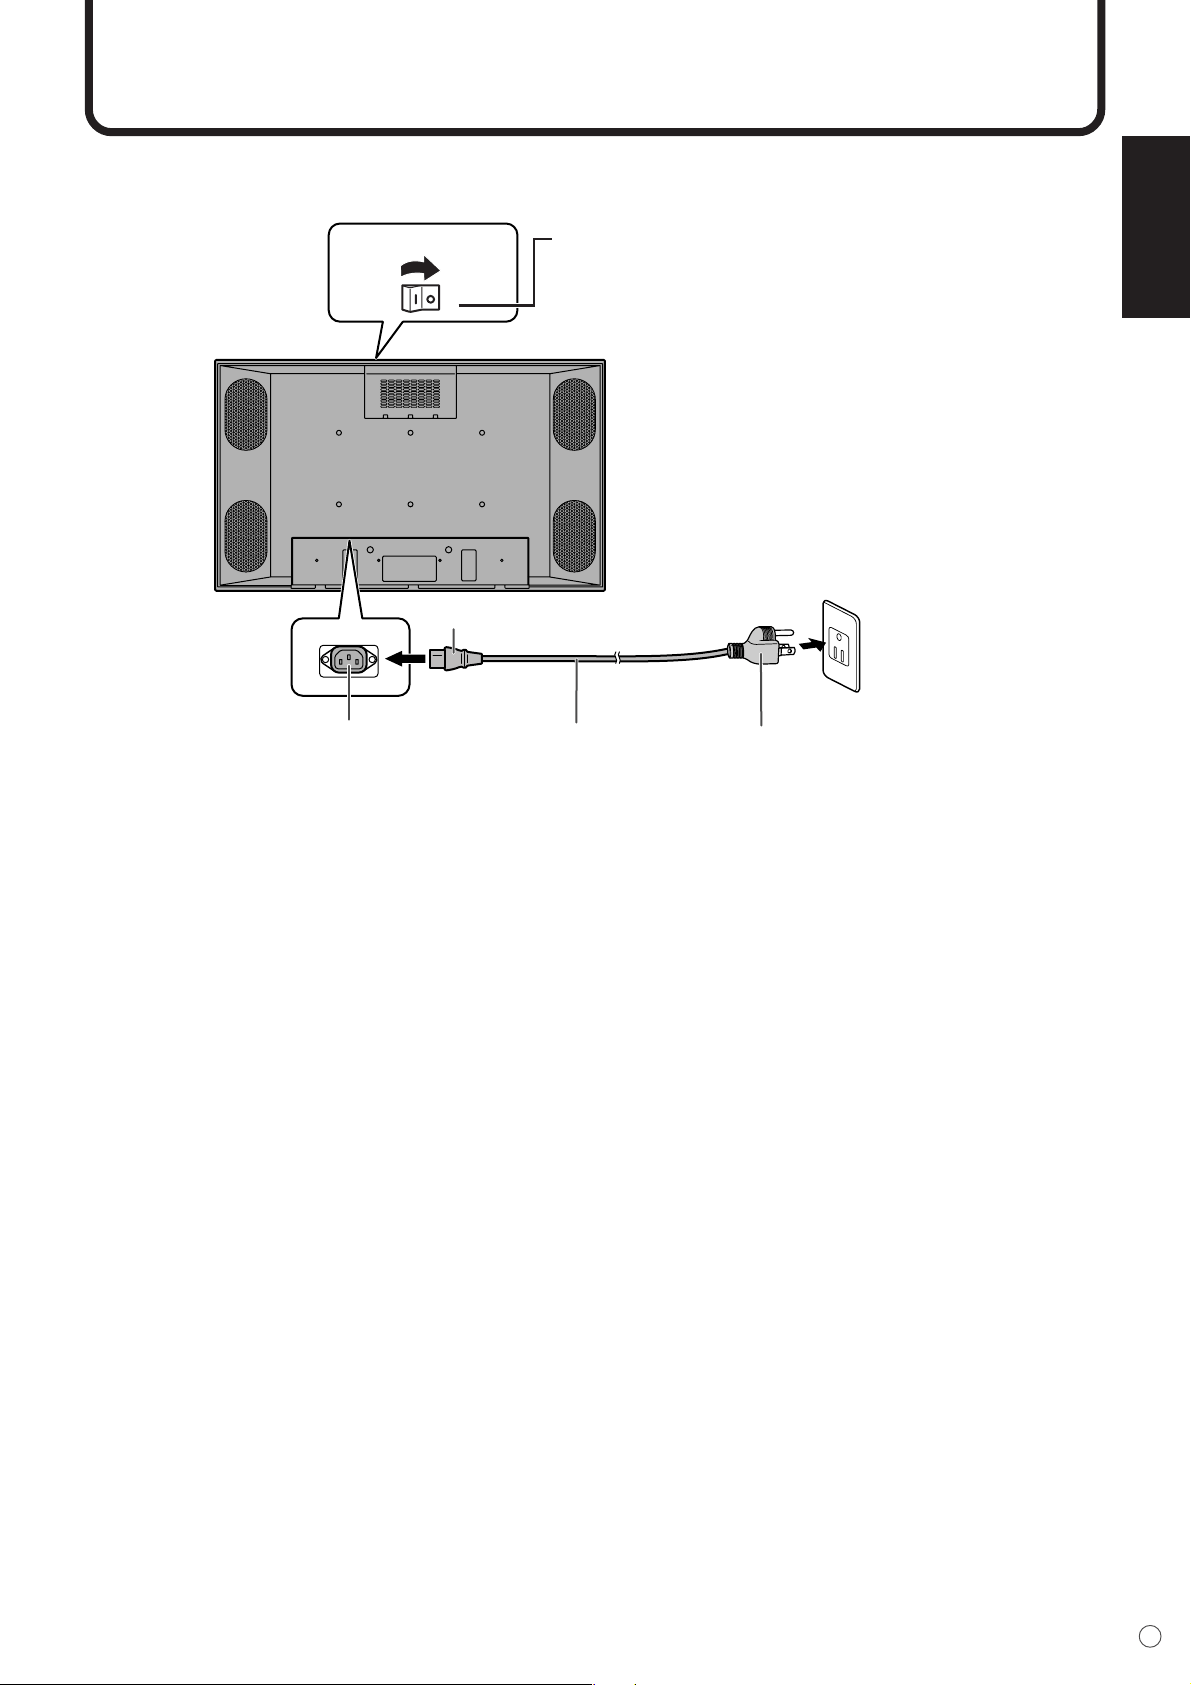
Plug (to power outlet)
AC input terminal
AC cord
Plug (to the AC input terminal)
Power outlet
Main power switch
Connecting the AC Cord
Turn off the main power switch on the top of the monitor.
Be sure to turn the main power switch off when connecting the cord.
▼ Rear view
Connecting the AC cord
1. Plug the AC cord into the AC input terminal of the monitor.
2. Plug the AC cord into the AC power outlet.

20
E
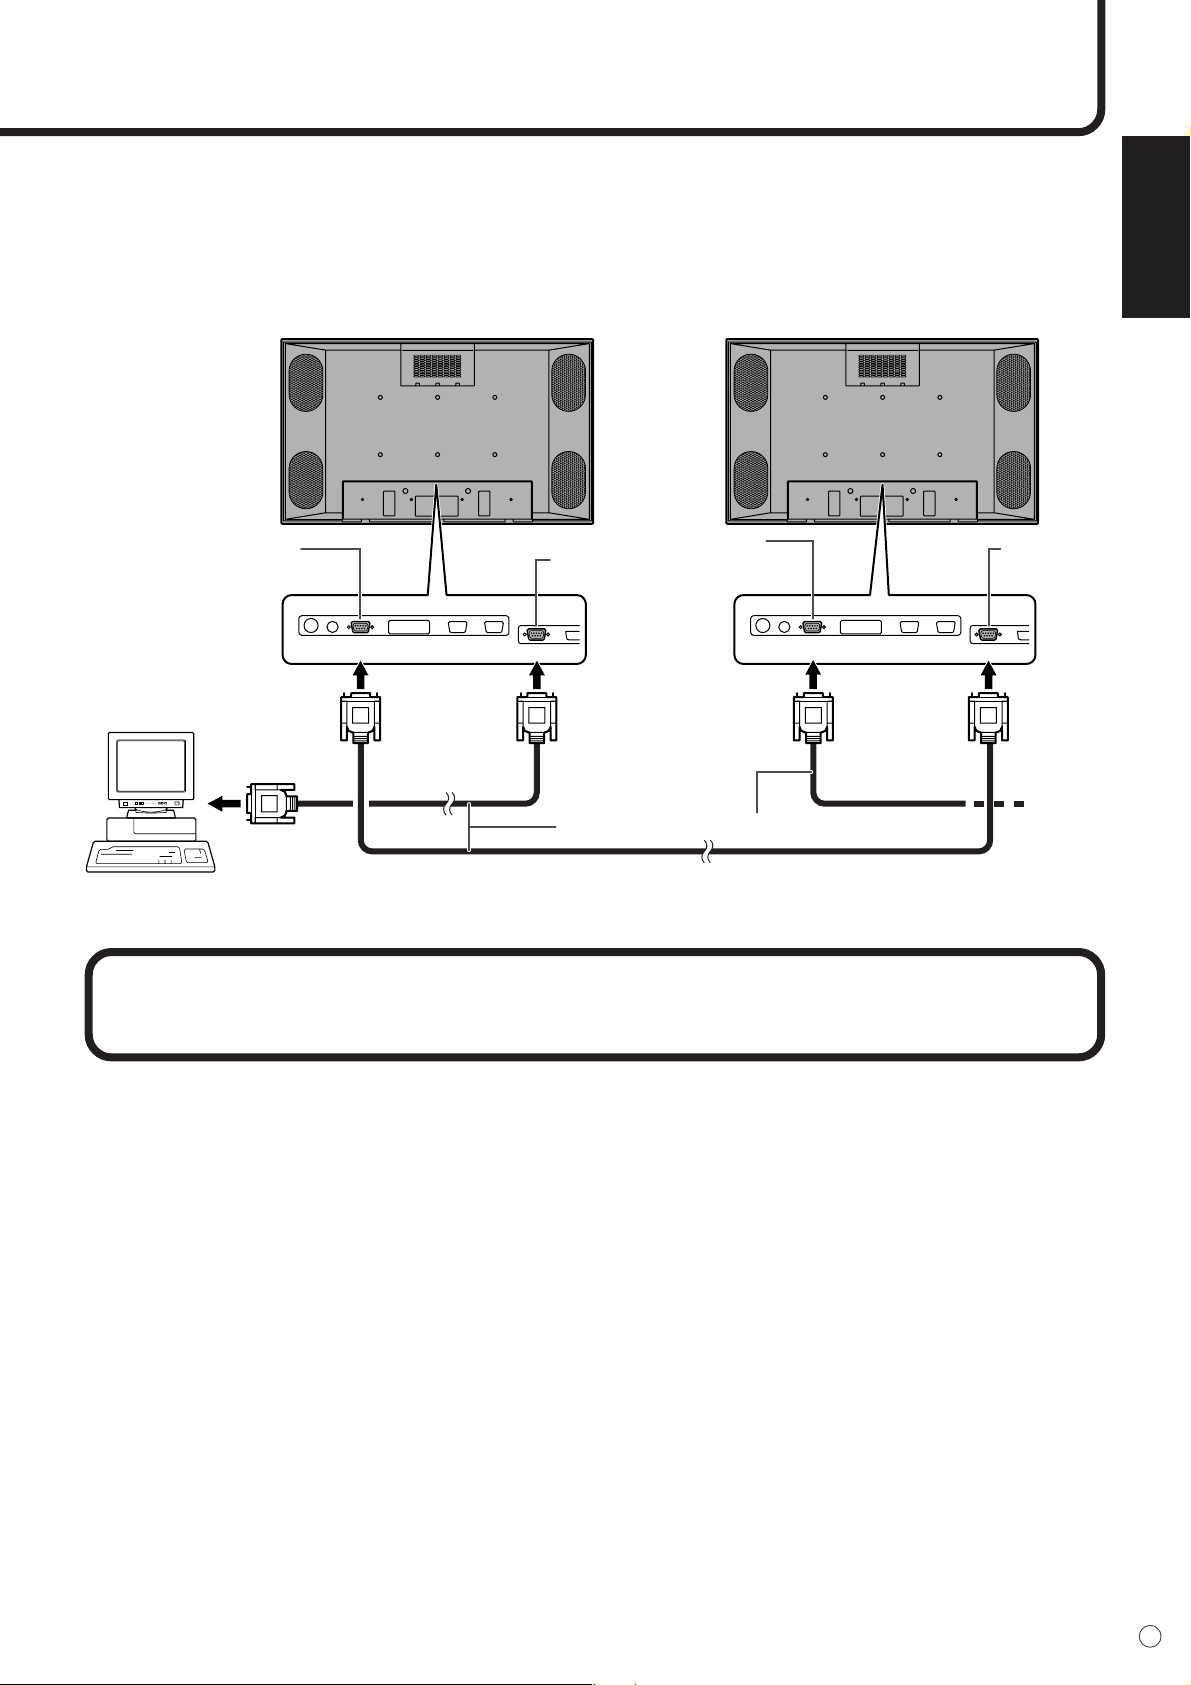
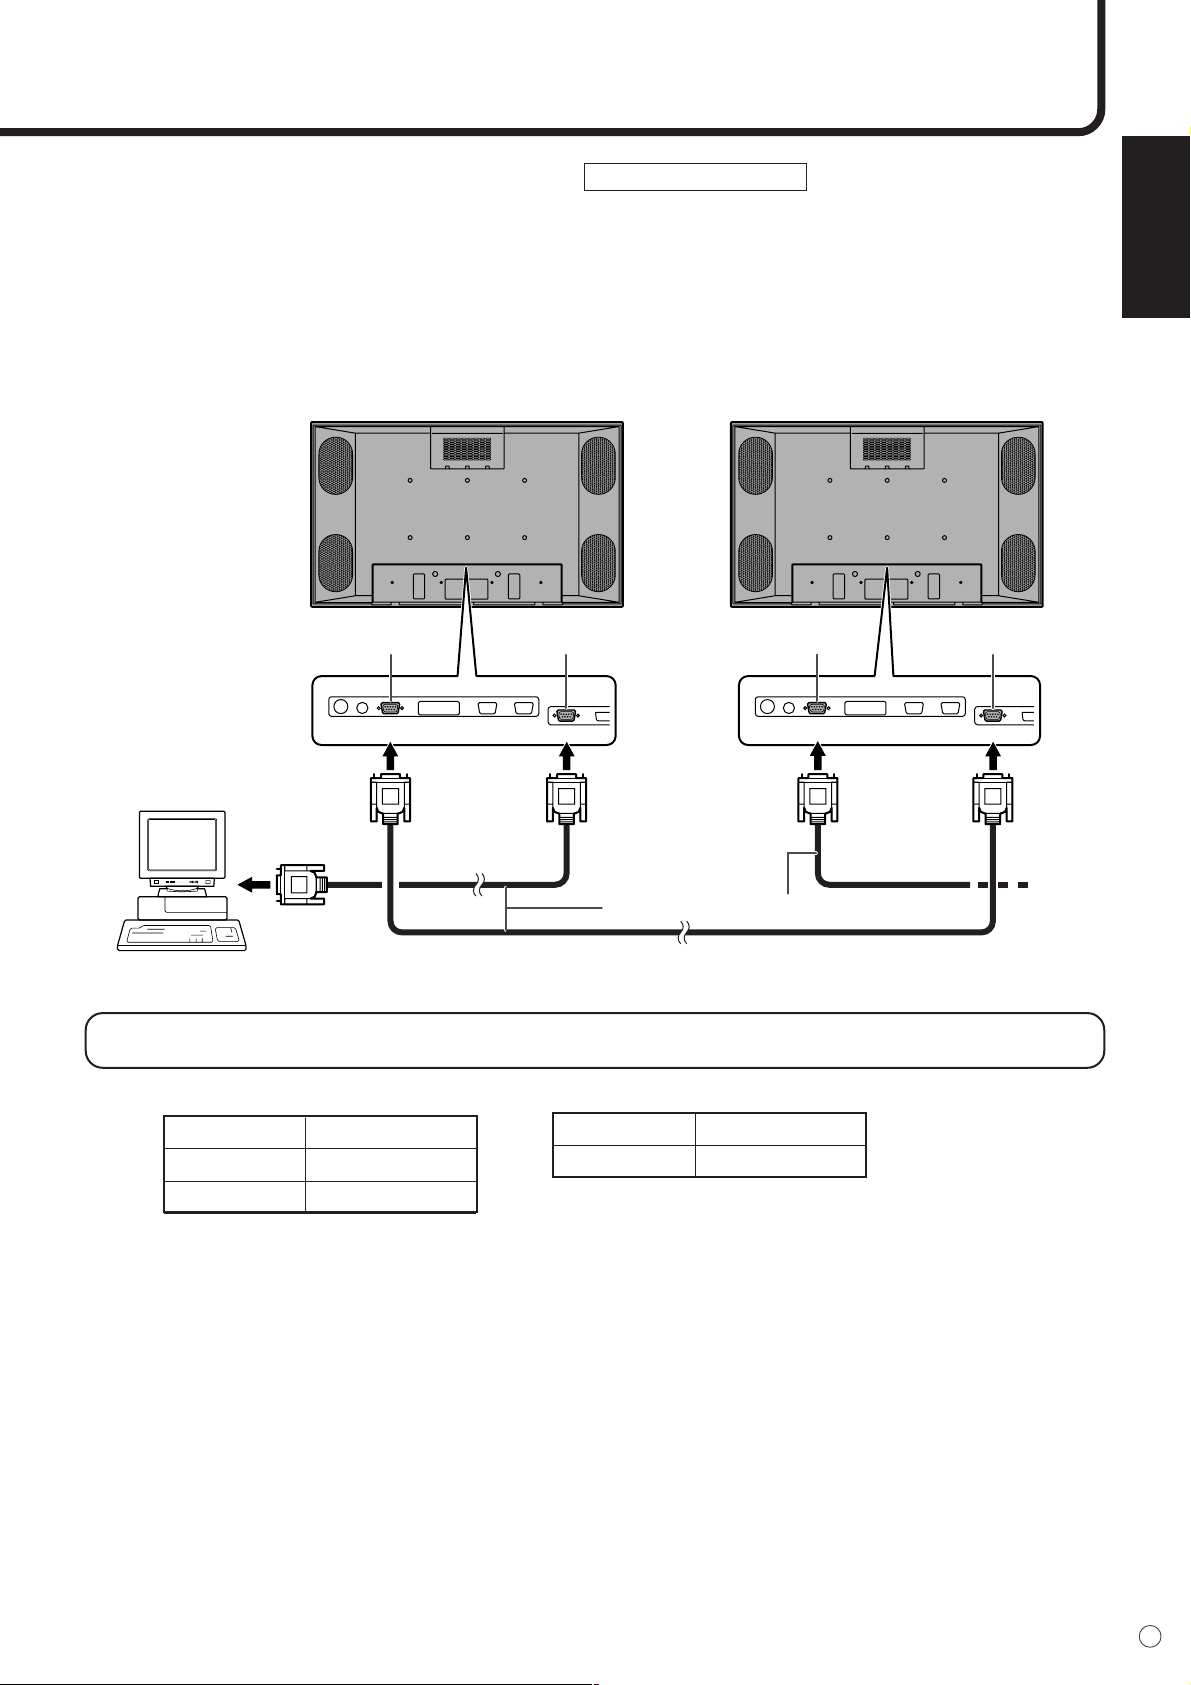
Connecting Multiple Monitors
shows the
signal flow.
INPUT2
(RGB)
OUTPUT
(RGB)
INPUT2
(RGB)
RGB cable
To PC analog RGB output terminal
PC analog RGB
input terminal
PC analog RGB
input terminal
PC analog RGB
output terminal
Multiple monitors can be connected in a daisy chain using the input/output terminals for video signals.
Connection example
▼ Second monitor
▼ First monitor
*1 Multiple monitors cannot be connected in a daisy chain for audio. Connect the external audio amplifier to the
audio output terminals.
*2 The length of RGB cable or surrounding environment may affect the image quality.
ENGLISH
21
E
Connection example for RS-232C
Monitors can be externally controlled using the RS-232C interface (COM port) of a PC, and, in this case
too, multiple monitors can be connected in a daisy chain. By assigning each monitor an ID number (see
page 46), you can perform input switching, adjustment and status monitoring of individual monitors.
RS-232C straight cable
RS-232C
INPUT
RS-232C
OUTPUT
RS-232C
OUTPUT
RS-232C
INPUT
To COM port
RS-232C
output terminal
RS-232C
input terminal
RS-232C
output terminal
RS-232C
input terminal
▼ Second monitor
▼ First monitor
▼ PC
Mounting Precautions
• Special techniques are required to mount this monitor, so be sure to rely on an authorized Sharp dealer
for installation work. You should never perform any of this work yourself. Our company will bear no respon-
sibility for accidents or injuries caused by improper mounting or handling.
•Moving or installing the monitor must be done by two or more people.
•Keep the monitor surface perpendicular to a level surface or tilt up to a maximum of 20 degrees down-
ward.
• This monitor is equipped with two temporary stands when shipped from the factory. Please note that
these stands are for temporary use only until the monitor is properly mounted.
• Be sure to use a stand or a wall-mount/ceiling-mount bracket designed or designated for mounting the
monitor.
• Do not lay the monitor display-side down or up as this could lead to a malfunction.
• When mounting the monitor, the following amount of open space is required to clear the ventilation for the
monitor; at least 7.9 inch (20 cm) above, 1.97 inch (5 cm) right/left/below, and 2.76 inch (7 cm) behind the
monitor. Do not block any ventilation openings. If the temperature inside the monitor rises, this could lead
to a malfunction.

22
E
Mounting the Temporary Stands
Temporary
stand
Screw
123
Hole for the
AC cord clamp
Fastened
part
Band
Bundling Cables
The AC cord can be fastened using the supplied AC cord clamp. This will prevent the AC cord from falling
off.
Also, the cables connected to the terminals on the back of the monitor from the external equipment can be
neatly bundled using the supplied cable clamps as shown in the illustration below. This will prevent stray or
disorganized cables at the back of the monitor.
Please note that the temporary stands are for temporary use only until the monitor is properly mounted.
Attach each temporary stand to the bottom of the monitor as shown below.
▼ Rear view
▼ Rear view
Fastening the AC cord
1. Attach the supplied AC cord clamp to the AC cord, making sure the AC cord clamp is circular hole-side
down.
2. Insert the tip of the band into the hole for the AC cord clamp.
3. While holding the tail of the band, slide the fastened part toward the AC input terminal.
ENGLISH
23
E
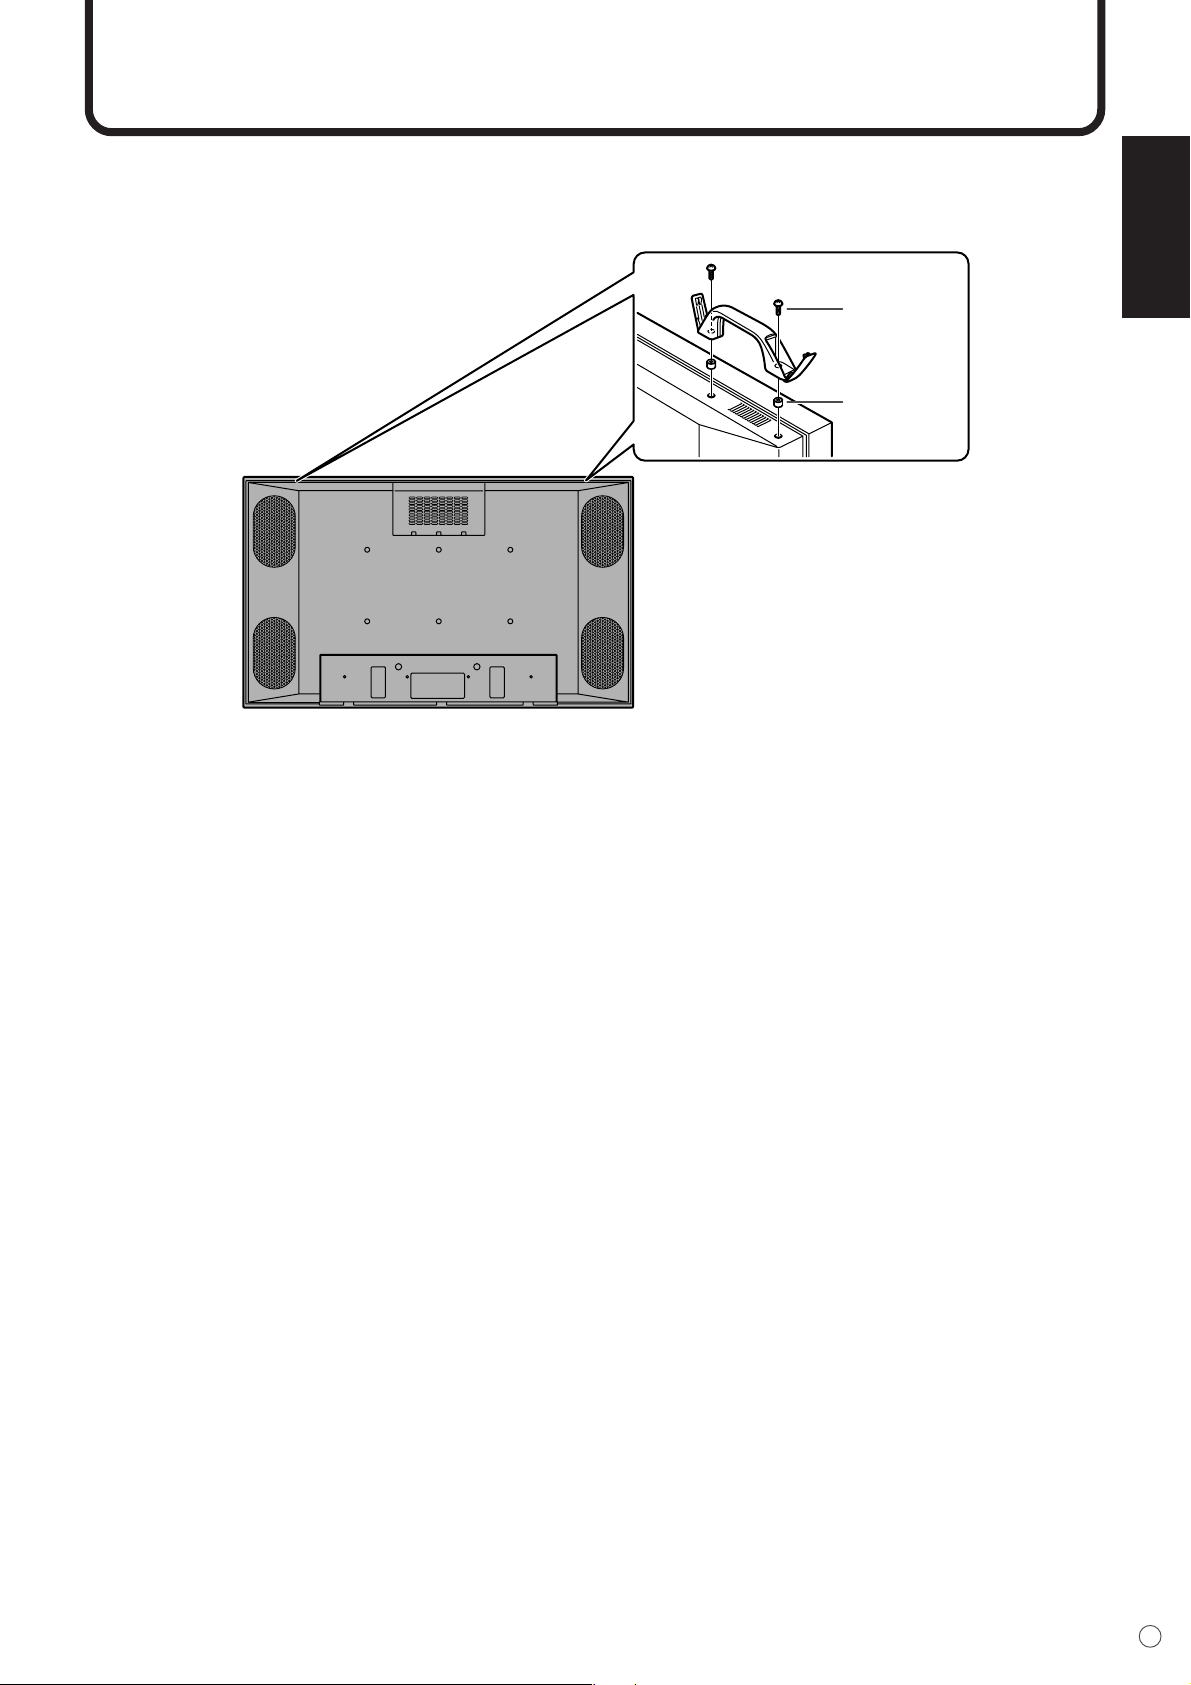
Attaching the Carrying Handles
Screw
Spacer
When carrying the monitor, attach the two carrying handles to the top of the monitor as shown below.
▼ Rear view
* After mounting the monitor, remove the carrying handles from the monitor.
24
E
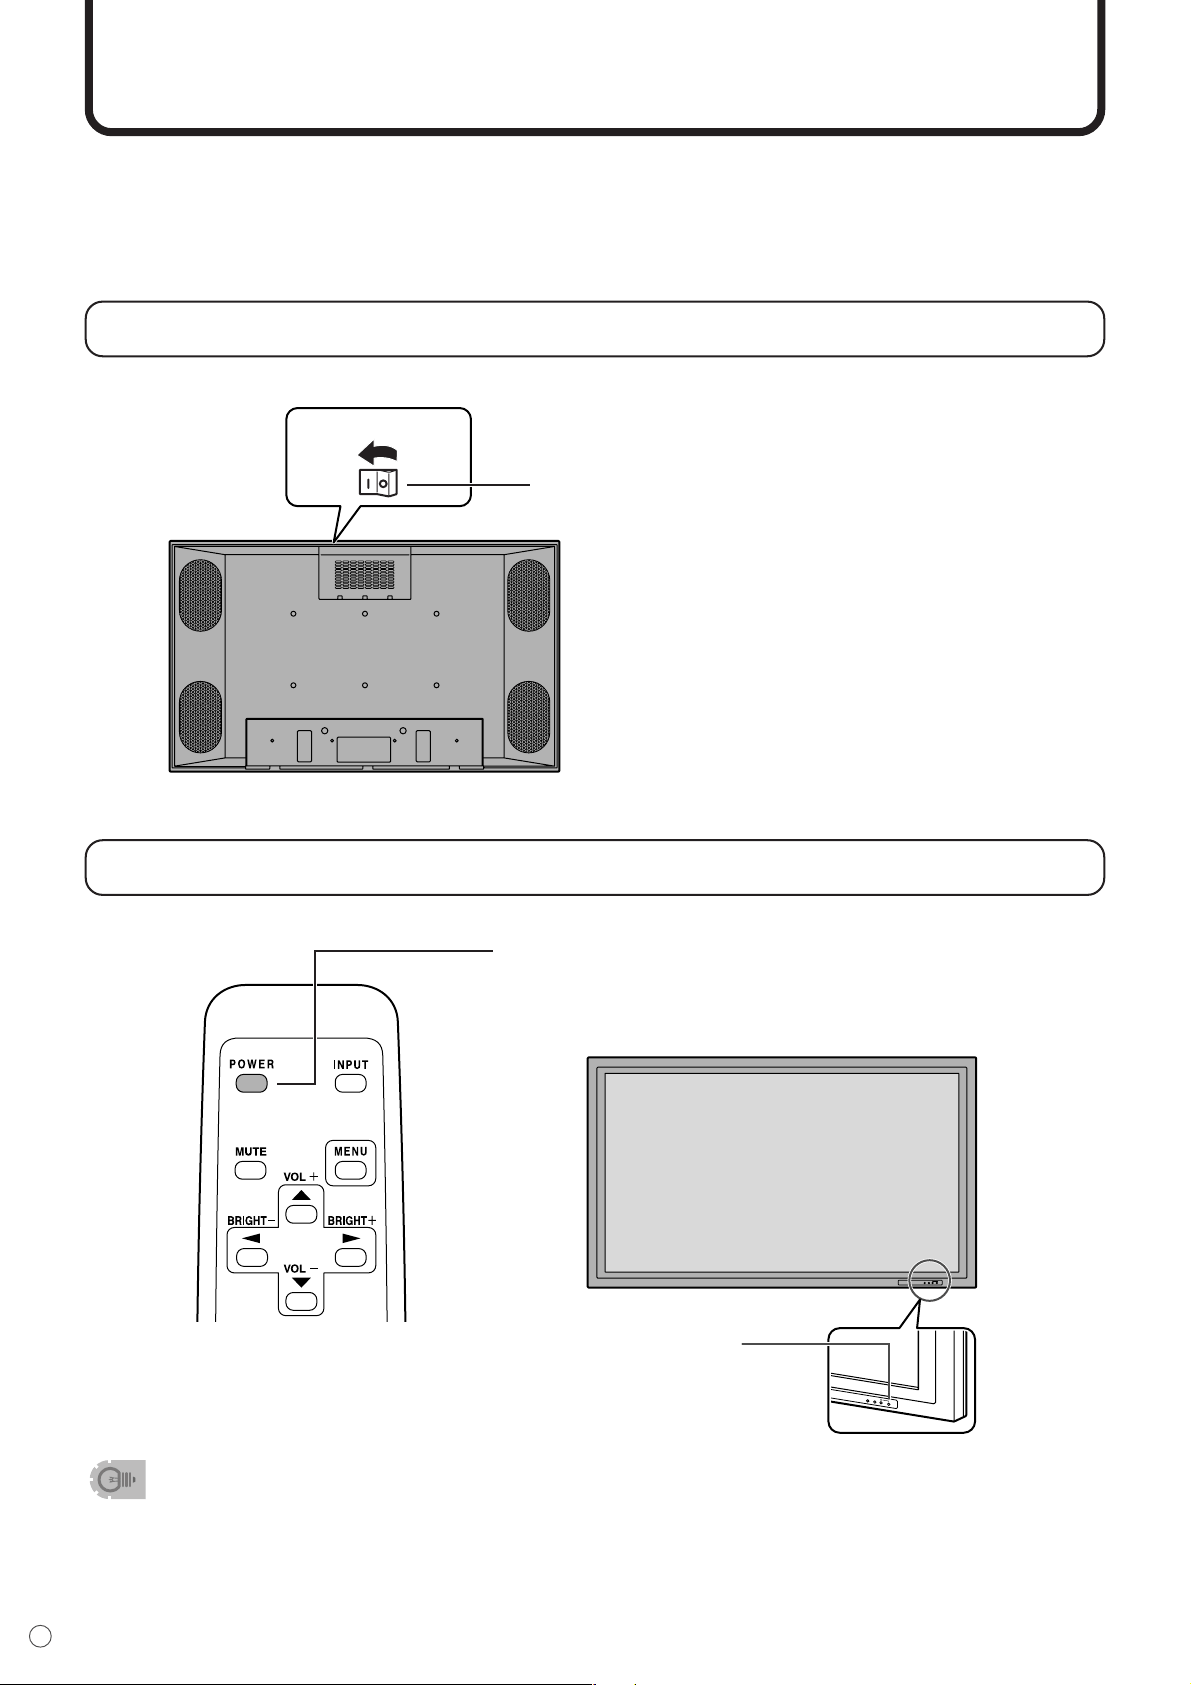
Turning on Power
Before turning on power, make sure that peripherals, external speakers, and the AC cord are connected
properly.
There are two power supply switches: Main power switch on the top of the monitor and POWER button
on the remote control unit.
If the monitor is connected to a computer, turn on the monitor first before turning on the computer.
Main power switch
When the main power switch is off, the monitor is not turned on with the POWER button on the remote
control unit.
• After turning on the power, if there is no video signal, the backlight of the monitor is turned off. (Waiting
mode)
• In waiting mode, the power LED blinks green.
• In waiting mode, if you press the POWER button on the remote control unit, the monitor will be turned off.
• If the remote control is not available, you can turn on/off by pressing the POWER button beside the power
LED with a sharp object.
Turning power on/off using remote control
Main power switch
Turn on the main power switch on the top of the monitor.
INPUT
IN
P
U
T
Power LED
Press the POWER button to turn the power ON/OFF.
Power “On”: Power LED lights up green.
Power “Off”: Power LED lights up orange. (Standby mode)
▼ Rear view
▼ Remote control unit
▼ Front view
When switching the main power switch off and back on, always wait for
at least 5 seconds. Rapid switching may result in a malfunction.
ENGLISH
25
E
Remote Control Unit
Generally the monitor is operated using the remote control unit.
INPUT (Input selection)
Each time you press this button, the mode changes in the following order:
• INPUT1 (DIGITAL) ➞ INPUT2 (ANALOG) ➞ INPUT3 (COMPONENT) ➞
INPUT4 (VIDEO) ➞ INPUT1 (DIGITAL)...
* If the remote control is not available, you can change the mode by
pressing the input button beside the remote control sensor with a sharp
object.
MUTE
Tu r ns off the volume temporarily.
Press the MUTE button again to turn the sound back to the previous level.
MENU
Displays and turns off the menu screen (see page 30).
VOL (Volume adjustment)
Displays the VOLUME menu when the menu screen is not displayed.
VOLUME 15
Press to increase the volume, and to decrease the volume.
* If you do not press any buttons for about 4 seconds, the VOLUME menu
automatically disappears.
Sound is muted when volume is set to “0”.
BRIGHT (Backlight adjustment)
Displays the BRIGHT menu when the menu screen is not displayed.
*41/06 #
Press to increase the brightness of the screen, and to decrease
the brightness of the screen.
* If you do not press any buttons for about 4 seconds, the BRIGHT menu
automatically disappears.
SIZE (Screen size selection)
Each time you press this button, the screen size changes in the following
order (see page 35):
• WIDE ➞ ZOOM1 ➞ ZOOM2 ➞ NORMAL ➞ Dot by Dot ➞ WIDE...
MODE (Screen mode selection)
Each time you press this button, the screen mode changes in the following
order:
• STD ➞ OFFICE (Power saving mode) ➞ VIVID ➞ STD...
DISPLAY
Displays monitor status such as INPUT, SIZE, etc.
Press the DISPLAY button again to exit.
26
E
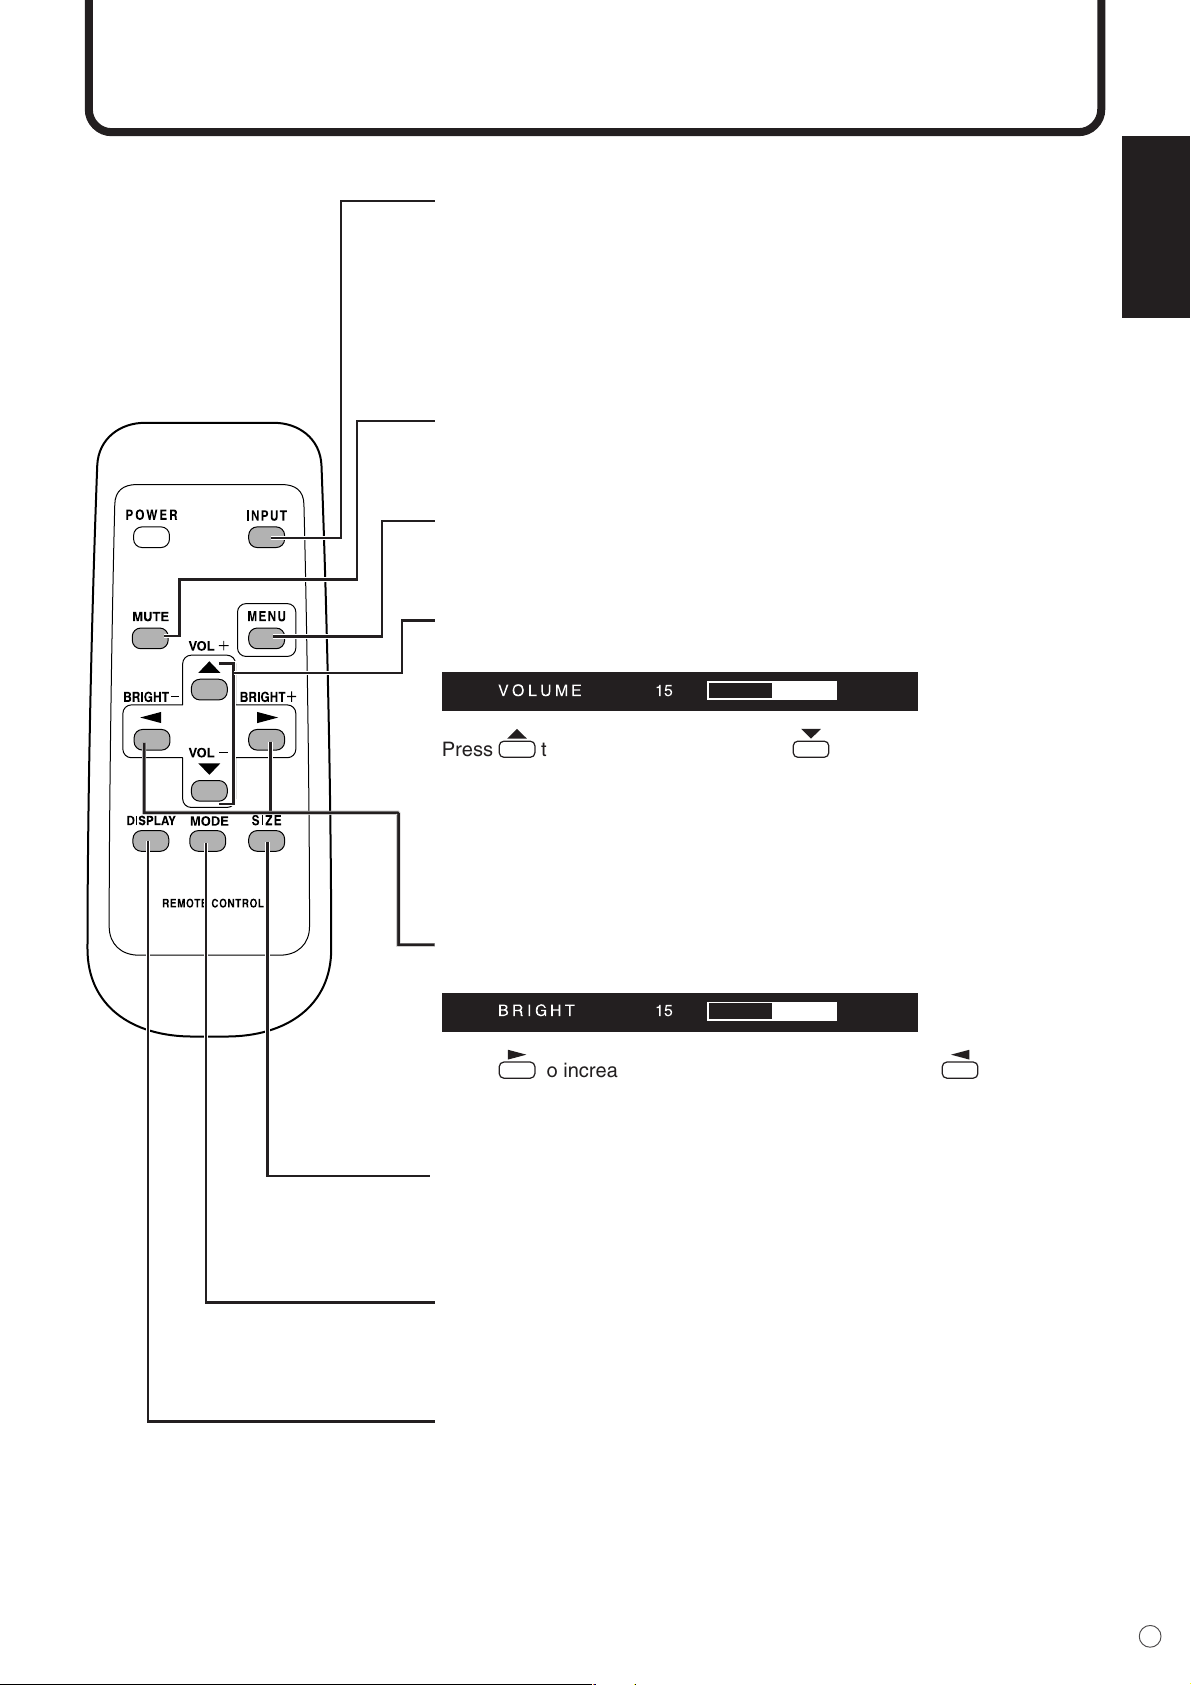
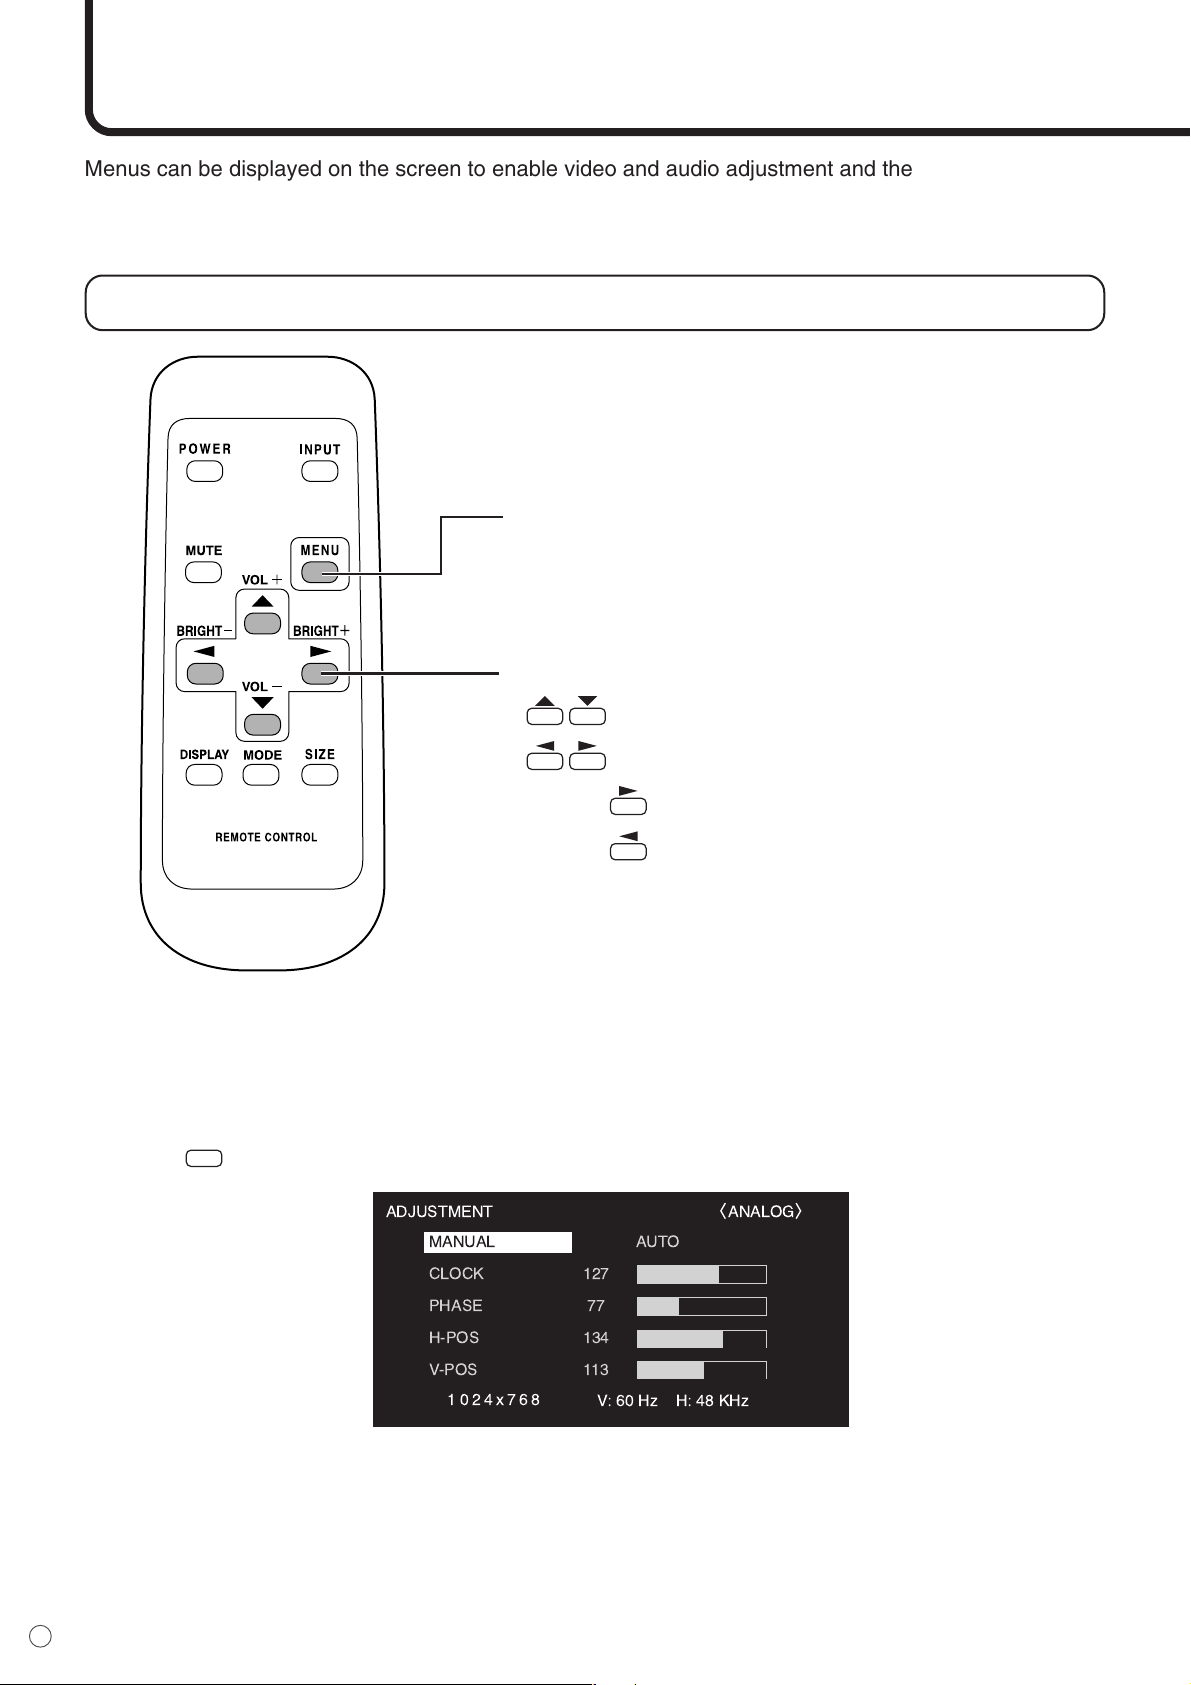
Menu Items
Menus can be displayed on the screen to enable video and audio adjustment and the setting of various
functions using the remote control unit. For more information, refer to the pages where each topic is
explained.
Menu option selection
Cursor control (UP/DOWN/LEFT/RIGHT)
• / : Selects a desired item on the screen.
• / : Adjusts the selected item.
Pressing increases a value.
Pressing decreases a value.
Example of menu operation: Adjusting CONTRAST (video) in the GAIN CON-
TROL menu.
1. Press
MENU
to display the menu screen.
MENU button
• Displays and turns off the menu screen.
• Switches menu screens.
ENGLISH
27
E
• The menu displayed when you press the MENU button will differ depending on the type of input signal.
2. Press
MENU
to display the GAIN CONTROL menu.
3. Press to select CONTRAST.
4. Press (or ) to adjust the setting.
5. Press
MENU
more than once to close the menu screen.
The menu screen will close automatically if no operation is performed for about 15 seconds.
28
E
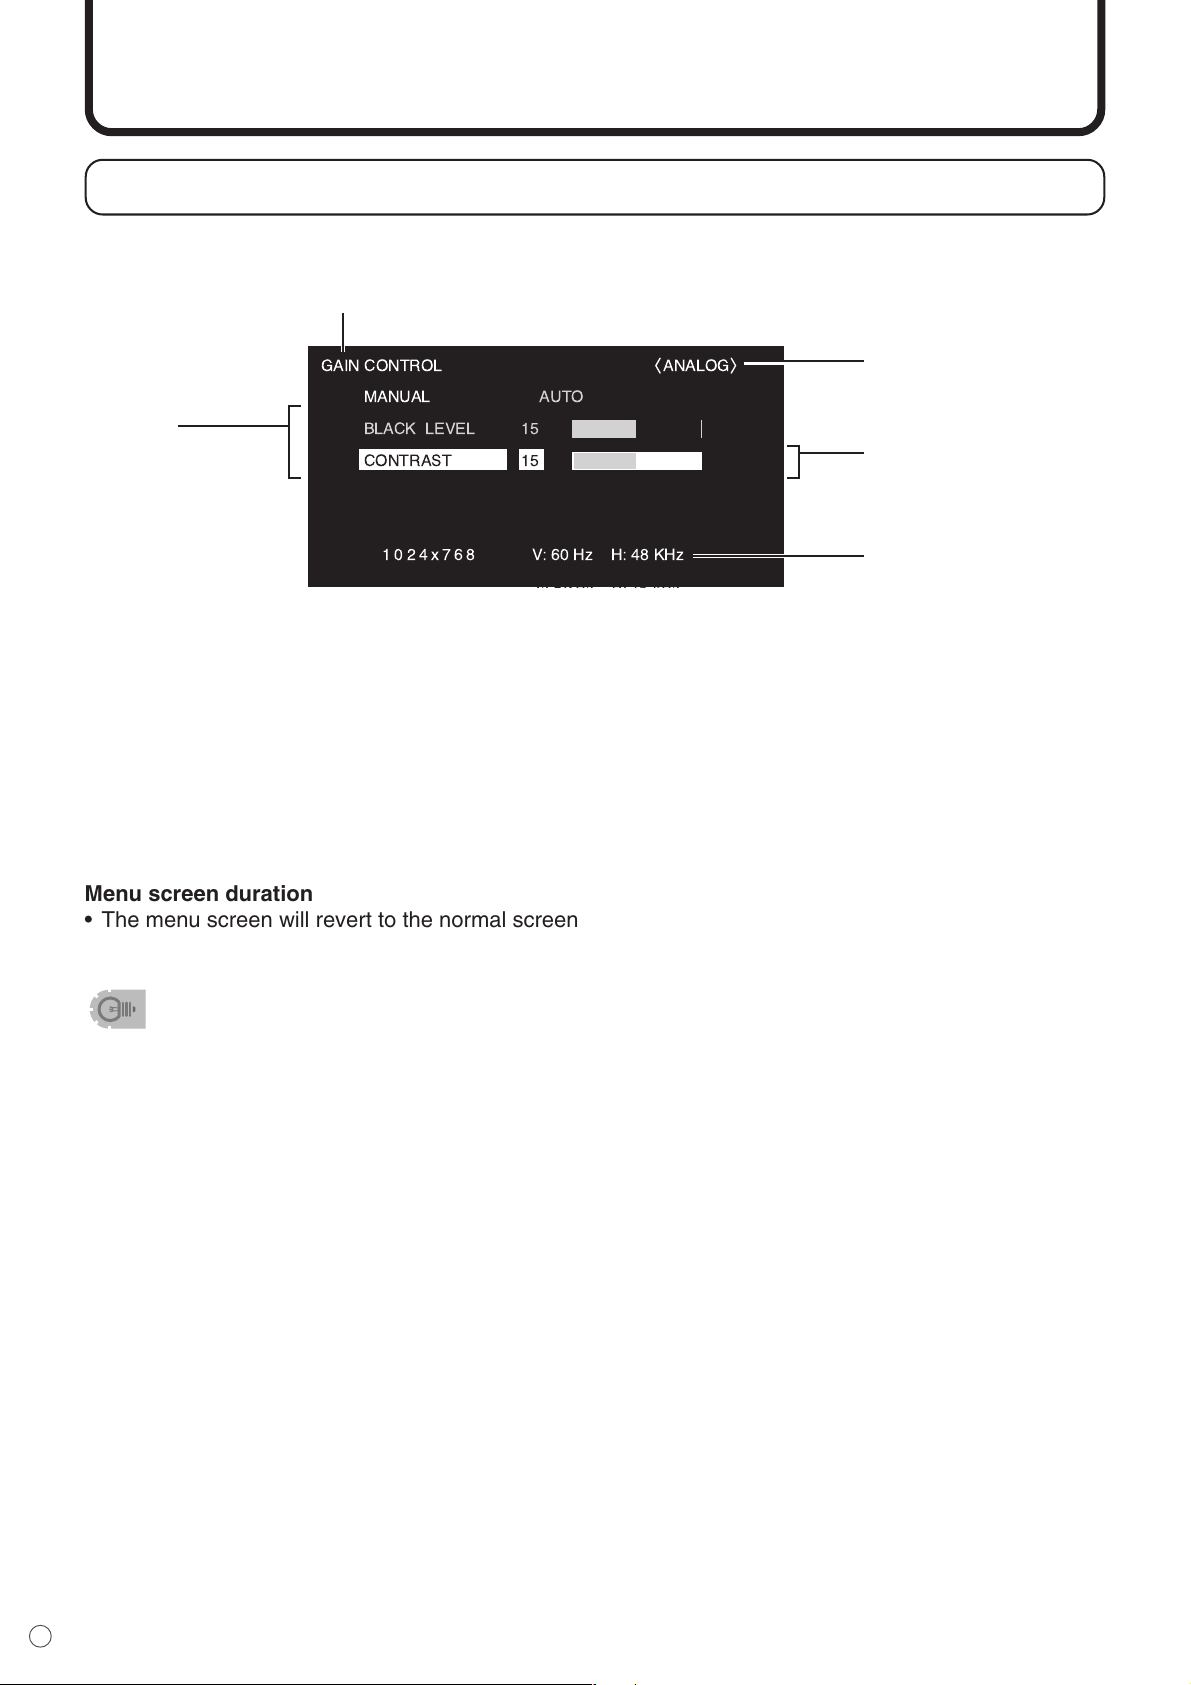
Menu screen explanation
Yellow: Current setting
Blue: Selectable items
Gray: Items that cannot be selected
* There are various reasons why items cannot be selected, but the main reasons are as follows:
• There is no signal.
• The function is not compatible with the current input signal.
• The menu item illustrations in this operation manual are for explanation purposes only and may vary
slightly from what is actually displayed.
Menu screen duration
• The menu screen will revert to the normal screen if there is no operation for about 15 seconds while
the menu screen is displayed.
Settings:
Setting names and
their status
Item: Select using the MENU button.
Input signal:
Displays the type of signal
currently being input.
Highlight:
The currently selected
item will be highlighted.
Screen resolution,
vertical frequency, and
horizontal frequency:
Displays the screen
resolution, vertical fre-
quency, and horizontal
frequency of the current
input signal.
Menu Items (Continued)
ENGLISH
29
E
Initialization (Reset)/Functional Restriction Setting
In the FUNCTION 1 screen, you can return contrast, image quality, and other settings to their factory-
preset values, specify whether LEDs lights, and enable control via RS-232C (see page 38) among other
functions.
1. After pressing
SIZE
for about 5 seconds, press , , , and in that order.
The FUNCTION 1 screen will appear.
2. Select and set the items you want.
ALL RESET
ADJUSTMENT LOCK
OSD DISPLAY
LED
RS-232C
LOCKED
ON
ON
LOCKED
ALL RESET
UNLOCKED
OFF
OFF
UNLOCKED
FUNCTION 1
3. Press
MENU
to return to the normal screen.
[ALL RESET]
Function Returns all settings to their factory preset values. After initialization (reset),
turn the main power switch off and then back on.
[ADJUSTMENT LOCK]
Function Specifies whether to lock settings such as ADJUSTMENT and WHITE BALANCE.
While locked, the remote control unit cannot perform operations other than turning
power on/off (POWER button) and displaying the FUNCTION 1 screen.
Default UNLOCKED
LOCKED Locks the setting.
UNLOCKED Unlocks the setting.
[OSD DISPLAY]
Function Hides/shows menus. The FUNCTION 1 screen cannot be hidden.
Default ON
ON Displays the menus.
OFF Hides the menus.
[LED]
Function Specifies whether to light LEDs.
Default ON
ON Lights LEDs.
OFF Does not light LEDs.
[RS-232C]
Function Specifies whether to allow control (see page 38) via RS-232C.
Default UNLOCKED
LOCKED Disables control via RS232C.
UNLOCKED Enables control via RS-232C.
30
E
Settings and Adjustments
■ ADJUSTMENT (INPUT2)
[MANUAL / AUTO]
Function Adjusts CLOCK, PHASE, H-POS (horizontal positioning), and V-POS (vertical
positioning) are adjusted.
Adjustable range MANUAL/AUTO
MANUAL The CLOCK, PHASE, H-POS, and V-POS are manually adjusted. You can use the
adjustment pattern on the supplied CD-ROM to adjust each parameter.
See page 41 for more information on the screen display for making adjustments.
AUTO The CLOCK, PHASE, H-POS, and V-POS are automatically adjusted.
[MANUAL (CLOCK)]
Function Adjusts frequency for sampling clock for applicable video.
Adjust when there is flickering in the form of vertical stripes.
When using the adjustment pattern (see page 36), make adjustments so that no
vertical stripe noise appears in it.
Adjustable range 0 - 255
Default 127
+ direction Clock frequency increases.
– direction Clock frequency decreases.
[MANUAL (PHASE)]
Function Adjusts sampling clock phase for applicable video.
Useful when small characters appear with low contrast and/or there are flickers at
corners. When using the adjustment pattern (see page 36), make adjustments so
that no horizontal stripe noise appears in it.
Adjustable range 0 - 255
Default 127
+ direction Advances clock phase.
– direction Delays clock phase.
[MANUAL (H-POS)]
Adjustable range 0 - 255
Default 127
+ direction Image shifts right.
– direction Image shifts left.
[MANUAL (V-POS)]
Adjustable range 0 - 255
Default 127
+ direction Image shifts up.
– direction Image shifts down.
ENGLISH
31
E
[MANUAL / AUTO]
Function Adjusts BLACK LEVEL and CONTRAST.
Adjustable range MANUAL / AUTO
MANUAL The BLACK LEVEL and CONTRAST are manually adjusted.
AUTO The BLACK LEVEL and CONTRAST are automatically adjusted.
[MANUAL (BLACK LEVEL)]
Adjustable range 0 - 31
Default 15
+ direction Brightens entire video signal.
– direction Darkens entire video signal.
[MANUAL (CONTRAST)]
Adjustable range 0 - 31
Default 15
+ direction For more contrast
– direction For less contrast
■ GAIN CONTROL (INPUT2)
■ WHITE BALANCE
[THRU / COOL / • / STD / • / WARM / USER] (INPUT1 / INPUT2)
Adjustable range THRU / COOL / • / STD / • / WARM / USER
Default STD
THRU Displays the input signal level as it is. This item is only selectable for INPUT1.
COOL Color tone bluer than standard
• Color tone slightly bluer than standard
STD Color tone standard setting
• Color tone slightly redder than standard
WARM Color tone redder than standard
USER Allows you to individually adjust R-CONTRAST, G-CONTRAST, and
B-CONTRAST.
[COPY to USER] (INPUT1 / INPUT2)
Adjustable range OFF / SET
SET Copies the values set for COOL / • / STD / • / WARM to USER settings.
[USER (R-CONTRAST)] (INPUT1 / INPUT2)
Adjustable range 0 - 255
+ direction Brightens red component.
– direction Darkens red component.
[USER (G-CONTRAST)] (INPUT1 / INPUT2)
Adjustable range 0 - 255
+ direction Brightens green component.
– direction Darkens green component.
[USER (B-CONTRAST)] (INPUT1 / INPUT2)
Adjustable range 0 - 255
+ direction Brightens blue component.
– direction Darkens blue component.
32
E
[CONTRAST] (INPUT3 / INPUT4)
Adjustable range 0 - 31
Default 15
+ direction For more contrast
– direction For less contrast
[BLACK LEVEL] (INPUT3 / INPUT4)
Adjustable range 0 - 31
Default 15
+ direction Brightens entire video signal.
– direction Darkens entire video signal.
[TINT] (INPUT3 / INPUT4)
Adjustable range 0 - 31
Default 15
+ direction Changes skin tone closer to magenta.
– direction Changes skin tone closer to green.
[COLORS] (INPUT3 / INPUT4)
Adjustable range 0 - 31
Default 15
+ direction For more color intensity
– direction For less color intensity (Monochrome at “0”)
[SHARPNESS] (INPUT3 / INPUT4)
Adjustable range 0 - 31
Default 15
+ direction For more sharpness
– direction For less sharpness
[WHITE BALANCE] (INPUT3 / INPUT4)
Adjustable range COOL / • / STD / • / WARM
Default STD
COOL Color tone bluer than standard
• Color tone slightly bluer than standard
STD Color tone standard setting
• Color tone slightly redder than standard
WARM Color tone redder than standard
Settings and Adjustments (Continued)

ENGLISH
33
E
■ MODE SELECT 1
[480 LINES] (INPUT2)
Function Manually selects input resolution.
Adjustable range 852 / 848 / 640
Default 640
[768 LINES] (INPUT2)
Function Manually selects input resolution.
Adjustable range 1366 / 1360 / 1280 / 1024
Default 1024
[ENLARGE] (INPUT1/INPUT2)
Function Sets the image enlargement ratio to be enlarged.
Adjustable range OFF / 2 x 2 / 3 x 3
Default OFF
[ENLARGE POS] (INPUT1 / INPUT2)
Function Sets the part of the original image to be enlarged.
Adjustable range (2 x 2) 0 - 3
Adjustable range (3 x 3) 0 - 8
Default 0
[MULTI ZOOM] (INPUT1 / INPUT2)
Function Adjusts the enlarged screen.
IMAGE ZOOM Adjusts the scale of enlargement.
H-POS Adjusts the horizontal position.
V-POS Adjusts the vertical position.
■ Enlarge
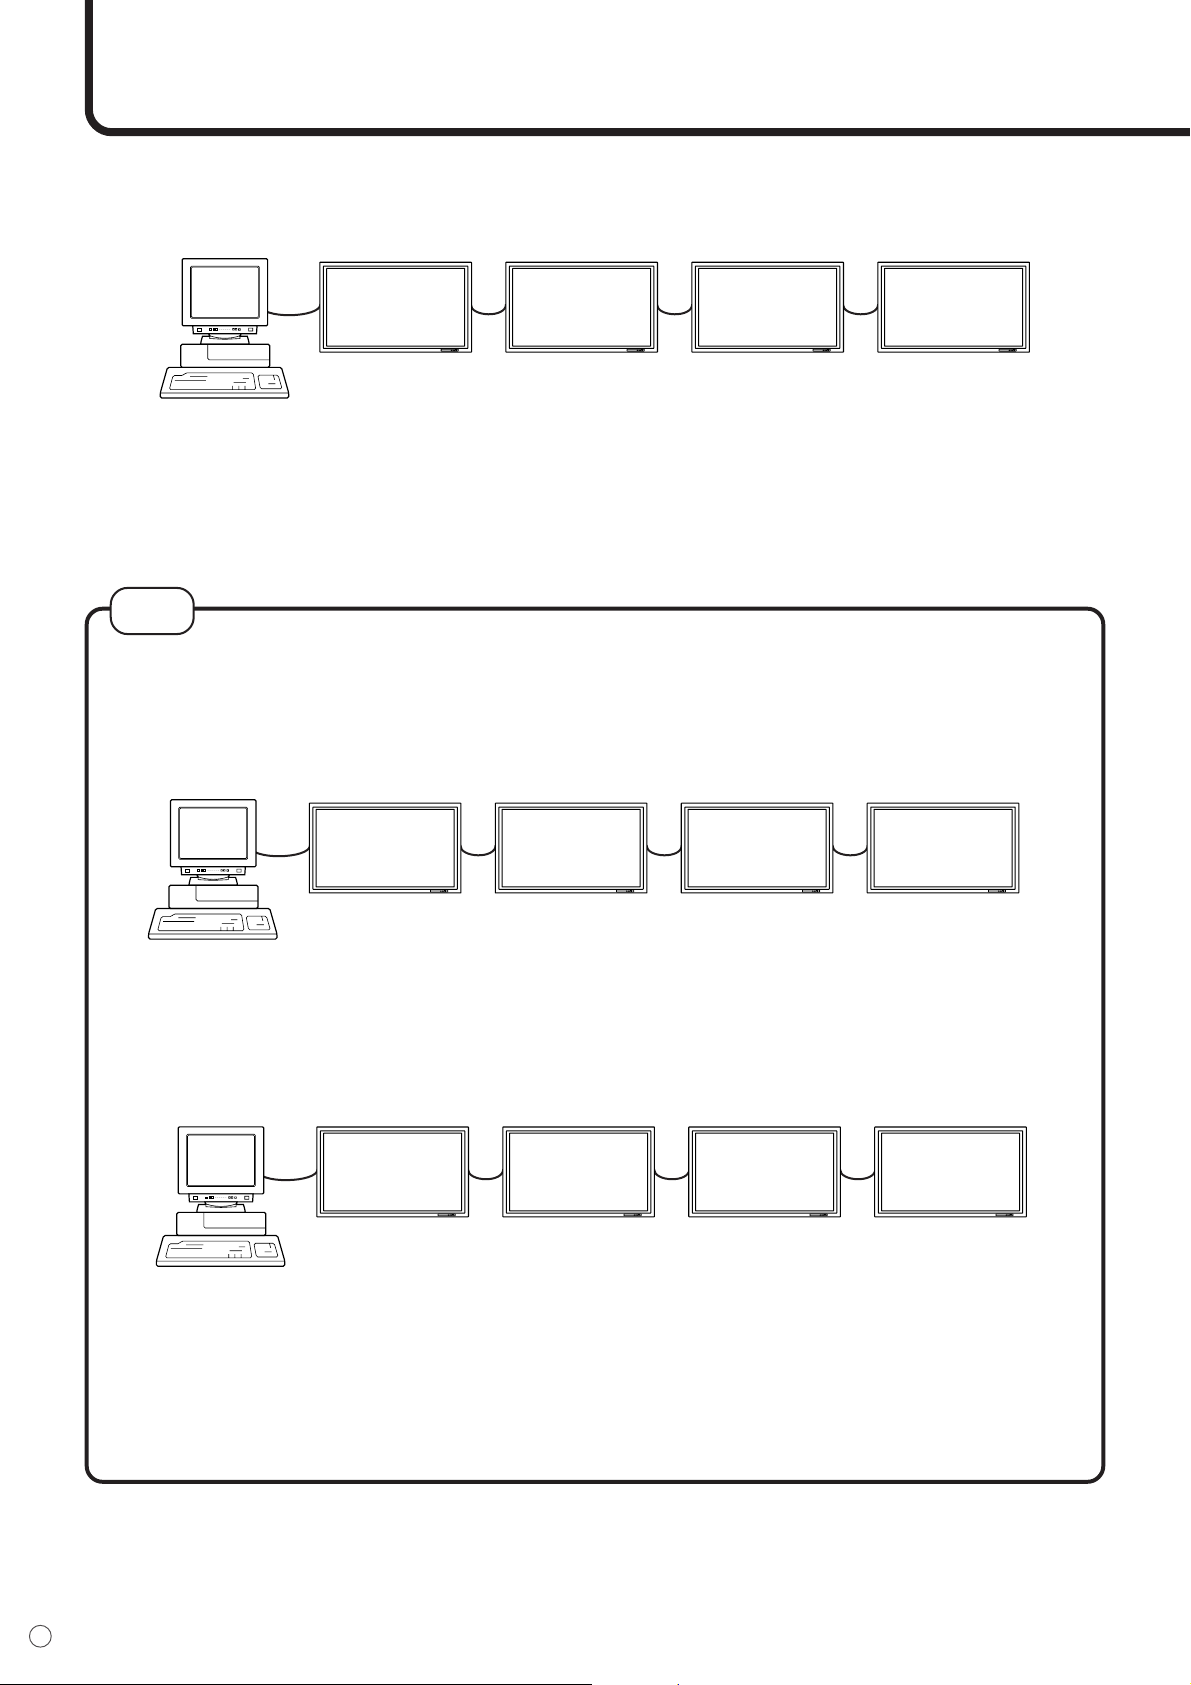
You can set up 4 or 9 monitors and integrate them into a single screen to display video. Each monitor
displays an enlargement of 1/4 or 1/9 of the original image.
How to use the “Enlarge” feature
• 4 screen monitor set-up • 9 screen monitor set-up
012
345
678
012
345
678
01
32
01
32
34
E
■ MODE SELECT 2
[OFF TIMER]
Function Specifies the remaining time before turning off the power.
Adjustable range 0 - 23
Default 0
[OSD H-POSITION]
Function Adjusts the horizontal display position of menu screen.
How to adjust Use / to move menu screen.
Default Center
[OSD V-POSITION]
Function Adjusts the vertical display position of menu screen.
How to adjust Use / to move menu screen.
Default Center
[LANGUAGE]
Function Switches the OSD language.
Available languages
ENGLISH / DEUTSCH / FRANÇAIS / ITALIANO / ESPAÑOL
Default ENGLISH
[ID NO SET]
Function Assigns ID numbers to monitors connected in a daisy chain (see page 39), using
RS-232C cables.
Adjustable range 0 - 255
Default 0
Note The numbers 1 to 255 are available for ID numbers. (If “0” is set, the system
regards this as the state where no ID number is set.) Although numbers up to 255
can be used for monitor IDs, the number of connectable monitors varies depending
on the length of RS-232C cables and the installation environment.
Use / to increase or decrease values.
Settings and Adjustments (Continued)
ENGLISH
35
E
■ Switching the screen size (INPUT1 / INPUT2)
WIDE ZOOM 1
ZOOM 2
Dot by Dot
NORMAL
Displays image so it fills the
screen vertically, while
maintaining the original
aspect ratio.
Displays image so it fills the
entire screen.
Use this size if ZOOM1
cuts off the subtitles.
Displays edge portion of
the image which is normally
cut off.
Detects the resolution of
the signal and displays an
image with the same
number of pixels on the
screen. (See page 56.)
■ Switching the screen size (INPUT3 / INPUT4)
The desired screen size can be selected to suit the input signal.
WIDE ZOOM 1
ZOOM 2
Dot by Dot
NORMAL
For 4:3 “Standard” pictures.
A side bar appears on each
side.
In this mode the image is
progressively stretched
toward each side of the
screen.
Use this size if ZOOM1
cuts off the subtitles.
Displays edge portion of
the image which is normally
cut off.
Detects the resolution of
the signal and displays an
image with the same
number of pixels on the
screen.
36
E
Screen display for adjustments (INPUT2)
Before making adjustments in the ADJUSTMENT menu (see page 30), display an image to brighten the
entire screen.
If you are using a Windows PC, use the adjustment pattern on the supplied CD-ROM.
Retrieving the adjustment pattern
This explanation assumes you are using Windows 2000/XP and your CD-ROM drive is the “D” drive.
1. Connect the monitor and computer.
2. Load the supplied CD-ROM into the computer’s CD-ROM drive.
3. Open the CD-ROM in [My Computer].
4. Double-click [Adj_uty.exe] to start the adjustment program.
The adjustment pattern will appear.
5. When adjustment is finished, press the [ESC] on the computer’s keyboard to quit the adjustment
program.
• If the display mode on the computer you are using is 65,000 colors, the color levels in the color pattern
may appear differently or grayscale may appear to be colored. (This is due to the specifications of the
input signal and is not a malfunction.)
<Adjustment pattern>
Settings and Adjustments (Continued)
• Using this monitor’s screen size switching function to compress or expand the screen for commercial or
public viewing in establishments like cafes or hotels may infringe on the rights of the creators, as
protected by Copyright Law, so please be careful.
• When set to “Enlarge” (i.e. with a “2 x 2” or “3 x 3” setting), the screen size is fixed in “WIDE” mode.
• When using the screen size selection function of this monitor, the appearance of the original video may
change if you select a screen size with a different aspect ratio than the original image (i.e. TV broadcast
or video input from external equipment). Please consider this point when selecting the screen size.
• When an ordinary non-wide image (4:3) is viewed with the whole screen using the screen size switching
function of this monitor, the edge of the image may be lost or appear distorted. If you wish to respect the
creator’s intentions, set the screen size to “NORMAL”.
• When playing commercial software, parts of the image (like subtitles) may be cropped. In this case
select the optimal screen size using “Wide Mode” and adjust the vertical position (see “Position” on
page 30). With some software, there may be noise or distortion at the edges or top of the screen. This is
due to the characteristics of the software, and is not a malfunction.
• Depending on the original image size (i.e. CinemaScope size), black bands may remain at the top and
bottom of the screen.

ENGLISH
37
E
Set-up information (INPUT1 / INPUT2)
Depending on the type of computer or OS, you may need to install monitor set-up information on your
system. If so, follow the steps below to install monitor set-up information. (Depending on the type of
computer or OS, command names and methods may differ. Please follow the computer’s own operation
manual while reading this.)
Installing set-up information
For Windows 2000
This explanation is for installing and setting monitor set-up information on a Windows 2000 computer,
and it assumes your CD-ROM drive is the “D” drive.
1. Connect the monitor and computer.
2. Load the supplied CD-ROM into the computer’s CD-ROM drive.
3. Click the [Start] button. From [Settings], choose [Control Panel].
4. Double-click [Display].
5. Click [Settings], [Advanced], and [Monitor].
6. Click [Properties], [Driver], and [Update Driver].
7. When the [Upgrade Device Driver Wizard] appears, click [Next].
8. Select [Display a list of the known drivers for this device so that I can choose a specific driver]
and click [Next].
9. When [Models] is displayed, click [Have disk], confirm that [Copy manufacturer’s files from:] is
[D:], and click [OK].
10. Select the monitor from the list displayed and click [Next].
11. Click [Next], confirm that the monitor’s name appears on the screen, and click [Finish]. If [The
Digital Signature Not Found] appears, click [Yes].
12. Click [Close] to close [Display Properties].
13. Click [OK] to close the window.
14. Eject the CD-ROM from the CD-ROM drive.
For Windows XP
This explanation is for installing and setting monitor set-up information on a Windows XP computer,
and it assumes your CD-ROM drive is the “D” drive.
1. Connect the monitor and computer.
2. Load the supplied CD-ROM into the computer’s CD-ROM drive.
3. Click the [Start] button. Choose [Control Panel].
4. Click [Appearance and Themes] and [Display].
When using Classic View, double-click [Display].
5. Click [Settings], [Advanced], and [Monitor].
6. Click [Properties], [Driver], and [Update Driver].
The [Hardware Update Wizard] appears.
When you are asked whether to search Windows Update for the device driver, select [No, not this
time] and click [Next].
7. Select [Install from a list or specific location] and click [Next].
8. Select [Don’t search. I will choose the driver to install.] and click [Next].
9. Click [Have Disk], confirm that [Copy manufacturer’s files from:] is [D:], and click [OK].
10. Select the monitor from the list displayed and click [Next].
If [has not passed Windows Logo testing...] appears, click [Continue Anyway].
11. Confirm that the monitor’s name appears on the screen and click [Finish].
12. Click [Close] to close [Screen Properties].
13. Click [OK] to close the window.
14. Eject the CD-ROM from the CD-ROM drive.
38
E
PC Operation
▼ Rear view
RS-232C straight cable
RS-232C
INPUT
To RS-232C
input terminal
To COM port
RS-232C
input terminal
PC connection
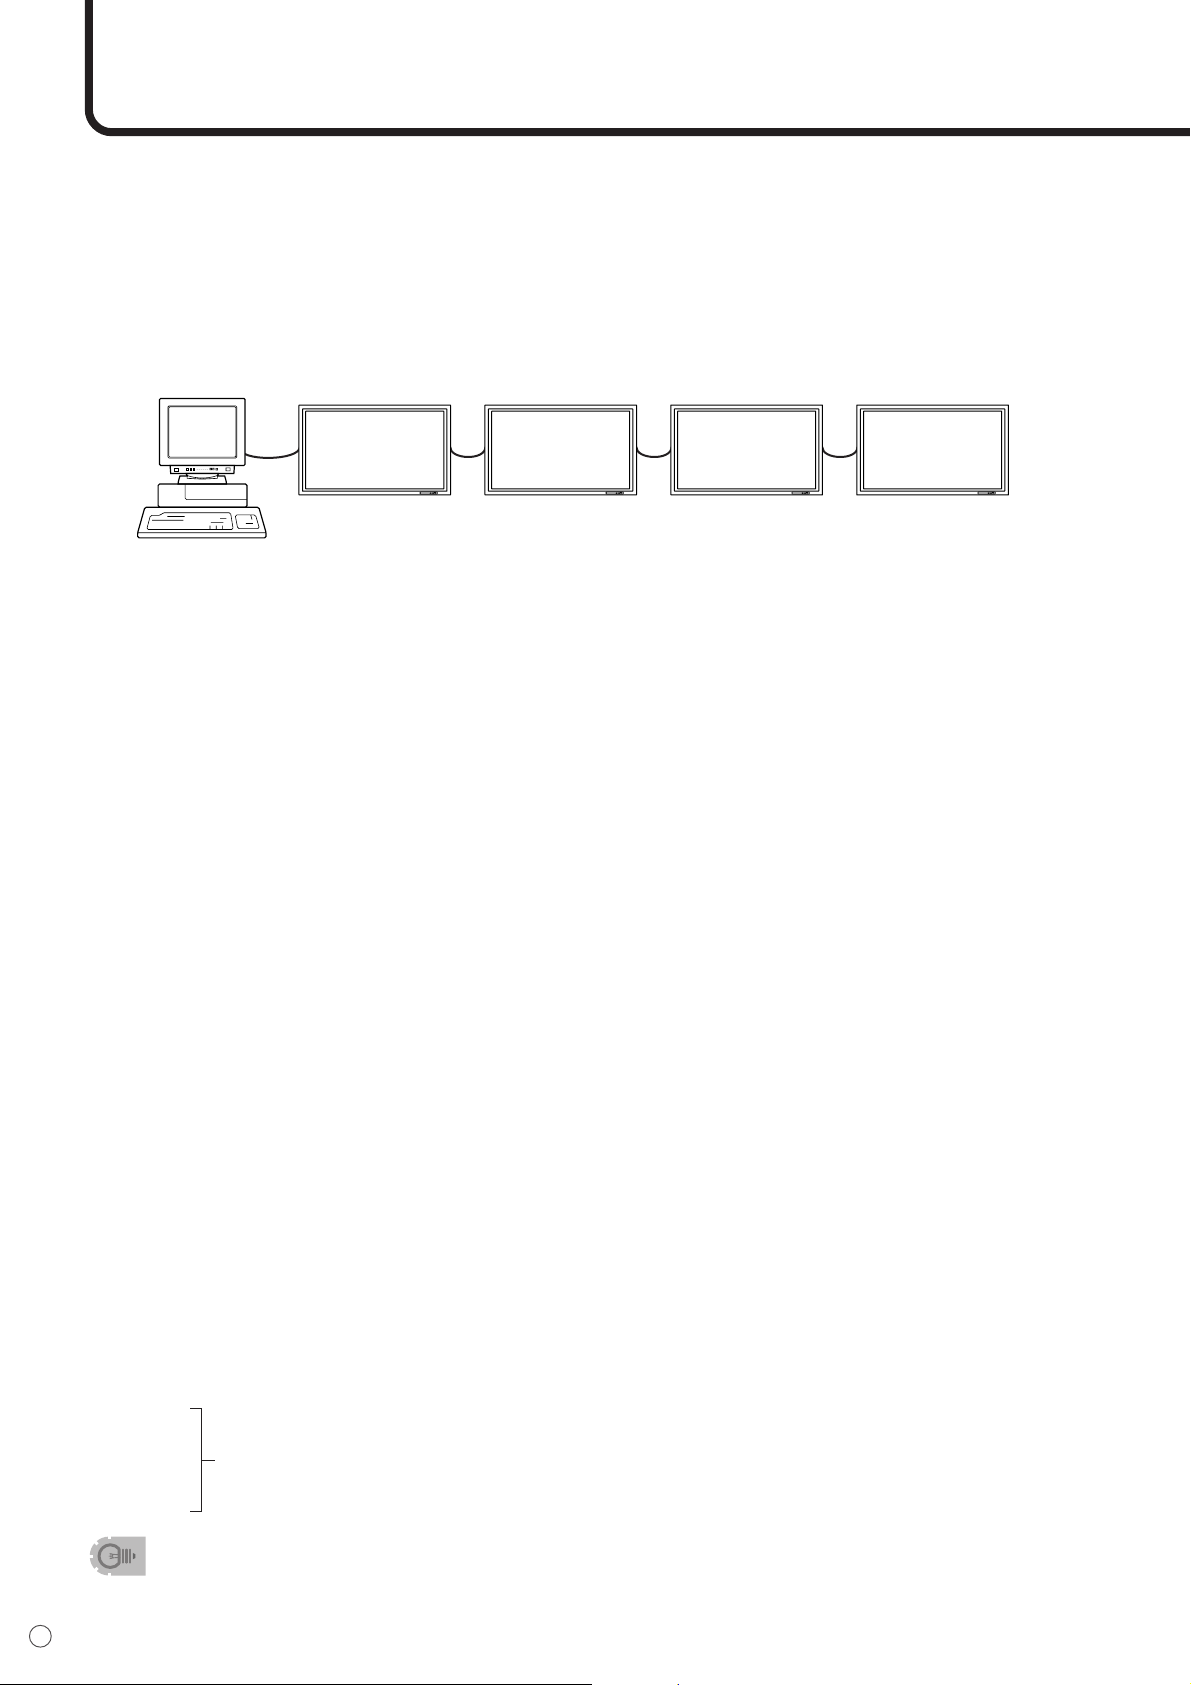
1. One-to-one connection with a PC...... Basic operation
Connect with RS-232C straight cable between the PC COM port (RS-232C connector) and the RS-
232C input terminal on the back of monitor.
▼ PC
ENGLISH
39
E
2. Daisy chain connection from a single PC...... Advanced operation
Connect with RS-232C straight cable between the PC COM port (RS-232C connector) and the RS-
232C input terminal on the back of monitor.
Next, connect RS-232C straight cable to the first monitor’s RS-232C output terminal and to the
second monitor’s RS-232C input terminal. Connect in the same way to the third and subsequent
monitors. The number of connectable monitors varies depending on the length of the cable used and
the surrounding environment.
Communication conditions
Set the RS-232C communication settings on the PC to match the monitor’s communication settings.
RS-232C straight cable
RS-232C
input terminal
RS-232C
input terminal
RS-232C
INPUT
RS-232C
OUTPUT
RS-232C
OUTPUT
RS-232C
INPUT
To COM port
RS-232C
output terminal
RS-232C
output terminal
▼ First monitor
▼ PC
▼ Second monitor
Baud rate 9,600 bps
Data length 8 bits
Parity bit None
Stop bit 1 bit
Flow control None
40
E
PC Operation (Continued)
Example: VOLM0030
POWR 1 (“ ” indicates a space.)
* Be sure to input 4 characters for the parameter. Pad with spaces if necessary.
✕ VOLM30
●● VOLM 30 (“ ” indicates a space. “ ” is the carriage return code (0DH, 0AH or 0DH).)
If a command has “R” listed for “DIRECTION” in the “RS-232C Command table” on page 52, the current
value can be returned by using “?” as the parameter.
Example: 1. If an ID number has not been set:
VOLM???? ← From PC to monitor (Current volume setting: ?)
30 ← From monitor to PC (Current volume setting: 30)
2. If an ID number has been assigned (For example, ID number = 001)
VOLM ? ← From PC to monitor (“ ” indicates a space.)
30 001 ← From monitor to PC (“ ” indicates a space.)
<Response code format>
■ When a command has been executed correctly
This is returned when execution of the command
is finished.
■ When a command has not been executed correctly*
* This is returned when there is no such com-
mand, or when the command cannot be used in
the current state of the monitor (i.e. video auto-
adjustment with video display).
* If there is a bad connection between the PC
and monitor, or if communication has not been
established, nothing is returned (not even
ERR).
■ If execution of the command is taking some time
If a command takes some time to execute, WAIT
may be returned as the return value. Wait for a
moment, and OK or ERR will be returned. New
commands cannot be received during this time,
even if they are sent.
■ If RS-232C is locked
If RS-232C control has been locked with the
operation lock (see page 29), LOCKED is re-
turned as the returned value.
Communication procedure
Basic operation
<Command format>
When a command is sent from the PC to the monitor, the monitor operates according to the received
command, and sends a response message to the PC.
C1 C2 C3 C4 P1 P2 P3 P4
Carriage return code
Command field
(4 prescribed
alphanumerical
characters)
Parameter field
(4 character string
comprised of:
0-9, +, -, space, ?)
OK
Carriage return code
(0D
H
, 0A
H
)
RRE
Carriage return code
(0D
H, 0AH)
IWTA
Carriage return code
(0D
H
, 0A
H
)
ECDKOL
Carriage return code (0DH, 0AH)

ENGLISH
41
E
Advanced operation
This section explains commands for daisy chain connection. The basic communication procedure is the
same as in the “Basic operation” section.
<ID numbers>
You can assign a unique ID number to each monitor (see page 34). This allows you to control a particular
monitor in a daisy chain of monitors.
Up to about 20 monitors can be connected, depending on the length of RS-232C cables and installation
environment.
You can assign ID numbers either from the menu screen (via remote control or the control buttons on the
monitor) or from the PC using RS-232C cable.
[Example]
If monitors are connected as shown above, you can execute commands like “Set the volume of the
monitor with ID 4 to 20”.
When controlling monitors linked in a daisy chain by designating ID numbers, you should basically avoid
any duplication of ID numbers.
If the same ID number is assigned to multiple monitors, only the monitor closest to the PC can be con-
trolled with that ID number.
If monitors are connected as shown below, only the monitor (1) can be accessed with ID number 2.
Monitor (2) cannot be controlled using that ID number.
[Example]
ID numbers do not have to be assigned in ascending order starting from the PC. They can also be con-
nected as shown below.
[Example]
PC ID number: 1 ID number: 2 ID number: 3 ID number: 4
PC ID number: 1 ID number: 2 ID number: 2 ID number: 3
(1) (2)
PC ID number: 3 ID number: 2 ID number: 4 ID number: 1
42
E
<Commands for ID control>
The command examples shown on this page assume the following connection and ID number set up.
IDST......A monitor receiving this command sets its own ID number in the parameter field.
Example: IDST0001
OK_001 ← The ID number of this monitor is set to 1.
PC ID number: 1 ID number: 2 ID number: 3 ID number: 4
After linking monitors, you can automatically assign ID numbers by using the IDST command with
the Repeater control (see “Repeater control” on page 49).
[Example]
If you connect monitors as shown above, and use the command “IDST001+”, ID numbers will be set
automatically, as shown below.
[Example]
IDST001+ ← ID setting command with repeater control
WAIT
OK 001 ← ID = “OK” response from ID number=1
OK 002 ← ID = “OK” response from ID number=2
OK 003 ← ID = “OK” response from ID number=3
OK 004 ← ID = “OK” response from ID number=4 (End)
Note
PC Set 1 Set 2 Set 3 Set 4
PC ID number: 1 ID number: 2 ID number: 3 ID number: 4
PC Operation (Continued)

ENGLISH
43
E
IDSL.......The parameter of this command sets the ID number indicating the monitor subject to the
next command.
Example:
IDSL0002 ← The next command is for the monitor with ID number=2.
WAIT ← Searching for monitor with ID number=2
OK_002 ← Found monitor with ID number=2
VOLM0030 ← Sets volume of monitor with ID number=2 to 30.
WAIT ← Processing
OK_002 ← OK response from monitor with ID number=2
VOLM0020 ← Sets volume to 20.
OK_001 ← The volume of the monitor with ID number=1
(the one directly connected to the PC) is set to 20.
IDLK....... The parameter of this command sets the ID number indicating the monitor subject to all
subsequent commands.
Example:
IDLK0002 ← Following commands are for the monitor whose ID number is “2”.
WAIT ← Searching for monitor with ID number=2
OK_002 ← Found monitor with ID number=2
VOLM0030 ← Sets volume of monitor with ID number=2 to 30.
WAIT ← Processing
OK_002
VOLM0020 ← Sets volume of monitor with ID number=2 to 20.
WAIT
OK_002
IDLK0000 ← Canceling ID number setting
WAIT ← Canceling IDLK
OK_002 ← Cancelation complete
VOLM0010
OK_001 ← The volume of the monitor with ID number=1
(the one directly connected to the PC) is set to 10.
IDCK ...... Provides screen display of the ID number currently assigned to a monitor, and the ID num-
ber currently set for IDLK (if any).
Example:
(After executing IDLK0002)
IDCK0000 ← (Parameter has no meaning.)
ID:001 IDLK:002 ← Returned response. The ID number is also displayed on the monitor screen.
IDCK000+ ← Repeater control
(If a command is used with repeater control, ID designation using IDSL or
IDLK is canceled.)
WAIT
ID:001 IDLK:002
ID:002 IDLK:002
ID:003 IDLK:002
ID:004 IDLK:002
The IDSL command is
effective only once, for the
immediately succeeding
command.
The IDLK command remains
effective until it is canceled, or
power is shut off.
44
E
<Repeater control>
This system has a function to allow setting of multiple monitors connected in a daisy chain using a
single command. This function is called repeater control.
The number of connectable monitors varies depending on the length of the cable used and the surround-
ing environment.
You can use Repeater control function without assigning ID numbers.
[Example]
If monitors are connected as shown above, you can execute a command like “Set all monitors’ input
settings to INPUT1”.
<Repeater control command>
Repeater control is achieved by setting the FOURTH CHARACTER of the parameter to “+”.
Example:
VOLM030+ ← Sets volume of all monitors to 30.
In repeater control, responses are returned by all the connected monitors.*
If you want to determine that a value has been returned by a specific set, assign ID numbers to
each monitor in advance.
If no response is returned, this may be because the monitor has not received (or is still processing)
the command, so it is possible that new commands may not be executed even if they
are sent.
* If power is turned “OFF” using Repeater control, only the monitor closest to the PC returns a re-
sponse.
Example:
(When 4 monitors are connected, and assigned ID numbers 1 through 4)
VOLM030+
WAIT
OK_001
OK_002
OK_003
OK_004 ← If 4 monitors are connected in a chain, reliable operation can be ensured by sending
a new command only after a reply has been returned by 4th (last) monitor.
Repeater control can also be used for reading settings.
Example:
VOLM???+
WAIT
10 001
20 002
Volume settings for all monitors are returned.
30 003
40 004
• If repeater control is used during ID designation (IDSL, IDLK), the ID designation is canceled.
PC Set 1 Set 2 Set 3 Set 4
PC Operation (Continued)

ENGLISH
45
E
<Response format in Advanced operation >
■ Normal response
• Response when no ID number has been set
A response is returned when execution of the
pertinent command is finished.
• Response when an ID number has been set
■ When a command has not been executed correctly*
• Response when no ID number has been set
• Response when an ID number has been set
* This is returned when there is no such command, or when the command cannot be used in the current state of
the monitor (i.e. video auto-adjustment with video display).
* If communication has not been established for reasons like a bad connection with the monitor, nothing is returned
(not even ERR).
* If no monitor has been assigned the designated ID number (e.g. if the command IDSL0002 is used, but no
monitor with ID=002 is found), no response is returned.
OK
Carriage return code
(0DH, 0AH)
OKSPC 0 0 1
ID number of responding monitor
Space (20
H
)
Carriage return code
(0D
H
, 0A
H
)
RRE
Carriage return code
(0D
H
, 0A
H
)
RRE SPC 0 0 1
ID number
Space (20
H
)
Carriage return code
(0D
H
, 0A
H
)
46
E
■ If execution of the command is taking some time
If execution of a command takes some time,
WAIT may be returned as the returned value. In
this case, a value will be returned if you wait a
while. During this time, new commands will not
be received, even if they are sent.
No ID number is attached to WAIT response.
• Cases where WAIT is returned
- When repeater control is used
- When an IDSL or IDLK command is used
- When one of the following commands is used: RSET, INPS, ASNC, WIDE, EMAG, EPOS, PXSL,
POWR
■ When control via RS-232C is locked (to prevent use) using the operation lock function (see
page 34)
■ If a timeout occurs while waiting for a command
■ If a timeout occurs while waiting for a command (when the monitor waiting for the command
is assigned an ID number = 001 in the following example)
■ If the current parameter is read out using “?” for the parameter (for numerical values etc.)
• Response when no ID number has been set
Example:
VOLM????
10
• Response when an ID number has been set (In the example below: ID=001)
Example:
VOLM????
10_001
<Communication interval>
• If the next command is sent in the interval before OK or ERR is returned, it will basically be ignored.
(Exception: Forced end using ASNC command)
• Leave an interval of 100 ms between command response and transmission of the next command.
IWTA
Carriage return code
(0D
H
, 0A
H
)
ECDKOL
Carriage return code
(0D
H, 0AH)
UETOMTI
Carriage return code
(0D
H
, 0A
H
)
UETOMTI
SPC 0 0 1
Space (20
H
)
Carriage return code
(0D
H
, 0A
H
)
VOLM0020
OK
VLMP0031
OK
Leave an interval of 100 ms
PC Operation (Continued)

ENGLISH
47
E
Power control/Input selection, etc.
RS-232C command table
<How to read the command table>
Command: Command field (See page 40.)
Direction: W When the “Parameter” is set in the parameter field (see page 40), the
command functions as described under “Control/Response Contents”.
R The returned value indicated under “Reply” can be obtained by setting
“????”, “___?” or “???+” (repeater control) in the parameter field (see page
40).
Parameter: Parameter field (See page 40.)
Reply: Response (Returned value)
*A circle indicates commands which can be used in power standby mode.
0
1
0
1
2
3
4
0
1
2
1
2
3
4
Ye s
Ye s
W
R
W
R
POWR
INPS
Power Setting
Input Selection
Control item Command Direction Parameter Reply Control/Response contents
*
Switches to standby.
Returns from standby.
Standby mode
Normal mode
Waiting mode
Toggle change
INPUT1 : DVI
INPUT2 : RGB
INPUT3 : Component
INPUT4 : S-Video/Video
INPUT1 : DVI
INPUT2 : RGB
INPUT3 : Component
INPUT4 : S-Video/Video
*can be used in standby mode
48
E
Picture Adjustment (INPUT1)
0
1
2
3
4
5
6
0-max value
0-max value
0-max value
0
1
2
0
1
2
3
0
1
2
3
4
5
6
7
8
1
2
3
4
5
0
1
2
3
4
5
6
0-max value
0-max value
0-max value
—
0
1
2
0
1
2
3
0
1
2
3
4
5
6
7
8
1
2
3
4
5
WR
WR
WR
WR
WR
WR
WR
WR
WR
WR
R
WR
WR
WR
WR
CTMP
CRTR
CRTG
CRTB
PXCK
EMAG
EPOS
EPOS
WIDE
WHITE
BALANCE
RESOLUTION CHECK
ENLARGE
ENLARGE
SETTING
IMAGE
POSITION
(2 x 2)
IMAGE
POSITION
(3 x 3)
WIDE MODE
THRU
COOL
•
STD
•
WARM
USER
R-CONTRAST
G-CONTRAST
B-CONTRAST
Returns current resolution in the form of xxx, xxx.
ENLARGE OFF
2 x 2
3 x 3
SETTING: 2 x 2) UPPER LEFT
SETTING: 2 x 2) UPPER RIGHT
SETTING: 2 x 2) LOWER LEFT
SETTING: 2 x 2) LOWER RIGHT
SETTING: 3 x 3) UPPER LEFT
SETTING: 3 x 3) UPPER MIDDLE
SETTING: 3 x 3) UPPER RIGHT
SETTING: 3 x 3) MIDDLE LEFT
SETTING: 3 x 3) CENTER
SETTING: 3 x 3) UPPER RIGHT
SETTING: 3 x 3) LOWER LEFT
SETTING: 3 x 3) UPPER MIDDLE
SETTING: 3 x 3) LOWER RIGHT
WIDE
NORMAL
Dot by Dot
ZOOM1
ZOOM2
Ye s
No
No
Ye s
Control item Command Direction Parameter Reply Control/Response contents
*
*can be used in standby mode
PC Operation (Continued)
ENGLISH
49
E
Picture Adjustment (INPUT2)
W
WR
WR
WR
WR
W
WR
WR
WR
WR
WR
WR
WR
WR
WR
WR
WR
R
WR
WR
WR
WR
WR
WR
ASNC
CLCK
PHSE
HPOS
VPOS
AGIN
BLVL
CONT
CTMP
CRTR
CRTG
CRTB
PXCK
PXSL
PXSL
EMAG
EPOS
EPOS
WIDE
Returns Error in case of DVI or Video input mode.
Returns Error in case of DVI or Video input mode.
Returns current resolution in the form of xxx, xxx.
V=768 / 1366 x 768
V=768 / 1360 x 768
V=768 / 1280 x 768
V=768 / 1024 x 768
V=480 / 852 x 480
V=480 / 848 x 480
V=480 / 640 x 480
ENLARGE OFF
2 x 2
3 x 3
SETTING: 2 x 2) UPPER LEFT
SETTING: 2 x 2) UPPER RIGHT
SETTING: 2 x 2) LOWER LEFT
SETTING: 2 x 2) LOWER RIGHT
SETTING: 3 x 3) UPPER LEFT
SETTING: 3 x 3) UPPER MIDDLE
SETTING: 3 x 3) UPPER RIGHT
SETTING: 3 x 3) MIDDLE LEFT
SETTING: 3 x 3) CENTER
SETTING: 3 x 3) UPPER RIGHT
SETTING: 3 x 3) LOWER LEFT
SETTING: 3 x 3) UPPER MIDDLE
SETTING: 3 x 3) LOWER RIGHT
WIDE
NORMAL
Dot by Dot
ZOOM1
ZOOM2
1
0-max value
0-max value
0-max value
0-max value
1
0-max value
0-max value
1
2
3
4
5
6
0-max value
0-max value
0-max value
0
1
2
3
4
5
6
0
1
2
0
1
2
3
0
1
2
3
4
5
6
7
8
1
2
3
4
5
0-max value
0-max value
0-max value
0-max value
0-max value
0-max value
1
2
3
4
5
6
0-max value
0-max value
0-max value
—
0
1
2
3
4
5
6
0
1
2
0
1
2
3
0
1
2
3
4
5
6
7
8
1
2
3
4
5
No
No
No
Ye s
Ye s
No
No
Ye s
AUTO ADJUSTMENT
Clock
Phase
H-Position
V-Position
AUTO ADJUSTMENT
Black level
Contrast
COOL
•
STD
•
WARM
USER
R-CONTRAST
G-CONTRAST
B-CONTRAST
Auto Sync.
Sync.
Adjustment
Auto Gain
Picture
adjustment
WHITE
BALANCE
768 LINES
480 LINES
ENLARGE
DOTS
SETTING
DOTS
SETTING
ENLARGE
SETTING
IMAGE
POSITION
(2 x 2)
IMAGE
POSITION
(3 x 3)
RESOLUTION CHECK
WIDE MODE
*
Control item Reply
Control/Response contents
*can be used in standby mode
Command Direction Parameter

50
E
Picture Adjustment (INPUT3/INPUT4)
0-max value
0-max value
0-max value
0-max value
0-max value
1
2
3
4
5
1
2
3
4
5
0-max value
0-max value
0-max value
0-max value
0-max value
1
2
3
4
5
1
2
3
4
5
WR
WR
WR
WR
WR
WR
WR
WR
WR
WR
WR
CONT
BLVL
COLR
TINT
SHRP
CTMP
WIDE
WHITE
BALANCE
WIDE MODE
CONTRAST
BLACK LEVEL
COLOR
TINT
SHARPNESS
COOL
•
STD
•
WARM
WIDE
ZOOM1
ZOOM2
NORMAL
Dot by Dot
Ye s
Ye s
Control item Command Direction Parameter Reply Control/Response contents
*
*can be used in standby mode
PC Operation (Continued)
ENGLISH
51
E
Special Control
W
R
W
R
W
W
W
R
R
WR
WR
WR
WR
W
WR
WR
WR
W
R
R
R
TIMER OFF
OFF TIMER
TIMER OFF
Remaining time
Sets the monitor’s ID number.
Returns the monitor’s ID number.
Sets a monitor ID number. This ID number is only
effective for the command immediately after this
command.
Clears the ID number if one has been designated.
Sets a monitor ID number. This ID number is
effective for the next and all subsequent commands
after this command.
Clears the ID number if one has been designated.
Displays selected ID number and the monitor’s own
ID number on the screen.
STANDARD
OFFICE MODE
VIVID MODE
BRIGHTNESS
OFF
ON
ALL RESET
OSD DISPLAY ON
OSD DISPLAY OFF
ADJUSTMENT UNLOCKED
ADJUSTMENT LOCKED
LED ON
LED OFF
Initialization
No detectable error has occurred
Standby by remote control
Standby by power switch
Standby by RS-232C
Waiting by No Signal/Out of Timing (Incl: VESA DPMS/DMPM)
Standby by FAN error
Standby by abnormal temperature
Temperature
No error
FAN error
0
1-23
0-255
1-255
0
1-255
0
0
0
1
2
0-max value
0-max value
0
1
0
0
1
0
1
0
1
0
0
1-23
0-255
Value
Value
0
1
2
0-max value
0-max value
0
1
0
1
0
1
0
1
0
1
2
3
4
5
6
Value
0
1
No
Ye s
Ye s
Ye s
Ye s
Ye s
Ye s
Ye s
Ye s
No
No
Ye s
Ye s
Ye s
Ye s
No
ID NO.
SETTING
ID NO.
SETTING
(ONCE)
ID NO.
SETTING
(SUBSEQUENT)
ID CHECK
MODEL
SERIAL NO.
Temperature
Fan
OFTM
IDST
IDSL
IDLK
IDCK
INF1
SRNO
BMOD
VLMP
VOLM
MUTE
RSET
ALCK
LOSD
OFLD
STCA
ERRT
ERRF
ID NUMBER
Information
OFF TIMER
Display mode
Brightness
Volume
Mute
ALL RESET
ADJUSTMENT
OSD DISPLAY
LED OFF
CAUSE OF LAST STANBY
Status check
*
Control item
Reply
Control/Response contents
*can be used in standby mode
Command Direction Parameter
52
E
Troubleshooting
Before calling for repair services, make sure following checks for possible remedies to the encountered
symptoms.
Problem Check item Page
There is no picture
or sound.
There is no picture.
Remote control does not work.
Sound from left and
right speakers is
reversed.
Sound is heard from
only one side.
There is a picture
but no sound.
Faint color or bad hue.
• Is the AC cord disconnected?
• Is the main power switch turned off or is the
monitor in standby mode?
• Make sure external equipment is connected
properly.
• Make sure correct INPUT is selected.
• Make sure the connected external equipment is
operating (playing back).
• The signal may be incompatible.
• Is the monitor in waiting mode?
• Are the batteries inserted with polarity ( , )
aligned?
• Are the batteries worn out?
•Point the remote control unit toward the monitor’s
remote control sensor.
• Is the menu display locked?
• Are audio cables connected properly?
• Make sure audio cables for external speakers are
connected properly: left and right cables may be
reversed or one of the two cables may not be
connected.
• Make sure the volume is not set to minimum.
• Video, S-video, component and RGB terminals
are for video only. Make sure audio cables are
also connected.
• Is the audio corresponding to the selected image
being input?
• Check “Color” and “Tint” adjustments.
• Make sure the connection sequence is correct.
19
24
13 to 17
25
–
–
24
12
29
13 to 17
18
25
13 to 17
13 to 17
31 to 32
13 to 17
Picture disappears.
ENGLISH
53
E
■ Warning when temperature rises
Nature of warning:
• The power LED lights up red and the monitor enters standby mode.
Solution:
• If the monitor enters standby mode due to a rise in temperature, you can turn off the main power
switch and turn it back on again. However the monitor will enter standby mode again if the cause of
the temperature rise is not eliminated.
• Check whether the monitor is placed at a location where a quick rise in temperature is likely. Internal
temperature rises quickly if the vents on the back are blocked.
• Internal temperature rises quickly if dust accumulates inside the monitor or around the vents.
Remove dust if possible. Ask your dealer about removing internal dust.
• If the power LED blinks red, there might be a problem with the fan.
Cracking sound
The monitor sometimes makes a cracking sound.
•You may hear cracking sound from the monitor. This happens
when the cabinet slightly expands and contracts according to
change in temperature. This does not affect the monitor’s
performance.
54
E
Specifications
■ Product Specifications
Model PN-455
LCD element 45" wide (113.1 cm diagonal) ASV low-reflection black TFT LCD
Max. resolution (pixels) 1920 x 1080
Max. colors 16.77 M colors (8 bits/color)
Viewing angle 170° right/left/up/down (contrast ratio ≥10)
Screen active area inch (mm) 38-
7
/
8
x 21-
7
/
8
(985.9 X 554.6)
Computer input signal Digital DVI 1.0 standard-compliant, analog RGB (0.7Vp-p) [75Ω]
Sync signal Horizontal/vertical separate (TTL: positive/negative), Sync-on-green,
Composite sync (TTL: positive/negative)
Video signal system NTSC (3.58MHz)
Plug and play VESA DDC2B
Power management VESA DPMS, DVI DMPM
Input terminals Computer signal Digital DVI-D 24 pin
Analog Mini D-sub 15 pin, 3 rows
Computer audio 3.5 mm mini stereo jack
Serial RS-232C
Composite video BNC
*1
S-video 1 line
*1
Component BNC (Y, Pb/Cb, Pr/Cr)
Audio RCA pin (L/R)
Output terminals Computer signal Analog
*2
Mini D-sub 15 pin, 3 rows
Serial RS-232C
Audio RCA pin (L/R)
Speaker 10 W + 10 W [6Ω]
Power requirement AC120 V, 60 Hz
Operating temperature 0°C to 40°C
Operating humidity 20% to 80% (no condensation)
Power consumption 312 W, 18 W in waiting mode, 2.9 W in standby mode
Dimensions inch (mm) Approx. 42-
7
/
8
x 3-
3
/
4
x 25-
3
/
8
(1,089 x 96 x 645) (excluding protrusions)
Weight lbs. (kg) Approx. 59.5 (27)
*1 S-video input will have priority over composite video when connected.
*2 Through output for the analog computer input signal. Does not support plug and play.
• As a part of our policy of continuous improvement, SHARP reserves the right to make design and
specification changes for product improvement without prior notice.
The performance specification figures indicates are normal values of production units: There may be
some deviation from these values in individual units.
ENGLISH
55
E
■ Power management
This monitor conforms to VESA DPMS and DVI DMPM. Both your video card and computer must support
the same standard in order for the monitor’s power management function to work.
DPMS: Display Power Management Signaling
DMPM: Digital Monitor Power Management
■ DDC (plug and play)
The monitor supports the VESA DDC (Display Data Channel) standard.
DDC is a signal standard for plug and play between monitors and computers. Information about resolu-
tion and other parameters is exchanged between the two. This function can be used if the computer
supports DDC and it has been configured to detect plug-and-play monitors.
There are several types of DDC, depending on the communication method used. This monitor supports
DDC2B.
ScreenDPMS Hsync Vsync
Power
consumption
Ye s
Ye s
No
No
Ye s
No
Ye s
No
ON STATE
STANDBY
SUSPEND
OFF STATE
Display
No
display
312 W
18 W
Display
No display
Monitor ON
Active OFF
312 W
18 W
Screen
DMPM
Power
consumption
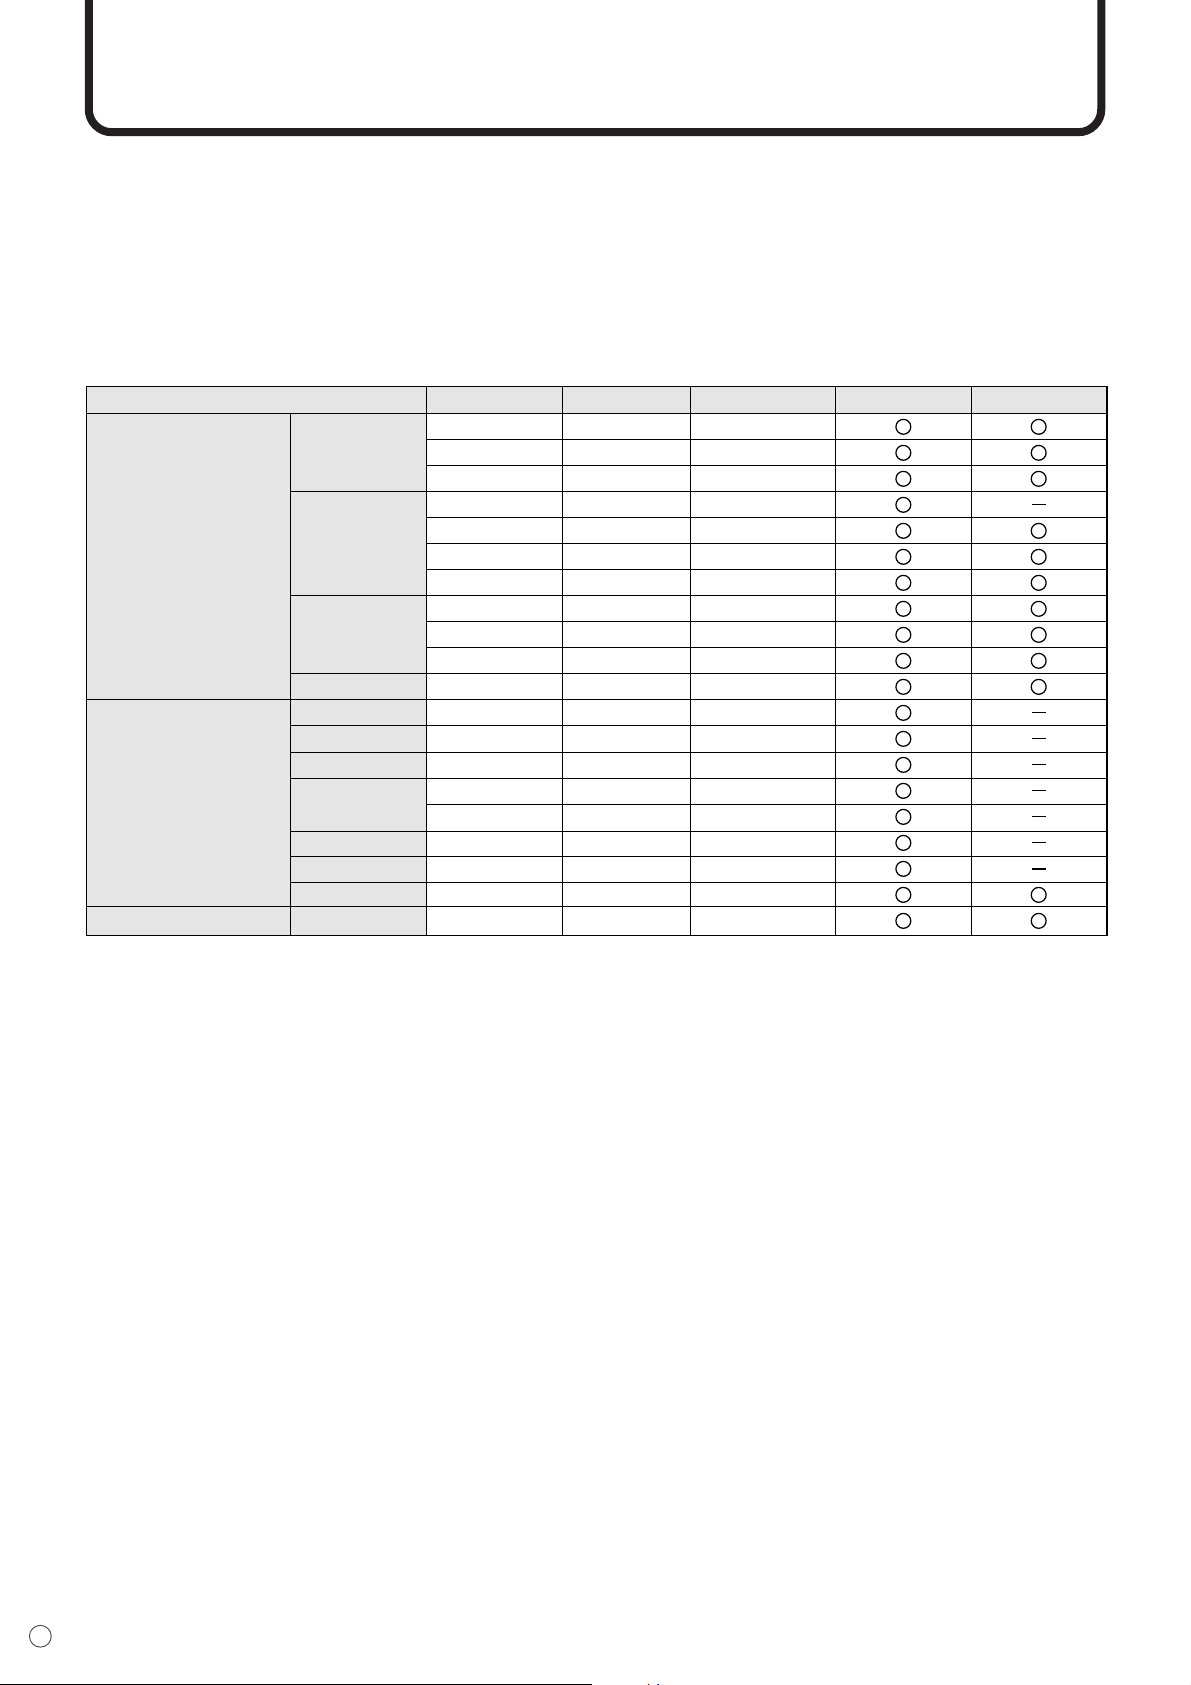
56
E
PC Digital/Analog Signal Input Compatibility Chart
• Video Analog RGB (0.7 Vp-p) [75 Ω]
Conforms to DVI (digital visual interface) standard 1.0
• Sync H/V separate (TTL: Positive/negative), Sync-on-green,
Composite sync (TTL: Positive/negative)
• Supported frequencies See the Screen resluton chart shown below.
VESA
• IBM AT compatible
Wide
US TEXT
Screen resolution Hsync Vsync Dot frequency Analog signal Digital signal
640 x 480
800 x 600
1024 x 768
1280 x 1024
848 x 480
852 x 480
1280 x 720
1280 x 768
1360 x 768
1366 x 768
1920 x 1080
720 x 400
31.5 kHz
37.9 kHz
37.5 kHz
35.1 kHz
37.9 kHz
48.1 kHz
46.9 kHz
48.4 kHz
56.5 kHz
60.0 kHz
63.3 kHz
31.1 kHz
31.7 kHz
44.7 kHz
47.986 kHz
60.15 kHz
47.7 kHz
48.3 kHz
67.5 kHz
31.5 kHz
60.0 Hz
72.0 Hz
75.0 Hz
56.0 Hz
60.0 Hz
72.0 Hz
75.0 Hz
60.0 Hz
70.0 Hz
75.0 Hz
60.0 Hz
60.0 Hz
60.0 Hz
60.0 Hz
60.0 Hz
75.0 Hz
60.0 Hz
60.0 Hz
60.0 Hz
70.0 Hz
25.175 MHz
31.5 MHz
31.5 MHz
36.0 MHz
40.0 MHz
50.0 MHz
49.5 MHz
65.0 MHz
75.0 MHz
78.75 MHz
108.2 MHz
33.3 MHz
35.0 MHz
74.4 MHz
81.0 MHz
102.977 MHz
84.7 MHz
81.9 MHz
148.5 MHz
28.3 MHz
* All are compliant only with non-interlaced.
* If the monitor is receiving timing signals that are not compatible, [OUT OF TIMING] will appear. In this case,
please change the setting so that the timing signals will be compatible with the monitor, according to your PC
manual.
* If the monitor is not receiving any signal (sync signal), [NO SIGNAL] will appear.
■ Screen resolution chart
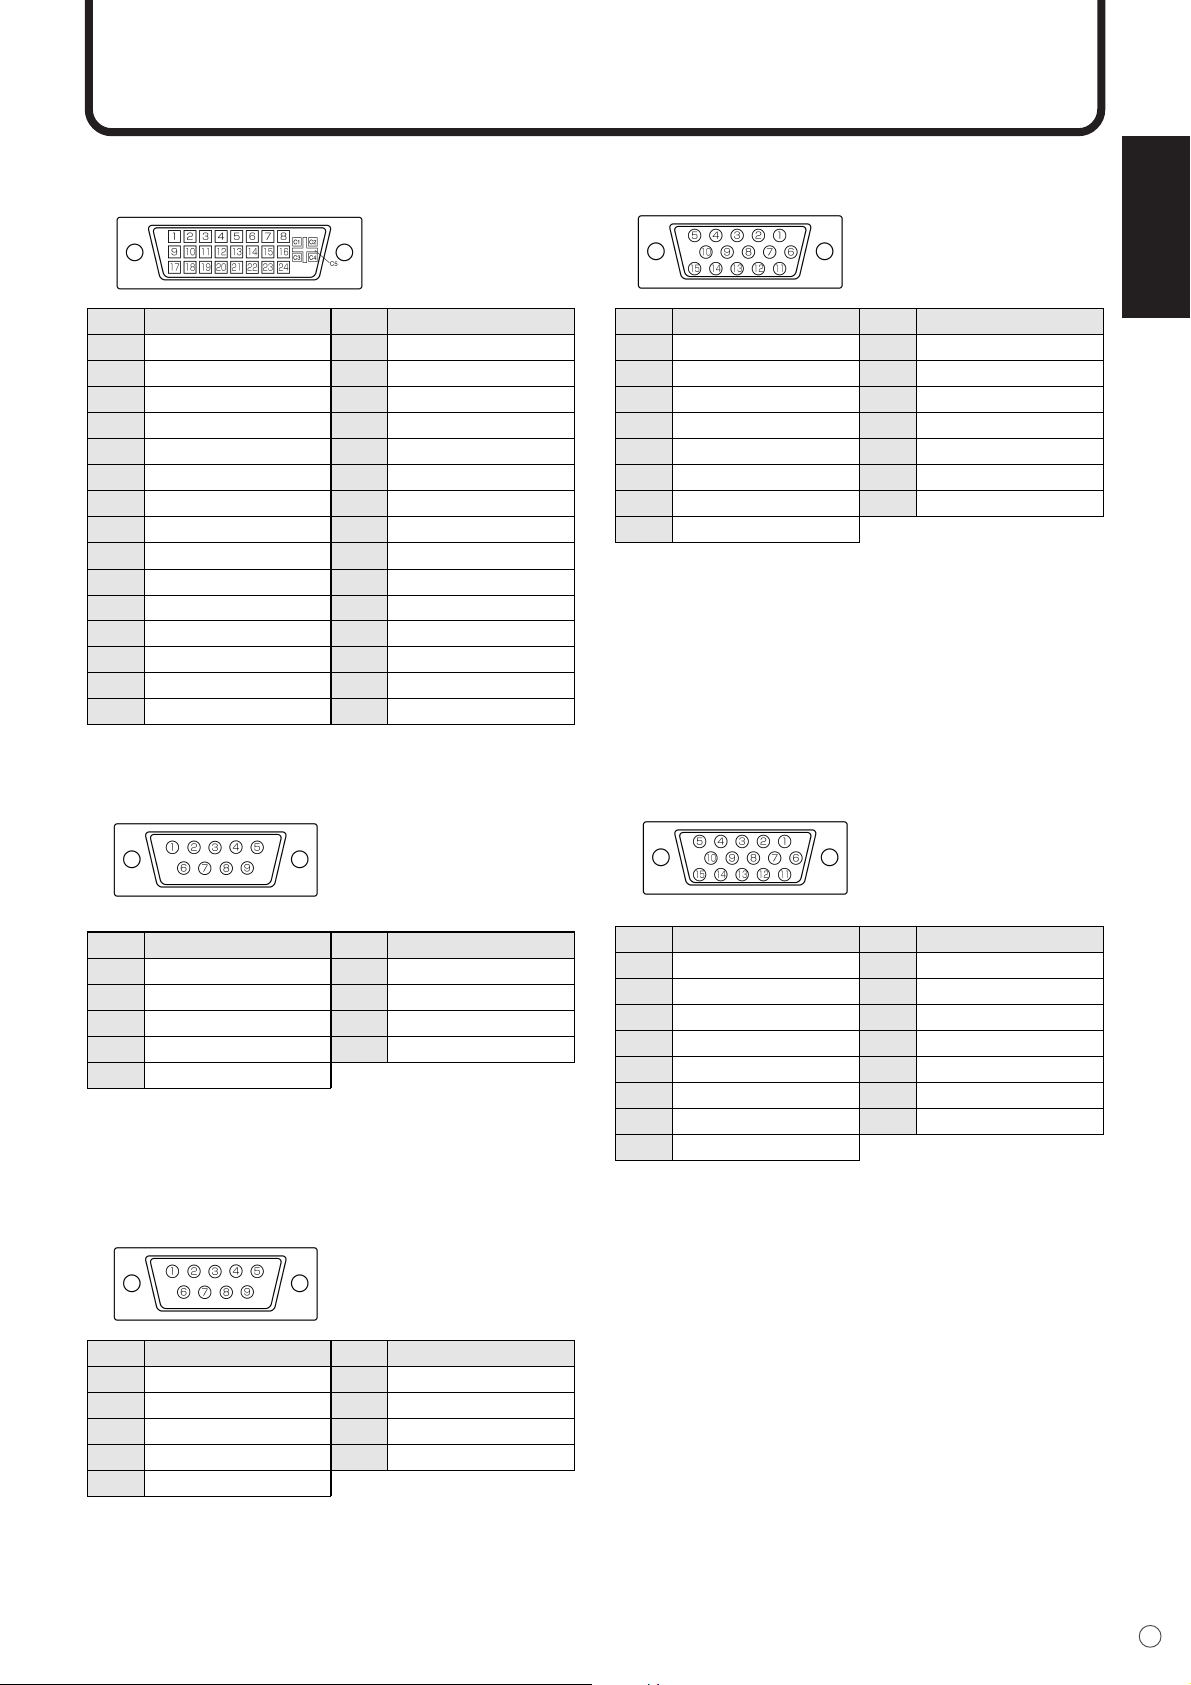
ENGLISH
57
E
Connector Compatibility Charts
■ PC digital RGB input terminal pins
(DVI-D 24 pin)
■ PC analog RGB input terminal pins
(Mini D-sub 15 pin)
No.
1
2
3
4
5
Function
N.C.
Transmitted data
Received data
Data terminal ready
GND
No.
6
7
8
9
Function
Data set ready
Request to send
Clear to send
N.C.
No.
1
2
3
4
5
Function
Carrier detect
Received data
Transmitted data
Data terminal ready
GND
No.
6
7
8
9
Function
Data set ready
Request to send
Clear to send
Ring indicator (open)
No.
1
2
3
4
5
6
7
8
9
10
11
12
13
14
15
Function
TMDS data 2–
TMDS data 2+
TMDS data 2/4 shield
N.C.
N.C.
DDC clock
DDC data
N.C.
TMDS data 1–
TMDS data 1+
TMDS data 1/3 shield
N.C.
N.C.
+5 V
GND
No.
16
17
18
19
20
21
22
23
24
C1
C2
C3
C4
C5
Function
Hot-plug detection
TMDS data 0–
TMDS data 0+
TMDS data 0/5 shield
N.C.
N.C.
TMDS clock shield
TMDS clock +
TMDS clock –
N.C.
N.C.
N.C.
N.C.
GND
No.
1
2
3
4
5
6
7
8
Function
Red video signal input
Green video signal input
Blue video signal input
N.C.
GND
GND for red video signal
GND for green video signal
GND for blue video signal
No.
9
10
11
12
13
14
15
Function
+5 V
GND
N.C.
DDC data
Hsync signal input
Vsync signal input
DDC clock
■ RS-232C input terminal pins
(D-sub 9 pin)
■ PC analog RGB output terminal pins
(Mini D-sub 15 pin)
■ RS-232C output terminal pins
(D-sub 9 pin)
No.
1
2
3
4
5
6
7
8
Function
Red video signal input
Green video signal input
Blue video signal input
N.C.
GND
GND for red video signal
GND for green video signal
GND for blue video signal
No.
9
10
11
12
13
14
15
Function
+5 V
GND
N.C.
N.C.
Hsync signal output
Vsync signal output
N.C.
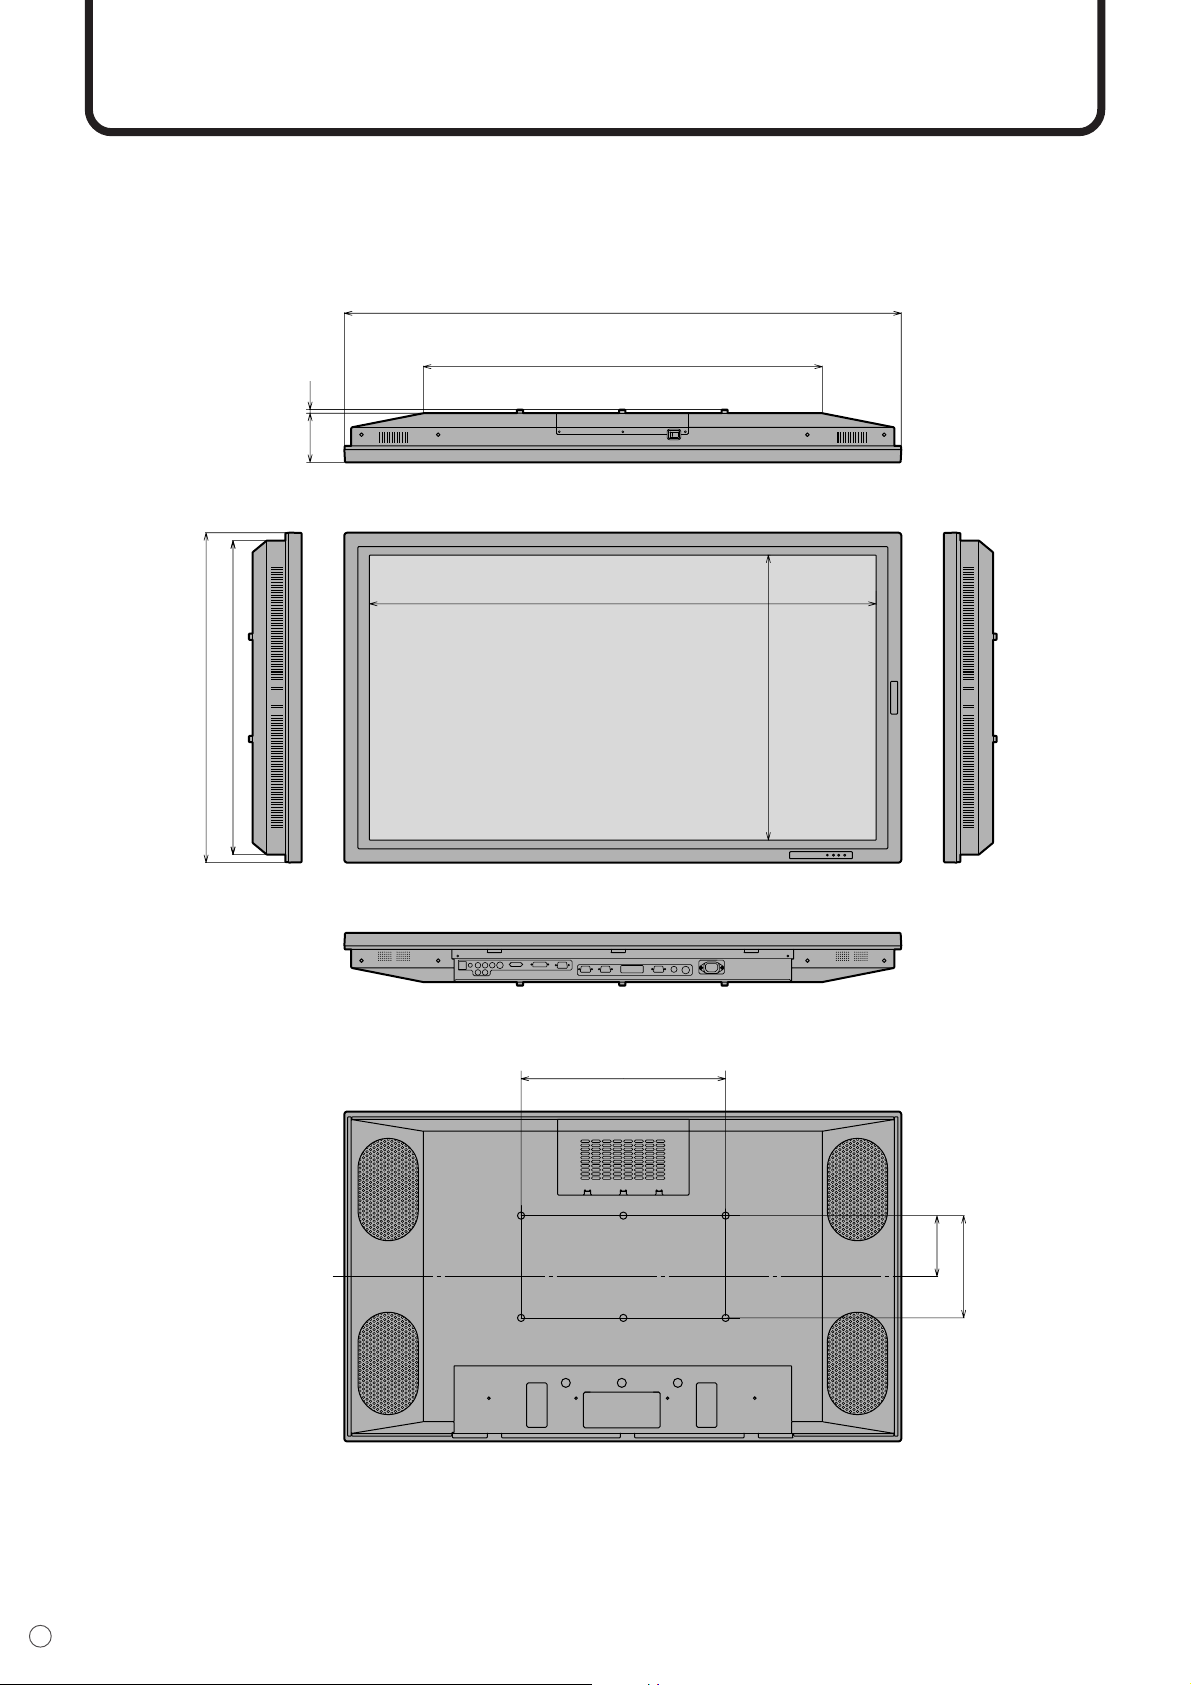
58
E
Unit: inch [mm]
Dimensional Drawings
Opening height
(21-
7
/8 [557])
Opening width (39 [991])
15-
3
/4 [400]
7-
8
/7 [200]
4-
5
/8 [119]
3-
3
/4 [96]
1
/4 [7]
42-
7
/8 [1089]
30-
3
/4 [780]
24-
1
/8 [614]
25-
3
/8 [645]
ENGLISH
59
E
Menu Option Reference Chart
MODE SELECT1
ENLARGE
ENLARGE POS
MULTI ZOOM
OFF, 2 x 2, 3 x 3
2 x 2: 0 to 3, 3 x 3: 0 to 8
IMAGE ZOOM
H-POS
V-POS
■ INPUT1
WHITE BALANCE
R-CONTRAST
G-CONTRAST
B-CONTRAST
0 to 255
0 to 255
0 to 255
MODE SELECT 2
THRU
COOL
•
STD
•
WARM
USER
OFF TIMER
OSD H-POSITION
OSD V-POSITION
LANGUAGE
ID NO SET
0 to 23
0 to 255
■ INPUT2
MODE SELECT1
ADJUSTMENT
480 LINES
768 LINES
ENLARGE
ENLARGE POS
MULTI ZOOM
852, 848 , 640
1366, 1360, 1280, 1024
OFF, 2 x 2, 3 x 3
2 x 2: 0 to 3, 3 x 3: 0 to 8
CLOCK
PHASE
H-POS
V-POS
0 to 255
0 to 255
0 to 255
0 to 255
BLACK LEVEL
CONTRAST
MANUAL
AUTO
GAIN CONTROL
MANUAL
AUTO
0 to 31
0 to 31
WHITE BALANCE
COOL
•
STD
•
WARM
USER
R-CONTRAST
G-CONTRAST
B-CONTRAST
0 to 255
0 to 255
0 to 255
IMAGE ZOOM
H-POS
V-POS
60
E
■ INPUT3/4
WHITE BALANCE
CONTRAST
BLACK LEVEL
TINT
COLORS
SHARPNESS
WHITE BALANCE
0 to 31
0 to 31
0 to 31
0 to 31
0 to 31
COOL, •, STD, •, WARM
MODE SELECT 2
OFF TIMER
OSD H-POSITION
OSD V-POSITION
LANGUAGE
ID NO SET
0 to 23
0 to 255
Menu Option Reference Chart (Continued)
MODE SELECT 2
OFF TIMER
OSD H-POSITION
OSD V-POSITION
LANGUAGE
ID NO SET
0 to 23
0 to 255