Loading ...
Loading ...
Loading ...
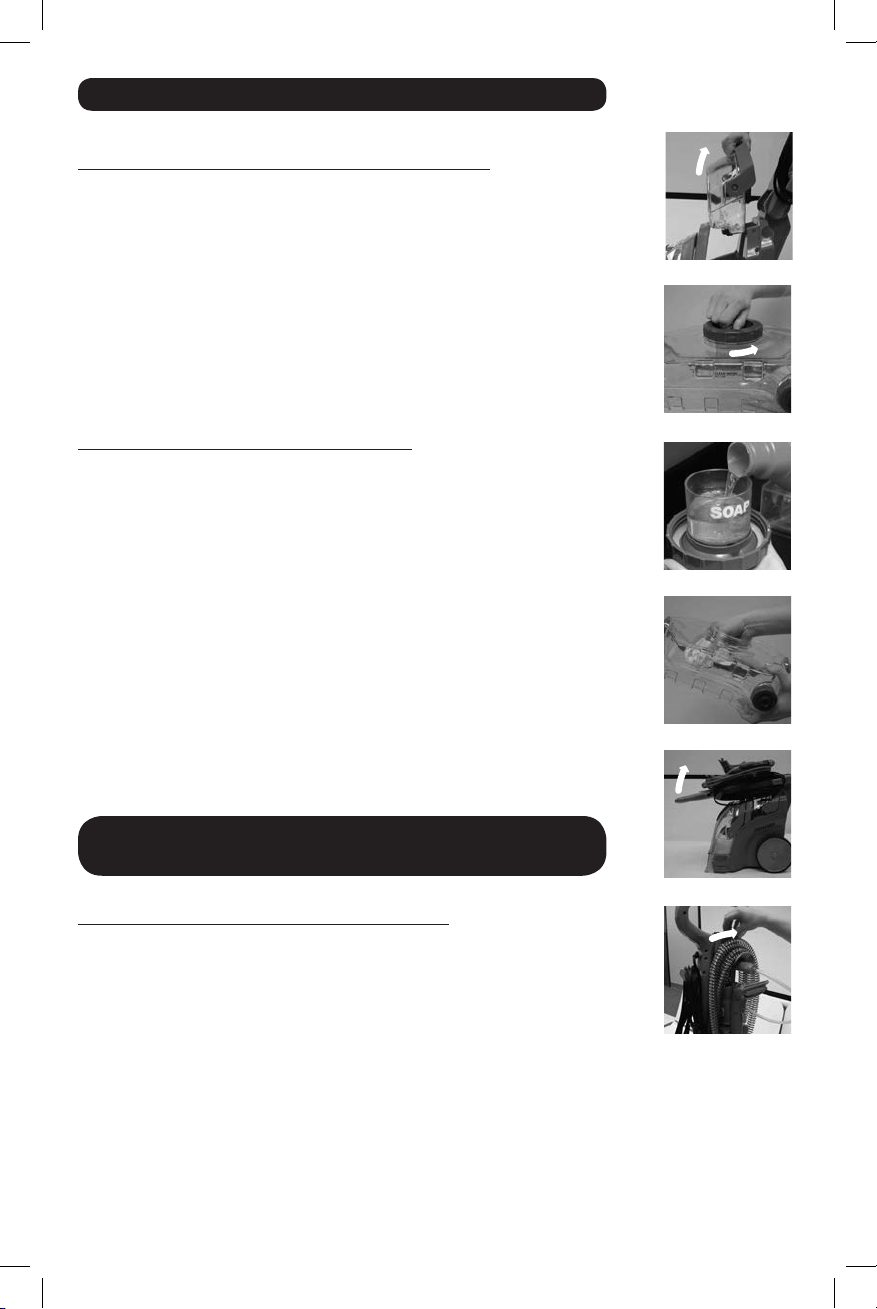
(Fig. 15)
REFILLING THE CLEAN WATER TANK (CONT)
3. Remove the CLEAN WATER TANK by grasping the TANK HANDLE and
lifting straight up. (Fig. 15)
4. Loosen the TANK LID by turning counter clockwise and remove from the
machine, set aside. Fill the tank with hot tap water to the “CLEAN
WATER FILL LINE”. (Fig. 16). DO NOT BOIL OR MICROWAVE WATER.
5. The TANK LID is also the “Soap” measure. (Fig. 17). Fill the lid with Rug
Doctor cleaning solution to the desired level (measured in ounces).
Follow instructions on the cleaning solution bottle for best results.
6. Pour the cleaning solution into the CLEAN WATER TANK and replace
the lid. Turn clockwise to tighten.
7. Place the CLEAN WATER TANK back in the machine, making sure it
is secure.
CLEANING UP/STORAGE AFTER USE
After you’ve used your RUG DOCTOR DEEP CARPET CLEANER follow these
easy steps for quick clean-up and storage for your machine.
1. Turn the machine o by pressing the POWER SWITCH down toward the
“OFF” setting.
2. Unplug the POWER CORD from the outlet and wrap it around the
ROTATING CORD HOOKS.
3. Empty the CLEAN WATER TANK (if necessary), rinse and replace on
the machine.
4. Empty the WASTE WATER TANK then rinse, clean and dry before
placing back on the machine base.
a. WIDE OPENING LID opening is designed to fit your hand inside to
thoroughly clean, rinse and dry to store a fresh and clean tank. (Fig. 7)
5. Move the machine to a closet or storage place. Use the HANDLE
RELEASE lever to collapse the HANDLE for convenient and compact
storage. (Fig. 18). Tip: Let the machine brushes dry before putting the
machine away.
(Fig. 16)
(Fig. 17)
HOW TO CLEAN / FEATURES (CONT)
8 rugdoctor.com 1-800-784-3628
(Fig. 17)
(Fig. 18)
CLEANING UPHOLSTERY, STAIRS AND
STAINS, USING THE UPHOLSTERY TOOL
SETTING UP/GETTING READY TO CLEAN
Your RUG DOCTOR DEEP CARPET CLEANER is ready to start cleaning right
out of the box. No assembly required! Follow these simple instructions to
start cleaning.
1. Wrap the UPHOLSTERY TOOL around the TOOL CADDY. The TOOL
CADDY is removable and can be stored on-board or hung on a hook
a. UPHOLSTERY TOOL CADDY wrapping instructions. (Fig. 19).
See Page 5 for UPHOLSTERY TOOL CADDY wrapping instructions.
2. Raise the COLLAPSIBLE HANDLE into the upright position
3. Fill the CLEAN WATER TANK:
a. Remove the CLEAN WATER TANK by grasping the tank HANDLE
and lifting straight up. (Fig. 15)
b. Loosen the TANK LID by turning counter clockwise and remove from
the machine, set aside.
(Fig. 19)
Loading ...
Loading ...
Loading ...