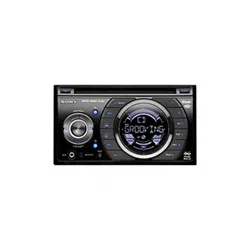
Operating Instructions FM/AM 2DIN Compact Disc Player
Getting Started
Playable discs on this unit
This unit can play CD-DA (also containing CD TEXT) and CD-R/CD-RW (MP3/WMA/AAC files (page 21)).
Resetting the unit
Before operating the unit for the first time, or after replacing the car battery or changing the connections, you must reset the unit. Press the RESET button (page 8) with a pointed object, such as a ball-point pen.
Note: Pressing the RESET button will erase the clock setting and some stored content
Canceling the DEMO mode
You can cancel the demonstration display which appears during turning off.
Press and hold the select button. The setup display appears.
Press the select button repeatedly until “DEMO” appears.
Rotate the control dial to select “DEMO-OFF.”
Press and hold the select button. The setup is complete and the display returns to normal play/reception mode.
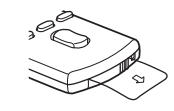
Preparing the card remote commander
Remove the insulation film.
Tip: For how to replace the battery, page 22.
Setting the clock
The clock uses a 12-hour digital indication.
Press and hold the select button. The setup display appears.
Press the select button repeatedly until “CLOCK-ADJ” appears.
Press (SEEK) +. The hour indication flashes.
Rotate the control dial to set the hour and minute. To move the digital indication, press (SEEK) +/–.
After setting the minute, press the select button. The setup is complete and the clock starts. To display the clock, press (DSPL). Press (DSPL) again to return to the previous display
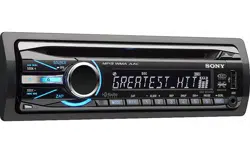
Location of controls and basic operations
Main unit
This section contains instructions on the location of controls and basic operations. For details, see the respective pages. The corresponding buttons on the card remote commander control the same functions as those on the unit.
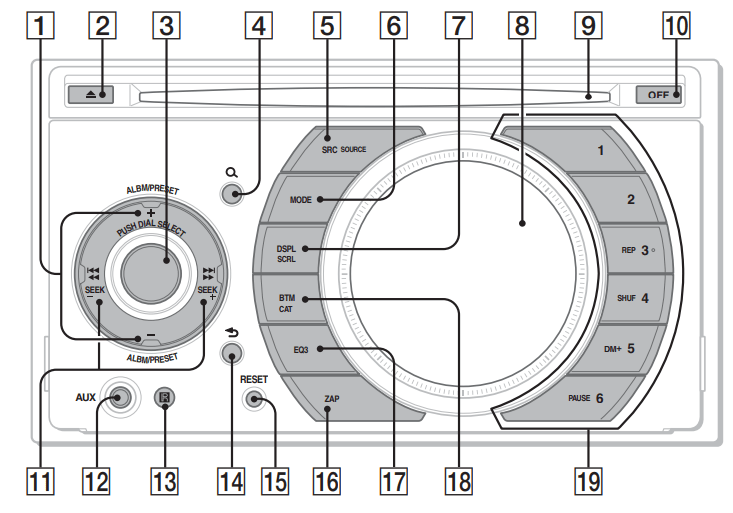
ALBM/PRESET +/– buttons CD/USB (during MP3/WMA/AAC playback): To skip albums (press); skip albums continuously (press and hold). Radio: To receive preset stations.
(eject) button To eject the disc.
Control dial/select button To adjust volume (rotate); select setup items (press and rotate).
(BROWSE) button To enter the Quick-BrowZer mode.
SOURCE (SRC) button To power on; change the source (Radio/CD/ USB/AUX)*1.
MODE button Press to: Select the radio band (FM/AM)*1/ select the play mode of iPod. Press and hold to: Enter/cancel the passenger control.
DSPL (display)/SCRL (scroll) button To change display items (press); scroll the display item (press and hold).
Display window
Disc slot Insert the disc (label side up), playback starts.
OFF button To power off; stop the source.
SEEK –/+ buttons CD/USB: To skip tracks (press); skip tracks continuously (press, then press again within about 1 second and hold); reverse/fastforward a track (press and hold). Radio: To tune in stations automatically (press); find a station manually (press and hold).
AUX input jack To connect a portable audio device.
Receptor for the card remote commander
(BACK) button To return to the previous display.
RESET button
ZAP button To enter ZAPPIN™ mode.
EQ3 (equalizer) button To select an equalizer type (XPLOD, VOCAL, EDGE, CRUISE, SPACE, GRAVITY, CUSTOM or OFF).
BTM/CAT*2 button To start the BTM function (press and hold).
Number buttons CD/USB: (3): REP (4): SHUF (5): DM+ Improves digitally compressed sound, such as MP3. To activate the DM+ function, set “ON.” To cancel, set “OFF.” (6): PAUSE To pause playback. To cancel, press again. Radio: To receive stored stations (press); store stations (press and hold).
Other functions
Changing the sound settings
Adjusting the sound characteristics
Press the select button repeatedly until the desired item appears.
Rotate the control dial to adjust the selected item.
Press (BACK). The setting is complete and the display returns to normal play/reception mode.
The following items can be set (follow the page reference for details):
DSO (Dynamic Soundstage Organizer) Creates a more ambient sound field. To select the DSO mode: “1,” “2,” “3” or “OFF.” The larger the number, the more enhanced the effect.
LOW, MID, HI (page 17)
BAL (Balance) Adjusts the sound balance between the left and right speakers.
FAD (Fader) Adjusts the relative level between the front and rear speakers.
SUB (Subwoofer volume) Adjusts the subwoofer volume.
AUX (AUX level)*2 Adjusts the volume level for each connected auxiliary equipment: “+18 dB” – “0 dB” – “–8 dB.” This setting negates the need to adjust the volume level between sources.
Customizing the equalizer curve— EQ3
“CUSTOM” of EQ3 allows you to make your own equalizer settings.
Select a source, then press (EQ3) repeatedly to select “CUSTOM.”
Press the select button repeatedly until “LOW,” “MID” or “HI” appears.
Rotate the control dial to adjust the selected item. The volume level is adjustable in 1 dB steps, from –10 dB to +10 dB.
Repeat steps 2 and 3 to adjust the equalizer curve. To restore the factory-set equalizer curve, press and hold the select button before the setting is complete.
Press (BACK). The setting is complete and the display returns to normal play/reception mode.
Tip: Other equalizer types are also adjustable.
Adjusting setup items — SET
Press and hold the select button. The setup display appears.
Press the select button repeatedly until the desired item appears.
Rotate the control dial to select the setting (example “ON” or “OFF”).
Press and hold the select button. The setup is complete and the display returns to normal play/reception mode.
Note: Displayed items will differ, depending on the source and setting.
Using optional equipment
Auxiliary audio equipment
By connecting an optional portable audio device to the AUX input jack (stereo mini jack) on the unit and then simply selecting the source, you can listen on your car speakers. The volume level is adjustable for any difference between the unit and the portable audio device. Follow the procedure below:
Connecting the portable audio device
Turn off the portable audio device.
Turn down the volume on the unit.
Connect to the unit.
* Be sure to use a straight type plug.
Adjust the volume level
Be sure to adjust the volume for each connected audio device before playback.
Turn down the volume on the unit.
Press (SOURCE) repeatedly until “AUX” appears. “AUX FRONT IN” appears.
Start playback of the portable audio device at a moderate volume.
Set your usual listening volume on the unit. 5 Adjust the input level (page 17).
Additional Information
Precautions
Cool off the unit beforehand if your car has been parked in direct sunlight.
Power antenna (aerial) extends automatically
Moisture condensation Should moisture condensation occur inside the unit, remove the disc and wait for about an hour for it to dry out; otherwise the unit will not operate properly.
To maintain high sound quality Do not splash liquid onto the unit or discs
Notes on discs
Do not expose discs to direct sunlight or heat sources such as hot air ducts, nor leave it in a car parked in direct sunlight.
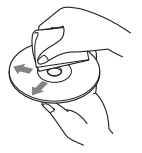
Before playing, wipe the discs with a cleaning cloth from the center out. Do not use solvents such as benzine, thinner, commercially available cleaners.
This unit is designed to playback discs that conform to the Compact Disc (CD) standard. DualDiscs and some of the music discs encoded with copyright protection technologies do not conform to the Compact Disc (CD) standard, therefore, these discs may not be playable by this unit.
Discs that this unit CANNOT play – Discs with labels, stickers, or sticky tape or paper attached. Doing so may cause a malfunction, or may ruin the disc. – Discs with non-standard shapes (e.g., heart, square, star). Attempting to do so may damage the unit. – 8 cm (3 1 /4 in) discs.
Notes on CD-R/CD-RW discs
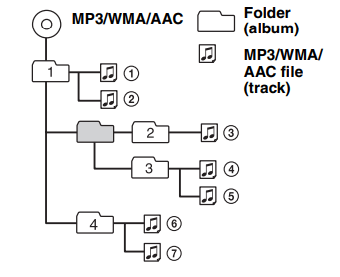
The maximum number of: (CD-R/CD-RW only) – folders (albums): 150 (including root folder) – files (tracks) and folders: 300 (may less than 300 if folder/file names contain many characters) – displayable characters for a folder/file name: 32 (Joliet)/64 (Romeo)
If the multi-session disc begins with a CD-DA session, it is recognized as a CD-DA disc, and other sessions are not played back.
Discs that this unit CANNOT play – CD-R/CD-RW of poor recording quality. – CD-R/CD-RW recorded with an incompatible recording device. – CD-R/CD-RW which is finalized incorrectly. – CD-R/CD-RW other than those recorded in music CD format or MP3 format conforming to ISO9660 Level 1/Level 2, Joliet/Romeo or multi-session.
Playback order of MP3/WMA/AAC files
About iPod
You can connect to the following iPod models. Update your iPod devices to the latest software before use. – iPod touch – iPod classic – iPod with video* – iPod nano (3rd generation) – iPod nano (2nd generation) – iPod nano (1st generation)* – iPhone and iPhone 3G * Passenger control is not available for iPod nano (1st generation) or iPod with video.
“Made for iPod” means that an electronic accessory has been designed to connect specifically to iPod and has been certified by the developer to meet Apple performance standards.
“Works with iPhone” means that an electronic accessory has been designed to connect specifically to iPhone and has been certified by the developer to meet Apple performance standards.
Apple is not responsible for the operation of this device or its compliance with safety and regulatory standards.
If you have any questions or problems concerning your unit that are not covered in this manual, consult your nearest Sony dealer.
Maintenance
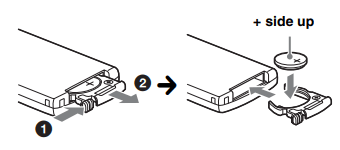
Replacing the lithium battery of the card remote commander
Under normal conditions, the battery will last approximately 1 year. (The service life may be shorter, depending on the conditions of use.) When the battery becomes weak, the range of the card remote commander becomes shorter. Replace the battery with a new CR2025 lithium battery. Use of any other battery may present a risk of fire or explosion.
Notes on the lithium battery
Keep the lithium battery out of the reach of children. Should the battery be swallowed, immediately consult a doctor.
Wipe the battery with a dry cloth to assure a good contact.
Be sure to observe the correct polarity when installing the battery.
Donot hold the battery with metallic tweezers, otherwise a short-circuit may occur.
WARNING: Battery may explode if mistreated. Do not recharge, disassemble, or dispose of in fire.
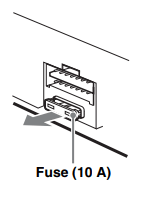
Fuse replacement
When replacing the fuse, be sure to use one matching the amperage rating stated on the original fuse. If the fuse blows, check the power connection and replace the fuse. If the fuse blows again after replacement, there may be an internal malfunction. In such a case, consult your nearest Sony dealer.
Troubleshooting
The following checklist will help you remedy problems you may encounter with your unit. Before going through the checklist below, check the connection and operating procedures. If the problem is not solved, visit the following support site.
General
No power is being supplied to the unit.
Check the connection or fuse.
If the unit is turned off and the display disappears, it cannot be operated with the remote commander. →Turn on the unit.
The power antenna (aerial) does not extend.
The power antenna (aerial) does not have a relay box.
No sound.
The ATT function is activated, or the Telephone ATT function (when the interface cable of a car telephone is connected to the ATT lead) is activated.
The position of the fader control “FAD” is not set for a 2-speaker system.
No beep sound.
The beep sound is canceled (page 18).
An optional power amplifier is connected and you are not using the built-in amplifier.
The contents of the memory have been erased.
The RESET button has been pressed. →Store again into the memory.
The power supply lead or battery has been disconnected or it is not connected properly.
Stored stations and correct time are erased. The fuse has blown. Makes noise when the position of the ignition is switched.
The leads are not matched correctly with the car’s accessory power connector.
During playback or reception, demonstration mode starts.
If no operation is performed for 5 minutes with “DEMO-ON” set, demonstration mode starts. →Set “DEMO-OFF” (page 18).
The display disappears from/does not appear in the display window.
The dimmer is set “DIM-ON” (page 18).
The display disappears if you press and hold (OFF). →Press and hold (OFF) on the unit until the display appears.
The Auto Off function does not operate.
The unit is turned on. The Auto Off function activates after turning off the unit. →Turn off the unit.
CD playback
The disc cannot be loaded.
Another disc is already loaded.
The disc has been forcibly inserted upside down or in the wrong way.
The disc does not playback.
Defective or dirty disc.
The CD-Rs/CD-RWs are not for audio use (page 21).
MP3/WMA/AAC files cannot be played back.
The disc is incompatible with the MP3/WMA/AAC format and version. For details on playable discs and formats, visit the support site.
MP3/WMA/AAC files take longer to play back than others.
The following discs take a longer time to start playback. – a disc recorded with a complicated tree structure. – a disc recorded in Multi Session. – a disc to which data can be added.
The display items do not scroll.
For discs with very many characters, those may not scroll.
“A.SCRL” is set to “OFF.” →Set “A.SCRL-ON” (page 18). →Press and hold (DSPL) (SCRL).
The sound skips.
Installation is not correct. →Install the unit at an angle of less than 45° in a sturdy part of the car.
Defective or dirty disc.
The operation buttons do not function.
The disc will not eject. Press the RESET button (page 6).
Radio reception
The stations cannot be received. The sound is hampered by noises.
The connection is not correct. →Connect a power antenna (aerial) control lead (blue) or accessory power supply lead (red) to the power supply lead of a car’s antenna (aerial) booster (only when your car has built-in FM/AM antenna (aerial) in the rear/side glass). →Check the connection of the car antenna (aerial). →If the auto antenna (aerial) will not go up, check the connection of the power antenna (aerial) control lead.
Preset tuning is not possible.
Store the correct frequency in the memory.
The broadcast signal is too weak.
Automatic tuning is not possible.
Setting of the local seek mode is not correct. →Tuning stops too frequently: Set “LOCAL-ON” (page 18). →Tuning does not stop at a station: Set “LOCAL-OFF” (page 18).
The broadcast signal is too weak. →Perform manual tuning.
During FM reception, the “ST” indication flashes.
Tune in the frequency accurately.
The broadcast signal is too weak. →Set “MONO-ON” (page 18).
An FM program broadcast in stereo is heard in monaural.
The unit is in monaural reception mode. →Set “MONO-OFF” (page 18)
USB playback
You cannot play back items via a USB hub.
This unit cannot recognize USB devices via a USB hub.
Cannot play back items.
A USB device does not work. →Reconnect it.
The USB device takes longer to play back.
The USB device contains files with a complicated tree structure.
A beep sounds.
During playback, the USB device has been disconnected. →Before disconnecting a USB device, make sure to stop playback first for data protection.
The sound is intermittent.
The sound may be intermittent at a high-bit-rate of more than 320 kbps.
Error displays/Messages
CHECKING
The unit is confirming the connection of a USB device. →Wait until confirming the connection is finished.
ERROR
The disc is dirty or inserted upside down.*2 →Clean or insert the disc correctly.
A blank disc has been inserted.
The disc cannot play due to a problem. →Insert another disc.
USB device was not automatically recognized. →Reconnect it again.
Press to remove the disc
FAILURE (Illuminates until any button is pressed.) The connection of speakers/amplifiers is incorrect. →See the installation guide manual of this model to check the connection.
FAILURE (Illuminates for about 1 second.) When the SAT tuner is connected, storing an SAT radio channel into a preset failed. →Be sure to receive the channel that you want to store, then try it again.
HUB NO SUPRT USB hub is not supported on this unit.
LOAD The CD changer is loading the disc. →Wait until loading is complete.
L. SEEK +/– The local seek mode is on during automatic tuning.
NO DEV (No Device) (SOURCE) is selected without a USB device connected. A USB device or a USB cable has been disconnected during playback. tBe sure to connect a USB device and USB cable
NO DISC The disc is not inserted in the CD changer. →Insert discs in the CD changer.
NO MAG The disc magazine is not inserted in the CD changer. →Insert the disc magazine in the CD changer.
NO MUSIC The disc or USB device does not contain a music file. →Insert a music CD in this unit or an MP3 playable CD changer. →Connect a USB device with a music file in it.
NO NAME A disc/album/artist/track name is not written in the track.
OFFSET There may be an internal malfunction. →Check the connection. If the error indication remains on in the display, consult your nearest Sony dealer.
OVERLOAD USB device is overloaded. →Disconnect the USB device, then change the source by pressing (SOURCE). →Indicates that the USB device is out of order, or an unsupported device is connected.
READ The unit is reading all track and album information on the disc. →Wait until reading is complete and playback starts automatically. Depending on the disc structure, it may take more than a minute.
RESET The CD unit, CD changer or USB device cannot be operated due to a problem. →Press the RESET button (page 6).
USB NO SUPRT (USB Not Support) The connected USB device is not supported. →For details on the compatibility of your USB device, visit the support site.
“”
During reverse or fast-forward, you have reached the beginning or the end of the disc and you cannot go any further

 (eject) button
  (BROWSE) button
  (BACK) button
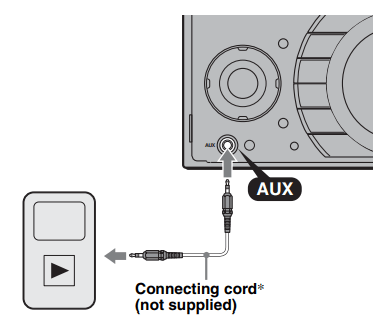
 to remove the disc
 ”
” ”
”