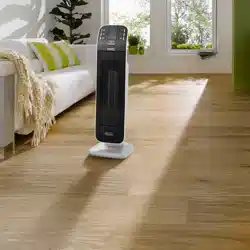

INSTANT CERAMIC TOWER HEATER
Instructions for use. Keep these instructions
Visit www.delonghi.com for a list of service centers near you.
ELECTRIC CHARACTERISTICS
120 V~ 60 Hz 1500 W
ITEM NUMBER: 1161562
CALENTADOR DE TORRE CERAMICO
INSTANTANEO
Repase y guarde estas instrucciones.
Lea cuidadosamente este instructivo antes de usar su aparato.
Visite www.delonghi.com para ver la lista de centros de servicios
cercanos a usted.
CARACTERISTICAS ELECTRICAS:
120 V~ 60 Hz 1500 W
NÚMERO DE ARTÍCULO: 1161562
HFX66V15C
2
3
EN
ES
page 4 page 9
3
D
E
F
B
H
C
A
B
C
D
E
F
A
G
I
4
5
IMPORTANT
INSTRUCTIONS
When using any electrical appliance, some basic safety pre-
cautions should always be observed to reduce the risk of re,
electric shock, and/or injury to persons. Read all instructions
carefully before using the appliance. Specically:
Danger!
Failure to observe the warning may result in life threatening
injury by electric shock.
- Do not operate any heater with a
damaged cord or plug or after the
heater malfunctions, has been dropped
or damaged in any manner. Return
heater to authorized service facility for
examination, electrical or mechanical
adjustment, or repair.
- This heater is not intended for use in bath-
rooms, laundry areas and similar indoor lo-
cations. Never locate heater where it may fall
into a bath tub or other water container.
- Do not use this heater in the immediate sur-
roundings of a bath, a shower or a swimming
pool.
- Do not insert or allow foreign objects to enter
any ventilation or exhaust opening as this
may cause an electric shock, re, or damage
the heater.
- CAUTION: to prevent electric shock
match wide blade of plug to wide slot,
then fully insert.
- CAUTION: In order to avoid a hazard due to
inadvertent resetting of thermal cutout, this
appliance must not be supplied through an
external switching device, such as a timer,
or connected to a circuit that is regulary
switched on and o by the utility.
- This heater may include an visual alarm to
warn that parts of the heater are getting
excessively hot. If the alarm ashes, imme-
diately turn the heater o and inspect for any
objects on or adjacent to the heater that may
cause high temperatures. DO NOT OPERATE
THE HEATER WITH THE ALARM FLASHING.
Important!
Failure to observe the warning could result in injury or
damage to the appliance.
- The appliance is not intended for use by
persons (including children) with reduced
physical, sensory ormental capabilities, or
lack of experience and knowledge, unless
they have been given supervision or instruc-
tion concerning use of the appliance by a
person responsible for their safety. Children
should be supervised to ensure that they do
not play with the appliance.
- Extreme caution is necessary when any heat-
er is used by or near children or invalids and
whenever the heater is left operating and
unattended.
- Always unplug heater when not in use.
- Use this heater only as described in this
manual. Any other use not recommended
by the manufacturer may cause re, electric
shock, or injury to persons.
- The heater must not be located immediately
below a socket-outlet.
- To prevent overload and blown fuses, be
sure that no other appliance is plugged into
the same outlet (receptacle) or into another
outlet (receptacle) wired into the same cir-
cuit.
- Be sure that the plug is fully inserted into an
appropriate outlet. Please remember that
outlets also deteriorate due to aging and
continuous use: check periodically if signs of
overheating or deformations are evi-denced
by the plug. Do not use the outlet and CALL
your electrician.
Danger of burns!!
Failure to observe the warning could result in burns or scalds.
- This heater is hot when in use. To avoid
burns, do not let bare skin touch hot surfaces.
Use handle when moving this heater. Keep
combustible materials, such as furniture, pil-
lows, bedding, papers, clothes, and curtains
at least 3 feet (0,9 m) from the front and top
5
of the heater and keep them away from the
sides and rear.
- Do not run cord under carpeting. Do not
cover cord with throw rugs, runners, or the
like. Arrange cord away from trac area and
where it will not be tripped over. Do not route
cord under furniture or appliances.
- To prevent a possible re, do not block air in-
takes or exhaust in any manner. Do not use on
soft surfaces,like a bed, where openings may
become blocked.
- A heater has hot or arcing or sparking parts
inside. Do not use it in areas where gasoline,
paint, or ammable liquids are used or stored.
- It is normal for the heater’s plug and cord to
feel warm to the touch. A plug or cord which
becomes hot tothe touch or becomes distort-
ed in shape may be a result of a worn electri-
cal outlet. Worn outlets or receptacles should
be replaced prior to further use of the heater.
Plugging heater into a worn outlet / recep-
tacle/ may result in overheating of the power
cord or re.
- If the supply cord is damage, it must be re-
placed by the manufacturer, its service agent
or similarly qualied person in order to avoid
a hazard.
- WARNING: Do not cover the appliance while
it is functioning in order to avoid overheating
which may cause risk of re.
Please note:
This symbol indicates recommendations and important
information for the user.
- If your appliance is equipped with a poly-
thene tape used as carry handle, remove it
before connecting appliance to the outlet.
- Do not use outdoors.
- To disconnect heater, turn controls to o, then
remove plug from outlet.
- Connect to properly polarized outlets only.
- This heater is not intended for use with an
extension cord or outlet strip. Plug the cord
directly into an appropriate wall receptable.
- Check that neither the appliance nor the
power cable have been damaged in any way
during transportation.
- Do not use the appliance in rooms with a oor
area of less than 43 square feet (4mq).
- Make sure that no pieces of polystyrene or
other packaging material have been left on
the appliance. It may be necessary to pass
over the appliance with a vacuum cleaner.
- When switching on the appliance for the rst
time, allow it to run at full power for at least
two hours to get rid of the unpleasant smell.
Make sure that the room in which the appli-
ance is located is well ventilated during this
operation. It is normal for the appliance to
emit small cracking sounds when you turn it
on.
SAVE THESE
INSTRUCTIONS
THIS PRODUCT IS FOR HOUSEHOLD USE
ONLY
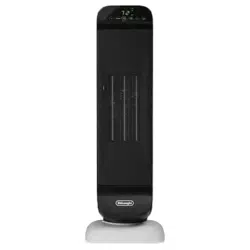
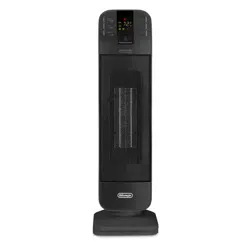
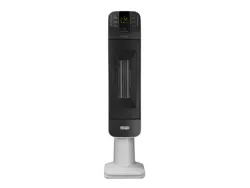
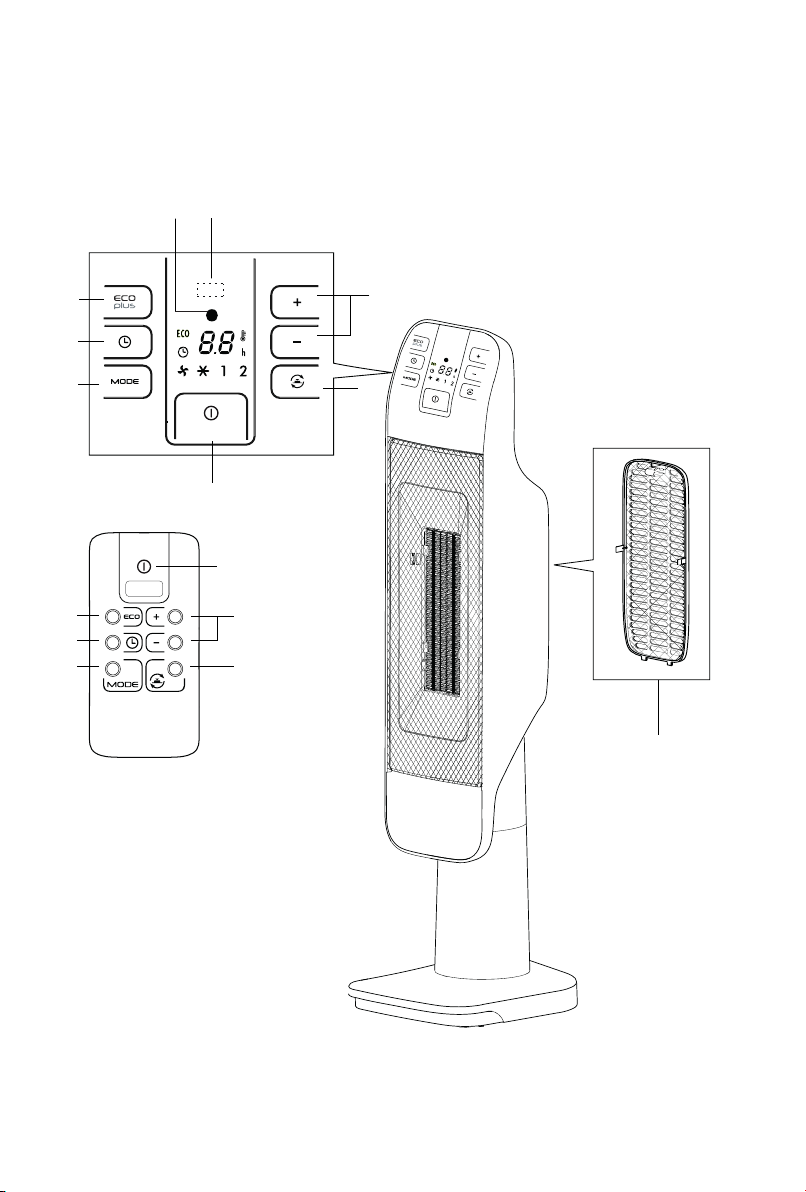
DESCRIPTION
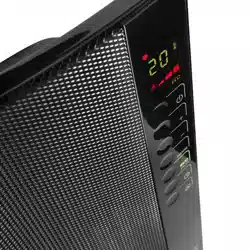
A ON/OFF button
B +/- Adjustment buttons
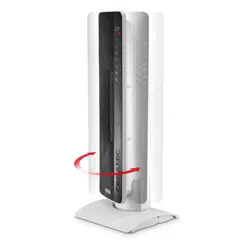
C Oscillation button
D “ECO PLUS” function button
E Timer button
F MODE button (for selecting the operating mode)
G Power indicator light
H Back cover with lter
I
Receiver for remote control
USE
Installation
The appliance can be used on any horizontal surface.
Do not overload the electrical circuit. Avoid using the same
socket for other appliances.
Electrical connection
- Before plugging the appliance into the outlet, check that
the power supply corresponds to the value indicated on
the rating plate and that the power supply is adequate
for the load.
6
7
- THIS APPLIANCE COMPLIES WITH DIRECTIVE 2004/108/
EEC ON RADIO INTERFERENCE SUPPRESSION.
Operation and use
- Connect the appliance to the power outlet.
- The appliance emits a beep and the power indicator
light (G) also comes on and remains lit while power to
the appliance is on. The appliance goes into STAND-BY.
- Press the ON/OFF button (A) to turn on the appliance. It
will begin to heat with the predened settings.
- Press the MODE button (F) to select one of the following
functions available:
l
Ventilation
In this operating mode only the fan operates, so the
appliance does not heat the room.
l
Anti-freeze
In this operating mode the appliance keeps the room
at a temperature of 45°F (7°C) to prevent freezing
temperatures.
l
Heating 1 and Heating 2
In this operating mode you can set the desired
temperature by pressing the + and - adjustment
buttons (B).
-
Heating 1 (minimum power level):
The appliance operates at the minimum power, reducing
noise and energy consumption to the minimum.
-
Heating 2 (maximum power level):
The appliance operates at the maximum power for rapid
heating of the room.
ECO PLUS function
In this operating mode the appliance will automatically set
the power level to guarantee the best comfort reducing the
energy consumption. In this operating mode the unit may
switch the heating power level from maximum to minimum
as needed, several times in an hour. When using the ECO PLUS
function, the maximum temperature setting is 79°F (26°C).
To activate this function, press the ECO PLUS button (D).
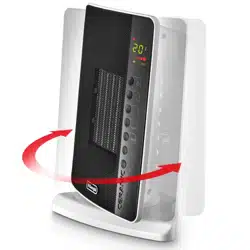
Swivel button
If you want the appliance to distribute the airow over a
larger area, press the oscillation button (C)
. The appliance
will then oscillate right and left. To stop the oscillation in the
desired position, just press oscillation button (C) again.
Turn the appliance o
To turn o the appliance press button ON/OFF (A). The
display could show the count down for about 6 seconds. To
completely turn o the appliance, remove the plug from the
socket.
Please note: The display can show the temperature
in both °F and °C. To change the temperature scale, press
and hold the + key for few seconds, then release. Please be
informed that as this is not a precision device, the showed
temperature not necessary corresponds to the real one.
24HOUR DIGITAL TIMER
This function can be activated from any operating mode.
Delayed switch-on: with the appliance in the STAND-BY
position, press the timer button (E)
.
The display shows the symbol and the time remaining
before switch-on. To set the timer, use the + and - adjustment
buttons (B), then wait a few seconds for the programming
to be set. During the rst ten hours, you can select half hour
intervals. For times greater than ten hours, one hour intervals
can be selected. The display returns to show for stand-
by and the symbol to indicate you have set the timer.
When the programmed time has been reached, the appliance
turns on with the same settings it had during the previous
operation.
Delayed shut-o: With the appliance on, press the timer
button (E) . The display shows the symbol and the
time remaining before shut-o. To set the timer, use the +
and – adjustment buttons (B), then wait a few seconds for
the programming to be set. During the rst ten hours, you
can select half hour intervals. For times greater than ten
hours, one hour intervals can be selected. The display returns
to show the current settings and the symbol to indicate
you have set the timer. When the programmed time as been
reached the appliance shuts o automatically. If you want
to go back to operation without the timer, press the timer
button (E) twice.
The timer symbol disappears from the display.
Using the remote control
The remote control functions correspond to those on the
control panel. See the section “Operation and Use" on the
previous page for a description of the functions.
Important! This product contains a button battery.
If swallowed, it could cause severe injury or death in just 2
hours. Seek medical attention immediately.
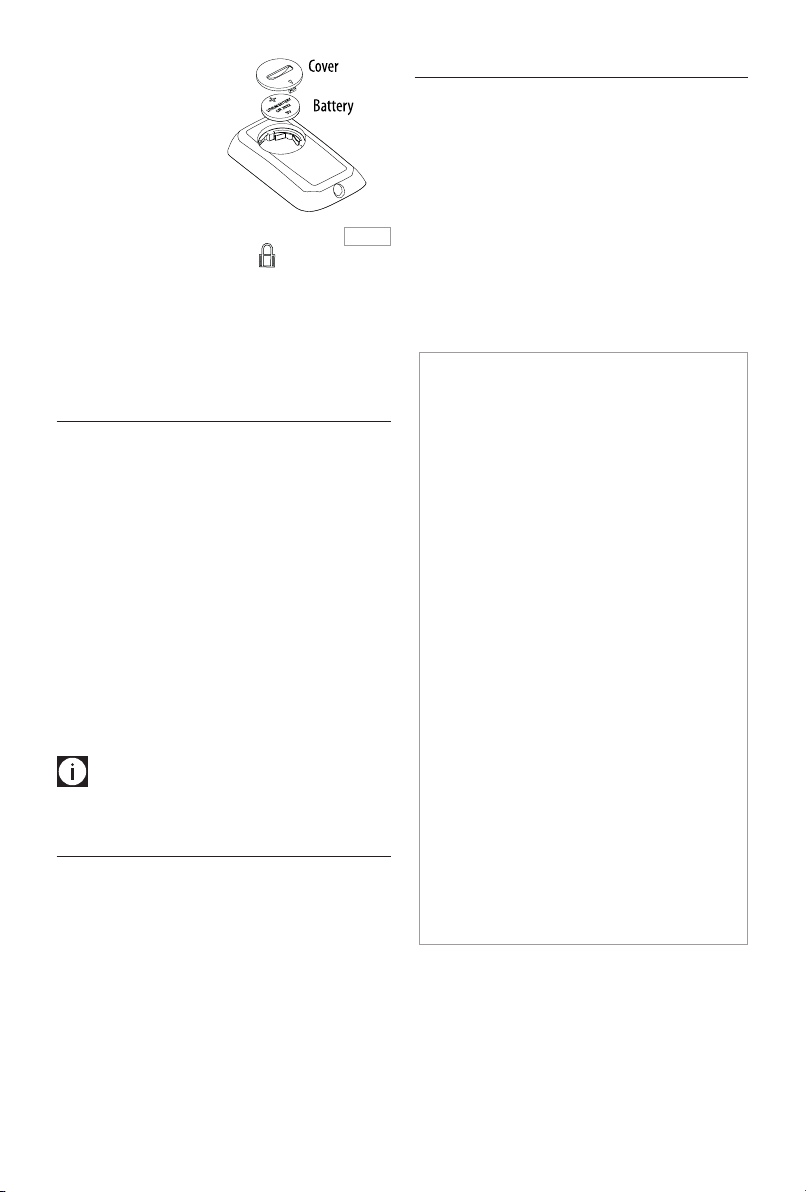
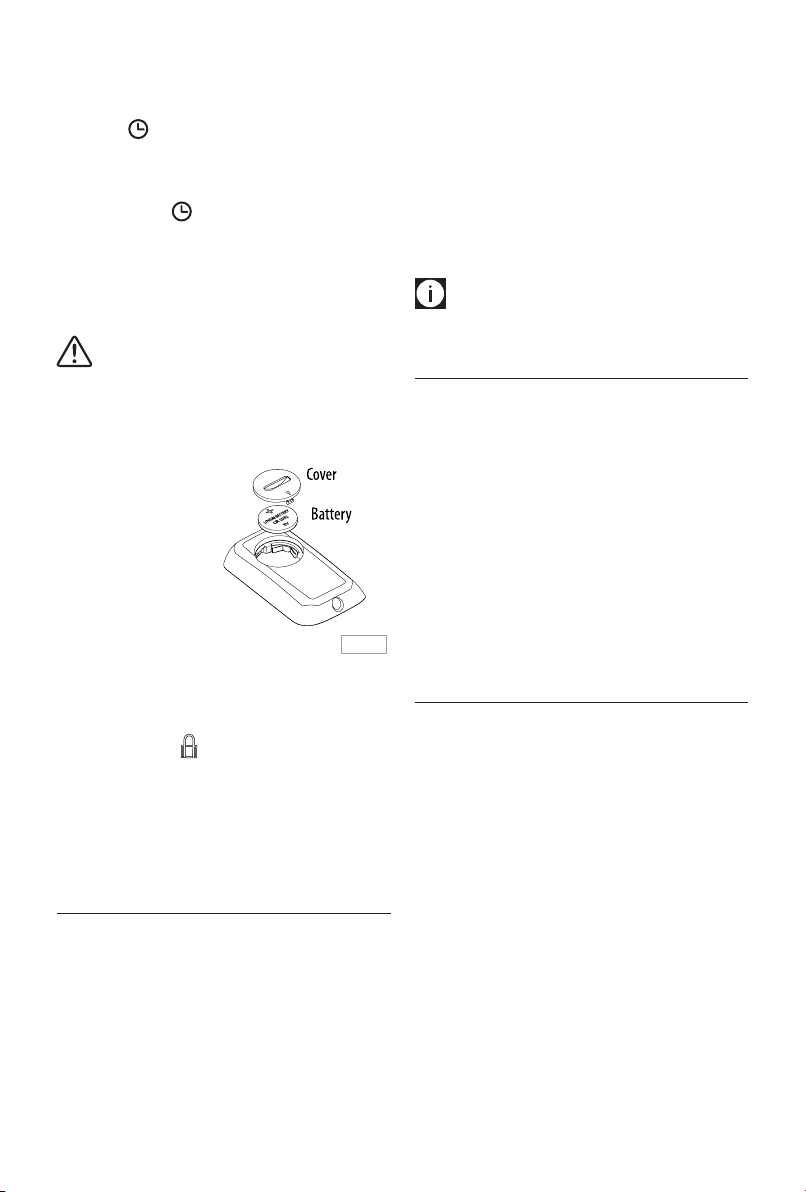
Inserting or replacing the batteries
- The remote control is provided with a lithium button
battery CR2032. To let the appliance function, remove
the battery cover strip, by pulling it.
7
- To replace the batteries,
remove the battery cover
by rotating it with a coin
or a screwdriver. Replace
the battery paying
attention to respect the
right polarity as shown
in gure 1.
- Replace the cover
rotating it towards the position .
- Old batteries must be removed and disposed o in
accordance with current legislation as they are harmful
to the environment.
WARNING: DO NOT DISPOSE OF BATTERIES IN FIRE. BATTERIES
MAY EXPLODE OR LEAK.
ADDITIONAL SAFETY FEATURES
1. Overheating protection: a safety device switches the
heater o if it accidentally overheats (e.g.: air intake
and outlet grilles obstructed, lter clogged). In this
case remove the plug from the power outlet and leave
it unplugged for a few minutes, eliminate the cause of
overheating, then plug the fan heater back and turn it
on again. If the appliance doesn't work please contact
the De'Longhi Customer Service.
2. Tip over safety switch: a safety tip-over switch
turns the heater o if it tips over or is positioned in an
improper way that could jeopardize safety.
The appliance emits a beep and the display will show
a blinking dot. After the appliance has been restored in
the vertical position it will take just few seconds to start
on again.
Please note: To avoid overheating the appliance, do
not cover it.
TROUBLESHOOTING
In case “PF” is displayed and a warning sound is emitted,
there is a fault on the temperature sensor. If the problem
persists contact the Service Center.
If the appliance shuts o unexpectedly:
- Check that the appliance is receiving power.
- Check that the appliance is in the vertical position and
on a at surface, as the safety tip-over switch may have
been tripped.
- Check the temperature set and the timer: the appliance
may be o because the set temperature has been
reached or the time set on the timer has elapsed.
MAINTENANCE
- Before carrying out any maintenance, always unplug
from the outlet.
- During the season when the appliance is in use, clean
the air intake and outlet grilles regularly using a vacuum
cleaner.
- Never use abrasive powders or solvents to clean the
appliance.
- The dust lter which retains impurities in the air, It is
integrated in the removable back cover. To clean the
lter, remove the grille by pulling outward. Blow it
lightly, then replace it into the appliance.
NOTE: This equipment has been tested and found
to comply with the limits for a Class B digital device,
pursuant to Part 15 of the FCC Rules. These limits are
designed to provide reasonable protection against
harmful interference in a residential installation.
This equipment generates, uses and can radiate radio
frequency energy and, if not installed and used in
accordance with the instructions, may cause harmful
interference to radio communications.
However, there is no guarantee that interference will
not occur in a particular installation. lf this equipment
does cause harmful interference to radio or television
reception, which can be determined by turning the
equipment o and on, the user is encouraged to try to
correct the interference by one or more of the following
measures:
- Reorient or relocate the receiving antenna.
- Increase the separation between the equipment and
receiver.
- Connect the equipment into an outlet on a circuit
dierent from that to which the receiver is connected.
- Consult the dealer or an experienced radio/TV technician
for help. Modications not approved by the party
responsible for compliance could void user’s authority to
operate the equipment.
CAN ICES-3 (B) / NMB-3 (B)
Fig. 1
8
TM
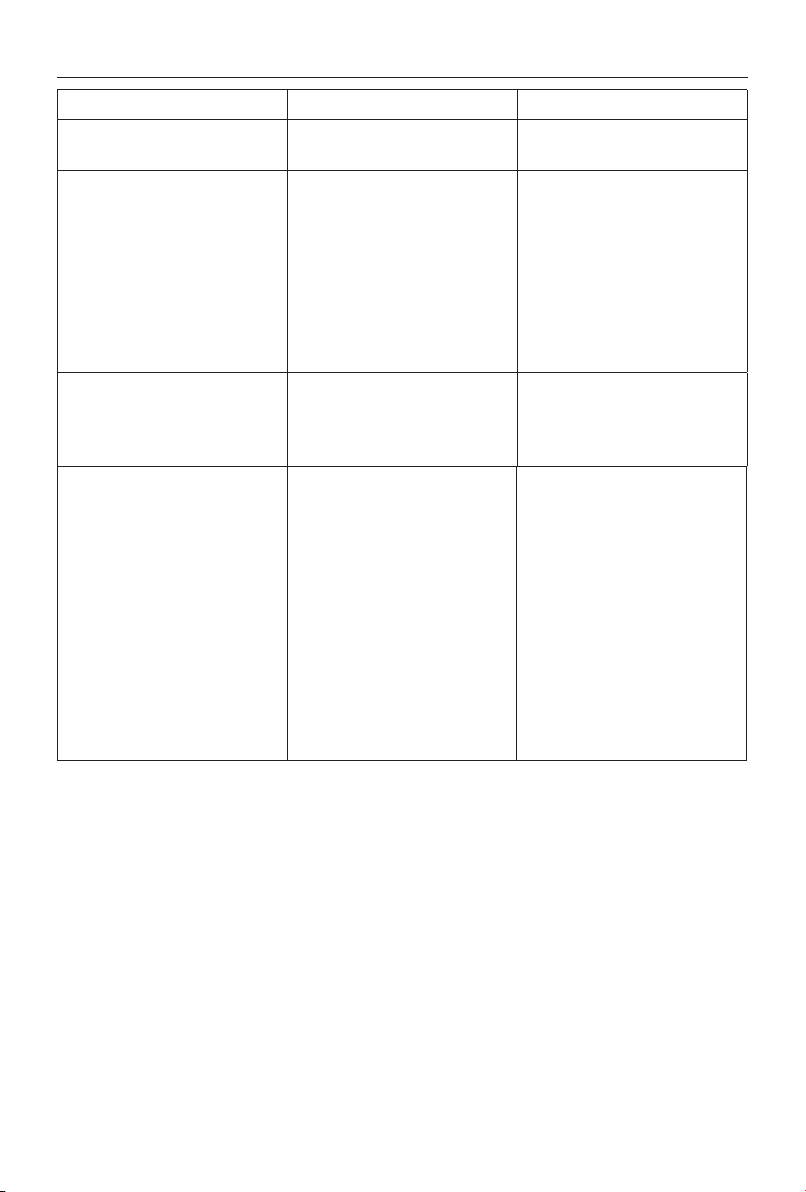
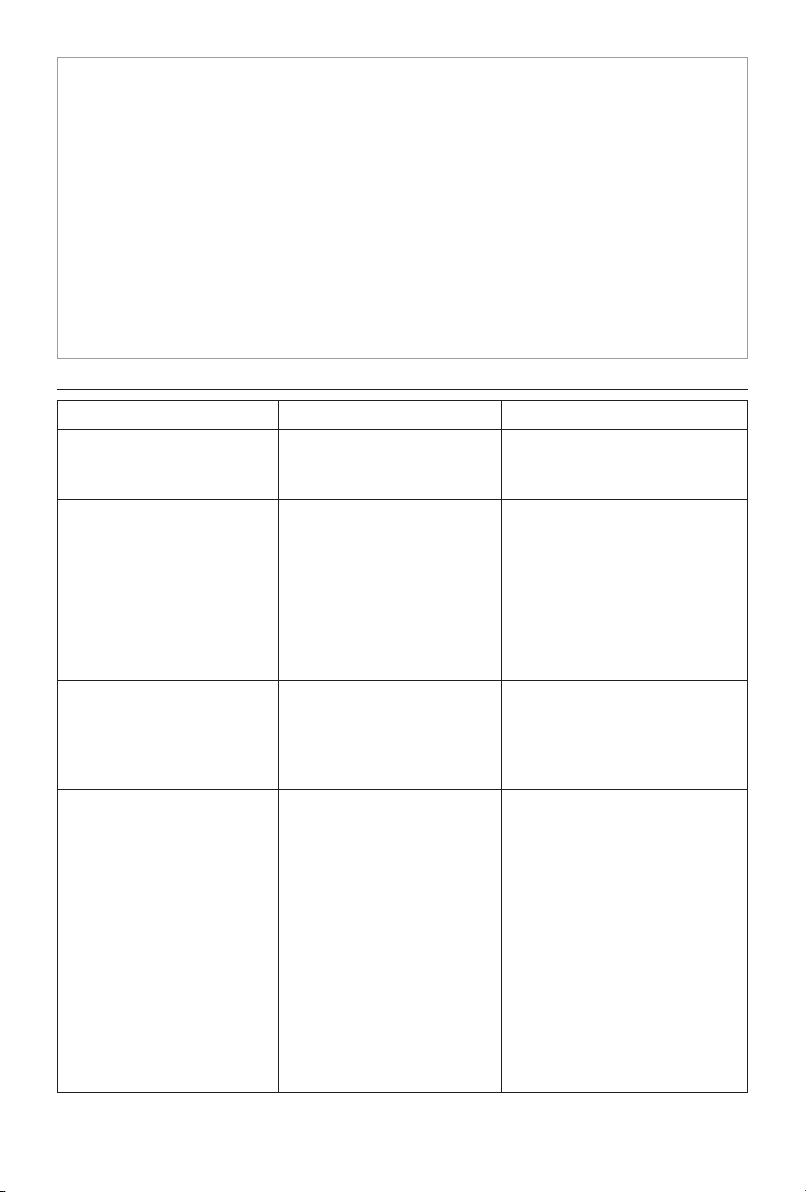
PROBLEM CAUSE SOLUTION
PF display
Temperature sensor is not working
properly
The product needs to be serviced, contact
our toll free number for assistance
Product doesn’t turn on Check that the plug is connected to the
outlet
Auto-start is on
Room temperature reaches the set
temperature
Plug in
Wait till time elapsed or press the but-
ton (E) twice to cancel the auto-start
and push the button (A)
Use the “+” button to increase the set
temperature
A dot is ashing and unit is o The tip-over switch has been activated Make sure the appliance is standing
upright on a at surface, if the problem
persists contact our toll free number to
assist you
The display shows "Ht" blinking
The internal temperature is too high.
The air intake or outlet grille is
obstructed
Check the appliance is correctly
positioned respecting the minum
distances from the wall, or objects, as
indicated on the instruction manual,
if not, position the appliance correctly
Remove the obstruction
Disconnect the plug from the outlet
and let the appliance cool down. After
few minutes plug the appliance again.
If the appliance doesn't work please
contact the De longhi toll free number
TROUBLESHOOTING
Please contact our toll free hotline at 1 (800) 322-3848
9
INSTRUCCIONES
IMPORTANTES
Cuando se utilizan aparatos eléctricos es oportuno adoptar
siempre algunas precauciones fundamentales para evitar
el riesgo de incendios, descargas eléctricas y/o lesiones.
Lea atentamente todas las instrucciones antes de utilizar el
aparato.Especícamente:
¡Peligro!
El incumplimiento puede ser o es la causa de lesiones
provocadas por descargas eléctricas con peligro para la vida.
- No haga funcionar ningún calentador
con el cable o enchufe averiado o si
éste funcionara mal, por haberse
caído o averiado en algún modo. Lleve
el calentador a un centro de servicio
de asistencia autorizado para que lo
examinen, para los ajustes eléctricos o
mecánicos o para su reparación.
- EI calentador no se debe de usar en baños,
lavaderos y otros locales similares. Nunca
coloque el calentador en donde se pueda caer
en la bañera o en cualquier otro recipiente con
agua.
- No utilice este calefactor en el entorno
inmediato de un baño, una ducha o una
piscina.
- No introduzca ni permita que entre ningún
objeto extraño en la ventilación o salida de
aire, porque esto puede causar una descarga
eléctrica, incendio o avería del aparato.
- ATENCIÓN: para prevenir descargas
eléctricas haga coindicir la espiga plana
del enchufe con la entrada ancha e
introdúzcalo hasta el fondo.
- PRECAUCIÓN: Con el n de evitar situaciones
de peligro debido al reinicio accidental de
protección térmica, este aparato no debe
tener un dispositivo de conmutación externo,
como un temporizador, o conectarse a un
circuito que se encienda o apague desde
afuera.
- Este calefactor puede incluir una alarma visual
para advertir de que partes del calefactor
se están calentando excesivamente. Si la
alarma parpadea, apague inmediatamente
el calefactor y verique que no existan
objetos arriba o cerca del calefactor que
puedan causar altas temperaturas. NO HAGA
FUNCIONAR EL CALEFACTOR CON LA ALARMA
PARPADEANDO.
¡Atención!
El incumplimiento puede ser o es la causa de lesiones o de
desperfectos al aparato.
- No permita que personas (incluidos
niños) con capacidades psicofísicas
sensoriales disminuidas o con experiencia y
conocimientos insucientes usen el aparato
a no ser que estén vigilados atentamente o
instruidos por un responsable en relación a su
seguridad. Vigile a los niños para asegurarse
de que no jueguen con el aparato.
- Ponga extremo cuidado cuando use el
calentador cerca de niños o inválidos y cuando
deje el calentador funcionando sin vigilancia.
- Siempre desconecte el calentador cuando no
lo esté usando.
- Use este calentador sólo como se indica en
este folleto. Todo otro uso que no sea aquel
recomendado por el fabricante puede causar
incendios, descarga eléctrica o lesiones a las
personas.
- El calefactor no debe estar situado
inmediatamente debajo de un tomacorriente.
- Para prevenir una sobrecarga de corriente
y que se quemen los fusibles, verique que
no haya otros aparato sconectados en el
mismo tomacorriente o en otro tomacorriente
conectado en el mismo circuito.
- Controle que el enchufe esté bien conectado y
que el tomacorriente sea adecuado. Recuerde
que los tomacorrientes se deterioran
con el tiempo y el uso continuo. Controle
periódicamente si el enchufe muestra signos
de recalentamiento o deformación. En tal
caso, no utilice el tomacorriente y llame
inmediatamente a un electricista.
¡Peligro de ustiones!
El incumplimiento de las advertencias puede ser la causa de
10
11
quemaduras o ustiones.
- Este calentador se calienta durante el uso.
Para evitar quemaduras, procure no tocar
supercies calientes con la piel sin protección.
Use la manija para desplazar este calentador.
Mantenga el material combustible, tal como
muebles, almohadas, ropa de cama, papeles,
prendas y cortinas, a una distancia de al
menos 90cm de la parte frontal y superior del
aparato, así como de los costados y de la parte
trasera del radiador.
- No pase el cable por debajo de la alfombra.
No cubra el cable con tapetes, alfombras
o similares. Ponga el cable lejos de zonas
transitadas y donde no pueda provocar
tropezones. No pase el cable por debajo de
muebles o electrodomésticos.
- Para evitar incendios, no cubra las entradas
o salidas de aire de ninguna manera. No use
el calentador sobre supercies blandas, como
una cama, en donde las aberturas se podrían
bloquear.
- Un calentador tiene adentro partes calientes o
que causan chispas. No lo use en zonas donde
seuse o almacene gasolina, pintura o líquidos
inamables.
- Es normal que el enchufe y el cable de
alimentación del aparato se sientan calientes
al tacto. Sin embargo, si el enchufe o el
cable están calientes o se deforman, puede
ser debido a un tomacorriente gastado. Los
tomacorrientes o enchufes gastados se deben
sustituir antes de seguir utilizando el aparato.
Si se conecta un aparato en un tomacorriente
deteriorado, el cable de alimentación podría
llegar a provocar un incendio.
- Si el cable de alimentación está dañado, debe
ser reemplazado por el fabricante, su agente
de servicio o persona calicada a n de evitar
un peligro.
- ADVERTENCIA: No cubra el aparato mientras
esté funcionando, a el n de evitar un
sobrecalentamiento, que puede provocar
riesgo de incendio.
Nota:
Este símbolo indica sugerencias e información importantes
para el usuario.
- Si el aparato tiene una cinta de polietileno
que se usa como manija para trasladarlo,
quítela antes deconectar el aparato a un
tomacorriente.
- No use el aparato a la intemperie.
- Para desconectar el calentador, apague los
mandos y luego desenchúfelo.
- Conecte el aparato solamente en
tomacorrientes debidamente polarizados.
- No use nunca el aparato conectándolo a una
extensión o a una tira de terminales. Conecte
el aparato directamente al tomacorriente en
el muro.
- Controle que el aparato y el cable de
alimentación no hayan sufrido daños durante
el transporte.
- No use este aparato en una habitación cuya
área de base sea inferior a 4m².
- Controle que en el aparato no hayan quedado
residuos de poliestireno u otras materiales
de embalaje. Podría ser necesario pasar el
aspirador sobre el aparato
- Al encender el aparato por primera vez, déjelo
funcionar durante alrededor de dos horas
a la potencia máxima, para eliminar el olor
desagradable. Ventile muy bien el local donde
se encuentra el aparato durante tal operación.
Es normal que el aparato produzca ligeros
crujidos cuando usted lo encienda.
GUARDE ESTAS
INSTR
UCCIONES
ÚNICAMENTE PARA USO DOMÉSTICO
DESCRIPCIÓN
(véase la g. 1)
A Botón ON/OFF
B Botones de ajuste +/-
C Botón de oscilación
D Botón función “ECO PLUS”
E Botón Timer

11
F Botón MODE (selección del modo de funcionamiento)
G Piloto luminoso
H Rejilla de entrada del aire con ltro
I Receptor del mando a distancia
USO
Instalación
Puede utilizar el aparato sobre cualquier supercie de apoyo
horizontal.
No utilice el mismo enchufe para otros aparatos para no so-
brecargar el circuito eléctrico.
Conexión eléctrica
- Antes de conectar la clavija al enchufe, compruebe que
la tensión de la red corresponda al valor indicado en la
placa de datos y que el enchufe y la red de alimentación
sean adecuados para la carga utilizada.
- ESTE APARATO CUMPLE LA DIRECTIVA 2004/108/CEE SO-
BRE LA SUPRESIÓN DE RADIOINTERFERENCIAS.
Funcionamiento y uso
- Enchufe el aparato a la corriente.
- El aparato emite una señal acústica y el piloto luminoso
(G) se enciende y permanece encendido mientras que el
aparato está funcionando. El aparato se pone en stand-
by.
- Presione el botón ON/OFF (A) para encender el
aparato. Empezará a calentar con las programaciones
predenidas.
- Presione el botón MODE (F) para seleccionar una de las
siguientes funciones disponibles:
l
Ventilación
En este modo funciona solamente el ventilador por lo
que el aparato no calienta el ambiente.
l
Antihielo
En este modo el aparato mantiene la temperatura
ambiente a 45°F (7°C) impidiendo la congelación.
l
Calefacción 1 y Calefacción 2
En este modo puede elegir la temperatura con los
botones de ajuste + y – (B).
- Calefacción 1 (nivel de potencia mínima)
El aparato funciona con la mínima potencia y reduce el
consumo energético al mínimo.
- Calefacción 2 (nivel de potencia máxima)
El aparato funciona con la máxima potencia para
calentar rápidamente el ambiente.
Función ECO PLUS
En este modo de funcionamiento el termoventilador ajustará
automáticamente el nivel de potencia para garantizar la
máxima comodidad reduciendo el consumo de energía. En
este modo de funcionamiento la unidad puede cambiar el
nivel de potencia de calentamiento de máximo a mínimo y
viceversa, varias veces en una hora. El ajuste de temperatura
máxima es 79 °F (26 °C). Para activar esta función, presione
el botón ECO PLUS (D).
Botón de oscilación
Presione el botón de oscilación (C) para que el aparato
distribuya el ujo de aire en una supercie más grande. El
aparato empezará a oscilar de derechas a izquierdas. Para
detener la oscilación en la posición elegida, solamente ha de
presionar de nuevo el botón de oscilación (C).
Apagar el aparato
Presione el botón ON/OFF (A) para apagar el aparato. En
la pantalla se puede ver la cuenta atrás durante unos 6
segundos.
Nota: La pantalla puede mostrar la temperatura tanto
en °F como en °C. Para cambiar la escala de temperaturas,
mantenga presionada la tecla + durante algunos segundos y
libere después. Tenga por favor en cuenta que dado que este
no es un dispositivo de precisión, la temperatura mostrada no
necesariamente corresponde con la verdadera.
TIMER DIGITAL DE 24H
Puede activar esta función en todos los modos de
funcionamiento.
Encendido retardado: presione el botón timer (E)
con
el aparato en la posición de STAND-BY.
En la pantalla se ve el símbolo
y el tiempo que falta
para que el aparato se encienda. Use los botones de ajuste
+ y – (B) para ajustar el timer y espere unos segundos para
memorizar la programación. Durante las 10 primeras horas,
puede realizar la selección con intervalos de media hora. Para
tiempos superiores a las 10 horas, la selección se hará con
intervalos de una hora.
En la pantalla se ve de nuevo
para el modo en stand-by
y el símbolo para indicar que el timer está programado.
El aparato se enciende a la hora programada con las mismas
programaciones utilizadas en el período de funcionamiento
precedente.
Apagado retardado. Presione el botón timer (E)
con el
aparato encendido. En la pantalla se ve el símbolo y el
tiempo que falta para que el aparato se apague.
Use los botones de ajuste + y – (B) para ajustar el timer y
espere unos segundos para memorizar la programación.
Durante las 10 primeras horas, puede realizar la selección con
12
13
intervalos de media hora. Para tiempos superiores a las 10
horas, la selección se hará con intervalos de una hora.
En la pantalla se ven de nuevo las programaciones corrientes
y el símbolo
para indicar que el timer está programado.
El aparato se apaga automáticamente a la hora programada.
Si quiere volver al modo de funcionamiento sin el timer,
presione dos veces el botón timer (E).
El símbolo del timer
desaparece de la pantalla.
Uso del mando a distancia
Las funciones del mando a distancia corresponden a las del
panel de mandos. Consulte la sección “Funcionamiento y uso”
en la página anterior para la descripción de las funciones.
¡Atención! Este producto contiene una pila de botón.
Si se ingiere, puede causar lesiones graves o la muerte en tan
solo 2 horas. Obtenga atención médica inmediata.
Colocación y cambio de las pilas
- El mando a distancia
lleva una pila de litio
CR2032. Tire de la banda
presente en la tapadera
de las pilas para quitarla
y hacer funcionar el
aparato.
- Gire la tapadera de las
pilas con una moneda
o un destornillador para quitarla y cambiar las
pilas. Respete la polaridad correcta (véase la gura 1)
cuando cambie las pilas.
- Coloque de nuevo la tapadera en su alojamiento, gírela
hacia la posición .
- Las pilas gastadas han de quitarse y eliminarse en
cumplimiento de la legislación en vigor porque son
perjudiciales para el medio ambiente.
ADVERTENCIA: NO DESECHE LAS PILAS EN EL FUEGO. LAS
PILAS PUEDEN EXPLOTAR O GENERAR FUGAS.
CARACTERÍSTICAS DE SEGURIDAD ADICIONALES
1. Protección contra sobrecalentamiento: un
dispositivo de seguridad apaga el termoventilador en
caso de sobrecalentamiento accidental (por ej., rejillas
de toma y descarga de aire obstruidas, ltro tapado).
En este caso, extraiga la clavija del tomacorriente y
déjela desconectada durante algunos minutos, elimine
la causa del sobrecalentamiento y luego vuelva a
conectar el termoventilador y enciéndalo otra vez. Si el
aparato sigue sin funcionar, póngase en contacto con el
Centro de asistencia De’Longhi más cercano.
2. Interruptor de seguridad contra caídas: un
interruptor de seguridad contra caídas apaga el
termoventilador cerámico si se vuelca o se coloca en
una manera inapropiada tal que pone en riesgo su
seguridad. El aparato emite un pitido y la pantalla
mostrará un punto parpadeante.
Después de que haya restablecido la posición vertical del
aparato, requerirá algunos segundos para encenderlo
nuevamente.
Nota: A n de evitar el sobrecalentamiento del
aparato, no lo cubra.
RESOLUCIÓN DE PROBLEMAS
En caso de que se despliegue “PF” y se emita un sonido de
advertencia, existe una falla en el sensor de temperatura.
Si persiste el problema, póngase en contacto con el Centro de
Servicio. Si el aparato se apaga inesperadamente:
- Verique que el aparato esté alimentado eléctricamente.
- Verique que el aparato esté colocado en posición
vertical y sobre una supercie plana, dado que pudo
haberse activado el interruptor de seguridad contra
caídas.
- Verique la temperatura ajustada y el temporizador:
el aparato puede estar apagado debido a que se
ha alcanzado la temperatura ajustada o a que ha
transcurrido el tiempo ajustado en el temporizador.
MANTENIMIENTO
- Antes de realizar cualquier operación de limpieza,
desenchufe siempre el aparato de la corriente.
- Limpie regularmente las rejillas de entrada y de salida
del aire cuando utilice el aparato, con un aspirador.
- No use nunca polvos abrasivos o disolventes para limpiar
el aparato.
- El ltro antipolvo, que retiene las impurezas del aire
aspirado del ambiente, está integrado en la rejilla
trasera extraíble. Para limpiar el ltro, extraiga la rejilla
jalándola hacia afuera. Sople ligeramente el ltro y
luego reinstale la rejilla en el aparato.
Fig. 1
13
PROBLEMA CAUSA SOLUCIÓN
PF visualización
El sensor de temperatura no está
funcionando adecuadamente
El producto necesita recibir
mantenimiento, llame a nuestro número
gratuito de servicio técnico
El producto no se enciende Revise si el enchufe se encuentra
conectado al tomacorriente
El encendido automático está activo
La temperatura ambiente alcanza la
temperatura de ajuste
Enchufe
Espere hasta que haya transcurrido el
tiempo o presione dos veces el botón (E)
para cancelar el encendido automático y
presione el botón (A)
Utilice el botón “+” para incrementar la
temperatura de ajuste
Un punto parpadea y la unidad se
apaga.
El interruptor de seguridad contra
caídas se ha activado
Asegúrese de que el aparato se encuentre
en posición vertical sobre una supercie
plana, si el problema persiste llame a
nuestro número gratuito de servicio
técnico
La pantalla muestra "Ht"
parpadeando
La temperatura interna es demasiado
alta. La rejilla de entrada o salida de
aire está obstruida
Verique que el aparato está
correctamente colocado respetando las
distancias mínimas de la pared o de los
objetos, tal y como se indica en el manual
de instrucciones. En caso de que no sea así
coloque correctamente el aparato.
Elimine la obstrucción
Desenchúfelo de la toma principal y deje
que el aparato se enfríe. Pasados unos
minutos vuelva a encender el aparato. Si
el aparato no funciona contacte el número
de teléfono gratuito Delonghi
RESOLUCIÓN DE LOS PROBLEMAS
NOTA: Tras realizar las pruebas correspondientes se encontró
que este equipo cumple con los límites establecidos
para considerarse un dispositivo digital de la Clase B, en
aplicación a lo dispuesto por la Parte 15 de las reglas del
FCC. Estos límites están establecidos para proporcionar una
protección razonable contra la interferencia nociva en una
instalación residencial. Este equipo genera, usa y puede
radiar energía de radiofrecuencia y si no se instala y usa de
acuerdo con las instrucciones puede causar interferencia
nociva a las comunicaciones de radio. Sin embargo, no
hay garantía de que la interferencia no ocurrirá en una
instalación especíca en particular. Si este equipo ocasiona
interferencia nociva para la recepción de radio o televisión,
que se puede determinar apagando y encendiendo el
equipo, se recomienda al usuario que trate de corregir
la interferencia aplicando una o más de las siguientes
medidas:
- Oriente o reubique la antena receptora.
- Aumente la distancia entre el equipo y el receptor.
- Conecte el equipo a un tomacorriente conectado a un
circuito diferente al que está conectado el receptor.
- Pida ayuda al distribuidor o a un técnico de radio
y televisión experimentado. Las modicaciones no
aprobadas por la entidad responsable del cumplimiento a
las normas puede anular el derecho del usuario a operar el
equipo.
CAN ICES-3 (B) / NMB-3 (B)
Llame al número gratis 1 (800) 322-3848

5711413301_01_0617
www.delonghi.com
Printed in China