Ed : 07/14 Rev : 00
Codice :
INSTRUCTION
GRLDEVEFTW500

NO. DESCRIPTION QTY NO. DESCRIPTION QTY
1 Upright post 2 30 End Cap (Φ25) 1
2 Cross bar 1 31 End Cap 2
3 Main Frame 1 32 Bumper 1
4
Leg Extension Upright post
1 33 Handle Grip 2
5 Front Stabilizer 1 34 Pulley 1
6 Leg Extension 1 35 Pulley Cover 2
7 Adjustment Rod 1 36 Lat Tower Cable 1
8 Foam Roller Tube 2 37 Lat Tower Bracket 1
9 Backrest Supports tube 2 38 Knob (M10) 2
10 Stabilizer Bracket 1 39 Locking Knob (M10*45) 1
11 Left Butterfly Arm 1 40 Locking Knob (M8*20) 1
12 Right Butterfly Arm 1 41 Spring Collar (Φ25) 5
13 Small foam Roller Tube 2 42 Right Safety Hook 1
14 Arm Curl Post 1 43 Left Safety Hook 1
15 Lat Tower Post Upper 1 44 Hook 1
16 Lat Tower Post Lower 1 45 Hex Bolt (M10*135) 2
17 Glide Carriage 1 46 Hex Bolt (M10*60) 4
18 Lat Tower Handle Bar 1 47 Hex Bolt (M10*45) 3
19 Backrest 1 48 Hex Bolt (M10*25) 3
20 Seat 1 49 Hex Bolt (M8*55) 4
21 Arm Curl 1 50 Hex Bolt (M8*40) 4
22 Foam Roller 6 51 Hex Bolt (M8*15) 10
23 Round End Cap(Φ25) 5 52 Bolt (M5*10) 4
24 Round End Cap (Φ19) 8 53 Nylon Lock Nut (M10) 10
25
Square End Cap (□38)
6 54 Nylon Lock Nut (M8) 4
26
Square End Cap (□30)
6 55 Nylon Lock Nut (M6) 2
27
Square End Cap (□25)
4 56 Flat Washer (M10) 22
28
Sleeve (□38V□33.4)
2 57 Flat Washer (M8) 22
29
Sleeve (□38V□33.4)
1
PARTS LISTING
2

3
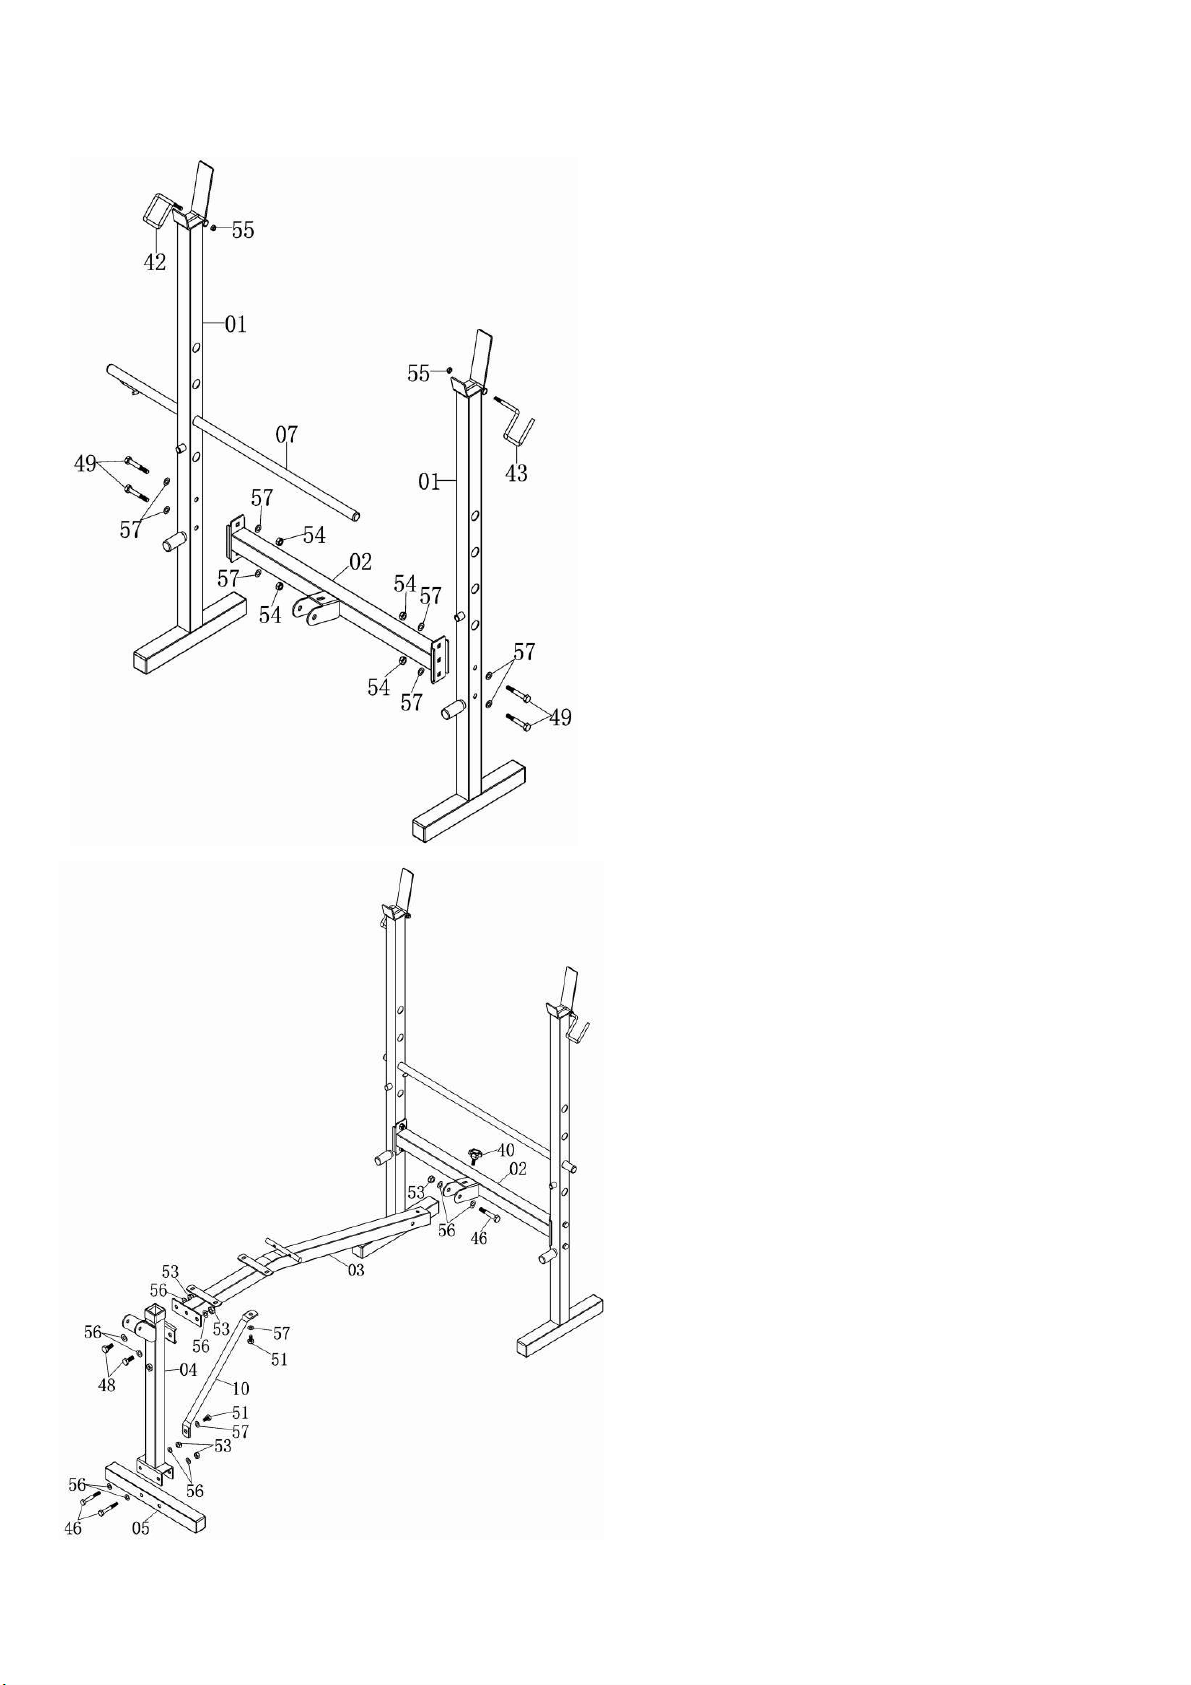
STEP1
STEP 2
Attach the Leg Extension Upright (04) to the Front
Stabilizer(05) using two Hex Bolts (46) ,four Flat
Washers (56) and two Nylon Lock Nuts (53).
Attach the Leg Extension Upright (04) to the Main
Frame (03) using two Hex Bolts (48), four Flat
Washers (56), and two Nylon Lock Nut (53).
Attach the Main Frame (03) to the Cross bar (02)
using one Hex Bolts (46),two Flat Washers (56) and
one Nylon Lock Nut (53) and tighten the Locking
Knob (40)
Attach the Stabilizer Bracket (10) to the Main Frame
(03) and Leg Extension Upright (04) using two Flat
Washers (57) and two Hex Bolt (51).
Attach both Uprights (01) to the Cross Bar (02) using
4pcs Hex Bolts (49),fitted from the outside as per
illustration, 8pcs Flat Washers (57) and 4pcs Nylon
Lock Nuts (54).
Attach the Safety Hook (43L & 42R) to the both
Uprights (01). Using 2pcs Nylon Lock Nuts (55).
Insert Backrest Adjustment Rod (07) to assembled
Upright (01).
4
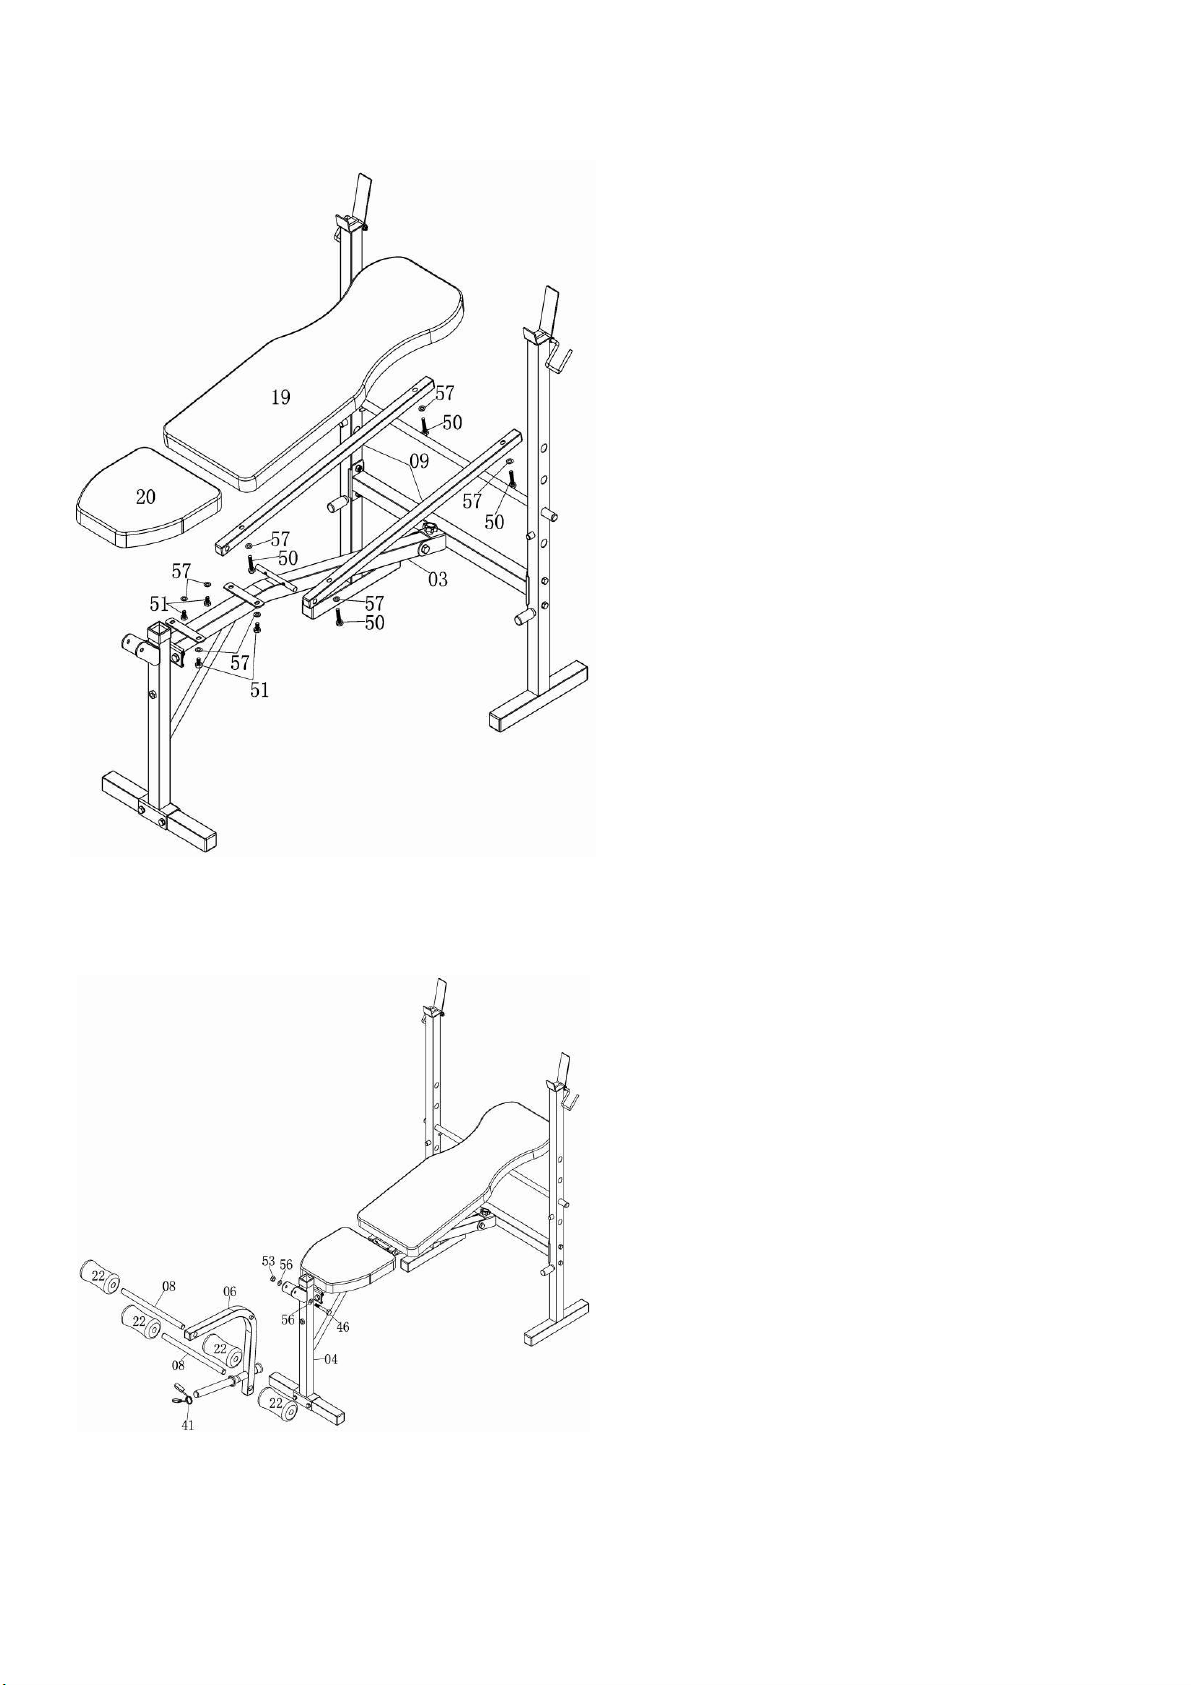
STEP 3
STEP 4
Take holes on the Backrest Supports (09) to the
bracket on the Main Frame (03) as shown.Fit the
Backrest Supports (09) to the Backrest (19) using
four Hex Bolts (50) and four Flat Washers (57).
Fit the Seat (20) to the Main Frame (03) using four
Flat Washers (57) and four Hex Bolts (51)
Attach the Leg Extension (06) to the Leg Extension
Upright (04) using an Hex Bolt (46), two Flat
Washers (56) and an Nylon Lock Nut (53).
Slide a Foam Roller (22) onto one end of a Foam
Roller Post (08) and fit into position on the Leg
Extension (06) . Slide the remaining Foam Roller
(22) onto the Foam Roller Post (08).
Put the Spring Collar (41) to the Leg Extension (06)
5
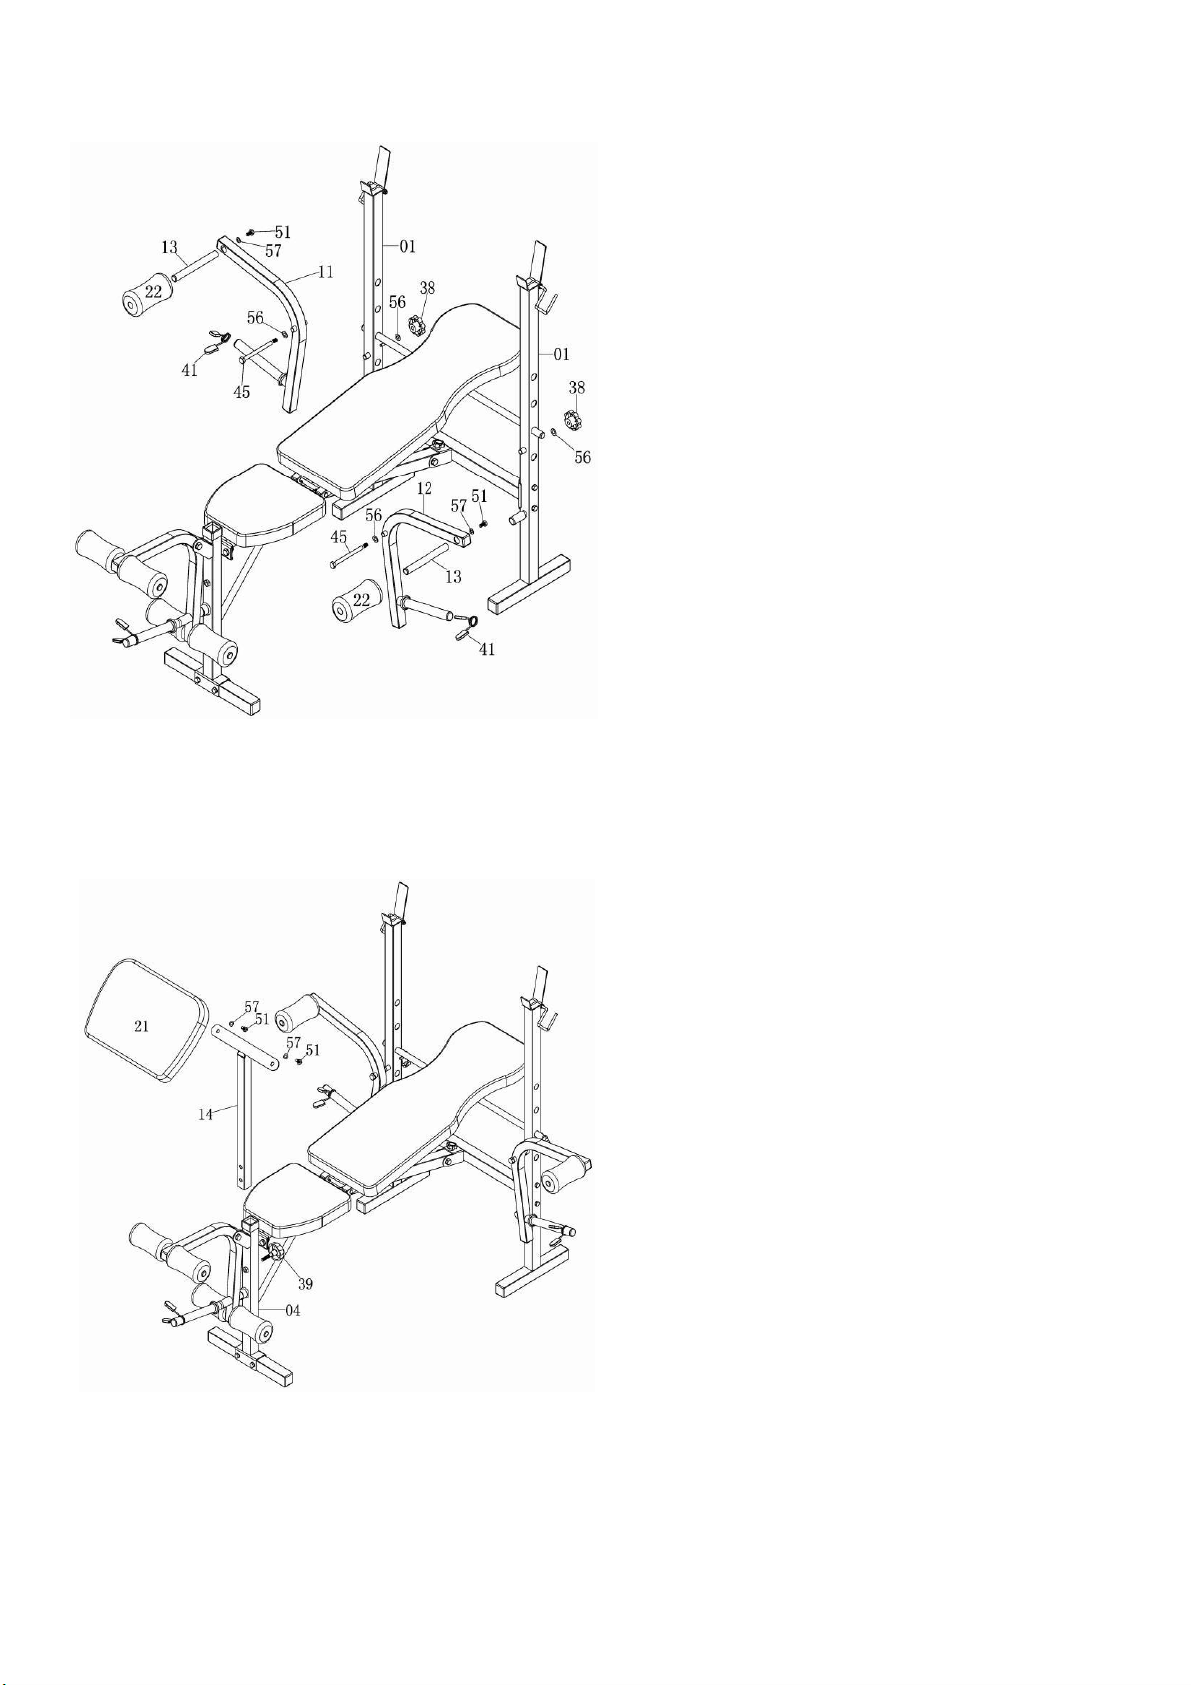
STEP 5
STEP 6
Attach the each Butterfly Arm (11 &12) to Upright
(01) ,using Hex Bolt (45) two Flat Washers (56) and
Knob (38).
Slide a Small foam Roller Post (13) into each
Butterfly Arm (11 &12) using a Flat Washer (57) and
a Hex Bolt (51)
Slide Foam Roller (22) onto each Small Foam Roller
post (13).
Slide the Spring Collar(41) onto the each weight post
of Butterfly Arm (11)
Attach Arm Curl (21) to the Arm Curl Post (14) using
two Flat Washers (57) and two Hex Bolts (51) .
Insert Arm Curl Post (14) into the Leg Extension
Upright (04) and tighten the Locking Knob (39) for
you needed
6

STEP 7
STEP 8
With Lat Tower Cable (36) in groove of
Pulley(34).thread the Lat Tower Cable (36) through
Lat Tower Post Upper(15) bracket.
Attach the Pulley (34) and Pulley Covers (35) to Lat
Tower Post Upper (15) bracket using one Hex Bolt
(47), two Flat Washers (56) and one Nylon Lock Nut
(53).
Slide the Glide Carriage (17) onto the Lat Tower Post
Upper (15) as illustration.
Attach the Lat Tower Post Upper assembly to the Lat
Tower Post Lower (16) using two Hex Bolts (47) ,
two Flat Washers (56) and two Nylon Lock Nut
(53).
Attach Lat Tower Handle Bar (18) to one end of Lat
Tower Cable (36) using a Hook (44). Fix the other
end of Lat Tower Cable (26) to Glide Carriage (17)
with a Hex Bolt, two Flat Washers (56) and one
Nylon Lock Nut (53)
Put the Spring Collar (41) to the Glide Carriage (17)
Insert the Lat Tower assembly into the Leg Extension
Upright (04) using Locking Knob (39) for you
needed.
7
GARLANDO SPA
Via Regione Piemonte, 32 - Zona Industriale D1
15068 - Pozzolo Formigaro (AL) - Italy
www.evert.it - info@evert.it