Cleaning needle for steam nozzle (See “Cleaning the steam wand” on page 9)
Cleaning tab (see “8.1 Cleaning of the coffee outlet”)
Cleaner
EAN: 8004399333307
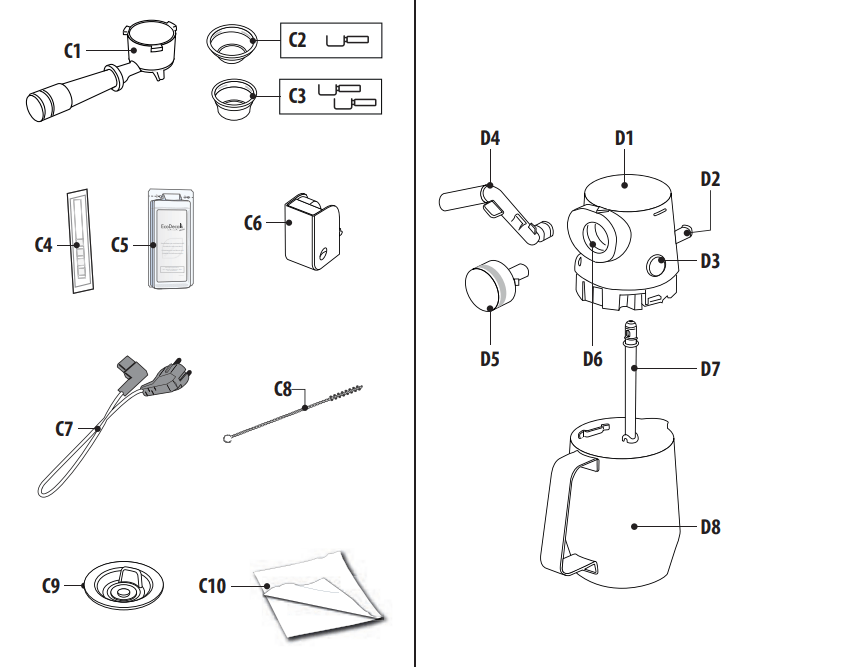
Description of LatteCrema System - D
D1. Milk container lid
D2. Milk container connector
D3. Lid release button
D4. Milk spout (adjustable height)
D5. Froth selection knob
D6. Knob housing
D7. Milk intake tube
D8. Milk container
PREPARING YOUR MACHINE FOR FIRST USE
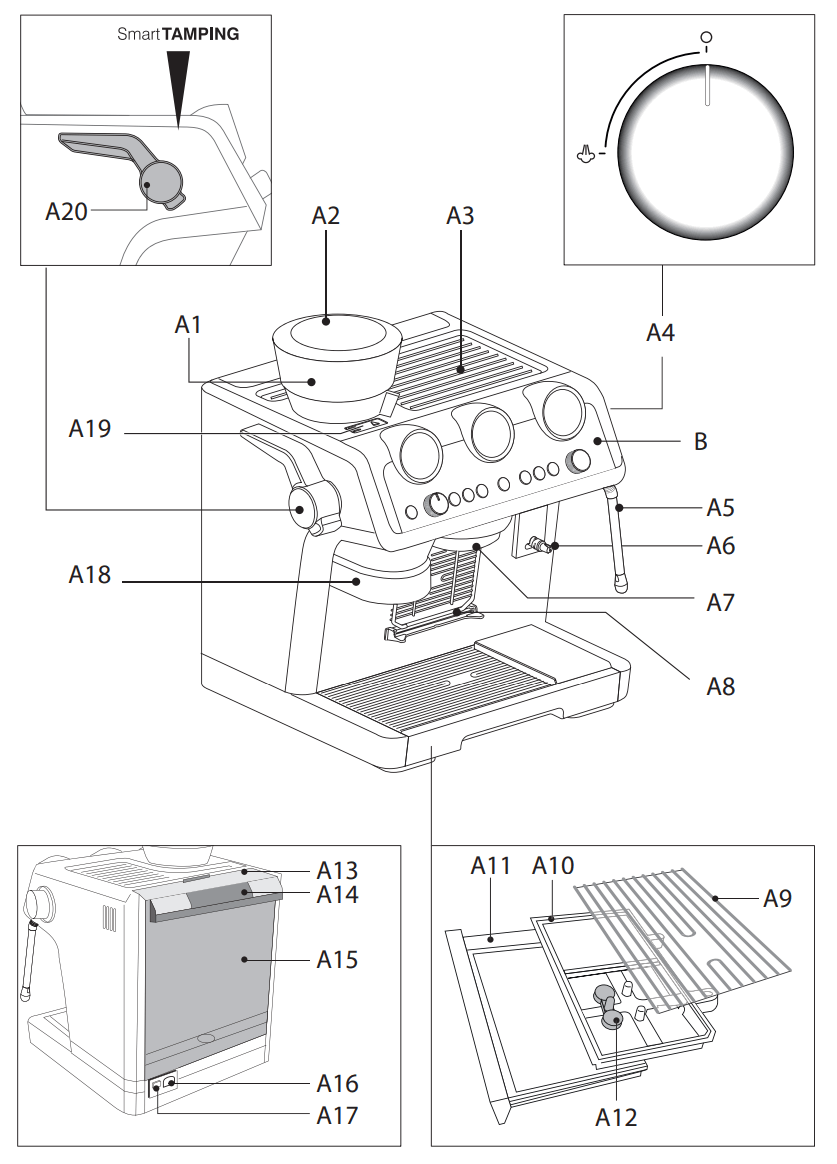
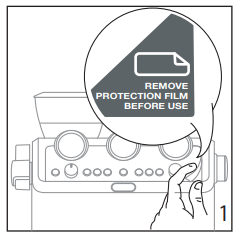
Remove stickers and packing materials.
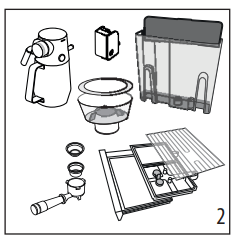
Wash and dry all accessories (including water tank) with warm water and washing-up liquid.
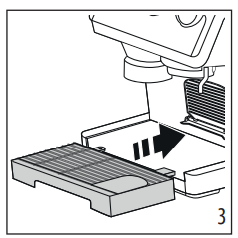
Insert the drip tray (A11) complete with cup grill (A9) and (A10).
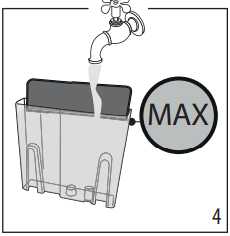
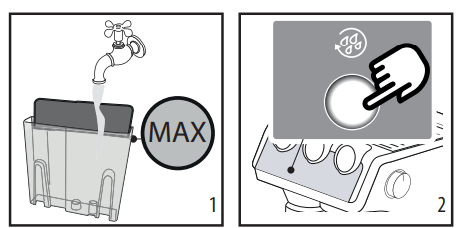
Remove the water tank (A15) and fill with fresh clean water, taking care not to exceed the MAX level.
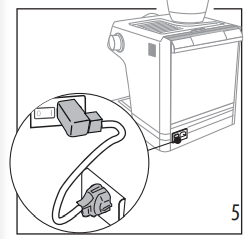
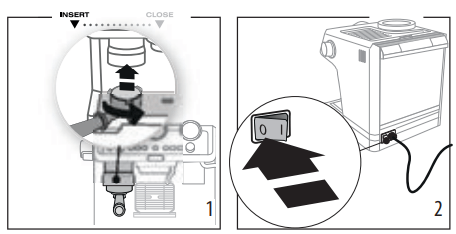
Plug the power cord connector (C7) into the socket (A16) at the back of the machine, then plug into the mains socket.
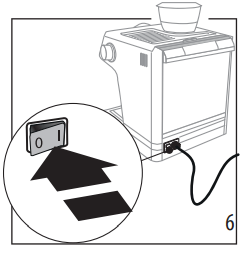
Make sure the main switch (A17) at the back of the machine is pressed and in the I position.
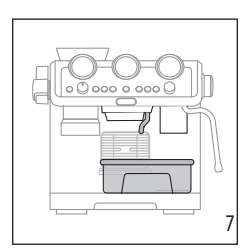
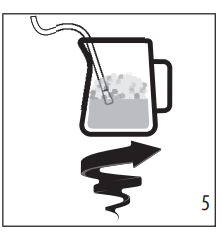
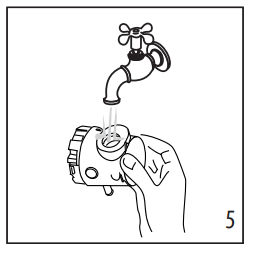
Place a container with a minimum capacity of 100 ml under the hot water spout (close to the coffee outlet (A7)).
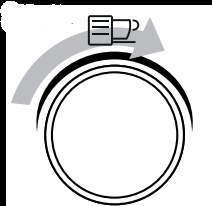
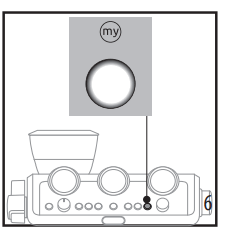
Press (B7) e to rinse.
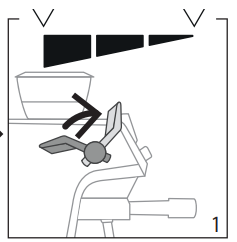
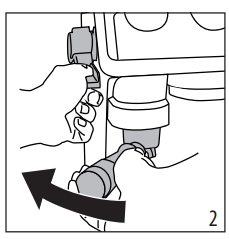
Insert coffee filter ((C2) or (C3)) in the portafilter (C1).
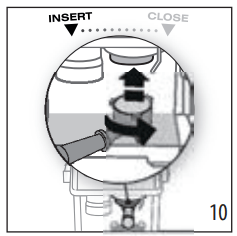
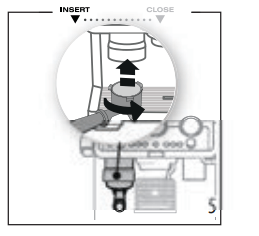
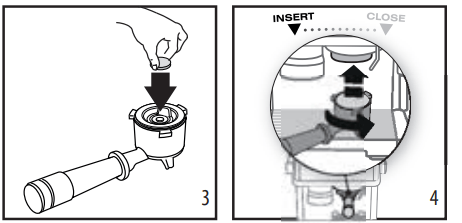
Attach the filter holder filter to the machine. To attach correctly, align the filter holder handle with “INSERT” then turn the handle to the right until it is aligned in the “CLOSE” position.
Place a container under the portafilter and frothing wand and press (B5).
Open the steam dial for a few seconds. For optimal steam performance we recommend you repeat this action 3 or 4 times. This is to purge the steam rm before frothing or steaming your milk.
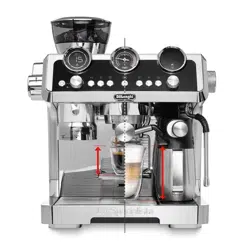
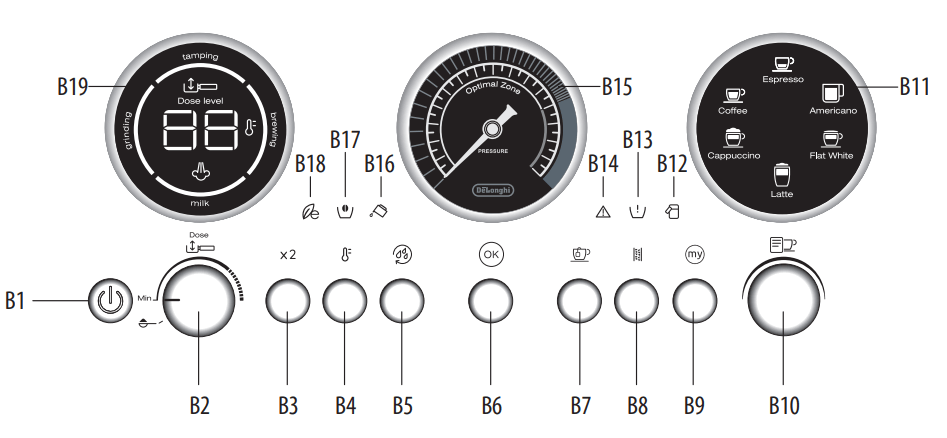
COFFEE DELIVERY
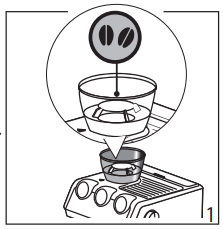
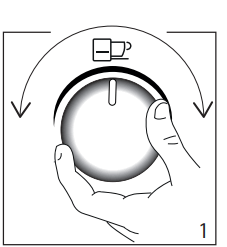
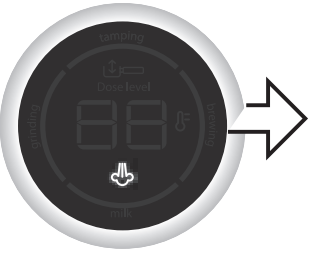
Step 1-grinding
Add beans to hopper. Fresh is best; fill in just with the quantity you need.
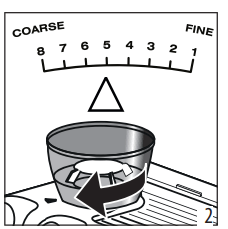
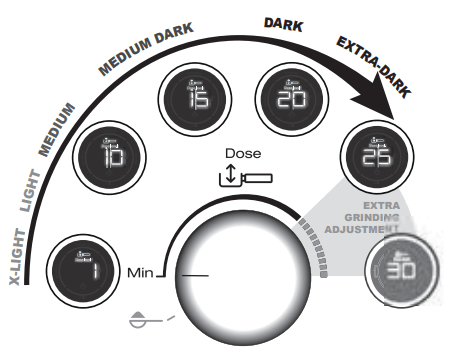
The factory setting is 5 (medium grinding). if you are not satisfied, adjust the level according to your personal taste and the type of coffee (do it while grinding).
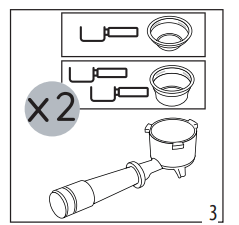
Select single or double dose filter and place in the portafilter. If you are using the double filter, press the X2 button (this will double the volume of the espresso shot as well).
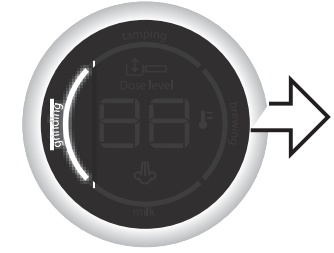
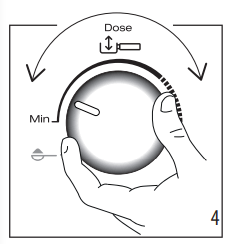
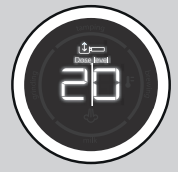
Set the dose level by adjusting the dial starting from the min.position. The numbers displayed on the indicator (B19) are a setting reference once the right level of coffee in the portafilter is reached. They do not correspond to grinder settings or to measurement units (gr/oz) or to grinding time. Refer to”3.1 Adjust dose” for suggestions.
Attach portafilter. Once locked into place, grinding will start.
Adjust dose
Each variety of coffee beans can behave diferently during grinding and this is the reason why setting the dose at the beginning might require extra care.
With this illustration we give you some indications on how to regulate the dose. Please note these suggested setting ranges, based on the roasting level, are certainly a good starting point, but htey might slightly vary depending on specific composition of your coffee beans.
Set the dose starting from the minimum position.
Look at which roasting level your coffee is and based on that, turn the knob slowly, referencing the ranges.
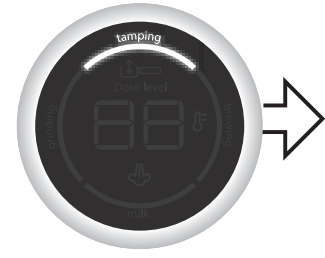
Step 2-tamping
After grinding, pull the lever down fully (do not remove portafilter). For a perfect result, you can do it twice.
Keep the lever down while removing the portafilter. Once it is done, place back the lever in its original position.
Check the dose (see “3.2 The perfect dose”) and attach the portafilter to the brewing unit.
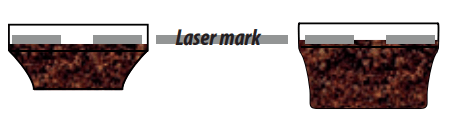
The perfect dose
The coffee filters have a laser mark inside to identify the level for perfect dose. Try different levels within the mark, keeping in mind that the minimum dose corresponds to the bottom line of the mark and the maximum dose corresponds to the upper line of the mark.
Ensure the coffee is at the recommended dosage level after tamping. You may need to adjust the dosage dial more times before reaching the perfect dose.
If your coffee is over or under extracted and the dose is within the perfect dose range, adjust the grinder settings finer or coarser (see Step 1 - grinding).
Over extracted coffee (pouring too slowly) needs coarser grind
Under extracted coffee (pouring too fast) needs finer grind.
Barista tip: Pull the filter holder out while the tamper is still down for polished finish of coffee.
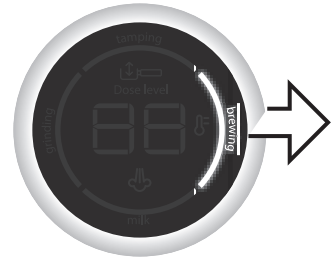
Step 3-brewing
Select your beverage.
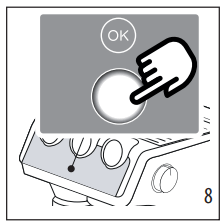
Press OK to start brewing (preinfusion and infusion). Coffee delivery stops automatically.
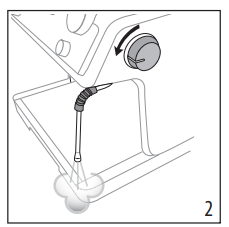
Manual frothing
Fill the milk jug with fresh cold milk. Milk will upt o triple in volume.
Turn the steam wand on 3. briefly to purge condensation. Make sure the wand is pointing away from you.
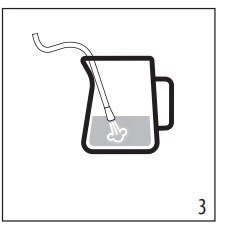
To make the froth, put the nozzle on the surface of the milk and air will catch by the mixing of milk and steam.
Keep the steam nozzle just on the surface, careful not to make big bubbles by letting too much air in.
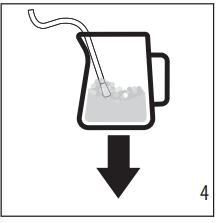
Insert the steam nozzle just under the milk: this create a vortex. Once the desired temperature is reached turn the steam knob off and wait till steam stops completely before removing jug.
Cleaning the steam wand
After every use, remove with a soft damp cloth any milk residues from the steam wand. For perfect cleaning, we recommend Eco MultiClean: it ensures hygiene by removing milk proteins and fats and can be used to clean the whole machine.
Use the steam for a deeper cleaning.
To maintain the better usability of the steam wand, we suggest to purchase the Cleaning Tool for opening the 3 holes of the nozzle.
Barista tips:
Fresh is best : Be sure to use fresh cold milk every time.
Whole milk is recommended for best results. Dairy and Non Dairy alternatives will vary in ease of texturing depending on type.
After foaming milk, eliminate unwanted bubbles by swirling the pitcher.
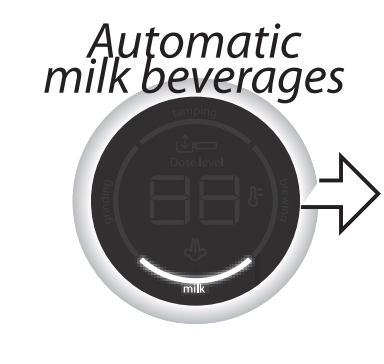
MAKING MILK BEVERAGES
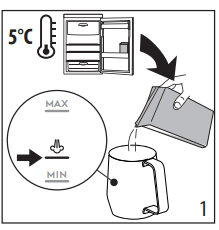
Fill the milk container with fresh cold milk from the refrigerator (4-6°C).
Close with the lid.
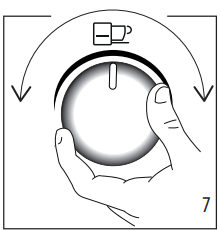
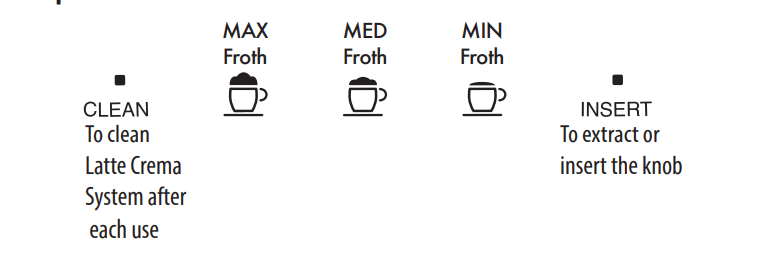
Turn the knob to select the desired froth.
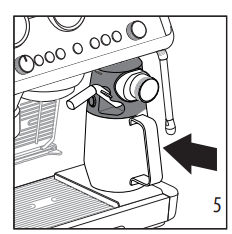
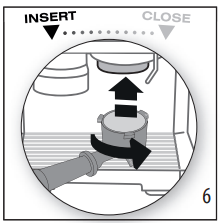
Attach the milk cointainer.
Prepare the perfect dose (see “3. Coffee delivery”-Steps 1- grinding & 2-tamping) and attach the portafilter.
Select your beverage.
Press OK to start brewing. The appliance automatically brews coffee and milk in sequence.
Cleaning Lattecrema System after every use
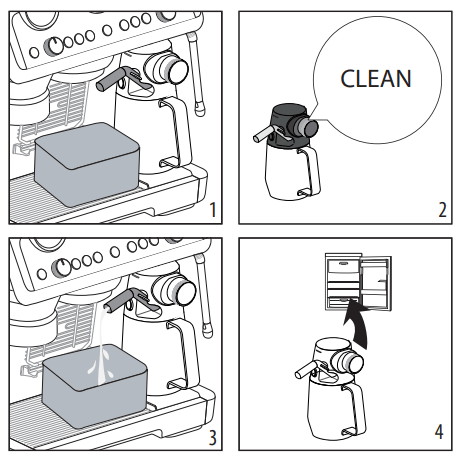
Leave the milk container in the machine (you do not need to empty it). Place a cup or other recipient under the frothed milk spout.
Turn the knob to “Clean”.
Cleaning automatically starts and stops. Watch out: Remember, after cleaning, to turn the knob back on foam setting.
Remove the milk container and put it in the refrigerator and use soon.
For perfect cleaning, we recommend Eco MultiClean : it ensures hygiene by removing milk proteins and fats and can be used to clean the whole machine.
Milk recipes
Double dose milk beverages: Fill the milk container with a sufficient quantity of milk, not exceeding the MAX level marked on the container. Each mark on the side of the container corresponds to about 100 ml of milk.
Using fresh cold full cream milk will achieve the best results.
Milk froth knob positions:
Cleaning Lattecrema System
All components are dishwasher safe, placing them in the top basket. If you do not have a dishwasher, wash by hand as described in the note at the end of the section.
Push the release button (D3) and lift the milk container lid (D1);
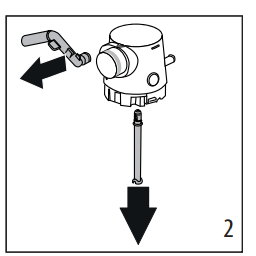
Remove the milk spout (D4) and milk intake tube (D7);
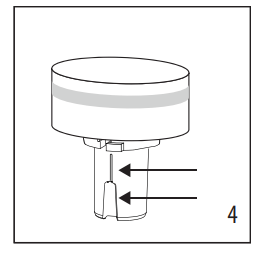
Make sure there are no milk residues on the hollow and groove under the dial: if necessary, scrape the groove with a toothpick;
Rinse inside the froth adjustment dial seat with running water;
Check that the intake tube and spout are not clogged with milk residues;
Reassemble all the lid components;
Carefully wash and rinse the milk container (D8) ;
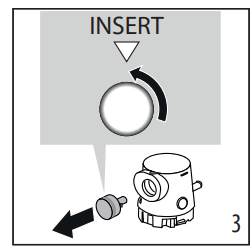
Attach the lid back on the milk container.
Please note: washing by hand
Washing in a dishwasher guarantees the perfect hygiene of all the components. When washing by hand, wash all components of the milk container lid thoroughly with hot water and immerse them in a basin of hot water for 30 minutes before proceeding as described in point (3) and (4).
EXPLANATION OF LIGHTS
LIGHTS
EXPLANATION OF LIGHTS
OPERATION
All the lights flash briefly
Turning the machine on
Self-diagnosis
on
The appliance is being turned on for the first time and the water circuit must be filled
Proceed as described in section “Setting la specialista for first use” of the quick guide.
on
Energy saving is enabled
If you want to disable the function, see section “6. Menu settings”
on
The beans container is empty
Fill the beans container
flashing
You are trying to grind coffee but the beans container is empty
Fill the beans container
on
Insufficient water in tank or water tank not inserted correctly
Fill the tank or extract the tank and put it back correctly
flashing
You are trying to deliver a beverage but water tank is empty
Fill the tank
on
General alarm
Contact Customer Services
on
The bean container is not inserted
Insert bean container or check that is completely locked (see fig. 15)
flashing
The finess of the grind regulation is incorrect (or out of correct range)
Move the selector within the 8 levels from coarse to fine, kepping in mind to:
Always adjust the coffee mill during the grinding
Adjust one grinding level at a time and make at least 5 coffees before adjusting again
The coffee bean container is not completely insert: the machine does not work for safety reasons
Check that the bean container is completely locked (see fig. 15)
on
After every use, the LatteCrema System must be cleaned
When all the milk drinks are ready, proceed with automatic cleaning turning the knob to Clean
on
The appliance is on and ready for use
The appliance is at the right temperature to deliver steam. To deliver steam, turn the steam dial (A4)
flashing
The appliance is on and energy saving is enabled. The steam dial (A4) is in the steam delivery position
The light flashes to indicate that the appliance is preparing to deliver steam. Delivery begins as soon as the appliance is at temperature
The appliance is heating up to be ready for use
The appliance is at temperature when the light remains on steadily
The appliance is delivering steam
on (orange)
Descaling must be performed
Descale the appliance as described in section “10. Descaling”
flashing (orange)
Descaling is underway
Complete the operation as described in section “10. Descaling”: the light comes white when the rinsing cycle of descaling is underway
on (white)
The rinsing cycle of descaling must be performed
See section “8.1 Cleaning of the coffee outlet”
flashing (white)
The rinsing cycle of descaling is underway
on (orange)
Cleaning of the coffee outlet must be performed
flashing (orange)
Cleaning of the coffee outlet is underway
flashing (white)
The active rinse is underway
flashing
If the water softener filter is present, an air bubble may have been released inside the circuit, obstructing delivery
The grinding is too fine and the coffee is delivered too slowly or not at all
Extract the filter holder and repeat the operations to make the perfect dose ( see Quick Guide - Step 1 Grinding).
The coffee filter is blocked.
Rinse the filters under abundant running water or by Active Rinse function (B5).
The tank has been inserted incorrectly and the valves on the bottom are not open
Press the tank down lightly to open the valves on the bottom
Scale in the water circuit
Descale as described in section “10. Descaling”
MENU SETTINGS
Enter the setting menu
Press both buttons for 5 seconds to enter setting menu
Select the setting
Turn the knob to select the drink light corresponding to the function to set
Save new settings:
Press the ON/Standby button to confirm.
CUSTOMISING THE QUANTITY OF COFFEE BEVERAGES WITH THE BUTTON (B9)
Prepare the appliance to deliver the beverage you want to make. Prepare the coffee dose and attach the portafilter to the coffee outlet: if you have to customise a milk based beverage, prepare and also attach the Lattecrema System .
Turn the dial (B10) to select the drink to be programmed.
Press the button: the light corresponding to the OK button (B6) comes on steadily and the light corresponding to the button flashes.
Press the OK button to start delivering the beverage. The lights corresponding to the OK and buttons flash.
When you have reached the desired quantity of the beverage, press the OK button again. If the recipe includes another ingredient, it starts delivery: when you have reached the desired quantity, press the OK button again.
Press the button to save the new setting. The appliance is ready for use again and the button remains on.
If you do not want to save the new setting, press any other button.
Please note:
You can programme coffee beverages, but not steam and hot water.
Programming changes the quantity of the beverages, but not the amount of coffee ground.
"X2" beverages can be programmed separately.
is not programmable.
To reset the default beverage quantities, press and hold the button until it goes off. The selected beverage is reset to the default values.
CLEANING AND MAINTENANCE_
Important!
Do not use solvents, abrasive detergents or alcohol to clean the coffee machine.
Do not use metal objects to remove encrustations or coffee deposits as they could scratch metal or plastic surfaces.
If the appliance is not used for more than a week, before using it again, we recommend you perform a rinse cycle.
Danger!
While cleaning, never immerse the coffee maker in water. It is an electrical appliance.
Before cleaning the outside of the appliance, turn it off, unplug from the mains socket and allow to cool.
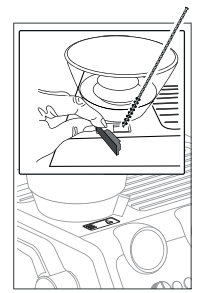
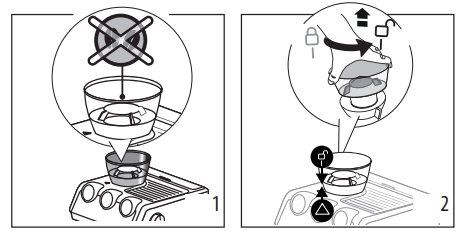
Cleaning of the coffee outlet
When the light comes on (orange) (B5), you have to proceed cleaning the coffee circuit. To run the cleaning, you have to purchase dedicated cleaning tabs for coffee makers.
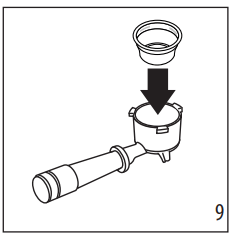
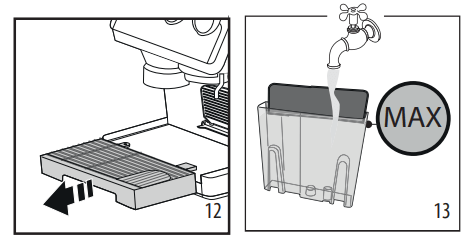
Insert the 1-cup coffee filter (C2) in the portafilter (C1)
Put on the coffee filter the special disk accessory (C9) (fig. 12) and press it to the bottom;
Put on the accessory the cleaning tab (fig. 13);
Attach the portafilter to the coffee outlet (A7);
Fill the water tank (A15). Make sure the drip tray (A11) is empty.
Keep pressed the button, until the related light start blinking (orange). After few minutes the cleaning stops automatically;
Remove the portafilter and the cleaning disk accessory;
Wash the portafilter and the filter under tap water;
Insert the portafilter again and make a rinse by pressing thebutton: we suggest to put a container under the portafilter;
Remove and empty the drip tray.
Please note:
This procedure can start by pressing the button (B5)) for some seconds. To delete this option, press the same button for 10 seconds.
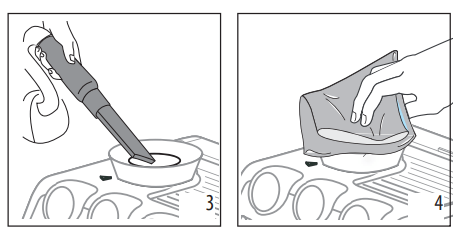
Cleaning the beans container housing
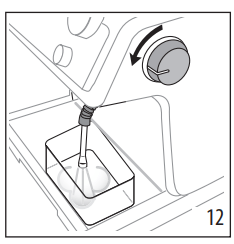
Make sure the beans container (A1) is empty. If necessary, operate the coffee mill without beans to empty it:
Release the beans container by turning it anticlockwise and extract from the appliance;
Remove coffee residues 4. using a vacuum cleaner;
Clean the beans container housing with a damp cloth and dry;
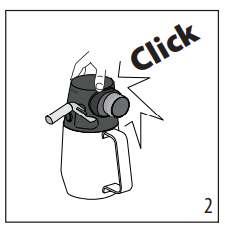
Put the container back inserting it in the coffee mill (fig. 15). The container is correctly inserted when the arrow ▲ is lined up with the symbol and you hear a “click”.
Cleaning the burr
When cleaning the beans container, clean the container housing and upper burr with a damp cloth. The burr can be removed and replaced by an authorised customer services centre.
You may also need to remove the burr if it becomes blocked with foreign matter. If this occurs, remove the beans container and clean as follows:
Attach the portafilter and operate the mill without beans to free the coffee guide;
Turn the appliance off;
Turn the grinding selector anticlockwise as far as it will go to the “REMOVE” position;
Extract the upper burr, gripping it by the handle;
Clean the burr with a brush (not included) and remove the coffee residues using a vacuum cleaner;
Put the upper burr back in place;
Turn the selector to select the desired grinding level.
Make sure the burr is inserted correctly by pulling it by the handle. If it is correctly inserted, it will not move.
Replacing the burrs
When the quantity of coffee becomes even less, contact a customer services centre to have the burrs replaced, then adjust the mill again as follows entering the setting menu (“6. Menu settings") and selecting the first range of the “Extra grinding adjustment". Then turn the ground coffee quantity dial (B2) to minimum position and set the dose like a first use (see “3.2 The perfect dose").
Cleaning the "Smart tamping station"
Clean the attachment area with a brush;
Pull the lever (A20) as far as it will go and clean the presser cylinder with a brush. Then release the lever.
Use the tube brush (C8) to clean the coffee funnel.
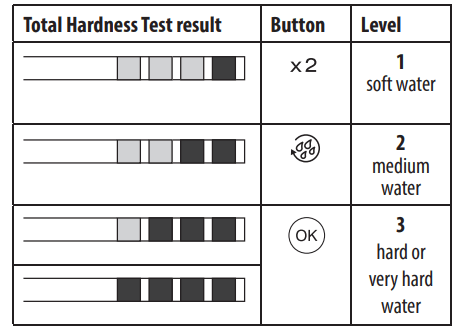
WATER HARDNESS
The descale light (B8) comes on after a period of time established according to water hardness. The machine can also be programmed according to the actual hardness of the water supply in the various regions, in which case descaling may be required less frequently.
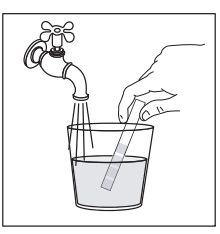
Remove the “TOTAL HARDNESS TEST” indicator paper (C4) from its pack.
Immerse the paper completely in a glass of water for one second.
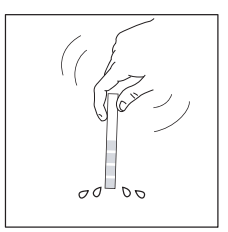
Remove the paper from the water and shake lightly.
Set the appliance as indicated in section “6. Menu settings”
After about a minute, 1, 2, 3, or 4 red squares form, depending on the hardness of the water. Each square corresponds to one level.
DESCALING
Please note
Before use, read the instructions and the labelling on the descaler pack.
It is important to use De'Longhi descaler only. Using unsuitable descaler and/or performing descaling incorrectly may result in faults not covered by the manufacturer's guarantee.
Descaler could damage delicate surfaces. If the product is accidentally spilt, dry immediately.
Descale the appliance when the light (B8) comes on (orange).
Please note
If you want anticipate the cleaning cycle, press the descaling button (fig. 5) for 3 seconds.
In case you start the descaling cycle by mistake, you can press the descaling button (fig. 5) for 10 seconds; the rinsing cycle can not be stopped (from step 9).
(IF PRESENT, REMOVE THE WATER SOFTENER DEVICE). Pour the descaler into the tank up to the level A marked inside the tank (equal to one 100ml packet).
Add water (1 liter) up to the level B . Then put the water tank back in the appliance.
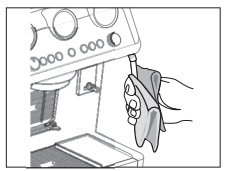
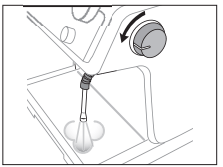
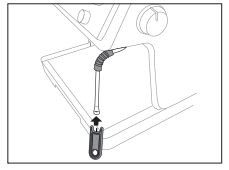
Insert the dedicated accessory (C6) to the Latte Crema connection (A6).
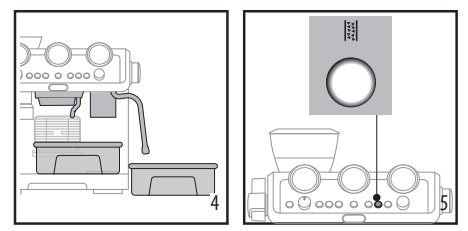
Make sure the portafilter is not attached and position a recipient under the coffee outlet, hot water spout and the other recipiente under the steam wand.
Keep pressed the button until the corresponding light begins to blink: descaling starts.
The descale programme starts and the descaler liquid comes out of the steam wand and coffee outlet. The descale programme removes limescale deposits from inside the appliance by automatically performing a series of rinses and pauses until the tank is empty. Delivery stops and thelight turns to white. This indicates that it is necessary to proceed with rinsing: see next page.
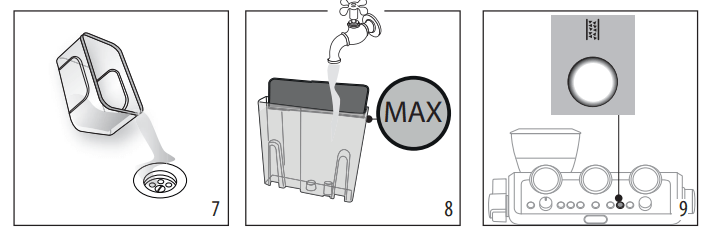
Empty the recipients used to collect the descaler solution and replace them empty.
Remove the water tank, empty any residues of descaler solution, rinse with running water and fill with fresh water up to the MAX level. Put the tank back in its housing.
Keep pressed the button until the corresponding light begins to blink: rinsing starts.
When rinsing is complete, delivery stops and the appliance prepares to be used again.
Empty the recipients used to collect the rinse water.
Extract and empty the drip tray, then put back in the appliance.
Empty, rinse, then fill the water tank with fresh water and replace it.
Now the appliance is ready to use.
TROUBLESHOOTING
PROBLEM
CAUSE
SOLUTION
There is water in the drip tray
It is normal: due to the internal water circuits operations
Regularly empty and clean the drip tray
No espresso coffee is delivered
No water in the tank (A15)
Fill the tank
The light is on to indicate that the coffee or steam circuit is empty
Press the button corresponding to the light to fill the circuit
The coffee filter is blocked
Rinse the filters under abundant running water or by Active Rinse function (B5).
The tank has been inserted incorrectly and the valves on the bottom are not open
Press the tank down lightly to open the valves on the bottom
Scale in the water circuit
Descale as described in section “10. Descaling”
Coffee grind too fine
Adjust coffee dose and grinding (refer to Quick Guide)
The portafilter cannot be attached to the appliance
The ground coffee has not been pressed or is too much
Repeat grinding with new settings. Reduce the powder quantity: check if the filte r(sin-gle or double filter) is the same size as the selector of grinding quantity (2x button (B3) selected or not)
The espresso coffee drips from the edges of the portafilter rather than the holes
The portafilter is inserted incorrectly
Attach the portafilter correctly and rotate firmly as far as it will go
The espresso boiler gasket has lost elasticity or is dirty
Have the espresso boiler gasket replaced by Customer Services
The coffee filter is clogged
Rinse the filters under abundant running water or by Active Rinse function (B5).
The coffee crema is too light (delivered from the spout too fast)
The appliance settings need reviewing
Refer to coffee guide for suggestions
The coffee crema is too dark (delivered from the spout too slowly)
The appliance settings need reviewing
Refer to coffee guide for suggestions
No milk froth is formed when making cappuccino with LatteCrema System
Milk not cold enough
Always use milk at refrigerator temperature
The froth selection knob (D5) is not in the correct position
Check and turn to the right position the froth selection knob max froth; med froth; min froth )
The LatteCrema System is dirty
Clean the cappuccino maker as described in section “6.3 Cleaning Lattecrema System”
Scale in the water circuit
Descale as described in section “10. Descaling”
At the end of descaling, the appliance requests a further rinse
During the rinse cycle, the water tank has not been filled to the MAX level
Complete the rinse cycle from point (8) of section “10. Descaling”
The appliance does not grind the coffee
There is foreign matter that cannot be ground in the coffee mill
Clean the burrs as described in section “8.3 Cleaning the burr” making sure you remove all the beans from the beans container (A1) before extracting it.
Before putting the burr back, vacuum all residues from the housing (fig.14)
The coffee beans container is not in the right position
The container is correctly inserted when the arrow ▲ is lined up with the symbol and you hear a “click".
If you want to change the type of coffee
You must remove all the beans present in the machine
Empty the beans container (if necessary, operate the coffee mill without beans or use a vacuum cleaner to remove any remaining beans)
Attach the filter holder and operate the coffee mill a number of times without beans to free the grinder. Attach the filter holder to the outlet of the grinder (A18), lining it up with "INSERT", then turning it to the right. Grinding begins when the filter holder reaches the CLOSE position and stops automatically. Repeat until the filter is empty
Place the new coffee in the beans container
If the amount of coffee ground is not enough to reach the perfect dose, proceed setting the appliance as for the first use
After grinding, the coffee filter is empty
The coffee grinder coffee funnel is clogged
Clean as described in section “8.5 Cleaning the “Smart tamping station””. If the problem persists, access the guide by opening the hatch and free it using the brush)
After tamping, there is too much coffee in the filter
After grinding, the ground coffee in the filter does not reach the “perfect dose”
The "Smart Tamping Station" needs cleaning
Clean as described in section “8.5 Cleaning the “Smart tamping station””, then grind again
The quantity of ground coffee needs adjusting
Adjust the quantity of coffee with the dial (B2). If the dial is already in the max. position, select the second range of grinding adjustment (see “6. Menu settings”- “Extra grinding adjustment”). If the problem persists, replace the burrs as described in section “8.4 Replacing the burrs”
Over time the burrs wear down
Replace the burrs as described in section “8.4 Replacing the burrs”

 to rinse.
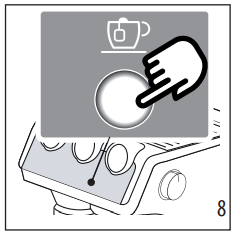
 (B5).
(B5).


 All components are dishwasher safe, placing them in the top basket. If you do not have a dishwasher, wash by hand as described in the note at the end of the section.
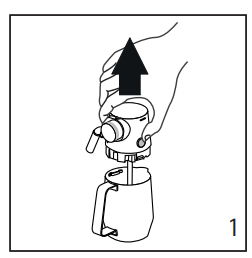
 on
on on
on on
on on
on on
on on
on on
on on
on on (orange)
 on (orange)
 flashing
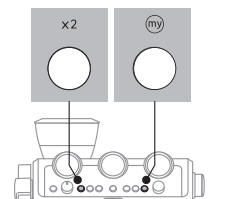


 BUTTON (B9)

 is not programmable.

 light comes on (orange) (B5), you have to proceed cleaning the coffee circuit. To run the cleaning, you have to purchase dedicated cleaning tabs for coffee makers.
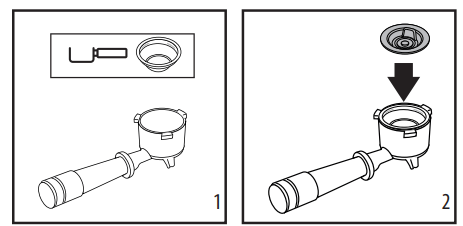
 symbol and you hear a “click”.
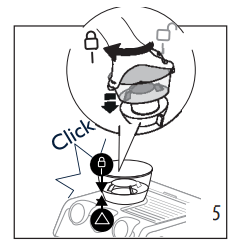
 descale light (B8) comes on after a period of time established according to water hardness. The machine can also be programmed according to the actual hardness of the water supply in the various regions, in which case descaling may be required less frequently.

 light (B8) comes on (orange).
 A marked inside the tank (equal to one 100ml packet).
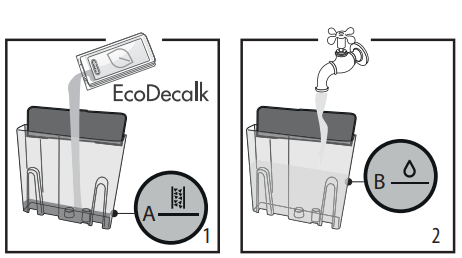
 B . Then put the water tank back in the appliance.
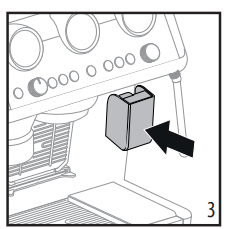
 light is on to indicate that the coffee or steam circuit is empty
 max froth;
  med froth;
  min froth )
 symbol and you hear a “click".