お買い上げいただきありがとうございます。
このマルチポッド(以下、本機とする)は、構成される自由雲台部、一脚部、
ミニ三脚部、付属のサポート機能付きキャリングケースを組み合わせてビ
デオカメラ/デジタル一眼カメラ/デジタルスチルカメラ(以下、カメラ
とする)に取り付けることで、使用シーンに合わせて長時間撮影をサポー
トします。
本製品は安全のための注意事項を守らないと、人身事故になること
があります。
この取扱説明書には、事故を防ぐための重要な注意事項と製品の取り扱いかたを示
しています。この取扱説明書をよくお読みのうえ、製品を安全にお使いください。
お読みになったあとは、いつでも見られるところに必ず保管してください。
安全のために
ソニー製品は安全に充分配慮して設計されています。しかし、まちがった
使いかたをすると、人身事故になることがあり危険です。事故を防ぐため
に次のことを必ずお守りください。
●安全のための注意事項を守る
●故障したら使わずに、お買い上げ店またはソニーの相談窓口に修理を
依頼する
警告表示の意味
取扱説明書では、次のような表示をしています。表示の内容をよく理
解してから本文をお読みください。
この表示の注意事項を守らないと、感電やその他の事故
によりけがをしたり周辺の家財に損害を与えたりするこ
とがあります。
注意を促す記号
行為を禁止する記号
行為を指示する記号
下記の注意事項を守らないと、
けが
をしたり周辺の
家財
に
損害
を与えたりすることがあります。
積載カメラおよび装着品の総重量(制限重量)を守る
制限重量を超えると、本機が不安定になり、倒れたりしてけがの原
因となることがあります。
本機を一脚またはサポートスタンドとして使用するときは、カメ
ラや一脚部に手を添える
手を離すとカメラや本機が不安定になり、倒れたりしてけがの原
因となることがあります。
各固定ツマミやレバー、カメラネジなどの締め付けパーツ、およ
び脚の長さの調節は確実に締め付けて固定する
締め付けが弱いと、ずれたりはずれたりして、カメラの破損やけが
の原因となることがあります。
カメラの取り付け角度を調節するときは、必ず手でカメラを支え
ながら行う
カメラ台が傾き、カメラの破損やけがの原因となることがありま
す。
カメラを取り付けたり取りはずしたりするときは、カメラ台固定
ツマミを確実に締め付けて固定する
締め付けが弱いとカメラ台が傾き、カメラの破損やけがの原因と
なることがあります。
カメラの真下に人や物があるような使いかたをしない
カメラの取り付けが不充分などの原因で落下したとき、自分がけ
がをしたり、人にけがを負わせたり、損害を与えたりすることがあ
ります。また、まわりの人や物にぶつからないようにご注意くださ
い。
カメラを取り付けて、本機を振ったり、下に向けたりしない
故障やけがの原因となることがあります。
マルチポッド
Multipod
Multipied
多功能脚架
4-419-781-01(1)
取扱説明書
Operating Instructions
Mode d‘emploi
Manual de instrucciones
VCT-MP1
©2012 Sony Corporation Printed in China
サポート機能付きキャリングケースを装着して飛びはねたり、
走ったりしない
キャリングケースの受け部から一脚部がはずれるなどして、故障
やけがの原因となることがあります。
カメラを一脚部およびミニ三脚部の連結ネジに直接取り付けない
カメラの破損の原因となることがあります。
脚の開閉、出し入れの操作には充分注意をはらう
指などをはさみ、思わぬけがをすることがあります。
本機を一脚またはサポートスタンドとして使用する場合、カメラ
を装着したまま持ち運ぶときは、一脚部とカメラを手で支える
手を離すとカメラや本機が不安定になり、倒れたりしてけがの原
因となることがあります。
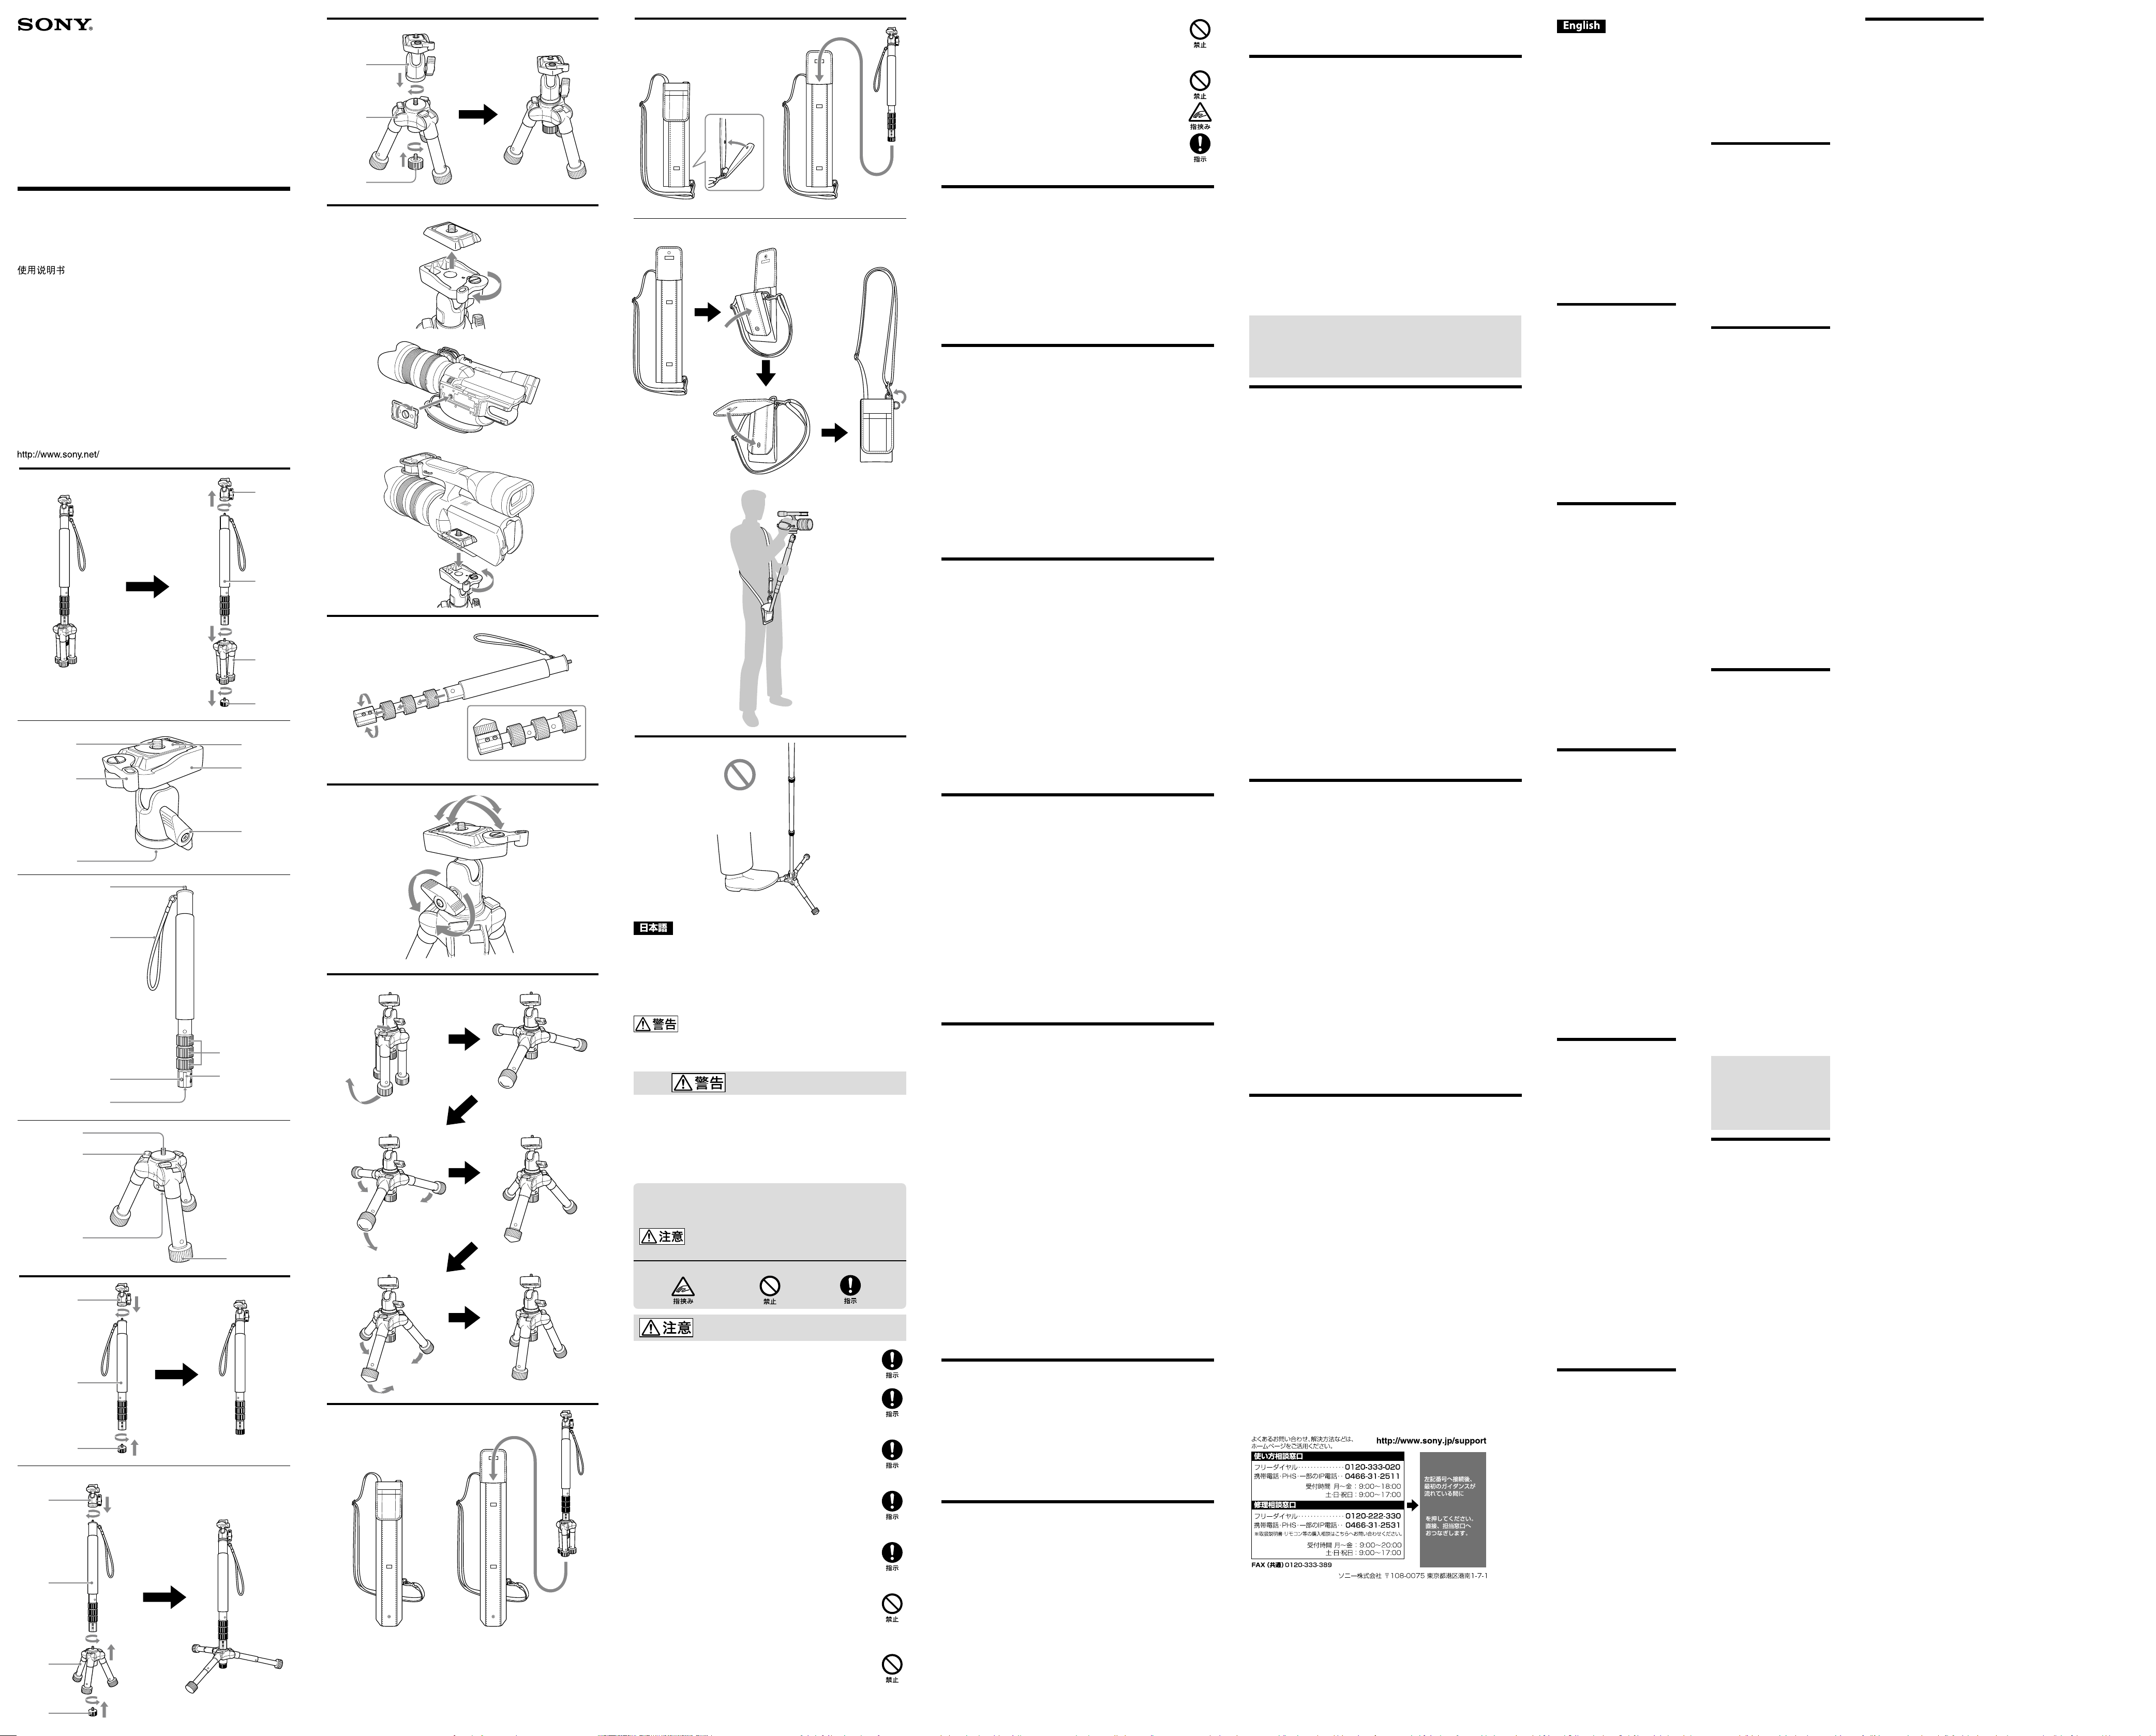
特長
本機は、自由雲台部、一脚部、ミニ三脚部、サポート機能付きキャリング
ケースで構成されています。組み合わせによりさまざまな使いかたができ
ます。
一脚とサポート機能付きキャリングケースを組み合わせて使うと、カメ
ˎ
ラやカメラに装着したアクセサリーの重量が肩に分散されるため、腕に
かかる負担を軽減することができます。ハイアングルや動きながらで
も、楽に撮影することができます。
キャリングケースを使わずに、一脚としても使用できます。
ˎ
三脚が使えない狭い場所でも設置できるサポートスタンドとして使用
ˎ
できます。
ミニ三脚として使用すると、低いアングルでの撮影やマクロ撮影時に安
ˎ
定した撮影ができます。
各部のなまえ
自由雲台部
カメラネジ
クイックシュー固定レバー
連結ネジ穴
クイックシュー
カメラ台
カメラ台固定ツマミ
一脚部
連結ネジ
ハンドストラップ
リリース用補助穴
連結ネジ穴
ロックグリップ
脚長さ調節ノブ
ミニ三脚部
連結ネジ
開脚調節ノブ
石突ゴム取り付け穴
ゴム足
石突ゴム
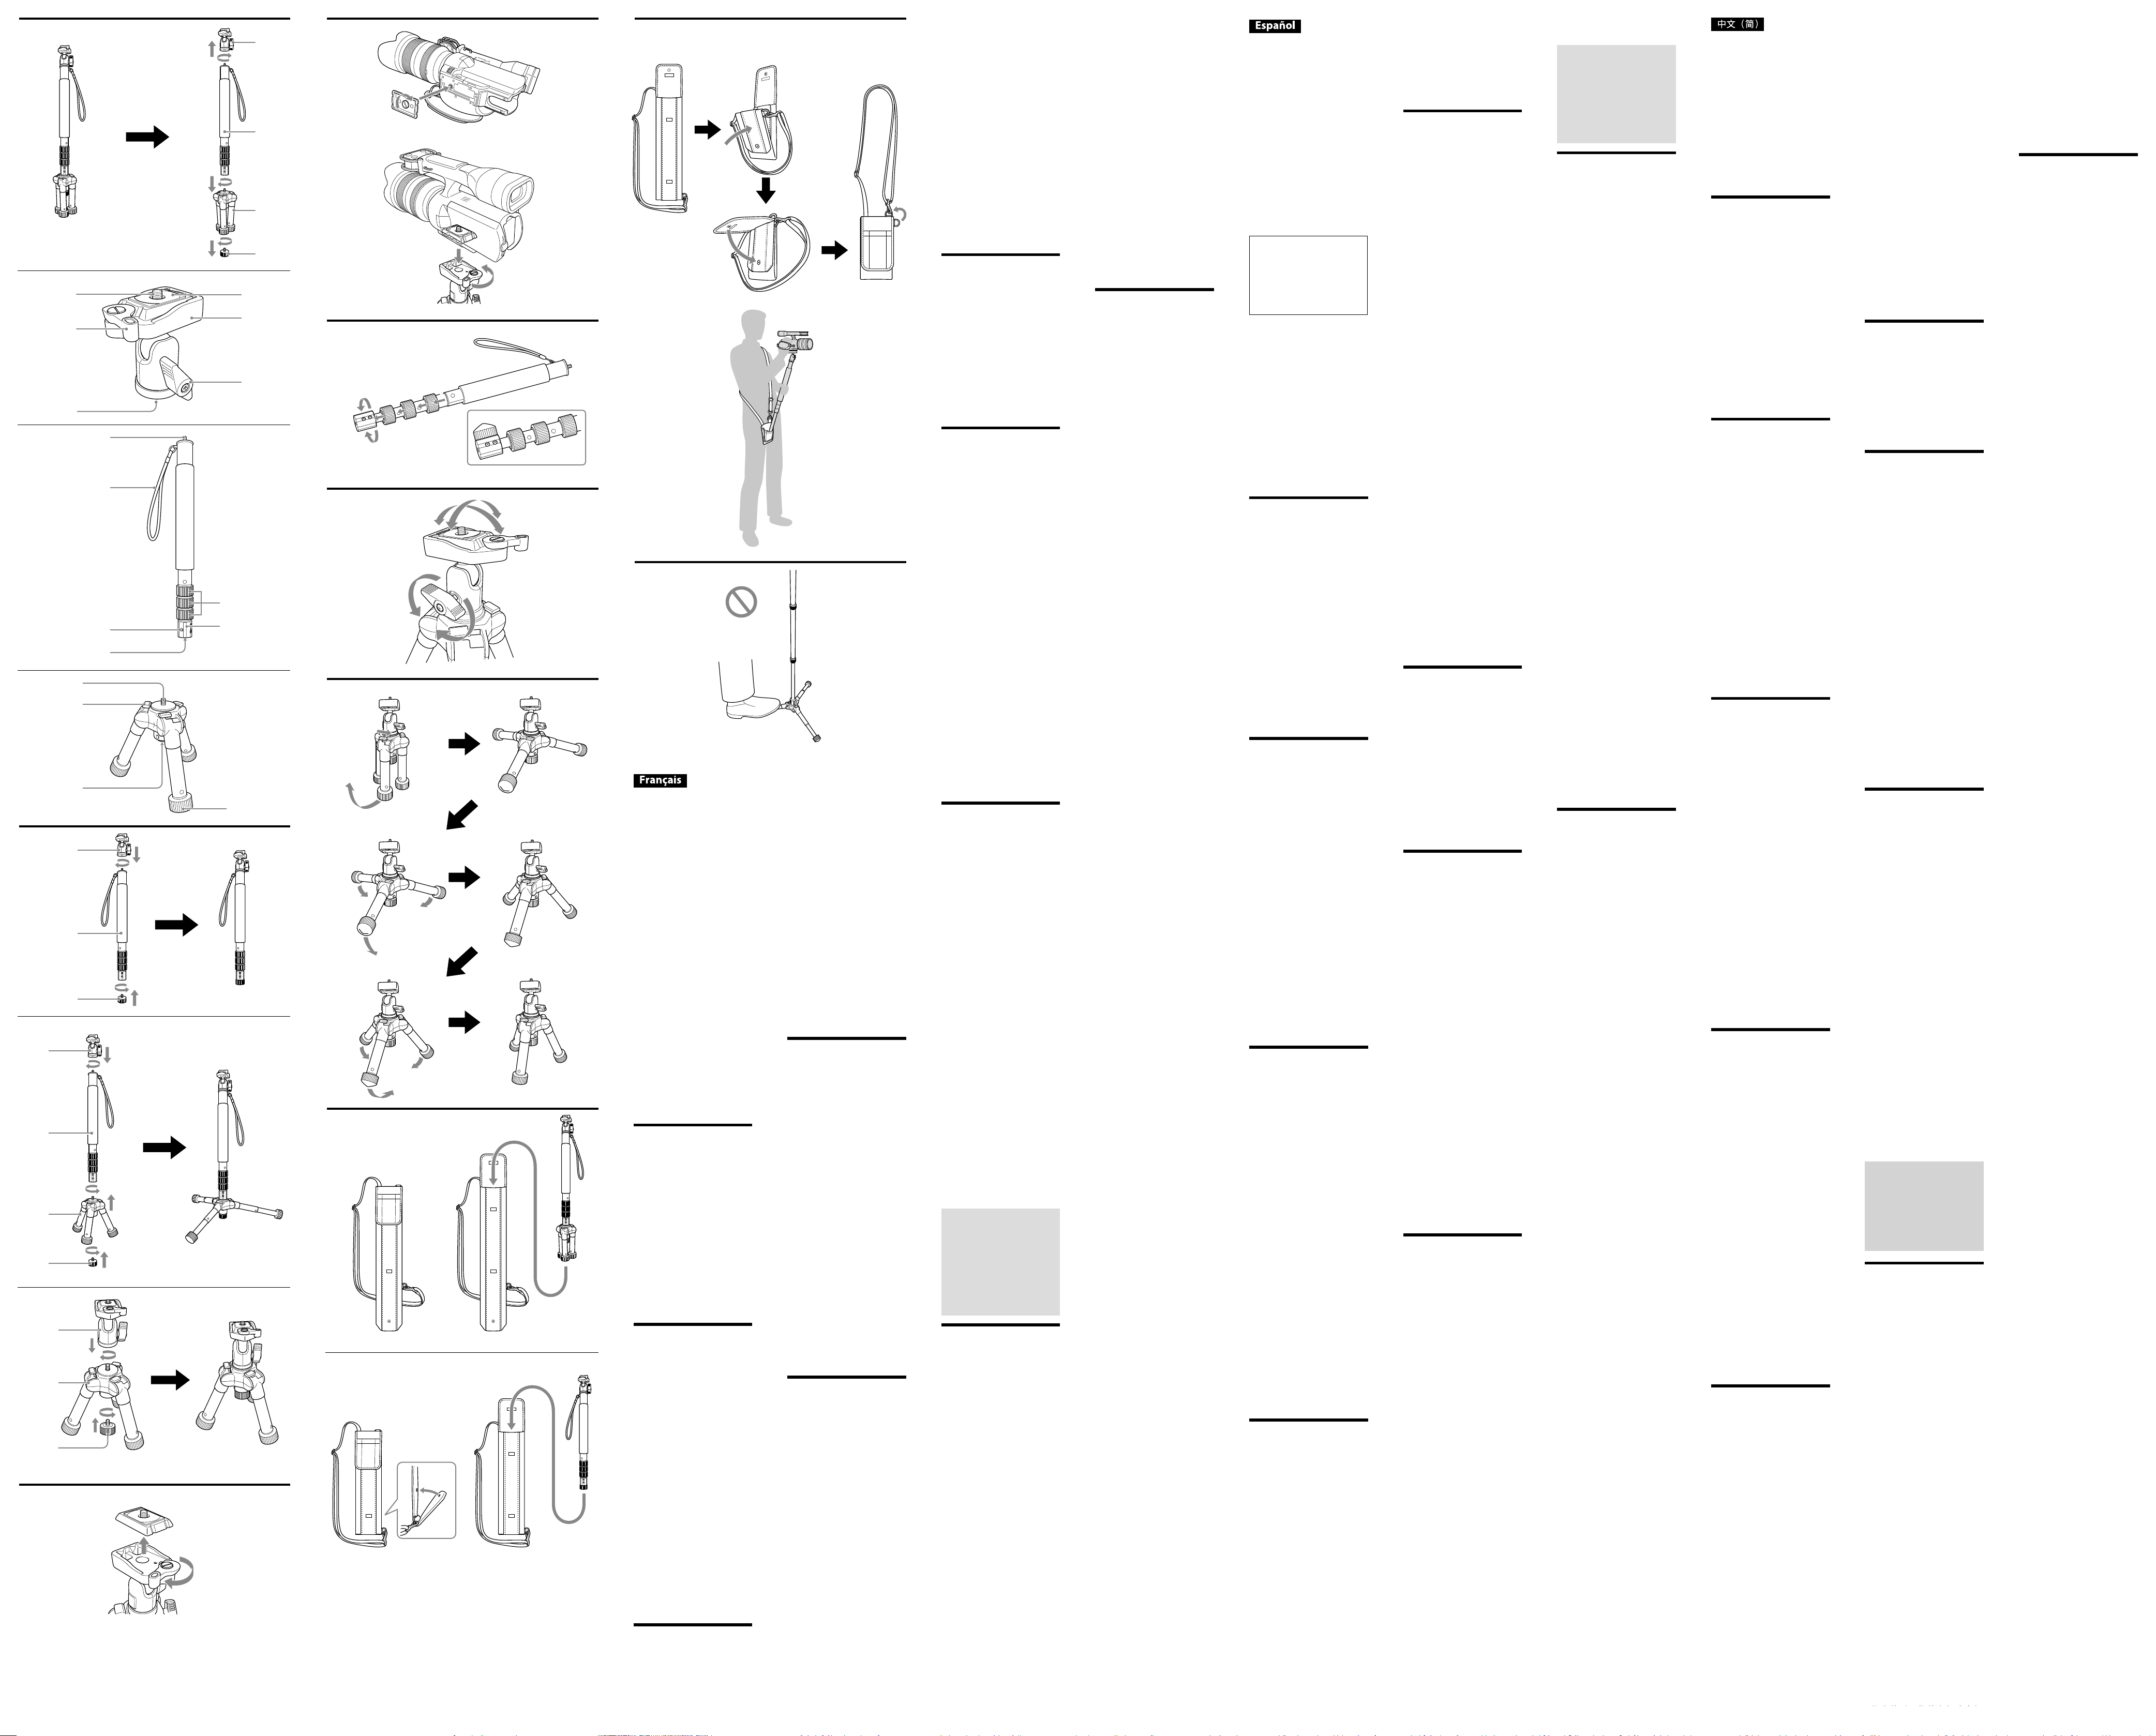
本機を準備する
自由雲台部、一脚部、ミニ三脚部、石突ゴムを組み合わせ、撮影シーンにあ
わせた形状に組み立てます。
自由雲台部の取り付け、取りはずしは、カメラ台固定ツマミを締めた状態
で行ってください。
-
一脚として使用する場合
自由雲台部()、一脚部()、石突ゴム()を組み立てる。
-
サポートスタンドとして使用する場合
自由雲台部()、一脚部()、ミニ三脚部()、石突ゴム()を組み立て
る。
ミニ三脚部は脚を伸ばして、ローポジションでご使用ください。(イラスト
-
)
ローポジションについて、詳しくは「ミニ三脚部の開脚角度を調節する」
をご覧ください。
-
ミニ三脚として使用する場合
自由雲台部()、ミニ三脚部()、石突ゴム()を組み立てる。
ご使用の際、石突ゴムがじゃまになる場合は取りはずしてください。
カメラを取り付ける
バッテリーやカセット、またはお使いのカメラに対応したメディアなど
は、カメラを本機に取り付ける前にセットしておいてください。
1
自由雲台部のクイックシュー固定レバーを左へ回し、クイックシュー
をはずす。
2
カメラにクイックシューを取り付ける。
クイックシューのネジをカメラの底部のネジ穴に合わせ、コインなど
で時計回りに回して締めてください。
3
カメラを自由雲台部に取り付ける。
カメラをクイックシューの先端から自由雲台部のカメラ台に入れ、
上から押すとカチッと音がして、セットされる。
クイックシュー固定レバーを右に回して固定する。
ご注意
取り付けられるカメラおよび装着品の総重量は
2 kg
以下(制限重量)で
ˎ
す。制限重量を超えて取り付けないでください。
カメラを取りはずす
取り付けるときと逆の手順で取りはずす。
一脚部、ミニ三脚部の脚の長さを調節する
一脚部およびミニ三脚部の脚は、お好みの長さに調節できます。
一脚部の長さを調節する
1
脚長さ調節ノブを握り、反時計回りに回す。
4
回カチッと音(クリック感)がするまで回してゆるめます。
2
使いたい長さに調節する。
ロックグリップも使用することで、
4
か所で長さの調節ができます。伸
ばす場合は、太い部分から伸ばしてください。
3
脚長さ調節ノブを握り、時計回りに回してしっかり固定する。
ご注意
脚の長さを調節する際、脚長さ調節ノブを握る手を挟まないよう充分注
ˎ
意してください。
サポートスタンドとして使用する場合は、一脚部とミニ三脚部を組み立
ˎ
てる前にそれぞれの長さを調節してください。
脚の長さを固定する際、脚長さ調節ノブを締めすぎないようご注意くだ
ˎ
さい。万一、脚長さ調節ノブがはずれなくなった場合は、石突ゴムを一脚
部のリリース用補助穴に取り付け、ハンカチ等をあてて握ると、握力を
かけやすくなります。
(
イラスト
-
)
ミニ三脚部の脚の長さを調節する
1
ゴム足を握り、反時計回りに回す。
2
使いたい長さに脚を調節する。
3
ゴム足を握り、時計回りに回してしっかり固定する。
ご注意
ミニ三脚部の脚の長さを調節する際は、カメラが不安定にならないよう
ˎ
ご注意ください。
カメラの向きを調節する
1
自由雲台部のカメラ台固定ツマミをゆるめる。
2
使いかたに合わせてカメラ台の角度を調節する。
自由雲台部の向きを調節することもできます。
3
カメラ台固定ツマミを締める。
ご注意
カメラ台固定ツマミをゆるめるときは、必ずカメラを手で支えながら
ˎ
行ってください。
サポートスタンドとして使用する場合は、一脚部を回転させたり傾けた
ˎ
りしないでください。
ミニ三脚部の開脚角度を調節する
-
ローポジション
1
ミニ三脚部の脚を閉じる。
2
開脚調整ノブを右方向へカチッと止まるまでスライドさせる。
3
脚をいっぱいに開く。
-
セミローポジション
ローポジションの状態から、ゆっくり脚を閉じる。
開脚調整ノブが左方向にスライドし、自動的にカチッと止まった位置が
ˎ
セミローポジションです。
-
標準ポジション
セミローポジションの状態から、脚を閉じる。
再び開脚調整ノブが左方向にスライドし、自動的にカチッと止まった位
ˎ
置が標準ローポジションです。
一旦脚を閉じ、開いて止まった状態も標準ポジションです。
ˎ
ミニ三脚部の開脚角度を調節する際は、カメラが不安定にならないよう
ˎ
ご注意ください。
ご使用の際、石突ゴムがじゃまになる場合は取りはずしてください。
ˎ
サポート機能付きキャリングケースを使う
サポートスタンドや一脚を収納する
どちらの場合も、一脚部やミニ三脚部の脚を縮めた状態で収納することが
できます。
-
サポートスタンドを収納する
-
一脚を収納する
キャリングケースを図のように折り曲げ、スナップで留めてください。
-
カメラサポートとして使用する
肩からかけたサポート機能付きキャリングケースの一脚受け部に一脚部
を固定することにより、カメラや本機の重量を肩に分散し、腕にかかる負
担を軽減するカメラサポートとして使用できます。
1
-
の状態からキャリングケースを図のように折り曲げ、面テープ
で留める。
2
キャリングケースのフロント部を上からかぶせてスナップで留める。
3
ストラップのフックをイラストの位置の
D
環に付けかえる。
4
キャリングケースのストラップを肩から斜めにかけ、長さを調節する。
5
一脚の先端をキャリングケースの受け部に差し込む。
このとき、取りはずしてあるミニ三脚部は、付属のキャリングポーチ
に収納してください。
ご注意
カメラの真下に人や物があるような使いかたをしないでください。カ
ˎ
メラの取り付けが不充分などの原因で落下したとき、自分がけがをし
たり、人にけがを負わせたり、損害を与えたりすることがあります。ま
た、まわりの人や物にぶつからないようにご注意ください。
使用上のご注意
カメラを取り付けたり取りはずしたりするときは、カメラ台固定ツマミ
ˎ
を確実に締めて固定してください。また、カメラ台にカメラを搭載した
あと、アクセサリーなどを取り付けないでください。カメラ台が傾き、カ
メラを破損することがあります。
カメラを取り付けるときは、本機が転倒しないようにご注意ください。
ˎ
カメラを直接一脚部やミニ三脚部の連結ネジに取り付けないでくださ
ˎ
い。
本機を一脚またはサポートスタンドとして使用するときは、一脚部のハ
ˎ
ンドストラップに必ず手を通し、カメラや本機に手を添えてください。
カメラに全長の長いレンズを取り付けて
撮影する場合はバランスが不
安
定になるため、特にご注意ください。
各固定ツマミやレバー、カメラネジなどの締め付けパーツ、および脚の
ˎ
長さ調節は確実に締め付けて、固定してください。
カメラを取り付けて、本機全体を振ったり、下に向けたりしないでくだ
ˎ
さい。
脚を出し入れするときは、指などをはさまないようにご注意ください。
ˎ
カメラ台固定ツマミをゆるめてティルティングするとき、ひっかかり感
ˎ
のある場合がありますが、故障ではありません。カメラ台固定ツマミを
確実にゆるめてください。
サポート機能付きキャリングケースを装着して飛びはねたり、走ったり
ˎ
しないでください。キャリンケースの受け部から一脚部がはずれるなど
して、故障やけがの原因となることがあります。
本機を置くときは、人がつまづいたりしないようにご注意ください。
ˎ
本機をサポートスタンドとして使用するとき、固定するためにミニ三脚
ˎ
部を足で踏まないでください。本機の破損の原因となることがありま
す。(イラスト
)
本機を一脚またはサポートスタンドとして使用する場合、カメラを装着
ˎ
したまま持ち運ぶときは、一脚部とカメラを手で支えてください。
お手入れについて
汚れたら、やわらかい布に中性洗剤溶液を含ませてふいてから、乾いた
ˎ
布でからぶきしてください。
海岸など、潮風の当たる所で使用したあとは、乾いた布でよくふいてく
ˎ
ださい。
主な仕様
積載カメラおよび装着品の総重量
2 kg
以下
一脚
外形寸法
全高
約
1,475 mm
縮長
約
460 mm
質量
約
575 g
脚段数
5
段
サポートスタンド
外形寸法
全高
約
1,535 mm
縮長
約
585 mm
質量
約
935 g
ミニ三脚
外形寸法
全高
約
270 mm
縮長
約
215 mm
質量
約
505 g
脚段数
2
段
同梱物
マルチポッド本体
(1)
サポート機能付きキャリングケース
(1)
キャリングポーチ
(1)
印刷物一式
仕様および外観は、改良のため予告なく変更することがあります。
保証書とアフターサービス
保証書
この製品には保証書が添付されていますので、お買い上げの際、お受け
ˎ
取りください。
所定事項の記入および記載内容をお確かめのうえ、大切に保管してくだ
ˎ
さい。
保証期間は、お買い上げ日より
1
年間です。
ˎ
アフターサービス
調子が悪いときはまずチェックを
この取扱説明書をもう一度ご覧になってお調べください。
それでも具合の悪いときは
ソニーの相談窓口にご相談ください。
保証期間中の修理は
保証書の記載内容に基づいて修理させていただきます。詳しくは保証書を
ご覧ください。
保証期間経過後の修理は
修理によって機能が維持できる場合は、ご要望により有料修理させていた
だきます。
部品の保有期間について当社ではマルチポッドの補修用性能部品(製品の
機能を維持するために必要な部品)を、製造打ち切り後
8
年間保有していま
す。ただ
し、故
障の状況その他の事情により、修理に代えて製品交換をする
場合がありますのでご了承ください。
ご相談になるときは次のことをお知らせください。
型名:
ˎ
VCT-MP1
故障の状態:できるだけ詳しく
ˎ
お買い上げ年月日
ˎ
「400」+「#」
1
2
3
1
3
2
2
1
3
2
1
2
3
4
5
2
3
Before operating the product, please
read this manual thoroughly and
retain it for future reference.
The Multipod VCT-MP1 (referred
to below as “this unit”) consists of a
ball head, monopod, mini tripod, and
supplied carrying case with support
function. These are assembled
and attached to a video camera,
interchangeable lens digital camera, or
digital still camera (referred to below
as “camera”). This unit can be used in
various ways that suit the situation, to
support taking photos for long hours.
For the Customers in Europe
Notice for the customers in
the countries applying EU
Directives
The manufacturer of this product
is Sony Corporation, 1-7-1 Konan
Minato-ku Tokyo, 108-0075 Japan.
The Authorized Representative for
EMC and product safety is Sony
Deutschland GmbH, Hedelfinger
Strasse 61, 70327 Stuttgart, Germany.
For any service or guarantee matters
please refer to the addresses given
in separate service or guarantee
documents.
Features
This unit consists of a ball head,
monopod, mini tripod, and carrying
case with support function. By
combining these, you can use it in
various ways.
Using a combination of the
ˎ
monopod and carrying case with
support function, the weight of your
camera and attached accessories
is distributed to your shoulder,
reducing the load on your arms. You
can record images easily, even from
a high angle or while moving.
You can also use this as a monopod,
ˎ
without the carrying case.
You can use this as a support stand,
ˎ
even in places too narrow for a
tripod.
Using as a mini tripod, you can use
ˎ
this for low angle recording and
stable recording in macro shooting.
Identifying the part
Ball head
Camera mounting screw
Camera mounting shoe lock lever
Connecting screw hole
Camera mounting shoe
Ball head
Ball head lock knob
Monopod
Connecting screw
Hand strap
Release auxiliary hole
Connecting screw hole
Lock grips
Leg length adjustment knob
Mini tripod
Connecting screw
Leg opening adjustment knob
Rubber leg tip mounting hole
Rubber foot
Rubber leg tip
Prepare this unit
Combine the ball head, monopod,
mini tripod and rubber leg tip in
various ways to suit your photo
situation.
When mounting or removing the
ball head, firmly tighten the ball head
lock knob.
- Use as monopod
Combine the ball head (),
monopod (), and rubber leg
tip ().
- Use as support stand
Combine the ball head (),
monopod (), mini tripod (),
and rubber leg tip ().
When using as a support stand,
extend the legs of the mini tripod
and set it to the low position. (See
illustration -)
For details on the low position, see
“ Adjust the leg opening angle of
the mini tripod”.
- Use as mini tripod
Combine the ball head (), mini
tripod (), and rubber leg tip
().
When using the mini tripod, remove
the rubber leg tip if it is unnecessary.
Mount the camera
Put the battery, cassette or other
media into the camera, before
mounting on this unit.
1 Turn the camera mounting
shoe lock lever of the ball head
to the left, and remove the
camera mounting shoe.
2 Attach the camera mounting
shoe to the camera.
Align the camera mounting
screw with the screw hole under
the camera, and firmly tighten it
clockwise with a coin, etc.
3 Attach the camera to the ball
head.
Starting from the edge of the
camera mounting shoe, set the
camera on the ball head, then
press the top of the camera.
You will hear a click as the
camera attaches to the ball
head.
Turn the camera mounting
shoe lock lever to the right to
lock the camera.
Notes
A maximum total 2 kg (4 lb 7 oz) ˎ
of camera and accessories can be
attached (weight limit). Do not
attach things that weigh more than
2 kg (4 lb 7 oz) in total.
Remove the camera
To remove, reverse the steps for
attaching it.
Adjust the leg length
of monopod and mini
tripod
You can adjust the leg length of the
monopod and mini tripod.
Adjust the length of the
monopod
1 Grip the leg length
adjustment knob, and turn it
counterclockwise.
Loosen it by turning until it clicks
four times.
2 Adjust to the length you want.
Also using the lock grips, you can
adjust its length in four places.
When extending, extend it from
the thick part.
3 Grip the leg length adjustment
knob, and turn it clockwise to
lock firmly.
Notes
When adjusting the leg length, be ˎ
careful the leg length adjustment
knob does not catch your hand
gripping it.
When using this unit as a support
ˎ
stand, adjust the leg length of the
monopod and mini tripod before
you combine them.
When you lock the leg length,
ˎ
do not tighten the leg length
adjustment knob too tight. If you
cannot loosen it, attach the rubber
leg tip to the release auxiliary hole
of the monopod, and use a cloth to
get a stronger grip the monopod.
(See illustration -)
Adjust the leg length of the
mini tripod
1 Grip the rubber foot, and turn
it counterclockwise.
2 Adjust to the leg length you
want.
3 Grip the rubber foot, and turn
it clockwise to lock firmly.
Notes
When adjusting the legs of the mini ˎ
tripod, be careful that the camera
does not lose balance.
Adjusting the
direction of the
camera
1 Loosen the lock knob of the
ball head.
2 Adjust the ball head to the
angle you want.
You can also adjust the direction
of the ball head.
3 Tighten the ball head lock
knob.
Notes
When loosening the ball head lock ˎ
knob, always hold the camera with
your hand.
When using this unit as a support
ˎ
stand, do not rotate or tilt the
monopod.
Adjust the leg
opening angle of the
mini tripod
- Low position
1 Close the legs of the mini
tripod.
2 Slide the leg opening
adjustment knob to the right
until it clicks and stops.
3 Spread the legs fully.
- Semi-low position
Close the legs slowly from the low
position.
The leg opening adjustment knob
ˎ
slides to the left, and automatically
clicks into place. This is the semi-
low position.
- Standard position
Close the legs from the semi-low
position.
The leg opening adjustment knob
ˎ
slides to the left, and automatically
clicks into place again. This is the
standard position.
If you close the legs fully, then open
ˎ
them until they stop, this is also the
standard position.
When adjusting the leg opening
ˎ
angle of the mini tripod, be careful
that the camera does not lose
balance.
When using the mini tripod,
ˎ
remove the rubber leg tip if it is
unnecessary.
Use the carrying case
with support function
Store the support stand or
monopod
When using this as a support stand or
monopod, shorten the leg length of
the monopod and mini tripod, then
you can store it.
- Store the support stand
- Store the monopod
Fold the carrying case as illustrated,
and fasten the snap.
- Use as a camera
support
Hang the carrying case with support
function on your shoulder. Set the
monopod into the holder of the
carrying case. The weight of the
camera and this unit are distributed
to your shoulder, reducing the load on
your arms. This is a way to use it as a
camera support.
1 Starting from the -
position, fold the carrying case
as illustrated, and fasten with
the hook and loop fastener.
2 Fold on top of the carrying
case, and fasten the snap.
3 Remove the strap hook from
the D-ring, and reattach it
to the D-ring at the position
illustrated.
4 Hang the carrying case strap in
an angle across your chest, and
adjust its length.
5 Put the base of the monopod
into the holder of the carrying
case.
Store the removed mini tripod in
the supplied carrying pouch.
Notes
Do not use this when there is a ˎ
person or thing directly under
the camera. If the camera is not
properly mounted and falls off, it
can injure you or another person
or cause damage. Also be careful
to not hit people or things nearby.
Precautions on use
When mounting or removing the ˎ
camera, firmly tighten and set the
ball head lock knob. Do not attach
accessories to the camera after
mounting it on the ball head. This
can make the ball head tilt and
damage the camera.
When you mount the camera, be
ˎ
careful that this unit does not fall
over.
Do not attach the camera directly
ˎ
to the connecting screw of the
monopod or mini tripod.
When using this unit as a monopod
ˎ
or support stand, be sure to pass
your hand through the hand strap of
the monopod, and hold the camera
or this unit with your hand. If you
attach a long lens to the camera,
this unit can lose balance, so be
especially careful.
Firmly tighten and set the parts
ˎ
to tighten: each lock knob, lever,
leg length adjusting lock, camera
screw, etc.
After mounting the camera, do
ˎ
not swing the entire unit or face it
down.
When you lengthen or shorten the
ˎ
monopod or legs of the mini tripod,
be careful it does not catch your
finger, etc.
When you loosen the ball head
ˎ
lock knob to tilt it, it may feel stuck.
This is not a malfunction. Loosen
the ball head lock knob with a firm
hand.
Do not jump or run when wearing
ˎ
the carrying case with support
function. If you do, the monopod
can come out of the holder of the
carrying case and malfunction or
injure you.
When you place this unit on the
ˎ
floor, be sure nobody trips on it.
When using this unit as a support
ˎ
stand, do not step on a leg of the
mini tripod to set it. That can
damage this unit. (See illustration
)
When using this unit as a monopod
ˎ
or support stand, if you carry it with
the camera mounted, hold both the
monopod and camera with your
hands.
Maintenance
When it gets dirty, clean with a soft ˎ
cloth lightly moistened with a mild
cleaning liquid. Then, wipe clean
with a dry cloth.
After using this unit at the beach or
ˎ
a place with sea breeze, wipe well
with a dry cloth.
Specifications
Total weight of camera and
mounted accessories
Maximum 2 kg (4 lb 7 oz)
Monopod
Dimensions
Maximum height:
Approx. 1,475 mm
(58 1/8 in.)
Minimum height:
Approx. 460 mm
(18 1/8 in.)
Mass Approx. 575 g
(1 lb 4 oz)
Leg extension Leg has 5 telescoping
shafts.
Support stand
Dimensions
Maximum height:
Approx. 1,535 mm
(60 1/2 in.)
Minimum height:
Approx. 585 mm
(23 1/8 in.)
Mass Approx. 935 g
(2 lb 1 oz)
Mini tripod
Dimensions
Maximum height:
Approx. 270 mm
(10 3/4 in.)
Minimum height:
Approx. 215 mm
(8 1/2 in.)
Mass Approx. 505 g
(1 lb 2 oz)
Leg extension Leg has 2 telescoping
shafts.
Included items
Multipod main body (1)
Carrying case with support function
(1)
Carrying pouch (1)
Set of printed documentation
Design and specifications are subject
to change without notice.
1
2
3
1
3
2
2
1
3
2
4
5
2
3
Avant de faire fonctionner ce produit,
prière de lire attentivement ce mode
d’emploi et de le conserver pour toute
référence ultérieure.
Le Multipied VCT-MP1 (désigné ci-
dessous par le terme « cet article »)
comporte une tête à rotule, un
monopied, un mini-trépied et l’étui de
transport fourni servant de support.
Ceux-ci peuvent être assemblés et
rattachés à un caméscope, un appareil
photo à objectif interchangeable
ou à un appareil photo numérique
(désignés ci-dessous par le terme
« la caméra »). Cet article peut être
utilisé de différentes manières, selon
la situation, pour une prise de vue de
longue durée.
Note pour les clients européens
Avis aux consommateurs des
pays appliquant les Directives
UE
Le fabricant de ce produit est
Sony Corporation, 1-7-1 Konan
Minato-ku Tokyo, 108-0075 Japon.
Le représentant agréé pour la
compatibilité électromagnétique
et la sécurité du produit est
Sony Deutschland GmbH,
Hedelfinger Strasse 61, 70327
Stuttgart, Allemagne. Pour toute
question relative à la garantie ou
aux réparations, reportez-vous à
l’adresse que vous trouverez dans
les documents ci-joints, relatifs à la
garantie et aux réparations.
Caractéristiques
Cet article comporte une tête à rotule,
un monopied, un mini-trépied et un
étui de transport servant de support.
En associant ces divers éléments,
vous pouvez utiliser cet article de
différentes manières.
La combinaison monopied et étui de
ˎ
transport servant de support permet
de répartir le poids de la caméra
et des accessoires sur l’épaule et de
réduire la charge sur les bras. La
prise de vue est facilitée, même en
contrebas ou en marchant.
Cet article peut être utilisé comme
ˎ
monopied sans étui de transport.
Cet article peut être utilisé comme
ˎ
support, même dans les endroits
trop étroits pour un trépied.
Employé comme mini-trépied, cet
ˎ
article permet des prises de vue en
contre-haut et en macro stables.
Description des
éléments
Tête à rotule
Vis de montage de caméra
Levier de blocage de sabot de
caméra
Douille filetée de raccordement
Sabot de caméra
Tête à rotule
Bouton de blocage de tête à rotule
Monopied
Vis de raccordement
Sangle
Orifice auxiliaire de libération
Douille filetée de raccordement
Bagues de blocage
Bouton de réglage de longueur du
pied
Mini-trépied
Vis de raccordement
Bouton de réglage de longueur du
pied
Douille pour embout d’axe en
caoutchouc
Pied en caoutchouc
Embout d’axe en
caoutchouc
Préparez cet article
Assemblez la tête à rotule, le
monopied, le mini-trépied et l’embout
d’axe en caoutchouc de diverses
manières, selon la situation.
Lorsque vous montez ou démontez
la tête à rotule, serrez fermement le
bouton de blocage de la tête à rotule.
- Utilisation comme
monopied
Assemblez la tête à rotule (), le
monopied () et l’embout d’axe
en caoutchouc ().
- Utilisation comme
support
Assemblez la tête à rotule (),
le monopied (), le mini-
trépied () et l’embout d’axe en
caoutchouc ().
Lorsque vous utilisez cet article
comme support, étirez les pieds du
mini-trépied et abaissez-les. (Voir
l’illustration -)
Pour le détail sur la position
basse, voir « Réglage de l’angle
d’ouverture des pieds du mini-
trépied ».
- Utilisation comme
mini-trépied
Assemblez la tête à rotule (),
le mini-trépied () et l’embout
d’axe en caoutchouc ().
Lorsque vous utilisez le mini-trépied,
retirez l’embout d’axe en caoutchouc
s’il est inutile.
Montage de la caméra
Mettez la batterie, la cassette ou le
support approprié dans la caméra
avant de l’installer sur cet article.
1 Tournez vers la gauche le
levier de blocage du sabot de
caméra sur la tête à rotule et
enlevez le sabot de caméra.
2 Fixez le sabot de caméra sur la
caméra.
Alignez la vis de montage de
caméra sur la douille filetée sous
la caméra et serrez-la fermement
dans le sens horaire avec une pièce
de monnaie, etc.
3 Rattachez la caméra à la tête à
rotule.
À partir du bord du sabot de
caméra, mettez la caméra sur
la tête à rotule, puis appuyez
sur le haut de la caméra. Vous
entendez un déclic lorsque
la caméra se fixe sur la tête à
rotule.
Tournez vers la droite le levier
de blocage de sabot de caméra
pour bloquer la caméra.
Remarques
Vous pouvez rattacher au maximum ˎ
2 kg (4 lb 7 oz), caméra et
accessoires compris (poids limite).
Ne rattachez pas d’objets pesant plus
de 2 kg (4 lb 7 oz) en tout.
Retrait de la caméra
Pour retirer la caméra, procédez
en sens inverse.
Réglage de longueur des
pieds du monopied et du
mini-trépied
Vous pouvez régler la longueur des
pieds du monopied et du mini-
trépied.
Réglage de longueur du
monopied
1 Saisissez le bouton de
réglage de longueur du pied
et tournez-le dans le sens
antihoraire.
Desserrez-le en tournant jusqu’à
ce qu’il clique quatre fois.
2 Réglez-le à la longueur
souhaitée.
Avec les bagues de blocage, vous
pouvez aussi ajuster sa longueur
à quatre endroits. Lorsque vous
tirez le pied, tirez-le depuis la
partie plus épaisse.
3 Saisissez le bouton de réglage
de longueur du pied et
tournez-le dans le sens horaire
pour bien le bloquer.
Remarques
Lorsque vous réglez la longueur ˎ
du pied, faites attention à ce que le
bouton de réglage de longueur de
pied ne vous pince pas les doigts.
Lorsque vous utilisez cet article
ˎ
comme support, ajustez la longueur
des pieds du monopied et du mini-
trépied avant de les assembler.
Lorsque vous bloquez la longueur ˎ
des pieds, ne serrez pas trop fort
le bouton de réglage de longueur
des pieds. Si vous ne pouvez pas le
desserrer, mettez l’embout d’axe en
caoutchouc dans l’orifice auxiliaire
du monopied et utilisez un chiffon
pour mieux tenir le monopied. (Voir
l’illustration -)
Réglage de longueur des
pieds du mini-trépied
1 Saisissez le pied en caoutchouc
et tournez-le dans le sens
antihoraire.
2 Réglez à la longueur de pied
souhaitée.
3 Saisissez le pied en caoutchouc
et tournez-le dans le sens
horaire pour bien le bloquer.
Remarques
Lorsque vous réglez la longueur ˎ
des pieds du mini-trépied, faites
attention à ce que la caméra ne soit
pas déséquilibrée.
Réglage de direction
de la caméra
1 Desserrez le bouton de
blocage de la tête à rotule.
2 Ajustez la tête à rotule selon
l’angle souhaité.
Vous pouvez aussi ajuster la
direction de la tête à rotule.
3 Serrez le bouton de blocage de
la tête à rotule.
Remarques
Lorsque vous desserrez le bouton ˎ
de blocage de la tête à rotule, tenez
toujours la caméra avec la main.
Lorsque vous utilisez cet article
ˎ
comme support, ne tournez pas ou
n’inclinez pas le monopied.
Réglage de l’angle
d’ouverture des pieds
du mini-trépied
- Position basse
1 Fermez les pieds du mini-
trépied.
2 Poussez le bouton de réglage
d’ouverture des pieds vers
la droite jusqu’à ce qu’il
s’encliquette et s’arrête.
3 Écartez complètement les
pieds.
- Position mi-basse
Fermez les pieds lentement
depuis la position basse.
Le bouton de réglage d’ouverture
ˎ
des pieds glisse vers la gauche et
s’encliquette automatiquement. C’est
la position mi-basse.
- Position standard
Fermez les pieds depuis la
position mi-basse.
Le bouton de réglage d’ouverture
ˎ
des pieds glisse vers la gauche
et s’encliquette à nouveau
automatiquement. C’est la position
standard.
Si vous fermez complètement les
ˎ
pieds, puis les rouvrez jusqu’à l’arrêt,
vous obtiendrez aussi la position
standard.
Lorsque vous réglez l’angle
ˎ
d’ouverture des pieds du mini-
trépied, faites attention à ce que la
caméra ne soit pas déséquilibrée.
Lorsque vous utilisez le mini-
ˎ
trépied, retirez l’embout d’axe en
caoutchouc s’il est inutile.
Utilisation de l’étui
de transport comme
support
Rangement du support ou
du monopied
Lorsque vous utilisez le support ou le
monopied, raccourcissez la longueur
des pieds du monopied et du mini-
trépied avant de les ranger.
- Rangement du support
- Rangement du monopied
Pliez l’étui de transport de la façon
illustrée et fermez le rabat.
- Utilisation comme
support de caméra
Suspendez l’étui de transport servant
de support à l’épaule. Posez le
monopied dans le support de l’étui de
transport. Le poids de la caméra et
de cet article se répartit sur l’épaule et
réduit la charge sur les bras. De cette
façon vous pouvez l’utiliser comme
support de caméra.
1 À partir de la position -,
pliez l’étui de transport de la
façon illustrée et fixez-le avec
le crochet à la boucle.
2 Pliez le haut de l’étui de
transport et fermez la
pression.
3 Retirez le crochet de la lanière
de l’anneau en D et rattachez-
le à l’anneau en D à la position
illustrée.
4 Suspendez la lanière de l’étui
de transport à travers la
poitrine et ajustez sa longueur.
5 Posez la base du monopied
dans le support de l’étui de
transport.
Rangez le mini-trépied retiré dans
la pochette de transport fournie.
Remarques
N’utilisez pas ce support quand ˎ
une personne ou un objet se
trouve directement sous la
caméra. Si la caméra n’était
pas installée correctement et
se détachait, elle pourrait vous
blesser, ou une autre personne,
ou encore causer des dommages.
Faites aussi attention à ne pas
frapper une personne ou des
objets à proximité.
Précautions d’emploi
Lorsque vous montez ou démontez ˎ
la caméra, serrez et bloquez bien le
bouton de blocage de la tête à rotule.
Ne rattachez pas d’accessoires à la
caméra après l’avoir montée sur
la tête à rotule. La tête à rotule
pourrait basculer et endommager
la caméra.
Lorsque vous montez la caméra,
ˎ
faites attention à ce que cet article
ne tombe pas.
Ne fixez pas directement la caméra à
ˎ
la vis de raccordement du monopied
ou du mini-trépied.
Lorsque vous utilisez cet article
ˎ
comme monopied ou support,
veillez à passer la main dans la
sangle du monopied et à retenir la
caméra ou cet article avec la main.
Si vous posez un long objectif sur la
caméra, faites très attention car cet
article risque d’être déséquilibré.
Serrez et bloquez bien les pièces
ˎ
devant être serrées : chaque bouton
de blocage, levier, verrou de réglage
de longueur des pieds, vis de
caméra, etc.
Après avoir monté la caméra, ne
ˎ
balancez pas le tout et ne l’inclinez
pas.
Lorsque vous allongez ou
ˎ
raccourcissez le monopied ou
les pieds du mini-trépied, faites
attention de ne pas vous pincer les
doigts, etc.
Lorsque vous desserrez le bouton
ˎ
de blocage de la tête à rotule
pour incliner celle-ci, il peut
sembler bloqué. Ce n’est pas une
défectuosité. Desserrez le bouton
de blocage de la tête à rotule d’une
main ferme.
Ne sautez pas ou ne courez pas ˎ
lorsque vous utilisez l’étui de
transport comme support. Sinon,
le monopied risque d’être éjecté
du support de l’étui de transport,
endommagé ou de vous blesser.
Lorsque vous posez cet article
ˎ
sur le sol, faites attention à ce que
personne ne marche dessus.
Lorsque vous utilisez cet article
ˎ
comme support, ne réglez pas un
pied du mini-trépied en posant
votre pied dessus. Ceci pourrait
endommager cet article. (Voir
l’illustration )
Lorsque vous utilisez cet article
ˎ
comme monopied ou support, si
vous le transportez avec la caméra
montée dessus, tenez bien le
monopied et la caméra avec les
mains.
Entretien
Quand cet article est sale, nettoyez- ˎ
le avec un chiffon doux légèrement
humidifié d’un liquide de nettoyage
léger. Ensuite, essuyez-le avec un
chiffon sec.
Après avoir utilisé cet article à la
ˎ
plage ou à un endroit exposé à l’air
marin, essuyez-le bien avec un
chiffon sec.
Spécifications
Poids total de la caméra et des
accessoires fixés
Maximum 2 kg (4 lb 7 oz)
Monopied
Dimensions
Hauteur maximale:
Environ 1 475 mm
(58 1/8 po.)
Hauteur minimale :
Environ 460 mm
(18 1/8 po.)
Poids Environ 575 g
(1 lb 4 oz)
Extension du pied
Le pied consiste en 5 tubes
télescopiques.
Support
Dimensions
Hauteur maximale :
Environ 1 535 mm
(60 1/2 po.)
Hauteur minimale :
Environ 585 mm
(23 1/8 po.)
Poids Environ 935 g
(2 lb 1 oz)
Mini-trépied
Dimensions
Hauteur maximale :
Environ 270 mm
(10 3/4 po.)
Hauteur minimale :
Environ 215 mm
(8 1/2 po.)
Poids Environ 505 g
(1 lb 2 oz)
Extension des pieds
Chaque pied consiste en 2
tubes télescopiques.
Articles inclus
Ensemble Multipied (1)
Étui de transport servant de support
(1)
Pochette de transport (1)
Jeu de documents imprimés
La conception et les spécifications
peuvent être modifiées sans préavis.
Antes de utilizar el producto, lea
detenidamente este manual y
consérvelo para realizar consultas en
un futuro.
El multipié VCT-MP1 (a partir de
ahora “esta unidad”) se compone
de una cabeza de rótula, un
monópode, un minitrípode, y una
funda de transporte suministrada
con función de soporte. Estos
elementos se ensamblan y fijan a una
videocámara, cámara digital de lentes
intercambiables, o cámara fotográfica
digital (a partir de ahora “cámara”).
Esta unidad puede utilizarse de varias
formas, de acuerdo con la situación,
para ayudar a tomar fotos durante
muchas horas.
Nombre del producto:
Multipié
Modelo:
VCT-MP1
POR FAVOR LEA
DETALLADAMENTE ESTE
MANUAL DE INSTRUCCIONES
ANTES DE CONECTAR Y OPERAR
ESTE EQUIPO.
RECUERDE QUE UN MAL USO DE
SU APARATO PODRÍA ANULAR
LA GARANTÍA.
Atención para los clientes en
Europa
Aviso para los clientes de
países en los que se aplican las
directivas de la UE
El fabricante de este producto es
Sony Corporation, 1-7-1 Konan
Minato-ku Tokyo, 108-0075, Japón.
El representante autorizado en lo
referente al cumplimiento de la
directiva EMC y a la seguridad de
los productos es Sony Deutschland
GmbH, Hedelfinger Strasse 61, 70327
Stuttgart, Alemania. Para resolver
cualquier asunto relacionado con el
soporte técnico o la garantía, consulte
las direcciones que se indican en los
documentos de soporte técnico y
garantía suministrados por separado.
Características
Esta unidad se compone de una
cabeza de rótula, un monópode,
un minitrípode, y una funda de
transporte con función de soporte.
Combinando estos elementos, podrá
utilizarla de varias formas.
Utilizando la combinación del
ˎ
monópode ya la funda de transporte
con función de soporte, el peso
de su cámara y de los accesorios
fijados se distribuirá en su hombro,
reduciendo la carga sobre sus
brazos. Podrá grabar imágenes
fácilmente, incluso desde un ángulo
elevado o mientras se mueva.
También podrá utilizarla como
ˎ
monópode, sin la funda de
transporte.
Podrá utilizarla como pedestal
ˎ
de soporte, incluso en lugares
demasiado angostos para un
trípode.
Utilizándola como minitrípode,
ˎ
podrá realizar grabaciones con
ángulo bajo y tomas estables en
macro.
Identificación de las
partes
Cabeza de rótula
Tornillo de montaje de cámara
Palanca de bloqueo de la zapata de
montaje de la cámara
Orificio roscado de conexión
Zapata de montaje de la cámara
Cabeza de rótula
Mando de bloqueo de la cabeza de
rótula
Monópode
Tornillo de conexión
Correa de mano
Orificio auxiliar de liberación
Orificio roscado de conexión
Empuñaduras de bloqueo
Mando de ajuste de la longitud de
la pata
Minitrípode
Tornillo de conexión
Mando de ajuste de la apertura de
las patas
Orificio de montaje de la punta de
caucho de la pata
Pie de caucho
Punta de caucho de la
pata
Preparación de esta
unidad
Combine la cabeza de rótula, el
monópode, y la punta de caucho de la
pata en varias formas de acuerdo con
su situación de toma de fotos.
Cuando monte o desmonte la cabeza
de rótula, apriete firmemente el
mando de bloqueo de la cabeza de
rótula.
- Utilización como
monópode
Combine la cabeza de rótula (),
el monópode (), y la punta de
caucho de la pata ().
- Utilización como
pedestal de soporte
Combine la cabeza de rótula (),
el monópode (), el minitrípode
(), y la punta de caucho de la
pata ().
Cuando utilice esta unidad como
pedestal de soporte, despliegue las
patas del minitrípode y colóquelo en
posición baja. (Consulte la ilustración
-.)
Con respecto a los detalles sobre la
posición baja, consulte “ Ajuste del
ángulo de apertura de las patas del
minitrípode”.
- Utilización como
minitrípode
Combine la cabeza de rótula (),
el minitrípode (), y la punta de
caucho de la pata ().
Cuando utilice el minitrípode, quite
la punta de caucho de la pata si es
innecesaria.
Montaje de la cámara
Coloque la batería y el casete, u otro
medio de grabación, en la cámara
antes de montarla en esta unidad.
1 Gire la palanca de bloqueo
de la zapata de montaje de la
cámara hacia la izquierda, y
retire la zapata de montaje de
la cámara.
2 Fije la zapata de montaje de la
cámara a la cámara.
Alinee el tornillo de montaje de la
cámara con el orificio roscado de
debajo de la cámara, y apriételo
firmemente girándolo hacia la
derecha con una moneda, etc.
3 Fije la cámara a la cabeza de
rótula.
Comenzando desde el borde
de la zapata de montaje de la
cámara, coloque la cámara en
la cabeza de rótula, y después
presione la parte superior de la
cámara. Cuando la cámara se
fije a la cabeza de rótula, oirá
un chasquido.
Gire la palanca de bloqueo
de la zapata de montaje de la
cámara hacia la derecha para
bloquear la cámara.
Notas
Podrá fijar la cámara y accesorios ˎ
con un peso máximo total de 2 kg
(límite de peso) No fije cosas que
pesen más de 2 kg en total.
Desmontaje de la cámara
Para desmontar, invierta los pasos
realizados para el montaje.
Ajuste de la longitud de
la pata del monópode y
las patas del minitrípode
Puede ajustar la longitud de la
pata del monópode y las patas del
minitrípode.
Ajuste de la longitud del
monópode
1 Sujete el mando de ajuste de
la longitud de la pata, y gírelo
hacia la izquierda.
Aflójelo girando hasta que
chasquee cuatro veces.
2 Ajuste la pata a la longitud
deseada.
También puede ajustar la longitud
en cuatro lugares utilizando las
empuñaduras de bloqueo. Cuando
extienda la pata, hágalo desde la
parte gruesa.
3 Sujete el mando de ajuste
de la longitud de la pata, y
gírelo hacia la derecha para
bloquearlo firmemente.
Notas
Cuando ajuste la longitud de la pata, ˎ
tenga cuidado de que el mando de
ajuste de la longitud de la pata no
pille la mano con la que lo sujete.
Cuando utilice esta unidad como
ˎ
pedestal de soporte, ajuste la
longitud de la pata del monópode
y las patas del minitrípode antes de
combinarlos.
Cuando bloquee la longitud de
ˎ
la pata, no apriete demasiado el
mando de ajuste de ajuste de la
longitud de la pata. Si no puede
aflojarlo, fije la punta de caucho
de la pata al orificio auxiliar
de liberación del monópode, y
utilice un paño para poder sujetar
con mayor fuerza el monópode.
(Consulte la ilustración -.)
Ajuste de la longitud de las
patas del minitrípode
1 Sujete el pie de caucho, y
gírelo hacia la izquierda.
2 Ajuste la pata a la longitud
deseada.
3 Sujete el pie de caucho, y
gírelo hacia la derecha para
bloquearlo firmemente.
Notas
Cuando ajuste la longitud de ˎ
las patas del minitrípode, tenga
cuidado de que la cámara no pierda
el equilibrio.
Ajuste de la
orientación de la
cámara.
1 Afloje el mando de bloqueo de
la cabeza de rótula.
2 Ajuste la cabeza de rótula al
ángulo deseado.
También puede ajustar la
orientación de la cabeza de rótula.
3 Apriete el mando de bloqueo
de la cabeza de rótula.
Notas
Cuando afloje el mando de bloqueo ˎ
de la cabeza de rótula, sujete
siempre la cámara con una mano.
Cuando utilice esta unidad como
ˎ
pedestal de soporte, no gire ni
incline el monópode.
Ajuste del ángulo de
apertura de las patas
del minitrípode
- Posición baja
1 Cierre las patas del
minitrípode.
2 Deslice el mando de ajuste de
la apertura de las patas hacia
la derecha hasta que chasquee
y se pare.
3 Despliegue completamente las
patas.
- Posición semi-baja
Cierre lentamente las patas desde
la posición baja.
El mando de ajuste de la apertura
ˎ
de las patas se deslizará hacia
la izquierda, y chasqueará
automáticamente en su lugar. Ésta
es la posición semi-baja.
- Posición estándar
Cierre las patas desde la posición
semi-baja.
El mando de ajuste de la apertura
ˎ
de las patas se deslizará hacia la
izquierda, y volverá a chasquear
automáticamente en su lugar. Ésta
es la posición estándar.
Si cierra completamente las patas,
ˎ
y después las abre hasta que se
paren, ésta será también la posición
estándar.
Cuando ajuste el ángulo de apertura
ˎ
de las patas del minitrípode, tenga
cuidado de que la cámara no pierda
el equilibrio.
Cuando utilice el minitrípode, quite
ˎ
la punta de caucho de la pata si es
innecesaria.
Utilización de la
funda de transporte
con función de
soporte
Almacenamiento del
pedestal de soporte o del
monópode
Cuando haya utilizado esta unidad
como pedestal de soporte o como
monópode, acorte la longitud de
la pata del monópode y las patas
del minitrípode, y después podrá
guardarla.
- Almacenamiento del
pedestal de soporte
- Almacenamiento del
monópode
Pliegue la funda de transporte como
se muestra en la ilustración, y apriete
el broche.
- Utilización como
soporte de la cámara
Cuelgue la funda de transporte con
función de soporte en su hombro.
Coloque el monópode en la
cartuchera de la funda de transporte.
El peso de la cámara y de esta
unidad se distribuirá en su hombro,
reduciendo la carga sobre sus manos.
Ésta es una forma de utilización como
soporte de la cámara.
1 Comenzando desde la posición
de -, pliegue la funda de
transporte como se muestra en
la ilustración, y apriete con el
cierre velcro.
2 Pliegue la parte superior de la
funda de transporte, y apriete
el broche.
3 Retire el gancho de correa del
anillo en D, y fíjelo en el aro
en D de la parte indicada en la
ilustración.
4 Cuelgue la correa de la funda
de transporte cruzada sobre su
pecho, y ajuste su longitud.
5 Coloque la base del monópode
en la cartuchera de la funda de
transporte.
Guarde el minitrípode
desmontado en el bolsillo
suministrado.
Notas
No utilice la unidad de esta ˎ
forma cuando haya una persona
o cosa directamente debajo de la
cámara. Si la cámara no estuviese
adecuadamente montada y
cayese, podría causar lesiones,
a usted o a la otra persona, o
daños materiales. Además, tenga
cuidado de no golpear a personas
o cosas de su alrededor.
Precauciones sobre la
utilización
Cuando monte o desmonte la ˎ
cámara, apriete firmemente y fije
el mando de bloqueo de la cabeza
de rótula. No fije accesorios a la
cámara después de haberla montado
en la cabeza de rótula. Esto podría
hacer que la cabeza de rótula se
inclinase y se dañase la cámara.
Cuando monte la cámara, tenga
ˎ
cuidado de que esta unidad no se
caiga.
No fije la cámara directamente al
ˎ
tornillo de conexión del monópode
ni del minitrípode.
Cuando utilice esta unidad como
ˎ
monópode o pedestal de soporte,
cerciórese de pasar su mano a través
de la correa de mano del monópode,
y de sujetar la cámara o esta unidad
con su mano. Si fija un objetivo
largo a la cámara, esta unidad puede
perder el equilibrio, en cuyo caso
deberá tener especial cuidado.
Coloque y apriete firmemente las
ˎ
partes que haya que apretar: cada
mando de bloqueo, palanca, mando
de ajuste de la longitud de la pata,
tornillo de montaje de la cámara,
etc.
Después de montar la cámara, no
ˎ
balancee toda la unidad ni la encare
hacia abajo.
Cuando alargue o acorte la pata
ˎ
del monópode o las patas del
minitrípode, tenga cuidado de no
pillarse los dedos, etc.
Cuando afloje el mando de bloqueo
ˎ
de la cabeza de rótula, es posible que
lo note pegado. Esto no significa
mal funcionamiento. Afloje el
mando de bloqueo de la cabeza
de rótula aplicando firmeza con la
mano.
No salte ni corra cuando lleve
ˎ
puesta la funda de transporte con
función de soporte. Si lo hiciese,
el monópode podría salirse de la
cartuchera de la funda de transporte
y causar mal funcionamiento o
lesionarle.
Cuando coloque esta unidad en
ˎ
el suelo, cerciórese de que nadie
tropiece con ella.
Cuando utilice esta unidad como
ˎ
pedestal de soporte, no la apoye
sobre una pata del minitrípode para
ajustarla. Esto podría dañar esta
unidad. (Consulte la ilustración
.)
Cuando utilice esta unidad como
ˎ
monópode o pedestal de soporte,
si la lleva con la cámara montada,
sujete tanto el monópode como la
cámara con las manos.
Mantenimiento
Cuando la unidad se ensucie, ˎ
límpiela con un paño suave
ligeramente humedecido en un
líquido de limpieza suave. Después,
frótela con un paño seco.
Después de haber utilizado esta
ˎ
unidad en una playa o en un lugar
sometido a la brisa marina, frótela
bien con un paño seco.
Especificaciones
Peso total de la cámara y los
accesorios instalados
2 kg como máximo
Monópode
Dimensiones
Altura máxima:
Aprox. 1 475 mm
Altura mínima:
Aprox. 460 mm
Peso Aprox. 575 g
Extensión de la pata
La pata tiene 5 ejes
telescópicos
Pedestal de soporte
Dimensiones
Altura máxima:
Aprox. 1 535 mm
Altura mínima:
Aprox. 585 mm
Peso Aprox. 935 g
Minitrípode
Dimensiones
Altura máxima:
Aprox. 270 mm
Altura mínima:
Aprox. 215 mm
Peso Aprox. 505 g
Extensión de las patas
Las patas tienen 2 ejes
telescópicos
Elementos incluidos
Cuerpo principal del multipié (1)
Funda de transporte con función de
soporte (1)
Bolsillo (1)
Juego de documentación impresa
El diseño y las especificaciones están
sujetos a cambio sin previo aviso.
1
2
3
使用本产品前,请通读本说
明书,并妥善保存,以备今
后参考。
多功能脚架 VCT-MP1(以
下简称“本装置”)由球
头、独脚架、小型三脚架及
具有支撑作用的便携包(随
附)组成。它们将被安装在
摄像机、可更换镜头数码相
机或数码相机(以下简称
“摄像机”)上。您可以根
据情况以不同的方式使用本
装置,从而满足长时间拍摄
的需要。
特性
本装置由球头、独脚架、小
型三脚架及具有支撑作用的
便携包组成。组合方式不
同,用途也各异。
将独脚架与具有支撑作用的
便携包组合在一起使用时,
摄像机及所安装附件的重量
会分布到肩膀上,从而减少
手臂的负载。即使在移动中
或以高角度拍摄时,也可轻
松记录下图像。
您还可以将本装置用作独脚
架,无需使用便携包。
本装置可用作支架,即便对
空间过窄而无法使用三脚架
的场所也是如此。
用作小型三脚架时,可进行
低角度拍摄,并可确保微距
拍摄的稳定性。
部件识别
球头
摄像机安装螺钉
摄像机安装座锁定杆
安装螺钉孔
摄像机安装座
球头
球头锁定旋钮
独脚架
安装螺钉
腕带
松紧辅助孔
安装螺钉孔
锁定手柄
支架腿长度调节旋钮
小型三脚架
安装螺钉
支架腿开角调节旋钮
橡胶腿端头安装孔
橡胶底座
橡胶腿端头
准备本装置
通过球头、独脚架、小型三
脚架与橡胶腿端头的不同组
合,可以满足拍摄场景的需
要。
安装或拆卸球头时,应牢牢
地拧紧球头锁定旋钮。
- 用作独脚架
将球头 ()、独脚架 ()
与橡胶腿端头 () 组合在一
起使用。
- 用作支架
将球头 ()、独脚架 ()、
小型三脚架 () 与橡胶腿端
头 () 组合在一起使用。
用作支架时,请展开小型三
脚架的支架腿并将其固定于
低位(参见图 -)。
有关低位的详细信息,请参
阅“ 调节小型三脚架的支
架腿开角”。
- 用作小型三脚架
将球头 ()、小型三脚架
() 与橡胶腿端头 () 组
合在一起使用。
使用小型三脚架时,如果不
需要橡胶腿端头,请将其卸
下。
安装摄像机
在将摄像机安装至本装置之
前,请先装好电池、录像带
或其他媒体。
1 将球头的摄像机安装座锁
定杆向左转,卸下摄像机
安装座。
2 将摄像机安装座安装到摄
像机上。
将摄像机安装螺钉对准摄
像机下面的螺孔,并用硬
币等沿顺时针方向将其牢
牢地拧紧。
3 将摄像机安装到球头上。
沿摄像机安装座的边
缘将摄像机安装到球头
上,然后按压摄像机顶
部。摄像机安装到球头
上时,您将会听到“咔
嗒”声。
向右推摄像机安装座锁
定杆,将摄像机锁定到
位。
注意
能够安装的摄像机及附件
的总重量最多为 2 kg(限
重)。切勿安装令总重量超
过 2 kg 的物体。
卸下摄像机
卸下摄像机时,请按照与安
装时相反的步骤进行操作。
调节独脚架和小型三脚架
的支架腿长度
您可以调节独脚架和小型三
脚架的支架腿长度。
调节独脚架长度
1 握住支架腿长度调节旋钮
并逆时针转动。
连续转动,直至听到四
次“咔嗒”声,从而将其
松开。
2 调节至所需的长度。
如同时使用锁定手柄,可
按四档调节其长度。展开
时,请从较粗的一端展
开。
3 握住支架腿长度调节旋钮
并顺时针转动,从而将其
牢牢锁定。
注意
调节支架腿长度时,小心不
要让支架腿长度调节旋钮夹
到手。
将本装置用作支架时,请在
组合之前调节独脚架和小型
三脚架的支架腿长度。
锁定支架腿长度时,不要将
支架腿长度调节旋钮拧得过
紧。如果无法松开调节旋
钮,请在独脚架的松紧辅助
孔上安装橡胶腿端头,并用
布增大抓握独脚架时的握持
力(参见图 -)。
调节小型三脚架的支架腿
长度
1 握住橡胶底座并逆时针转
动。
2 调节至所需的支架腿长
度。
3 握住橡胶底座并顺时针转
动,从而将其牢牢锁定。
注意
调节小型三脚架的支架腿
时,小心不要令摄像机失
衡。
调节摄像机方向
1 松开球头的锁定旋钮。
2 调节球头至所需的角度。
也可以调节球头的方向。
3 拧紧球头锁定旋钮。
注意
松开球头锁定旋钮时,请务
必用手握住摄像机。
将本装置用作支架时,请勿
旋转或倾斜独脚架。
调节小型三脚架的支架
腿开角
- 低位
1 合上小型三脚架的支架
腿。
2 向右滑动支架腿开角调节
旋钮,直至听到“咔嗒”
声且不能动为止。
3 完全展开支架腿。
- 半低位
从低位慢慢合上支架腿。
支架腿开角调节旋钮向左滑
动,且自动卡入就位。这就
是半低位。
- 标准位
从半低位合上支架腿。
支架腿开角调节旋钮向左滑
动,且再次自动卡入就位。
这就是标准位。
如果完全合上支架腿,然后
打开直至不能动为止,也能
到达标准位。
调节小型三脚架的支架腿开
角时,小心不要令摄像机
失衡。
使用小型三脚架时,如果不
需要橡胶腿端头,请将其
卸下。
使用具有支撑作用的便
携包
存放支架或独脚架
当用作支架或独脚架时,请
先缩短独脚架和小型三脚架
的支架腿长度,然后收起。
- 存放支架
- 存放独脚架
按图中所示将便携包折叠
好,然后扣紧扣钉。
- 用作摄像机支撑
将具有支撑作用的便携包挎
在肩膀上。将独脚架固定到
便携包的固定器中。摄像机
及本装置的重量将会分布到
肩膀上,从而减少手臂的负
载。这样即可用作摄像机支
撑。
1 从 - 位置开始,沿图
中所示折叠好便携包,然
后用粘扣带将其扣紧。
2 将便携包收叠于顶部位
置,然后扣紧扣钉。
3 从 D 环上取下肩带钩,然
后按图中所示的位置重新
将其安装到 D 环上。
4 将便携包肩带斜挎于胸部
并调节其长度。
5 将独脚架的底座放入便携
包固定器中。
用随附的携带包将卸下的
小型三脚架收好。
注意
当摄像机下有人或其他物
体时,切勿如此使用。如
果摄像机安装不当并跌落
下来,可能会伤及自身或
他人,或者造成损坏。同
时,小心不要撞到旁边的
人或物体。
使用须知
安装或拆卸摄像机时,应牢
牢地拧紧并固定好球头锁定
旋钮。请勿在摄像机安装到
球头之后再向摄像机上安装
附件。否则,可能会导致球
头倾斜并损坏摄像机。
安装摄像机时,小心不要让
本装置翻倒。
切勿将摄像机直接安装在独
脚架或小型三脚架的安装螺
钉上。
将本装置用作独脚架或支架
时,务必让手穿过独脚架的
腕带并用手握住摄像机或
本装置。如果为摄像机安装
长镜头,可能会令本装置失
衡,因此应格外小心。
牢牢地拧紧并固定下列部
件: 每个锁定旋钮、杆、
支架腿长度调节锁定杆、摄
像机螺钉等等。
安装摄像机后,切勿晃动整
个装置或令其面朝下。
伸缩独脚架或小型三脚架的
支架腿时,小心不要夹到手
或其他物体。
松开球头锁定旋钮以倾斜
时,有时会有卡滞感。这并
非故障。请用力松开球头锁
定旋钮。
挎上具有支撑作用的便携包
时,不要跳跃或奔跑。否
则,独脚架可能会从便携包
固定器中松脱,从而造成故
障或人身伤害。
将本装置放在地板上时,确
保不会有人绊倒。
将本装置用作支架时,切勿
踩踏小型三脚架的支架腿将
其固定。否则可损坏本装置
(参见图 )。
将本装置用作独脚架或支架
时,如果在安装摄像机的情
况下携带本装置,应用手同
时握住独脚架和摄像机。
维护
当本装置变脏时,可使用蘸
有少量柔性清洁剂溶液的软
布进行清洁。然后,再用干
布将其擦拭干净。
在海滩或经受海风吹拂的地
方使用本装置后,请用干布
将其擦拭干净。
规格
摄像机及所安装附件的总
重量
最大 2 kg
独脚架
尺寸
最大高度: 约 1475 mm
最小高度: 约 460 mm
质量 约 575 g
支架腿展开级数
支架腿具有 5
节伸缩杆。
支架
尺寸
最大高度: 约 1535 mm
最小高度: 约 585 mm
质量 约 935 g
小型三脚架
尺寸
最大高度: 约 270 mm
最小高度: 约 215 mm
质量 约 505 g
支架腿展开级数
支架腿具有 2
节伸缩杆。
所含物品
多功能脚架主体 (1)
具有支撑作用的便携包 (1)
携带包 (1)
成套印刷文件
设计或规格如有变动,恕不
另行通知。
索尼公司
出版日期:2011 年 11 月