User manual Refrigerator
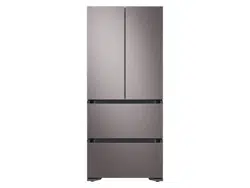
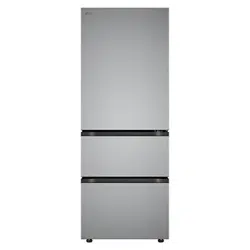
Refrigerator at a glance

- Top compartment
- Door bin
- Cool Keeper
- Middle compartment
- Bottom compartment
- Main panel
- Top compartment drawers
Operations

- Wi-Fi connection indicator
- Ferment (Top / Middle / Bottom) / Turn Off (Top / Middle / Bottom)
- Progress indicator
- Preserve (Top / Middle / Bottom) / Peak Demand Off (Middle)
- Peak Demand Off indicator
- Lock
- Cooling Off
01 Wi-Fi connection indicator ( )
)
- You can connect to a network via the SmartThings app.
- The Wi-Fi icon turns on if the refrigerator successfully connects to the wireless router.
- If the Wi-Fi icon blinks when you open and close the top compartment door, it indicates that the refrigerator is not connected to the SmartThings app. We recommend connecting the refrigerator to the SmartThings app if you see the blinking Wi-Fi icon.
NOTE: You can control and monitor your refrigerator through the SmartThings app. For more information, see the SmartThings section.
02 Ferment (Top / Middle / Bottom compartment) / Turn off (Top / Middle / Bottom compartment)
| Ferment |
Unlock the main panel and press Ferment of the desired compartment to select a ferment mode for kimchi.
- For the top and middle compartment, each time you press Ferment changes the mode in the following order: Slow > Normal.
- For the bottom compartment, each time you press Ferment changes the mode in the following order: Radish Kimchi > Watery Kimchi.
|
| Turn off (3 sec) |
Unlock the main panel and press and hold Ferment of the desired compartment for 3 seconds to turn off the selected compartment.
- To turn on the compartment again, press Ferment or Preserve of the corresponding compartment.
|
03 Progress indicator
The number of remaining days of the selected Ferment or Preserve mode is displayed.
NOTE: The remaining days are only displayed for some of the Preserve modes.
04 Preserve (Top / Middle / Bottom compartment) / Peak Demand Off (Middle compartment)
| Preserve |
Unlock the main panel and press Preserve to select the desired Preserve mode.
- For the top compartment, each time you press Preserve changes the mode in the following order: Regular-Cold > Regular-Cold+ > Regular-Cool > Low Salt-Cold > Low Salt-Cold+ > Low Salt-Cool > Fridge-Cold > Fridge-Cold+ > Fridge-Cool.
- For the middle compartment, each time you press Preserve changes the mode in the following order: Regular-Cold > RegularCold+ > Regular-Cool > Low Salt-Cold > Low Salt-Cold+ > Low Salt-Cool > 1hr Cold+ > Packaged > Freezer-Cold > Freezer-Cold+ > Freezer-Cool > Meat Aging > Meat/Fish > Veg/Fruit > Grain.
- For the bottom compartment, each time you press Preserve changes the mode in the following order: Regular-Cold > RegularCold+ > Regular-Cool > Low Salt-Cold > Low Salt-Cold+ > Low Salt-Cool > 1hr Cold+ > Packaged > Freezer-Cold > Freezer-Cold+ > Freezer-Cool > Meat/Fish > Veg/Fruit > Wine > Root Veg.
|
| Peak Demand Off (3 sec) |
Unlock the main panel and press and hold Preserve of the middle compartment for 3 seconds to turn off the Peak Demand function. |
05 Peak Demand Off indicator
The icon turns on when the Peak Demand function turns off, turns off when the Peak Demand function is on.
06 Lock
With the main panel unlocked, press Lock to lock the main panel. The blue LED indicator on the button turns on when the panel is locked. With the main panel locked, press and hold Lock for 3 seconds to unlock the main panel. The blue LED indicator on the button turns off when the panel is unlocked.
07 Cooling Off
Cooling Off mode (also called Shop mode) is designed for use by retailers when they are displaying refrigerators on a retail floor.
In Cooling Off mode, the refrigerator’s fan motor and lights operate normally, but the compressors do not run, so neither the refrigerator nor the freezer becomes cold. To enter or exit the Cooling Off mode, press and hold Ferment, Preserve (top compartment) and Lock simultaneously for 5 seconds. When the Cooling Off mode is on, the refrigerator chime sounds, and the refrigerator shows “0”, “F”, and “F” on the progress indicator.
NOTE
- If no action is taken for one minute after selecting a mode, the main panel will be locked automatically.
- If you press a button while the main panel is locked, the LED indicator on the Lock button will blink to indicate that the panel is locked.
Using the Ferment mode (Top / Middle / Bottom compartment)
1. Press and hold Lock for 3 seconds to unlock the main panel.
- The blue LED indicator on the button turns off when the panel is unlocked.
- If the desired compartment is off, you must turn on the compartment first. Press Ferment of the corresponding compartment to turn on.
2. Press Ferment of the desired compartment to select the desired Ferment mode.
- For the top and middle compartment, you can select Slow or Normal.
- For the bottom compartment, you can select Radish Kimchi or Watery Kimchi.
3. Press Lock to lock the main panel.
- Once you complete your selection, the main panel will be locked automatically after one minute, even if you do not press Lock. (The blue LED indicator on the button turns on when the panel is locked.)
4. The number of remaining days of the selected Ferment mode is shown on the progress indicator.
- The Normal mode ferments kimchi properly without concern about overfermentation.
- Use the Slow mode to ferment kimchi at a low temperature while enriching the flavor.

5. Once the fermenting process has finished, the refrigerator will enter the Regular-Cold mode. At this point, you will be able to enjoy the fresh taste of aged kimchi.
Using the Preserve mode (Top / Middle / Bottom compartment)
- Press and hold Lock for 3 seconds to unlock the main panel.
- The blue LED indicator on the button turns off when the panel is unlocked.
- If the desired compartment is off, you must turn on the compartment first. Press Ferment or Preserve of the corresponding compartment to turn on.
- Press Preserve of the desired compartment to select the desired Preserve mode.
- Press Preserve of the top, middle, or bottom compartment and select the desired mode from Regular-Cold, Regular-Cold+, Regular-Cool, Low Salt-Cold, Low Salt-Cold+, Low Salt-Cool, 1hr Cold+, or Packaged.
- Press Lock to lock the main panel.
- Once you complete your selection, the main panel will be locked automatically after one minute, even if you do not press Lock. (The blue LED indicator on the button turns on when the panel is locked.)
Using the fridge mode (Top / Middle / Bottom compartment)
You may select one of the fridge modes available to store items such as foods, vegetables, fruits, or beverages.
- Press and hold Lock for 3 seconds to unlock the main panel.
- The blue LED indicator on the button turns off when the panel is unlocked.
- If the desired compartment is off, you must turn on the compartment first. Press Ferment or Preserve of the corresponding compartment to turn on.
- Press Preserve of the desired compartment to select the desired Preserve mode.
- Press Preserve of the top compartment and select the desired mode from FridgeCold, Fridge-Cold+, or Fridge-Cool.
- Press Preserve of the middle or bottom compartment and select Veg/Fruit.
- Press Lock to lock the main panel.
- Once you complete your selection, the main panel will be locked automatically after one minute, even if you do not press Lock. (The blue LED indicator on the button turns on when the panel is locked.)
Using the freezer mode (Middle / Bottom compartment)
You may select one of the freezer modes available to store items such as frozen foods, meat, or fish.
- Press and hold Lock for 3 seconds to unlock the main panel.
- The blue LED indicator on the button turns off when the panel is unlocked. - If the desired compartment is off, you must turn on the compartment first. Press Ferment or Preserve of the corresponding compartment to turn on.
- Press Preserve of the desired compartment to select the desired freezer mode.
- Press Preserve of the middle or bottom compartment and select from Freezer-Cold, Freezer-Cold+, Freezer-Cool or Meat/Fish.
- Press Lock to lock the main panel.
- Once you complete your selection, the main panel will be locked automatically after one minute, even if you do not press Lock. (The blue LED indicator on the button turns on when the panel is locked.)
Using the fresh mode (Middle / Bottom compartment)
You may select one of the fresh modes available to store items such as grains, potatoes/ bananas, and wine.
- Press and hold Lock for 3 seconds to unlock the main panel.
- The blue LED indicator on the button turns off when the panel is unlocked.
- If the desired compartment is off, you must turn on the compartment first. Press Ferment or Preserve of the corresponding compartment to turn on.
- Press Preserve of the desired compartment to select the desired fresh mode.
- Press Preserve of the middle compartment and select Grain.
- Press Preserve of the bottom compartment and select from Wine or Root Veg.
- Press Lock to lock the main panel.
- Once you complete your selection, the main panel will be locked automatically after one minute, even if you do not press Lock. (The blue LED indicator on the button turns on when the panel is locked.)
Using the Meat Aging mode (Middle compartment)
- Press and hold Lock for 3 seconds to unlock the main panel.
- The blue LED indicator on the button turns off when the panel is unlocked.
- If the desired compartment is off, you must turn on the compartment first. Press Ferment or Preserve of the corresponding compartment to turn on.
- Press Preserve of the middle compartment and select Meat Aging.
- Press Lock to lock the main panel.
- Once you complete your selection, the main panel will be locked automatically after one minute, even if you do not press Lock. (The blue LED indicator on the button turns on when the panel is locked.)
- The number of remaining days of the Meat Aging mode is shown on the progress indicator.
- The programmed aging period is 3 days.
- Once the aging process has finished, the refrigerator will enter the Meat/Fish mode.
Turning off a compartment
- Press and hold Lock for 3 seconds to unlock the main panel.
- The blue LED indicator on the button turns off when the panel is unlocked.
- Press and hold Ferment of the desired compartment for 3 seconds.
- The display for the corresponding compartment turns off, except for the Off indicator.
- The Off indicator turns on to indicate the compartment is not in operation.
CAUTION: Do not store anything in the compartment that has turned off.
Turning on the compartment
To turn on the compartment again, press Ferment or Preserve of the corresponding compartment.
SMART GRID Function (Demand Response)
Using the SMART GRID (Demand Response) Function
This feature monitors energy prices and demand information from your utility company and sends notifications to the refrigerator to run high energy consuming tasks during offpeak times when electricity costs and demand are lower.
If the refrigerator receives a control signal from the utility company, the refrigerator will display the DAL (L3) ~ TALR (L4) levels on the refrigerator display and control the power consumption according to the level.
[Exception condition] The DAL and TALR control signals from a utility company work as long as product performance is maintained.
If the refrigerator receives the SMART GRID (Demand Response) signal (DAL or TALR), the refrigerator will operate in Delay Appliance Load (Display:L3) or Temporary Appliance Load Reduction (Display:L4) mode.
- Delay Appliance Load (L3): The refrigerator responds to a DAL signal by providing a moderate load reduction for the duration of the delay period. This function controls functions that consume a lot of energy such as adjusting the Cooling system and running the defrost cycle.
- When the refrigerator operates in DAL (L3) mode, “L3” is displayed on the refrigerator display.
- DAL mode is automatically deactivated after it lasts for the amount of time stipulated by the DAL signal (max. 4.5 hours) or when the Peak Demand Off (Preserve for the middle compartment) button is pressed.
- Temporary Appliance Load Reduction (L4): The refrigerator responds to a TALR signal by aggressively reducing the load for a short time period. This function reduces energy consumption by stopping the compressor and controlling the functions that consume a lot of energy such as the defrost cycle.
- When the refrigerator operates in TALR (L4) mode, “L4” is displayed on the refrigerator display.
- TALR (L4) mode is automatically deactivated after it lasts for the received duration (max. 15 minutes), or when the Peak Demand Off (Preserve for the middle compartment) button is pressed. The mode is immediately deactivated and the refrigerator returns to the normal state when the door is opened or closed, or the dispenser is used.
To check the MAC address

- Press and hold Preserve (Middle compartment) and Lock simultaneously for 6 seconds.
- The entire LEDs on the main panel blink.
- Press Preserve (Top compartment) to display the MAC address.
- The MAC address appears on the progress indicators (of the top and middle compartment), and it will appear sequentially for 1 minute. For example, if the MAC address is “11-22-33-44-55-66”, the progress indicators displays the address for 1 minute in following sequence: "- -", "1 1", "2 2", "3 3", "4 4", "5 5", "6 6", "- -"
- After 1 minute, the main panel stops displaying the MAC address and returns to the normal state.
Peak Demand Off
When you want the refrigerator to ignore the SMART GRID (Demand Response) signal from the utility company, you can turn off the Peak Demand function. When you turn off the Peak Demand function, the refrigerator ignores the SMART GRID (Demand Response) signal and is not controlled by the utility company.
Turning off the Peak Demand function
- Unlock the main panel and press and hold Preserve of the middle compartment for 3 seconds to turn off the Peak Demand function.
- The Peak Demand Off indicator (
 ) turns on. - ‘Or’ is displayed on the progress indicator of the upper and the middle compartment.
- To turn on the Peak Demand function, press and hold Preserve of the middle compartment for 3 seconds again.
- The Peak Demand Off indicator () turns off.
Using the Energy Management Function
The Energy Management function enables you to control and monitor your Energy Management refrigerator using the SmartThings app for your convenience.
NOTE: To use the Energy Management refrigerator functions, you have to install the corresponding app first.
1. Operational Status
- You can check the DR and Peak Demand status.
2. Energy Consumption Reporting
- Shows the accumulated power consumption. Power consumption data is updated every 10 minutes.
3. Delay Defrost Capability
- The Delay Defrost Capability function saves energy by delaying the defrost operation to a time specified by the user. You can configure the time. and this function will save energy during the specified period in a 24 hour cycle. If the time is not set, the function works with the default time settings. The default time settings are below: - 6 am to 10 am: 1st. November ~ 30th. April - 3 pm to 7 pm: 1st. May ~ 31th. October
To change the time setting for the Delay Defrost Capability: You can change the time setting for the Delay Defrost Capability on the app.
Maintenance
Handling and care
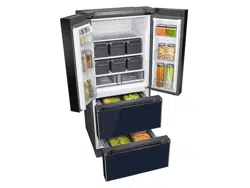
Top compartment
Upper shelf
To remove the shelf, hold the front of the shelf with one hand, and support the back of the shelf with the other hand. Then, pull the shelf to remove.

Check for the correct sides before inserting the shelves back into the place.

CAUTION: Do not put the shelves upside down or reverse the front and back. The metallic/tempered glass shelves are heavy. Be careful when handling them. Mai
Top compartment drawer/lower shelf (applicable models only)
- Hold the handle and pull the drawer. When the drawer is fully out, slightly lift and pull to remove.
- Remove all the top compartment drawers. Hold the front of the shelf with one hand and support the back of the shelf with the other hand. Then, pull the shelf to remove.

Top compartment Airtight Crisper (applicable models only)
1. Pull the top compartment drawer.
2. Push the cover on the drawer to the back, and then spread the part with the rollers outward to separate the cover from the drawer.

3. After the cleaning, align the rollers on the cover and the drawer as shown in the figure and then pull the cover forward to put them back together.

CAUTION: Dropping the metallic plate can cause an injury
Middle compartment
Middle compartment basket

Fully open the middle compartment door, and then lift the basket from the front side to remove.
Bottom compartment
Bottom compartment basket

Fully open the bottom compartment door, and then lift the basket from the front side to remove.
Deodorizer
Top compartment Airtight Crisper (applicable models only)

- Pull the top compartment drawer.
- Locate the deodorizer on top of the drawer. Put your finger in the groove and press and lift to remove.
- After changing the deodorizer, put it back in the reversed order of the disassembly.
Middle and bottom compartment

- Fully open the middle (or bottom) compartment door, and then remove all the kimchi containers.
- Locate the deodorizer on the left side of the basket divider. Put your finger in the groove and press and pull to remove.
- After changing the deodorizer, put it back in the reversed order of the disassembly.
Cleaning
Interior and exterior
WARNING:
- Do not use benzene, thinner, home/car detergent, or Clorox™ to clean the refrigerator. They may damage the surface of the refrigerator and cause a fire.
- Do not spray water onto the refrigerator. It may cause an electric shock
Regularly use a dry cloth to remove all foreign substances such as dust or water from the power plug terminals and contact points.
- Unplug the power cord.
- Use a moistened, soft, lint-free cloth or paper towel to clean the refrigerator’s interior and exterior.
- When done, use a dry cloth or paper towel to dry well.
- Plug the power cord.
Rubber seals
If the rubber seals of a door become dirty, the door may not close properly and reducing refrigerator performance and efficiency. Use a mild detergent and damp cloth to clean the rubber seals. Then, dry well with a cloth.
Rear panel

To keep cords and exposed parts of the rear panel free of dirt, vacuum the panel once or twice a year.
CAUTION: Do not remove the rear panel cover. Electric shock may occur.
The rear of the refrigerator
Remove dust using a vacuum cleaner once a year to improve the product's efficiency.
Deodorizing the refrigerator
Place used coffee grounds inside the refrigerator to effectively remove foul odors
Kimchi containers
- When using the kimchi containers for the first time, the containers can smell of plastic. Use a neutral detergent and a soft sponge to wash them before use.
- To deodorize the used containers, put finely sliced pieces of green leaves inside the containers and leave it for a day with the lids closed. You can also fill the container with rice water for 30 minutes and then scrub with a sponge.
- The color and smell of kimchi in the container may not go away after using it for a long time.
WARNING
- Do not spray water directly on the containers or clean them using a detergent, bleach, acetone, a thinner, alcohol, chloride, or benzene.
- Do not clean the handles using a wet piece of cloth.
CAUTION
- Do not use an abrasive tool such as a brush, scrub, or rough piece of cloth to clean the refrigerator's interior, exterior, metallic container, and metallic plate.
- After cleaning the product, check for a power cord damage, plug overheating, and secure plug connection. Make sure there is no problem.
- Do not put your bare hands under the product. There are sharp parts that can injure you.
- Disassembling or assembling the LED lamp on your discretion can cause damage to the LED lamp.
- Kimchi container lids are not dishwasher-safe. It is for hand-wash only.
- Do not boil kimchi containers and their lids, nor put them in hot water (over 122 °F / 50 °C).
- Kimchi containers and their lids are not dishwasher-safe nor microwave-safe.
Replacement
LED Lamps
To replace the lamps of the refrigerator, contact a local Samsung service center.
WARNING: The lamps are not user-serviceable. Do not attempt to replace a lamp yourself. This can cause electric shock.
Troubleshooting
Temperature
|
Symptom
|
Possible causes
|
Solution
|
|
Fridge/freezer does not operate. Fridge/freezer temperature is warm.
|
• Power cord is not plugged in properly.
|
• Properly plug in the power cord.
|
|
• Temperature control is not set correctly.
|
• Set the temperature lower.
|
|
• Refrigerator is located near a heat source or direct sunlight.
|
• Keep the refrigerator away from direct sunlight or a heat source.
|
|
• Not enough clearance between refrigerator and nearby walls or cabinets.
|
• Make sure there is a gap of at least 2.5 inches (5 cm) between the refrigerator back and sides and any nearby walls or cabinets.
|
|
• Energy Saver mode is activated.
|
• Deactivate Energy Saver mode.
|
|
• The refrigerator is
overloaded. Food is blocking the refrigerator vents.
|
• Do not overload the refrigerator. Do not allow food to block vents.
|
|
An alarm sounds.
|
• Door is not closed properly.
|
• Check the door and close it properly.
|
|
The main panel does not work.
|
• Main panel is locked.
|
• Press and hold Lock for 3 seconds to unlock the main panel, and then try again.
|
|
Strange code is displayed on the progress indicator / The progress indicator blinks
|
• Abnormal temperature detected.
|
• Please consult a Samsung Customer Care Center.
|
|
Fridge/freezer is over-cooling.
|
• Temperature control is not set correctly.
|
• Set the temperature higher.
|
| Interior wall is hot. |
• Refrigerator has heat-proof piping in the interior wall.
|
• To prevent condensation from forming, the refrigerator has heat-proof piping in the front corners. If the ambient temperature rises, this equipment may not work effectively. This is not a system failure.

|
Odors
|
Symptom
|
Possible causes
|
Solution
|
|
Refrigerator has odors.
|
• Spoiled food.
|
• Clean the refrigerator and remove any spoiled food.
|
|
• Food with strong odors.
|
• Make sure strong smelling food is wrapped airtight.
|
Frost
|
Symptom
|
Possible causes
|
Solution
|
|
Frost around the vents.
|
• Food is blocking the vents.
|
• Make sure no food blocks the refrigerator vents.
|
|
Frost on interior walls.
|
• Door is not closed properly.
|
• Make sure food does not block the door. Clean the door gasket.
|
Condensation
|
Symptom
|
Possible causes
|
Solution
|
|
Condensation forms on the interior walls.
|
• If door is left open, moisture enters the refrigerator.
|
• Remove the moisture and do not leave a door open for extended periods of time.
|
|
• Food with high moisture content.
|
• Make sure food is wrapped airtight.
|
SmartThings
|
Symptom
|
Action
|
|
Could not find “SmartThings" in the app market.
|
• The SmartThings app is designed for Android 6.0
(Marshmallow) or later, iOS 10.0 or later, iPhone 6 or later, and is optimized for Samsung smartphones (Galaxy S and Galaxy Note series).
|
|
The SmartThings app fails to operate.
|
• The SmartThings app is available for applicable models only.
• The old Samsung Smart Refrigerator app cannot connect with Samsung Smart Home models.
|
|
The SmartThings app is installed but is not connected to my refrigerator.
|
• You must log into your Samsung account to use the app.
• Make sure that your router is operating normally.
• If you have not connected your refrigerator to the SmartThings App after the app was installed, you must make the connection using the device registration function of the app.
|
|
Could not log into the app.
|
• You must log into your Samsung account to use the app.
• If you don't have a Samsung account, follow the app's onscreen instructions to create one.
|
|
An error message appears when I try to register my refrigerator.
|
• Easy Connection may fail due to the distance from your access point (AP) or electrical interference from the surrounding environment. Wait a moment and try again.
|
|
The SmartThings app is successfully connected to my refrigerator but does not run.
|
• Exit and restart the SmartThings app or disconnect and reconnect the router.
• Unplug the power cord of the refrigerator, and then plug it in again after 1 minute.
|
Smart Grid
|
Symptom
|
Action
|
|
What Do I Need to use the Energy Management and Smart Grid functions?
|
To use the SMART GRID (Demand Response) and Energy Management functions on your refrigerator, you need the following:
Devices
• Wireless access point (router)
• Samsung Energy Management-supported refrigerator
• Smartphone
Registration
• Connect your refrigerator to your home Wi-Fi network.
• Register for the EMS service with your electric company that has an EMS (Energy Management System) supporting SEP (Smart Energy profile).
Application
• Download the SmartThings app from the Google Play Store, Apple App Store, or Samsung Galaxy Apps.
• Install and run the SmartThings app on your smartphone.
|
|
Why isn't the Energy Management function working normally?
|
• Make sure that your home router is operating normally with proper Internet service and connection.
• Make sure that the refrigerator is connected to the AP.
Checkpoints
• Connect your smartphone to the router (AP, Access Point), and then check if you can browse the Internet on the smartphone.
• Check if the Wi-Fi icon on the refrigerator's display is on. If not, connect the refrigerator to the AP.
|
|
Why isn't the Delay Defrost Capability working normally?
|
• Make sure that your home router is operating normally with proper Internet service and connection.
• Make sure that the refrigerator does not display L3 or L4 on the display panel.
|
Do you hear abnormal sounds from the refrigerator?
These sounds are normal.
- When starting or ending an operation, the refrigerator may make sounds similar to a car engine ignition. As the operation stabilizes, the sounds will decrease.

- While the fan is operating, these sounds may occur. When the refrigerator reaches the set temperature, the fan sound will stop.

- During a defrost cycle, water may drip on the defrost heater, causing sizzling sounds

- As the refrigerator cools or freezes, refrigerant gas moves through sealed pipes, causing bubbling sounds.

- As the refrigerator temperature increases or decreases, plastic parts contract and expand, creating knocking noises. These noises occur during the defrosting cycle or when electronic parts are working.

- Due to pressure equalizing when you open and close the refrigerator door, you may hear a whooshing sound.