B8 end of season accessories bag (*not on all models)
B9 end of season dust cover (*not on all models)
B10 stripping foam
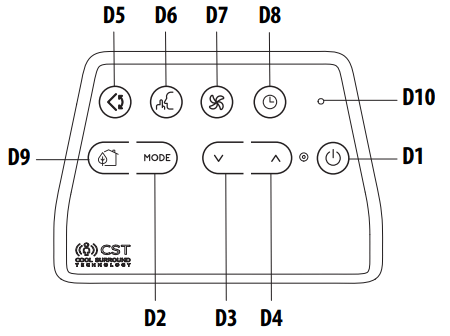
DESCRIPTION OF THE CST REMOTE CONTROL
D1 ON/STAND-BY (on/off) button
D2 MODE button
D3 Decrease button
D4 Increase button
D5 Swing button (flap swing)
D6 ARCTIC WHISPER EXTREME button
D7 Air flow button
D8 Timer button
D9 ECO REAL FEEL button
D10 Indication LED
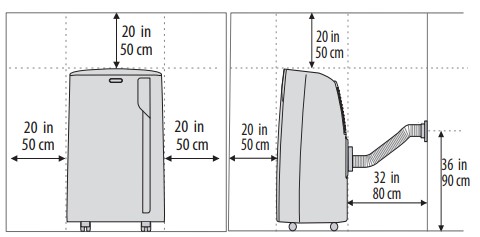
AIR CONDITIONING INSTALLATION
For optimal results see the figures below for the suggested minum distances.
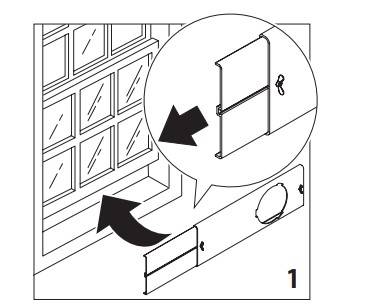
DOUBLE-HUNG WINDOW
Place the window bracket (B5) in the window sill, extend the bracket fully within the window frame (fig. 1).
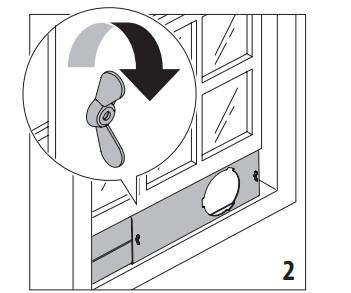
Fix the bracket by the wing nut (fig. 2). Attach the provided stripping foam (B10) to the top of the window bracket and then lower the window onto the bracket. (Should the window bracket be too large for the window the plastic can be cut with a saw by a qualified professional.)
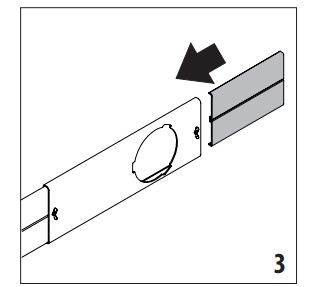
If the windows are large, use additional window bracket (B4) to cover your window aperture, extending it to the required length, then blocking it with the locking wing nut supplied (fig. 3).
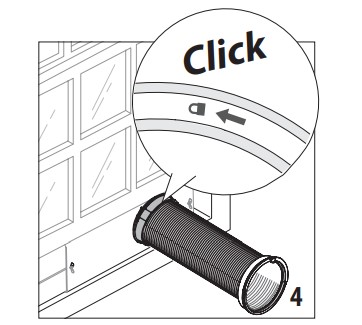
Insert and lock the accessory for window bracket (B1) already assembled to the air exhaust hose, into the slot of the window bracket (fig. 4).
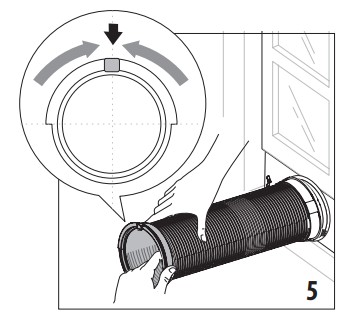
In order to facilitate the fitting of the air exhaust hose (B2) in the relevant housing located on the rear side of the appliance, position the hose adapter‘s tabs (B3) in a vertical axis as shown in fig. 5
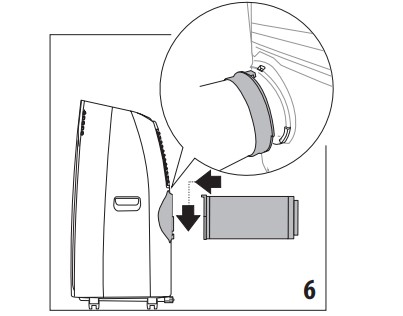
Fit the air exhaust hose (B2) in the relevant housing located on the rear side of the appliance (fig . 6).
SLIDING WINDOWS
Thanks to the locking wing nut, it’s possible to use the window bracket also for sliding windows. Position the hole of the bracket so to allow a correct installation of the exhaust hose.
OPERATING FROM THE CONTROL PANEL
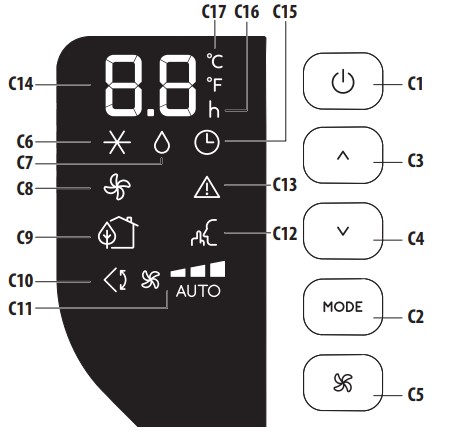
DESCRIPTION OF THE CONTROL PANEL (C)
C1. ON/STAND-BY (on/off) key
C2. Function selection key MODE (air conditioning, dehumidifying, fan)
C3. Increase key
C4. Decrease key
C5. Fan speed selection key (MIN/MED/MAX/AUTO)
C6. Air conditioning symbol
C7. Dehumidifying symbol
C8. Fan symbol
C9. ECO REAL FEEL symbol/status indicator
C10.Swing symbol
C11.Fan speed indicator
C12.ARCTIC WHISPER EXTREME symbol
C13.Alarm symbol
C14.Set temperature values, programmed on/off timer
C15.Timer symbol
C16.Timer indicator
C17.Selected temperature scale indicator
CONTROL PANEL OPERATION
TURNING THE APPLIANCE ON AND OFF
Insert the plug in the socket. Two dashes appear on the display indicating that the appliance is in stand-by.
Touch the (C1) key to turn ON the appliance.
The flap A1 will open after few seconds. When the appliance comes ON the last function set before it was shut off is activated.
Please note: If start-up is not continued, after a few minutes the display light dims in order to reduce energy consumption. To turn the appliance off, touch the key and then pull the plug.
Please note: Never turn off the air conditioner by simply pulling the plug. Touch the key in order to put your air conditioner in stand-by and wait a few minutes before pulling the plug. In this manner, the appliance can perform the operating status checks.
MODES SELECTION
To select the desired operating mode, touch repeatedly the MODE key (C2) until the desired function is selected.
AIR CONDITIONING MODE
This is ideal for hot and humid weather when the room needs to be cooled. This function also helps dehumidify the air.
To correctly set this mode:
Touch repeatedly the MODE key (C2) until the air conditioning symbol appears. The display will show the desired temperature.
To change the temperature to be reached, touch the (C3) or (C4) key.
Select the desired fan speed by touching the (C5) key.
The speeds available are:
Minimum speed: when maximum silent operation is desired.
Medium speed: when the noise level needs to be low but with a good comfort level.
Maximum speed: to reach the desired temperature as soon as possible.
Auto: the appliance automatically chooses the best fan speed based on the temperature select ed and the environmental conditions.
DEHUMIDIFYING MODE
This is ideal for reducing humidity in the room (spring and autumn, damp rooms, rainy periods, etc). For this type of use, the appliance must be set up as for air conditioning mode. That is, the air exhaust hose (B2) must be fitted to the appliance to allow the humidity to be discharged outside.
To correctly set this mode:
Touch repeatedly the MODE key (C2) until the dehumidifying symbol appears
The appliance will automatically choose the best airflow.
FAN MODE
When using this mode, the air exhaust hose (B2) does not need to be attached to the appliance.
To correctly set this mode:
Touch repeatedly the MODE (C2) key until the fan symbol appears
Select the desired air flow by pressing button (C5).
The air flows available are:
Minimum air flow: when most silent operation is desired.
Medium air flow: when the noise level needs to be low but with a good comfort level.
Maximum air flow: for maximum performance.
SELECT THE TEMPERATURE SCALE
The temperature can be displayed in °C or °F. To change the temperature unit of measure touch both the increase (C3) or decrease (C4) keys for about 10 sec.
CLEANING
CLEANING THE APPLIANCE
You should clean the appliance with a slightly damp cloth then dry with a dry cloth. For safety reasons, never wash the air conditioner with water.
Attention! Never use petrol, alcohol or solvents to clean the appliance. Never spray insecticide liquids or similar.
CLEANING THE AIR FILTER
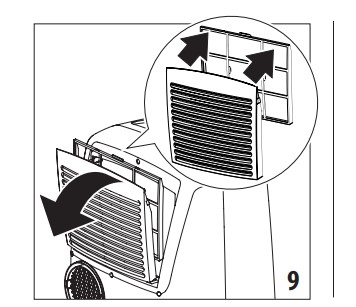
If the filter is dirty, air circulation is compromised and the efficiency of the appliance decreases. It is therefore good practice to clean the filter at regular intervals. The frequency depends on the duration and conditions of operation. If the unit is used constantly or systematically, you are recommended to clean the filter once a week. The filter is housed in the intake grille. To clean the filter, extract as shown in fig. 9.
Use a vacuum cleaner to remove the dust collected on the filter. If it is very dirty, immerse in warm water and rinse a number of times. The water should never be hotter than 104°F. After washing the filter, allow it to dry completely before repositioning it. The filter helps capture dust and pollen.
START OF SEASON CHECKS
Make sure the power cable and plug are undamaged and the electrical outlet is in working order.
Follow the installation instructions precisely
END OF SEASON OPERATIONS
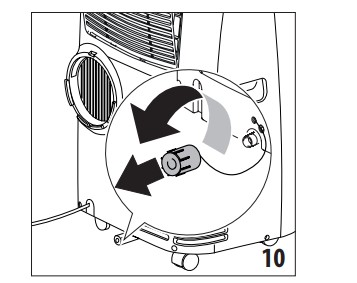
To drain all water from the circuit, remove the external cap by unscrewing it in the counter clockwise direction and allow the water to drain out into a basin (fig. 10).
When the appliance is empty, replace the caps. Clean the filter and dry thoroughly before putting back. In order to properly storage the appliance at the end of the season, we suggest you cover it with the supplied end of season dust cover (B9) and you put the accessories in the relevant end of season accessories bag (B8).
*dust cover and accessories bag only included with some models.
TROUBLESHOOTING
PROBLEM
CAUSE
SOLUTION
The air conditioner does not come ON
it is not plugged into the outlet
plug into the outlet
there is no power
wait for the current to return
the internal safety device has tripped
call the Service Center
The air conditioner works for a short time only
there are bends or kinks in the air exhaust hose
position the air hose correctly, keeping it as short and free of curves as possible to avoid bottlenecks
something is preventing the air from being discharged
check and remove any obstacles obstructing air discharge
The air conditioner works, but does not cool the room
windows, doors and/or curtains open
close doors, windows and curtains, bearing in mind the “TIPS FOR CORRECT USE” given above
there are heat sources in the room (oven, hairdryer, etc
minimize heat sources impact by setting on low or unplugging unnecessary sources
the air exhaust hose is detached from the appliance
fit the air exhaust hose in the housing at the back of the appliance (fig. 6).
filter clogged
clean or replace the filter as described above
During operation, there is an unpleasant smell in the room
filter clogged or dirty
clean the filter as described above
The air conditioner does not operate for about three minutes after restarting it
an internal safety device prevents the appliance from being restarted until three minutes have elapsed since it was last turned off wait. This delay is part of normal operation.
wait. This delay is part of normal operation.
The scripts Lt/Ht/Lh/PF/HL/Ei and the symbol appear on display.
the appliance has a self diagnosis system to identify a number of malfunctions.
#1 Where does the condensation water end up? can you run it to a drain?
This unit features our No-drip technology, which automatically recycles condensation within the unit, helping to prevent any type of leaks.
#2 How narrow can exhaust be? I have 23" wide window. There are two 19" sections for exhaust. Will the exhaust need modification to fit 23" wide windo
This unit includes two brackets that are 19 inches combined, however, an additional 10-inch bracket can be purchased separately to accommodate a bigger size window.
EER determines the energy efficiency class of the machine, however, portable air conditioners are not regulated by the Department of Energy so this does not apply to the portable air conditioner.
The hose diameter is 6" and the hose length is 4 ft.
#5 How does this unit drain humidity from the room?
This unit drains humidity by pulling in air, and separating the moisture from the air. Once achieved, the air is forced back into the room and the moisture is recycled back into the unit.


 (C1) key to turn ON the appliance.
 AIR CONDITIONING MODE
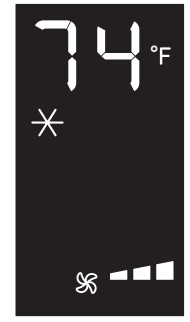
 (C3) or
  (C4) key.
 (C5) key.


 DEHUMIDIFYING MODE


 appear on display.