User Manual Smart TV
Connection
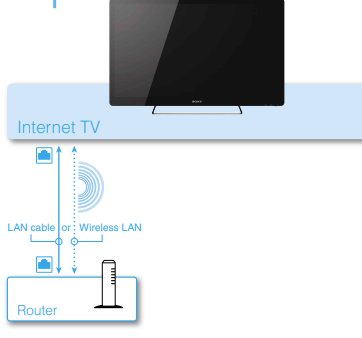
1. Connect to a network
When using wired connection, connect the TV and a router with a LAN cable. When using wireless connection, you need to set the Network Setup in the Initial Setup Wizard (on step 6).
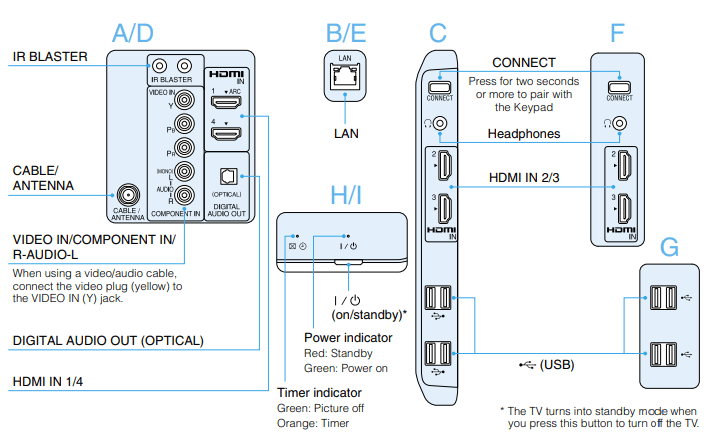
2. Connect the Cable/Satellite Box
Use one of the connection cables illustrated below. Then, place the IR Blaster near the remote sensor of the Cable/Satellite Box.
Place the IR Blaster so that the infrared transmitter points to the remote sensor of the Cable/Satellite Box. For details on the IR Blaster, see “Help Guide” on the back side.
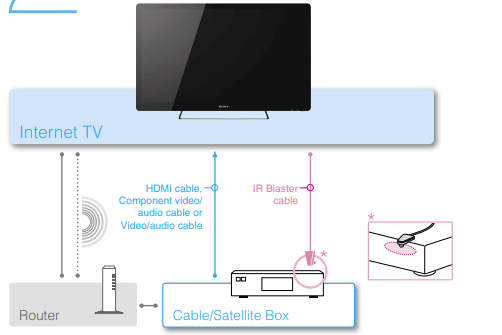
- When connecting the Cable/Satellite Box with an HDMI cable, you can use any HDMI jack on the TV.
- For details of network connection with the Cable/Satellite Box, see the operating instructions supplied with the Cable/Satellite Box.
- You can control a Cable/Satellite Box via the Home Network depending on your Cable/Satellite TV provider. For details, see “Help Guide” on the back side
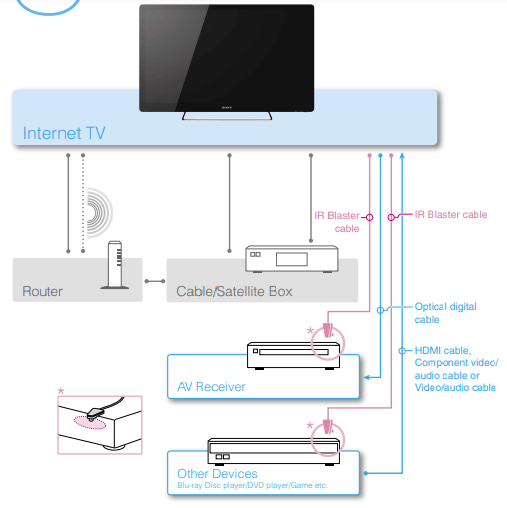
3. Connect other devices
Connect the AV Receiver and other devices to the TV if necessary
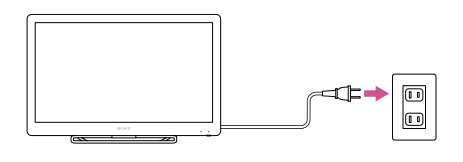
4. Connect to the power source
Plug the TV into the wall outlet.
- Refer to the Table-Top Stand leaflet (supplied) for directions on how to attach the AC power cord (except NSX-24GT1) and the cable cover.
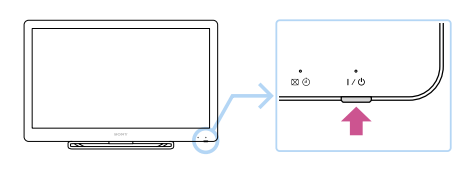
5. Press the  (on/standby) button
6. Start Internet TV setup
Follow the directions of the Initial Setup Wizard displayed on the screen.
- When you skip the Network Setup, only limited functions will be available with the TV.
- The screen may stay dark for several seconds after the Sony logo disappears. Wait for a while until the Initial Setup Wizard is displayed.
- It takes about 15 minutes to complete the Initial Setup.
* This illustration may differ from the actual display
Keypad
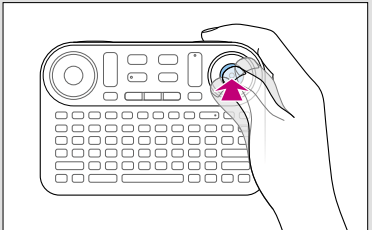
A. OPTICAL FINGER SENSOR (OFS)
Allows you to control the pointer with just your thumb. To operate the pointer, slide your thumb on the OFS. To click, press down on the OFS.
B. SCROLL
Scrolls a page or list. Hold down SCROLL and slide your thumb up and down on the OFS.
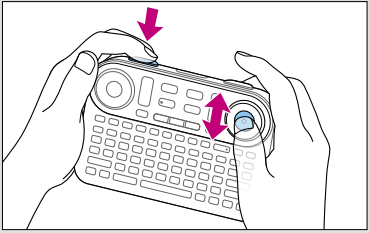
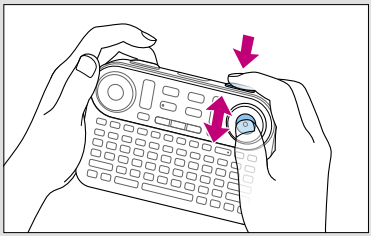
C. ZOOM
Zooms images. Hold down ZOOM and slide your thumb up and down on the OFS.
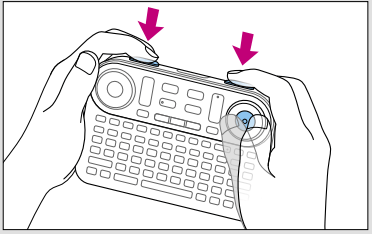
To drag and drop
Hold down SCROLL and ZOOM, and slide your thumb on the OFS.
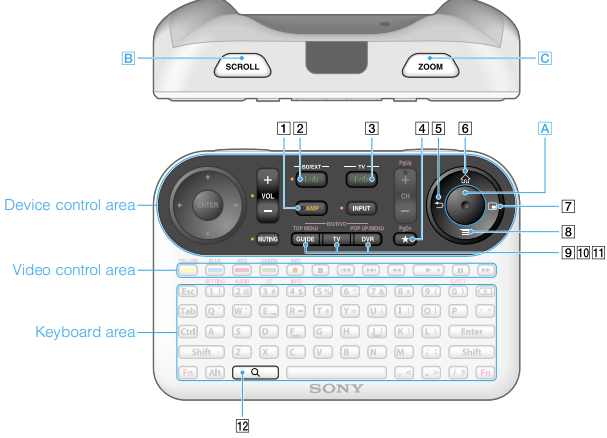
1. AMP : AMP*
Allows you to control the connected AV Receiver. Keys beside orange markers are active when the AMP indicator is on.
2.  ON/STANDBY (BD/EXT)
Turns on the connected device.
3. ON/STANDBY (TV)
Turns on the TV.
4.  BOOKMARK
Bookmarks your favorite content.
5.  BACK
BACK
Returns to the previous display
6.  HOME
HOME
Displays the HOME menu. The HOME menu is a gateway to various contents.
7.  WINDOW
Switches the window style
8.  MENU
MENU
Displays menu items according to applications.
9. GUIDE :GUIDE
Displays the TV Guide.
10. TV : TV
Displays live TV.
11. DVR : DVR
Displays the DVR (Digital Video Recorder) menu.
12. SEARCH
Displays the Quick Search Box. Type your interest in the Quick Search Box, and the TV will suggest contents from various media.
Help Guide
Find out more about the Internet TV
The Help Guide gives you detailed information on how to use the Internet TV as follows:
–Basics of the Internet TV
–How to use applications
–Details on how to use the Keypad
–Customizing settings
–Software Updates
To launch the Help Guide
- From your Internet TV : Select “Help Guide” from the Applications List.
Or, press (SEARCH) and type “help” in the Quick Search Box. Help Guide appears in the search results.
- The network connection is required for accessing the “Help Guide” from the TV.
- From a PC browser
Access the following web
Troubleshooting
Before starting the Initial Setup Wizard
Check the following so that the Initial Setup Wizard operations go smoothly.
–Check whether your home network is a wired or wireless connection.
When Wireless LAN is used
–Check whether the wireless access point device such as a Wireless LAN router supports Wi-Fi Protected Setup (WPS). If WPS is not supported, you will need to make a connection manually.
–Check whether the Push or PIN method is used for WPS.
–Check your SSID and Password if setting up the wireless connection manually.
–Check your ID and Password for your Google Account*.
* You can create a new account in the Initial Setup Wizard.
–Check the Cable/Satellite TV provider name.
–Check the manufacturer name of the device to be connected with the IR Blaster.
Before connecting with a Wireless LAN
Check the following to ensure that the Wireless LAN connection can be made.
- Depending on the surrounding environment, such as the wall material, radio wave receiving condition, or obstacles between this TV and the wireless LAN router, the communication distance may be shortened. Move the TV and the wireless LAN router closer to each other.
- Devices that use a 2.4 GHz frequency band, such as a microwave, Bluetooth, or digital cordless device, may interrupt the communication. Move the TV away from such devices, or turn off such devices
Frequently-asked questions (FAQ)
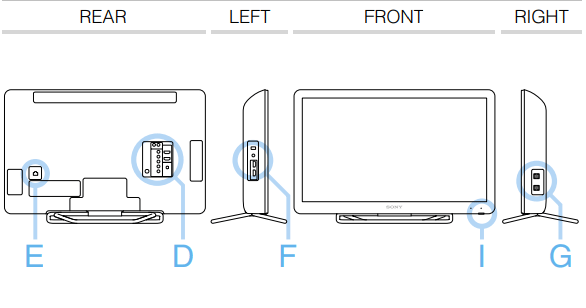
There is no picture (screen is dark).
- Make sure that all the connecting cables are securely connected.
- Make sure that the Power indicator is lit up green.
- If the Power indicator and Timer indicator on the front side are flashing, check the condition of the TV by examining how the Power indicator and Timer indicator on the front side are flashing (numbers of flashes). For details, access the Help Guide.
Tiny black dots and/or bright dots appear on the screen.
- The screen is composed of pixels. Tiny black dots and/or bright dots (pixels) on the screen do not indicate a malfunction.
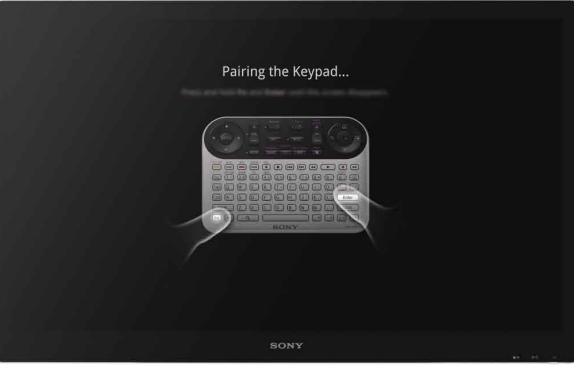
The Keypad does not function (cannot be paired with the TV).
- Operate the Keypad closer to the TV.
- Make sure that the batteries are inserted correctly.
- Hold down the Fn and Enter keys following the instructions on the screen until the pairing screen disappears.
The TV cannot connect to the Internet.
- Make sure that the LAN router or Wireless LAN router is on.
- Check the settings of the LAN router or Wireless LAN router. For details, see the operating instructions supplied with the LAN router or Wireless LAN router.
- Make sure that the LAN cable is connected correctly when using a wired network connection.
- Check your network environment as noted in “Before connecting with a Wireless LAN” when using a wireless network connection.
The TV cannot connect to the Internet after “Wi-Fi Protected Setup (WPS)” is finished.
- The wireless setting of the router may change automatically if you have used the WPS function before. In this case, change the wireless settings of your PC accordingly
For more information about the Internet TV.
Parts and controls
NSX-32GT1/NSX-40GT1/NSX-46GT1

NSX-24GT1
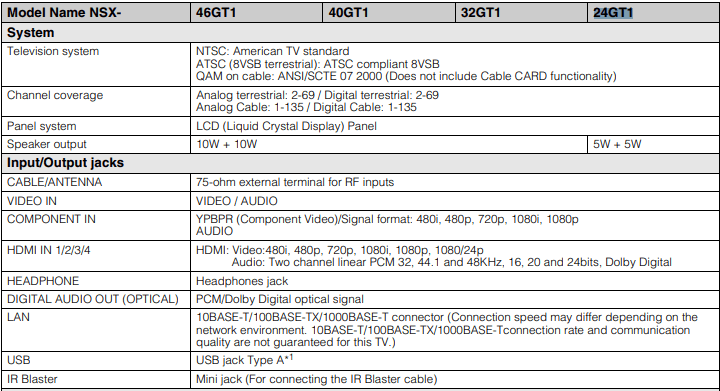
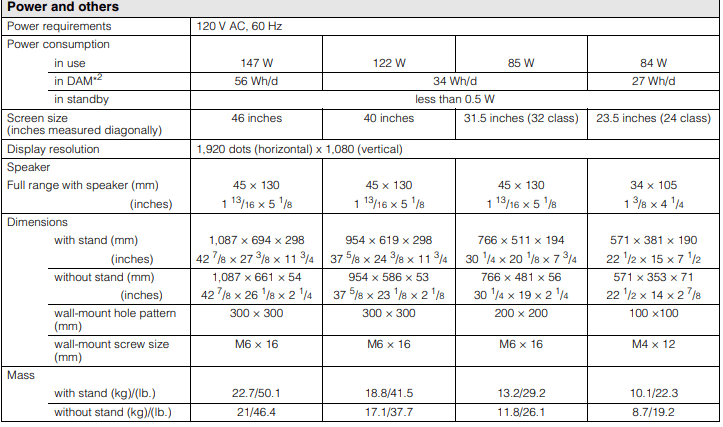
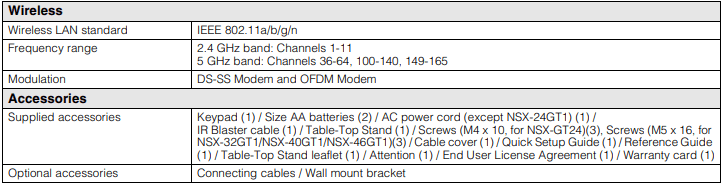
Specifications