1
Video Cassette
Player
©1998 by Sony Corporation
Operating Instructions
Owner’s record
The model and serial numbers are located at the rear of the
unit. Record these numbers in the spaces provided below.
Refer to them whenever you call upon your Sony dealer
regarding this product.
Model No. _________________________
Serial No. _________________________
3-862-516-11 (1)
SVX-800
2
This symbol is intended to alert the user to the
presence of uninsulated “dangerous voltage”
within the product’s enclosure that may be of
sufficient magnitude to constitute a risk of
electric shock to persons.
This symbol is intended to alert the user to the
presence of important operating and
maintenance (servicing) instructions in the
literature accompanying the appliance.
The graphical symbols are on the bottom
enclosure.
To prevent fire or shock hazard, do not expose the
unit to rain or moisture.
Installing
• Allow adequate air circulation to prevent internal
heat buildup.
• Do not place the unit on surfaces (rugs, blankets,
etc.) or near materials (curtains, draperies) that
may block the ventilation slots.
• Do not install the unit near heat sources such as
radiators or air ducts, or in a place subject to direct
sunlight, excessive dust, mechanical vibration or
shock.
• Keep the unit and cassettes away from equipment
with strong magnets, such as microwave ovens or
large loudspeakers.
• Do not place heavy objects on the unit.
• If the unit is brought directly from a cold to a warm
location, moisture may condense inside the VCR
and cause damage to the video head and tape.
When you first install the unit, or when you move
it from a cold to a warm location, wait for about
one hour before operating the unit.
Information
For customers in the USA
CAUTION
You are cautioned that any changes or modifications
not expressly approved in this manual could void
your authority to operate this equipment.
WARNING
This equipment has been tested and found to comply
with the limits for a Class B digital device, pursuant
to Part 15 of the FCC Rules. These limits are
designed to provide reasonable protection against
harmful interference in a residential installation. This
equipment generates, uses, and can radiate radio
frequency energy and, if not installed and used in
accordance with the instructions, may cause harmful
interference to radio communications. However,
there is no guarantee that interference will not occur
in a particular installation. If this equipment does
cause harmful interference to radio or television
reception, which can be determined by turning the
equipment off and on, the user is encouraged to try
to correct the interference by one or more of the
following measures:
– Reorient or relocate the receiving antenna.
– Increase the separation between the equipment and
receiver.
– Connect the equipment into an outlet on a circuit different
from that to which the receiver is connected.
– Consult the dealer or an experienced radio/TV technician
for help.
WARNING
Your VCR and power supply should not be exposed
to rain or moisture. Do not connect the power supply
or operate your VCR if it gets wet. Your VCR has
been designed for outdoor use, however it is not
designed to sustain direct exposure to water, rain,
sleet, snow, sand, dust, or a direct splashing from a
pool or even a cup of coffee. This action could
permanently damage the internal parts of your VCR.
Do not attempt to disassemble this unit. There are no
user serviceable parts inside. Unplug your VCR from
the power supply before cleaning.
Precautions
Safety
• For car battery operation, use the car battery cord
recommended for this set. Do not use any other
car battery cord.
• Disconnect the cigarette lighter plug when your
player is not being used.
• If anything falls into the cabinet, unplug the unit
and have it checked by qualified personnel before
operating it any further.
3
The SVX-800 equipped with the HQ System and is compatible with existing VHS equipment.
Only use those tapes with the mark. It is recommended that only cassette tapes that have
been tested and inspected for use in 2, 4, 6 and 8 hour VCR machines be used.
Table of contents
Supplying Power ................................................... 4
Connecting to TV/Monitor .................................. 4
How to Install the Unit ......................................... 4
Playing a Tape ........................................................ 5
Special Playback Features..................................... 6
LED Display ........................................................... 7
Helpful Notes on Operations ............................... 7
Cleaning Care for Video Heads ........................... 7
Names of Controls ................................................. 8
Specifications ........................................................ 10
Troubleshooting ................................................... 11
4
Install the unit in a horizontal or vertical position,
and fix it securely so that it won't move or fall.
Horizontal installation
Vertical installation
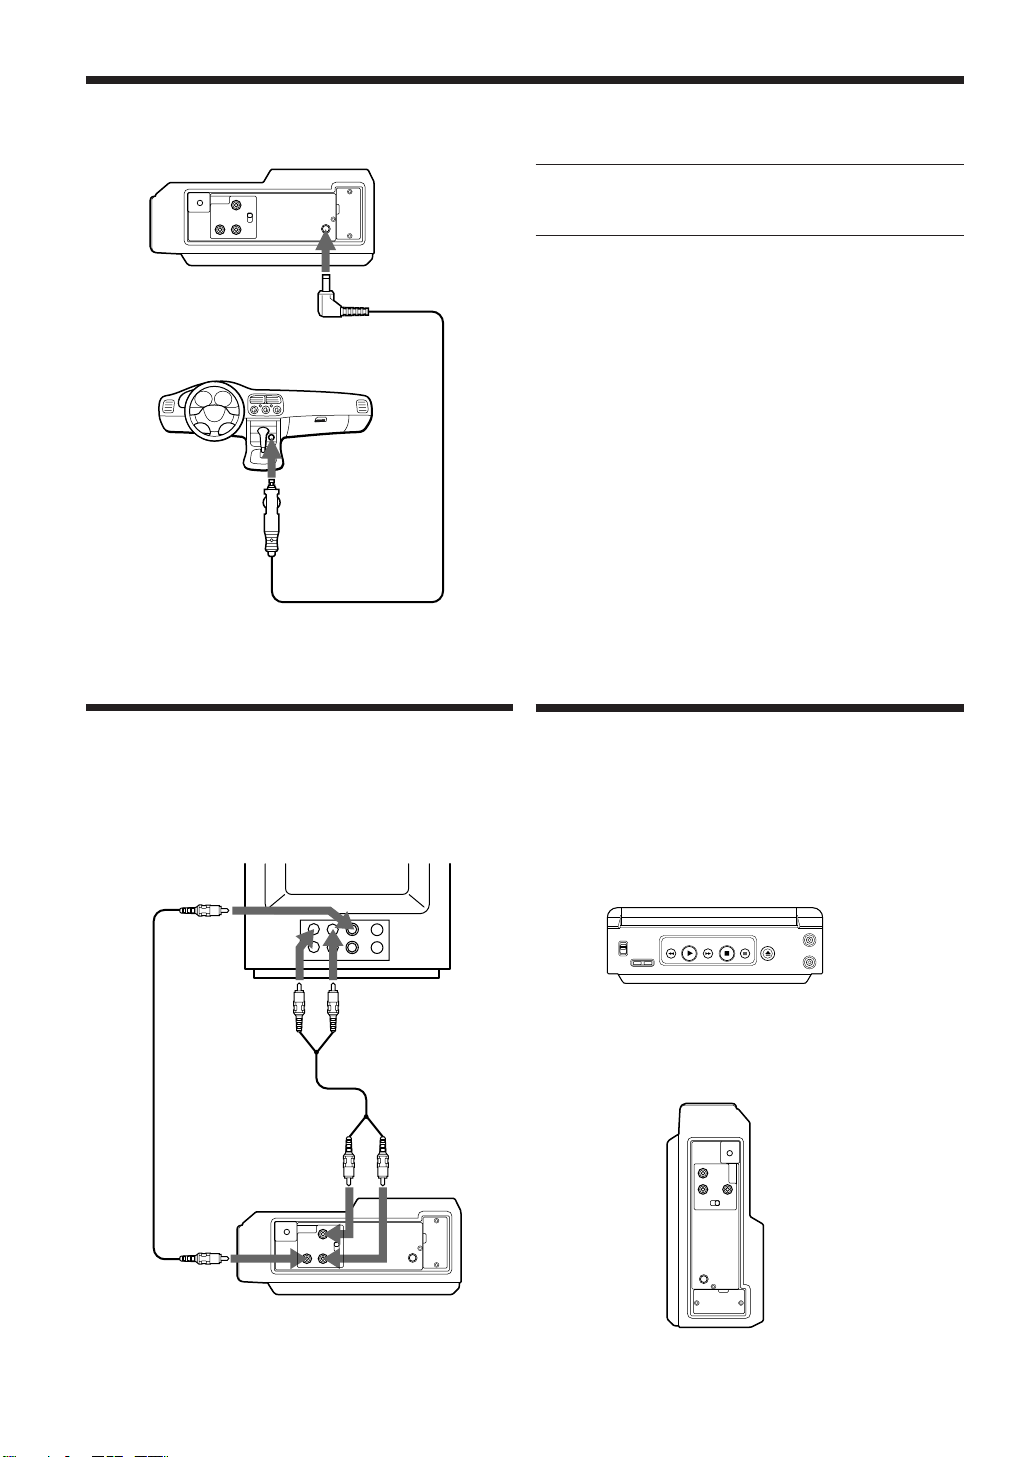
to audio input
jacks
to video input
jack
to AUDIO
OUTPUT L/R
to VIDEO
OUTPUT
Connecting to
TV/Monitor
TV/Monitor
Supplying Power
1 Connect the car battery cord to the DC 12 V jack
of your player.
2 Start your car engine and then insert the car
battery cord plug to your cigarette lighter
socket.
12 V CAR BATTERY
• Use the Sony car battery cord (supplied), and
connect the player DC 12 V jack to the cigarette
lighter socket of a car.
• There is a fuse located in the lighter plug end of the
cord.
Should fuse replacement be necessary use the exact
current rating (in amps).
Note
• Be sure to start your car engine before connecting
the cigarette lighter plug of the car battery cord to
the lighter socket; otherwise, the cigarette lighter
plug fuse may burn out.
to DC 12 V
Cigarette lighter
plug
Car battery cord
(supplied)
to cigarette
lighter socket
(12V)
How to Install the Unit
Audio cord
(not supplied)
Video cord
(not supplied)
5
Before you start...
• Connections are made (see page 4).
• Turn the TV/monitor on.
• Set the TV/monitor to video input.
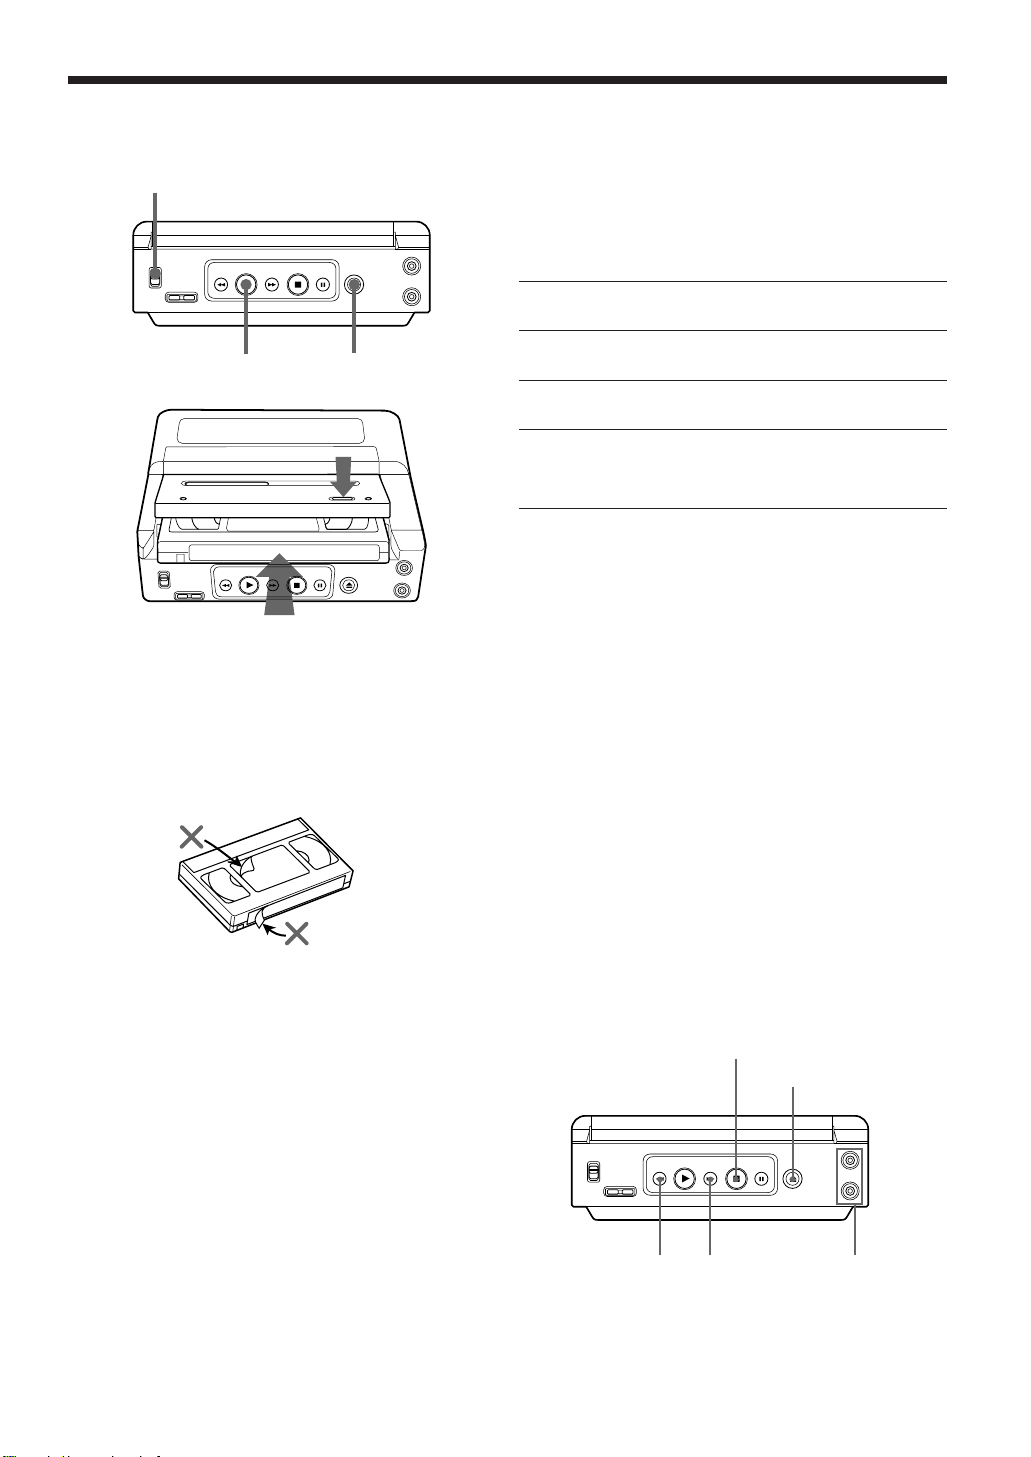
1 Set the POWER switch to ON.
2 Press 6 (eject) on the player to insert a cassette.
3 Insert a cassette.
4 Press the lid to close the tape compartment.
Playback begins if cassette has no record tab .
5 Press ( PLAY to start playback.
Playing a Tape
HEADPHONES 1/2
1
25
3
4
Caution
Please inspect your cassette tape for any loose or
peeling labels as it may become jammed in your unit.
To quickly locate a scene during playback
Press 0 REW or ) FF.
• SP mode tapes have a search speed of 3 times and
SLP mode tapes 9 times the normal speed.
• Some noise bars will appear during search.
To stop playback
Press p STOP.
To eject the cassette
Press 6.
Listening through the headphones
Connect the headphones to HEADPHONES 1/2. No
sound will be reproduced from the speakers.
p STOP
6
0 REW
) FF
6
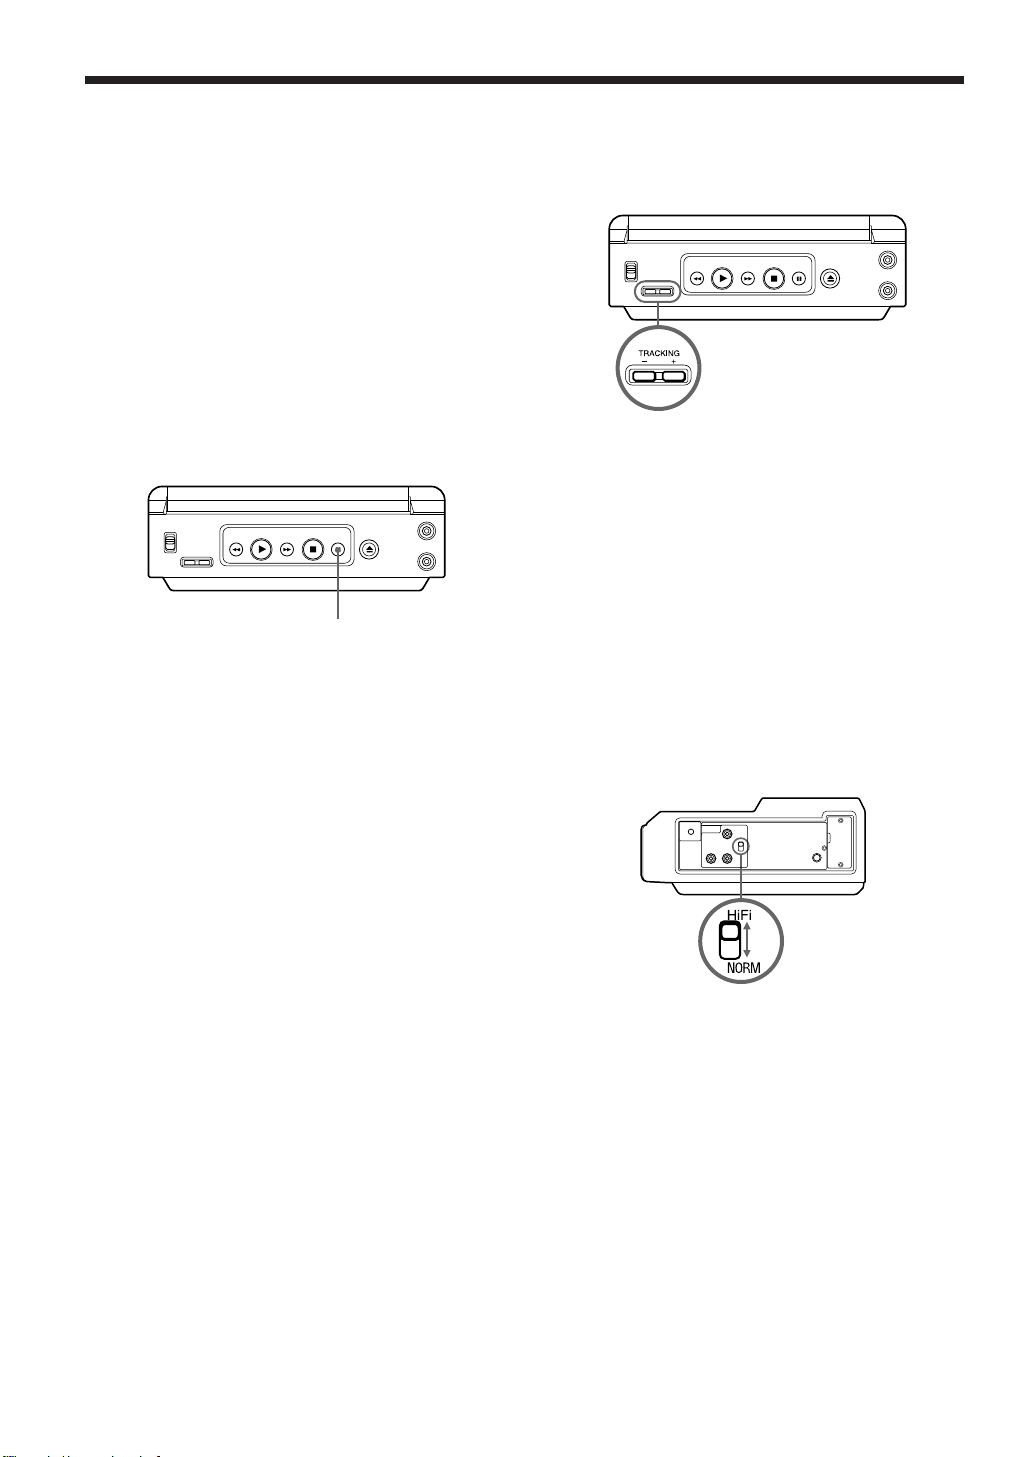
Special Playback Features
Tracking control
Auto tracking
This feature continuously analyzes the signal and
adjusts for optimum picture quality.
Manual tracking control
Use during playback to reduce picture noise.
Press +/– until the picture clears up.
To return to the Auto Tracking mode, press
TRACKING +/– at same time.
VHS Hi-Fi stereo sound system
Both Hi-Fi and normal audio sound are automatically
recorded. To enjoy Hi-Fi audio stereo sound
playback, connect your player to a stereo TV or to
your stereo system.
HiFi Position
Set to this position for normal use. Also when you
want to listen to the Hi-Fi track only of an audio
dubbed recording.
NORM (normal) Position
Set to this position to listen to the normal track only
of an audio dubbed recording.
Special effects during playback
These features work best in SP or SLP mode.
Sound will be muted.
Auto playback
When POWER is ON, the tape will automatically
begin play back if the record tab has been removed.
Auto rewind
After a tape reaches its end during fast forward, the
player will rewind it and go into stop mode.
Pause frame picture
Press P PAUSE to pause the play.
Repeat play
• The player will play to the end of a tape, or until it
reaches a blank portion 5 seconds or more. (Erased
portions of tape are not considered blank.) Then,
the player will automatically rewind the tape and
play it again and again until you cancel repeat play.
• All function buttons (0 REW, ) FF, etc.) are
operational during repeat play.
Features for a quality picture
S-VHS Quasi Playback (SQPB)
This feature allows you to view tapes pre-recorded in
the S-VHS format right on your standard VHS VCR.
The resolution will be that of a standard VHS tape.
P PAUSE
7
If excessive moisture condenses in the unit, it will not
operate and this indicator will flash.
In this case, set the POWER switch to ON and wait
until the indicator no longer flashes.
During DEW, the LED flashes amber.
DEW
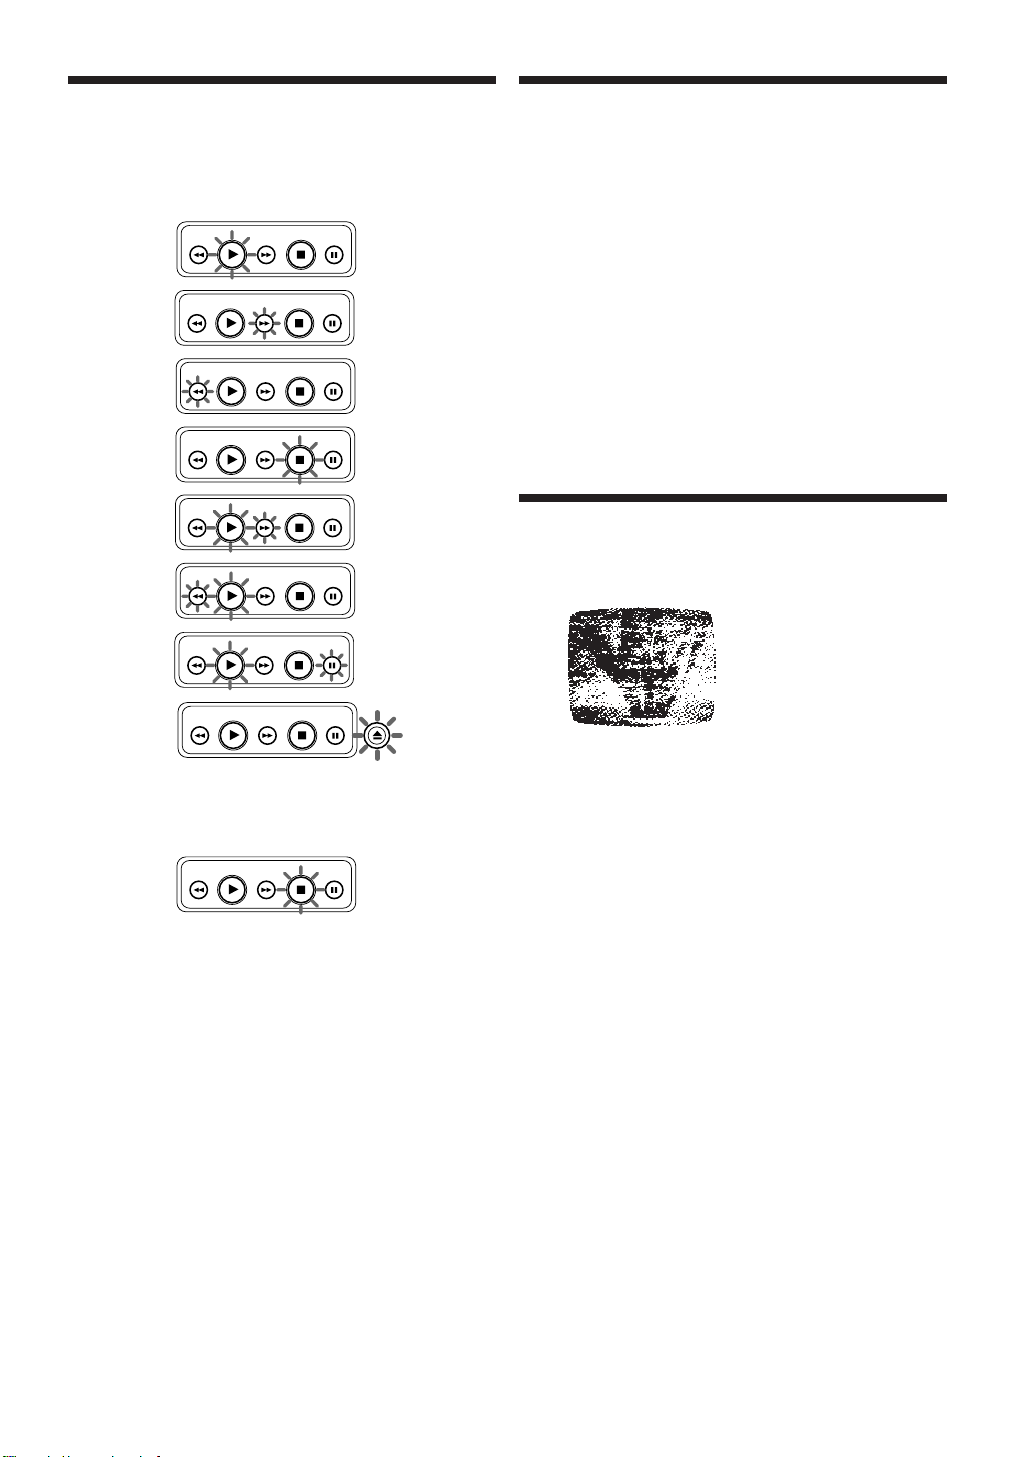
LED Display
During the following operations, the LED changes
from amber to green.
PLAY
STOP
FF
REW
CUE
PAUSE
REV
EJECT
Helpful Notes on
Operations
Special playback peatures
• During search playback, horizontal noise bars will
appear on the TV screen.
• After the player is in the still or recording pause
mode for 5 minutes it will go into the stop mode
automatically to protect the tape and video head.
• The special effects playback feature is intended for
tapes recorded in SP or SLP speed.
Tapes recorded in LP mode can also be viewed in
special effects playback, but the picture may be
completely snowy.
Clogged video heads
Your player will not normally require head cleaning,
however the heads may become clogged when
playing an old or damaged tape.
If the image on your screen resembles the image
shown left during playback, the heads probably
require cleaning.
Cleaning the heads
It is recommended that head cleaning be performed
by a qualified service technician. Please contact your
nearest Sony dealer. An alternate solution is to obtain
a head cleaning cassette. Be sure to follow the
cleaning instructions carefully. Excessive use of a
cleaning cassette could shorten head life. Use this
cassette only when symptoms occur.
Note
The player will rewind a head cleaning cassette
approximately 5 seconds after the cleaning started. In
this case, press p STOP and then ( PLAY to
continue cleaning.
Picture Playback with
Clogged Heads
Cleaning Care for Video
Heads
8
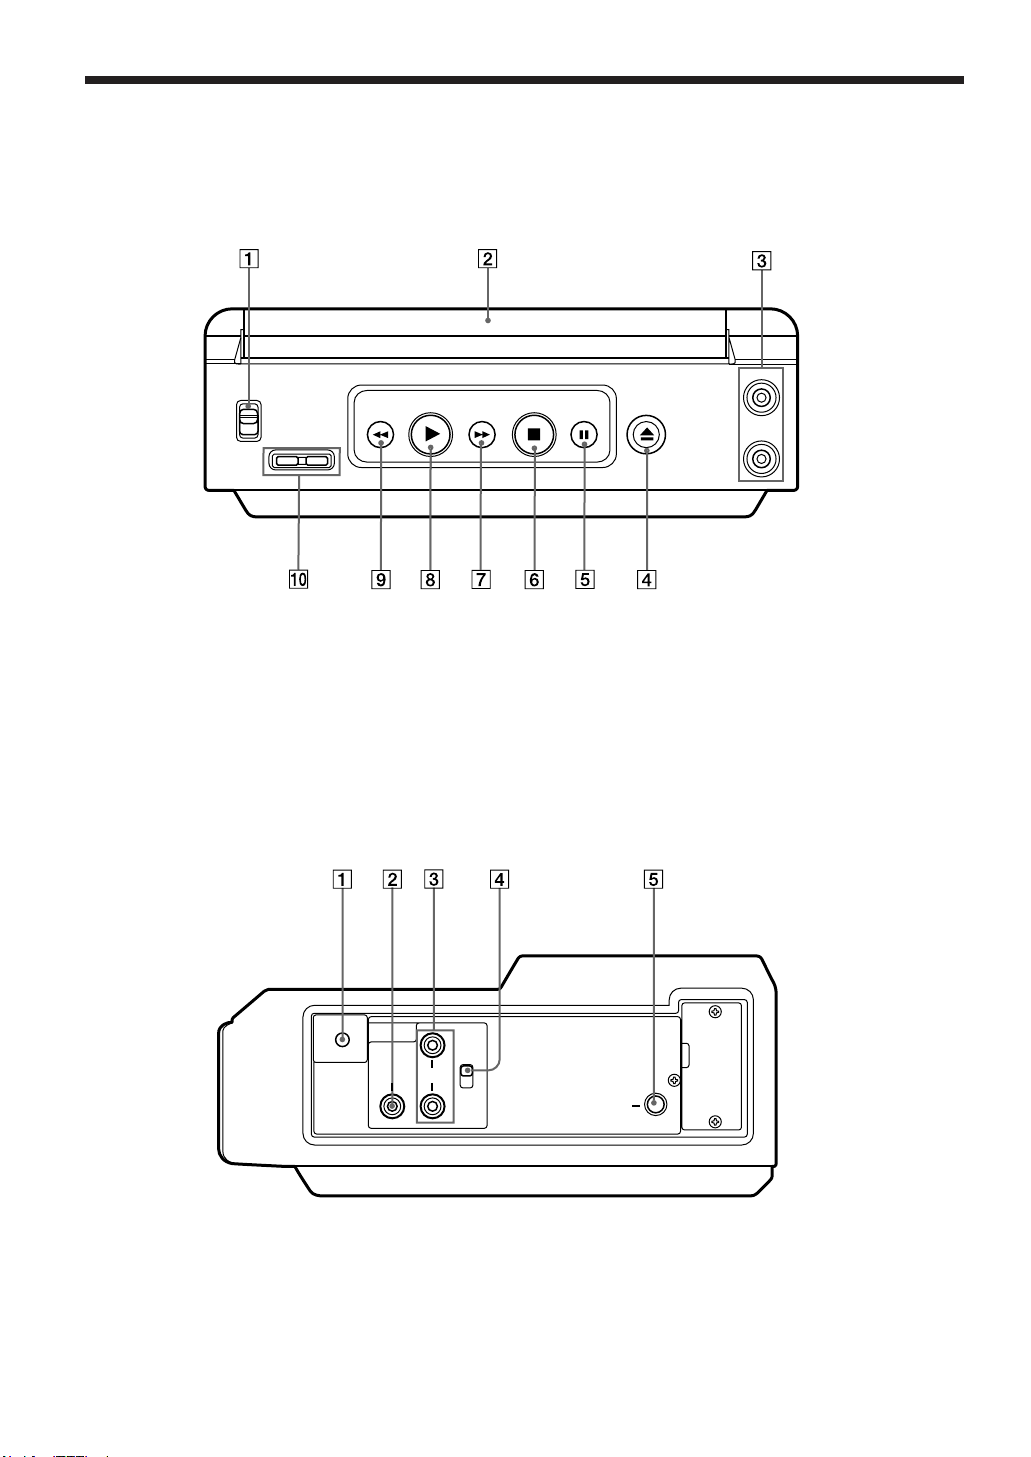
Names of Controls
Front View
Side View
1 POWER Switch (5)
2 Tape compartment (5)
3 HEADPHONES 1/2 jacks (5)
4 6 (eject) button (5)
5 P PAUSE button (6)
1 REMOTE Jack (9)
2 VIDEO OUTPUT jack (4)
3 AUDIO OUTPUT L/R jacks (4)
4 Hi-Fi/NORM (normal) select switch (6)
5 DC 12 V jack (4)
Refer to the pages indicated in parentheses ( ) for details.
6 p STOP button (5)
7 ) FF (fast-forward) button (5)
8 ( PLAY button (5)
9 0 REW (rewind) button (5)
!º TRACKING +/– button (6)
VIDEO AUDIO
HiFi
NORM
REMOTE
DC 12V
L
R
POWER
ON
OFF
TRACKING
– +
REW
PLAY
FF
STOP
PAUSE
HEADPHONES
1
2
9
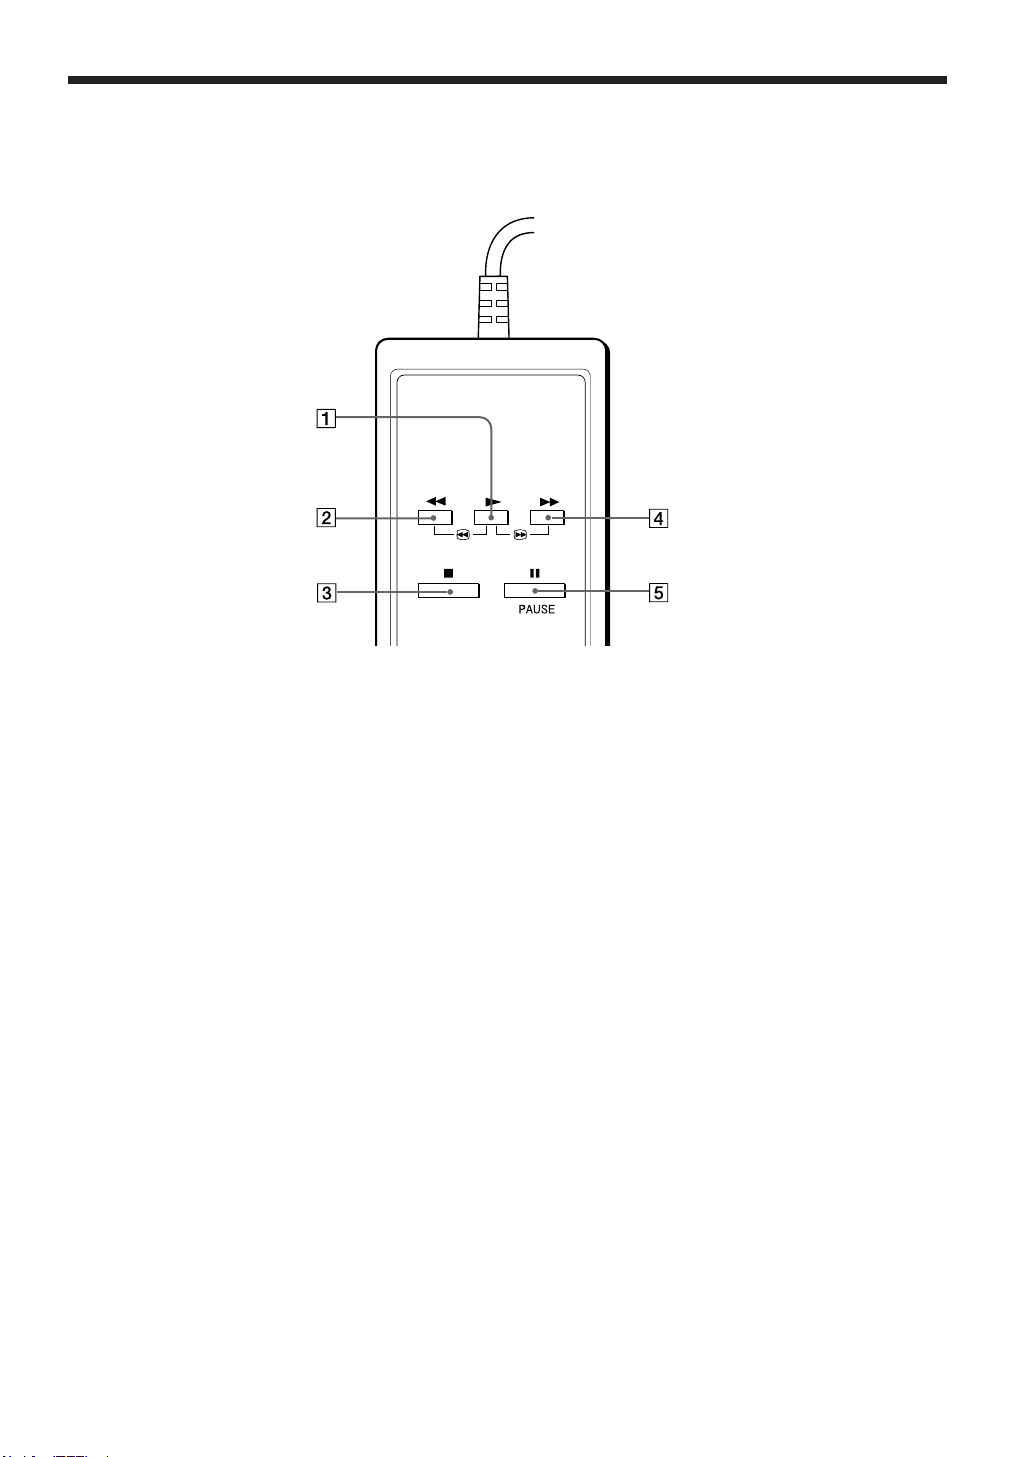
Remote commander
You can also control the player with the following buttons.
Connect the plug of the remote commander to the REMOTE jack of the player.
1 ( (play) button (5)
2 0 (rewind) button (5)
3 p (stop) button (5)
4 ) (fast-forward) button (5)
5 P PAUSE button (6)

10
Specifications
Power requirements: 12 V DC
Power consumption: 8 W
Video signal: EIA standard NTSC color
Audio track: 1 track (normal)
2 channels (Hi-Fi audio sound)
Operating temperature: 5°C to 40°C (41°F to 104°F)
Operating humidity: 10 % to 80 %
Dimensions: Approx. 250
×
88
×
205 mm (w/h/d)
(Approx. 9
3
/4
×
3
1
/2
×
8
1
/8 inches)
including projecting parts and controls
Mass: Approx. 1.9 kg (4 lbs 3 oz)
Supplied accessories: Car battery cord (5 m) (1)
Remote commander (1)
Design and specifications are subject to change without notice.

11
Symptom
No power.
No operation starts when
operation buttons are pressed.
There is not playback picture, or the
playback picture is noisy or contains
streaks.
During special effects playback, the
picture may contain some vertical
jitter when using a TV which has an
automatic vertical hold control.
If the top of your playback picture
waves back and forth excessively.
Video cassette can't be inserted.
Video cassette can't be removed.
Troubleshooting
Check the following points once again if you are having some trouble with your VCR.
Remedy
• Check that the car battery cord is completely connected to the DC 12 V
input connector and the cigarette lighter socket.
• Check that the POWER switch is set to on.
• Check the DEW indicator (p.7.) If it is displayed, the unit will not operate.
• Adjust the TRACKING control slowly in either direction (p.6.)
• Video heads are clogged (p.7.)
• Set the TV's vertical hold control to “MANUAL” and then adjust it.
• Because the VCR playback signal is not as stable as an off-the-air TV
signal, the top of your TV screen may be bent or unstable during
playback. To solve this problem, slowly turn the horizontal hold control
on your TV to correct the wavy picture. If your TV does not have a
horizontal hold control or adjusting the control does not help, please
contact your local TV service center.
• Insert the cassette with the window side up and the record tab facing you.
• Check that the car battery cord is completely connected to the cigarette
lighter socket.
PowerPlaybackOthers

12
If you have any questions about this product, you may call: Sony Customer Information Center 1-800-222-
SONY (7669) or write to: Sony Customer Information Center Sony Drive, Mail Drop #T1-11, Park Ridge, NJ
07656
Sony Corporation Printed in Japan