SAVE THIS MANUAL FOR REFERENCE
You will need this manual for safety
instructions, operating procedures, and Warranty.
The original sales receipt is required for warranty service.
16" Cordless Line Trimmer
OPERATOR’S MANUAL
Our Customer Service staff is ready to provide assistance.
In the case of a damaged or missing part, most replacement parts ship directly from
Merotec USA in Atlanta or from one of our service partners in the US.
For immediate help with assembly, or for additional product information, email support@
MerotecUSA.com or call 866-902-9690 M-F 8:30am – 5:00pm ET. More information can be
found on www.YardForceUSA.com.
YF60VRX18-LT

2
TABLE OF CONTENTS
Description of Product Parts ....................................................................................................................6
Intended use………………………………...................................................................................................6
Technical Specications……………........................................................................................………….....6
Safety Information………...................................................................................................………………....6
Assembly …………...........................................................................................…………………………...11
Adjustment ………............................................................................................…………………………….11
Operation……………………………...........................................................................................…………12
Maintenance and Storage ...............................………………..........................................................……13
Troubleshooting ..................................................................................................…………………………14
Warranty ................................................................................................................................................15
WARNING
1. To reduce the risk of electric shock- Do not expose to water.
2. Do not use in rain. Store indoors only. Replace damaged battery pack immediately.
3. Disconnect battery pack before cleaning or servicing. Use proper eye protection. Keep away
from rotating line.
4. Do not operate without guard in place.
5. Use only 60V Li-ion battery YF60VRX4.0-BAT & YF60VRX2.5-BAT and battery charger
YF60VRX4A-CHG & YF60VRX2A-CHG.
3
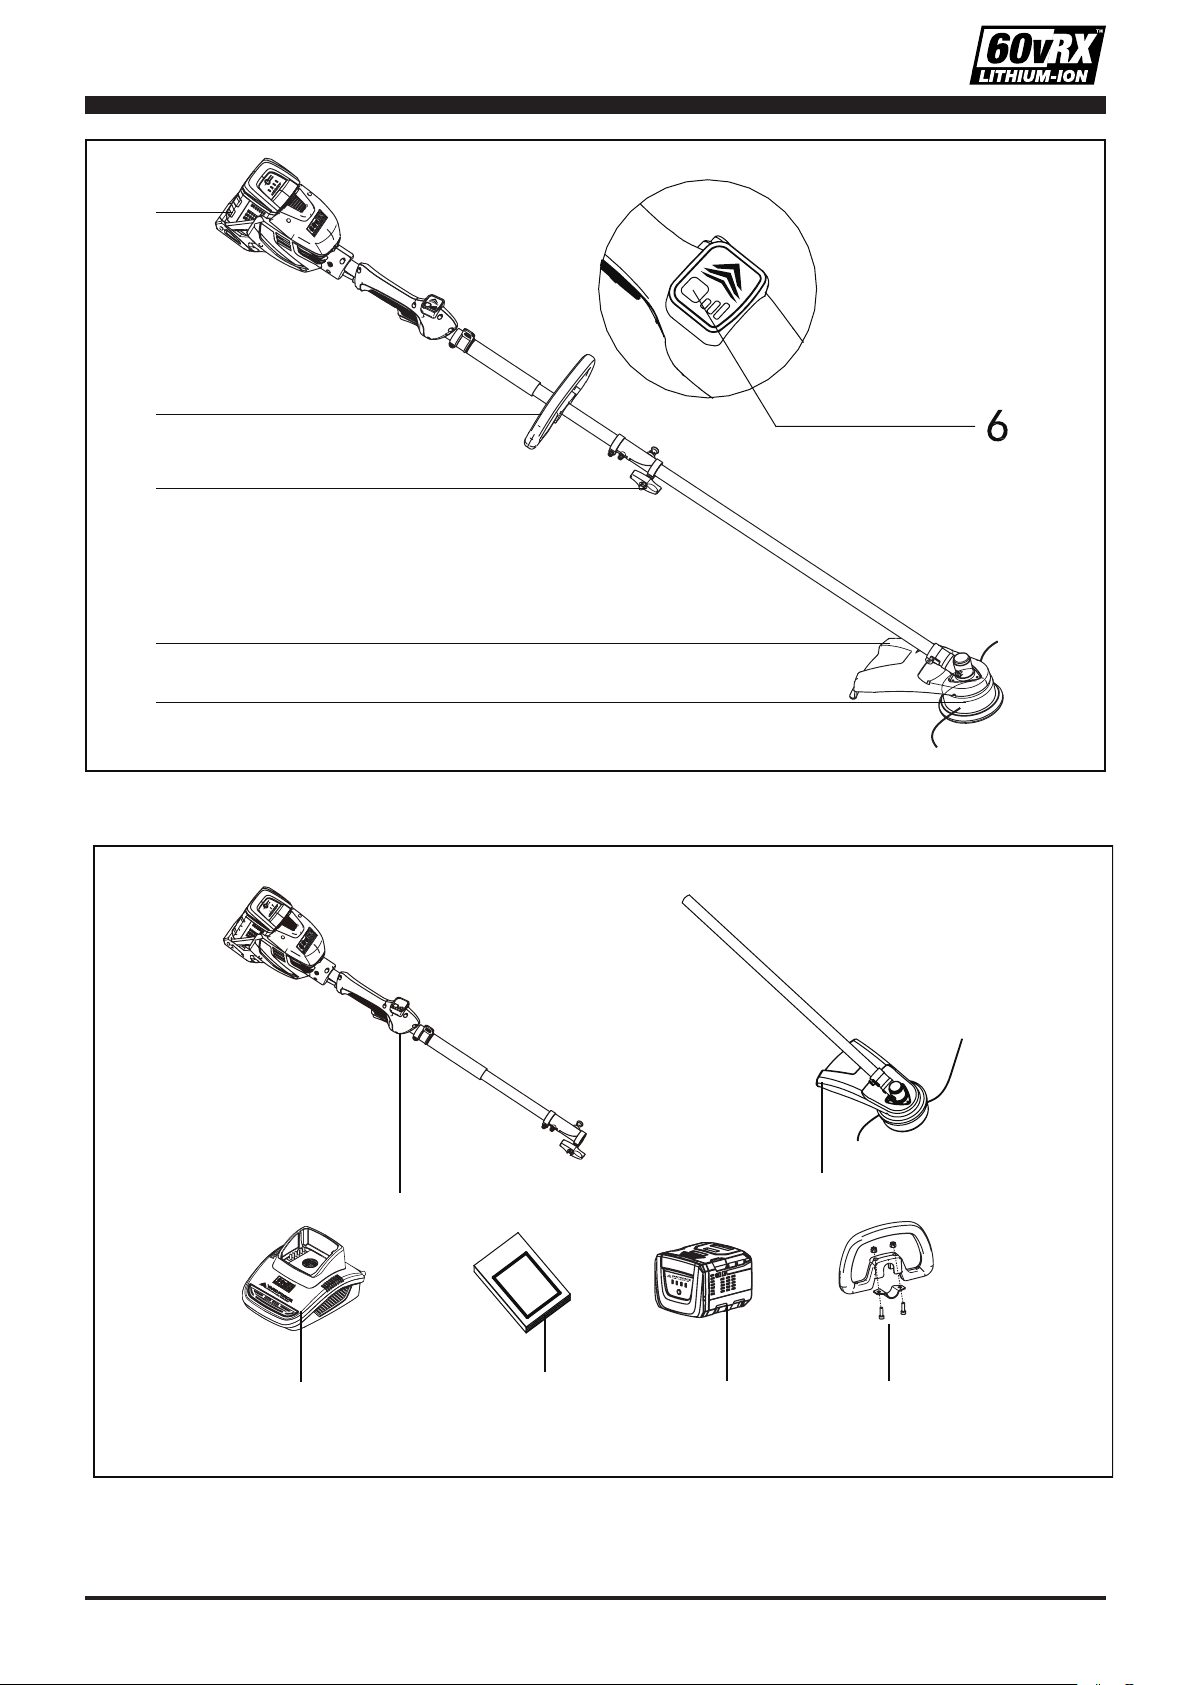
Fig. 1
1
2
3
4
5
DE
C
A
B
F
Fi
g
.
2
4
2
Fig. 3 Fig. 4
Fig. 5
Fig. 7
Fig. 9
Fig. 6
2
2
3
1
Fig. 8
B
A
1
3
5
Fig. 10
Fig. 12
Fig. 14
Fig. 11
Fig. 13
16 ft.
6
DESCRIPTION OF PRODUCT PARTS
Parts list (See Fig. 1)
1
.
Power head
2
.
Auxiliary handle
3
.
Shaft connector
4. Safety guard
5. Cutting head
6. Speed adjustment button
Delivery list (See Fig. 2)
A. Power head assy. x 1
B. Line trimmer attachment x 1
C. Auxiliary handle x 1
D. Battery pack x 1
E. Manual x 1
F. Charger x 1
Carefully remove the machine and parts from
its packaging. Identify all the parts packaged in
the carton against the parts list. Please contact
our customer service center
(Monday - Friday
8:30AM - 5:00PM ET) at (866) 902-9690
if
anything is missing.
WARNING!
If any parts are damaged or
missing, do not operate this tool until the missing
parts are replaced. Failure to heed this warning
could result in serious personal injury.
NOTE!
Always recycle the packaging in
accordance with local recycling schemes.
WARNING!
This item requires a two person
lift to remove from the packaging. Make sure that
you have sucient space to put the lawn mower
down. Keep your feet apart so that you have a
stable position, bend at the knees and keep your
back straight.
TECHNICAL SPECIFICATIONS
Item No. YF60VRX18-LT
Voltage/Capacity
60 v d.c. / 2.5 Ah Li-ion
Cutting Width 16
"
Cutting Line Dia. 0.095
"
(0.080" Compatible)
Line Feed Dual Line, Tap-Feed
Running Speed
3 Speeds, 4500/5000/
5500 RPM
Motor Brushless
Charger
Input: 100~240 V, 50/60 Hz,
Output: 63 v d.c. 2.5 A
Charging Time 60 minutes
Weight 20.2 lbs
Battery Pack Type
YF60VRX2.5-BAT
Adapter Type
YF60VRX2A-CHG
INTENDED USE
The product is intended for cutting weed, grass
or similar soft vegetation in areas that are hard to
reach, e.g. under bushes, on slopes and edges. It
may not be used to work on unusual thick, dry or
wet grass, e.g. pasture grass, or to shred leaves.
For safety reasons it is essential to read the
entire instruction manual before rst operation
and to observe all the instructions therein.
SAFETY SYMBOLS
The purpose of safety symbols is to attract your
attention to possible dangers. The safety symbols
and the explanations with Vthem deserve your
careful attention and understanding. The symbol
warnings do not, by themselves, eliminate any
danger. The instructions and warnings they give
are no substitutes for proper accident prevention
measures.
WARNING
: Be sure to read and understand
all safety instructions in this Operator’s Manual,
including all safety alert symbols such as
“
DANGER
,” “
WARNING
,” and “
CAUTION
” before
using this tool. Failure to follow all instructions
listed below may result in electric shock, re, and/
or serious personal injury.
SAFETY INSTRUCTIONS
This page depicts and describes safety symbols
that may appear on this product. Read,
understand, and follow all instructions on the
machine before attempting to assemble and
operate.
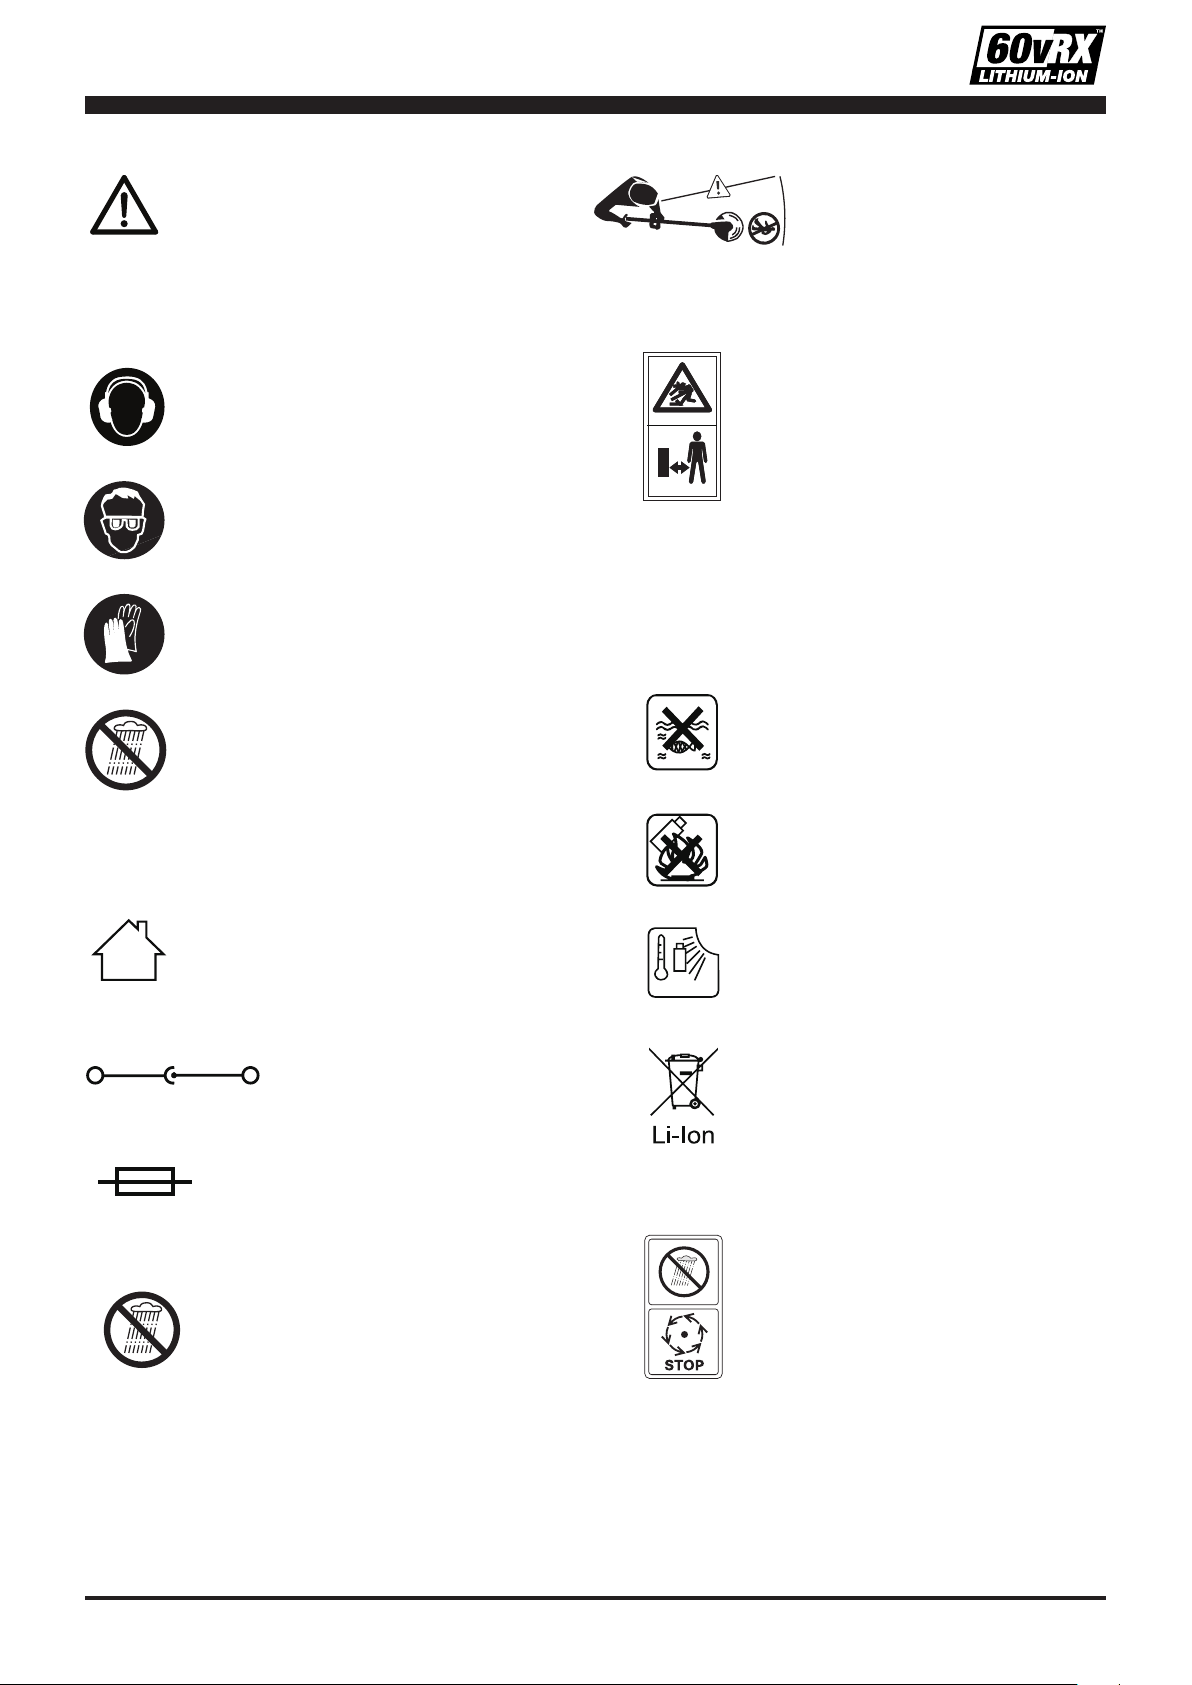
7
This symbol, before a safety comment,
indicates a precaution, a warning or
a danger. Ignoring this warning can
lead to an accident for yourself or
for others. To limit the risk of injury,
re, or electrocution always apply the
recommendations indicated.
Wear ear protection
Wear eye protection
Wear protective gloves
Protect against rain and wet.
Do not expose and operate the tool in
rain.
Beware of thrown or ying
objects to bystanders.
Keep by standers a safe
distance away from the
machine.
Objects thrown by the product could
hit the user or other by standers.
Always ensure that other people
and pets remain at a safe distance
from the product when it is in
operation.
In general, children must not come
near the are a where the product is.
0
6
3
o
Do not expose and operate the tool
in rain.
Wait until all machine components
have completely stopped before
touching them. The blades continue
to rotate after the machine is
switched o, a rotating blade can
cause injury.
Warning symbols on the battery pack
Batteries contain Li-ion. Waste
batteries should be sorted for eco-
friendly. Do not dispose of waste
batteries as unsorted municipal
waste.
Do not throw into water
Do not litter to re.
Do not subject the battery to strong
sunlight over long periods and do
not leave it on a heater (max. 113
˚
F).
Warning symbols on the charger
+
-
The charger is for indoor use only.
Pole orientation
Protective 5A limited
Do not expose and operate the tool in
rain.
max. 113
˚
F
T5A

8
IMPORTANT SAFETY INSTRUCTIONS
READ ALL INSTRUCTIONS BEFORE
USING TRIMMER
WARNING
- To reduce the risk of re,
electric shock, or injury:
1. Replacement Parts - When servicing use only
identical replacement parts.
2. Avoid Dangerous Environment - Don't use
appliances in damp or wet locations.
3. Don't Use In Rain.
4. Keep Children Away - All visitors should be
kept at a distance from work area.
5. Dress Properly - Do not wear loose clothing
or jewelry. They can be caught in moving
parts. Use of rubber gloves and substantial
footwear is recommended when working
outdoors. Wear protective hair covering to
contain long hair.
6. Use Safety Glasses - Always use face or dust
mask if operation is dusty.
7. Use Right Appliance - Do not use appliance
for any job except that for which it is intended.
8. Don't Force Appliance - It will do the job
better and with less likelihood of a risk of
injury at the rate for which it was designed.
9. Don't Overreach - Keep proper footing and
balance at all times.
10. Stay Alert - Watch what you are doing. Use
common sense. Do not operate appliance
when you are tired.
11. Maintain Appliance With Care - Keep cutting
edge sharp and clean for best performance
and to reduce the risk of injury. Follow
instructions for lubricating and changing
accessories. Keep handles dry, clean, and
free from oil and grease.
12. Check Damaged Parts - Before further use
of the appliance, a guard or other part that
is damaged should be carefully checked to
determine that it will operate properly and
perform its intended function. Check for
alignment of moving parts, binding of moving
parts, breakage of parts, mounting, and any
other condition that may aect its operation.
A guard or other part that is damaged should
be properly repaired or replaced by an
authorized service center unless indicated
elsewhere in this manual.
SAVE THESE INSTRUCTIONS
GENERAL POWER TOOL SAFETY WARNINGS
WARNING:
Read all safety warnings and
instructions. Failure to follow the warnings and
instructions may result in electric shock, re and/
or serious injury.
Save all warnings and instructions for future
reference.
Work area safety
1. Keep work area clean and well lit.
Cluttered or dark areas invite accidents.
2. Do not operate power tools in explosive
atmospheres, such as in the presence of
ammable liquids, gases or dust. Power tools
create sparks which may ignite the dust or
fumes.
3. Keep children and bystanders away while
operating a power tool. Distractions can
cause you to lose control.
Electrical safety
1. Power tool plugs must match the outlet.
Never modify the plug in any way. Do not use
any adapter plugs with earthed (grounded)
power tools. Unmodied plugs and matching
outlets will reduce risk of electric shock.
2. Avoid body contact with earthed or grounded
surfaces, such as pipes, radiators, ranges
and refrigerators. There is an increased risk
of electric shock if your body is earthed or
grounded.
3. Do not expose power tools to rain or wet
conditions. Water entering a power tool will
increase the risk of electric shock.
4. Do not abuse the cord. Never use the cord for
carrying, pulling or unplugging the power tool.
Keep cord away from heat, oil, sharp edges
or moving parts. Damaged or entangled
cords increase the risk of electric shock.
5. When operating a power tool outdoors,
use an extension cord suitable for outdoor
use. Use of a cord suitable for outdoor use
reduces the risk of electric shock.
6. If operating a power tool in a damp location
is unavoidable, use a residual current device
(RCD) protected supply. Use of an RCD
reduces the risk of electric shock.
NOTE:
The term “residual current
device(RCD)” may be replaced by the term
“ground fault circuit interrupter (GFCI)” or
“earth leakage circuit breaker(ELCB)”

9
Personal safety
1. Stay alert, watch what you are doing and
use common sense when operating a power
tool. Do not use a power tool while you are
tired or under the inuence of drugs, alcohol
or medication. A moment of inattention while
operating power tools may result in serious
personal injury.
2. Use personal protective equipment. Always
wear eye protection. Protective equipment
such as dust mask, non-skid safety shoes,
hard hat, or hearing protection used for
appropriate conditions will reduce personal
injuries.
3. Prevent unintentional starting. Ensure the
switch is in the o-position before connecting
to power source and/or battery pack, picking
up or carrying the tool. Carrying power tools
with your finger on the switch or energising
power tools that have the switch on invites
accidents.
4. Remove any adjusting key or wrench before
turning the power tool on. A wrench or a key
left attached to a rotating part of the power
tool may result in personal injury.
5. Do not overreach. Keep proper footing and
balance at all times. This enables better
control of the power tool in unexpected
situations.
6. Dress properly. Do not wear loose clothing
or jewellery. Keep your hair, clothing and
gloves away from moving parts. Loose
clothes, jewellery or long hair can be caught
in moving parts. Dress proper footwear.
7. If devices are provided for the connection
of dust extraction and collection facilities,
ensure these are connected and properly
used. Use of dust collection can reduce dust-
related hazards.
Power tool use and care
1. Do not force the power tool. Use the correct
power tool for your application.
The correct power tool will do the job
better and safer at the rate for which it was
designed.
2. Do not use the power tool if the switch
does not turn it on and off. Any power tool
that cannot be controlled with the switch is
dangerous and must be repaired.
3. Disconnect the plug from the power source
and/or the battery pack from the power tool
before making any adjustments, changing
accessories, or storing power tools. Such
preventive safety measures reduce the risk of
starting the power tool accidentally.
4. Store idle power tools out of the reach of
children and do not allow persons unfamiliar
with the power tool or these instructions
to operate the power tool. Power tools are
dangerous in the hands of untrained users.
5. Maintain power tools. Check for misalignment
or binding of moving parts, breakage of parts
and any other condition that may affect the
power tool’s operation. If damaged, have
the power tool repaired before use. Many
accidents are caused by poorly maintained
power tools.
6. Keep cutting tools sharp and clean. Properly
maintained cutting tools with sharp cutting
edges are less likely to bind and are easier to
control.
7. Use the power tool, accessories and tool bits
etc. in accordance with these instructions,
taking into account the working conditions
and the work to be performed. Use of the
power tool for operations different from
those intended could result in a hazardous
situation.
Battery tool use and care
1. Recharge only with the charger specied by
the manufacturer. A charger that is suitable
for one type of battery pack may create a risk
of re when used with another battery pack.
2. Use power tools only with specifically
designated battery packs. Use of any other
battery packs may create a risk of injury and
re.
3. When battery pack is not in use, keep it away
from other metal objects, like paper clips,
coins, keys, nails, screws or other small
metal objects, that can make a connection
from one terminal to another. Shorting the
battery terminals together may cause burns
or a re.
4. Under abusive conditions, liquid may be
ejected from the battery; avoid contact. If
contact accidentally occurs, ush with water.
If liquid contacts eyes, additionally seek
medical help. Liquid ejected from the battery
may cause irritation or burns.
5. Use only with the battery packs and chargers
listed below:
Battery pack Charger
YF60VRX2.5-BAT YF60VRX2A-CHG

10
Service
a) Have your power tool serviced by a
qualified repair person using only identical
replacement parts. This will ensure that the
safety of the power tool is maintained.
CORDLESS GRASS TRIMMER SAFETY
WARNINGS
1. Read the instructions carefully
2. Be familiar with the controls and proper use
of the equipment
3. Wear protective glassed or goggles
4. Never allow children or people unfamiliar with
the instructions to use the machine .
5. Stop using the machine while people.
Especially children or pets are nearby
6. Only use the machine in daylight or good
articial light.Never use when visibility is bad.
7. Before using the machine and after any
impact . check for the sings of wear or
damage and repair as necessary
8. Never operate the machine with damaged
guards or without the guards in place.
9. Keep hands and feet away from the cutting
means at all times and especially when
switching on the motor.
10. Take care against injury from any device
tted for trimming the lament line length.
After extending new cutter line always return
the machine to its normal operating position
before switching on
11. Never t metal cutting elements. Only use
2.3mm rounded nylon line.
12. Never use replacement parts or accessories
not provided or recommended by the
manufacturer.
13. Ensure that the battery pack has been
removed before checking , cleaning or
working on the machine and when it is not in
use.
14. Always ensure that ventilation openings are
kept clear of debris.
15. During assembly take great care when tting
the guard as this has a very sharp cutting
edge on one side for cutting the nylon line.
16. Never hold the cutter head above foot height
or point it towards people or animals when in
use.
17. If the trimmer starts to vibrate excessively
switch o immediately and have it checked
by a qualied service engineer.
CAUTION:
The cutting head continues to
rotate for a few seconds after switching o.
18. Always remove any sticks and stones etc.
before using the trimmer.
19. Do not cross roads or gravel paths while
operating trimmer.
20. On steep slopes cut across the slope, never
in an up and down direction. Never run while
using the trimmer.
21. Never use the trimmer while it is raining or in
damp weather.
22. Do not overreach, keep proper footing and
balance at all times.
23. Use only genuine spare parts. Only these
spare parts are designed and suitable for
the product. The use of other spare parts not
only voids the warranty, but also endanger
yourself and your environment.
24. Never use of appliance for edging operation.
Special Operation safety for the charger
1. Recharge only with the charger specied by
the manufacturer. Do not use the original
charger on other li-ion batteries or on any
other type of battery—re or explosion may
occur.
2. Check the battery charger, cable and plug
each time before using. Do not use the
battery charger when defects are detected.
Do not open the battery charger yourself and
have it repaired only by qualied personnel
using original spare parts.
3. The charger is designed to use standard
household 100~240 V, 50/60 Hz power
source. The charger’s plug must match the
outlet. Never modify the plug in any way.
Unmodied plugs and matching outlets will
reduce risk of electric shock.
4. Do not abuse the cord of charger. Never use
the cord for carrying, pulling or unplugging
the charger. Keep cord away from heat, oil,
sharp edges or moving parts. Damaged or
entangled cords increase the risk of electric
shock.
5. Make sure the charger cord is located so
that it will not be stepped on, tripped over, or
otherwise subjected to damage or stress.
6. Keep the battery charger clean.
Contamination may cause the danger of
electric shock.
7. Protect the battery charger from rain and
moisture. The penetration of water in a
battery charger increases the risk of electric
shock.
8. Do not operate the battery charger on easily
inammable surfaces (e.g. paper, textiles,
etc.) or in combustible environments. There
is danger of re due to the heating of the
battery charger during charging.
11
9. The temperature range over which the
battery pack can be charged is typically 41
˚
F
- 113
˚
F. Therefore, charging eorts outside
the prescribed temperature range may
automatically be blocked by the protection
circuitry of the battery pack. Longest life and
best performance can be obtained if the
battery pack is charged in the normal room
condition.
10. Disconnect charger from the power supply
when not in use. This will reduce the risk of
electric shock or damage to the charger if
metal items should fall into the opening.
11. The charger is for indoor use only.
Special Operation safety for the battery pack
1. The Li-ion battery pack is not fully charged
at the factory. Before attempting to use it ,it
must be fully charged rstly.
2. The battery pack should be recharged when
it fails to produce sucient power on jobs
which were easily done previously. DO NOT
CONTINUE using product with its battery in a
depleted condition.
3. Do not charge the battery in an air
temperature below 41
˚
F or above 113
˚
F.
This is important and will prevent serious
damage to the battery. Longest life and best
performance can be obtained if the battery is
charged when air temperature is about 68
˚
F.
4. When the machine continues to be used and
the battery temperature is above 113
˚
F, the
battery can not be charged, even you put on
the charger. Let the machine cool for some
times and wait the temperature reduced, it
can be charged again .
5. Protect the battery pack against heat, e.g.
including against continuous sun irradiation
and re. There is a danger of explosion.
6. Do not carry individual battery packs in your
pockets or bags, as they could short-circuit
against other metal items.
7. If an exposed li-ion battery pack dose start a
re, it wll burn even more violently if it comes
into contact with water or even the moisture
in the air. DO NOT throw water on a burning
li-ion battery! A re extinguisher must be
used.
8. If the battery pack becomes too hot to the
touch during charging, disconnect and switch
o immediately. Contact Service Centre
directly.
9. Do not open the battery yourself. There is
danger of a short circuit.
10. When battery pack is not in use, keep it away
from other metal objects, lie paperclips,
coins, keys, nails, screws or other small
metal objects, that can make a connection
from one terminal to another. Shorting the
battery terminals together may cause burns
or a re.
WARNING:
Battery posts, terminals
and related accessories contain lead and lead
compounds, chemicals known to the State of
California to cause cancer and birth defects
or other reproductive harm. Wash hands after
handling.For more information, go to www.
P65Warnings.ca.gov.
ASSEMBLY
WARNING:
If any parts are damaged
or missing, do not operate this product until
the parts are replaced. Use of this product with
damaged or missing parts could result in serious
personal injury.
WARNING:
Do not attempt to modify this
product or create accessories not recommended
for use with this blower. Any such alteration
or modication is misuse and could result in a
hazardous condition leading to possible serious
personal injury.
WARNING:
Do not connect to power
supply until assembly is complete. Failure to
comply could result in accidental starting and
possible serious personal injury.
WARNING:
Read the Instruction Manual
for the attachment used on this power head and
follow all warnings and instructions. Failure to
follow all instructions may result in electric shock,
re and/or serious personal injury.
WARNING:
Never install, remove, or
adjust the attachment while power head is
running. Failure to stop the motor can cause
serious personal injury. Never operate power

12
head without the attachment.
Note:
Remove the battery if tted before making
any adjustments.
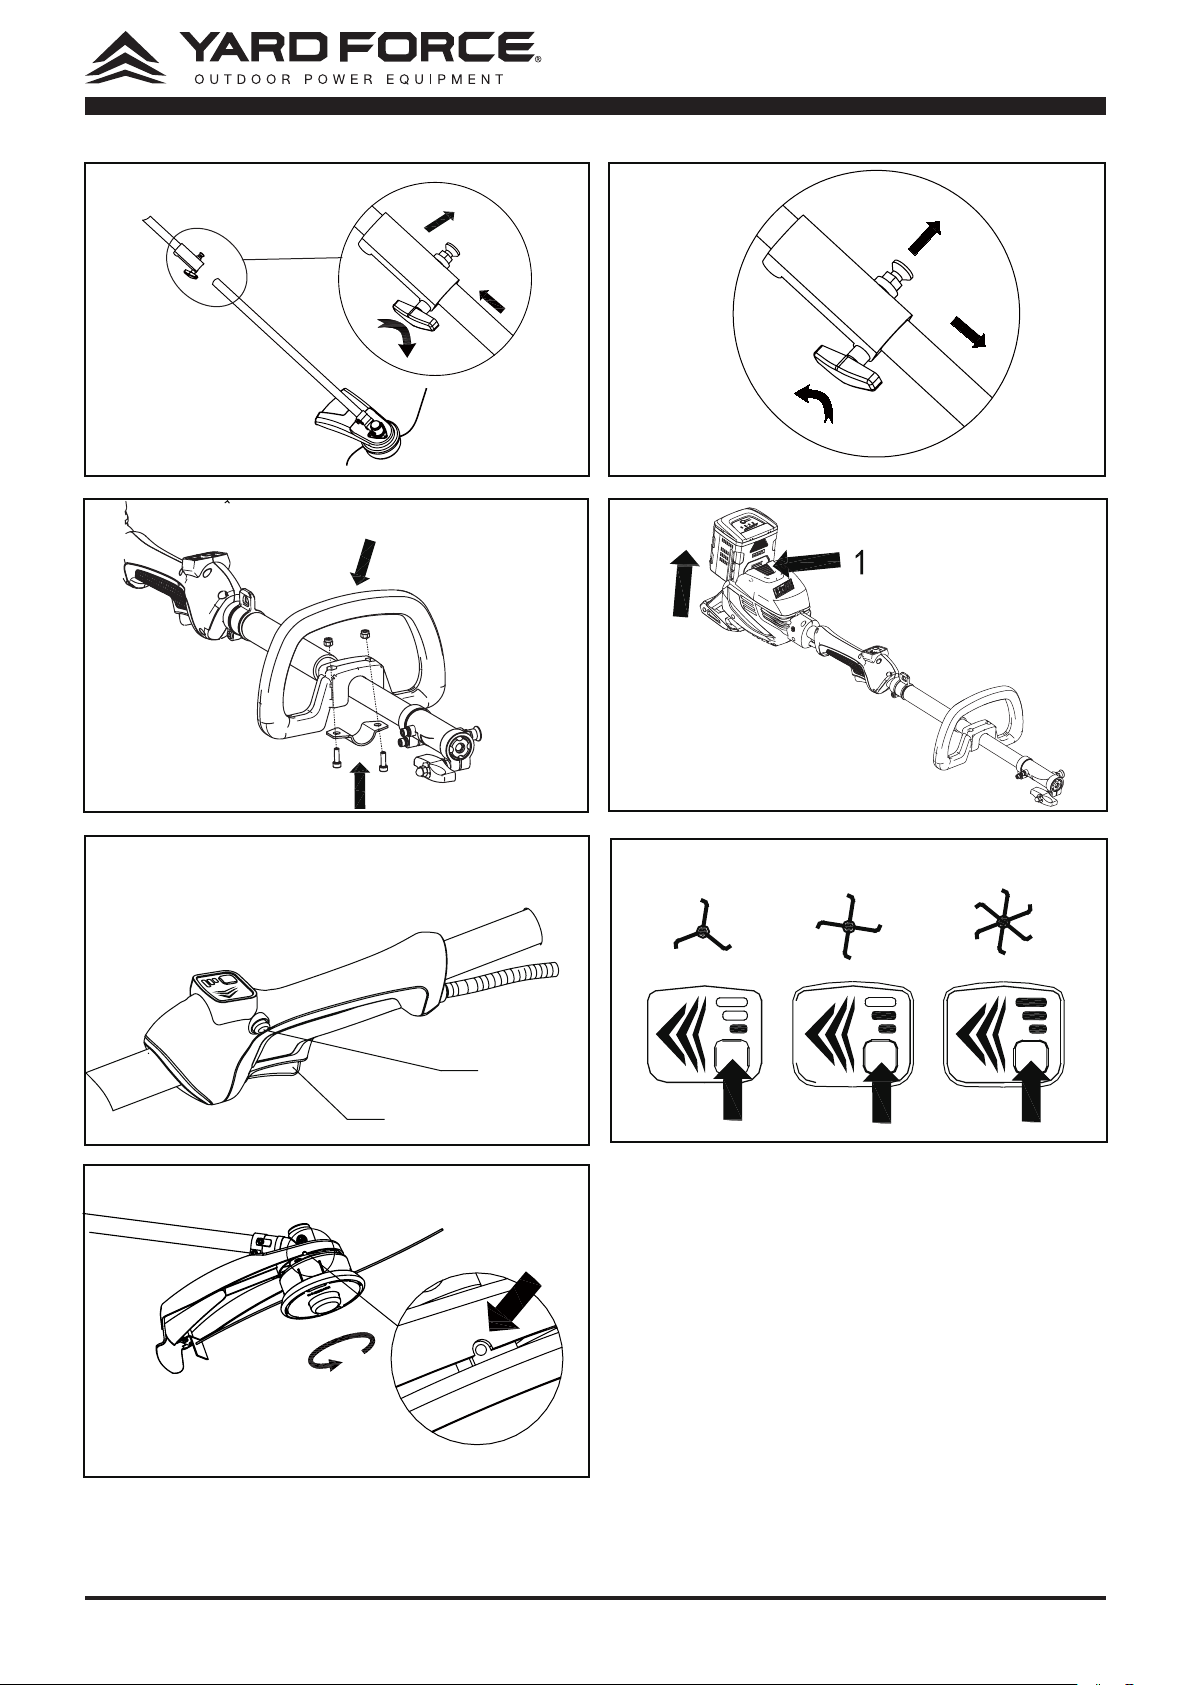
Installing the line trimmer attachment. (See
Fig. 3 )
1. Pull out the locking pin on the coupling
connector and rotate it to stay on the collar
top.
2. Loosen the coupling connector knob by
rotating counterclockwise on the power head
assembly.
3. Align the male square shaft inside the line
trimmer attachment to the female square
hole inside the coupling connector and insert
the line trimmer attachment to the coupling
connector completely.
4. Pull out the locking pin and rotate it to leave
the collar top.
5. Rotate the line trimmer attachment until
an audible ‘click’ to tell the locking pin is in
locking position.
Note!
You may have to rotate the shaft to nd
the right position for the pin to lock!
6. Re-tighten the connector knob and make
sure the attachment is fully secured in place.
Removal of the line trimmer attachment (See
Fig. 4)
1. Stop the line trimmer and remove the battery
pack from the machine.
2. Loosen the coupling connector knob by
rotating counterclockwise.
3. Pull out the locking pin on the coupling
connector and rotate it to stay on the collar
top.
4. Pull out the line trimmer attachment on any
purpose.
Installing auxiliary handle (See Fig. 5)
1. Uninstall the bolts on the auxiliary handle.
2. Install the auxiliary handle on the Shaft and
then tighten the bolts with nut and make sure
the auxiliary handle is rmly secured in place.
OPERATION
Inserting and removing the battery pack
To insert the battery pack
1 Align the groove on the battery pack with the
corresponding mounting ribs and press the
battery pack down until you hear a “click”.
2. Check to make sure the battery pack is rmly
secured into position.
To remove the battery pack from the tool (See
Fig. 6)
1. Depress the battery releasing/locking button
on the housing.
2. The battery pack will pop up automatically.
3. Lift and hold the battery pack while pressing
the releasing/locking button again, and then
remove the battery pack.
Note!
The second operation that needs to be
performed when removing the battery pack is
to avoid any misoperations at work, especially
for the 60VRX hand-held tools, in case the
battery pack falls and hurts consumers.
Switching On/O
WARNING!
Before operating the unit, remove stones, loose
pieces of wood and other objects from the cutting
area.
To switch ON(See Fig. 7)
1. Depress the safety lock button-A and
squeeze the switch trigger-B at the same
time.
2. Select your required speed setting by
depressing the speed adjustment button.
3. Move your thumb away from the safety
button.
To switch OFF
- Release the on/o trigger switch.
NOTE:
Always switch o line trimmer before
placing it down.
Speed adjustment (See Fig. 8)
This line trimmer has 3 speed settings which can
be changed with a press of the button.
1. Ensure the line trimmer is switched ON.
2. Press the speed adjustment button and set to
your desired cutting speed.
3. If the speed is set to the highest speed, press
the speed adjust button again and this will
reduce to the lowest speed.
13
To Increase Line Length
1. The line trimmer comes with a full line pool.
2. The line will wear in use and you will need to
feed out new line .
3. The cutting bump head allows the operator to
release more line without stopping the motor.
As line becomes frayed or worn, additional
line can be released by tapping the bump
knob on the ground while operating the
line trimmer.
NOTE:
For a good cutting performance. Cut high
grass in stages. Starting from the tip.
Special notice for line trimmer use
1. For best results, do not cut wet grass
because it tends to stick to the cutting head
and guard, prevents proper discharge of
grass trimmings, and could cause you to slip
and fall.
2. Pay special attention when performing the
work close to trees and bushes. The cutting
head could damage sensitive bark, and
damage fence posts.
Removing/replacing the cutting bump head
WARNING:
Before performing any
assembly, always ensure that the battery pack
has been removed.
If the nylon cutting line is broken and the nylon
spool needs replacing.
WARNING:
wearing working gloves when
doing any replacements.
Note!
Alway use Yard Force branded service
replacement parts - to prevent voiding your
warranty.
1. Line up the safety spacer hole up with the
hole on the side of guard. (See Fig. 9)
2. Place a small screw driver or metal rod in the
spacer hole. (See Fig. 10)
3. Rotate the head clockwise to loosen and
remove.
4. Reverse steps 1 - 3 to reinstall the same
cutting bump head.
5. Make sure that the cutting head is securely
located.
Removing /replacing trimmer line
1. Press two release tabs simultaneously on the
cutting bump head and pull the spool cover
out. (See Fig.11)
2. Remove the spool from the spool retainer,
keep the spring in position. (See Fig.12).
Clean any remaining line, dirt and debris,
replace the spool if damaged.
3. Take approximately 16 ft. of 0.095” diameter
line and insert the midpoint into the slot
bottom in the central rim of the spool. (See
Fig.13 &14)
4. Wrap the line evenly and rmly around
the spool as per the arrowhead direction
(clockwise when tap button towards you) on
both grooves.
5. Position the lines in the guide slots with 3~5
inch line left.
6. Insert the ends of the lines through the line
exit holes in the side of spool container.
7. Place the spool back into the spool container,
make sure the spring is in position.
8. Reinstall the spool cover back and push it
until cover snaps into place.
STORING AND MAINTENANCE
WARNING
!
Before performing any repair work, always
remove the battery pack and wait until the cutting
line has come to a standstill!
1. Do not spray the line trimmer with water.
Ingress of water may destroy the battery
pack and the electric motor.
2. Clean the unit with a cloth, hand brush, etc.
3. Keep all nuts, bolts and screws tight to
be sure the equipment is in safe working
condition;
4. Replace worn or damaged parts for safety.
Storage:
Clean the exterior of the machine thoroughly
using as of brush and cloth, Do not use water,
solvents or polishes.
Store the machine in a dry place. Do not place
other objects on top of the machine.
Transport
Use the original packaging to ship whenever
possible.

14
TROUBLE SHOOTING
WARNING
!
Before performing any repair work, always ensure that the battery pack/safety key has been removed
and wait until the cutting head has stopped completely and the tool has cooled down.
WARNING
!
Always wear heavy duty gloves when adjusting or cleaning, especially when handling sharp objects.
Fault/malfunction Cause Remedy
Product does not start Battery discharged? Remove and recharge the battery.
The battery is not correctly located. Remove the battery and re-install into
the product, check that it is securely
locked in place.
Device defective? Contact service partner.
Safety lock not depressed prior to
starting.
Restart machine by rstly depressing
the lock button and then depressing the
switch trigger.
Motor overload protection activated. Wait 10 mins and then restart the ma-
chine.
The tool is vibrating The guard is not tted -resulting in
too much line be extended.
Remove the battery pack and t the
guard.
Bigger diameter cutting line being
used.
Use correct cutting line dia --0.095"
(0.080" Compatible).
The cutting head is bound up with
grass.
Remove the battery pack and clean
grass from the cutting head.
The trimmer will not ad-
vance line
The spool is empty or there is NOT
enough line on the spool.
STOP the trimmer – remove the battery
pack and reload the spool with correct
size /length of line.
The line on the cutting head spool is
twisted /tangled on the spool.
STOP the trimmer -remove the battery
pack and check the spool line.
Trimmer head is dirty. STOP the trimmer -remove the battery
pack and clean the cutting head.
Grass wrapped around
cutting head
Cutting too tall grass in one pass. Recommend to cut smaller amounts of
grass height -starting from the top and
working downwards.
Line is not cutting Trimmer guard blade is worn. Sharpen blade OR replace with New
blade.

15
WARRANTY
Product Warranty
Please keep your original purchase receipt in a safe place as proof of purchase.
Warranty coverage for this product must be veried by the original purchase receipt.
The warranty period begins on the day that the product was purchased from an authorized retailer of
Yard Force products. Warranty coverage only applies to the original purchaser and is not transferrable.
Warranty coverage is only provided on products purchased from authorized Yard Force retailers.
Warranty only applies to products purchased and OPERATED in the USA. Any product purchased or
operated outside of the USA is not covered by any warranty.
(1) Five-Year Warranty on Yard Force Outdoor Power Equipment and
Three- Year Warranty on 60vRX Battery Pack and Adapter
The Yard Force Outdoor Power Equipment has a Five-Year Limited Warranty and 60vRX Battery Pack
and Adapter has a Three-Year Limited Warranty from the date of purchase against manufacturer defects
for residential use only. Commercial use voids the warranty. This warranty does not cover accidental
damage, unreasonable use, normal wear and tear, neglect or non-compliance with the Operating, Safety
and Maintenance Instructions. All service, outside of normal maintenance as described in this manual,
must be done by an authorized service technician. Any unauthorized service or changes to the original
conguration of this product will void the warranty. All parts and accessories used on and with this prod-
uct must be manufactured and/or authorized by Merotec Inc.
(2) Ninety-Day Warranty – Accessories
The accessories included with the machine including cutting head, shoulder harness and safety guard,
and other similar parts are warranted against manufacturer defects for residential use only for a period of
90 days from date of purchase.
Warranty does not cover loss of use or other consequential damages arising from any of the above, nor
does it cover repairs made or attempted by unauthorized persons.
This warranty is void if the product is used for commercial, rental or industrial purposes.
Certain parts, attachments and accessories are subject to normal wear and tear and are excluded from
the warranty.
Service and Warranty Claims Process
Contact the Yard Force Support Center toll-free at
(866) 902-9690 Monday-Friday between 8:30 AM
and 5:00 PM Eastern Time
for service and warranty support.
Yard Force Service Support agents can help you troubleshoot problems over the phone to get you back
up and running as quickly as possible. In the situation where service or warranty inspection is needed,
please follow these steps:
1. Call Yard Force at
(866) 902-9690 Monday-Friday between 8:30 AM and 5:00 PM Eastern Time
.
2. Send in proof-of-purchase and serial number (if applicable) to conrm warranty Coverage as directed
by Yard Force.
3. If service or a warranty evaluation is requested, Yard Force will provide an RGA number that should be
used in all communications with Yard Force and is required to be indicated on the product itself and on
the outside of the box.
4. All shipments to Yard Force must have an RGA number. Any shipment received that does not have an
RGA number clearly marked on the outside of the box will be refused.
5. All shipments must be sent pre-paid, Yard Force does not pay for any shipping costs for service or
warranty evaluation. Yard Force is not responsible for any packages that are lost by carrier. We recom-
mend that shipments are made by a carrier that provides tracking and delivery conrmation.
For more information or to ask questions, please call toll-free
(866) 902-9690 Monday-Friday between
8:30 AM and 5:00 PM Eastern Time
.
SAVE THESE INSTRUCTIONS

Need Help?
Please do not return the product to the place of purchase yet.
We’re here to help and take care of all your needs.
Contact our Customer Care Center in
Atlanta, GA for help with:
Product assembly or use
Missing or damaged parts
Troubleshooting
You can also visit our website to download
owner's manuals and get additional product information.
Visit www.YardForceUSA.com, or call our
toll free hotline: 1-866-902-9690 M-F 8:30am – 5:00pm ET
1-866-902-9690 [email protected]
Merotec Inc.
3655 Kennesaw North Industrial Parkway, Kennesaw, GA 30144
© Copyright 2020 Merotec Inc.
Made in China at a SUMEC manufacturing facility.
MADE IN CHINA