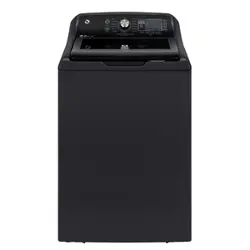
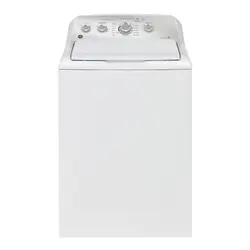
PM14X10005 4 ft Braided Metal Water Supply Hoses WH1X2267 Rubber Washer (1) and Screen (1)
NOTE: We strongly recommend the use of new water supply hoses. Hoses degrade over time and need to be replaced every 5 years to reduce the risk of hose failures and water damage.
LOCATION
Do Not Install the Washer:
1. In an area exposed to dripping water or outside weather conditions. The ambient temperature should never be below 60°F (15.6°C) for proper washer operation.
2. In an area where it will come in contact with curtains or drapes.
3. On carpet. The floor MUST be a hard surface with a maximum slope of 1/2 per foot (1.27 cm per 30 cm). To make sure the washer does not vibrate or move, you may have to reinforce the floor.
NOTE: If floor is in poor condition, use 3/4 impregnated plywood sheet solidly attached to existing floor covering.
IMPORTANT: Minimum Installation Clearances - Alcove or Closet
• If your washer is approved for installation in an alcove or closet, there will be a label on the back of the machine describing requirements.
• Minimum clearance between washer and adjacent walls or other surfaces: 0" either side, 2" front, 3" rear. Vertical space from floor to overhead shelving, cabinets, ceiling, etc. = 60".
• Closet doors must be louvered or otherwise ventilated and require 60 square inches of opening near the top of the door and 60 square inches near the bottom of the door. If a dryer is located in the same closet, then these areas must be doubled.
NOTE: The clearances stated on this label are minimums. Consideration must be given to providing adequate clearances for installing and servicing.
WATER SUPPLY REQUIREMENTS
WATER PRESSURE - Must be 20 psi minimum to 120 psi maximum.
WATER TEMPERATURE - Household water heater should be set to deliver water at 120° to 150°F (50° to 66°C) TO THE WASHER when hot wash is selected.
SHUTOFF VALVES - Both hot and cold shutoff valves (faucets) should be supplied.
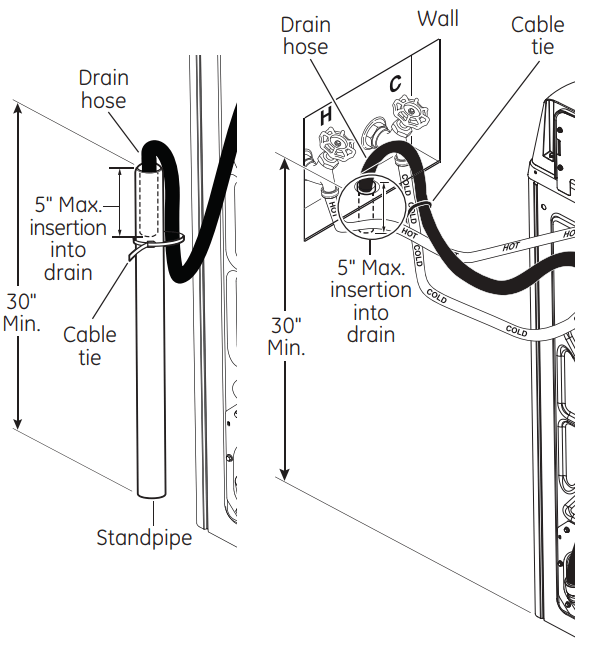
DRAIN - Water should be drained into standpipe. Discharge height MUST NOT BE LESS THAN 30 INCHES, and no more than 8 feet above the base of the washer. Standpipe must be 1-1/2 inches minimum inside diameter and must be open to atmosphere.
STEP BY STEP INSTALLATION
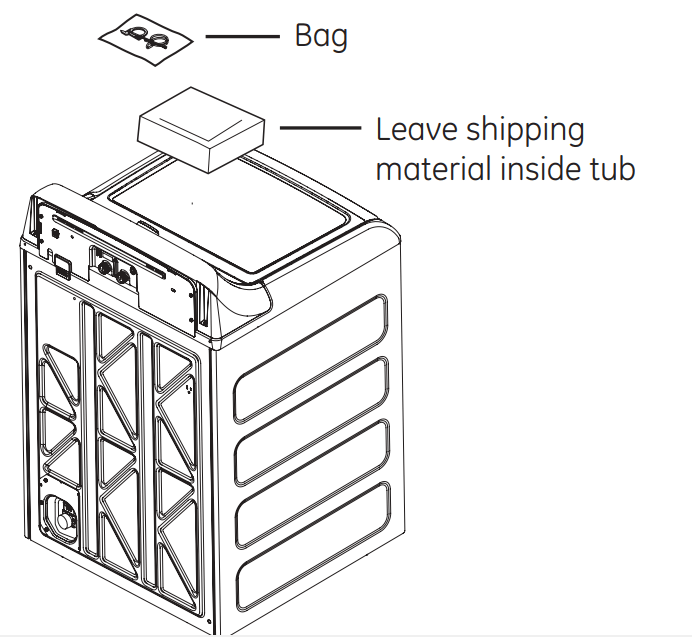
1. UNPACKING THE WASHER
After the machine is in the home, remove outside packing material/carton from washer.
Remove bag (containing cable tie, drain hose clip) and Owner’s Reference Guide from tub.
NOTE: Leave foam shipping material inside tub opening to hold tub in place during the rest of installation.
2. REMOVE THE BASE
Remove base from unit by placing foot on side of base and tipping unit back on corner post. Remove base and bring the washer back upright.
3. CONNECT WATER HOSES TO WASHER
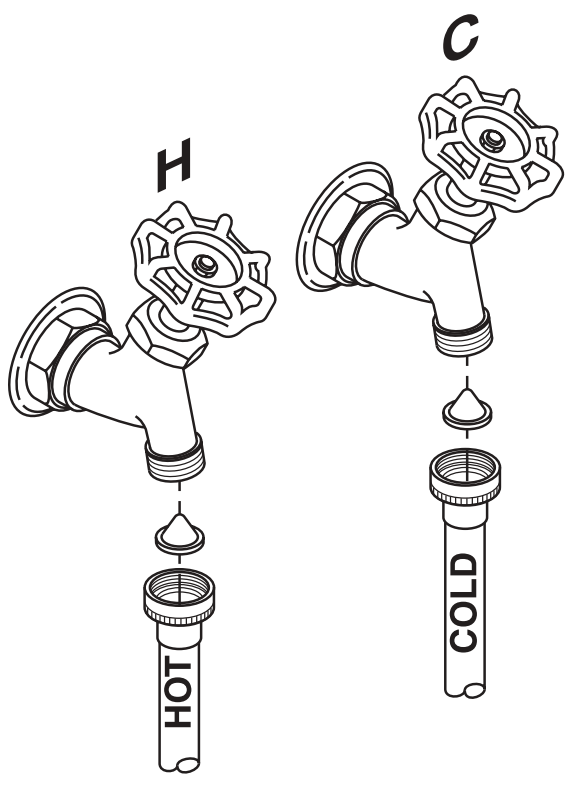
Disconnect electrical cord before installing water hoses. If not installed, install rubber washer in one end of hot water hose. Thread hot water hose onto connection labeled H at top rear of washer. Hand tighten and use pliers to tighten hoses between 1/8 and 1/4 turn beyond hand-tight.
If not installed, install rubber washer in one end of cold water hose C. Thread cold water hose onto connection labeled C at top rear of washer. Hand tighten and use pliers to tighten hoses between 1/8 and 1/4 turn beyond hand-tight.
Move washer as close to final location as possible, leaving room for you to make water, drain, and electrical connections to your home.
4. CONNECT WATER HOSES TO OUTLET VALVES
Determine which is HOT water line before attaching water hoses to faucets. Traditionally, HOT faucet is on left.
If screen washers are not installed) With protruding part of screen toward you, install strainer screen/rubber washer into each of the free ends of two water hoses.
Connect hot water hose to hot water outlet valve of your home. Hand tighten and use pliers to tighten hoses between 1/4 and 1/2 turn beyond hand-tight. Open hot water valve.
Connect cold water hose to cold water outlet valve of your home. Hand tighten and use pliers to tighten hoses between 1/4 and 1/2 turn beyond hand-tight. Open cold water valve.
Check for leaks and drips at the hose
Connect both hot and cold water inlets correctly and be sure to open water faucets completely, this is important to ensure the proper product operation.
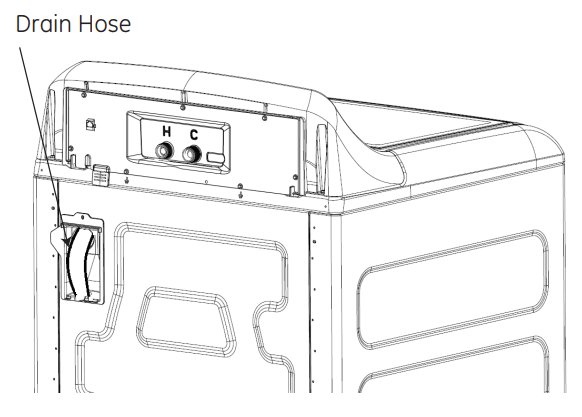
Pull the drain hose out from top to proceed installation.
5. CONNECT TO DRAIN
The drain or standpipe must be capable of accepting a discharge at a rate of 16 gal per minute. The drain height must be 30” minimum and 96” maximum.
The standpipe diameter must be 1-1/2” minimum. There MUST be an air gap around the drain hose in the stand pipe. A snug fit can cause a siphoning action.
For a drain facility less than 33” high, the hose, coupling and clamps provided in the machine must be used and, in addition, a siphon break MUST be installed on the back of the machine. Obtain and use a siphon break kit and follow the instructions in the kit.
If water valves and drain are built into wall, fasten drain hose to one of water hoses with cable tie provided (ribbed side on inside). If your drains is a standpipe, fasten drain hose to standpipe with cable tie provided.
NOTE: Placing the drain hose too far down the drain pipe can cause a siphoning action. No more than 5" of hose should be in the drain pipe. There must be an air gap around the drain hose. A snug fit can also cause a siphoning action.
ELECTRICAL REQUIREMENTS
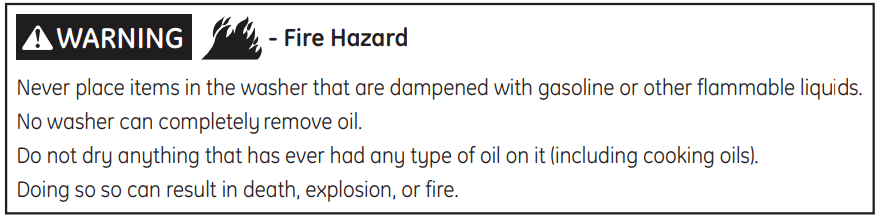
WARNING- Fire Hazard
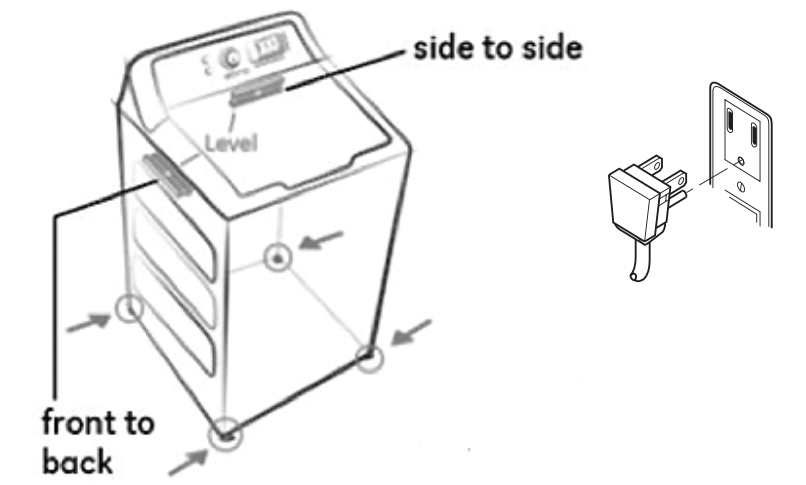
Plug into a grounded 3-prong outlet.
DO NOT remove ground prong.
DO NOT use an adapter.
DO NOT use an extension cord.
Failure to follow these instructions can result in death, fire or electrical shock.
CIRCUIT – Individual, properly polarized and grounded 15 or 20 amp circuit breaker or time-delay fuse.
POWER SUPPLY – 2 wire plus ground, 120 Volt, single phase, 60 Hz, alternating current.
Outlet Receptacle – Properly grounded 3-prong receptacle to be located so the power cord is accessible when the washer is in an installed position. If a 2-prong receptacle is present, it is the owner’s responsibility to have a licensed electrician replace it with a properly grounded 3-prong grounding type receptacle.
Washer must be electrically grounded in accordance with local codes and ordinances, or in the absence of local codes, in accordance with the NATIONAL ELECTRICAL CODE, ANSI/NFPA NO. 70 latest edition. Check with a licensed electrician if you are not sure that the washer is properly grounded.
6. CONNECT POWER AND INSTALL
Do not shim leveling legs.
Make sure large dial control (on some models) on washer is pushed in to the OFF position.
Insert plug of electrical cord into a 115V, 15- or 20-amp wall receptacle. Move washer into final position. Place level on flat top side edges of washer. Adjust all four leveling legs with an adjustable spanner until washer is level left to right and front-to-back. Remove level
Open tub lid. Remove and discard tub shipping material (see Step 1). Remove plastic protector sheet from control panel face.
GROUNDING INSTRUCTIONS
This appliance must be grounded. In the event of malfunction or breakdown, grounding will reduce the risk of electric shock by providing a path of least resistance for electric current. This appliance is equipped with a cord having an equipment- grounding conductor and a grounding plug. The plug must be plugged into an appropriate outlet that is properly installed and grounded in accordance with all local codes and ordinances.
WARNINGImproper connection of the equipment grounding conductor can result in a risk of electrical shock. Check with a qualified electrician, or service representative or personnel, if you are in doubt as to whether the appliance is properly grounded. DO NOT modify the plug on the power supply cord. If it will not fit the outlet, have a proper outlet installed by a qualified electrician.
If required by local codes, an external 18 gauge or larger copper ground wire (not provided) may be added. Attach to washer cabinet with a #10-16 x 1/2” sheet metal screw (available at any hardware store) to rear of washer as illustrated.
Attach ground wire and ground screw (obtain locally)
Mobile Home Installation: Installation must conform to Standard for Mobile Homes, ANSI A119.1 and National Mobile Home Construction and Safety Standards Act of 1974 (PL93-383).
FINAL CHECKLIST
Before starting the washer, check to make sure:
□ Main power is turned on.
□ The washer is plugged in.
□ The water faucets are turned on.
□ The unit is level and all four leveling legs are firmly on the floor.
□ The shipping foam and cardboard are removed.
□ The drain hose is properly tied up.
□ There are no leaks at the faucet, drain line or washer.
Run the washer through a complete cycle.
□ Check for water leaks and proper operation.
□ Place these instructions in a location near the washer for future reference.
Operating Instructions
Step by step
Step 1:
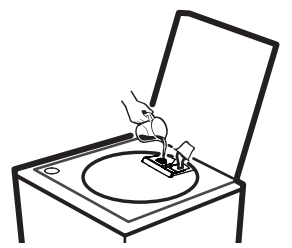
Add fabric softener to the fabric softener dispenser;
Add the manufacturer's recommended amount of detergent. GE recommends the use of High Efficiency detergents such as he in your energy efficient washer. Place detergent pods in the bottom of the wash basket before.
Step 2:
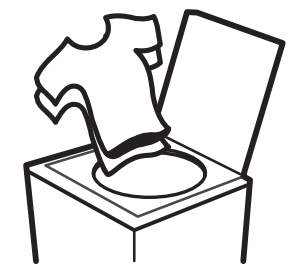
Loosely add items around Infusor. Overloading may negatively impact wash performance.
Close lid.
NOTE: Washer will not start with lid open.
Step 3:
Select wash cycle.
Select wash options, including Deep Rinse option when using fabric softener. Select options.
Step 4: Press Start.
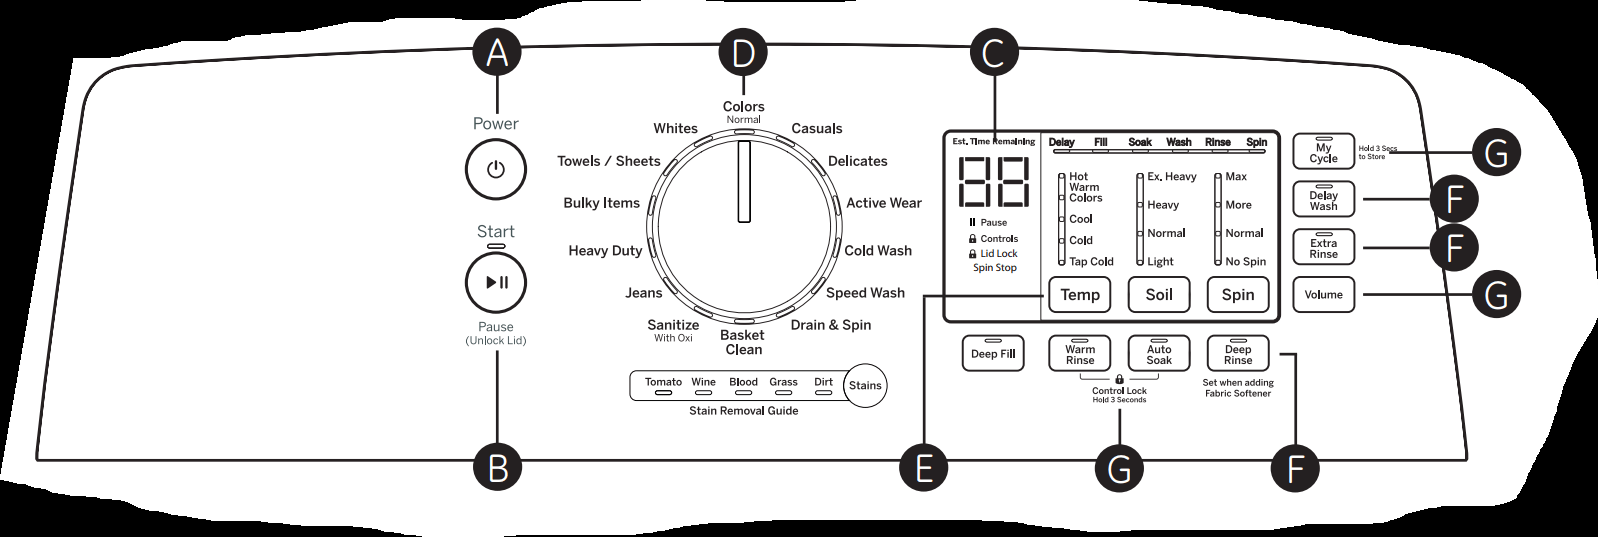
APower
Press to “wake up” the display. If the display is active, press to put the washer into idle mode.
NOTE: Pressing Power does not disconnect the appliance from the power supply.
B Start/Pause
Press Start to begin the cycle.NOTE: The lid must be closed for the washer to start the cycle. If the lid is open, “Lid” will scroll across the display. If the lid is closed, the lid will lock, theLid Lock light will illuminate, and “SEnSing” will scroll across the display. Pressing Pause will unlock the lid (if locked at that time), pause the cycle and the Start indicator light will blink.
To continue the cycle, press Start again. If machine is paused more than 24 hours, the cycle will be cancelled. If water remains in the machine, select the Drain & Spin cycle to drain basket and spin water out of the washer basket.
C Display and Status Lights
Display: The display shows the approximate time remaining until the end of the cycle.NOTE: The cycle time is affected by how long it takes the washer to fill. This depends on the water pressure in your home. The size of the load being washed also significantly impacts cycle time, with larger loads taking longer.
In addition, this display will, “scroll” the washer status:
• bALAnCINg Start of rebalancing cycle to redistribute clothes. Stops after rebalancing is complete.
• dELAY When Delay Wash is initiated. Replaced with estimated time when cycle starts.
• End End of current cycle.
• FILL For the first 45 seconds of a fill, the estimated end of cycle time is displayed. For the rest of the fill time, “FILL” is scrolled until the fill completes.
• H2O SUPPLY Can not sense water level (valves possibly turned off).
• LId Cycle stopped because lid is open. Close the lid.
• SEnSIng Sensing load size and type before and during fill (normal).
• PAUSE Cycle paused because the Start/Pause button was pressed and the washer was set to Pause. Press Start button again to restart the cycle.
Cycle status lights: Shows whether the washer is in the Delay, Fill, Soak, Wash, Rinse or Spin portion of the cycle. If an out-of-balance condition is detected by the washer, the Spin light will blink during the remaining portion of the cycle and will stay illuminated for a short time after cycle completion. When this occurs, the washer is taking actions to correct the out-of-balance condition and complete the cycle normally. In some cases, the washer may not be able to balance the load and spin up to full speed. If you notice the load is more wet than normal at the end of the cycle, redistribute the load evenly in the wash basket and run a Drain & Spin cycle.
Feature status lights indicate (see sections F and G for more details):
Pause - Will display when washer is paused between cycles.
Controls - The washer is locked - will blink once if you press any button or turn the cycle knob.
Lid Lock - The lid is locked. See the Control Lock description.
Spin Stop - Indicates wash basket is coasting to a stop following spin. Lid will not unlock until basket has fully come to a stop.
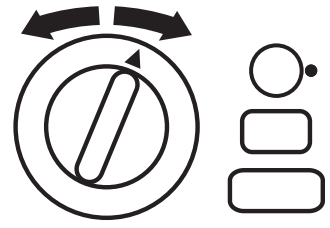
DWash Cycles-Cycle Selector Knob
The wash cycle controls the type of washing process. The cycle selector knob can be turned in either direction. Turning the knob after starting a cycle will stop the washer and change the cycle/options to the new selection. Press Start to begin the new cycle selection. The chart below will help you match the items to be washed with the best wash cycle settings. For optimal performance, select the cycle that most closely matches the items being washed.
Selections and options shown in bold are the recommended settings for that cycle.
Some cycles and options may not be available on some models.
Items to Wash
Cycle
Wash Temp
Soil Level
Spin Selection
Options Available
Cycle Details
Cycle for normal, regular, or typical use for washing up to a full load of normally soiled cotton clothing.
Colors
Hot
Warm
Colors
Cool
Cold
Tap Cold
Ex. Heavy Heavy
Normal
Light
Max
More
Normal
No Spin
Stain Removal Guide Warm Rinse Auto Soak Deep Rinse Delay Wash Extra Rinse
Cycle for normal, regular, or typical use for washing up to a full load of normally soiled cotton clothing. Choose the Heavy or Extra Heavy soil level selection and Warm or Hot water temperature selection as appropriate for your clothes load for a higher degree of cleaning. Incorporates multi-stage fills and wash periods to provide optimal fabric care.
Casual clothes, lightly soiled office wear.
Casuals
Hot
Warm
Colors
Cool
Cold
Tap Cold
Ex. Heavy Heavy
Normal
Light
Max
More
Normal
No Spin
Stain Removal Guide Deep Fill Warm Rinse Auto Soak Deep Rinse Delay Wash Extra Rinse
Wash cycle tailored to care for casual clothes and office wear items.
Lingerie and special care fabrics with light soil.
Delicates
Hot
Warm
Colors
Cool
Cold Tap Cold
Ex. Heavy Heavy
Normal
Light
Max
More
Normal
No Spin
Stain Removal Guide Deep Fill Warm Rinse Auto Soak Deep Rinse Delay Wash Extra Rinse
Utilizes a unique "tri-pulse" extra gentle agitate profile to provide special care to delicate fabrics. It is recommended to place small or ultra delicate items in mesh bags before washing.
Medium to lightly soiled athletic wear items of technical or synthetic fabrics.
Active
Wear
Hot
Warm
Colors
Cool
Cold
Tap Cold
Ex. Heavy Heavy
Normal
Light
Max
More
Normal
No Spin
Stain Removal Guide Deep Fill Warm Rinse Auto Soak Deep Rinse Delay Wash Extra Rinse
Cycle designed for care of medium to lightly soiled active wear, athletic wear, and technical fabrics. Incorporates a dual stage wash period with soak to effectively treat body soils and odors. Use the Heavy Duty cycle for heavily soiled sports clothing constructed of sturdy fabric.
Dark colored fabrics and mixed loads.
Cold
Wash
Hot
Warm
Colors
Cool
Cold
Tap Cold
Ex. Heavy Heavy
Normal
Light
Max
More
Normal
No Spin
Stain Removal Guide Deep Fill Auto Soak Deep Rinse Delay Wash Extra Rinse
Cycle combines multiple wash agitation periods with soak periods to provide enhanced cleaning performance and energy efficiency with colder water temperatures.
Small loads of lightly soiled items that are needed in a hurry. Examples include one casual wear outfit or 3 soccer uniforms.
Speed
Wash
Hot
Warm
Colors
Cool
Cold
Tap Cold
Ex. Heavy Heavy
Normal
Light
Max
More
Normal
No Spin
Stain Removal Guide Deep Fill Warm Rinse Auto Soak Deep Rinse Delay Wash Extra Rinse
Utilizes more intense agitation profile, expedited wash period, and time saving continuous spray rinse to clean small lightly soiled loads in the fastest time possible.
Wet load of items. For items that need only to be rinsed, use this cycle with Deep Rinse option.
Drain & Spin
Max
More
Normal
No Spin
Deep Rinse Extra Rinse
Utilizes a high speed spin to extract water from wet items. For items that need to be rinsed, select the Deep Rinse option when using this cycle.
Cleaning the basket of residue and odor. No clothes to be washed using this cycle.
Basket
Clean
Hot
Ex. Heavy
Normal
Deep Fill Deep Rinse
Recommended use of at least once per month. Never load laundry when using this cycle; laundry may become damaged or contaminated. Cycle incorporates a hot deep wash, intense agitation action, a dispenser purge (on some models), and a deep rinse.
Heavily soiled colorfast items.
Sanitize with Oxi*
Hot
Ex. Heavy
Max
More
Warm Rinse Auto Soak Deep Rinse Delay Wash Extra Rinse
Cycle uses an initial lower water fill for super concentrated, high temperature sanitization followed by a heavy wash step. A pump purge and deep rinse is incorporated to remove contaminants. See additional details and certifications below.
Jeans with medium to light soil. For heavily soiled work jeans, use the Heavy Duty Cycle.
Jeans
Hot Warm Colors Cool Cold Tap Cold
Ex. Heavy Heavy Normal Light
Max More Normal No Spin
Stain Removal Guide Deep Fill Warm Rinse Auto Soak Deep Rinse Delay Wash Extra Rinse
Combines higher water levels, a specially designed agitation profile, and multi-step wash and soak periods to care for jeans with medium to light soil. Use the Heavy Duty cycle for heavily soiled work jeans.
Sturdy fabrics with heavy to medium soil.
Heavy
Duty
Hot Warm Colors Cool Cold Tap Cold
Ex. Heavy Heavy Normal Light
Max More Normal No Spin
Stain Removal Guide Deep Fill Warm Rinse Auto Soak Deep Rinse Delay Wash Extra Rinse
Incorporates multi-step wash and soak periods combined with extended wash periods to effectively clean heavily to medium soiled sturdy fabrics.
Non-waterproof large coats, bead spreads, matters covers, and similar large bulky items
Bulky
Items
Hot Warm Colors Cool Cold Tap Cold
Ex. Heavy Heavy Normal Light
Max More Normal No Spin
Stain Removal Guide Deep Fill Warm Rinse Auto Soak Deep Rinse Delay Wash Extra Rinse
Provides a Deep Fill/max fill wash water level with a specially designed agitation profile to wash bulky items. Also incorporates a Deep Fill rinse to effectively rinse bulky items.
Towels Sheets
Towels / Sheets
Hot Warm Colors Cool Cold Tap Cold
Ex. Heavy Heavy Normal Light
Max More Normal No Spin
Stain Removal Guide Deep Fill Warm Rinse Auto Soak Deep Rinse Delay Wash Extra Rinse
Cycle designed washing towels or sheets, using a higher water level and a soak period to effectively clean these items. It is recommended that towels and sheets be washed separately for best care and washing performance.
Whites and household linens
Whites
Hot Warm Colors Cool Cold Tap Cold
Ex. Heavy Heavy Normal Light
Max More Normal No Spin
Stain Removal Guide Deep Fill Warm Rinse Auto Soak Deep Rinse Delay Wash Extra Rinse
Cycle tailored to clean and brighten your whites.
Sanitize with Oxi
The Sanitize with Oxi cycle, when using an Oxi additive along with your detergent, is designed to remove 99.9% of bacteria found in home laundry. Measure the detergent and the Oxi products carefully. Using the amounts appropriate for a large heavily soiled load, follow the detergent and the Oxi product label instructions. The detergent should be added using the dispenser instructions as shown on page 9 of this guide. Place the Oxi product directly in the bottom of the wash basket, before adding the clothes. The washer hot water supply connection must provide a minimum of 120°F to ensure the effectiveness of this cycle.
NOTE: The default Sanitize With Oxi cycle water temperature can NOT be changed.
The Sanitize With Oxi cycle is certified by NSF International, an independent third party testing and certification organization. The certification verified that the cycle reduced 99.9% of bacteria typically found in residential laundry and that no significant contamination is transferred to subsequent washer loads. Only the Sanitize With Oxi cycle has been designed to meet the requirements of NSF Protocol P172 for sanitizing effectiveness
Stain Removal Guide
The Stain Removal Guide feature allows you to indicate what stains are on the garments in your load. This feature incorporates a patent pending treatment method. An initial water fill is performed at a temperature tailored to the stain type selected and to an amount which enables a concentrated cleaning step. A stain scrubbing period, followed by an active soak, is conducted to effectively treat the stain. Then additional water is added to the selected temperature and the wash phase is conducted for the cycle selected. This feature can be applied to most wash cycles as described in the cycle guide.
To use Stain Removal Guide:
1. Select the desired wash cycle.
2. Press the Stain Removal Guide button.
Continue to press to select Tomato stain, Wine stain, Blood stain, Grass stain or Dirt stain. The indicator light will show the selected stain. To select a different stain, press the Stain Removal Guide button until desired stain to be removed is lit.
To turn off Stain Removal Guide, press until no indicator lights are illuminated.
NOTE: The Soil and Temperature levels will be changed to match the recommended default setting for each stain type. Turning off Stain Removal Guide will return the settings to default.
Stain Removal Guide
Category
Recommended
Temperatures
Treatment/Wash
Stain
For best results, before placing in washer:
Blood
Cold/Cool
Blood
Sweat
Body Fluids
Urine
Rinse in cold water; pretreat stain with liquid detergent or stain remover product.
Grass
Cold/Warm
Grass
Lipstick
Chocolate
Gravy
Mayonnaise
BBQ Sauce
Pretreat with liquid detergent or stain remover product. Brush lightly; rinse with cold water.
Dirt
Cool/Warm
Dirt
Clay
Mud
Allow dirt to dry; remove loose dirt using a brush.
Rinse with cool water.
Tomato
Cool/Warm
Sauce
Catsup
Salsa
Pretreat with liquid detergent or stain remover product;
Rinse with cool water.
Wine
Cool/Warm
Wine
Soda
Kool-Aid
Tea
Coffee
Juice
Beer
Pretreat with mixture of Oxi product and cool water.
Add Oxi product along with detergent in the washer.
Recommended temperatures are optimal for stain removal performance; adjust temperature selection to suit load being washed.
Ensure stain is completely removed after wash cycle and before placing in dryer; very tough stains may require a second treatment.
For waterproof, water-resistant items only use the Delicates cycle. DO NOT use other cycles for these items, for example: ski clothing, diaper covers, bulky waterproof bed covers, umbrella covers, vehicle covers, sleeping bags, waterproof coats, etc).
In other cycles different to the one recommended, when the basket turns, it is possible that water gets trapped in waterproof items and clothing, which can cause abnormal vibration. Besides, the clothing moves upwards and may be expelled, this may result in injury or damage to the washer, walls, floor, or clothing.
DO NOT mix waterproof and non-waterproof items.
E Settings
Individual settings for agitation (Soil), water temperature (Temp), and spin (Spin) can be set from the minimum (lowest in column) to maximum (highest in column). In general, the higher up the column, the more washer energy will be used. NOTE: Longer Spin times typically reduce dryer time/energy usage (i.e. reduces total energy when using both a washer and a dryer).
FCycle Options
Deep Fill
Select the Deep Fillfeature for loads where extra water is needed.
Press the Deep Fillbutton once before starting the cycle to add an incremental amount of water to the wash load. Holding the Deep Fill button for 3 seconds will provide the deepest fill level possible; this will increase cycle time due to the additional time ittakes to fill the washer.
To cancel the option if desired, press the Deep Fillbutton again.
NOTE: The Deep Fillbutton can also be pressed after the washer has completed filling and is in the wash phase if additional water is desired. To stop the extra fill, press the Deep Fillbutton again and the water will stop.
Warm Rinse
Provides a warm rinse to your wash load. Note that rinsing operations may be different with this operation selected in order toeffectively apply the warm rinse water to your load.
Auto Soak
This option begins with a brief agitation, soaks for a specified period of time, then moves through the rest of the cycle automatically. Repeated pressing of the Soakbutton will scroll through 15 minute, 30 minute, 1 hour, 2 hour selections and then return back to 0 soak minutes.
Deep Rinse
Set this option to provide a deep rinse or when using fabric softener. It may change other settings [e.g. Spinmay go to a higher setting) to maximize performance.
Delay Wash
When the Delay Washbutton is repeatedly pressed, the delay time is set from 1 [01H) to 9 [09H) hours and back to clear [00H) hours. If you press and hold the Delay Washbutton for 3 seconds, it will immediately reset.
Extra Rinse
When you use extra detergent or bleach to clean heavily soiled clothes, use theExtra Rinseoption to better remove additional residues. NOTE:This option is not allowed for some cycles.
G Additional Options
My Cycle Settings
As the cycle selector knob is turned, the Temp, Soiland Spinsettings change to automatic pre-set default settings for each cycle.
If you desire different default settings, select the desired options or changes to the cycle settings, then press and hold the My Cycle button for 3 seconds to store them. The My Cyclebutton will light when active. In the future, when you turn the selector knob to that cycle, your settings will be automatically recalled. To restore the factory defaults temporarily [i.e. for this load), press the My Cyclebutton for 1/2 second. The My Cyclelight will turn off and the factory defaults will load. However, the next time you select this cycle, your My Cyclesettings will load. If you wish to permanently restore the factory default settings for the cycle; when the My Cycleis active [button light on) press and hold the My Cyclebutton for 3 seconds. The factory defaults will load for the selected cycle and the My Cyclelight will turn off. The default settings will load when this cycle is selected in the future and the My Cyclelight will remain off. NOTE:My Cycle saves the following options: Temp, Soil, Spin, Extra Rinse, Deep Fill, Warm Rinse, Auto Soak, Deep Rinse and Stain Removal Guide.
Volume
Use the Volumebutton to change the volume of the end of cycle signal and other system tones. Press the button until you reach the desired volume [high, medium, low) or off.
Control Lock
Use the control lock before or during a cycle to prevent any selections from being made.
To lock/unlock the washer controls, press and hold the Warm Rinseand Auto Soakbuttons for 3 seconds. The control lock icon will light up when it is on. NOTE: The Power button can still be used when the machine is locked.
About Washer Features
Automatic Load Sensing
This determines the correct agitate profile, agitate duration and amount of water suited to the size and type of load placed in the washer. The washer will not start the wash cycle or fill with water if the lid is open. When the lid is closed the machine is able to begin filling with water in order to sense the load size.
NOTE: Automatic Load Sensinginitiates a spin at the beginning of the cycle and will take as much as 3 minutes to complete (significantly shorter for smaller loads); this is normal operation.
NOTE: This is a high efficiency washing machine with Infusor wash action. This system requires less water while providing effective cleaning action. You may notice that the water level is lower than on your previous washer. This is normal for an Infusor-equipped washer.
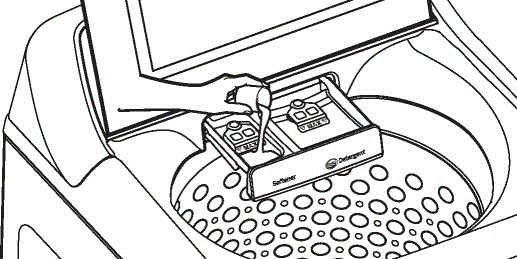
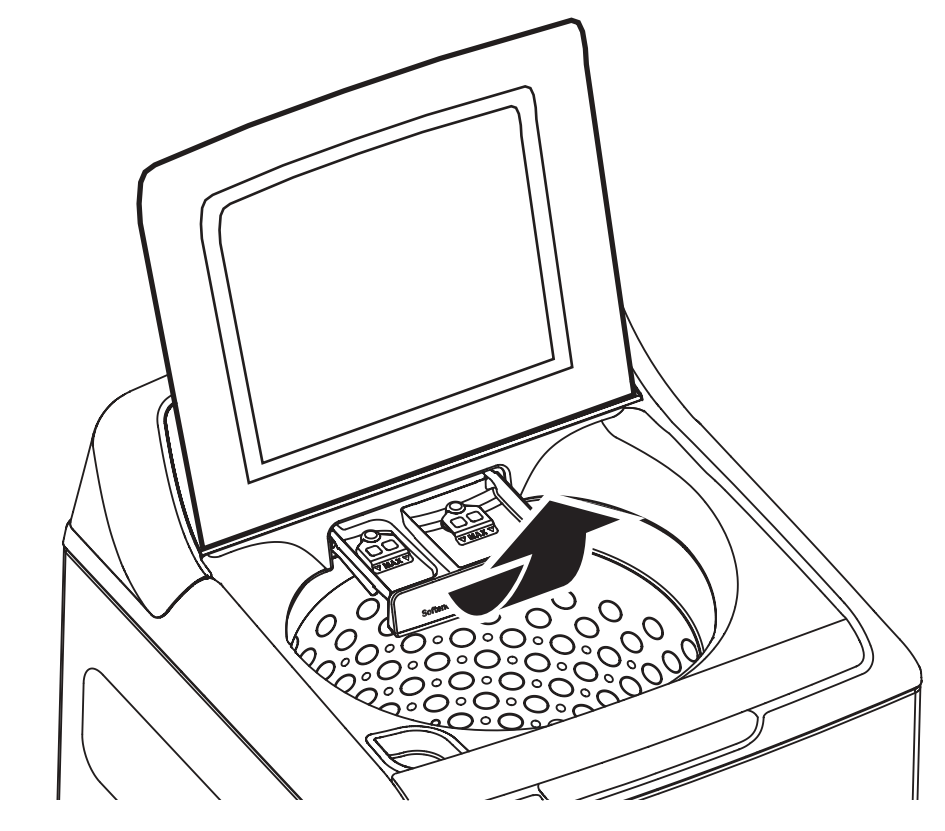
Detergent Dispenser
Liquid or powdered HE detergent should be added to the right sideof the dispenser drawer. Follow the detergent manufacturer's recommendations for the correct amount of detergent, based on load size, taking care to add detergent to the right compartment. Do not overfill or dilute detergent as this can result in additive being dispensed prematurely in the wash cycle. Your option selections will determine when detergent is automatically dispensed at its optimal time in the wash cycle.
NOTE:Single-dose laundry packets should not be added to the dispenser drawer, as they will not dispense properly. Put packets in bottom of wash basket.
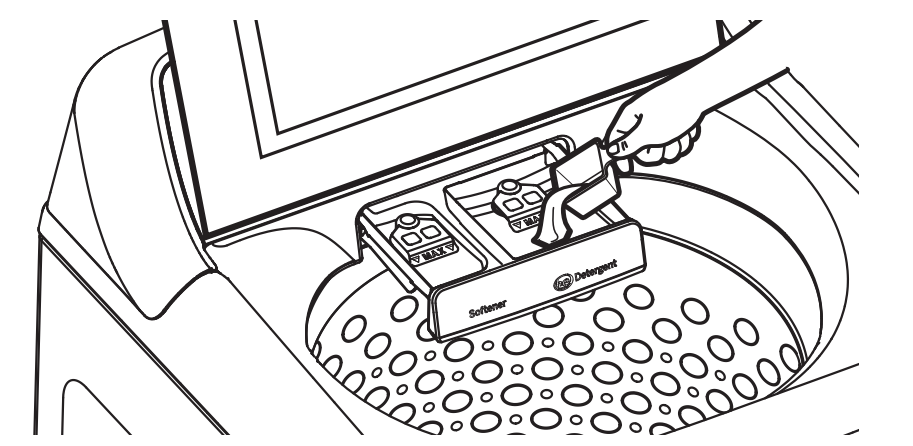
Liquid Fabric Softener Dispenser
Liquid fabric softener should be added to the left sideof the dispenser drawer. Follow the liquid fabric softener manufacturer's recommendations for the correct amount of softener, based on load size, taking care to add softener to the left compartment. Do not overfill or dilute softener as this can result in additive being dispensed prematurely in the wash cycle. Your option selections will determine when liquid fabric softener is automatically dispensed at its optimal time in the rinse cycle.
NOTE:Fabric softener crystals should not be added to the dispenser drawer, as they will not dispense properly.
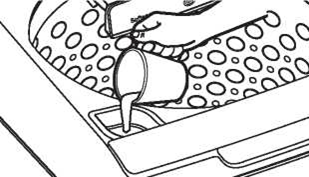
Liquid Bleach
Liquid chlorine bleach should be added through the bleach dispenser in the front left corner. Follow bleach manufacturer's recommendations for the correct amount of liquid chlorine bleach based on load size, taking care to not apply or spill it directly on clothing.
NOTE:Do not use liquid chlorine bleach and laundry pretreatments such as an Oxi product in the same wash load.
Pretreatment
Place laundry pretreatments, such as an Oxi product, directly in the bottom of the wash basket before loading clothes.
NOTE:Do not use liquid chlorine bleach and laundry pretreatments such as an Oxi product in the same wash load.
Loading the Washer
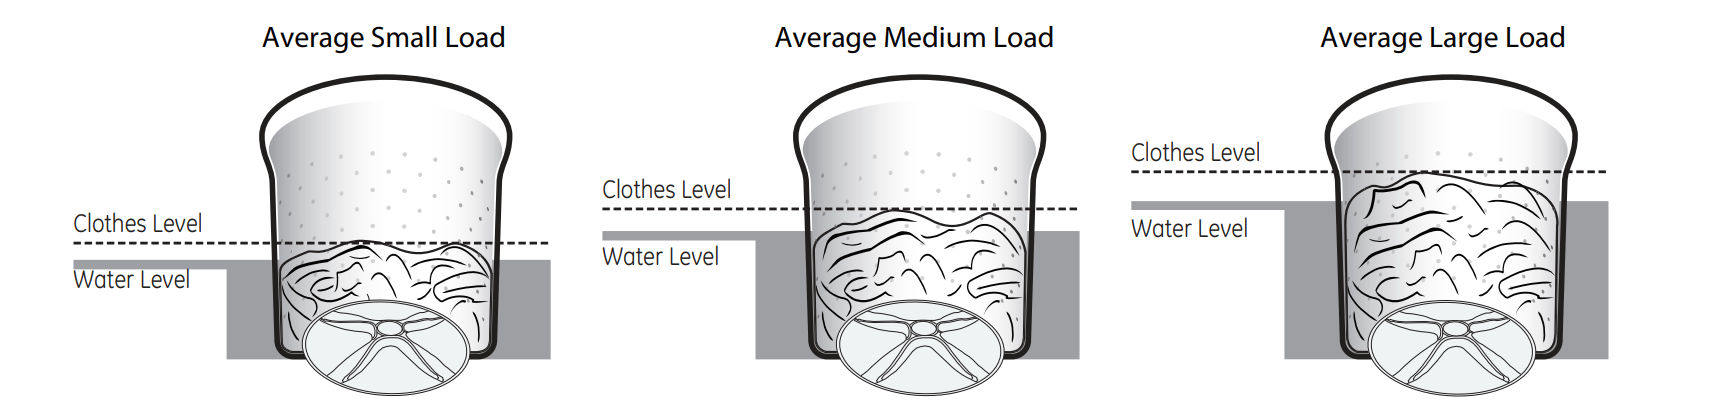
Load dry items loosely in the washer basket. For best results, load items evenly and loosely around the outside of the basket, filling in towards the center on larger loads. To add items after washer has started, press Start/Pause if the lid is locked; wait until the Lid Locked indicator on the display is no longer illuminated before attempting to open the lid. Lift the lid and submerge additional items around the outside of the basket. Close the lid and press Start to resume. Adjust load size selection and/or use Deep Fill option if necessary.
■ Do not place large items such as sheets, blankets and towels across the Infusor (on some models). Load them around the outside of the basket.
■ Do not put lawn or sofa cushions into the washer as they are too big to move. Remove outer covers and ONLY wash them.
Proper Use of Detergent
Using too little or too much detergent is a common cause of laundry problems.
Use less detergent if you have soft water, a smaller load or a lightly soiled load.
For spots, applypre-treatment to items as recommended on the product label. Application should be made in the basket to prevent overspray which may cause the coloring on the lid or graphics to fade.
Place detergent pods in the bottom of the wash basket before adding clothes.
GE recommends the use of High Efficiency detergents such as he in your energy efficient washer. HE detergents are formulated to work with low water wash and rinse systems. HE detergents reduce the oversudsing problems commonly associated with regular detergents.
When using high efficiency or concentrated detergents, consult the product label to determine amount required for optimum performance. Excessive detergent will negatively impact wash performance.
Sorting Wash Loads
Sort by color (whites, lights, colors), soil level, fabric type (sturdy cottons, easy care, delicates) and whether the fabric produces lint (terry cloth, chenille) or collects lint (velveteen, corduroy).Wash lint producers such as cotton towels and socks separate from lint collectors including synthetic garments and dress pants.
Care and Cleaning
Exterior of the Washer
Immediately wipe off any spills with a damp cloth.
Interior of the Washer
To clean the interior of the washer, select the Basket Cleanfeature on the control panel. This Basket Cleancycle should be performed, at a minimum, once per month. This cycle will use more water, in addition to bleach, to control the rate at which soils and detergents may accumulate in your washer.
NOTE:Read the instructions below completely before starting the Basket Cleancycle.
1. Remove any garments or objects from the washer and ensure the washer basket is empty.
2. Open the washer lid and pour one cup or 250 ml of liquid bleach or other washing machine cleaner into the basket.
3. Close the lid and select the Basket Clean cycle. Push the Startbutton.
4. When the Basket Cleancycle is working, the display will show the estimated cycle time remaining. Do not interrupt the cycle.
Basket Cleanmay be interrupted by pressing the Startbutton in between cycles. A power outage in the house might also interrupt the cycle. When the power supply is back, the Basket Cleancycle resumes where it had stopped. When interrupted, be sure to run a complete Basket Cleancycle before using the washer. If the Powerbutton is pressed during Basket Clean, the cycle will be lost.
IMPORTANT:
Run Basket Cleanwith 1 Cup (250 ml) of bleach once a month.
After the completion of a Basket Cleancycle, the interior of your washer may have a bleach smell.
Cleaning the Dispenser Drawer
After some period of use, a small amount of detergent or softener residue may be present in the dispenser drawer. The drawer can easily be removed for cleaning. To remove the drawer, pull it out until the drawer stops and then lift up on the front of the drawer. The drawer can then be removed from the dispenser box. Wash the drawer in warm, soapy water using a mild detergent.
Rinse drawer with warm water. If siphon caps are removed for cleaning, be sure to push siphon caps fully back into place after cleaning.
The dispenser drawer and siphon caps are not dishwasher safe. The dispenser box is not removable, but it can be wiped clean using a damp cloth if necessary. Do not attempt to remove the dispenser box for cleaning.
Water Supply Hoses
Hoses connecting washer to faucet should be replaced every 5 years.
Moving and Storage
Ask the service technician to remove water from drain pump and hoses. Do not store the washer where it will be exposed to the weather.
Long Vacations
Be sure water supply is shut off at faucets. Drain all water from hoses and water filter pump area if weather will be below freezing.
Troubleshooting Tips
WATER
Possible Causes
What To Do
Small amount of water remaining in dispenser (on some models) at end of cycle
Normal dispenser operation
It is normal for a small amount of water to remain in dispenser after the cycle.
Short spray and delay after pushing the Start button
Lid was opened and closed between cycle selection and start
This is normal. See START-UP SEQUENCE in the Safety Instructions section.
Water level seems low
This is normal
Water may not cover the top level of the clothes. This is normal for this high efficiency washer.
Low water flow
Water valve screens are stopped up
Turn off the water source and remove the water connection hoses from the upper back of the washer and the water faucets. Clean both the hose screens (if so equipped) and the screens in the machine using a brush or a toothpick. Reconnect the hoses and turn the water back on. Check to ensure there are no leaks at the connections.
Water siphoning out of washer
Drain standpipe is too low or hose too far into standpipe
The drain hose must exceed 32“ height at some point between the washer back and the drain pipe. Use anti-siphon clip. See the Installation Instructions.
Too many suds
Soft water
Try less detergent.
Too much detergent
Measure your detergent carefully. Use less soap if you have soft water, a smaller load or a lightly soiled load.
Type of detergent
Switch to High Efficiency detergent such as he
Water leaks
Type of detergent
Switch to High Efficiency detergent such as he
Using too much detergent in washer
Use less detergent. Use less soap if you have soft water, a smaller load or a lightly soiled load.
Fill hoses or drain hose is improperly connected
Make sure hose connections are tight at faucets and rubber washers are installed. Make sure end of drain hose is correctly inserted in and secured to drain facility.
Household drain clogged
Check household plumbing. You may need to call a plumber.
Drain hose rubs on wall
Make sure drain hose does not make contact with the wall. May cause excessive wear on the hose.
Constant water pressure to fill hoses at water source
Tighten hoses at the faucets.
Check condition of the fill hoses; they should be replaced every 5 years.
Water temperature seems incorrect
Cooler water temperatures provide improved energy efficiency
New laundry detergents have been formulated to work with cooler water temperatures without affecting wash performance.
Water supply is turned off or improperly connected
Turn both hot and cold faucets fully on and make sure hoses are connected to correct faucets. NOTE: Water valves are marked "H" and “C.
Water valve screens are stopped up
Turn off the water source and remove the water connection hoses from the upper back of the washer and the water faucets. Clean both the hose screens (if so equipped) and the screens in the machine using a brush or a toothpick. Reconnect the hoses and turn the water back on. Check to ensure there are no leaks at the connections.
Cool/Cold Water when selecting Hot
This is normal. The washer senses water temperature (on some models) and optimizes for best results. Cold water is added periodically when hot is selected.
House water heater is not set properly
Make sure house water heater is delivering water at 120°F-140°F (48°C-60°a.
Water pumped out before cycle is complete
Lid lifted or cycle was put in pause for over 24 hours
Reset cycle.
Water won't drain
Drain hose is kinked or improperly connected
Straighten drain hose and make sure washer is not sitting on it. Top of drain outlet should be less than 6 ft (1.8 m) above floor.
Washer spins and pauses at the beginning of cycles
This is normal
The washer is sensing the load.
Washer pauses during wash cycle
The Soak Option was chosen
This is normal. The washer alternates between agitate and soak during these cycles to get your clothes cleaner with less wear.
This is normal
Many cycles incorporate as series of soaks within the agitation period to get your clothes clean with less wear. u
OPERATION
Possible Causes
What To Do
Residual powder in dispenser or clogging of dispensers (on some models)
Wash water too cold or low home water pressure
Select a warmer wash temperature if possible to improve dissolving of detergent or use liquid detergent. Make sure siphon caps are free of debris and fully pressed into position. Remove and clean tray if clogging occurs.
Laundry additives dispensing too soon (Dispensers on some models)
Overfilling of dispensers
Do not overfill or add water to dispenser. Select Deep Rinse option when using fabric softener.
Washer pauses during spin cycle
This is normal
The washer may pause during the spin cycle to remove soapy water more efficiently.
Washer won't operate
Washer is unplugged
Make sure cord is plugged securely into a working outlet.
Water supply is turned off
Turn both hot and cold faucets fully on.
Lid is open-safety feature prevents agitation and spinning when lid is up
Close lid and press Start.
Circuit breaker/fuse is tripped/blown
Check house circuit breakers/fuses. Replace fuses or reset breaker. Washer should have a separate outlet.
Electronics need to be reset
Unplug washer, wait 2 minutes, plug back in and press Start.
Start was not pressed
Press Start.
Detergent packets not dissolving
Laundry detergent packet placed in dispenser
Laundry detergent packets should not be used in the dispensers. They should only be added directly to the wash basket following the manufacturer's directions.
Unexplained time and/ or settings changes
Changing options (on some models)
This is normal. Several options will change other options to maximize washer performance.
Basket seems loose
Basket moves or rotates freely
Washer basket does not have a traditional brake. Washer basket will move freely. This is normal.
PERFORMANCE
Possible Causes
What To Do
Colored spots
Incorrect use of fabric softener
Check fabric softener package for instructions and follow directions for using dispenser.
Make sure you have selected the Deep Rinse option.
Pretreat stain and rewash using Speed Wash cycle before drying.
Dye transfer
Sort whites or lightly colored items from dark colors.
Grayed or yellowed clothes
Detergent amount
Be sure to follow detergent manufacturer's directions.
Hard water
Use a water conditioner or install a water softener.
Water is not hot enough
Make sure water heater is delivering water at 120°F-140°F (48°C-60°C).
Washer is overloaded
Loosely load clothes no higher than the top row of holes in the washer basket. For best results, load items around the outside of the basket.
Dye transfer
Sort clothes by color. If fabric label states wash separately, unstable dyes may be indicated.
Lint or residue on clothes
Clothes are air or line dried
If you do not dry your clothes with a clothes dryer, your clothes may retain more lint.
Incorrect sorting
Separate lint producers from lint collectors.
Washing too long
Wash small loads for a shorter time using Light Soil setting.
Detergent not dissolving
Rewash, next time: Try a liquid detergent; Use warmer water temperature.
Overloading
Loosely load clothes in the washer basket. For best results, load items around the outside of the basket.
Incorrect use of fabric softener
Check fabric softener package for instructions and follow directions for using dispenser.
Make sure you have selected the Deep Rinse option.
Clothes too wet
No spin selected
Select a spin option.
Incorrect cycle selected
Make sure the cycle selected matches the load you are washing. Some fabrics will feel wetter when rinsed with cold water.
Wash load out of balance
Redistribute load in washer and run through Drain & Spin cycle.
Blinking Spin light or Spin light on at end of cycle
Out of balance condition has been detected
Allow cycle to continue and finish.
If load is wet at the end of the cycle, even out load and run a Drain & Spin cycle.
Pilling
Result of normal wear on poly-cotton blends and fuzzy fabrics
While this is not caused by the washer, you can slow the pilling process by washing garments inside out.
Snags, holes, tears, rips or excessive wear
Pins, snaps, hooks, sharp buttons, belt buckles, zippers and sharp objects left in pockets
Fasten snaps, hooks, buttons and zippers.
Remove loose items like pins, objects in pockets and sharp buttons. Turn knits (which snag easily) inside out.
Undiluted chlorine bleach
Check bleach package instructions for proper amount.
Never add undiluted bleach to wash or allow clothes to come in contact with undiluted bleach.
Chemicals like hair bleach or dye, permanent wave solution
Rinse items that may have chemicals on them before washing. Use Speed Wash cycle with Extra Rinse option.
Wrinkling
Incorrect wash and dry cycles
Match Cycle selection to the type of fabric you are washing (especially for easy care loads).
Improper sorting
Avoid mixing heavy items (like jeans) with light items (like blouses). Try a fabric softener.
Overloading
Loosely load clothes in the washer basket.
Repeated washing in water that is too hot
Wash in warm or cold water.
SOUNDS
Possible Causes
What To Do
"Clicking"
Shifter mechanism is engaging or disengaging
The drive system will engage at the start of agitate and disengage when agitate is complete. This occurs multiple times during the wash.
Back and forth "swoosh"
Electric motor reversing direction
This sound is the motor rotating back and forth to clean your laundry.
"Clicking" behind Control during fill
Automatic Temperature Control Valve
Two valves mix cold and hot water. The “clicking” is when either valve turns on or off to raise or lower the fill water temperature.
Water flow changes during fill
Automatic Temperature Control Valve
Two valves mix cold and hot water. The “clicking” is when either valve turns on or off to raise or lower the fill water temperature.
Motor sounds during spin
Motor ramping up/down during spin cycle
The motor will speed up incrementally during the spin cycle. When spin is complete, it will coast until it stops.
"Humming"
Water drain pump
The drain pump will make a humming sound when pumping out water after agitation stops and continue until spin is complete.
Drive motor
The drive motor will make a “humming” sound during the wash and spin phases of the cycle.
"Gurgling"
Water drain pump
When the pump starts drawing in air, It starts to gurgle. The washer should then begin spinning and the sound will continue until it is done spinning.
Water "swishing"
Washing process
Water swishing while the unit is agitating is normal, especially with smaller loads.
Washer rocking/ moving
Washer leveling legs uneven
To level the washer, adjust the leveling legs by rotating the individual leg in the proper direction for up or down.
"Squeaking" sound
Washer not level and rubbing on cabinet
To level the washer, adjust the leveling legs by rotating the individual leg in the proper direction for up or down.


 2. REMOVE THE BASE
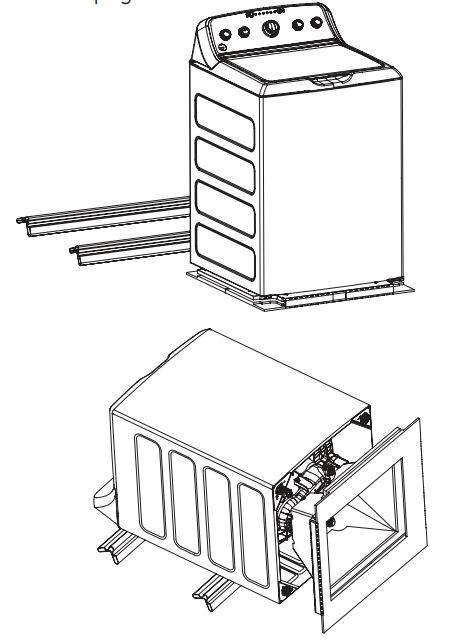


 Pause - Will display when washer is paused between cycles.
 Controls - The washer is locked - will blink once if you press any button or turn the cycle knob.
 Lid Lock - The lid is locked. See the Control Lock description.