Loading ...
Loading ...
Loading ...
40Programming
MAINTENANCE ALERT SYSTEM (MAS)
Feature: An internal cycle counter will activate a fl ashing LED on
the 3-button control station when the preset number of cycles or
months has elapsed (whichever occurs fi rst). Setting this feature
is optional. By default this feature will never activate. Logic 5.0
operators incorporate a self diagnostic feature built into the MAS
LED. In addition to indicating when routine maintenance is due,
the MAS LED can be used to troubleshoot some problems with the
operator.
Benefi t: The Maintenance Alert System (MAS) assists the installing
dealer in setting up a routine maintenance program. Once
programmed, the MAS notifi es the end user (with a fl ashing LED on
the 3-button station) when a preset number of cycles/months has
elapsed and scheduled maintenance is due.
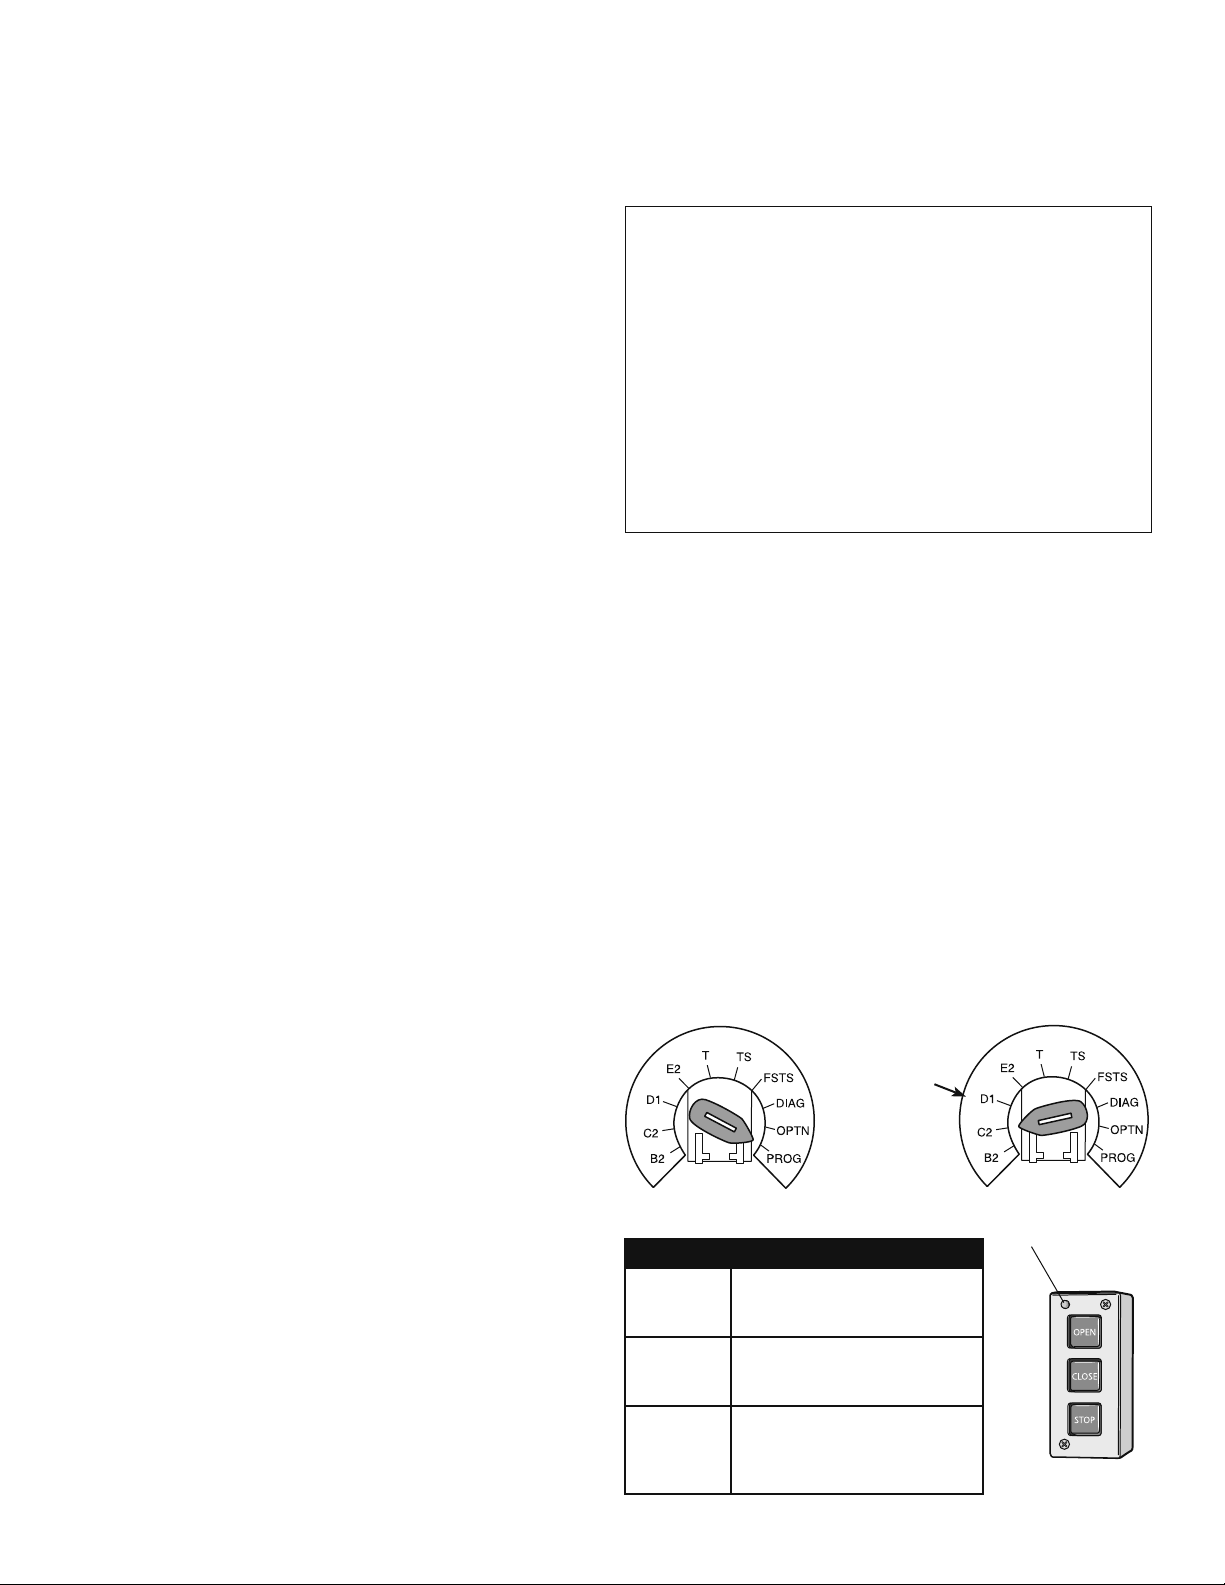
To Program (from the Operator Logic Board):
1. Close the door.
2. Turn the selector dial to PROG.
3. Press and release the MAS SET button.
4. Press the STOP button once to clear the MAS memory.
5. Press the OPEN button once for every 5,000 cycles increments.
Press the CLOSE button once for every 3 month increments.
6. Press and release the MAS button to complete the programming.
The on board LED will fl ash back the programmed settings. The
OPEN LED will fl ash once for every 5,000 cycles. The CLOSE
LED will fl ash once for every 3 months.
7. Turn the selector dial back to the desired wiring type.
NOTE: If MAS LED fl ashes 2 or more fl ashes in a row followed by a
pause, an operator error occurred. Turn to page 47 to diagnose the
problem.
Example: A door is installed with 30,000 cycle springs and has an
annual service contract. To set the MAS, turn selector dial to PROG,
press MAS button, press the STOP button to clear the memory
and then press the OPEN button 6 times (30,000 cycles) and the
CLOSE button 4 times (12 months). Press the MAS button again
to complete the programming. Turn the selector dial back to the
desired wiring type.
Special Notes about MAS: A 5th wire must be run to the control
station to activate the MAS LED. The MAS LED on the logic board
is always enabled. When the operator is serviced after the MAS LED
has started to fl ash, repeat the setup procedure to program in the
number or cycles desired until the next service visit OR press and
SELECTOR DIAL
3-BUTTON CONTROL STATION
Maintenance Alert LED
Operation will
vary depending
on the wiring type
hold the MAS button for 5 seconds in the PROGRAM mode to reset
the MAS with the current programmed value. To disable the MAS,
follow the programming procedure and press the STOP button to
reset the counter to zero. Every time the operator leaves the close
limit one cycle is counted.
To view how many cycles are programmed into the MAS, set the
selector dial to DIAG and press the MAS button. The OPEN button
LED will fl ash once for every 5,000 cycle increment programmed
and the CLOSE button LED will fl ash once for every 3 month
increment programmed.
To view how many cycles have elapsed since the last time the MAS
was programmed, set the selector dial to DIAG and press the MAS
button. Press the OPEN button; the OPEN LED will fl ash once for
every 5,000 cycles that has elapsed. Press the CLOSE button; the
CLOSE LED will fl ash once for every (3) months that has elapsed.
Press the CLOSE button; the CLOSE LED will fl ash once for every (3)
months that have elapsed. Press the MAS button to exit. Turn the
selector dial back to the desired wiring type.
Press This To Get This
OPEN
Adds 5,000 cycles to the
Maintenance Alert System
Activation Counter.
CLOSE Adds 3 Months to the
Maintenance Alert System
Activation Timer.
STOP Clears memory, sets the
Maintenance Alert System
Activation Counter to 0 cycles
and 0 months
PROGRAMMING REMOTE CONTROLS (CONTINUED)
REMOTE CONTROL PROGRAMMING FEATURE
Program Remote Controls from the 3-button control station
(3BCS) (continued)
To turn this feature off:
1. Turn the selector dial to PROG.
2. Press and release the RADIO button. The RADIO LED will be lit.
3. Press and release the MRT button. The RADIO LED will fl ash
quickly 3 times.
4. Press and release RADIO button. The RADIO LED will turn off.
5. Return selector dial to desired wiring type.
NOTE: Restoring the operator to Factory Default (see RESETTING
FACTORY DEFAULTS) will also disable this feature. The remote
controls will still be learned.
ERASING REMOTE CONTROLS
Press and hold the RADIO button on the logic board until the
RADIO LED fl ashes rapidly (approximately 5 seconds).
All remote controls will be erased.
NOTICE: This device complies with Part 15 of the FCC rules and Industry Canada’s license-exempt RSSs.
Operation is subject to the following two conditions: (1) this device may not cause harmful interference,
and (2) this device must accept any interference received, including interference that may cause undesired
operation.
Any changes or modifi cations not expressly approved by the party responsible for compliance could void
the user’s authority to operate the equipment.
This device must be installed to ensure a minimum 20 cm (8 in.) distance is maintained between users/
bystanders and device.
This device has been tested and found to comply with the limits for a Class B digital device, pursuant
to part 15 of the FCC rules and Industry Canada ICES standard. These limits are designed to provide
reasonable protection against harmful interference in a residential installation. This equipment generates,
uses and can radiate radio frequency energy and, if not installed and used in accordance with the
instructions, may cause harmful interference to radio communications. However, there is no guarantee that
interference will not occur in a particular installation. If this equipment does cause harmful interference
to radio or television reception, which can be determined by turning the equipment off and on, the user is
encouraged to try to correct the interference by one or more of the following measures:
• Reorient or relocate the receiving antenna.
• Increase the separation between the equipment and receiver.
• Connect the equipment into an outlet on a circuit different from that to which the receiver is connected.
• Consult the dealer or an experienced radio/TV technician for help.
Loading ...
Loading ...
Loading ...