Loading ...
Loading ...
Loading ...
En-5
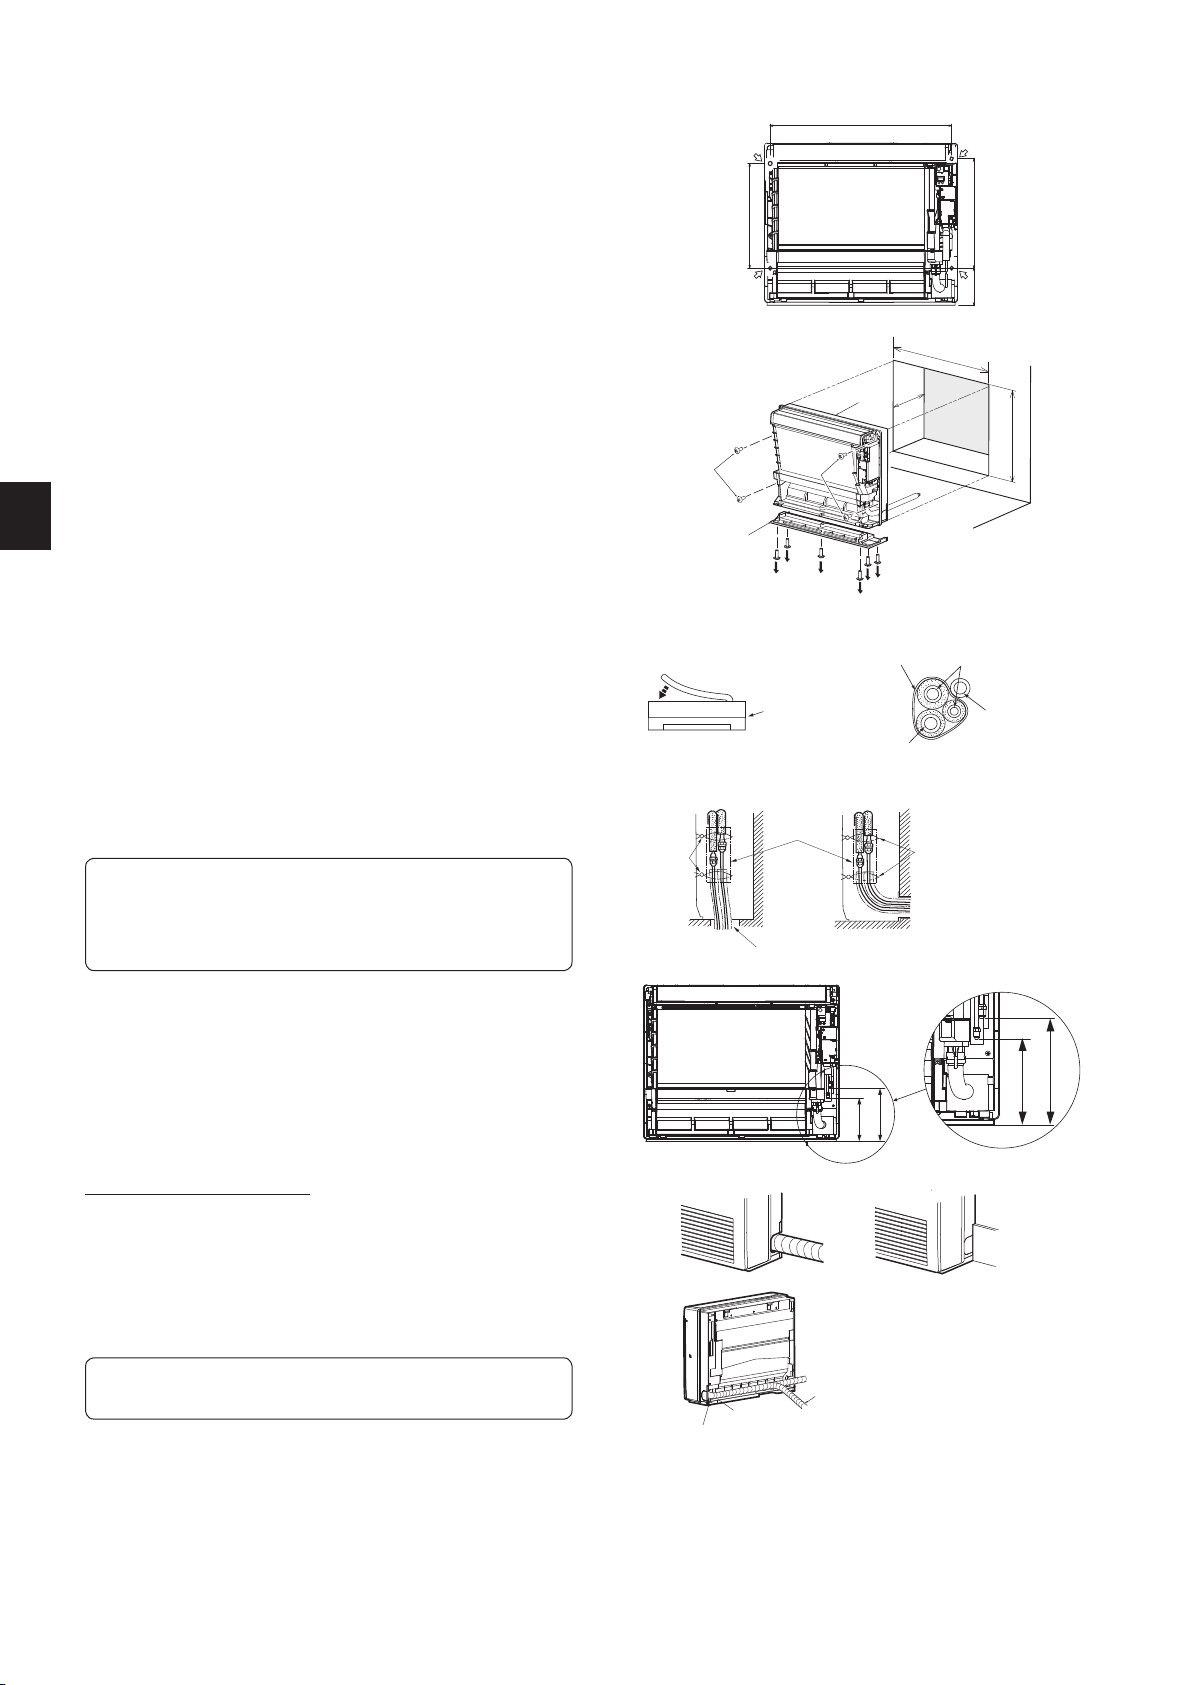
2-4-3.EMBEDDINGTHEINDOORUNITINAWALL
1. Make a hole in the wall.
2. Using reinforcement material, adjust the depth.
3.Remove6screwsthatxthebasetotheunit.Removethebasefromtheunit.
4. Fix the indoor unit at 4 points with the included wood screws (9) and washers
(10). Tighten the screws securely.
3
3
3
3
3
3
4
22-41/64 (575)
29-9/64 (740)
2-3/4
(
70
)
4
27-3/4 (705)
2-4.INDOORUNITINSTALLATION
2-4-1.INSTALLINGTHEINDOORUNITONTHEFLOOR
1.Placetheindoorunitontheatoor.
2. Fix the indoor unit at 4 points with the included wood screws (9) and washers
(10). Tighten the screws securely.
2-4-2.MOUNTINGTHEINDOORUNITONTHEWALL
1. Hook the top of the indoor unit on the indoor unit mounting bracket (7).
2. Fix the indoor unit at 4 points with the included wood screws (9) and washers
(10). Tighten the screws securely.
15-15/16 (405)
5-25/64
(137)
15-15/64 (387)
Reinforcement
material
Unit
Base
Wrap the felt tape (11) tightly around the pipes and hose starting near where
the pipes and hose are routed from the indoor unit. (The overlap width of the
felt tape (11) should not be more than 1/2 of the tape width.)
Felt tape (11)
Start wrapping the piping tape (G) around
the pipes and hose 25/64 in. (10 mm)
inside the indoor unit.
Fasten the end of the felt tape (11) with
a bandage stopper.
Make sure that the drain hose
is not routed upward.
FOR LEFT OR LEFT-REAR PIPING
Bundle the connecting pipes and drain hose together, and then wrap them in
felt tape (11).
Cut and use the lower side panels on the left and right sides of the indoor unit
as shown below.
Smooth the cut edges of the side panels so that they will not damage the insula-
tion coating.
• For left or right piping
• Installingushagainstawallwithmolding
Molding
Cut the lower side panels to
match the height of the molding.
Piping
tape
Drain hose
Refrigerant piping
Indoor unit
Push
Piping bent outward
• Be sure to insulate the connecting pipes so that they do not contact the
panel.
• Be careful not to crush the connecting pipes when bending them.
(Use a tube benders for left or right piping.)
• The pipe cover cannot be attached without connecting the conduit pipe
after connecting the pipes.
Remove the cover.
RIGHT DOWNWARD PIPING OTHER PIPING
Band (5)
Pipe cover (4)
Band (5)
Conduit pipe
8-5/64 (205)
6-1/2 (165)
inch (mm)
2-5. PIPE FORMING AND INSTALLATION
Note: Refer to 4. FLARE CONNECTION, PIPE CONNECTION.
Pipe Forming
• Route the drain hose diagonally below the connecting pipes.
• Make sure that the drain hose is not routed upward and that there are no
waves in the hose.
• Do not pull the hose when applying the tape.
• Route the piping so that it does not project past the rear of the indoor unit.
(Refertotheguretotheright.)
Connecting Pipe Installation
• Install the connecting pipes so that the piping can move slightly to the
front, back, left, and right.
RG79Y918H02_en.indd 5 2019/05/10 8:54:06
Loading ...
Loading ...
Loading ...