
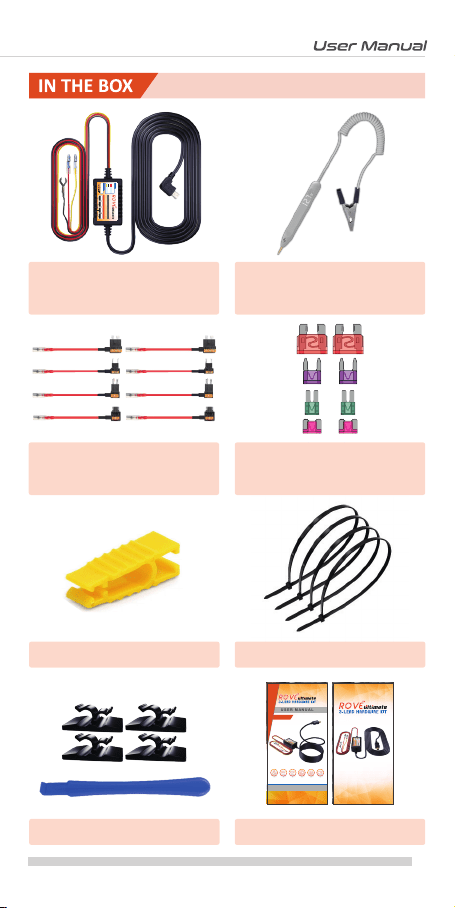
Please Read
USER MANUAL
USER MANUAL
Copyright (C) 2020, All rights reserved
www.rovedashcam.com
Suitable for Cars,
Vans, Truck
And Buses
Universal Kit,
Compatible with
most Dashcam
Voltage Cut-Off
to Prevent
Battery Drain
Constant Power
Supply
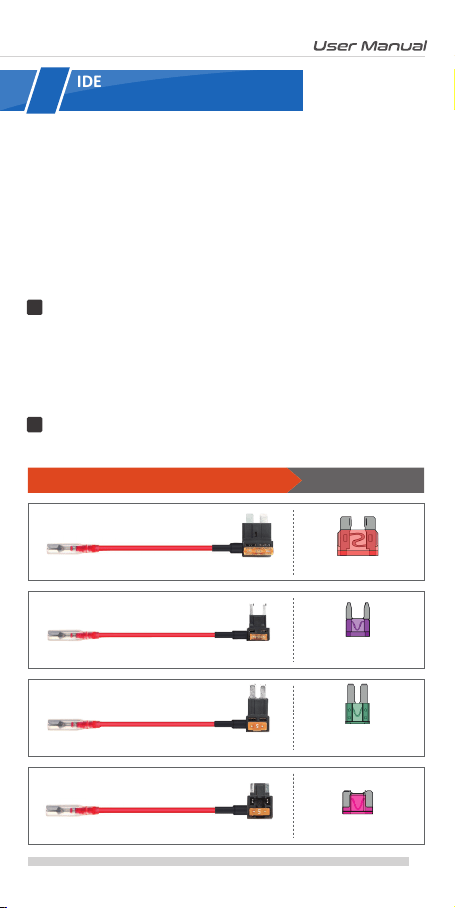
Includes 4x2
Types Fuse & Piggy
Back Fuse Cables
Input Voltage
DC12V/24V

WE WILL HELP YOU IN RESOLVING ANY ISSUES ASAP
CONTACT US BEFORE RETURNING THE ITEM
EXPERIENCING
PROBLEMS
?
Item NOT as described?
Damaged or defective?
Missing items?
Any issues what so ever?
Scan the Code to Text usScan the Code to Email us
1 (401) 484-ROVE(7683)[email protected]
CUSTOMER SERVICE
Hours: Mon - Fri 9am-5pm PST
For faster response text us
1 (401) 484-ROVE(7683)
Response in just 6 hours
Email Us
Text Us
Just Scan the QR Code with your iPhone or Android’s
Camera to get in touch with us.

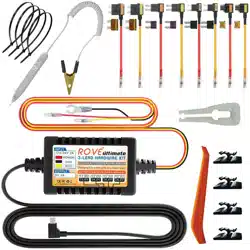
3-LEAD HARDWIRE KIT
FOR 24-HR AUTO TRIGGER PARKING MONITORFOR 24-HR AUTO TRIGGER PARKING MONITOR
INPUT
12V/24V 2A
OUTPUT
5V 2A
POWER
GND
ACC
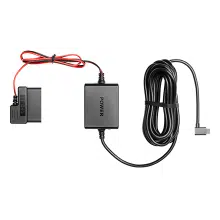
Designed to work with any Dash Cam
www.rovedashcam.com
11.8V
23.6V
12.0V
24.0V
12.2V
24.4V
12.4V
24.8V
BATTERY DRAIN PROTECTION STARTING AT
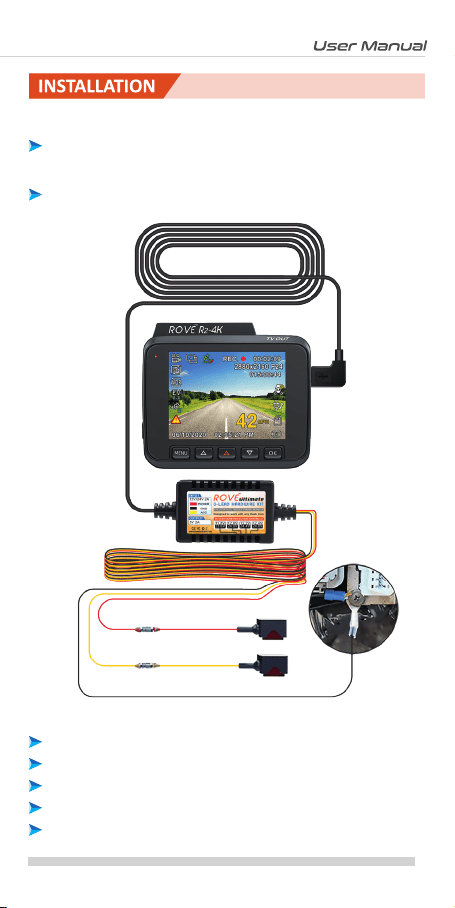
INSTALLATION
INSTALLATION
HOW TO INSTALL
Visit our website
www.rovedashcam.com/pages/videos
Understanding
ROVE Ultimate 3-Lead Hardwire Kit
Watch HOW-TO INSTALL to learn & understand all the
features so you can get the maximum benefit out of it.
WATCH

INDE
What Is Hardwire Kit?
Features
4
4
4
4
5
5
5
6
7
7
9
10
10
11
11
12
13
15
16
18
19
20
....................................................
.............................................................................
................................................
....................................
................................................
.....................................
...................................................................
.....................................
...........................................................................
................................................
.........................................................................
...............................................
..........................................
.......................................................................
................................
....................................................
..........
...........
...............................
...............................................
.....................
...............................................................
3

4

5
3-LEAD HARDWIRE KIT
FOR 24-HR AUTO TRIGGER PARKING MONITORFOR 24-HR AUTO TRIGGER PARKING MONITOR
INPUT
12V/24V 2A
OUTPUT
5V 2A
POWER
GND
ACC
Designed to work with any Dash Cam
www.rovedashcam.com
11.8V
23.6V
12.0V
24.0V
12.2V
24.4V
12.4V
24.8V
BATTERY DRAIN PROTECTION STARTING AT
3-LEAD HARDWIRE KIT
FOR 24-HR AUTO TRIGGER PARKING MONITORFOR 24-HR AUTO TRIGGER PARKING MONITOR
INPUT
12V/24V 2A
OUTPUT
5V 2A
POWER
GND
ACC
Designed to work with any Dash Cam
www.rovedashcam.com
11.8V
23.6V
12.0V
24.0V
12.2V
24.4V
12.4V
24.8V
BATTERY DRAIN PROTECTION STARTING AT
3-LEAD HARDWIRE KIT
FOR 24-HR AUTO TRIGGER PARKING MONITORFOR 24-HR AUTO TRIGGER PARKING MONITOR
INPUT
12V/24V 2A
OUTPUT
5V 2A
POWER
GND
ACC
Designed to work with any Dash Cam
www.rovedashcam.com
11.8V
23.6V
12.0V
24.0V
12.2V
24.4V
12.4V
24.8V
BATTERY DRAIN PROTECTION STARTING AT
3-LEAD HARDWIRE KIT
FOR 24-HR AUTO TRIGGER PARKING MONITORFOR 24-HR AUTO TRIGGER PARKING MONITOR
INPUT
12V/24V 2A
OUTPUT
5V 2A
POWER
GND
ACC
Designed to work with any Dash Cam
www.rovedashcam.com
11.8V
23.6V
12.0V
24.0V
12.2V
24.4V
12.4V
24.8V
BATTERY DRAIN PROTECTION STARTING AT
3-LEAD HARDWIRE KIT
FOR 24-HR AUTO TRIGGER PARKING MONITORFOR 24-HR AUTO TRIGGER PARKING MONITOR
INPUT
12V/24V 2A
OUTPUT
5V 2A
POWER
GND
ACC
Designed to work with any Dash Cam
www.rovedashcam.com
11.8V
23.6V
12.0V
24.0V
12.2V
24.4V
12.4V
24.8V
BATTERY DRAIN PROTECTION STARTING AT
3-LEAD HARDWIRE KIT
FOR 24-HR AUTO TRIGGER PARKING MONITORFOR 24-HR AUTO TRIGGER PARKING MONITOR
INPUT
12V/24V 2A
OUTPUT
5V 2A
POWER
GND
ACC
Designed to work with any Dash Cam
www.rovedashcam.com
11.8V
23.6V
12.0V
24.0V
12.2V
24.4V
12.4V
24.8V
BATTERY DRAIN PROTECTION STARTING AT
3-LEAD HARDWIRE KIT
FOR 24-HR AUTO TRIGGER PARKING MONITORFOR 24-HR AUTO TRIGGER PARKING MONITOR
INPUT
12V/24V 2A
OUTPUT
5V 2A
POWER
GND
ACC
Designed to work with any Dash Cam
www.rovedashcam.com
11.8V
23.6V
12.0V
24.0V
12.2V
24.4V
12.4V
24.8V
BATTERY DRAIN PROTECTION STARTING AT
(i.e. Moon Detecon, Time-Lapse Parking Guard etc.)
*
X Means No Connecon or Connect to Ground
6

WARNING
7

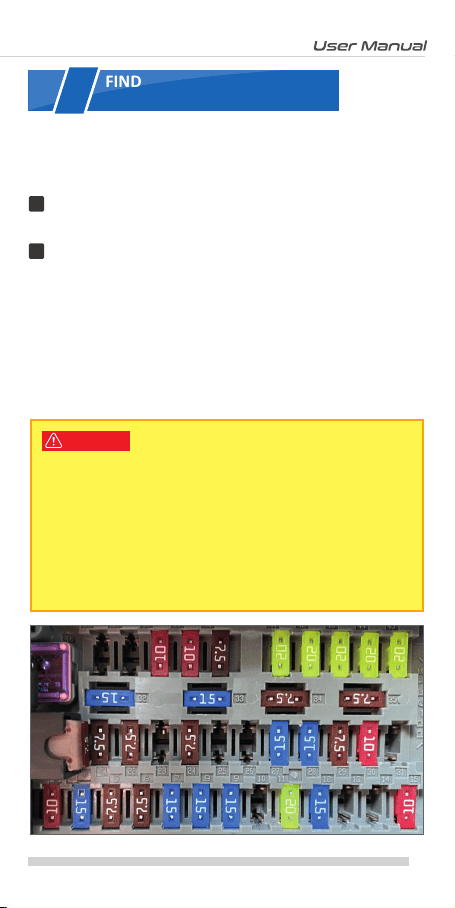
NOTE: In this user manual the photos and images are only
for the reference guide and general illustraon purpose only.
We have used Honda Civic’s fuse box as an example and
some other stock photos of the fuse box to give you an idea
of how to install a hard wire kit.
8
3-LEAD HARDWIRE KIT
FOR 24-HR AUTO TRIGGER PARKING MONITORFOR 24-HR AUTO TRIGGER PARKING MONITOR
INPUT
12V/24V 2A
OUTPUT
5V 2A
POWER
GND
ACC
Designed to work with any Dash Cam
www.rovedashcam.com
11.8V
23.6V
12.0V
24.0V
12.2V
24.4V
12.4V
24.8V
BATTERY DRAIN PROTECTION STARTING AT
Please Read
USER MANUAL
USER MANUAL
Copyright (C) 2020, All rights reserved
www.rovedashcam.com
Suitable for Cars,
Vans, Truck
And Buses
Universal Kit,
Compatible
With any Dashcam
Voltage Cut-Off
to Prevent
Battery Drain
Constant Power
Supply
Includes 4x2
Types Fuse & Piggy
Back Fuse Cables
Input Voltage
DC12V/24V 2A
www.rovedashcam.com
9

10
11
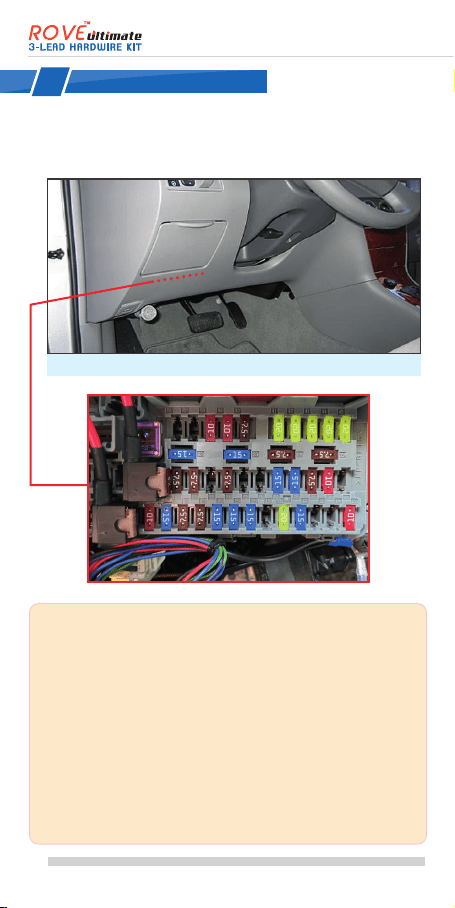
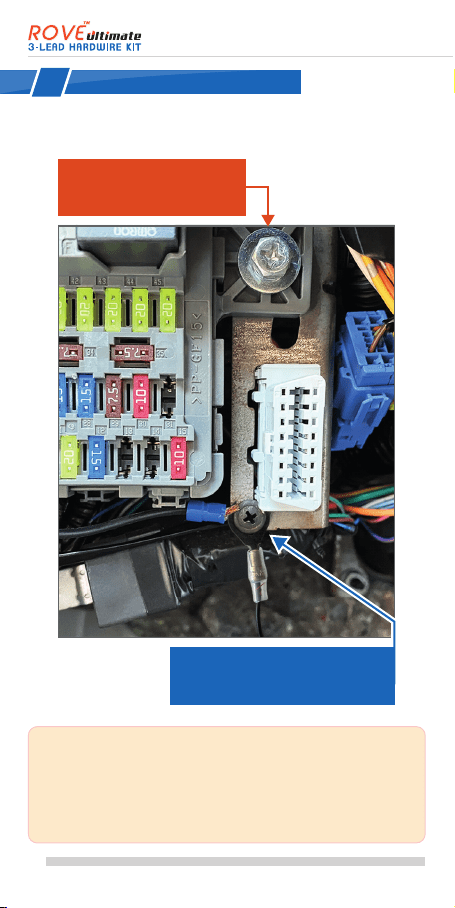
NOTE: To Determine the locaon of your vehicle’s fuse box
refer to the vehicle owner’s manual.
It will instruct you on how to get access to your fuse box. In
above case, we have removed the top panel to get access to
the fuse box.
You probably need to remove trim or open some panels to
gain access to your car’s fuse box. On most cars, you can
access the fuse box simply by liing a tab or pulling a panel
with your fingers, while some others may require you to pry
with an included trim tool.
See the how to video for more details about this.
1
Fuse box is located behid this panel.
(Example Shown: Honda Civic)
12
1
2
WARNING
2
13
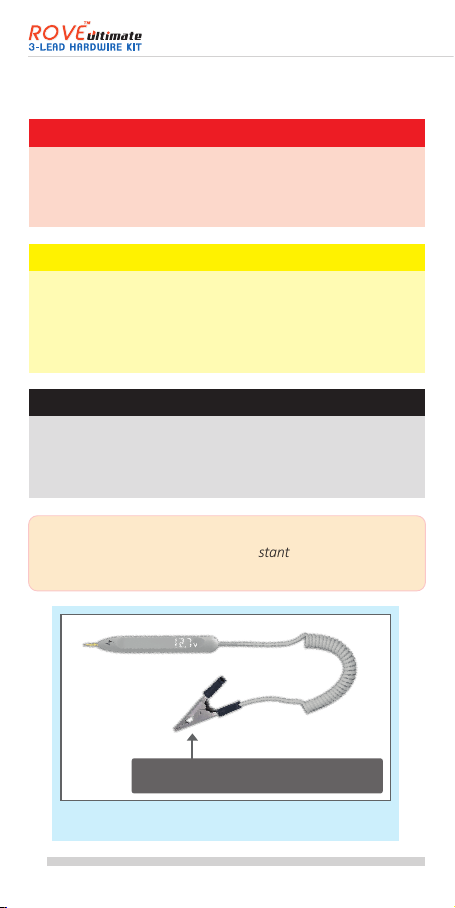
TIP: Use the voltage meter included in the box or equivalent
to test which fuse is constant and which is
ACC/ignion-switched.
Fig: 30V Voltage Meter, included into the box.
14
Or
1
2
3
15

1
REMINDER
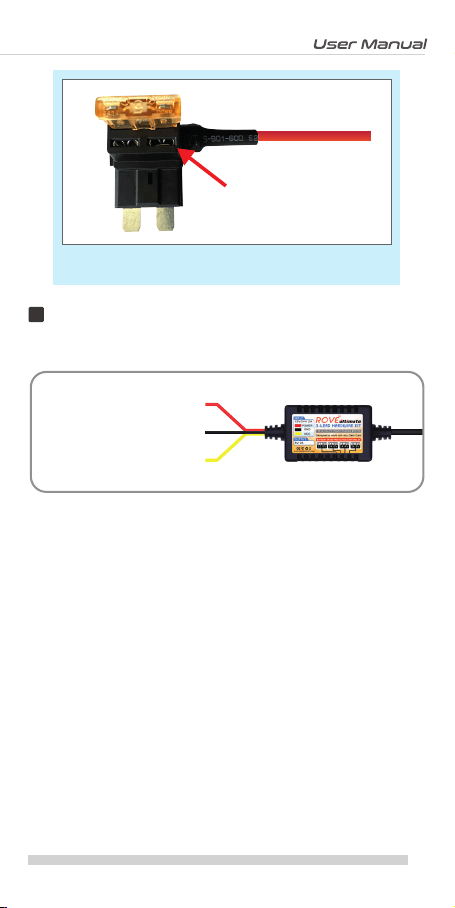
Fig: Crimp the fuse taps with Red & Yellow wires
4
16
3-LEAD HARDWIRE KIT
FOR 24-HR AUTO TRIGGER PARKING MONITORFOR 24-HR AUTO TRIGGER PARKING MONITOR
INPUT
12V/24V 2A
OUTPUT
5V 2A
POWER
GND
ACC
Designed to work with any Dash Cam
www.rovedashcam.com
11.8V
23.6V
12.0V
24.0V
12.2V
24.4V
12.4V
24.8V
BATTERY DRAIN PROTECTION STARTING AT
2
Fig: Add-A-Fuse / Piggyback Fuse Tap
17
NOTE: See the picture above for reference. We
recommend that you choose the metal Chassis
Grounding Screw, or it may cause your dash cam to not
funcon properly and restart/reboot when power does
not flow properly.
5
18
WARNING
6
a
c
19

Hardwire Kit
20

www.rovedashcam.com