Loading ...
Loading ...
Loading ...
three minutes or until irritation ceases. If medical attention is needed, the battery
electrolyte is composed of a mixture of liquid organic carbonates and lithium salts.
WARNING: Burn hazard. Battery liquid may be flammable if exposed to spark or flame.
IMPORTANT CHARGING NOTES
1. After normal usage, your tool should be fully charged in 8 to 9 hours. Your tool was
sent from the factory in an uncharged condition. Before attempting to use it, it must
be charged for at least 9 hours.
2. DO NOT charge the tool in an air temperature below 40°F (4,5° C) or above 105°F
(+40,5 °C). This is important and will prevent serious damage to the batteries.
Longest life and best performance can be obtained if batteries are charged when air
temperature is about 75°F (23,8° C).
3. While charging, the charger may hum and become warm to touch. This is a normal
condition and does not indicate a problem.
4. If the tool does not charge properly—(1) Check current at receptacle by plugging
in a lamp or other appliance. (2) Check to see if receptacle is connected to a light
switch which turns power off when you turn out the lights. (3) Move charger and
tool to a surrounding air temperature of 40°F (4,5° C) to 105°F (+40,5° C). (4) If the
receptacle and temperature are OK, and you do not get proper charging, take or
send the tool and charger to your local BLACK+DECKER service center.
5. The tool should be recharged when it fails to produce sufficient power on jobs which
were easily done previously. DO NOT CONTINUE using product with its batteries in a
depleted condition.
CHARGING PROCEDURE
THE BATTERIES IN YOUR TOOL ARE NOT FULLY CHARGED AT THE FACTORY.
BEFORE ATTEMPTING TO CHARGE THEM, THOROUGHLY READ ALL OF THE
SAFETY INSTRUCTIONS.
To charge your tool, follow the steps below.
1. Plug the charger into any standard 120 Volt 60 Hz electrical outlet.
NOTE: Because this tool is equipped with a USB port,
it can be charged through USB ports. Ensure the
cable (Micro USB) and port are USB compliant.
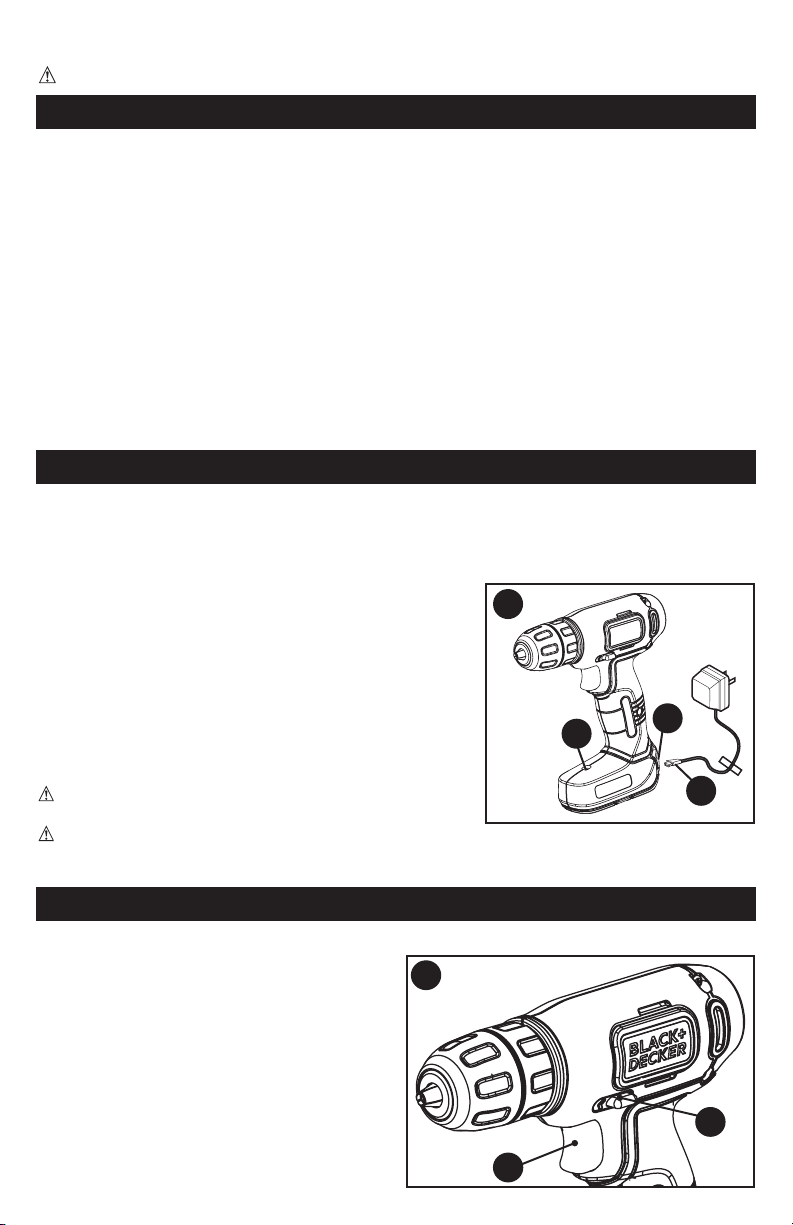
2. Insert the charger plug (7) into the usb charging
port (4) as shown in figure A. The charging
indicator LED (6) will remain on continuously,
indicating that the battery inside the drill is being
charged. When charging is complete, the LED will
turn off.
3. Let the tool charge initially for 9 hours. After the
initial charge, under normal usage, your tool should
be fully charged in 8 to 9 hours.
WARNING: Do not use tool while it is connected
to the charger.
WARNING: Fire Hazard. When disconnecting the
charger from the tool, be sure to unplug the charger from the outlet first, then disconnect
the charger cord from the tool.
OPERATING INSTRUCTIONS
TRIGGER SWITCH & REVERSING BUTTON (FIGURE B)
• ThedrillisturnedONandOFFbypulling
and releasing the trigger switch (1).
• Aforward/reversecontrolbutton(2)
determines the direction of the tool and
also serves as a lock off button.
• Toselectforwardrotation,releasethe
trigger switch and depress the forward/
reverse control button to the left.
• Toselectreverse,depresstheforward/
reverse control button the opposite direction.
NOTE: The center position of the control
button locks the tool in the off position. When
changing the position of the control button, be
sure the trigger is released.
6
1
2
B
A
7
4
6
Loading ...
Loading ...
Loading ...