Loading ...
Loading ...
EN
EN
JBL DSP Amplifier DSP4086
2
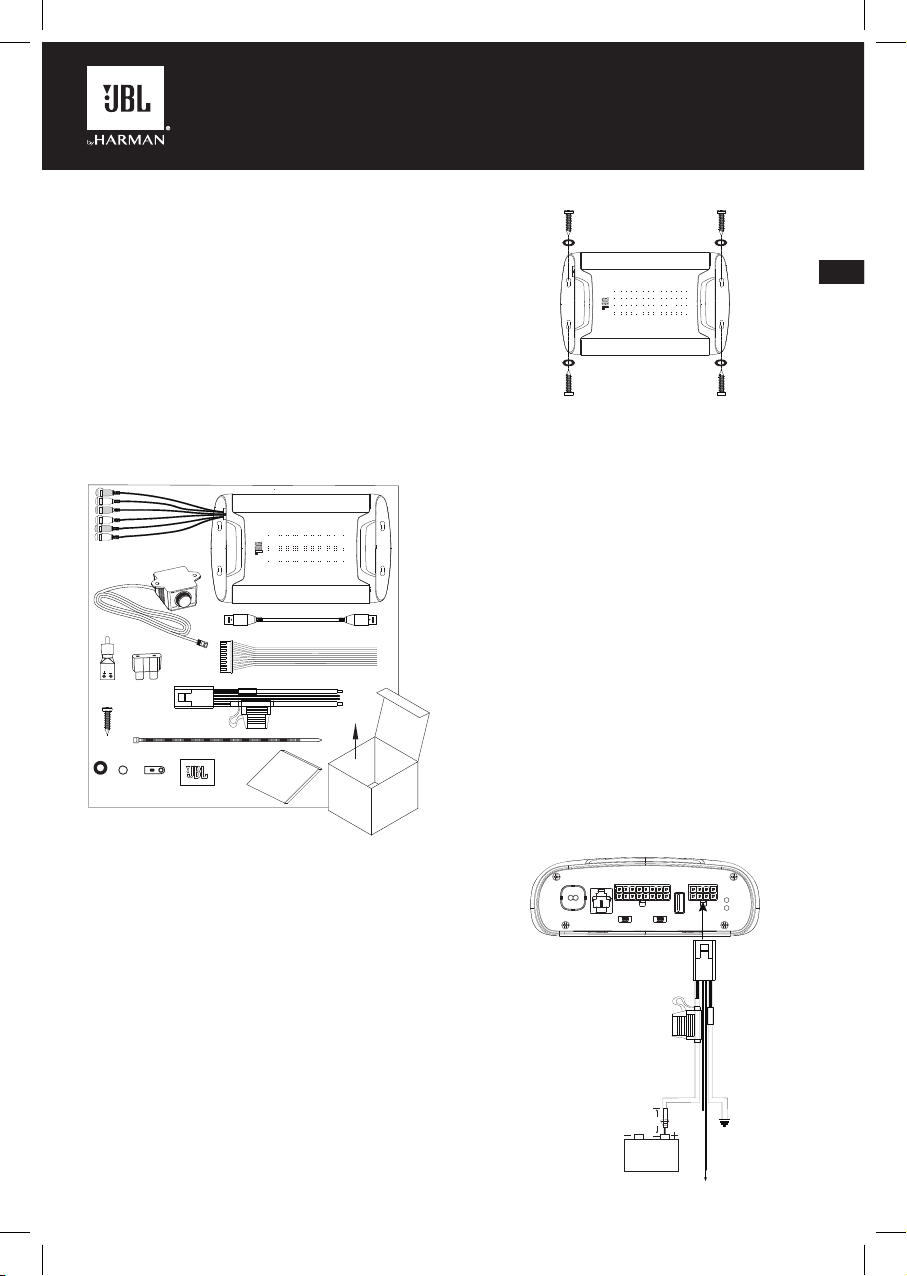
Power and Ground Connections
• Power: Connect the +12V power wire to the positive terminal
of the vehicle’s battery. Make sure the fuse and fuse holder are
within 18” (457mm) of the battery.
• Ground: Connect the GND wire to the negative terminal of
the vehicle’s battery, or to the vehicle’s chassis near the battery
with a screw. NOTE: If possible, remove any paint from the
chassis for best contact. It is recommended to use a star
washer below the ring connector for a secure connection.
• Remote-In: Connect the remote turn-on wire to the “Remote
Out” lead of the source unit, if using low-level signal inputs with
an aftermarket stereo. NOTE: If you are using high-level signal
inputs (your vehicle’s speaker wires), you can choose to have
the 12-volt DC offset feature turn the amplifier on when you
turn on the vehicle power, or the audio-sensing feature turn on
the amplifier when it detects audio signal. In either case, you
will not have to connect the remote turn-on wire and can tape
or cap it off to prevent the introduction of noise.
• Remote-Out: Connect the remote-out wire to external devices
that require 12V turn-on after the JBL DSP Amplifier. This
connection will allow turn-on of 12V devices after the amplifier
wakes from turn-on by 12V remote-in, DC offset or audio
signal sensing input.
Power/Protect indicators
The power light will illuminate in green when the amplifier is getting
power and playing. The light will illuminate in red if the amp enters
protect mode in the event of conditions such as over/under voltage,
short circuit, amplifier output circuit failure, or excessive heat.
REMOTE
INPUT
LEVEL
LO HI HI2 REM DC AUDIO
TURN-ON
MODE
PC
SPEAKER OUTPUT CHANNELS POWER
REM OUT GND
GND
GND
12V
12V
12V
REM IN
PRT
PWR
AUDIO
INPUT
8+1+ 2+ 3+ 4+ 5+ 6+ 7+
8-1- 2- 3-
4- 5-
6- 7-
Chassis ground (-)
Remote turn-on
(blue) to stereo
REM out
Battery
Fuse holder, 40A fuse
18" (46cm)
PRODUCT DESCRIPTION
The JBL DSP Amplifier is an audio processor for fine-tuning of
aftermarket audio systems. It is a self-contained audio system
with 6-channel audio inputs, 8-channel powered audio outputs,
an easy-to-use tuning interface a novice can understand, and
detailed tuning capabilities to satisfy even experienced installers.
With a USB connection to access the tuning interface using a
Windows PC, you can control fully variable crossovers, selectable
0-to-48 dB slopes, time delay, 31-band parametric or graphic EQ
adjustment, assignable input-to-output mixer with input channel
summing, channel gain, master volume control, clipping indicator
to ensure the audio output is not distorted, and ability to save up
to 10 presets.
WHAT'S IN THE BOX
1X
4X
4X 4X 1X
6X
1X
1X
1X
4X
1X
1X
2X
1X
INSTALLATION AND WIRING
IMPORTANT: Disconnect the vehicle’s negative (–) battery
terminal before beginning the installation.
• Wear protective eyewear when using tools.
• Choose a safe mounting location. Check clearances on both
sides of the location. Be sure that screws will not puncture
brake or fuel lines or wiring harnesses, and that wire routing will
not interfere with vehicle operation. Use caution when drilling
or cutting.
• When making electrical connections, make sure they are
secure and properly insulated.
• Do not mount the amplifier with the heat sink facing downward,
as this interferes with cooling.
• Using the amplifier as a template, mark the locations of the
holes on the mounting surface.
• Drill pilot holes in the mounting surface.
• Attach the amplifier to the mounting surface with the included
sheet metal screws and washers.
Loading ...
Loading ...
Loading ...