Loading ...
Loading ...
Loading ...
ENGLISH
19ninjakitchen.com18
1-877-646-5288
CARE & MAINTENANCE
CLEANING AFTER A BREW
1 After the unit has cooled, remove the
filter holder from the brew basket.
If using a paper coee filter, discard
it. If using either the coee or tea
permanent filter, wash it thoroughly
with soap and warm water or place
on top rack of dishwasher.
2 Clean the frother whisk after each
use. Hand-wash thoroughly or place
on top rack of dishwasher.
3 Wash the carafe and brew-through
lid with soap and warm water. Use a
bottle brush or a cloth to wash the
inside of the carafe. DO NOT use a
wire brush.
4 After the brewer has cooled, wipe
down the main unit, showerhead,
and water reservoir shelf with a
cloth and warm water. DO NOT
immerse the brewer in water.
CLEANING YOUR WATER RESERVOIR
Empty the water reservoir and hand-
wash or place in your dishwasher.
CLEANING YOUR CARAFE
We recommend cleaning your carafe
with warm, soapy water.
If you want to clean the carafe more
thoroughly, we recommend using a soft
foam brush. DO NOT use a wire brush.
NOTE: The glass carafe, brew-through
lid, coee and tea permanent filters,
removable filter holders, water reservoir,
flip-top lid, frother whisk, and scoop are
top-rack dishwasher safe.
NOTE: For best results, we
recommend rinsing the reservoir
after brewing and refilling with fresh
water for the next brew.
Fig. 22
CP307 P4 BACKLIT UI LAYOUT
2017.12.21
PREPARING & USING
THE NINJA
HOT & COLD BREWED SYSTEM™ - CONT.
3 Press DELAY BREW. DELAY BREW
will illuminate and the clock will begin
to flash “12:00” or the last Delay Brew
time that was set (Fig. 18).
4 While the clock is flashing, press
the hour (H) or minute (M) button
to set the time that you would like
the Delay Brew to begin. The AM or
PM indicator will illuminate on the
left side of the display as you are
setting the desired time.
5 Once the proper time has been set,
select the size of the vessel that you
would like to brew into.
6 Turn the START/SELECT dial to
choose your brew style. If brewing
tea, press the Tea button
to
toggle to the tea menu, and use
the bottom dial to choose your
tea type. To change your brew
style while in the tea menu,
press the Tea button
again.
7 Once the time, brew size, brew
style, and tea type (if applicable)
have been set, allow DELAY BREW
to stop flashing, or press DELAY
BREW to activate. When activated,
the unit will beep and DELAY BREW
and your selected options will
remain illuminated. To cancel,
press DELAY BREW again.
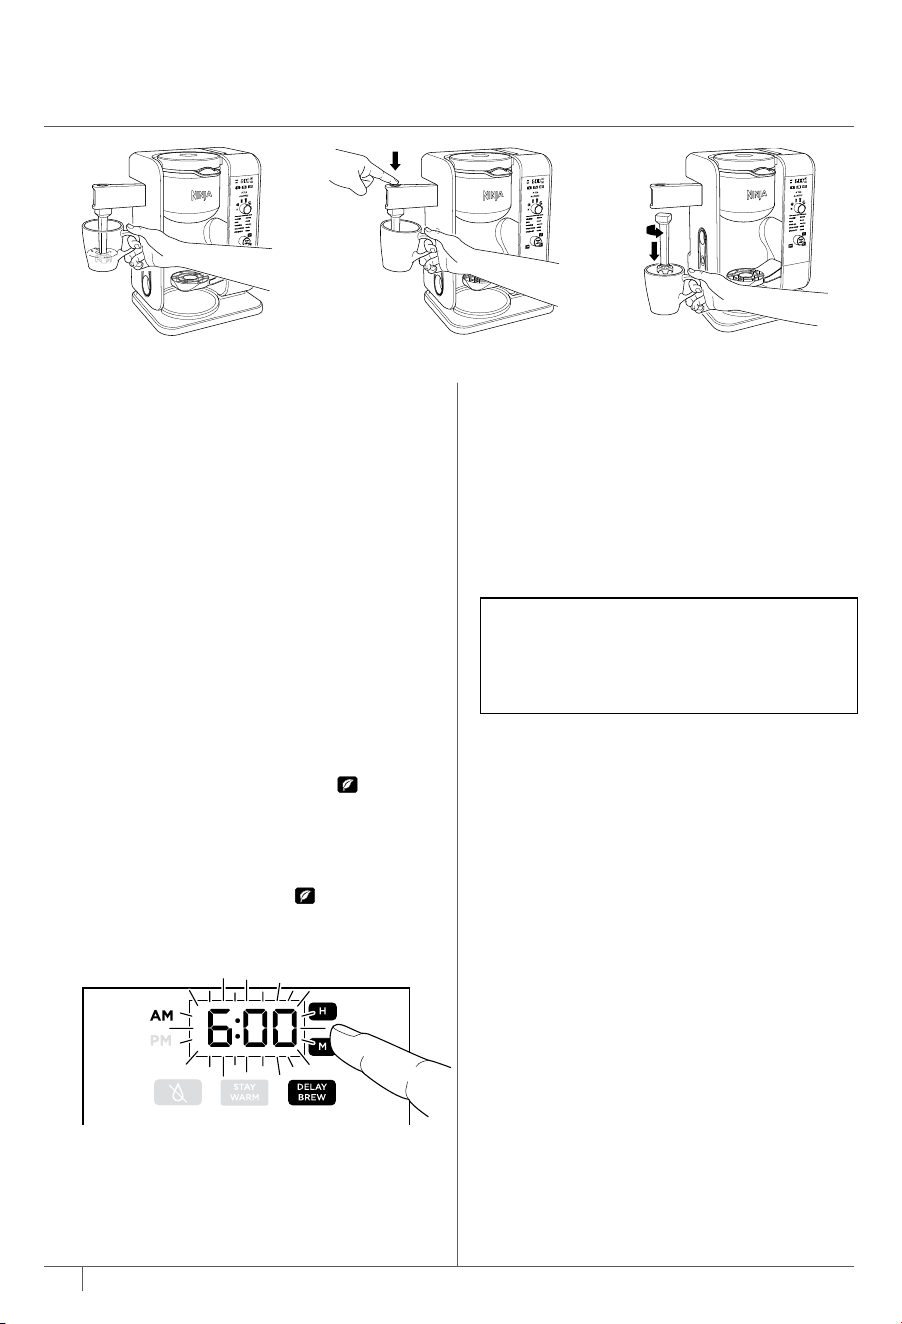
FROTHING MILK
1 Pour milk into cup, until it is about
1
/
3
full. (Use more or less milk
depending on your preference.)
Microwave for 45 to 60 seconds
for hot milk.
2 Move the frother into the ready
position by swinging the arm
toward the front.
3 Hold the cup under the frother and
submerge the whisk just below the
surface of the milk. This allows air
to fold into the milk for the frothiest
results (Fig. 19).
4 Press and hold the frothing button
for 30 to 45 seconds (Fig. 20).
5 You can easily remove the frother
whisk by twisting it clockwise. To
avoid spills, keep your cup below
the whisk and carry it to your sink
or dishwasher for cleaning (Fig. 21).
NOTE: If you attempt to change your
selections while Delay Brew is set, the
unit will beep and DELAY BREW will
flash. To change your selections, cancel
the Delay Brew.
Fig. 19 Fig. 20 Fig. 21
Fig. 18
Loading ...
Loading ...
Loading ...