

FormNo.3379-685RevB
14inElectricTrimmer
ModelNo.51480—SerialNo.312000001andUp
Operator'sManual
Ifyouhavequestionsorproblems,contactusatwww.Toro.comor
calltollfree1-800-237-2654(US)or1-800-248-3258(Canada)before
returningthisproduct.
Importer:SERVICIOSHOMEDEPOT,S.DER.L.DEC.V.
RicardoMargain605,SantaEngracia,SanPedroGarzaGarcía,
NuevoLeón,México,C.P .66267Tel.018000046633
ThewarrantyprintedinthemanualisnotvalidforMexico.
GeneralSafetyRules
WARNING:Whenusingelectricgardeningappliances,basic
safetyprecautionsshouldalwaysbefollowedtoreducetheriskof
re,electricshock,andpersonalinjury,includingthefollowing:
Readallinstructions.
Theterm“powertool”inallofthewarningsreferstoyour
mains-operated(corded)powertoolorbattery-operated(cordless)
powertool.
1.Workareasafety
A.Keepworkareacleanandwelllit.Clutteredordark
areasinviteaccidents.
B.Donotoperatepowertoolsinexplosive
atmospheres,suchasinthepresenceofammable
liquids,gases,ordust.Powertoolscreatesparks,
whichmayignitethedustorfumes.
C.Keepchildrenandbystandersawaywhileoperating
apowertool.Distractionscancauseyoutolose
control.
2.Electricalsafety
A.Powertoolplugsmustmatchtheoutlet.Never
modifythepluginanyway.Donotuseany
adapterplugswithearthed(grounded)powertools.
Unmodiedplugsandmatchingoutletswillreducerisk
ofelectricshock.
B.Avoidbodycontactwithearthedorgrounded
surfaces.Thereisanincreasedriskofelectricshockif
yourbodyisearthedorgrounded.
C.Donotabusethecord.Neverusethecordfor
carrying,pulling,orunpluggingthepowertool.
Keepcordawayfromheat,oil,sharpedges,or
movingparts.Damagedorentangledcordsincrease
theriskofelectricshock.
D.Donotexposepowertoolstorainorwetconditions.
Waterenteringapowertoolwillincreasetheriskof
electricshock.
E.Ifoperatingapowertoolinadamplocationis
unavoidable,useasupplyprotectedbyaresidual
currentdevice(RCD)inAUSoragroundfault
interrupt(GFI)intheUSA.
UseofanRCDorGFIreducestheriskofelectricshock.
F.Whenoperatingapowertooloutdoors,usean
extensioncordsuitableforoutdooruse.Useofa
cordsuitableforoutdoorusereducestheriskofelectric
shock.
G.Disconnecttheplugfromthepowersourcewhen
theapplianceisnotinuse.
3.Personalsafety
A.Stayalert;watchwhatyouaredoing,anduse
commonsensewhenoperatingapowertool.Do
notuseapowertoolwhileyouaretiredorunder
theinuenceofdrugs,alcohol,ormedication.A
momentofinattentionwhileoperatingpowertoolsmay
resultinseriouspersonalinjury.
B.Usepersonalprotectiveequipment.Alwayswear
eyeprotection.Protectiveequipmentsuchasdust
mask,non-skidsafetyshoes,hardhat,orhearing
protectionusedforappropriateconditionswillreduce
personalinjuries.
C.Preventunintentionalstarting.Ensuretheswitch
isintheoff-positionbeforeconnectingtopower
sourceand/orbatterypack,pickinguporcarrying
thetool.Carryingpowertoolswithyourngeronthe
switchorenergizingpowertoolsthathavetheswitch
oninvitesaccidents.
D.Donotoverreach.Keepproperfootingandbalance
atalltimes.Thisenablesbettercontrolofthepower
toolinunexpectedsituations.
E.Dressproperly.Donotwearlooseclothingor
jewelry.Keepyourhair,clothingandglovesaway
frommovingparts.Looseclothes,jewelry,orlonghair
canbecaughtinmovingparts.
F.Keephandsandfeetawayfromthecuttingarea.
G.Thedeviceshouldnotbeusedbypersons
(includingchildren)withreducedphysical,sensory
ormentalabilities,orlackofexperienceor
knowledge,unlesssuchpersonsaresupervision
ortrainingtooperatetheappliancebyaperson
responsiblefortheirsafety.Childrenshouldbe
supervisedtonotusethedeviceasatoy.
4.Powertooluseandcare
A.Donotforcethepowertool.Usethecorrectpower
toolforyourapplication.Thecorrectpowertoolwill
dothejobbetterandsaferattherateforwhichitwas
designed.
B.Donotusethepowertooliftheswitchdoesnotturn
itonandoff.Anypowertoolthatcannotbecontrolled
withtheswitchisdangerousandmustberepaired.
C.Disconnecttheplugfromthepowersourceand/or
thebatterypackfromthepowertoolbeforemaking
anyadjustments,changingaccessories,orstoring
©2014—TheToro®Company
8111LyndaleAvenueSouth
Bloomington,MN55420
Registeratwww.Toro.com.
OriginalInstructions(EN)
PrintedinChina
AllRightsReserved
*3379-685*B
powertools.Suchpreventivesafetymeasuresreduce
theriskofstartingthepowertoolaccidentally.
D.Removethebatterypackfromthepowertoolbefore
makinganyadjustments,changingaccessories,or
storingpowertools.Suchpreventivesafetymeasures
reducetheriskofstartingthepowertoolaccidentally.
E.Storeidlepowertoolsoutofthereachofchildren,
anddonotallowpersonsunfamiliarwiththepower
toolortheseinstructionstooperatethepowertool.
Powertoolsaredangerousinthehandsofuntrained
users.
F.Storeidleappliancesindoors.Whennotinuse,
appliancesshouldbestoredindoorsinadryandhigh
orlocked-upplace,outofthereachofchildren.
G.Maintainpowertools.Checkformisalignmentor
bindingofmovingparts,breakageofparts,and
anyotherconditionthatmayaffecttheoperation
ofthepowertool.Ifdamaged,havethepowertool
repairedbeforeuse.Manyaccidentsarecausedby
poorlymaintainedpowertools.
H.Keepcuttingtoolssharpandclean.Properly
maintainedcuttingtoolswithsharpcuttingedgesare
lesslikelytobindandareeasiertocontrol.
I.Usethepowertoolinaccordancewiththese
instructionsandinthemannerintendedforthe
particulartypeofpowertool,takingintoaccountthe
workingconditionsandtheworktobeperformed.
Useofthepowertoolforoperationsdifferentfromthose
intendedcouldresultinahazardoussituation.
J.Keepguardsinplaceandinworkingorder.
5.Service
A.Haveyourpowertoolservicedbyaqualiedrepair
personusingonlyidenticalreplacementparts.
Thiswillensurethatthesafetyofthepowertoolis
maintained.
B.Ifthecordisdamaged,itmustbereplacedbythe
manufacturer,itsauthorizedserviceagentora
similarlyqualiedinordertoavoidhazard.
6.ExtensionCord
Ensurethatyourextensioncordisingoodcondition.When
usinganextensioncord,useoneheavyenoughtocarry
thecurrentyourproductwilldraw.Anundersizedextension
cordwillcauseadropinlinevoltage,resultinginlossof
powerandoverheating.Thefollowingtableliststhecorrect
cordsizedependingonthelengthofthecord.Ifyouarein
doubt,usethenextheaviergauge.Thesmallerthegauge
number,theheavierthegauge.
ExtensionCordLengthMinimumWireGauge
(A.W.G.)
32.8m(100ft)
16
49.2m(150ft)
14
Note:Donotuseanextensioncordover49.2m(150ft)
long.
Toreducetheriskofdisconnectionoftheextensioncord
duringuse,connecttheextensioncordtothetrimmeras
illustratedinOperation(page5).
SAVETHESEINSTRUCTIONS
Electricalspecications:120V~60Hz5A
SafetyandInstructionalDecals
Safetydecalsandinstructionsareeasilyvisibletotheoperatorandarelocatednearanyareaofpotentialdanger.
Replaceanydecalthatisdamagedorlost.
Symbol
Name
Designation/Explanation
AC
Alternatingcurrent
Typeofcurrent
AAmperes
Current
HzHertz
Frequency(cycles
persecond)
rpm
Revolutionsper
minute
Speedofstring
VVoltsVoltage
125–8323
121–7615
2

121–7617
125–3274
1.Warning—readtheOperator’sManual;donotoperatein
wetconditions;donotoperateifthecordisdamaged;wear
eyeprotection.
125–8325
125–8326
Setup
LooseParts
Usethechartbelowtoverifythatallpartshavebeenshipped.
ProcedureDescription
Qty.
Use
Auxiliaryhandle1
Latch1
1
Brace1
Installtheauxiliaryhandle.
Guard
1
2
Phillipsscrew1
Installtheguard.
3
Edgeguard1Installtheedgeguard.
4
Nopartsrequired
–
Adjustthetrimmerheightandthebase
position.
3
1
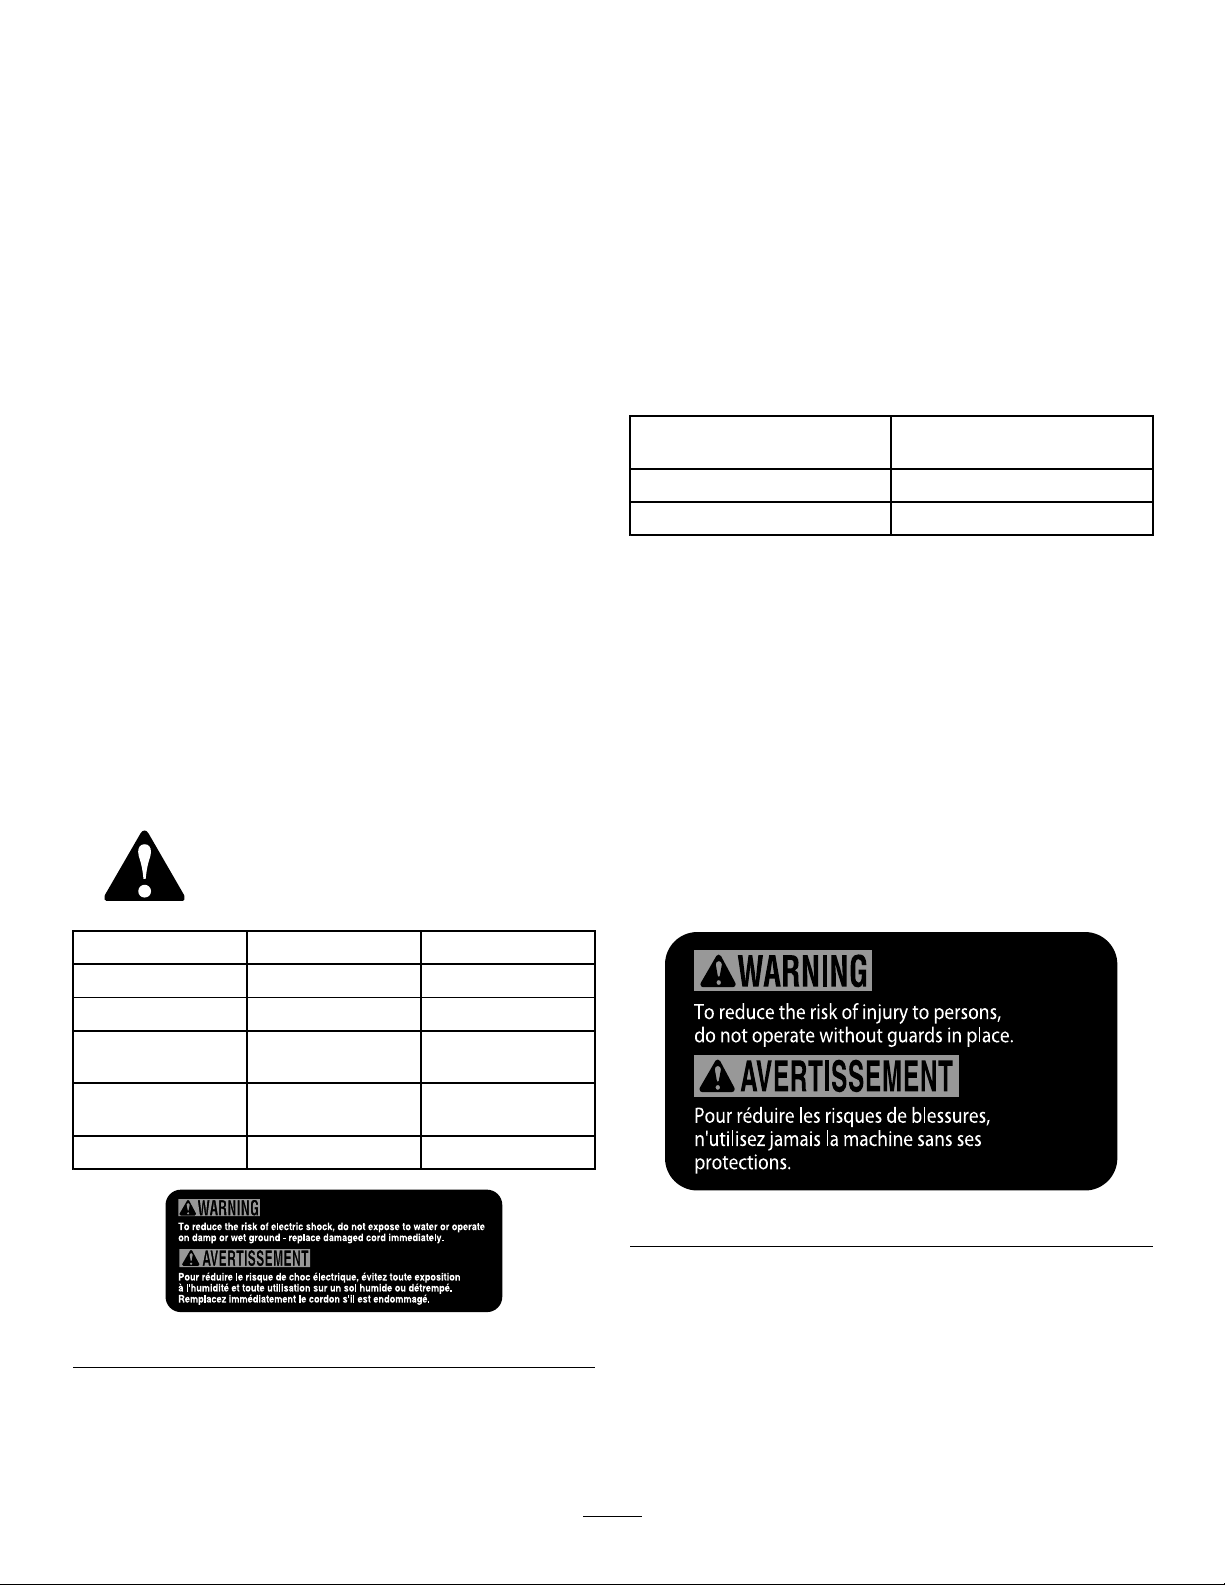
InstallingtheAuxiliaryHandle
Partsneededforthisprocedure:
1Auxiliaryhandle
1Latch
1Brace
1.Positiontheauxiliaryhandleontheshaftofthetrimmerwith
thesmoothsurfacefacingtheoperator(
Figure1).
G017277
1
2
3
Figure1
1.Auxiliaryhandle3.Brace
2.Latch
2.Slidethebraceintotheauxiliaryhandlesothatthebrace
restsinthegroovealongtheshaft(Figure1).
3.Slidethelatchfromtheleftthroughthehandleandbrace,
andtightenthelatchscrewwithaPhillipsscrewdriver
(Figure1).
2
InstallingtheGuard
Partsneededforthisprocedure:
1
Guard
1Phillipsscrew
Procedure
1.SlidetheguardontothetrimmerbaseasshowninFigure2.
1
2
G015656
Figure2
1.Phillipsscrew
2.Guard
2.SecuretheguardusingthePhillipsscrew.
3
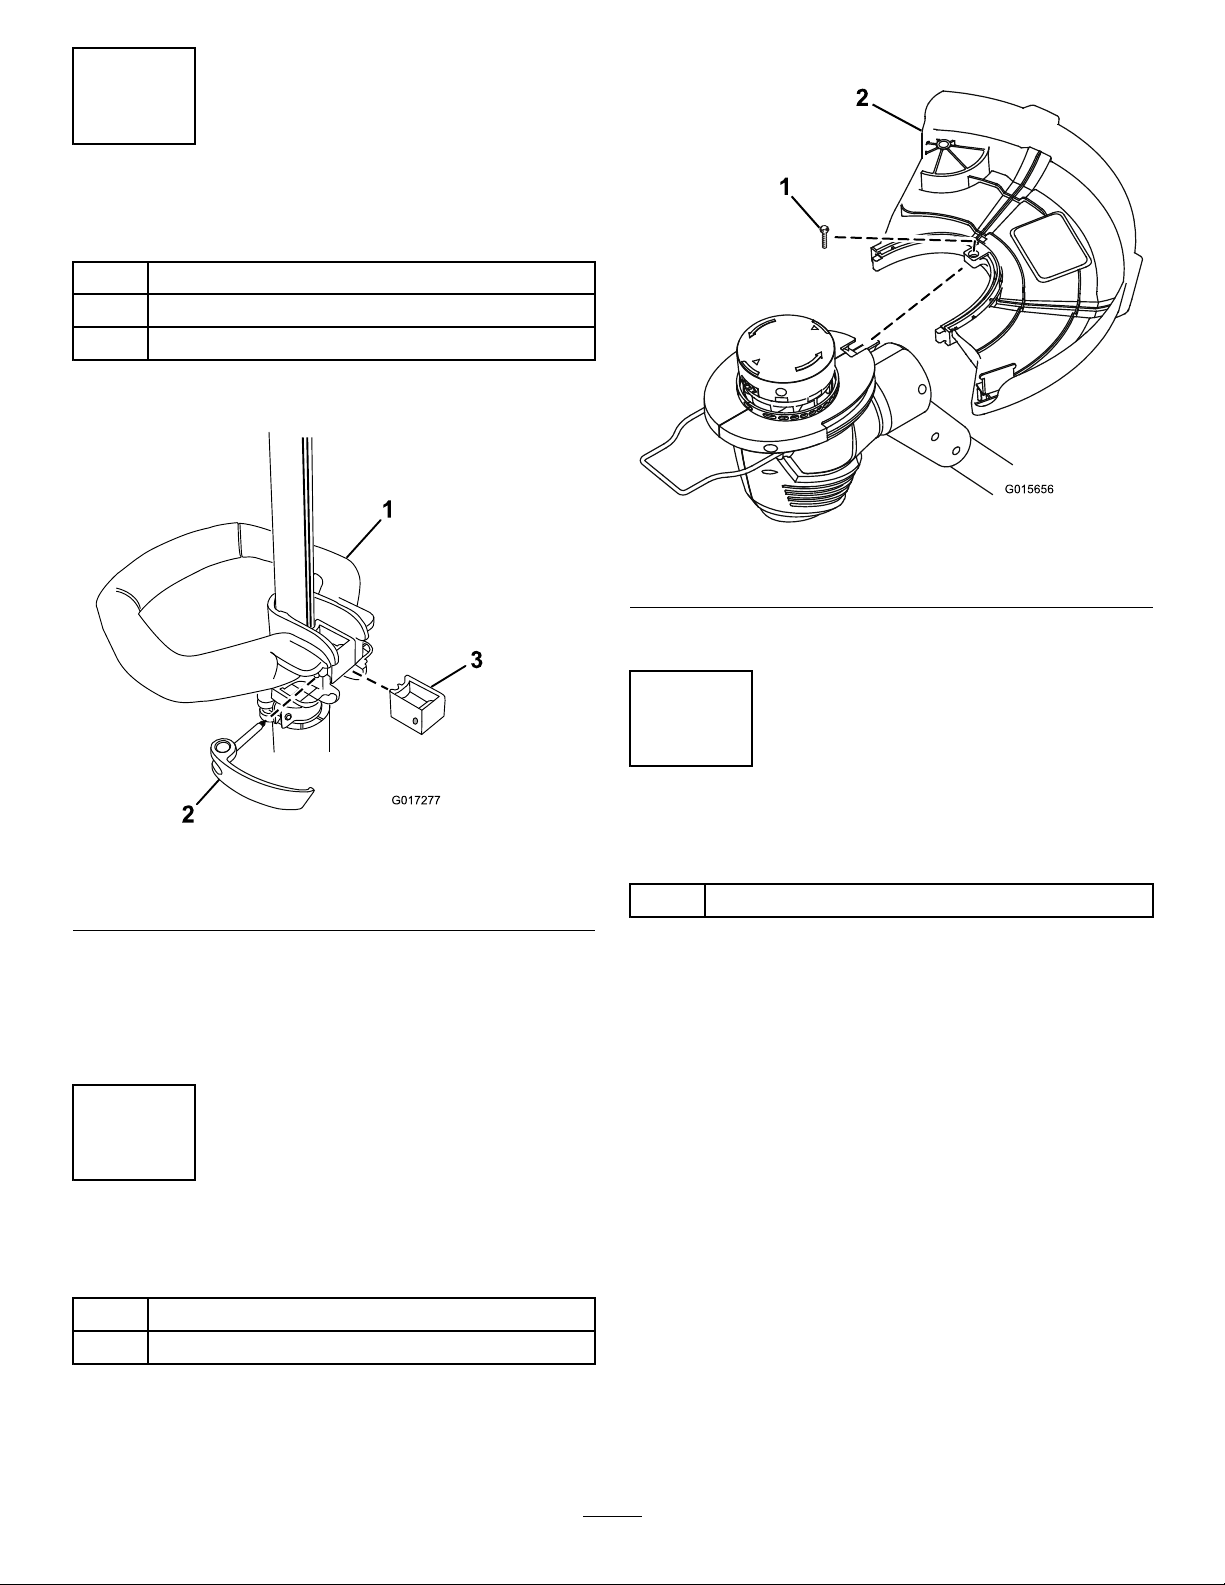
InstallingtheEdgeGuard
Partsneededforthisprocedure:
1Edgeguard
Procedure
Inserttheendsoftheedgeguardintotheholesinthetrimmer
housingasshowninFigure3.
4
G017621
1
Figure3
1.Edgeguard
4
AdjustingtheTrimmerHeight
andBasePosition
NoPartsRequired
Procedure
•Toadjusttheauxiliaryhandleheight,releasetheauxiliary
handlelatch,slidetheauxiliaryhandleupordowntothe
desiredheight,thensecuretheauxiliaryhandleinplaceby
closingtheauxiliarylatch(Figure4).
G015655
Figure4
1.Auxiliaryhandle3.Height-adjustmentlatch
2.Auxiliary-handlelatch
•Toadjustthetrimmerheight,opentheheightadjustment
latch,thenslidetheshaftupordowntodesiredheight,
securingitinplacewiththelatch(Figure4).
•Toadjustthepositionofthebase,pressdownontherotator
buttonlocatedatthebaseoftheshaft,thenmovethebase
tofacethedesireddirection(Figure5).
1
G015683
Figure5
1.Rotatorbutton
Operation
ConnectingtoaPowerSource
WARNING
Ifyoudonotfullyseattheextensioncordontheinlet
plug,thelooseplugcouldleadtooverheatingand
causeare,possiblyburningyouorothers.
Ensurethatyoufullyseatthecordonthepluganduse
thecordlockfeaturetosecurethecord.
NOTICE!Donotuseadamagedcord.
5

1
2
G015693
3
Figure6
1.Inletplug
3.Cordlock
2.Extensioncord
StartingtheTrimmer
Tostartthetrimmer,slidethelockswitchbacktotheOnposition,
thensqueezethetrigger(Figure6).
1
2
G015658
Figure7
1.Lockswitch2.Trigger
StoppingtheTrimmer
Tostopthetrimmer,releasethetrigger.
AdvancingtheLine
Note:Thetrimmerisequippedwithanauto-feedhead.
1.Withthetrimmerrunning,releasetheswitchtrigger.
2.Wait2seconds,thenpresstheswitchtrigger.
Note:Thelinewillextendapproximately6mm(1/4inch)
witheachstopandstartoftheswitchtrimmeruntiltheline
reachesthelengthofthegrassdeectorblade.
3.Resumetrimming.
AdvancingtheLineManually
Disconnectthestringtrimmerfromthepowersupply,thenpush
theredbuttonatthebaseofthespoolretainerwhilepullingonthe
trimmerlinetomanuallyadvancetheline.
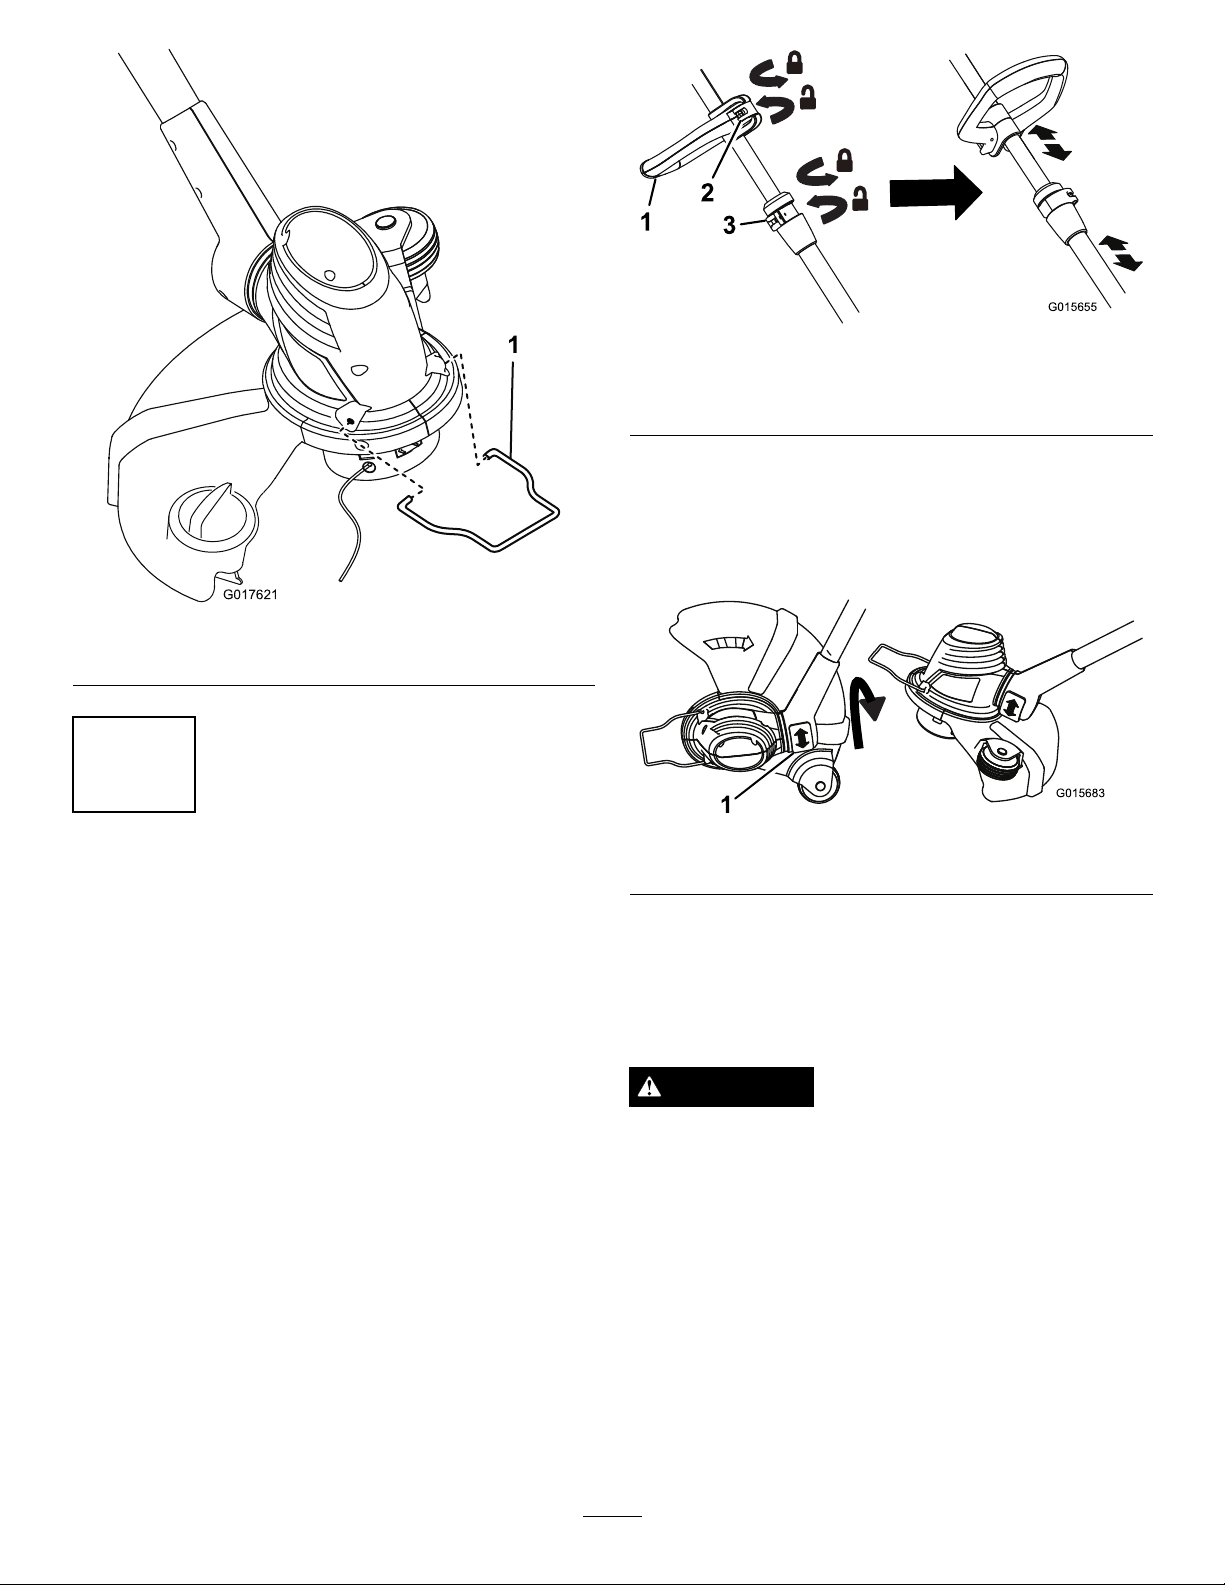
Trimming
Figure8
Edging
Toconvertthetrimmertoanedger,presstherotatorbuttonand
rotatetheheadasshowninFigure9.
1
2
G015660
Figure9
1.Rotatorbutton2.Edgerguide
6
OperatingTips
•Keepthetrimmertiltedtowardtheareabeingcut;thisisthe
bestcuttingarea.
•Thestringtrimmercutswhenpassingtheunitfromleftto
right.Thisavoidsthrowingdebrisattheoperator.
•Usethetipofthestringtodothecutting;donotforcethe
stringheadintouncutgrass.
•Usingthetrimmeralongwireandpicketfences,stoneand
brickwalls,curbs,andwoodcancausethelinetorapidly
wearandevenbreak.
•Avoidtreesandshrubs.Treebark,woodmoldings,siding,
andfencepostscaneasilybedamagedbythestrings.
G023661
Figure10
1.Directionofrotation3.Stringpath
2.Idealcuttingrange
Maintenance
Aftereachuseofthetrimmer,completethefollowing:
1.Wipethetrimmercleanwithadampcloth.Donothosethe
trimmerdownorsubmergeitinwater.
2.Wipeorscrapecleananydebrisfromthecutting-headarea.
3.Checkandtightenallfasteners.Ifanypartisdamagedor
lost,repairorreplaceit.
4.Brushdebrisawayfromtheairintakeventsonthemotor
housingtopreventthemotorfromoverheating.
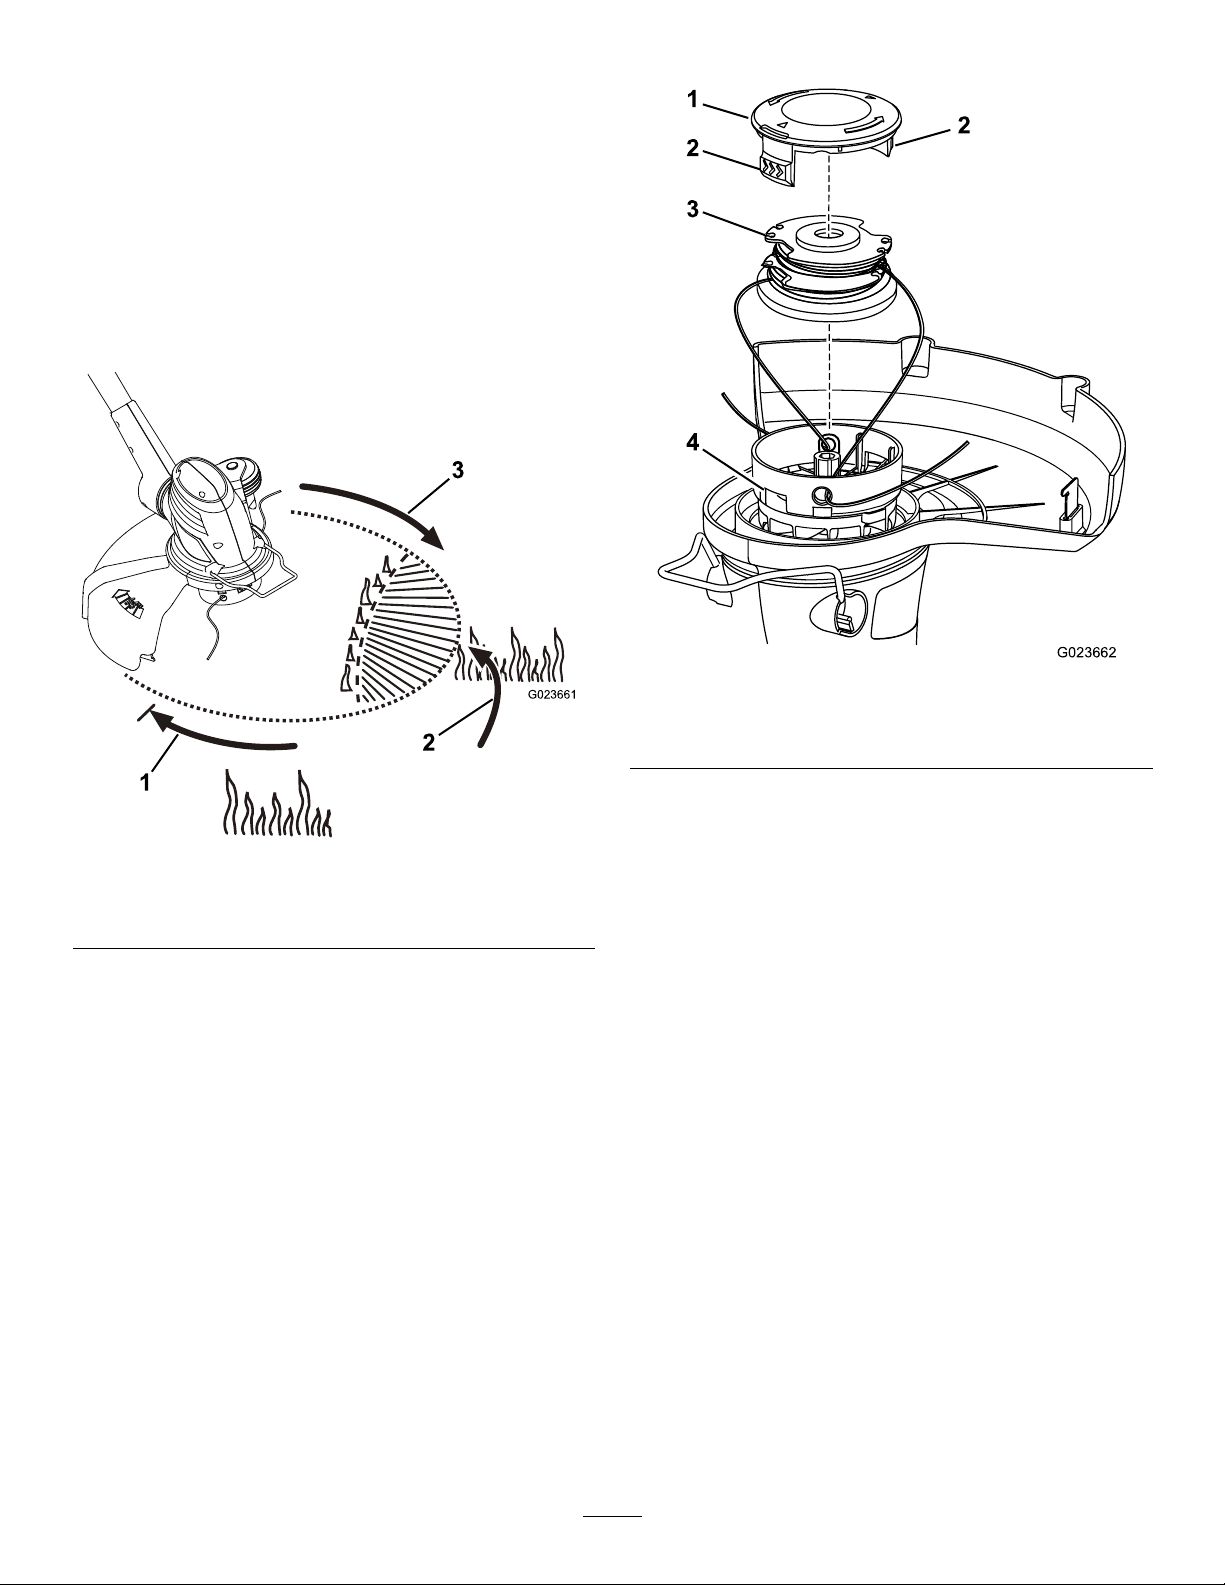
ReplacingtheSpool
Note:Useonly1.65mm(065in)diametermonolamentstring.
Forbestperformance,useonlyTororeplacementstring(part
number88512).
Important:Usingalargerdiameterstringmaycausethe
motortooverheatandfail.
1.Pushinthetabsonthesideofthespoolretainer(
Figure11).
G023662
1
2
3
4
2
Figure11
1.Spoolretainer3.Slots
2.Spool
4.Tabs
2.Pullthespoolretaineruptoremoveit.
3.Removethespool.
4.Installthenewspool,makingsurethatthestringsare
capturedintheretainingslotsonthenewspool.
Note:Makesurethattheendsofthestringsextend
approximately152mm(6in).
5.Installthenewspoolsothatthestringendsalignwith
theeyeletsinthestringhead,andthreadthestringends
throughtheeyelets.
6.Pullthestringsextendingfromthestringheadsothatthe
stringsreleasefromtheslotsinthespool.
7.Installthespoolretainerbypressingthetabsintotheslots
andpushingdownonthespooluntilthespoolretainerclicks
intoplace.
ReplacingtheString
Important:Useonly.065inch(1.65mm)diameter
monolamentstring.Donotuseanyothergaugeortypeof
string,asthiscoulddamagethetrimmer.
1.Removethespool;refertoReplacingtheSpool(page7).
2.Removeanystringremainingonthespool.
3.Insertthestringintotheanchorholeintheupperpartof
thespool(Figure12).
7

Figure12
1.Slotinupperspoolange3.Slotinlowerspoolange
2.Hole
Note:Windthestringontothespoolinthedirectionshown
bythearrowsonthespool.
Note:Thespoolcanacceptupto4.6m(15ft)ofstring.
4.Placethestringendsintheslotsontheupperspoolange,
leavingabout152mm(6in)beyondtheslot.
Note:Donotoverllthespool.Afterwindingthestring,
thereshouldbeatleast6mm(1/4inch)betweeneachofthe
woundstringsandtheoutsideedgeofthespool.
5.Replacethespoolandthespoolretainer;referto
Replacing
theSpool(page7).
Service
Torohasdesignedthisproducttogiveyouyearsoftrouble-free
use.Shoulditneedservice,bringtheproducttoanAuthorized
ToroServiceDealerwhoisspeciallytrainedtorepairToro
products.
Double-insulatedAppliance
Inadouble-insulatedappliance,2systemsofinsulationare
providedinsteadofgrounding.Nogroundingmeansisprovided
onadouble-insulatedappliance,norshouldameansfor
groundingbeaddedtotheappliance.Servicingadouble-insulated
appliancerequiresextremecareandknowledgeofthesystem,
andshouldbedoneonlybythequaliedservicepersonnelat
yourAuthorizedT oroServiceDealer.Replacementpartsfora
double-insulatedappliancemustbeidenticaltothepartsthatthey
replace.Adouble-insulatedapplianceismarkedwiththewords
“DoubleInsulation”or“DoubleInsulated.”Thesymbol(square
withinasquare)mayalsobemarkedontheappliance.
Storage
Storethetrimmerandtheextensioncordindoorsinacool,dry
locationandoutofthereachofchildrenandanimals.
NOTICE!Donotrestthetrimmerontheguard,oritmaywarp
andinterferewiththecuttingline.
Note:Devicesforretainingextensioncordsarecommercially
available.
TheToroPromise-ElectricProducts
ATwo-YearFullWarrantyforResidentialUsefortheUnitedStatesandCanada
TheT oroCompanyanditsafliate,ToroWarrantyCompany,pursuanttoanagreementbetweenthem,jointlywarrantthisproductfortwoyearsagainst
defectsinmaterialorworkmanshipwhenusedfornormalresidentialpurposes.*
IfyouthinkyourT oroProductcontainsadefectinmaterialsorworkmanship,ifyouhavequestionsorproblems,andbeforereturningthisproductcall
tollfree:
Trimmers:Blowers:
Snowthrowers:
1-800-237-2654(US)
1-800-248-3258(Canada)
1-888-367-6631(US)
1-888-430-1687(Canada)
1-800-574-3312(Mexico)
1-800-808-2963(US)
1-800-808-3072(Canada)
Toreceiveareplacementorrepair,atouroption,returnthecompleteunittotheseller.UnitedStatesandCanadacustomersmayreturntheirproduct,
withproofofpurchase,toanyAuthorizedServiceDealer.UnitedStatescustomersmayalsoreturntheirproduct,withproofofpurchase,postage
prepaid,totheToroServiceCenter,5500SEDelaware,Ankeny,IA50021.
Thiswarrantycoversproductdefectsonly.NeitherTheToroCompanynorToroWarrantyCompanyisliableforindirect,incidental,or
consequentialdamagesinconnectionwiththeuseoftheToroProductscoveredbythiswarranty,includinganycostorexpenseofproviding
substituteequipmentorserviceduringreasonableperiodsofmalfunctionornon-usependingcompletionofrepairsunderthiswarranty.
Somestatesdonotallowexclusionsofincidentalorconsequentialdamages,sotheaboveexclusionsmaynotapplytoyou.Thiswarranty
givesyouspeciclegalrights,andyoumayalsohaveotherrightswhichvaryfromstatetostate.
CountriesOtherthantheUnitedStatesandCanada
CustomerswhohavepurchasedT oroproductsexportedfromtheUnitedStatesorCanadashouldcontacttheirT oroDistributor(Dealer)toobtain
guaranteepoliciesforyourcountry,province,orstate.IfforanyreasonyouaredissatisedwithyourDistributor’sserviceorhavedifcultyobtaining
guaranteeinformation,contacttheToroimporter.Ifallotherremediesfail,youmaycontactusatT oroWarrantyCompany.
AustralianConsumerLaw
AustraliancustomerswillnddetailsrelatingtotheAustralianConsumerLaweitherinsidetheboxoratyourlocalT oroDealer.
*Residentialusemeansuseoftheproductonthesamelotasyourhome.PartNumber374-0262Rev.D
8