Documents: Go to download!
- Owner's manual - (English)

- Before You Brew
- Brew Your First Cup
- Caring for your Brewer
- Descaling your Brewer
- Troubleshooting
Table of contents
User manual Coffee Maker
Before You Brew
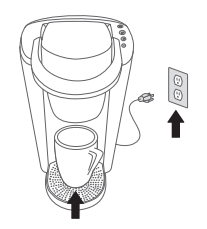
1. Plug & Place

Remove packing tape from brewer and plug into a grounded outlet.
Place a large mug (10 oz. minimum) on the drip tray plate.
2. Rinse & Fill
-693823.png)
Remove the water reservoir lid, then lift the reservoir straight up to remove it. Rinse reservoir with fresh water and fill to the MAX line.
Replace water reservoir, making sure the lock tabs engage with the brewer. Replace lid.
NOTE: Do not use distilled water.
3. Power On
-256695.png)
Press power button—the green power light will illuminate.
The brewer will automatically begin heating the water. This will take about 4 minutes. Once the heating sound stops, the brewer is ready
4. Lift & Lower
-54871.png)
Lift and lower the handle. Do not insert a K-Cup® pod. The three brew buttons will blink.
Press the small cup button to start a cleansing brew. Pour the hot water into the sink.
The one-time setup process is now complete and you are ready to brew!
Brew Your First Cup
Place Mug
-256116.png)
Place a mug on the drip tray plate. If using a travel mug, remove the drip tray and place the mug on the drip tray base.
NOTE: Between brew cycles, the brewer may take about a minute to reheat.
Lift & Insert
-662294.png)
Lift the handle and place a K-Cup® pod in the K-Cup® pod holder. Lower the handle completely to close the lid.
Do not remove the foil lid on the K-Cup® pod.
Brew & Enjoy
-850785.png)
Select your brew size. The button will remain illuminated while brewing—about 1 minute. Brewing ends with a burst of air. Lift the handle and dispose of the used K-Cup® pod. The brewer will be ready to brew another cup in about a minute.
NOTE: After 60 seconds, the brew buttons will be disabled. To re-activate, lift and lower the handle completely.
CAUTION: While brewing, there is extremely hot water in the K-Cup® pod holder. To avoid injury, do not lift the handle during the brewing process.
Brewer Features
-353790.png)
Smart Start heats then brews in one simple process. No need to wait for the brewer to heat before selecting brew size. Power on your brewer, place mug, insert a K-Cup® pod, and lower the handle. Then, select your brew size. The brewer will heat, then automatically begin brewing.
Auto Off automatically turns your brewer off 2 hours after the last brew for energy savings
Caring for your Brewer
Regular cleaning keeps your brewer running smoothly. Always be sure to turn off and unplug your brewer before cleaning.
Brewer Exterior
-139549.png)
Keep your Keurig® brewer looking its best by cleaning the exterior from time to time. Just clean with a damp, soapy, lint-free, non-abrasive cloth. Never immerse the brewer in water or other liquids.
Drip Tray
-576139.png)
The drip tray can accumulate up to 8 ounces of overflow and should be emptied and cleaned occasionally. To remove, slide it toward you, keeping it level to avoid spilling. Clean in dishwasher (top rack only) or rinse and clean with a damp, soapy, lintfree, non-abrasive cloth.
Water Reservoir & Reservoir Lid
-487431.png)
The water reservoir lid and water reservoir should be periodically cleaned with a damp, soapy, nonabrasive cloth and rinsed thoroughly. The water reservoir lid and water reservoir should not be put into the dishwasher. Do not dry the inside of the water reservoir with a cloth as lint may remain.
To clean the filter screen at the base of your water reservoir, empty the water reservoir and follow one or all of the following procedures:
- Rinse the filter screen with the strong force of water from your faucet.
- If you have a sprayer, aim the water spray at the filter screen.
- Fill the water reservoir with approximately two inches of clean water and agitate (shake) the water reservoir. Empty the water reservoir, fill with clean water, and return it to the brewer. If needed, repeat above procedures.
CAUTION: Please rinse the water reservoir thoroughly after cleaning. This will ensure that no cleaners or cleaning solutions remain in this area as they may contaminate the water supply in the brewer.
K-Cup® Pod Holder Assembly
-361728.png)
To remove the K-Cup® pod holder from the brewer, lift the handle and grasp the top of the K-Cup® pod holder with one hand while pushing up on the bottom of the K-Cup® pod holder from underneath with the other until it releases. After cleaning, align the K-Cup® pod holder with the opening using the two front ribs as a guide and snap into place from the top.
CAUTION: There are sharp needles that puncture the K-Cup® pod above the K-Cup® pod holder and in the bottom of the K-Cup® pod holder. To avoid risk of injury, do not put your fingers in the K-Cup® pod holder.
Funnel
-472815.png)
The funnel can be removed from the K-Cup® pod holder by pulling on it until it pops off. To replace it, just snap it back onto the K-Cup® pod holder.
Exit Needle
-376809.png)
Remove the pod holder assembly and detach the funnel. Locate the exit needle on the inside bottom of the K-Cup® pod holder. Insert a straightened paper clip into the exit needle to loosen the clog and push it out.
Entrance Needle
Lift the brewer handle and locate the entrance needle on the underside of the lid. To clean both holes in the needle, hold the brewer handle in the upward position and with your other hand, carefully insert a straightened paper clip into both holes. Gently move it around to loosen any coffee grounds. Lower the handle completely and run two water-only brew cycles. Do not insert a K-Cup® pod.
TIP: Refer to www.Keurig.com/support for video instructions on cleaning the entrance/exit needles
Descaling your Brewer
You should descale your brewer every 3-6 months. Properly follow the descaling procedure.
Depending on the mineral content of your water, calcium deposits or scale may build up in your brewer. Scale is nontoxic but if left unattended can hinder brewer performance. Regularly descaling your brewer every 3-6 months helps maintain the heating element, and other internal parts that come in contact with water. Calcium deposits may build up faster, making it necessary to descale more often.
Descaling Procedure
Before you begin, you will need a large ceramic mug, fresh water, Keurig® Descaling Solution, and access to a sink. Do not use a paper cup. Ensure that there is no beverage pod in the K-Cup® pod holder. Please allow approximately 45 minutes for the descaling procedure.
STEP 1: Descaling Solution Rinse
Press the power button to power the brewer off.
Pour the entire bottle of Keurig® Descaling Solution into an emptied water reservoir. Then fill the empty bottle with water and pour into the water reservoir. Press the power button to turn the brewer back on.
Place a large mug on the drip tray and run a rinsing brew by lifting and lowering the handle and selecting the largest brew size.
STEP 2: Descaling Rinse & Repeat
Repeat the rinsing brew process until the add water light is illuminated. Do not use a K-Cup® pod. Let brewer stand for at least 30 minutes while still on.
After 30 minutes, discard any residual solution from the water reservoir and rinse thoroughly.
STEP 3: Fresh Water Rinse
Fill the water reservoir with fresh water to and not beyond the MAX line.
Place a large mug on the drip tray plate and run a rinsing brew using the largest brew size. Do not use a K-Cup® pod.
Pour the contents of the mug into the sink.
Repeat brew process until you have completed at least 12 rinsing brews using the largest brew size. You may need to refill the water reservoir at least one time during this process.
NOTE: The cleaning action of Keurig® Descaling Solution may result in a “foam” dispensed from the brewer. This is natural, as the solution is reacting with the scale inside. For a brewer that is heavily scaled, the brewer may not fill properly after the descaler is added. If this occurs, you may see only a small or no output dispensed, followed by the sound of air blowing out. If this occurs:
- Turn off and unplug the brewer.
- If there is Keurig® Descaling Solution in the water reservoir, discard the contents, rinse the water reservoir thoroughly and refill with water.
- Plug the brewer back in, power on, and repeat the Step 3 Fresh Water Rinse cycle. The brewer should begin to function normally as the solution is rinsed out and the scale is removed. If problem persists, allow brewer to sit unplugged for at least 30 minutes before continuing with the rinse.
Troubleshooting
Grounds in Your Coffee
Grounds may have gathered in the exit or entrance needle and can be cleaned using a straightened paper clip or similar tool.
- Clean the exit needle of the K-Cup® pod holder. Refer to the exit needle care instructions.
- Clean the brewer entrance needle. Refer to the entrance needle care instructions.
Brewer Will Not Brew
- After placing the K-Cup® pod in the K-Cup® pod holder, make sure that the handle is pushed down securely and the brew buttons are flashing.
- If the add water light is illuminated, add water to water reservoir. Fill to and not beyond the MAX line. Make sure the water reservoir is seated properly in its base. If the add water light continues to be illuminated even after refilling, contact Customer Service.
- If the small cup, small mug, and large mug lights are all on simultaneously, lift handle and remove K-Cup® pod (if present in the brewer). Close handle and place a large mug on the drip tray. Press the power button once. The brewer may dispense hot water.
- If the small cup, small mug and large mug lights all blink simultaneously, contact Customer Service.
Brewing a Partial Cup
- The exit needle may be clogged. Refer to the exit needle care instructions.
- The water reservoir may have been removed during brewing. Replace the water reservoir and perform a rinsing brew without a K-Cup® pod.
- The brewer may need to be descaled. If you have repeated the descale procedure on your brewer two times and it is still only brewing a partial cup, contact Customer Service.
Brewer Does Not Have Power or Shuts Off
- Make sure that the power button has been turned on.
- Plug brewer into its own grounded outlet. If the electric circuit is overloaded with other appliances, your brewer may not function properly. The brewer should be operated on its own circuit, separate from other appliances.
- For energy savings, the brewer automatically turns off 2 hours after the last brew. Press the power button and the green power light will illuminate.
- If the brewer still doesn’t have power, contact Customer Service.
Helpful Hints
Water quality varies greatly. If you notice an undesirable taste in your beverage (such as chlorine or mineral tastes), we recommend using bottled or filtered water. Do not use distilled water.
Service
Beyond these recommended cleaning and maintenance procedures, this brewer is not user serviceable. For service, please refer to the Warranty section of this guide.
Storage
Empty the water reservoir before storing or transporting and take care to ensure that you store your brewer in a safe and frost free environment. Please be sure to store your brewer in its upright position to avoid water leakage from the inner tank. If you store the brewer in a cold environment, you run the risk of water freezing inside the brewer and causing damage. When you prepare to use it after storage, we recommend rinsing the water reservoir with fresh water and running three rinsing brews without a K-Cup® pod.
If you plan to move your brewer to a different location, turn the brewer off, unplug it, and empty the water reservoir. If your brewer has been in an environment below freezing, please be sure to let it warm to room temperature for at least 2 hours before using.
See other models: K-DUO PLUS K-DUO K-DUO ESSENTIALS K-LATTE K-EXPRESS ESSENTIALS
