Loading ...
Loading ...
Loading ...
Rev 08/20/20 #720107
Reduce-Reuse-Recycle
This product is made primarily of recyclable materials. You can reduce your carbon footprint by
recycling this product at the end of its useful life. Contact your local recycling support center for
further recycling instructions.
WARRANTY
For more eective and safer operation and to prolong
the life of the heater, read the Owner’s Guide and
follow the instructions. Failure to properly maintain
the heater will void any warranty and may cause the
heater to function improperly.
LIMITED ONE YEAR WARRANTY: Manufacturer
will repair or replace any Electric baseboard BTF
thermostat found to be defective within one year
after the date of purchase.
These warranties do not apply:
1. Damage occurs to the product through improper
installation or incorrect supply voltage;
2. Damage occurs to the product through improper
maintenance, misuse, abuse, accident, or alteration;
3. The use of unauthorized accessories or
unauthorized components constitutes an alteration
and voids all warranties. Refer to Manufacturer
website or call customer service at 888.346.7539
for list of authorized accessories and components.
4. Manufacturer’s warranty is limited to repair or
replacement.
5. In the event Manufacturer elects to replace any
part of your product, the replacement parts are sub-
ject to the same warranties as the product. The in-
stallation of replacement parts does not modify or
extend the underlying warranties. Replacement or
repair of any product or part does not create any
new warranties.
If you believe your product is defective, please
contact Manufacturer during the warranty period, for
instructions on how to have the repair or replacement
processed.
Parts and Service
Visit gdaheat.com/parts for information on where to
obtain parts and service.
©2020 Glen Dimplex Americas Printed in USA
To register your product, visit gdaheat.com/register
6
Make sure all wires are properly connected and installation is complete
before you turn on the heater.
Turn power back on at the main disconnect panel.
1. Turn the thermostat knob all the way to the right. For tamper proof models, remove small plastic plug
rst, then turn the thermostat shaft all the way to the right.
2. When the room reaches your comfort level, turn the knob/shaft to the left, just until it clicks and the
heater turns o. The heater will automatically keep the room temperature at this setting.
3. To reduce the room temperature, turn the knob to the left. To increase the room temperature, turn the
knob to the right.
OPERATING INSTRUCTIONS
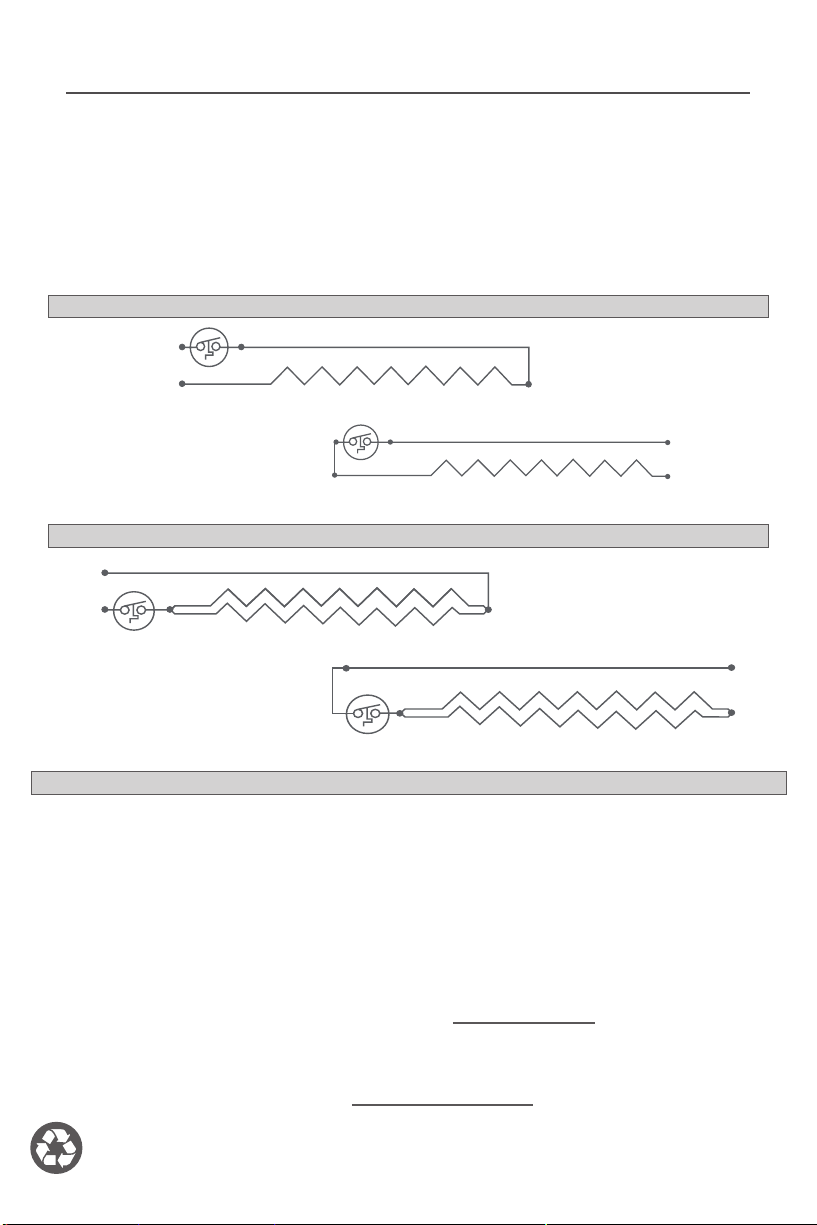
INTERNAL HEATER WIRING DIAGRAMS
INTERNAL HEATER WIRING DIAGRAMS 8F2025 ONLY
Wired on the left side
Wired on the left side
Wired on the right side
Wired on the right side
L1
L2 (240V)
Neutral (120V)
All except 8F2025
Connected to Left
L1
L2
8F2025
Connected to Left
8F2025
Connected to Right
All except 8F2025
Connected to Right
L1
L2 (240V)
Neutral (120V)
L1
L2
L1
L2 (240V)
Neutral (120V)
All except 8F2025
Connected to Left
L1
L2
8F2025
Connected to Left
8F2025
Connected to Right
All except 8F2025
Connected to Right
L1
L2 (240V)
Neutral (120V)
L1
L2
L1
L2 (240V)
Neutral (120V)
All except 8F2025
Connected to Left
L1
L2
8F2025
Connected to Left
8F2025
Connected to Right
All except 8F2025
Connected to Right
L1
L2 (240V)
Neutral (120V)
L1
L2
L1
L2 (240V)
Neutral (120V)
All except 8F2025
Connected to Left
L1
L2
8F2025
Connected to Left
8F2025
Connected to Right
All except 8F2025
Connected to Right
L1
L2 (240V)
Neutral (120V)
L1
L2