Loading ...
Loading ...
Loading ...
8
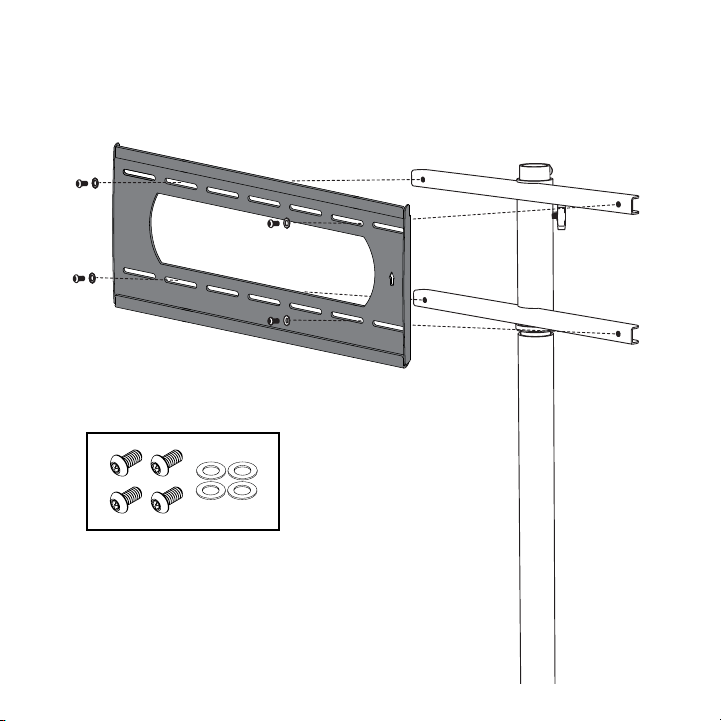
Step 1: Assemble and Prepare Mount
1. Aach mounting plate to oor stand
Using the four included fasteners, attach the mounting plate to the oor stand rails as shown.
44"
17
15
16
"
1"
4
5
16
"
14"
14"
5
13
16
"
5
13
16
"
5
13
16
"
5
13
16
"
1
2
" X 1"
20
5
16
"
26
1
4
"
14" 14"
44"
17
15
16
"
1"
4
5
16
"
14"
14"
5
13
16
"
5
13
16
"
5
13
16
"
5
13
16
"
1
2
" X 1"
20
5
16
"
26
1
4
"
14" 14"
44"
17
15
16
"
1"
4
5
16
"
14"
14"
5
13
16
"
5
13
16
"
5
13
16
"
5
13
16
"
1
2
" X 1"
20
5
16
"
26
1
4
"
14" 14"
44"
17
15
16
"
1"
4
5
16
"
14"
14"
5
13
16
"
5
13
16
"
5
13
16
"
5
13
16
"
1
2
" X 1"
20
5
16
"
26
1
4
"
14" 14"
P5080T
Installation Instructions
Visit the Premier Mounts website at http://www.premiermounts.com Page 3
Parts List
Installation Tools
The following tools may be required depending upon your particular installation. They are not included.
Pencil
Level
¼˝ Drill Bit for
Wood Stud
Electronic Stud Finder
Socket Wrench
Phillips Tip Screwdriver
Tape Measure
Hand Held Drill
Hammer**
3
/8 ˝ Concrete Drill Bit*
Protective Eyewear
* Optional tools for concrete installations.
½˝ Socket
M10 Socket*
2
1
5
/16
˝ x 3˝ Lag Bolts
(Qty 6)
Thread Depth Indicator
(Qty 1)
Universal Spacers
Finned Anchors
(Qty 6)
(Qty 24)
5
/16
˝ Flat Washers
(Qty 6)
Pro Mounting Hardware
Universal Washers
(Qty 6)
Security Barrel
(Qty 1)
Wall Plate
(Qty 1)
Universal Tilt Brackets
(Qty 2)
M6 x 60mm Screws
(Qty 2)
Loading ...
Loading ...
Loading ...