Register online at http://shop.panasonic.com/support
(U.S. customers only)
If you have any questions, visit:
USA : http://shop.panasonic.com/support
Canada : www.panasonic.ca/english/support
PPP
Please read these instructions carefully before using this product, and
save this manual for future use.
More detailed owner's manual is available in “Owner’s Manual for advanced
features” (PDF format). To read it, download it from the website. (P93)
Basic Owner’s Manual
Digital Camera
Model No. DC-G95
DVQX1749ZA
F0419MH0
until
2019/05/15
DC-G95PP-DVQX1749_eng.book 1 ページ 2019年3月29日 金曜日 午後1時31分
2
DVQX1749 (ENG)
Dear Customer,
Thank you for choosing Panasonic!
You have purchased one of the most sophisticated and reliable products on the market
today. Used properly, we’re sure it will bring you and your family years of enjoyment.
Please take time to fill in the information below. The serial number is on the tag located on
the underside of your camera. Be sure to retain this manual as your convenient camera
information source.
Please note that the actual controls and components, menu items, etc. of your Digital
Camera may look somewhat different from those shown in the illustrations in this Owner’s
Manual.
Carefully observe copyright laws.
• Recording of pre-recorded tapes or discs or other published or broadcast material for purposes
other than your own private use may infringe copyright laws. Even for the purpose of private
use, recording of certain material may be restricted.
For the U.S.A. and Canada only
Information for Your Safety
A lithium ion battery that is recyclable powers the product you have
purchased. Please call 1-800-8-BATTERY for information on how to
recycle this battery.
WARNING:
To reduce the risk of fire, electric shock or product damage,
• Do not expose this unit to rain, moisture, dripping or splashing.
• Use the recommended accessories.
• Do not remove covers.
• Do not repair this unit by yourself. Refer servicing to qualified service personnel.
The socket outlet shall be installed near the equipment and shall be easily accessible.
Date of Purchase
Dealer Purchased From
Dealer Address
Dealer Phone No.
Model No.
Serial No.
DC-G95PP-DVQX1749_eng.book 2 ページ 2019年3月29日 金曜日 午後1時31分
3
(ENG) DVQX1749
∫ Product identification marking
THE FOLLOWING APPLIES ONLY IN THE U.S.A.
Product Location
Digital camera Bottom
Battery charger Bottom
FCC Note:
This equipment has been tested and found to comply with the limits for a Class B digital
device, pursuant to Part 15 of the FCC Rules. These limits are designed to provide
reasonable protection against harmful interference in a residential installation. This equipment
generates, uses, and can radiate radio frequency energy and, if not installed and used in
accordance with the instructions, may cause harmful interference to radio communications.
However, there is no guarantee that interference will not occur in a particular installation. If this
equipment does cause harmful interference to radio or television reception, which can be
determined by turning the equipment off and on, the user is encouraged to try to correct the
interference by one or more of the following measures:
• Reorient or relocate the receiving antenna.
• Increase the separation between the equipment and receiver.
• Connect the equipment into an outlet on a circuit different from that to which the receiver is
connected.
• Consult the dealer or an experienced radio/TV technician for help.
FCC Caution:
• Any unauthorized changes or modifications to this equipment would void the user's authority
to operate this device.
• To assure continued compliance, follow the attached installation instructions and use only
shielded interface cables with ferrite core when connecting to computer or peripheral
devices.
This device complies with Part 15 of the FCC Rules. Operation is subject to the following two
conditions: (1) This device may not cause harmful interference, and (2) this device must
accept any interference received, including interference that may cause undesired operation.
Supplier’s Declaration of Conformity
Trade Name: Panasonic
Model No.: DC-G95
Responsible Party: Panasonic Corporation of North America
Two Riverfront Plaza, Newark, NJ 07102-5490
Support Contact: http://shop.panasonic.com/support
DC-G95PP-DVQX1749_eng.book 3 ページ 2019年3月29日 金曜日 午後1時31分

4
DVQX1749 (ENG)
THE FOLLOWING APPLIES ONLY IN THE U.S.A.
How to Display Certification and Compliance Information
Certification and compliance information for this camera can be viewed on the menu
screen.
> [Setup] > [Approved Regulations]
Contains FCC ID: VPYLB1JS955
This transmitter must not be co-located or operated in conjunction with any other
antenna or transmitter.
This equipment complies with FCC radiation exposure limits set forth for an
uncontrolled environment and meets the FCC radio frequency (RF) Exposure
Guidelines.
This equipment has very low levels of RF energy that is deemed to comply without
testing of specific absorption rate (SAR).
MENU
DC-G95PP-DVQX1749_eng.book 4 ページ 2019年3月29日 金曜日 午後1時31分
5
(ENG) DVQX1749
THE FOLLOWING APPLIES ONLY IN CANADA.
How to Display Certification and Compliance Information
Certification and compliance information for this camera can be viewed on the menu
screen.
> [Setup] > [Approved Regulations]
CAN ICES-3(B)/NMB-3(B)
Contains IC: 772C-LB1JS955
This device contains licence-exempt transmitter(s)/receiver(s) that comply with
Innovation, Science and Economic Development Canada’s licence-exempt RSS(s).
Operation is subject to the following two conditions:
(1) This device may not cause interference.
(2) This device must accept any interference, including interference that may cause
undesired operation of the device.
The available scientific evidence does not show that any health problems are
associated with using low power wireless devices. There is no proof, however, that
these low power wireless devices are absolutely safe. Low power Wireless devices
emit low levels of radio frequency energy (RF) in the microwave range while being
used. Whereas high levels of RF can produce health effects (by heating tissue),
exposure of low-level RF that does not produce heating effects causes no known
adverse health effects. Many studies of low-level RF exposures have not found any
biological effects. Some studies have suggested that some biological effects might
occur, but such findings have not been confirmed by additional research. DC-G95
(HMN is 1JS1904) has been tested and found to comply with ISED radiation exposure
limits set forth for an uncontrolled environment and meets RSS-102 of the ISED radio
frequency (RF) Exposure rules.
MENU
DC-G95PP-DVQX1749_eng.book 5 ページ 2019年3月29日 金曜日 午後1時31分

6
DVQX1749 (ENG)
∫ About the battery pack
• Do not heat or expose to flame.
• Do not leave the battery(ies) in a car exposed to direct sunlight for a long period of time with
doors and windows closed.
CAUTION
Battery pack (Lithium ion battery pack)
• Use the specified unit to recharge the battery pack.
• Do not use the battery pack with equipment other than the specified unit.
• Do not get dirt, sand, liquids, or other foreign matter on the terminals.
• Do not touch the plug terminals (i and j) with metal objects.
• Do not disassemble, remodel, heat or throw into fire.
If any electrolyte should come into contact with your hands or clothes, wash it off
thoroughly with water.
If any electrolyte should come into contact with your eyes, never rub the eyes. Rinse
eyes thoroughly with water, and then consult a doctor.
CAUTION
• Danger of explosion if battery is incorrectly replaced. Replace only with the type
recommended by the manufacturer.
• When disposing of the batteries, please contact your local authorities or dealer and ask for
the correct method of disposal.
Warning
Risk of fire, explosion and burns. Do not disassemble, heat above 60 xC (140 oF) or
incinerate.
DC-G95PP-DVQX1749_eng.book 6 ページ 2019年3月29日 金曜日 午後1時31分

7
(ENG) DVQX1749
∫ About the AC adaptor (supplied)
• The AC adaptor is in the standby condition when the mains plug is connected. The primary
circuit is always “live” as long as the mains plug is connected to an electrical outlet.
• Do not use any other USB connection cables except the supplied one.
• Always use a genuine Panasonic shutter remote control (DMW-RS2: optional).
• Use a “High Speed HDMI micro cable” with the HDMI logo.
Cables that do not comply with the HDMI standards will not work.
“High Speed HDMI micro cable” (Type D–Type A plug, up to 2 m (6.6 feet) long)
• Do not use the headphone cables with the length of 3 m (9.8 feet) or more.
• Do not use the stereo microphone cables with the length of 3 m (9.8 feet) or more.
Keep this unit as far away as possible from electromagnetic equipment (such as
microwave ovens, TVs, video games etc.).
• If you use this unit on top of or near a TV, the pictures and/or sound on this unit may be
disrupted by electromagnetic wave radiation.
• Do not use this unit near cell phones because doing so may result in noise adversely affecting
the pictures and/or sound.
• Recorded data may be damaged, or pictures may be distorted, by strong magnetic fields
created by speakers or large motors.
• Electromagnetic wave radiation may adversely affect this unit, disturbing the pictures and/or
sound.
• If this unit is adversely affected by electromagnetic equipment and stops functioning properly,
turn this unit off and remove the battery or disconnect AC adaptor. Then reinsert the battery or
reconnect AC adaptor and turn this unit on.
Do not use this unit near radio transmitters or high-voltage lines.
• If you record near radio transmitters or high-voltage lines, the recorded pictures and/or sound
may be adversely affected.
CAUTION!
To reduce the risk of fire, electric shock or product damage,
• Do not install or place this unit in a bookcase, built-in cabinet or in another confined
space. Ensure this unit is well ventilated.
AC adaptor
This AC adaptor operates on AC between 110 V and 240 V.
But
• In the U.S.A. and Canada, the AC adaptor must be connected to a 120 V AC power supply
only.
• When connecting to an AC supply outside of the U.S.A. or Canada, use a plug adaptor to
suit the AC outlet configuration.
Cautions for Use
DC-G95PP-DVQX1749_eng.book 7 ページ 2019年3月29日 金曜日 午後1時31分

8
DVQX1749 (ENG)
• Before cleaning the camera, remove the battery or the DC coupler (DMW-DCC8:
optional), or disconnect the power plug from the outlet.
• Do not press the monitor with excessive force.
• Do not press the lens with excessive force.
• Do not spray the camera with insecticides or volatile chemicals.
• Do not keep rubber or plastic products in contact with the camera for a long period of
time.
• Do not use solvents such as benzine, thinner, alcohol, kitchen detergents, etc., to clean
the camera, since it may deteriorate the external case or the coating may peel off.
• Do not leave the camera with the lens facing the sun, as rays of light from the sun may
cause it to malfunction.
• Always use the supplied cords and cables.
• Do not extend the cords or the cables.
• During access (image writing, reading and deleting, formatting etc.), do not turn this unit
off, remove the battery, card or disconnect the AC adaptor. Furthermore, do not subject
the camera to vibration, impact or static electricity.
• The data on the card may be damaged or lost due to electromagnetic waves, static electricity or
breakdown of the camera or the card. We recommend storing important data on a PC etc.
• Do not format the card on your PC or other equipment. Format it on the camera only to ensure
proper operation.
• The battery is not charged when the camera is shipped. Charge the battery before use.
• The battery is a rechargeable lithium ion battery. If the temperature is too high or too
low, the operating time of the battery will become shorter.
• The battery becomes warm after using and during and after charging. The camera also
becomes warm during use. This is not a malfunction.
• Do not leave any metal items (such as clips) near the contact areas of the power plug or
near the batteries.
• Store the battery in a cool and dry place with a relatively stable temperature: (Recommended
temperature: 15 oC to 25 oC (59 oF to 77 oF), Recommended humidity: 40%RH to 60%RH)
• Do not store the battery for a long time while fully charged. When storing the battery for a
long period of time, we recommend charging it once a year. Remove the battery from the
camera and store it again after it has completely discharged.
DC-G95PP-DVQX1749_eng.book 8 ページ 2019年3月29日 金曜日 午後1時31分

9
(ENG) DVQX1749
Contents
Information for Your Safety..........................2
Preparation/Basic
Care of the camera ...................................10
Standard Accessories ...............................11
About cards that can be used
with this unit ..............................................12
About the Lens..........................................13
Names and Functions of Components......14
Quick Start Guide ......................................16
Basic Operations.......................................25
Setting menu items ...................................29
Quick Menu ...............................................30
Fn Buttons.................................................30
Recording
Easy Recording
(Intelligent Auto Mode) ..............................31
Record Using MF ......................................32
Selecting the Drive Mode ..........................34
4K Photo Recording ..................................34
Post Focus Recording...............................38
Bracket Recording.....................................41
Live View Composite Recording ...............43
Image Stabilizer.........................................44
Recording Motion Pictures ........................46
Creative Video Mode.................................49
Playback
Playing Back Pictures ...............................52
Playing Back Motion Pictures....................52
Deleting Images ........................................53
Menu Guide
Menu Guide .............................................. 54
Wi-Fi/Bluetooth
What you can do
with the Wi-Fi
®
/Bluetooth
®
function........... 65
Connecting to a Smartphone.................... 67
Operating the Camera
with a Smartphone.................................... 72
Others
Importing Images to a PC......................... 75
Monitor Display/Viewfinder Display .......... 76
Troubleshooting........................................ 80
Specifications............................................ 85
Digital Camera Accessory System ........... 92
Reading the Owner’s Manual
(PDF format)............................................. 93
Limited Warranty
(ONLY FOR U.S.A.).................................. 94
Limited Warranty
(ONLY FOR CANADA) ............................. 97
DC-G95PP-DVQX1749_eng.book 9 ページ 2019年3月29日 金曜日 午後1時31分

Preparation/Basic
10
DVQX1749 (ENG)
Care of the camera
∫ Handling of the Camera
Do not subject the camera to strong vibration, impacts, or pressure.
These may cause a malfunction or damage.
– Do not drop or knock against hard surfaces.
– Do not push hard on the lens section or monitor.
If sand, dust, or liquid gets on the monitor, wipe it off with a dry soft cloth.
– If the monitor is closed when such liquids are present, malfunction may result.
– Touch operations may be incorrectly recognized.
Do not place a hand inside the camera mount.
This may cause a failure or damage because the sensor is a precision device.
If you shake the camera while turning the camera off, a sensor may operate or a
rattling sound may be heard. This is caused by the image stabilizer mechanism in
the body. It is not a malfunction.
∫ Splash Resistant
Splash Resistant is a term used to describe an extra level of protection this camera
offers against exposure to a minimal amount of moisture, water or dust. Splash
Resistant does not guarantee that damage will not occur if this camera is subjected
to direct contact with water.
In order to minimize the possibility of damage please be sure the following
precautions are taken:
– Splash Resistant works in conjunction with the lenses that were specifically designed to
support this feature.
– Securely close the doors, socket caps, contact points cover, flash, etc.
– When the lens or cap is removed or a door is open, do not allow sand, dust, and moisture to
enter inside.
– If liquid gets on the camera, wipe it off with a dry soft cloth.
∫ Condensation (When the Lens, the Viewfinder or Monitor is Fogged Up)
• Condensation occurs when there are temperature or humidity differences. Be careful because
condensation can lead to stains or mold on the lens, viewfinder, and monitor or cause a failure.
• If condensation occurs, turn off the camera and leave it for approx. 2 hours. The fog will
disappear naturally when the temperature of the camera becomes close to the ambient
temperature.
∫ Also Refer to the Cautions for Use in the “Owner’s Manual for advanced features”
(PDF Format)
DC-G95PP-DVQX1749_eng.book 10 ページ 2019年3月29日 金曜日 午後1時31分
11
Preparation/Basic
(ENG) DVQX1749
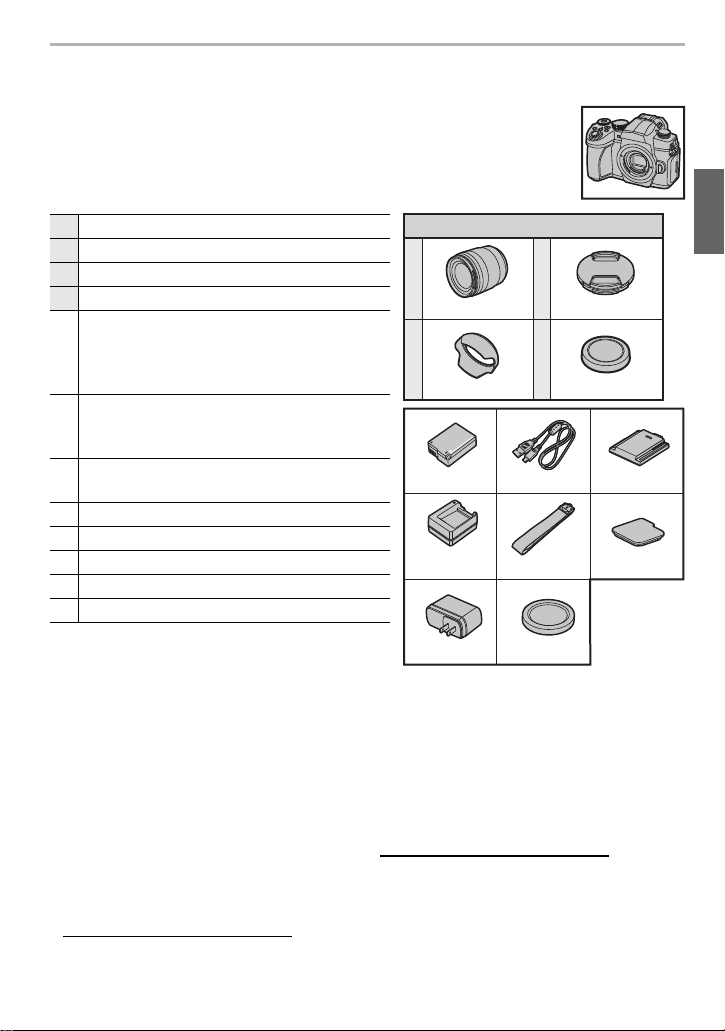
Standard Accessories
Check that all the accessories are supplied before using the camera.
Product numbers correct as of April 2019. These may be subject to
change.
Digital Camera Body
(This is referred to as camera body in this owner’s manual.)
¢
1 This is referred to as
lens
in this owner’s manual.
¢2 The interchangeable lens (H-FS12060) is dust
and splash resistant.
¢3 This is attached to the interchangeable lens at the time of purchase.
¢4 Order the part number A to purchase only a battery charger.
¢5 This is attached to the camera body at the time of purchase.
• SD Memory Card, SDHC Memory Card and SDXC Memory Card are indicated as
card
in the text.
• The card is optional.
• Description in this owner’s manual is based on the interchangeable lens (H-FS12060).
(For U.S.A. only)
• If accessories are lost, customers can visit us at http://shop.panasonic.com/support for further
information about obtaining replacement parts.
(For Canada only)
• If any accessories are lost, customers in Canada should visit our support page at
www.panasonic.ca/english/support
for further information about obtaining replacement parts.
1 Interchangeable Lens
¢1,2
2 Lens Hood
3 Lens Cap
¢3
4 Lens Rear Cap
¢3
5
Battery Pack
(Indicated as battery pack or battery in the
text)
Charge the battery before use.
6
Battery Charger
¢4
(Indicated as battery charger or charger in
the text)
7
AC Adaptor
This is used for charging and power supply.
8 USB Connection Cable
9 Shoulder Strap
10 Body Cap
¢5
11 Hot Shoe Cover
¢5
12 Cover for the battery grip connector
¢5
1
2
VFC4605
H-FS12060
DC-G95M
3
4
6
10
85
9
7
11
12
VKF4971
DMW-BLC12PP
DMW-BTC12
DVPW1001Z SKF0145K
SKF0106K
VSK0815F
K1HY04YY0106
(
: DVLC1001Z)
SYA0066
VYF3514
DC-G95PP-DVQX1749_eng.book 11 ページ 2019年3月29日 金曜日 午後1時31分
Preparation/Basic
12
DVQX1749 (ENG)
About cards that can be used with this unit
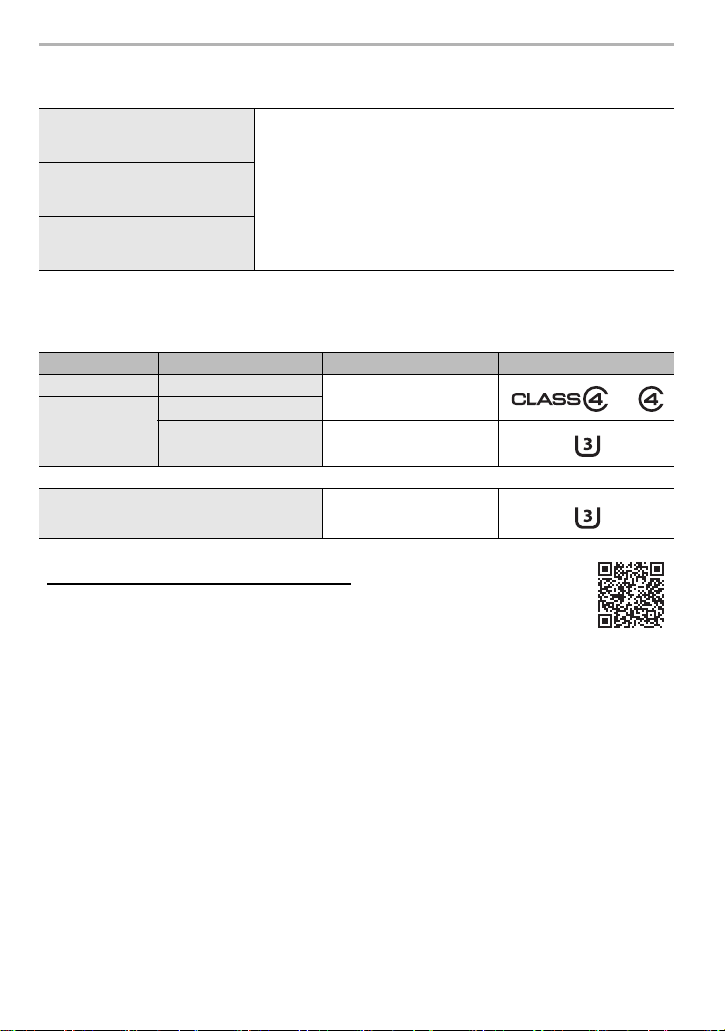
∫ Recording of motion pictures/4K photos and speed class ratings
Use a card that meets the following ratings of the SD Speed Class or UHS Speed Class.
• Please confirm the latest information on the following website.
https://panasonic.jp/support/global/cs/dsc/
(This Site is English only.)
• Keep the memory card out of reach of children to prevent swallowing.
SD Memory Card
(512 MB to 2 GB)
• This unit is compatible with UHS-I/UHS-II UHS Speed Class
3 standard SDHC/SDXC memory cards.
• Operation of the cards on the left has been confirmed with
Panasonic’s cards.
SDHC Memory Card
(4 GB to 32 GB)
SDXC Memory Card
(48 GB to 128 GB)
[Rec Format] [Rec Quality] Speed class Label example
[AVCHD] All
Class 4 or higher
[MP4]
FHD/HD
4K UHS Speed Class 3
When recording in High Speed Video/
4K Photo/Post Focus
UHS Speed Class 3
DC-G95PP-DVQX1749_eng.book 12 ページ 2019年3月29日 金曜日 午後1時31分

13
Preparation/Basic
(ENG) DVQX1749
About the Lens
This unit can use the dedicated lenses compatible with
the Micro Four Thirds
TM
System lens mount specification
(Micro Four Thirds mount).
You can also use a lens of any of the following
standards by attaching a mount adaptor.
For smoother recording, we recommend updating the firmware of the interchangeable lens
to the latest version.
To check the firmware version of the interchangeable lens, attach it to the camera body
and select [Version Disp.] in the [Setup] menu.
• To view the latest information on the firmware or to download the
firmware, visit the support site below:
https://panasonic.jp/support/global/cs/dsc/
(This Site is English only.)
Lens Mount adaptor
Four Thirds™ mount specification
lens
Mount Adaptor (DMW-MA1: optional)
Leica M Mount interchangeable lens M Mount Adaptor (DMW-MA2M: optional)
Leica R Mount interchangeable lens R Mount Adaptor (DMW-MA3R: optional)
DC-G95PP-DVQX1749_eng.book 13 ページ 2019年3月29日 金曜日 午後1時31分
Preparation/Basic
14
DVQX1749 (ENG)
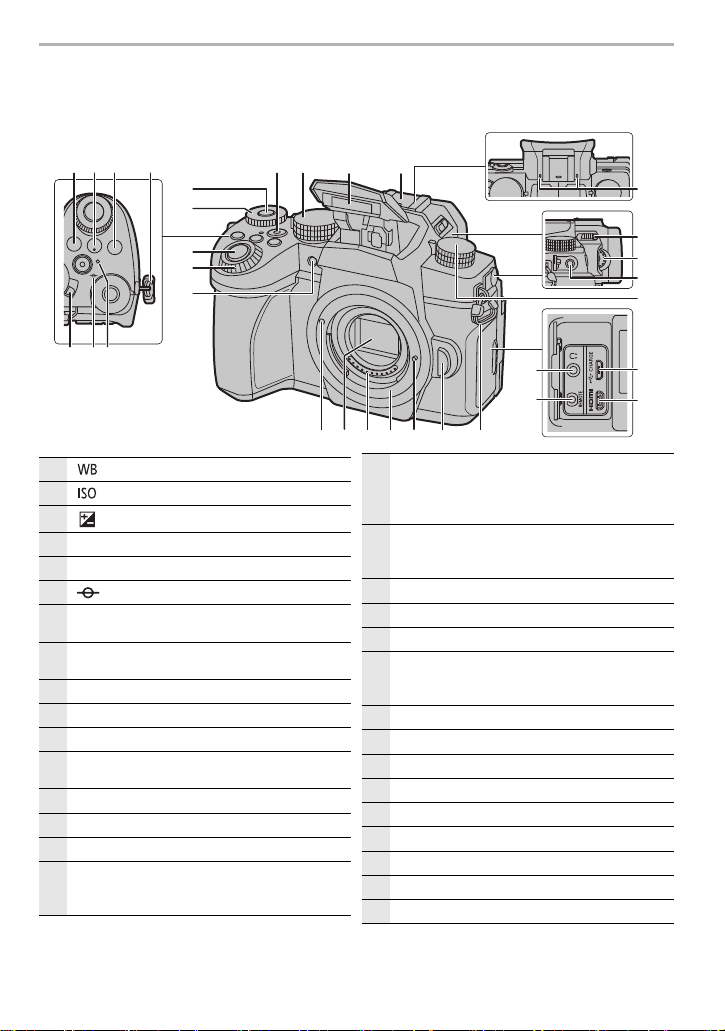
Names and Functions of Components
∫ Camera body
ヤラモンヨユ
8
3
27 2631 28
2930
15
9
11
12
24
75
421
4
161413
10
22
23
25
19
18
17
21
20
6
1
[ ] (White Balance) button
2
[ ] (ISO sensitivity) button
3
[ ] (Exposure Compensation) button
4
Shoulder strap eyelet (P16)
5
Camera ON/OFF switch (P22)
6
[ ] (Focus distance reference mark)
7
Charging lamp (P20)/
WIRELESS connection lamp (P65)
8
Dial operation switch button (P26)/
Fn button (Fn1) (P30)
9
Rear dial (P25)
10
Shutter button (P24)
11
Front dial (P25)
12
Self-timer indicator/
AF Assist Lamp
13
Motion picture button (P46)
14
Mode dial (P27)
15
Flash
16
Hot shoe (Hot shoe cover) (P16)
• Keep the hot shoe cover out of reach of
children to prevent swallowing.
17
Stereo microphone
• Be careful not to cover the microphone with
your finger. Doing so may make sound difficult
to record.
18
[‰] (Flash open lever)
• The flash opens, and recording with the flash
becomes possible.
19
Diopter adjustment dial (P23)
20
[MIC] socket
21
Drive mode dial (P34)
22
Headphone socket
• Excessive sound pressure from earphones
and headphones can cause hearing loss.
23
[REMOTE] socket
24
[USB/CHARGE] socket (P19)
25
[HDMI] socket
26
Lens release button (P21)
27
Lens lock pin
28
Mount
29
Contact points
30
Sensor
31
Lens fitting mark (P21)
DC-G95PP-DVQX1749_eng.book 14 ページ 2019年3月29日 金曜日 午後1時31分
15
Preparation/Basic
(ENG) DVQX1749
• Fn buttons ([Fn4] to [Fn8]) are touch
icons.
Touch the [ ] tab on the recording screen to
display them.
32
41
42
43
46
45
34 35
38
37
36
51 4748
40
39
44
33
50 49
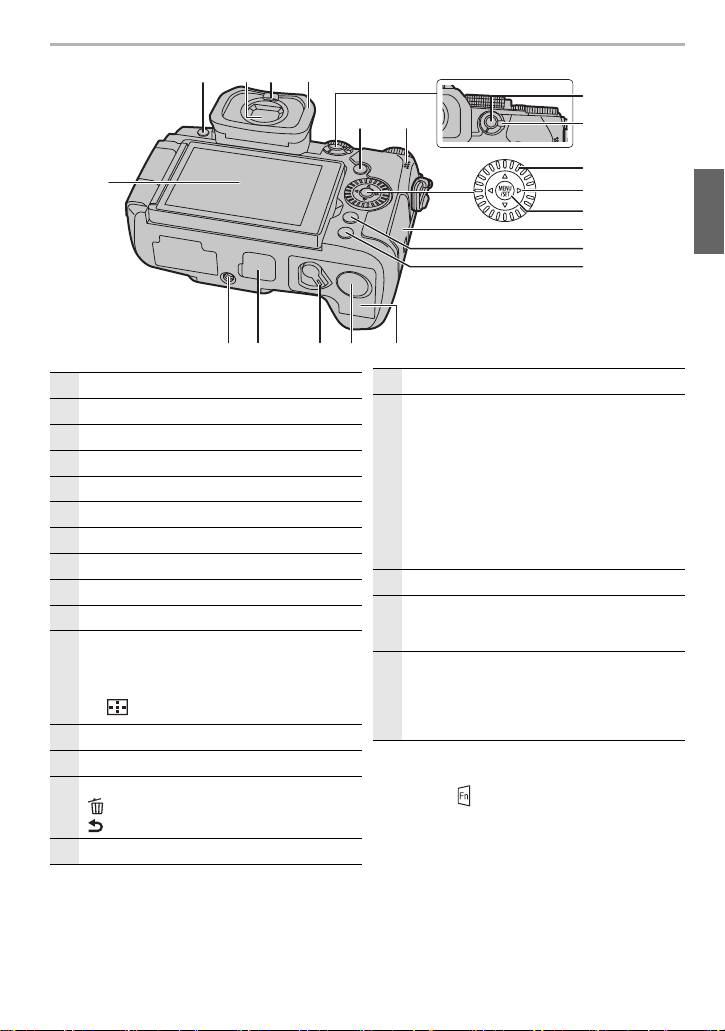
32
Touch screen (P28)/monitor (P76)
33
[LVF] button (P28)/[Fn3] button (P30)
34
Viewfinder (P28)
35
Eye sensor (P28)
36
Eye cup
37
[(] (Playback) button (P52)
38
Speaker
39
[AF/AE LOCK] button
40
Focus mode lever (P32)
41
Control dial
42
Cursor buttons (P25)/
3 Fn button (Fn9) (P30)/
1 Fn button (Fn10) (P30)/
4 Fn button (Fn11) (P30)/
2 [ ] (AF Mode) button
43
[MENU/SET] button (P25, 29)
44
Card door (P21)
45
[Q.MENU] button (P30)/[Fn2] button (P30)/
[ ] (Delete) button (P53)/
[ ] (Cancel) button (P29)
46
[DISP.] button
47
Battery door (P18)
48
DC coupler cover
• When using an AC adaptor, ensure that the
Panasonic DC coupler (DMW-DCC8: optional)
and AC adaptor (DMW-AC10PP: optional) are
used.
• Always use a genuine Panasonic AC adaptor
(DMW-AC10PP: optional).
• When using an AC adaptor (optional), use the
AC cable supplied with the AC adaptor
(optional).
49
Release lever (P18)
50
Cover for the battery grip connector
• Keep the cover for the battery grip connector
out of reach of children to prevent swallowing.
51
Tripod mount
• It may not be possible to attach and securely
fasten a tripod with a screw length of 5.5 mm
(0.22 inch) or more to the camera. Doing so
may also damage the camera.
DC-G95PP-DVQX1749_eng.book 15 ページ 2019年3月29日 金曜日 午後1時31分
Preparation/Basic
16
DVQX1749 (ENG)
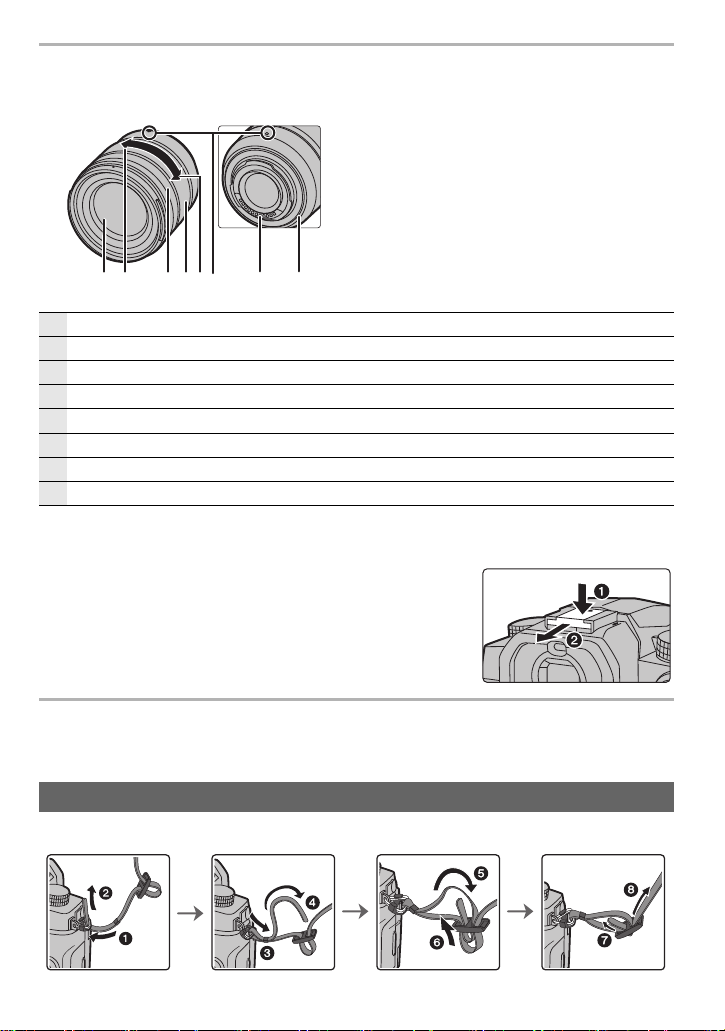
∫ Lens
∫ Removing the Hot Shoe Cover
The camera comes with a hot shoe cover attached to the hot shoe.
Remove the hot shoe cover by pulling it in the direction
indicated by arrow
2
while pressing it in the direction
indicated by arrow
1
.
Quick Start Guide
• Check that the camera is turned off.
Attach the shoulder strap when using the camera to prevent it from dropping.
H-FS12060
1
Lens surface
2
Tel e
3
Focus ring
4
Zoom ring
5
Wide
6
Lens fitting mark (P21)
7
Contact points
8
Lens mount rubber
Attaching the Shoulder Strap
2 435 7 81
6
DC-G95PP-DVQX1749_eng.book 16 ページ 2019年3月29日 金曜日 午後1時31分
17
Preparation/Basic
(ENG) DVQX1749
• In addition, attach the other side of the shoulder strap in the same manner.
• Use the shoulder strap around your shoulder.
– Do not wrap the strap around your neck. It may result in injury or accident.
– Do not leave the shoulder strap where an infant can reach it.
It may result in an accident by mistakenly wrapping around the neck.
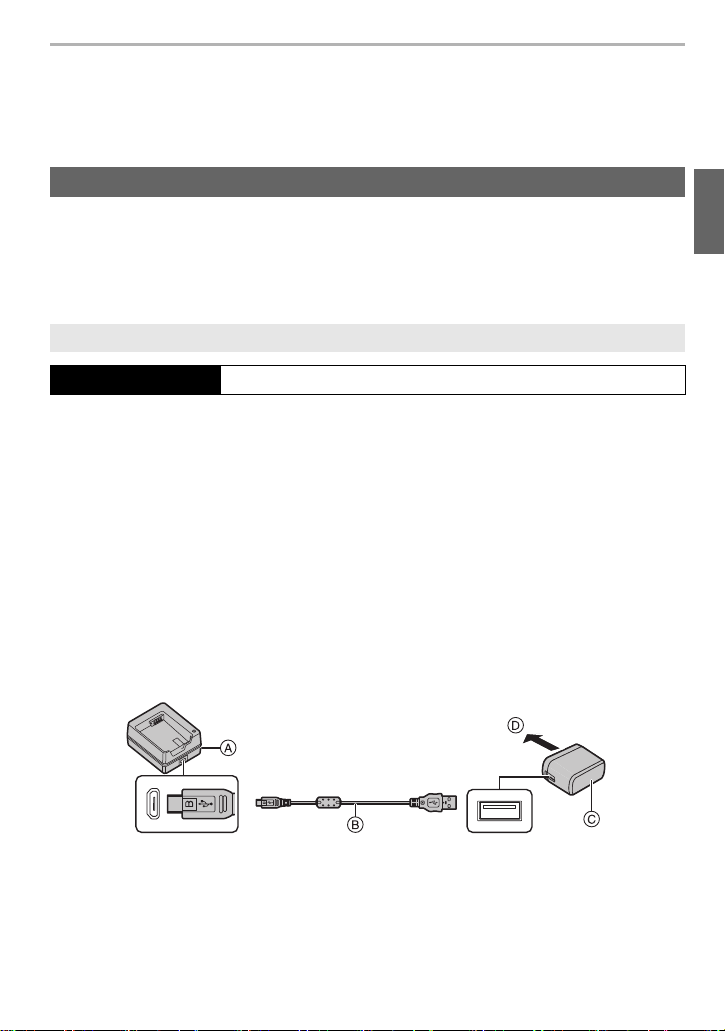
You can charge the battery either using the supplied charger, or in the camera body.
If you turn on the camera, you can also power it from a power outlet.
• The battery that can be used with this unit is DMW-BLC12PP. (As of April 2019)
• Use the supplied charger and AC adaptor.
• The indicated charging time is for when the battery has been discharged completely.
The charging time may vary depending on how the battery has been used.
The charging time for the battery in hot/cold environments or a battery that has not been used
for a long time may be longer than normal.
1 Connect the battery charger (supplied) and the AC adaptor (supplied) with the
USB connection cable (supplied).
• Check the direction of the terminals and plug in/out straight holding onto the plug.
(It may result in malfunction by the deforming of the terminal if it is plugged in obliquely or
in wrong direction.)
2 Insert the AC adaptor (supplied) into the power outlet.
Charging the Battery
¥ The battery is not charged at the time of purchase. Charge the battery before use.
Charge the battery using the battery charger
Charging time Approx. 175 min
¥ Use the products supplied with the camera for charging.
¥ Use the charger indoors.
A Charger (supplied)
B USB connection cable (supplied)
C AC adaptor (supplied)
D To power outlet
DC-G95PP-DVQX1749_eng.book 17 ページ 2019年3月29日 金曜日 午後1時31分
Preparation/Basic
18
DVQX1749 (ENG)
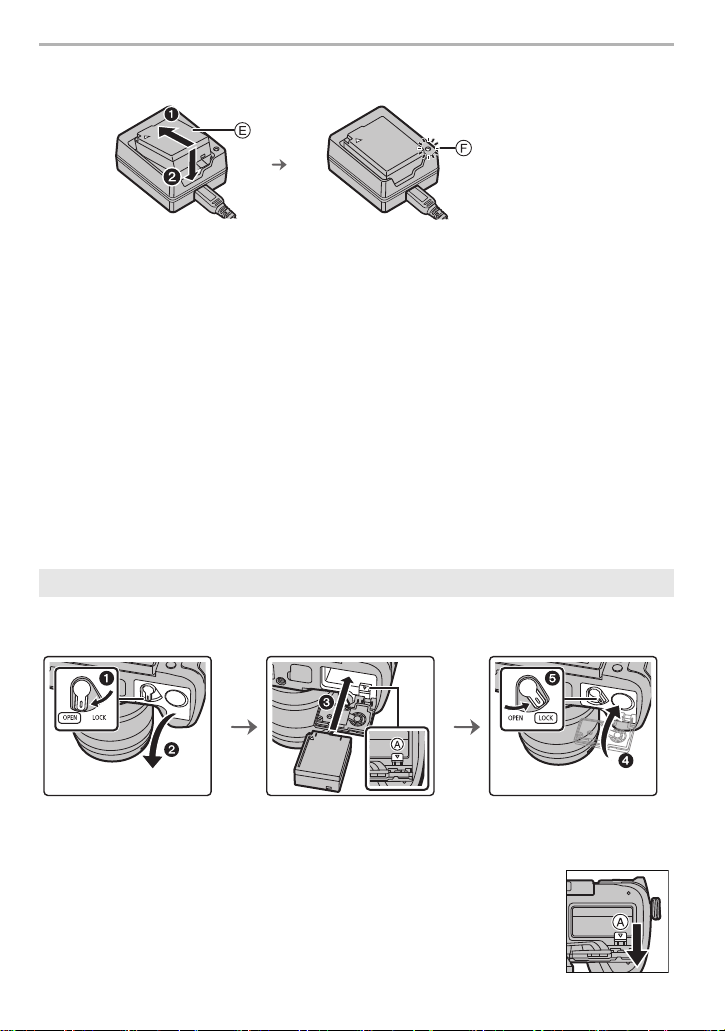
3 Insert the battery E in the correct direction.
• The [CHARGE] indicator F lights up and charging begins.
∫ About the [CHARGE] indicator
• When the [CHARGE] indicator flashes
– The battery temperature is too high or too low. It is recommended to charge the battery again
in an ambient temperature of between 10 oC and 30 oC (50 oF and 86 oF).
– The terminals of the charger or the battery are dirty. In this case, wipe them with a dry cloth.
• Always use genuine Panasonic batteries (DMW-BLC12PP).
• If you use other batteries, we cannot guarantee the quality of this product.
• Being careful about the battery orientation, insert all the way until you hear a locking sound and
then check that it is locked by lever A.
∫ To remove
Push the lever A in the direction of the arrow to remove.
• Turn the camera off and wait for the “LUMIX” display on the monitor to clear
before removing the battery.
• Remove the battery after use.
¥ Do not use any other USB connection cables except the supplied one.
¥ Do not use any other AC adaptors except the supplied one.
¥ The AC adaptor (supplied) and USB connection cable (supplied) are for this camera only. Do
not use them with other devices.
On: Charging.
Off: Charging has completed.
(After charging is complete, disconnect the AC adaptor (supplied) from
the power outlet and remove the battery.)
Battery Insertion
DC-G95PP-DVQX1749_eng.book 18 ページ 2019年3月29日 金曜日 午後1時31分
19
Preparation/Basic
(ENG) DVQX1749
• Using the camera body and the supplied AC adaptor. The camera is turned off.
• The indicated charging time is for when the battery has been discharged completely.
The charging time may vary depending on how the battery has been used.
The charging time for the battery in hot/cold environments or a battery that has not been used
for a long time may be longer than normal.
1 Turn off the camera.
2 Insert the battery into the camera.
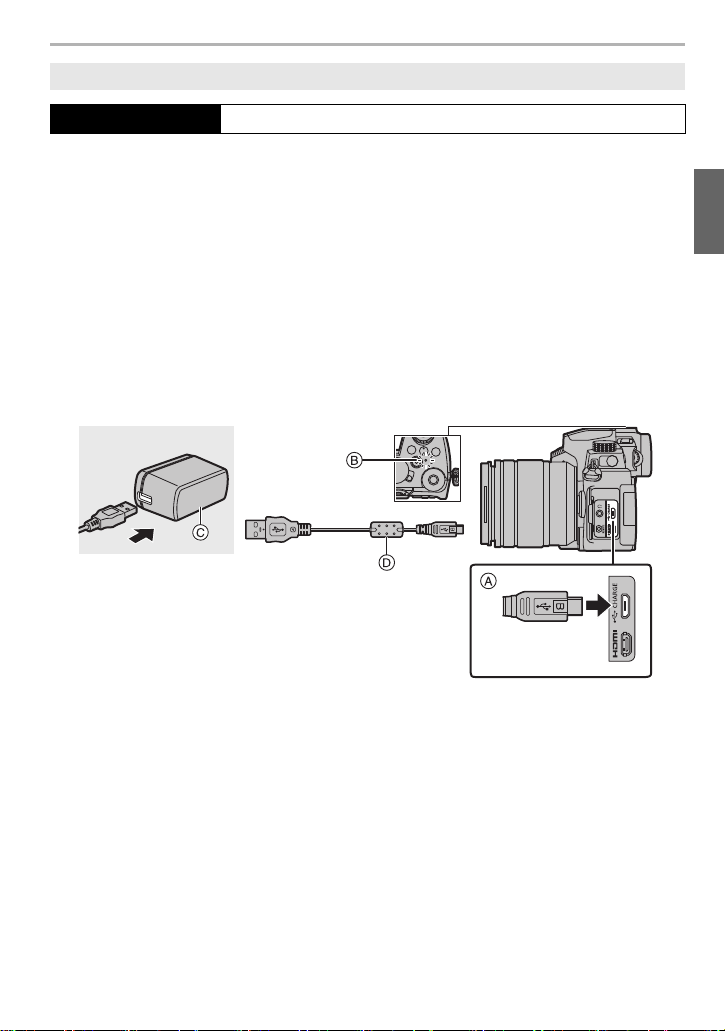
3 Connect the camera [USB/CHARGE] socket and the AC adaptor (supplied) with
the USB connection cable (supplied).
4 Insert the AC adaptor (supplied) into the power outlet.
Charge the battery using the camera
Charging time Approx. 180 min
¥ Use the products supplied with the camera for charging.
¥ The battery inserted in the Battery Grip (optional) cannot be charged.
A Connect the USB connection cable (supplied) to the [USB/CHARGE] socket.
• Place the camera in an upright position, and find the terminal at the top.
• Check the direction of the terminals and plug in/out straight holding onto the plug.
(It may result in malfunction by the deforming of the terminal if it is plugged in obliquely or
in wrong direction.)
Do not connect devices to incorrect terminals. Doing so may cause malfunction.
B Charging lamp
C AC adaptor (supplied)
D USB connection cable (supplied)
DC-G95PP-DVQX1749_eng.book 19 ページ 2019年3月29日 金曜日 午後1時31分
Preparation/Basic
20
DVQX1749 (ENG)
∫ About the charging lamp
• When the charging lamp flashes
– Reconnect the USB connection cable (supplied) in a location where the ambient temperature
(and the temperature of battery) is in a 10 oC to 30 oC (50 oF to 86 oF) range, and try charging
again.
– If the USB device (PC etc.) is not capable of supplying sufficient power, charging is not
possible.
If you connect the camera to a power outlet (AC adaptor (supplied)) or the USB device
(PC etc.) while the camera is turned on, power can be supplied via the USB connection
cable (supplied).
• Insert the battery into the camera.
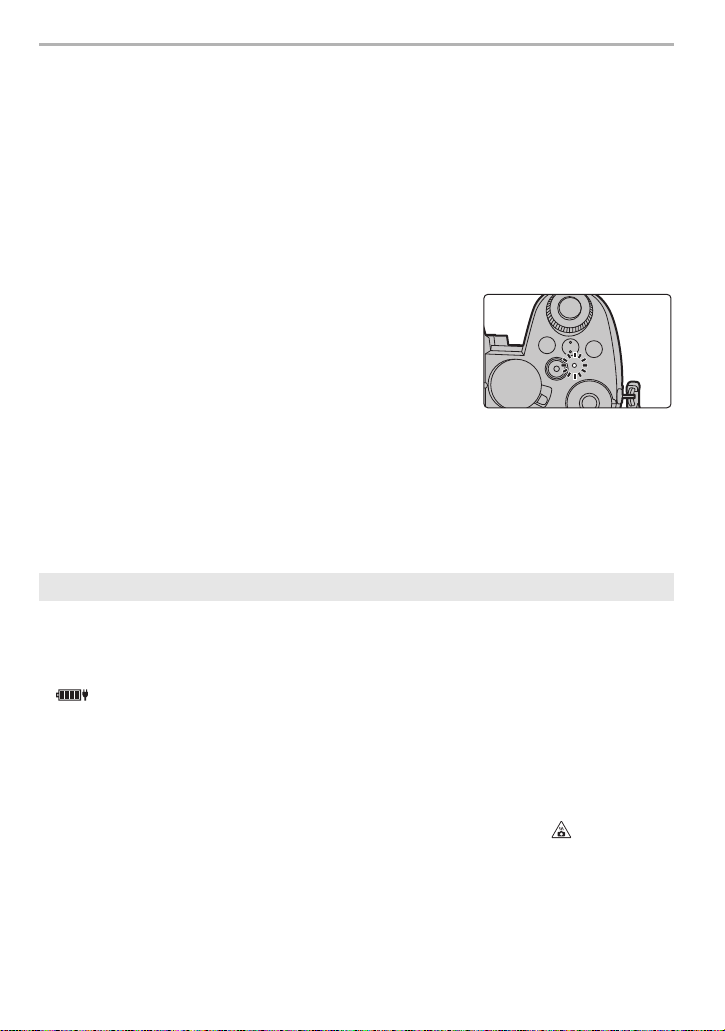
• [ ] is displayed on the recording screen while power is being supplied.
¥ The camera consumes a small amount of power even after it is turned off by setting the
camera ON/OFF switch to [OFF]. When leaving the product unused for a long time,
disconnect the AC adaptor (supplied) from the power outlet for power saving.
¥ You can also charge the battery by connecting a USB device (PC, etc.) and the camera with
the USB connection cable (supplied). In that case, charging may take a while.
¥ Do not use any other USB connection cables except the supplied one.
¥ Do not use any other AC adaptors except the supplied one.
¥ The AC adaptor (supplied) and USB connection cable (supplied) are for this camera only. Do
not use them with other devices.
Lit red: Charging.
Off: Charging has completed.
(When charging is complete, disconnect
the camera from the power outlet.)
About the power supply
¥
In certain situations where the camera is used, such as during recording, the battery
may drain. The camera will turn off when the battery power runs out.
¥ Before connecting or disconnecting the AC adaptor (supplied), turn the camera off.
¥ Power may not be supplied depending on the power supply capacity of the USB device (PC
etc.).
¥ If the ambient temperature is high or power is supplied continuously, after [ ] is displayed,
the supply of power may stop. Wait until the camera cools down.
DC-G95PP-DVQX1749_eng.book 20 ページ 2019年3月29日 金曜日 午後1時31分
21
Preparation/Basic
(ENG) DVQX1749
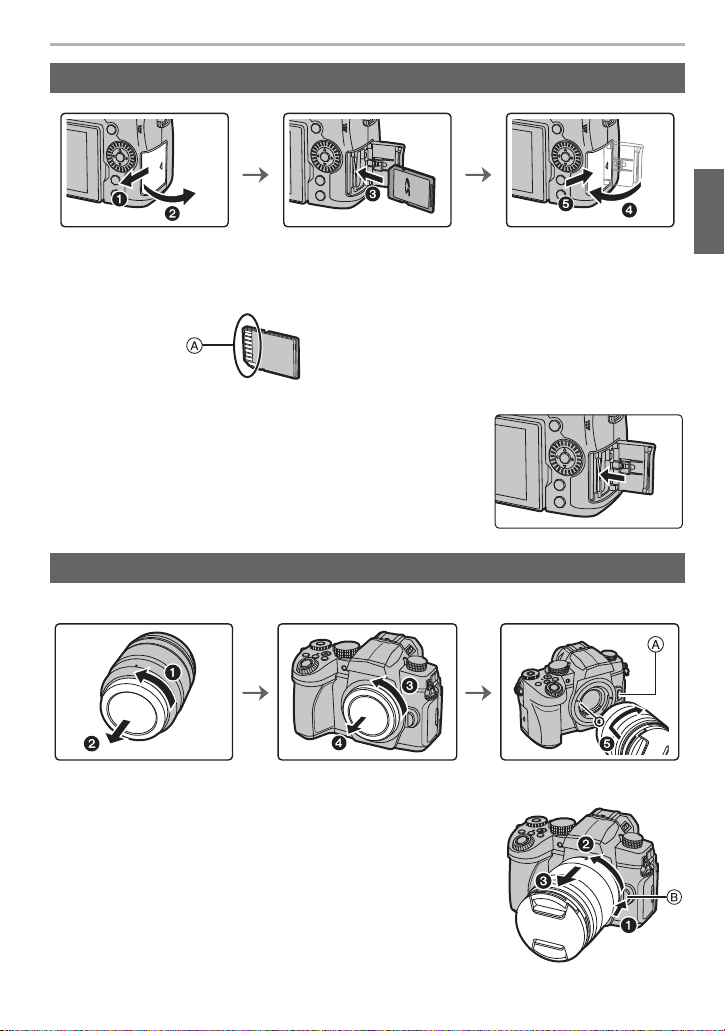
• Push it securely all the way until you hear a click while being careful about the direction in
which you insert it.
• Do not touch the card terminals A.
∫ To remove
Insert until a clicking sound is heard and then pull it
straight out.
• Turn the camera off and wait for the “LUMIX” display on the
monitor to clear before removing the card.
• Change lenses where there is not a lot of dirt or dust.
• Do not press the lens release button A when you attach a lens.
∫ Remove a lens
1 Attach the lens cap.
2 While pressing on the lens release button B, rotate
the lens toward the arrow until it stops and then
remove.
Inserting the Card (Optional)
Attaching a Lens
DC-G95PP-DVQX1749_eng.book 21 ページ 2019年3月29日 金曜日 午後1時31分
Preparation/Basic
22
DVQX1749 (ENG)
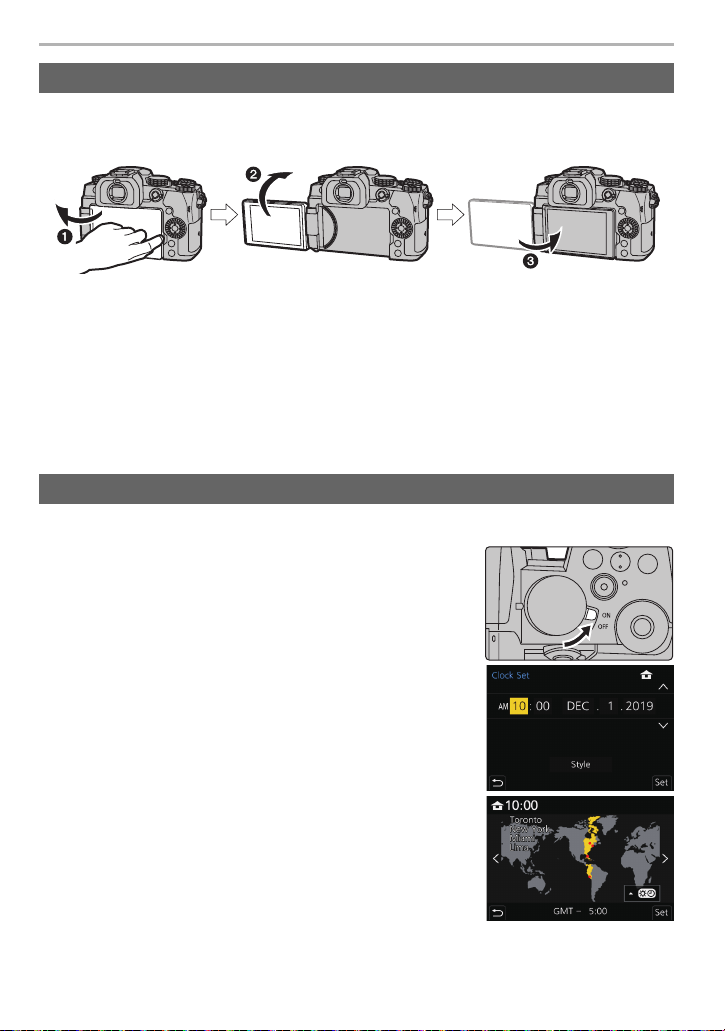
At the time when this camera is purchased, the monitor is stowed in the camera body.
Bring out the monitor as shown below.
1 Open the monitor. (It opens up to 180o.)
2 It can be rotated 180o forward.
3 Return the monitor to its original position.
• The clock is not set when the camera is shipped.
1 Turn the camera on.
2 Press [MENU/SET].
3 Press 3/4 to select the language, and press [MENU/
SET].
4 Press [MENU/SET].
5 Press 2/1 to select the items (year, month, day,
hour, minute), and press 3/4 to set.
6 Press [MENU/SET] to set.
7 When [The clock setting has been completed.] is
displayed, press [MENU/SET].
8 When [Please set the home area] is displayed, press
[MENU/SET].
9 Press 2/1 to select the home area, and then press
[MENU/SET].
Changing the Monitor Position
¥ When rotating the monitor, be careful not to apply too much force. Doing so may cause
damage.
¥ When not using the monitor it is recommended that you close it with the screen facing inward
to prevent dirt and scratches.
Setting the Clock (When Turning On for the First Time)
DC-G95PP-DVQX1749_eng.book 22 ページ 2019年3月29日 金曜日 午後1時31分
23
Preparation/Basic
(ENG) DVQX1749
Format the card before recording a picture with this unit.
Since data cannot be recovered after formatting, make sure to back up necessary
data in advance.
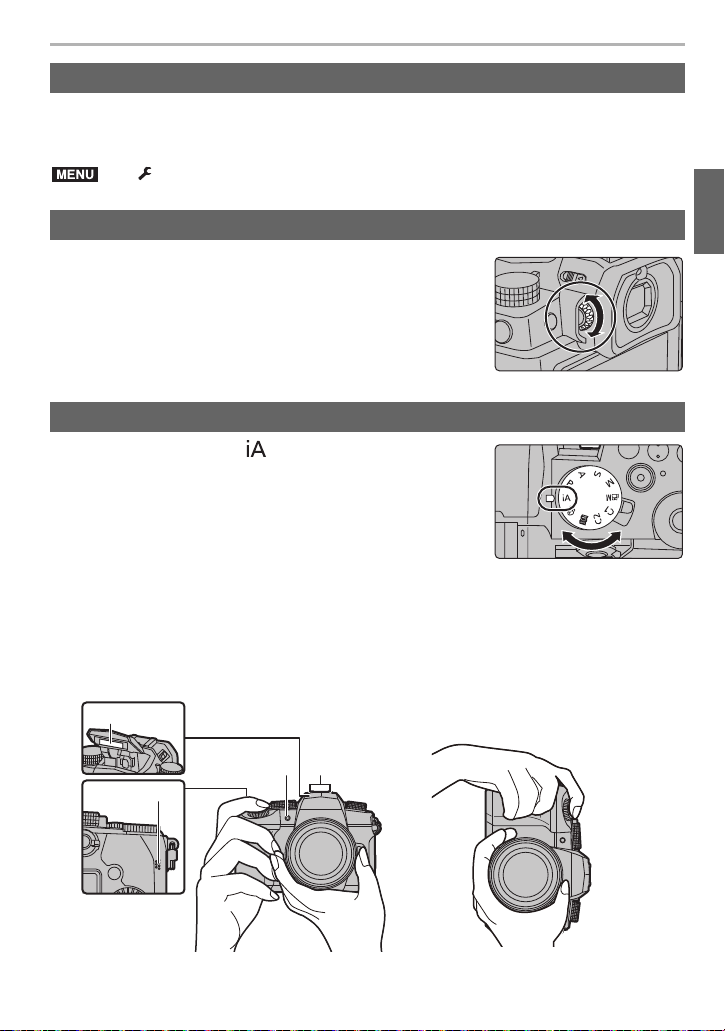
Rotate the diopter adjustment dial until you can see the
characters displayed in the viewfinder clearly.
1 Set the mode dial to [ ].
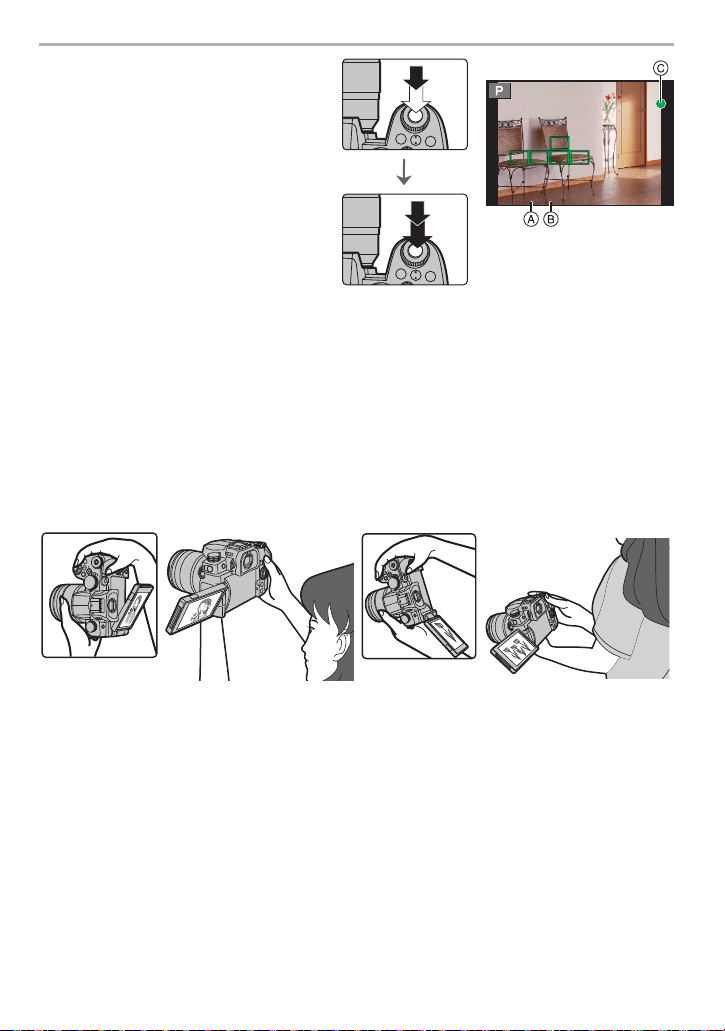
2 Hold the camera gently with both hands, keep your arms still at your side and
stand with your feet slightly apart.
• Do not cover the flash A, AF Assist lamp B, microphone C, or speaker D with
your fingers or other objects.
• Make sure your footing is stable and there is no danger of colliding with another person or
object in the vicinity while taking pictures.
Formatting the card (initialization)
> [Setup] > [Format]
Adjusting the Viewfinder Diopter
Taking pictures
MENU
DC-G95PP-DVQX1749_eng.book 23 ページ 2019年3月29日 金曜日 午後1時31分
Preparation/Basic
24
DVQX1749 (ENG)
3 Press the shutter button halfway
to focus.
A Shutter speed
B Aperture value
C Focus indication
• Aperture value and shutter speed are
displayed.
(It will flash in red if the correct
exposure is not achieved, except
when set to flash.)
• Once the subject is in focus, the
focus indication is displayed. (When
the subject is not in focus, the indication flashes.)
4 Press the shutter button fully (push it in further), and take the picture.
∫ Free angle shooting
The monitor can be rotated to suit your needs. This is convenient as it allows you to take
pictures from various angles by adjusting the monitor.
¥
Make sure that the camera does not move at the moment the shutter button is pressed.
¥ Pictures cannot be taken until focus is achieved when [Focus/Release Priority] is set to
[FOCUS].
¥ To display the picture in Playback Mode, press [(]. (P52)
Taking pictures at a high angle Taking pictures at a low angle
F
F
F
DC-G95PP-DVQX1749_eng.book 24 ページ 2019年3月29日 金曜日 午後1時31分

25
Preparation/Basic
(ENG) DVQX1749
Basic Operations
Pressing the cursor button: Selects an item or numeric
value.
• This owner’s manual expresses the up, down, left, and right of
the cursor button as 3/4/2/1.
Pressing [MENU/SET]: Confirms a setting.
• Displays the menu during recording and playback.
Rotating: Selects an item or numeric value.
• This is expressed as follows in this document:
– When rotating the control dial to the left or right:
Rotating: Selects an item or numeric value.
• This owner’s manual describes operations of the front dial/rear dial as follows:
Cursor buttons/[MENU/SET] button
Control Dial
Front Dial/Rear Dial
e.g.: When rotating the front dial to the left
or right
e.g.: When rotating the rear dial to the left
or right
DC-G95PP-DVQX1749_eng.book 25 ページ 2019年3月29日 金曜日 午後1時31分
Preparation/Basic
26
DVQX1749 (ENG)
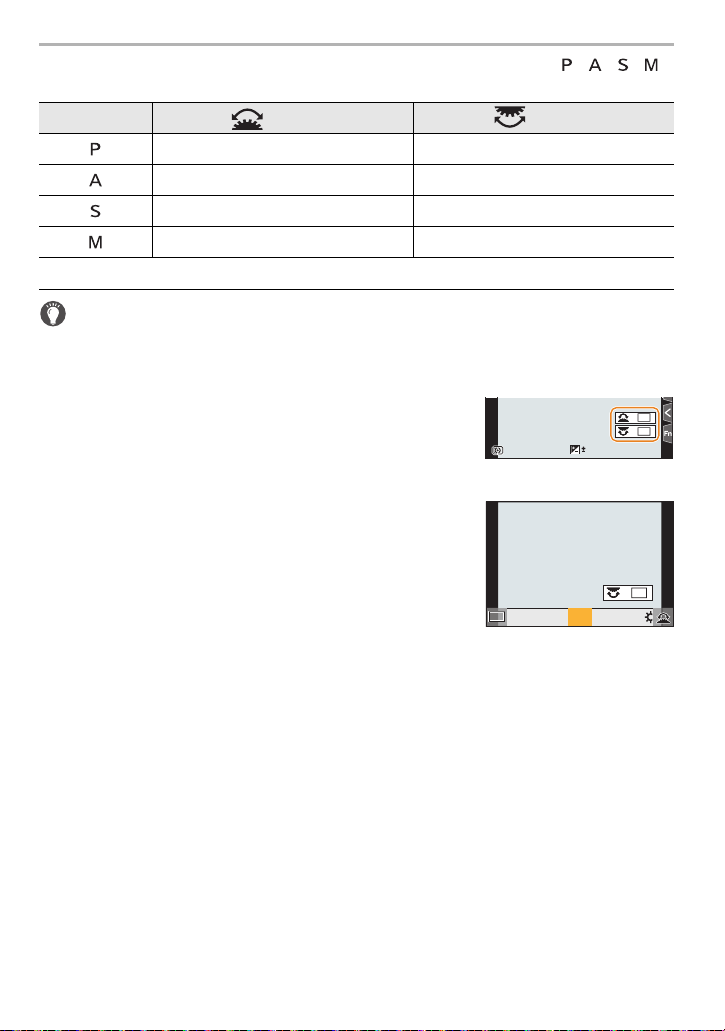
Allows you to set the aperture, shutter speed, and other settings when in / / /
modes.
Temporarily changing the items assigned to the front/rear dials ([Dial Operation
Switch])
1 Set a Fn button to [Dial Operation Switch]. (P30)
• This function is set in Fn button (Fn1) at the time of purchase.
2 Press the Fn button.
• A guide will be displayed showing the items temporarily
assigned to the front/rear dials.
• If no operations are performed, the guide will disappear in
a few seconds.
3 Rotate the front/rear dials while the guide is
displayed.
4 Press [MENU/SET] and set.
• You can also complete this step by performing either of the
operations below:
– Press the shutter button halfway
– Press the Fn button
Mode dial Front dial Rear Dial
Program Shift Program Shift
Aperture value Aperture value
Shutter speed Shutter speed
Aperture value Shutter speed
¥ You can set the following settings in [Dial Set.] of the [Custom] ([Operation]) menu.
– Operation methods of the front/rear dials
– Operation method of the control dial
– Items to be assigned temporarily to the front/rear dials in [Dial Operation Switch]
98
98
98
0
ISOISOISOISO
WBWBWBWB
WBWBWBWBWBWBWBWBWBWBWB
AWBc
AWBc
AWBw
AWBw
AWBAWB
ISOISOISOISO
DC-G95PP-DVQX1749_eng.book 26 ページ 2019年3月29日 金曜日 午後1時31分
27
Preparation/Basic
(ENG) DVQX1749
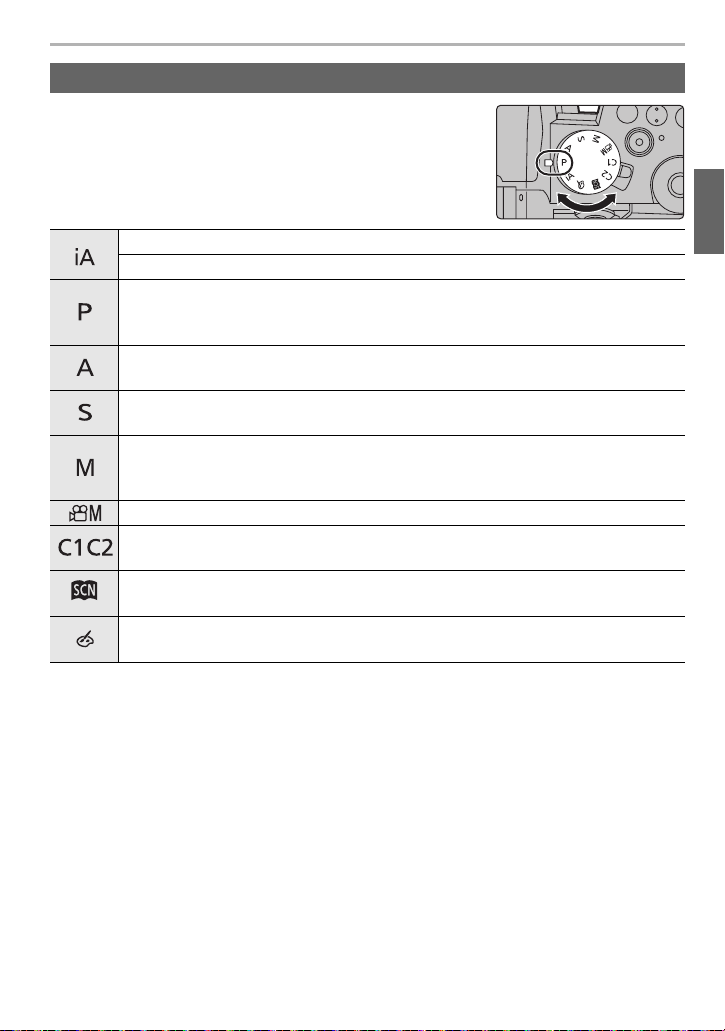
Rotate the mode dial and select the recording mode.
• Rotate the mode dial slowly to select the desired mode.
Mode dial (Selecting a Recording Mode)
Intelligent Auto Mode (P31)
Intelligent Auto Plus Mode (P31)
Programme AE Mode
The camera automatically sets the shutter speed and the aperture value
according to the brightness of the subject.
Aperture-Priority AE Mode
The shutter speed is automatically determined by the aperture value you set.
Shutter-Priority AE Mode
The aperture value is automatically determined by the shutter speed you set.
Manual Exposure Mode
The exposure is adjusted by the aperture value and the shutter speed which are
manually adjusted.
Creative Video Mode (P49)
Custom Mode
Use this mode to take pictures with previously registered settings.
Scene Guide Mode
This mode allows you to take pictures that match the scene being recorded.
Creative Control Mode
This mode records with additional image effects.
DC-G95PP-DVQX1749_eng.book 27 ページ 2019年3月29日 金曜日 午後1時31分
Preparation/Basic
28
DVQX1749 (ENG)
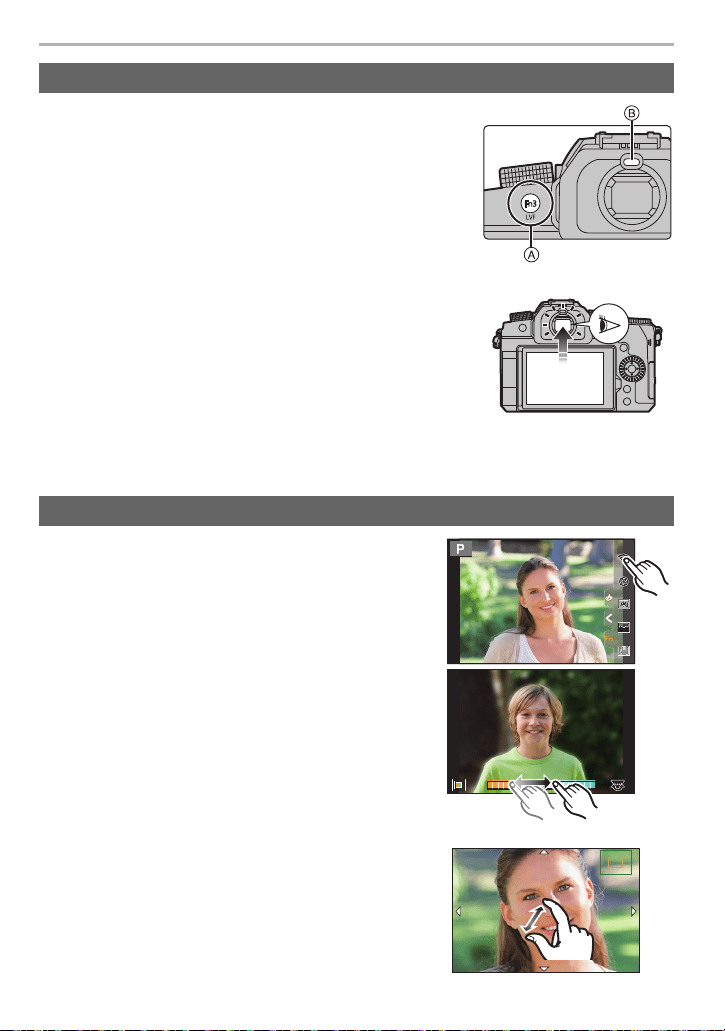
Press [LVF].
A [LVF] button
B Eye sensor
• The monitor/viewfinder will switch as follows:
– Automatic viewfinder/monitor switching
– Viewfinder display
– Monitor display
∫ Notes on automatic viewfinder/monitor switching
Bring your eye or an object near the viewfinder to
automatically switch to the viewfinder display using the eye
sensor.
• To reduce the battery consumption, set [Power Save LVF
Shooting] in [Economy].
∫ Touch
To touch and release the touch screen.
∫ Drag
A movement without releasing the touch screen.
∫ Pinch (enlarge/reduce)
On the touch screen, spread (pinch out) two fingers to
zoom in and narrow (pinch in) them to zoom out.
[LVF] button (Switching the Monitor/Viewfinder)
¥ When [Eye Sensor AF] is set to [ON] in the [Custom] ([Focus / Release Shutter]) menu,
looking through the viewfinder will adjust focus.
Touch screen (Touch operations)
Fn5
Fn5
Fn5
Fn4
Fn4
Fn4
Fn6
Fn6
Fn6
Fn8
Fn8
Fn8
Fn7
Fn7
Fn7
A
AB
B
B
2.0X2.0X2.0X2.0X
DC-G95PP-DVQX1749_eng.book 28 ページ 2019年3月29日 金曜日 午後1時31分
29
Preparation/Basic
(ENG) DVQX1749
Setting menu items
You can either operate the buttons or touch the monitor to set menu items.
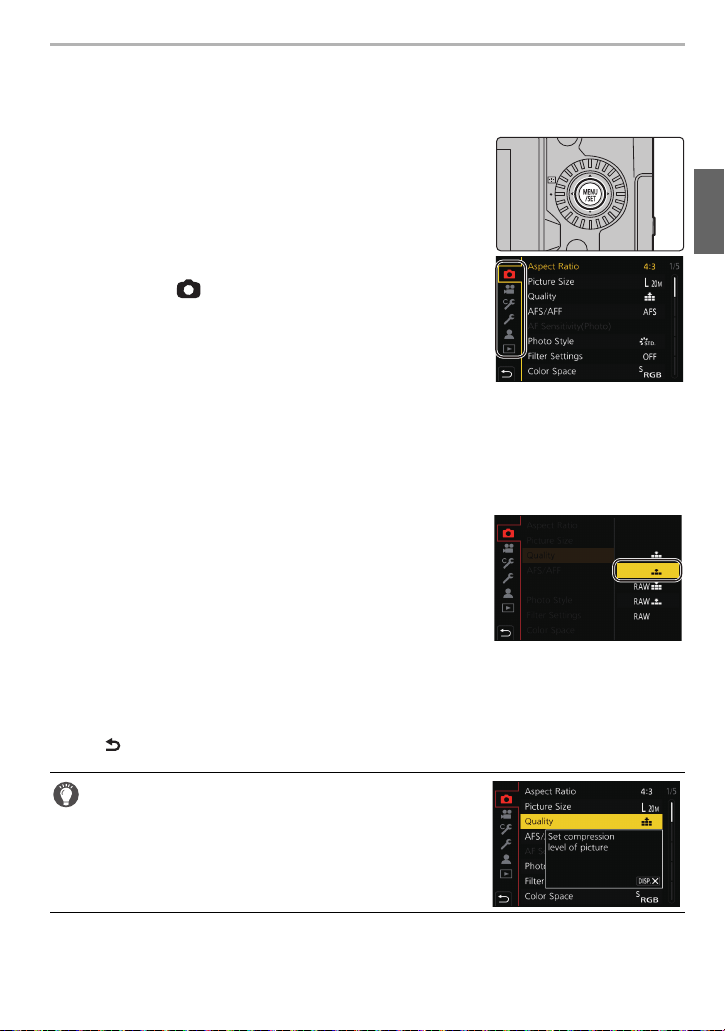
1
Press [MENU/SET] to display the menu.
2
Press 2.
3
Press 3/4 to select a menu selector icon,
such as [ ].
• You can also select the menu toggle icons by rotating
the front dial.
4
Press [MENU/SET].
5
Press 3/4 of the cursor button to select the menu item and press
[MENU/SET].
• You can also move to the next screen by rotating the rear dial.
6
Press 3/4 of the cursor button to select
the setting and press [MENU/SET].
• Depending on the menu item, its setting may not
appear or it may be displayed in a different way.
¥ You can also rotate the control dial to select the menu selector icon, menu item, or setting.
∫ Close the menu
Press [ ] or press the shutter button halfway.
• Press [DISP.] to display the menu description.
• Menu items that are not available are displayed in gray.
If you press [MENU/SET] while a gray item is selected,
the reason why it cannot be set is displayed in some
setting situations.
DC-G95PP-DVQX1749_eng.book 29 ページ 2019年3月29日 金曜日 午後1時31分
Preparation/Basic
30
DVQX1749 (ENG)
Quick Menu
This menu enables you to quickly set functions that are frequently used during recording
without calling the menu screen.
1 Press [Q.MENU] to display the Quick Menu.
2 Rotate the front dial to select the menu item.
3 Rotate the rear dial to select the setting.
4 Press [Q.MENU] to exit the Quick Menu once the
setting is complete.
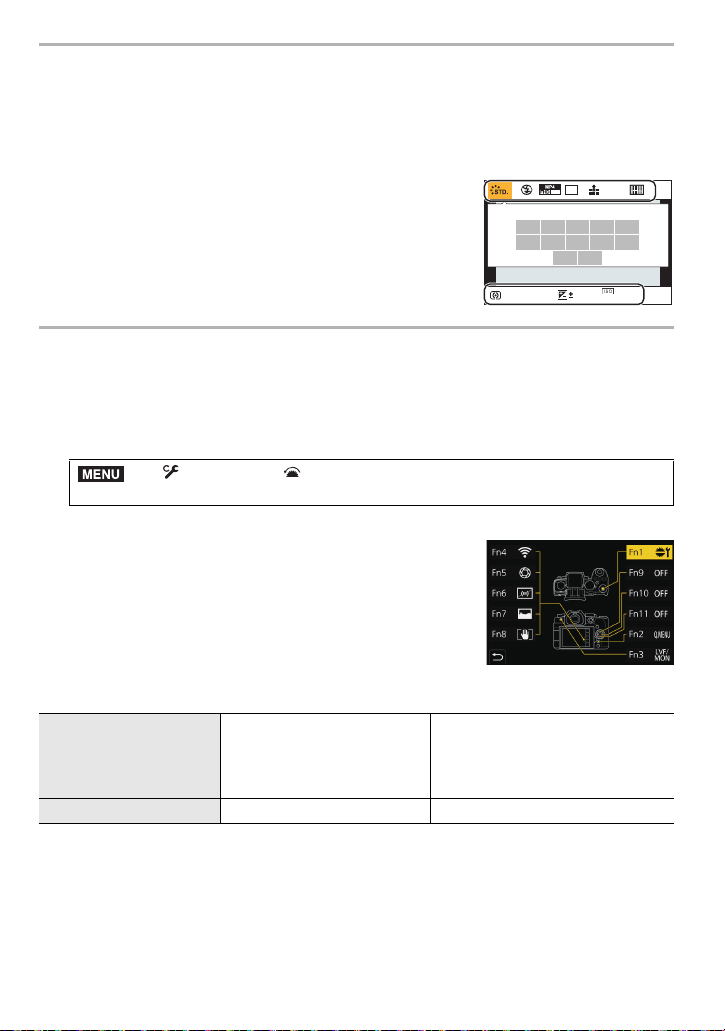
Fn Buttons
You can register functions to the Fn (Function) buttons.
Different functions can be set for both during recording and playback.
1 Select the menu.
2 Press 3/4 to select the Fn button you want to
assign a function to and then press [MENU/SET].
3 Press 3/4 to select the function you want to assign
and then press [MENU/SET].
• To restore the default Fn button settings, select [Restore to
Default].
• Select [Off] when not setting a function in the Fn button.
∫ Fn button settings at the time of purchase
> [Custom] > [Operation] > [Fn Button Set] >
[Setting in REC mode]/[Setting in PLAY mode]
[Setting in REC mode]
[Fn1]: [Dial Operation Switch]
[Fn2]: [Q.MENU]
[Fn3]: [LVF/Monitor Switch]
[Fn4]: [Wi-Fi]
[Fn5]: [Preview]
[Fn6]: [Level Gauge]
[Fn7]: [Histogram]
[Fn8]: [I.S. Lock (Video)]
[Fn9] to [Fn11]:
No function is set by default.
[Setting in PLAY mode] [Fn1]: [Wi-Fi] [Fn3]: [LVF/Monitor Switch]
¥ If you press and hold a Fn button ([Fn1] to [Fn3], [Fn9] to [Fn11]) for 2 seconds, the screen in
step
3 can be displayed quickly. This screen, however, may not be displayed depending on
conditions such as the function registered or the screen displayed.
¥ Some functions may not be available depending on the mode or the displayed screen.
¥ Some functions cannot be assigned depending on the Fn button.
AFSAFS
AU
TO
60 F3.5
AWB
L
4:3
0
60
p
MENU
DC-G95PP-DVQX1749_eng.book 30 ページ 2019年3月29日 金曜日 午後1時31分
31
Recording
(ENG) DVQX1749
Easy Recording (Intelligent Auto Mode)
Recording Mode:
The [ ] mode (Intelligent Auto mode) can record images using settings automatically
selected by the camera.
The camera detects the scene to set the optimal recording settings automatically to match
the subject and recording conditions.
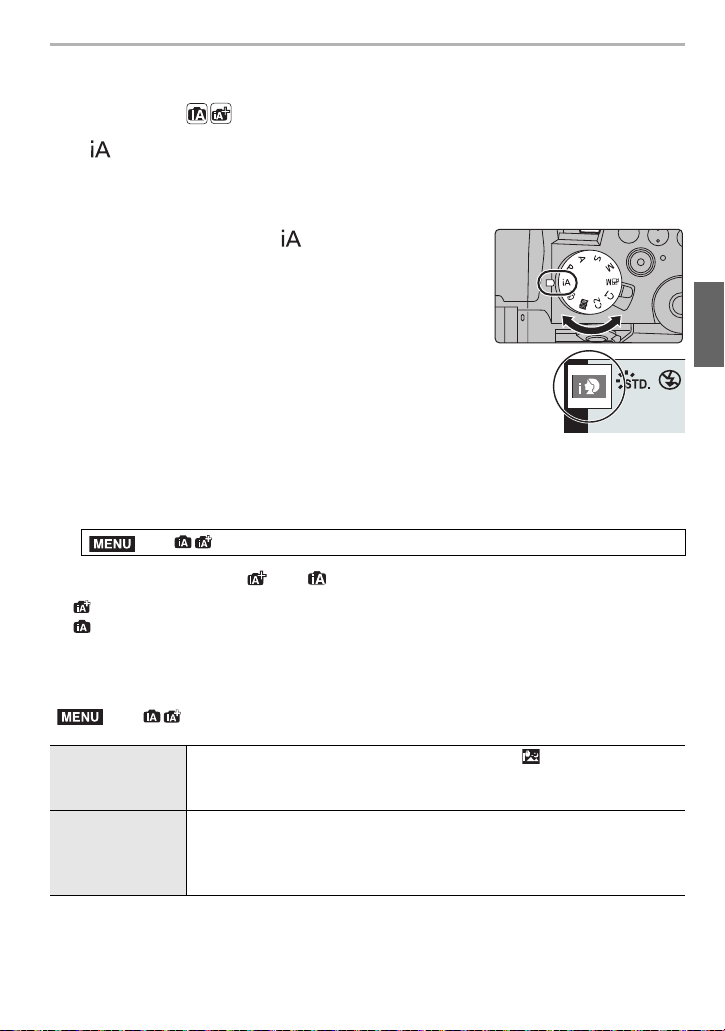
1
Set the mode dial to [ ].
2
Hold the camera with the lens facing toward
the subject.
• When the camera identifies the optimum scene, the icon
of the scene concerned will change.
(Automatic Scene Detection)
∫ Switching between Intelligent Auto Plus Mode and Intelligent Auto Mode
1 Select the menu.
2 Press 3/4 to select [ ] or [ ] and then press [MENU/SET].
∫ [Intelligent Auto] menu
> [Intelligent Auto] > [Intelligent Auto Mode]
¥
[ ] allows you to adjust some settings such as the brightness and color tone while also using
[ ] for other settings so that you can record pictures more suited to your preferences.
¥ At the time of purchase, the mode is set to Intelligent Auto Plus Mode.
> [Intelligent Auto]
[iHandheld Night
Shot]
• When [iHandheld Night Shot] is set to [ON] and [ ] is detected while
taking handheld night shots, pictures of the night scenery will be taken at
a high burst speed and composed into a single picture.
[iHDR]
• When [iHDR] is set to [ON] and there is, for example, strong contrast
between the background and the subject, multiple still pictures are
recorded with differing exposures and combined to create a single still
picture rich in gradation.
MENU
MENU
DC-G95PP-DVQX1749_eng.book 31 ページ 2019年3月29日 金曜日 午後1時31分
Recording
32
DVQX1749 (ENG)
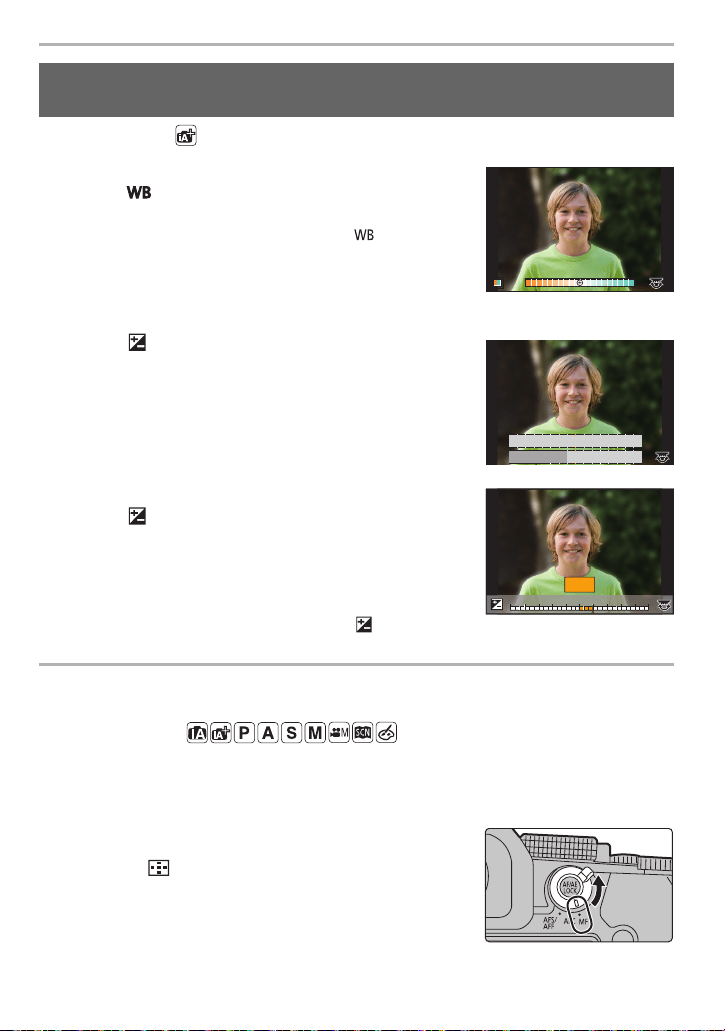
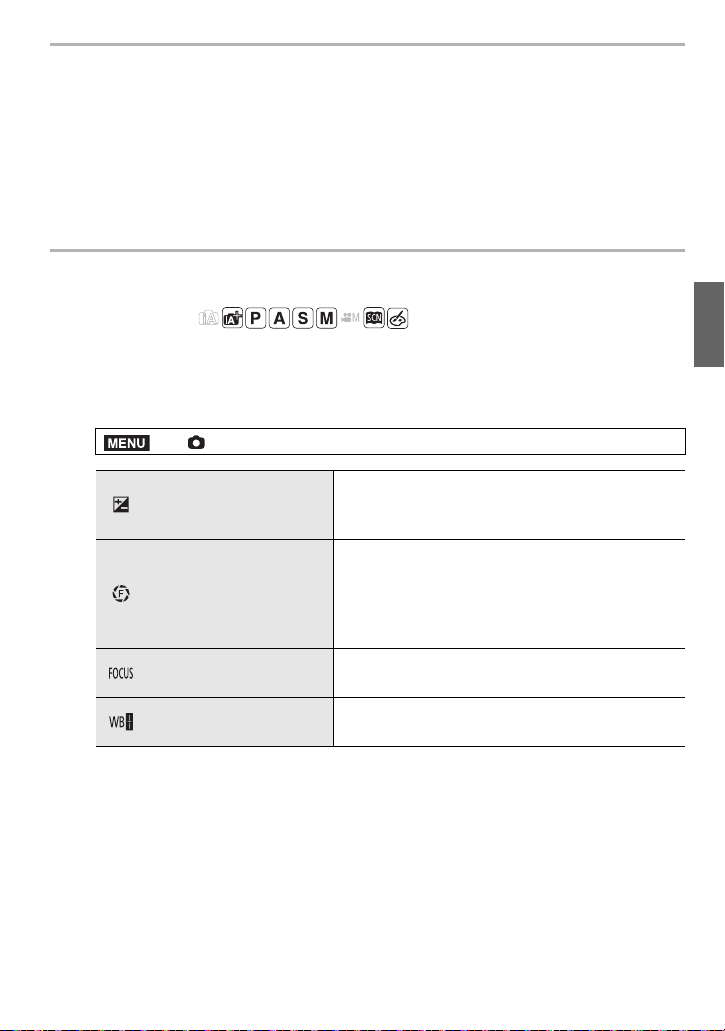
Recording Mode:
∫ Setting color
1 Press [ ].
2 Rotate the rear dial to adjust color.
• To return to the recording screen, press [ ] again.
• The color setting will return to the default level (center
point) when this unit is turned off or the camera is switched
to another Recording Mode.
∫ Taking a picture with a blurred background (Defocus Control)
1 Press [ ] to display the brightness setting screen.
2 Press the Fn button (Fn1) to display the setting
screen.
3 Set the blurriness by rotating the rear dial.
• To return to the recording screen, press [MENU/SET].
• To cancel the setting, press [Fn2] on the blurriness setting
screen.
∫ Setting brightness
1 Press [ ].
2 Rotate the rear dial to adjust brightness.
• In the [Custom] ([Operation]) menu, [Exposure Comp.
Disp. Setting], you can change the functions to be set on
the exposure compensation screen.
• To return to the recording screen, press [ ] again.
Record Using MF
Applicable modes:
MF (Manual Focus) refers to manual focusing.
Use this function when you want to fix the focus or when the distance between the lens
and the subject is determined and you do not want to activate AF.
1
Set the focus mode lever to [MF].
2
Press [ ] (2).
Taking pictures with customized color, defocus control, and brightness
settings
AABBB
SSSSSS
500 250 125 60 30
FF
4.0 5.6 8.0
+1+1
+3+3+1+1 +2+2 +3+3
-
5
-
5
-
4
-
4
-
3
-
3
-
2
-
2
-
1
-
100
+5+5+4+4
DC-G95PP-DVQX1749_eng.book 32 ページ 2019年3月29日 金曜日 午後1時31分
33
Recording
(ENG) DVQX1749
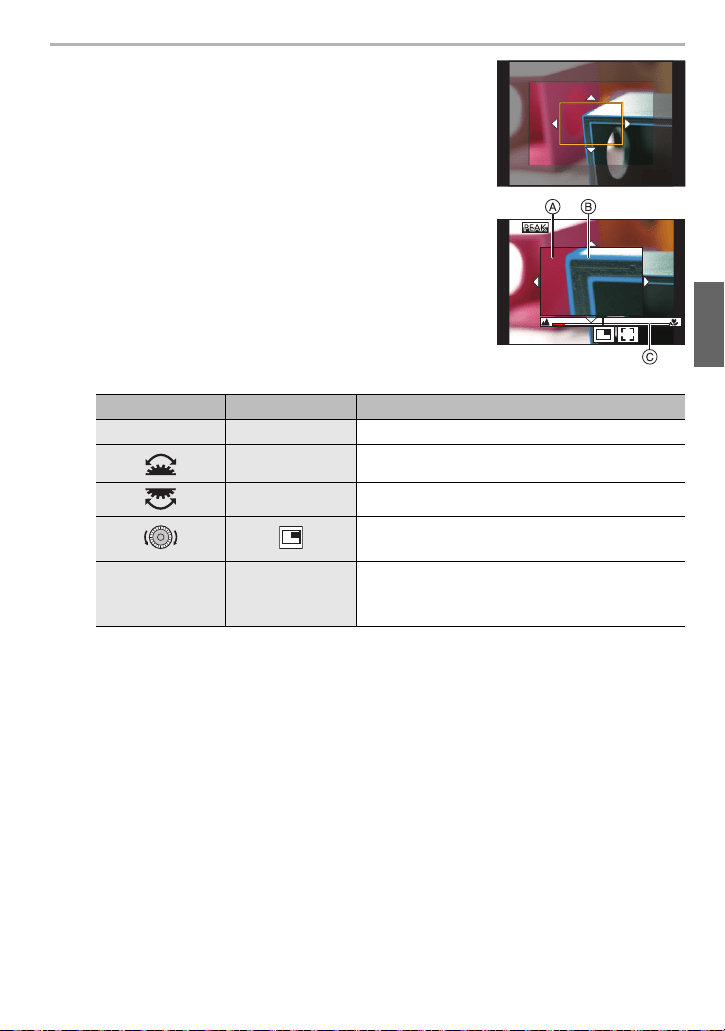
3
Press 3/4/2/1 to adjust the focus position,
and press [MENU/SET].
• The assist screen is displayed, enlarging the area. (MF
Assist)
4
Adjust the focus.
A MF Assist (enlarged screen)
B Peaking
C MF Guide
• In-focus portions are highlighted with color. (Peaking)
• You can check whether the point of focus is to the near
side or to the far side. (MF Guide)
You can perform the following operations:
5
Press the shutter button halfway.
• The recording screen will be displayed.
Button operation Touch operation Description of operation
3/4/2/1 Dragging Moves the enlarged area.
Pinching out/in Enlarges/reduces the screen in small steps.
s Enlarges/reduces the screen.
Switches the enlarged display (windowed/full
screen).
[DISP.] [Reset]
First time: The position of the enlarged area is
reset to the center.
Second time: The size is reset to the default.
¥ MF Assist and MF Guide may not display depending on the lens used. To display MF Assist,
use the touch screen or buttons to operate the camera directly.
AF
+
DC-G95PP-DVQX1749_eng.book 33 ページ 2019年3月29日 金曜日 午後1時31分
Recording
34
DVQX1749 (ENG)
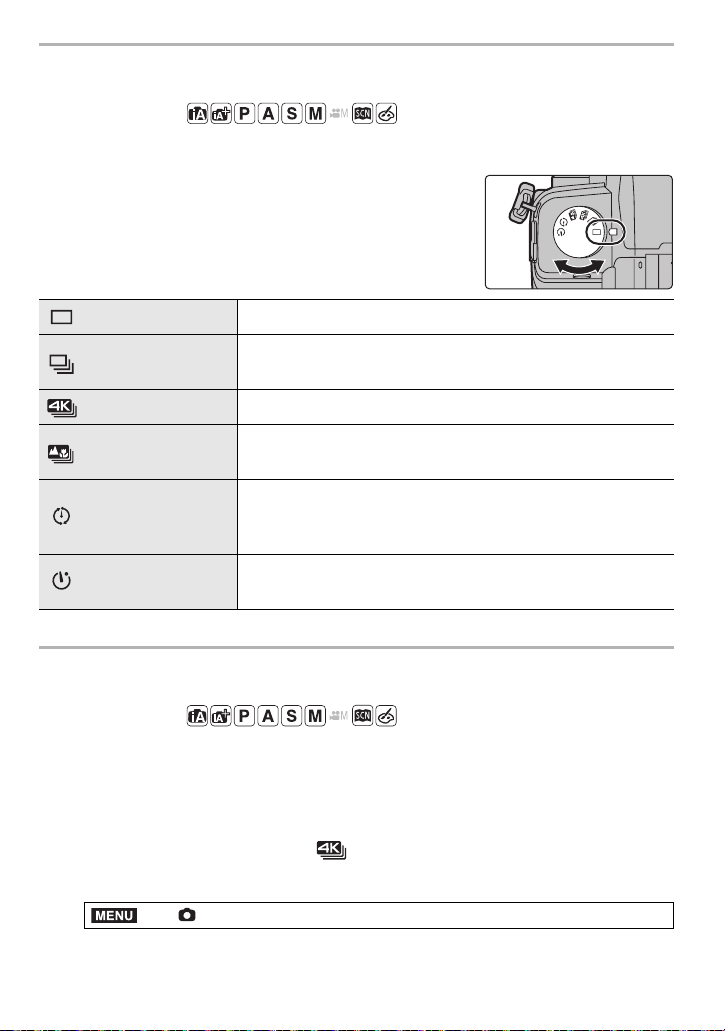
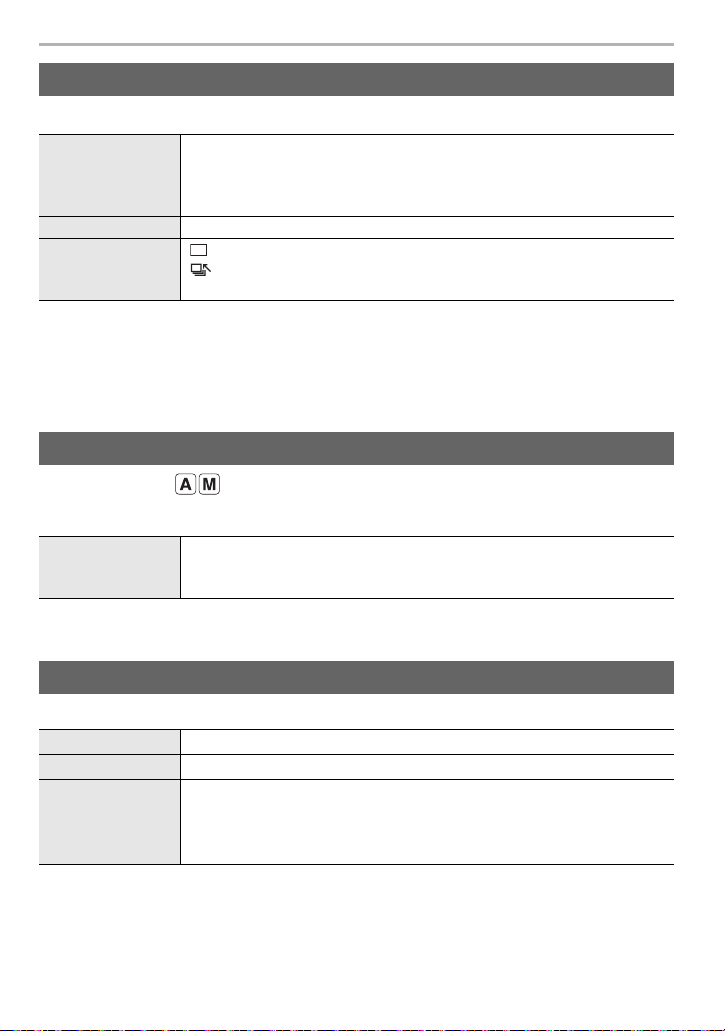
Selecting the Drive Mode
Applicable modes:
You can change what the camera will do when you press the shutter button.
Rotating the drive mode dial.
4K Photo Recording
Applicable modes:
The camera allows you to take burst pictures of 8 million pixels (approx.) at 30 frames/
second. After taking these pictures, you can save the desired moment extracted from their
burst file.
• Use a UHS Speed Class 3 card.
1
Set the drive mode dial to [ ]. (P34)
2
Select the recording method.
Single When the shutter button is pressed, only one picture is recorded.
Burst
Recordings are made in succession while the shutter button is
pressed.
4K PHOTO (P34) When the shutter button is pressed, a 4K photo is recorded.
Post Focus (P38)
When the shutter button is pressed, Post Focus recording is
performed.
Time Lapse Shot/
Stop Motion
Animation
Pictures are recorded with Time Lapse Shot or Stop Motion
Animation.
Self Timer
When the shutter button is pressed, recording takes place after
the set time has elapsed.
> [Rec] > [4K PHOTO] > [Rec Method]
MENU
DC-G95PP-DVQX1749_eng.book 34 ページ 2019年3月29日 金曜日 午後1時31分
35
Recording
(ENG) DVQX1749
3
Press the shutter button halfway to exit the menu.
4
Press the shutter button to perform recording.
• The camera will perform burst recording of a 4K photo and saves it as a 4K burst file
with a [Rec Format] setting of [MP4].
• When [Auto Review] is enabled, the picture selection screen will be displayed
automatically. To continue recording, press the shutter button halfway to display the
recording screen.
∫ Preventing camera shake when you are recording pictures
To reduce camera shake, we recommend that you use a tripod and shutter remote control
(DMW-RS2: optional) when using [Light Composition] or [Sequence Composition].
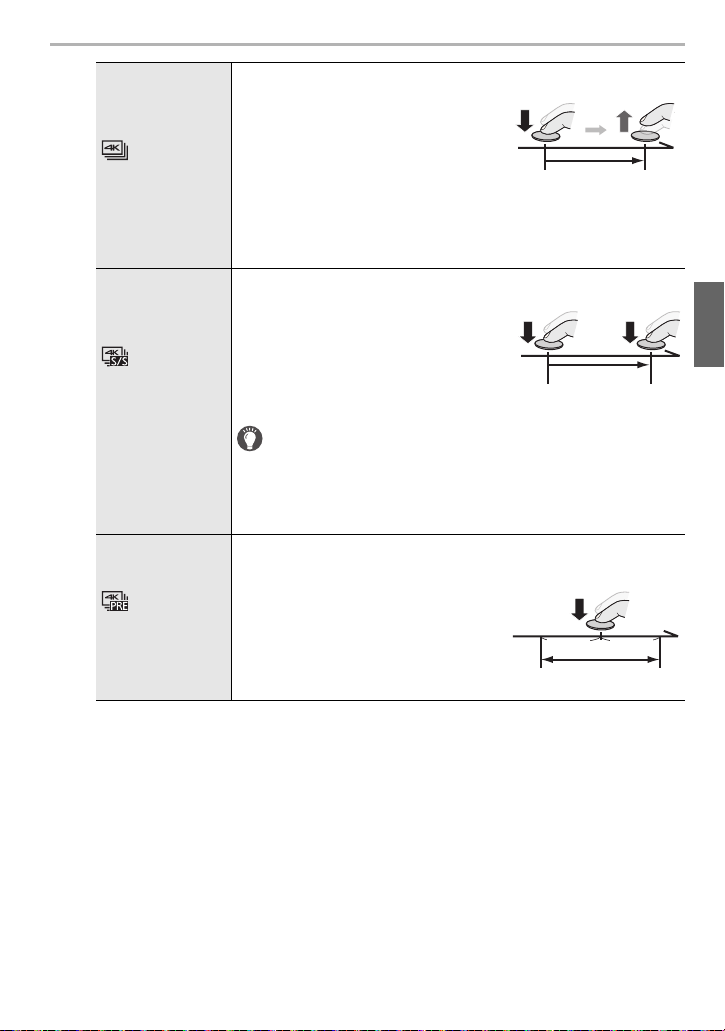
[4K Burst]
For capturing the best shot of a fast-moving subject
Burst recording is performed while
the shutter button is pressed and
held.
• Press the button fully slightly in
advance. Recording starts
approximately 0.5 seconds after it
has been pressed fully.
A Press and hold
B Recording is performed
[4K Burst(S/S)]
“S/S” is an
abbreviation of
Start/Stop.
For capturing unpredictable photo opportunities
Burst recording starts when the
shutter button is pressed and stops
when pressed again.
C Start (First)
D Stop (Second)
E Recording is performed
Adding markers to select and save pictures
You can add markers if you press [Fn2] during recording.
(Up to 40 markers per recording) When selecting and saving
pictures from a 4K burst file, you can skip to the positions where
you added markers.
[4K Pre-Burst]
For recording as needed whenever a photo opportunity
arises
Burst recording is performed for
approximately 1 second before and
after the moment that the shutter
button is pressed.
F Approximately 1 second
G Recording is performed
DC-G95PP-DVQX1749_eng.book 35 ページ 2019年3月29日 金曜日 午後1時31分
Recording
36
DVQX1749 (ENG)
∫ Setting Pre-Burst Recording ([4K Burst]/[4K Burst(S/S)])
The camera starts recording approximately 1 second before the shutter button is pressed
fully, so you will not miss a photo opportunity.
• AF operation settings and menus that cannot be set while this function is in use are the same
as those during [4K Pre-Burst] operation.
∫ Setting Loop Recording ([4K Burst(S/S)])
You can perform recording while deleting the oldest recorded data, allowing you to keep
on recording while waiting for a photo opportunity without replacing the card.
• Once you start recording, the 4K burst file will be recorded and divided approximately every
2 minutes.
Approximately the last 10 minutes (up to approximately 12 minutes) will be saved. The
preceding part will be deleted.
• We recommend that you use a sufficiently charged battery or an AC adaptor (optional)
and DC coupler (optional).
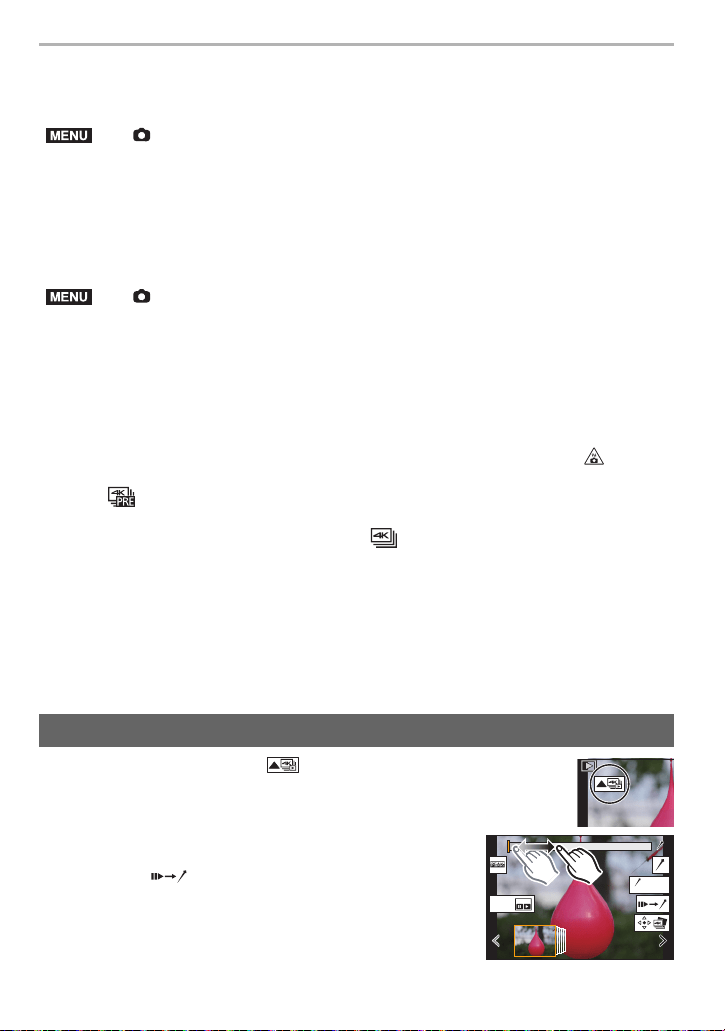
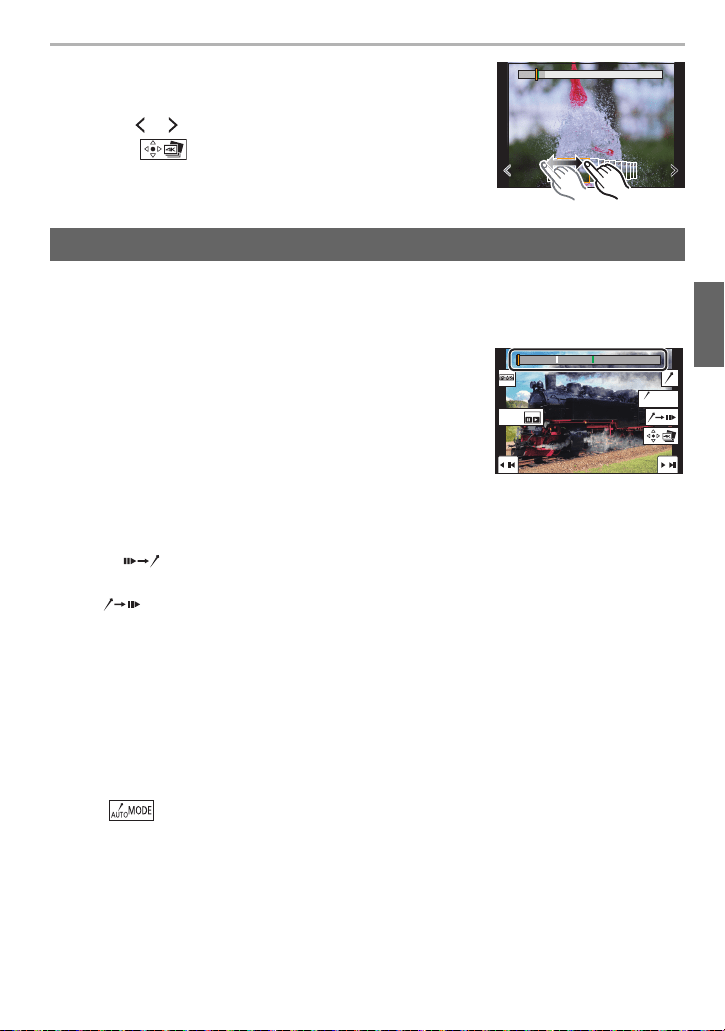
1 Select an image with the [ ] icon on the playback screen, and
press 3.
• If the image was recorded with [4K Pre-Burst], proceed to step 3.
2 Drag the slide bar to make a rough selection of
scenes.
• Touching [ ] allows you to switch to the marker
operation screen.
> [Rec] > [4K PHOTO] > [Pre-Burst Recording] > [ON]
> [Rec] > [4K PHOTO] > [Loop Recording(4K PHOTO)] > [ON]
¥
If the surrounding temperature is high or 4K photos are recorded continuously, [ ] may be
displayed and recording may be stopped halfway through. Wait until the camera cools down.
¥ When [ ] ([4K Pre-Burst])
¢
or [Pre-Burst Recording] is set, the battery drains faster
and the camera temperature rises. Select only when recording.
¢ To protect itself, the camera may switch to [ ] ([4K Burst]).
¥ Files will be split up and saved and played back as smaller files in the following cases. (You
can continue recording without interruption.)
When using an SDHC memory card:
If the file size exceeds 4 GB
When using an SDXC memory card:
If the continuous recording time exceeds 3 hours and 4 minutes or the file size exceeds 96 GB
¥ The angle of view becomes narrower.
Selecting Pictures from a 4K Burst File
MENU
MENU
Fn1
AUTO
MODE
AUTOAUTOAUTO
DC-G95PP-DVQX1749_eng.book 36 ページ 2019年3月29日 金曜日 午後1時31分
37
Recording
(ENG) DVQX1749
3 Drag the frames to select the frame you want to save
as a picture.
• To continuously rewind/forward frame-by-frame, touch and
hold [ ]/[ ].
4 Touch [ ] to save the picture.
• The picture will be saved in JPEG format.
When selecting and saving pictures from a 4K burst file, you can select pictures easily by
skipping between marked positions.
∫ Skips to the marked positions
Touching [ ] allows you to switch to the marker operation screen, where you can press
2/1 to skip to the marked positions.
Touch [ ] to return to the original operation.
• Up to 10 markers are displayed for each file.
• In the following cases, markers may not be set by the Auto Marking function depending on the
recording conditions and the status of subjects.
– The camera is moving because of panning or jitter
– The movement of a subject is slow/small
– The subject is small
– A face is not facing front
∫ Switches a marker to be displayed
Touch [ ].
Settings: [Auto]/[Face Priority]/[Motion Priority]/[Off]
¢2
¢2 Displays manually set markers only.
Marker
White marker:
This is manually set during recording or playback.
Green marker:
This is automatically set by the camera during recording. (Auto
Marking function
¢1
)
¢1 The camera automatically sets markers on scenes in which
a face or the movement of a subject is detected.
(Example: At the scene when a vehicle passes by, a balloon
bursts, or a person turns around)
Marker operation screen
Fn1
AUTO
MODE
DC-G95PP-DVQX1749_eng.book 37 ページ 2019年3月29日 金曜日 午後1時31分
Recording
38
DVQX1749 (ENG)
You can save pictures of a 4K burst file that were extracted from any 5 second period at
once.
• When Auto Review is set, the slide view screen is displayed automatically after 4K photo
recording. Press the shutter button halfway to display the recording screen, and then follow the
steps below.
1 Select the menu.
2 Press 2/1 to select the 4K photo burst files and press [MENU/SET].
• If the burst time is 5 seconds or less, all frames will be saved as pictures.
3 Select the first frame of the pictures to be saved at once.
• Select the frame in the same way as you select pictures from a 4K burst file.
• Pictures will be saved as a group of Burst Mode pictures in JPEG format.
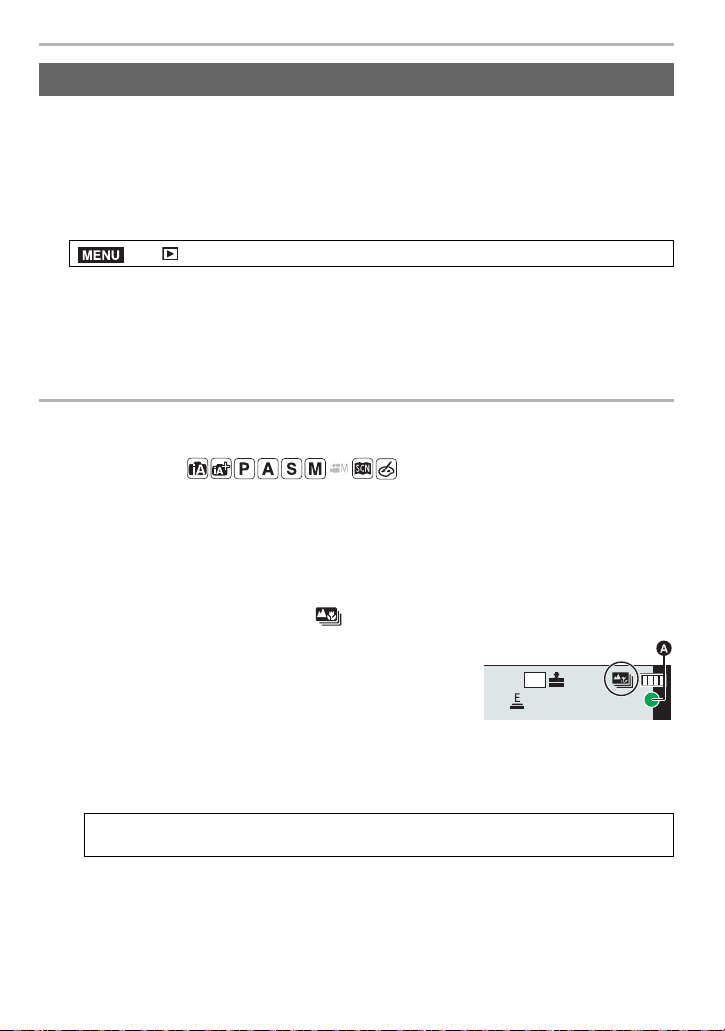
Post Focus Recording
Applicable modes:
The camera allows you to take 4K burst pictures while shifting the focus to different areas.
After taking these pictures, you can select the desired focus area.
This function is suited for recording still objects.
• Use a UHS Speed Class 3 card.
• We recommend that you use a tripod when recording images to be used for Focus Stacking.
1
Set the drive mode dial to [ ]. (P34)
2
Decide on the composition, and press the
shutter button halfway.
• AF will detect focus areas on the screen. (Excluding the
edges of the screen)
• While the shutter button is pressed and held halfway,
shake may be seen on the screen.
• If no areas on the screen can be brought into focus, the focus display (
A
) will flash.
Recording is not possible in this case.
[4K PHOTO Bulk Saving]
> [Playback] > [4K PHOTO Bulk Saving]
From the time you press the shutter button halfway until the end of recording:
• Maintain the same distance to the subject and the same composition.
MENU
4K
4:3
DC-G95PP-DVQX1749_eng.book 38 ページ 2019年3月29日 金曜日 午後1時31分
39
Recording
(ENG) DVQX1749
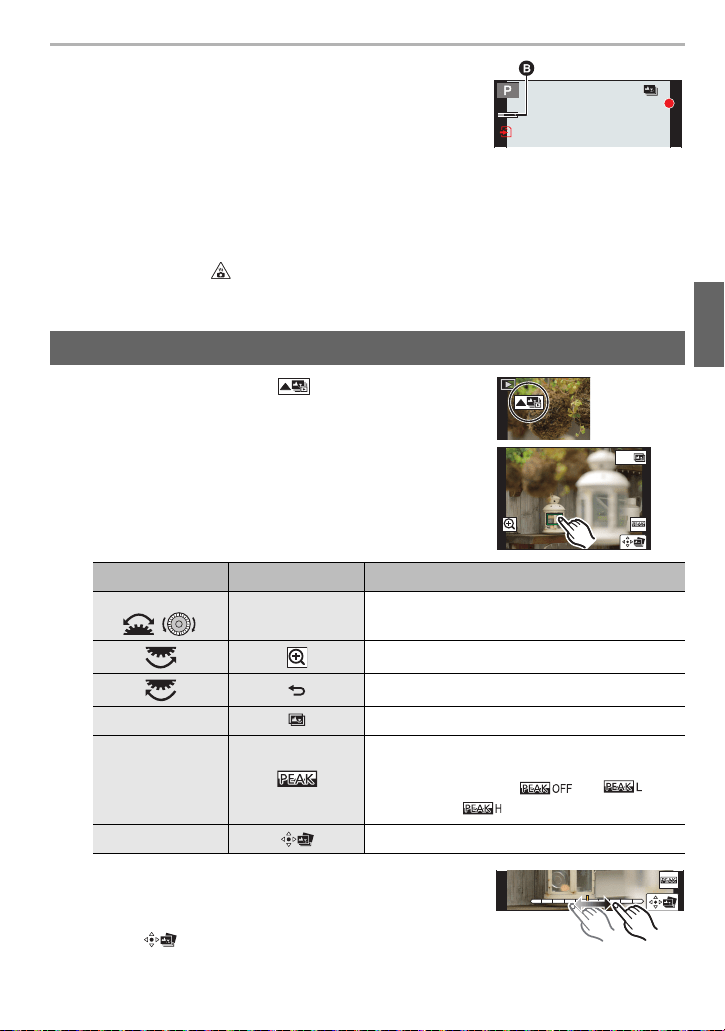
3
Press the shutter button fully to start
recording.
• The focus point changes automatically while recording.
When the icon (
B
) disappears, recording automatically
ends.
• A motion picture will be recorded with [Rec Format] set to [MP4]. (Audio will not be recorded.)
• When [Auto Review] is enabled, a screen that lets you select the desired focus area will
be displayed. (P39)
1 Select an image with the [ ] icon on the playback
screen, and press 3.
2 Touch the desired focus area.
• If a picture that is in focus is not available for the selected
area, a red frame will be displayed. You cannot save a
picture in this case.
• You cannot select the edges of the screen.
• You can fine-adjust the focus by dragging the slide bar
during enlarged display. (You can also perform the same
operation by pressing 2/1.)
3 Touch [ ] to save the picture.
• The picture will be saved in JPEG format.
¥ When the ambient temperature is high or Post Focus recording is performed continuously, the
camera may display [ ] and recording may stop. Wait until the camera cools down.
¥ During recording, the angle of view will be narrower.
Selecting the Focus Position for the Picture to Save
Button operation Touch operation Description of operation
3/4/2/1/
/
Touching
Selects a focus area.
• It cannot be selected during enlarged display.
Enlarges the display.
Reduces the display (during enlarged display).
Fn1 Switches to the Focus Stacking function. (P40)
s
In-focus portions are highlighted with color.
([Peaking])
• Switches in order of [ ]>[]
([LOW]) > [ ] ([HIGH]).
[MENU/SET] Saves the picture.
Fn1
DC-G95PP-DVQX1749_eng.book 39 ページ 2019年3月29日 金曜日 午後1時31分
Recording
40
DVQX1749 (ENG)
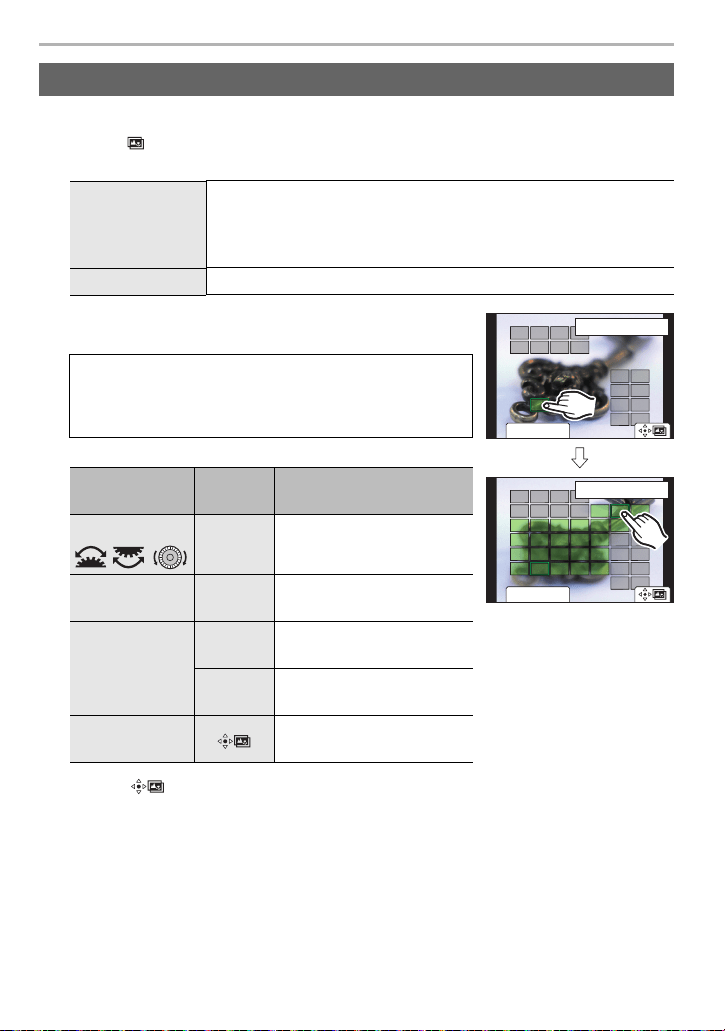
Save a picture with multiple focus positions merged.
1 Touch [ ] in step 2 of “Selecting the Focus Position for the Picture to Save”.
2 Touch the merging method.
(When [Range Merging] is selected)
3 Touch the desired focus area.
• To cancel the selection, touch the focus area again.
4 Touch [ ] to merge the pictures and save the resulting picture.
• The picture will be saved in JPEG format. Recording information (Exif information) of the
original picture with the closest focus distance, including the shutter speed, aperture, and
ISO sensitivity, will also be recorded to the new picture.
Focus Stacking
[Auto Merging]
Automatically selects pictures that are suited to be merged, and
merges them into a single picture.
• Priority will be given to pictures with closer focus.
• Perform the focus stacking and save the picture.
[Range Merging] Merges pictures with specified focus areas into a single picture.
• Specify at least two areas.
• In-focus parts between the selected two points are
indicated.
• Parts that cannot be selected are indicated in gray.
Button
operation
Touch
operation
Description of operation
3/4/2/1/
//
Touching Selects an area.
Fn1
[Set/
Cancel]
Specifies/cancels an area.
[DISP.]
[All]
Selects all areas.
(Before selecting areas)
[Reset]
Cancels all selections.
(After selecting areas)
[MENU/SET]
Merges pictures and saves
the resulting picture.
Fn1
ュリヴヱハ
5HVHW
6HW&DQFHO
ュリヴヱハ
5HVHW
Fn1
6HW&DQFHO
DC-G95PP-DVQX1749_eng.book 40 ページ 2019年3月29日 金曜日 午後1時31分
41
Recording
(ENG) DVQX1749
Bracket Recording
Applicable modes:
You can take multiple pictures while automatically adjusting a setting by pressing the
shutter button.
1
Select the menu.
2
Press 3/4 to select [More Settings] and then press [MENU/SET].
• For information on [More Settings], refer to the page that describes each function.
• Press the shutter button halfway to exit the menu.
3
Focus on the subject and take a picture.
• When Exposure Bracket is selected, the bracket display flashes until all of the pictures you
have set are taken. If you change the bracket settings or turn off the camera before all of the
pictures you have set are taken, the camera restarts recording from the first picture.
∫ To deactivate Bracket
Select [OFF] in step
1.
¥
The camera may automatically correct the misalignments of pictures caused by camera shake. If
they are corrected, the angle of view becomes slightly narrower when pictures are merged.
¥ Pictures may be merged into an unnatural picture in the following cases:
– When the subject moves during recording
– When the distance between subjects is great
– When pictures are too defocused (If you take pictures with a larger aperture value, the
resulting picture may look less unnatural.)
¥ Focus Stacking may not be available for images recorded with other than this camera.
> [Rec] > [Bracket] > [Bracket Type]
Exposure Bracket
Press the shutter button to perform recording while
adjusting the exposure. (P42)
• This does not work when recording with the flash.
Aperture Bracket
Press the shutter button to perform recording while
adjusting the aperture. (P42)
• Available in Aperture-Priority AE Mode or when
the ISO sensitivity is set to [AUTO] in Manual
Exposure Mode.
Focus Bracket
Press the shutter button to perform recording while
adjusting the focus position. (P42)
White Balance Bracket
Press the shutter button once to take three pictures with
different white balance settings automatically. (P43)
MENU
DC-G95PP-DVQX1749_eng.book 41 ページ 2019年3月29日 金曜日 午後1時31分
Recording
42
DVQX1749 (ENG)
∫ About [More Settings] (step 2 in P41)
¢1 Not available for burst recording. When using burst recording, if you press and hold the
shutter button, recording will be performed continuously until a specified number of pictures
are taken.
Recording Mode:
∫ About [More Settings] (step
2 in P41)
• When using burst recording, if you press and hold the shutter button, recording will be
performed until a specified number of pictures are taken.
∫ About [More Settings] (step 2 in P41)
¢2 Not available for burst recording. When using burst recording, if you press and hold the
shutter button, recording will be performed continuously until a specified number of pictures
are taken.
Exposure Bracket
[Step]
Sets the number of pictures to be taken and the exposure compensation
range.
[3•1/3] (Takes three pictures with an interval of 1/3 EV) to [7•1] (Takes
seven pictures with an interval of 1 EV)
[Sequence] Sets the order in which pictures are taken.
[Single Shot
Setting]
¢1
[ ]: Takes one picture each time you press the shutter button.
[ ]: Takes all the pictures set to be taken when you press the shutter
button once.
¥ When taking pictures using Exposure Bracket after setting the Exposure Compensation value,
the pictures taken are based on the selected Exposure Compensation value.
Aperture Bracket
[Image Count]
[3], [5]: Takes a specified number of pictures with different aperture
values within the range based on the initial aperture value.
[ALL]: Takes pictures using all aperture values.
Focus Bracket
[Step] Sets the interval between focus positions.
[Image Count]
¢2
Sets the number of pictures to be taken.
[Sequence]
[0/s/r]: Alternately moves the focus position closer and farther away
within the range centered on the initial position as you take pictures.
[0/r]: Moves the focus position farther away from the initial position as
you take pictures.
¥ Pictures taken with Focus Bracket are displayed as a set of group pictures.
DC-G95PP-DVQX1749_eng.book 42 ページ 2019年3月29日 金曜日 午後1時31分
43
Recording
(ENG) DVQX1749
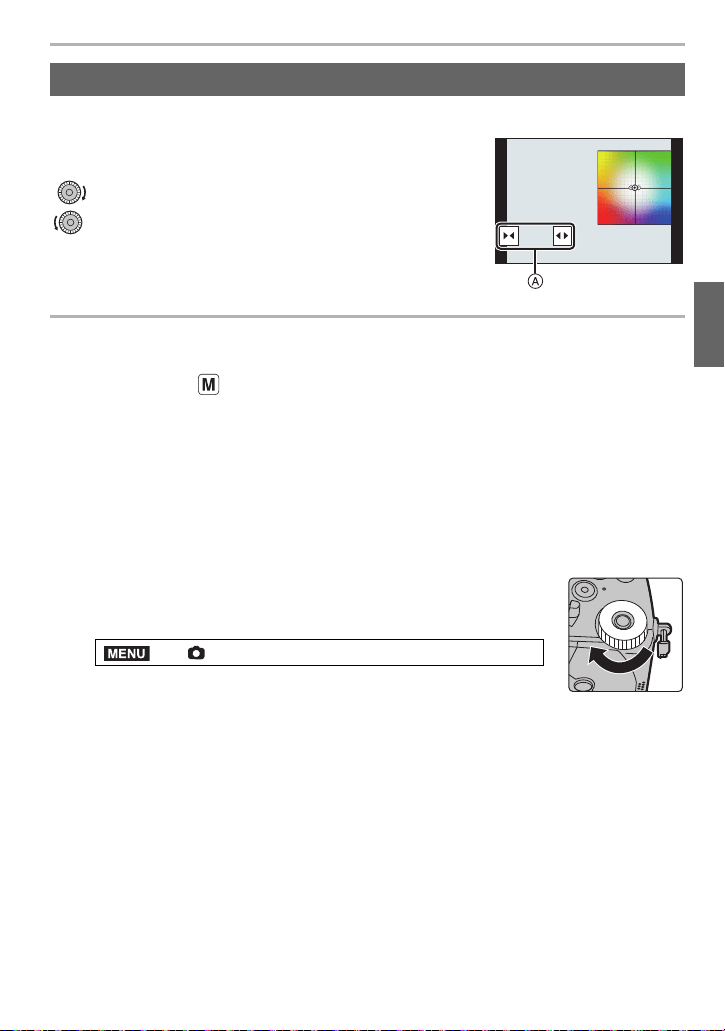
∫ About [More Settings] (step 2 in P41)
Rotate the control dial to adjust the correction range,
and press [MENU/SET].
: Horizontal ([A] to [B])
: Vertical ([G] to [M])
• You can also set the correction range by touching A.
Live View Composite Recording
Applicable modes:
The camera records images at set exposure time intervals, and combines parts with
changes in bright light to save the result as one picture.
A combined image is displayed at each exposure time interval, so you can keep recording
while checking results.
With its ability to take pictures with reduced overall brightness, this function is useful for
capturing the light trails of stars and fireworks with bright night scenery in the background.
1
Set the mode dial to [M].
2
Rotate the rear dial to set the shutter speed to [LC].
3
Select the menu.
4
Select the exposure time per frame (shutter speed).
• This can be set in a range of [1/2 SEC] to [60 SEC].
• Press the shutter button halfway to return to the recording screen.
5
Press the shutter button fully to obtain an image with reduced noise.
• A countdown screen is displayed. Wait until this step completes.
6
Press the shutter button fully to start recording.
• Images are combined every time the exposure time set in step 4 has passed.
7
Press the shutter button fully again to stop recording.
• This will run noise reduction and save the image.
• Live View Composite can record up to 3 hours per recording.
(Recording stops automatically when the recording time exceeds 3 hours.)
White Balance Bracket
> [Rec] > [Live View Composite]
GGGGGG
AAAAAABBBBBBB
MMMMMM
MENU
DC-G95PP-DVQX1749_eng.book 43 ページ 2019年3月29日 金曜日 午後1時31分
Recording
44
DVQX1749 (ENG)
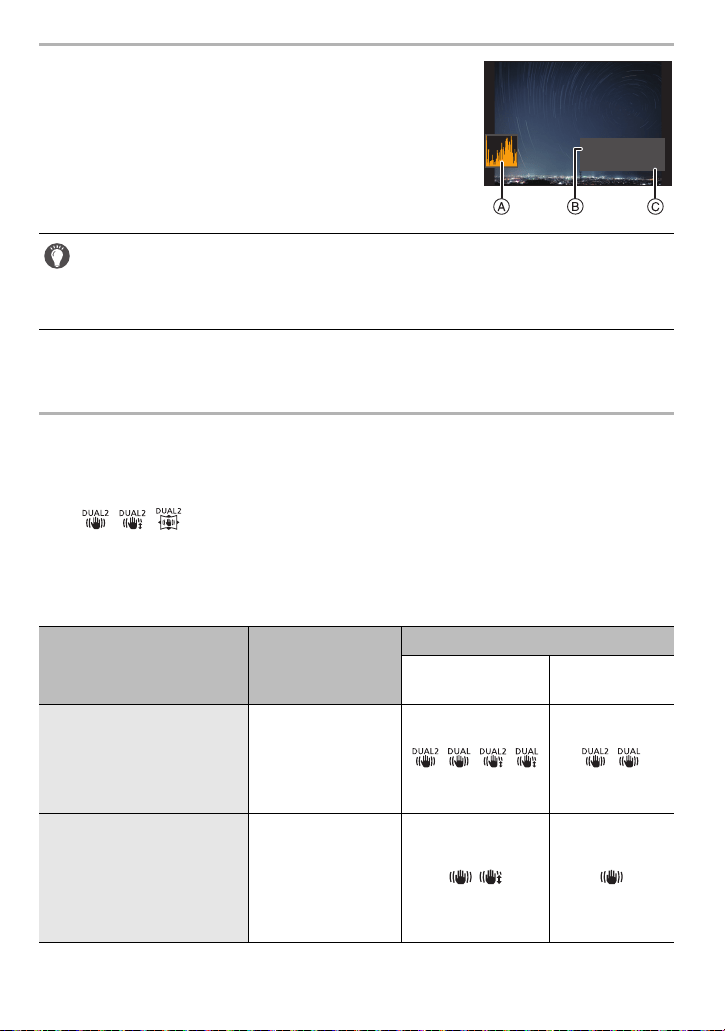
∫ Screen indications during recording
A Histogram display
• After following step
5, this is displayed automatically.
B Exposure time per frame k Number of pictures combined
C Elapsed time
• The time is updated with each increase in the number of
pictures combined.
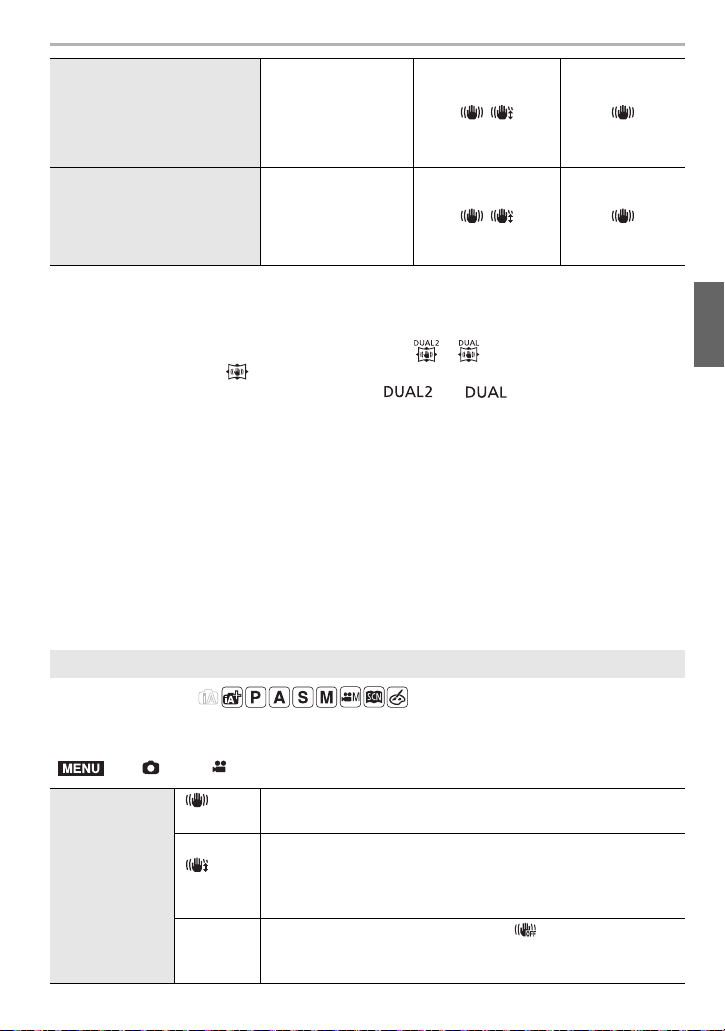
Image Stabilizer
The camera can use both the in-body image stabilizer and the in-lens image stabilizer.
Of the Dual I.S. modes that effectively combine two image stabilizers, this supports Dual
I.S.2 ( , , ) with high correction efficiency.
Furthermore, during motion picture recording, you can use the 5-Axis Hybrid Image
Stabilizer that incorporates electronic stabilization.
• The image stabilizers to be activated differ depending on your lens. The icon for the currently
activated image stabilizer is displayed on the recording screen.
• We recommend using a tripod or the Shutter Remote Control (DMW-RS2: optional) for
Live View Composite recording.
• We recommend that you use a sufficiently charged battery or an AC adaptor (optional)
and DC coupler (optional).
¥ When the shutter button is pressed fully to stop recording, the last image may not be included
in the combined image.
Attached lens
Available image
stabilizer
Icons displayed
When taking
pictures
When recording
motion pictures
Panasonic lenses
compatible with Dual I.S.
Mode
(Based on the Micro Four
Thirds System standard)
Lens + Body
(Dual I.S.)
// / /
Lenses compatible with the
image stabilizer function
(Based on the Micro Four
Thirds System standard/
Four Thirds System
standard)
Lens or Body /
LCLCLC
5 sec. x 1200 sec. x 12005 sec. x 1200
1h40m00s1h40m00s1h40m00s
DC-G95PP-DVQX1749_eng.book 44 ページ 2019年3月29日 金曜日 午後1時31分
45
Recording
(ENG) DVQX1749
• The 5-Axis Hybrid Image Stabilizer function can be used with all lenses.
Set [E-Stabilization (Video)] in [Stabilizer] to [ON] in the [Rec] menu.
The recording screen displays the following icons when [ON] is set:
– Panasonic lenses compatible with Dual I.S. Mode: [ ]/[ ]
– Other than the above: [ ]
• If the recording screen icon is not indicated with [ ] or [ ] even when a supported
lens is being used, update the lens firmware to the latest version.
For the latest information on supported lenses or to download their firmware, refer to our
website.
∫ Using the Image Stabilizer
• When using a lens with an O.I.S. switch, set it to [ON].
• When using lenses without a function for communicating with this camera, a message asking
you to check the focal length setting is displayed after you turn on the camera.
Correctly operating the image stabilization function requires that the focal length be set to
match the attached lens.
Set the focal length in accordance as prompted by the message.
This can also be set using the menu. (P46)
Applicable modes:
Set the image stabilizer movement to match the recording situation.
Lenses without the image
stabilizer function (Based
on the Micro Four Thirds
System standard/Four
Thirds System standard)
Body /
When using a Leica lens
mount adaptor (optional)/
Mount adaptor made by
another manufacturer
Body /
Image Stabilizer Settings
> [Rec]/ [Motion Picture] > [Stabilizer]
[Operation
Mode]
[]
(Normal)
Camera shake is corrected for up/down, left/right, and
rotational movements.
[]
(Panning)
Camera shake is corrected for up/down movements.
This mode is ideal for panning (a method of taking pictures
which involves turning the camera to track the movements of a
subject which continues to move in a fixed direction).
[OFF]
The image stabilizer does not work. ([ ])
• When using a lens with an O.I.S. switch, set the switch to
[OFF].
MENU
DC-G95PP-DVQX1749_eng.book 45 ページ 2019年3月29日 金曜日 午後1時31分
Recording
46
DVQX1749 (ENG)
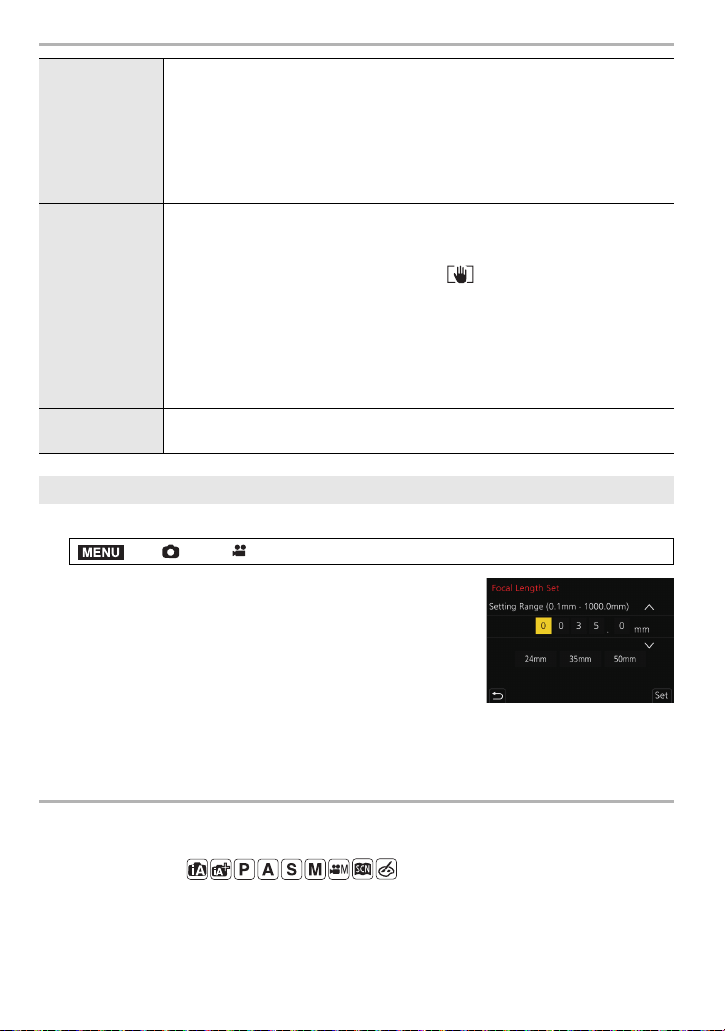
1 Select the menu.
2 Enter a focal length.
2/1: Select the item (digit); 3/4: Setting
3 Press [MENU/SET].
Recording Motion Pictures
Applicable modes:
This camera can record full high definition motion pictures compatible with the AVCHD
format or motion pictures recorded in MP4.
In addition, the camera can record 4K motion pictures in MP4.
Audio will be recorded in stereo.
[E-Stabilization
(Video)]
Jitter during motion picture recording is corrected along the vertical,
horizontal, roll, pitch, and yaw axes by making use of the In-Lens Image
Stabilizer, In-Body Image Stabilizer, and Electronic Image Stabilizer. (5-Axis
Hybrid Image Stabilizer)
[ON]/[OFF]
• When [ON] is selected, the angle of view of recorded motion pictures may
become narrower.
[I.S. Lock
(Video)]
Allows you to enhance the image stabilization effect during motion picture
recording.
[ON]/[OFF]
• This effect works only during recording. [ ] is displayed on the
recording screen.
• To change the composition during recording, set the effect to [OFF]
first, and then move the camera.
Use an Fn button to switch between [ON]/[OFF] during recording. (P30)
• [I.S. Lock (Video)] is not available when using other manufacturer’s lenses
with an image stabilization function.
[Focal Length
Set]
When using lenses without a function for communicating with this camera,
manually set the focal length.
Setting the focal length of a lens
> [Rec]/ [Motion Picture] > [Stabilizer] > [Focal Length Set]
¥
The Image Stabilizer may produce operational sound or cause vibration during its
operation, but these are not malfunctions.
¥ It is recommended to disable the Image Stabilizer when using a tripod.
MENU
DC-G95PP-DVQX1749_eng.book 46 ページ 2019年3月29日 金曜日 午後1時31分
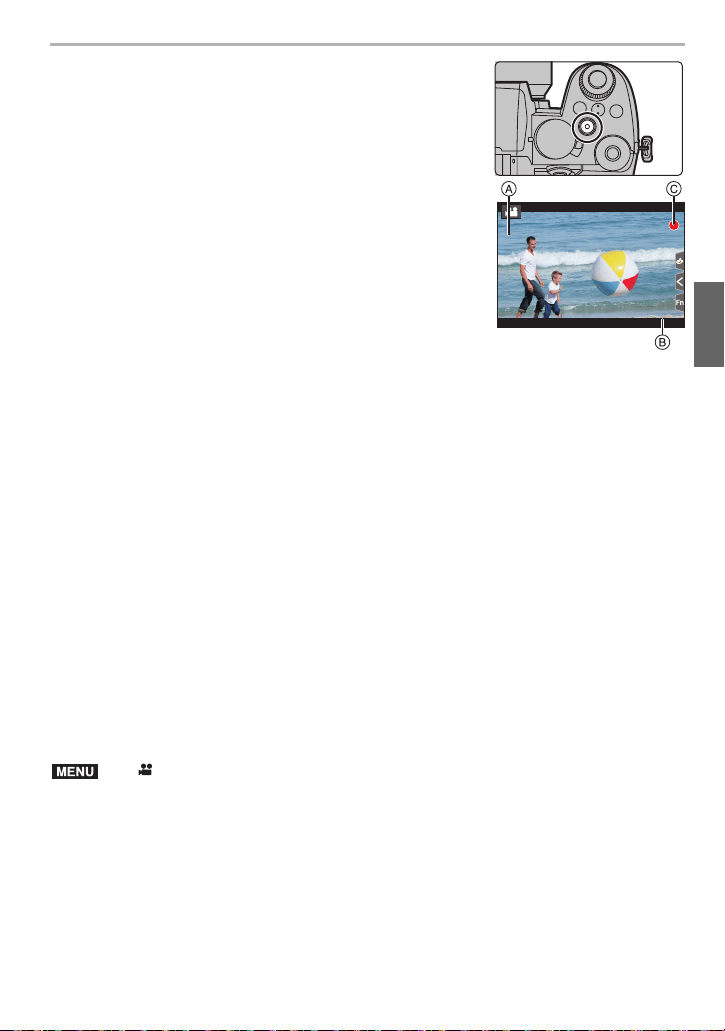
47
Recording
(ENG) DVQX1749
1
Start recording by pressing the motion
picture button.
A Elapsed recording time
B Available recording time
• Recording of motion picture appropriate for each mode
is possible.
• The recording state indicator (red) C will lit while
recording motion pictures.
• Release the motion picture button right after you press it.
• Still picture recording is also possible during the motion
picture recording by fully pressing the shutter button.
(Except for in Creative Video Mode)
2
Stop the recording by pressing the motion picture button again.
∫ Continuous motion picture recordable times
• [AVCHD] motion pictures:
You can continue recording without interruption even if the file size exceeds 4 GB, but the
motion picture file will be divided.
• [MP4] motion pictures with a [Rec Quality] size of [FHD] or [HD]:
You can continue recording without interruption even if the continuous recording time exceeds
30 minutes or the file size exceeds 4 GB, but the motion picture file will be divided and
recorded/played back separately.
• [MP4] motion pictures with a [Rec Quality] size of [4K]:
Motion picture file will be recorded and played back in separate files in the following cases.
(You can continue recording without interruption.)
– When using an SDHC memory card: If the file exceeds 4 GB
– When using an SDXC memory card: If the continuous recording time exceeds 3 hours and
4 minutes or If the file exceeds 96 GB
• The maximum available continuous recording time is displayed on the screen.
∫ [Rec Format]/[Rec Quality]
Settings: [AVCHD]/[MP4]
> [Motion Picture] > [Rec Format]
R1R1
m
3737
s
R1
m
37
s
3
s
3
s
3
s
MENU
DC-G95PP-DVQX1749_eng.book 47 ページ 2019年3月29日 金曜日 午後1時31分
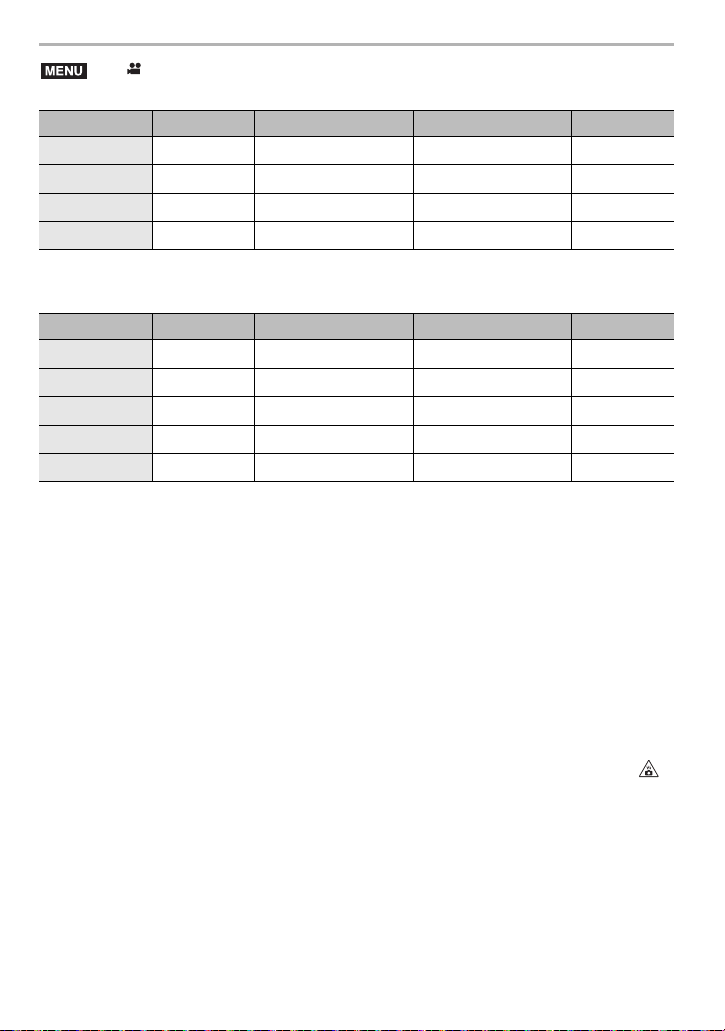
Recording
48
DVQX1749 (ENG)
When [AVCHD] is selected
¢1 AVCHD Progressive
When [MP4] is selected
¢2 4K motion pictures
∫ When recording 4K motion pictures
• When recording motion pictures in 4K, use a card rated as UHS Speed Class 3.
• When you record 4K motion pictures, the angle of view will be narrower than motion pictures of
other sizes.
• To ensure highly accurate focus, 4K motion pictures are recorded at reduced AF speeds. It may
be difficult to focus on the subject with AF, but this is not a malfunction.
> [Motion Picture] > [Rec Quality]
Item Size Recording frame rate Sensor output Bit rate
[FHD/28M/60p]
¢1
1920k1080 60p 60 frames/second 28 Mbps
[FHD/17M/60i] 1920k1080 60i 60 frames/second 17 Mbps
[FHD/24M/30p] 1920k1080 60i 30 frames/second 24 Mbps
[FHD/24M/24p] 1920k1080 24p 24 frames/second 24 Mbps
Item Size Recording frame rate Sensor output Bit rate
[4K/100M/30p]
¢2
3840k2160 30p 30 frames/second 100 Mbps
[4K/100M/24p]
¢2
3840k2160 24p 24 frames/second 100 Mbps
[FHD/28M/60p] 1920k1080 60p 60 frames/second 28 Mbps
[FHD/20M/30p] 1920k1080 30p 30 frames/second 20 Mbps
[HD/10M/30p] 1280k720 30p 30 frames/second 10 Mbps
¥ ISO sensitivity operates as [AUTO] (for motion pictures) during motion picture recording. In
Creative Video Mode, you can set the ISO sensitivity for motion picture recording.
¥ In quiet recording environments, the sound of aperture and focus actions may be recorded.
This is not a malfunction. You can set the focus operation during motion picture recording to
[OFF] in [Continuous AF].
¥ When the ambient temperature is high or motion picture is recorded continuously, after [ ]
is displayed, recording may stop to protect the camera. Wait until the camera cools down.
MENU
DC-G95PP-DVQX1749_eng.book 48 ページ 2019年3月29日 金曜日 午後1時31分

49
Recording
(ENG) DVQX1749
Creative Video Mode
Recording Mode:
It is possible to manually change the aperture, shutter speed and ISO sensitivity and
record motion pictures.
1
Set the mode dial to [ ].
2
Select the menu.
• The operation for changing the aperture value or shutter speed is the same as the
operation for setting the mode dial to , , or .
• Program Shift does not work.
3
Press the motion picture button (or shutter button) to start recording.
• The operational sound of the zoom or button operation may be recorded when it is
operated during the recording of a motion picture.
Using touch icons allows silent operation while recording motion pictures.
¢ When using an interchangeable lens that supports power zoom (electronic zoom)
4
Press the motion picture button (or shutter button) again to stop
recording.
Records slow motion pictures of MP4 format by performing ultra-high-speed recording.
• Use a UHS Speed Class 3 card.
1 Set the mode dial to [ ].
2 Select the menu.
> [Creative Video] > [Exposure Mode] > [P]/[A]/[S]/[M]
1 Touch [ ]. (This cannot be used when recording with High Speed Video.)
2 Touch icon.
: Zoom
¢
: Aperture value
: Shutter speed
: Exposure Compensation
: ISO sensitivity
: Sound Rec level adjustment
3 Drag the slide bar to set.
[ ]/[ ]: Changes the setting
slowly
[ ]/[ ]: Changes the setting
quickly
[High Speed Video]
> [Creative Video] > [High Speed Video]
MENU
F
SS
ISO
MENU
DC-G95PP-DVQX1749_eng.book 49 ページ 2019年3月29日 金曜日 午後1時31分
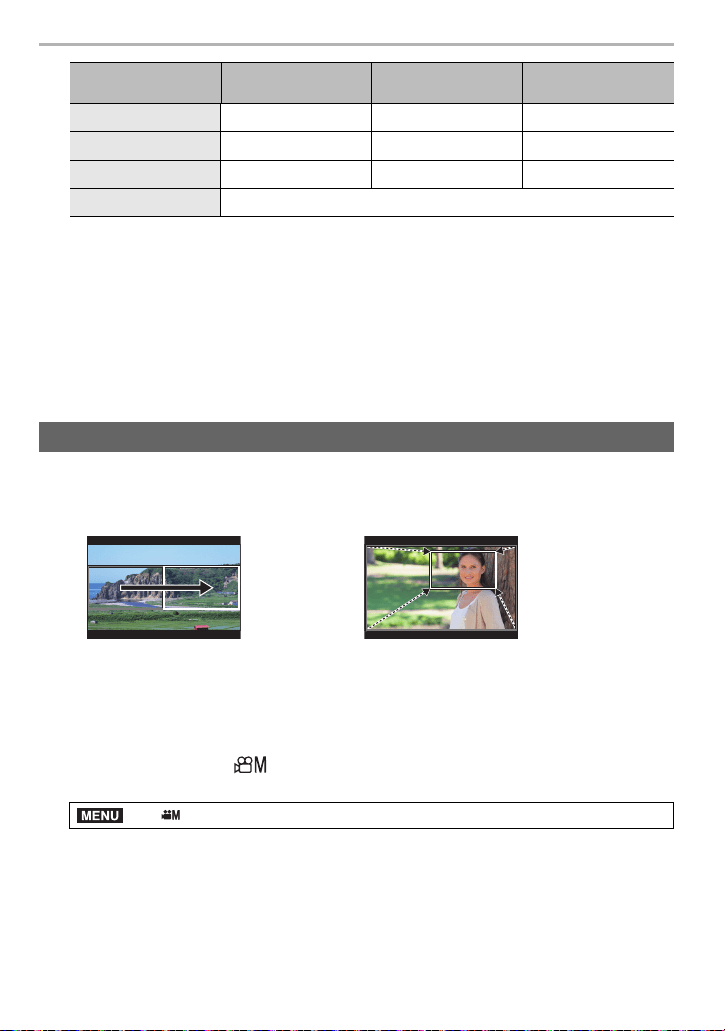
Recording
50
DVQX1749 (ENG)
3 Press the motion picture button (or shutter button) to start recording.
4 Press the motion picture button (or shutter button) again to stop recording.
By cropping your motion picture down from the 4K angle of view to Full High Definition,
you can record a motion picture that pans and zooms in/out while leaving the camera in a
fixed position.
• [Rec Format] and [Rec Quality] in the [Motion Picture] menu will be fixed to [MP4] and [FHD/
20M/30p], respectively.
• Hold the camera firmly in place while recording.
• The angle of view becomes narrower.
1 Set the mode dial to [ ].
2 Select the menu.
Settings
Frame rate
(for recording)
[Rec Quality]
(for storage)
Slow motion effect
[120fps/FHD] 120 frames/second FHD/20M/30p Approx. 1/4k
[90fps/FHD] 90 frames/second FHD/20M/30p Approx. 1/3k
[60fps/FHD] 60 frames/second FHD/20M/30p Approx. 1/2k
[OFF] —
¥ In the following case, the angle of view becomes narrower:
– When [120fps/FHD] or [90fps/FHD] is set
¥ AF does not work.
¥ Audio is not recorded.
¥ When using an interchangeable lens with no focus ring, you cannot set focus with MF.
¥ Under fluorescent lighting, flicker or horizontal bars may be seen.
[4K Live Cropping]
Pan Zoom in
> [Creative Video] > [4K Live Cropping] > [40SEC]/[20SEC]
MENU
DC-G95PP-DVQX1749_eng.book 50 ページ 2019年3月29日 金曜日 午後1時31分
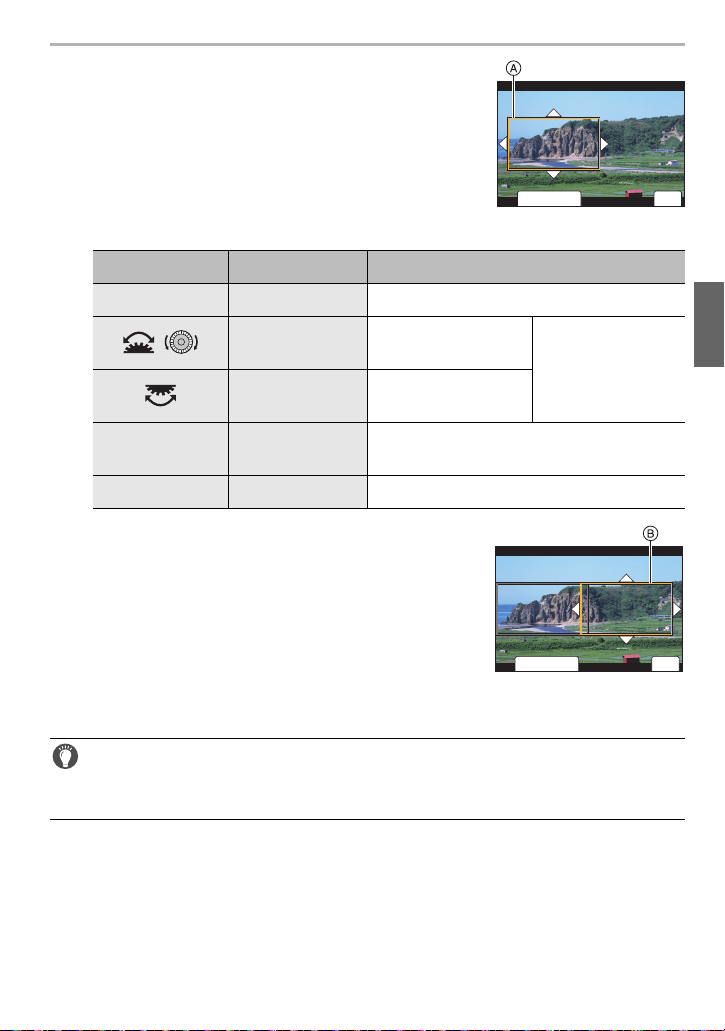
51
Recording
(ENG) DVQX1749
3 Set the cropping start frame.
A Cropping start frame
• When making settings for the first time, a cropping start
frame of size 1920k1080 is displayed. (After setting the
cropping start frame and end frame, the start frame and
end frame that you set immediately before will be
displayed.)
• The camera will remember the frame position and size
even when the camera is turned off.
4 Set the cropping end frame.
B Cropping end frame
5 Press the motion picture button (or shutter button)
to start recording.
• Immediately release the motion picture button (or the
shutter button) after pressing it.
• When the set operating time has elapsed, recording
automatically ends.
To end recording midway, press the motion picture button
(or the shutter button) again.
∫ Changing the position and size of a crop frame
Press 2 while the recording screen is displayed, and perform steps
3 and 4.
∫ To cancel [4K Live Cropping] recording
Set to [OFF] in [4K Live Cropping] in step
2.
Button operation Touch operation Description of operation
3/4/2/1 Touching Moves the frame.
/ —
Enlarges/reduces the
frame in small steps.
The range of settings
allowed is from
1920k1080 to
3840k2160.
Pinching out/in
Enlarges/reduces the
frame.
[DISP.] [Reset]
Returns the position of the frame to the center
and its size to the default setting.
[MENU/SET] [Set] Decides the position and size of the frame.
To add zoom in/out effects, set different angles of view for the cropping start
and end frames. For example, to zoom in while recording, set a larger angle of
view for the start frame and a smaller angle of view for the end frame.
¥
The setting of the AF Mode switches to [š].
(The eye to be brought into focus will not be indicated.)
ュリヴヱハ
5HVHW
6HW
ュリヴヱハ
5HVHW
6HW
DC-G95PP-DVQX1749_eng.book 51 ページ 2019年3月29日 金曜日 午後1時31分
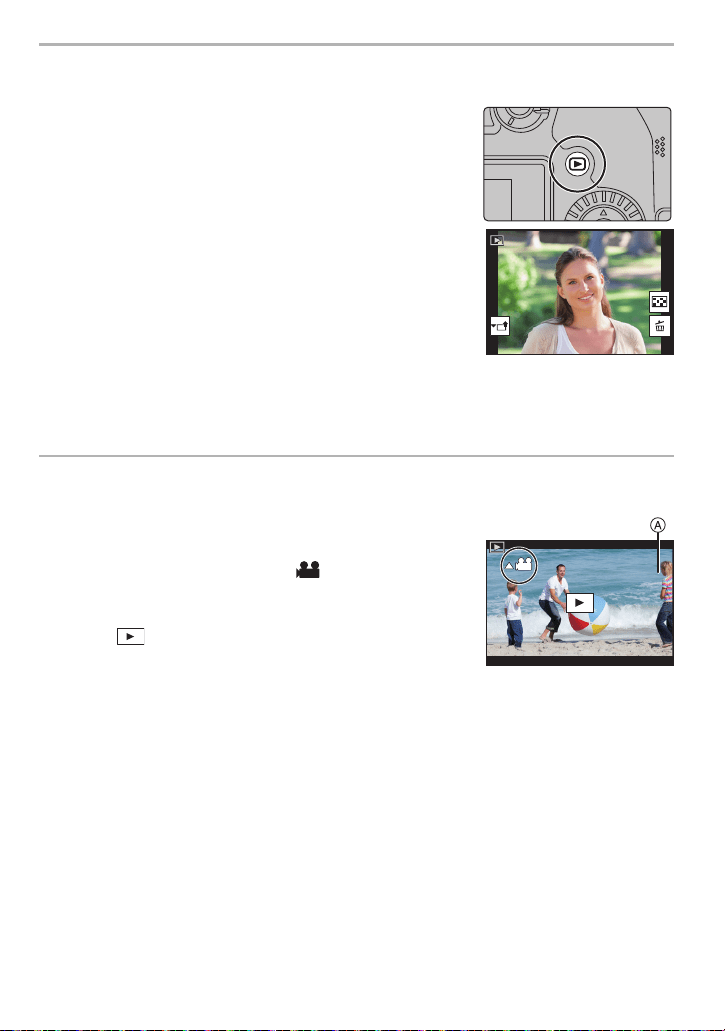
Playback
52
DVQX1749 (ENG)
Playing Back Pictures
1
Press [(].
2
Press 2/1.
• If you press and hold 2/1, you can play back the
pictures in succession.
∫ To finish playback
Press [
(] again or press the shutter button halfway.
Playing Back Motion Pictures
This unit was designed to play motion pictures using the
AVCHD and MP4 formats.
Select an icon indicated with [ ], and then press
3 to play it back.
A Motion picture recording time
• Touching [ ] in the middle of the screen allows you to play
back motion pictures.
2: Play back the previous picture
1: Play back the next picture
1/981/981/981/98
12s12s12s12s
DC-G95PP-DVQX1749_eng.book 52 ページ 2019年3月29日 金曜日 午後1時31分
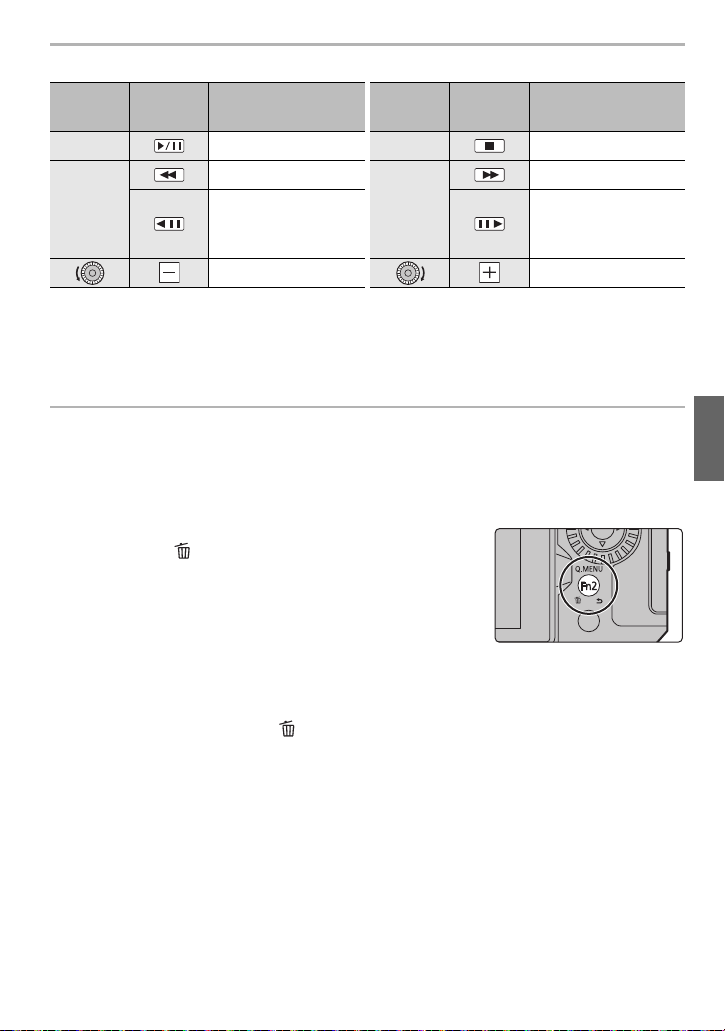
53
Playback
(ENG) DVQX1749
∫ Operations during Motion Picture Playback
¢1 The fast forward/rewind speed increases if you press 1/2 again.
¢2 When a motion picture recorded with [AVCHD] is rewound frame-by-frame, its frames will be
shown in intervals of approximately 0.5 seconds.
Deleting Images
Once deleted, pictures cannot be recovered.
∫ To delete a single picture
1 In Playback Mode, select the picture to delete and
then press [ ].
2 Press 3/4 to select [Delete Single] and then press
[MENU/SET].
∫ To delete multiple pictures (up to 100) or all the pictures
• Picture groups are treated as a single picture. (All the pictures in the selected picture group will
be deleted.)
1 In Playback Mode, press [ ].
2 Press 3/4 to select [Delete Multi] or [Delete All] and then press [MENU/SET].
• After selecting [Delete All], if you select [Delete All Non-rating], you can delete all pictures
except for those with ratings.
(When [Delete Multi] is selected)
3 Press 3/4/2/1 to select the picture, and then press [MENU/SET] to set.
(Repeat this step.)
•[‚] appears on the selected pictures.
If [MENU/SET] is pressed again, the setting is canceled.
4 Press [DISP.] to execute.
Button
operation
Touch
operation
Description of
operation
Button
operation
Touch
operation
Description of
operation
3 Play/Pause 4 Stop
2
Fast rewind
¢1
1
Fast forward
¢1
Frame-by-frame
rewind
(while pausing)
¢2
Frame-by-frame
forward
(while pausing)
Reduce volume level Increase volume level
¥ You can create a picture from a motion picture by pressing [MENU/SET] during a pause.
¥ Depending on the number of pictures to be deleted, it may take some time to delete them.
DC-G95PP-DVQX1749_eng.book 53 ページ 2019年3月29日 金曜日 午後1時31分
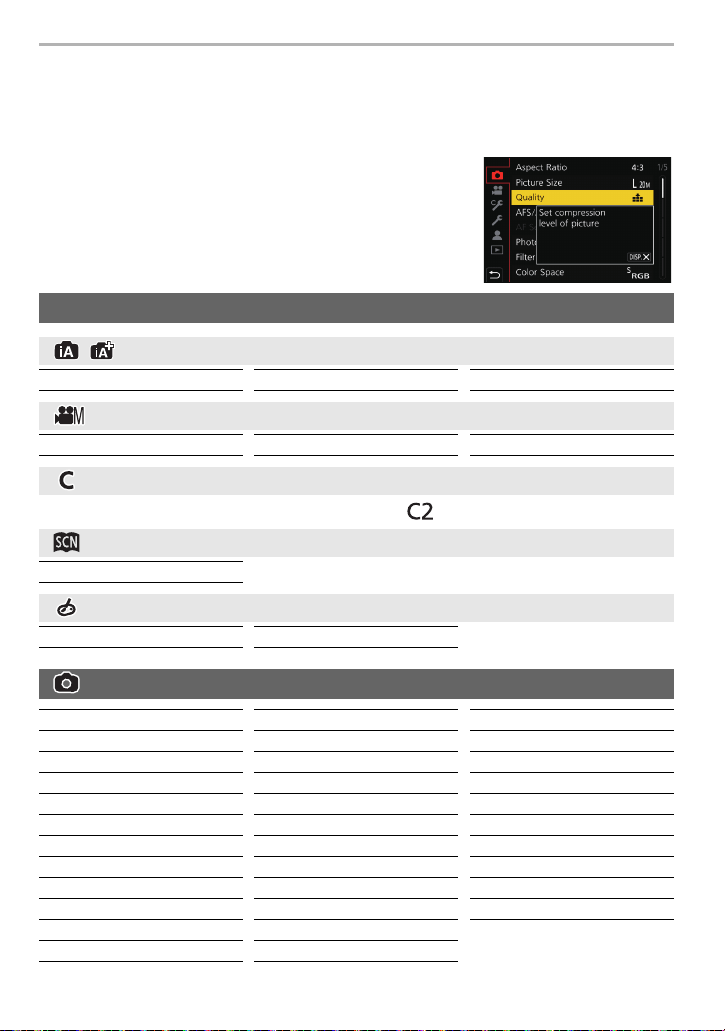
Menu Guide
54
DVQX1749 (ENG)
Menu Guide
This chapter provides a menu list and default settings. Menus explained in detail in other
chapters are indicated with page numbers.
∫ Displaying Descriptions About Menu Items and
Settings
If you press [DISP.] while a menu item or setting is selected,
a description of the menu is displayed.
You can change the settings registered to custom sets ( ).
Menus Displayed in Each Recording Mode
[Intelligent Auto]
[Intelligent Auto Mode] (P31) [iHandheld Night Shot] [iHDR]
[Creative Video]
[Exposure Mode] (P49) [High Speed Video] (P49) [4K Live Cropping] (P50)
[Custom Mode]
[Scene Guide]
[Scene Switch]
[Creative Control]
[Filter Effect] [Simultaneous Record w/o Filter]
[Rec]
[Aspect Ratio] (P56) [Flash] [Self Timer]
[Picture Size] (P57) [Red-Eye Removal] [Time Lapse/Animation]
[Quality] (P57) [ISO Sensitivity (photo)] [Live View Composite] (P43)
[AFS/AFF] [Min. Shtr Speed] [Panorama Settings]
[AF Sensitivity(Photo)] [Long Shtr NR] [Silent Mode]
[Photo Style] (P58) [Shading Comp.] [Shutter Type] (P61)
[Filter Settings] [Diffraction Compensation] [Shutter Delay]
[Color Space] [Stabilizer] (P45) [Bracket] (P41)
[Metering Mode] (P60) [Ex. Tele Conv.] [HDR]
[Highlight Shadow] [Digital Zoom] [Multi Exp.]
[i.Dynamic] [Burst Rate]
[i.Resolution] [4K PHOTO] (P34)
DC-G95PP-DVQX1749_eng.book 54 ページ 2019年3月29日 金曜日 午後1時31分
55
Menu Guide
(ENG) DVQX1749
[Motion Picture]
[Rec Format] (P47) [Highlight Shadow] [Sound Rec Level Disp.]
[Rec Quality] (P48) [i.Dynamic] [Sound Rec Level Adj.]
[Snap Movie] [i.Resolution] [Sound Rec Level Limiter]
[AFS/AFF] [ISO Sensitivity (video)]
[Wind Noise Canceller]/
[Wind Cut]
[Continuous AF] [Diffraction Compensation]
[AF Custom Setting(Video)] [Stabilizer] (P44) [Lens Noise Cut]
[Photo Style] (P58) [Flkr Decrease] [Special Mic.]
[Filter Settings] [Ex. Tele Conv.] [Sound Output]
[Luminance Level] (P61) [Digital Zoom]
[Metering Mode] (P60) [Picture Mode in Rec.]
[Custom]
[Exposure] [Operation] [Highlight]
[ISO Increments] [Fn Button Set] (P30) [Zebra Pattern]
[Extended ISO] [WB/ISO/Expo. Button] [Expo.Meter]
[Exposure Comp. Reset] [ISO Displayed Setting] [MF Guide]
[Exposure Comp. Disp. Setting] [LVF/Monitor Disp. Set]
[Focus / Release Shutter] [Q.MENU] [Monitor Info. Disp.]
[AF/AE Lock] [Dial Set.] [Rec Area]
[AF/AE Lock Hold] [Operation Lock Setting] [Remaining Disp.]
[Shutter AF] [Focus Ring Lock] [Menu Guide]
[Half Press Release] [Video Button]
[Quick AF] [Video Rec. Button (Remote)]
[Lens / Others]
[Eye Sensor AF] [Touch Settings] [Lens Position Resume]
[Pinpoint AF Setting] [Power Zoom Lens]
[AF Assist Lamp]
[Monitor / Display] [Lens Fn Button Setting]
[Direct Focus Area] [Auto Review] [Face Recog.]
[Focus/Release Priority] [Monochrome Live View] [Profile Setup]
[Focus Switching for Vert / Hor] [Constant Preview]
[Loop Movement Focus Frame] [Live View Boost]
[AF Area Display] [Peaking]
[AF+MF] [Histogram]
[MF Assist] [Guide Line]
[MF Assist Display] [Center Marker]
DC-G95PP-DVQX1749_eng.book 55 ページ 2019年3月29日 金曜日 午後1時31分
Menu Guide
56
DVQX1749 (ENG)
Applicable modes:
This allows you to select the aspect ratio of the pictures to suit printing or the playback
method.
[Setup]
[Online Manual] (P93) [Monitor Display Speed] [Folder / File Settings]
[Cust.Set Mem.]
[Monitor Display]/
[Viewfinder]
[No.Reset]
[Clock Set] (P22) [Reset]
[World Time] [Monitor Luminance] [Reset Network Settings]
[Travel Date] [Eye Sensor] [Pixel Refresh]
[Wi-Fi] [Battery Use Priority] [Sensor Cleaning]
[Bluetooth] [USB Mode] [Level Gauge Adjust.]
[Wireless Connection Lamp] [USB Power Supply] [Demo Mode]
[Beep] [TV Connection] [Approved Regulations]
[Headphone Volume] [Language] [Format] (P23)
[Economy] [Version Disp.]
[My Menu]
[My Menu Setting]
[Playback]
[Slide Show] [4K PHOTO Bulk Saving] (P38) [Rotate]
[Playback Mode] [Light Composition] [Video Divide]
[Protect] [Sequence Composition] [Time Lapse Video]
[Rating] [Clear Retouch] [Stop Motion Video]
[Title Edit] [Text Stamp] [Rotate Disp.]
[Face Rec Edit] [Resize] [Picture Sort]
[RAW Processing] (P62) [Cropping] [Delete Confirmation]
[Aspect Ratio]
> [Rec] > [Aspect Ratio]
[4:3] [Aspect Ratio] of a 4:3 TV
[3:2] [Aspect Ratio] of a 35 mm film camera
[16:9] [Aspect Ratio] of a 16:9 TV
[1:1] Square aspect ratio
MENU
DC-G95PP-DVQX1749_eng.book 56 ページ 2019年3月29日 金曜日 午後1時31分
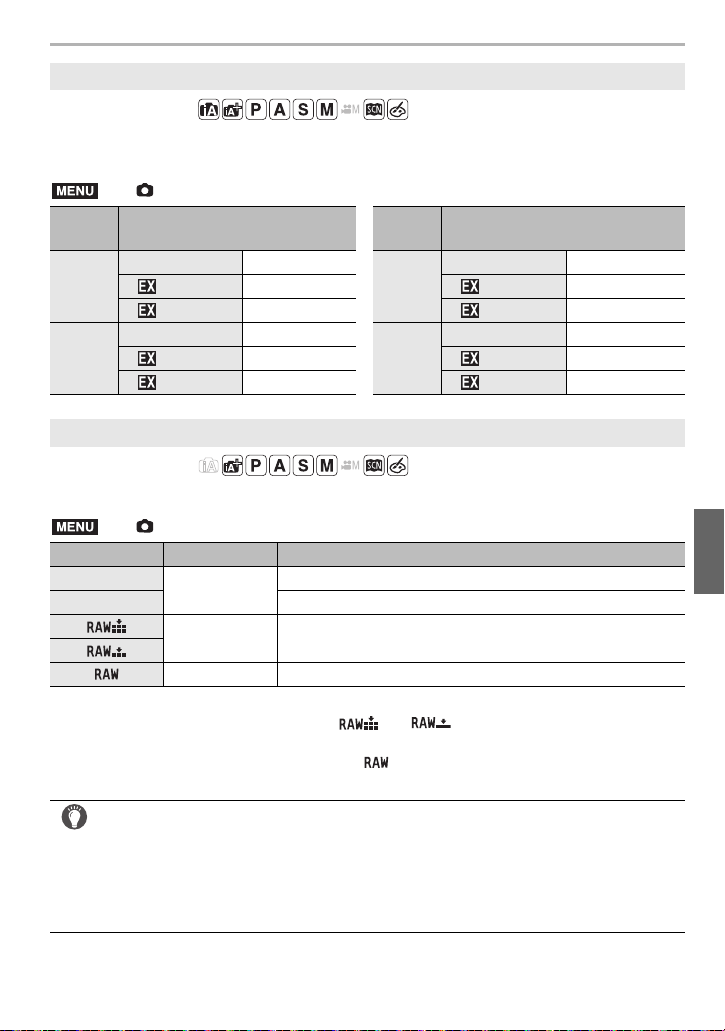
57
Menu Guide
(ENG) DVQX1749
Applicable modes:
The higher the numbers of pixels, the finer the detail of the pictures will appear even when
they are printed onto large sheets.
Applicable modes:
Set the compression rate at which the pictures are to be stored.
• RAW images are always recorded in the [4:3] (5184k3888) aspect ratio.
• When you delete an image recorded with [ ] or [ ], both the RAW and JPEG images
will be deleted simultaneously.
• When you play back an image recorded with [ ], gray areas corresponding to the aspect
ratio at the time of recording are displayed.
[Picture Size]
> [Rec] > [Picture Size]
Aspect
ratio
Picture size
Aspect
ratio
Picture size
[4:3]
[L] (20M) 5184k3888
[16:9]
[L] (14.5M) 5184k2920
[ M] (10M) 3712k2784 [ M] (8M) 3840k2160
[ S] (5M) 2624k1968 [ S] (2M) 1920k1080
[3:2]
[L] (17M) 5184k3456
[1:1]
[L] (14.5M) 3888k3888
[ M] (9M) 3712k2480 [ M] (7.5M) 2784k2784
[ S] (4.5M) 2624k1752 [ S] (3.5M) 1968k1968
[Quality]
> [Rec] > [Quality]
Settings File format Description of settings
[A]
JPEG
A JPEG image in which image quality was given priority.
[›] A standard image quality JPEG image.
[]
RAWiJPEG
You can record a RAW image and a JPEG image ([A] or
[›]) simultaneously.
[]
[] RAW You can only record RAW images.
About RAW
RAW format refers to a data format of images that have not been processed. Playback
and editing of RAW images require the camera or the dedicated software.
• You can process RAW images in [RAW Processing] in the [Playback] menu. (P62)
• Use software (“SILKYPIX Developer Studio” (P75) by Ichikawa Soft Laboratory) to process
and edit RAW files on a PC.
MENU
MENU
DC-G95PP-DVQX1749_eng.book 57 ページ 2019年3月29日 金曜日 午後1時31分
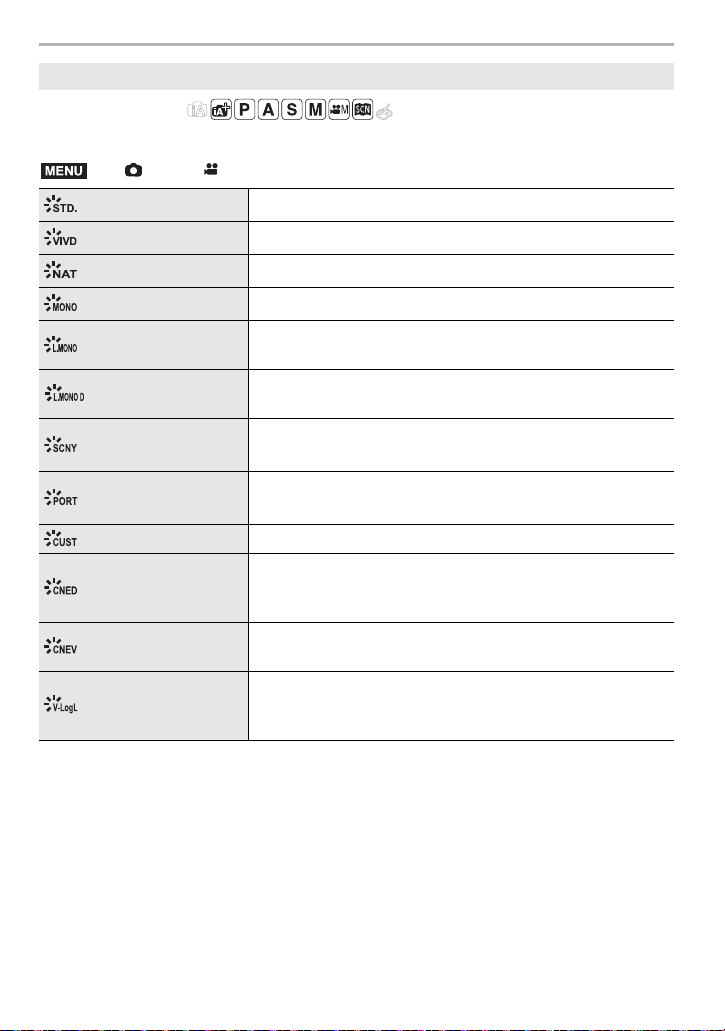
Menu Guide
58
DVQX1749 (ENG)
Applicable modes:
You can select effects to match the type of image you wish to record.
• This can be set to [Standard] or [Monochrome] in Intelligent Auto Plus Mode.
[Photo Style]
> [Rec] / [Motion Picture] > [Photo Style]
[Standard]
This is the standard setting.
[Vivid]
Brilliant effect with high saturation and contrast.
[Natural]
Soft effect with low contrast.
[Monochrome]
Monochrome effect with no color shades.
[L.Monochrome]
Black-and-white effect with rich gradation and crisp black
accents.
[L.Monochrome D]
Monochrome effect that creates a dynamic impression with
enhanced highlights and shadows.
[Scenery]
An effect appropriate for sceneries with vivid blue skies and
greens.
[Portrait]
An effect appropriate for portraits with a healthy and beautiful
skin tone.
[Custom] Use the setting registered in advance.
[Cinelike D]
Gives priority to the dynamic range by using a gamma curve
designed to create film-like images.
• Suited for editing.
[Cinelike V]
Gives priority to the contrast by using a gamma curve designed
to create film-like images.
[V-Log L]
A gamma curve effect designed for post production editing.
• It allows you to add rich gradation to images during post
production editing.
MENU
DC-G95PP-DVQX1749_eng.book 58 ページ 2019年3月29日 金曜日 午後1時31分

59
Menu Guide
(ENG) DVQX1749
∫ Adjusting the picture quality
1 Press 2/1 to select the type of Photo Style.
2 Press 3/4 to select the items, and then press 2/1
to adjust.
• You can register adjusted details to [Custom] by pressing
[DISP.].
¢1It cannot be adjusted when [V-Log L] is set.
¢2Not displayed when [Monochrome], [L.Monochrome] or [L.Monochrome D] is selected.
¢3Displayed when [Monochrome], [L.Monochrome] or [L.Monochrome D] is selected.
• If you adjust the picture quality, [_] is displayed beside the Photo Style icon on the screen.
3 Press [MENU/SET].
[Contrast]
¢1
[r]
Increases the difference between the brightness
and the darkness in the picture.
[s]
Decreases the difference between the brightness
and the darkness in the picture.
[Sharpness]
[r] The picture is sharply defined.
[s] The picture is softly focused.
[Noise
Reduction]
[r]
The noise reduction effect is enhanced.
Picture resolution may deteriorate slightly.
[s]
The noise reduction effect is reduced. You can
obtain pictures with higher resolution.
[Saturation]
¢1, 2
[r] The colors in the picture become vivid.
[s] The colors in the picture become natural.
[Color Tone]
¢3
[r] Adds a bluish tone.
[s] Adds a yellowish tone.
[Filter Effect]
¢3
[Yellow] The blue sky can be recorded clearly.
[Orange] The blue sky can be recorded in darker blue.
[Red] The blue sky can be recorded in much darker blue.
[Green]
The skin and lips of people appear in natural tones.
Green leaves appear brighter and more enhanced.
[Off] —
[Grain Effect]
¢3
[Low]/
[Standard]/
[High]
Sets the graininess in a picture.
[Off] —
DISP.カスタム登録
-
5
-
500
+5+5
±0
±0
S
±0
±0
6WDQGDUG
S
DC-G95PP-DVQX1749_eng.book 59 ページ 2019年3月29日 金曜日 午後1時31分
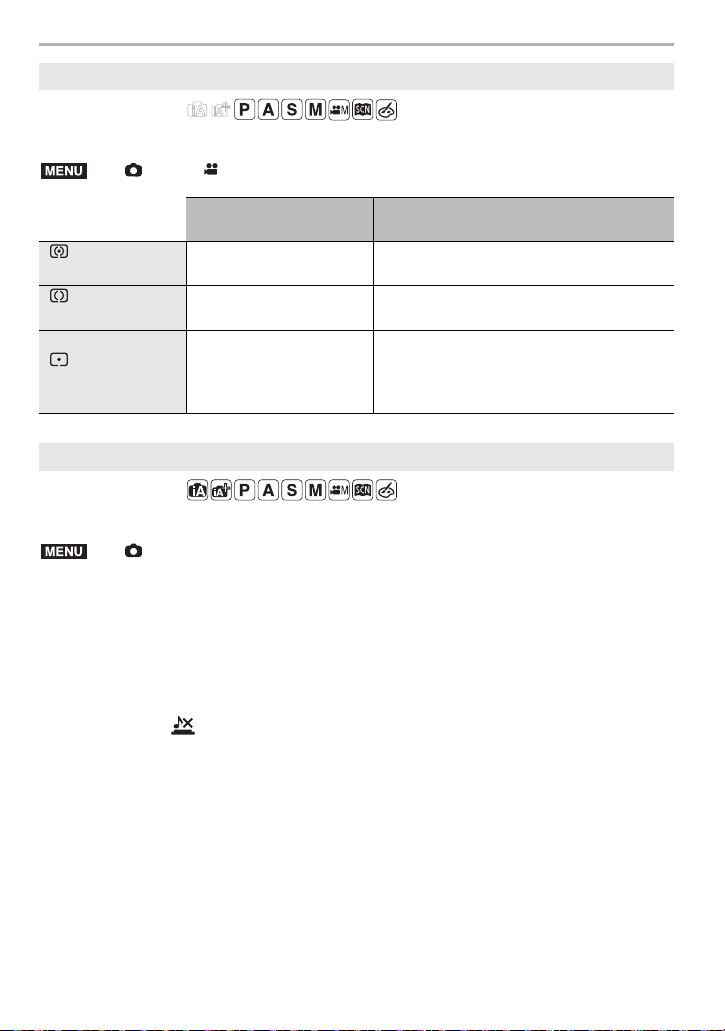
Menu Guide
60
DVQX1749 (ENG)
Applicable modes:
Type of optical measurement to measure brightness can be changed.
Applicable modes:
Disables operational sounds and output of light at once.
Settings: [ON]/[OFF]
[Metering Mode]
> [Rec] / [Motion Picture] > [Metering Mode]
Brightness
measurement position
Conditions
[]
Multiple
Whole screen
Normal usage
(produces balanced pictures)
[]
Center weighted
Center and surrounding
area
Subject in center
[]
Spot
[i] (spot metering target)
Great difference between brightness of
subject and background
(e.g. person in spotlight on stage,
backlighting)
[Silent Mode]
> [Rec] > [Silent Mode]
• Audio from the speaker will be muted and the flash and the AF Assist lamp will be disabled.
The following settings are fixed.
– [Flash Mode]: [Œ] (forced flash off)
– [Shutter Type]: [ESHTR]
– [AF Assist Lamp]: [OFF]
– [Beep Volume]: [s] (OFF)
– [E-Shutter Vol]: [ ] (OFF)
¥ Even when [ON] is set, the following lamp light up/flash.
– WIRELESS connection lamp
– Self-timer indicator
¥ Sounds that are produced by the camera regardless of your operations, such as the lens
aperture sound, cannot be muted.
¥ Be sure to pay special attention to the privacy, the likeness rights, etc. of the subject
when you use this function. Use at your own risk.
MENU
MENU
DC-G95PP-DVQX1749_eng.book 60 ページ 2019年3月29日 金曜日 午後1時31分
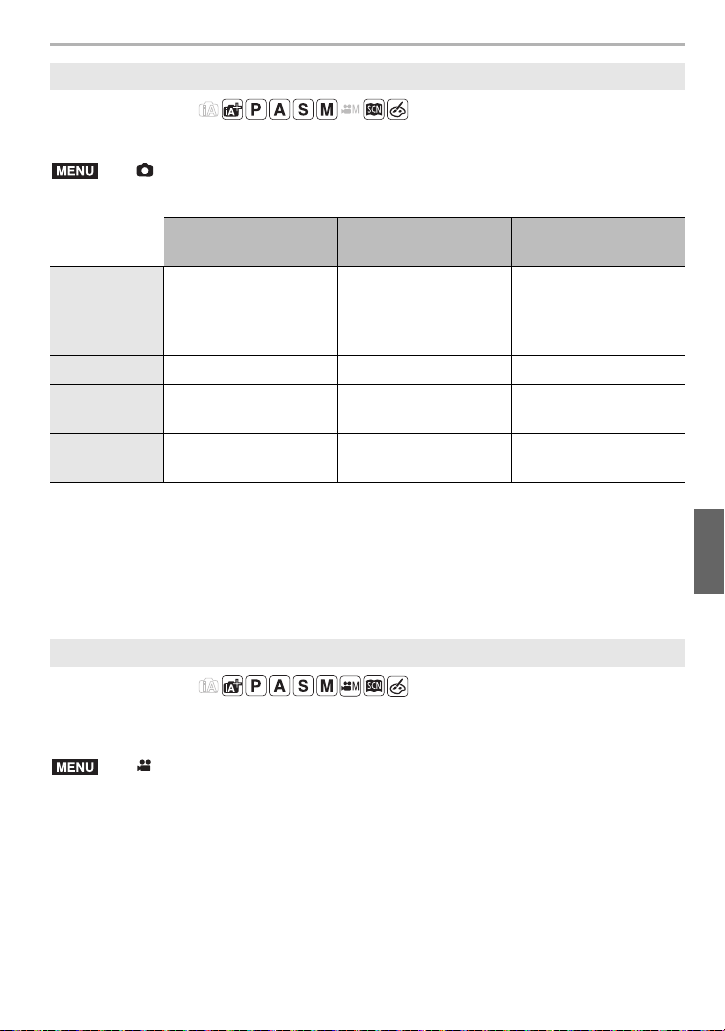
61
Menu Guide
(ENG) DVQX1749
Applicable modes:
Select the shutter type to be used for taking pictures.
Settings: [AUTO]/[MSHTR]/[EFC]/[ESHTR]
¢1 This setting is available only in Manual Exposure Mode.
¢2 When the ISO sensitivity is higher than [ISO3200], the shutter speed will be faster than
1 second.
• Compared to Mechanical Shutter Mode, Electronic Front Curtain Mode produces less shutter-
induced shake, so it can minimize the influence of shutter vibration.
• Electronic Shutter Mode allows you to take pictures without causing shutter vibration.
Applicable modes:
Select the luminance range to match the use of motion picture.
• The recording format is set to [MP4].
Settings: [0-255]/[16-255]
• This will be fixed at [16-255] when the [Rec Format] is [AVCHD].
• The setting is fixed at [0-255] in the following cases:
– When taking pictures (including picture-taking during motion picture recording)
– When [Photo Style] is set to [V-Log L]
[Shutter Type]
> [Rec] > [Shutter Type]
Mechanical shutter
Electronic Front
Curtain
Electronic Shutter
Description
The camera starts and
ends an exposure with
the mechanical shutter.
The camera starts an
exposure electronically,
and ends it with the
mechanical shutter.
The camera starts and
ends an exposure
electronically.
Flash ±±—
Shutter Speed
(Sec.)
B (Bulb)
¢1
/
60 to 1/4000
B (Bulb)
¢1
/
60 to 1/2000
1
¢2
to 1/16000
Shutter sound
Mechanical shutter
sound
Mechanical shutter
sound
Electronic shutter sound
[Luminance Level]
> [Motion Picture] > [Luminance Level]
MENU
MENU
DC-G95PP-DVQX1749_eng.book 61 ページ 2019年3月29日 金曜日 午後1時31分
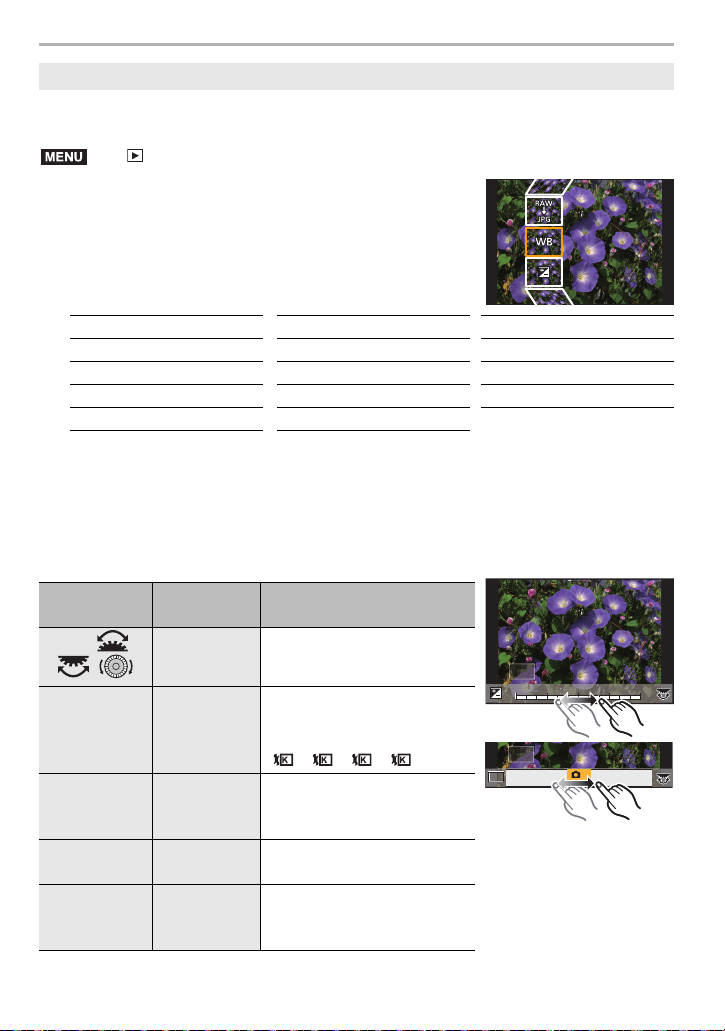
Menu Guide
62
DVQX1749 (ENG)
You can process the pictures taken in RAW format. The processed pictures will be saved
in JPEG format.
1 Select RAW images with 2/1, and then press
[MENU/SET].
2 Press 3/4 to select an item.
• You can set the following items. The settings you used for
the recording are selected when you start setting these
items.
3 Press [MENU/SET] and set.
4 Press [MENU/SET].
• This operation returns you to the screen in step 2. To set other items, repeat steps 2
through
4.
5 Select [Begin Processing] with 3/4, and then press [MENU/SET].
∫ How to set each item
[RAW Processing]
> [Playback] > [RAW Processing]
[White Balance] [Highlight] [Noise Reduction]
[Brightness correction] [Shadow] [i.Resolution]
[Photo Style] [Saturation]/[Color Tone] [Sharpness]
[i.Dynamic] [Filter Effect] [More Settings] (P63)
[Contrast] [Grain Effect]
Button
operation
Touch
operation
Description of operation
2/1//
/
Dragging Selects a setting.
3 [WB K Set]
Displays the screen that lets
you set the color temperature.
(when [White Balance] is set to
[ ]/[ ]/[ ]/[ ])
4 [Adjust.]
Displays the white balance
adjustment screen.
(when [White Balance] is set)
[DISP.] [DISP.]
Displays the comparison
screen.
[MENU/SET] [Set]
Sets the adjusted level and
returns you to the item
selection screen.
MENU
+1+1+1 +2+2+2
-
2
-
2
-
2
-
1
-
1
-
1000
DISP.
DISP.
WBWBWBWBWBWBWBWBWBWBWB
AWBc
AWBc
A
WAWBw
AWB
AWB
AWBAWB
1
2
3
4
DC-G95PP-DVQX1749_eng.book 62 ページ 2019年3月29日 金曜日 午後1時31分
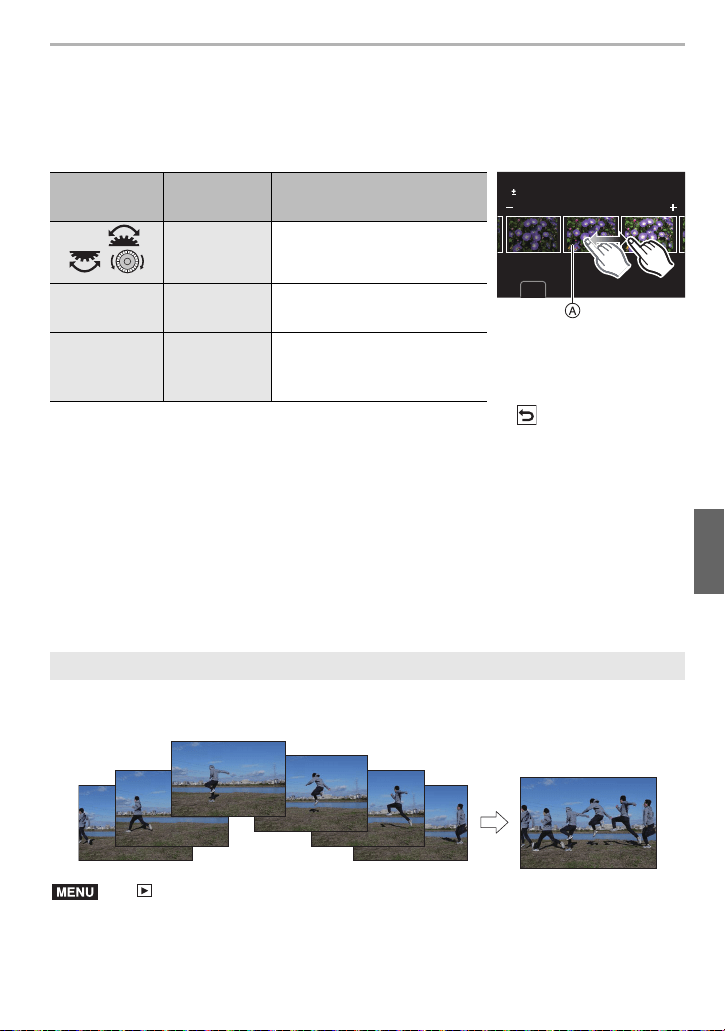
63
Menu Guide
(ENG) DVQX1749
• When [Noise Reduction], [i.Resolution] or [Sharpness] is selected, the comparison screen
cannot be displayed.
• Each time you touch the screen twice, the display switches between enlarged and normal view.
On the comparison screen, you can use the following operations to make adjustments:
A Current setting
• If you touch the picture at the center, it will be enlarged. If you touch [ ], the picture will be
reduced to the original size.
∫ [More Settings] setting
Use 3/4 to select items and press [MENU/SET] to perform the following operations.
[Reinstate Adjustments]:
Returns the settings to the ones you used during the recording.
[Color Space]:
Allows you to select a [Color Space] setting from [sRGB] or [Adobe RGB].
[Picture Size]:
Allows you to select the size in which the image will be saved in JPEG format.
Select multiple frames from a 4K burst file to create a sequence composition of a moving
subject into one picture.
1 Press 2/1 to select the 4K photo burst files and press [MENU/SET].
Button
operation
Touch
operation
Description of operation
2/1//
/
Dragging Selects a setting.
[DISP.] [DISP.]
Returns you to the setting
screen.
[MENU/SET] [Set]
Sets the adjusted level and
returns you to the item
selection screen.
[Sequence Composition]
> [Playback] > [Sequence Composition]
DISP.
0
MENU
DC-G95PP-DVQX1749_eng.book 63 ページ 2019年3月29日 金曜日 午後1時31分
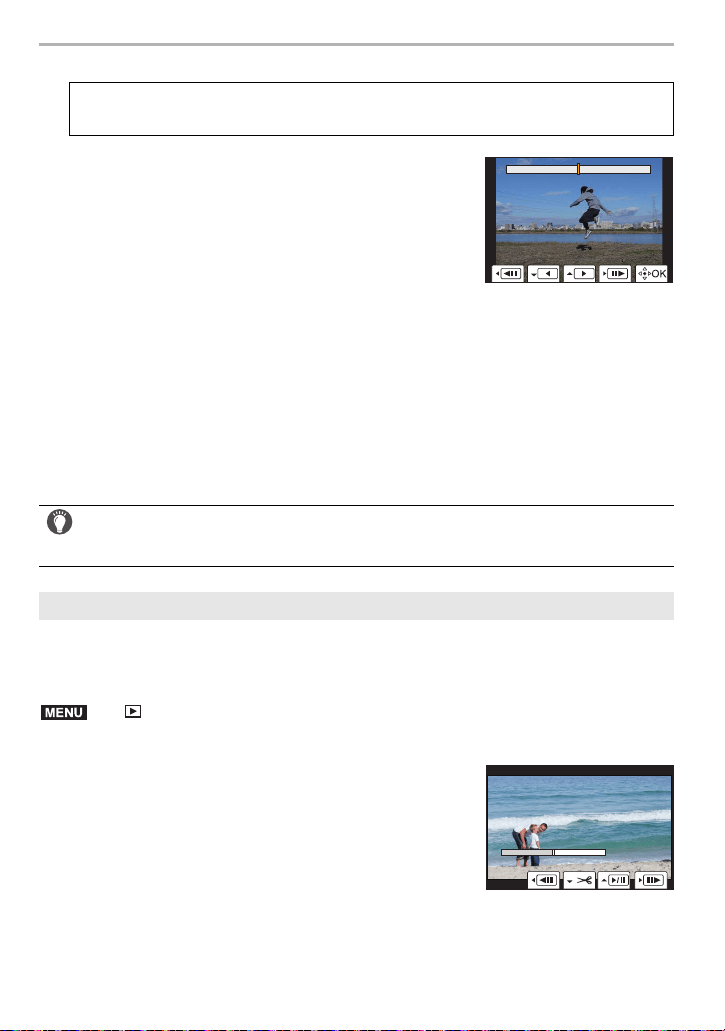
Menu Guide
64
DVQX1749 (ENG)
2 Select frames to combine.
Recorded motion picture and 4K burst files can be divided in two. It is recommended for
when you want to divide a part you need with a part you do not need.
Dividing a file is permanent. Decide before you divide!
1 Press 2/1 to select the file to divide, and then press [MENU/SET].
Select the frames so that the moving subject will not overlap on the preceding or subsequent
frames. (The sequence composition may not be created properly if the subject overlaps.)
1 Drag the slide bar or use 3/4/2/1 to select the
frames to combine.
2 Press [MENU/SET].
• The selected frames are remembered, and the display
goes to the preview screen.
• Press 3/4 to select items and press [MENU/SET] to
perform the following operations.
–[Next]:
Lets you select more frames for combining.
– [Reselect]:
Discards the frame selected immediately before and lets you select a different image.
3 Repeat steps 1 and 2 to select more frames to combine.
• You can select 3 to 40 frames.
4 Press 3/4 to select [Save], and then press [MENU/SET].
¥
Pictures are saved in JPEG format. Recording information (Exif information) of the first frame
such as shutter speed, aperture, and ISO sensitivity are also registered.
Tips for [Sequence Composition]
We recommend using a tripod to take pictures for [Sequence Composition].
[Video Divide]
> [Playback] > [Video Divide]
2 Press 3 at the location to divide.
• You can finely adjust the location for division by pressing
2/1 while the file is paused.
3 Press 4.
• The file may be lost if the card or battery is removed while
processing the dividing.
¥ It may not be possible to divide a file at a point near the beginning or end.
¥ This function is not available in the following case:
– When the recording time is short.
MENU
DC-G95PP-DVQX1749_eng.book 64 ページ 2019年3月29日 金曜日 午後1時31分
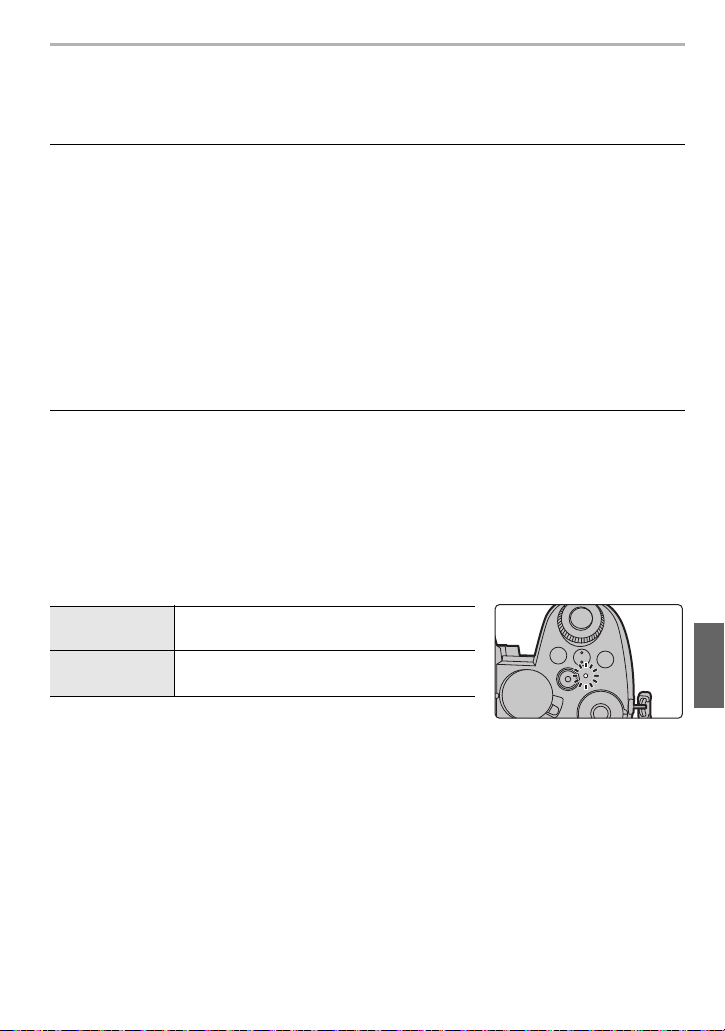
65
Wi-Fi/Bluetooth
(ENG) DVQX1749
What you can do with the Wi-Fi
®
/Bluetooth
®
function
This owner’s manual refers to both smartphones and tablets as smartphones from this
point on unless noted otherwise.
• For details, refer to the “Owner’s Manual for advanced features” (PDF format).
∫ Before Use
• Set the clock. (P22)
• To use the Wi-Fi function on this unit, a wireless access point or a destination device equipped
with the wireless LAN function is required.
∫ About the WIRELESS connection lamp
• In [Wireless Connection Lamp] in the [Setup] menu, you can set
the lamp so that it will not light/flash.
∫ About the [Wi-Fi] button
In this owner’s manual, a Fn button to which [Wi-Fi] is assigned is referred to as the [Wi-Fi]
button.
(By default, [Wi-Fi] is assigned to [Fn4] when the camera is in Recording Mode, while it is
assigned to [Fn1] when the camera is in Playback Mode.)
• For information about the Fn button, refer to P30.
• Remote shooting (P73)
• Playing back/saving images stored on the camera, or uploading them on social media sites
(P74)
• Editing motion pictures recorded with Snap Movie
Connect to a smartphone that supports Bluetooth Low Energy to expand the scope
of applications
• Pairing (connection setup) (P68)
• Camera Power Operations (P72)
• Shutter Remote Control
• Sending recorded images to a smartphone automatically
• Recording location information of a smartphone on recorded images
• Synchronizing the camera’s clock with a smartphone
Lit blue
When the Wi-Fi/Bluetooth function is ON or
connected
Blinking blue
When sending image data by operating the
camera
DC-G95PP-DVQX1749_eng.book 65 ページ 2019年3月29日 金曜日 午後1時31分

Wi-Fi/Bluetooth
66
DVQX1749 (ENG)
Steps for pressing [Wi-Fi] (in Recording Mode)
1 Touch [ ].
2 Touch [ ].
∫ Use the camera as a wireless LAN device
When using equipment or computer systems that require more reliable security than
wireless LAN devices, ensure that the appropriate measures are taken for safety designs
and defects for the systems used. Panasonic will not take any responsibility for any
damage that arises when using the camera for any purpose other than as a wireless LAN
device.
∫ Use of the Wi-Fi function of this camera is presumed to be in countries where this
camera is sold
There is the risk that the camera violates the radio wave regulations if used in countries
other than those where this camera is sold, and Panasonic takes no responsibility for any
violations.
∫ There is the risk that data sent and received via radio waves may be intercepted
Please note that there is the risk that data sent and received via radio waves may be
intercepted by a third party.
∫ Do not use the camera in areas with magnetic fields, static electricity or
interference
• Do not use the camera in areas with magnetic fields, static electricity or interference, such as
near microwave ovens. These may cause the interruption of the radio waves.
• Using the camera near devices such as microwave ovens or cordless telephones that use the
2.4 GHz radio wave band may cause a decrease in performance in both devices.
∫ Do not connect to the wireless network you are not authorized to use
When the camera utilizes its Wi-Fi function, wireless networks will be searched
automatically. When this happens, wireless networks that you are not authorized to use
(SSID
¢
) may be displayed, however do not attempt to connect to the network as it may be
considered as unauthorized access.
¢ SSID refers to the name that is used to identify a network over a wireless LAN connection.
If the SSID matches for both devices, transmission is possible.
Fn5Fn5Fn5
Fn4Fn4Fn4
Fn6Fn6Fn6
Fn8Fn8Fn8
Fn7Fn7Fn7
Fn4
DC-G95PP-DVQX1749_eng.book 66 ページ 2019年3月29日 金曜日 午後1時31分

67
Wi-Fi/Bluetooth
(ENG) DVQX1749
Connecting to a Smartphone
“Panasonic Image App” is an application for smartphones provided by Panasonic.
•OS
Installing “Panasonic Image App”
App for Android
TM
:
Android 4.4 or higher
(Android 5.0 or higher is required to use the Bluetooth function.)
App for iOS:
iOS 9.3 or higher
(The Bluetooth function cannot be used with the iPad 2.)
1 Connect the smartphone to a network.
2 (Android) Select “Google Play
TM
Store”.
(iOS) Select “App Store”.
3 Enter “Panasonic Image App” or “LUMIX” into the search box.
4 Select “Panasonic Image App” and install it.
¥
Use the latest version.
¥ Supported OSs are current as of April 2019 and are subject to change.
¥ The service may not be able to be used properly depending on the type of
smartphone being used.
Refer to the support site below for details about the “Image App”.
https://panasonic.jp/support/global/cs/dsc/
(This Site is English only.)
¥ When downloading the app on a mobile network, high packet communication fees may be
incurred depending on the details of your contract.
¥ Read the [Help] in the “Image App” menu for further details on how to operate.
¥ When you operate the “Image App” on the smartphone that is connected to the camera via
Wi-Fi, [Help] in the “Image App” may not be displayed depending on the smartphone. In this
case, after terminating the connection to the camera, reconnect the smartphone to a mobile
phone network such as the 3G or LTE network or to a Wi-Fi router, and then display [Help] in
the “Image App”.
¥ Some of the screens and information provided in this owner’s manual may differ from your
device depending on the supported OS and “Image App” version.
DC-G95PP-DVQX1749_eng.book 67 ページ 2019年3月29日 金曜日 午後1時31分
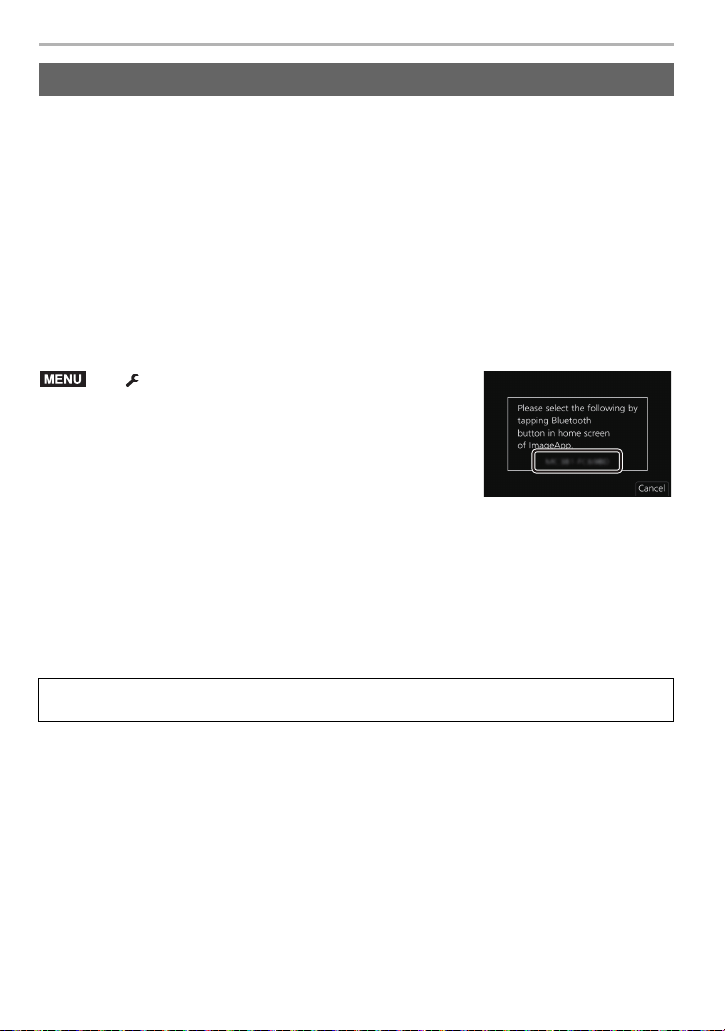
Wi-Fi/Bluetooth
68
DVQX1749 (ENG)
Follow a simple connection setup procedure (pairing) to connect to a smartphone that
supports Bluetooth Low Energy.
When pairing is set up, the camera also automatically connects to the smartphone via Wi-Fi.
• Supported smartphones
∫ First-time connection
You need to set up pairing (connection) for the first time only.
When pairing is set up, a Wi-Fi connection is made automatically.
(On the camera)
• The camera enters pairing standby mode and displays its
device name.
(On your smartphone)
1 Start “Image App”.
• If a message is displayed indicating that the smartphone is
searching for cameras, close the message.
2 Select [Bluetooth].
3 Turn on the Bluetooth.
4 Select the device name displayed on the camera’s screen from the [Camera
enable to be registered] list.
• Bluetooth connection between the camera and the smartphone will be made.
(For Android devices) A Wi-Fi connection will be made by selecting [Connection].
Connecting to a Smartphone (Bluetooth Connection)
Android: Android 5.0 or higher equipped with Bluetooth 4.0 or higher
(excluding those that do not support Bluetooth Low Energy)
iOS: iOS 9.3 or higher (excluding the iPad 2)
> [Setup] > [Bluetooth] > [Bluetooth] >
[SET] > [Pairing]
If you are using an Android device, follow the steps up to here to complete the setup.
Proceed to the steps below only if you are using an iOS device.
• If [Wi-Fi Password] is set to [OFF] on the camera, select [Wi-Fi Setup]. (At the time of
purchase, [Wi-Fi Password] is set to [OFF].)
• If [Wi-Fi Password] is set to [ON] on the camera, you need to install the profile.
1 Install the profile.
• If a pass code is set on the smartphone, you need to enter it.
2 Press the home button to close the browser.
MENU
DC-G95PP-DVQX1749_eng.book 68 ページ 2019年3月29日 金曜日 午後1時31分
69
Wi-Fi/Bluetooth
(ENG) DVQX1749
5 Turn on the Wi-Fi function in the smartphone’s setting menu.
6 On the Wi-Fi setting screen, select the SSID displayed on the
camera. (The device name selected in step
4)
• If the SSID is not displayed, it may be displayed after the Wi-Fi
function is turned off and on.
• The paired smartphone will be registered as a paired device after
connected via Wi-Fi.
7 Start “Image App ”.
• After the Wi-Fi connection is completed, the paired smartphone is registered as a paired
device.
∫ Connecting to a Paired Smartphone
(On the camera)
(On your smartphone)
1 Start “Image App” and then select [Bluetooth].
2 Turn on the Bluetooth.
3 Select the camera (device name) you want to connect to from the [Camera registered]
list.
∫ End Bluetooth Connection
To terminate the Bluetooth connection, turn off the Bluetooth function of the camera.
• Even if you terminate the connection, the pairing information for it will not be deleted.
∫ Canceling Pairing
(On the camera)
1 Select the menu.
2 Select the smartphone you want to delete.
(On your smartphone)
Select the camera (device name) for which to delete the pairing information from the [Camera
registered] list.
> [Setup] > [Bluetooth] > [Bluetooth] > [ON]
> [Setup] > [Bluetooth] > [Bluetooth] > [OFF]
> [Setup] > [Bluetooth] > [Bluetooth] > [SET] > [Delete]
¥
[ ] is displayed on the recording screen during Bluetooth connection. When the Bluetooth
function is enabled, but a connection is not established, [ ] appears translucent.
Wi-Fi
0123456789ABC
MENU
MENU
MENU
DC-G95PP-DVQX1749_eng.book 69 ページ 2019年3月29日 金曜日 午後1時31分
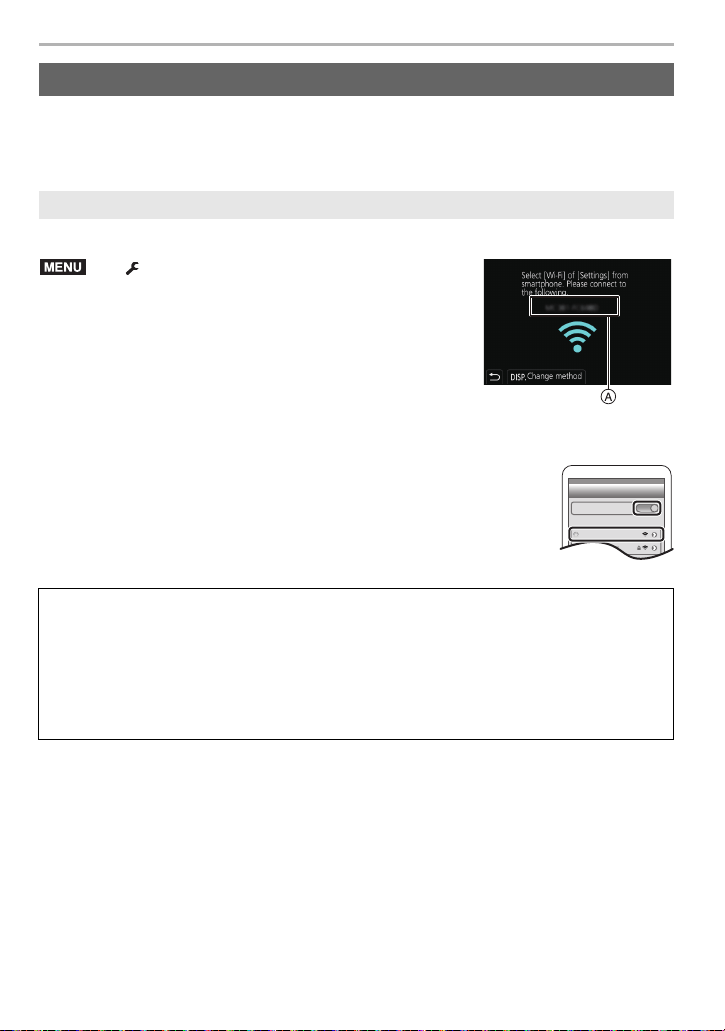
Wi-Fi/Bluetooth
70
DVQX1749 (ENG)
Use Wi-Fi to connect the camera and a smartphone that does not support Bluetooth Low
Energy.
• You can also connect via Wi-Fi to a smartphone that supports Bluetooth Low Energy by
following the same steps.
(On the camera)
A SSID
• The information required for directly connecting your
smartphone to this unit (SSID) is displayed.
• You can also display the information by pressing [Wi-Fi] on the
camera.
(On your smartphone)
1 Turn on the Wi-Fi function in the setup menu.
2 On the Wi-Fi setting screen, select the SSID displayed on the
camera.
3 Start “Image App”.
• When the connection confirmation screen is displayed on the camera,
select [Yes] to connect. (For first time connection only)
Connecting to a Smartphone (Wi-Fi connection)
Connecting Without Entering a Password
> [Setup] > [Wi-Fi] > [Wi-Fi Function] >
[New Connection] > [Remote Shooting &
View]
At the time of purchase, [Wi-Fi Password] is set to [OFF].
Before connecting to a Wi-Fi network, ensure that the device displayed on the
connection confirmation screen is the one you actually want to connect to. When a
wrong device is displayed, if you select [Yes], the camera will automatically connect to
that device.
We recommend that you set [Wi-Fi Password] to [ON] if, for example, there is another
Wi-Fi device nearby.
MENU
Wi-Fi
0123456789ABC
DC-G95PP-DVQX1749_eng.book 70 ページ 2019年3月29日 金曜日 午後1時31分
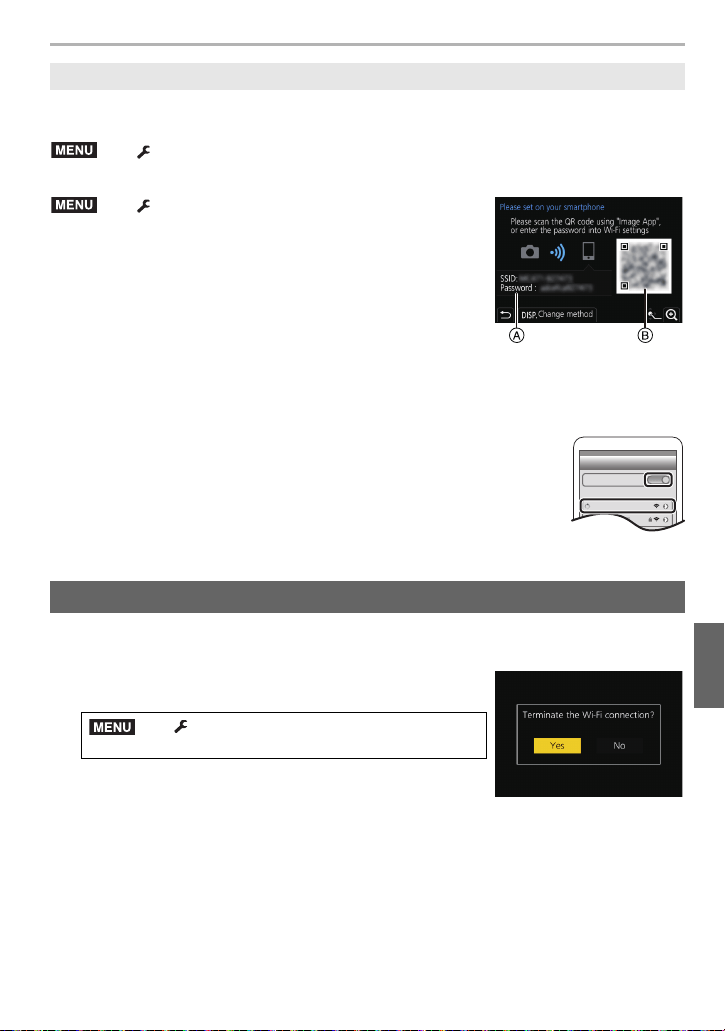
71
Wi-Fi/Bluetooth
(ENG) DVQX1749
Preparations:
(On the camera) Set the [Wi-Fi Password] to [ON].
(On the camera)
A SSID and password
B QR code
• The information required for directly connecting your
smartphone to this unit (SSID, password and QR code) is
displayed.
• You can also display the information by pressing [Wi-Fi] on the
camera.
(On your smartphone)
1 Turn on the Wi-Fi function in the setting menu.
2 On the Wi-Fi setting screen, select the SSID displayed on the
camera.
3 Enter the password displayed on the camera into the
smartphone. (For first time connection only)
4 Start “Image App ”.
1 Set the camera to Recording Mode.
• Press the shutter button halfway to return to recording mode.
2
Select the camera’s menu items to terminate the Wi-Fi
connection.
3 On the smartphone, close “Image App”.
Using Password Authentication to Connect
>
[Setup] > [Wi-Fi] > [Wi-Fi Setup] > [Wi-Fi Password] > [ON]
> [Setup] > [Wi-Fi] > [Wi-Fi Function] >
[New Connection] > [Remote Shooting &
View]
Terminating the Wi-Fi connection
> [Setup] > [Wi-Fi] > [Wi-Fi Function]
> [Yes]
MENU
MENU
Wi-Fi
0123456789ABC
MENU
DC-G95PP-DVQX1749_eng.book 71 ページ 2019年3月29日 金曜日 午後1時31分
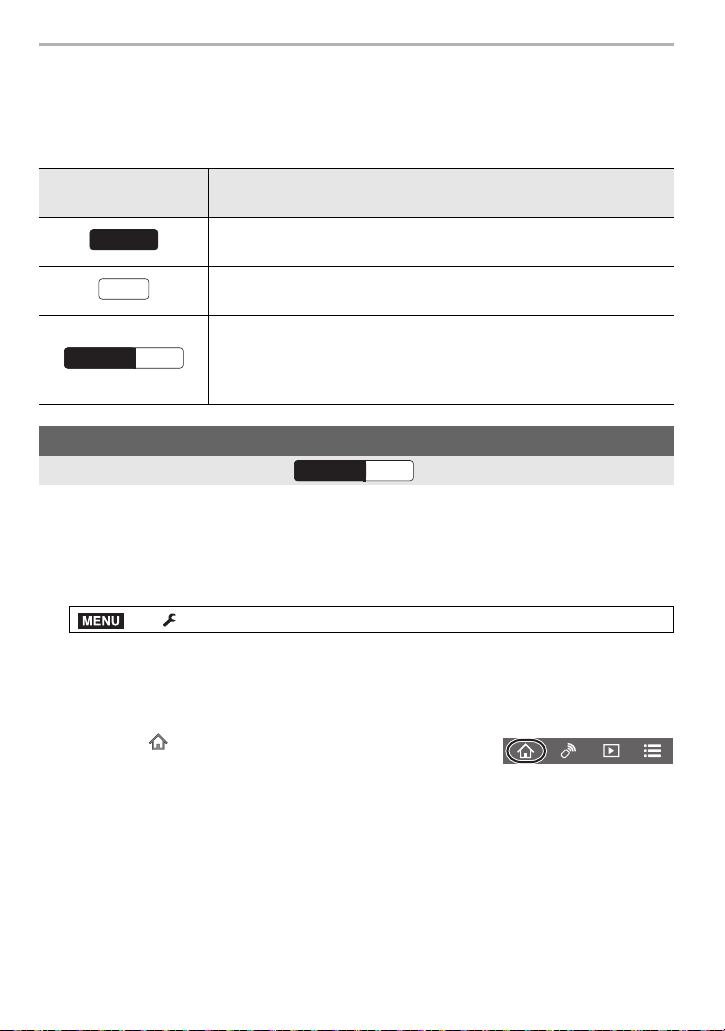
Wi-Fi/Bluetooth
72
DVQX1749 (ENG)
Operating the Camera with a Smartphone
∫ Required wireless connectivity mode
The wireless connectivity mode required varies depending on the function to be used after
connecting to a smartphone.
By operating a smartphone, you can turn on the camera to record from a remote location
or to view images even when the camera is in your bag.
Preparations:
1 Make a Bluetooth connection to the smartphone. (P68)
2 Select the camera’s menu.
3 Set the camera ON/OFF switch to [OFF].
4 On the smartphone, start up the “Image App”, and set the Bluetooth function to
a state in which a connection can be made (standby state).
5 Operate the smartphone.
• The camera automatically turns on, allowing it to make a Wi-Fi connection automatically.
– (iOS devices) Depending on the connection status of the smartphone, you may need to
change the connected device on the Wi-Fi setup screen. Follow the on-screen message
on the smartphone to change the setting.
Wireless connectivity
required
Support for Bluetooth Low Energy
Indicates that the function can be used with smartphones that
support Bluetooth Low Energy.
Indicates that the function can be used with smartphones that do not
support Bluetooth Low Energy.
Indicates that the function can be used with smartphones that
support Bluetooth Low Energy.
• Indicates that the function requires you to connect to a smartphone
using both Bluetooth and Wi-Fi.
Camera Power Operations
Wireless connectivity required:
> [Setup] > [Bluetooth] > [Remote Wakeup] > [ON]
1 Select [ ].
2 Select [Remote operation].
Bluetooth
Wi-Fi
Wi-FiBluetooth
Wi-FiBluetooth
MENU
DC-G95PP-DVQX1749_eng.book 72 ページ 2019年3月29日 金曜日 午後1時31分
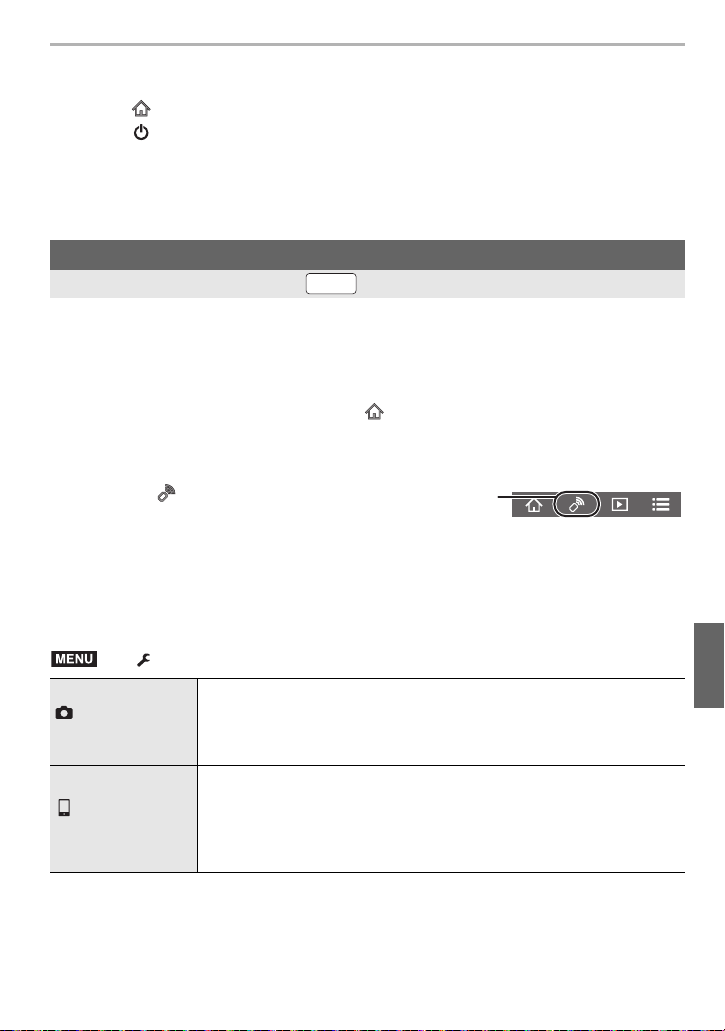
73
Wi-Fi/Bluetooth
(ENG) DVQX1749
∫ Turning Off the Camera
Operate the smartphone.
1 Select [ ].
2 Select [ OFF].
You can use the smartphone to record from a remote location while viewing the live view
images from the camera.
1 Connect to a smartphone. (P70)
2 Operate the smartphone.
∫ Operation Method During Remote Recording
Set either the camera or the smartphone as the priority control device to be used during
remote recording.
¥
When [Remote Wakeup] is set to [ON], the Bluetooth function continues to operate even after
the camera is turned off, thus causing the battery to drain.
Remote shooting
Wireless connectivity required:
(When connected via Bluetooth) Select [ ] > [Remote operation]
(iOS devices) If you need to change the connected device on the Wi-Fi setup screen, follow
the on-screen message to change the setting.
1 Select [ ].
2 Record an image.
• The recorded images are saved in the camera.
• Some settings are not available.
> [Setup] > [Wi-Fi] > [Wi-Fi Setup] > [Priority of Remote Device]
[Camera]
Allows you to perform operations with both the camera and the
smartphone during remote recording.
• The camera’s dial settings, etc. cannot be changed with the
smartphone.
[Smartphone]
Allows you to perform operations only with the smartphone during
remote recording.
• The camera’s dial settings, etc. can be changed with the smartphone.
• To end remote recording, press any of the buttons on the camera to
turn on the screen, and select [End].
Wi-Fi
MENU
DC-G95PP-DVQX1749_eng.book 73 ページ 2019年3月29日 金曜日 午後1時31分
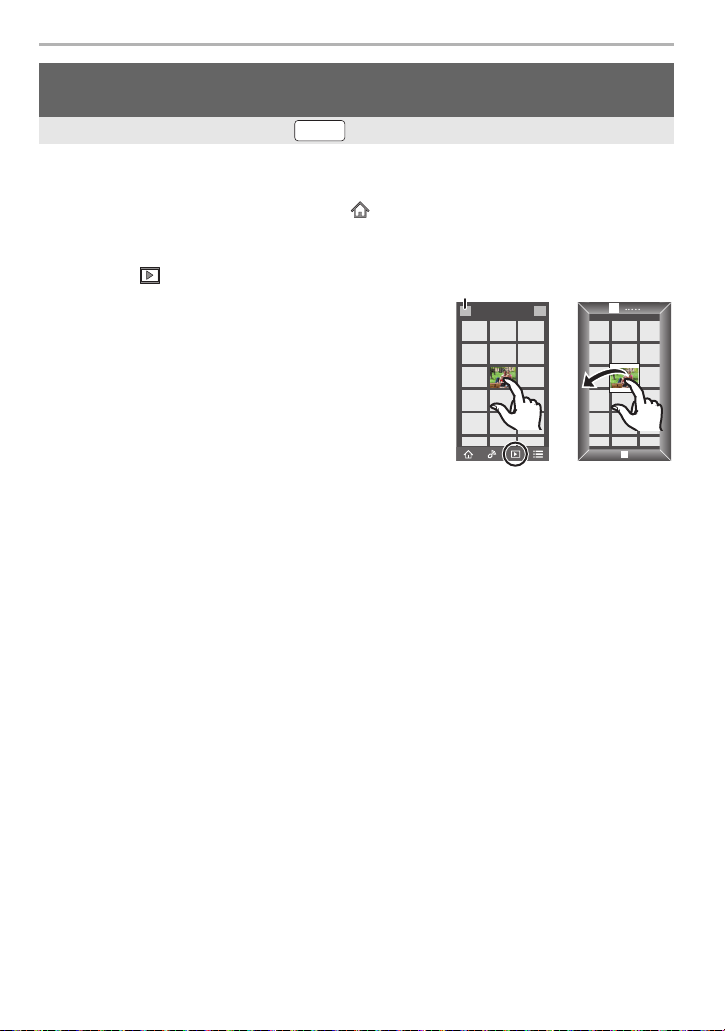
Wi-Fi/Bluetooth
74
DVQX1749 (ENG)
1 Connect to a smartphone. (P70)
2 Operate the smartphone.
Playing back/saving images stored on the camera, or uploading them
on social media sites
Wireless connectivity required:
(When connected via Bluetooth) Select [ ] > [Remote operation]
(iOS devices) If you need to change the connected device on the Wi-Fi setup screen, follow
the on-screen message to change the setting.
1 Select [ ].
• You can switch the images to be displayed by
selecting the icon (A) on the top left of the screen.
To display images stored in the camera, select
[LUMIX].
(To play back the image)
2 Touch the image to enlarge it.
• When you play a motion picture, image quality differs
from that of the actual recorded motion picture. The
image quality may deteriorate or the sound may skip
during motion picture or picture playback.
(To save the image or upload it on a social media site
or other web service)
3 Touch and hold and then drag the image.
¥
An OS version of Android 7.0 or higher or iOS 10.0 or higher is required to save pictures in
RAW format.
¥ Depending on the smartphone or its OS version, pictures in RAW format may not be displayed
correctly.
¥ You cannot save the following types of images:
– Motion pictures in AVCHD and 4K formats
– 4K burst files
– Images recorded with the Post Focus function
Wi-Fi
DC-G95PP-DVQX1749_eng.book 74 ページ 2019年3月29日 金曜日 午後1時31分

75
Others
(ENG) DVQX1749
Importing Images to a PC
• To download the software, you need to connect the PC to the Internet.
• It may take some time to download the software depending on the communication environment.
• Supported OSs are current as of April 2019 and are subject to change.
This software allows you to manage images. For example, you can send pictures and
motion pictures to a PC and sort them by recording date or model name. You can also
perform operations such as writing images to a DVD, processing and correcting images,
and editing motion pictures.
• For 4K motion pictures and 4K photos, a 64 bit OS version of Windows 10 / 8.1 / 7 is required.
• For details about information such as the operating environment or operating method, refer to
the “Owner’s Manual for advanced features” (PDF format) or the operating instructions for the
respective software programs.
• “PHOTOfunSTUDIO” is not compatible with Mac.
This is software to edit RAW format images.
Edited images can be saved in a format (JPEG, TIFF, etc.) that can be displayed on a
personal computer.
• For details on how to use the SILKYPIX Developer Studio, refer to the Help or the Ichikawa Soft
Laboratory’s support website.
This software allows you to edit motion pictures with ease.
• For more information on how to use LoiLoScope, read the LoiLoScope manual available for
download at the site.
• “LoiLoScope” is not compatible with Mac.
Downloading software
PHOTOfunSTUDIO 10.0 AE (Windows
®
10 / 8.1 / 7)
Check the site below to download and install the software.
Download the software while it is available for download.
• Download expiration: April 2024
https://panasonic.jp/support/global/cs/soft/download/d_pfs10ae.html
(This Site is English only.)
SILKYPIX Developer Studio SE (Windows
®
10/8.1/7,
Mac OS X v10.10, v10.11, macOS 10.12 to 10.14)
Check the site below to download and install the software.
http://www.isl.co.jp/SILKYPIX/english/p/
LoiLoScope 30 day full trial version (Windows
®
10/8.1/8/7)
Check the site below to download and install the software.
http://loilo.tv/product/20
DC-G95PP-DVQX1749_eng.book 75 ページ 2019年3月29日 金曜日 午後1時31分
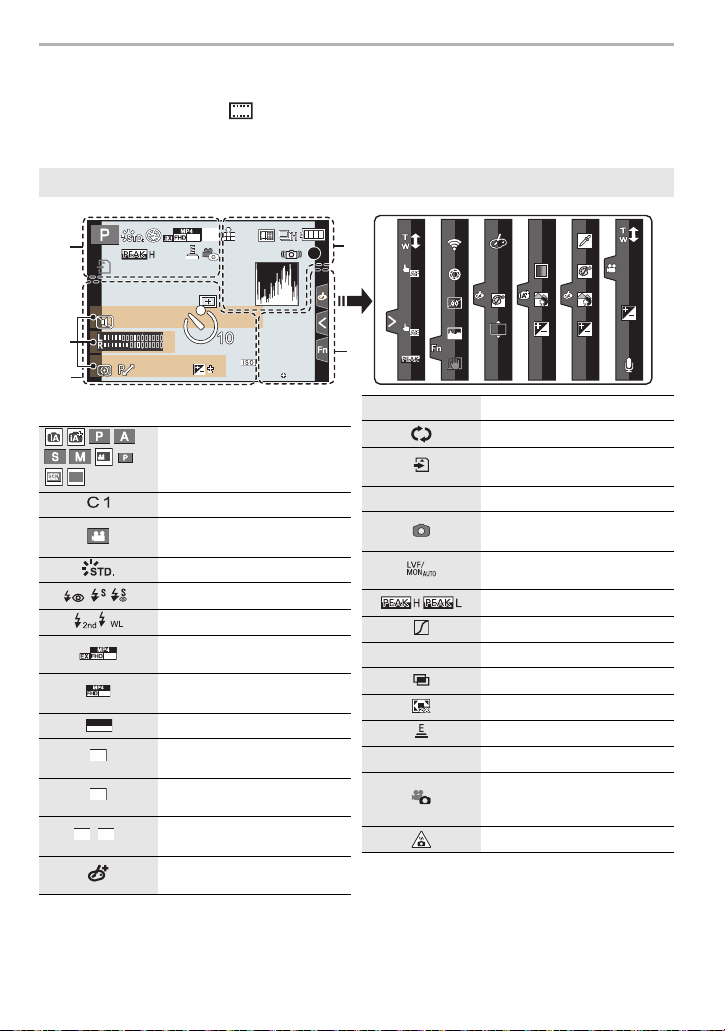
Others
76
DVQX1749 (ENG)
Monitor Display/Viewfinder Display
Display example: When [ ] (monitor style) is set and the monitor display is in use
• The information displayed, such as histograms, magnifications, and numeric values, are only
for the purpose of reference.
In recording
989898
2
0000
2
00
2
00
606060
F
3.53.5
F
3.5
AFSAFSAFS
BKTBKTBKT
L
4:3
00
BKTBKTBKT
AELAELAEL
BKTBKTBKT
AWBAWBAWB
ラュンラュン
BKTBKTBKT
60
p
Fn8Fn8Fn8Fn8
Fn5Fn5Fn5Fn5
Fn4Fn4Fn4Fn4
Fn6Fn6Fn6Fn6
Fn7Fn7Fn7Fn7
MINIMINIMINIMINI
ISOISO
SSSSSS
FF
1
Recording Mode (P27)
Custom settings
Motion picture recording mode
(P46)
Photo Style (P58)
‰Œ
Flash Mode
Flash
Extra Tele Conversion (when
recording motion pictures)
Recording format/Recording
quality (P47)
Snap Movie
Aspect Ratio (P56)/
Picture size (P57)
Extra Tele Conversion (when
taking still pictures)
Image size ([Panorama
Settings])
Image effect (filter) adjustment
display
P
C1
1
EXPSEXPS
WL
60
p
60
p
SNAP
4SEC
L
4:3
EXM
4:3
STD. WIDE
Image effect (filter) setting
Loop Recording
Card (displayed only during
recording)
Elapsed recording time
¢1
(P47)
Simultaneous recording
indicator
Automatic viewfinder/monitor
switching (P28)
Peaking
Highlight Shadow
HDR/iHDR
Multi exposure
Digital Zoom
Electronic shutter (P61)
High speed video (P49)
Picture-taking during motion
picture recording (Photo
Priority)
Overheat indicator
EXPS
8
m
30
s
ラュン
120fps
DC-G95PP-DVQX1749_eng.book 76 ページ 2019年3月29日 金曜日 午後1時31分
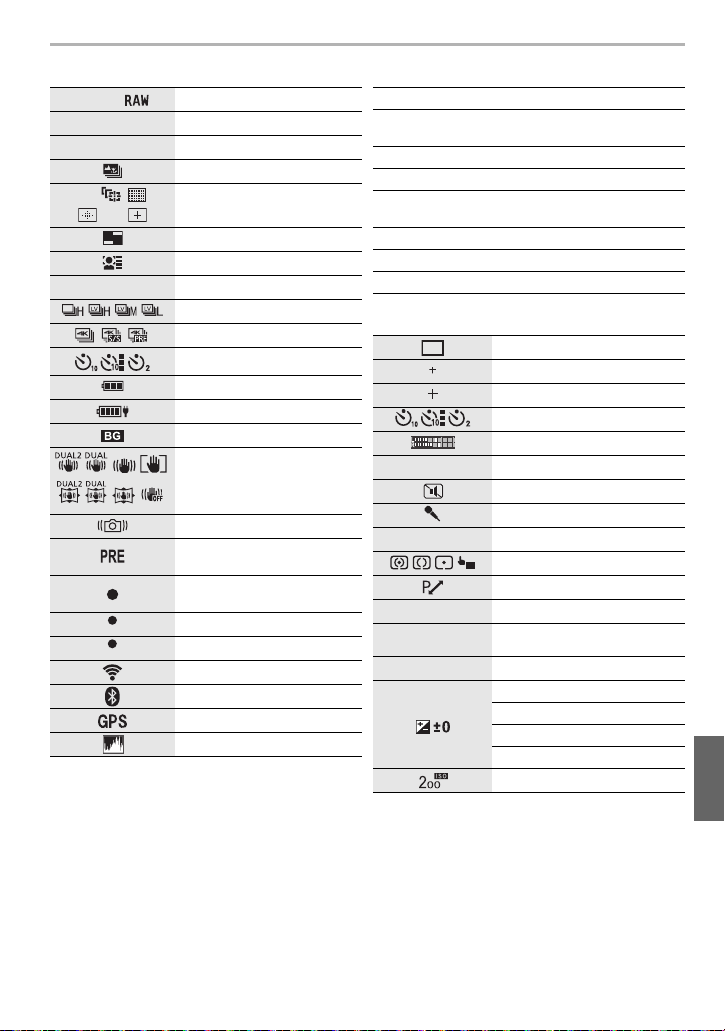
77
Others
(ENG) DVQX1749
2
A ›
Quality (P57)
Focus Mode (P32)
Focus Bracket (P42)
Post Focus (P38)
š
Ø
AF Mode
Pull Focus
Face Recognition
AF Lock
Burst
4K Photo (P34)
Self-timer
Battery indication
Power is being supplied (P20)
Battery Grip
Image Stabilizer (P44)
Jitter alert
4K Pre-Burst/Pre-Burst
Recording
Recording state (Lights red.)/
Focus (Lights green.) (P24)
Focus (Under low illumination)
Focus (Starlight AF)
Connected to Wi-Fi
Connected to Bluetooth
Location Logging
Histogram
AFS
AFF
AFC
MF
AFS
BKT
AFL
LOW
STAR
3
Name
¢2
Number of days that have passed since the
departure date
¢3
Age
¢2
Location
¢3
Current date and time/
Travel destination setting
¢3
: “
Exposure meter
Focal distance display
Step zoom
4
AF area
Spot metering target
Center marker display
Self-timer
Recording level display
Recording level Limiter (OFF)
Silent Mode (P60)
External Microphone
AE Lock
Metering Mode (P60)
Program Shift
F3.5
Aperture value (P24)
Aperture Bracket (P42)
60
Shutter speed (P24)
Exposure compensation value
Exposure Bracket (P42)
Brightness (P32)
Manual Exposure Assistance
ISO sensitivity
LM
T
OFF
A
E
L
AE
F3.5
BKT
BKT
DC-G95PP-DVQX1749_eng.book 77 ページ 2019年3月29日 金曜日 午後1時31分
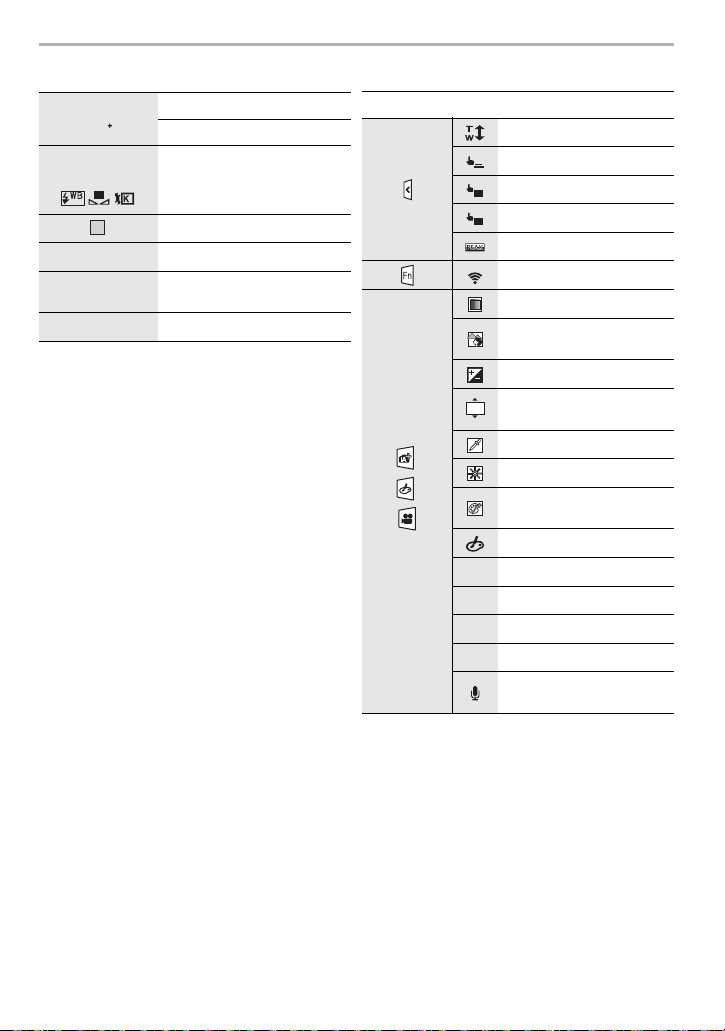
Others
78
DVQX1749 (ENG)
¢1 h: hour, m: minute, s: second
¢2 This is displayed for about 5 seconds when the camera is turned on if the [Profile Setup]
setting is set.
¢3 This is displayed for about 5 seconds when the camera is turned on, after setting the clock
and after switching from Playback Mode to Recording Mode.
5
White Balance Bracket (P43)
White Balance Adjustment
VÐîÑ
White Balance
Color (P32)
98
Number of recordable pictures
r20
Maximum number of pictures
that can be taken continuously
Available recording time
¢1
BKT
AWB
AWBc
AWBw
1
1
R 8
m
30
s
6
Touch tab
Touch zoom
Touch Shutter
Touch AF
Touch AE
Peaking
Fn button (P30)
/
/
(P49)
Color (P32)
Defocus control function
(P32)
Brightness (P32)
Type of defocus ([Miniature
Effect])
One point color
Position of the light source
Image effect (filter)
adjustment
Image effect ON/OFF
Image effect (filter)
Aperture value (P24)
Shutter speed (P24)
ISO sensitivity
Sound recording level
adjustment
AF
AE
Fn4
MINIMINI
F
SS
ISO
DC-G95PP-DVQX1749_eng.book 78 ページ 2019年3月29日 金曜日 午後1時31分
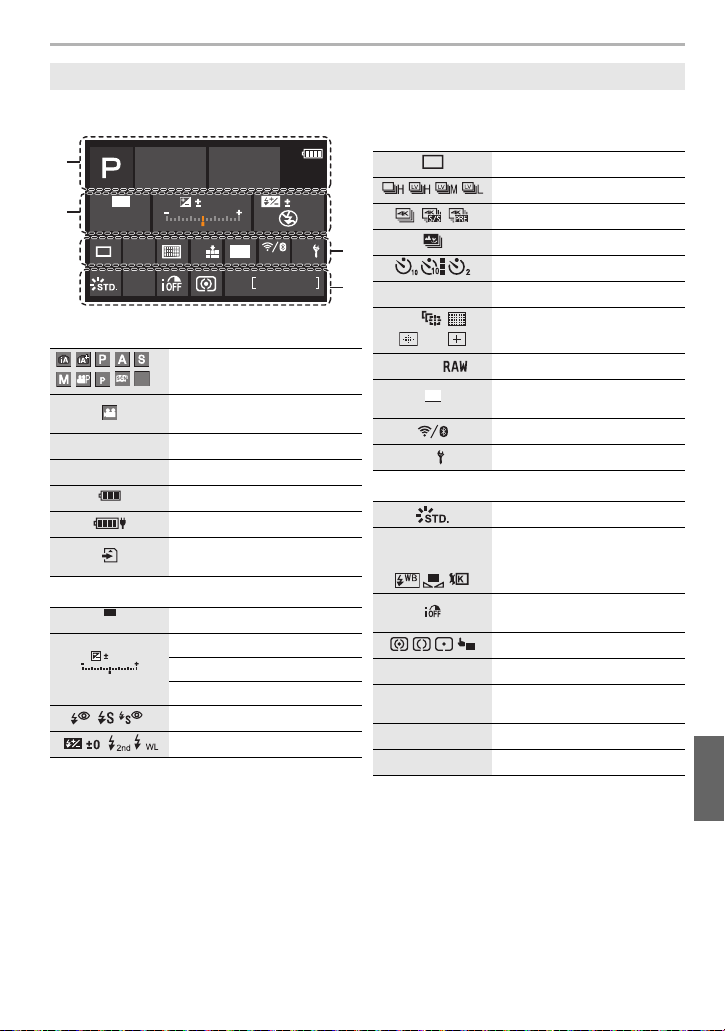
79
Others
(ENG) DVQX1749
On-monitor recording information
¢ h: hour, m: minute, s: second
In recording
1
Recording Mode (P27)
Motion picture recording mode
(P46)
F3.5
Aperture value (P24)
1/60
Shutter speed (P24)
Battery indication
Power is being supplied (P20)
Card (displayed only during
recording)
2
ISO sensitivity
Exposure compensation value
Brightness (P32)
Manual Exposure Assistance
‰Œ
Flash Mode
Flash
AWB
0 0
0
Fn
98
ISO
AUTO
OFF
L
4:3
AFSAFS
1/60 F3.5
C1
1
EXPS
EXPS
ISO
AUTO
0
0
WL
3
Single
Burst
4K Photo (P34)
Post Focus (P38)
Self-timer
Focus Mode (P32)
š
Ø
AF Mode
A ›
Quality (P57)
Aspect Ratio (P56)/
Picture size (P57)
Wi-Fi/Bluetooth (P65)
Fn button setting (P30)
4
Photo Style (P58)
VÐîÑ
White Balance
Intelligent Dynamic Range
Control
Metering Mode (P60)
98
Number of recordable pictures
r20
Maximum number of pictures
that can be taken continuously
Available recording time
¢
----
No card
AFS
AFF
AFC
MF
L
4:3
Fn
AWB
AWBc
AWBw
1
1
AE
R
8
m
30
s
DC-G95PP-DVQX1749_eng.book 79 ページ 2019年3月29日 金曜日 午後1時31分

Others
80
DVQX1749 (ENG)
Troubleshooting
First, try out the following procedures.
• Please also refer to the “Owner’s Manual for advanced features” (PDF format), which describes
more detailed information.
• The sound is caused by the In-Body Image Stabilizer. This is not a malfunction.
• Depending on the lens you attach, it may move inside and create a sound. This is not a
malfunction.
• Charging is being performed in a place with extremely high or low temperature.
– Reconnect the USB connection cable (supplied) and retry charging in a place where ambient
temperature is 10 °C to 30 °C (50 oF to 86 oF) (temperature conditions also apply to the
battery itself).
• Charging is not possible if the power supply capacity of the computer is low.
• The battery is drained. Charge the battery. (P17)
If the problem is not resolved, it may be improved by selecting [Reset] on the
[Setup] menu.
When I shake the camera, I hear a rattling sound.
When I shake the camera, I hear a rattling sound from the attached lens.
Recording stops before finishing.
Cannot record.
Cannot use some functions.
• In high ambient temperatures or if the camera is used for continuous recording, the
temperature of the camera will rise.
To protect the camera against a rise in temperature, after [ ] is displayed, recording will be
stopped, and the following functions will not be available for a time.
Wait until the camera cools down.
–[4K PHOTO]
– Post Focus
– Motion picture recording
– Power supply via the USB connection cable
The charging lamp blinks.
The camera does not operate even if it is turned on. The camera quickly turns off
after being turned on.
DC-G95PP-DVQX1749_eng.book 80 ページ 2019年3月29日 金曜日 午後1時31分

81
Others
(ENG) DVQX1749
• When [4K Pre-Burst] or [Pre-Burst Recording] is set, the battery drains faster.
Set these settings only when recording.
• When connected to Wi-Fi, the battery drains quickly.
Turn the camera off frequently such as by using [Economy].
• When drive mode is set to [ ] (Burst), pressing and holding the shutter button will take burst
pictures.
• When bracketing is set, then pressing the shutter button records multiple images while
automatically changing the settings.
• Confirm the following details:
– Is the subject outside of the focus range?
– Is [Shutter AF] set to [OFF]?
– Is [Focus/Release Priority] set to [RELEASE]?
– Is AF Lock set where it is not appropriate?
• If there are fingerprints or dirt on the lens, the focus may be set to the lens and not the subject.
• The shutter speed will become slower and the stabilizer function may not work properly when
recording in dark places.
In these cases, use a tripod and the self-timer when recording.
• This is characteristic of MOS sensors which serve as the camera’s
pickup sensors.
This is not a malfunction.
• When using the electronic shutter, lowering the shutter speed may
reduce the effect of the horizontal stripes.
• If flicker or horizontal stripes are noticeable when recording motion
picture, this can be mitigated by fixing the shutter speed.
Either set [Flkr Decrease], or record in Creative Video Mode.
The battery becomes flat too quickly.
Multiple images are recorded at once.
The subject is not focused properly.
The recorded image is blurred.
The stabilizer is not effective.
Striping or flicker may appear under lighting such as fluorescent lighting and
LED lighting fixture.
DC-G95PP-DVQX1749_eng.book 81 ページ 2019年3月29日 金曜日 午後1時31分

Others
82
DVQX1749 (ENG)
• When recording under fluorescent or LED lighting fixture, etc., increasing the shutter speed
may introduce slight changes to brightness or coloring.
These are a result of the characteristics of the light source and do not indicate a malfunction.
• When recording subjects in extremely bright locations or recording under fluorescent lighting,
LED lighting fixture, mercury lamp, sodium lighting, etc., the coloring or screen brightness may
change or horizontal striping may appear on the screen.
• When a moving subject is recorded while using the following functions, the subject may appear
distorted in the picture:
– [ESHTR]
– Motion picture recording
–[4K PHOTO]
This is a characteristic of the MOS sensor that is the image sensor of the camera, and is not a
malfunction.
• When using a large capacity card, you may not be able to record for a while after turning on the
camera.
• Recording motion picture using the SD card requires an SD card of a supported speed class.
Use a compatible SD card.
• This may occur when taking a picture by reducing the AF speed in order to adjust the focus at
high precision. This is not a malfunction.
• Open the flash if it is closed.
• The flash does not fire when [Œ] (forced flash off) is selected.
• The flash does not fire when using the following functions:
– Motion picture recording
–[4K PHOTO]
– Post Focus
– [ESHTR]
– [Silent Mode]
– [Filter Settings]
– [HDR]
The brightness or coloring of the recorded image is different from the actual
scene.
The subject appears distorted on the image.
Cannot record motion pictures.
Motion picture recording stops before finishing.
Sometimes focus adjustment with AF mode is difficult while recording 4K
motion pictures.
The flash does not fire.
DC-G95PP-DVQX1749_eng.book 82 ページ 2019年3月29日 金曜日 午後1時31分

83
Others
(ENG) DVQX1749
• If no operations are performed within the set time period, [Auto LVF/Monitor Off] is activated,
and the monitor/viewfinder turns off.
• When an object or your hand is positioned near the eye sensor, the monitor display may switch
to the viewfinder display.
• Folders and images processed on a PC cannot be played on the camera.
We recommend using the software “PHOTOfunSTUDIO” to write images from the PC to the
card.
• Set [Playback Mode] to [Normal Play].
General tips for using a Wi-Fi connection
• Use within the communication range of the device to be connected.
• Usage near devices that utilize the 2.4 GHz frequency such as microwave ovens and cordless
telephones may result in the radio wave being lost.
Use the camera at a sufficient distance from these devices.
• When the remaining battery level is low, it may not be possible to connect to or maintain
communication with other devices.
(A message such as [Communication error] is displayed.)
• If you place the camera on a metal table or shelf, the radio waves may be adversely affected. In
such cases, you may not be able to establish a connection.
Move the camera away from the metal surface.
Wireless access point
• Confirm that the connected wireless access point can be used.
• Confirm the radio wave conditions of the wireless access point.
– Move the camera closer to the wireless access point.
– Change the location and angle of the wireless access point.
• Depending on the wireless access point, the radio wave may not be displayed even though it is
present.
– Turn off and then on the wireless access point.
– If the wireless channel of the wireless access point cannot be set automatically, manually set
the channel supported by the camera.
– If the wireless access point SSID is set not to broadcast, it may not be detected.
Enter the SSID, and then connect.
The monitor/viewfinder turns off when the camera is turned on.
Cannot play back.
There are no recorded pictures.
A Wi-Fi connection cannot be established.
Radio waves get disconnected.
Wireless access point is not displayed.
DC-G95PP-DVQX1749_eng.book 83 ページ 2019年3月29日 金曜日 午後1時31分

Others
84
DVQX1749 (ENG)
• Depending on the version of the OS, there are two types of user account (local account/
Microsoft account). Ensure you use the local account user name and password.
• At the time of purchase, this camera is set to use a workgroup name of “WORKGROUP”.
If you have changed the workgroup name of the PC, this will not be recognized.
In the [Wi-Fi Setup] menu, [PC Connection], change the workgroup name of the PC to which to
connect.
• Check that the login name and password are correctly typed.
• When the clock settings of the PC connected to the camera differs considerably from those of
the camera, the camera cannot be connected to the PC depending on the OS.
– Confirm that the [Clock Set]/[World Time] settings of the camera match the time, date, and
time zone settings of the Windows or Mac.
If there are considerable differences, correct them.
• Is the size of the image too large?
– Reduce the image size at [Size], and then send.
– Transmit after dividing the motion picture with [Video Divide].
• It may take longer time to transmit when distance to the wireless access point is far.
Transmit closer to the wireless access point.
• File format of the motion picture that can be sent differs depending on the destination.
• The lens movement and aperture operation emit sound when turning the camera on or off; this
is not a malfunction.
• This is the sound of aperture operation when brightness changes; this is not a malfunction.
• During use, the camera may get warm, but this does not affect performance or quality.
• When the camera is left for a long time, the clock may reset.
Reset the clock. (P22)
When trying to connect to a PC by Wi-Fi, this does not recognize the user name
and password, and connection is not possible.
The PC is not recognized when I use a Wi-Fi connection.
The camera cannot be connected to the PC using the Wi-Fi function.
It takes time to transmit an image to the web service.
Transmission of the image fails midway.
Some images cannot be transmitted.
There is a sound from the lens unit.
The camera becomes warm.
The clock is wrong.
DC-G95PP-DVQX1749_eng.book 84 ページ 2019年3月29日 金曜日 午後1時31分
85
Others
(ENG) DVQX1749
Specifications
Specifications are subject to change without notice.
Digital Camera Body (DC-G95):
Information for your safety
Power Source: 8.4 V
Power Consumption: 3.1 W (When recording with Monitor)
(When the Interchangeable lens (H-FS12060) is used)
2.3 W (When playing back with Monitor)
(When the Interchangeable lens (H-FS12060) is used)
Type
Type Digital Single Lens Mirrorless camera
Recording media SD Memory Card / SDHC Memory Card
¢
/ SDXC Memory Card
¢
¢ UHS-I/UHS-II UHS Speed Class 3
Lens mount Micro Four Thirds mount
Image sensor
Image sensor 4/3q Live MOS sensor, total pixel number 21,770,000 pixels,
Primary color filter
Camera effective
pixels
20,300,000 pixels
DC-G95PP-DVQX1749_eng.book 85 ページ 2019年3月29日 金曜日 午後1時31分

Others
86
DVQX1749 (ENG)
Recording format for still images
File format for still
images
JPEG (based on “Design rule for Camera File system”, based on
“Exif 2.31” standard) / RAW
File format for 4K
photos
MP4 (H.264/MPEG-4 AVC, AAC (2 ch))
Picture size
(pixels)
When the aspect ratio setting is [4:3]
3328k2496 pixels (4K photo), 5184k3888 pixels ([L]),
3712k2784 pixels ([M]), 2624k1968 pixels ([S])
When the aspect ratio setting is [3:2]
3504k2336 pixels (4K photo), 5184k3456 pixels ([L]),
3712k2480 pixels ([M]), 2624k1752 pixels ([S])
When the aspect ratio setting is [16:9]
3840k2160 pixels (4K photo), 5184k2920 pixels ([L]),
3840k2160 pixels ([M]), 1920k1080 pixels ([S])
When the aspect ratio setting is [1:1]
2880k2880 pixels (4K photo), 3888k3888 pixels ([L]),
2784k2784 pixels ([M]), 1968k1968 pixels ([S])
Image quality for
pictures
Fine / Standard / RAWiFine / RAWiStandard / RAW
Recording format for motion picture
Video format AVCHD Progressive / AVCHD / MP4
Audio format AVCHD Dolby Audio
TM
(2 ch)
MP4 AAC (2 ch)
Image quality for
motion pictures
[Rec Format]: [AVCHD], [MP4]
Refer to P47 of this document for details.
Refer to P49 of this document for details about High Speed Video.
Viewfinder / Monitor
Viewfinder OLED Live Viewfinder (4:3) (Approx. 2,360,000 dots)
(field of view ratio about 100%)
(Magnification approx. 1.48k, approx. 0.74k (35 mm film camera
equivalent), with 50 mm lens at infinity; j1.0 m
j1
)
(with diopter adjustment j4 to i4 diopter)
Monitor 3.0q TFT LCD (3:2) (Approx. 1,240,000 dots)
(field of view ratio about 100%)
Touch screen
DC-G95PP-DVQX1749_eng.book 86 ページ 2019年3月29日 金曜日 午後1時31分
87
Others
(ENG) DVQX1749
Focus
Auto focus type TTL type based on image detection (Contrast AF)
Focus mode AFS / AFF / AFC / MF
AF mode Face/Eye Detection / Tracking / 49-area-focusing / Custom Multi /
1-area-focusing / Pinpoint
(Focus area selection is possible by touching)
Exposure control
Light metering
system,
Light metering mode
1728-zone multi-pattern sensing system, Multiple / Center
weighted / Spot
Metering range EV 0 to EV 18
Exposure Program AE / Aperture-priority AE / Shutter-priority AE / Manual
exposure
Exposure
compensation
1/3 EV Step, d5EV
ISO sensitivity
(standard output
sensitivity)
1 EV step (1/3 EV step change possible),
AUTO / / 200 to 25600
¢
¢ When [Extended ISO] is set: 100 to 25600
Image stabilizer
Image stabilizer type Compliant with Image sensor shift type, 5-axis stabilizer, Dual I.S.2
Image stabilizer effect 5.0 stops
Based on the CIPA standard (Yaw/Pitch direction: focal length
f=60 mm)
(35 mm conversion: f=120 mm)
(When using the interchangeable lens (H-FS12060))
White balance
White balance mode AWB / AWBc / AWBw / Daylight / Cloudy / Shade / Incandescent
lights / Flash / White set 1, 2, 3, 4 / Color temperature 1, 2, 3, 4
Shutter
Shutter type Focal-plane shutter
Shutter speed Still picture:
B (Bulb) (Max. approx. 30 minutes), 60 seconds to 1/4000 of a
second (Mechanical shutter),
B (Bulb) (Max. approx. 30 minutes), 60 seconds to 1/2000 of a
second (Electronic Front Curtain),
1 second to 1/16000 of a second (Electronic shutter)
Motion picture:
1/25 of a second to 1/16000 of a second
DC-G95PP-DVQX1749_eng.book 87 ページ 2019年3月29日 金曜日 午後1時31分

Others
88
DVQX1749 (ENG)
Burst recording
Mechanical shutter/
Electronic front
curtain/
Electronic shutter
9 pictures/second (High speed, AFS/MF),
6 pictures/second (High speed, AFF/AFC),
6 pictures/second (Middle speed),
2 pictures/second (Low speed)
Number of burst
picture frames
With RAW file: 30 frames or more
Without RAW file: 600 frames or more
When recording is performed under the test conditions specified
by Panasonic
Minimum illumination
Approx. 9 lx (when i-Low light is used, the shutter speed is 1/30 of a second)
(When the Interchangeable lens (H-FS12060) is used)
Flash
Flash Built-in pop up flash
GN 9.0 equivalent (ISO200·m)
(GN 6.4 equivalent (ISO100·m))
Flash mode AUTO / AUTO/Red-Eye Reduction /
Forced ON / Forced ON/Red-Eye Reduction /
Slow Sync. / Slow Sync./Red-Eye Reduction /
Forced OFF
Flash synchronization
speed
Equal to or smaller than 1/200 of a second
Flash range Approx. 0.5 m (1.6 feet) to 7.3 m (24 feet)
(When the Interchangeable lens (H-FS12060) is mounted, WIDE,
[ISO AUTO] is set)
DC-G95PP-DVQX1749_eng.book 88 ページ 2019年3月29日 金曜日 午後1時31分
89
Others
(ENG) DVQX1749
Zoom
Digital zoom 2k / 4k
Extra tele conversion When taking still pictures:
Max. 2k
When recording motion pictures:
2.7k (FHD) / 4.0k (HD)
Microphone / Speaker
Microphone Stereo
Speaker Monaural
Language select
[ENGLISH]/[DEUTSCH]/[FRANÇAIS]/[ESPAÑOL]/[PORTUGUÊS]/[ITALIANO]/[
繁體中文]/
[¢]
Interface
USB USB 2.0 (High Speed) Micro-B
HDMI micro HDMI Type D
[REMOTE] ‰ 2.5 mm jack
[MIC] ‰ 3.5 mm jack
Headphones ‰ 3.5 mm jack
Splash Resistant
Yes
Dimensions / Mass
Dimensions Approx. 130.4 mm (W)k93.5 mm (H)k77.4 mm (D)
(5.14q (W)k3.69q (H)k3.05q (D))
(excluding the projecting parts)
Mass (Weight) Approx. 536 g/1.19 lb
(with one card and the battery)
Approx. 484 g/1.07 lb (camera body)
DC-G95PP-DVQX1749_eng.book 89 ページ 2019年3月29日 金曜日 午後1時31分
Others
90
DVQX1749 (ENG)
Battery Charger (Panasonic DMW-BTC12):
Information for your safety
AC Adaptor (Panasonic VSK0815F):
Information for your safety
Battery Pack (lithium-ion) (Panasonic DMW-BLC12PP):
Information for your safety
The symbols on this product (including the accessories) represent the following:
Operating environment
Recommended
operating temperature
0 oC to 40 oC (32 oF to 104 oF)
Permissible relative
humidity
10%RH to 80%RH
Wi-Fi
Compliance standard IEEE 802.11b/g/n (standard wireless LAN protocol)
Frequency range used
(central frequency)
2412 MHz to 2462 MHz (1 to 11 ch)
Encryption method Wi-Fi compliant WPA
TM
/WPA2
TM
Access method Infrastructure mode
Bluetooth
Compliance standard Bluetooth v4.2 (Bluetooth Low Energy (BLE))
Frequency range used
(central frequency)
2402 MHz to 2480 MHz
Input: 5.0 V 1.8 A
Output: 8.4 V 0.75 A
Input: 110– 240 V 50/60 Hz 0.25 A
Output: 5.0 V 1.8 A
Voltage/capacity: 7.2V/1200mAh
AC
DC
Class II equipment (The construction of the product is double-insulated.)
DC-G95PP-DVQX1749_eng.book 90 ページ 2019年3月29日 金曜日 午後1時31分

91
Others
(ENG) DVQX1749
Interchangeable Lens
for digital camera
H-FS12060
“LUMIX G VARIO 12–60 mm/F3.5–5.6 ASPH./POWER O.I.S.”
Mount Micro Four Thirds mount
Focal length f=12 mm to 60 mm
(35 mm film camera equivalent: 24 mm to 120 mm)
Lens construction 11 elements in 9 groups (3 aspherical lenses, 1 ED lens)
Aperture type 7 diaphragm blades/circular aperture diaphragm
Maximum aperture F3.5 (Wide) to F5.6 (Tele)
Minimum aperture value F22
Angle of view 84x (Wide) to 20x (Tele)
In focus distance Wide: 0.20 m (0.66 feet) to ¶ / Tele: 0.25 m (0.82 feet) to ¶ (from
the focus distance reference line)
Maximum image
magnification
0.27k (35 mm film camera equivalent: 0.54k)
Optical image stabilizer Yes
Filter diameter 58 mm
Maximum diameter Ø66 mm (2.6q)
Overall length Approx. 71 mm (2.8q)
(from the tip of the lens to the base side of the lens mount)
Mass (Weight) Approx. 210 g/0.46 lb
Dust and splash
resistant
Yes
Recommended
operating temperature
0 oC to 40 oC (32 oF to 104 oF)
Permissible relative
humidity
10%RH to 80%RH
DC-G95PP-DVQX1749_eng.book 91 ページ 2019年3月29日 金曜日 午後1時31分

Others
92
DVQX1749 (ENG)
Digital Camera Accessory System
¢1 Supplied with an AC adaptor and a USB connection cable.
¢2 The AC Adaptor (optional) can only be used with the designated Panasonic DC Coupler
(optional). The AC adaptor (optional) cannot be used by itself.
¢3 Supplied with a battery pack (DMW-BLC12).
¢4 Use if the attached lens is in contact with the tripod pedestal.
Product numbers correct as of April 2019. These may be subject to change.
• Some optional accessories may not be available in some countries.
• NOTE: Accessories and/or model numbers may vary between countries. Consult your local
dealer.
• For lens-related optional accessories such as compatible lenses and filters, refer to catalogs/
Web pages, etc.
(For U.S.A. only)
• To order optional accessories please visit http://shop.panasonic.com or your local Photo
Specialty Dealer.
Description Accessory#
Battery Pack DMW-BLC12
Battery Charger
¢1
DMW-BTC12
AC Adaptor
¢2
DMW-AC10
DC Coupler
¢2
DMW-DCC8
LED Video Light VW-LED1
Flash DMW-FL580L, DMW-FL360L, DMW-FL200L
Stereo Shotgun Microphone DMW-MS2
Stereo Microphone VW-VMS10
Shutter Remote Control DMW-RS2
Battery Grip
¢3
DMW-BGG1
Body Cap DMW-BDC1
Tripod Adaptor
¢4
DMW-TA1
Mount Adaptor DMW-MA1, DMW-MA2M, DMW-MA3R
DC-G95PP-DVQX1749_eng.book 92 ページ 2019年3月29日 金曜日 午後1時31分
93
Others
(ENG) DVQX1749
Reading the Owner’s Manual (PDF format)
More detailed owner’s manual is available in “Owner’s Manual for
advanced features” (PDF format). To read it, download it from the
website.
https://panasonic.jp/support/dsc/oi/index.html?model=DC-
G95&dest=P
• Click the desired language.
∫ To check the URL and QR code on the camera
• You will need Adobe Reader to browse or print the “Owner’s Manual for advanced features”
(PDF format).
You can download and install a version of Adobe Reader that you can use with your OS from
the following website. (As of April 2019)
http://www.adobe.com/products/acrobat/readstep2.html
This product incorporates the following software:
(1) the software developed independently by or for Panasonic Corporation,
(2) the software owned by third party and licensed to Panasonic Corporation,
(3) the software licensed under the GNU General Public License, Version 2.0 (GPL V2.0),
(4) the software licensed under the GNU LESSER General Public License, Version 2.1 (LGPL
V2.1), and/or
(5) open source software other than the software licensed under the GPL V2.0 and/or LGPL
V2.1.
The software categorized as (3) - (5) are distributed in the hope that it will be useful, but
WITHOUT ANY WARRANTY, without even the implied warranty of MERCHANTABILITY or
FITNESS FOR A PARTICULAR PURPOSE. Please refer to the detailed terms and conditions
thereof displayed by selecting [MENU/SET] > [Setup] > [Version Disp.] > [Software info].
At least three (3) years from delivery of this product, Panasonic will give to any third party who
contacts us at the contact information provided below, for a charge no more than our cost of
physically performing source code distribution, a complete machine-readable copy of the
corresponding source code covered under GPL V2.0 or LGPL V2.1, as well as the respective
copyright notice thereof.
Contact Information: oss-cd-r[email protected]anasonic.com
The source code and the copyright notice are also available for free in our website below.
https://panasonic.net/cns/oss/index.html
> [Setup] > [Online Manual]
[URL display] Displays the URL of the website on the camera’s monitor.
[QR Code display] Displays the QR code on the camera’s monitor.
MENU
DC-G95PP-DVQX1749_eng.book 93 ページ 2019年3月29日 金曜日 午後1時31分

94
Others
DVQX1749 (ENG)
Limited Warranty (ONLY FOR U.S.A.)
Panasonic Products Limited Warranty
Limited Warranty Coverage (For USA Only)
If your product does not work properly because of a defect in materials or workmanship,
Panasonic Corporation of North America (referred to as “the warrantor”) will, for the length
of the period indicated on the chart below, which starts with the date of original purchase
(“warranty period”), at its option either (a) repair your product with new or refurbished
parts, (b) replace it with a new or a refurbished equivalent value product, or (c) refund your
purchase price. The decision to repair, replace or refund will be made by the warrantor.
During the “Labor” warranty period there will be no charge for labor. During the “Parts”
warranty period, there will be no charge for parts. This Limited Warranty excludes both
parts and labor for non-rechargeable batteries, antennas, and cosmetic parts (cabinet).
This warranty only applies to products purchased and serviced in the United States. This
warranty is extended only to the original purchaser of a new product which was not sold
“as is”.
Mail-In Service--Online Repair Request
Online Repair Request
To submit a new repair request and for quick repair status visit our Web Site at
http://shop.panasonic.com/support
.
When shipping the unit, carefully pack, include all supplied accessories listed in the
Owner’s Manual, and send it prepaid, adequately insured and packed well in a carton box.
When shipping Lithium Ion batteries please visit our Web Site at
http://shop.panasonic.com/support
as Panasonic is committed to providing the most up to
date information. Include a letter detailing the complaint, a return address and provide a
daytime phone number where you can be reached. A valid registered receipt is required
under the Limited Warranty.
Product or Part Name Parts Labor
Digital Camera 1 Year 1 Year
All included Accessories
(Except Non-Rechargeable Batteries)
90 Days Not Applicable
Only Non-Rechargeable Batteries 10 Days Not Applicable
DC-G95PP-DVQX1749_eng.book 94 ページ 2019年3月29日 金曜日 午後1時31分

95
Others
(ENG) DVQX1749
IF REPAIR IS NEEDED DURING THE WARRANTY PERIOD, THE PURCHASER WILL
BE REQUIRED TO FURNISH A SALES RECEIPT/PROOF OF PURCHASE
INDICATING DATE OF PURCHASE, AMOUNT PAID AND PLACE OF PURCHASE.
CUSTOMER WILL BE CHARGED FOR THE REPAIR OF ANY UNIT RECEIVED
WITHOUT SUCH PROOF OF PURCHASE.
Limited Warranty Limits and Exclusions
This warranty ONLY COVERS failures due to defects in materials or workmanship, and
DOES NOT COVER normal wear and tear or cosmetic damage. The warranty ALSO
DOES NOT COVER damages which occurred in shipment, or failures which are caused
by products not supplied by the warrantor, or failures which result from accidents, misuse,
abuse, neglect, mishandling, misapplication, alteration, faulty installation, set-up
adjustments, misadjustment of consumer controls, improper maintenance, power line
surge, lightning damage, modification, introduction of sand, humidity or liquids,
commercial use such as hotel, office, restaurant, or other business or rental use of the
product, or service by anyone other than a Factory Service Center or other Authorized
Servicer, or damage that is attributable to acts of God.
THERE ARE NO EXPRESS WARRANTIES EXCEPT AS LISTED UNDER “LIMITED
WARRANTY COVERAGE”.
THE WARRANTOR IS NOT LIABLE FOR INCIDENTAL OR CONSEQUENTIAL
DAMAGES RESULTING FROM THE USE OF THIS PRODUCT, OR ARISING OUT OF
ANY BREACH OF THIS WARRANTY.
(As examples, this excludes damages for lost time, travel to and from the servicer, loss of
or damage to media or images, data or other memory or recorded content. The items
listed are not exclusive, but for illustration only.)
ALL EXPRESS AND IMPLIED WARRANTIES, INCLUDING THE WARRANTY OF
MERCHANTABILITY, ARE LIMITED TO THE PERIOD OF THE LIMITED WARRANTY.
Some states do not allow the exclusion or limitation of incidental or consequential
damages, or limitations on how long an implied warranty lasts, so the exclusions may not
apply to you.
This warranty gives you specific legal rights and you may also have other rights which vary
from state to state. If a problem with this product develops during or after the warranty
period, you may contact your dealer or Service Center. If the problem is not handled to
your satisfaction, then write to:
Consumer Affairs Department
Panasonic Corporation of North America
661 Independence Pkwy
Chesapeake, VA 23320
DC-G95PP-DVQX1749_eng.book 95 ページ 2019年3月29日 金曜日 午後1時31分

96
Others
DVQX1749 (ENG)
PARTS AND SERVICE, WHICH ARE NOT COVERED BY THIS LIMITED WARRANTY,
ARE YOUR RESPONSIBILITY.
As of July 2015
DC-G95PP-DVQX1749_eng.book 96 ページ 2019年3月29日 金曜日 午後1時31分

97
Others
(ENG) DVQX1749
Limited Warranty (ONLY FOR CANADA)
Panasonic Canada Inc.
5770 Ambler Drive, Mississauga, Ontario L4W 2T3
PANASONIC PRODUCT – LIMITED WARRANTY
Panasonic Canada Inc. warrants this product to be free from defects in material and
workmanship under normal use and for a period as stated below from the date of original
purchase agrees to, at its option either (a) repair your product with new or refurbished
parts, (b) replace it with a new or a refurbished equivalent value product, or (c) refund your
purchase price. The decision to repair, replace or refund will be made by Panasonic
Canada Inc.
This warranty is given only to the original purchaser, or the person for whom it was
purchased as a gift, of a Panasonic brand product mentioned above sold by an authorized
Panasonic dealer in Canada and purchased and used in Canada, which product was not
sold “as is”, and which product was delivered to you in new condition in the original
packaging.
IN ORDER TO BE ELIGIBLE TO RECEIVE WARRANTY SERVICE HEREUNDER, A
PURCHASE RECEIPT OR OTHER PROOF OF DATE OF ORIGINAL PURCHASE,
SHOWING AMOUNT PAID AND PLACE OF PURCHASE
IS REQUIRED
Digital Camera One (1) year, parts and labour
Digital Camera Peripherals One (1) year, parts and labour
Digital Camera Accessories Ninety (90) days, parts and labour
DC-G95PP-DVQX1749_eng.book 97 ページ 2019年3月29日 金曜日 午後1時31分

98
Others
DVQX1749 (ENG)
LIMITATIONS AND EXCLUSIONS
This warranty ONLY COVERS failures due to defects in materials or workmanship, and
DOES NOT COVER normal wear and tear or cosmetic damage. The warranty ALSO
DOES NOT COVER damages which occurred in shipment, or failures which are caused
by products not supplied by Panasonic Canada Inc., or failures which result from
accidents, misuse, abuse, neglect, mishandling, misapplication, alteration, faulty
installation, set-up adjustments, misadjustment of consumer controls, improper
maintenance, improper batteries, power line surge, lightning damage, modification,
introduction of sand, humidity or liquids, commercial use such as hotel, office, restaurant,
or other business or rental use of the product, or service by anyone other than a
Authorized Servicer, or damage that is attributable to acts of God.
Dry cell batteries, printer ink cartridge and paper are also excluded from coverage under
this warranty.
Rechargeable batteries are warranted for ninety (90) days from date of original purchase.
THIS EXPRESS, LIMITED WARRANTY IS IN LIEU OF ALL OTHER WARRANTIES,
EXPRESS OR IMPLIED, INCLUDING ANY IMPLIED WARRANTIES OF
MERCHANTABILITY AND FITNESS FOR A PARTICULAR PURPOSE. IN NO EVENT
WILL PANASONIC CANADA INC. BE LIABLE FOR ANY SPECIAL, INDIRECT OR
CONSEQUENTIAL DAMAGES RESULTING FROM THE USE OF THIS PRODUCT OR
ARISING OUT OF ANY BREACH OF ANY EXPRESS OR IMPLIED WARRANTY. (As
examples, this warranty excludes damages for lost time, travel to and from the Authorized
Servicer, loss of or damage to media or images, data or other memory or recorded
content. This list of items is not exhaustive, but for illustration only.)
In certain instances, some jurisdictions do not allow the exclusion or limitation of incidental
or consequential damages, or the exclusion of implied warranties, so the above limitations
and exclusions may not be applicable. This warranty gives you specific legal rights and
you may have other rights which vary depending on your province or territory.
WARRANTY SERVICE
For product operation, repairs and information assistance, please visit our Support
page:
www.panasonic.ca/english/support
DC-G95PP-DVQX1749_eng.book 98 ページ 2019年3月29日 金曜日 午後1時31分
99
Others
(ENG) DVQX1749
• Micro Four Thirds™ and Micro Four Thirds Logo marks
are trademarks or registered trademarks of Olympus
Corporation, in Japan, the United States, the European
Union and other countries.
• Four Thirds™ and Four Thirds Logo marks are
trademarks or registered trademarks of Olympus
Corporation, in Japan, the United States, the European
Union and other countries.
• SDXC Logo is a trademark of SD-3C, LLC.
• The terms HDMI and HDMI High-Definition Multimedia
Interface, and the HDMI Logo are trademarks or
registered trademarks of HDMI Licensing Administrator,
Inc. in the United States and other countries.
• “AVCHD”, “AVCHD Progressive” and the
“AVCHD Progressive” logo are trademarks of
Panasonic Corporation and Sony Corporation.
• Dolby, Dolby Audio, and the double-D symbol are
trademarks of Dolby Laboratories.
• HDAVI Control™ is a trademark of Panasonic
Corporation.
• Adobe is a trademark or registered trademark of Adobe Systems Incorporated in the United
States and/or other countries.
• Pentium is a trademark of Intel Corporation in the U.S. and/or other countries.
• Windows is a registered trademark or trademark of Microsoft Corporation in the United States
and/or other countries.
• iMovie, Mac, OS X and macOS are trademarks of Apple Inc., registered in the U.S. and other
countries.
• iPad, iPhone, iPod, and iPod touch are trademarks of Apple Inc., registered in the U.S. and
other countries.
• App Store is a service mark of Apple Inc.
• Google, Android and Google Play are trademarks of Google LLC.
• The Bluetooth
®
word mark and logos are registered trademarks owned by Bluetooth SIG, Inc.
and any use of such marks by Panasonic Corporation is under license. Other trademarks and
trade names are those of their respective owners.
DC-G95PP-DVQX1749_eng.book 99 ページ 2019年3月29日 金曜日 午後1時31分

• The Wi-Fi CERTIFIED™ Logo is a certification mark of Wi-Fi
Alliance
®
.
• The Wi-Fi Protected Setup™ Logo is a certification mark of
Wi-Fi Alliance
®
.
•“Wi-Fi
®
” is a registered trademarks of Wi-Fi Alliance
®
.
• “Wi-Fi Protected Setup™”, “WPA™”, and “WPA2™” are
trademarks of Wi-Fi Alliance
®
.
• DLNA, the DLNA Logo and DLNA CERTIFIED are
trademarks, service marks, or certification marks of the Digital
Living Network Alliance.
• This product uses “DynaFont” from DynaComware Corporation. DynaFont is a registered
trademark of DynaComware Taiwan Inc.
• QR Code is a registered trademark of DENSO WAVE INCORPORATED.
• Other names of systems and products mentioned in these instructions are usually the
registered trademarks or trademarks of the manufacturers who developed the system or
product concerned.
This product is licensed under the AVC Patent Portfolio License for the personal use of a
consumer or other uses in which it does not receive remuneration to (i) encode video in
compliance with the AVC Standard (“AVC Video”) and/or (ii) decode AVC Video that was
encoded by a consumer engaged in a personal activity and/or was obtained from a video
provider licensed to provide AVC Video. No license is granted or shall be implied for any other
use. Additional information may be obtained from MPEG LA, L.L.C.
See http://www.mpegla.com
Printed in China
Two Riverfront Plaza, Newark, NJ 07102-5490
Panasonic Corporation of North America
Panasonic Canada Inc.
5770 Ambler Drive, Mississauga, Ontario L4W 2T3
Panasonic Corporation 2019
www.panasonic.com
http://shop.panasonic.com
DC-G95PP-DVQX1749_eng.book 100 ページ 2019年3月29日 金曜日 午後1時31分