
BREADMAKER
User Manual
Mod.-Nr.: 304971/20200901FS002

2
Table of contents
1. Deutsch................................................................................................................ 3
2. English ............................................................................................................... 31
3. Italiano ............................................................................................................... 59
4. Français.............................................................................................................. 87
5. Español ............................................................................................................ 115

3Deutsch
WICHTIGE SICHERHEITSHINWEISE FÜR DIESES
GERÄT
• Stellen Sie vor dem Anschluss des Gerätes sicher,
dass die Netzspannung mit der Angabe des Typen-
!
• Dieses Gerät darf nicht mit einem beschädigten oder
defekten Kabel oder Stecker in Betrieb genommen
werden!
• Das Produkt darf, nachdem es heruntergefallen
oder beschädigt worden ist, nicht mehr in Betrieb
genommen werden!
•
• Tauchen Sie keinesfalls das Gerät, den Stecker oder
das Kabel in Wasser oder andere Flüssigkeiten ein!
• Schalten Sie das Gerät nach der Nutzung aus. Ziehen
Sie vorher den Netzstecker, wenn Sie das Gerät rei-
nigen oder die Backform entnehmen möchten.
• Lassen Sie das Kabel und den Stecker nicht über eine
• -
-
gefahr!
• Überwachen Sie das Produkt zu jeder Zeit, sofern
sich Kinder oder gebrechliche Personen in der Nähe

4 Deutsch
• Stellen Sie den Brotbackautomat nicht in der Nähe
von anderen heißen Geräten wie z.B. einem Gas-,
Elektro- oder Backofen auf.
• Bewegen Sie das Produkt keinesfalls, wenn es mit
heißer Flüssigkeit wie z.B. Marmelade gefüllt ist!
• Berühren Sie keine bewegenden oder drehenden
Teile des Gerätes, wenn es eingeschaltet ist!
• Schalten Sie den Brotbackautomat nicht ein, wenn
der Backaufsatz nicht ordnungsgemäß mit Zutaten
gefüllt wurde.
• Nehmen Sie die Backform während des Betriebes
auf keinen Fall heraus!
• Zum Herausnehmen des Brotes sollte die Backform
unter keinen Umständen auf eine Kante oder Ar-
-
nem Defekt der Backform führen!
• Decken Sie das Gerät während des Betriebes nicht
ab! Hitze und Dämpfe müssen entweichen können.
Es kann ein Brand entstehen, sofern es mit brennba-
ren Material abgedeckt wird.
• Es dürfen keine Metallfolien oder andere Materia-
lien in den Backautomaten eingesetzt werden, da
dies die Gefahr eines Brandes oder Kurzschlusses
erhöht!

5Deutsch
• Um den Brotbackautomaten vollständig vom Strom-
netz zu trennen, ziehen Sie den Netzstecker aus der
Steckdose!
• Benutzen Sie das Gerät nur für vorgesehene und in
-
dungen!
• Gebrauchen Sie es nicht im Freien!
• Das Gerät darf von Kindern ab 8 Jahren und von Per-
sonen mit verringerten physischen, sensorischen
oder mentalen Fähigkeiten oder Mangel an Erfah-
rung und/oder Wissen benutzt werden, wenn sie
Gebrauchs des Gerätes unterwiesen wurden und
-
ben. Das Gerät ist kein Spielzeug. Das Säubern und
die Wartung des Gerätes dürfen von Kindern nicht
ohne Aufsicht durchgeführt werden!
•
nicht mit dem Gerät spielen!
• Wenn das Netzkabel beschädigt ist, muss es durch
den Hersteller, seinen Kundendienst oder eine ähn-
• Dieses Gerät darf nicht mit einem externen Zeitge-
ber oder mit einem getrennten Fernsteuersystem
betrieben werden!

6 Deutsch
• Beachten Sie, dass Sie die maximalen Mengenan-
gaben - so wie in diesem Handbuch angegeben -
nicht überschreiten!
•
besteht die Gefahr eines elektrischen Schlags!
•
Gebrauch und nicht für den gewerblichen Einsatz
geeignet.
ACHTUNG: Dieses Gerät wird während des Be-
triebs sehr heiß! Es besteht Verbrennungsge-
fahr!
haben. Damit Sie auch lange Freude mit Ihrem erworbenen Gerät
-
leitung aufmerksam durch. Prüfen Sie vor Inbetriebnahme der ge-
lieferten Ware, ob diese vollständig, fehlerfrei und unbeschädigt ist.
1. Lieferumfang
• Brotbackautomat
• Knethaken
• Backform
• Messbecher
•
•

7Deutsch
2. Technische Daten
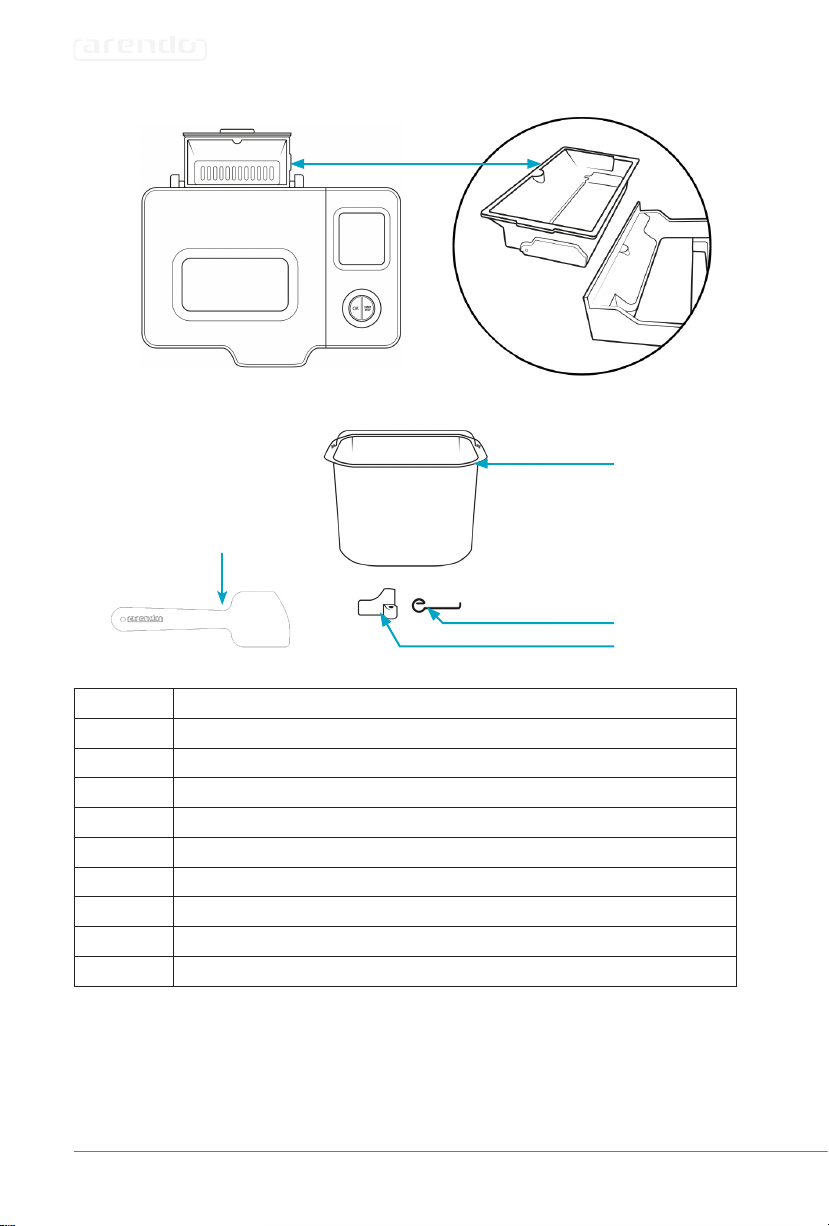
3. Produkt-Details
Spannungsversorgung
Leistungsaufnahme 550 W
Gewicht 6000 g (nur Gerät)
Features •
• Überhitzungsschutz
•
•
• Konstante Temperatur
•
•
•
• Wärmeisoliertes Design
1
2
3
4
8 Deutsch
4. Vor dem ersten Gebrauch
• Überprüfen Sie, ob das Zubehör und alle Teile vollständig und un-
beschädigt im Lieferumfang enthalten sind.
5
6
7
8
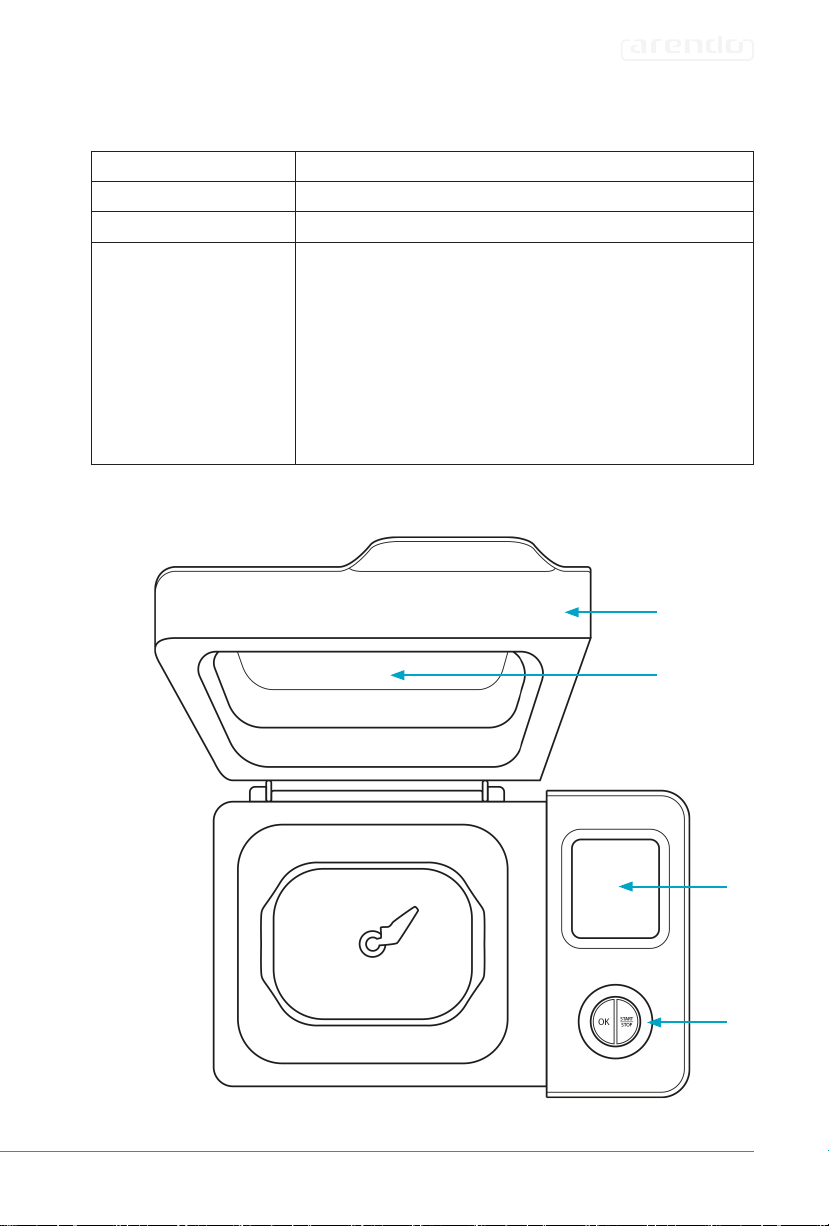
Nummer Beschreibung
1 Deckel
2 Fenster
3 Display
4 Bedienelemente
5 Zutaten-Fach
6 Backform
7
8 Knethaken
9 Teigschaber
9

9Deutsch
•
dieser Bedienungsanleitung beschrieben.
•
etwa 10-15 Minuten. Lassen Sie das Gerät im Anschluss vollstän-
reinigen Sie das Gerät und das Zubehör erneut.
• -
der in das Gerät ein. Nun ist der Brotbackautomat betriebsbereit.
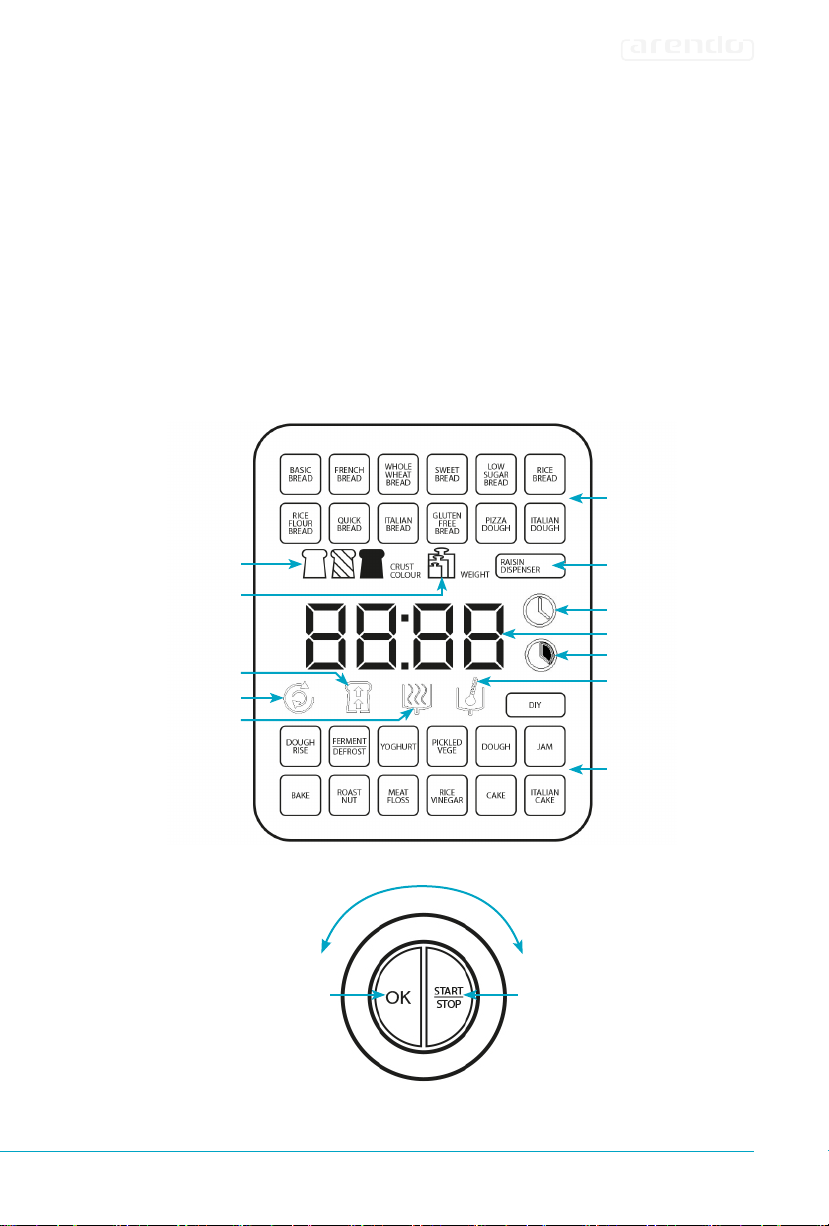
5. Display und Bedienelemente
Programme
Programme
Arbeitszeit
Zeit-Anzeige
Warmhalten
Backen/Bake
Kneten/Knead (1,2)
Brotgröße
Bräunungsgrad
Start/Stopp-Taste
OK-Taste
"+"/"-"-Drehrad
Zutatenzugabe

10 Deutsch
6. START/STOP
-
te, bis ein Piepton zu hören ist. Im eingeschalteten Betrieb ist aus-
-
grammes können Sie das Programm pausieren.
-
laufende Programm ausgeschaltet wurde.
7. Programme
Durch Drehen des "+"/"-"- Drehrads können Sie das gewünschte
-
gramm mit der "OK"-Taste. Die verschiedenen Programme und
Programmzeit: 2:42 h-3:07 h (je nach Brotgröße)
Kneten, Aufgehen und Backen von normalem
Brot. Sie können auch Zutaten hinzufügen, um den
Geschmack anzupassen.
Programmzeit: 3:18 h-3:33 h (je nach Brotgröße)
Kneten, Gären und Backen mit längerer Gärzeit.
Das Brot, das in diesem Menü gebacken wird, hat
normalerweise eine knusprigere Kruste und eine
leichte Textur.
Programmzeit: 3:31 h-3:50 h (je nach Brotgröße)
damit das Korn das Wasser aufsaugen und sich aus-
-
Ergebnissen führen kann.
Programmzeit: 2:55 h-3:07 h (je nach Brotgröße)
Kneten, Aufgehen und Backen des süßen Brotes.
Zum Backen von knusprig-süßen Brot.
Programmzeit: 3:04 h-3:19 h (je nach Brotgröße)
Zuckerarmes Brot: Kneten, Aufgehen und Backen,
mit niedrigem Zuckergehalt

11Deutsch
Programmzeit: 3:18 h-3:33 h (je nach Brotgröße)
Beim Kneten, Aufgehen und Backen ist der Anteil an
und leichter verdaulich.
Programmzeit: 3:21 h-3:28h (je nach Brotgröße)
Kneten, Aufgehen und Backen. Die Größe ist die gleiche
Programmzeit: 2:10 h
Kneten, Aufgehen und Backen von Laib mit Backso-
da oder Backpulver. Brot, das auf dieser Einstellung
gebacken wird, ist normalerweise kleiner und hat eine
dichte Textur.
(9)
Programmzeit: 3:20 h-3:32 h (je nach Brotgröße)
Beim Kneten, Aufgehen und Backen ist der Geschmack
weicher und mit einer dichten Textur.
(10)
Programmzeit: 2:45 h-2:55 h (je nach Brotgröße)
Kneten, Aufgehen und Backen von glutenfreiem
Brot. Sie können auch Zutaten hinzufügen, um den
Geschmack anzupassen.
PIZZATEIG (11)
Programmzeit: 0:35 h
Pizza formen.
(12)
Programmzeit: 0:20 h
Teig kneten, Teig entnehmen und zum Dessert formen
TEIG AUFGEHEN (13)
Programmzeit: 1:30 h
AUFGEHEN/AUFTAU-
EN (14)
Programmzeit: 0:10 h-1:00 h (einstellbar)
Nur mit niedriger Temperatur heizen, die Aufgehzeit
kann im angegebenen Bereich selbst eingestellt werden.
Programmzeit: 6:00 h-12:00 h (einstellbar)
Nur mit niedriger Temperatur heizen, die Aufgehzeit
kann im angegebenen Bereich selbst eingestellt werden.
EINGELEGTES
GEMÜSE (16)
Programmzeit: 24:00 h-48:00 h (einstellbar)
Herstellung von eingelegtem Gemüse.
TEIG (17)
Programmzeit: 0:10 h-0:30 h (einstellbar)
den Teig und formen Sie ihn zu Brötchen, Pizza, Dampf-
brot usw.

12 Deutsch
7.1 DIY (Do it yourself)-Programm
Der Herstellungsprozess beinhaltet Kneten / Gehen lassen / Ba-
cken sowie Warmhalten und viele Perioden. Der Benutzer kann die
Arbeitszeit für jede Periode selbst einstellen. Das Programm wird
hauptsächlich für den Benutzer verwendet, der mit der Brother-
stellung vertraut ist, um die Arbeitszeit nach eigenem Geschmack
einzustellen und um ein zufriedenstellendes Ergebnis zu erhalten.
Programmzeit: 1:20 h
pürieren, bevor sie in die Brotpfanne gegeben werden.
Programmzeit: 0:10 h-0:60 h (einstellbar)
nur Backen, kein Kneten und Aufgehen. Wird auch ver-
wendet, um die Backzeit bei ausgewählten Einstellungen
zu verlängern.
(20)
Programmzeit: 0:45 h-1:30 h (einstellbar)
reduziert wird.
Programmzeit: 1:10 h
Programmzeit: 24:00 h-48:00 h
Programmzeit: 1:53 h
Kneten, Aufgehen und Backen. Mit Soda oder Backpulver
aufgehen lassen.
Programmzeit: 1:53 h
Kneten, Aufgehen und Backen.
-
Programmzeit: 2:15 h (Standard, einstellbar)
Der Herstellungsprozess beinhaltet Kneten/Gehen lassen/
Backen/Warmhalten und viele Perioden. Der Benutzer
kann die Arbeitszeit für jede Periode selbst einstellen. Das
Programm wird hauptsächlich für den Benutzer ver-
wendet, der mit der Brotherstellung vertraut ist, um die
Arbeitszeit nach eigenem Geschmack einzustellen und um
ein zufriedenstellendes Ergebnis zu erhalten.

13Deutsch
Wählen Sie mit dem Drehrad das "DIY"-Programm aus. Wenn das
Menü Do-it-yourself gewählt wird, drücken Sie die "OK"-Taste.
1.
diesen mit der "ON"-Taste.
2. Im Anschluss können Sie entscheiden, ob Sie Zutaten hinzufü-
3.
4. Danach haben Sie die Möglichkeit die einzelnen Programm-
angezeigt. Der Zyklus ist wie folgt:
KNETEN1-AUFGEHEN1-KNETEN2-AUFGEHEN2-BACKEN-
WARMHALTEN.
Durch Drehen des "+"/"-"-Drehrads können Sie die Zeit jeder Pro-
grammphase ändern. Drücken Sie die Taste "OK", um die Zeit zu
-
te Phase blinkt auf dem Display, bis die Einstellung jeder Phase des
-
drücken, beginnt das Programm wie von Ihnen geplant zu arbeiten.
8. Auswahl der Brotgröße und des Bräunungsgrads
Wählen Sie zuerst ein Programm aus.
Anschließend können Sie den Bräunungsgrad des Brotes wählen.

14 Deutsch
Sie mit der "OK"-Taste. Sie können zwischen "HELL", "MEDIUM"
-
niert nur in den folgenden Programmen: PIZZATEIG, ITALIENISCHER
TEIG, TEIG AUFGEHEN, GÄREN/AUFTAUEN, JOGHURT, EINGELEGTES
GEMÜSE, TEIG, MARMELADE, GERÖSTETE NÜSSE, GETROCKNETES
FLEISCH, REISESSIG, KUCHEN
Anschließend kann die Brotgröße angepasst werden. Sie können
zwischen folgenden Werten wählen:
500g (klein) 750g (medium) oder 950g (groß)
Beachten Sie, dass die Backzeit je nach Brotgewicht und Größe
-
den Programmen: SCHNELL, PIZZA TEIG, ITALIENISCHER TEIG, TEIG
AUFGEHEN, GÄREN/AUFTAUEN, JOGHURT, EINGELEGTES GEMÜSE,
TEIG, MARMELADE, KUCHEN, GERÖSTETE NÜSSE, GETROCKNETES
FLEISCH, REISESSIG, KUCHEN, ITALIENISCHER KUCHEN UND BENUT-
ZERDEFINIERT
9. Zeitverzögerung
Wenn gewünscht ist, dass der Brotbackautomat erst in einem
Zeitverzögerung einstellen. Beachten Sie, dass Sie keine verderbli-
-
-
gramm aus und stellen Sie es wie gewünscht ein. Wenn Sie bei der
" angelangt sind, können Sie die Zeit ein-
-
sollte.
Beispiel: Es ist 20:30 Uhr. Wenn Sie möchten, dass Ihr Brot am
nächsten Morgen um 7 Uhr ferg ist, sind das 10 Stunden und 30

15Deutsch
Minuten. Stellen Sie das gewünschte Programm, den gewünschten
Bräunungsgrad und die Brotgröße ein.
Wählen Sie danach bei der Verzögerungszeit die aktuelle Zeit 10:30
aus, welche auf der LCD-Anzeige erscheint. Berühren Sie dann die
STOP/START-Taste, um dieses Verzögerungsprogramm zu akvieren.
Die verbleibende Zeit wird heruntergezählt und auf der LCD-Anzeige
angezeigt. Das frische Brot wird um 7:00 Uhr morgens ferggestellt.
Wenn das Brot nicht sofort herausgenommen wird, beginnt die
Warmhaltezeit von einer Stunde.
-
gramme: PIZZA TEIG, ITALIENISCHER TEIG, TEIG AUFGEHEN, GÄREN/
AUFTAUEN, JOGHURT, EINGELEGTES GEMÜSE, TEIG, MARMELADE,
KUCHEN, GERÖSTETE NÜSSE, GETROCKNETES FLEISCH, REISESSIG,
KUCHEN, ITALIENISCHER KUCHEN
10. Pause
Wenn das Programm begonnen hat, kann der Betrieb mit der
-
gestellten Zeiten bleiben erhalten.
11. Speicher
Falls die Stromversorgung des Gerätes unterbrochen wird, kann der
forgesetzt werden. Wenn die Unterbrechung länger als 10 Minuten
anhält, kann der Brotbackautomat die Daten nicht speichern. In die-
sem Fall wird empfohlen, die Zutaten aus der Backform zu nehmen,
diese zu entsorgen und neue frische Zutaten zu verwenden.
12. Warmhaltefunkon
Stunde nach dem Backen warmgehalten werden. Wenn Sie den
Inhalt während der Warmhaltephase herausnehmen wollen, schal-

16 Deutsch
13. Zutaten-Fach (5) (Automasches Beifügen von Zutaten)
-
Bevor Sie Brot backen, ziehen Sie die Schublade des Zutaten-Faches
(5) -
halten. Nehmen Sie die Zutatenschachtel heraus, legen Sie die be-
in die Brotschale beigefügt.
Befüllen Sie das Zutaten-Fach maximal bis zur Oberkante des Faches.
beigefügt werden.
14. Display-Warnhinweise
-
raum des Brotbackautomaten zu hoch. Das aktuell laufende Pro-
und lassen Sie den Automaten vollständig abkühlen.
15. Brot backen
Stellen Sie die Backform auf die Antriebswelle und drehen Sie diese
im Uhrzeigersinn, bis die Backform einrastet. Stecken Sie anschlie-
ßend den Knethaken auf die Antriebswelle. Es wird empfohlen, den
sich nach dem Backvorgang leichter lösen lässt.
Geben Sie im Anschluss die gewünschten Zutaten in die Backform
Mehl und schließlich Backpulver oder Hefe hineingegeben.

17Deutsch
Sobald die Zutaten in der Backform sind, schließen Sie den Deckel
des Brotbackautomaten. Stecken Sie den Stecker in die Steckdose.
Wählen Sie im Anschluss das gewünschte Programm mit der
-
-
Danach können Sie auswählen, ob der Brotbackvorgang direkt be-
ginnen soll oder eine Zeitverzögerung geplant ist. Wenn Sie sich für
die Zeitverögerung entscheiden, stellen Sie die gewünschte Zeit mit
bis ein Signalton ertönt und der Backvorgang gestartet wird.
Die Dauer des Backvorganges ist vom ausgewählten Programm, von
der Größe, dem Gewicht und der eingestellten Bräunung abhängig.
-
nem Fall während des Backvorganges den Deckel des Brotbackauto-
matens!
-
Programm zu beenden. Nachdem das Programm beendet wurde,
Backform mit Ofenhandschuhen entgegen des Uhrzeigersinns dre-
hen und sie entnehmen. Benutzen Sie den Schaber, um das Brot
keinesfalls ein Messer oder einen ähnlich scharfen Gegenstand. Die
-

18 Deutsch
Achtung! Das Gehäuse, die Backform, der Knethaken und das Brot
Ziehen Sie den Knethaken aus der Unterseite des Brotes heraus, ver-
-
-
Stunde ein. Signaltöne weisen auf das Ende des Warmhaltemodus
hin.
Empfehlung des Herstellers: Verwenden Sie Mineralwasser sta her-
kömmliches Wasser, denn dieses macht das Brot luiger!
Brote aus Fergmischungen
Sie können in diesem Brotbackautomaten nahezu alle im Handel er-
hältlichen Brotbackmischungen verwenden. Jedoch raten wir von
werden.
Beachten Sie die Mengenangaben auf der Packung und gehen Sie in
- Schalten Sie den Brotbackautomaten ein und geben Sie die Flüssig-
- Wählen Sie das entsprechende Programm und die gewünschte

19Deutsch
Bräunung aus und drücken Sie anschließend den "Start/Stop"-Knopf,
bis das Gerät einen Signalton abgibt und startet.
16. Besondere Hinweise
16.1 Programm "QUICK" (Schnell)
Mit dem Quick-Programm kann der Brotbackautomat die Herstellung
eines Laibes innerhalb kürzerer Zeit mit Backpulver oder Soda anstel-
le von Hefe abschließen. Um ein perfektes Schnellbrot zu erhalten,
-
form und die trockenen Zutaten auf die Oberseite zu legen. Wäh-
rend des anfänglichen Knetens können sich einige trockene Zutaten
in den Ecken der Pfanne ansammeln, sodass Sie, um Mehlklümpchen
zu vermeiden, einen Gummispatel als Hilfe beim Kneten des Teigs
verwenden können.
16.2 Messung der Zutaten
-
-
• Wiegen von üssigen Zutaten
Wasser, Frischmilch oder Milchpulverlösung sollten mit Messbe-
chern gemessen werden. Beobachten Sie die Höhe des Messbechers
mit den Augen waagerecht. Wenn Sie Speiseöl oder andere Zutaten
messen, reinigen Sie den Messbecher gründlich ohne andere Zuta-
ten.
• Trockene Zutaten
in den Messbecher gegeben und nach dem Füllen mit einem Messer
nivelliert werden. Schöpfen oder klopfen Sie einen Messbecher nicht
mehr als erforderlich. Diese zusätzliche Menge könnte die Ausgewo-
-
werden. Die Messungen sollten waagerecht erfolgen und dürfen

20 Deutsch
17. Abmessen von Zutaten
Flüssigkeit genau. Andererseits kann nicht ausgeschlossen werden,
• Wasser, Milch oder Milchpulverlösungen sollte mit dem beige-
legten Messbecher gemessen werden. Halten Sie den Becher ge-
• Wenn Speiseöl oder andere Zutaten mit dem Becher gemessen
wurden, reinigen Sie diesen im Anschluss gründlich.
•
-
spricht. Achten Sie darauf, dass Sie die Zutaten nicht andrücken,
da dies das Messergebnis verfälschen kann.
18. Reihenfolge von Zutaten
-
Hefe oder Backpulver
Trockene Zutaten
Flüssigkeit (z.B. Wasser)

21Deutsch
Flüssigkeit (Milch, Wasser etc. ), Eier, Salz und Milchpulver usw.
Flüssigkeit durchweicht werden darf. Hefe muss anschließend auf
das trockene Mehl gegeben werden und sollte nicht mit Salz in Be-
rührung kommen.
Wenn der Teig einige Minuten geknetet wurde, ertönt ein Signal mit
mehreren aufeinanderfolgenden Pieptönen. Sobald dieses Signal er-
tönt, können Sie weitere Zutaten hinzufügen, wie z.B. Früchte. Geben
Sie Früchte zu früh in den Teig, wird das Aroma nach langer Knetzeit
keine verderblichen Zutaten wie z.B. Eier oder Früchte hinzugegeben
werden.
19. Reinigung und Pege
Ziehen Sie den Netzstecker aus der Steckdose und lassen Sie das Ge-
-
haken, indem Sie diese gegen den Uhrzeigersinn drehen.
Wischen Sie die Backform und den Knethaken mit einem feuchten
den Knethaken in die Spülmaschine einlegen, um diese zu reinigen.
Trocknen Sie die Backform und den Knethaken anschließend vollstän-
dig ab. Setzen Sie diese wieder in den Brotbackautomaten, indem Sie
die Backform auf das Getriebe setzen und im Uhrzeigersinn drehen,
bis die Backform einrastet.
Sollte der Knethaken nur mühsam aus dem Brot herauszubekommen
-
-

22 Deutsch
20. Fehlerbehebung
Fehler Fehlergrund Fehlerbehebung
während des Backens
-
nung
den sich zu nah an den
Heizelementen oder
Ziehen Sie den Stecker aus der
Steckdose, lassen Sie das Gerät
vollständig abkühlen und reinigen
Sie die Heizelemente.
Die Kruste des Brotes
ist zu dick
Das Brot wurde zu lange
warmgehalten und in der
Form gelassen
Entnehmen Sie das Brot frühst-
möglich und halten Sie es nur bei
Bedarf warm.
Die Zutaten sind
ungleichmäßig ver-
mischt und das Brot
ist nicht zufriedenstel-
lend gebacken.
- Ungeeignetes Pro-
gramm ausgewählt
- Der Deckel wurde zu
- Der Drehwiederstand
ist zu hoch, sodass der
Knethaken nicht korrekt
drehen kann
-
mablaufs den Deckel nicht.
- Überprüfen Sie den Sitz des
Knethakens. Sollten Sie eine
Sie nicht, den Kundendienst zu
Das Brot ist so groß,
dass es gegen den
Deckel stößt
- Zu viel Hefe, Wasser
oder Mehl verwendet
- Umgebungstemperatur
zu hoch.
Überprüfen Sie die Menge der Hefe,
des Wassers oder Mehls. Gegeben-
enfalls muss die Menge angepasst
werden.
Das Brot ist zu klein
und nicht aufgegan-
gen
Zu wenig Hefe wurde ver-
wendet. Es ist möglich,
dass die Hefe alt und
Grund kann eine zu hohe
Wassertemperatur sein.
prüfen Sie die Wassertemperatur.
Das Display zeigt
Knopf gedrückt wurde
Die Innenraumtempera-
tur des Brotbackautoma-
tens ist zu hoch.
und lassen Sie den Automaten voll-
ständig abkühlen.
Der Motor ist hörbar
eingeschaltet, der
Teig wird jedoch nicht
geknetet
Die Backform ist nicht
Teigmenge ist zu groß,
um geknetet zu werden
Backform oder die vorhandene Teig-

23Deutsch
21. Hinweise zu möglichen Zutaten
Verschiedene Mehlarten
Vollkornmehl
Es ist besonders gut geeignet, um mit anderen Mehlsorten ver-
mischt zu werden.
Mehl ohne Backpulver
Das Mehl ohne Backpulver ist auch bekannt als Weißmehl. Es ist für
schnelles Backen oder für verschiedene Kekse geeignet.
Glutenmehl
Glutenmehl hat einen hohen Anteil an Gluten und Proteinen. Diese
behält der Teig die Form. Die Mehlart ist besonders gut zum Backen
von Brot geeignet.
Fehler Fehlergrund Fehlerbehebung
sehr schwer und die
innere Struktur ist
äußerst dicht
- Es wurde zu viel Mehl
und zu wenig Wasser
benutzt
- Es wurden zu viele
Früchte verwendet oder
benutzt worden
mehr Wasser
Das Brot fällt beim
-
men
- Das Mehl ist nicht stark
genug, um den Teig auf-
gehen zu lassen
- Die Temperatur ist zu
hoch oder die Hefe wirkt
zu schnell
- Zu viel Wasser macht
den Teig zu schwer
- Benutzen Sie im Zweifel Brotmehl
oder Stärkemehl
-
menge an

24 Deutsch
Dunkles Weizenmehl
-
mehl zu vergleichen. Um die Form nach dem Backen zu erhalten,
sollte es mit anderen Mehlsorten gemischt werden.
Selbsreibendes Mehl
Dieses Mehl enthält Backpulver und eignet sich ideal zur Herstel-
lung von Kuchen.
Mais- oder Haferockenmehl
Diese Mehlarten werden aus Mais bzw. Hafer hergestellt. Sie sind
die Zusatzbestandteile für die Herstellung von grobem Brot wie
Zucker
Zucker ist ein wichtiger Bestandteil und dient dem süßen Ge-
schmack und der Farbe des Brotes. Meistens wird weißer Zucker
verwendet, brauner Zucker oder Puderzucker können jedoch auch
eingesetzt werden.
Eier
Eier machen das Brot nahrhaft und fülliger. Befreien Sie die Eier
komplett von der Schale, bevor Sie gleichmäßig verrührt werden.
Backsoda
Backsoda ist dem Backpulver sehr ähnlich. Backsoda kann in Kombi-
nation mit Backpulver verwendet werden.
Backpulver
Backpulver wird dafür verwendet, um zum Beispiel Kuchen oder
-

25Deutsch
Salz
Salz eignet sich dafür, den Geschmack des Brotes sowie die Farbe
der Brotkruste zu verbessern. Halten Sie sich beim Zugeben von Salz
Sie darauf, dass das Brot kleiner wird, sollte Salz verwendet werden.
Fett, Butter und Pflanzenöl
Fett erhöht die Haltbarkeit des Brotes. Das Brot wird dadurch wei-
cher. Sollten Sie Butter dazu geben wollen, achten Sie darauf, dass
diese zuvor in kleine Stücke geschnitten wurde.
Wasser und andere Flüssigkeiten
Wasser ist eine wichtige Zutat bei der Herstellung von Brot. Allge-
Sie können Wasser durch frische Milch oder Wasser gemischt mit
2% Milchpulver ersetzen. Dies verbessert Aroma und Farbe der
oder Orangensaft.
Hefe
In der Gehphase setzt die Hefe Kohlendioxide frei. Das Kohlendioxid
lässt das Brot mehr aufgehen und sorgt für die weiche innere Stru-
kur. Allerdings braucht Hefe dazu Zucker und Mehl als Nährstoff.
Lagern Sie frische Hefe ausschließlich in Ihrem Kühlschrank, da
eine zu warme Temperatur die Hefepilze abtöten kann. Sollten Sie
Hefe kaufen, achten Sie auf das Mindesthaltbarkeitsdatum. Lagern
Sie Hefe nach jedem Gebrauch unverzüglich wieder in einem Kühl-
schrank.
Sollte das Brot schlecht aufgehen, ist das in den meisten Fällen auf
die Hefe zurückzuführen!
Auf folgende Art und Weise können Sie nachprüfen, ob Ihre Hefe
noch frisch und aktiv ist:
1. Gießen Sie einen halben Messbecher warmes Wasser ein (45-
2. Fügen Sie in den Messbecher einen Teelöffel weißen Zuck-
er hinzu und verrühren Sie den Inhalt. Anschließend geben
Sie zwei Teelöffel Hefe über das Wasser.

26 Deutsch
3. Stellen Sie den Messbecher für ca. 10 Minuten an einem war-
men Ort und rühren Sie das Wasser nicht mehr um!
4. Nach 10 Minuten sollte der Schaum etwa eine Tasse ergeben.
Falls dies nicht der Fall ist, ist die Hefe inaktiv.
22. Beispielrezepte
Tipps:
- Benutzen Sie Mineralwasser, um das Brot luftiger und leichter zu
machen.
- Wasser und/oder Milchpulver können ebenfalls durch die gleiche
Menge an Milch ersetzt werden.
Brotrezepte
Vollkornbrot
Brotgröße 850 g
lauwarmes Wasser
350 ml
Salz
Honig
Weizenvollkornmehl
550 g
Trockenhefe
Programm:
3 - Whole Wheat,
Farbe: Dunkel
Eiweißbrot
Brotgröße 750 g
Quark
250 g
Eiweiß 4
Salz
Weizenkleie
Backpulver
1 Päckchen
Leinsamen (ganz oder
geschrotet)
100 g
Dinkel- oder Haferkleie
30 g
Programm:
1 - Basic
, Farbe: Dunkel
Weißbrot
Brotgröße 1000 g
lauwarmes Wasser
350 ml
Mehl 500 g
Hefe
Meersalz
Zucker
Olivenöl
Programm:
1 - Basic,
Farbe: Hell
Bauernbrot
Brotgröße 1000 g
lauwarmes Wasser
360 ml
Mehl Typ 1050 600 g
Trockenhefe 1 Packung
Salz
Zucker
Weizensauerteig
getrocknet
30 g
Programm:
1 - Basic,

27Deutsch
Teig
Kuchen
Pizzateig
Mehl 300 g
Salz
Frischhefe
1/2 Würfel
Olivenöl
2 Esslöffel
Wasser, lauwarm 200 ml
Zucker 1 Prise Zucker
Programm 11 - Pizza Dough
Zubereitung:
Lösen Sie die Hefe im Wasser auf. Geben Sie diese mit den anderen Zutaten in den
Brotbackautomaten. Wählen Sie Programm "8 - Teig" aus und schalten Sie das Gerät
ein. Nach dem Kneten rollen Sie den Teig aus. Geben Sie dazu etwas Mehl auf den Teig.
Bevor Sie ihn nach Belieben belegen können, muss der Teig nach dem Ausrollen noch ca.
10 Minuten gehen lassen.
Rührkuchen
Eier 3
Zucker
125 g
125 g
1 Päckchen
Milch
Weißmehl 300 g
Backpulver 1 Päckchen
Programm: 10 - Kuchen
Zubereitung:
Sie die Mischung schaumig. Geben Sie das Mehl und das Backpulver zu der Mischung
und verrühren Sie alles gleichmäßig. Im Anschluss können Sie den Teig mit etwas Milch
Mischung in die Backfrom und starten Sie das "Kuchen"-Programm.
Hinweis: Die Zuckermenge kann je nach Bedarf variieren.

28 Deutsch
23. Sicherheitshinweise und Haungsausschluss
-
nungen. Schließen Sie das Produkt nicht kurz. Das Gerät ist nicht was-
von hohen Temperaturen fern.
Setzen Sie das Gerät keinen plötzlichen Temperaturwechseln oder
-
gen. Das Gerät sollte nicht benutzt werden, wenn es einen Stoß ab-
Sie das Gerät nicht für andere Zwecke als die, die in der Anleitung
beschrieben sind. Dieses Produkt ist kein Spielzeug.
-
lichen Lieferanten durchgeführt wird, führt zum Erlöschen der Ge-
-
sonen benutzt werden, die diese Anleitung gelesen und verstanden
vorher gesondert darauf hingewiesen wurde.
24. Entsorgungshinweise
Elektrische und elektronische Geräte dürfen nach der europäischen
-
standteile müssen getrennt der Wiederverwertung oder Entsorgung
-
-
-

29Deutsch
ben. Einzelheiten dazu regelt das jeweilige Landesrecht.
Das Symbol auf dem Produkt, der Betriebsanleitung oder/und der

30 Deutsch
Hiermit erklärt die Firma WD Plus GmbH, dass sich das Gerät 304971/20200901FS002 in
GmbH, Wohlenbergstraße 16, 30179 Hannover
WEEE Richtlinie 2012/19/EU
WEEE Register-Nr: DE 67896761

31English
IMPORTANT SAFETY GUIDELINES FOR THIS APPLI-
ANCE
•
nameplate of the appliance!
• This appliance should not be operated if the cable
• The product should not be used if it has fallen down
or has been damaged!
• Do not touch any hot surfaces! Always use the knobs
or handles provided!
• Never immerse the appliance, plug or cable in water
or any other liquid!
•
mains plug before cleaning the appliance or remov-
ing the baking mould.
• Do not allow the cable and the plug to protrude over
an edge or over hot surfaces!
• Use only accessories recommended by the appli-
ance manufacturer! There is a risk of injury!
• Monitor the product constantly, if children or invalid
persons are nearby.
• Do not place the bread machine near other hot ap-
pliances such as a gas, electric or backing oven.
•

32 English
• -
pliance when it is switched on!
• Do not turn on the bread machine if the baking at-
-
ents.
•
• To remove the bread, the baking mould should nev-
er be struck against an edge or work surface! This
may damage the baking mould!
• Do not cover the appliance during use! Heat and
steam should be able to escape. It mat result in a
• Metal foils or other materials should not be used in
or short circuit!
• To disconnect the bread baking machine from the
mains, remove the plug from the socket!
• Use the appliance only for the intended purposes
described in this user manual!
• Do not use it outdoors!
• This appliance may be operated by children from 8
years of age and above, as well as by people with
or who lack knowledge or experience, if they are su-

33English
pervised or instructed with regard to safe use of the
appliance, and have understood the resultant dan-
-
tenance of the appliance should not be done by chil-
dren without supervision!
•
they do not play with the appliance!
• If the power cable is damaged, it should be replaced
by the manufacturer, his customer service person-
• This appliance should not be operated with an ex-
• Ensure that you do not exceed the maximum quan-
• Never open the housing of the appliance. There is a
risk of electric shock!
•
not for commercial use.

34 English
CAUTION: This appliance becomes very hot
during use! There is a risk of burns!
Thank you for choosing an Arendo product. Please read the following
user manual carefully so that you can get the most from the product
delivered item is complete, accurate and undamaged.
1. Scope of delivery
• Bread machine
• Kneader
• Baking mould
• Measuring cup
• Kneader remover
• Measuring spoon

35English
2. Technical data
3. Product details
Power supply
550 W
Weight 6000 g (appliance only)
Features • Non-slip base
•
•
•
•
•
•
•
• Heat-insulated design
1
2
3
4

36 English
4. Before rst use
•
scope of supply and are not damaged.
5
6
7
8
Number Descripon
1 Lid
2 Window
3 Display
4
5 Ingredients compartment
6 Baking mould
7 Kneader remover
8 Kneader
9 Dough scraper
9
37English
•
• -
side for about 10-15 minutes. Then allow the appliance to cool
and clean the appliance and the accessories again.
• Finally dry all the parts thoroughly. Place them back in the appli-
ance. The bread machine is now ready for use.
5. Display and Controls
Programs
Programs
Time
Time display
Keep warm
Bake
Knead (1,2)
Bread size
Degree of browning
OK but
ton
"+" / "-" dial
Adding ingredients

38 English
6. START/STOP
during a program.
about 2 seconds. A long beep indicates that the current program has
7. Programs
Program me: 2:42 to 3:07 hours (depending on
the size of bread) Kneading, rising and baking nor-
mal bread. You can also add ingredients to adjust
the taste.
Program me: 3:18 to 3:33 hours (depending on
the size of bread)
that is baked in this program usually has a crisper
crust and a light texture.
Program me: 3:31 to 3:50 hours (depending on
the size of bread) Kneading, rising and baking of
-
-
Program me: 2:55 to 3:07 hours (depending on
the size of bread) Kneading, rising and baking
sweet bread. For baking crispy and sweet bread.
Program me: 3:04 to 3:19 hours (depending on
the size of bread) Low sugar bread: Kneading, rising
and baking, with low-sugar content

39English
Program me: 3:18 to 3:33 hours (depending on the size
of bread) When kneading, rising and baking the quan-
Program me: 3:21 to 3:28 hours (depending on the size
of bread)
Kneading, rising and baking. The size is the same as in
Program me: 2:10 hours
Kneading, rising and baking loaves using baking soda or
usually small and has a dense texture.
Program me: 3:20 to 3:32 hours (depending on the size
of bread) When kneading, rising and baking, the taste is
(10)
Program me: 2:45 to 2:55 hours (depending on the size
of bread) Kneading, rising and baking gluten-free bread.
You can also add ingredients to adjust the taste.
PIZZA DOUGH (11)
Program me: 00:35 hours
Kneading, allowing the dough to rise, removing the
dough and shaping into Pizza..
ITALIAN DOUGH (12)
Program me: 00:20 hours
Kneading, removing the dough and shaping into the
dessert
Program me: 1:30 hours
Kneading, allowing the dough to rise, removing the
dough and shaping it into rolls, pizza, steamed bread,
etc.
Program me: 0:10 to 1: 00 hours (adjustable)
Program me: 6:00 to 12: 00 hours (adjustable)
(16)
Program me: 24:00 to 48:00 hours (adjustable)
Making pickled vegetables.
DOUGH (17)
Program me: 0:10 to 0:30 hours (adjustable)
dough and shape it into rolls, pizza, steamed bread, etc.

40 English
7.1 DIY (Do it yourself) program
each period by himself. The program is mainly intended for the user
JAM (18)
Program me: 1:20 hours
-
bles before adding them to the bread pan.
BAKE (19)
Program me: 0:10 to 0:60 hours (adjustable)
Only baking, no kneading and rising. Is also used to in-
Program me: 0:45 to 1:30 hours (adjustable)
completely removed and the dust is reduced.
MEAT FLOSS (21) Program me: 1:10 hours
Program me: 24:00 to 48:00 hours
Making rice vinegar
Program me: 1:53 hours
baking powder.
Program me: 1:53 hours
Kneading, rising and baking.
DIY
(25)
Program me: 2:15 hours (Default, adjustable)
baking and keeping warm and many periods. The user can
is mainly intended for the user who is familiar with bread

41English
the Do-it-yourself menu is selected.
1.
2. You can then decide if you want to add any ingredients. Select
cross mark for "No".
3.
4.
display. The cycle is as follows:
KNEAD1-RAISE1-KNEAD2-RAISE2-BAKE-
KEEPWARM.
-
8. Selecon of bread size and degree of browning
First select a program.

42 English
-
grams: PIZZA DOUGH, ITALIAN DOUGH, DOUGH RISE, FERMENT/DE-
FROST, YOGHURT, PICKLED VEGE, DOUGH, JAM, ROAST NUT, MEAT
FLOSS, RICE VINEGAR, CAKE
The bread size can then be changed. You can choose between the
following values:
500g (small) 750g (medium) or 950g (large)
programs: QUICK, PIZZA DOUGH, ITALIAN DOUGH, DOUGH RISE,
FERMENT/DEFROST, YOGHURT, PICKLED VEGE, DOUGH, JAM, BAKE,
ROAST NUT, MEAT FLOSS, RICE VINEGAR, CAKE, ITALIAN CAKE and
DO IT YOURSELF
9. Time delay
not use perishable ingredients such as eggs, fruit or onions in the
-
Example: It is 8:30 pm. If you want your bread to be ready at 7 am the
next morning, then the me to be set is 10 hours and 30 minutes. Ad-
just the desired program, the desired degree of browning and bread
size. Then select the current me 10:30 in the delay me, which is
shown on the LCD display. Then touch the STOP / START buon to
acvate this delay program. The remaining me is counted down and
displayed on the LCD. The fresh bread will be ready at 7:00 am. The
keep warm period of one hour starts if the bread is not taken out
immediately.

43English
PIZZA
DOUGH, ITALIAN DOUGH, DOUGH RISE, FERMENT/DEFROST, YO-
GHURT, PICKLED VEGE, DOUGH, JAM, BAKE, ROAST NUT, MEAT
FLOSS, RICE VINEGAR, CAKE and ITALIAN CAKE
10. Pause
retained.
11. Memory
minutes. The bread machine can not store the data if the interrup-
remove the ingredients from the baking mould, dispose of them
and to use new ingredients.
12. Keep-warm funcon
-
program ends.

44 English
13. Ingredients compartment (5) (Automacally adding ingredi-
ents)
-
bread, pull the ingredient compartment (5) out by holding the lock
and the handle of the compartment. Take the ingredients box out,
place the required ingredients in the box and then put the box back.
the process.
Fill the ingredients compartment only up to the upper edge of the
compartment.
are added.
14. Display warnings
If the display shows the code "HH: H", then the temperature inside
the bread machine is too high. The current program needs to be
terminated. Open the lid of the appliance and allow the machine to
cool down completely.
15. Baking bread
the baking mould locks into place. Then place the kneader on the
Add the desired ingredients to the baking mould. It is important
to follow the sequence given in the recipe. Generally, the liquid is
yeast.

45English
Once the ingredients are added to the baking mould, close the lid of
You can then select whether the bread baking process has to begin
you hear a beep and the baking process starts.
the size, the weight and the desired browning. You can monitor the
progress of the baking process through the window at the top of the
appliance. Never open the lid of the bread machine during the bak-
ing process!
program. Once the program is complete, you can remove the bread
oven gloves and then removing it. Use the scraper to separate the
bread from the edges of the baking mould. Never use a knife or such
-
aged! Place the baking mould upside down, so that the bread can be
shaken out easily.
Cauon! The housing, the baking mould, the kneader and the bread
may be very hot! Therefore, be very careful always!
-
er remover for this purpose.

46 English
Allow the bread to cool for about 20 minutes. If you are not near
the bread machine when the process is completed, the keep-warm
of the keep-warm mode.
Manufacturer's recommendaon: Use mineral water instead of nor-
mal water because this makes the bread uer!
Bread made of ready-mixes
You can use almost any commercially available bread mixes in this
bread machine. However, we do not recommend pure rye bread, as
- Turn the bread machine on and add the liquid as recommended on
the ready-mix.
- Select the appropriate program and the desired browning and then
starts.

47English
16. Special notes
16.1 Program "QUICK"
-
ing baking powder or soda instead of yeast with the quick program.
To get perfect breads quickly, it is advisable to put all the liquid ingre-
-
lumps, use a rubber spatula when kneading the dough.
16.2 Measuring the ingredients
-
gredients. It is very important to use a measuring cup or measuring
spoon to measure the ingredients accurately, otherwise the bread
• Weighing liquid ingredients
measuring cups. The measuring cup should be in line with your eyes
horizontally. When you measure cooking oil or other ingredients,
clean the measuring cup thoroughly to remove any other ingredi-
ents.
• Dry ingredients
When measuring dry ingredients, they have to be added carefully
-
measurements should be horizontal and should not be heaped since

48 English
17. Measuring the ingredients
and the measuring cup. Measure each ingredient and liquid accu-
-
•
the measuring cup provided. Keep the cup straight or place it on
• If cooking oil or other ingredients were measured with the cup,
• Dry ingredients should be measured with the measuring cup or
measuring spoon. The large side of the measuring spoon corre-
sponds to a tablespoon, while the small side corresponds to a
teaspoon. Make sure that you do not press the ingredients, as
this may give you the incorrect measurement.
18. Sequence of ingredients
The sequence in which the ingredients are added, should always be
followed. The following sequence applies in general: Liquid (milk,
water, etc. ), eggs, salt and milk powder etc.
Yeast or baking powder
Dry ingredients
Liquid (e.g. water)

49English
come in contact with salt.
Once the dough has been kneaded for a few minutes, you will hear
a series of beeps. Once you hear this beep, you can add the other
ingredients, such as fruit. If you add fruit too early to the dough, the
delay is being used, then perishable ingredients such as eggs or fruit
should not be added.
19. Cleaning and Care
Disconnect the plug from the mains socket and allow the appliance
Wipe the baking mould and kneader using a damp cloth. Do not use
you can place the baking mould and kneader in the dishwasher to
clean them. Dry the baking mould and kneader completely. Put them
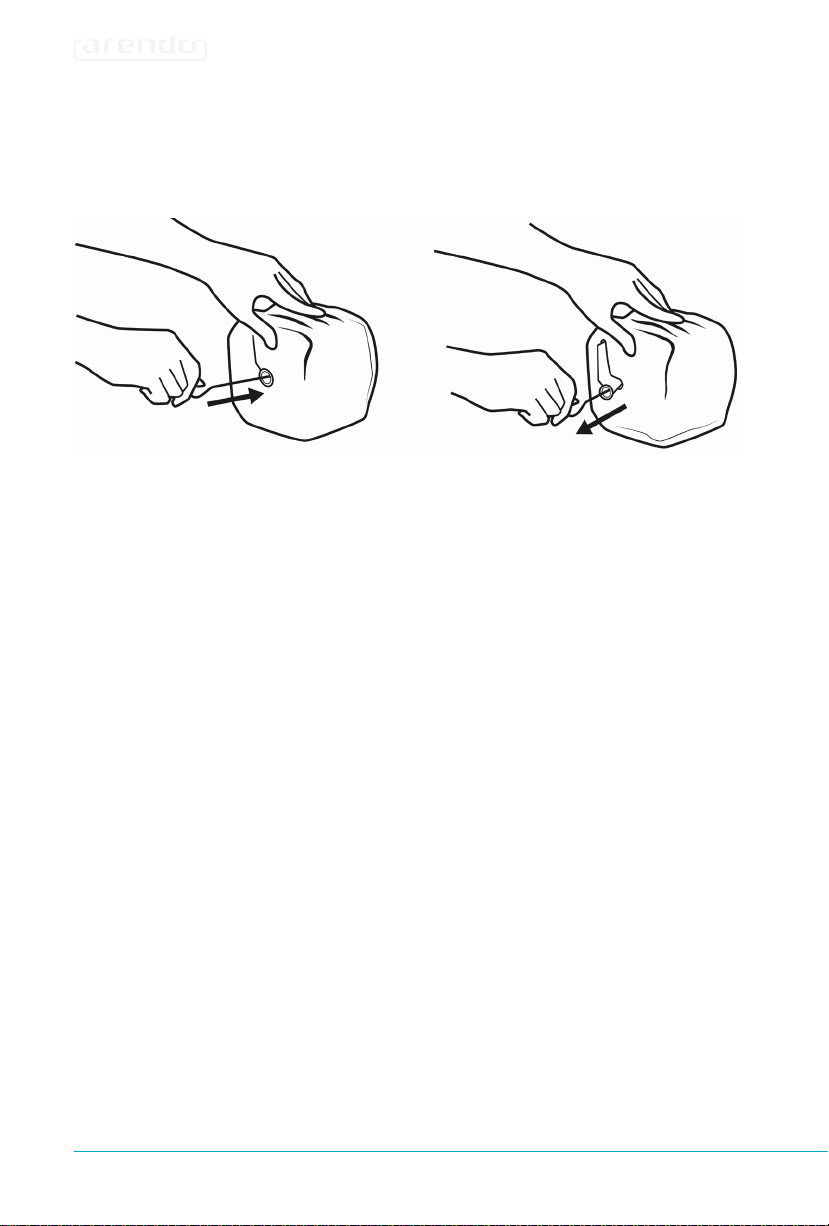
If the kneader does not come out of the bread easily, use the knead-
er remover.
Use a damp cloth to clean the rest of the housing and the lid. Gently
wipe the housing, the window and the lid. Do not use any aggressive
cleaning agents or sharp objects. Never immerse the appliance in
water or other liquids for cleaning.

50 English
20. Troubleshoong
Error Error reason Troubleshoong
Smoke comes out
of the vent during
baking
Some ingredients are
them
Disconnect the plug from the sock-
et, allow the appliance to cool down
elements.
The crust of the bread
is too thick
The bread was kept warm
the mould
-
sible and keep it warm only when
needed.
The ingredients are
mixed unevenly and
the bread is not
- Inappropriate program
selected
- The lid was opened too
is too high, and the
kneader cannot rotate
properly
- Select the correct program.
- Do not open the lid when the
program is running.
properly. If you detect a problem,
do not hesitate to contact our cus-
tomer service.
The bread is so large
that it is pushing
against the lid
- Too much yeast, water
- Ambient temperature
too high.
be adjusted.
The bread is too small
and has not risen
Not enough yeast was
used. It is possible that
the yeast is old and
may be very high water
temperature.
Use more yeast and check the water
temperature.
The display shows
the "Start/Stop"
The inside temperature
of the bread machine is
too high.
Open the lid of the appliance and
allow the machine to cool down
completely.
The motor has
switched on audibly
but the dough is not
kneaded
The baking mould is not
much to be kneaded

51English
21. Notes on possible ingredients
Dierent types of our
Whole grain
Flour without baking powder
-
Gluten our
Error Error reason Troubleshoong
very heavy and the
internal structure is
extremely dense
- Too many fruits or too
has been used
The bread collapses
at the middle when
baking
enough to allow the
dough to rise
- The temperature is too
too quickly
- Too much water makes
the dough very heavy
case of doubt
- Always use the yeast at room
temperature
necessary

52 English
Dark wheat our
Self drying our
Corn or oatmeal our
-
also help in improving the taste and texture.
Sugar
Sugar is an important component and gives the sweet taste and
colour to the bread. White sugar is mostly used, but brown sugar or
powdered sugar can also be used.
Eggs
completely from the shell before mixing them evenly.
Baking soda
Baking soda is very similar to baking powder. Baking soda can be
used along with baking powder.
Baking powder
Baking powder is used, for example, to bake cakes or breads in
phase".
Salt
Salt is used to improve the taste of the bread and the colour of the
bread crust. Always stick to the recipe when adding salt! Too much

53English
-
comes smaller if salt is used.
Fat, butter and vegetable oil
Fat increases the shelf life of the bread. The bread becomes softer.
If you want to add butter, make sure that it has been previously cut
into small pieces.
Water and other liquids
Water is an important ingredient for making bread. In general, a wa-
water with fresh milk or water mixed with 2% milk powder. This
improves the flavour and colour of the crust. Some recipes require
different juices such as apple or orange juice.
Yeast
In the rising phase, the yeast releases carbon dioxide. The carbon
dioxide makes the bread rise more and provides the soft inner
structure. However, yeast needs sugar and flour as nutrient.
Store fresh yeast only in your refrigerator, since high temperature
can kill the yeast fungi. Pay attention to the expiry date when you
buy yeast. Put the yeast back in the refrigerator immediately after
each use.
If the bread does not rise properly, this is mostly due to the yeast!
This is how you can check whether your yeast is fresh and active:
1.
2. Add a teaspoon of white sugar to the measuring cup and stir the
contents. Then add two teaspoons of yeast to the water.

54 English
3. Place the measuring cup for about 10 minutes in a warm place,
and do not stir the water!
4. After 10 minutes, you should get about a cup of foam. If this is
not the case, then the yeast is inactive.
22. Sample recipes
Tips:
- Use mineral water to make the bread fluffier and lighter.
- Water and/or milk powder can also be replaced with the same
amount of milk.
Bread recipes
Brown bread
Bread size 850 g
Lukewarm water
350 ml
Salt
Honey
1 teaspoon
550 g
Dry yeast
Program:
3 - Whole Wheat,
Protein bread
Bread size 750 g
Quark
250 g
Protein 4
Salt 1 teaspoon
Wheat bran
4 tablespoons
Baking powder
1 small packet
Linseed (whole or
crushed)
100 g
Spelt bran or oat bran
30 g
Program:
1 - Basic
White bread
Bread size 1000 g
Lukewarm water
350 ml
Flour 500 g
Yeast
Sea salt
1 tablespoons
Sugar
1 tablespoons
Olive oil
1 tablespoons
Program:
1 - Basic,
Farmhouse bread
Bread size 1000 g
Lukewarm water
360 ml
Flour type 1050 600 g
Dry yeast 1 pack
Salt
1 teaspoon
Sugar
1 teaspoon
Dried wheat sour-
dough
30 g
Program:
1 - Basic,

55English
Dough
Cake
Pizza dough
Flour 300 g
Salt
1/2 teaspoon
Fresh yeast
1/2 cube
Olive oil
2 tablespoons
Water, lukewarm 200 ml
Sugar A pinch of sugar
Program 11 - Pizza Dough
Dissolve the yeast in the water. Add this along with the other ingredients to the bread
Pound cake
Eggs 3
Sugar
125 g
125 g
1 small packet
Milk
300 g
Baking powder 1 small packet
Program:
-
Note: The quanty of sugar can vary depending on the requirement.

56 English
23. Safety instrucons and disclaimer
Please do not try to open the appliance to carry out repairs or mod-
the product. The appliance is not waterproof, therefore please use
it only in dry surroundings. Protect it from high humidity, water and
snow. Do not expose the appliance to high temperatures.
Do not expose the appliance to sudden changes in temperature or
not be used if it has been subject to impact or has been damaged in
-
described in the user manual. This product is not a toy.
Keep it out of the reach of children or mentally disabled persons.
original supplier will void any warranty and guarantee claims. The ap-
pliance should only be used by those who have read and understood
24. Disposal instrucons
Their components have to be separately sent for recycling or dispos-
al, because improper disposal of toxic and dangerous components
may permanently damage the environment. According to the Elec-
trical and Electronic Equipment Act (ElektroG), you are obliged (as
a consumer) to return (free of charge) all electrical and electronic
points at the end of their service life. The relevant local laws regulate
the details in this regard. The symbol displayed on the product,
in the user manual or/and on the packaging refers to these regu-
our environment.

57English

58 English
-
plete conformity statement can be obtained from: WD Plus GmbH, Wohlenbergstraße 16,
30179 Hannover
WEEE direcve 2012/19/EU
WEEE Register no.: DE 67896761

59
Français
CONSIGNES DE SÉCURITÉ IMPORTANTES POUR
CET APPAREIL
• Avant de connecter l'appareil, assurez-vous que la
!
•
• Le produit ne doit plus être mis en service après s'il
• -
• Ne plongez en aucun cas l'appareil, le connecteur
•
•
sur une arête ou au-dessus de surfaces chaudes !
•
le fabricant de l'appareil ! Il existe un risque de bles-
sures !
•
•

60 Français
•
• -
•
-
dients.
• N’extrayez en aucun cas le moule pendant le fonc-
•
cas cogner contre un bord ou un plan de travail !
• Ne couvrez pas l'appareil pendant qu'il est en ser-
vice ! La chaleur et la vapeur doivent pouvoir
•
• Pour couper complètement le courant de la machine
•
•

61
Français
•
-
emploi sûr de l'appareil, et si elles comprennent les
-
lance!
•
pour s'assurer qu'ils ne jouent pas l'appareil !
•
-
• -
• -
•
• -

62 Français
ATTENTION : Pendant le service, l'appareil de-
vient très chaud ! Il existe un risque de brû-
lures !
Nous vous remercions d'avoir choisi un produit d'Arendo. Pour que
-
1. Contenu de la livraison
•
•
• Moule
•
•
•
63
Français
2. Caractérisques techniques
3. Parcularités du produit
550 W
Poids
•
•
•
•
•
•
•
•
•
1
2
3
4
64 Français
4. Avant la première ulisaon
• -
tacts et contenus dans le volume de livraison.
5
6
7
8
Numéro Descripon
1
2 Fenêtres
3
4
5
6 Moule
7
8
9
9
65
Français
•
•
contenu pendant environ 10-15 minutes. Ensuite, laissez l’appa-
• -
5. Achage et éléments de commande
Programmes
Pro-
grammes
Horaires de travail
la chaleur
Bake
Faire lever/rise (1,2)
Taille du
pain
brunissage
Touche OK
-
dients

66 Français
6. DÉMARRAGE/ARRÊT
7. Programmes
-
SIQUE) (1)
Durée du programme : 2:42 h-3:07 h (en foncon
de la taille du pain)
Durée du programme : 3:18 h-3:33 h (en foncon
de la taille du pain)
est cuit dans ce menu dispose naturellement d'une
(3)
Durée du programme : 3:31 h-3:50 h (en foncon
de la taille du pain)
(4)
Durée du programme : 2:55 h-3:07 h (en foncon de
la taille du pain)
(5)
Durée du programme : 3:04 h-3:19 h (en foncon
de la taille du pain)
sucre

67
Français
Durée du programme : 3:18 h-3:33 h (en foncon de la
taille du pain)
Durée du programme : 3:21 h-3:28h (en foncon de la
taille du pain)
Durée du programme : 2:10 h
une miche de pain avec de la soude ou de la levure
-
ITALIEN) (9)
Durée du programme : 3:20 h-3:32 h (en foncon de la
taille du pain)
(PAIN SANS GLUTEN)
(10)
Durée du programme : 2:45 h-2:55 h (en foncon de la
taille du pain)
pour adapter le goût.
PIZZA DOUGH (PÂTE À
PIZZA) (11)
Durée du programme : 0:35 h
.
ITALIAN DOUGH (PÂTE
ITALIENNE) (12)
Durée du programme : 0:20 h
Durée du programme : 1:30 h
-
-
TION) (14)
Durée du programme : 0:10 h-1:00 h (réglable)
(15)
Durée du programme : 6:00 h-12:00 h (réglable)
(16)
Durée du programme : 24:00 h-48:00 h (réglable)
DOUGH (PÂTE) (17)
Durée du programme : 0:10 h-0:30 h (réglable)

68 Français
7.1 Programme DIY (À faire soi-même)
(18)
Durée du programme : 1:20 h
pain.
(19)
Durée du programme : 0:10 h-0:60 h (réglable)
Durée du programme : 0:45 h-1:30 h (réglable)
-
-
Durée du programme : 1:10 h
(22)
Durée du programme : 24:00 h-48:00 h
(23)
Durée du programme : 1:53 h
de la levure chimique.
(GÂTEAU ITALIEN)
(24)
Durée du programme : 1:53 h
.
DIY
Durée du programme : 2:15 h (Standard, réglable)
-

69
Français
1.
2.
3.
4.
-
PÉTRIR1-FAIRE LEVER1-PÉTRIR2-FAIRE LEVER2-CUIRE-
MAINTIEN DE LA CHALEUR.
-
8. Sélecon de la taille du pain et du degré de brunissage
-

70 Français
que dans les programmes suivants : PIZZA DOUGH (PÂTE À PIZZA),
ITALIAN DOUGH (PÂTE ITALIENNE), DOUGH RISE (PÂTE LEVÉE), FER-
MENT/DEFROST (FERMENT/DÉCONGÉLATION), YOGHURT (YAOURT),
PICKLED VEGE (LÉGUMES MARINÉS), DOUGH (PÂTE), JAM (CONFI-
TURE), ROAST NUT (NOIX RÔTIES), MEAT FLOSS (VIANDE SÉCHÉE),
RICE VINEGAR (VINAIGRE DE RIZ), CAKE (GÂTEAU)
les valeurs suivantes :
que dans les programmes suivants : QUICK (RAPIDE), PIZZA DOUGH
(PÂTE À PIZZA), ITALIAN DOUGH (PÂTE ITALIENNE), DOUGH RISE
(PÂTE LEVÉE), FERMENT/DEFROST (FERMENT/DÉCONGÉLATION),
YOGHURT (YAOURT), PICKLED VEGE (LÉGUMES MARINÉS), DOUGH
(PÂTE), JAM (CONFITURE), BAKE (CUISSON), ROAST NUT (NOIX
RÔTIES), MEAT FLOSS (VIANDE SÉCHÉE), RICE VINEGAR (VINAIGRE
DE RIZ), CAKE (GÂTEAU), ITALIAN CAKE (GÂTEAU ITALIEN) et DO IT
YOURSELF (À FAIRE SOI-MÊME)
9. Temporisaon

71
Français
cuisson du programme.
Exemple : Il est 20:30 heures. Si vous souhaitez que votre pain soit
terminé le lendemain man à 7 heures, alors il s’agit de 10 heures et
30 minutes. Réglez le programme souhaité, le degré de brunissage
souhaité et la taille du pain. Séleconnez ensuite l’heure actuelle de
10:30 pour le délai de temporisaon, qui apparaît à l’écran LCD. Ap-
puyez alors sur la touche « ARRÊT »/« DÉMARRAGE » pour acver
ce programme de temporisaon. Le temps restant est décompté et
aché à l’écran LCD. Le pain frais sera terminé à 7:00 heures du ma-
n. Si le pain n’est pas sor immédiatement, la durée de mainen
de la chaleur d’une heure commence.
les programmes suivants : PIZZA DOUGH (PÂTE À PIZZA), ITALIAN
DOUGH (PÂTE ITALIENNE), DOUGH RISE (PÂTE LEVÉE), FERMENT/DE-
FROST (FERMENT/DÉCONGÉLATION), YOGHURT (YAOURT), PICKLED
VEGE (LÉGUMES MARINÉS), DOUGH (PÂTE), JAM (CONFITURE),
BAKE (CUISSON), ROAST NUT (NOIX RÔTIES), MEAT FLOSS (VIANDE
SÉCHÉE), RICE VINEGAR (VINAIGRE DE RIZ), CAKE (GÂTEAU) et ITA-
LIAN CAKE (GÂTEAU ITALIEN)
10. Pause
-
-
11. Mémoire
-

72 Français
12. Foncon de mainen de la chaleur
-
13. Comparment à ingrédients (5) (Ajout automaque d’ingré-
dients)
en
-
-
14. Averssements d'écran d’achage
refroidir complètement.

73
Français
15. Cuire le pain
Posez le moule sur l’arbre de transmission et tournez-le dans le
-
le pain, en ouvrant le couvercle, en tournant dans le sens horaire
-
-

74 Français
Aenon !
-
-
chaleur.
Recommandaon du fabricant : Ulisez de l’eau minérale à la place
de l’eau courante, car cela permet une meilleure aéraon du pain !
Pains à parr de mélanges prêts à l’emploi
-
suivantes :
-

75
Français
16. Instrucons parculières
16.1 Programme « QUICK » (Rapide)
pain dans un temps plus court avec de la levure ou du bicarbonate
16.2 Mesure des ingrédients
-
• Pesage d’ingrédients liquides
-
• Ingrédients secs
-

76 Français
17. Mesure des ingrédients
-
•
droit et posez-le sur une surface plane.
•
•
-
18. Ordre des ingrédients
Levure ou levure chimi-
que
Liquide (par ex. eau)

77
Français
Liquide (lait, eau etc.), œufs, sel et poudre de lait etc.
ne doit pas entrer en contact avec le sel.
-
-
ex. les œufs ou les fruits.
19. Neoyage et entreen
-
-

78 Français
20. Dépannage
Erreur Mof du défaut Dépannage
-
dant la cuisson
prise et laissez l’appareil se refroidir
La croûte du pain est
trop longtemps
pain n'est pas cuit de
- Mauvais programme
souvent ouvert
au point que le crochet
tourner correctement.
- N’ouvrez pas le couvercle pendant
Le pain est si grand
qu’il peut cogner
contre le couvercle
- Une trop grande quan-
trop haute.
Il est même possible que
peut être un autre raison.
-
Ouvrez le couvercle de l'appareil
et laissez la machine se refroidir
complètement.
de manière audible,
Le moule n'est pas bien

79
Français
21. Indicaons des ingrédients possibles
Diérents types de farine
Farine complète
d’autres sortes de farine.
Farine sans levure chimique
-
rents types de biscuits.
Farine au gluten
Erreur Mof du défaut Dépannage
Le pain cuit est très
lourd et la structure
dense
- Une trop grande quan-
- Une trop grande quan-
d’eau
farine complète
Le pain retombe au
milieu pendant la
cuisson
- La farine n'est pas assez
forte pour faire lever la
haute ou la levure agit
trop vite
- Une trop grande quan-
d’eau

80 Français
Farine de blé sombre
-
langer avec d'autres sortes de farine.
Farine autopropulsée
Farine de maïs ou de ocons d’avoine
goût et la texture.
Sucre
Œufs
Soude
Levure chimique

81
Français
Sel
croûte de pain. Suivez scrupuleusement la recette pour les quanti-
Matière grasse, beurre et huile végétale
pain devient ainsi plus moelleux. Si vous voulez incorporer du
Eau et autres liquides
-
pomme ou le jus d’orange.
Levure
dioxyde de carbone fait plus lever le pain et assurer une structure
farine comme nutriment.
-
pain ne lève pas bien !
et active :
1.
2.
levure dans l’eau.

82 Français
3. Posez le gobelet doseur pendant env. 10 minutes sur un endroit
4.
tasse. Dans le cas contraire, la levure est inactive.
22. Exemples de recettes
Astuces :
- Utilisez de l’eau minérale pour aérer et alléger le pain.
- L’eau et/ou la poudre de lait peuvent même être remplacés par la
même quantité de lait.
Recettes de pain
Pain complet
Taille du pain 850 g
350 ml
Sel
Miel
Farine complète de
550 g
Levure sèche
Programme :
3 - Whole Weat,
Pain protéiné
Taille du pain 750 g
Fromage blanc
250 g
4
Sel
soupe
Levure chimique
1 sachet
100 g
d’avoine
30 g
Programme :
1 - Basic ,
couleur :
Pain blanc
Taille du pain 1000 g
350 ml
Farine 500 g
Levure
Sel de mer
soupe
Sucre
soupe
Huile d’olive
soupe
Programme :
1 - Basic,
Pain de campagne
Taille du pain 1000 g
360 ml
Farine type 1050 600 g
Levure sèche 1 paquet
Sel
Sucre
30 g
Programme :
1 - Basic,
-
enne

83
Français
Pâte
Gâteau
Pâte à pizza
Farine 300 g
Sel
Levure fraîche
1/2 cube
Huile d’olive
200 ml
Sucre
Programme
Quatre-quarts
Œufs 3
Sucre
125 g
Beurre/margarine 125 g
1 sachet
Lait
Farine blanche 300 g
Levure chimique 1 sachet
Programme :
Remarque : La quanté de sucre peut varier si nécessaire.

84 Français
23. Consignes de sécurité et clause de non responsabilité
-
-
-
-
-
24. Informaons sur la mise au rebut de vos appareils
des composants toxiques ou dangereux pourraient endommager
-
-

85
Français
Le symbole sur le produit, le mode d'emploi et / ou l'emballage in-

86 Français
Wohlenbergstraße 16, 30179 Hanovre
Direcve DEEE 2012/19/UE
Numéro de registre DEEE : DE 67896761

87
Italiano
IMPORTANTI INFORMAZIONI SULLA SICUREZZA
PER QUESTO APPARECCHIO
• Prima di collegare l’apparecchio accertarsi che la
tensione di rete disponibile corrisponda all’indica-
!
• -
• -
to!
• -
• Non immergere il cavo, la spina o l'intero apparec-
chio in acqua o altri liquidi!
• Spegnere l'apparecchio dopo l’uso. Staccare la spina
per pulirlo o per rimuovere il cestello.
• Il cavo e la spina non devono penzolare dai bordi e
• -
• -
ni o persone indifese.
• Non posizionare la macchina per il pane in prossimi-
• -
quidi caldi come la marmellata!

88 Italiano
• -
chio quando è acceso!
• Non accendere la macchina per il pane solo, se il
-
• Non rimuovere mai il cestello durante il funziona-
mento!
• Per rimuovere il pane, il cestello non deve in nessun
cestello!
• Non coprire l’apparecchio durante l’uso. Possono
• -
-
menta il rischio di incendio o di cortocircuito!
• Per scollegare completamente la macchina per il
-
sa!
•
-
so.
•

89
Italiano
•
dell'apparecchio e ai pericoli che ne possono scatu-
manutenzione dell’apparecchio non devono essere
eseguite da bambini senza adeguata supervisione!
• -
tare che non giochino con l'apparecchio.
• Se il cavo di alimentazione è danneggiato deve esse-
-
•
un sistema di comando a distanza separato!
• -
dicate in questo manuale!
•
•
non per l’uso commerciale.

90 Italiano
ATTENZIONE: L’apparecchio durante l’uso si ri-
scalda molto! Rischio di usoni!
-
danneggiata.
1. Contenuto della confezione
• Macchina per il pane
• Pala impastatrice
•
• Misurino dosatore
• Gancio per estrarre la pala impastatrice
•

91
Italiano
2. Da tecnici
3. Deagli del prodoo
Aliment. di tensione
Potenza assorbita 550 W
Peso 6000 g (solo apparecchio)
•
• Protezione contro il surriscaldamento
• Funzione ritardo
•
• Temperatura costante
• Funziona di mantenimento del calore (1 ora)
•
•
• Design termoisolato.
1
2
3
4

92 Italiano
4. Prima del primo ulizzo
•
di danni.
5
6
7
8
Numero Descrizione
1
2 Finestrella
3 Display
4
5
6
7 Gancio per estrarre la pala impastatrice
8 Pala impastatrice
9
9

93
Italiano
•
•
pala e pulire nuovamente l’apparecchio e gli accessori.
• -
vo. Ora, la macchina per il pane è pronta per l'uso.
5. Display ed elemen di controllo
Programmi
Programmi
Orario di lavoro
Mantenimento
del calore
Tempo di ritardo
Ammassare/Knead (1,2)
Lievitazione/rise (1,2)
Dimensione del
pane
Grado di doratura
Tasto Start/Stop
Tasto OK

94 Italiano
6. START/STOP
-
7. Programmi
seguito.
-
ard) (1)
Tempo programma: 2:42 h-3:07 h (a seconda della
grandezza del pane) Ammassare, Lievitazione e
francese) (2)
Tempo programma: 03:18 h-3:33 h (a seconda del-
la grandezza del pane) Ammassare, Fermentazione
una crosta croccante e una mollica leggera.
(pane integrale) (3)
Tempo programma: 03:31 h-3:50 h (a seconda del-
la grandezza del pane) Ammassare, Lievitazione e
che il grano possa assorbire l'acqua ed espandersi.
dolce) (4)
Tempo programma: 02:55 h-3:07 h (a seconda della
grandezza del pane) -
dolce.
a basso contenuto di zuc-
cheri) (5)
Tempo programma: 03:04 h-3:19 h (a seconda della
grandezza del pane) Pane a basso contenuto di zuc-
a basso contenuto di zuccheri

95
Italiano
riso) (6)
Tempo programma: 03:18 h-3:33 h (a seconda della
grandezza del pane) -
-
digeribile.
(pane di farina di riso)
(7)
Tempo programma: 03:21 h-3:50 h (a seconda della
grandezza del pane)
veloce) (8)
Tempo programma: 2:10 h Impastare, lievitazione e
italiano) (9)
Tempo programma: 03:20 h-3:32 h (a seconda della
grandezza del pane) -
(10)
Tempo programma: 02:45 h-2:55 h (a seconda della
grandezza del pane)
-
PIZZA DOUGH (impasto
per pizza) (11)
Tempo programma: 0:35 h Impastare, far lievitare l’im-
pasto, rimuoverlo e preparare la pizza.
ITALIAN DOUGH (im-
pasto italiano) (12)
Tempo programma: 0:20 h
Impastare, rimuovere l’impasto e preparare il dessert
-
one impasto) (13)
Tempo programma: 1:30 h Impastare, far lievitare l’im-
pasto, rimuoverlo e preparare i panini, la pizza, il pane a
vapore, ecc.
-
tare/scongelare) (14)
Tempo programma: 0:10 h-1:00 h (regolabile)
essere impostato personalmente nel campo indicato.
Tempo programma: 06:00 h-12:00 h (regolabile)
-
indicato.
Tempo programma: 24:00 h-48:00 h (regolabile)
DOUGH (impasto) (17)
Tempo programma: 00:10 h-0:30 h (regolabile) Am-
l’impasto e preparare i panini, la pizza, il pane a vapore,
ecc.

96 Italiano
7.1 Programma DIY (Do it yourself)
-
impostare il tempo di lavoro per ogni periodo. Il programma viene
JAM (marmellata)
(18)
Tempo programma: 1:20 h
le verdure, prima di versarli nel cestello del pane.
forno) (19)
Tempo programma: 00:10 h-0:60 h (regolabile)
-
-
oni selezionate.
tostate) (20)
Tempo programma: 0:45 h-1:30 h (regolabile)
Prima della tostatura delle noci è necessario rimuovere
MEAT FLOSS (carne
secca) (21)
Tempo programma: 01:10 h
(aceto di riso) (22)
Tempo programma: 24:00 h-48:00 h (regolabile)
Preparazione di aceto di riso.
Tempo programma: 01:53 h
lievito in polvere.
-
ta italiana) (24)
Tempo programma: 01:53 h
DIY
(fai da te) (25)
Tempo programma: 2:15 h (Standard, regolabile)
-
-
possa impostare il tempo di lavoro a proprio piacimento e

97
Italiano
-
1. Per prima cosa selezionare il grado di doratura e confermare con
2.
3.
4. -
gramma. Il simbolo dell’orologio e il simbolo del passo program-
è il seguente:
AMMASSARE1-LIEVITAZIONE1-AMMASSARE2-LIEVITAZIO-
NE2-CUOCERE-
MANTENIMENTO DEL CALORE.
tempo e poi passate alla fase successiva. La fase successiva lampeg-
le impostazioni e uscire dal Setup.
8. Selezione della dimensione del pane e del grado di doratura
Selezionare prima un programma.
Successivamente è possibile selezionare il grado di doratura del

98 Italiano
-
grammi: PIZZA DOUGH (impasto per pizza), ITALIAN DOUGH (im-
pasto italiano), DOUGH RISE (lievitazione impasto), FERMENT/DE-
FROST (fermentare/scongelare), YOGHURT (jogurt), PICKLED VEGE
(verdure sooaceto), DOUGH (impasto), JAM (marmellata), ROAST
NUT (noci tostate), MEAT FLOSS (carne secca), RICE VINEGAR (aceto
di riso), CAKE (torta)
500 g (piccolo) o 750 g (medio) o 950 g (grande)
QUICK ( veloce), PIZZA DOUGH (im-
pasto per pizza), ITALIAN DOUGH (impasto italiano), DOUGH RISE
(lievitazione impasto), FERMENT/DEFROST (fermentare/scongelare),
YOGHURT (jogurt), PICKLED VEGE (verdure sooaceto), DOUGH (im-
pasto), JAM (marmellata), ROAST NUT (noci tostate), MEAT FLOSS
(carne secca), RICE VINEGAR (aceto di riso), CAKE (torta), ITALIAN
CAKE (torta italiana) e DO IT YOURSELF (fai da te)
9. Ritardo
Se si desidera che la macchina per il pane inizi a cuocere dopo un
Il tempo di ritardo massimo è di 13 ore. Selezionare un programma
e impostarlo come desiderato. Quando entrate nel tempo di ritardo
macchina del pane di terminare il processo a un orario prestabilito.
-

99
Italiano
Esempio: Sono le ore 20:30. Se però preferite che il pane sia pronto
il giorno dopo alle ore 7:00, si traa di 10 ore e 30 minu. Impostare
il programma, il grado di doratura e la grandezza del pane desi-
dera. Successivamente, nel tempo di ritardo selezionare l’orario
auale 10:30, che viene visualizzato sul display LCD. Premere il tasto
“STOP/START” per avare il tempo di ritardo. Ha luogo il conto alla
rovescia del tempo residuo il quale viene visualizzato sul display
LCD. Il pane fresco è pronto alle ore 7:00 del giorno dopo. Se il pane
non viene prelevato immediatamente, inizia a decorrere il tempo di
Mantenimento del calore di un ora.
-
mi: PIZZA DOUGH (impasto per pizza), ITALIAN DOUGH (impasto
italiano), DOUGH RISE (lievitazione impasto), FERMENT/DEFROST
(fermentare/scongelare), YOGHURT (jogurt), PICKLED VEGE (verdure
sooaceto), DOUGH (impasto), JAM (marmellata), BAKE (coura a
forno), ROAST NUT (noci tostate), MEAT FLOSS (carne secca), RICE
VINEGAR (aceto di riso), CAKE (torta) e ITALIAN CAKE (torta italiana)
10. Pausa
11. Memoria
-

100 Italiano
12. Funzione di mantenimento del calore
-
rimuovere il contenuto durante la fase di riscaldamento, spegnere
13. Scomparto ingredien (5) (aggiunta automaca degli ingre-
dien)
, mantenendo il luc-
dello scomparto.
14. Messaggi di avviso sul display
Se sul display appare il codice "HH:H", la temperatura all'interno
della macchina per il pane è troppo alta. Il programma in esecuzio-
ne deve essere terminato. Aprire il coperchio dell’apparecchio e far

101
Italiano
15. Coura del pane
Posizionare il cestello sull'albero motore e ruotarlo in senso orario
la pala impastatrice sull’albero motore. Si consiglia di ungere la pala
norma, si aggiunge prima il liquido, poi lo zucchero, il sale o la farina
nel cestello, chiudere il coperchio della macchina per il pane. Inse-
rire la spina nella presa. Quindi selezionare il programma deside-
rato con il tasto "MENU" e poi la dimensione del pane con il tasto
-
-
aprite mai il coperchio della macchina per il pane durante il processo
Non appena il processo completo è terminato, viene emesso un se-
terminare il programma in esecuzione. Una volta terminato il pro-
gramma, è possibile rimuovere il pane aprendo il coperchio, ruotan-
-
volgere con cautela il cestello in modo da poter estrarre facilmente
il pane.
102 Italiano
Aenzione! La macchina, il cestello, la pala impastatrice e il pane
possono essere molto caldi! Quindi usare sempre la dovuta cautela!
Estrarre la pala impastatrice dal fondo del pane con l'apposito gancio.
-
-
-
mento del calore.
Consigli del produore: Ulizzare acqua minerale al posto dell'acqua
naturale, perché questo rende il pane più buono!
Pane con impas pron
-
cente.
procedere come segue:
- Accendere la macchina per il pane e inserire il liquido, come consi-
gliato nell’impasto pronto.
- Selezionare il corrispondente programma e la doratura desidera-

103
Italiano
16. Istruzioni parcolari
16.1 Programma “QUICK” (veloce)
-
sulla parte superiore. Durante l’impasto è possibile che si accumulino
16.2 Misura degli ingredien
-
• Pesatura degli ingredien liquidi
-
-
• Ingredien secchi
-
-
re il misurino. Le misure dovrebbero essere eseguite in orizzontale
-

104 Italiano
17. Quantà degli ingredien
-
-
•
• -
surino, pulirlo accuratamente dopo l’uso.
•
il cucchiaio dosatore. Il lato grande del cucchiaio dosatore cor-
risponde ad un cucchiaio da tavola, mentre il lato piccolo corri-
misurazione.
18. Sequenza degli ingredien
-
Lievito o lievito in polvere
Liquido (per es. acqua)

105
Italiano
Assicurarsi che la farina non sia completamente bagnata dal liquido
quando viene aggiunta. Il lievito deve essere aggiunto alla farina sec-
Quando l'impasto è stato impastato per qualche minuto, si sente un
-
-
19. Pulizia e cura
-
-
-
-
nella macchina per il pane posizionando il cestello sull'ingranaggio
l’apposito gancio.
Usare un panno umido per pulire la parte restante della macchina e
Per la pulizia, non immergere l’apparecchio nell'acqua o in altri liqui-
di.

106 Italiano
20. Risoluzione anomalie
Guasto Movo anomalia Risoluzione anomalie
Esce fumo dall'aper-
forno
sono troppo vicini agli
Scollegare l'apparecchio dalla presa
completamente e pulire l’elemento
riscaldante.
La crosta del pane è
troppo spessa
Il pane è stato tenuto
caldo troppo a lungo e
lasciato nello stampo
Togliere il pane il prima possibile e
tenerlo in caldo solo se necessario.
modo non uniforme e
il pane non si
in modo soddisfa-
cente.
- Il coperchio è stato
aperto troppo spesso
- La resistenza alla rotazi-
one è troppo elevata, per
cui la pala impastatrice
non riesce a ruotare
- Non aprire il coperchio mentre il
programma è in esecuzione.
pala impastatrice. Se notate un
malfunzionamento, non esitate a
coperchio
lievito, acqua o farina
- Temperatura ambiente
troppo alta.
acqua o di farina. Qualora necessar-
Il Pane è troppo pic-
colo e non è lievitato
il lievito sia vecchio o
potrebbe essere una
temperatura troppo alta
dell’acqua.
temperatura dell’acqua.
Il display mostra
"H HH", dopo che è
stato premuto il tasto
"Start/Stop".
La temperatura interna
della macchina per pane
è troppo alta.
Aprire il coperchio dell’apparecchio
macchina.
Il motore è acceso
in modo udibile,
ma l'impasto non è
impastato
-
è troppo grande per
essere impastato

107
Italiano
21. Note sui possibili ingredien
Diversi pi di farina
Farina integrale
Farina senza lievito in polvere
La farina senza lievito in polvere è conosciuta anche come farina
Farina di glune
Guasto Movo anomalia Risoluzione anomalie
interna è estrema-
mente densa
acqua e troppa farina.
integrale
farina integrale
Il pane crolla al centro
- La farina non è
abbastanza forte da
dell'impasto
- La temperatura è troppo
alta o il lievito agisce
troppo velocemente
- Troppa acqua rende
l’impasto troppo pesante
per pane o amido di mais
-
peratura ambiente
di acqua

108 Italiano
Farina di grano tenero
-
Farina autolievitante
-
zione di torte.
Farina di mais o farina d'avena
-
-
tegrale e servono, tra l'altro, per migliorare il gusto e la consistenza.
Zucchero
Lo zucchero è un ingrediente importante e serve ad esaltare il gusto
dolce e il colore del pane. Di solito si usa lo zucchero bianco, ma si
Uova
uova prive guscio quindi mescolarle uniformemente.
Bicarbonato di sodio
Il bicarbonato di sodio è molto simile al lievito in polvere. Il bicarbo-
polvere.
Lievito in polvere
Il lievito in polvere viene utilizzato per cuocere torte o pane con il
"Programma - 9 ultraveloce". Il lievito in polvere non richiede una
vera e propria "fase di lievitazione".

109
Italiano
Sale
Il sale è adatto per migliorare il gusto del pane e il colore della
crosta del pane. Attenersi sempre alla ricetta nell’aggiunta del sale!
Grasso, burro e olio vegetale
Il grasso aumenta la durata di conservazione del pane. Questo ren-
che sia stato precedentemente tagliato a piccoli pezzi.
Acqua e altri liquidi
L'acqua è un ingrediente importante nella produzione del pane.
-
-
lata con un 2% di latte in polvere. Questo migliora l’aroma e il colore
della crosta. Alcune ricette richiedono succhi di frutta diversi, come
il succo di mela o di arancia
Lievito
Durante la fase di lievitazione il lievito rilascia anidride carbonica.
-
sce una struttura interna morbida. Tuttavia, il lievito ha bisogno di
zucchero e farina come nutrienti.
il lievito in frigorifero immediatamente dopo ogni utilizzo.
Se il pane non lievita bene, nella maggior parte dei casi questo è
dovuto al lievito!
seguente:
1.
dosatore.
2. Aggiungere un cucchiaino di zucchero bianco al misurino e me-
scolare il contenuto. Poi versate due cucchiaini di lievito sull'ac-
qua.

110 Italiano
3. Mettere il misurino in un luogo caldo per circa 10 minuti e non
4. Dopo 10 minuti dovrebbe fare circa una tazza di schiuma. Se non
22. Alcuni esempi di ricette
Suggerimenti:
- Utilizzare acqua minerale per rendere il pane più leggero.
Anche l'acqua e/o il latte in polvere possono essere sostituiti dalla
stessa quantità di latte.
Ricette per il pane
Pane integrale
Dimensione del pane 850 g
350 ml
Sale
Miele
1 cucchiaino
Farina integrale
550 g
Lievito secco
Programma:
3 - Farina inte-
grale, colore:
scuro
Pane proteico
Dimensione del pane 750 g
Quark
250 g
Albumi 4
Sale 1 cucchiaino
4 cucchiai
Lievito in polvere
Semi di lino (interi o
100 g
Farro o crusca d'avena
30 g
Programma:
1 - Basic
, colore: scuro
Pane bianco
Dimensione del pane 1000 g
350 ml
Farina 500 g
Lievito
Sale marino
1 cucchiaio
Zucchero
1 cucchiaio
Olio d'oliva
1 cucchiaio
Programma:
1 - Basic,
Pane del contadino
Dimensione del pane 1000 g
360 ml
Tipo di farina 1050 600 g
Lievito secco
Sale
1 cucchiaino
Zucchero
1 cucchiaino
pasta acida di fru-
mento
30 g
Programma:
1 - Basic,
colore: Medio

111
Italiano
Impasto
Torta
Impasto per pizza
Farina 300 g
Sale
1/2 cucchiaino
Lievito fresco
1/2 dado
Olio d'oliva
2 cucchiaio
200 ml
Zucchero 1 presa di zucchero
Programma 11 - Pizza Dough
Preparazione:
Selezionare il programma "8 - Impasto" e accendere l'apparecchio. Dopo l'impastamen-
to, stendere la pasta. Aggiungere un po' di farina all'impasto. Prima di poterla guarnire a
Pan di spagna
Uova 3
Zucchero
125 g
Burro/margarina 125 g
Zucchero vanigliato
Farina bianca 300 g
Lievito in polvere
Programma: 10 - Torta
Preparazione:
-
avviare il programma "Torta".
Nota: La quantà di zucchero può variare a seconda delle vostre esigenze.

112 Italiano
23. Avvertenze di sicurezza ed esclusione della responsabilità
-
-
neve. In ogni caso, tenere l'apparecchio lontano da elevate tempe-
rature.
-
-
mentali limitate.
-
senza preavviso.
24. Indicazioni per lo smalmento
e pericolosi possono inquinare permanentemente l'ambiente in caso
-
-
-

113
Italiano
-
portante contributo alla tutela dell'ambiente.

114 Italiano
-
30179 Hannover
Direva RAEE 2012/19/UE
Numero reg. RAEE: DE 67896761

115Español
OBSERVACIONES IMPORTANTES DE SEGURIDAD
PARA ESTE APARATO
• Antes de conectar el aparato, asegúrese de que la
tensión de red coincide con los datos que aparecen
en la placa.
•
dañados o defectuosos.
• -
do.
•
los mangos previstos para ello.
• No sumerja el aparato, el enchufe ni el cable en agua
•
• No cuelgue el cable ni el enchufe sobre bordes o su-
•
fabricante del aparato. ¡Peligro de lesiones!
• No pierda de vista el producto, sobre todo cuando
•
•
calientes como mermelada.
• No toque las piezas móviles o giratorias del aparato

116 Español
• -
de correctamente.
•
• No golpee el molde sobre un borde o una encimera
•
ocasionarse un incendio si lo cubre con un material
• No coloque papel de aluminio ni otros materiales en
o cortocircuito.
• ¡Para desconectar el aparato por completo de la red,
desenchúfelo de la toma de corriente!
•
estas instrucciones de uso.
•
•
o mentales reducidas o falta de experiencia y cono-
cimientos cuando se encuentren bajo supervisión o
hayan sido instruidos en relación con el uso seguro
del aparato y los peligros que pueden derivarse del

117Español
mismo. Este producto no es un juguete. No deje que
los niños se encarguen de la limpieza y el manteni-
miento del aparato sin supervisión.
• Se debe vigilar a los niños para que no jueguen con
el aparato.
•
-
vicio de atención al cliente o una persona con una
•
un sistema de control remoto independiente.
• -
mas como las indicadas en este manual.
• -
•
y no es adecuado para usos comerciales.

118 Español
ATENCIÓN: ¡El aparato se calienta mucho du-
rante el funcionamiento! ¡Peligro de quemadu-
ras!
Muchas gracias por escoger un producto de Arendo. Para que pueda
lea atentamente las siguientes instrucciones de uso. Antes de poner-
lo en marcha, compruebe que el producto suministrado no presenta
defectos ni daños.
1. Contenido
•
• Gancho de amasar
• Molde
• Jarra medidora
•
•

119Español
2. Datos técnicos
3. Detalles del producto
550 W
Peso 6000 g (solo el aparato)
Propiedades •
• Protección contra sobrecalentamiento
• Función de retardo
•
• Temperatura constante
• Función de mantenimiento de calor (1 hora)
•
•
•
1
2
3
4

120 Español
4. Antes del primer uso
• -
ños.
5
6
7
8
Número Descripción
1 Tapa
2 Mirilla
3 Pantalla
4 Elementos de mando
5
6 Molde
7
8 Gancho de amasar
9
9
funcionamiento

121Español
•
•
a limpiar el aparato y los accesorios.
•
5. Pantalla y controladores
Programa
Programa
Tiempo de funcionamiento
Mantener cali-
ente
Tiempo de demora
Horneado/
Bake
Amasar/Knead (1,2)
Fermentar/rise (1,2)
Tamaño del pan
Nivel de tostado
Botón Start/Stop
Botón OK
Adición de ingredientes
funcionamiento

122 Español
6. START/STOP
-
-
7. Programa
Puede elegir el programa que desee girando la rueda giratoria
programas y funciones.
7.1 Programa DIY (OPCIÓN PERSONALIZADA)
-
Tiempo de programación: 2:42 h-3:07 h (depen-
diendo del tamaño del pan) Amasar, fermentar y
-
dientes para ajustar el sabor.
Tiempo de programación: 3:18 h-3:33 h (depen-
diendo del tamaño del pan) Amasar, fermentar y
se hornea en esta opción suele tener una corteza
crujiente y una textura ligera.
Tiempo de programación: 3:31 h-3:50 h (depen-
diendo del tamaño del pan) Amasar, fermentar y
cereal pueda absorber el agua y expandirse. No se
Tiempo de programación: 2:55 h-3:07 h (dependien-
do del tamaño del pan) Amasar, fermentar y hor-
near pan dulce. Para amasar pan dulce y crujiente.
Tiempo de programación: 3:04 h-3:19 h (dependien-
do del tamaño del pan) pan bajo en azúcar: Amasar,
fermentar y hornear, con bajo contenido en azúcar

123Español
Tiempo de programación: 3:18 h-3:33 h (dependiendo
del tamaño del pan) Al amasar, fermentar y hornear,
Tiempo de programación: 3:21 h-3:28h (dependiendo
del tamaño del pan) Amasar, fermentar y hornear. El
Tiempo de programación: 2:10 h
Amasar, fermentar y hornear una barra con soda en
polvo o levadura en polvo. El pan que se hornea de
textura densa.
ITALIANO) (9)
Tiempo de programación: 3:20 h-3:32 h (dependiendo
del tamaño del pan) Al amasar, fermentar y hornear el
(PAN SIN GLUTEN)
(10)
Tiempo de programación: 2:45 h-2:55 h (dependiendo
del tamaño del pan) Amasar, fermentar y hornear pan
ajustar el sabor.
PIZZA DOUGH (MASA
DE PIZZA) (11)
Tiempo de programación: 0:35 h Amasar, fermentar la
.
ITALIAN DOUGH
(MASA ITALIANA) (12)
Tiempo de programación: 0:20 h
-
Tiempo de programación: 1:30 h
ella panecillos, pizza, pan al vapor, etc.
-
-
Tiempo de programación: 0:10 h-1:00 h (ajustable)
-
ación puede ajustarse en el campo indicado.
(15)
Tiempo de programación: 6:00 h-12:00 h (ajustable)
-
ación puede ajustarse en el campo indicado.
-
HADAS) (16)
Tiempo de programación: 24:00 h-48:00 h (ajustable)
Preparación de las verduras introducidas.
DOUGH (MASA) (17)
Tiempo de programación: 0:10 h-0:30 h (ajustable)
forme con ella panecillos, pizza, pan al vapor, etc.

124 Español
El proceso de elaboración incluye amasar / fermentar / hornear
-
-
DA) (18)
Tiempo de programación: 1:20 h
antes de colocarla en la bandeja del pan.
Tiempo de programación: 0:10 h-0:60 h (ajustable)
-
cionados.
-
DAS) (20)
Tiempo de programación: 0:45 h-1:30 h (ajustable)
Antes de tostar las nueces debe procurarse que se hayan
reducido la fricción.
MEAT FLOSS
-
Tiempo de programación: 1:10 h
-
Tiempo de programación: 24:00 h-48:00 h
Elaboración de vinagre de arroz
Tiempo de programación: 1:53 h
Amasar, fermentar y hornear. Fermentar con soda o polvos
de hornear.
(24)
Tiempo de programación: 1:53 h
Amasar, fermentar y hornear.
DIY
-
ALIZADA) (25)
Tiempo de programación: 2:15 h (Estándar, ajustable)
El proceso de elaboración incluye amasar/fermentar/
hornear/mantener caliente y muchos periodos. El usua-
usuario familiarizado con el proceso de fabricación de pan

125Español
1.
2. Tiene la opción de añadir otros ingredientes. En caso de que la
-
la cruz.
3.
4. Tiene la opción de ajustar cada paso de programa concreto. La
-
ciclo es el siguiente:
AMASAR1-FERMENTAR1-AMASAR2-FERMENTAR2-HORNEAR-
MANTENER CALIENTE.
-
haya programado.
8. Selección del tamaño del pan y nivel de tostado
Seleccione primero un programa.

126 Español
PIZZA DOUGH (MASA DE PIZZA), ITALIAN DOUGH (MASA ITALIANA),
DOUGH RISE (FERMENTAR MASA) , FERMENT/DEFROST (FERMEN-
TAR, DESCONGELAR), YOGHURT (YOGURT), PICKLED VEGE (VER-
DURAS ESCABECHADAS), DOUGH (MASA), JAM (MERMELADA),
BAKE (HORNEADO), ROAST NUT (NUECES TOSTADAS), MEAT FLOSS
(CARNE DESHIDRATADA), RICE VINEGAR (VINAGRE DE ARROZ), CAKE
(TARTA)
los valores siguientes:
500 g (pequeño) 750 g (medio) o 950 g (grande)
-
-
ciona solo con los siguientes programas: QUICK (PAN RÁPIDO),
PIZZA DOUGH (MASA DE PIZZA), ITALIAN DOUGH (MASA ITALIANA),
DOUGH RISE (FERMENTAR MASA), FERMENT/DEFROST (FERMEN-
TAR/DESCONGELAR), YOGHURT (YOGURT), PICKLED VEGE (VER-
DURAS ESCABECHADAS), DOUGH (MASA), JAM (MERMELADA),
BAKE (HORNEADO), ROAST NUT (NUECES TOSTADAS), MEAT FLOSS
(CARNE DESHIDRATADA), RICE VINEGAR (VINAGRE DE ARROZ), CAKE
(TARTA), ITALIAN CAKE (TARTA ITALIANA) y DO IT YOURSELF (OPCIÓN
PERSONALIZADA)
9. Conguración de la hora de comienzo del programa
-
-
nado es de 13 horas. Seleccione un programa y ajústelo como usted

127Español
Ejemplo: Son las 20:30 horas. Si quiere que el pan esté listo la ma-
ñana siguiente a las 7 horas, debe calcular 10 horas y 30 minutos.
Ajuste el programa, el nivel y el tamaño deseado del pan. Seleccio-
ne en empo de demora este empo de 10:30, que aparecerá en la
pantalla LCD. Pulse el botón STOP/START para acvar este programa
de demora. El empo restante se mostrará en la pantalla LCD. El
pan recién hecho estará listo a las 7:00 horas. Si el pan no se saca
de inmediato, comenzará un empo de mantenimiento del calor de
una hora .
los siguientes programas: PIZZA DOUGH (MASA DE PIZZA), ITA-
LIAN DOUGH (MASA ITALIANA), DOUGH RISE (FERMENTAR MASA),
FERMENT/DEFROST (FERMENTAR/DESCONGELAR), YOGHURT
(YOGURT), PICKLED VEGE (VERDURAS ESCABECHADAS), DOUGH
(MASA), JAM (MERMELADA), BAKE (HORNEADO), ROAST NUT
(NUECES TOSTADAS), MEAT FLOSS (CARNE DESHIDRATADA), RICE
VINEGAR (VINAGRE DE ARROZ), CAKE (TARTA), ITALIAN CAKE (TARTA
ITALIANA)
10. Pausa
Puede detener el programa una vez que ha comenzado pulsando el
-
do.
11. Memoria
Si se interrumpe el suministro de corriente del aparato, es posible
-

128 Español
12. Función de mantenimiento de calor
-
13. Comparmento de ingredientes (5) (añadido automáco de
ingredientes)
-
hornear el pan, saque el cajón de ingredientes (5) sujetando el asa y
la cerradura. Extraiga la caja de ingredientes, introduzca los ingre-
dientes necesarios y vuelva a introducir el cajón. Durante el funcio-
bandeja del pan.
borde superior.
deben añadirse los ingredientes.
14. Mensajes de advertencia en la pantalla
-

129Español
15. Hornear pan
-
de amasar en el eje motriz. Se recomienda engrasar el gancho de
amasar con margarina, por ejemplo, para poder extraerlo con ma-
-
y luego el azúcar, la sal o la harina, seguido de la levadura o polvos
de hornear.
-
necte el enchufe a una toma de corriente.
-
-
Si desea comenzar de inmediato, ignore este paso y pulse el botón
marcha.
La duración del horneado depende del programa seleccionado, el ta-
horneado por la mirilla de la tapa. ¡No abra en ningún caso la tapa de
-
-
cuidado y sacúdalo con suavidad para sacar el pan.

130 Español
¡Atención! ¡La carcasa, el molde, el gancho de amasar y el pan pue-
den estar muy calientes! Tenga cuidado al manipularlos.
suministrada.
Deje enfriar el pan unos 20 minutos. Si no apaga el programa una
-
de calor.
Recomendación del fabricante: ulice agua mineral en lugar de agua
de grifo para obtener un pan más esponjoso.
Panes a parr de mezclas de harina
-
-
te manera:
-
quete de la mezcla de harina.
- Seleccione el programa correspondiente y el tueste deseado y pulse
funcionamiento.

131Español
16. Observaciones especiales
16.1 Programa «QUICK» (pan rápido)
-
co en lugar de levadura. Para elaborar el pan perfecto, se recomienda
-
dir los ingredientes secos en la parte superior. Durante el amasado
inicial, pueden colocarse algunos ingredientes secos en los bordes y,
-
tula de goma para amasar.
16.2 Medición de los ingredientes
Un paso importante para la elaboración de un buen pan es añadir la
-
• Peso de ingredientes líquidos
Mida el agua, la leche fresca o la leche en polvo con el vaso medidor
Si mide aceite u otros ingredientes, limpie el vaso medidor a fondo.
• Ingredientes secos
En la medición en seco deben añadirse los ingredientes con una cu-
-
-
do horizontal y no deben colmarse los instrumentos de medición, ya
equilibrio de la receta.

132 Español
17. Medir ingredientes
Un importante paso para obtener buenos panes es el número y la
y un vaso medidores. Mida con precisión todos los ingredientes se-
• Mida el agua, la leche y la leche en polvo rehidratada con el vaso
•
bien.
• Mida los ingredientes secos con el vaso o la cuchara medidores
suministrados. El lado grande de la cuchara medidora equivale
a una cuchara, y el pequeño, a una cucharilla. No presione los
18. Orden de los ingredientes
-
etc.), huevos, sal y leche en polvo, etc. Asegúrese de que la harina no
sobre la harina seca, no debe entrar en contacto con la sal.
Levadura o polvos de hornear
Ingredientes secos

133Español
-
otros ingredientes como, por ejemplo, frutas. El aroma se ve afecta-
do por un amasado largo si los agrega demasiado pronto a la masa. Si
19. Limpieza y cuidado
Desconecte siempre el aparato del suministro de corriente y deje
Limpie el molde y el gancho de amasar con un paño ligeramente hu-
-
de las agujas del reloj hasta que se encaje.
pegado al pan.
tapa. Limpie la carcasa, la mirilla y la tapa con cuidado. No use limpia-

134 Español
20. Solución de errores
Error Causa Solución de errores
Sale humo por los
-
lación durante el
horneado
Algunos ingredientes
o se han pegado a los
elementos calentadores
Desconecte el aparato del suminis-
por completo y limpie los elementos
calentadores.
La corteza del pan es
demasiado gruesa
Se ha dejado el pan de-
en el molde
Saque el pan lo antes posible del
cuando sea necesario.
Los ingredientes no
se han mezclado de
forma uniforme y el
pan no se ha hornea-
do bien.
- Se ha seleccionado el
programa inadecuado
- Se ha abierto la tapa
demasiadas veces
- La resistencia al giro es
demasiado alta y el gan-
cho de amasar no puede
girar correctamente
- Seleccione el programa adecuado.
- No abra la tapa durante el progra-
ma.
detecta un mal funcionamiento, no
dude en ponerse en contacto con el
servicio de atención al cliente.
El pan es tan grande
que llega a la tapa
- Se ha usado demasiada
levadura, agua o harina
- La temperatura ambien-
tal es demasiado alta.
agua o harina. En caso necesario,
El pan es muy pe-
queño y no ha levado
Se ha usado muy poca
levadura. Es posible que
la levadura estuviera in-
ser una temperatura muy
alta del agua.
temperatura del agua.
En la pantalla aparece
de pulsar el botón
La temperatura en el
es demasiado alta.
Abra la tapa del aparato y deje que
pero no se amasan los
ingredientes
-
es demasiado grande
-
ta según la receta.

135Español
21. Notas sobre posibles ingredientes
Disntos pos de harina
Harina integral
-
tes. Es ideal para mezclarla con otras.
Harina sin polvos de hornear
Esta harina es conocida como harina de trigo. Adecuada para hor-
Harina de fuerza
-
la forma dada. Es especialmente indicada para hornear pan.
Error Causa Solución de errores
El pan acabado es
muy pesado y la
estructura interna es
muy densa
- Se ha usado demasiada
harina y muy poca agua
- Se ha usado demasiada
fruta o demasiada harina
integral
-
na integral
El pan se hunde por
el centro durante el
horneado
sostener el pan
- La temperatura es de-
masiado alta o la levadu-
ra ha actuado demasiado
- Demasiado agua hace
que la masa sea muy
pesada
- En caso de duda, use harina para
pan o harina de fuerza
- Use la levadura siempre a temper-
atura ambiente
-
dad de agua

136 Español
Harina de trigo oscura
Esta harina es muy rica en nutrientes, y se puede comparar con la
Harina leudante
Harina de maíz o de copos de avena
adicionales para la elaboración de panes bastos como el pan negro
y sirven, entre otros, para mejorar el sabor y la textura.
Azúcar
El azúcar es un componente importante y sirve para endulzar el
sabor y dar color al pan. Por lo general se usa azúcar blanco, pero
Huevos
Los huevos aportan nutrientes e intensidad al pan. Elimine cual-
Bicarbonato
El bicarbonato es muy parecido a los polvos de hornear. Se puede
utilizar junto con estos.
Polvos de hornear
-
Sal
La sal sirve para mejorar el sabor del pan y el color de la corteza.
-
pequeños cuando se usa sal.

137Español
Grasa, mantequilla y aceite vegetal
desea añadir mantequilla, no se olvide de cortarla previamente en
trozos pequeños.
Agua y otros líquidos
El agua es un ingrediente importante para la elaboración de pan.
Puede sustituir el agua por leche fresca o agua mezclada con un
2 % de leche en polvo. Esto mejora el aroma y el color de la corteza.
Algunas recetas necesitan zumos como de manzana o naranja.
Levadura
Durante el levado, la levadura emite dióxido de carbono, que hace
que el pan se hinche y garantiza una estructura interna suave. Pero
necesita azúcar y harina como alimento.
Guarde la levadura fresca en la nevera, porque las temperaturas
demasiado altas pueden matarla. Si tiene que comprar levadura,
a guardar en la nevera.
Si el pan sale mal, el problema suele ser la levadura.
-
tiva:
1.
2. Añada una cucharadita de azúcar blanco y mezcle el contenido. A
continuación, agregue dos cucharaditas de levadura al agua.
3.
caliente sin dar vueltas al agua.
4.
de espuma equivalente a una taza. Si no es el caso, la levadura

138 Español
22. Ejemplos de recetas
Consejos:
- Use agua mineral para obtener un pan más esponjoso y ligero.
- También puede sustituir el agua y la leche en polvo por la misma
cantidad de leche.
Recetas de pan
Pan integral
Tamaño del pan 850 g
Agua templada
350 ml
Sal
Miel
1cucharadita
Harina de trigo
integral
550 g
Levadura seca
Programa:
3 - Whole Wheat,
color: oscuro
Pan de proteínas
Tamaño del pan 750 g
250 g
4
Sal 1 cucharadita
Salvado de trigo
4 cucharaditas
Polvos de hornear
1 paquete
Semillas de linaza (enter-
as o tronzadas)
100 g
Salvado de espelta o
avena
30 g
Programa:
1 - Basic
, color: oscuro
Pan blanco
Tamaño del pan 1000 g
Agua templada
350 ml
Harina 500 g
Levadura
Sal marina
1 cucharadita
Azúcar
1 cucharadita
Aceite de oliva
1 cucharadita
Programa:
1 - Basic,
color: claro
Pan campesino
Tamaño del pan 1000 g
Agua templada
360 ml
600 g
Levadura seca 1 paquete
Sal
1 cucharadita
Azúcar
1 cucharadita
Masa madre de trigo
deshidratada
30 g
Programa:
1 - Basic,
color: Medio

139Español
Masa
Bizcocho
Masa de pizza
Harina 300 g
Sal
1/2 cucharadita
Levadura fresca
1/2 dado
Aceite de oliva
2 cucharadita
Agua, templada 200 ml
Azúcar 1 pizca de azúcar
Programa 11 - Pizza Dough (masa de pizza)
Preparación:
una vez amasada. Para ello, esparza un poco de harina sobre la masa. Antes de colocar
el resto de ingredientes, deje reposar la masa unos 10 minutos.
Bizcocho
Huevos 3
Azúcar
125 g
Mantequilla/marga-
rina
125 g
Azúcar avainillado 1 paquete
Leche
Harina de trigo 300 g
Polvos de hornear 1 paquete
Programa: 10 - Bizcocho
Preparación:
Ponga en primer lugar los huevos, la mantequilla, el azúcar y el azúcar avainillado en un
cuenco y mezcle los ingredientes hasta que espumen. Añada la harina y la levadura a la
Indicación: La candad de azúcar puede variarse.

140 Español
23. Advertencias de seguridad y exoneración de responsabilidad
-
-
-
ciones porque esto puede dañar las partes electrónicas. Antes del
-
instrucciones. Este producto no es un juguete.
-
-
sario realizar un aviso previo.
24. Indicaciones de eliminación
-
nentes deben separarse para el reciclaje o su eliminación, ya que los
componentes peligrosos y venenosos pueden producir daños al me-
-

141Español
manual de instrucciones o en el embalaje indica estas determinacio-
-
-
ción importante al medio ambiente.

142 Español
La empresa WD Plus GmbH declara por la presente que el aparato 304971/20200901FS002
declaración de conformidad completa en: WD Plus GmbH, Wohlenbergstraße 16, 30179
Hannover (Alemania)
Direcva WEEE 2012/19/UE
Número de registro WEEE: DE 67896761

143
Notes

WD Plus GmbH
Wohlenbergstraße 16
D-30179 Hannover