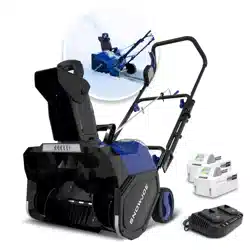
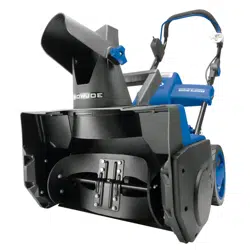
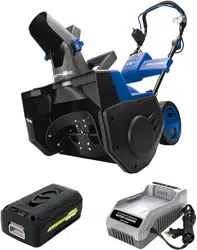
Owner Manual Cordless Snow Blower
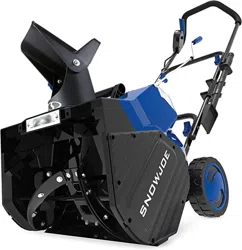
Know Your Cordless Snow Blower
Read the owner’s manual and safety rules carefully before operating your cordless snow blower. Compare the illustration below to the actual unit in order to familiarize yourself with the location of the various controls and adjustments. Save this manual for future reference.
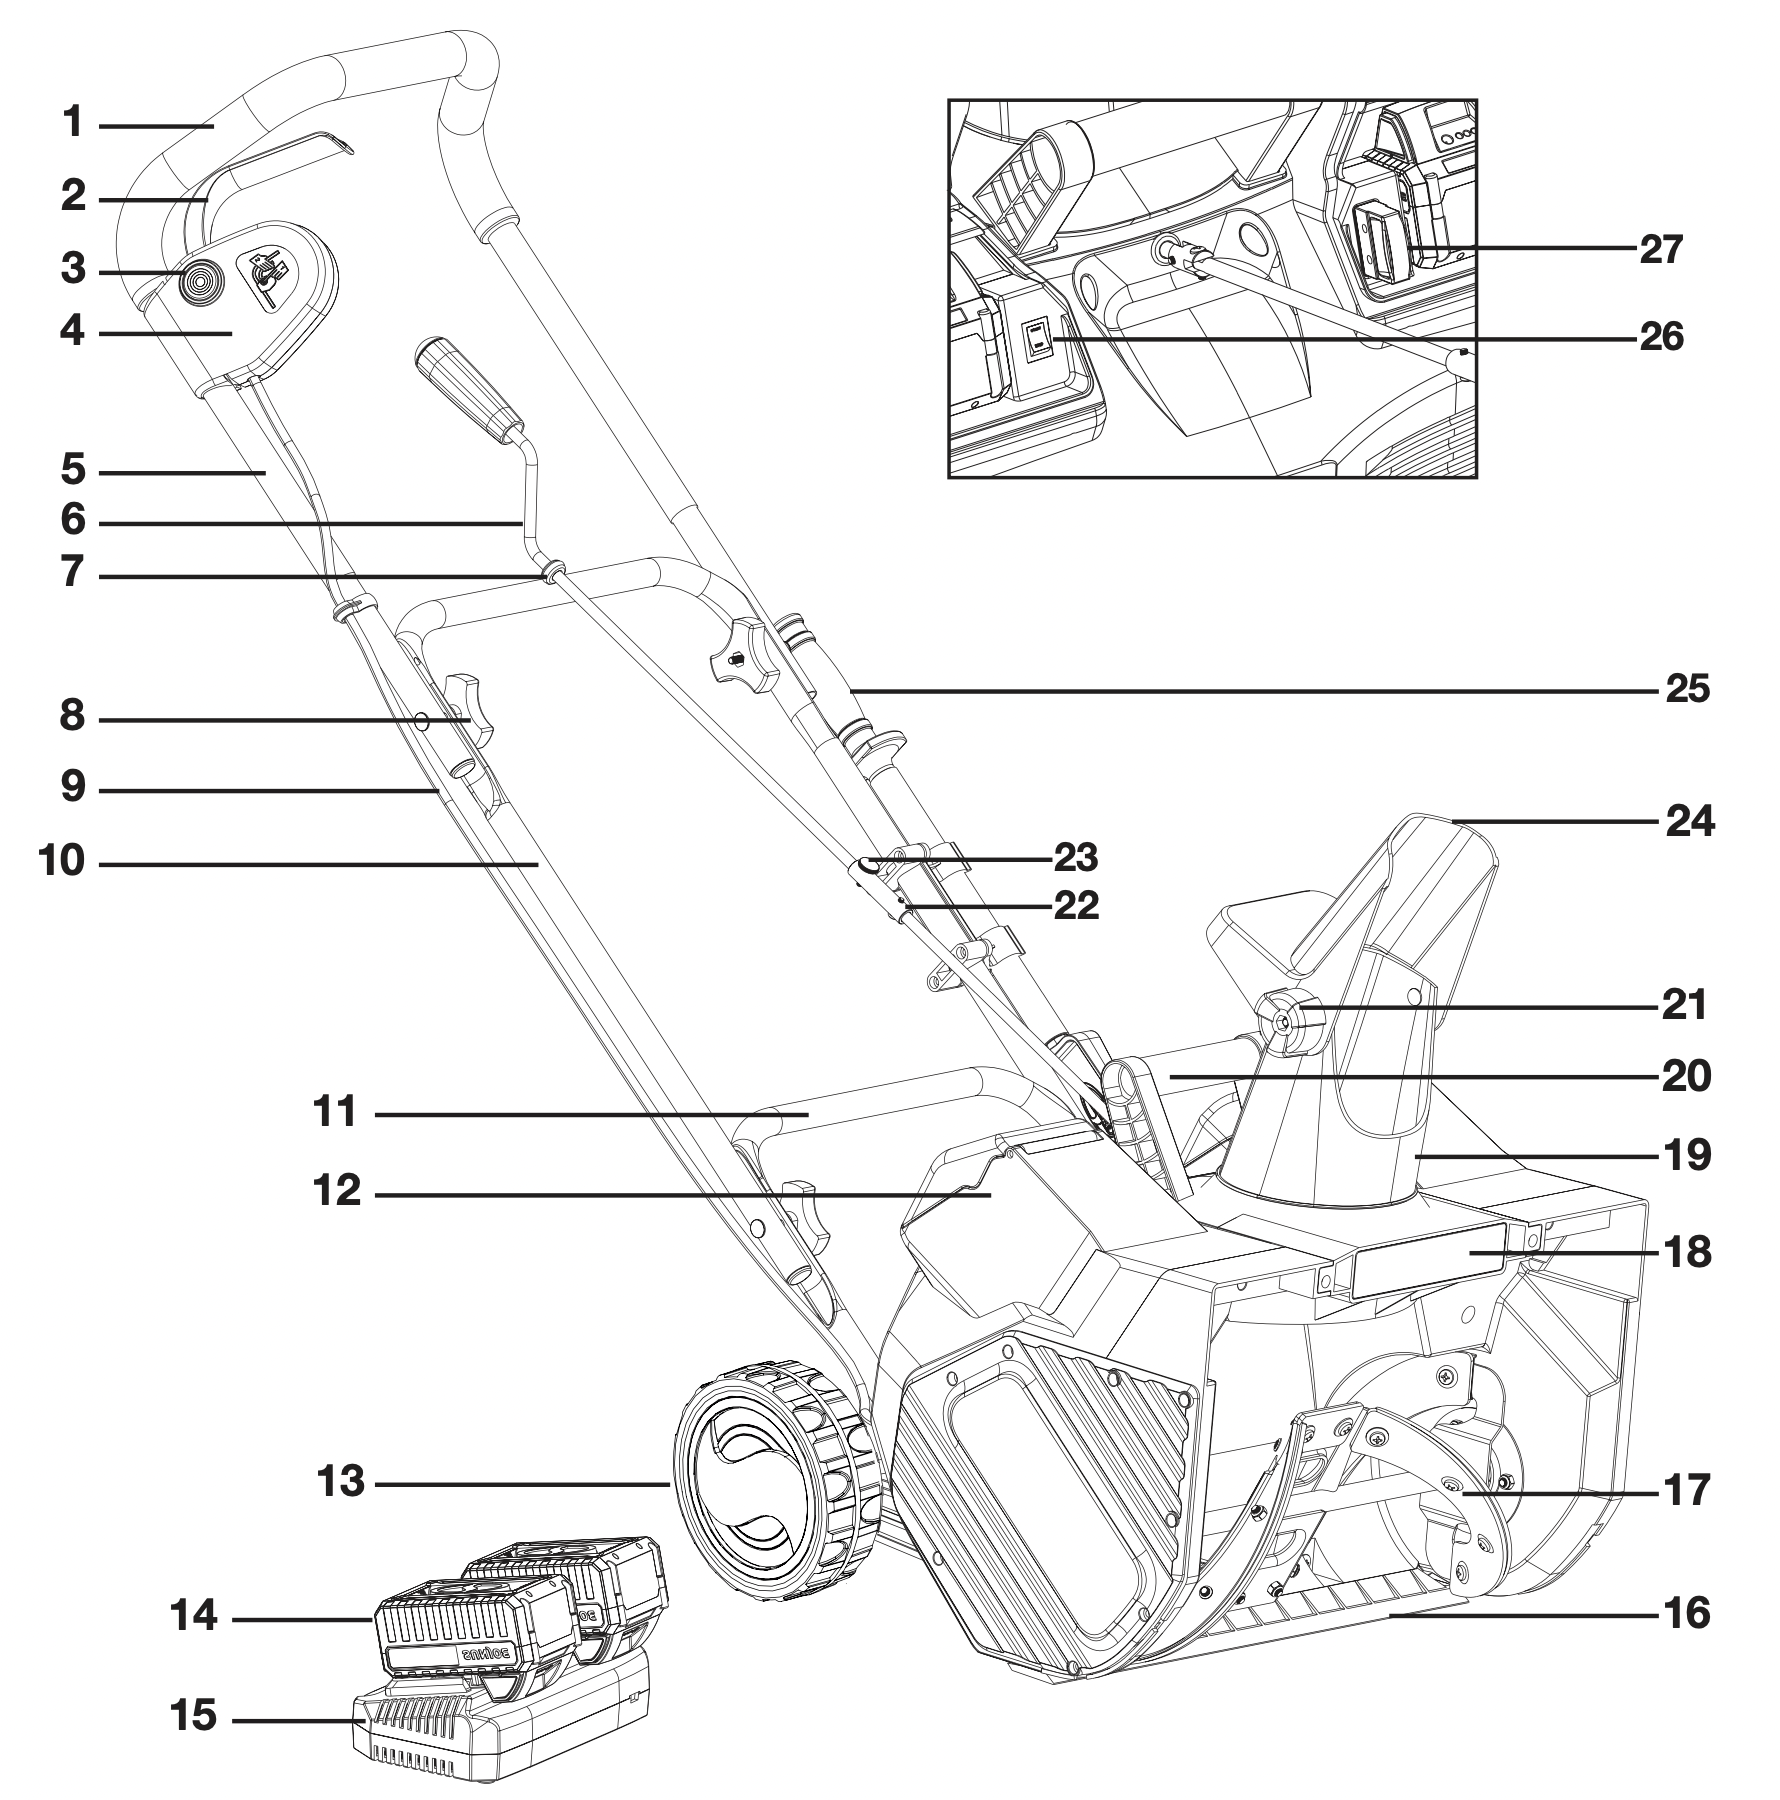
- Handle bar
- ON/OFF trigger
- Safety lock button
- Switch box
- Upper frame
- Upper crank rod
- Rubber ring
- Handle knobs and bolts
- Cord
- Middle frame
- Lower frame
- Battery compartment (2)
- Wheel (2)
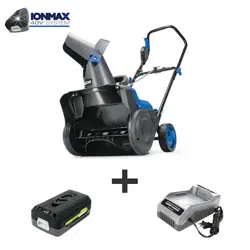
- iON+ 24V lithium-ion battery (24VBAT) featuring exclusive EcoSharp ® technology (2)
- iON+ 24V lithium-ion dual-port charger (24VCHRG-DPC)
- Scraper bar
- Auger
- LED light
- Discharge chute
- Auxiliary handle
- Deflector knob
- Crank rod connector
- Thumbscrew
- Chute deflector
- Clean out tool
- Light switch
- Safety key
Charger Operation
WARNING! Charge only iON+ 24V lithium-ion battery packs with its compatible iON+ 24V lithium-ion charger. Other types of batteries may cause personal injury and damage.
To reduce the risk of electric shock, do not allow water to flow into the charger's AC/DC plug.
When to Charge the iON+ 24VBAT Lithium-iON Batteries
NOTE: The iON+ 24VBAT lithium-ion battery packs do not develop a "memory" when charged after only a partial discharge. Therefore, it is not necessary to run down the battery pack before inserting the charger plug.
- Use the battery indicator lights to determine when to charge your iON+ 24VBAT lithium-ion battery packs.
- You can "top-off" your battery pack's charge before starting a big job or after a long day of use.
Charging the Batteries
- Press the push lock buttons on the batteries to pull them out of the equipment (Fig. 1).

- Check that the mains voltage is the same as that marked on the rating plate of the battery charger. Then, insert the charger's plug into the electrical wall outlet. When you plug in the charger, two green lights will illuminate and stay green (Fig. 2).
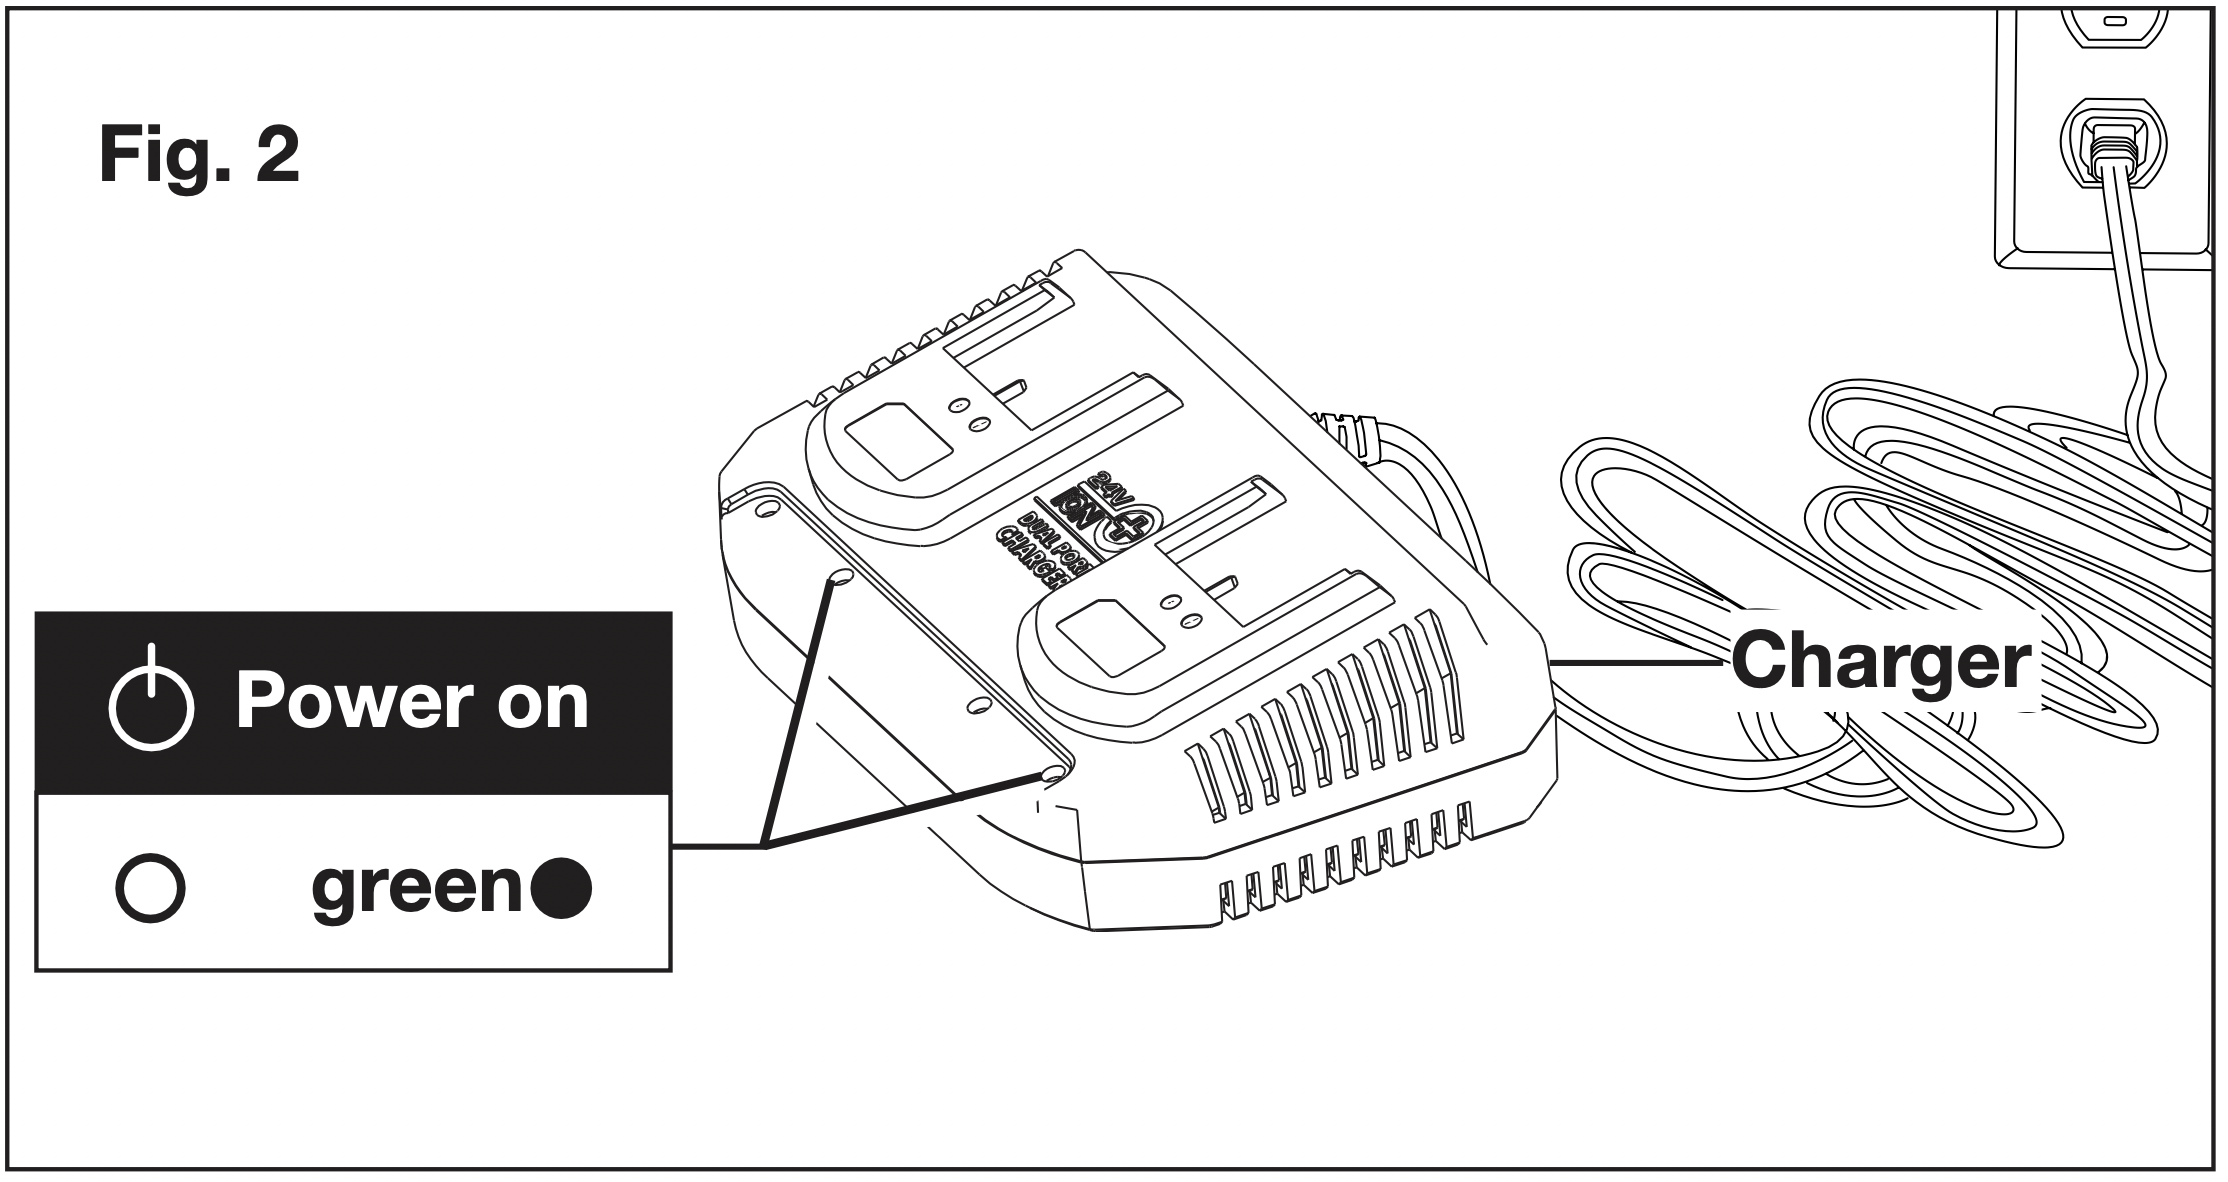
- Place the battery packs into the charger by sliding the packs to lock them into position. When you insert the batteries into the charger, the two green lights will go off, and the red lights will illuminate to indicate that the batteries are charging (Fig. 3).

- When the charger lights turn green, the batteries are fully charged (Fig. 3).
NOTE: A fully discharged pack with an internal temperature in the normal range will fully charge in 1 hrs and 50 mins (between 32ºF/0ºC and 113ºF/45ºC).
- If the light indicators do not come on at all, check that the battery packs are fully seated into the bay. Remove the battery packs and reinsert. If the problem persists, contact an authorized Snow Joe ® + Sun Joe ® dealer or call the Snow Joe ® + Sun Joe ® customer service center at 1-866-SNOWJOE (1-866-766-9563) for assistance.
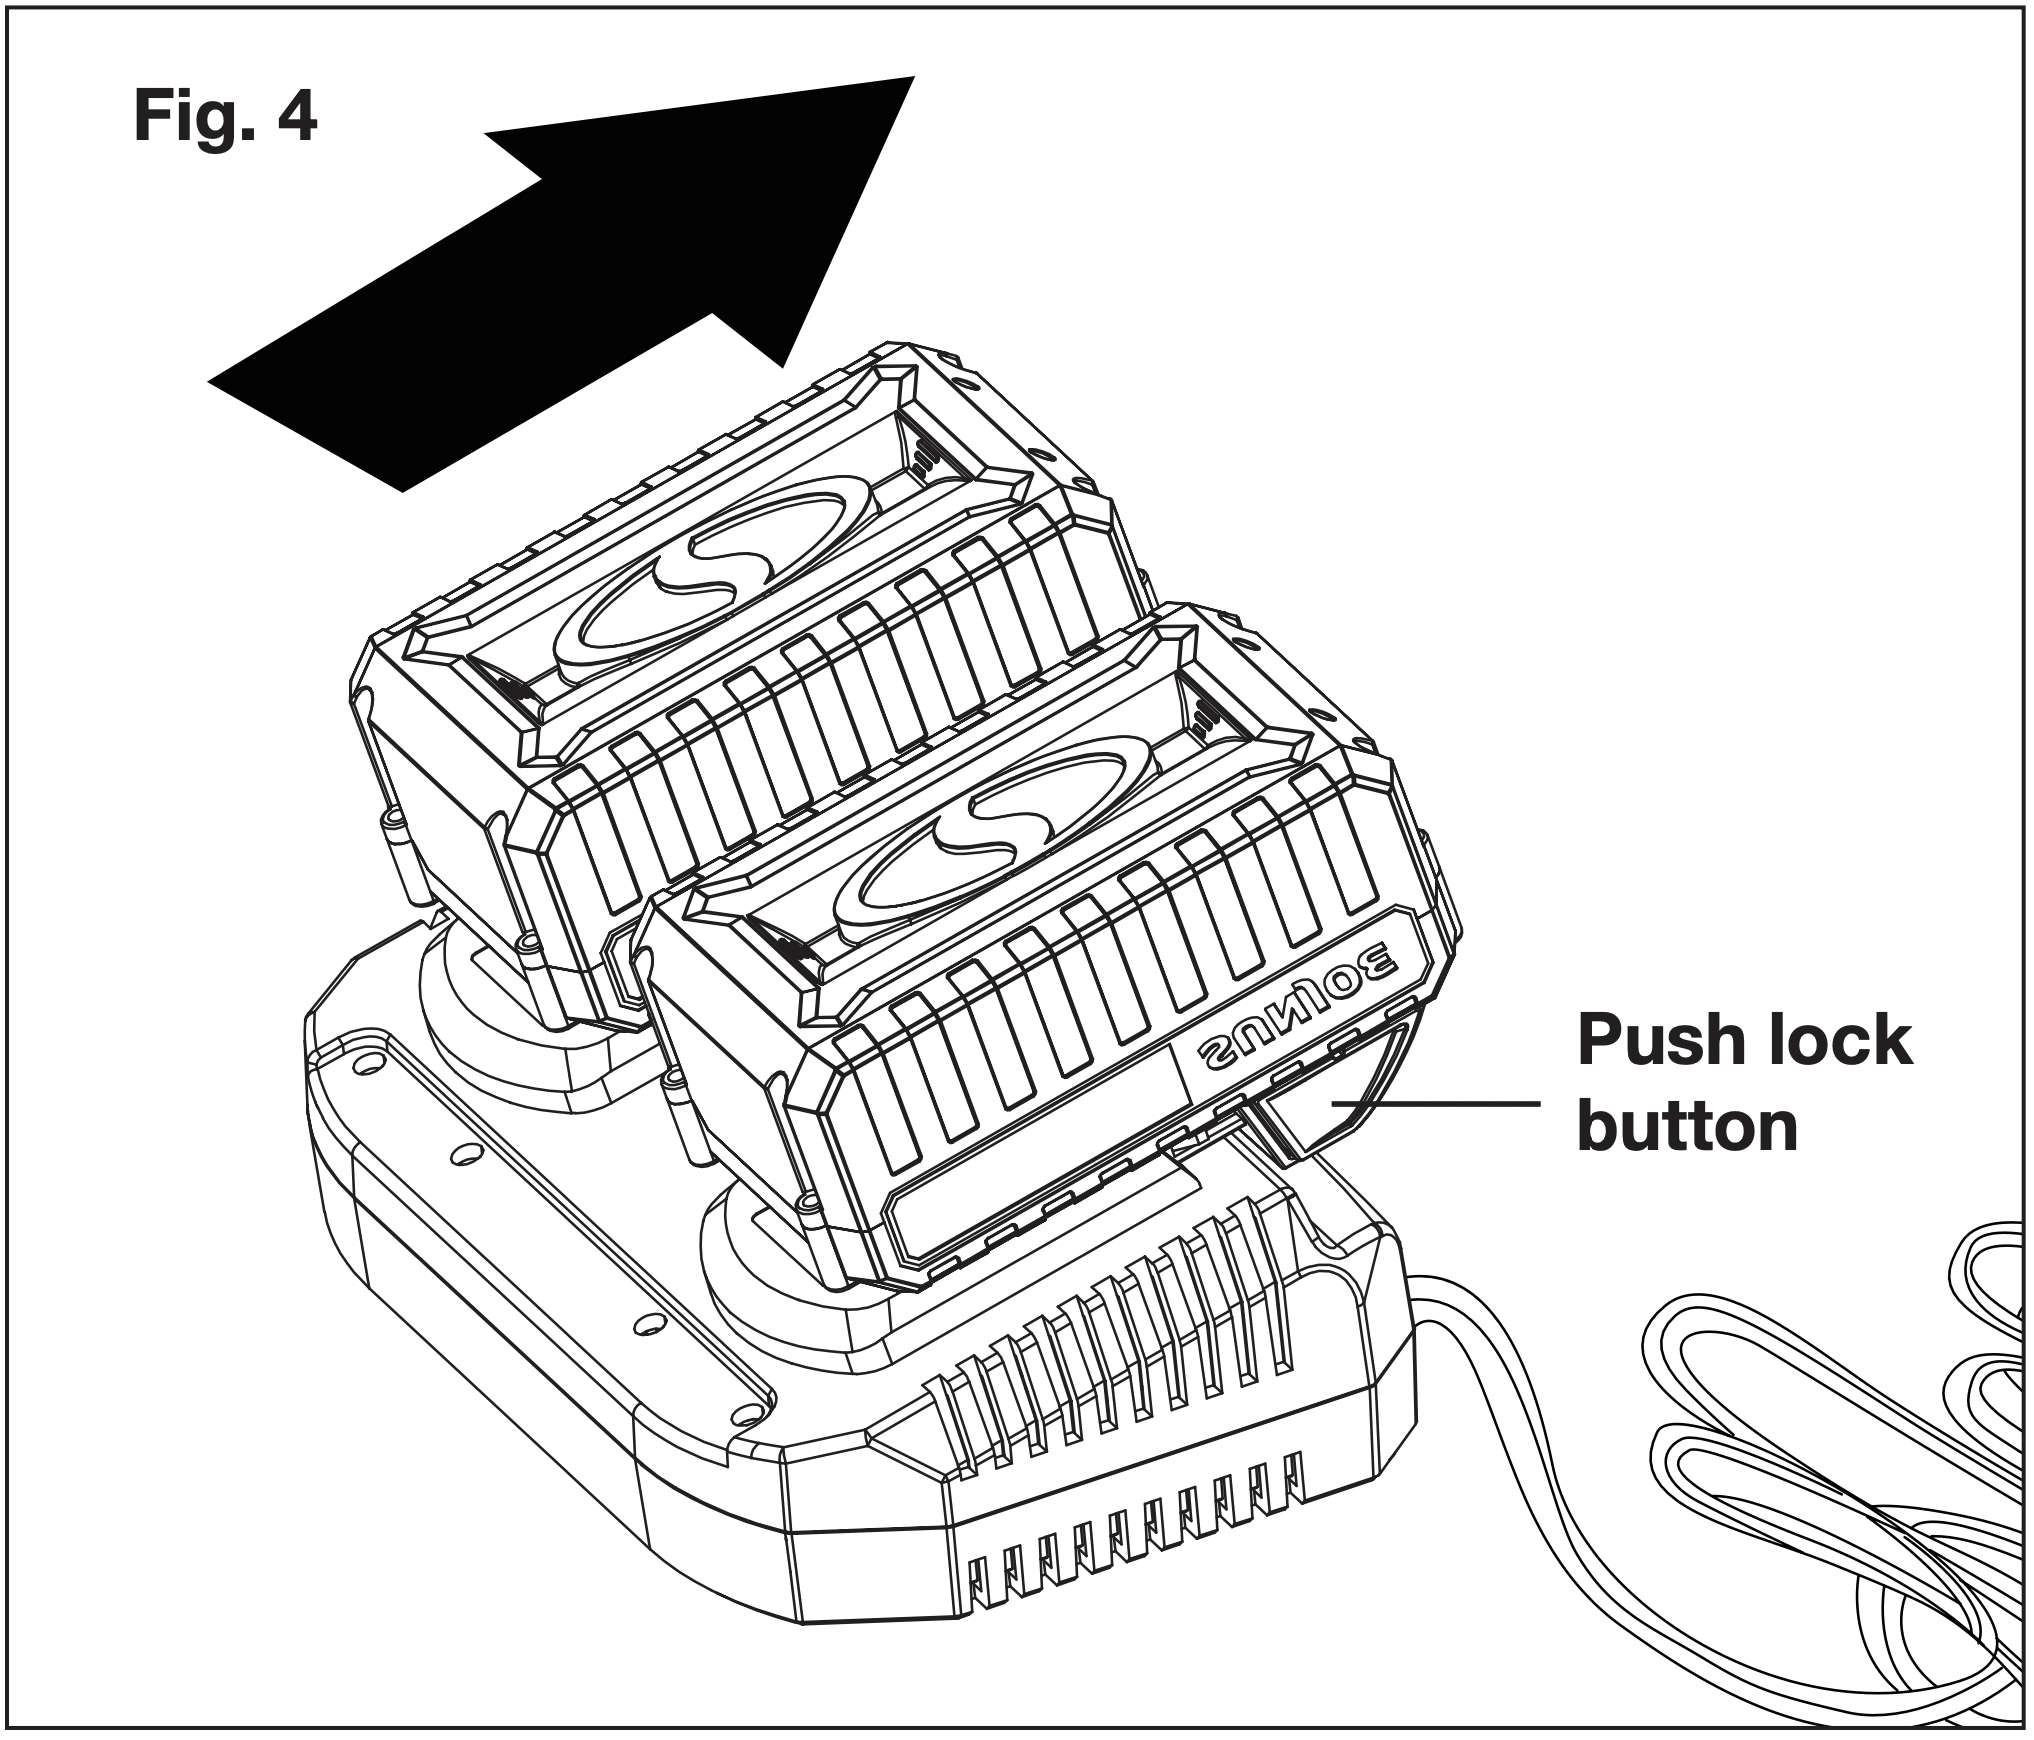
- When charging is complete, remove the batteries from the charger by pressing the push lock buttons and sliding the batteries backward to unlock them from the charger (Fig. 4).
- Timely recharging of the batteries will help prolong the batteries' life. You must recharge the battery packs when you notice a drop in the equipment's power.
IMPORTANT! Never allow the battery packs to become fully discharged as this will cause irreversible damage to the batteries.
Charging a Hot or Cold Battery Pack
The green indicator lights on the charger base indicates that the battery pack temperatures are outside the charging range. Once the pack are within the acceptable range, normal charging will take place and the red light will be continuous. Hot or cold battery packs may take longer to charge.

Assembly
Assembling the handles
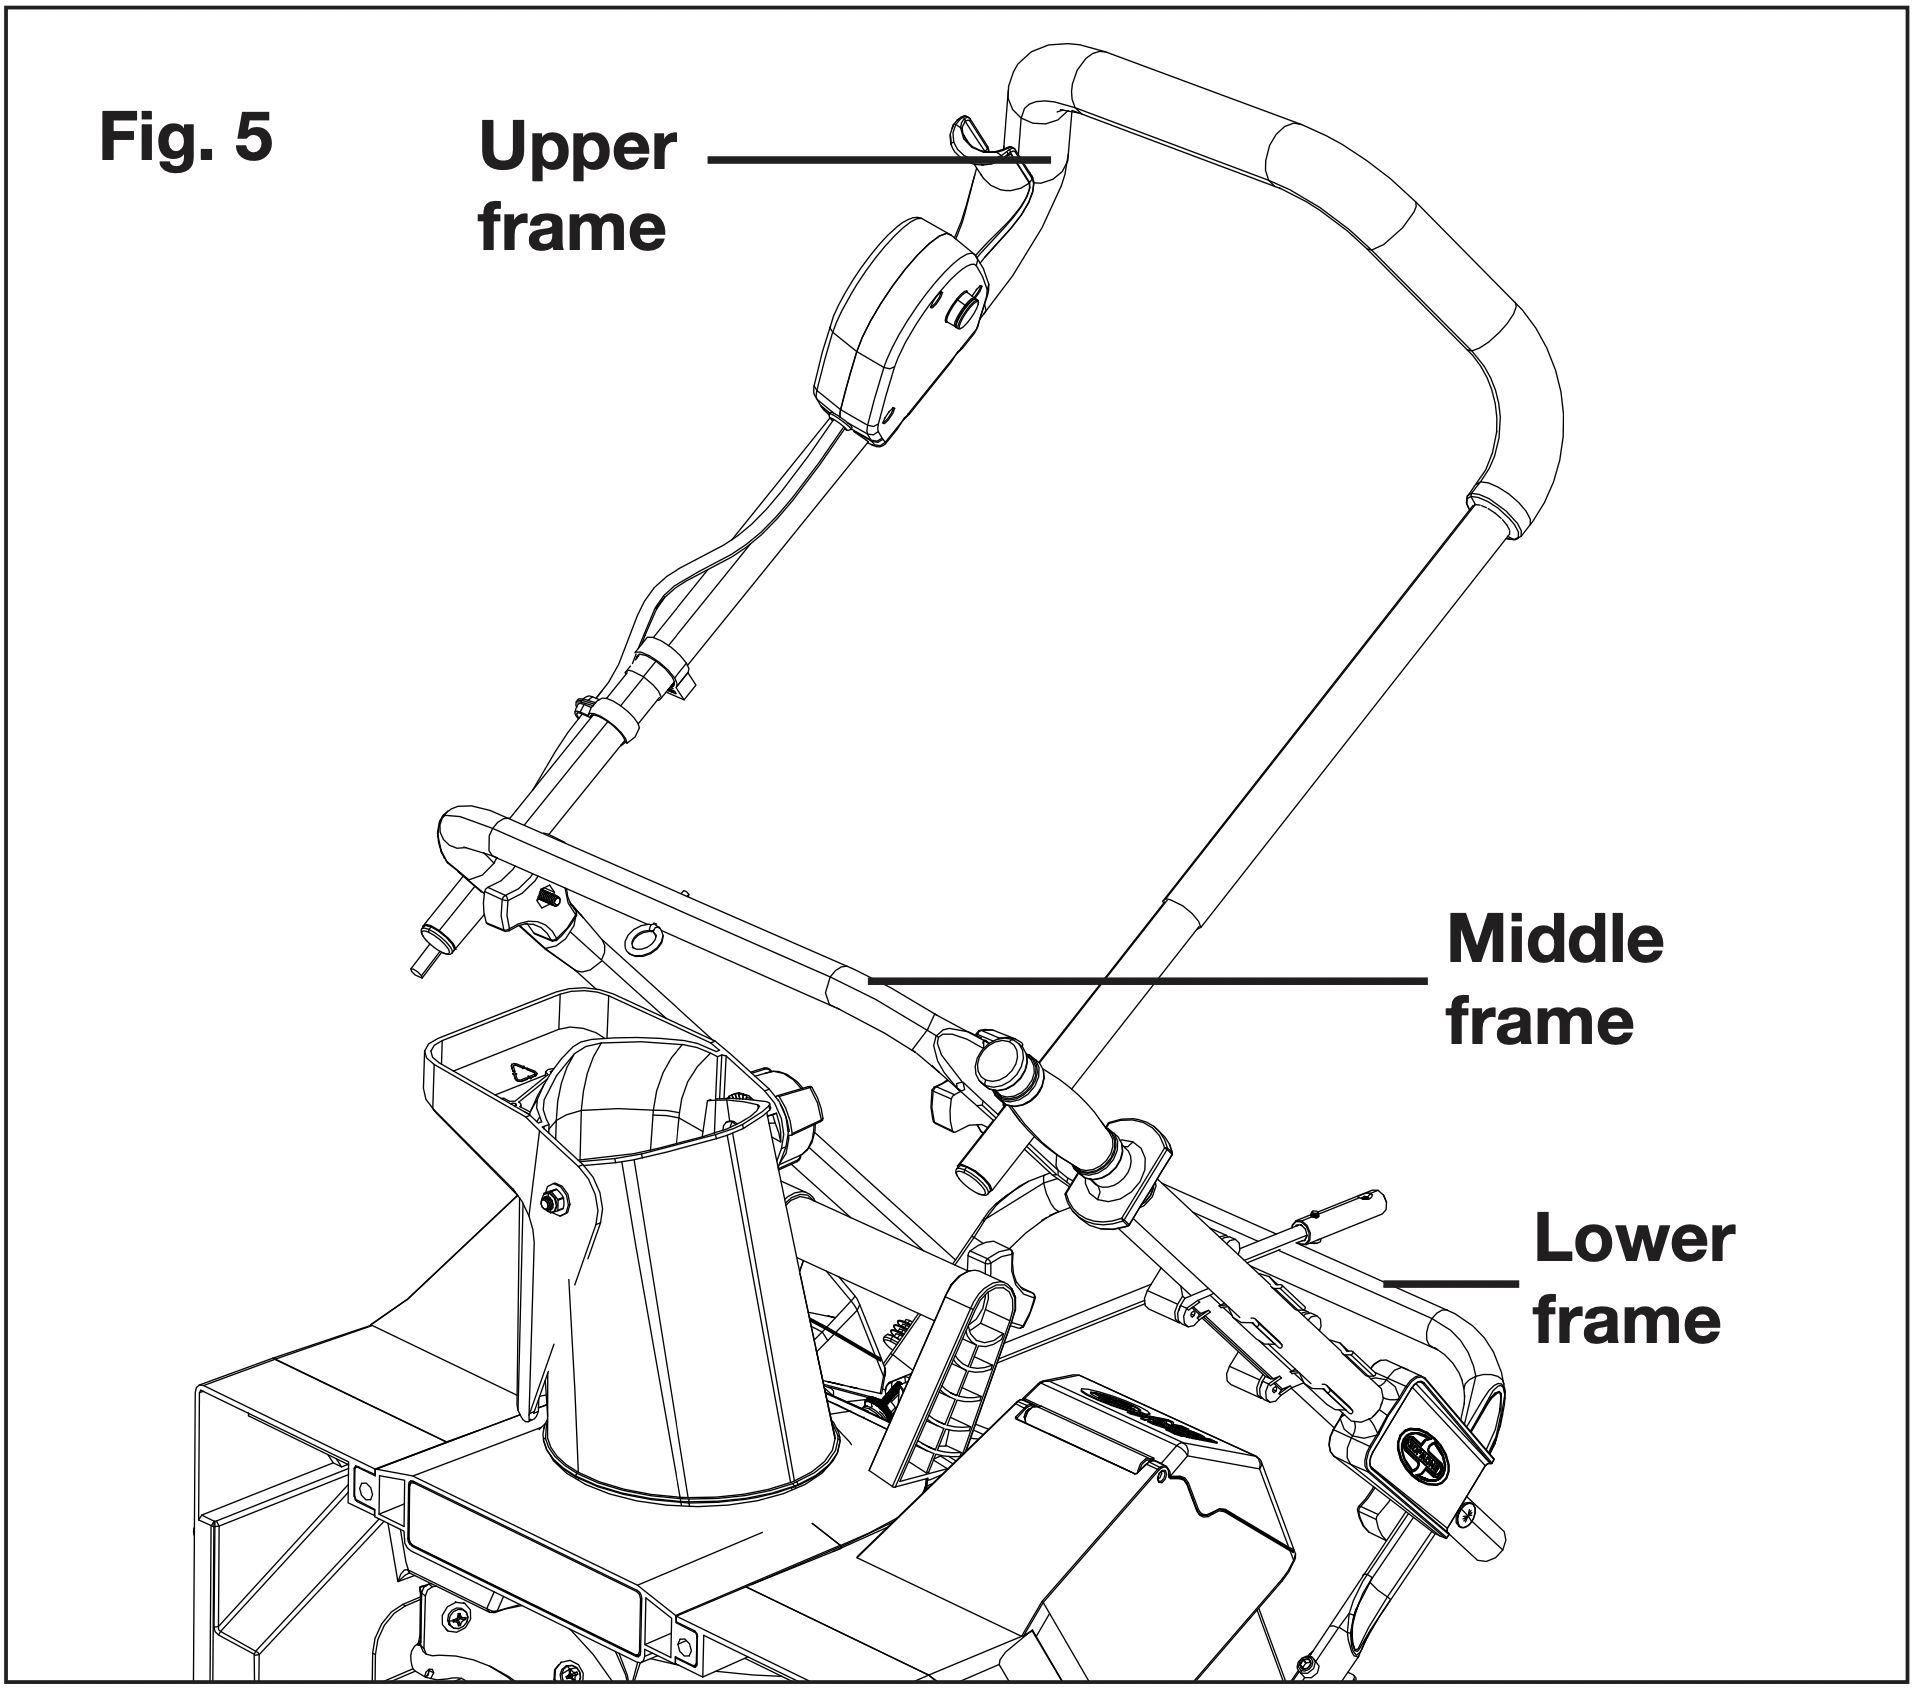
- For easy assembly, the unit comes complete with most parts already connected. To complete the handle assembly, simply pull the middle frame back and pull the upper frame up (Fig. 5).
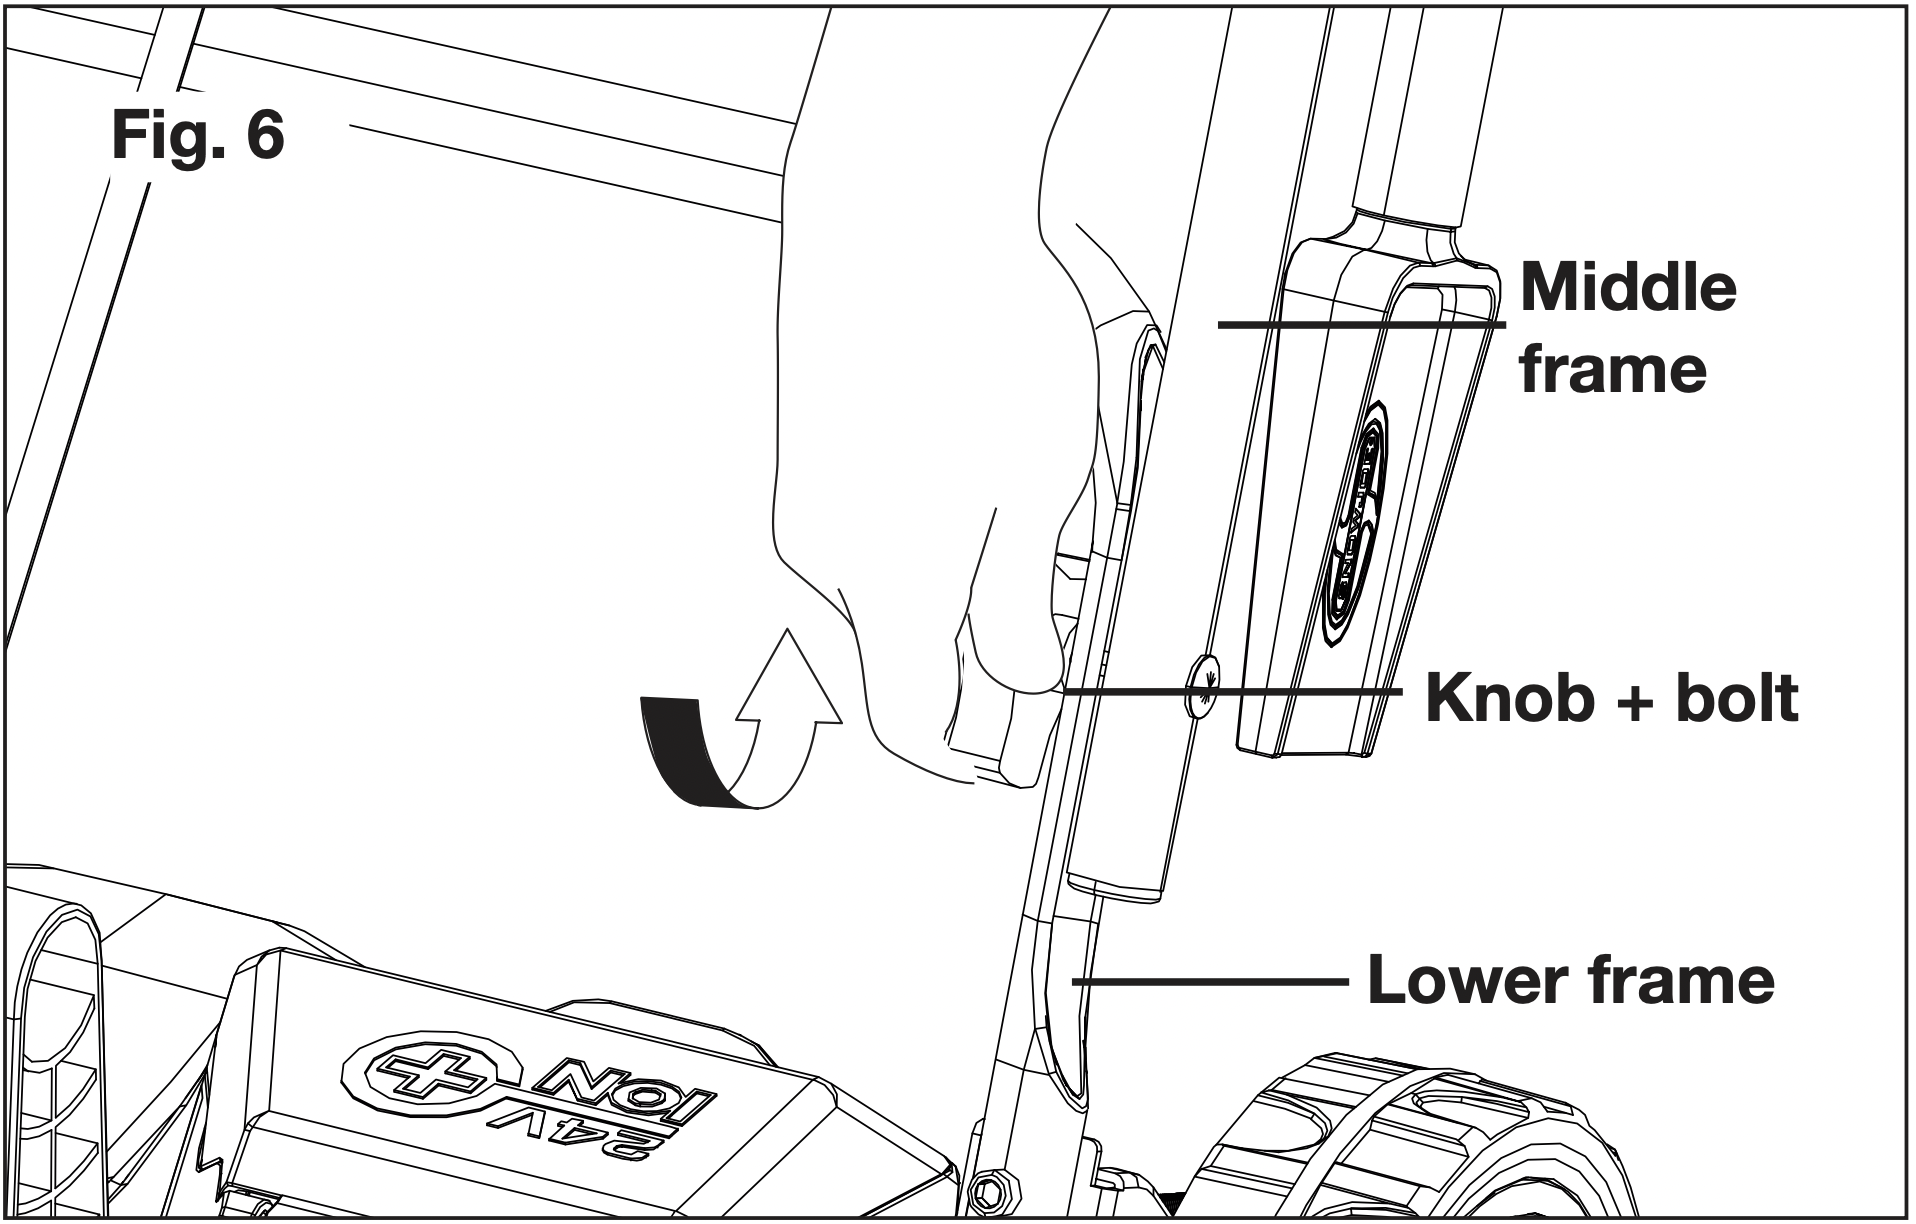
- Secure the connection of the middle frame to the lower frame by fastening the first set of knobs and bolts on each side (Fig. 6).
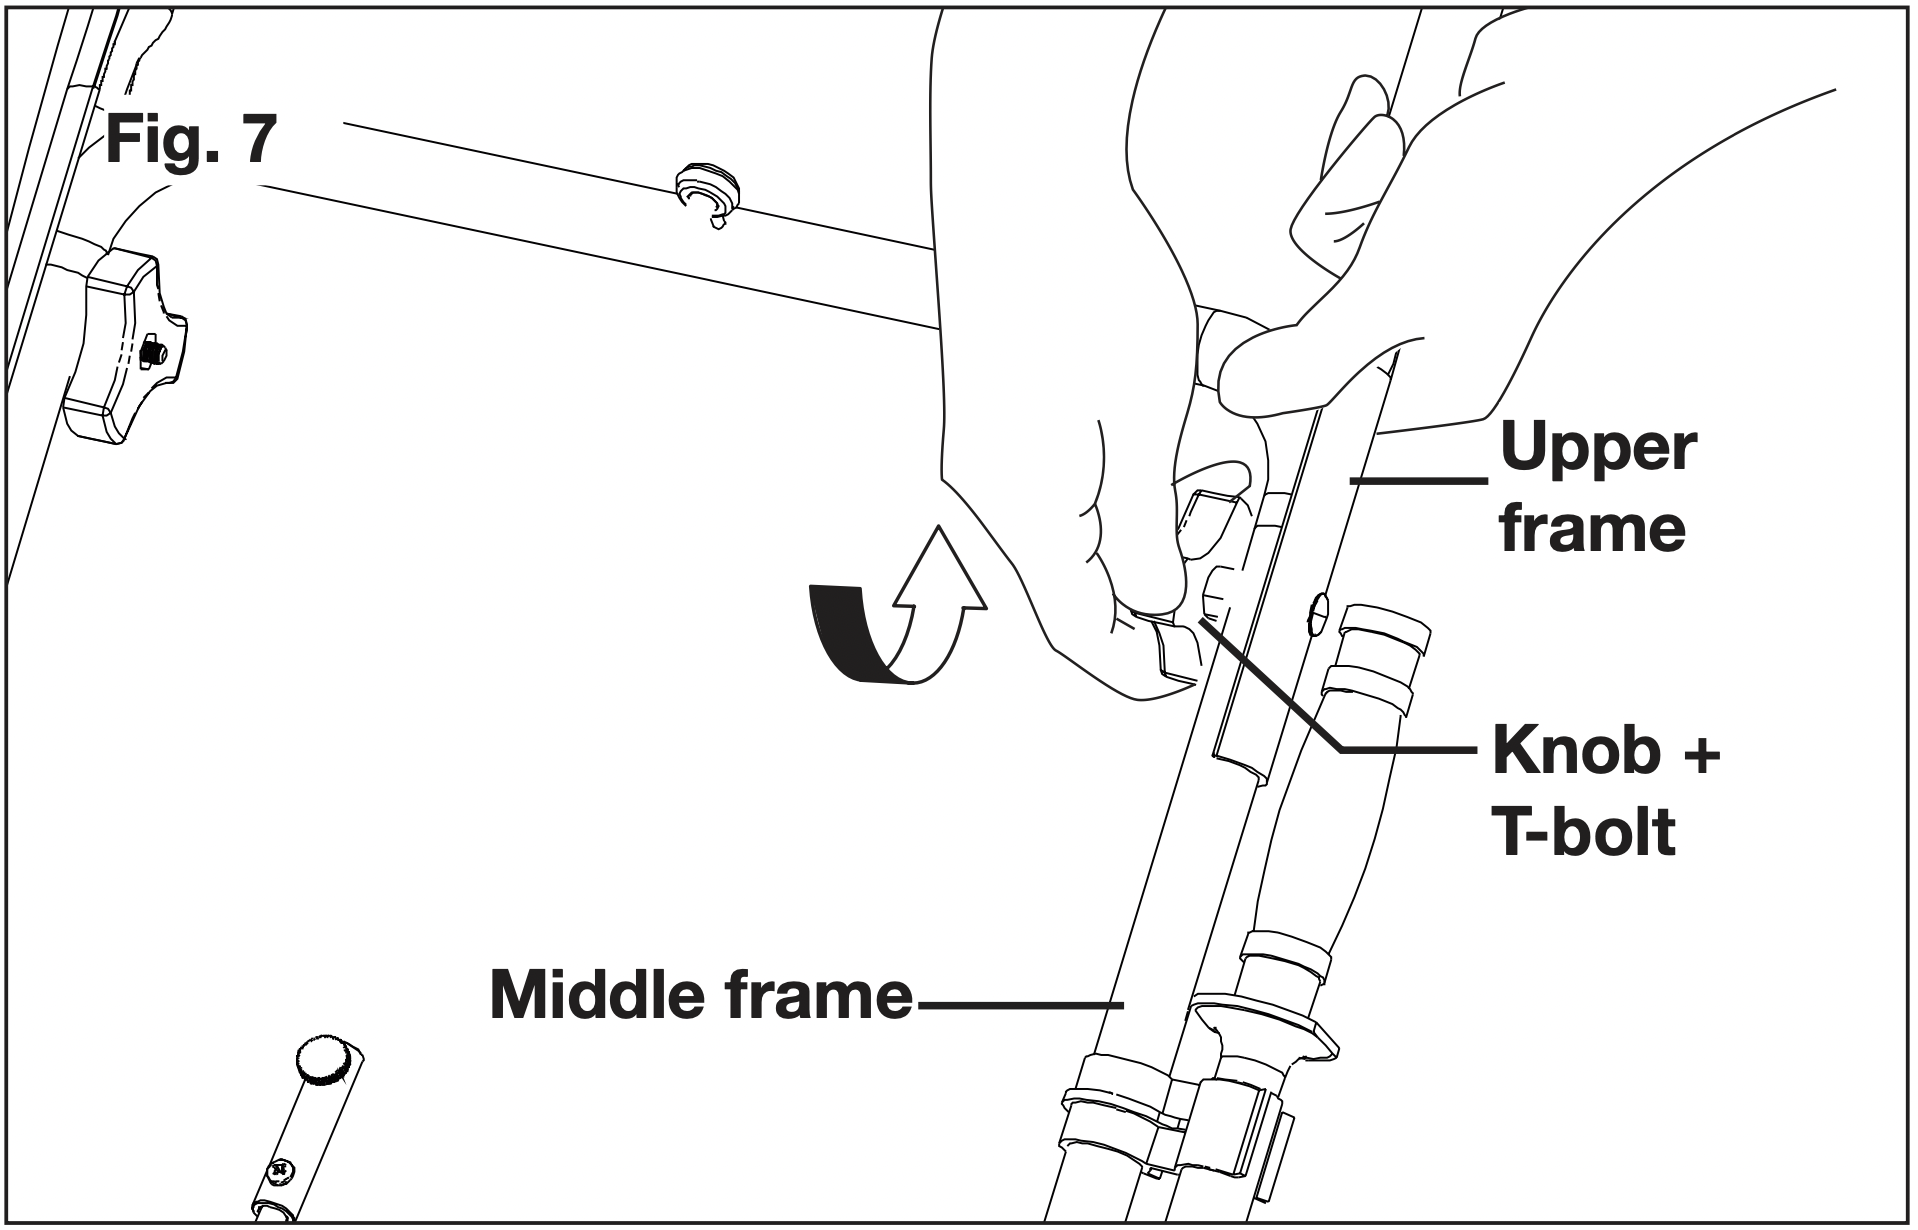
- Secure the connection of the upper frame to the middle frame by fastening the second set knobs and bolts on each side (Fig. 7).
Discharge Chute Assembly
- Loosen the chute deflector knob to lift the chute deflector (Fig. 8).

- Lift the chute deflector and lock it securely onto the discharge chute (Fig. 9).
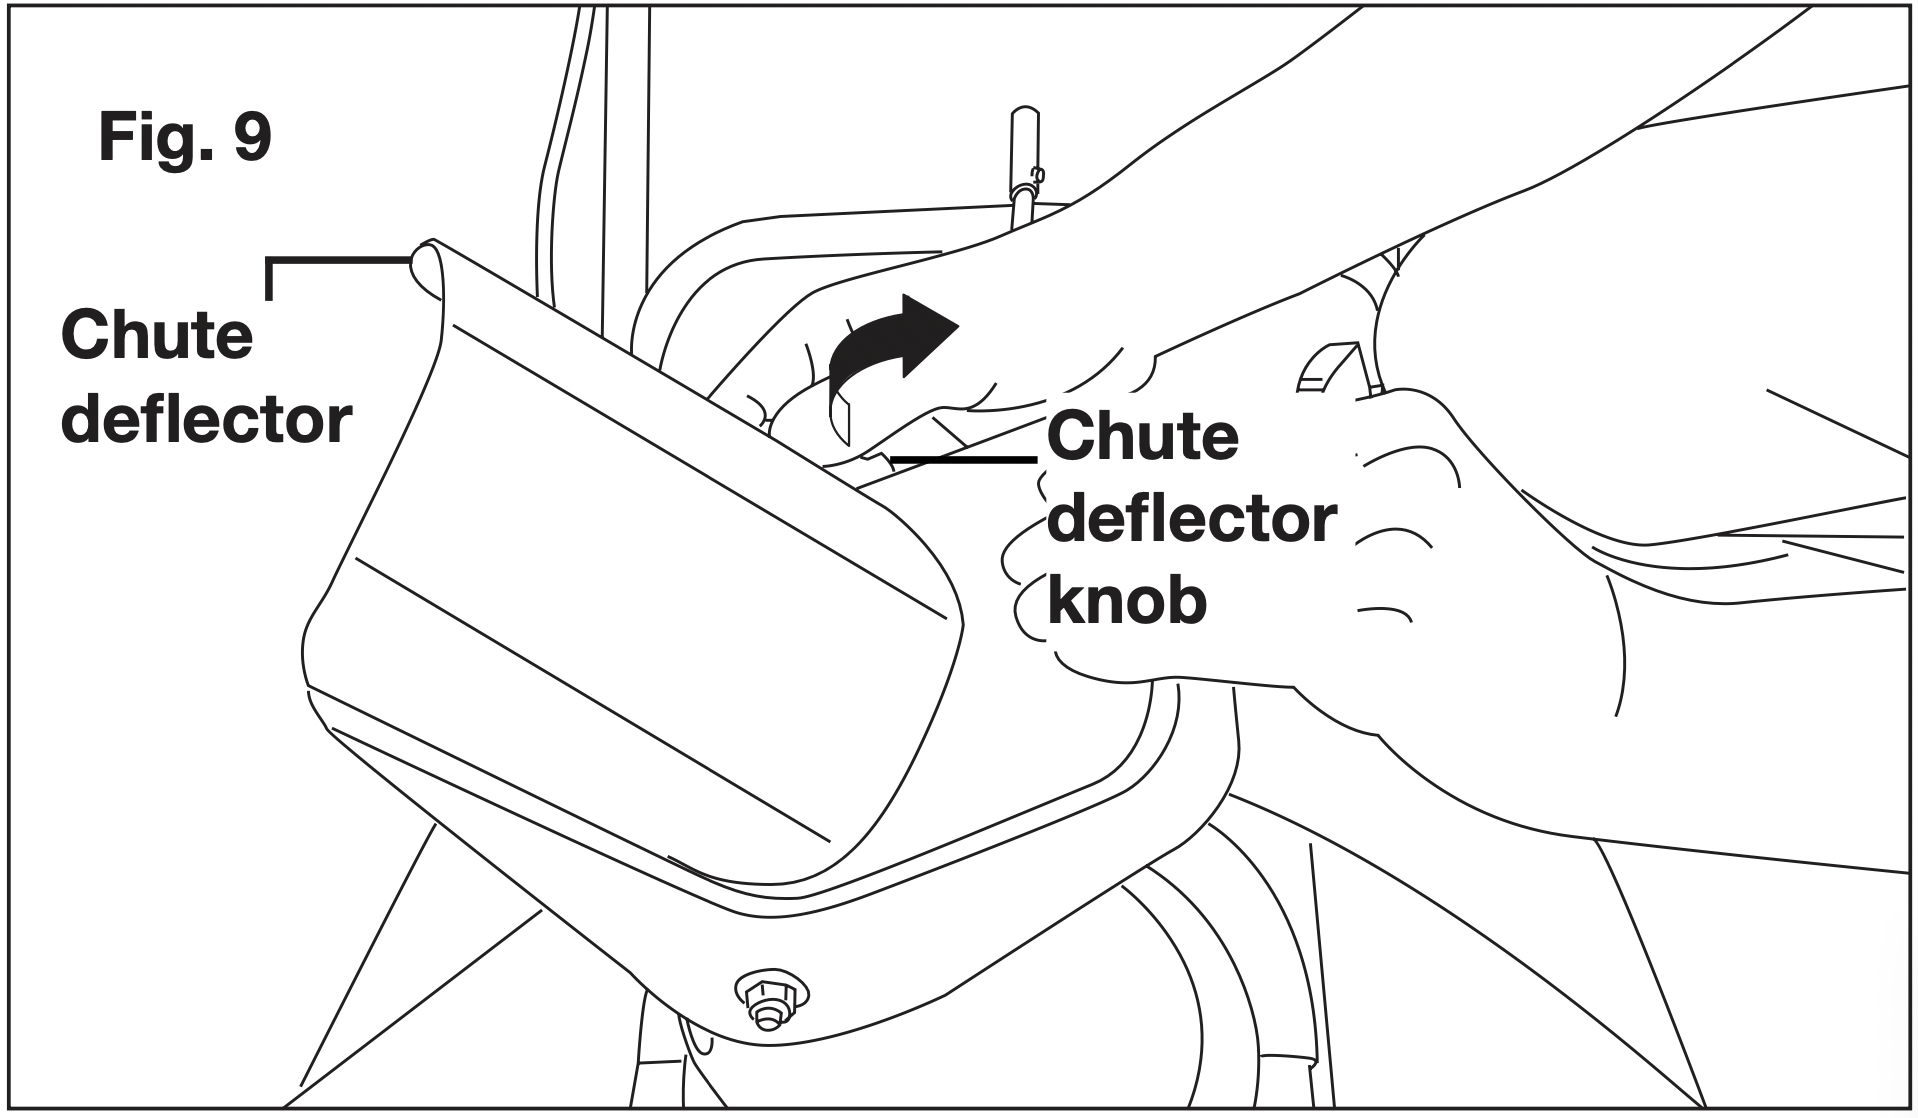
- Raise or lower the chute deflector to the desired height of the snow stream and tighten the chute deflector knob (Fig. 9).
NOTE: Do not overtighten the chute deflector knob.
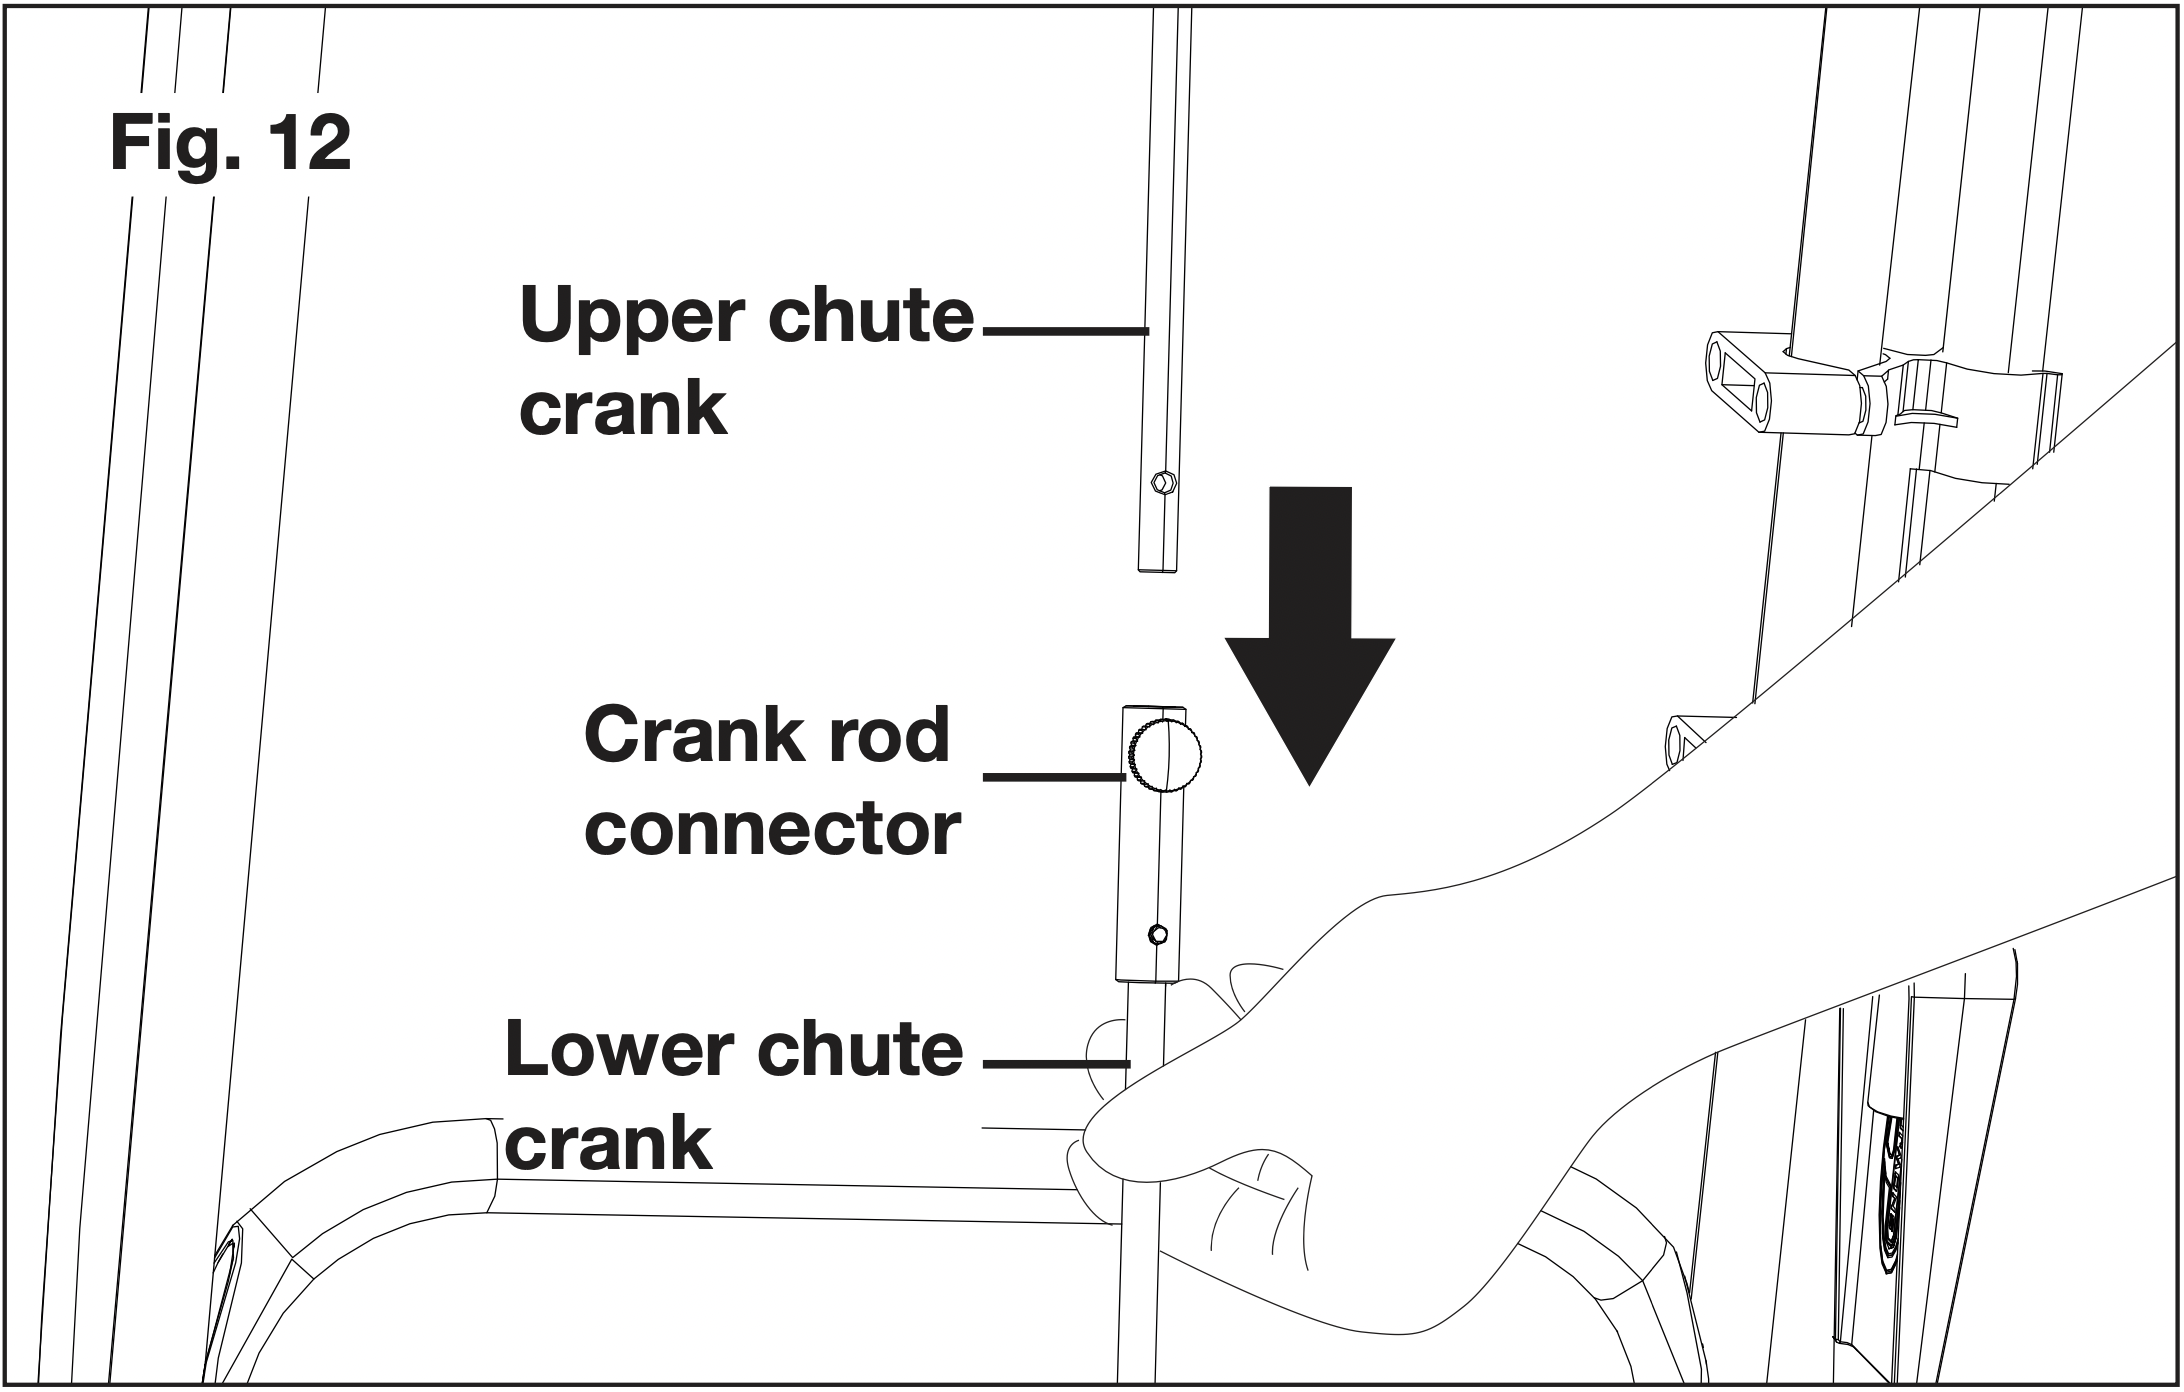
Chute Crank Assembly
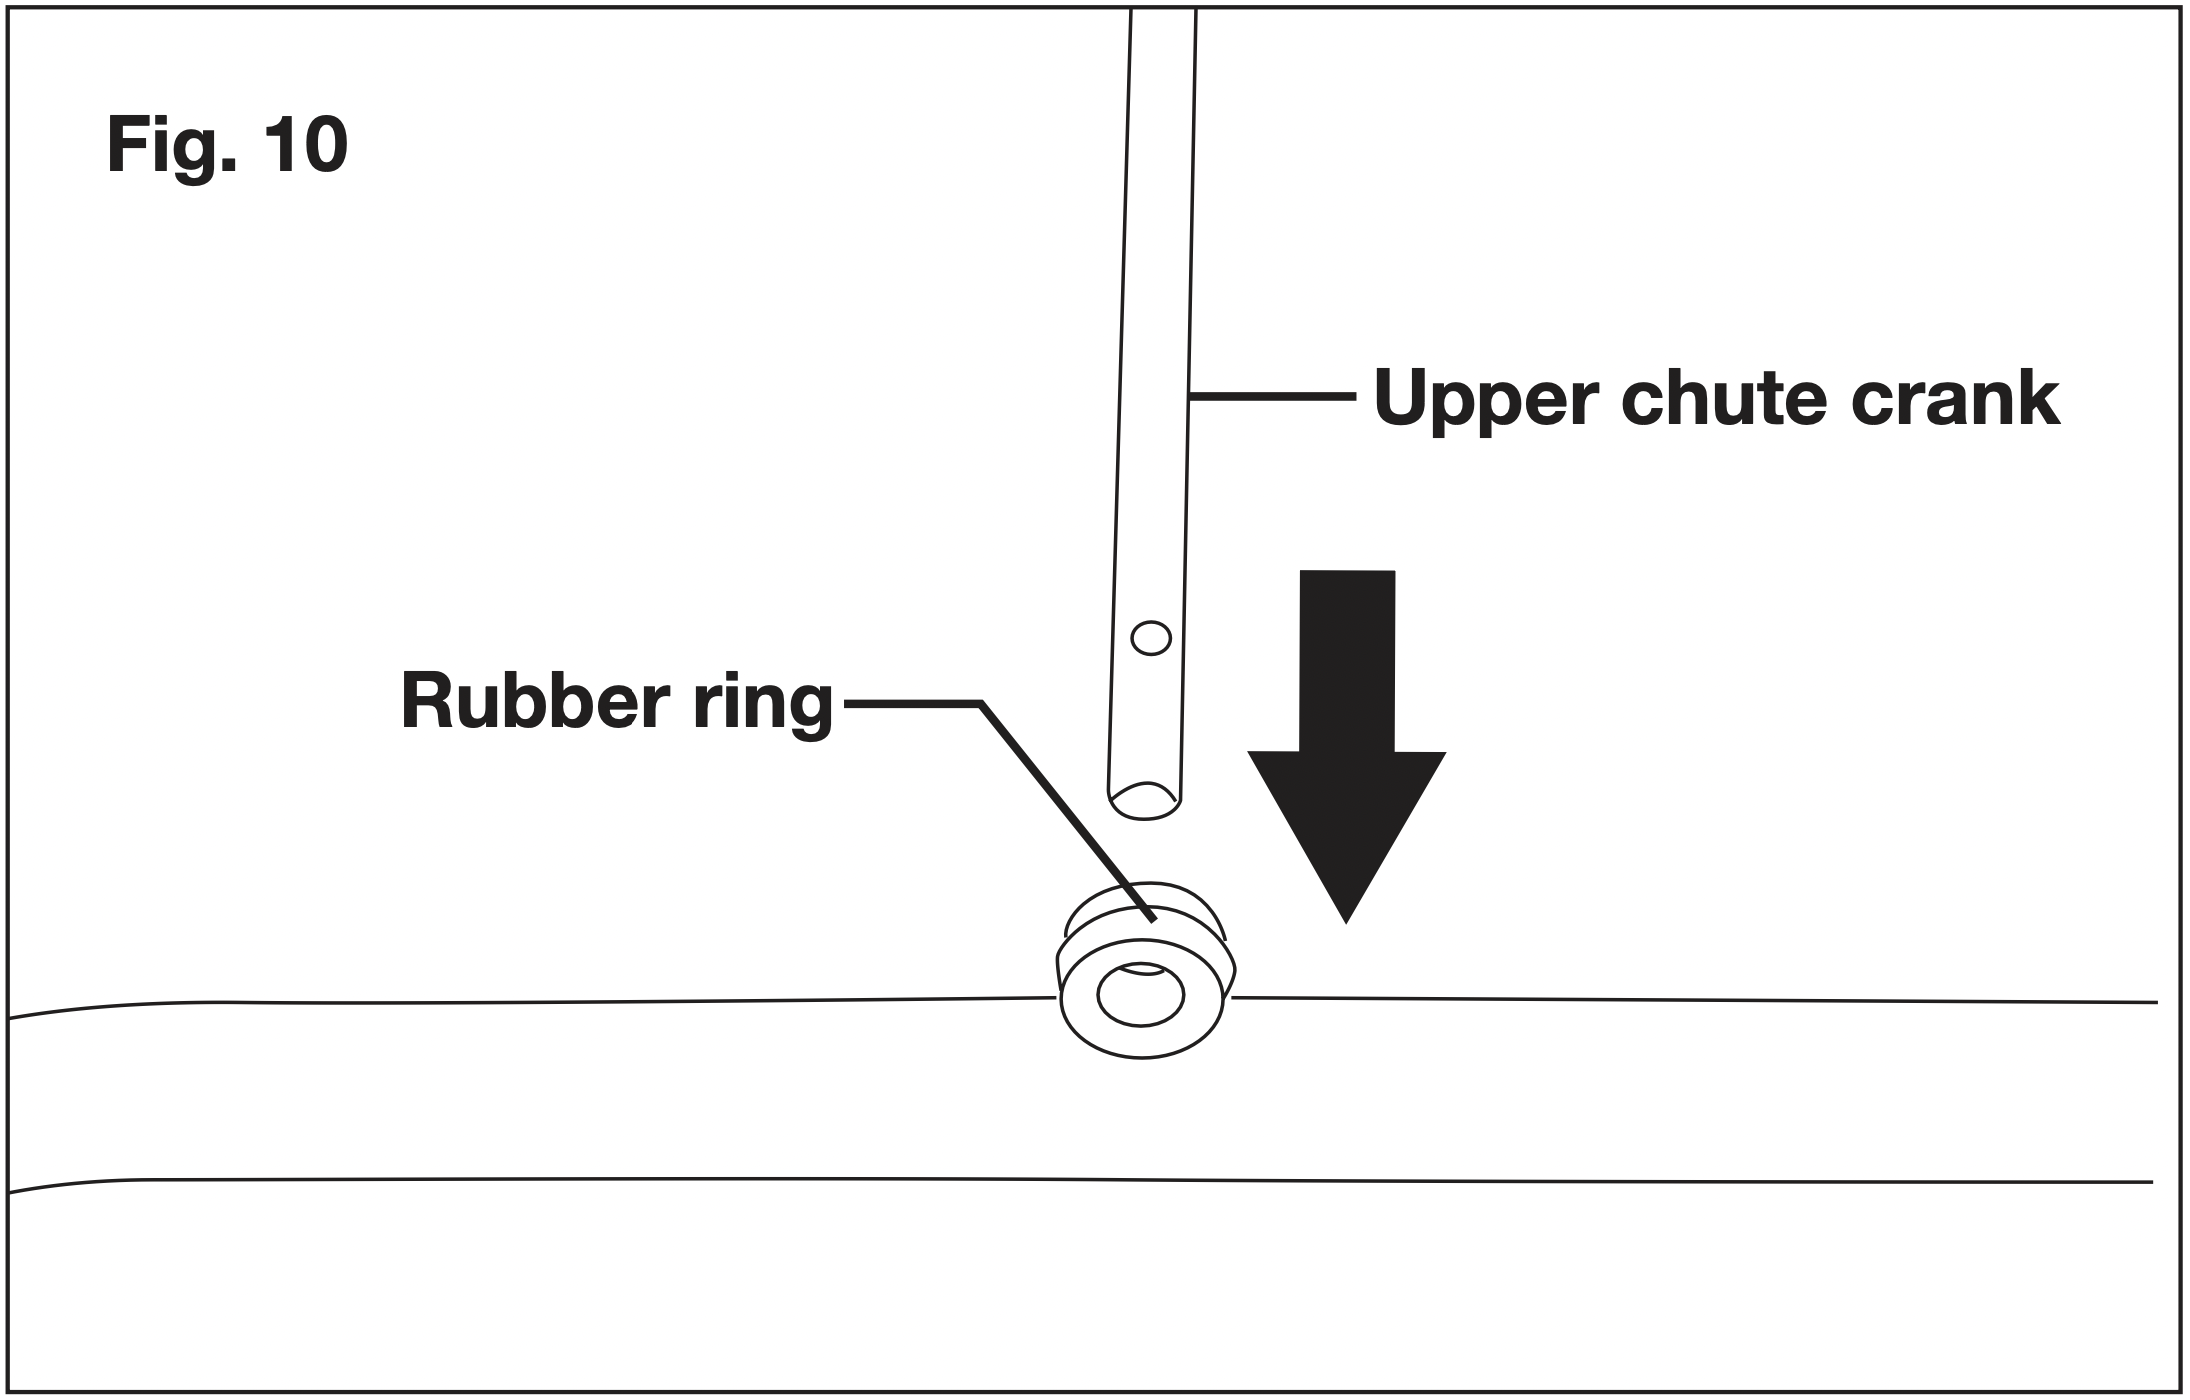
- Slide the upper chute crank through the rubber ring located on the middle frame (Fig. 10).
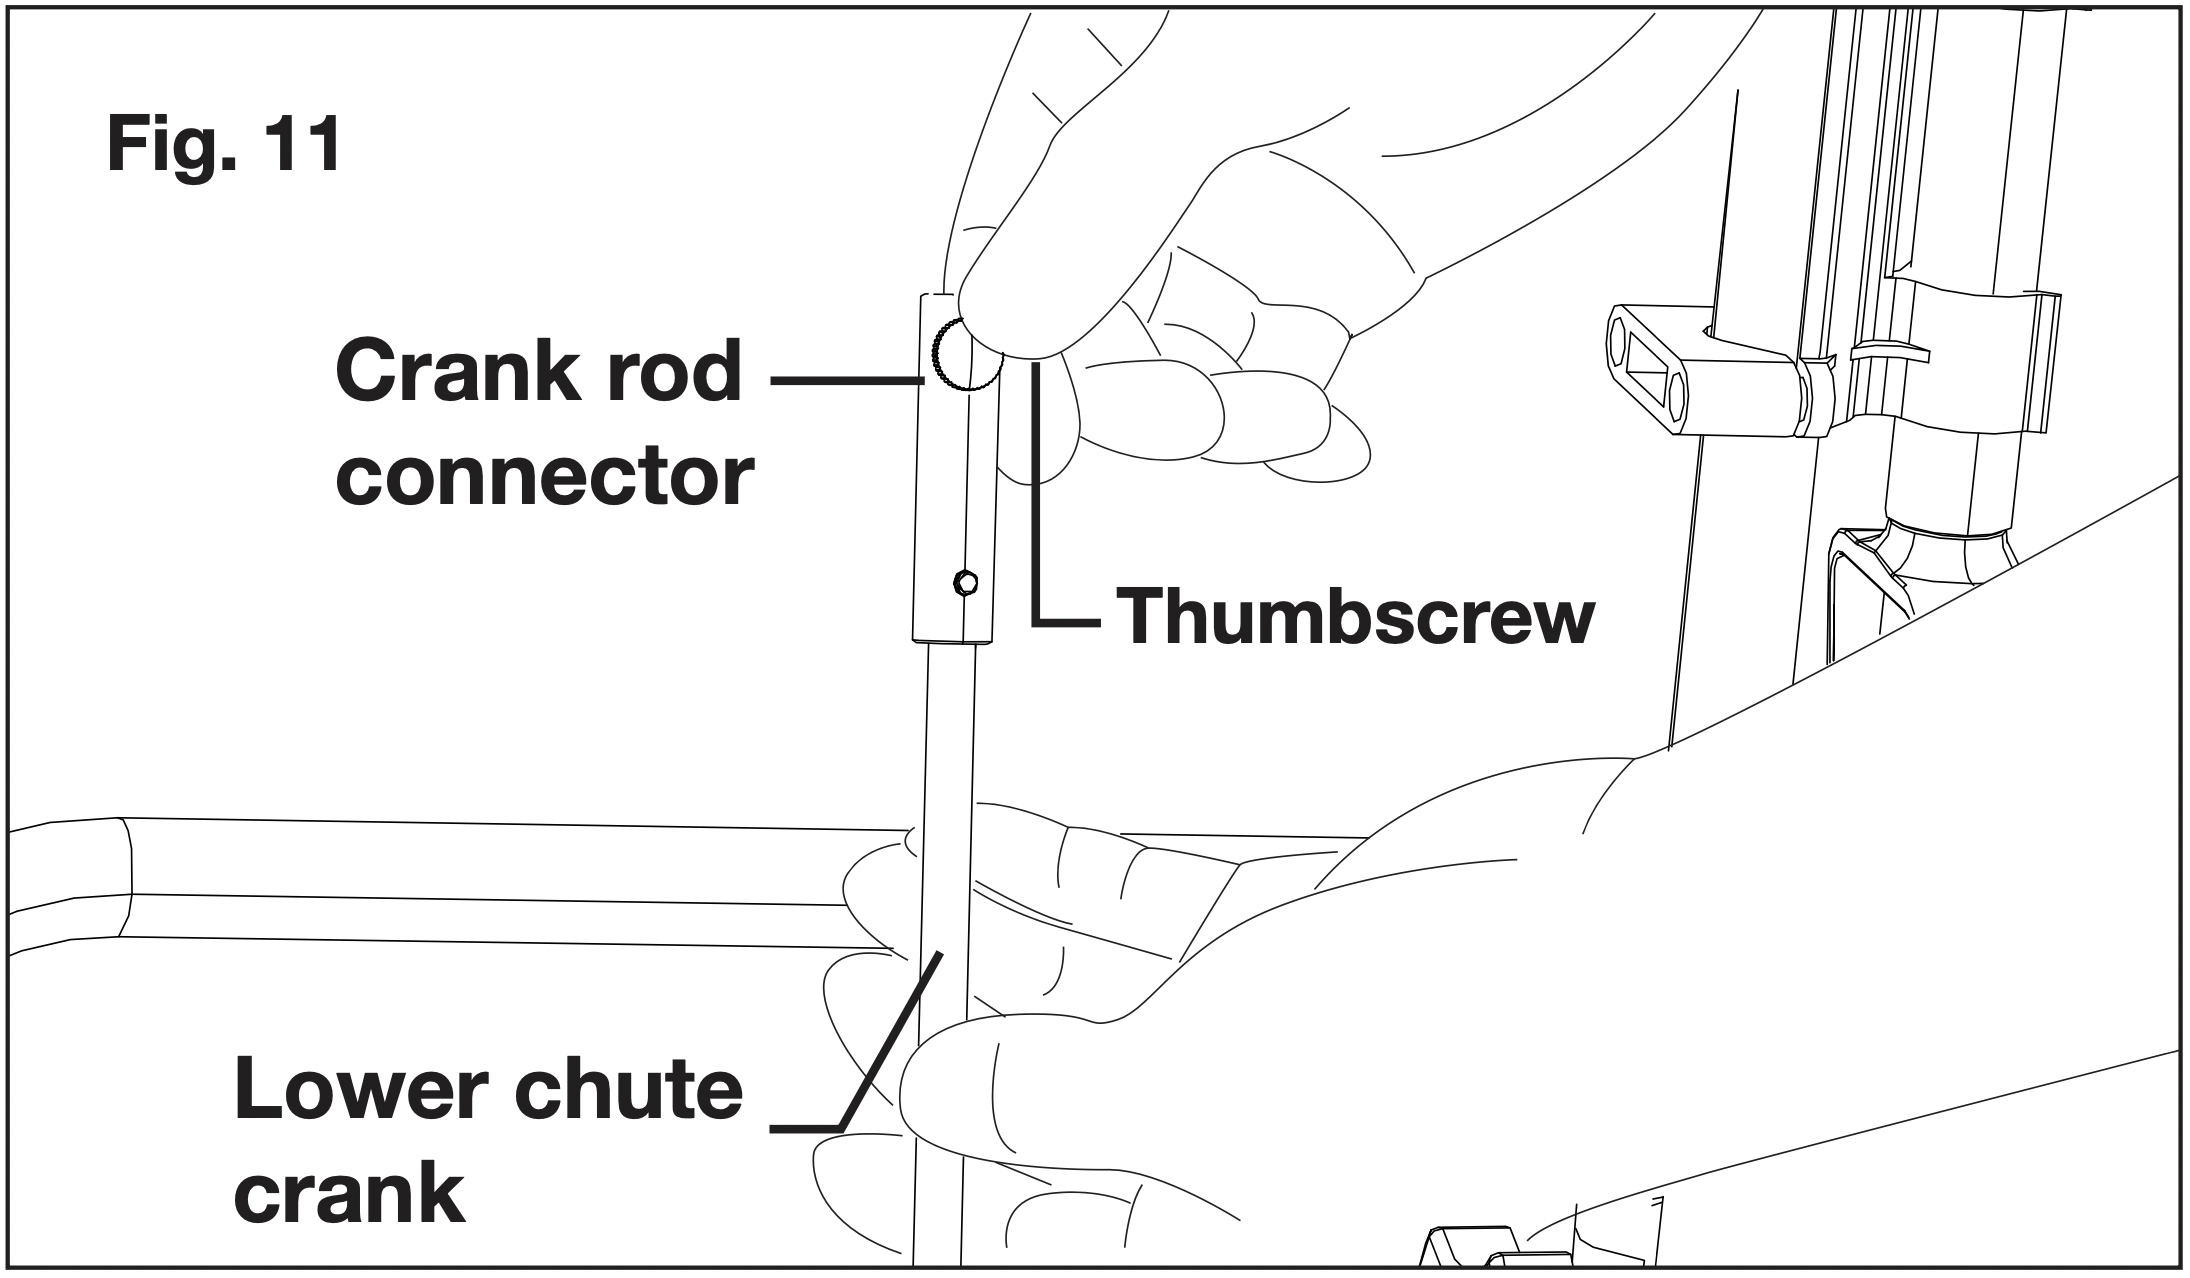
- Loosen the screw on the lower chute crank by hand (Fig. 11).
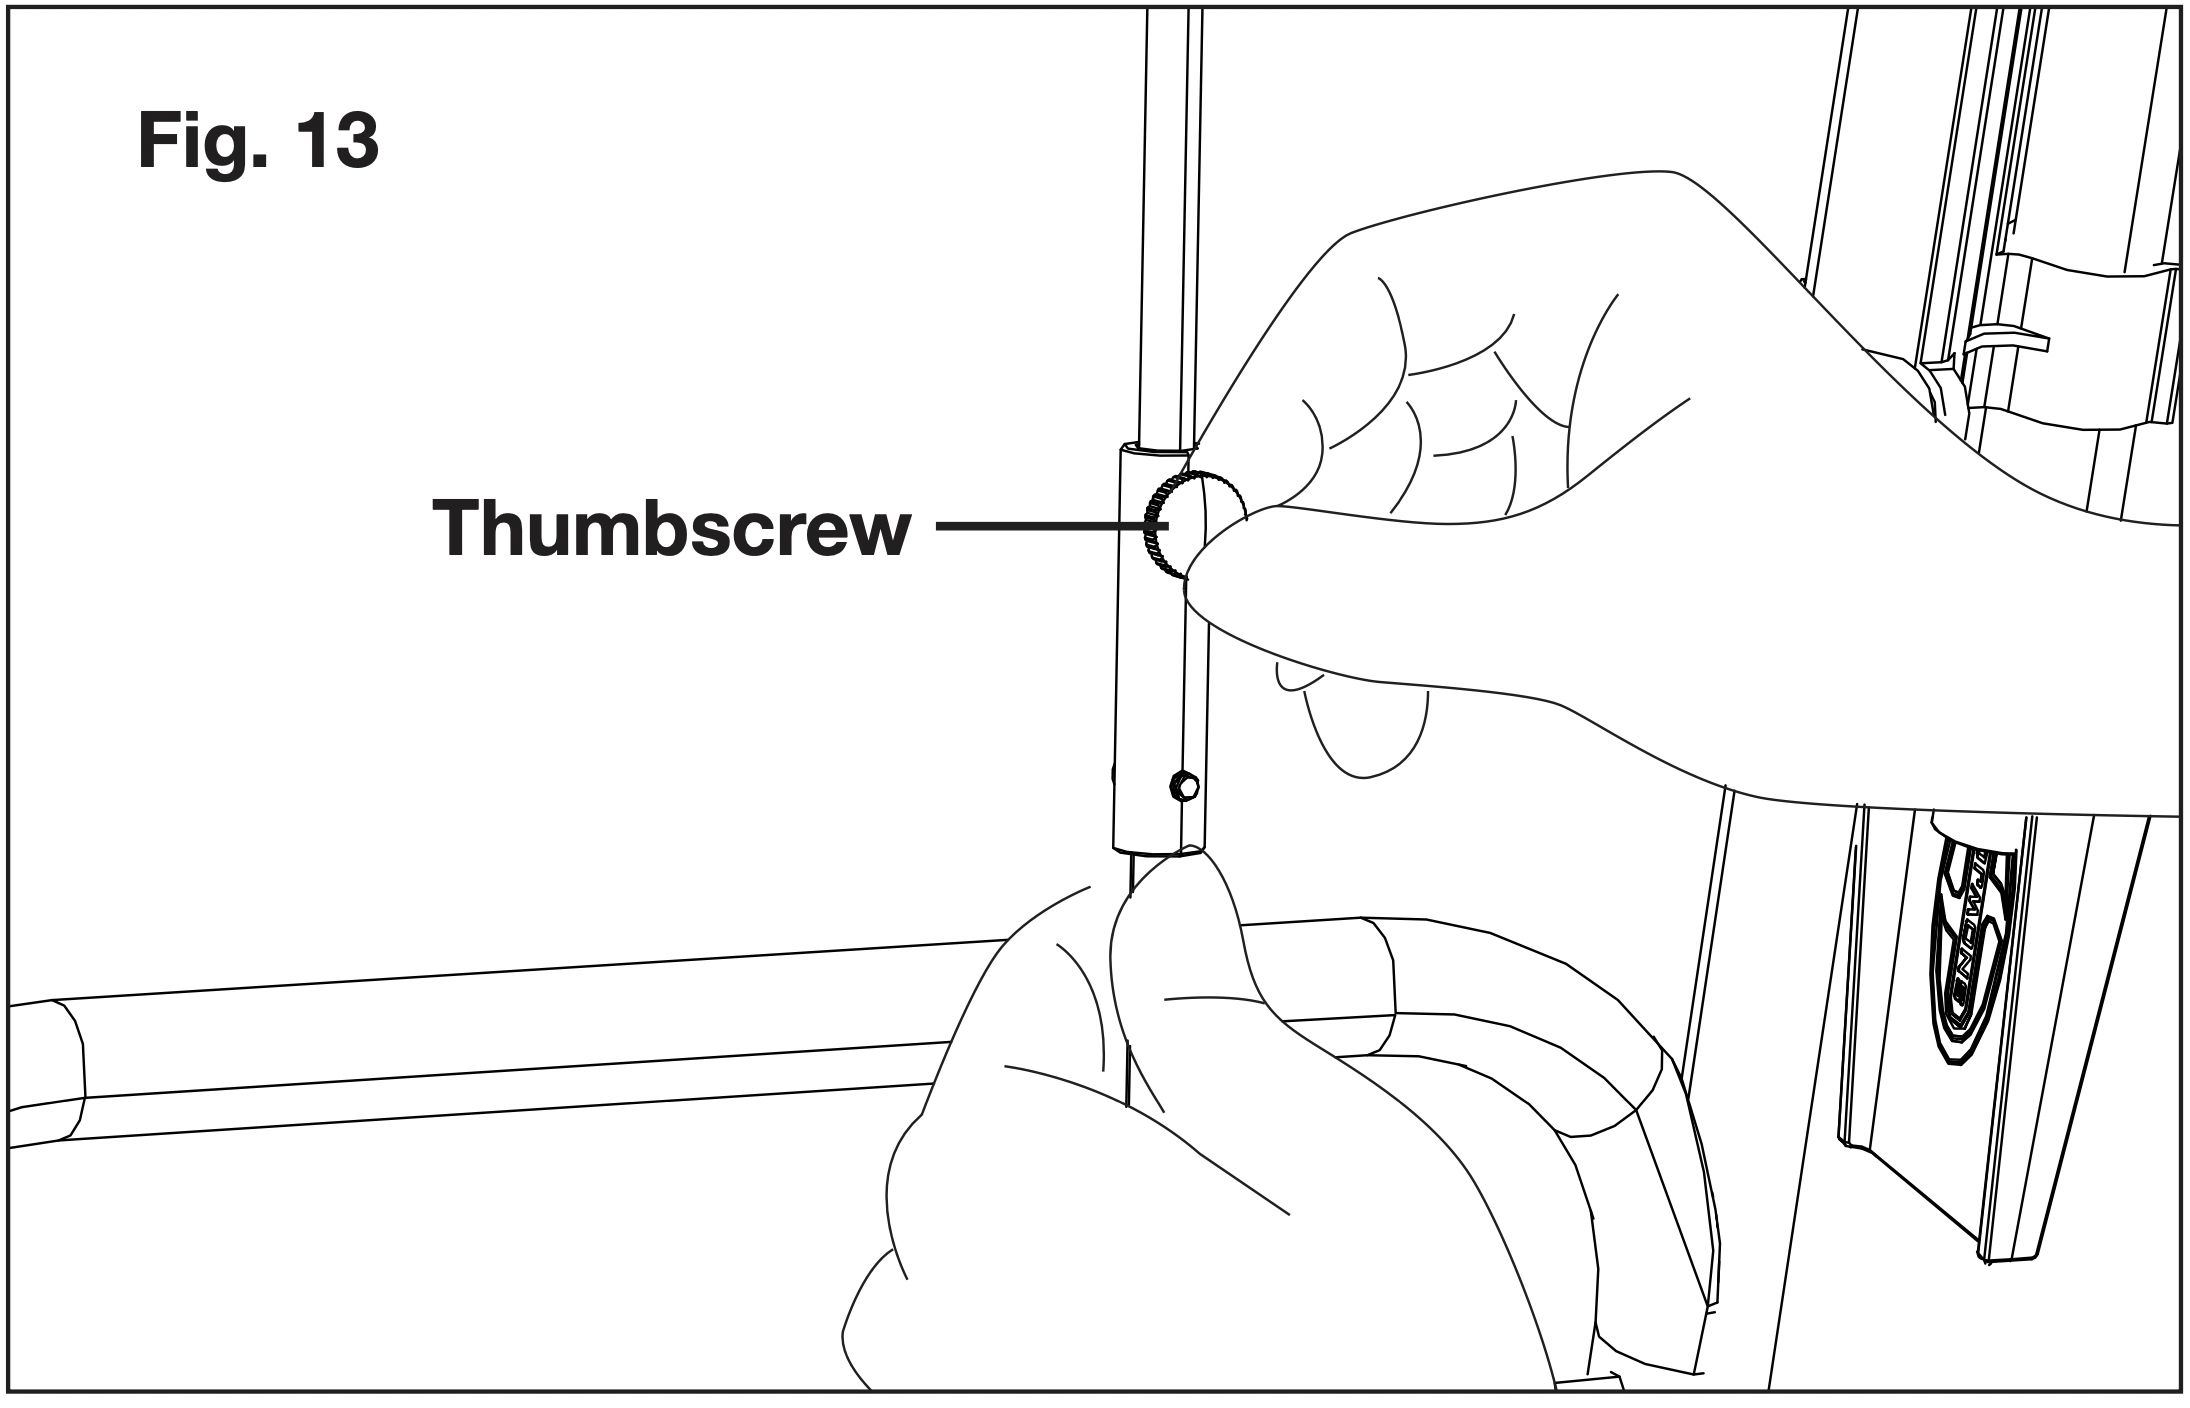
- Slide the upper chute crank into the lower chute crank (Fig. 12).
- Align the screw holes and tighten the screw by hand (Fig. 13).
Operation
WARNING! Keep the area to be cleared free of stones, toys or other foreign objects that the rotor blades might pick up and throw. Such items could be covered by snow and are easy to overlook, so be sure to conduct a thorough inspection of the area before beginning work.
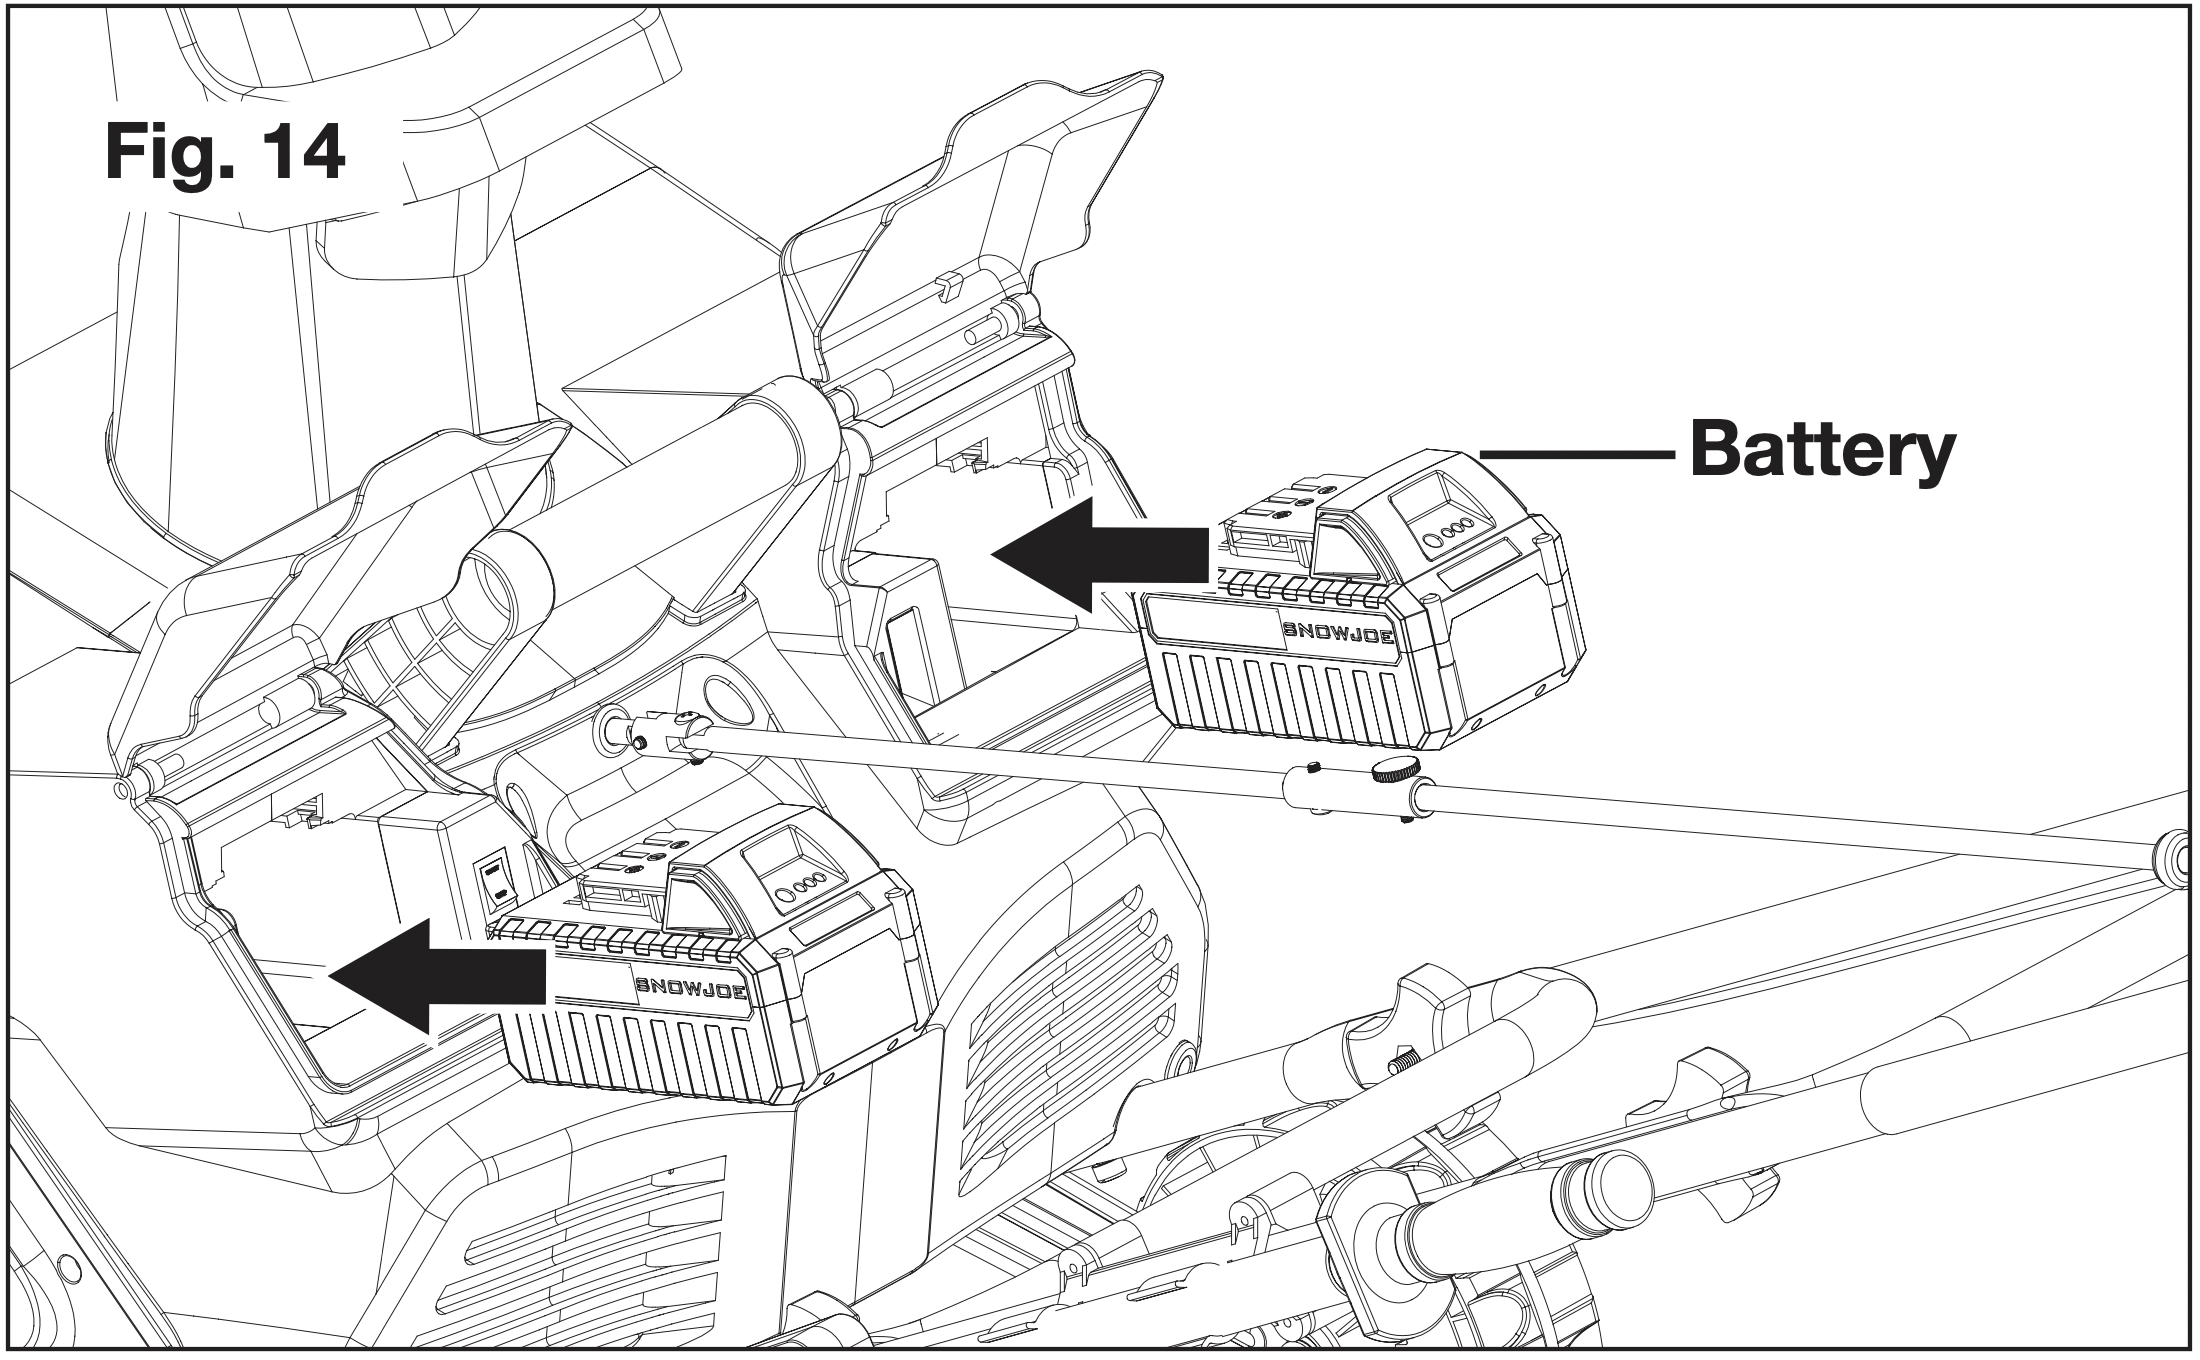
Starting + Stopping
- Open the battery compartment covers and slide each battery down until it clicks to lock it into position (Fig. 14).
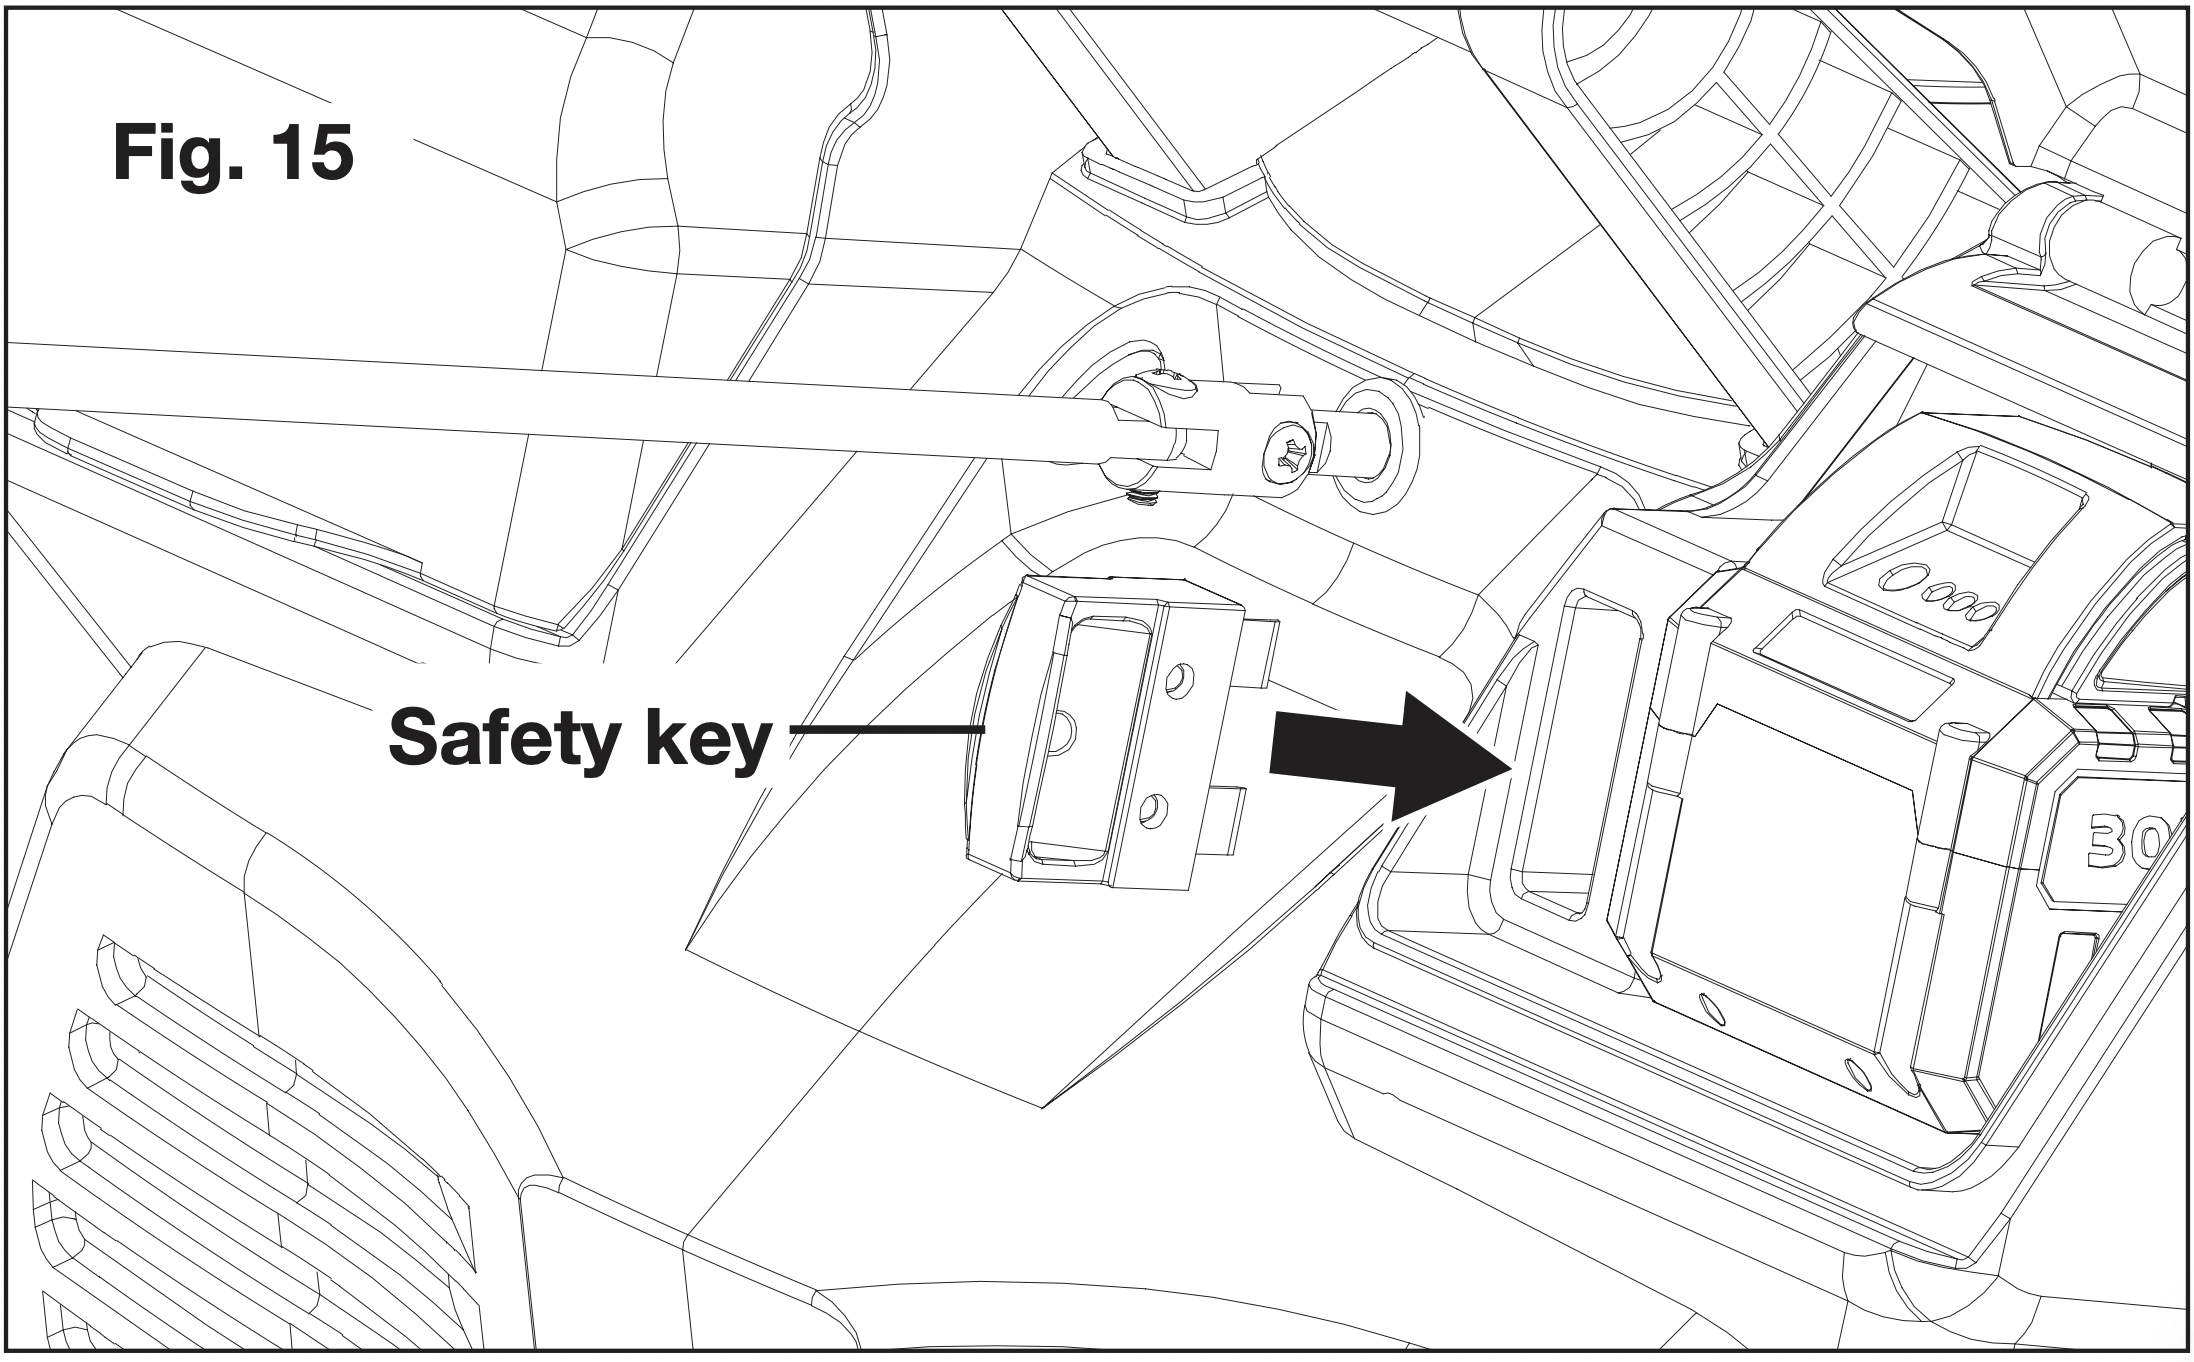
- Insert the safety key into the slot and close the battery compartment cover (Figs. 15).
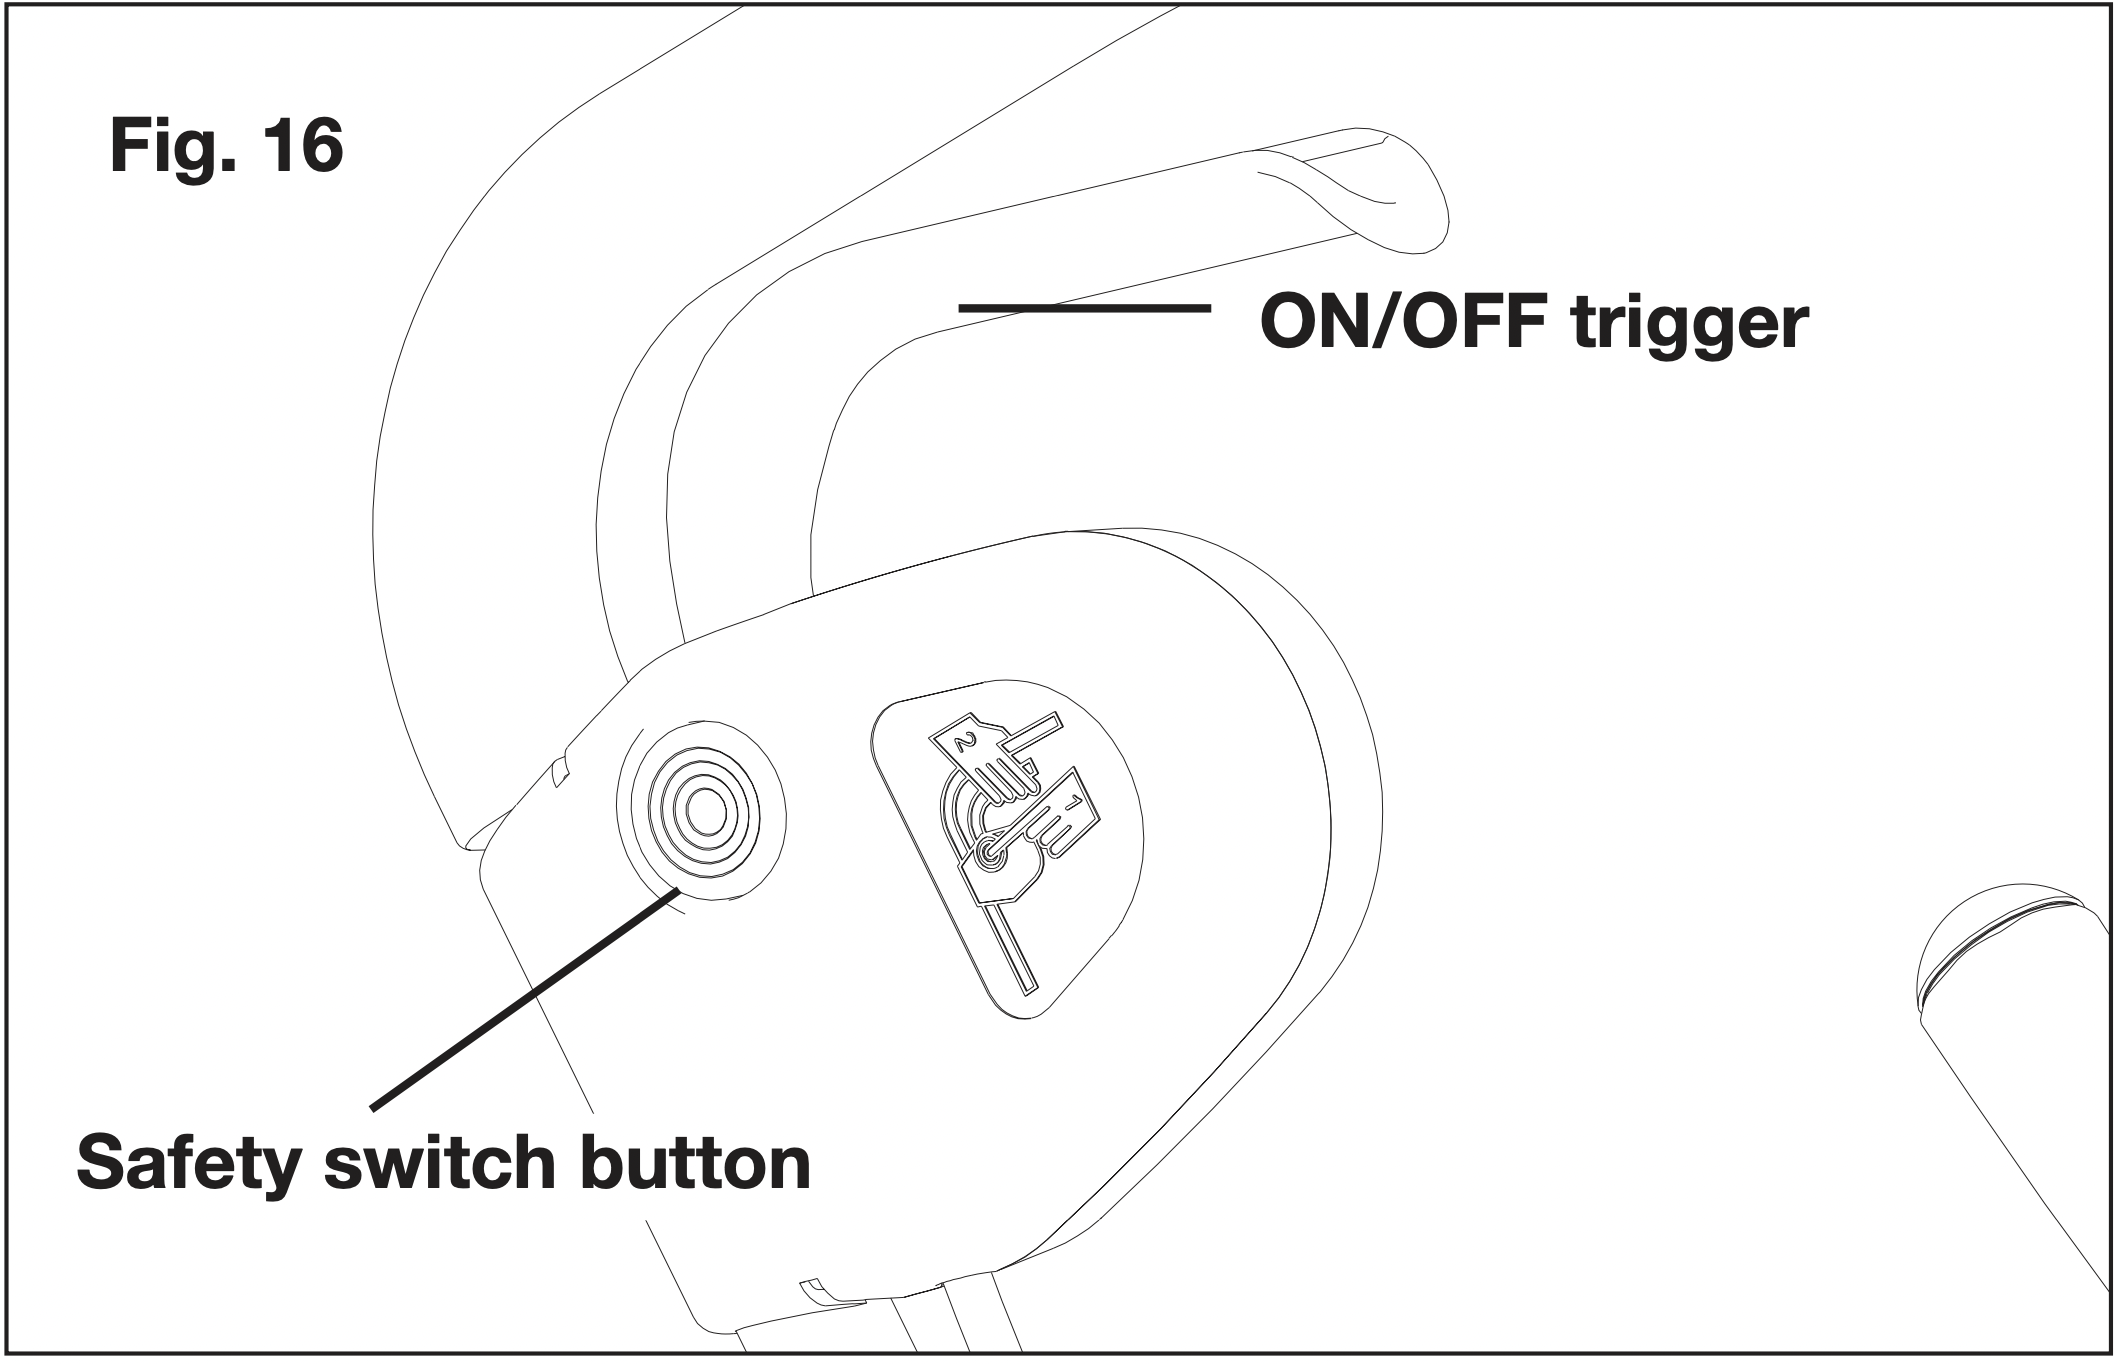
- While depressing the safety switch button, pull the ON/OFF trigger toward you. Once the machine powers on, release the safety switch button and begin operation (Fig. 16). The machine can only be started by depressing the safety switch button first, followed by squeezing the ON/OFF trigger; reverse operation will not start the machine.
- To power off, release your grip on the ON/OFF trigger.
Operating Tips
WARNING! Foreign objects, such as rocks, broken glass, nails, wire, or string, can be picked up and thrown by the snow blower, causing serious personal injury. Remove all foreign objects from the area to be plowed before operating the snow blower.
- Keep the area of operation free of foreign objects that can become thrown by the rotor blades. Perform a thorough inspection of the area since some objects may be hidden from view by surrounding snow. If the snow blower hits an obstruction or picks up a foreign object during use, stop the snow blower, remove the batteries, remove the obstruction, and inspect the unit for damage. Repair or replace any damaged part before restarting and operating the unit.
- Keep children, pets, and bystanders away from the area of operation. Be aware that the normal noise of the machine when turned on may make it diɉcult for you to hear approaching people.
- When moving the snow blower, use the wheels on one side as the pivot point. Slightly tilt the snow blower on this pivot point to move it forward or backward.
- Start your clearing path outward, throwing snow in a back and forth motion. To clear in the opposite direction, pivot the snow blower on its wheels. Make sure to overlap clearing paths.
- Note the wind direction. If possible, move in the same direction as the wind so that the snow is not thrown against the wind (and thus back into your face and on the just cleared path).
- Do not push the snow blower with excessive force.
You should push the machine gently and evenly in accordance with the unit’s throw rate.
- Do not apply additional man-made load to the motor since this may cause motor damage.
- Some parts of the snow blower may freeze under extreme temperature conditions. Do not attempt to operate the snow blower with frozen parts. If the parts freeze while the snow blower is in use, stop the snow blower, remove the batteries, and inspect for frozen parts. Free all parts before restarting or operating the snow blower. Never force controls that have frozen.
- When working on pebbles, gravel, or unpaved surfaces, avoid throwing loose surface material along with the snow by pushing down on the handle to raise the scraper at the base of the unit above the pebbles or gravel.
Headlight
The snow thrower is equipped with a headlight that can be used to illuminate the forward path in the dark. To use the light, turn on the light switch located on the back side next to the battery compartment on the left (Fig. 17).
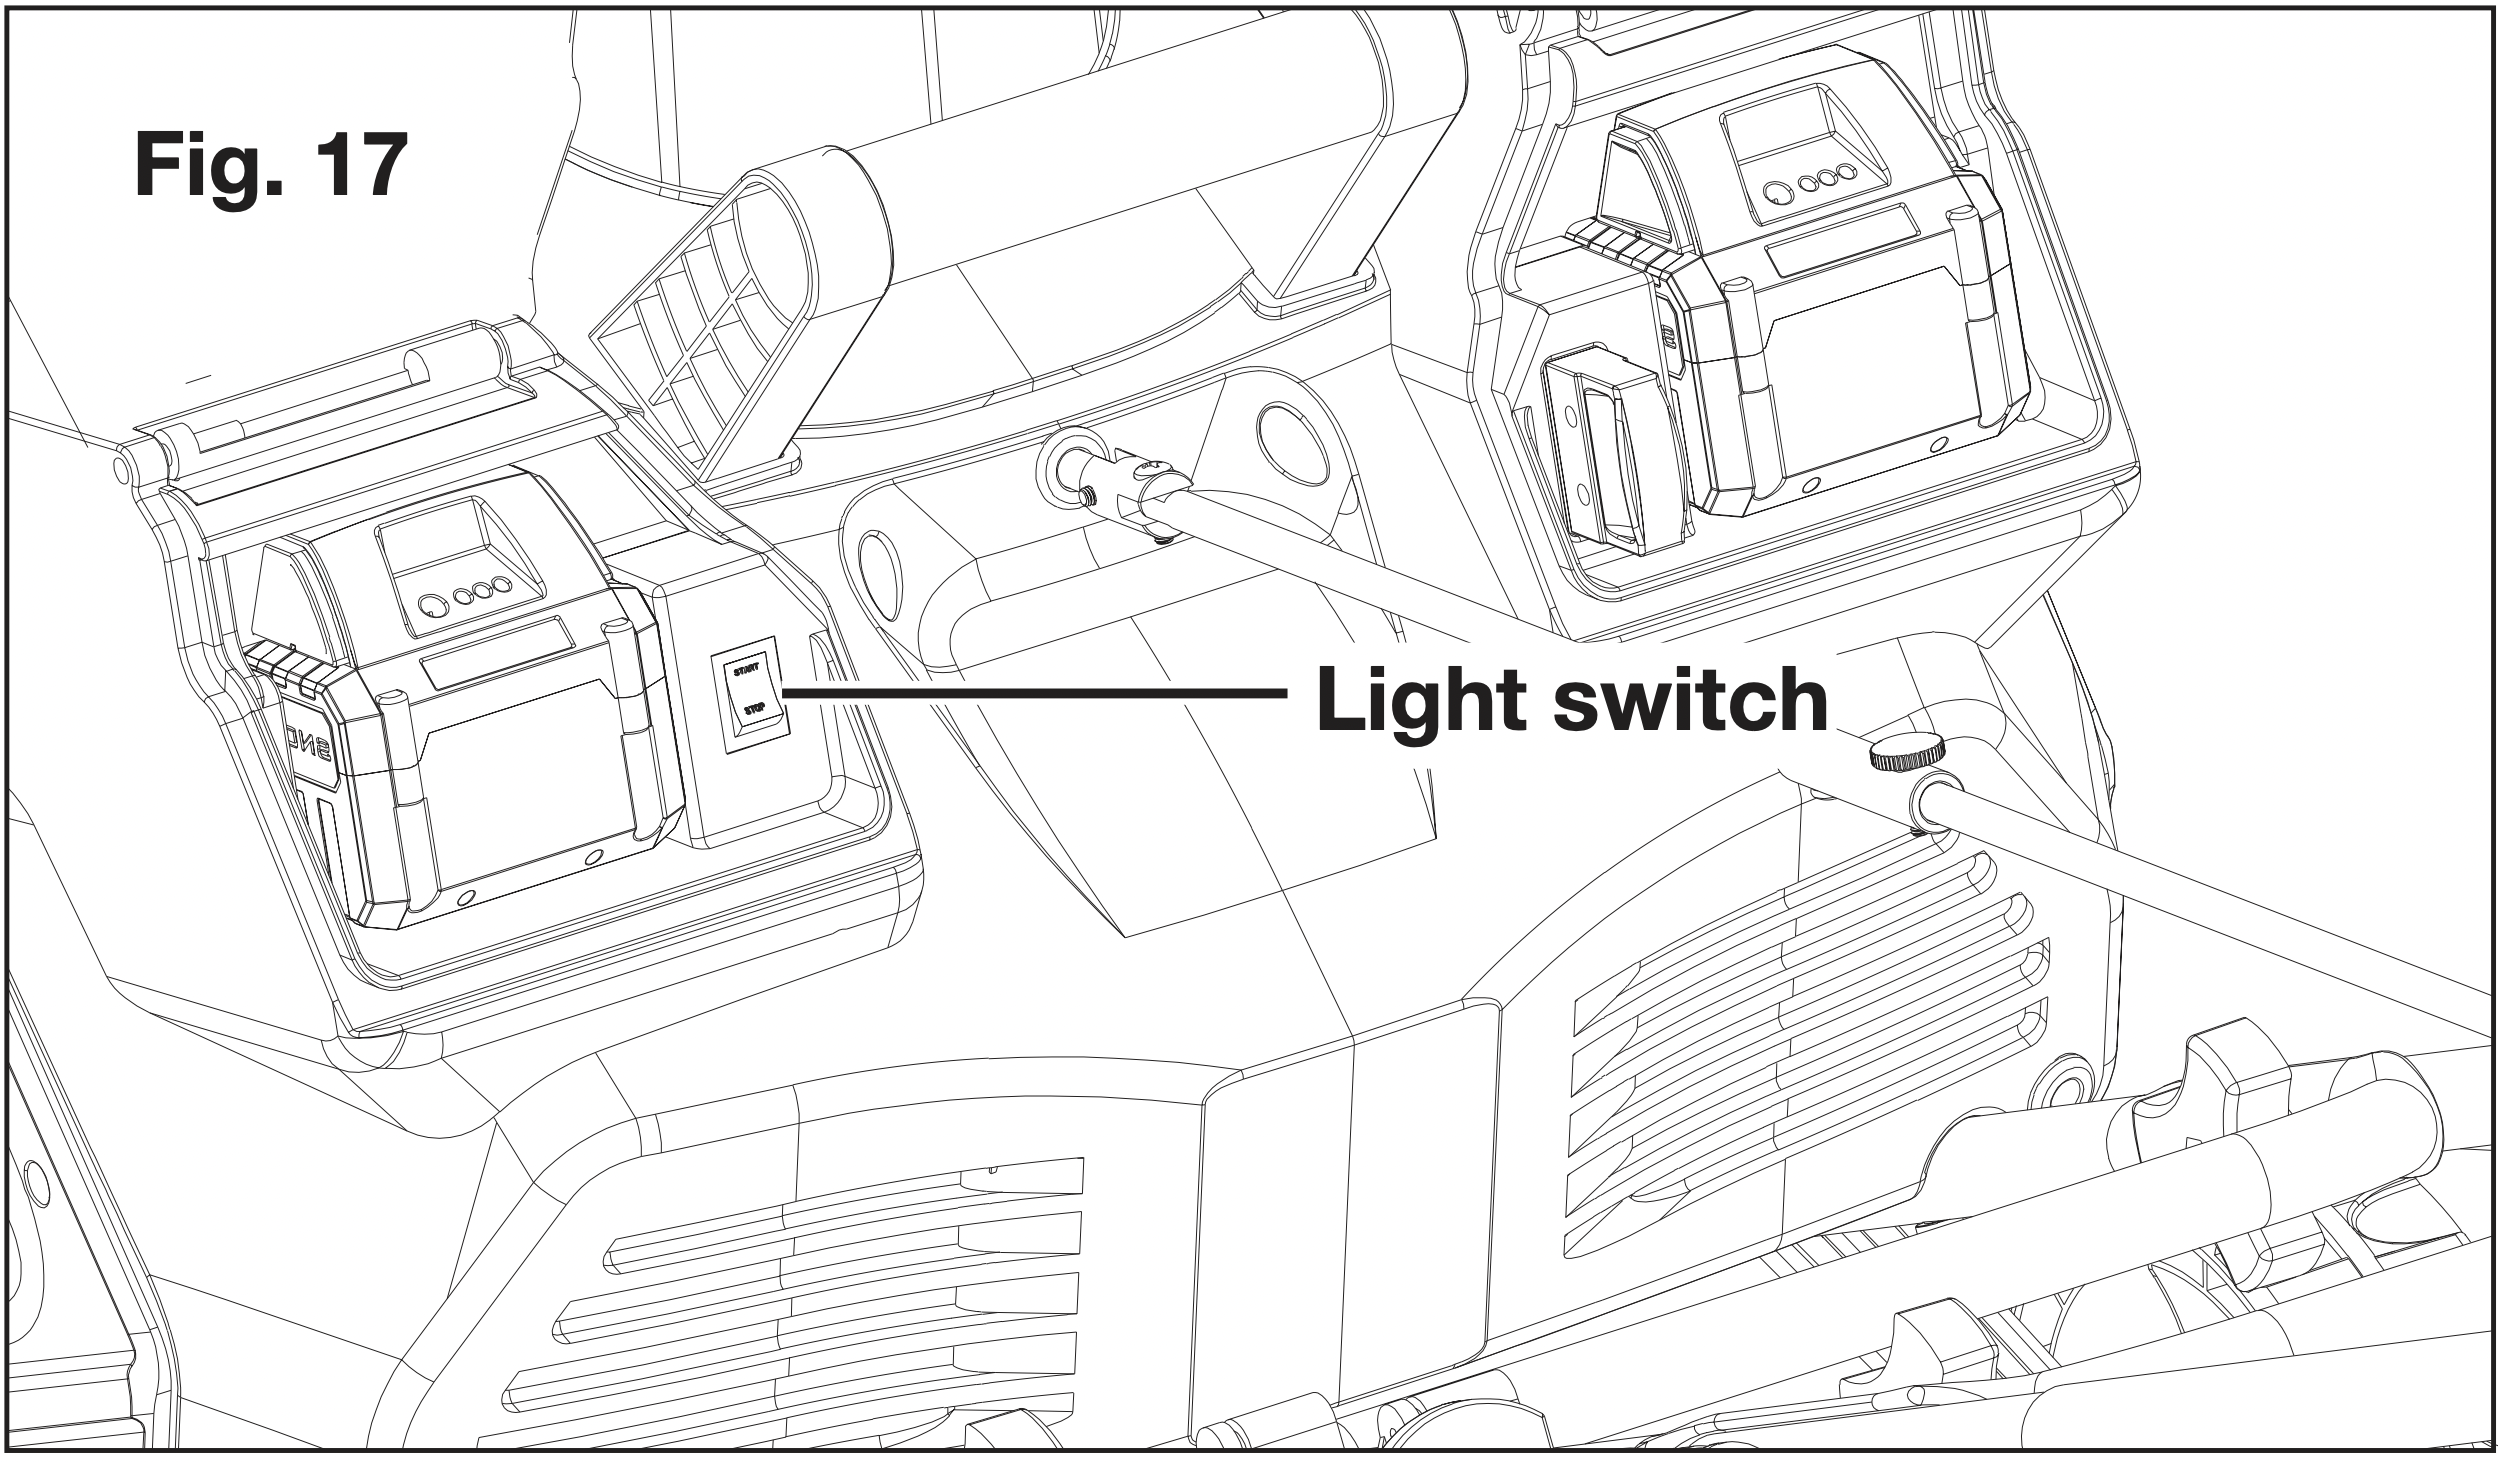
NOTE: The lights will only turn ON when the snow thrower is running. After finishing your work session, REMEMBER to TURN OFF the light switch.
Changing Throw Direction and Throw Height
WARNING: Never direct the snow discharge chute at the operator, at bystanders, at vehicles, or at nearby windows. The discharged snow and foreign objects accidentally picked up by the snow thrower can cause serious damage and personal injury.
Always orient the discharge chute in the opposite direction from where you, bystanders, surrounding vehicles, or windows are located.
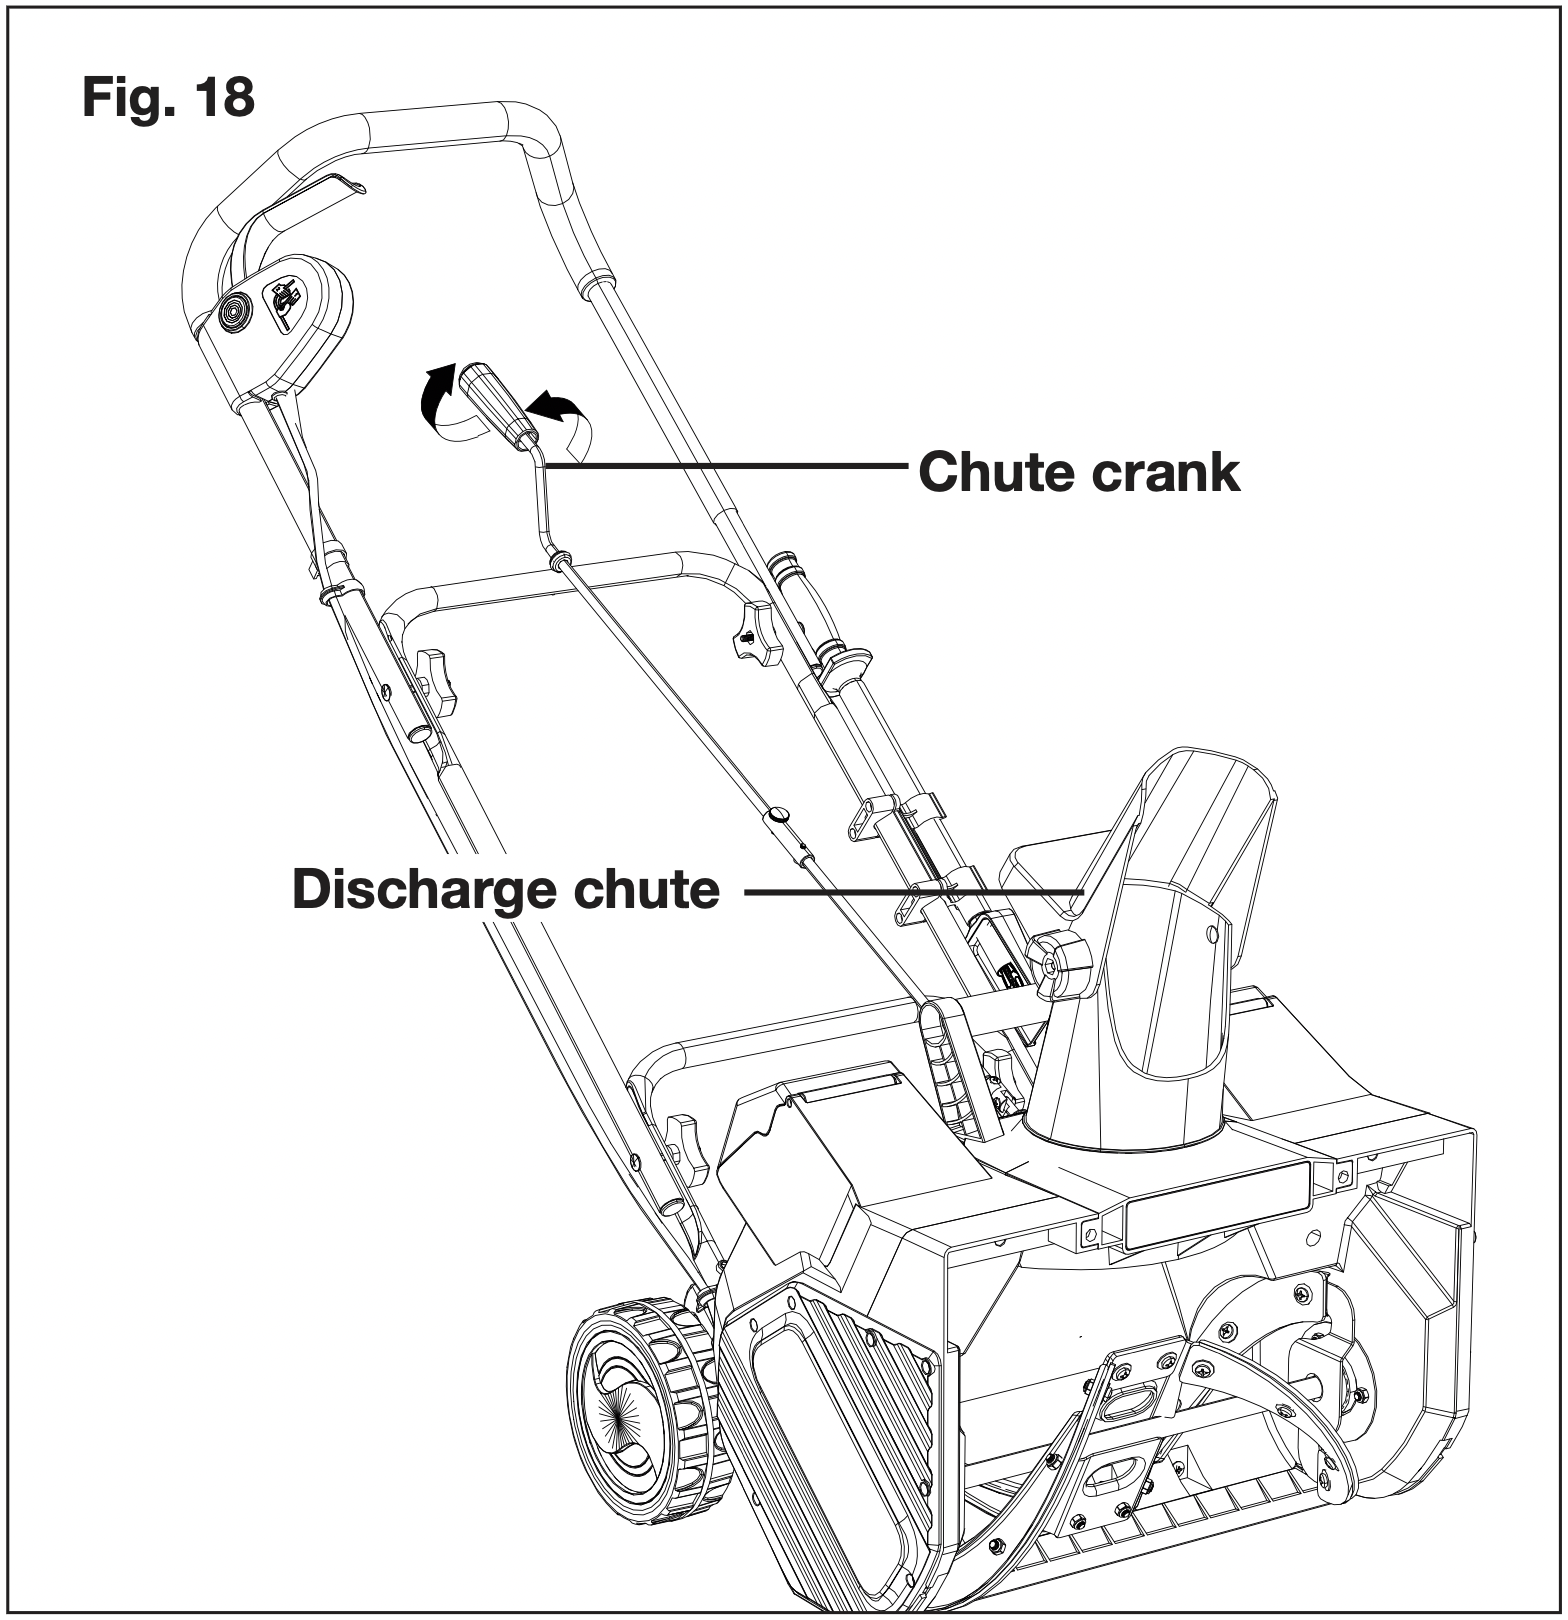
- The discharge chute can be adjusted 180 degrees by rotating the chute crank. Rotate the chute control crank clockwise to move the discharge chute to the left and counterclockwise to move the chute to the right (Fig. 18).
- The chute deflector on the top of the discharge chute controls the height of the snow stream. Loosen the knobs to raise or lower the deflector to the desired height of snow you wish to throw. Tighten the knobs to secure the deflector (Fig. 19).
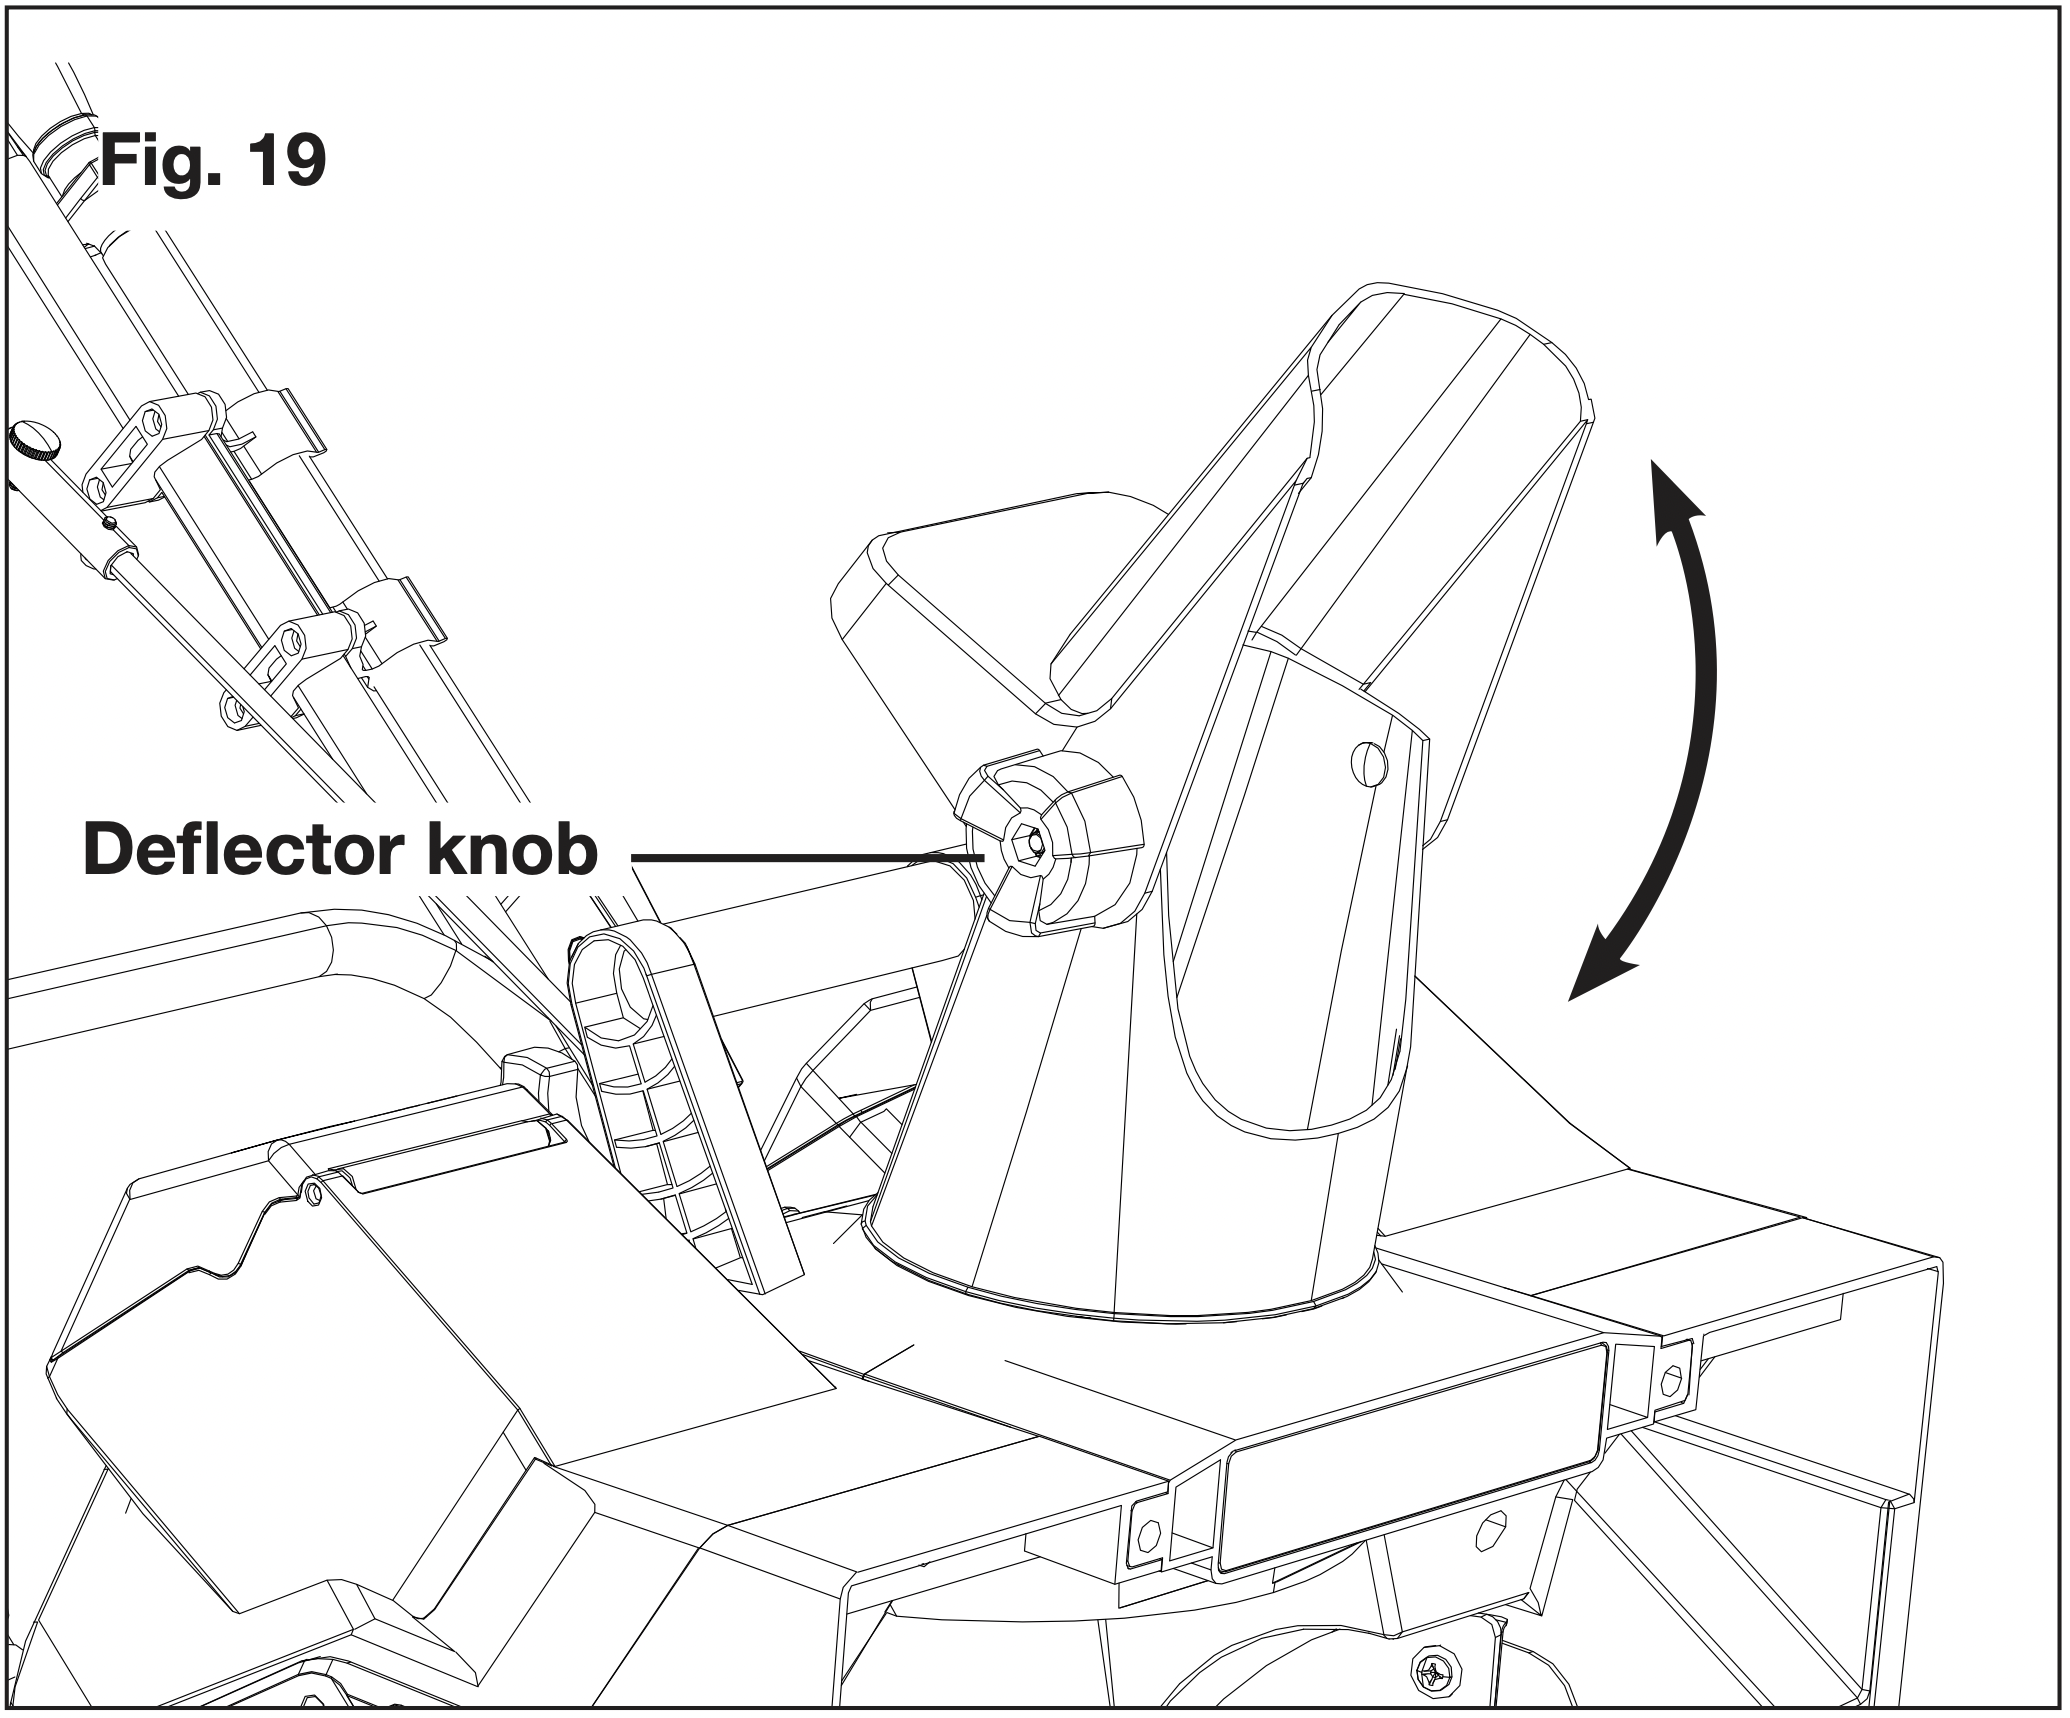
WARNING: Make sure that the chute deflector snaps and locks completely onto the discharge chute. An opening between the discharge chute and the chute deflector may allow foreign objects to be picked up by the snow thrower and thrown in the direction of the operator causing serious bodily injury.
- Do not advance the chute deflector too far forward causing an opening to appear between the deflector and discharge chute.
- Do not overtighten the knobs on the chute deflector.
Maintenance
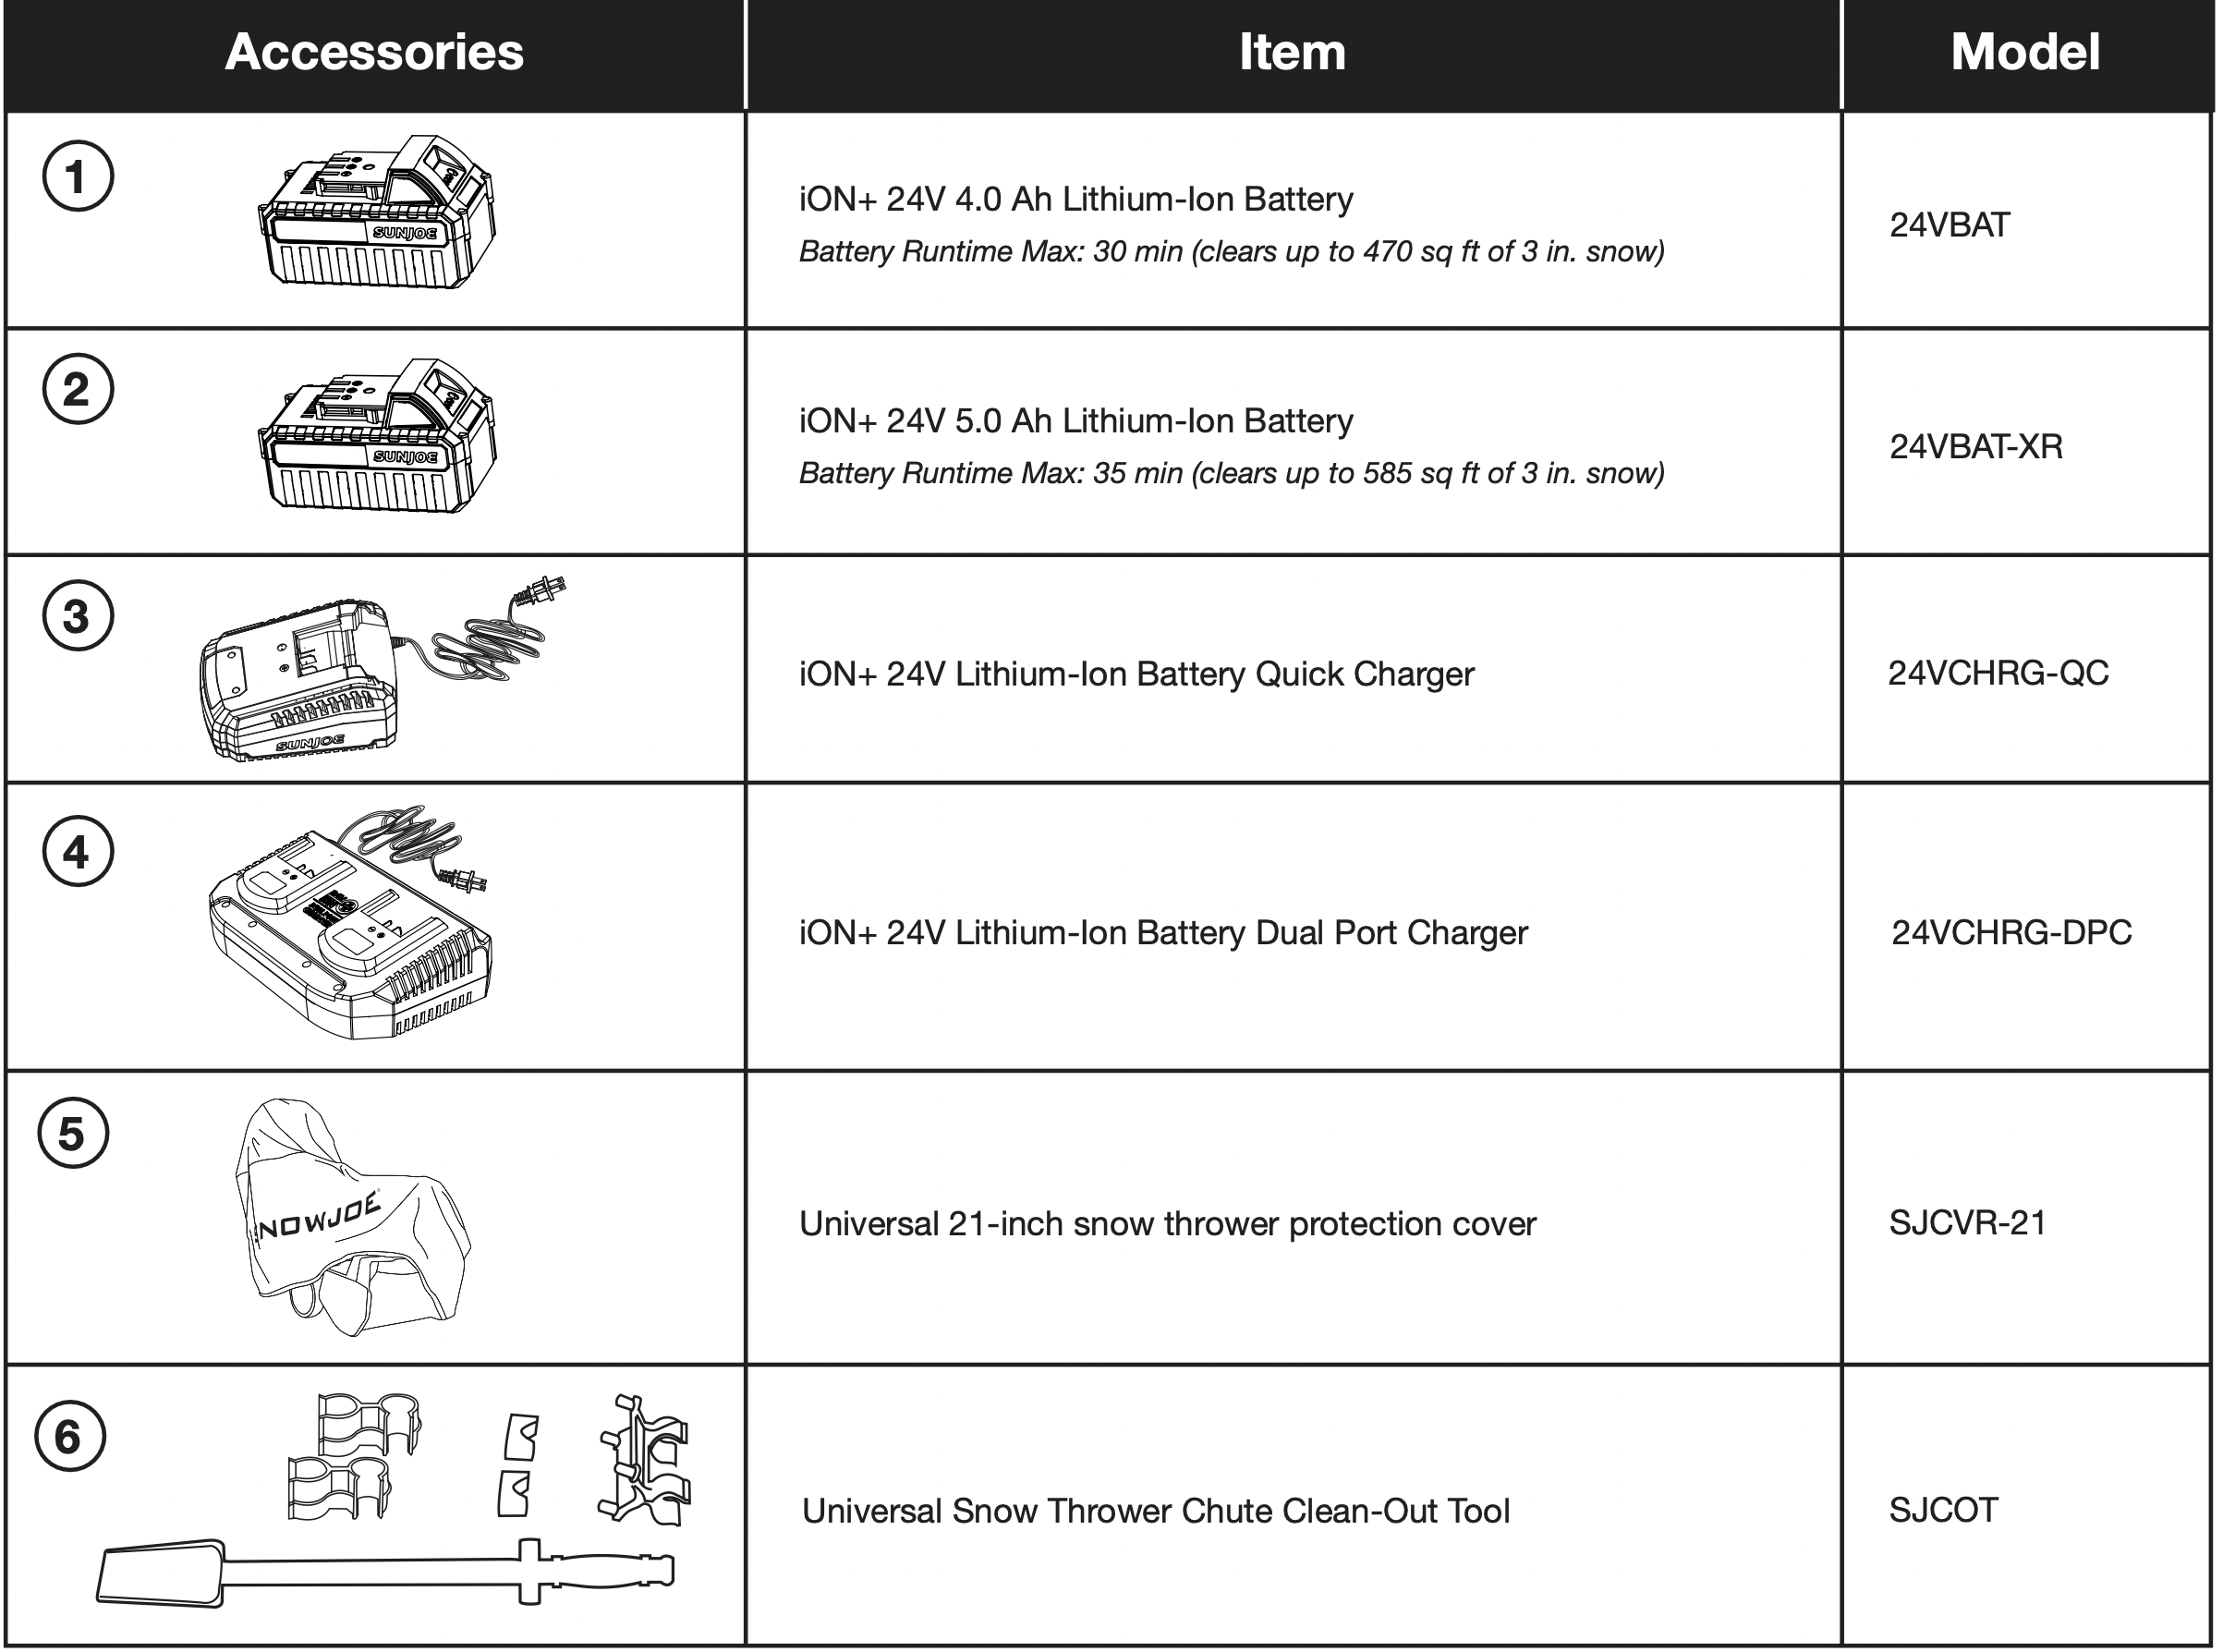
To order genuine replacement parts or accessories for the Snow Joe ® 24V-X2-SB18 cordless snow blower, please visit snowjoe.com or contact the Snow Joe ® + Sun Joe ® customer service center at 1-866-SNOWJOE (1-866-766-9563).
WARNING! Make sure to turn off the switch and remove the batteries before performing any maintenance task on your snow blower.
Lifetime Lubrication (Motor + Auger)
Lubrication is not necessary and may damage the unit. The snow blower is lubricated for lifetime use at the factory before shipment.
General Maintenance Tips
- Do not attempt to repair the machine unless you have the proper tools and instructions for disassembly and repair of the machine.
- Check bolts and screws at frequent intervals for proper tightness to ensure that the equipment is in safe working condition.
- After each snow removal session, run the snow blower for a few minutes to prevent the collector/impeller from freezing. Shut off the motor, wait for all revolving parts to stop completely, and wipe residual ice and snow off the unit. Rotate the chute deflector by the chute control crank several times to remove any excess snow.
Proper Care for Batteries + Charger
WARNING! To reduce the risk of injury, always unplug the charger and remove the battery packs from the charger before performing any maintenance task. Never disassemble the battery packs or charger. Contact your Snow Joe ® + Sun Joe ® dealer or the Snow Joe ® + Sun Joe ® customer service center for ALL repairs.
- To reduce the risk of injury and damage, never immerse your battery packs or charger in liquid or allow any liquid to flow inside these components.
- Clean out dust and debris from charger vents and electrical contacts by blowing with compressed air.
- Use only mild soap on a damp cloth to clean the battery packs and charger, keeping away from all electrical contacts. Certain cleaning agents and solvents are harmful to plastics and other insulated parts. Some of these include gasoline, turpentine, lacquer thinner, paint thinner, chlorinated cleaning solvents, ammonia and household detergents containing ammonia. Never use flammable or combustible solvents around battery packs, battery chargers or tools.
- The iON+ 24V lithium-ion battery charger has no serviceable parts.
Maintenance + Storage
- Run the machine a few minutes after throwing snow to prevent the auger from freezing.
- Examine the cordless snow blower thoroughly for worn, loose or damaged parts. Should you need to repair or replace a part, contact an authorized Snow Joe ® + Sun Joe ® dealer or call the Snow Joe ® + Sun Joe® customer service center at 1-866-SNOWJOE (1-866-766-9563) for assistance.
- Clean the snow blower before storing or transporting.
Be sure to secure the unit while transporting.
- Remove the batteries and the safety key from the cordless snow blower before storing.
- Store the cordless snow blower indoors in a locked, dry place out of the reach of children to prevent unauthorized use or damage.
- Maintain safety and instruction labels, as necessary.
- Always refer to the Battery + Charger Off-Season Storage section for important details if the snow thrower is to be stored for an extended period.
Battery + Charger Off-Season Storage
- Do not expose your battery packs or charger to water, rain or allow them to get wet. This could permanently damage the charger and the battery packs. Do not use oil or solvents to clean or lubricate your battery packs as the plastic casing can become brittle and crack, causing a serious risk of injury.
- Store the battery packs and charger at room temperature away from moisture. Do not store in damp locations where corrosion of terminals may occur. As with other battery pack types, permanent capacity loss can result if the pack is stored for long periods of time at high temperatures (over 120ºF/49ºC).
- iON+ 24V lithium-ion battery packs maintain their charge during storage longer than other battery pack types. As a general practice, it is best to unplug the battery charger and remove the battery packs when they are not in use. Recharge the battery packs every 6 months to 50% capacity (2 lights on) during off-season storage to maintain optimal battery performance.
Always dispose of your battery packs according to federal, state, and local regulations. Contact a recycling agency in your area for recycling locations.
CAUTION! Even discharged battery packs contain some energy. Before disposing, use electrical tape to cover the terminals to prevent the battery packs from shorting, which could cause a fire or explosion.
WARNING! To reduce the risk of injury or explosion, never burn or incinerate battery packs even if it is damaged, dead or completely discharged. When burned, toxic fumes and materials are emitted into the surrounding atmosphere.
- Batteries vary according to device. Consult your manual for specific information.
- Install only new batteries of the same type in your product (where applicable).
- Failure to insert batteries in the correct polarity, as indicated in the battery compartment or manual, may shorten the life of the batteries or cause batteries to leak.
- Do not mix old and new batteries.
- Do not mix Alkaline, Standard (Carbon-Zinc) or Rechargeable (Nickel Cadmium, Nickel Metal Hydride, or Lithium-Ion) batteries.
- Do not dispose of batteries in fire.
- Batteries should be recycled or disposed of as per state and local guidelines.
Service + Support
If your Snow Joe ® 24V-X2-SB18 cordless snow blower requires service or maintenance, please call the Snow Joe ® + Sun Joe ® customer service center at 1-866-SNOWJOE (1-866-766-9563).
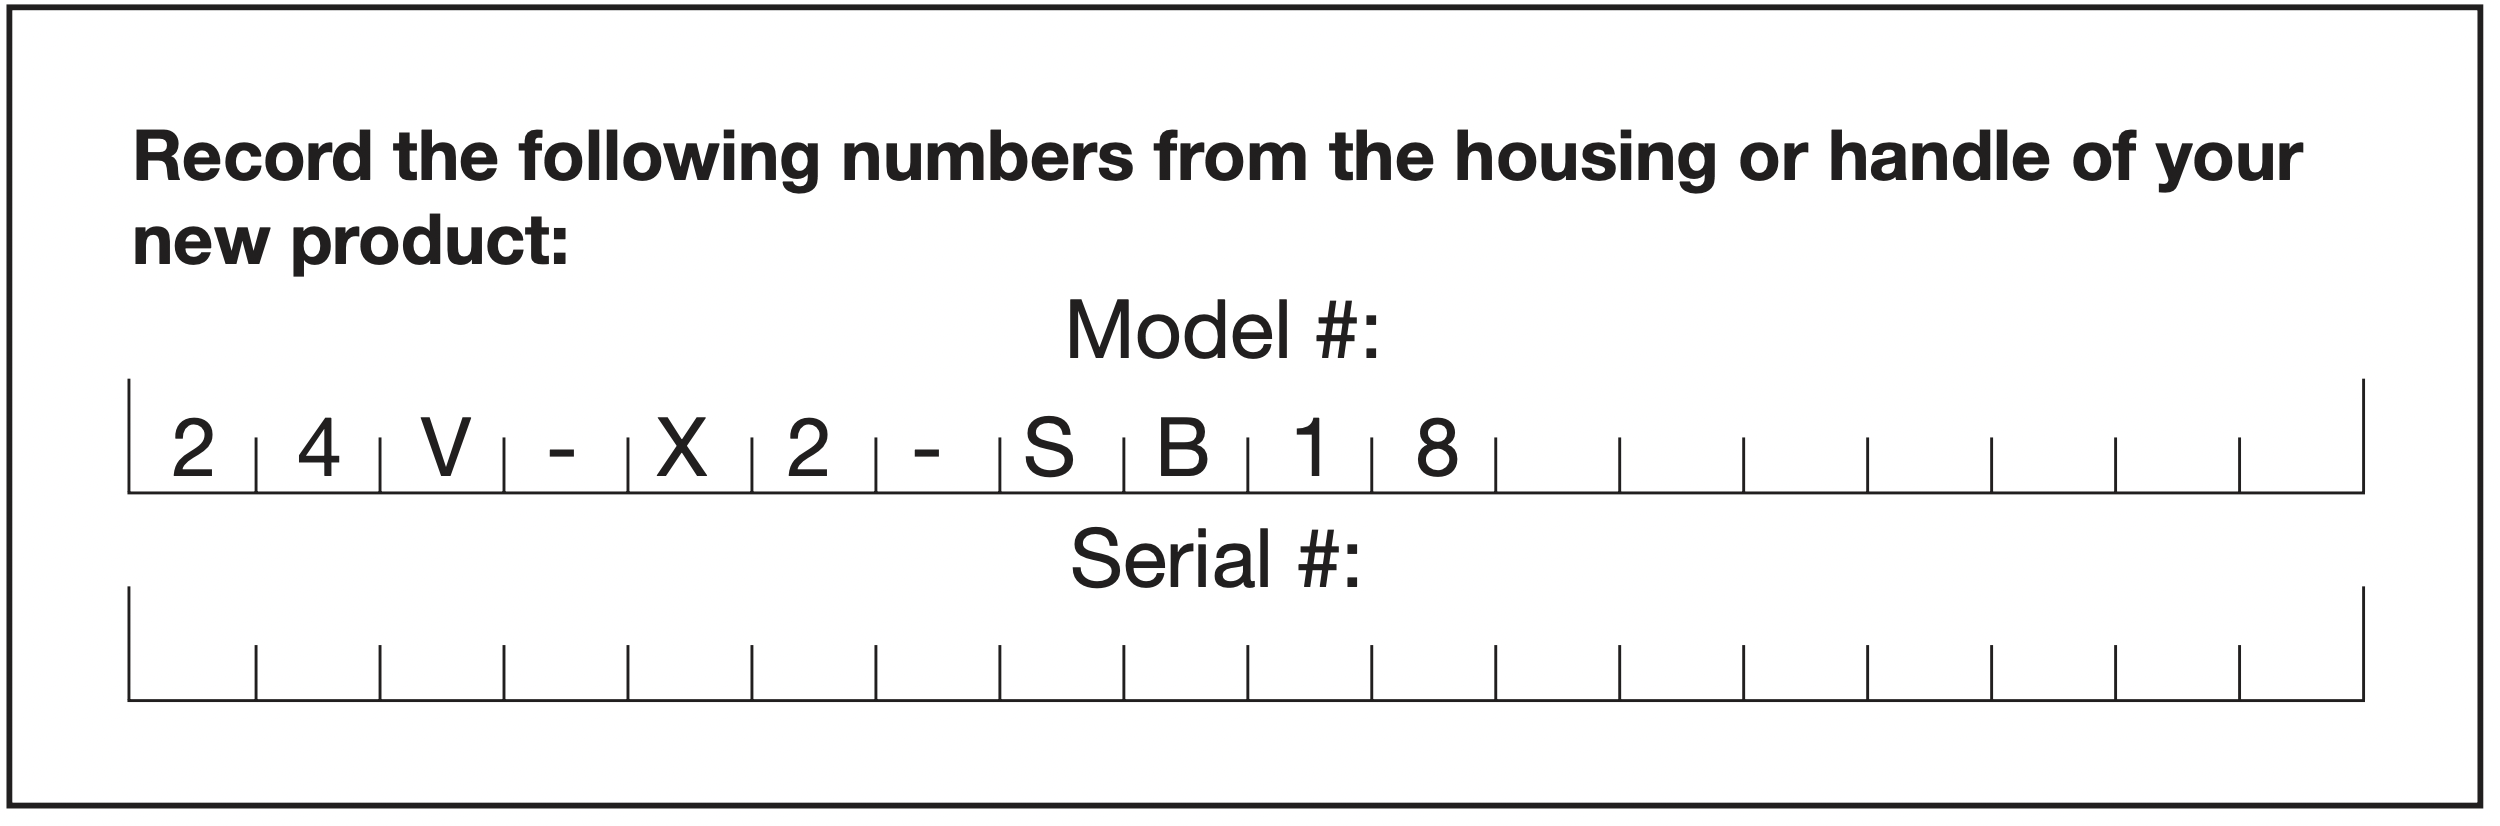
Model + Serial Numbers
When contacting the company, reordering parts or arranging service from an authorized dealer, you will need to provide the model and serial numbers, which can be found on the decal located on the housing of the unit. Copy these numbers into the space provided below.
Accessories
WARNING! ALWAYS use only authorized Snow Joe ® + Sun Joe ® replacement parts and accessories. NEVER use replacement parts or accessories that are not intended for use with this cordless snow blower. Contact Snow Joe ® + Sun Joe® if you are unsure whether it is safe to use a particular replacement part or accessory with your cordless snow blower. The use of any other attachment or accessory can be dangerous and could cause injury or mechanical damage.