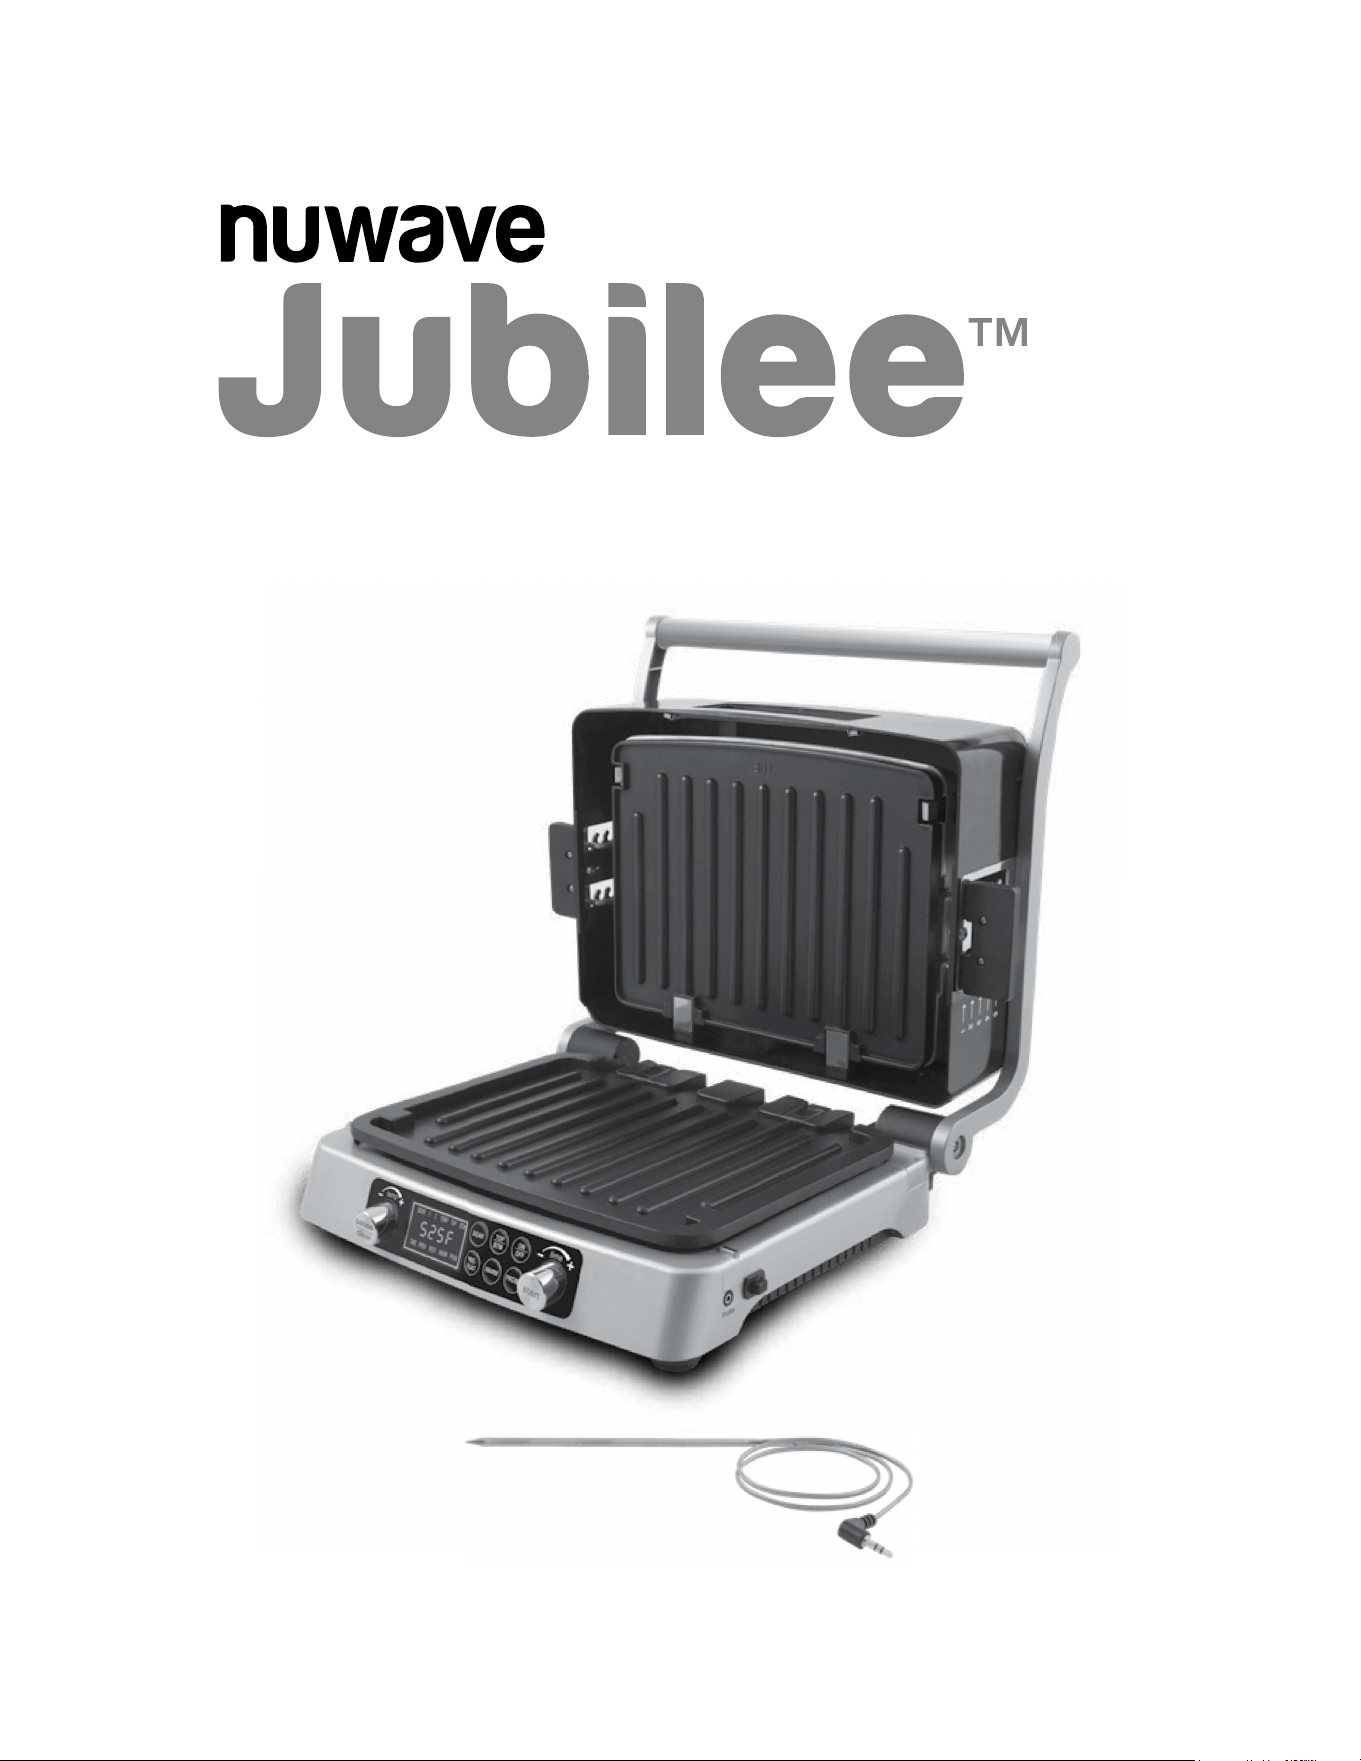
OWNER’SMANUAL
nuwavenow.com
Digital Grill
with Temperature Probe

2 3
2 3
REGISTER
Asaspecialthank-youforregisteringyourNuWaveunit,you’ll
automatically receive an additional 3 months added to your
limitedmanufacturer’swarranty!*
Allyouhavetodoisfollowthesesimplesteps.
Using your smartphone or smart
device, scan the QR code located on
the unit label on the back of the unit.
YouwillbedirectedtoNuWave’s
product registration page with
yourunit’suniqueserialnumber
automatically entered in the
appropriateeld.
NOTE: If you do not have a web-
enabled smart device, simply visit
nuwavenow.com/QR and manually
enterinyourunit’sserialnumber.
Fill out the remaining information and
complete the optional survey.
Once you submit your information,
youwillreceiveaconrmation
email containing your extended
warranty details.
1
2
3
4
*Register your product within 1 year of date of purchase for a free
3-month extension of your limited warranty.

Open your mobile app store
(App Store, Google Play).
Search for "QR code readers."
Simply download the QR code reader to your phone, open it,
scan the code and you are ready to go.
NOTE: You may need to open your downloaded QR code
reader each time you want to scan a QR code.
nuwavenow.
com
2 3
nuwavenow.
com
2 3
for an additional
months
warranty!
1
2
3
DOWNLOADTHEQRCODE
APPTOYOURMOBILEDEVICE
QR code readers
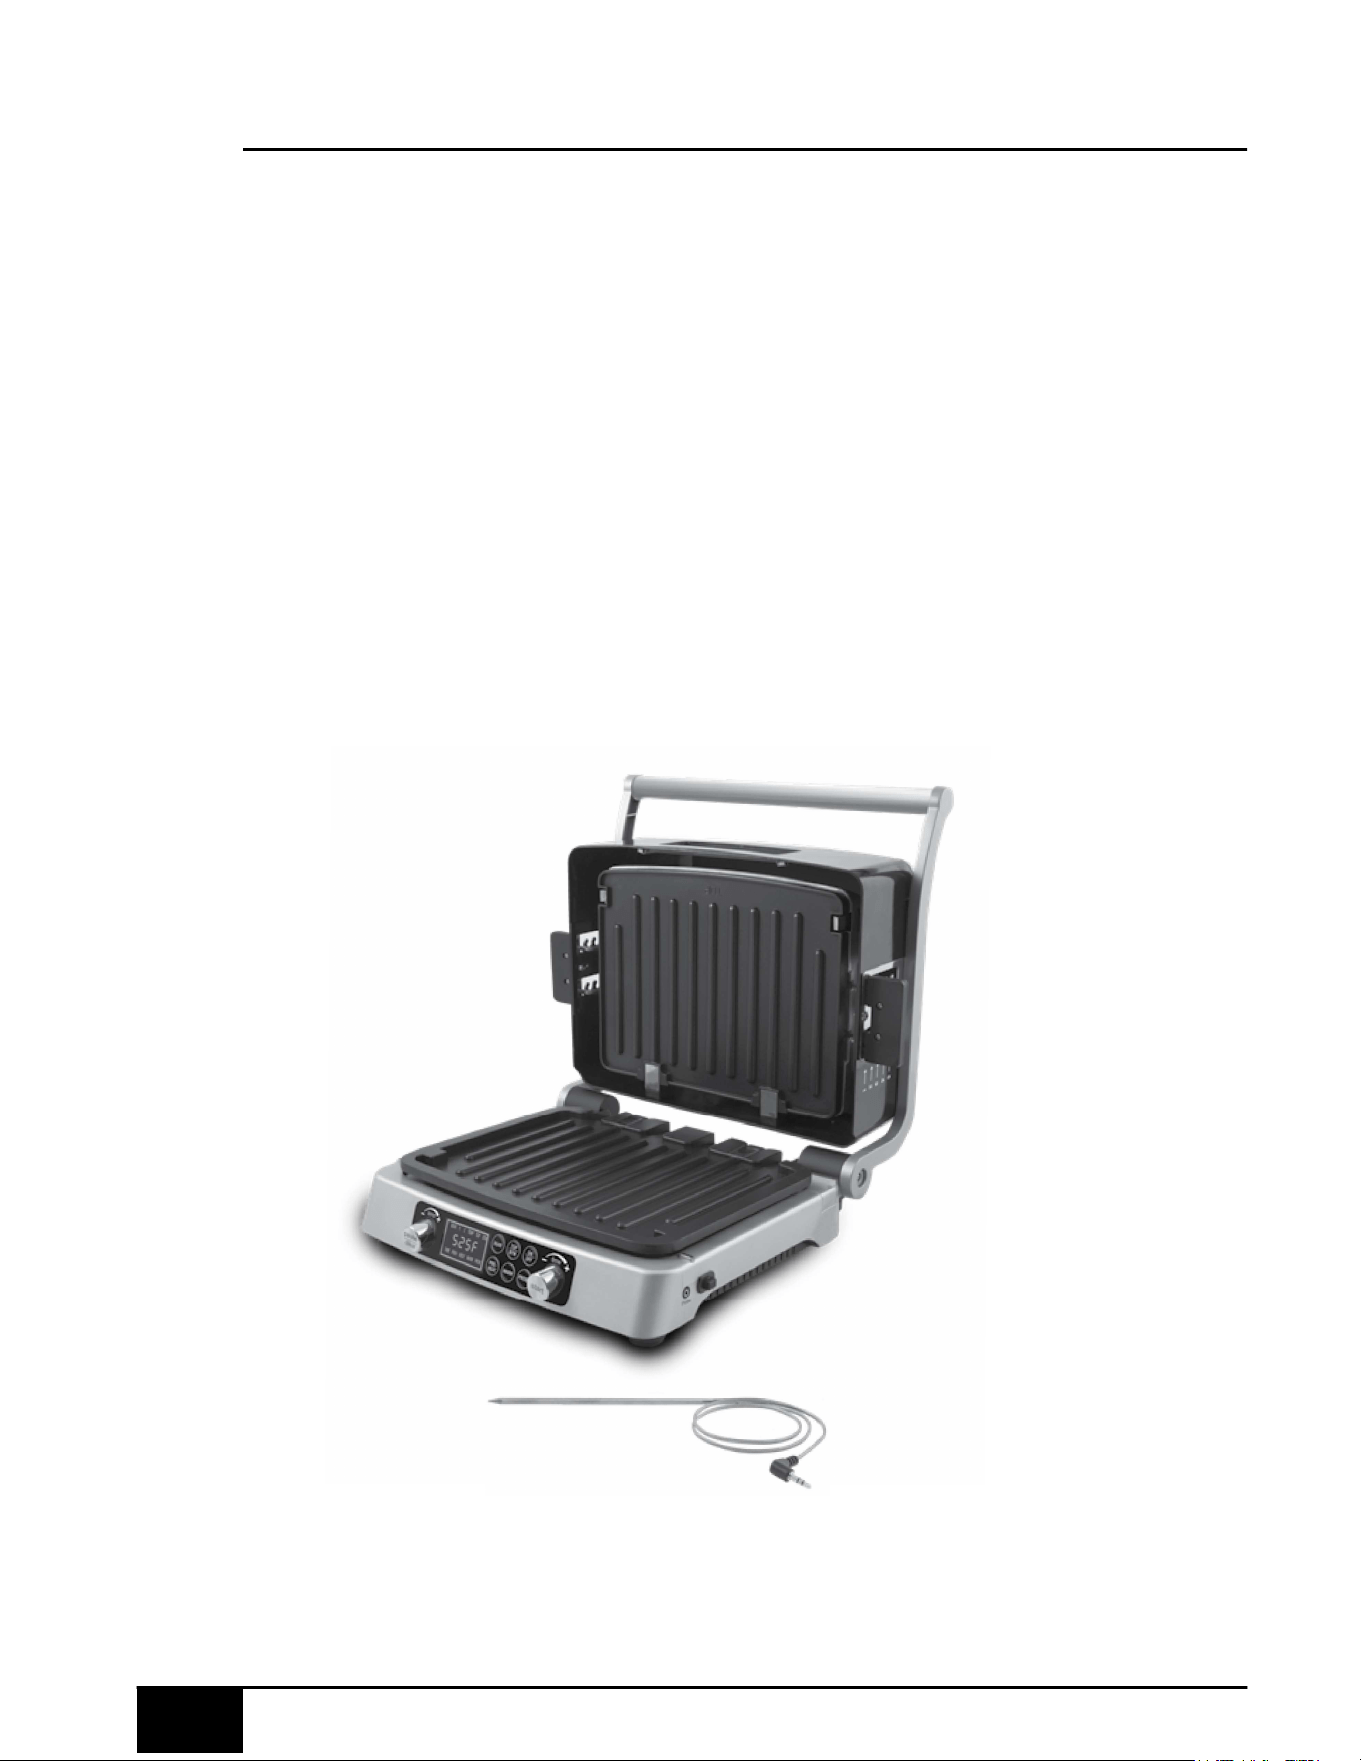
table of contents
44
TABLEOFCONTENTS
OWNER’SMANUAL
Important Safeguards ............................................................... 5-7
Parts & Accessories.................................................................. 8-9
Assembly Guide ....................................................................10-11
Quickstart ...................................................................................12
Instructions ........................................................................... 13-18
Cleaning&Maintenance ........................................................ 19-21
TroubleshootGuide ......................................................................22
LimitedWarranty .................................................................... 23-25
Spanish.................................................................................... 26-53
ReplaceableParts................................................................... 54-55
nuwavenow.com

nuwavenow.
com
5
ENGLISH
nuwavenow.
com
5
IMPORTANTSAFEGUARDS
HOUSEHOLDUSEONLY•READALLINSTRUCTIONSBEFOREUSE
WARNING:WhenusingtheJubilee,basicsafetyprecautions
shouldbefollowed:
1. Do not touch hot surfaces. Only use handles or knobs.
2. To protect against electrical shock, do not immerse cord, plugs,
or the Jubilee in water or other liquids.
3. Do not operate the Jubilee with a damaged cord or plug or
after the appliance malfunctions or has been damaged in any
manner. Return appliance to the nearest authorized service
facility for examination, repair, or adjustment.
4. If the power cord is damaged, do not attempt to operate
the Jubilee.
5. Close supervision is necessary when the Jubilee is used near
children. This appliance is not intended for use by persons
(including children) with reduced physical, sensory or mental
capabilities, or lack of experience and knowledge, unless they
have been given supervision or instruction concerning use of the
appliance by a person responsible for their safety.
6. The use of other accessories that are not intended to be used
with the Jubilee is not recommended. Doing so may damage the
Jubilee and can cause accidents.
7. NOT INTENDED FOR OUTDOOR USE.
8. Do not let cord hang over edge of table or counter or touch
hot surfaces.
9. Do not place on or near a hot gas, electric burner, or in a
heated oven.
10. Extreme caution must be used when moving the Jubilee
containing hot oil or other hot liquids.
11. To disconnect, turn the Jubilee “OFF”, then remove plug from the
wall outlet.
12. FOR HOUSEHOLD USE ONLY.
13. Do not leave appliance unattended while in use.
14. Never put the Jubilee against a wall or other appliances. Keep at
least a minimum of 3 inches of free space for the back, left/right
sides, and top of the appliance.
15. Never place objects on top of the Jubilee.
16. Never leave utensils in contact with any part of the Jubilee,
including Grill Plates.
17. Never use sharp-edged or metal utensils on any part of the
Jubilee, including Grill Plates, as scratching may occur.
Use only wood or heatproof, plastic utensils.
18. Do not use aluminum foil or other objects between Grill Plates
and the food while cooking.

important safeguards
6 7
IMPORTANT SAFEGUARDS
HOUSEHOLD USE ONLY • READ ALL INSTRUCTIONS BEFORE USE
6 7
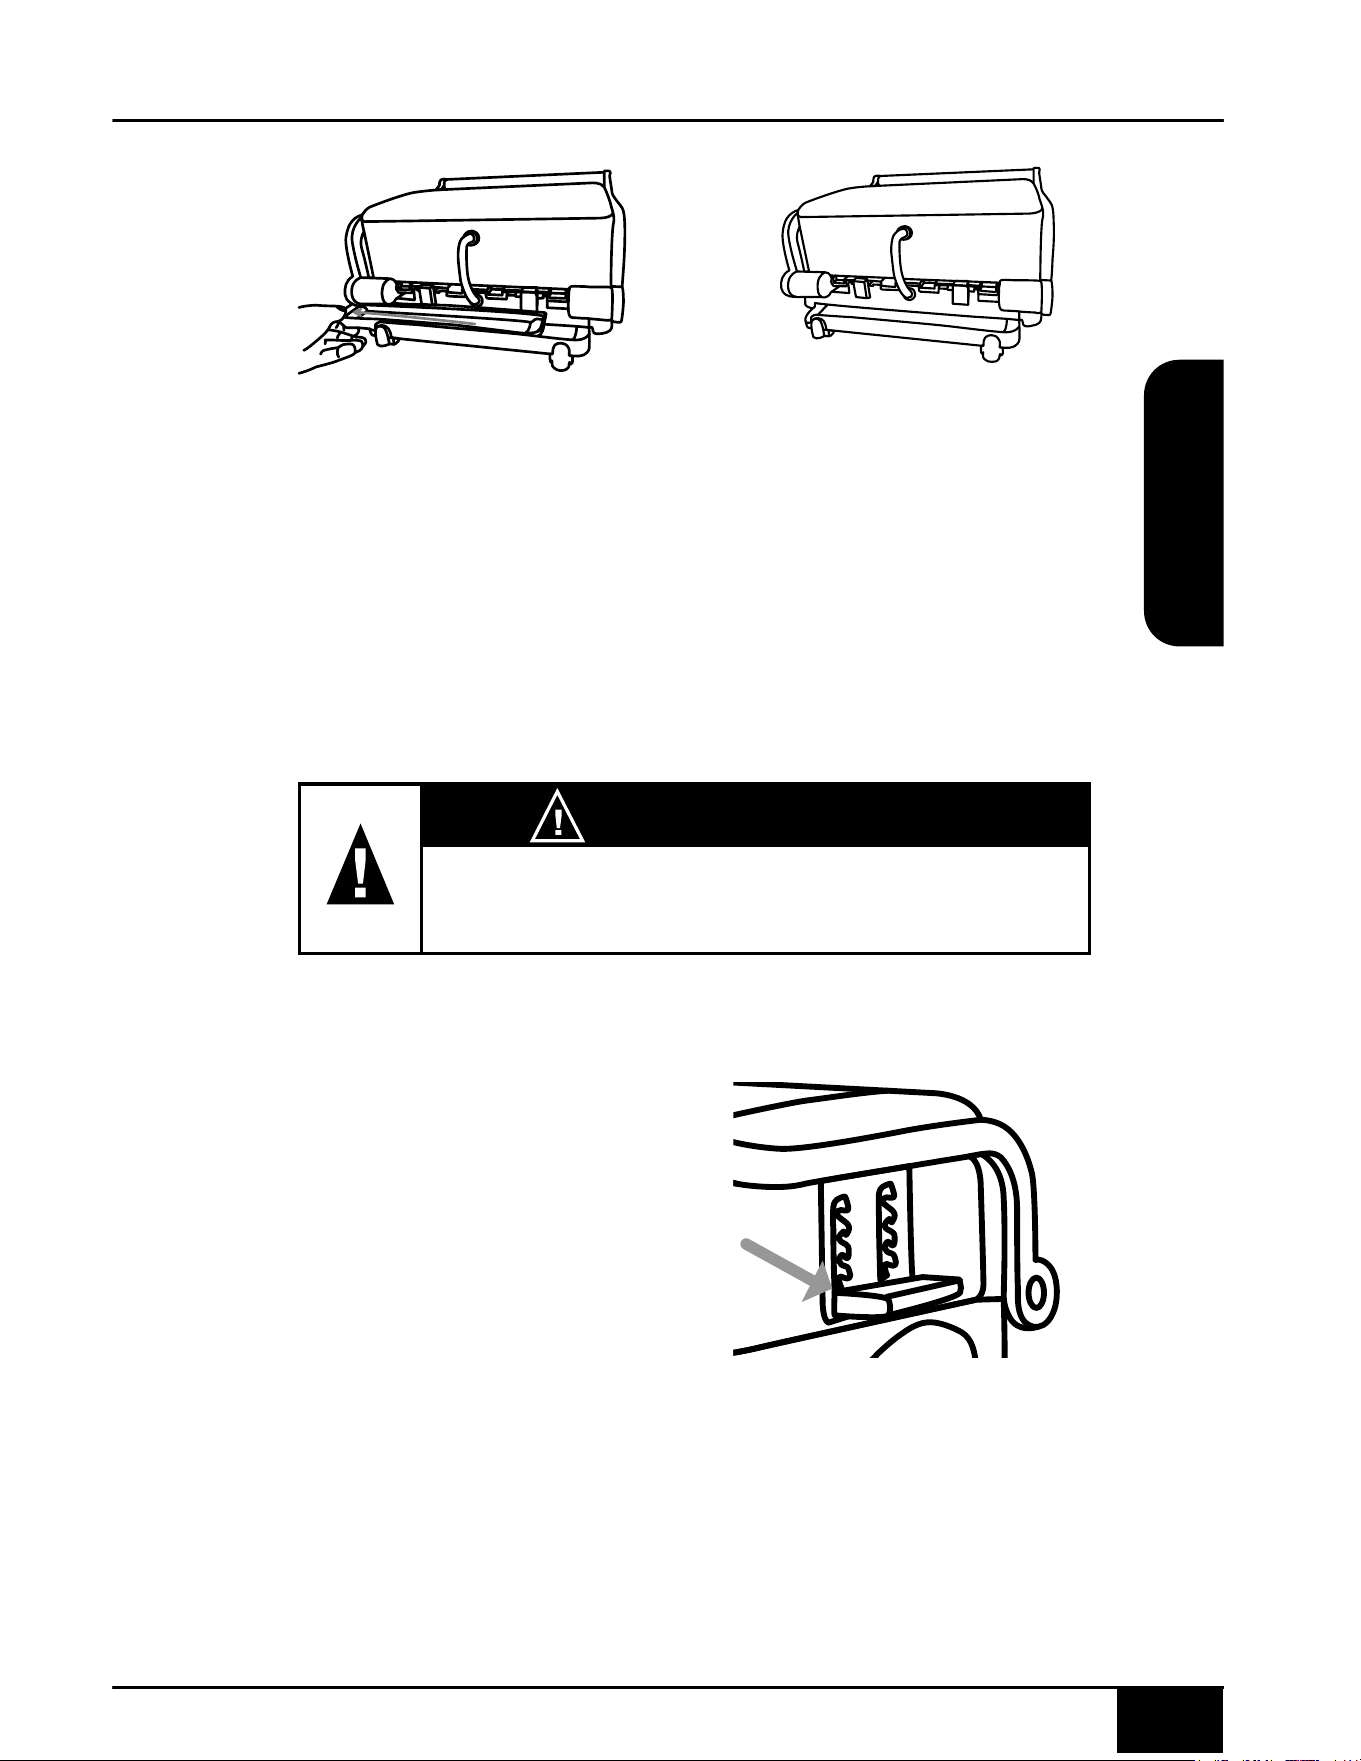
19. Do not disassemble. There are no user-serviceable parts.
20. Do not remove the Drip Tray from appliance when cooking.
21. Do not place a hot Grill Plate under water, on a fragile surface, or
on a countertop.
22. Turn off and unplug the Jubilee when not in use and before
cleaning. Allow to cool before putting on or taking off parts, and
before cleaning the appliance.
23. Keep this manual handy for future reference.
ADDITIONALSAFEGUARDS
SEECLEANINGANDMAINTENANCEBEFOREUSE
ElectricalInformation
Ashortpower-supplycord(ordetachablepower-supply
cord)isprovidedtoreducetheriskresultingfrombecoming
entangledinortrippingoveralongercord.Longer
detachablepower-supplycordsorextensioncordsare
availableandmaybeusedifcareisexercisedintheiruse.
Ifalongerdetachablepower-supplycordorextensioncord
isused:
1. The marked electrical rating of the extension cord should be
at least as great as the electrical rating of the appliance.
2. The longer cord should be arranged so that it will not drape
over the countertop or tabletop where it could be pulled
on by children or tripped over unintentionally. The Jubilee
should be operated on a separate electrical outlet from other
operating appliances due to wattage limitations. Certain
models of the appliances may have a polarized plug (one
blade is wider than the other). To reduce the risk of an
electric shock, this plug is intended to fit into a polarized
outlet one way. If the plug does not fit fully into the outlet,
reverse the plug. If the plug still does not fit properly, contact
a qualified electrician. Do not attempt to modify the plug in
any way.
3. If the appliance is of the grounded type, the cord set or
extension cord should be a grounding-type 3-wire cord.

nuwavenow.
com
6 7
ENGLISH
nuwavenow.
com
6 7
SAVETHESEINSTRUCTIONS
ReadandunderstandtheentiremanualbeforeusingtheJubilee.
1. Turn power OFF and unplug when the Jubilee is unattended.
2. Do not operate the Jubilee if abnormal sounds are detected.
InspecttheJubilee’spartsaftereachuseandaftertheunithas
cooled down. If there are loose, damaged, or missing parts,
contact Customer Service at 1-877-689-2838 or email
help@nuwavenow.com.
3. Always use extreme caution when operating and maintaining the
Jubilee or any appliance.
4. Children should be supervised to ensure that they do not play
with the appliance.
5. The appliance is not intended to be operated by means of an
external timer or separate remote-control system.
DONOTUSETHEJUBILEEFOROTHERTHANITSINTENDEDUSE.
Note:Put the Jubilee on a surface that is horizontal, even, and
stable. This appliance is intended for normal household use. It is
not intended to be used in environments such as staff kitchens/
cafeterias of shops, offices, farms, or other work environments.
Nor is it intended to be used by clients in hotels, motels, bed and
breakfasts, and non-residential environments.
WARNING:NeverusetheJubileewithloose,damaged,or
missingparts.
NOTICE:THEFAILURETOFOLLOWANYOFTHEIMPORTANT
SAFEGUARDS,ADDITIONALSAFEGUARDS,ORTHE
INSTRUCTIONSFORSAFEUSEISAMISUSEOFYOURJUBILEE
THATCANVOIDYOURWARRANTYANDCREATETHERISKOF
SERIOUSINJURY.
WARNING
In case of malfunctions, immediately
unplug and contact Customer Service
Department.
1-877-689-2838 • help@nuwavenow.com
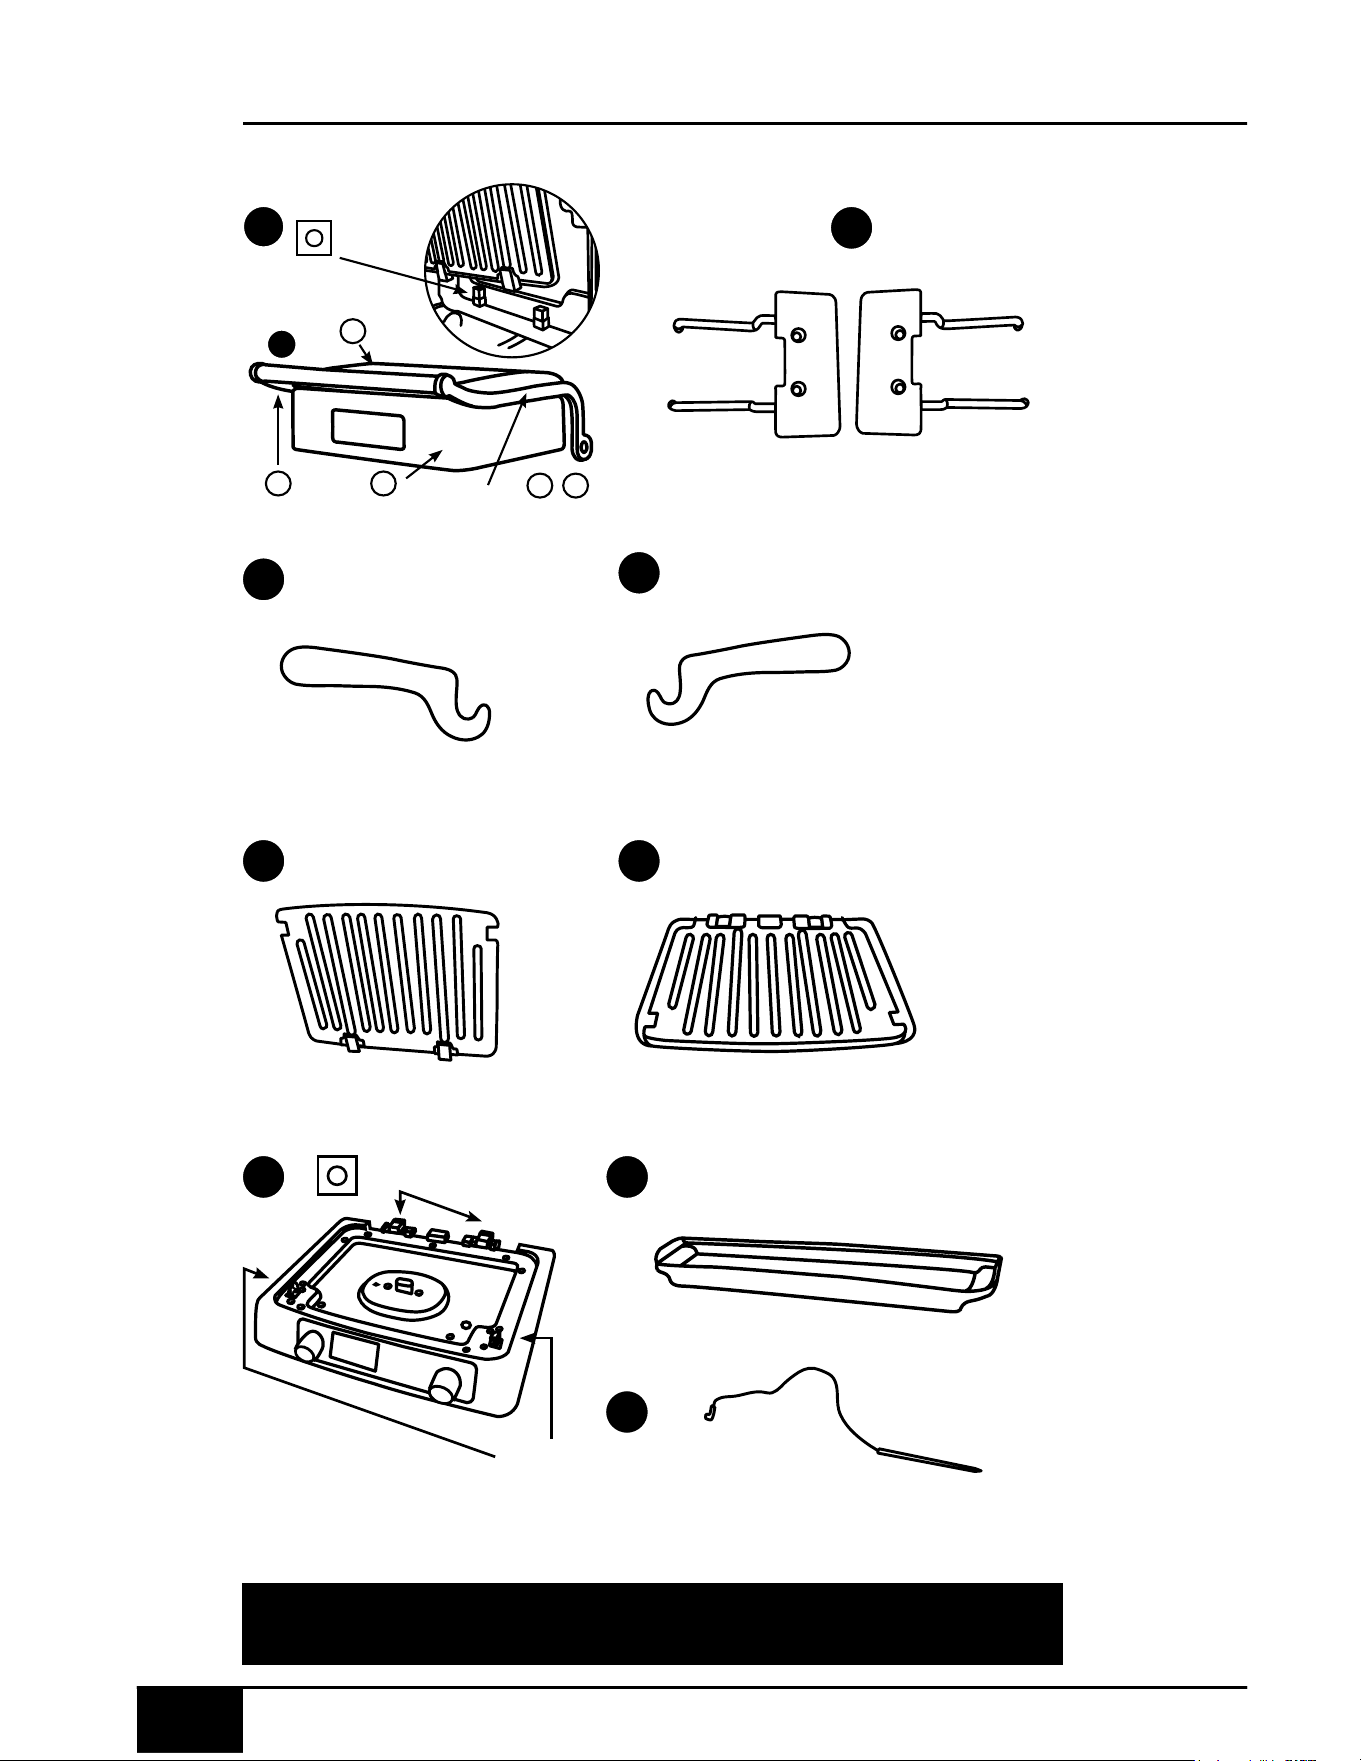
parts & accessories
8 9
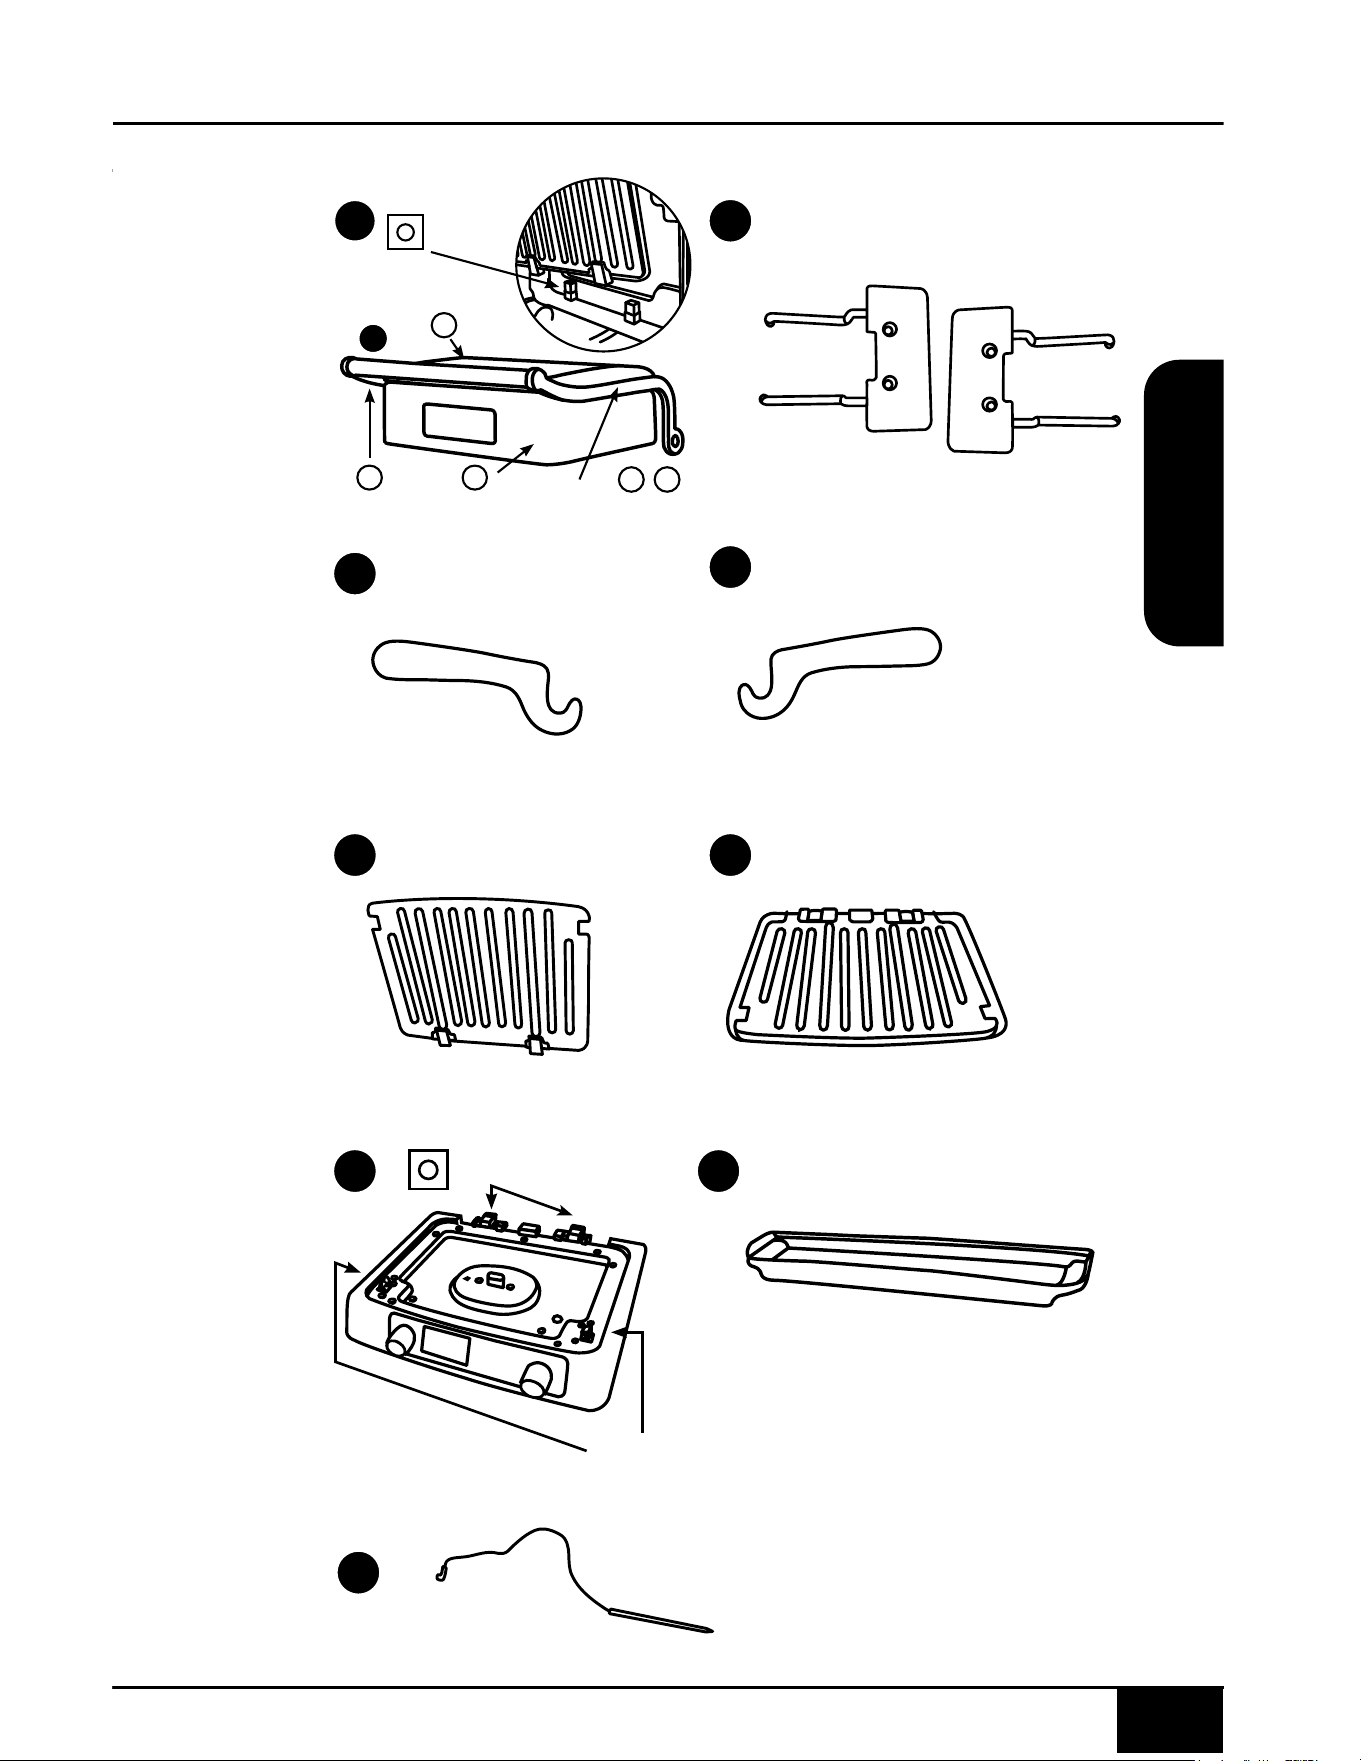
PARTS & ACCESSORIES
8 9
1
3a
4a
2
4b
5
3b
6
7
1
Brackets
Grill Connector
Outer Shell Hinges (right/left)
a
Top Shell
c
d e
b
Handle Bar
ForreplaceablepartsheadovertoReplaceablePartssection
andthenNuWaveNow.com
Grill Connector

nuwavenow.
com
8 9
ENGLISH
nuwavenow.
com
8 9
BeforeFirstUse
Before using your Jubilee, remove all packaging, stickers, and
adhesives. Wipe outside of unit with a damp cloth. Dry all sides
thoroughly before use. Wash all removable parts in warm, soapy
water or in the dishwasher, top rack only.
Hand-wash both sides of the Grill Plates or clean in dishwasher, top
rack only. Dry Grill Plates thoroughly before assembling into Grill
Base and Lid. Usingacleanclothorpapertowel,applysmall
amountofoilontoGrillPlates(sidesfacingout)beforeusing
forthefirsttime.SeeCleaning&Maintenance.
GrillLidPart #: 35612
TopShell Part #:35612a
HandleBar Part #:35612b
OuterShell Part #:35612c
Hinge(Right) Part #:35612d
Hinge(Left) Part #:35612e
Handles
Part #: 35613
GrillHook
Part#: 35616 (Left)
GrillHook
Part#: 35617 (Right)
TopGrillPlate
Part #: 35614
BottomGrillPlate
Part #: 35615
GrillBase
Part #: 35611
DripTray
Part #: 35619
Probe
Part #: 35620
1
2
3a
3b
4a
4b
5
6
7
assembly guide
10 11
ASSEMBLY GUIDE
10 11
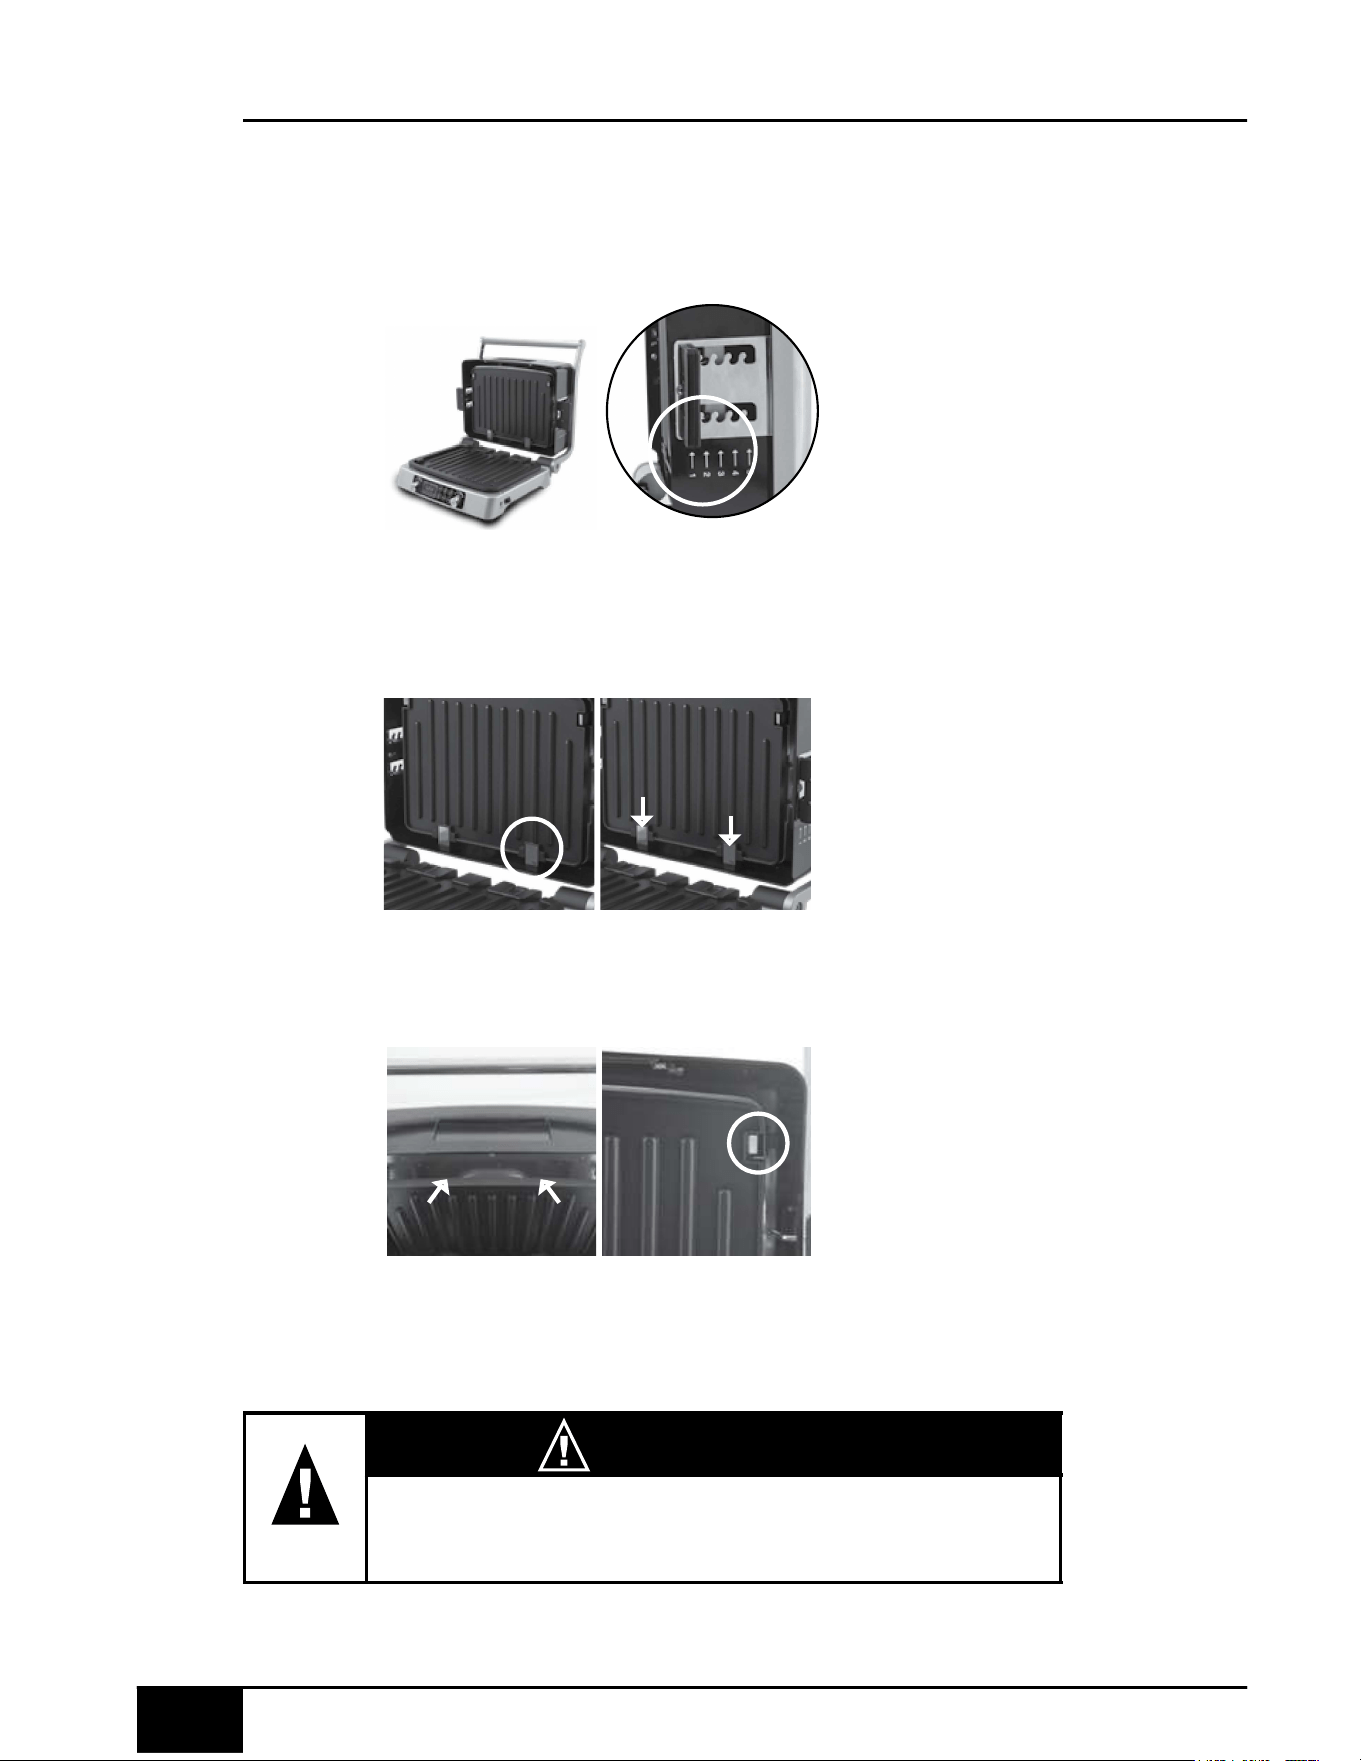
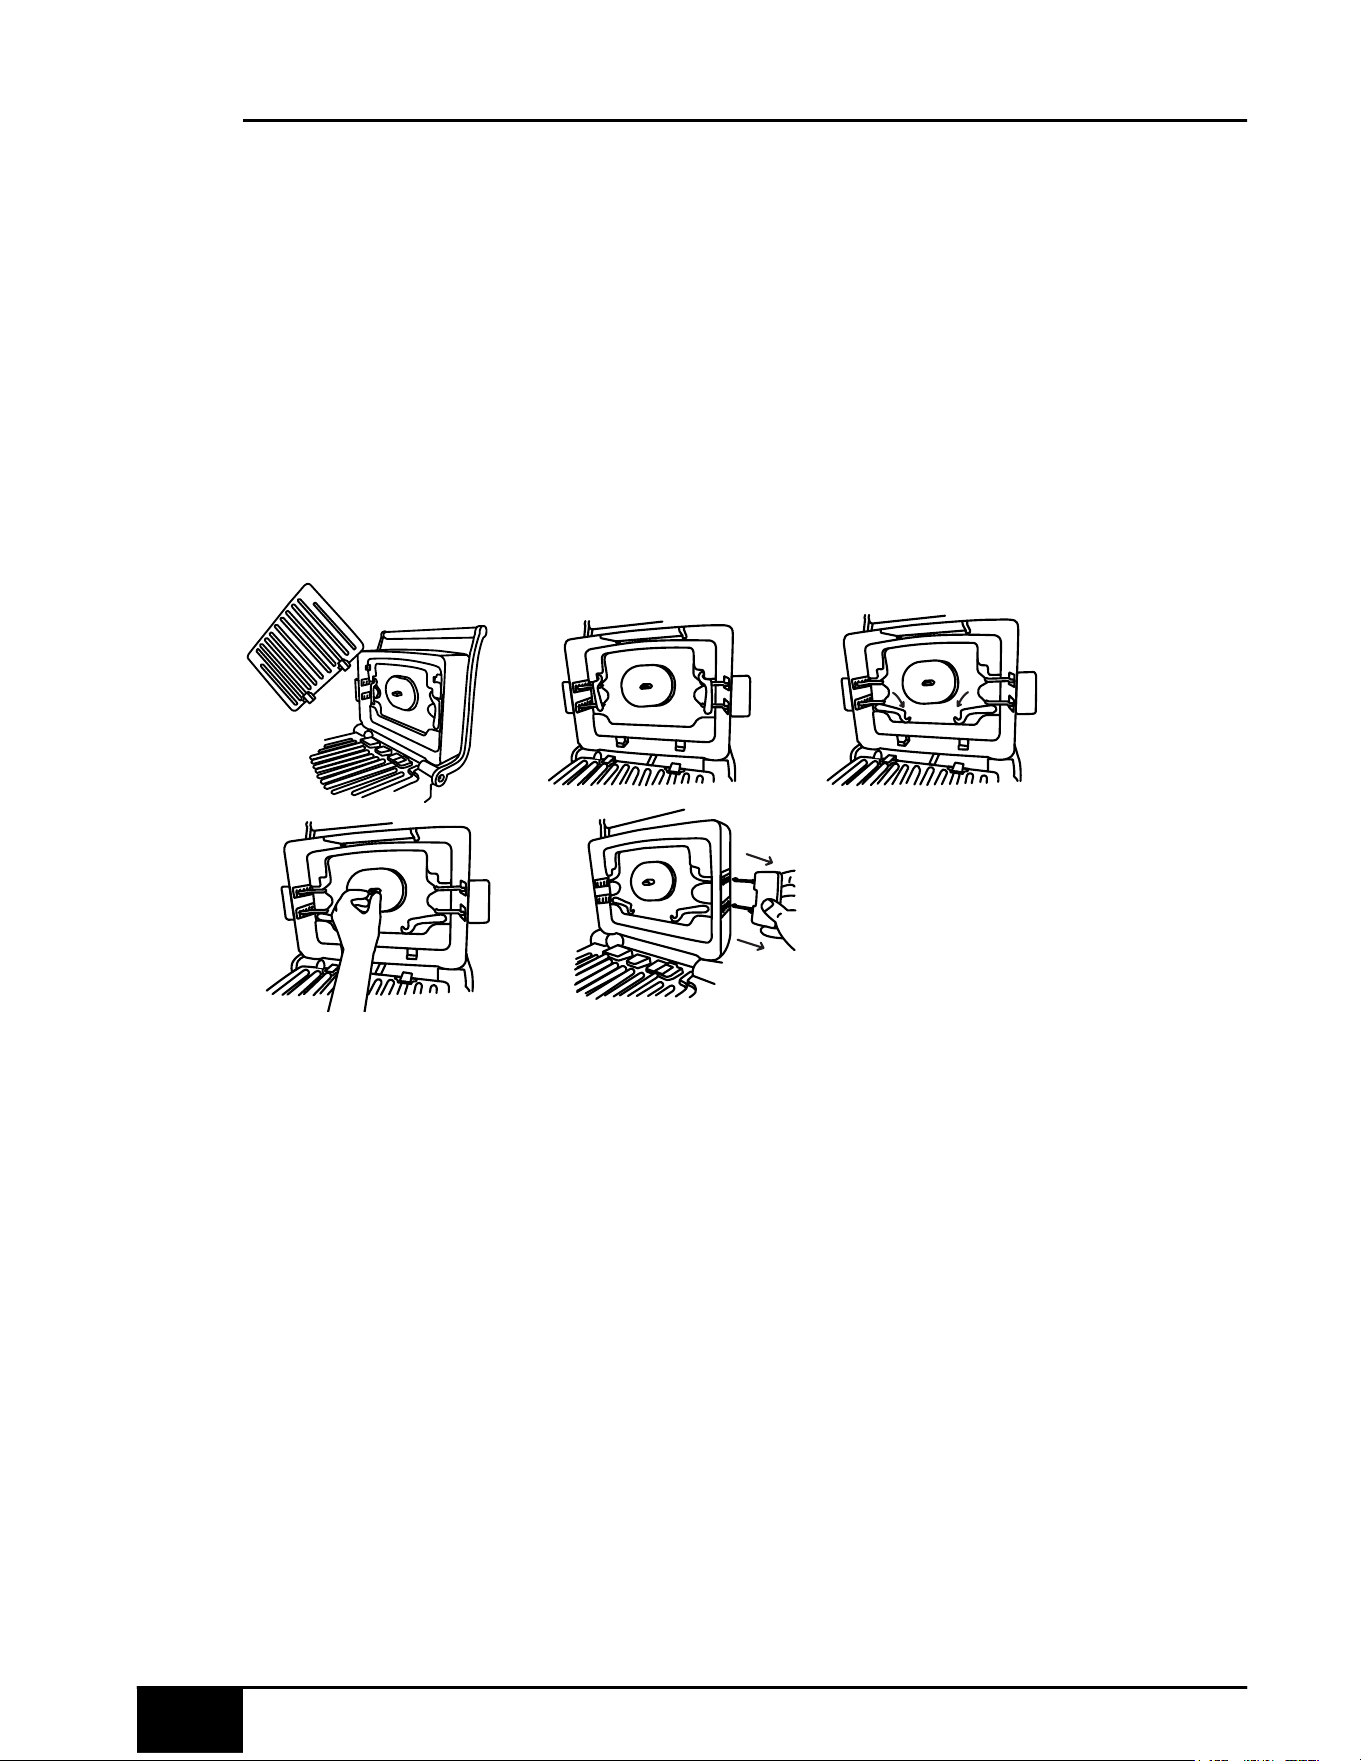
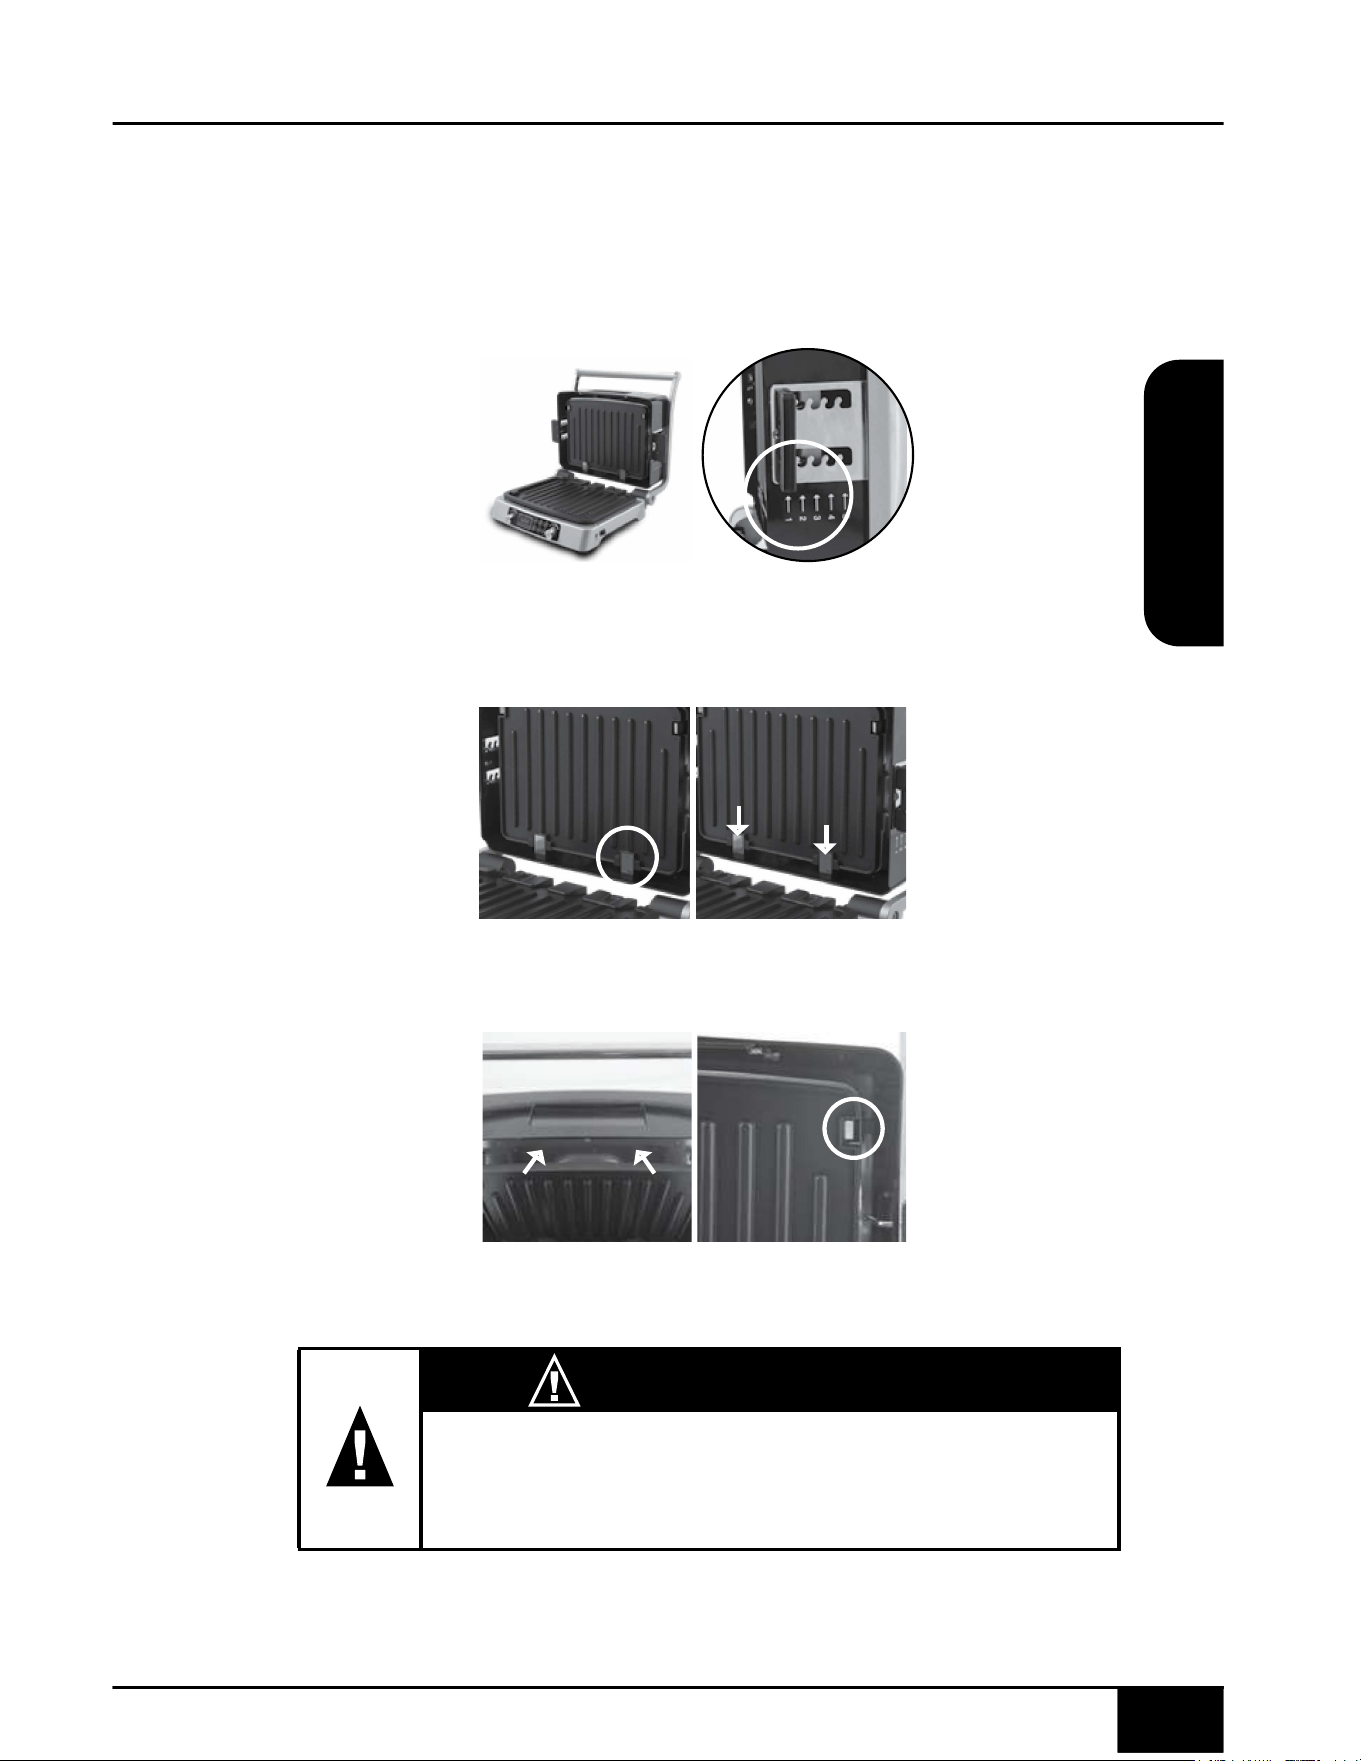
TopGrillPlateAssembly:
1. For first-time assembly, locate Top Grill Plate and Handles.
Before attaching Top Grill Plate to Jubilee, make sure top
(adjustable) Handles are in position 1. (Fig. 1.) See Removing
the Handles under Cleaning & Maintenance for more.
2. Once Handles are in place, slide Top Grill Plate onto the tabs
at the back of the Top Grill Plate Assembly. (Fig. 2.)
3. Push the Top Grill Plate into position so that the Grill Plate Clips
snap into place. (Fig. 3.)
Fig. 1
GrillPlateAssembly
Make sure your Jubilee is on a flat, stable surface before installing
Grill Plates. The Jubilee should be fully open (at a 90-degree angle)
when assembling or removing Grill Plates.
Fig. 2
Fig. 3
CAUTION
AllowGrillPlatestocooldowncompletelybefore
removingafteruse.
nuwavenow.
com
10 11
ENGLISH
nuwavenow.
com
10 11
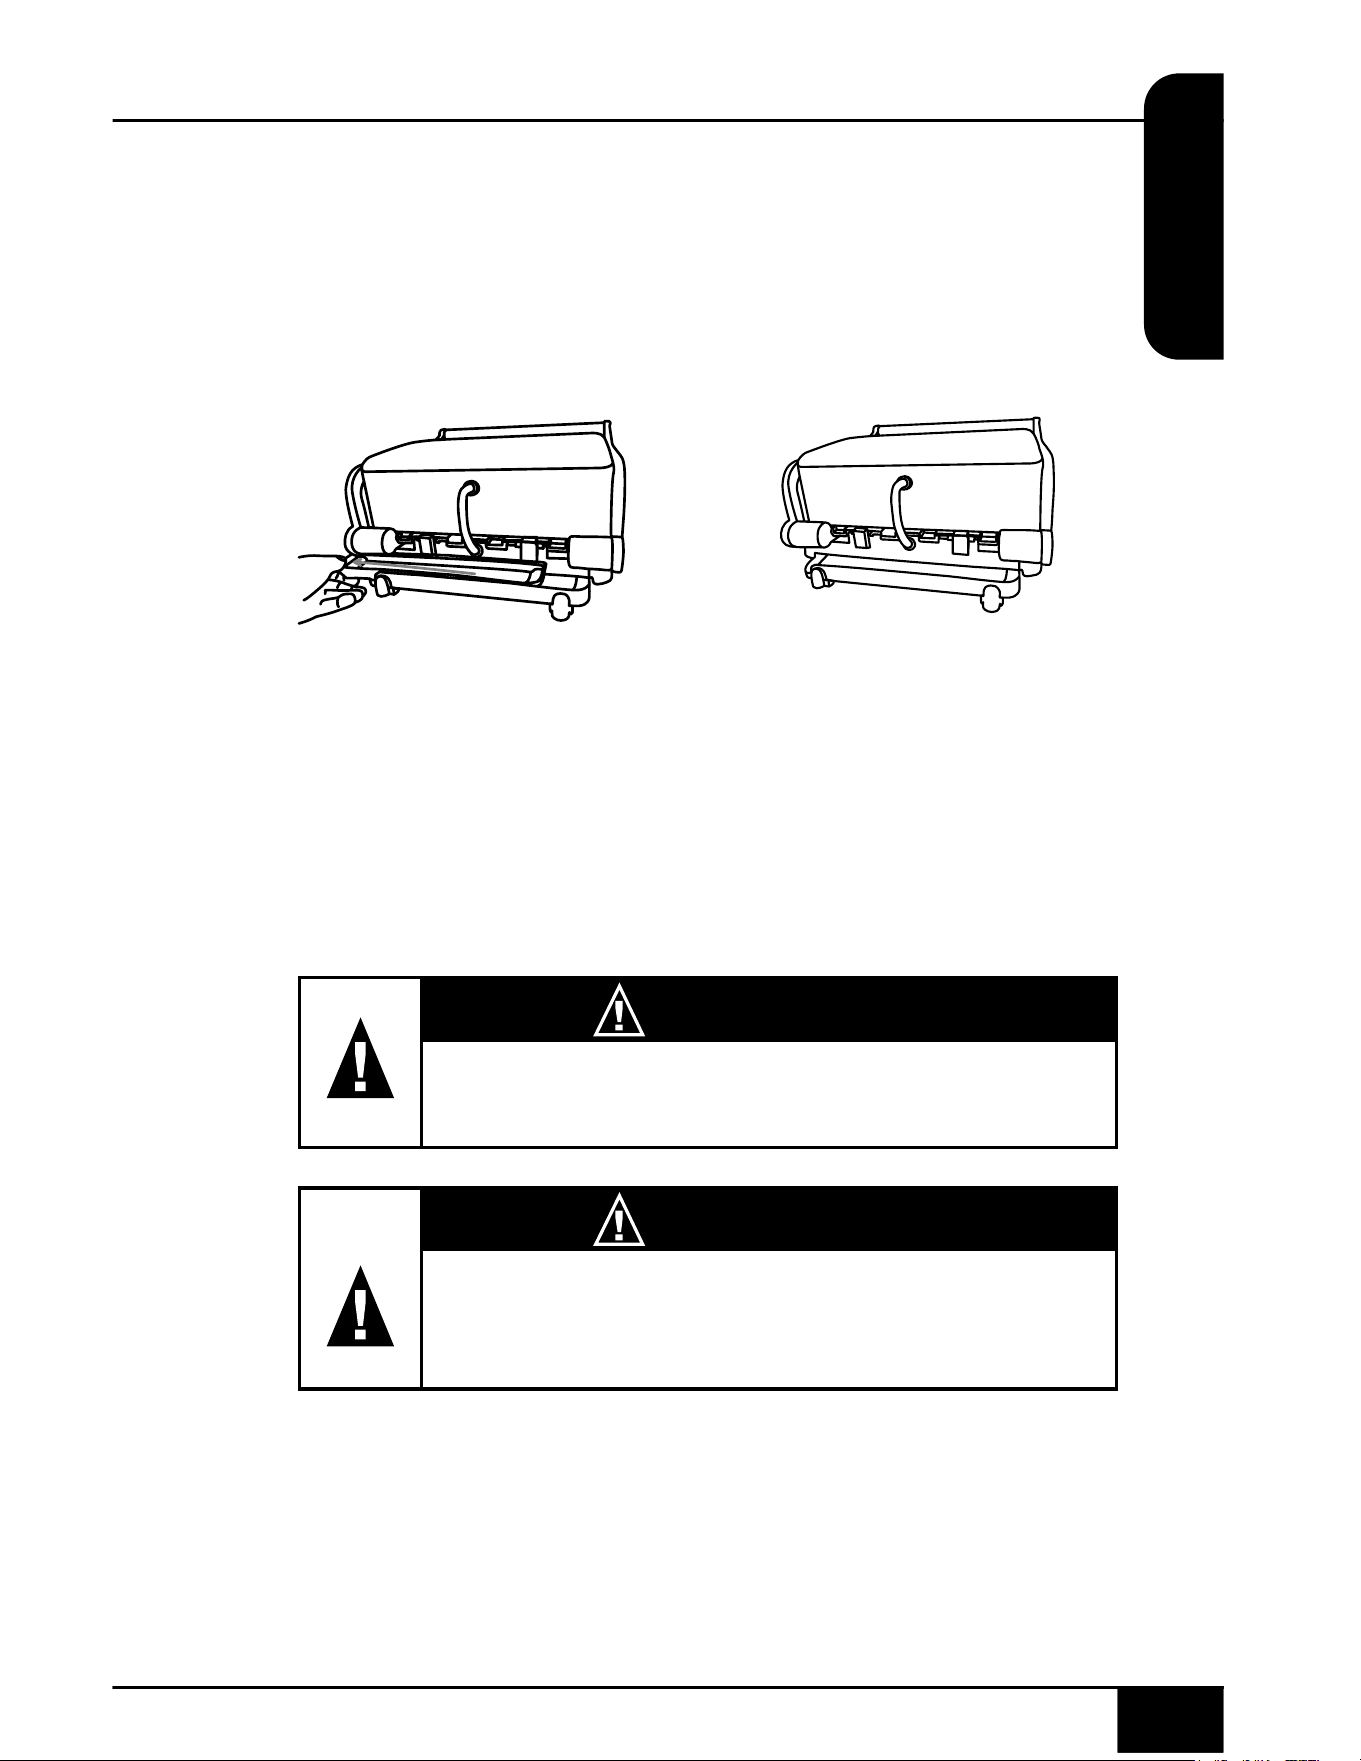
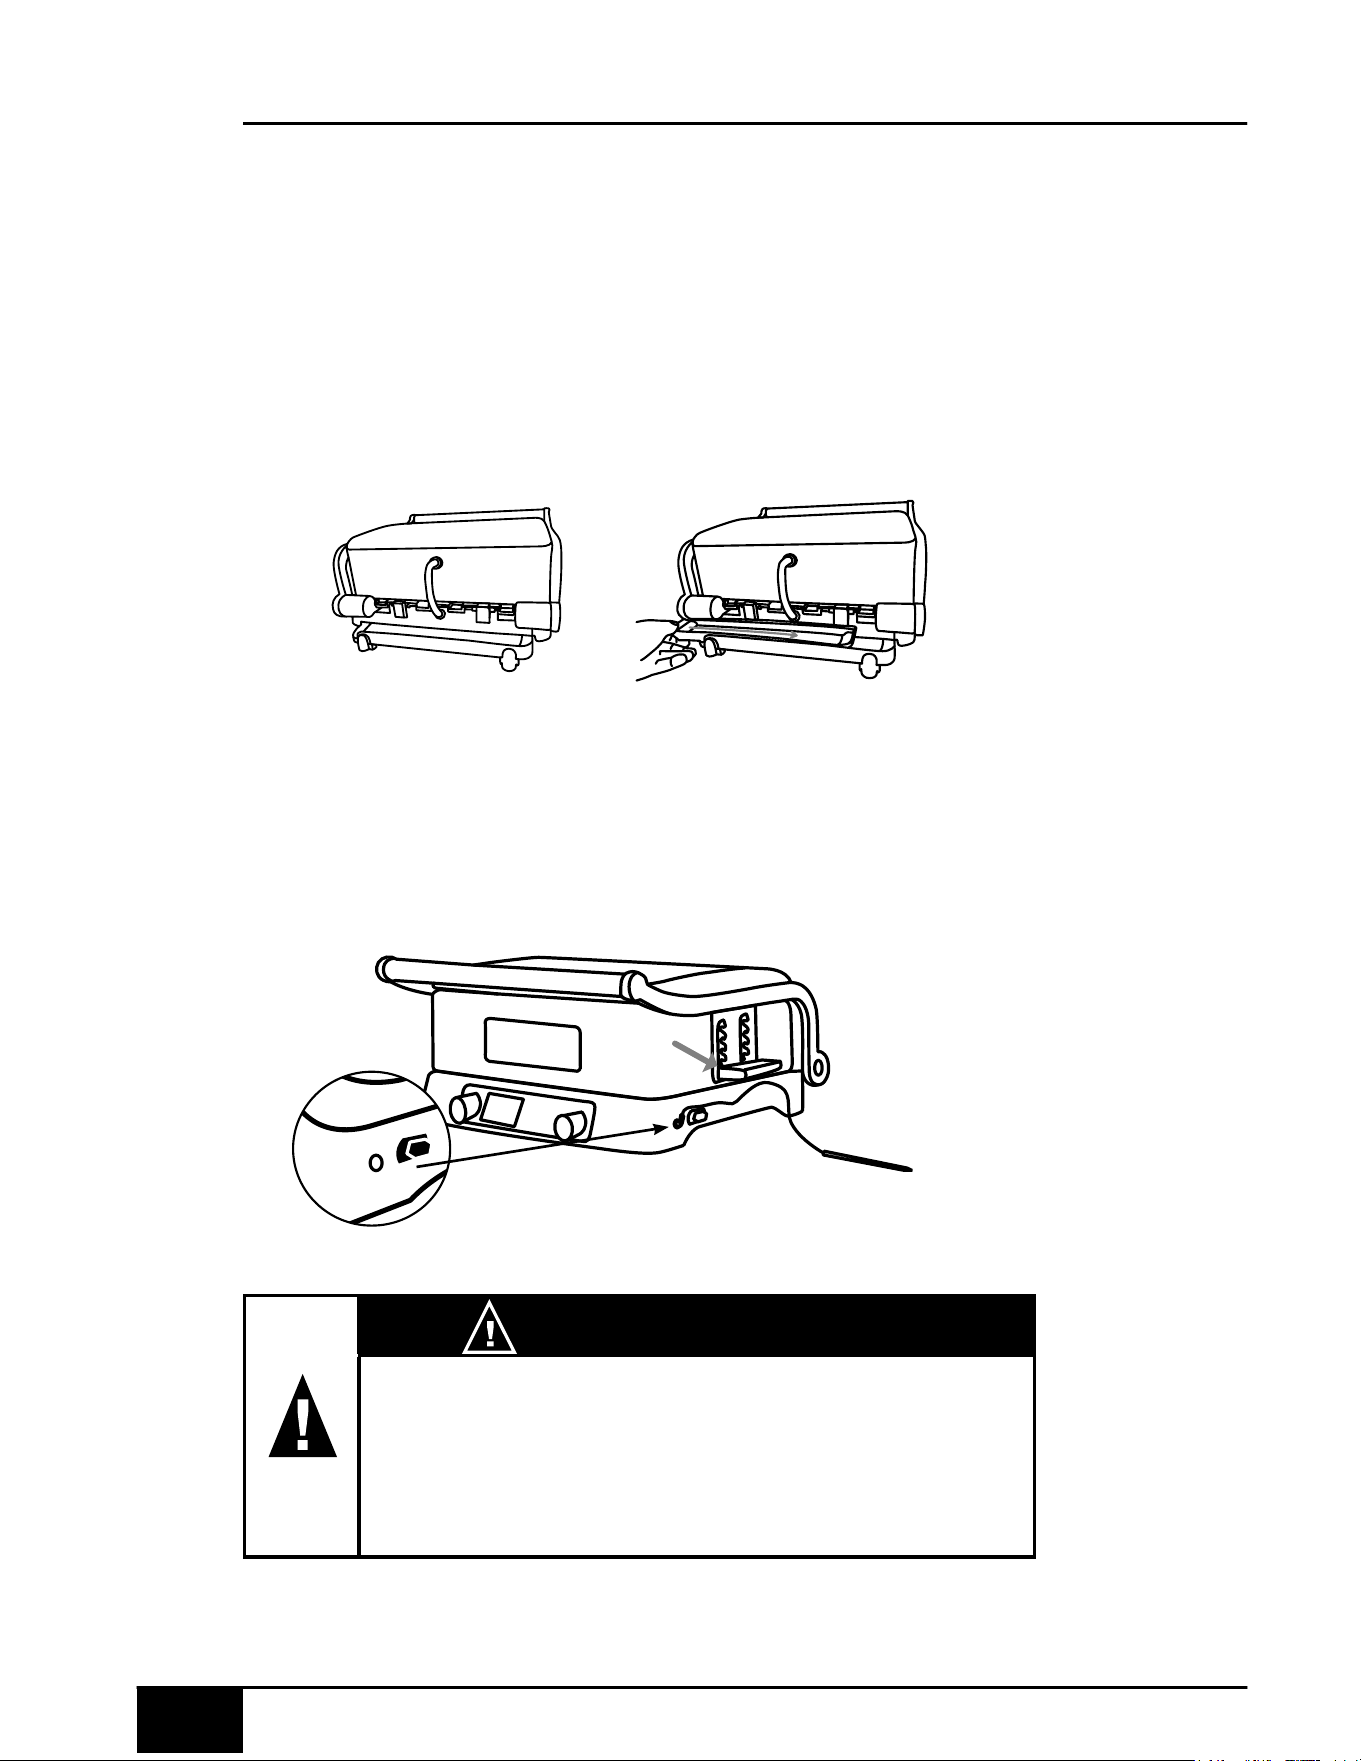
DripTrayAssembly
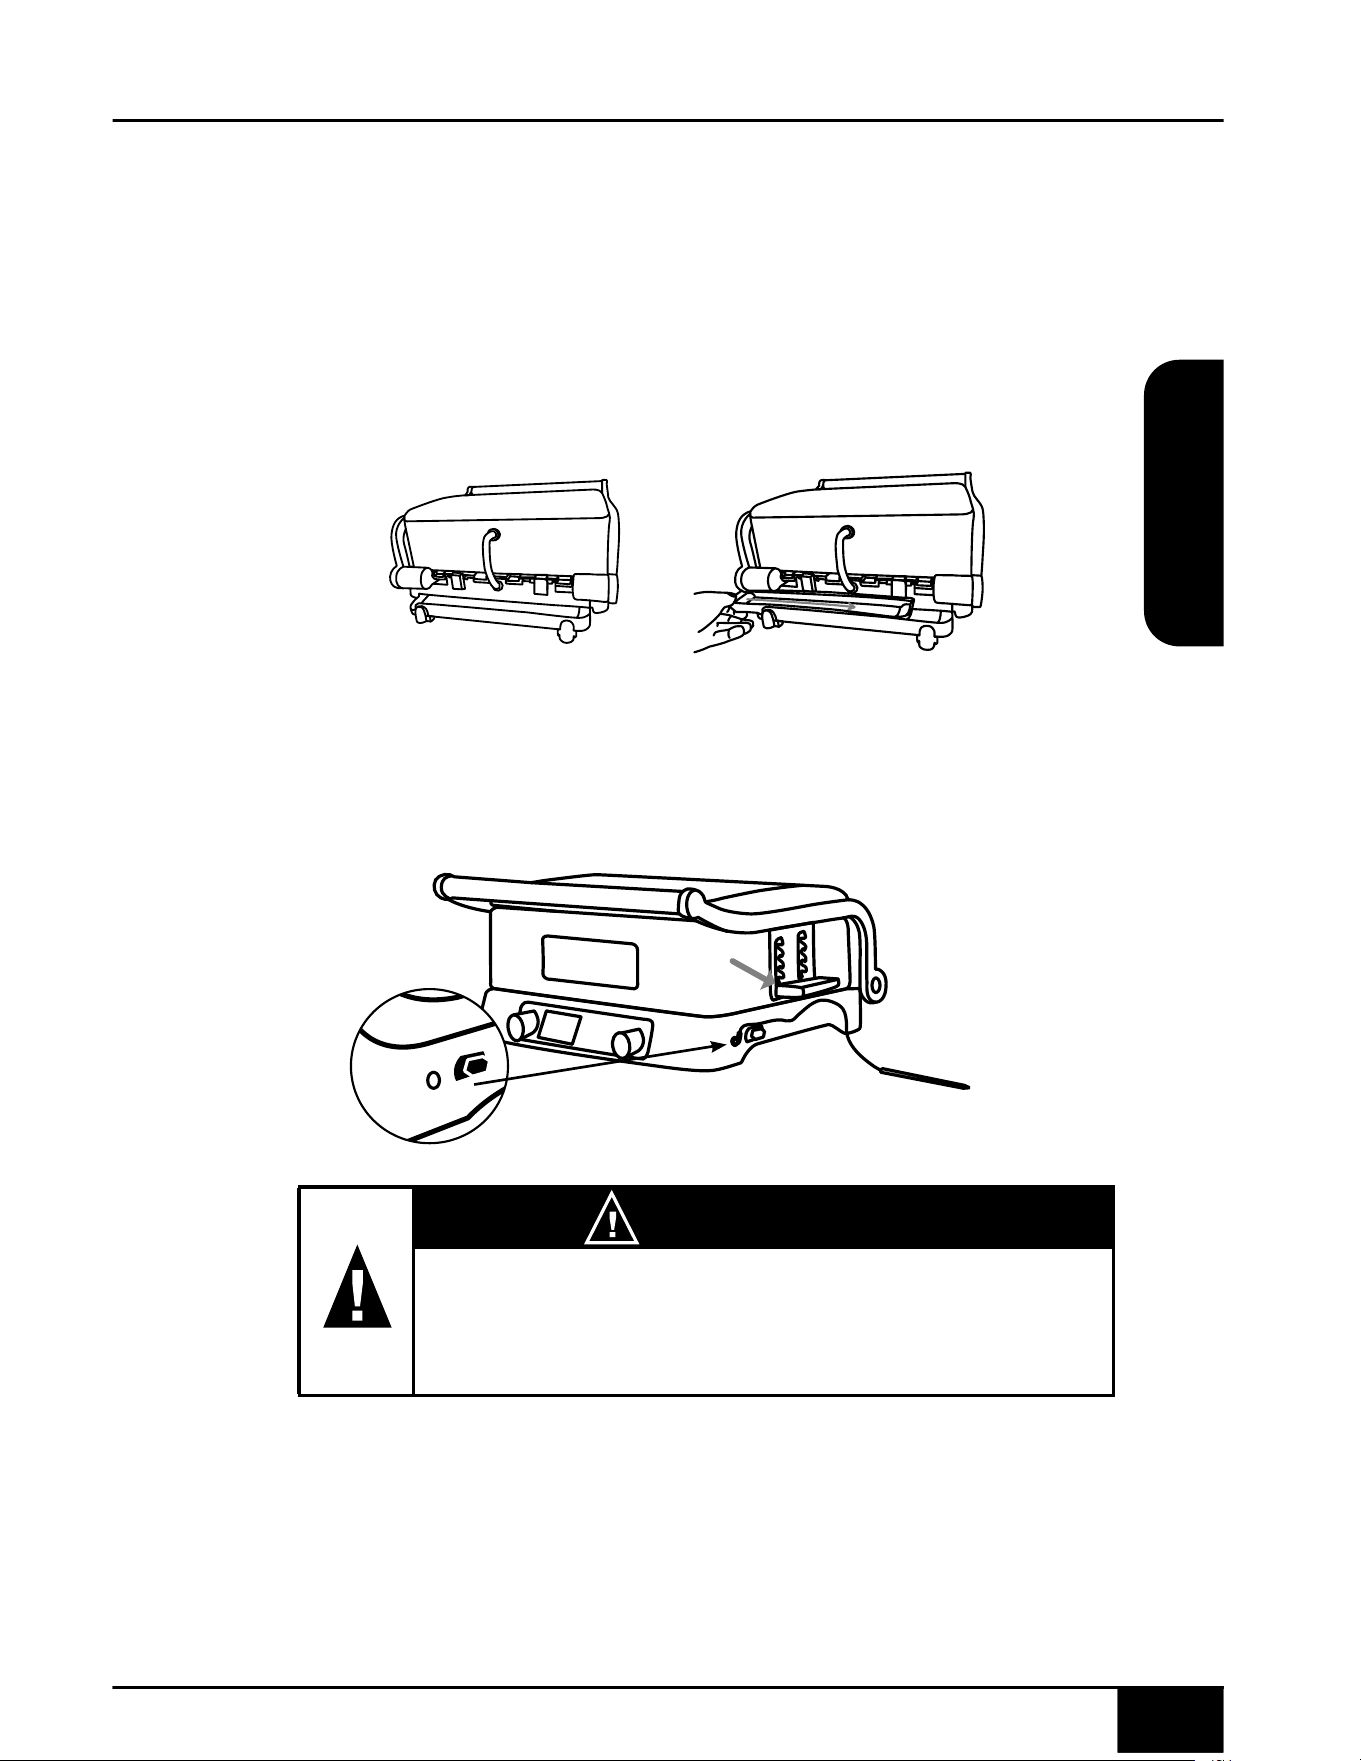
Your Jubilee comes with a Drip Tray for easy removal of grease.
1. Locate slot for sliding Drip Tray into appliance on the back
of the Jubilee.
2. Carefully slide in Drip Tray into opening.
• Always make sure Drip Tray is assembled into the Jubilee
before cooking.
• Tray only slides in one way.
ProbeAssembly
1. Take end of Probe (plug) and connect into end of the unit (jack).
2. Insert other end of Probe into the food. Push "start". Unit
will start to cook at desired temperature. See Probe under
INSTRUCTIONS for more.
1. 2.
position 1
WARNING
Aswithmostelectricalappliances,electricalpartsare
liveevenwhentheJubileeisoff.Makesuretheunitis
unpluggedwhenassembling.

quickstart
12 13
QUICKSTART
12 13
BTMTOPTEMPSEAR 1 2
PROBWARMREDYTIME PREH
pause
clear
temp time
start
TOP
BTM
SEAR
ON
OFF
PRE-
HEAT
WARM PROBE
ON/OFF
Press ON/OFF. This button also stops any cooking function.
While cooking, press ON/OFF to cancel.
START
Select a cooking function, press start to begin cooking. Default is
375˚Ffor10min.
TEMP
Turn pause/clear to adjust the cooking temperature before and
while cooking.
TIME
Turn start to adjust the cooking time before and while cooking.
TOP/BTM
Adjusts the temperature of the Top and Bottom Grill plates. Press TOP/
BTM, turn pause/clear to adjust. Press TOP/BTM to adjust the Bottom
GrillPlate.Temperaturesrangefrom0˚Fto475˚F.
SEAR
Searyourfoodbeforetheregularcookingprocess.525˚Ffor2min.
are the defaults. Press SEAR. If preferred, adjust Sear temp and time
and press start.
Note: The Sear function can be set for before or after regular cooking
cycle. Refer to SEAR in INSTRUCTIONS for details.
WARM
Quickly warm your favorite leftovers. 145°F for 60 min. are the defaults.
Press WARM and use the dials to adjust temperature and time. Press
start to begin.
Note: Refer to WARM in INSTRUCTIONS for details.
PREHEAT
Forcrispierresults,375˚Fisthedefaults.Ifpreferred,adjustSear
temp and time and press start. Once the unit has reached the set
temperature the Jubilee will beep and a 5-minute countdown will
begin. Place your food into the Jubilee, set your cooking temperature
and time, and press start.
PROBE
UsetheDigitalProbeforperfectresultseverytime.160˚Fisthedefault.
Plug the Probe into Jubilee unit (Jack). Press and hold PROBE for
2 seconds and set Probe target internal temperature for food using
pause/clear. Insert the other end of the Probe into your food.
Press start to begin cooking.
Note: Refer to Probe in INSTRUCTIONS for details.
nuwavenow.
com
12 13
ENGLISH
nuwavenow.
com
12 13
INSTRUCTIONS
GettingStarted
1. Press ON/OFF once to turn
your Jubilee on. The unit is set
todefaultat375˚Ffor10min.
2. After the unit is turned
on, adjust the times and
temperature by turning
the dials.
3. Press start. Time will be
displayed and a countdown will begin.
See Temperature and Time for adjusting your temperature and time.
Pause/Clear
1. When cooking, press pause/
clear once to pause the unit.
• If time was displayed, the
remaining time will be
displayed.
• To resume cooking press
start.
• Temperature and time can still be adjusted while in pause.
2. Press pause/clear again to clear any program out. If the display
is showing the remaining cooking time when the unit is paused,
the display will continue to show the remaining time. Conversely,
if the display is showing the cooking temperature when the unit is
paused, the display will continue to show the temperature.
Top/Bottom
The Jubilee can cook your food using heat from the top, bottom, or
both.Defaultis375˚Ffor10min.
1. Press TOP/BTM.
• Turn pause/clear to adjust
temperaturebetween0˚F
and475˚F.
• If set to “0F”, the Top
(upper) Grill Plate will be off.
2. Press TOP/BTM again. BTM
will be displayed.
• Adjustthetemperatureasneededbetween0˚Fand475˚F.
• If set to “0F”, the bottom (lower) Grill Plate will be off.
ON
OFF
BTMTOPTEMP
375F
pause
clear
BTMTOP
10:00
TIME
TOP
BTM
TOPTEMP
375F

instructions
14 15
INSTRUCTIONS
14 15
Temperature
Use pause/clear on the left to decrease or increase temperature.
1. Turn pause/clear to the right toward (+) to increase temperature
or to the left (-) to decrease temperature.
• Temperaturerangeis60˚F~475˚Fin5-degreeincrements.
2. To decrease or increase the temperature in larger increments,
turn dial quickly.
Time
Use start on the right to decrease or increase time.
1. Turn start to the right toward (+) to increase time or to the left (-) to
decrease time.
• Time range is 00:00-99:59. Displays in minutes and seconds.
2. To decrease or increase the time in larger increments, turn
dial quickly.
Preheat
1. Set your cooking temperature and time.
2. Press PREHEAT.
3. Press start. The unit will start
preheating to the set cooking
temperature.
• Once the desired
temperature is reached,
REDY and 5 will be
displayed and a 5-min.
countdown will begin.
4. Place your food onto the Grill Plate. Press start and a countdown
will begin.
• If food is not placed onto grill within 5 min. and start is not
pressed, the unit will turn to standby mode.
Sear
Use “SEAR” to cook your foods at a high temperature before, after,
or when using a combination of
cooking with regular temperatures.
Sear1
Sear 1 always functions BEFORE
regular cooking.
1. Press SEAR.
• Default is 525°F for 2 min.
• Time can be adjusted for up
to 5 min.
2. Press start. A countdown for 2 min. will begin.
• When the countdown is finished the unit will cook at 375°F for
10 min. and the countdown time will be displayed.
PRE-
HEAT
TOPTEMP
375F
BTM
PREH
SEAR
TOPTEMP
525F
BTM
SEAR 1 2

nuwavenow.
com
14 15
ENGLISH
nuwavenow.
com
14 15
• When cooking is done, End will be displayed.
Example: Press ON/OFF >> Adjust cooking temperature and time
to300˚Ffor20min.>>PressSEARonce>>Pressstart.
The unit will:
• Cookat525˚Ffor2min.
• Cookat300˚Ffor20min.
• Finish cooking and display End.
Sear2
Sear 2 always functions AFTER regular cooking stages.
1. Press SEAR three times.
• Default is 525°F for 2 min.
2. Press start. The unit will cook
at 375°F for 10 min., and
then sear at 525°F for 2 min.
• When the cooking has
finished, End will be
displayed.
• Use the dials to adjust
your temperature and time
for the phase of cooking after SEAR. When the cooking has
finished, End will be displayed and the unit will beep three
times.
Example: Press ON/OFF >> Adjust cooking temperature and time to
300˚Ffor20min.>>PressSEARthreetimes>>Pressstart.
The unit will:
• Cookat300˚Ffor20min.
• Cookat525˚Ffor2min.
• Finish cooking and display End.
Sear12
1. Press SEAR twice.
• Default is 525°F for 2 min.
2. Press start. The Jubilee will cook your food at 525°F for 2 min. and
then cook at 375°F for 10 min.
• The countdown time will be displayed during this cooking phase.
• When the cooking has finished, End will be displayed and the
unit will beep three times.
• Use the dials to adjust the temperature and time for the phase
of cooking after sear.
Example: Press ON/OFF >> Adjust cooking temperature and time to
300˚Ffor20min.>>PressSEARtwice>>Pressstart.Theunitwill:
• Cookat525˚Ffor2min.
• Cookat300˚Ffor20min.
SEAR
TOPTEMP
525F
BTMSEAR 1 2

instructions
16 17
INSTRUCTIONS
16 17
• Cookat525˚Ffor2min.
• Finish cooking and display End.
Warm
1. Press WARM. 145F will be
displayed.
• The default in WARM is
145°F for 60 min.
• Temperature range is
60-200˚F.
• Use the dials to adjust
temperature and time in
Warm mode.
2. Press start.
• The Jubilee will start to cook at 375°F for 10 min., and then will
keep food warm at 145°F for 60 min.
• Press ON/OFF, WARM, or pause/clear at any time to stop the
Warm function.
3. Once Warm function has finished, End will be displayed.
WarmasanIndependentFunction
1. Press ON/OFF.
2. Press and hold down WARM for 2 seconds. The grill will begin
to warm.
• Adjust warming temperature and time using the dials.
Note: To cancel Warm function at any time press WARM.
Probe
The Probe function is used to cook your food until a preset internal
temperature is reached. Probe needs to be plugged into the Jubilee
with other end inserted in food.
1. Press ON/OFF.
• Adjust the cooking
temperature.
2. Plug the Probe into the unit
(jack). Press PROBE. 375F
will change to display the
current Probe temperature.
3. Press and hold down PROBE
for 2 seconds to adjust the
Probe temperature (default
is 160F). Press and hold PROBE for
2 seconds to display the Probe set
temperature.
WARM
TOPTEMP
145F
BTM
WARM
PROBE
TEMP
160F
PROB
nuwavenow.
com
16 17
ENGLISH
nuwavenow.
com
16 17
• To change the desired probe internal temperature during
cooking, turn pause/clear. If nothing is adjusted within 3
seconds, the last probe temperature entered will be set.
4. When desired temperature of the Probe is reached, End will
be displayed.
• If sear 2 was selected, once the desired probe temperature has
been reached the Jubilee will begin cooking at sear 2. When
finished, End will be displayed. See Sear section for more.
• If WARM was selected, once the desired probe temperature
has been reached the Jubilee will begin cooking at WARM.
When finished, End will be displayed.
Note: If PROBE is pressed and the display shows Prob1 or Prob2,
one of the following problems has occurred:
1. The Probe is not plugged into the Jubilee
Or
2. The set probe temperature is higher than the cooking
temperature. (Prob2)
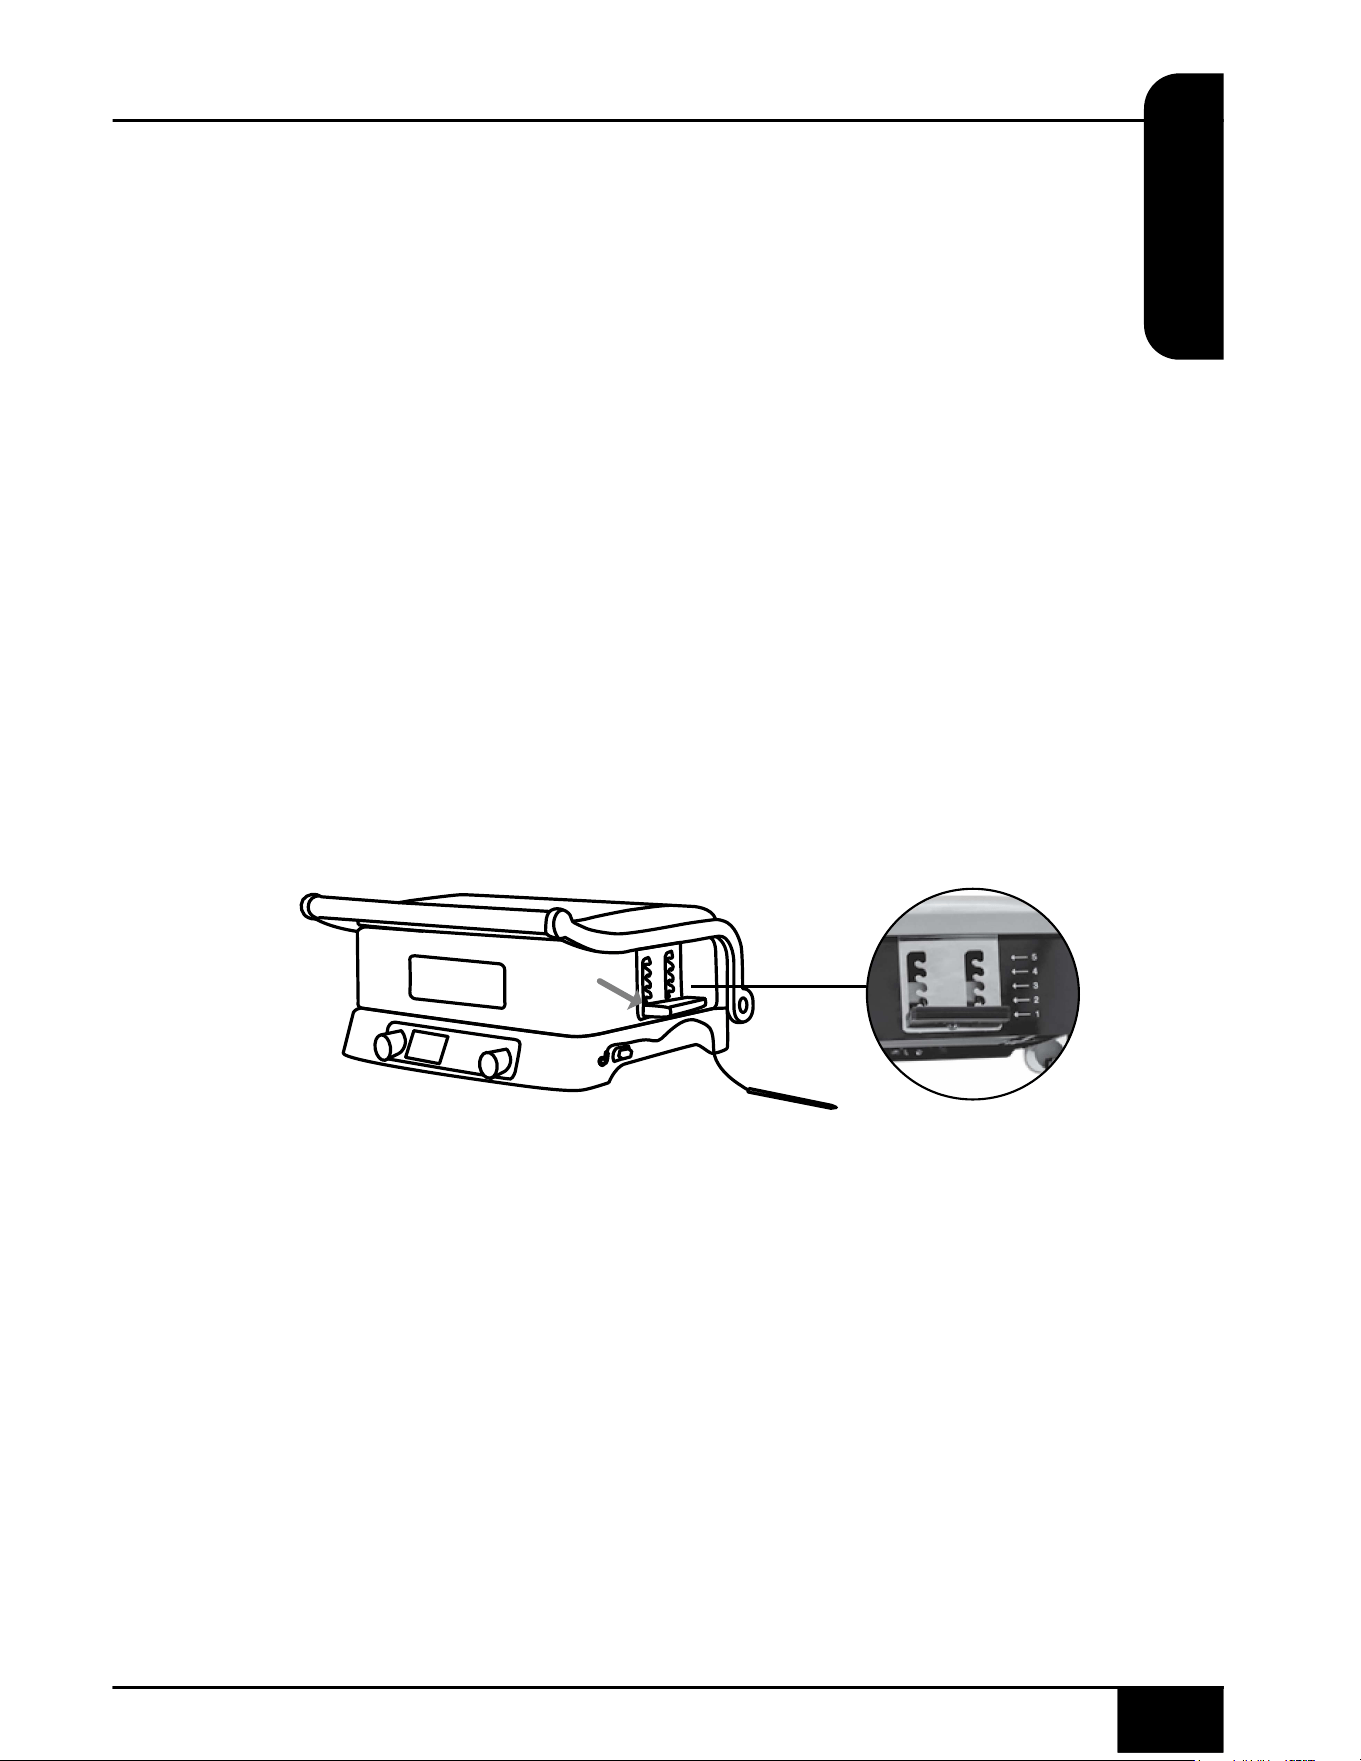
AdjustingCookingLevelofTopGrillPlate
The Jubilee has 5 adjustable cooking levels, making it easy to cook
foods of varying thickness.
To adjust Top (upper) Grill Plate cooking level from food:
1. Holding both Handles, and move Handles with Grill Plate toward
front of the unit to adjust and slide.
2. Move and slide to position higher or lower and place in chosen
slot (1-5). Open and close Lid to ensure Grill Plate is secure.

instructions
18 19
INSTRUCTIONS
18 19
ProbeTempGuide
Meats
Temp.
°F
Rare
°F
Med
Rare
°F
Med
°F
Med
Well
°F
Well
°F
Time
Min.
Chicken,breast
Turkey,breast
Duck,breast
360 165*
6 - 8 per lb
7 - 9 per lb
5 - 7 per lb
Chicken,whole
Turkey,whole
Duck,whole
360 165*
8 - 10
per lb
11 - 13
per lb
10 - 13
per lb
Chicken,thigh
Turkey,thigh
Duck,thigh
360 165*
14 - 16
per lb
14 - 16
per lb
9 - 11
per lb
Steak1"thick
400
or 450
125 135 145* 150* 160* 3 - 8
Burgers½lb
350
125 135
145 155* 160* 5 - 7
RoastBeef(bone-
in)
RoastBeef
(boneless)
325 125 135 145* 150* 160*
15 - 20
per lb
10 - 15
per lb
Lamb(bone-in)
Lamb(boneless)
325 125 135
145* 150* 160* 15 - 20
per lb
10 - 15
per lb
Pork(bone-in)
Pork(boneless)
350 145* 150* 160*
15 - 20
per lb
10 - 15
per lb
Salmon,Tuna,
Halibut,Swordfish
145* 150* 160*
2 - 3
FishSteaks1"
thick
350
145* 150* 160* 5 - 7
Sausage 360
160* 4 - 5
Note:Timesmayvary.Consumingraworundercookedmeats,poultry,orseafood
mayincreaseyourriskoffoodborneillness.*Toreducetherisk,cookyourfoodto
USDA-safetemperatures.
nuwavenow.
com
18 19
ENGLISH
nuwavenow.
com
18 19
BeforeFirstUse
Before using your Jubilee, remove all packaging, stickers, and
adhesives. Wipe outside of unit with a damp cloth. Dry all sides
thoroughly before use. Wash all removable parts in warm, soapy
water or in the dishwasher, top rack only.
Hand-wash both sides of the Grill Plates or clean in dishwasher, top
rack only. Dry Grill Plates thoroughly before assembling into Grill Base
and Lid. Using a clean cloth or paper towel, apply small amount of oil
onto Grill Plates (sides facing out) before using for the first time.
Fig. 1
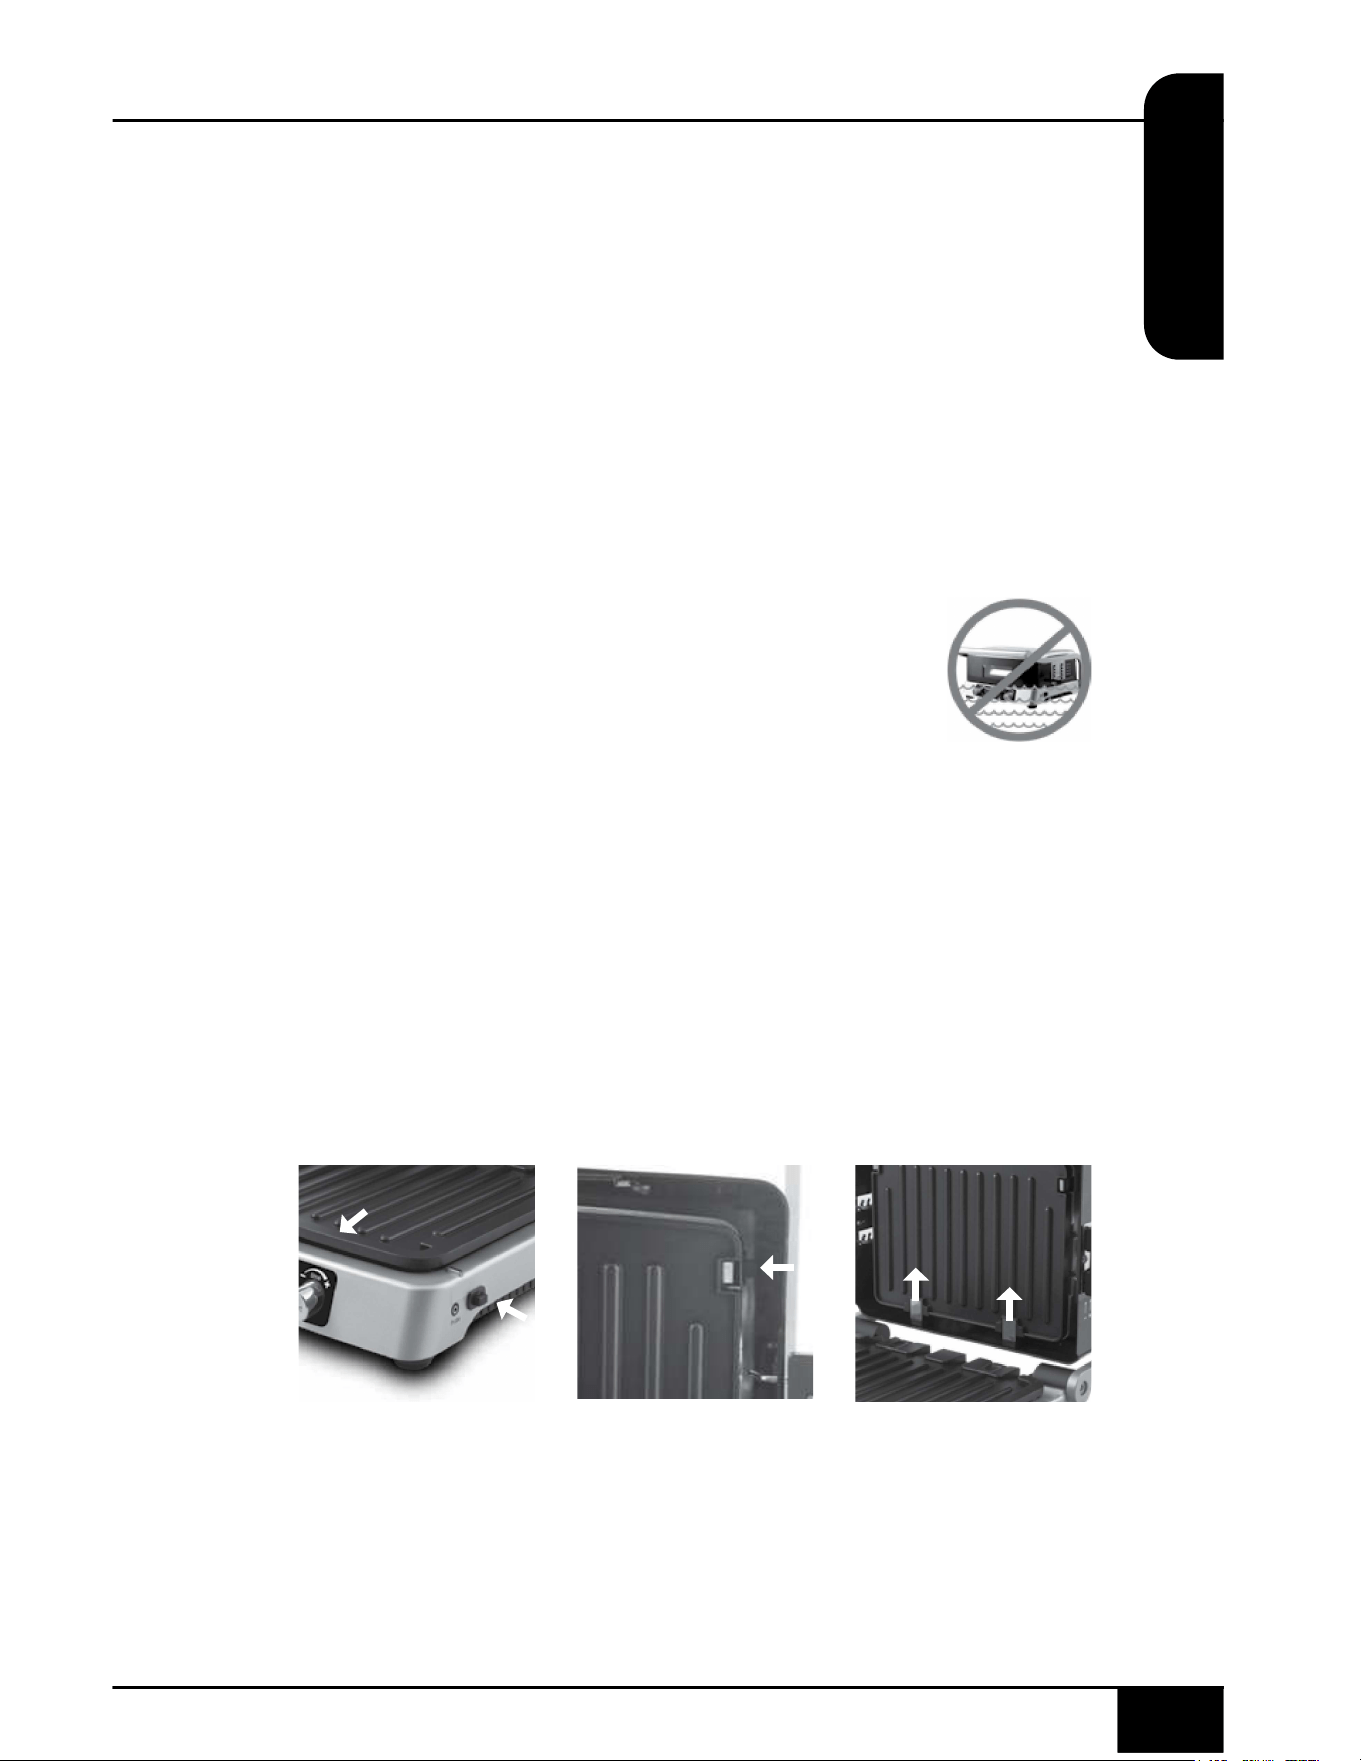
Top/BottomGrillPlateRemoval
Before removing Top or Bottom Grill Plate, ensure the Jubilee has
completely cooled and unit is unplugged.
1. To remove the Bottom Grill Plate, push Clip Release Button
located on the right side of the bottom base. The Bottom Grill
Plate releases from Grill Plate Clips. (Fig. 1.)
2. Carefully remove the Bottom Grill Plate by pulling the plate
toward you. The Bottom Grill Plate should easily slide out.
3. To remove the Top Grill Plate, push the Clip Release Button
located on the right side of the Top Grill Assembly. (Fig. 2.)
4. Carefully remove the Top Grill Plate by pulling the Plate up.
The Top Grill Plate should easily slide out (Fig. 3).
Fig. 2 Fig. 3
CLEANING&MAINTENANCE
DonotimmerseJubileeBaseinwater.Cleanwith
dampspongeorclothandwipedry.
CleaningtheJubilee
Between use, clean the outside and insides of your Jubilee with a soft
damp cloth and mild nonabrasive soap. Do not use harsh cleansers
or cleaning pads or brushes. Dry the Jubilee on outside and insides
thoroughly before using again.
20 2120 21
cleaning&maintenance
CLEANING&MAINTENANCE
1. 2. 3.
4. 5.
CleaningtheGrillPlates
When cooled, clean both sides with warm soapy water and a damp
dishcloth or clean in the dishwasher, top rack only. Do not use harsh
cleansers or cleaning pads or brushes. If needed, presoak the Grill
Plates before cleaning.
CleaningBetweenRecipes
If you are grilling different foods and the Grill Plates are not being
removed, wipe any remaining food debris or grease off with a damp
cloth or paper towel.
RemovingtheHandles
The Handles on the Jubilee are removable and can be hand-
washed or cleaned in the dishwasher, top rack only.
1. Remove Top (upper) Grill Plate. See Top/Bottom Grill Plate
Removal.
2. Locate the two silver Grill Hooks under Lid.
• Each side will have a Hook.
3. Remove end of Hook from the slot for each.
4. Grab middle of Lid from the underneath. Lift and swing out
metal ends of the Handle from holes.
5. Pull out Handle. Repeat steps for other Handle.
nuwavenow.
com
20 21
ENGLISH
nuwavenow.
com
20 21
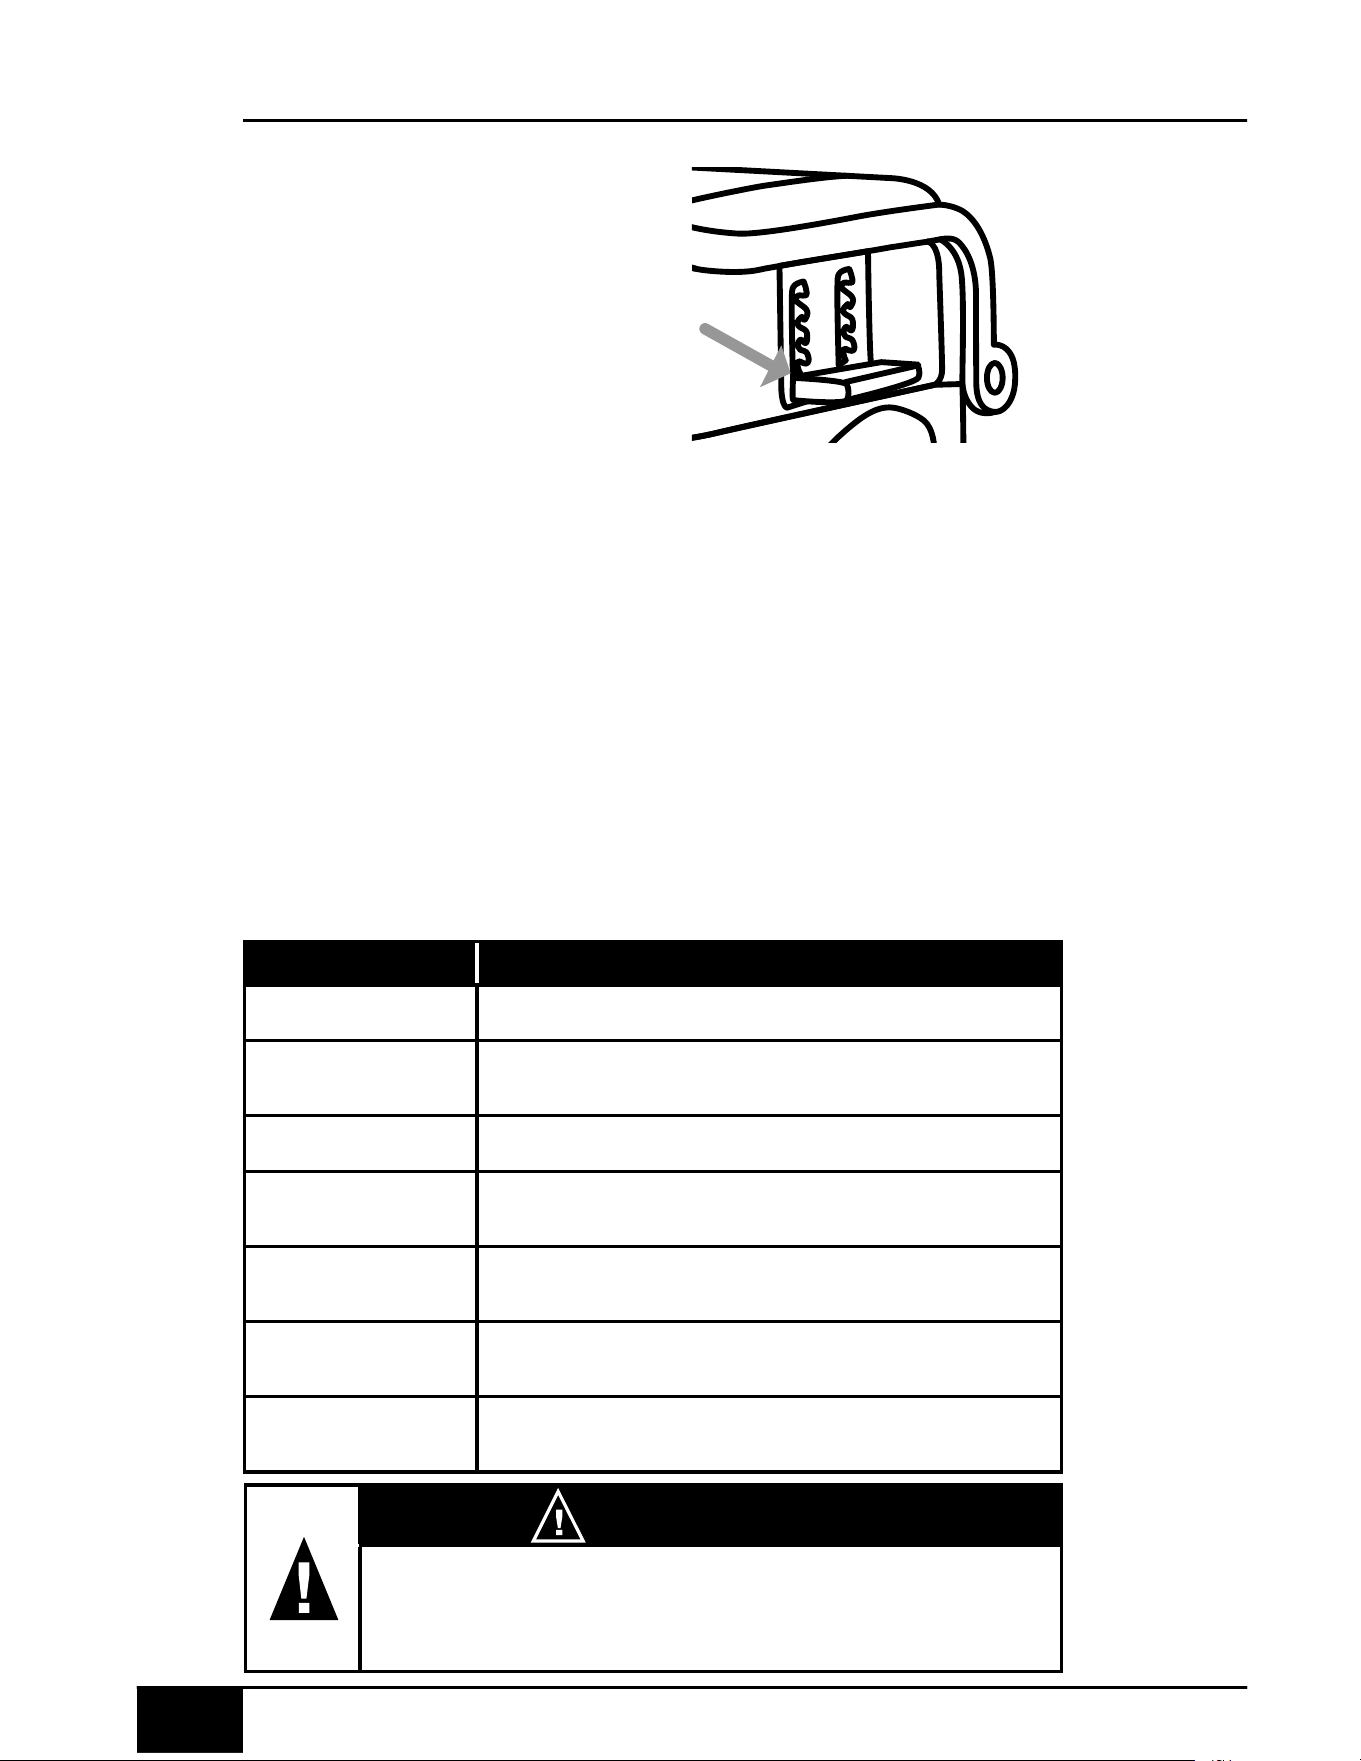
CleaningtheDripTray
Oil may build up in the Drip Tray after using your Jubilee. The Drip Tray
is removable. Always check before cooking to see if the Drip Tray is full.
1. Slide out the Drip Tray from the back of the Jubilee.
2. Empty out oil in the Drip Tray.
3. Clean the Drip Tray using warm soapy water or clean in
dishwasher, top rack only.
4. Dry the Drip Tray thoroughly before returning to unit.
1. 2.
CAUTION
Useextremecautionwhenremovingordisposingof
oilorgrease.
CAUTION
Thepowercordneedstobeunpluggedfromthe
powersourcebeforeinsertingorremovingany
attachmentsorpartsandbeforecleaning.
RemovingtheDripTray
1. Locate the Drip Tray in the back of the Jubilee. Tray is long and runs
parallel with back rear of appliance under the hinge.
2. Carefully slide out Drip Tray.
• Tray only slides out one way.
troubleshoot guide
22 23
TROUBLESHOOT GUIDE
22 23
YourNuWaveJubileewasengineeredwithanautomaticshut-off
featuretopreventoverheatingduringuse.
• If the Jubilee shuts off to cool itself down, an odor may be
detected. Unplug the unit and wait for it to completely cool down.
• To prevent overheating, do not cook at temperatures or
settings not recommended for specific ingredients or recipes.
• Do not leave unit on or cook for prolonged times not needed.
WARNING
ImmediatelyunplugandcontactCustomerService
Departmentifyouexperienceanymalfunctions.
1-877-689-2838orhelp@nuwavenow.com
Problem: Solution(s):
Prb1 Probe not connected to unit.
Prb2
Probe target temperature higher than cooking
temperature.
Prb3 Probe short circuit.
Prb4
Probe Sensor not detecting temperature
increase.
Er1
The unit is overheating. Allow to cool. If problem
persists contact Customer Service.
Err1
The unit is malfunctioning. Contact Customer
Service.
Err2
The unit is malfunctioning. Contact Customer
Service.
ReinstallingtheHandles
To reinstall handle(s), reverse
actions/steps 1-5 from “Removing
the Handles.”
1. Place metal ends of one Handle
through the opening of position 1.
2. Insert metal ends into holes in
underneath of Lid.
3. Hold in place and swing silver
Grill Hook up and insert end into
its slot.
4. Repeat with other Handle.
• Ensure Handles are secure.
5. Reinstall the Top (upper) Grill Plate.
• Open and close Lid to ensure Grill Plate is secure.
TROUBLESHOOTGUIDE
CLEANING&MAINTENANCE

nuwavenow.
com
22 23
ENGLISH
nuwavenow.
com
22 23
TheNuWaveJubilee
™
DigitalGrill
THEMANUFACTURERWARRANTS
NuWave warrants that the Jubilee including Grill Lid, Handles, Grill
Hooks, Top Grill Plate, Bottom Grill Plate, Grill Base, Drip Tray, and
Probe will be free from manufacturer defects under normal household
use for 1 year from the date of purchase. This Warranty covers
original owner of this grill for personal household use only and when
operatedinaccordancewiththeManufacturer’swritteninstructions.
This Warranty does not apply to products used for commercial, rental
or resale purposes. The Manufacturer will provide the necessary parts
and labor to repair any part of the Jubilee at NuWave LLC Service
Department. After the expiration of the warranty, the cost of the labor
and parts will be the responsibility of the owner.
THEWARRANTYDOESNOTCOVER
The Limited Warranty is voided if repairs are made by an
unauthorized dealer and/or the serial number data plate is removed
and/or defaced. Normal deterioration of finish due to use or
exposure is not covered by this Warranty. This Limited Warranty
does not cover failure, damages or inadequate performance due
to accident, acts of God (such as lightning), fluctuations in electric
power, alterations, abuse, misuse, misapplications, corrosive-type
atmospheres, improper installation, failure to operate in accordance
withtheManufacturer’swritteninstructions,abnormaluseor
commercial use. NuWave LLC reserves the right to void the Limited
Warranty, where allowable by law, for products purchased from an
unauthorized dealer.
TOOBTAINSERVICE
The owner shall have the obligation and responsibility to: pay for all
services and parts not covered by the warranty; prepay the freight to
and from Service Department for any part or system returned under
this warranty; and carefully package the product using adequate
padding material to prevent damage in transit. The original container
isidealforthispurpose.Includeinthepackagetheowner’sname,
address, daytime telephone number, a detailed description of the
problem, and your “RGAnumber.”Call1-877-689-2838oremail
help@nuwavenow.com to obtain the RGAnumber(ReturnGoods
Authorizationnumber).
Provide the cooking system model & serial number and proof of date of
purchase (a copy of the receipt) when making claims under this warranty.
MANUFACTURER’SOBLIGATION
TheManufacturer’sobligationunderthisLimitedWarrantyis
limited, to the extent allowable by law, to repairing or replacing any
part covered by this Limited Warranty which upon examination is
found to be defective under normal use. The Limited Warranty is
applicable only within the continental United States and only to the
originalpurchaserofthemanufacturer’sauthorizedchannelsof
distribution. THE LIMITED WARRANTY MAY NOT BE ALTERED,
LIMITEDWARRANTY

limited warranty
24 25
LIMITED WARRANTY
24 25
2424
limitedwarranty
VARIED OR EXTENDED EXCEPT BY A WRITTEN INSTRUMENT
EXECUTED BY THE MANUFACTURER. THE REMEDY OF
REPAIR OR REPLACEMENT AS PROVIDED UNDER THIS
LIMITED WARRANTY IS EXCLUSIVE. IN NO EVENT SHALL THE
MANUFACTURER BE LIABLE FOR ANY CONSEQUENTIAL OR
INCIDENTAL DAMAGES TO ANY PERSON, WHETHER OR NOT
OCCASIONED BY NEGLIGENCE OF THE MANUFACTURER,
INCLUDING WITHOUT LIMITATION, DAMAGES FOR LOSS OF
USE, COSTS OF SUBSTITUTION, PROPERTY DAMAGE, OR
OTHER MONEY LOSS.
Some states do not allow the exclusion or limitation of incidental
or consequential damages, so the above limitation exclusions
may not apply. This Limited Warranty gives specific legal rights,
and there may also be other rights which vary from state to state.
EXCEPT AS OTHERWISE EXPRESSLY PROVIDED ABOVE, THE
MANUFACTURER MAKES NO WARRANTIES EXPRESSED OR
IMPLIED ARISING BY LAW OR OTHERWISE, INCLUDING WITHOUT
LIMITATION, THE IMPLIED WARRANTIES OF MERCHANTABILITY
AND FITNESS FOR A PARTICULAR PURPOSE TO ANY OTHER
PERSON.READYOUROWNER’SMANUAL.IFYOUSTILLHAVE
ANY QUESTIONS ABOUT OPERATION OR WARRANTY OF THE
PRODUCT, PLEASE CONTACT NUWAVE LLC.
DISPUTE RESOLUTION PROCEDURE. For disputes relating to use
of the website or use or purchase of a NuWave product or service
(collectively “Disputes”), you agree to first contact NuWave LLC
at (877) 689-2838 (phone), (847) 367-5486 (facsimile), or legal@
nuwavenow.com (email). If we cannot resolve your dispute informally,
any and all disputes shall be submitted to final and binding arbitration.
You may start the arbitration process by submitting in writing a
demand to the American Arbitration Association (“AAA”) and sending
a copy to NuWave. NuWave will pay all filing costs. A single arbitrator
of the AAA will conduct the arbitration in a location convenient to
youorbyphone.Thearbitrator’sawardwillbebindingandmay
be entered as a judgment in a court of competent jurisdiction. The
arbitration will be conducted in accordance with the provisions of
AAA’sCommercialArbitrationRulesandMediationProceduresin
effect at the time of submission of your demand for arbitration. See
https://www.adr.org/sites/default/files/CommercialRules_Web.pdf.
Except as may be required by law as determined by an arbitrator, no
party or arbitrator may disclose the existence, content, or results of
any arbitration hereunder without prior written consent of both parties.
A. WAIVER OF RIGHT TO SUE. By agreeing to arbitration you
understand that, to the maximum extent permitted by law, you are
agreeing to waive your right to file suit in any court, to a court hearing,
judge trial, and jury trial.

nuwavenow.
com
24 25
ENGLISH
nuwavenow.
com
24 25
B. CLASS ACTION WAIVER. To the maximum extent permitted by law
you expressly agree to refrain from bringing or joining any claims in any
representative or class-wide capacity, including but not limited to, bringing
or joining any claims in any class action or class-wide arbitration.
C. OPT OUT PROCEDURE. To opt out of arbitration you must
contact NuWave. To request to opt out of arbitration contact us at
legal@nuwavenow.com (email), NuWave LLC, 1795 N. Butterfield
Road, Libertyville, IL 60048, U.S.A., (847) 367-5486 (fax), or (877)
689-2838 or (224) 206-3019 (phone). You will have thirty (30) days
from the date of product delivery to opt out of arbitration with respect
to any dispute arising out of or relating to use or purchase of any
NuWave product. If more than 30 days have passed you are not
eligible to opt out of arbitration and will have waived your right to
sue or participate in a class action with respect to the dispute arising
out of your purchase or use of a NuWave product. For any dispute
arisingoutofyouruseofNuWave’swebsite,youhavethirty(30)days
from the date you provided information to the website to opt out of
arbitration. If more than 30 days have passed you are not eligible to
opt out of arbitration and you will have waived your right to sue and
participate in a class action with respect to the dispute arising out of
youruseofNuWave’swebsite.
D. SOME MATTERS ARE NOT SUBJECT TO ARBITRATION.
Notwithstanding the foregoing, the following shall not be subject
to arbitration and may be adjudicated only in the state and federal
courts of Illinois: (i) any dispute, controversy, or claim relating to
or contesting the validity of our intellectual property rights and
proprietary rights, including without limitation, patents, trademarks,
service marks, copyrights, or trade secrets; (ii) an action by a party
for temporary, preliminary, or permanent injunctive relief, whether
prohibitive or mandatory, or other provisional relief; or (iii) interactions
with governmental and regulatory authorities. You expressly agree
to refrain from bringing or joining any claims in any representative or
class-wide capacity, including but not limited to, bringing or joining any
claims in any class action or any class-wide arbitration.
READYOUROWNER’SMANUAL
If you still have any questions about operation or warranty
of the product, please contactNuWaveLLCat:
1-877-689-2838oremailhelp@nuwavenow.com.
nuwavenow.comnuwavenow.com
MANUAL DEL
USUARIO
Parrilla Digital
Con Sensor de Temperatura
nuwavenow.
com
27
nuwavenow.
com
27
Como agradecimiento especial por registrar su producto,
¡recibirá automáticamente 3 meses adicionales a su garantía
limitada del fabricante!*
Todo lo que tiene que hacer es seguir estos
simples pasos.
Usando su teléfono inteligente o
dispositivo inteligente, escanee el
código QR ubicado en la etiqueta de
su producto en la parte posterior de
la unidad.
Se le dirigirá a la página de registro
del producto NuWave con el número
de serie único de su producto que
se ingresa automáticamente en el
campo correspondiente.
NOTA: Si no tiene un dispositivo
inteligente habilitado para la web,
simplemente visite nuwavenow.
com/QR e ingrese manualmente el
número de serie de su producto.
Complete la información restante y
complete la encuesta opcional.
Una vez que envíe su información,
recibirá un correo electrónico de
conrmaciónconlosdetallesdela
garantía extendida.
1
2
3
4
* Registre su producto dentro de 1 año a partir de la fecha
de compra para una extensión gratuita de 3 meses de
garantía limitada.
¡R
E
G
ÍS
T
R
E
S
E
AHORA!

Abra su tienda de aplicaciones móviles (App Store,
Google Play).
Busque “lectores de códigos QR.”
Simplemente descargue el lector de códigos QR a su
teléfono, ábralo y escanee el código, ya está listo para
comenzar.
NOTA: Es posible que deba abrir el lector de código QR
descargado cada vez que desee escanear un código QR.
28
28
1
2
3
DESCARGUELAAPLICACIÓNQR
CODEENSUDISPOSITIVOMÓVIL
lectores de códigos QR
!para una garantía
adicional de
meses

nuwavenow.
com
29
nuwavenow.
com
29
SPANISH
ADVERTENCIA:AlusarelJubilee,sedebenseguir
precaucionesbásicasdeseguridad:
1. No toque las superficies calientes. Utilice sólo manijas o botones.
2. Para protegerse contra descargas eléctricas, no sumerja el
cable, los enchufes ni el Jubilee en agua u otros líquidos.
3. No opere ningún aparato con un cable o enchufe dañado o
después de que el aparato funcione mal o haya sido dañado
de alguna manera. Devuelva el aparato al centro de servicio
autorizado más cercano para que lo examinen, reparen o
ajusten.
4. Si el cable de alimentación está dañado, no intente operar
el Jubilee.
5. Es necesaria una estrecha supervisión cuando se utiliza
cualquier aparato cerca de niños. Este dispositivo no está
destinado a ser utilizado por personas (incluidos niños) con
capacidades físicas, sensoriales o mentales reducidas, o por
falta de experiencia y conocimiento, a menos que hayan sido
supervisados o instruidos sobre el uso del dispositivo por una
persona responsable de su seguridad.
6. No se recomienda el uso de otros accesorios que no estén
diseñados para usarse con el Jubilee. Hacerlo puede dañar el
Jubilee y causar accidentes.
7. NO DISPONIBLE PARA USO EXTERIOR.
8. No deje que el cable cuelgue del borde de la mesa o
mostrador ni que toque superficies calientes.
9. No lo coloque sobre ni cerca de un gas caliente, un quemador
eléctrico ni en un horno caliente.
10. Se debe tener mucho cuidado al mover el Jubilee que
contiene aceite caliente u otros líquidos calientes.
11. Para desconectar, apague el Jubilee, luego retire el enchufe
del tomacorriente de pared.
12. SÓLO PARA USO DOMÉSTICO.
13. No deje el aparato desatendido mientras esté en uso.
14. Nunca ponga el Jubilee contra una pared u otros aparatos.
Mantenga al menos un mínimo de 3 pulgadas de espacio
libre para la parte posterior, los lados izquierdo / derecho y la
parte superior del aparato. Nunca coloque objetos encima
del Jubilee.
MEDIDASDESEGURIDADIMPORTANTES
USODOMÉSTICOSOLAMENTE•LEATODASLASINSTRUCCIONES
ANTESDEUSAR

medidas de seguridad importantes
30 31
MEDIDAS DE SEGURIDAD IMPORTANTES
USO DOMÉSTICO SOLAMENTE • LEA TODAS LAS INSTRUCCIONES
ANTES DE USAR
30 31
15. Nunca deje los utensilios en contacto con ninguna parte del
Jubilee, incluidas las placas de la parrilla.
16. Nunca use utensilios afilados o metálicos en ninguna parte
del Jubilee, incluidas las placas de la parrilla, ya que pueden
rayarse. Utilice únicamente utensilios de madera o de plástico
a prueba de calor.
17. No utilice papel de aluminio u otros objetos entre las placas
de la parrilla y la comida mientras cocina.
18. No desarmar. No hay partes reparables por el usuario.
19. No retire la bandeja de goteo del aparato al cocinar.
20. Tenga mucho cuidado al mover la unidad que contiene
aceite caliente u otros líquidos calientes.
21. No coloque una placa de parrilla caliente debajo del agua,
sobre una superficie frágil o sobre una encimera.
22. Apague y desenchufe el Jubilee cuando no esté en uso y antes
de limpiarlo. Permita que se enfríe antes de poner o quitar
partes, y antes de limpiar el aparato.
23. Mantenga este manual a mano para futuras referencias.

nuwavenow.
com
30 31
nuwavenow.
com
30 31
SPANISH
MEDIDASDESEGURIDADADICIONALES
VERLIMPIEZAYMANTENIMIENTOANTESDEUSAR
Informacióneléctrica
ElJubileesesuministraconuncabledealimentacióncorto
parareducirelriesgodeenredosotropezones.Sepuedenusar
cablesdeextensiónsisetienecuidadoensuuso.Siseutiliza
uncabledeextensión:
1. La calificación eléctrica marcada del cable de extensión debe
ser al menos tan grande como la calificación eléctrica de el
Jubilee.
2. El cable más largo debe estar dispuesto de modo que no se
cuelgue sobre el mostrador o la mesa donde los niños puedan
tirar de él o tropezarse con él sin querer. El Jubilee debe
operarse en una toma eléctrica separada de otros aparatos
operativos debido a las limitaciones de vataje. Ciertos modelos
de los aparatos pueden tener un enchufe polarizado (una
cuchilla es más ancha que la otra). Para reducir el riesgo de una
descarga eléctrica, este enchufe está diseñado para encajar en
un tomacorriente polarizado de una manera. Si el enchufe no
encaja completamente en el tomacorriente, invierta el enchufe.
Si el enchufe aún no encaja correctamente, comuníquese con
un electricista calificado. No intente modificar el enchufe de
ninguna manera.
3. Si el aparato es del tipo conectado a tierra, el juego de cables
o el cable de extensión debe ser un cable de 3 cables tipo
conexión a tierra.

medidasdeseguridadimportantes
32
MEDIDASDESEGURIDADIMPORTANTES
USODOMÉSTICOSOLAMENTE•LEATODASLASINSTRUCCIONES
ANTESDEUSAR
32
PRECAUCIÓN
Encasodemalfuncionamiento,desenchúfelo
inmediatamenteycomuníqueseconel
DepartamentodeServicioalCliente.
1-877-689-2838•help@nuwavenow.com
GUARDEESTASINSTRUCCIONES
LeaycomprendatodoelmanualantesdeusarelJubilee.
1. Apague y desenchufe cuando el Jubilee
esté desatendida.
2. No opere el Jubilee si se detectan sonidos anormales.
Inspeccione las partes de el Jubilee después de cada uso. Si hay
piezas sueltas, dañadas o faltantes, comuníquese con el Servicio
al Cliente al 1-877-689-2838 o envíe un correo electrónico a
help@nuwavenow.com.
3. Siempre tenga mucho cuidado al operar y dar mantenimiento a
el Jubilee o cualquier otro aparato.
4. Los niños deben ser supervisados para asegurarse de que
no jueguen con el aparato.
NOUTILICELAUNIDADPARAUNUSOADICIONAL.
Nota: Coloque el Jubilee en una superficie que sea horizontal, uniforme
y estable.Este aparato está diseñado para uso doméstico normal.
No se pretende que sea utilizado en entornos tales como el personal
de cocina de tiendas, oficinas, granjas u otros entornos laborales.
Tampoco está destinado a ser utilizado por clientes en hoteles, moteles,
Alojamiento y desayuno, y ambientes no residenciales.
ADVERTENCIA:NuncauseelJubileeconpiezassueltas,dañadas
ofaltantes.
AVISO:ELNOSEGUIRCUALQUIERADELASMEDIDASDE
SEGURIDADIMPORTANTES,LASMEDIDASDESEGURIDAD
ADICIONALESOLASINSTRUCCIONESPARASUUSOSEGURO
ESUNAFALTASOBRESUJUBILEEQUEPUEDEANULARLA
GARANTÍAYCREARELRIESGODELESIONESGRAVES.
nuwavenow.
com
33
SPANISH
nuwavenow.
com
33
1
3a
4a
2
4b
5
3b
6
7
1
Soportes
Concha
Exterior
Bisagra
a
Carcasa
Superior
c
d e
b
Barra de
la Manija
Conector de Parrilla
Conector de Parrilla
PARTESYACCESORIOS

partes y accesorios
34 35
PARTES Y ACCESORIOS
34 35
Paraobtenerpiezasreemplazables,diríjasealasección
ReplaceablePartsoNuWaveNow.com
Antesdelprimeruso
Antes de usar el Jubilee, retire todos los empaques, etiquetas y
adhesivos. Limpie el exterior de la unidad con un paño húmedo.
Seque bien todos los lados antes de usar. Lave todas las piezas
extraíbles con agua tibia y jabón o en el lavavajillas, sólo en la rejilla
superior. Lave a mano ambos lados de las placas de la parrilla o
límpielos en el lavavajillas, sólo en la rejilla superior.
Seque bien las placas de la parrilla antes de ensamblarlas en la base
de la parrilla. Conunpañolimpioounatoalladepapel,aplique
unapequeñacantidaddeaceitealasplacasdelaparrillaantes
deusarlasporprimeravez.VeaLimpiezayMantenimiento.
TapadelaparrillaParte #: 35612
CarcasaSuperior Parte #: 35612a
BarradelaManija Parte #: 35612b
ConchaExterior Parte #: 35612c
Bisagra(Derecha) Parte #: 35612d
Bisagra(Izquierda) Parte #: 35612e
Manija
Parte #: 35614
SegurodelaParrilla
Parte #: 35616 (Izquierda)
SegurodelaParrilla
Parte #: 35617 (Derecha)
PlacadelaParrillaSuperior
Parte #: 35614
PlacadelaParrillaInferior
Parte #: 35615
BasedelaParrilla
Parte #: 35611
BandejadeGoteo
Parte #: 35619
Sensor
Parte #: 35620
1
2
3a
3b
3b
4a
4b
5
6
7
nuwavenow.
com
34 35
SPANISH
nuwavenow.
com
34 35
EnsambledeladeParrillaSuperior:
1. Para el primer montaje, ubique la Parilla Superior de la parrilla y
las Manijas. Antes de colocar la placa de la Parrilla Superior en el
Jubilee, asegúrese de que las manijas superiores (ajustables) estén
en la posición 1 (Fig. 1).
2. Una vez que las Manijas estén en su lugar, deslice la Parilla
Superior de la parrilla sobre los agujeros en la parte posterior del
Jubilee (Fig. 2).
3. Empuje la Parilla Superior en su posición para que los clips de la
placa de la parrilla encajen en su lugar (Fig. 3).
GUÍADEMONTAJE
Fig. 1
EnsambledeParillas
Asegúrese de que el Jubilee esté sobre una superficie plana y
estable antes de instalar las Placas de la Parrilla. El Jubilee debe
estar completamente abierto (en un ángulo de 90 grados) al
ensamblar o retirar las placas de la parrilla.
Fig. 2
Fig. 3
PRECAUCIÓN
PERMITAQUELASPLACASDELAPARRILLA
SEENFRÍENCOMPLETAMENTEANTESDE
RETIRARLAS.
partes y accesorios
36
PARTES Y ACCESORIOS
36
Ensambledelabandejadegoteo
El Jubilee viene con una bandeja de goteo para quitar fácilmente
la grasa.
1. Ubique la ranura para deslizar la bandeja de goteo en el
dispositivo en la parte trasera de el Jubilee.
2. Con cuidado deslice la bandeja de goteo en la abertura.
• Siempre asegúrese de que la bandeja de goteo esté
ensamblada en el Jubilee antes de cocinar.
Ensambledelsensor
1. Tome el extremo del sensor (conector) y conéctelo al extremo de
la unidad.
2. Inserte el otro extremo de la sonda en la comida. Presione “Start”.
La unidad comenzará a cocinar a la temperatura deseada.
1. 2.
posición 1
ADVERTENCIA
ACOMOENELCASODETODOSLOSAPARATOS
ELÉCTRICOS,LASPARTESELÉCTRICAS
ESTÁNVIVASAÚNCUANDOELJUBILEEESTÉ
APAGADA.ASEGÚRESEDEQUELAUNIDADESTÁ
DESCONECTADACUANDOLADESARME.

nuwavenow.
com
37
SPANISH
nuwavenow.
com
37
BTMTOPTEMPSEAR 1 2
PROBWARMREDYTIME PREH
pause
clear
temp time
start
TOP
BTM
SEAR
ON
OFF
PRE-
HEAT
WARM PROBE
ON/OFF
Presione ON/OFF. Este botón también detiene cualquier función de
cocción. Mientras cocina, presione ON/OFF para cancelar.
START
Seleccione una función de cocción, pulse start para comenzar a
cocinar.Elvalorpredeterminadoes375˚Fdurante10min.
TEMP
Gire pause/clear para ajustar la temperatura de cocción antes y
durante la cocción.
TIME
Gire start para ajustar el tiempo de cocción antes y durante la cocción.
TOP/BTM
Ajusta el porcentaje de temperatura de las placas superior e inferior
de la parrilla. Presione TOP/BTM, gire pause/clear para ajustar.
Presione TOP/BTM para ajustar la placa inferior. Las temperaturas
oscilanentre0˚Fy475˚F.
SEAR
Sellarsucomidaantesdelprocesodecoccióninicial.525˚Fpor2
min.sonlosvalorespredeterminadospresioneSEAR.Silopreere,
ajuste la temperatura y el tiempo de abrasión y presione Iniciar.
Nota:LafunciónSearsepuedecongurarparaantesodespuésdel
ciclo de cocción regular. Consulte SEAR en INSTRUCCIONES para
más detalles.
WARM
Calienta rápidamente tus sobras favoritas. 145° F durante 60 min. son
los valores por defecto Presione WARM (calentar) y use los diales para
ajustar la temperatura y el tiempo. Presione start para comenzar.
Nota: Consulte WARM en INSTRUCCIONES para más detalles.
PREHEAT
Pararesultadosmáscrujientes,375˚Fdurante5min.sonlosvalores
predeterminados.Silopreere,ajustelatemperaturayeltiempode
abrasión y presione Iniciar. Una vez que la unidad haya alcanzado
la temperatura establecida, el Jubilee emitirá un pitido y comenzará
una cuenta regresiva de 5 minutos. Coloque su comida en el Jubilee,
establezca la temperatura y el tiempo de cocción y presione start.
iniciorápido
38
INICIORÁPIDO
38
INSTRUCCIONES
PROBE
Utilice la sonda digital para obtener resultados perfectos en todo
momento.160˚Feselvalorpredeterminado.Enchufelasondaenla
unidad de Jubilee. Mantenga presionado PROBE durante 2 segundos
ycongurelatemperaturainternaobjetivodeProbeparaalimentos
usando pause/clear. Inserte el otro extremo de la sonda en su comida.
Presione start para comenzar.
Nota: Consulte PROBE en INSTRUCCIONES para más detalles.
Empezando
1. Presione ON/OFF una vez
para encender su Jubilee. La
unidad está configurada de
formapredeterminadaa375˚F
durante 10 min.
2. Después de encender la
unidad, ajústela girando los
diales.
3. Presiona start. Se mostrará el tiempo, y comenzará una cuenta
atrás.
Consulte Temperatura y Tiempo para ajustar su temperatura y tiempo.
Pause/Clear
1. Al cocinar, presione “pause/
clear” una vez para pausar la
unidad.
• Si se mostró el tiempo, se
mostrará el tiempo restante.
• Para reanudar la cocción,
presione “start”.
• La temperatura y el tiempo
todavía se pueden ajustar mientras está en pausa.
2. Presione “pause/clear” nuevamente para borrar
cualquier programa. Si la pantalla muestra el tiempo de cocción
restante cuando la unidad está en pausa, la pantalla continuará
mostrando el tiempo restante. A la inversa, si la pantalla muestra la
temperatura de cocción cuando la unidad está en pausa, la pantalla
continuará mostrando la temperatura.
ON
OFF
BTMTOPTEMP
375F
ON
OFF
BTMTOPTEMP
375F

nuwavenow.
com
39
SPANISH
39
Top/Bottom
El Jubilee puede cocinar usando
calor de la parte superior, inferior
o ambos. “TOP” y “BTM” se
mostrarán como predeterminados.
1. Presione “TOP/BTM”. Se
mostrarán “TOP” y “375F”.
• Use el dial “pause / clear”
para ajustar la temperatura
entre 0F y 475F.
• Si se establece en 0F, la placa superior de la parrilla
estará apagada.
2. Presione “TOP / BTM” de nuevo. Se mostrarán “TOP”
y “375F”.
• Ajuste la temperatura según sea necesario entre 0F
y 475F.
• Si se establece en 0F, la placa inferior de la parrilla estará apagada
Temperature
Utilice la perilla de la izquierda para disminuir o aumentar
la temperatura.
1. Gire la perilla hacia la derecha (+) para aumentar la temperatura
o hacia la izquierda (-) para disminuir la temperatura.
• Elrangodetemperaturaesde60˚F475˚Fenincrementosde
5 grados.
2. Para disminuir o aumentar la temperatura en incrementos más
grandes, gire la perilla y manténgala presionada.
• Ajuste el tiempo en incrementos de 5, 10 y 30 minutos.
Time
Use la perilla de la derecha para disminuir o aumentar el tiempo.
1. Gire la perilla hacia la derecha (+) para aumentar el tiempo o
hacia la izquierda (-) para disminuir el tiempo.
• El rango de tiempo es de 00:00 a 99:59. Se muestra en
minutos y segundos.
2. Para disminuir o aumentar el tiempo en incrementos más
grandes, gire la perilla y manténgala presionada.
Notas:
• 400˚F~475˚F:0segundosto30minutos(:00-30:00)
• 300˚F~395˚F:0segundosto60minutos(:00-60:00)
• 60˚F~295˚F:0segundosto60minutos(:00-99:59)
TOP
BTM
TOPTEMP
375F

instrucciones
40 41
INSTRUCCIONES
40 41
Preheat
1. Presione “ON/OFF” y ajuste
la temperatura de cocción y el
tiempo.
2. Presione “PREHEAT”. Se
mostrarán “PREH”, “TEMP” y
“375F”.
3. Presiona start. La unidad
comenzará a precalentar
a la temperatura de cocción establecida. La temperatura de
precalentamiento destellará.
• Una vez que se alcanza la temperatura deseada, se mostrará
“REDY” y “5” y comenzará una cuenta regresiva de 5 minutos.
4. Coloque la comida en el Jubilee. Presione “start” y comenzará
una cuenta regresiva.
5. Si los alimentos no se colocan en la parrilla dentro de los 5
minutos y no se presiona “start”, la unidad pasará al modo de
espera.
Sear
Use “sear” para cocinar a alta
temperatura antes, después o
cuando use una combinación
de cocción con temperaturas
regulares.
Sear1
Sear 1 SIEMPRE funciona ANTES
de la cocción regular.
1. Presione “SEAR”. “sear 1” parpadeará y se mostrarán “TEMP” y
“525F”.
• El valor predeterminado en “sear” es de 525°F durante
2 minutos.
• El tiempo se puede ajustar por hasta 5 minutos.
2. Presiona “start”. Comenzará una cuenta regresiva de
2 minutos.
• Cuando termine la cuenta regresiva, la unidad cocinará a 375°
F durante 10 minutos y se mostrará el tiempo de cuenta atrás.
• Cuando termine la cocción, se mostrará “End”.
Ejemplo: Presione “ON / OFF >> Ajuste la temperatura de cocción y
el tiempo demasiado 300°F durante 20 minutos >> Presione” SEAR
“una vez. >> Presione “start”:
1. La unidad cocinará a 575°F durante 2 minutos.
2. La unidad cocinará a 300°F durante 20 minutos.
3. La unidad terminará de cocinar y se mostrará “End”.
PRE-
HEAT
TOPTEMP
375F
BTM
PREH
SEAR
TOPTEMP
525F
BTM
SEAR 1 2

nuwavenow.
com
40 41
SPANISH
nuwavenow.
com
40 41
Sear2
Sear 2 siempre funciona DESPUÉS de las etapas de cocción
regulares
1. Presione “dorar” tres
veces. “Sear 2” y “TEMP”
se encenderán, y “2”
parpadeará.
• El valor predeterminado para
“sear” es 525°F durante
2 minutos.
2. Presiona inicio”. La unidad
cocinará a 375°F durante 10 minutos. La unidad luego se quema
a 525°F durante
2 minutos.
• Cuando la cocción haya finalizado, se mostrará “End”.
• Use las perillas para ajustar la temperatura y el tiempo para
la fase de cocción después de “sear”. Cuando la cocción
haya finalizado, se mostrará “End” y la unidad emitirá un
pitido tres veces.
Ejemplo: Presione ON/OFF >> Ajuste la temperatura y el tiempo de
cocción demasiado 300 F durante 20 minutos >> Presione “SEAR”
tres veces. >> Presione “start”:
1. La unidad cocinará entonces a 300°F durante
20 minutos.
2. La unidad cocinará a 525°F durante 2 minutos.
3. La unidad terminará de cocinar y se mostrará “Fin”.
Sear12
1. Presione “Sear” dos veces. Aparecerá “sear 1” y “2” parpadeará,
se iluminará “TEMP” y se mostrará “525F”.
• El valor predeterminado en “sear” es de 525°F durante 2
minutos.
2. Presiona inicio”. La unidad cocinará a 525°F durante 2 minutos,
luego cocinará a 375°F durante 10 minutos.
• El tiempo de cuenta atrás se mostrará durante esta fase de
cocción.
• Cuando la cocción haya finalizado, se mostrará “Fin” y la
unidad emitirá un pitido tres veces.
• Use los diales para ajustar la temperatura y el tiempo para
la fase de cocción después de dorar.
Ejemplo: Presione “ON/OFF >> Ajuste la temperatura y el tiempo de
cocción demasiado 300°F durante 20 minutos >> Presione” SEAR
“dos veces. >> Presione “start”:
SEAR
TOPTEMP
525F
BTM
SEAR 1 2

instrucciones
42 43
INSTRUCCIONES
42 43
1. Launidadcocinaráa525˚Fdurante2minutos.
2. La unidad luego cocinará a 300°F durante 20 minutos.
3. Launidadcocinaráa525˚Fdurante2minutos.
4. La unidad terminará de cocinar y se mostrará “Fin”.
Warm
1. Presione “WARM”. Se mostrará “145F”.
• El valor predeterminado en Cálido es 145°F durante 60 minutos.
• La temperatura es entre
60-200˚F
• Use las perillas para ajustar
la temperatura y el tiempo
en el modo de Mantener
Caliente.
2. Presione “start”.
• El Jubilee comenzará a
cocinar a 375°F durante 10 minutos, y luego mantendrá la
comida caliente a 145°F durante 60 minutos.
• Presione “ON/OFF”, “Warm”, o “pause/clear” en cualquier momento
para detener la función Warm.
3. Una vez que la función de mantener caliente haya finalizado,
se mostrará “End”.
MantenerCalientecomounFunciónIndependiente
1. Presione “ON/OFF”. Se mostrarán “375F”, “TEMP”, “TOP” y “BTM”.
2. Mantenga presionado “WARM” durante 2 segundos. La parrilla
comenzará a calentarse. Ajuste la temperatura y el tiempo de
“calentamiento” con las perillas.
Nota: Para cancelar la función de calentamiento en cualquier
momento, presione “WARM”.
Probe
La función del sensor se utiliza para cocinar alimentos hasta que se
alcanza una temperatura interna predeterminada. El sensor debe
estar conectado a el Jubilee y
al otro extremo insertado en la
comida.
1. Presione “ON/OFF”.
• Ajustar la temperatura de
cocción.
2. Enchufe la sonda en la unidad
(conector). Presione Probe.
375F cambiará para mostrar
la temperatura actual de la sonda.
WARM
TOPTEMP
145F
BTM
WARM
PROBE
TEMP
160F
PROB
nuwavenow.
com
42 43
SPANISH
nuwavenow.
com
42 43
3. Mantenga presionado Probe durante 2 segundos para ajustar
la temperatura de la sonda (el valor predeterminado es 160F).
Mantenga presionado PROBE durante 2 segundos para mostrar
la temperatura configurada de la sonda.
• Para cambiar la temperatura interna de la sonda deseada
durante la cocción, gire / pausa. Si no se ajusta nada en 3
segundos, se configurará la última temperatura de sonda
ingresada.
4. Cuando se alcanza la temperatura deseada de la sonda, se
mostrará Fin.
• Si se seleccionó sear 2, una vez que se haya alcanzado la
temperatura deseada de la sonda, el Jubilee comenzará a
cocinar en la sear 2. Cuando termine, se mostrará End. Vea la
sección Sear para más.
• Si se seleccionó cálido, una vez que se haya alcanzado la
temperatura deseada de la sonda, el Jubileo comenzará a
cocinar en caliente. Cuando termine, aparecerá Fin.
Nota:Si se presiona PROBE y la pantalla muestra Prob1 o Prob2,
ocurrió uno de los siguientes problemas::
1. El sensor no está conectado en el Jubilee.
y
2. La temperatura de la sonda ajustada es más alta que la temperatura
de cocción. (Prob2)
Ajustedelniveldecoccióndelaplacasuperiordelaparrilla
El Jubileo tiene 5 niveles de cocción ajustables, lo que facilita la cocción
de alimentos de diferentes espesores.
Paraajustarelniveldecoccióndelaplacadelaparrillasuperior
(superior)delosalimentos:
1. Sostenga ambas manijas y mueva las manijas con la placa de la
parrilla hacia la parte frontal de la unidad para ajustar y deslizar.
2. Muévase y deslice hasta la posición más alta o más baja y
colóquela en la ranura elegida (1-5). Abra y cierre la tapa para
asegurarse de que la placa de la parrilla esté segura.

instrucciones
44 45
INSTRUCCIONES
44 45
Antesdelprimeruso
Antes de usar el Jubilee, retire todos los empaques, etiquetas y
adhesivos. Limpie el exterior de la unidad con un paño húmedo.
Seque bien todos los lados antes de usar. Lave todas las piezas
extraíbles con agua tibia y jabón o en el lavavajillas, sólo en la rejilla
superior. Lave a mano ambos lados de las placas de la parrilla o
límpielos en el lavavajillas, sólo en la rejilla superior.
Seque bien las placas de la parrilla antes de ensamblarlas en la
base de la parrilla. Con un paño limpio o una toalla de papel, aplique
una pequeña cantidad de aceite a las placas de la parrilla antes de
usarlas por primera vez.
GuíadeTemperaturadelSensor
Carnes
Temp.
°F
Poco
°F
Tres
Cuartos
°F
Medio
°F
Cocido
°F
Bien
Cocido
°F
Tiempo
Minutos
Pechugadepollo
Pechugadepavo
Pechugadepato
360 165*
6-8 per lb
7-9 per lb
5-7 per lb
Polloentero
Turquíaentera
Patoentero
360 165*
8-10 per lb
11-13 per lb
10-13 per lb
Muslodepollo
Pollo,Pavo,Muslo
Pato,muslo
360 165*
14-16 per lb
14-16 per lb
9-11 per lb
Filetede1”de
grosor
400
or
450
125 135 145* 150* 160* 3-8
Hamburguesas
½lb
350 125 135 145* 155* 160* 5-7
Rosbif(con
hueso)
Rosbif(sinhueso)
325 125 135 145* 150* 160*
15-20 per lb
10-15 per lb
Cordero(con
hueso)
Cordero
(deshuesado)
325 125 135 145* 150* 160*
15-20 per lb
10-15 per lb
Cerdo(conhueso)
Cerdo
(deshuesado)
350 145* 150* 160*
15-20 per lb
10-15 per lb
Salmón,Atún,
Halibut,Pez
Espada
145* 150* 160* 2-3
Filetesdepescado
de1“deespesor
350 145* 150* 160* 5-7
Chorizo 360 160* 4-5
Nota:Lostiempospuedenvariarsegúnlapreferenciadecocción.Elconsumo
decarnes,avesomariscoscrudosopocococidospuedeaumentarelriesgode
enfermedadestransmitidasporlosalimentos.*Parareducirelriesgo,cocinesus
alimentosatemperaturassegurasdelUSDA.
nuwavenow.
com
44 45
SPANISH
nuwavenow.
com
44 45
ExtraccióndelaplacadelaParrillaTopyBottom
Antes de retirar la placa de la parrilla TOP y BOTTOM, asegúrese de que
el Jubilee esté completamente frío y no esté caliente.
1. Para retirar la placa de la parrilla inferior, presione el botón de
liberación del clip (Fig. 1) que se encuentra en el lado derecho de la
base inferior. La liberación de la placa inferior de la parrilla de los clips
de la placa de la parrilla.
2. Retire con cuidado la placa de la parrilla inferior tirando de la placa
hacia usted. La placa inferior de la parrilla debería deslizarse
fácilmente hacia afuera.
3. Para quitar la placa de la parrilla superior, presione el botón de
liberación del clip ubicado en el lado derecho del conjunto de la
parrilla superior (Fig. 2).
4. Retire con cuidado la placa superior de la parrilla tirando de la placa
hacia arriba. La placa superior de la parrilla debería deslizarse
fácilmente hacia afuera (Fig. 3).
LIMPIEZAYMANTENIMIENTO
NosumerjalabasedeelJubileeenagua.Limpiecon
unaesponjaopañohúmedoyseque.
Fig. 1 Fig. 2 Fig. 3
LimpiandoelJubilee
Entre el uso, limpie los exteriores y el interior de el Jubilee con
un paño suave y húmedo y un jabón suave no abrasivo. No use
limpiadores fuertes o almohadillas o cepillos de limpieza. Seque el
Jubilee por fuera y por dentro antes de volver a utilizarla.
instrucciones
46
INSTRUCCIONES
46
Quitandolasasas
Las asas de el Jubilee son extraíbles y pueden lavarse a mano o
limpiarse en el lavavajillas, sólo en la rejilla superior.
1. Retire la placa de la parrilla superior (consulte Extracción de
las placas de la parrilla, parte superior).
2. Localice los dos ganchos plateados de la parrilla debajo
de la tapa.
• Cada lado tendrá un gancho.
3. Quite la terminación del gancho de la ranura en cada uno.
4. Sostenga la tapa a la mitad desde abajo. Levante y gire hacia afuera
los extremos metálicos del asa desde los agujeros.
5. Jale el asa. Repita los pasos para la otra asa.
1. 2. 3.
4. 5.
Limpiezadelasplacasdelaparrilla
Cuando se enfríe, retire las placas de la parrilla del aparato. Limpie
ambos lados con agua tibia jabonosa y un paño húmedo o limpie
en el lavavajillas, sólo en la rejilla superior. No use limpiadores
fuertes o almohadillas o cepillos de limpieza. Si es necesario,
remoje las placas de la parrilla antes de limpiarlas.
LimpiezaentreRecetas
Si cocina diferentes platillos y no se están retirando las placas,
limpie los restos de alimentos o la grasa con un paño húmedo o
una toalla de papel.
ExtraccióndelaBandejadeGoteo
1. Localice la bandeja de goteo en la parte posterior de el
Jubilee. La bandeja es larga y corre paralela a la parte
posterior trasera del aparato debajo de la bisagra.
2. Deslice con cuidado la bandeja de goteo.
• La bandeja se desliza en una sola dirección.
nuwavenow.
com
47
SPANISH
nuwavenow.
com
47
limpiezaymantenimiento
LimpiezadelaBandejadeGoteo
El aceite puede acumularse en la bandeja de goteo después de
usar el Jubilee. La bandeja de goteo es extraíble. Siempre revise
antes de cocinar para ver si la bandeja de goteo está llena.
1. Deslice hacia afuera la bandeja de goteo desde la parte posterior
de el Jubilee.
2. Vacíe el aceite en la bandeja de goteo.
3. Limpie la bandeja de goteo con agua tibia jabonosa o lávela en
el lavavajillas, sólo en la rejilla superior.
4. Seque bien la bandeja de goteo antes de volverla a colocar.
1. 2.
PRECAUCIÓN
Tengaextremaprecaucióncuandoretireo
desechelagrasa.
SOLUCIÓNDEPROBLEMAS
Reinstalandolasasas
Parareinstalarel(los)manejador
(es),inviertalasacciones/pasos
1a5de“EliminacióndeLas
manijas”.
1. Coloque los extremos
metálicos de un asa a través
de la abertura de la posición 1.
2. Inserte los extremos de metal
en los orificios debajo de la
tapa.
3. Manténgalo en su lugar y mueva el gancho plateado de la
parrilla e inserte el extremo en su ranura.
4. Repita con la otra asa.
• Asegúrese de que las asas estén seguras.
5. Vuelva a instalar la placa de la parrilla superior.
limpieza y mantenimiento
48
LIMPIEZA Y MANTENIMIENTO
48
PRECAUCIÓN
Elcablenecesitaserdesconectadodelcontacto
antesdecolocaroquitaraditamentosopartesy
antesdelimpiarla.
LaNuWaveJubileefuediseñadaconunafuncióndeapagado
automáticoparaevitarelsobrecalentamientodurantesuuso.
• Si el Jubilee se apaga para enfriarse, podrá detectarse un olor.
Desenchufe la unidad y espere a que se enfríe completamente.
• Para evitar el sobrecalentamiento, no cocine a una temperatura
más alta o más baja recomendada para ingredientes o recetas
específicas.
• No deje la unidad encendida ni cocine por períodos prolongados
que no sean necesarios.
ADVERTENCIA
Desenchufedeinmediatoycomuníqueseconel
DepartamentodeServicioalClientesiexperimenta
algúnmalfuncionamiento.
1-877-689-2838ohelp@nuwavenow.com
Problem: Solution(s):
Prb1 El Sensor no está conectada a la unidad.
Prb2
La temperatura deseada del Sensor esta más
alta que la temperatura de cocción.
Prb3 Cortocircuito del Sensor.
Prb4 El Sensor no detecta aumento de temperatura.
Er1
La unidad está funcionando mal. Contactar
Servicio al Cliente.
Err1
La unidad está funcionando mal. Contactar
Servicio al Cliente.
Err2
La unidad está funcionando mal. Contactar
Servicio al Cliente.

nuwavenow.
com
49
SPANISH
nuwavenow.
com
49
LaParrillaDigitalNuWaveJubilee™
ELFABRICANTEGARANTIZA
NuWave garantiza que Jubilee incluso Tapa de la parrilla, Manija,
Seguro de la parrilla, Placa de la parrilla superior, Más bajo Placa de
la parrilla, Base de la parrilla, Bandeja de goteo, y Sensor está libre
de defectos de fabricación bajo un uso doméstico normal durante 1 año
a partir de la fecha de compra. Esta garantía cubre al propietario original
de esta parrilla bajo un uso doméstico personal únicamente y cuando
se maneje de acuerdo a las instrucciones escritas del fabricante. Esta
garantía no se aplica a los productos utilizados con fines comerciales,
de alquiler o de reventa. El fabricante proporcionará las partes y mano
de obra necesarias para reparar cualquier parte de el Jubilee en el
Departamento de Servicio NuWave LLC. Después del vencimiento de la
garantía, el costo de la mano de obra y las piezas será responsabilidad
del propietario.
LAGARANTÍANOCUBRE
La Garantía Limitada se invalida si la reparación es hecha por
un distribuidor no autorizado o si la placa del número de serie es
retirada o maltratada. El deterioro normal del acabado, por uso
o exposición, no está cubierto por esta Garantía. Esta Garantía
Limitada tampoco cubre fallas, daños o desempeño inadecuado por
accidentes, desastres naturales (como relámpagos), variaciones
en la potencia eléctrica, alteraciones, abuso, mal uso, ambientes
corrosivos, instalación inadecuada, o falla en la operación de
acuerdo con las instrucciones escritas por el Fabricante, uso no
normal o comercial. NuWave LLC se reserva el derecho de invalidar
la Garantía Limitada, donde lo permita la ley, a los productos que
hayan sido comprados a distribuidores no autorizados.
PARAOBTENERELSERVICIO
El propietario tendrá la obligación y responsabilidad de: Pagar
por todos los servicios y partes no cubiertas por la garantía;
Prepagar el envío hacia y desde el Departamento de Servicio
para cualquier parte o sistema devuelto bajo esta garantía;
Empacar cuidadosamente el producto utilizando el material de
relleno adecuado para prevenir cualquier daño durante el tránsito.
GARANTÍALIMITADA

garantía limitada
50 51
GARANTÍA LIMITADA
50 51
El empaque original es ideal para este propósito. Incluya en el
empaque el nombre del propietario, dirección, teléfono durante el
día, una descripción detallada del problema y su “númeroRGA”.
Llameal1-877-689-2838oescribaahelp@nuwavenow.com
para obtener el RGA (Número de Autorización de Devolución del
Producto). Proporcione el modelo del producto, el número de serie
y comprobante de la fecha de compra (una copia del recibo) cuando
reclame su garantía.
OBLIGACIONESDELFABRICANTE
La obligación del Fabricante bajo esta Garantía Limitada está
limitada, hasta lo permitido por ley, a reparar o reemplazar cualquier
parte cubierta por esta Garantía Limitada cuya revisión muestre que
el defecto es por uso normal. La Garantía Limitada aplica únicamente
en los Estados Unidos y sólo para el comprador original en los
canales de distribución autorizados por el fabricante. LA GARANTÍA
LIMITADA NO PUEDE SER ALTERADA, CAMBIADA O EXTENDIDA
EXCEPTO POR UN INSTRUMENTO POR ESCRITO REALIZADO
POR EL FABRICANTE. LA SOLUCIÓN DE REPARACIÓN O
REEMPLAZO INCLUIDA EN ESTA GARANTÍA ES EXCLUSIVA.
EN NINGÚN CASO EL FABRICANTE SERÁ RESPONSABLE
DE NINGÚN DAÑO RELEVANTE O FORTUITO A ALGUNA
PERSONA, SEA O NO OCASIONADO POR LA NEGLIGENCIA DEL
FABRICANTE, INCLUYENDO, SIN LÍMITE, DAÑOS POR PÉRDIDA
POR USO, COSTOS POR REEMPLAZO, DAÑO A LA PROPIEDAD,
U OTRAS PÉRDIDAS MONETARIAS.
Algunos estados no permiten la exclusión o limitación de daños
relevantes o fortuitos, así que la exclusión mencionada podría
no aplicar. Esta Garantía Limitada proporciona derechos legales

nuwavenow.
com
50 51
SPANISH
nuwavenow.
com
50 51
específicos y podría haber otros derechos que varíen entre estado
y estado. EXCEPTO POR LO QUE YA SE EXPRESÓ DE FORMA
DIFERENTE, EL FABRICANTE NO GARANTIZA EXPRESA
O IMPLÍCITAMENTE POR LEY U OTRAS, INCLUYENDO
SIN LIMITACIONES, LAS GARANTÍAS IMPLÍCITAS DE
COMERCIALIZACIÓN Y EJERCICIO PARA UN PROPÓSITO
PARTICULAR A CUALQUIER OTRA PERSONA. LEA EL
MANUAL DEL USUARIO. SI TUVIERA ALGUNA DUDA SOBRE
EL FUNCIONAMIENTO O LA GARANTÍA DEL PRODUCTO,
CONTACTE A NuWave LLC.
PROCEDIMIENTO DE RESOLUCIÓN DE CONTROVERSIAS. Para
disputas relacionadas con el uso del sitio web o el uso o la compra
de un producto o servicio NuWave (colectivamente “Disputas”),
usted acepta comunicarse primero con NuWave LLC al (877) 689-
2838 (teléfono), (847) 367-5486 ( facsímil) o legal@nuwavenow.
com (correo electrónico). Si no podemos resolver su disputa de
manera informal, todas las disputas se someterán a un arbitraje final
y vinculante. Puede comenzar el proceso de arbitraje enviando una
solicitud por escrito a la Asociación Americana de Arbitraje (“AAA”) y
enviando una copia a NuWave. NuWave pagará todos los costos de
presentación. Un solo árbitro de la AAA llevará a cabo el arbitraje en
un lugar conveniente para usted o por teléfono. El laudo del árbitro
será vinculante y podrá presentarse como un fallo en un tribunal de
jurisdicción competente. El arbitraje se llevará a cabo de conformidad
con las disposiciones de las Reglas de arbitraje comercial de AAA
y los Procedimientos de mediación vigentes en el momento de la

garantía limitada
52 53
GARANTÍA LIMITADA
52 53
presentación de su solicitud de arbitraje. Ver https://www.adr.org/
sites/default/files/CommercialRules_Web.pdf. Salvo que lo exija la
ley según lo determine un árbitro, ninguna de las partes o el árbitro
puede revelar la existencia, el contenido o los resultados de cualquier
arbitraje a continuación sin el consentimiento previo por escrito de
ambas partes.
A. RENUNCIA DE DERECHO A DEMANDAR. Al aceptar el arbitraje,
comprende que, en la medida máxima permitida por la ley, acepta
renunciar a su derecho a presentar una demanda en cualquier tribunal,
a una audiencia judicial, un juicio con jueces y un juicio con jurado.
B. RENUNCIA A LA ACCIÓN DE CLASE. En la medida máxima
permitida por la ley, usted acepta expresamente abstenerse de
presentar o unirse a cualquier reclamo en cualquier capacidad
representativa o de toda la clase, incluyendo, entre otros, presentar o
unir cualquier reclamo en cualquier acción de clase o arbitraje de clase.
C. PROCEDIMIENTO DE SALIDA. Para optar por no participar
en el arbitraje, debe comunicarse con NuWave. Para solicitar la
exclusión voluntaria del arbitraje, contáctenos en legal@nuwavenow.
com (correo electrónico), NuWave LLC, 1795 N. Butterfield Road,
Libertyville, IL 60048, EE. UU., (847) 367-5486 (fax) o (877) 689
-2838 o (224) 206-3019 (teléfono). Tendrá treinta (30) días a partir
de la fecha de entrega del producto para optar por el arbitraje con
respecto a cualquier disputa que surja o esté relacionada con el uso o
la compra de cualquier producto NuWave. Si han pasado más de 30
días, no es elegible para optar por no participar en el arbitraje y habrá
renunciado a su derecho de demandar o participar en una demanda
colectiva con respecto a la disputa que surge de su compra o uso de
un producto NuWave. Para cualquier disputa que surja de su uso del

nuwavenow.
com
52 53
SPANISH
nuwavenow.
com
52 53
sitio web de NuWave, tiene treinta (30) días a partir de la fecha en
que proporcionó información al sitio web para optar por no participar
en el arbitraje. Si han pasado más de 30 días, no es elegible para
optar por no participar en el arbitraje y habrá renunciado a su derecho
de demandar y participar en una demanda colectiva con respecto a la
disputa que surge del uso del sitio web de NuWave.
D. ALGUNOS ASUNTOS NO ESTÁN SUJETOS A ARBITRAJE.
Sin perjuicio de lo anterior, lo siguiente no estará sujeto a arbitraje
y podrá ser juzgado solo en los tribunales estatales y federales de
Illinois: (i) cualquier disputa, controversia o reclamo relacionado o que
impugne la validez de nuestros derechos de propiedad intelectual
y derechos de propiedad , incluidas, entre otras, patentes, marcas
comerciales, marcas de servicio, derechos de autor o secretos
comerciales; (ii) una acción de una parte para una medida cautelar
temporal, preliminar o permanente, ya sea prohibitiva u obligatoria,
u otra medida provisional; o (iii) interacciones con autoridades
gubernamentales y reguladoras. Usted acepta expresamente
abstenerse de presentar o unirse a cualquier reclamo en cualquier
capacidad representativa o de toda la clase, incluyendo, entre otros,
presentar o unir cualquier reclamo en cualquier acción de clase o
cualquier arbitraje de clase.
LEASUMANUALDELUSUARIO: Si tuviera alguna duda sobre el
funcionamiento o la garantía del producto, contacte a NuWaveLLC
al:1-877-689-2838oescribaa
help@nuwavenow.com.
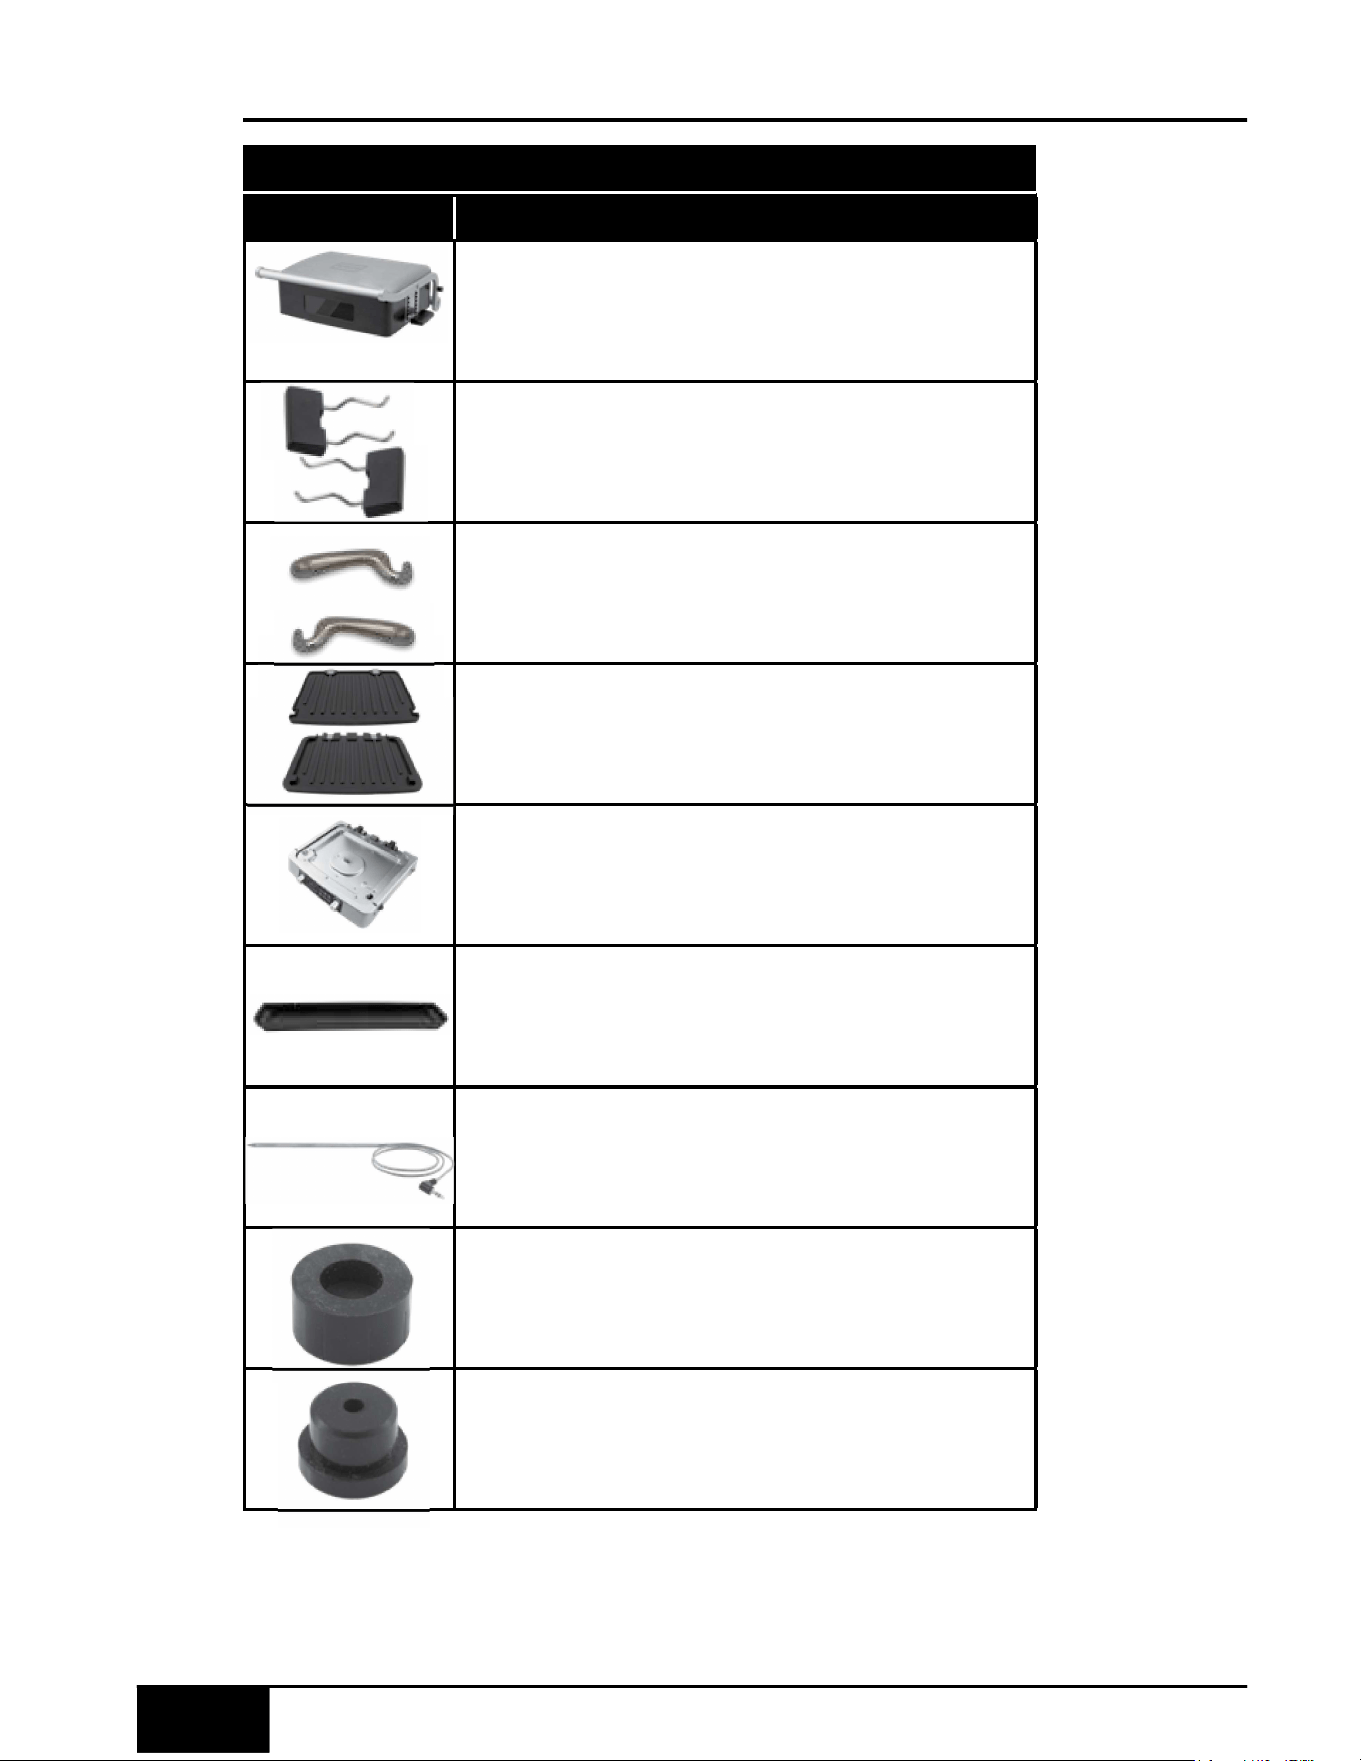
54 5554 55
replaceable parts
REPLACEABLE PARTS
Part Name Part Description Part No.
To order replaceable parts head over to NuWaveNow.com
FrontRubberFeet
BackRubberFeet
GrillLid
Top Shell
Handle Bar
Outer Shell
Hinge (Right)
Hinge (Left)
Handles
GrillHook(Left)
GrillHook(Right)
TopGrillPlate
BottomGrillPlate
GrillBase
DripTray
Probe

54 5554 55
nuwavenow.
com
REPLACEABLE PARTS
nuwavenow.
com
Part Name Part Description Part No.
Placed into front two holes. Keeps unit
from sliding.
35621
Placed into back two holes. Keeps unit
from sliding.
35622
On top of the unit. Opens and closes grill.
Attaches onto the Grill Lid. Use when
opening and closing the lid.
Located behind Top Grill Plate in the Grill
Lid. Holds the underneath of the Grill Lid
in place.
Used to cook food on. Located in Top Grill
Lid and Grill Base.
Bottom of the unit, holds Bottom Grill
Plate, and where control panel
is located.
Located on back rear of unit, collects fat
and oils.
Inserted into food. Measures internal
temperature of food.
35613
35616
35617
35614
35615
35611
35619
35620
35612
35612a
35612b
35612c
35612d
35612e
nuwavenow.com
Item No: BM35001
Rev. 13-TH
10-30-19
RB02 PC02
B
FOR HOUSEHOLD USE ONLY
Model: 35001
120V, 60Hz, 1800 Watts
Forpatentinformationpleasegoto:
www.nuwavenow.com/legal/patent
Designed&DevelopedinUSAby:
NuWaveLLC
1795N.ButtereldRoad
Libertyville, IL 60048, U.S.A.
CustomerService:
1-877-689-2838 • help@nuwavenow.com
Made in China
©2019 NuWave LLC • All Rights Reserved.