Owner's Guide Coffee Maker
PARTS
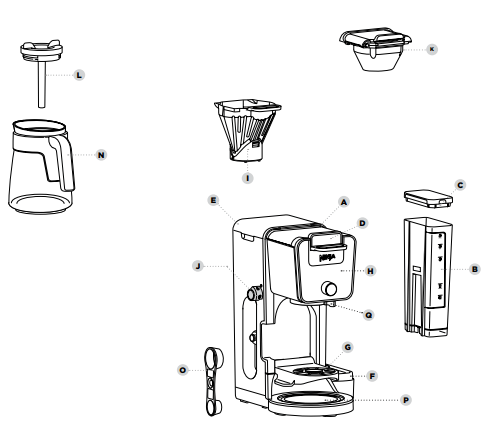
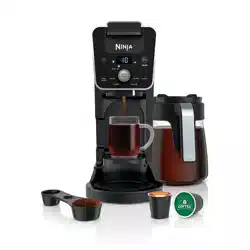
A Brewer (Power cord not shown)
B 60 oz. Removable Water Reservoir
C Removable Water Reservoir Lid
D Sliding Lid
E Hinged Hood
F Water Reservoir Base
G Single-Serve Cup Platform
H Control Panel
I Brew Basket
J Hot Water Dial (Not available on all models)
K Ninja Pod Adapter
L Brew-Through Lid
N Ninja Glass Carafe
O Ninja Smart Scoop™
P Intelligent Warming Plate
Q Drip Stop
USING THE CONTROL PANEL
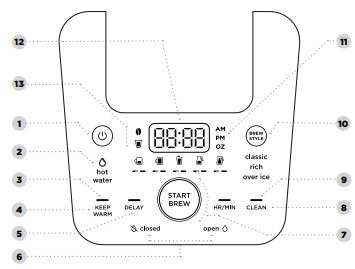
1 Power Button
2 Hot Water Indicator (Not included on all models)
3 Keep Warm Indicator (Orange)
4 Keep Warm Button
5 Delay Brew Button
6 Drip Stop Indicators
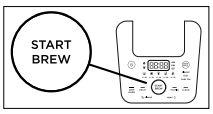
7 Multi-Serve Dial and Start/Stop Button
8 Intelligent Clean Cycle Button
9 Intelligent Clean Cycle Indicator (Orange)
10 Brew Style Button
11 Hour/Minute Button
12 Programmable Digital Clock and Ounce Display
13 Smart Sensing Mode Indicators
Not all functions are available on all models
SMART SENSING MODE INDICATORS
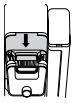
 Grounds: The Sliding Lid is slid all the way forward over the brew basket until it is completely closed and the brewer is ready to brew grounds.
 Pods: The Ninja® Pod Adapter is inserted, locked, and shut, and the brewer is ready to brew pods.
 Water: The dial on the left side of the brewer is turned to the water droplet icon (not available on all models), and the brewer is ready to dispense hot water.
 No State: One of the above criteria has not been met.
PREPARING FOR USE
SETTING THE CLOCK
When the brewer is first plugged in, the time will need to be set.
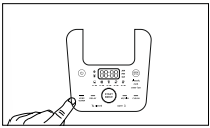
- Press the HR/MIN button to set the clock.
- Use the Multi-Serve Dial to select the correct hour. Then, press the START BREW button to toggle to minutes.
- Use the dial again to select the correct minute, and press the START BREW button to set the clock at the displayed time.
NOTE: At any time, you can set the clock by pressing the HR/MIN button, and following steps 2 and 3.
NOTE: If you unplug the brewer or in the event of a power loss, you will need to reset the clock the next time the brewer is plugged in.
HIGH-ALTITUDE CALIBRATION BREW
Required for users in high-altitude areas. Not running the high-altitude calibration brew in a high-altitude area will result in excessive steaming during brewing.
Because water boils at a lower temperature at higher altitudes, running a calibration cycle before your first brew allows the brewer to detect the boiling point of water at your location. Running a calibration cycle will help deliver a consistent brew each time.
- Fill the water reservoir up to, but not exceeding, the Full line.
- Insert the brew basket and slide the sliding lid closed, then place an empty carafe on the base.
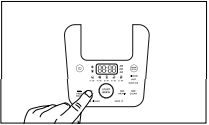
- Press and hold both BREW STYLE and HR/MIN until you hear a confirmation sound.
- A calibration cycle will begin, and the display will count down until the Altitude calibration is complete. When complete, the brewer will beep and display “End” on the dial. Discard the water in the carafe.
NOTE: This calibration is permanently saved and will not be lost if power is lost or brewer is unplugged. Brewer can be recalibrated at any time if the altitude where it is being used changes.
PRIMING YOUR NINJA® DUALBREW COFFEE MAKER
- Clean all accessories before your first brew.
- Plug the brewer in and turn it on by pressing the power button.
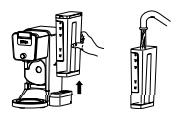
- Lift the water reservoir off of its base. Remove the reservoir lid. Add water up to, but not exceeding the Full line. Return the water reservoir to the brewer. DO NOT fill the water reservoir with anything other than water, as other liquids may damage your brewer.
NOTE: We recommend using cool or room temperature water in the reservoir. DO NOT fill with hot or boiling water.
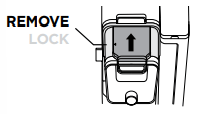
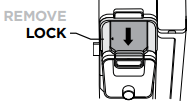
- Remove the Ninja Pod Adapter by pushing the handle away from you so that the position indicator is in the REMOVE position. Then, using the handles on the left and right, lift the adapter out of the brewer.
- After the adapter is removed, slide the sliding lid all the way forward over the brew basket until it is completely closed and clicks into place.
NOTE: DO NOT use ground coffee for the priming brew.
- Center the carafe with the brew-through lid installed below the brew basket. With everything securely in place and the brewer powered on, turn the dial to select the Full Carafe size and press the BREW STYLE button to select Classic.

- To start, press the START BREW button. When the cycle is complete, discard the water and rinse the carafe. You are now ready to use your Ninja DualBrew Coffee Maker.
USING THE NINJA® DUALBREW COFFEE MAKER
BREW VOLUMES AND MEASUREMENTS
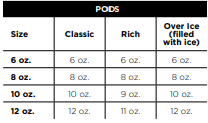
Each size and brew style produces a different amount of coffee to optimize strength and flavor.
NOTE: The coffee grounds will absorb some of the water that is brewed; this will cause slight variability in brew volumes.
NOTE: Brew volumes may be slightly larger or smaller than what is stated due to various factors in the system.
APPROXIMATE BREW VOLUMES
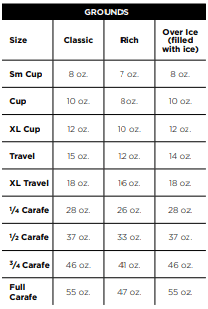
NOTE: There may be some water left in the reservoir after your brew. This is normal to keep the brewer from running out of water.
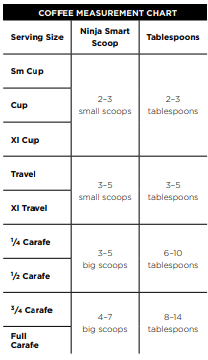
MEASURING YOUR COFFEE GROUNDS
For best results, use the measurements on the Ninja Smart Scoop™ or in the chart to determine how much ground coffee to use for each brew size. The amount of ground coffee for each size will remain the same for any brew type you select. For example, if you select Cup and Classic, you will use the same amount of coffee grounds as if you were to select Cup and Over Ice.
NOTE: Adjust to your preferred taste. More scoops result in stronger coffee but slightly lower volumes, fewer scoops result in weaker coffee and slightly higher volumes. Use fewer scoops of decaffeinated coffee to prevent overflow. Use a medium-sized grind if grinding whole beans. Grinding beans too finely may cause the brew basket to overflow.
BREWING GROUND COFFEE
USING THE BREW BASKET AND SLIDING LID
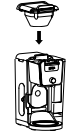
- To prepare for brewing, open the sliding lid by sliding it back under the hood and ensure the brew basket is installed.
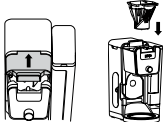
- Place a #4 paper cone filter or permanent filter (not included on all models, sold separately) in the brew basket.
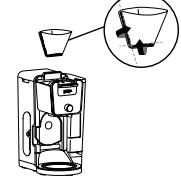
NOTE: Fold the paper filter along the seams, open the top fully, and firmly press it into the brew basket, making sure it is fully seated.
NOTE: DO NOT place ground coffee directly in the brew basket without a filter.
- Use the Ninja Smart Scoop™ and follow the measurements on the scoop or on the Coffee Measurement Chart to fill the filter

- Return the sliding lid to its closed position by sliding it forwards over the brew basket until it clicks into place.
BREWING PODS
USING THE NINJA POD ADAPTER
- To prepare for brewing, open the sliding lid by sliding it back under the hood, and ensure the brew basket is installed. NOTE: The Ninja Pod Adapter comes already installed in the brewer.
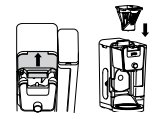
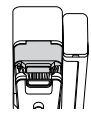
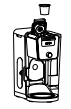
- Ensure the adapter is in the REMOVE position before installing. Then place the adapter over the brew basket and push down firmly so it is fully seated.
NOTE: Make sure the brew basket is clean and free of any filters before inserting the Ninja® Pod Adapter.
- Slide the Ninja Pod Adapter handle into the LOCK position.
- Lift the the Ninja Pod Adapter handle to reveal the pod holder. Place a new pod in the holder.
- Press the handle down firmly to pierce the pod, and ensure that it is completely closed. There will be an audible click and some resistance when closing the handle as the needles puncture the pod.

NOTE: DO NOT remove the top of the K-Cup Pod
HIGH-ALTITUDE BREWING: Before closing the Ninja Pod Adapter handle to start a brew, Using your fingers, carefully apply pressure on the K-Cup Pod until the bottom of the K-Cup Pod is punctured by the exit needle, and the pod is fully seated in the pod holder. This releases excessive gas built up from the high altitude and prevents pod blowout
NOTE: Reusable K-Cup Coffee Filters are not compatible with the Ninja Pod Adapter. If using ground coffee, use the grounds mode with a paper or permanent filter (sold separately) to brew a single-serve size.
BREW STYLES
CLASSIC BREW & RICH BREW

- Use the Multi-Serve dial to select the brew size. Place the empty vessel under the brew basket. NOTE: If making a single cup, lower the Single-Serve Cup Platform and set your vessel in the center of it to help prevent splashing. This applies to all brew styles.
- Press the BREW STYLE button to choose either Classic Brew or Rich Brew.
- Press the START BREW button on the dial to start the brew. To cancel the brew at any time, press the START BREW button on the dial again or press the Power button.
- The brewer will beep to signal the brew has started. The progress bar around the dial will illuminate to indicate the status of the brew. When the brew is finished, the machine will beep again and End will appear on the display. NOTE: Rich Brew will use slightly less water and yield slightly less brewed coffee than Classic Brew. See Approximate Brew Volume chart for additional information.
OVER ICE BREW
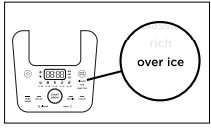
- Fill your desired vessel to the top with ice cubes and place the vessel below the brew basket. Use the Multi-Serve dial to select the brew size. NOTE: DO NOT add ice to the water reservoir.
- Press the BREW STYLE button to choose Over Ice Brew.
- Press the START BREW button on the dial to start the brew. To cancel the brew at any time, press the START BREW button on the dial again or press the Power button.
- The brewer will beep to signal the brew has started. The progress bar around the dial will illuminate to indicate the status of the brew. When the brew is finished, the machine will beep again and End will appear on the display.
NOTE: DO NOT use any glassware except the provided Ninja glass carafe, which is safe to use due to its specialized glass material.
NOTE: Over Ice brew is designed to produce a concentrated brew into a vessel filled with ice. It is normal for some ice in the vessel to melt as the coffee is brewed, and this will produce a cold beverage with the ideal strength and flavor.
INTELLIGENT WARMING PLATE
The Intelligent Warming Plate will automatically turn on during Classic or Rich brews when a 1 /4, 1 /2, 3/4, or full carafe size is selected. The Intelligent Warming Plate is set to a specific temperature setpoint to avoid burning the coffee over time. To turn the warming plate on at any time, turn the dial to one of the carafe sizes, select Classic or Rich, and press the KEEP WARM button.
TIME ADJUSTMENT
You can adjust how long the Intelligent Warming Plate remains on (up to 4 hours).
By default, the Intelligent Warming Plate is set to remain on for 2 hours. To change the time setting of your warming plate, follow these instructions:
- Press and hold KEEP WARM until the clock begins to flash the current warming time.
- Turn the dial to increase the time in 15 minute increments up to 4 hours or decrease the time to 0 hours. Press START BREW on the dial to set the new time.
NOTE: If you set the warming time to 0 hours, Keep Warm will not automatically activate during or after a carafe brew cycle, but you can still turn it on manually by pressing the KEEP WARM button.
NOTE: The time adjustment setting will be saved and will not reset when the brewer is unplugged or loses power.
SETTING THE DELAY BREW
- Plug the brewer in and turn it on by pressing the Power button. NOTE: The clock will remain on even if the brewer is turned off. Ensure the brewer is powered on to set Delay Brew.
- After filling the water reservoir and adding ground coffee to the filter or inserting a pod in the Ninja Pod Adapter, close the sliding lid or adapter handle, and place the appropriate-size vessel under the brew basket.
- Press DELAY. DELAY will illuminate and the clock will begin to flash “12:00” or the last time that was set.
- While the clock is flashing, turn the Multi-Serve dial to adjust the hour. The AM or PM indicator will illuminate under the clock display as you are setting the desired time. Press START BREW on the dial and turn the Multi-Serve dial to adjust the minute. Press START BREW on the dial to lock in the time.
- Once the desired time has been set, use the Multi-Serve dial to select the size of the vessel you would like to brew into.
- Press the BREW STLYE button to choose your brew style.
- Once the time, brew size, and brew style have been set, press the START BREW button to activate. When activated, the brewer will beep and DELAY and your selected options will remain illuminated. To cancel, press DELAY again.
NOTE: The brewer must remain on for the Delay Brew function to work. DO NOT power off or unplug after setting Delay Brew. If the brewer is turned off or unplugged, delay brew will need to be reset.
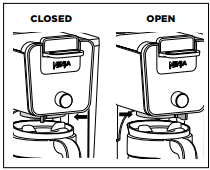
USING THE DRIP STOP
The drip stop is used to close off the brew basket to prevent any coffee from dispensing. You will need to manually open and close the drip stop by moving the lever to your desired position. It can be closed and reopened at any point before, during, or after a brew.
If you forget to open the Drip Stop, the brewer will pause the brew, and after 30 seconds it will give you a friendly audible reminder. After 5 minutes, the brew will be canceled.
NOTE: If the Drip Stop is closed before you begin a brew, the brewer will notify you with 3 beeps and the Drip Stop indicator will illuminate. Move the Drip Stop to the open position and press the START BREW button to begin your brew.
CLOSING THE DRIP STOP AFTER A BREW
When the brew cycle is complete, set the Drip Stop to the closed position to stop dripping from the brew basket and Ninja Pod Adapter. While the Drip Stop is closed, the Drip Stop indicator will illuminate.
NOTE: Remember to open the Drip Stop when you are ready to brew again. If you forget, your brewer will give you a friendly audible reminder.
DISPENSING HOT WATER
The Ninja DualBrew Coffee Maker has a separate water line completely independent of the line used for brewing coffee. This ensures you get clean water every time with no coffee crosscontamination.
1. To switch to Hot Water Mode, turn the dial on the left side of the brewer to the water droplet icon. You should notice a change on the control panel.
NOTE: If the display is flashing the water droplet icon, make sure the dial is turned completely to one side.
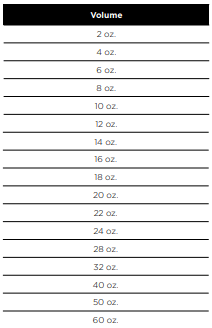
2. Use the Multi-Serve Dial to choose one of 17 sizes between 2 oz. and 60 oz.
3. Press START BREW on the dial to start the brew.
NOTE: When dispensing hot water, use a vessel that is suitable for high temperatures.
NOTE: The water will cool down once dispensed into vessel.
Not all functions are available on all models.
CLEANING & MAINTENANCE
CLEANING AFTER A BREW
- After the brewer has cooled, remove the brew basket. If using pods, remove the Ninja Pod Adapter and brew basket. Wash the used parts thoroughly with soap and warm water.
- Wash the carafe and brew-through lid with soap and warm water. Use a bottle brush or cloth to wash the inside of the carafe. DO NOT use a wire brush.
NOTE: For best results, we recommend rinsing the reservoir after brewing and refilling with fresh water for the next brew.
CLEANING THE WATER RESERVOIR
Empty the reservoir and hand-wash or place in dishwasher. For a better clean, we recommend placing it in the bottom rack of the dishwasher standing upright with the opening facing downward. We recommend doing this weekly.
CLEANING THE CARAFE
We recommend cleaning your carafe after each use with warm, soapy water.
To clean the carafe more thoroughly, we recommend using a soft foam brush.
DO NOT use a wire brush.
CLEANING THE SLIDING LID
Open the hinged hood on top of the brewer by pulling up on the left side. Once opened, slide the sliding lid out of the back of the brewer to remove it. Hand-wash the sliding lid with warm, soapy water. Slide the sliding lid back into its tracks and close the hinged hood.
NOTE: DO NOT place the sliding lid in the dishwasher
CLEANING THE NINJA POD ADAPTER
Open the handle to reveal the needles and pod holder and hand-wash with warm, soapy water. Take care when cleaning around the needles. Then, close the handle and slide it back into the REMOVE position before reinstalling.
NOTE: DO NOT place the Ninja Pod Adapter in the dishwasher.
CLEANING & DESCALING YOUR BREWING SYSTEM
Your Ninja DualBrew coffee maker offers multiple modes to choose from, which include Grounds, Pods, and Hot Water (not available on all models). Each mode that you use will eventually need to be cleaned with a clean cycle.
The clean cycle is used for descaling the brewer when calcium scale buildup is affecting the performance of the brewer and/or the flavor of your coffee. The Intelligent Clean Cycle Indicator will automatically illuminate orange when a cleaning cycle is recommended for your brewer. If the indicator is ignored, your brewer may stop mid-brew and display “CLn,” indicating it needs immediate cleaning on the current mode.
NOTE: The clean cycle takes approximately 75 minutes.
CHOOSING WHICH MODE TO CLEAN
When the Intelligent Clean Cycle Indicator turns on for the first time, run a clean cycle on the mode you use most. For example, if you primarily brew with grounds, run the clean cycle on the Grounds mode with the Sliding Lid closed. If you primarily use pods, ensure the Ninja Pod Adapter is installed, and run the clean cycle through the Ninja Pod Adapter. If Hot Water mode (not available on all models) is used at all, run an additional clean cycle in Hot Water mode.
The next time the Intelligent Clean Cycle Indicator illuminates orange, run a clean cycle on the remaining way to brew coffee. For example, if you ran a clean cycle on the Grounds mode first, run a clean cycle on the Pods mode next.
NOTE: If the display ever reads “CLn,” it indicates heavy scale buildup on that mode. Run a clean cycle on the current mode.
To clean and descale your Ninja DualBrew Coffee Maker:
1. Place the empty carafe beneath the brew basket.
2. Use a descaling solution specifically formulated for coffeemaker cleaning and follow the directions on the package. Fill the water reservoir up to, but not exceeding, the Full line.
OR
Fill the water reservoir to the Travel Mug line (16 oz.) with white vinegar, then fill the rest of the reservoir with water up to, but not exceeding, the Full line.
IMPORTANT: Only use white vinegar
NOTE: Running a water-only clean cycle will not descale the brewer properly
3. Once the water reservoir is filled with your cleaning solution and water mixture, press the CLEAN button then press the START BREW button to confirm and begin the cleaning cycle.
NOTE: To cancel the clean cycle, press the Power button or CLEAN button once. The brewer will beep and stop brewing through the cleaning mixture. Continue to follow the instructions starting at Step 6.
IMPORTANT: If you cancel the clean cycle, your brewer will not be properly descaled.
4. The clock will display and count down the remaining clean cycle time, which takes approximately 75 minutes to complete. Your brewer will deliver a small amount of cleaning solution to distribute it through the system. It will then pause, deliver additional cleaning solution, and repeat this process for 75 minutes. The extended pauses allow for maximum cleaning and descaling.
IMPORTANT: DO NOT remove the carafe at any time during the clean cycle.
5. Upon completion, the brewer will beep, the clock will display End, and the Intelligent Clean Cycle Indicator will turn off.
6. Empty the contents of the carafe and place it back under the brew basket. Clean the water reservoir with warm, soapy water to remove any cleaning solution that could affect the flavor of your coffee.
7. Fill the reservoir with fresh water up to, but not exceeding, the Full line.
8. Flush the system by running a water-only cycle. If cleaning the Grounds mode, run a Full Carafe Classic brew cycle. If cleaning the Pods mode, run a 12 oz. Classic brew. If cleaning the Hot Water mode (not available on all models), run a Full Carafe on BOIL. Rerun a water-only cycle if taste persists. After the cycle is complete, discard the water and thoroughly clean the carafe and brew basket.
NOTE: Hard water will cause scale buildup faster than soft water and the brewer will indicate it needs cleaning more often.
TROUBLESHOOTING GUIDE
There’s sediment in my coffee.
- If using a permanent filter (sold seperately), this may be due to using finely ground coffee.
- To reduce the amount of sediment in the brewed coffee, use a slightly coarser grind or use a paper filter.
NOTE: DO NOT use a paper filter in conjunction with a permanent filter, as water and/or coffee can back up and clog the filter basket.
Over Ice Brew is not cold.
- Ensure your cup, travel mug, or carafe is filled all the way to the top with ice cubes before brewing. Brewer will brew at elevated temperatures to lock in the best flavor, then the ice will cool the brewed coffee to the perfect temperature.
Coffee is too weak.
- For stronger coffee, use the Rich brew setting. For an even bolder flavor, you can add more coffee grounds to the filter.
Coffee is too strong.
- For milder coffee, use the Classic brew setting. For an even milder flavor, use fewer coffee grounds in the filter.
Brew cycle is too slow.
- The brew time will vary based on size and brew style. Full carafe sizes and Rich brews will take longer to brew than single-serve and classic brews. The progress bar on the control panel will indicate brew status.
Cup or travel mug overflowed.
- Refer to the Approximate Brew Volumes chart on page 10.
Brew basket overflowed.
- The bottom of the brew basket may be clogged. This can happen with finely ground coffee or too many coffee grounds in the filter. Medium-grind coffee is recommended.
- Using both the permanent filter and a paper filter can cause grounds to clog and water to back up in the brew basket. Use only the permanent filter or a paper filter.
- Decaf coffee grounds absorb water differently, so use fewer scoops when using decaf.
There is water left in the reservoir.
- When the reservoir is filled to a specific size and then that size is brewed, there will be some water left in the reservoir. This is normal to ensure the reservoir does not run dry for the best performance of the pump and brew system.
Brewer is leaking.
- After removing the water reservoir, there may be a small amount of water in the reservoir valve. This can be easily removed with a dry cloth.
- If the leak is coming from above the brew basket, refer to “Brew basket overflowed.” above.
- If the leaking is coming from below the brew basket, close the drip stop. Refer to page 17 for more information.
- If the leak is coming from the bottom of the brewer, call Customer Service at 1-877-646-5288.
Intelligent Clean Cycle Indicator is illuminating orange.
- Run a clean cycle. If you have recently completed a clean cycle, you may need to run another cycle to remove additional mineral buildup that occurs naturally over time and is common in hard-water areas. Make sure you are using vinegar or a descaling solution and follow the cleaning instructions on pages 20 and 21.
Brewer is not detecting the Ninja® Pod Adapter.
- Ensure the adapter is fully seated in place over the brew basket with the handle closed. Pull the handle toward you until it clicks into the LOCK position. Refer to pages 12 and 13 for more information.
- Ensure the Hot Water Dial (not available on all models) is turned completely to the coffee bean icon.
Coffee is splattering.
- Some splatter is normal. Use the cup tray when possible to reduce the distance between the cup and the coffee outlet.
- Ensure the Ninja Pod adapter is installed over the brew basket when brewing pods.
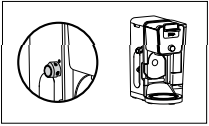
Water reservoir is unstable.
- Ensure the water reservoir is properly installed on the hook on the side of the brewer and pressed down firmly into the water reservoir base.
CLOCK DISPLAY MESSAGES:
End
- The brew cycle is complete.
Add Wtr
- The system does not have enough water in the reservoir to complete your brew. Add fresh water to the reservoir and then press the START BREW button to resume.
- If the reservoir is filled with water, remove and reseat the reservoir. If the issue persists, contact Customer Service at 1-877-646-5288.
CLn
- The system has detected that a clean cycle needs be run immediately to remove calcium scale buildup in the heater. See ‘Cleaning & Descaling Your Brewing System’ for instructions.
STOP
- A brew cycle was cancelled.
ERROR MESSAGES:
- If the clock displays “Er” and then a number (ex. “Er 03”), contact Customer Service at 1-877-646-5288.