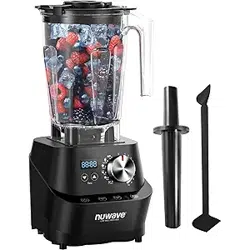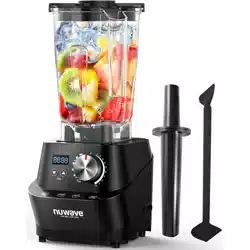
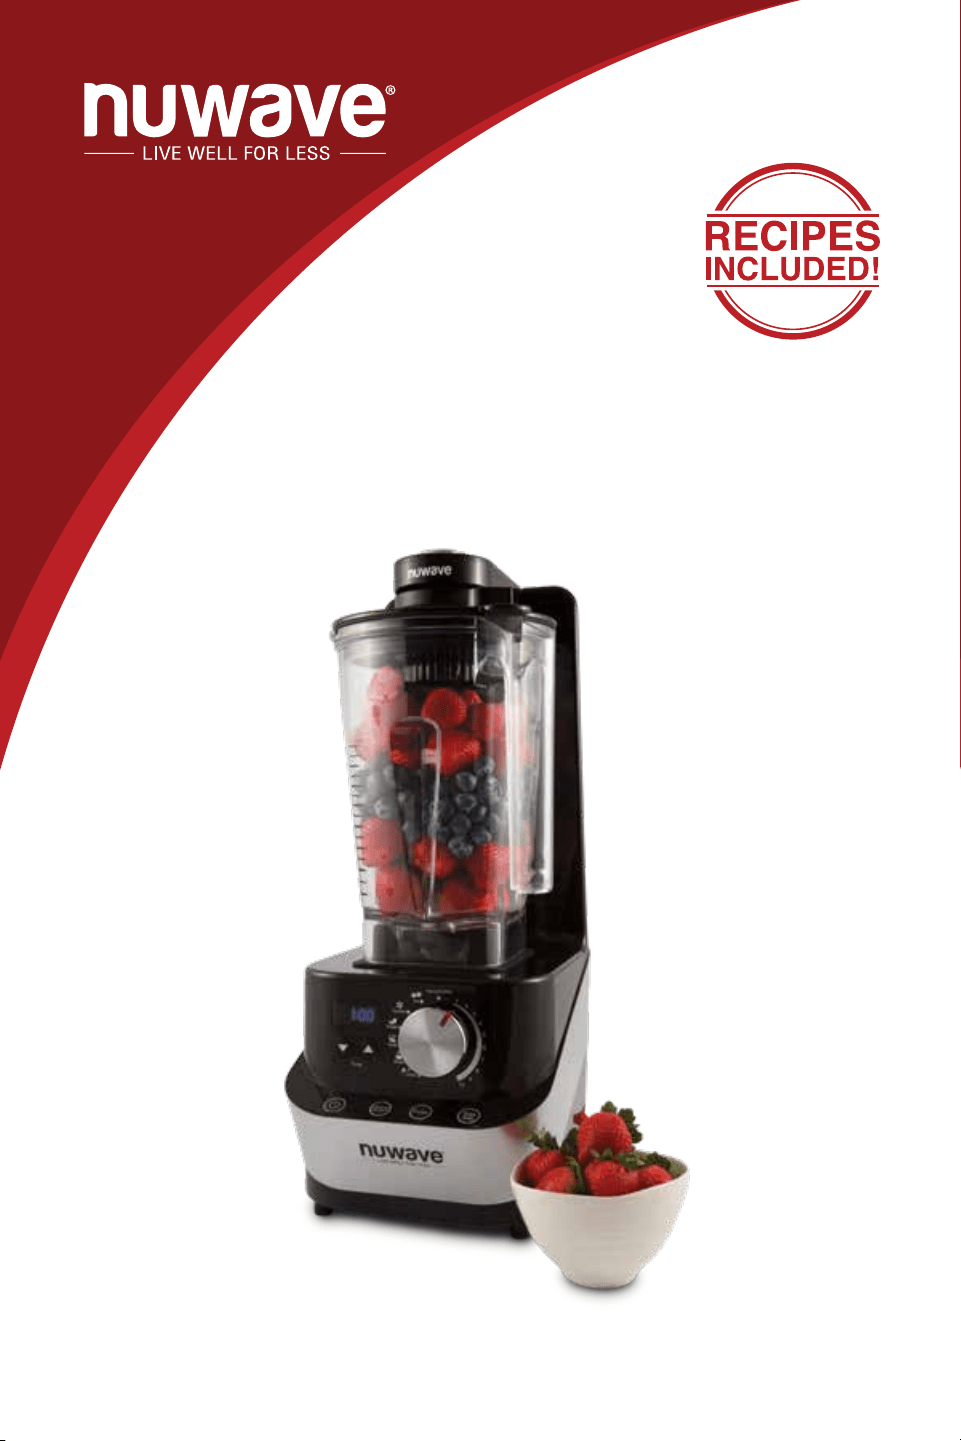
Owner’s Manual & Complete Recipe Book
NuWave Moxie
™
Digital Vacuum Blender
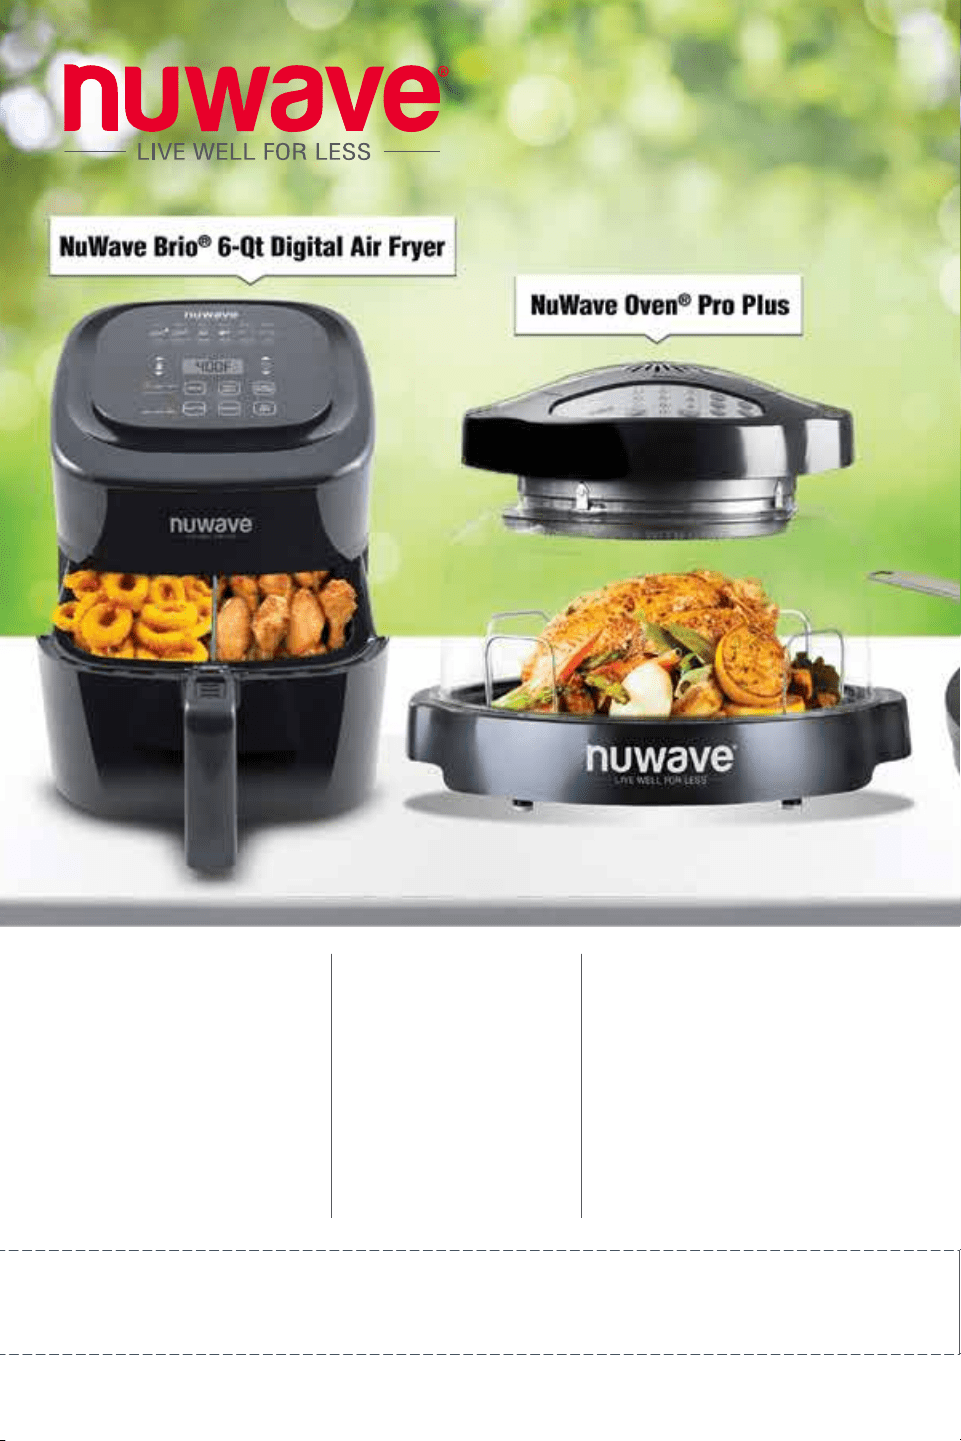
NuWave Brio
®
6Qt
Digital Air Fryer
NuWave Oven
®
Pro Plus
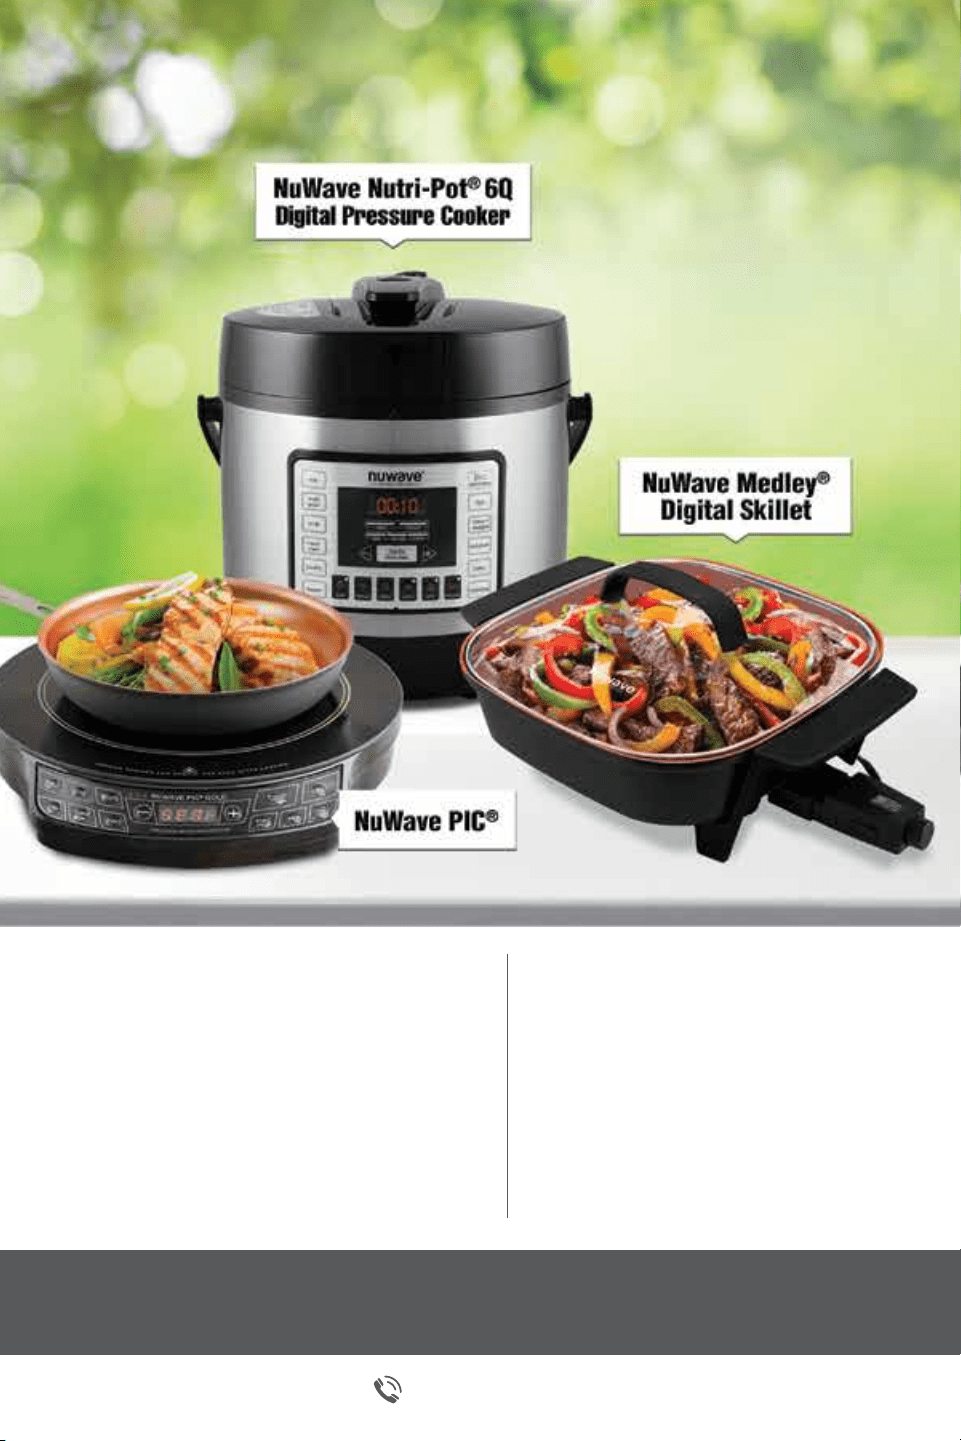
NuWave Nutri-Pot
®
6Q
Digital Pressure Cooker
Super-heated air cooks
your food to crispy,
tender perfection.
The digital touch screen
gives you precise
temperature control.
Cook healthier
meals faster and
more efficiently
with Triple Combo
Cooking Power.
Easily cook rice, poultry, vegetables,
and more all with the press of a
button! The Nutri-Pot’s safety release
valve and hinged lid make for
convenient and safe operation.
NuWave PIC
®
(Precision Induction
Cooktop)
Cook faster, safer,
and more efficiently
than you ever could
on your gas or
electric stovetop.
NuWave Medley
®
12”x12” Digital Skillet
Coated with Duralon
®
Healthy
Ceramic Non-Stick coating
for easy cleanup. Includes a
premium, vented, tempered
glass lid.
1-877-689-2838
For more about our innovative products, visit:
www.nuwavenow.com
NuWave Brio
®
6Qt
Digital Air Fryer
NuWave Oven
®
Pro Plus
NuWave Nutri-Pot
®
6Q
Digital Pressure Cooker
Super-heated air cooks
your food to crispy,
tender perfection.
The digital touch screen
gives you precise
temperature control.
Cook healthier
meals faster and
more efficiently
with Triple Combo
Cooking Power.
Easily cook rice, poultry, vegetables,
and more all with the press of a
button! The Nutri-Pot’s safety release
valve and hinged lid make for
convenient and safe operation.
NuWave PIC
®
(Precision Induction
Cooktop)
Cook faster, safer,
and more efficiently
than you ever could
on your gas or
electric stovetop.
NuWave Medley
®
12”x12” Digital Skillet
Coated with Duralon
®
Healthy
Ceramic Non-Stick coating
for easy cleanup. Includes a
premium, vented, tempered
glass lid.
1-877-689-2838
For more about our innovative products, visit:
www.nuwavenow.com
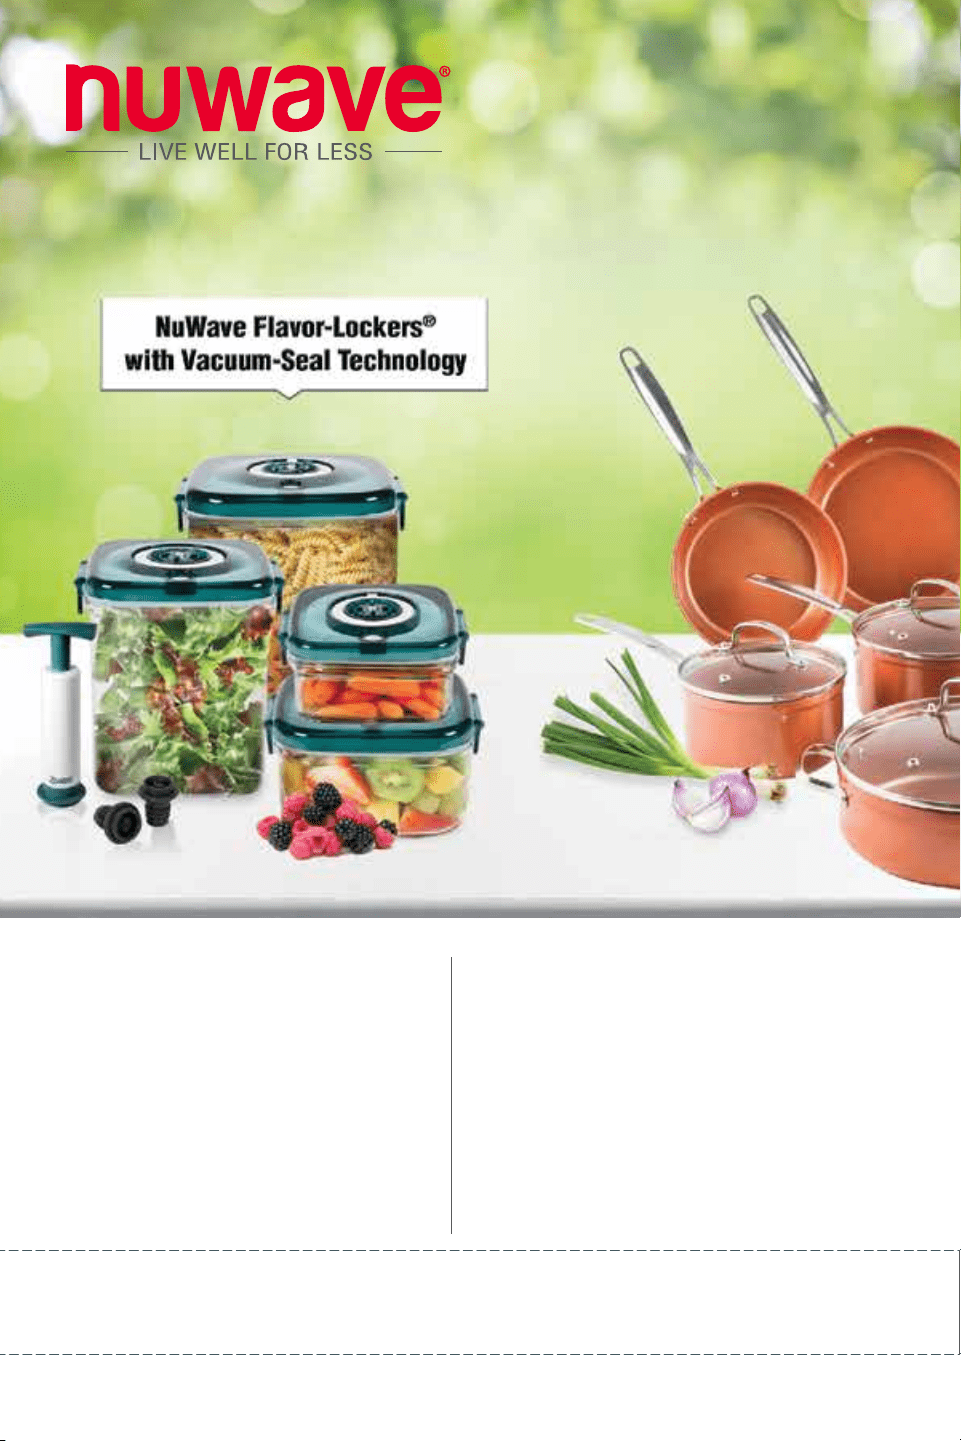
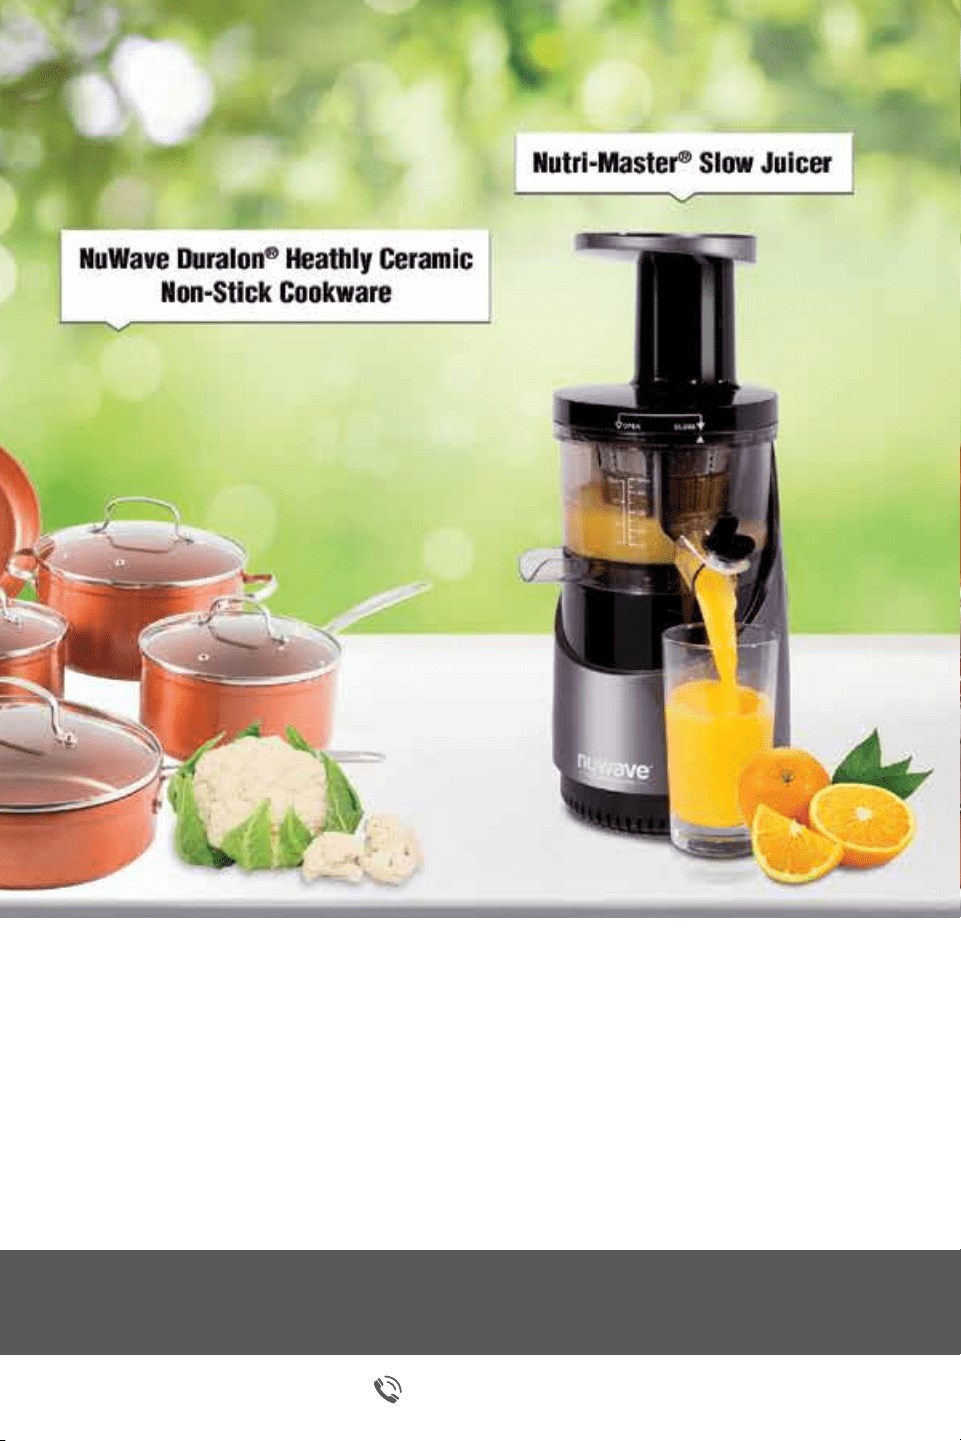
NuWave Flavor-Lockers
®
with Vacuum-Seal Technology
NuWave Nutri-Master
®
Slow Juicer
Keep food fresh for up to 21 days!
Slow the growth of mold by removing
trapped oxygen with a few easy pumps.
The Nutri-Master, with a low 48 RPM, is both
incredibly quiet and powerful enough to extract
juice from nuts and hard vegetables.
NuWave Duralon
®
Healthy
Ceramic Non-Stick
Cookware
Coated with Duralon Healthy
Ceramic Non-Stick coating for
easy cleanup, this versatile
cookware is perfect for use in
ovens or on gas, electric, and
even induction cooktops.
1-877-689-2838
For more about our innovative products, visit:
www.nuwavenow.com
7
Owner’s Manual
TABLE OF CONTENTS
OWNER’S MANUAL
Important Safeguards .................... 7
Additional Safeguards .................... 8
Parts Description............................ 9
Assembly Guide ...................... 10-13
Operating Instructions ............. 14-16
Care & Maintenance ............... 17-18
Troubleshooting ...................... 19-20
Limited Warranty ..................... 21-22
Juices
Green Emotion ............................. 24
Tummy Elixir ................................ 25
Carrot Ginger ............................... 26
Almond Milk ................................. 27
Carbonara .................................... 28
Jams & Spreads
Fig Jam ........................................ 30
Homemade Hazelnut Spread....... 31
Nut Butter ..................................... 32
Guacamole................................... 33
Homemade Mayonnaise .............. 34
Sauces
Apple Sauce................................. 36
White Bean Hummus ................... 37
Sun-dried Tomato Pesto .............. 38
Cranberry Sauce .......................... 39
Salsa Verde.................................. 40
Tzatziki Sauce.............................. 41
Tuscan Pesto ............................... 42
Thai Peanut Dipping Sauce ......... 43
Nacho Cheese Sauce .................. 44
Hummus ....................................... 45
Dressings
Classic Dijon Salad Dressing ....... 47
Ginger Lime Dressing .................. 48
Classic Ranch Dressing ............... 49
Soy Sesame Dressing ................. 50
Classic Caesar Dressing.............. 51
Lemon Poppy Seed Dressing ...... 52
Soups
Cumin-scented Carrot Soup ........ 54
Chilled Fruit Soup ........................ 55
Beet Soup .................................... 56
Tomato Basil Bisque .................... 57
Gazpacho..................................... 58
Potato Trufe Cauliower Soup ... 59
Desserts
Blueberry Lemon Mufns ............. 61
Banana Oat Pancakes ................. 62
Classic Crepes ............................. 63
Spanish.......................................... 64-
nuwavenow.com
IMPORTANT SAFEGUARDS
READ ALL INSTRUCTIONS
WARNING: When using the Moxie Blender, basic safety precautions
should always be followed:
1. To protect against risk of electrical shock, do not immerse Blender Base,
cord, plug, or any part of the main unit in water or any other liquids.
2. Close supervision is necessary when any appliance is used near
children. The Moxie Blender is not intended for use by children, persons
with reduced physical, sensory, or mental capabilities or those with lack
of expertise or knowledge of this unit.
3. Unplug the Moxie Blender from outlet when not in use, before putting on
or taking off parts, and before cleaning.
4. Avoid contact with moving parts.
5. Do not operate the Moxie Blender with a damaged cord or plug, if the
appliance malfunctions, is dropped, or damaged in any manner, contact
Customer Service at 1-877-689-2838 or email help@nuwavenow.com for
information on examination, repair, or adjustment.
6. NOT INTENDED FOR OUTDOOR USE.
7. Do not let cord hang over the edge of table or counter. Do not let cord
contact hot surfaces, including from a stove.
8. Keep hands, utensils, and foreign objects out of the Jar while blending to
reduce the risk of severe injury to persons or damage to blender. A scraper
may be used, but only when blender is NOT running.
9. Do not place on or near a hot gas or electric burner, or in a heated oven.
10. CAUTION! Blades are sharp. Handle blender carefully. Do not handle blades.
11. Always operate blender with Lid and Jar correctly in place. Blender will not
operate if Lid is not firmly in place and the dot is not lined up with the handle.
12. Alteration or modification of any part of the blender or the use of
attachments not recommended by the manufacturer may cause fire, injury,
or damage to property.
13. Do not add hot or boiling liquids to Jar.
14. Never knock Jar against a surface to loosen ingredients. Remove Jar from
Moxie Blender’s Base first, then use a rubber spatula to remove mixture
from bottom of Jar.
15. Do not shake or rattle Jar while in use.
16. Never remove Jar before the Moxie Blender’s blades have come to a
complete stop.
17. When making nut butters or recipes with oil-based ingredients, do not process
for more than 1 minute after the mixture begins to circulate in Jar. Blending for
longer periods than this can cause overheating of the Moxie Blender.

8 9
Owner’s ManualOwner’s Manual
Lock
Close
Open
Close
Open
Lock
Close
Open
Close
Open
ADDITIONAL SAFEGUARDS
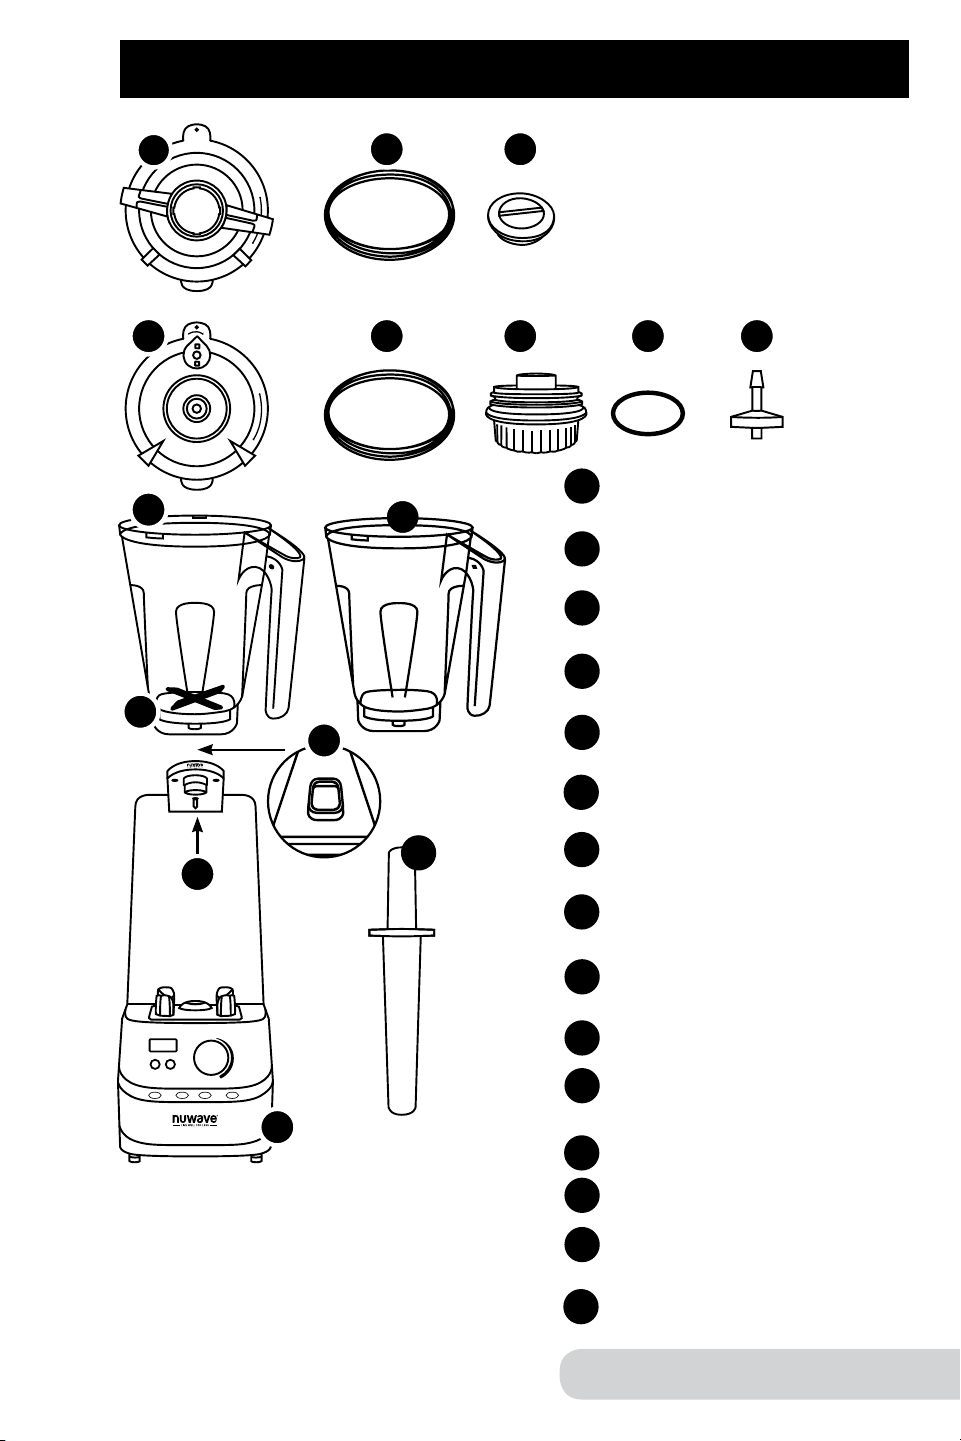
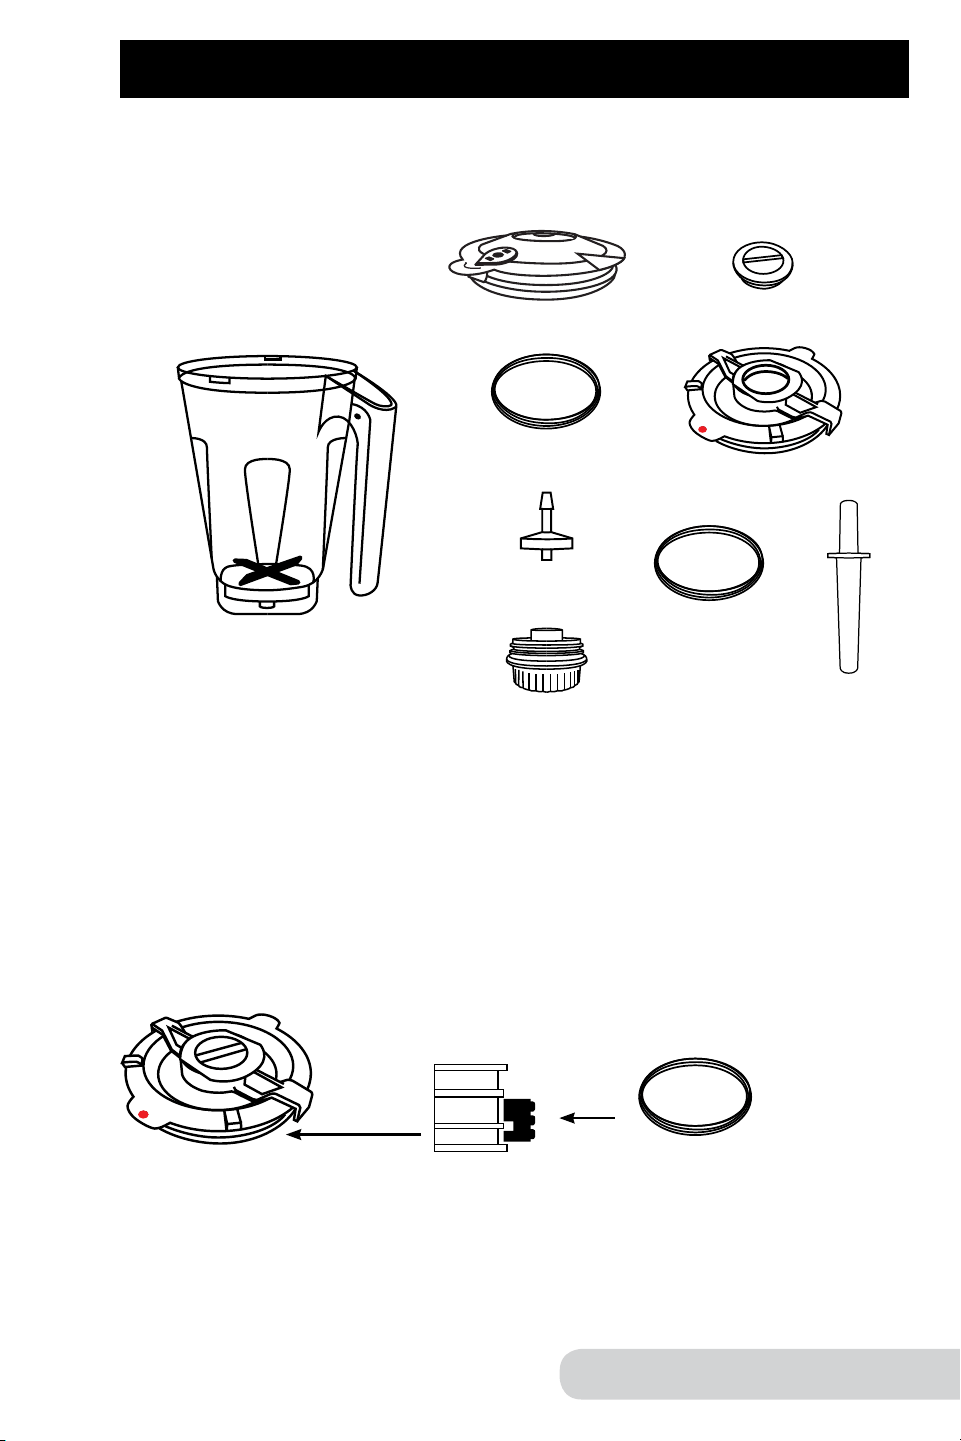
PARTS DESCRIPTION
1
7
9
10
4
Plunger Lid*
Part #: 27413
Plunger Lid Seal Ring
Part #: 27418
Plunger Cap
Part #: 27414
Vacuum Lid**
Part #: 27412
Vacuum Lid Seal Ring
Part #: 27417
Vacuum Cap
Part #: 27415
Vacuum Cap O-Ring
Part#: 27419
Vacuum Plug
Part #: 27420
Jar
Part #: 27422
Blade
Part #: 27423
Storage Jar (Optional)
Part #: 27410
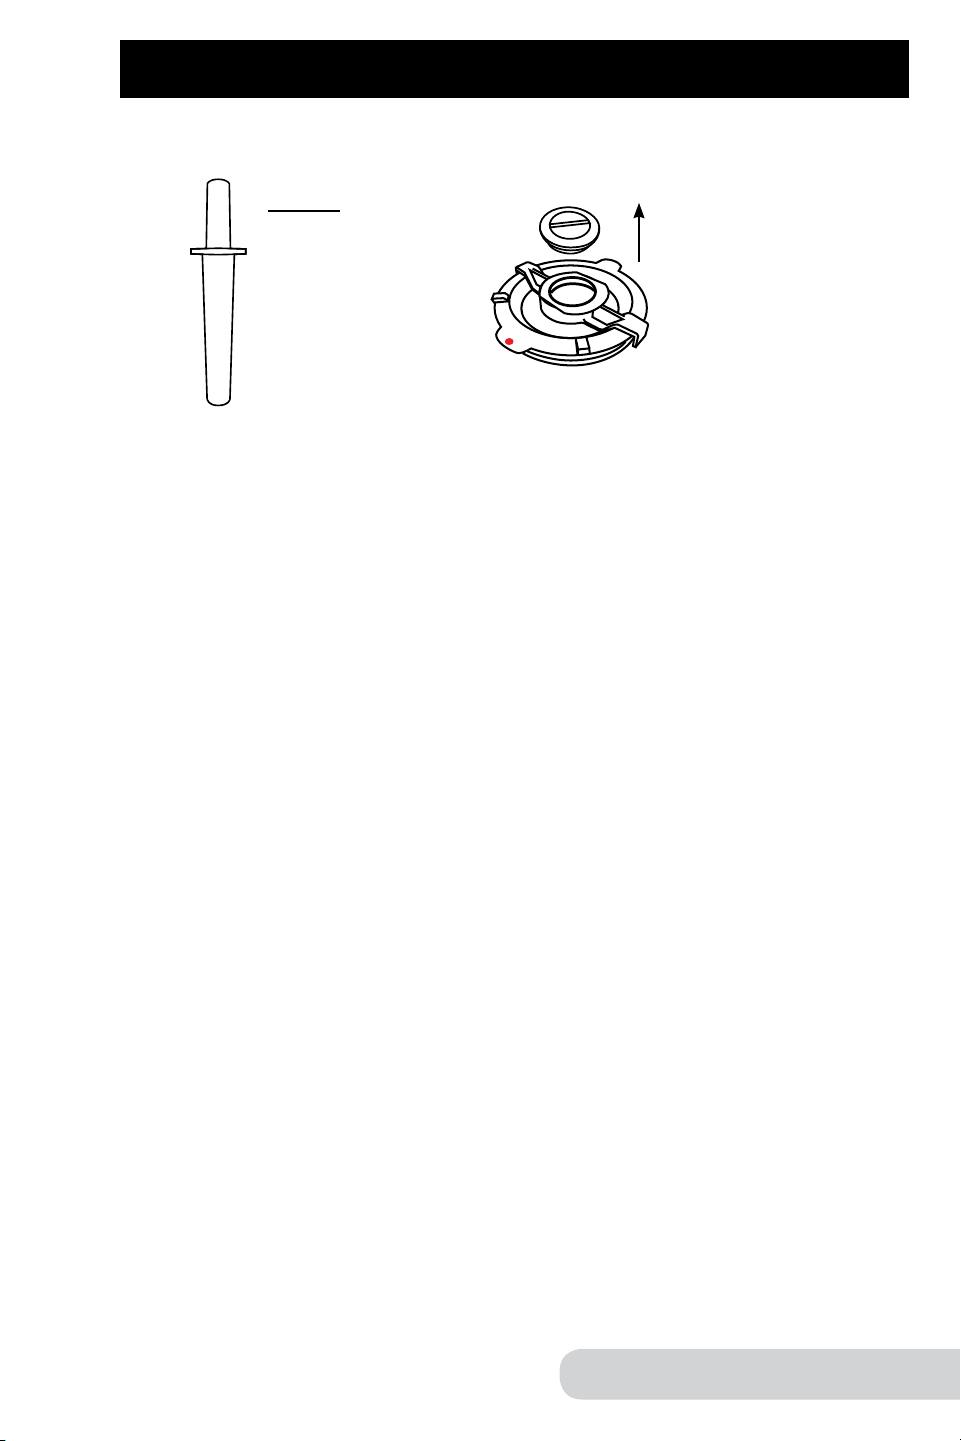
Vacuum Switch
Vacuum Arm
Blender Base
Part #: 27421
Plunger
Part #: 27416
1
2
3
4
5
6a
6b
6c
7
8
9
10
11
12
3
8
6a 6b
Electrical Information
The Moxie Blender is supplied with a short power cord to reduce the
risk of entanglement or tripping. Extension cords may be used if care
is exercised in their use. If an extension cord is used:
1. The marked electrical rating of the extension cord should be at least as
great as the electrical rating of the Moxie Blender.
2. The longer cord should be arranged so that it will not drape over
the countertop or tabletop where it could be pulled on by children or
tripped over unintentionally. The Moxie Blender should be operated
on a separate electrical outlet from other operating appliances due
to wattage limitations. Certain models of the appliances may have a
polarized plug (one blade is wider than the other). To reduce the risk
of an electric shock, this plug is intended to fit into a polarized outlet
one way. If the plug does not fit fully into the outlet, reverse the plug.
If the plug still does not fit properly, contact a qualified electrician.
Do not attempt to modify the plug in any way.
2
11
6c
5
12
SEE CARE AND MAINTENANCE BEFORE USE
SAVE THESE INSTRUCTIONS:
Read and understand the entire manual before using the Moxie Blender.
1. DO NOT remove blades in any way or attempt to remove for cleaning.
2. Turn power off and unplug Moxie Blender BEFORE touching movable
parts or reaching in with a utensil. Turn power OFF and unplug when Moxie
Blender is unattended.
3. Do not operate blender if abnormal sounds or motion is detected. If a
hard or foreign object comes into contact with blades in Jar, do not serve.
Inspect the Moxie Blender’s blade assembly after each use, and if there
are loose, damaged, or missing parts, contact Customer Service at
1-877-689-2838 or email help@nuwavenow.com.
4. Always use extreme caution when operating and maintaining the Moxie
Blender or any appliance.
WARNING: Never use the Moxie Blender’s blade assembly with loose,
damaged, or missing parts.
NOTICE: THE FAILURE TO FOLLOW ANY OF THE IMPORTANT
SAFEGUARDS, ADDITIONAL SAFEGUARDS, OR THE INSTRUCTIONS
FOR SAFE USE IS A MISUSE OF YOUR MOXIE BLENDER THAT CAN VOID
YOUR WARRANTY AND CREATE THE RISK OF SERIOUS INJURY.
*
Part# 27413 is comprised of the Plunger Lid,
Plunger Lid Seal Ring, and Plunger Cap.
**
Part# 27412 is comprised of the Vacuum
Lid, Vacuum Cap, Vacuum Plug, O-Ring,
and Vacuum Lid Seal Ring.
13
13
8 9
Owner’s ManualOwner’s Manual
Lock
Close
Open
Close
Open
Lock
Close
Open
Close
Open
ADDITIONAL SAFEGUARDS
PARTS DESCRIPTION
1
7
9
10
4
Plunger Lid*
Part #: 27413
Plunger Lid Seal Ring
Part #: 27418
Plunger Cap
Part #: 27414
Vacuum Lid**
Part #: 27412
Vacuum Lid Seal Ring
Part #: 27417
Vacuum Cap
Part #: 27415
Vacuum Cap O-Ring
Part#: 27419
Vacuum Plug
Part #: 27420
Jar
Part #: 27422
Blade
Part #: 27423
Storage Jar (Optional)
Part #: 27410
Vacuum Switch
Vacuum Arm
Blender Base
Part #: 27421
Plunger
Part #: 27416
1
2
3
4
5
6a
6b
6c
7
8
9
10
11
12
3
8
6a 6b
Electrical Information
The Moxie Blender is supplied with a short power cord to reduce the
risk of entanglement or tripping. Extension cords may be used if care
is exercised in their use. If an extension cord is used:
1. The marked electrical rating of the extension cord should be at least as
great as the electrical rating of the Moxie Blender.
2. The longer cord should be arranged so that it will not drape over
the countertop or tabletop where it could be pulled on by children or
tripped over unintentionally. The Moxie Blender should be operated
on a separate electrical outlet from other operating appliances due
to wattage limitations. Certain models of the appliances may have a
polarized plug (one blade is wider than the other). To reduce the risk
of an electric shock, this plug is intended to fit into a polarized outlet
one way. If the plug does not fit fully into the outlet, reverse the plug.
If the plug still does not fit properly, contact a qualified electrician.
Do not attempt to modify the plug in any way.
2
11
6c
5
12
SEE CARE AND MAINTENANCE BEFORE USE
SAVE THESE INSTRUCTIONS:
Read and understand the entire manual before using the Moxie Blender.
1. DO NOT remove blades in any way or attempt to remove for cleaning.
2. Turn power off and unplug Moxie Blender BEFORE touching movable
parts or reaching in with a utensil. Turn power OFF and unplug when Moxie
Blender is unattended.
3. Do not operate blender if abnormal sounds or motion is detected. If a
hard or foreign object comes into contact with blades in Jar, do not serve.
Inspect the Moxie Blender’s blade assembly after each use, and if there
are loose, damaged, or missing parts, contact Customer Service at
1-877-689-2838 or email help@nuwavenow.com.
4. Always use extreme caution when operating and maintaining the Moxie
Blender or any appliance.
WARNING: Never use the Moxie Blender’s blade assembly with loose,
damaged, or missing parts.
NOTICE: THE FAILURE TO FOLLOW ANY OF THE IMPORTANT
SAFEGUARDS, ADDITIONAL SAFEGUARDS, OR THE INSTRUCTIONS
FOR SAFE USE IS A MISUSE OF YOUR MOXIE BLENDER THAT CAN VOID
YOUR WARRANTY AND CREATE THE RISK OF SERIOUS INJURY.
*
Part# 27413 is comprised of the Plunger Lid,
Plunger Lid Seal Ring, and Plunger Cap.
**
Part# 27412 is comprised of the Vacuum
Lid, Vacuum Cap, Vacuum Plug, O-Ring,
and Vacuum Lid Seal Ring.
13
13
10 11
Owner’s ManualOwner’s Manual
Lock
Close
Open
Close
Open
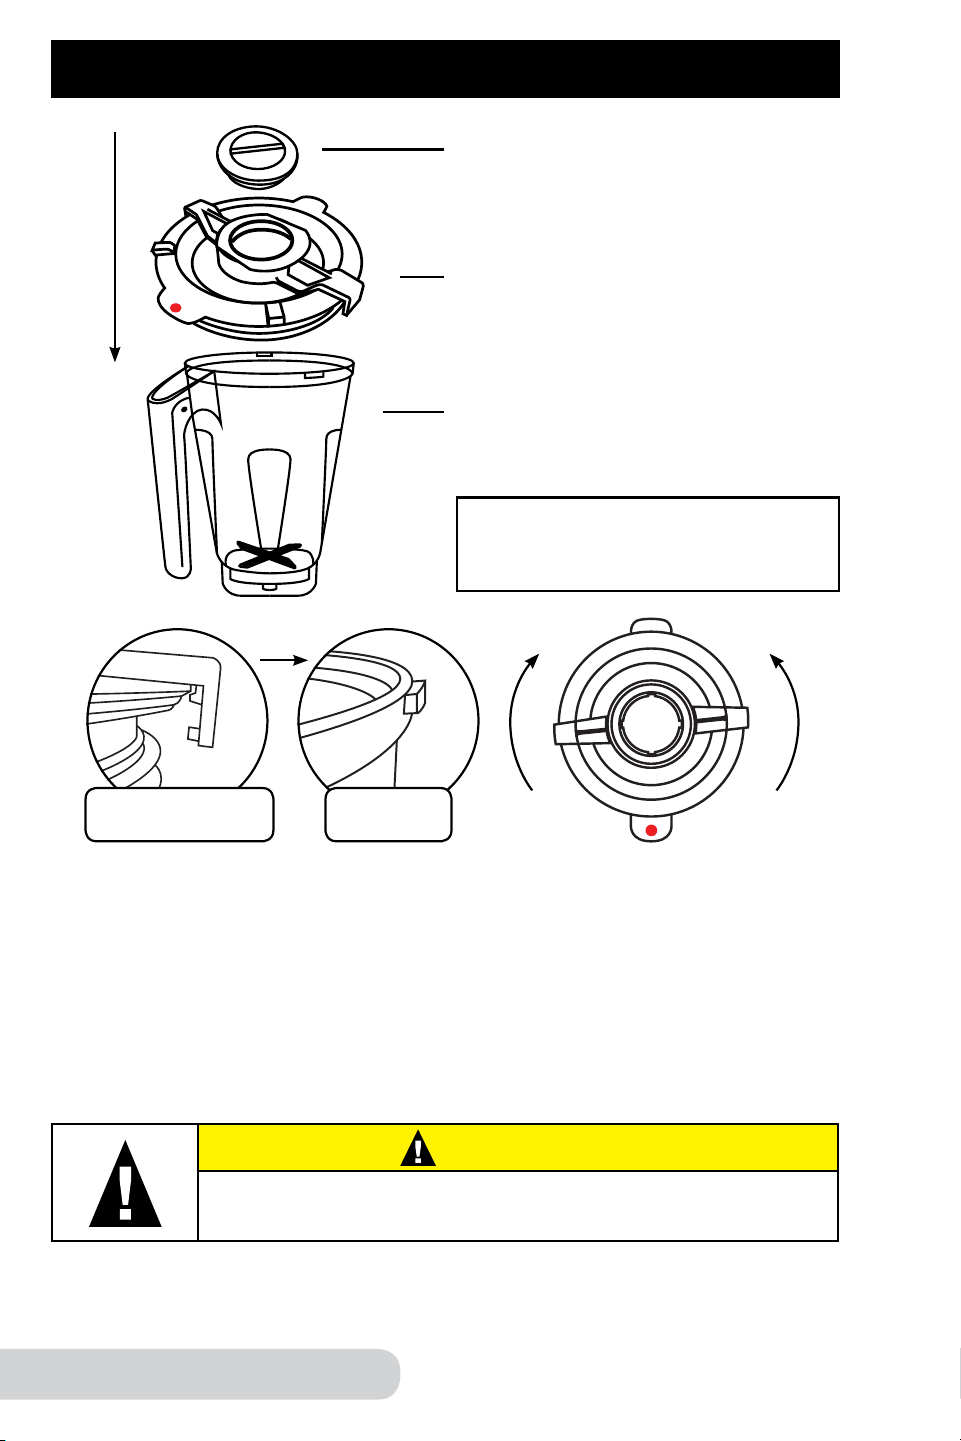
ASSEMBLY GUIDE
Plunger Lid Assembly
1. Line up red dot on Lid with the handle.
2. Push down on the Lid until it sits firmly in place.
3. The Lid Lock has two Lock Hooks that will lock the Lid in place. Make sure
the two Lock Hooks line up with the Jar Tabs.
• Turn the Lid Lock clockwise to close and lock.
• To unlock, turn the Lid Lock counterclockwise.
Jar Tabs
(1 on each side)
Lid Lock Hooks
(1 on each side)
UnlockLock
ASSEMBLY GUIDE (Continued)
Plunger Cap
Lock
Close
Open
Close
Open
Lock
Close
Open
Close
Open
Plunger Lid
Jar
Plunger Lid with the Plunger Cap
is used when adding additional
ingredients while blending.
CAUTION
Make sure all parts are securely attached.
WARNING: As with most electrical appliances, electrical parts are live even
when the Moxie Blender is off. Be sure the unit is unplugged when assembling.
Plunger
When using the Plunger
Remove the Plunger Cap from the Plunger Lid before inserting the Plunger.
The Plunger Lid is designed with the hole opening so that the Plunger does not
come into contact with blades.
When not using Plunger, place Plunger Cap in Plunger Lid by pressing down.
Lock
Close
Open
Close
Open
10 11
Owner’s ManualOwner’s Manual
Lock
Close
Open
Close
Open
ASSEMBLY GUIDE
Plunger Lid Assembly
1. Line up red dot on Lid with the handle.
2. Push down on the Lid until it sits firmly in place.
3. The Lid Lock has two Lock Hooks that will lock the Lid in place. Make sure
the two Lock Hooks line up with the Jar Tabs.
• Turn the Lid Lock clockwise to close and lock.
• To unlock, turn the Lid Lock counterclockwise.
Jar Tabs
(1 on each side)
Lid Lock Hooks
(1 on each side)
UnlockLock
ASSEMBLY GUIDE (Continued)
Plunger Cap
Lock
Close
Open
Close
Open
Lock
Close
Open
Close
Open
Plunger Lid
Jar
Plunger Lid with the Plunger Cap
is used when adding additional
ingredients while blending.
CAUTION
Make sure all parts are securely attached.
WARNING: As with most electrical appliances, electrical parts are live even
when the Moxie Blender is off. Be sure the unit is unplugged when assembling.
Plunger
When using the Plunger
Remove the Plunger Cap from the Plunger Lid before inserting the Plunger.
The Plunger Lid is designed with the hole opening so that the Plunger does not
come into contact with blades.
When not using Plunger, place Plunger Cap in Plunger Lid by pressing down.
Lock
Close
Open
Close
Open
12 13
Owner’s ManualOwner’s Manual
ASSEMBLY GUIDE (Continued)
Lock
Close
Open
Close
Open
Vacuum Lid Assembly
1. Underneath Vacuum Lid, make sure the Vacuum Plug is in place and
screw Vacuum Cap up into Vacuum Lid clockwise until tight.
2. Line up red dot (located on top of Lid) with the handle.
3. Push down on the Lid until it sits firmly in place.
• Make sure to turn the Release Valve to the Lock position before using
vacuum function.
• Vacuum Lid will NOT open when in Lock position.
Vacuum Arm
Switch
Jar Assembly with the Vacuum Lid
1. Lift the Vacuum Arm up.
2. Place the Jar on Base by aligning it on top of the 4 Rubber Columns.
3. The Vacuum Cap needs to be screwed tightly into place prior to use.
4. Push the Vacuum Arm down and press on Lid until a connection is made and
a “click” is heard.
5. Make sure the Release Valve is in Lock position before vacuuming.
• Before removing Vacuum Lid, turn the Release Valve to open position.
ASSEMBLY GUIDE (Continued)
Vacuum Cap
Vacuum Plug
Use Vacuum Lid when vacuum blending only.
Vacuum Lid
Jar
Release Valve
Lock
Lock
Close
Open
Close
Open
4 Rubber Columns
CAUTION
Make sure all parts are securely attached.
14 15
Owner’s ManualOwner’s Manual
OPERATING INSTRUCTIONS
OPERATING INSTRUCTIONS (Continued)
ON OFF
Power Button ON/OFF
1. Turn the red main Base Power Switch ON. Switch is located
on the right side of Blender Base.
• The “Power” button will flash.
2. Press “Power” button once to turn the unit on. The LCD
display will show the default time for the selected setting.
3. Press “Power” button again to turn the unit off.
Start/Stop
1. Turn the dial to choose the appropriate blending function.
2. Press “Start/Stop” to start blending.
3. Press “Start/Stop” again to stop blending.
Time Setting
Press the up and down arrows to increase or decrease the
time on the display.
• Times are displayed in minutes and seconds.
• This can be done on all settings except vacuum only.
Example:
Press “Power Button”. Turn dial to “Ice”. “0:15” (15 seconds)
will be displayed. Press up and down arrows to adjust the time.
Press “Start/Stop”.
Numbered Settings
For standard blending, select from one of the numbered settings
between 1 and 10.
1. Turn the dial to your desired setting between 1 and 10. When in
Vacuum, default will be set to “2:00”.
2. Adjust the time if desired
1
, then press “Start/Stop” to begin
blending at your selected setting.
3. Adjust the number setting using the dial at any point while
blending, if needed.
• The lowest setting is #1 (5,000 RPM). The highest setting is
#10 (27,000 RPM).
Vacuum
By vacuuming the air out of the blender, you can ensure no air is being
mixed with your ingredients during the blending process, maximizing
the nutritional value and ensuring your blender creations will remain
fresher longer.
Follow these steps to take advantage of the unit’s vacuum
capabilities BEFORE blending:
1. Turn the unit on (press red switch on the side of Base. Then press
“Power” button).
2. Select your desired setting using the dial.
3. Press “Vacuum ON/OFF”. The button will be lit blue.
4. Press “Start/Stop”. The display will flash default time for selected setting.
• Unit will remove all air from Jar.
• Once all air has been removed, unit will automatically
start blending.
Example:
1. Turn dial to Frozen. “0:35” seconds will be displayed.
2. Press “Vacuum On/Off”. The button will be lit blue.
3. Press “Start/Stop”. Once all air has been removed, the blender will
start blending.
Vacuum Only
Follow these steps to take advantage of the unit’s vacuum capabilities
AFTER blending:
1. Turn the dial to “Vacuum Only”. “0:00” will be shown on the LCD display.
2. Press “Start/Stop”. The unit will vacuum excess air from the blender, then
automatically power off. The display will show “0:00”.
1 If blending for more than 3 minutes, use Plunger Lid.
16 17
Owner’s ManualOwner’s Manual
OPERATING INSTRUCTIONS (Continued)
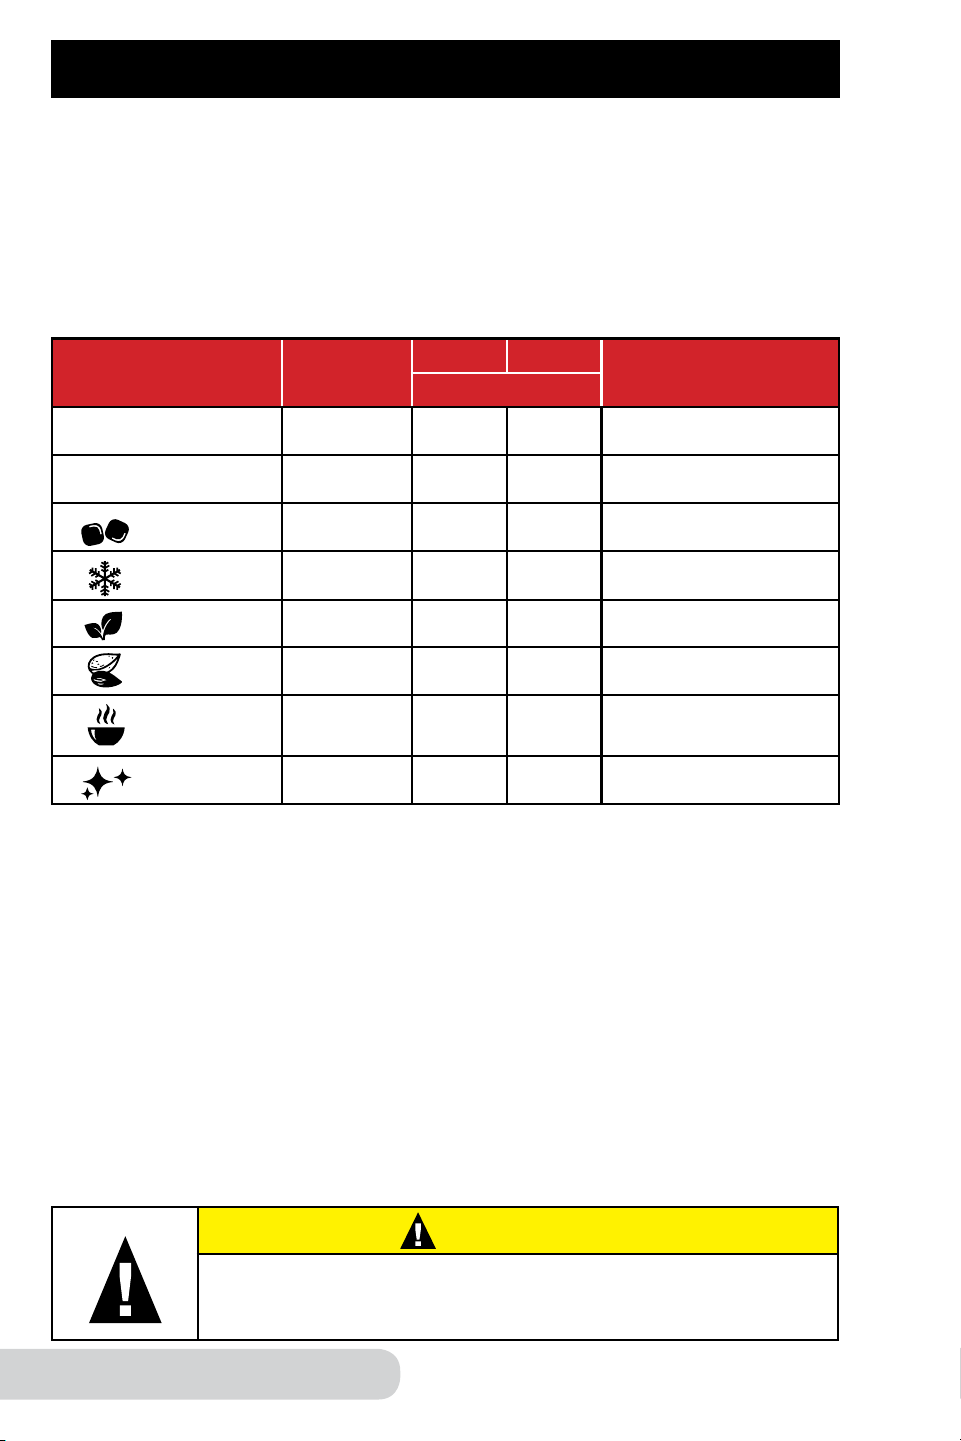
Icon
Default
Min. : Sec.
Min. Max.
Notes
Min. : Sec.
1-10 (With Vacuum)* 2:00 0:05 3:00 Adjustable speed
1-10 (Without Vacuum) 3:00 0:05 5:00 Adjustable speed
Ice 0:15 0:05 2:00 Smoothie and sorbet
Frozen 0:35 0:05 2:00 Ice-based drinks
Fresh 0:30 0:05 2:00 Sauces
Nuts 1:30 0:05 2:00 Jam and spread
Soup 3:00 0:05 5:00
Soup and hot
chocolate
Clean** 0:15 0:05 2:00 Self-cleaning
CARE & MAINTENANCE
Removal of Lid Seal Ring may be necessary for cleaning or if the part
is worn, damaged, or needs replacing. To assemble:
1. Line the inside of the Lid Seal Ring into the rim.
2. Press the Seal Ring into the rim to ensure it is properly sealed.
3. Make sure the lower part of the Seal Ring lines up with the bottom side
of the rim.
Lock
Close
Open
Close
Open
Seal Ring
Plunger and
Vacuum Lid Rim
Lock
Close
Open
Close
Open
Lock
Close
Open
Close
Open
Icon Setting
For more specialized blending tasks, select one of the preset icons with
the dial. Each icon setting has a default time and RPM built into the unit.
1. Turn the dial to your desired icon setting. The LCD display will show the
default time.
2. Adjust the time, if needed, then press “Start/Stop” to begin blending at your
selected setting.
• If desired, increase or decrease time at any point while blending.
*Note:
• When blending for a long period of time, steam may escape from Plunger Cap.
• Always start with cold liquids when blending. DO NOT add hot liquids to
the blender.
• Do not fill Jar above 3/4 capacity. For best results, do not fill more than 1.5
liters (51 fl oz) of liquid.
**Tips for Cleaning:
• Add water and 1-2 drops of liquid dish soap to the Jar, place on the Base, and
close the Lid.
• Turn the dial to “Clean”. “0:15” will be shown on the LCD display. Adjust the
time if desired, then press “Start/Stop”.
• Once finished, remove the Jar, rinse thoroughly, and dry before using.
For detailed instructions on cleaning, see “Care and Maintenance.”
Before First Use:
Wash all removable parts in warm, soapy water or in the dishwasher, top rack
only. The Jar can be washed using the “Clean” function. See “Operating
Instructions” for details.
Lock
Close
Open
Close
Open
Lock
Close
Open
Close
Open
Lock
Close
Open
Close
Open
Pull down and remove the Vacuum Plug if cleaning is necessary. After part is
cleaned and dried, push the Vacuum Plug firmly back into place. Remember to
reattach Vacuum Cap before use.
Residue and moisture may build up inside Vacuum Cap and on Vacuum Plug.
Clean and dry thoroughly after each use.
Unscrew the Vacuum Cap counterclockwise, and hand-wash or clean in
dishwasher, top rack only. Make sure that the Vacuum Cap is screwed tightly
into place prior to use.
Jar
Vacuum Lid
Seal Ring
Vacuum Plug
Vacuum Cap
Plunger Cap
Plunger Lid
Seal Ring
Plunger
CAUTION
Moving parts may become hot with extended use.
DO NOT TOUCH.
16 17
Owner’s ManualOwner’s Manual
OPERATING INSTRUCTIONS (Continued)
Icon
Default
Min. : Sec.
Min. Max.
Notes
Min. : Sec.
1-10 (With Vacuum)* 2:00 0:05 3:00 Adjustable speed
1-10 (Without Vacuum) 3:00 0:05 5:00 Adjustable speed
Ice 0:15 0:05 2:00 Smoothie and sorbet
Frozen 0:35 0:05 2:00 Ice-based drinks
Fresh 0:30 0:05 2:00 Sauces
Nuts 1:30 0:05 2:00 Jam and spread
Soup 3:00 0:05 5:00
Soup and hot
chocolate
Clean** 0:15 0:05 2:00 Self-cleaning
CARE & MAINTENANCE
Removal of Lid Seal Ring may be necessary for cleaning or if the part
is worn, damaged, or needs replacing. To assemble:
1. Line the inside of the Lid Seal Ring into the rim.
2. Press the Seal Ring into the rim to ensure it is properly sealed.
3. Make sure the lower part of the Seal Ring lines up with the bottom side
of the rim.
Lock
Close
Open
Close
Open
Seal Ring
Plunger and
Vacuum Lid Rim
Lock
Close
Open
Close
Open
Lock
Close
Open
Close
Open
Icon Setting
For more specialized blending tasks, select one of the preset icons with
the dial. Each icon setting has a default time and RPM built into the unit.
1. Turn the dial to your desired icon setting. The LCD display will show the
default time.
2. Adjust the time, if needed, then press “Start/Stop” to begin blending at your
selected setting.
• If desired, increase or decrease time at any point while blending.
*Note:
• When blending for a long period of time, steam may escape from Plunger Cap.
• Always start with cold liquids when blending. DO NOT add hot liquids to
the blender.
• Do not fill Jar above 3/4 capacity. For best results, do not fill more than 1.5
liters (51 fl oz) of liquid.
**Tips for Cleaning:
• Add water and 1-2 drops of liquid dish soap to the Jar, place on the Base, and
close the Lid.
• Turn the dial to “Clean”. “0:15” will be shown on the LCD display. Adjust the
time if desired, then press “Start/Stop”.
• Once finished, remove the Jar, rinse thoroughly, and dry before using.
For detailed instructions on cleaning, see “Care and Maintenance.”
Before First Use:
Wash all removable parts in warm, soapy water or in the dishwasher, top rack
only. The Jar can be washed using the “Clean” function. See “Operating
Instructions” for details.
Lock
Close
Open
Close
Open
Lock
Close
Open
Close
Open
Lock
Close
Open
Close
Open
Pull down and remove the Vacuum Plug if cleaning is necessary. After part is
cleaned and dried, push the Vacuum Plug firmly back into place. Remember to
reattach Vacuum Cap before use.
Residue and moisture may build up inside Vacuum Cap and on Vacuum Plug.
Clean and dry thoroughly after each use.
Unscrew the Vacuum Cap counterclockwise, and hand-wash or clean in
dishwasher, top rack only. Make sure that the Vacuum Cap is screwed tightly
into place prior to use.
Jar
Vacuum Lid
Seal Ring
Vacuum Plug
Vacuum Cap
Plunger Cap
Plunger Lid
Seal Ring
Plunger
CAUTION
Moving parts may become hot with extended use.
DO NOT TOUCH.

18 19
Owner’s ManualOwner’s Manual
CARE & MAINTENANCE (Continued)
Problem Solution(s):
Unit does not turn on:
1. Plug may not be in the outlet. Plug in unit.
2. Red Power Switch on right side of Base may not
be on. Check to see if Power Switch is on.
Blender does not
work when plugged
in and Power button
and Power Switch
are both ON:
1. Lid is not on Jar properly. Line up red dot on top
of Lid with the Jar’s handle and press Lid down
firmly to secure onto Jar.
2. Vacuum Lid may not be properly locked. Line up
Lid Lock Hooks with Jar Tabs and lock onto Jar.
Blender is not
running at a high
enough speed for
your recipe:
1. Dial is not on the correct setting. Turn the dial to
proper setting based on recipe.
2. Jar is overloaded. Reduce amount of ingredients.
Blender is not
vacuuming out air
from Jar:
1. “Vacuum ON/OFF” is not on. Press “Vacuum ON/
OFF” before blending.
2. Dial is not on correct setting. Turn the dial to
“Vacuum Only”.
3. Release Valve on Lid is in the open position. Turn
Release Valve to “Lock”.
4. Seal Ring may be loose, installed incorrectly, or
broken. Reinstall Seal Ring properly. See Lid Seal
Ring assembly under Care and Maintenance.
If Lid Seal Ring is broken, contact Customer
Service: 1-877-689-2838 or email
help@nuwavenow.com.
5. Vacuum Lid is not on Jar securely. Line up red dot
on Lid with the Jar’s handle and press Vacuum Lid
down firmly onto Jar.
6. May be using the Plunger Lid. Make sure to use
the Vacuum Lid.
7. Vacuum Arm did not secure onto Lid correctly.
Lower Vacuum Arm onto Vacuum Lid and press
down until a “click” is heard.
Vacuum Lid will
not open after air is
vacuumed out:
Release Valve on Vacuum Lid is in “Lock” position.
Turn Release Valve to the open position to open Lid.
TROUBLESHOOTING
Do not immerse the Moxie Base in water. Clean with
a damp sponge or cloth and wipe dry.
CAUTION
The power cord needs to be unplugged from the power
source before inserting or removing any attachments and
before cleaning.
The Moxie Blender was engineered with an automatic shut-off feature to prevent
overheating during use. If the blender shuts off to cool itself down, an odor may
be detected. Unplug the unit and wait for it to completely cool down. To prevent
overheating, do not process at higher or lower speeds not recommended.

20 21
Owner’s ManualOwner’s Manual
Problem Solution(s):
Blender becomes
clogged and not
operating efficiently:
1. Certain ingredients can cause clogging. If using
Plunger Lid, remove Plunger Cap from Lid and insert
Plunger through hole. Press ingredients down and
around until mixture loosens around bottom of Jar.
If using Vacuum Lid, unlock Release Valve, remove
Lid, and then use Plunger to scrape mixture around to
free ingredients.
2. Ingredient amounts higher than specified are being used.
Do not fill Jar above ¾ capacity (1.5 liters, 51 fl oz).
3. Large pieces of ice are not mixing properly. Use smaller
pieces of ice.
Blended mixture has
lumps or texture is
not even:
Air pocket has formed (cavitation) and mixture is
too cold or has solidified in areas, and blades are
spinning in cavity. Increase temperature by reducing
ice in recipe.
Noises or motions
unusual for
normal operation
of the blender are
detected:
1. Blade assembly may be loose, missing a part,
or possibly damaged. Turn blender OFF and
unplug immediately. DO NOT disassemble blade
assembly. Call Customer Service: 1-877-689-2838
or email help@nuwavenow.com.
2. Foreign objects from ingredients may have been
put into Jar and are making unusual sounds.
Prior to adding ingredients to Jar and blending,
clean fruits/other ingredients and remove all
debris or any objects.
TROUBLESHOOTING (Continued)
LIMITED WARRANTY
The NuWave Moxie
®
Digital Vacuum Blender
THE MANUFACTURER WARRANTS
The NuWave Moxie Digital Vacuum Blender, including the Blender Base, Jar,
Plunger Lid, Plunger Cap, Plunger Lid Seal Ring, Vacuum Lid, Vacuum Lid
Seal Ring, Vacuum Cap, Vacuum O-Ring, Vacuum Plug, Storage Jar, and
Plunger are to be free from manufacturer defects. All electrical components are
warrantied for 5 years from the date of purchase, under normal household use,
and when operated in accordance with the Manufacturer’s written instructions.
The Manufacturer will provide the necessary parts and labor to repair any
part of the NuWave Moxie Digital Vacuum Blender at NuWave, LLC Service
Department. After the expiration of the warranty, the cost of the labor and parts
will be the responsibility of the owner.
THE WARRANTY DOES NOT COVER
The Limited Warranty is voided if repairs are made by an unauthorized dealer
and/or the serial number data plate is removed and/or defaced. Normal
deterioration of finish due to use or exposure is not covered by this Warranty.
This Limited Warranty does not cover failure, damages or inadequate
performance due to accident, acts of God (such as lightning), fluctuations in
electric power, alterations, abuse, misuse, misapplications, corrosive-type
atmospheres, improper installation, failure to operate in accordance with
the Manufacturer’s written instructions, abnormal use or commercial use.
NuWave, LLC reserves the right to void the Limited Warranty, where allowable
by law, for products purchased from an unauthorized dealer.
TO OBTAIN SERVICE
The owner shall have the obligation and responsibility to: pay for all services
and parts not covered by the warranty; prepay the freight to and from Service
Department for any part or system returned under this warranty; and carefully
package the product using adequate padding material to prevent damage in
transit. The original container is ideal for this purpose. Include in the package
the owner’s name, address, daytime telephone number, a detailed description
of the problem, and your “RGA number.” Call 1-877-689-2838 or email
help@nuwavenow.com to obtain the RGA number (Return Goods
Authorization number). Provide the cooking system model & serial number
and proof of date of purchase (a copy of the receipt) when making claims
under this warranty.
MANUFACTURER’S OBLIGATION
The Manufacturer’s obligation under this Limited Warranty is limited, to the
extent allowable by law, to repairing or replacing any part covered by this
Limited Warranty which upon examination is found to be defective under
normal use. The Limited Warranty is applicable only within the continental
United States and only to the original purchaser of the manufacturer’s
authorized channels of distribution. THE LIMITED WARRANTY MAY NOT BE
ALTERED, VARIED OR EXTENDED EXCEPT BY A WRITTEN INSTRUMENT

23
Recipes
22
Owner’s Manual
LIMITED WARRANTY (Continued)
EXECUTED BY THE MANUFACTURER. THE REMEDY OF REPAIR OR
REPLACEMENT AS PROVIDED UNDER THIS LIMITED WARRANTY IS
EXCLUSIVE. IN NO EVENT SHALL THE MANUFACTURER BE LIABLE
FOR ANY CONSEQUENTIAL OR INCIDENTAL DAMAGES TO ANY
PERSON, WHETHER OR NOT OCCASIONED BY NEGLIGENCE OF THE
MANUFACTURER, INCLUDING WITHOUT LIMITATION, DAMAGES FOR
LOSS OF USE, COSTS OF SUBSTITUTION, PROPERTY DAMAGE, OR
OTHER MONEY LOSS.
Some states do not allow the exclusion or limitation of incidental or
consequential damages, so the above limitation exclusions may not apply.
This Limited Warranty gives specific legal rights, and there may also be other
rights which vary from state to state. EXCEPT AS OTHERWISE EXPRESSLY
PROVIDED ABOVE, THE MANUFACTURER MAKES NO WARRANTIES
EXPRESSED OR IMPLIED ARISING BY LAW OR OTHERWISE, INCLUDING
WITHOUT LIMITATION, THE IMPLIED WARRANTIES OF MERCHANTABILITY
AND FITNESS FOR A PARTICULAR PURPOSE TO ANY OTHER PERSON.
READ YOUR OWNER’S MANUAL. IF YOU STILL HAVE ANY QUESTIONS
ABOUT OPERATION OR WARRANTY OF THE PRODUCT, PLEASE
CONTACT NUWAVE, LLC.
READ YOUR OWNER’S MANUAL
If you still have any questions about operation or warranty of the
product, please contact NuWave, LLC at: 1-877-689-2838 or email
help@nuwavenow.com.
Juices

24 25
RecipesRecipes
Green Emotion
Ingredients:
2 cups fresh kale, well rinsed
2 cups fresh spinach, well rinsed
1 bunch fresh parsley
1 liter purified water
Juice of 1 lemon
Directions:
Add all ingredients to blender, set to 10, and blend for 1-2 minutes.
Lid:
Plunger or Vacuum Lid
Tummy Elixir
Ingredients:
1 (3-ounce) piece fresh unpeeled ginger, rinsed well
1 whole lemon, rinsed well
1 liter purified or spring water
1 sprig fresh mint
2 tablespoons agave nectar
Directions:
1. Place all ingredients in blender, set to 10, and blend for 1-2 minutes.
2. Refrigerate overnight before drinking. Or, use Vacuum Lid and Vacuum
Function to store in Jar for a longer period.
3. Drink it straight or strain to remove the pulp.
Lid:
Plunger or Vacuum Lid
26 27
RecipesRecipes
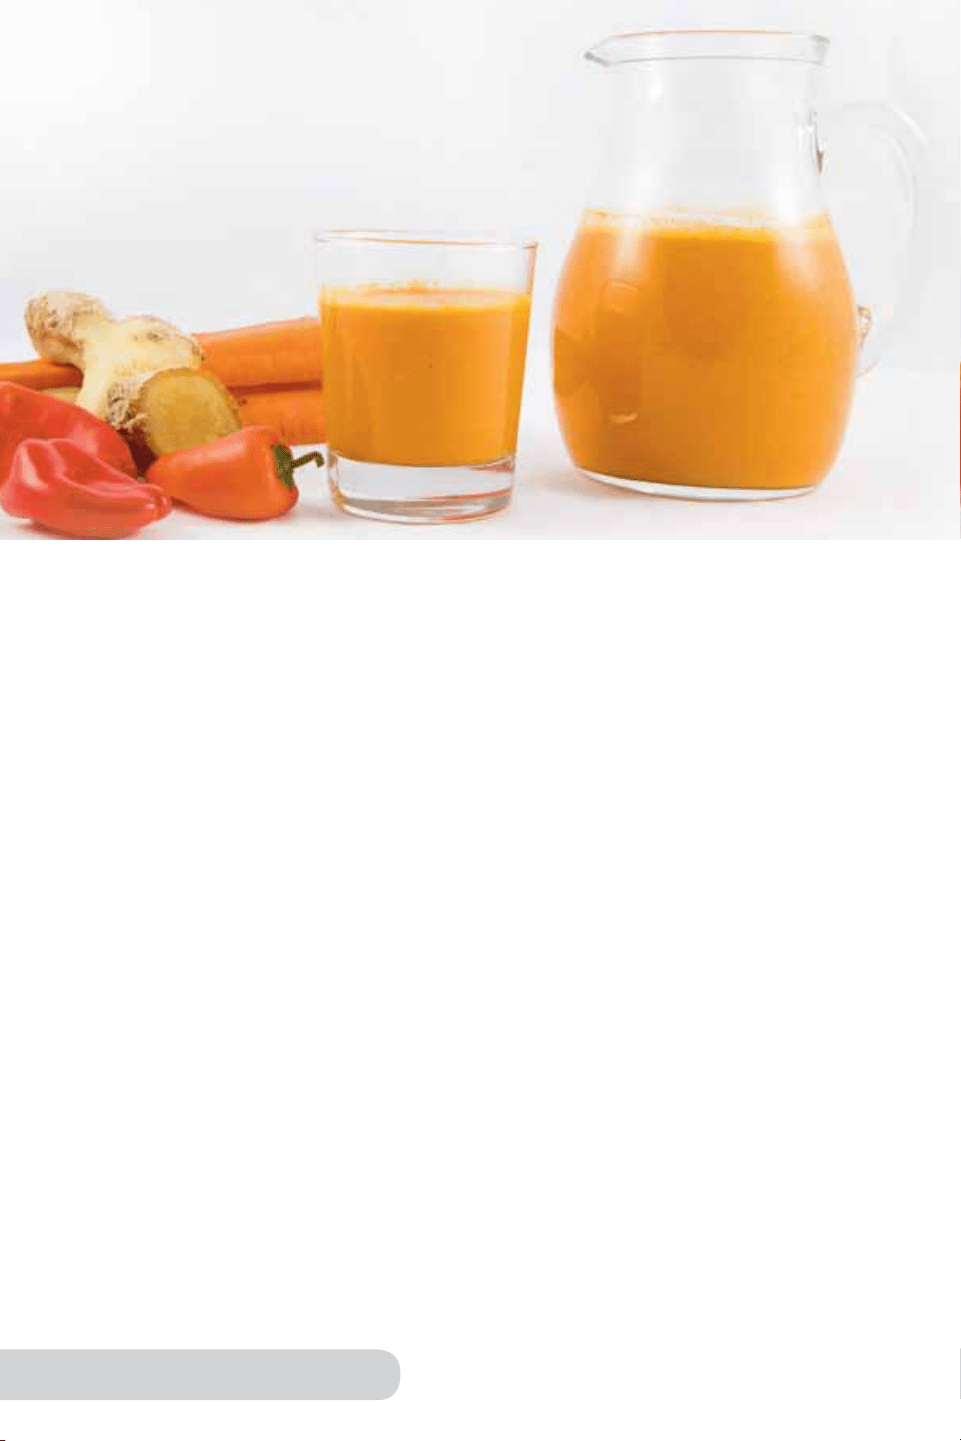
Carrot Ginger Bell Pepper Pick-Me-Up
Ingredients:
3 ounces fresh unpeeled ginger, rinsed well
3 large unpeeled carrots, rinsed well
8 ounces all-natural coconut water
2 red peppers, cored, seeds removed, and well rinsed
Directions:
Add all ingredients to blender, set to 5, and blend for 2 minutes.
Lid:
Plunger or Vacuum Lid
Almond Milk
Ingredients:
1 cup almonds
3 cups distilled water
Directions:
1. Place all ingredients in blender and pulse 5-6 times.
2. Scrape sides of blender with a rubber spatula.
3. Continue to pulse for no longer than 1 minute at a time until milk is smooth.
4. Once ready, strain milk through a fine strainer or jelly bag.
Lid:
Plunger or Vacuum Lid

26 27
RecipesRecipes
Carrot Ginger Bell Pepper Pick-Me-Up
Ingredients:
3 ounces fresh unpeeled ginger, rinsed well
3 large unpeeled carrots, rinsed well
8 ounces all-natural coconut water
2 red peppers, cored, seeds removed, and well rinsed
Directions:
Add all ingredients to blender, set to 5, and blend for 2 minutes.
Lid:
Plunger or Vacuum Lid
Almond Milk
Ingredients:
1 cup almonds
3 cups distilled water
Directions:
1. Place all ingredients in blender and pulse 5-6 times.
2. Scrape sides of blender with a rubber spatula.
3. Continue to pulse for no longer than 1 minute at a time until milk is smooth.
4. Once ready, strain milk through a fine strainer or jelly bag.
Lid:
Plunger or Vacuum Lid

28 29
RecipesRecipes
Carbonara
Ingredients:
½ pound pancetta or high-quality bacon, cut into small cubes
1 small onion, finely chopped
2 cloves freshly peeled garlic
½ cup heavy cream
½ cup milk
2 cups freshly grated Parmesan cheese
2 eggs
1 tablespoon flour
Directions:
1. Add pancetta and onions to a large skillet and fry on medium heat until it
renders all its fat and is crispy, but not burned.
2. Drain the fat from the pancetta and place pancetta in the blender.
3. Add flour, cream, and milk to blender, set to 10, and blend for 5 minutes.
4. Let cream mixture rest in the blender for 5 minutes.
5. Add eggs, set blender to 4, and blend for about 20 seconds.
6. Add cheese and serve over spaghetti.
Lid:
Plunger Lid only
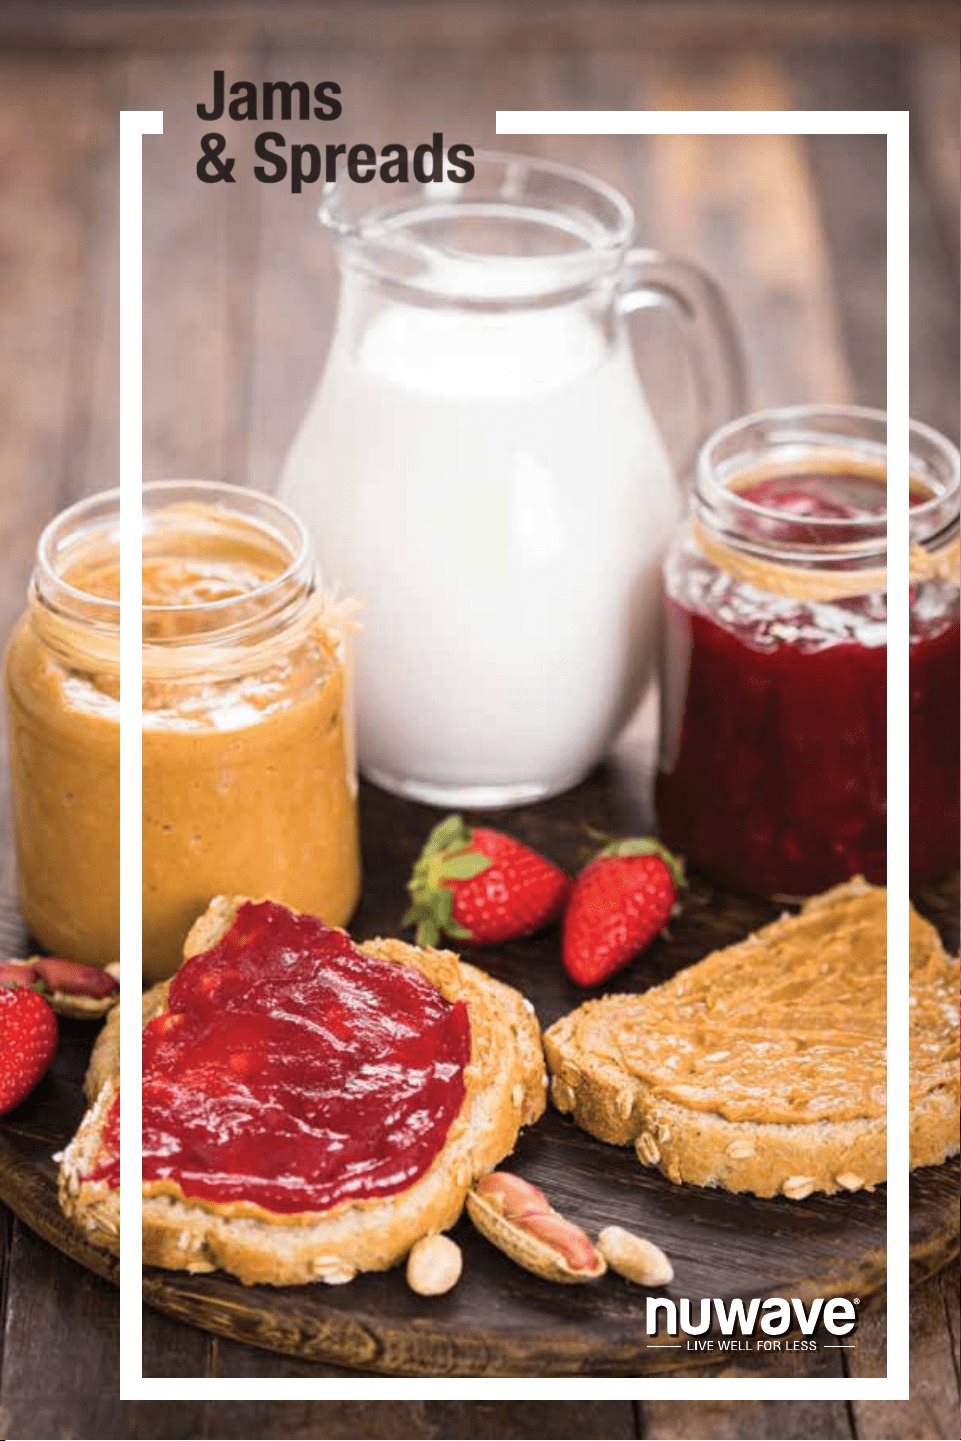
Jams
& Spreads
28 29
RecipesRecipes
Carbonara
Ingredients:
½ pound pancetta or high-quality bacon, cut into small cubes
1 small onion, finely chopped
2 cloves freshly peeled garlic
½ cup heavy cream
½ cup milk
2 cups freshly grated Parmesan cheese
2 eggs
1 tablespoon flour
Directions:
1. Add pancetta and onions to a large skillet and fry on medium heat until it
renders all its fat and is crispy, but not burned.
2. Drain the fat from the pancetta and place pancetta in the blender.
3. Add flour, cream, and milk to blender, set to 10, and blend for 5 minutes.
4. Let cream mixture rest in the blender for 5 minutes.
5. Add eggs, set blender to 4, and blend for about 20 seconds.
6. Add cheese and serve over spaghetti.
Lid:
Plunger Lid only
Jams
& Spreads

30 31
RecipesRecipes
Fig Jam
Ingredients:
1 pound fresh figs, washed, stemmed, and halved
½ cup water
2 tablespoons agave nectar or honey
Sea salt and freshly ground black pepper to taste
1 teaspoon sumac
Juice and zest of 1 lemon
1 tablespoon dark molasses
Directions:
1. In a large nonreactive saucepan, bring water, lemon juice, molasses, and
agave to a boil.
2. Add the gs and simmer over medium heat for about 10 minutes.
3. Add the salt, pepper, and sumac to g mixture.
4. Transfer all ingredients to blender and pulse until smooth.
Lid:
Plunger Lid only
Homemade Hazelnut Spread
Ingredients:
2 cups hazelnuts
10 ounces milk chocolate, chopped
2-3 tablespoons canola oil
2 tablespoons powdered sugar
2 tablespoons dark cocoa powder
½ teaspoon of vanilla extract
Pinch sea salt
Directions:
1. Place the hazelnuts on a cookie sheet and toast in an oven at 400°F
for 8-10 minutes.
2. Once toasted, place hazelnuts in a clean kitchen towel and rub the skins off.
Transfer to the blender.
3. Add all remaining ingredients to blender.
4. Set blender to 10 and blend for about 1 minute or until creamy, scraping
occasionally with a rubber spatula, if necessary.
5. Refrigerate overnight, allowing the spread to firm up.
Lid:
Plunger Lid only

32 33
RecipesRecipes
Nut Butter
Ingredients:
4 cups nuts, shelled, skins removed
½ cup of nut oil
Directions:
1. Add all ingredients to blender.
2. Set blender to 1 and blend, slowly increasing speed until mixture reaches
your desired consistency. Scraping occasionally with a rubber spatula,
if necessary.
Lid:
Plunger Lid only
Tips:
• This recipe can be made with peanuts, hazelnuts, almonds, or cashews. It is
recommended you use the oil from the same type of nut you’re blending.
• The nuts can be either raw or roasted.
Guacamole
Ingredients:
4 fresh ripe avocados
¼ cup freshly squeezed lime juice
1 small shallot or sweet onion
2 cloves garlic
1 teaspoon sea salt
1 bunch fresh cilantro, rinsed, shaken dry
¼ teaspoon cayenne pepper (optional)
1 roasted fresh tomato (optional)
Directions:
1. Add lime juice, shallot, and cilantro to blender. Set blender to 3 and blend
for about 30 seconds.
2. Add avocado and pulse 6-8 times until puree comes together.
3. Add cilantro and roasted tomato. Set blender to 3 and blend for 30 seconds
until a rich, chunky puree comes together. Scrape occasionally with a rubber
spatula, if necessary.
4. Season guacamole with sea salt and a pinch of cayenne pepper.
Lid:
Plunger or Vacuum Lid

34 35
RecipesRecipes
Homemade Mayonnaise
Ingredients:
1 egg yolk
¼ teaspoon Dijon mustard
1 tablespoon lemon juice
¼ teaspoon white vinegar
¼ teaspoon Worcestershire sauce
1 tablespoon hot water
1½ cups canola oil, divided
Sea salt to taste
Tabasco sauce to taste
Directions:
1. Add egg yolk, mustard, lemon juice, vinegar, Worcestershire, warm water,
and ½ cup oil to blender.
2. Set blender to 10 and blend for 1 minute.
3. Slowly add oil while continuing to blend until mixture reaches thickness
of traditional mayonnaise.
4. Season with salt and Tabasco.
5. Refrigerate overnight.
Lid:
Plunger Lid only
Sauces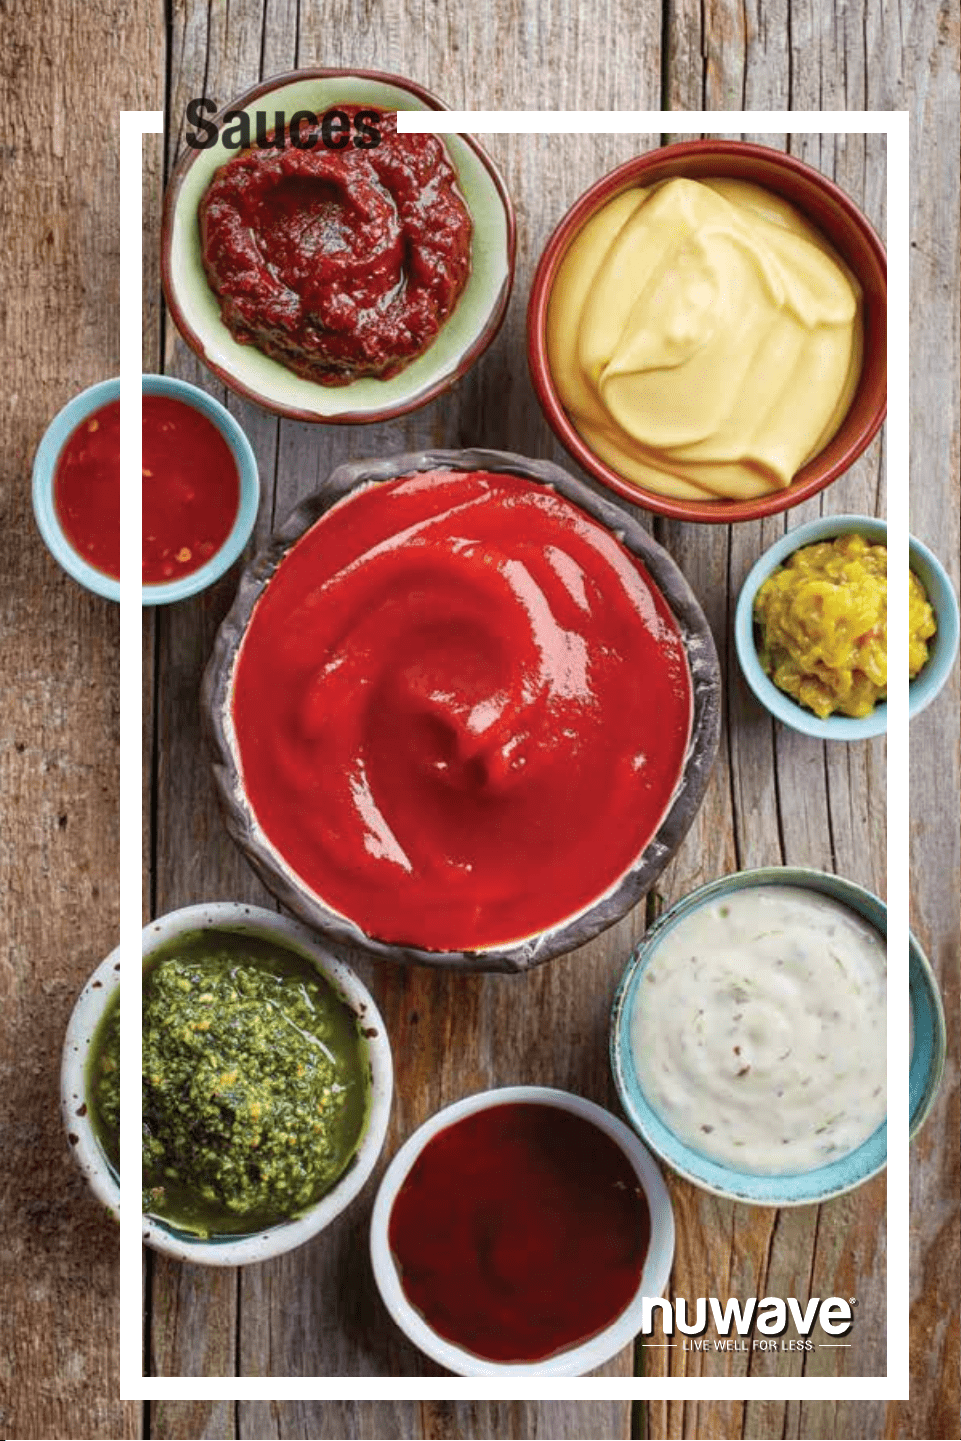

36 37
RecipesRecipes
Apple Sauce
Ingredients:
6 Jonathan or McIntosh apples, quartered, core removed
½ cup sugar or ¼ cup agave
½ teaspoon cinnamon
⅛ teaspoon sea salt
Juice and zest of 1 lemon
1 tablespoon apple cider vinegar (optional)
Directions:
1. Combine sugar, lemon juice, and vinegar in a large pot and bring to a boil
on your stove.
2. Once mixture is clear and sugar has dissolved, add apples to mixture, lower
the heat, and simmer for 1-2 minutes.
3. Transfer mixture to the blender and add cinnamon.
4. Set blender to 10 and blend for 5 minutes. If needed, set blender to 10 and
blend for additional 5 minutes or until desired consistency is reached.
5. Let applesauce cool. Refrigerate until ready to serve.
Lid:
Plunger Lid only
Tip:
If you prefer raw applesauce, simply add all ingredients to the blender and set to
10 for 2-3 minutes.
White Bean Hummus
Ingredients:
16 ounces home-cooked or high-quality canned northern or cannellini beans,
drained, rinsed
Juice and zest from 1 lemon
1 teaspoon chili flakes
2 cloves garlic
1 small bunch Italian parsley, leaves only
Sea salt and freshly ground pepper to taste
½ cup extra-virgin olive oil
Directions:
1. Add lemon juice, garlic, parsley, and olive oil to blender and pulse for
30 seconds.
2. Let garlic mixture sit in blender for 10 minutes to develop avors.
3. Add beans and chili akes to blender, set to 10, and blend for
2 minutes or until smooth, scraping occasionally with a rubber spatula,
if necessary.
4. Season with salt and pepper.
Lid:
Plunger or Vacuum Lid

38 39
RecipesRecipes
Sun-dried Tomato Pesto
Ingredients:
6 fresh plum or Roma tomatoes, washed and cut in half
8 ounces sundried tomatoes
2 cloves fresh garlic
¼ cup pine nuts
1 small onion or medium shallot
1 tablespoon tomato paste
¼ cup dry red wine
1 tablespoon red wine vinegar
¼ cup fresh basil leaves
½ cup extra-virgin olive oil
Sea salt and freshly ground pepper to taste
Directions:
1. Soak sundried tomatoes in the wine for 10 minutes; set aside.
2. Add plum tomatoes, garlic, and onion to blender and pulse 5-6 times.
3. Add red wine-soaked tomatoes and pulse 5-6 times.
4. Add all remaining ingredients, set blender to 10 and blend for 45 seconds,
scraping occasionally with a rubber spatula if necessary.
Lid:
Plunger Lid only
Cranberry Sauce
Ingredients:
2 (12-ounce) bags fresh cranberries
1 cup sugar
2 tablespoons fresh rosemary
Juice and zest of 3 oranges
⅛ teaspoon nutmeg
¼ teaspoon sea salt
Directions:
1. Place all ingredients in blender, set to 10, and blend for 5 minutes.
2. Let the sauce rest for 5 minutes before blending on the same setting for 5
additional minutes.
3. Allow sauce to cool. Refrigerate until ready to serve.
Lid:
Plunger Lid only
40 41
RecipesRecipes
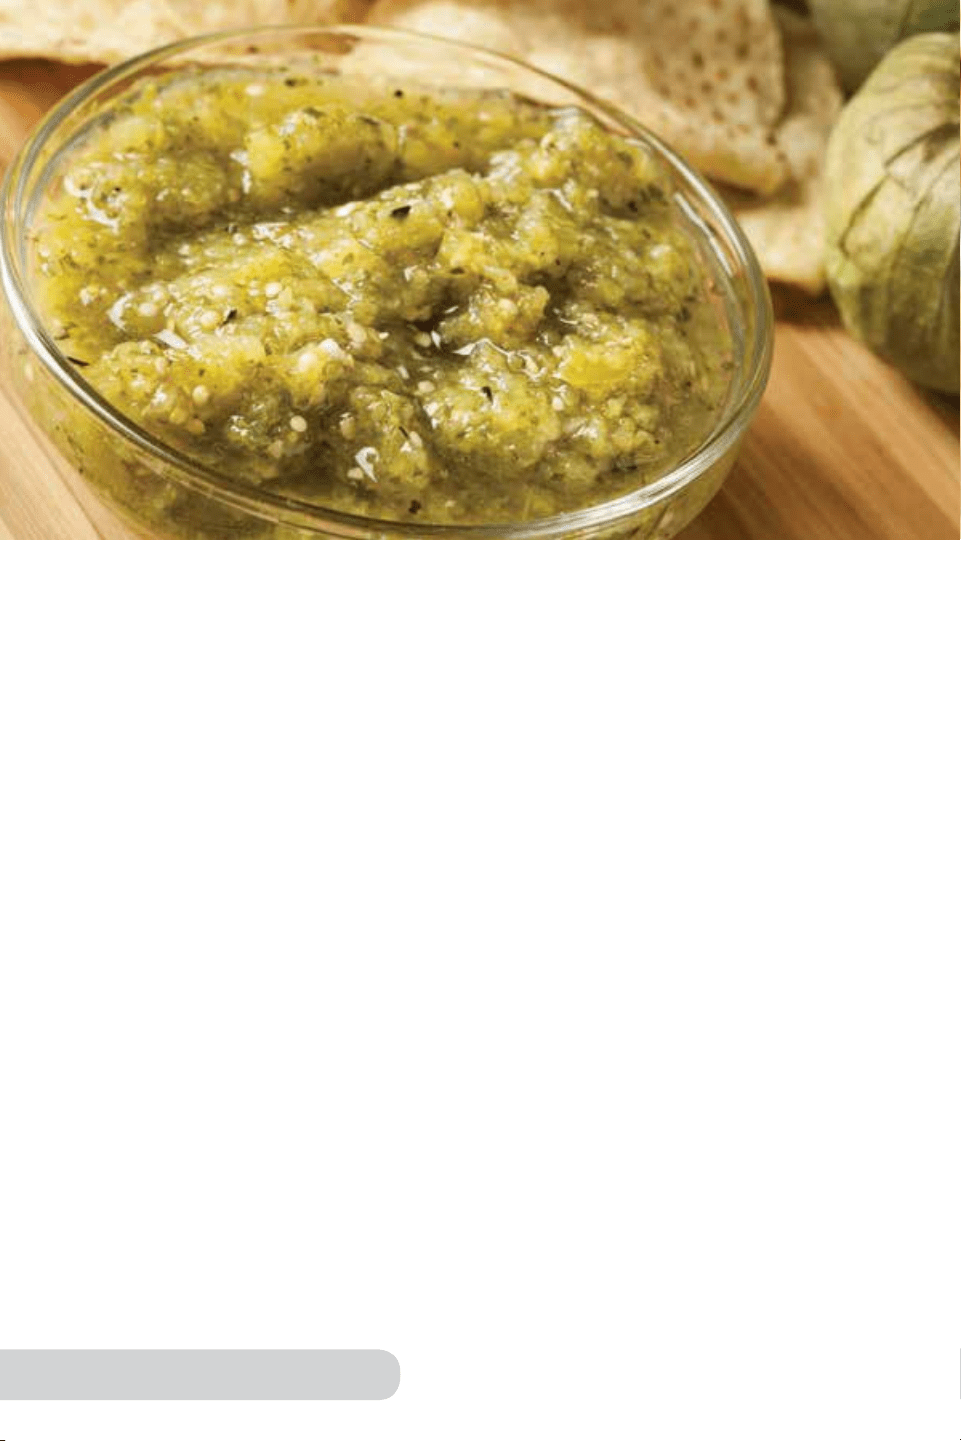
Salsa Verde
Ingredients:
1½ pounds of tomatillos, husked
1 small onion, peeled
2 cloves garlic
2 serrano peppers
1 jalapeño (optional)
1 small bunch cilantro, rinsed, shaken dry
1 tablespoon dried Mexican oregano
1 teaspoon dried cumin
Sea salt to taste
1 teaspoon sumac (optional)
2 cups hot water
1 tablespoon lime juice
1 tablespoon extra-virgin olive oil
Directions:
1. Add tomatillos, onion, garlic, and peppers to blender. Pulse 5-8 times
until chunky to achieve a thicker consistency.
2. Set blender to 10. Blend for 4-5 minutes, adding warm water 1 cup at time,
until completely incorporated.
3. Add sumac, lime juice, olive oil, and salt and pulse 3 times.
4. Add the fresh and dried herbs and pulse 4-5 times.
5. Refrigerate overnight.
Lid:
Plunger Lid only
Tip:
Use as a salsa dip or a sauce for roasted sh or chicken.
Tzatziki Sauce
Ingredients:
16 ounces plain full-fat Greek yogurt
2 English cucumbers, peeled, cut in half and seeds removed
¼ cup extra-virgin olive oil
Juice and zest of 1 fresh lemon
2 tablespoons fresh dill leaves
1 teaspoon dried or fresh mint
3 cloves garlic
1 tablespoon sumac (optional)
Sea salt and freshly ground pepper to taste
Directions:
1. Place cucumbers, garlic, mint, and dill in blender and pulse 3-4 times.
2. Let cucumber mixture sit in blender for 10 minutes to develop avor.
3. Add yogurt and pulse 6-8 times, until sauce is homogenous.
4. Add sea salt, pepper, and sumac and pulse for 5-10 seconds.
5. Serve with lemon zest.
Lid:
Plunger Lid only

40 41
RecipesRecipes
Salsa Verde
Ingredients:
1½ pounds of tomatillos, husked
1 small onion, peeled
2 cloves garlic
2 serrano peppers
1 jalapeño (optional)
1 small bunch cilantro, rinsed, shaken dry
1 tablespoon dried Mexican oregano
1 teaspoon dried cumin
Sea salt to taste
1 teaspoon sumac (optional)
2 cups hot water
1 tablespoon lime juice
1 tablespoon extra-virgin olive oil
Directions:
1. Add tomatillos, onion, garlic, and peppers to blender. Pulse 5-8 times
until chunky to achieve a thicker consistency.
2. Set blender to 10. Blend for 4-5 minutes, adding warm water 1 cup at time,
until completely incorporated.
3. Add sumac, lime juice, olive oil, and salt and pulse 3 times.
4. Add the fresh and dried herbs and pulse 4-5 times.
5. Refrigerate overnight.
Lid:
Plunger Lid only
Tip:
Use as a salsa dip or a sauce for roasted sh or chicken.
Tzatziki Sauce
Ingredients:
16 ounces plain full-fat Greek yogurt
2 English cucumbers, peeled, cut in half and seeds removed
¼ cup extra-virgin olive oil
Juice and zest of 1 fresh lemon
2 tablespoons fresh dill leaves
1 teaspoon dried or fresh mint
3 cloves garlic
1 tablespoon sumac (optional)
Sea salt and freshly ground pepper to taste
Directions:
1. Place cucumbers, garlic, mint, and dill in blender and pulse 3-4 times.
2. Let cucumber mixture sit in blender for 10 minutes to develop avor.
3. Add yogurt and pulse 6-8 times, until sauce is homogenous.
4. Add sea salt, pepper, and sumac and pulse for 5-10 seconds.
5. Serve with lemon zest.
Lid:
Plunger Lid only

42 43
RecipesRecipes
Tuscan Pesto
Ingredients:
1 pound packed basil leaves
2 cups extra-virgin olive oil
½ cup shelled walnuts or pine nuts
3 cloves garlic
Sea salt and freshly ground pepper to taste
1 tablespoon fresh lemon juice
¼ cup freshly grated Pecorino Romano cheese
Directions:
1. Place oil, lemon juice, and garlic into blender. Set blender to 10 and blend
for 1 minute.
2. Let oil mixture rest for 10 minutes to develop avor.
3. Add basil, set to 10, and blend for 1-2 minutes until smooth.
4. Add nuts and cheese and pulse 6-8 times.
5. Refrigerate until ready to serve.
Lid:
Plunger or Vacuum Lid
Thai Peanut Dipping Sauce
Ingredients:
1 small knob fresh ginger, peeled, roughly chopped
1 clove garlic
Juice and zest of 2 limes
1 tablespoon chili flakes
1 tablespoon agave nectar
2 tablespoons shoyu or soy sauce
½ cup of coconut water
Directions:
1. Add ginger, garlic, chili akes, lime juice, and zest to blender.
2. Set to 10 and blend for 1 minute.
3. Let sauce sit in blender for 10 minutes to develop avor.
4. Add soy sauce and peanut butter, set to 5 and blend, adding coconut water
as needed to achieve creamy consistency.
Lid:
Plunger Lid only

44 45
RecipesRecipes
Nacho Cheese Sauce
Ingredients:
2 cups milk
2 tablespoons flour
2 tablespoons melted butter
Sea salt to taste
3 fresh flame-roasted jalapeños
1½ cups shredded sharp cheddar cheese
¼ heavy cream or sour cream
Directions:
1. Mix our and melted butter, milk, and heavy cream together and add to blender.
2. Set blender to 10 and blend for 3 minutes.
3. Lower blender speed to 3 and add jalapeños, shredded cheese and blend
for 3 minutes.
4. Season with salt.
Lid:
Plunger Lid only
Hummus
Ingredients:
3 cups cooked or canned chickpeas
3 garlic cloves, peeled, smashed
½ a cup of extra-virgin olive oil
3 tablespoons tahini paste
4 tablespoons fresh lemon Juice
1 teaspoon sea salt
Freshly ground white pepper to taste
Directions:
1. If necessary, drain cooking liquid from chickpeas.
2. Add chickpeas and all remaining ingredients to blender and pulse for
1 minute.
3. Blend on Soup setting for about 2 minutes, until hummus reaches desired
consistency. Use Plunger as needed.
Lid:
Plunger Lid only
Tip:
If you want to add extra avor to your hummus, add one or more of the following
ingredients: 2 tablespoons yogurt, cayenne pepper, sumac, paprika, ras el
hanout, or your favorite nely chopped herbs.
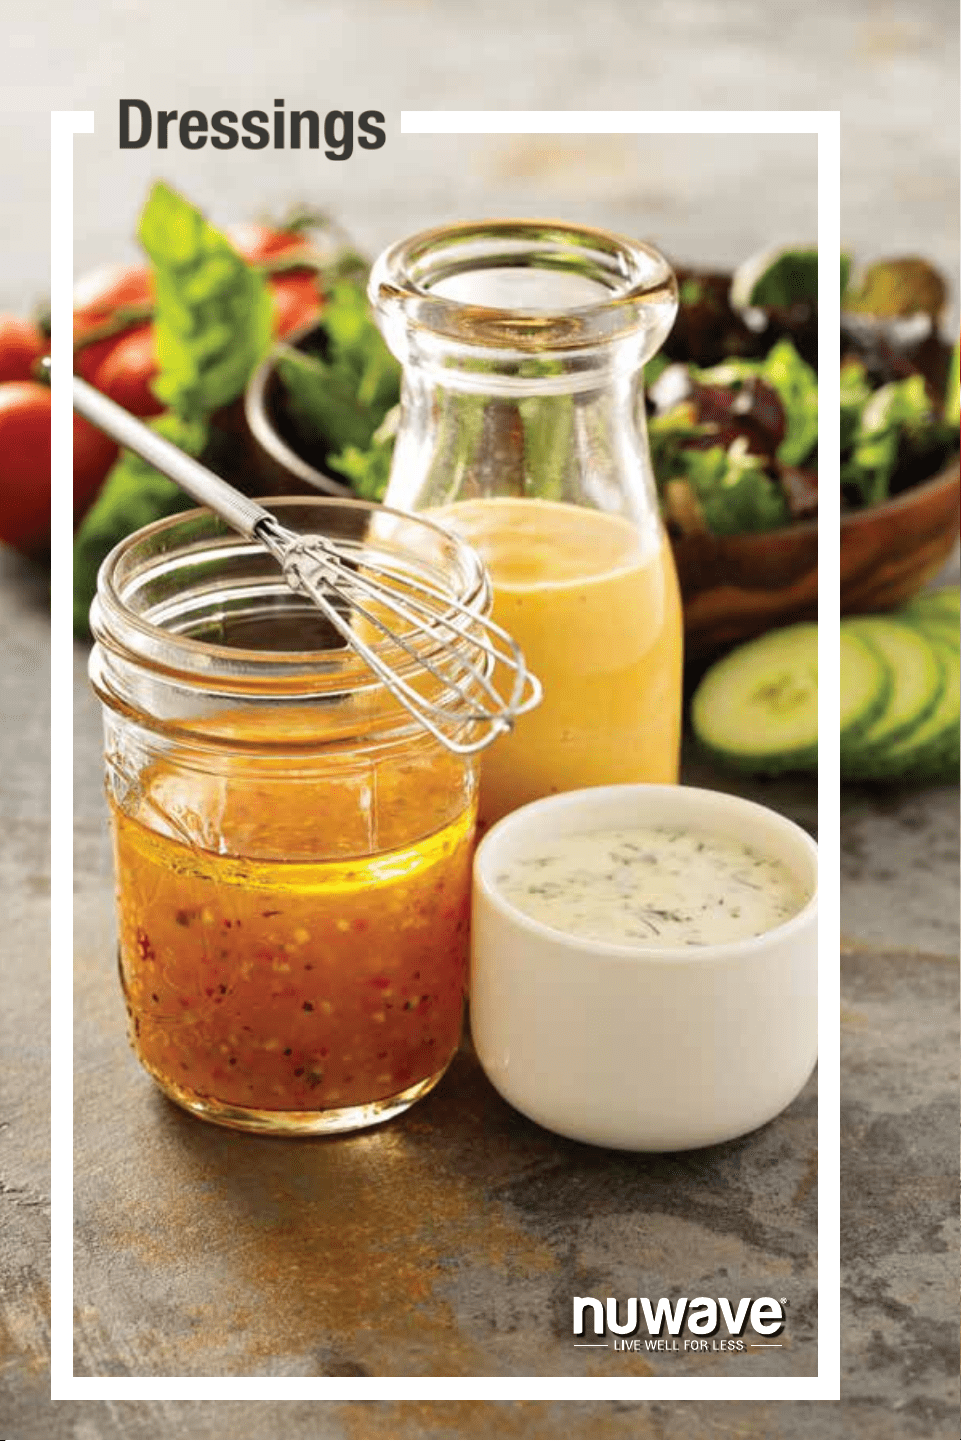
46 47
RecipesRecipes
Dressings
Classic Dijon Salad Dressing
Ingredients:
2 egg yolks
⅛ cup lemon juice
⅛ cup white wine vinegar
2 tablespoons Dijon mustard
1 teaspoon Tabasco sauce
Sea salt and white pepper to taste
2½ cups canola oil
Directions:
1. Add egg yolks, mustard, vinegar, and lemon juice to blender. Set blender
to 10 and blend for 30 seconds.
2. Set blender to 5 and blend, slowly adding oil until you have a thick, pourable
consistency. If the dressing is too thick, add a little warm water to thin it out.
3. Season dressing with salt, pepper, and Tabasco.
Lid:
Plunger Lid only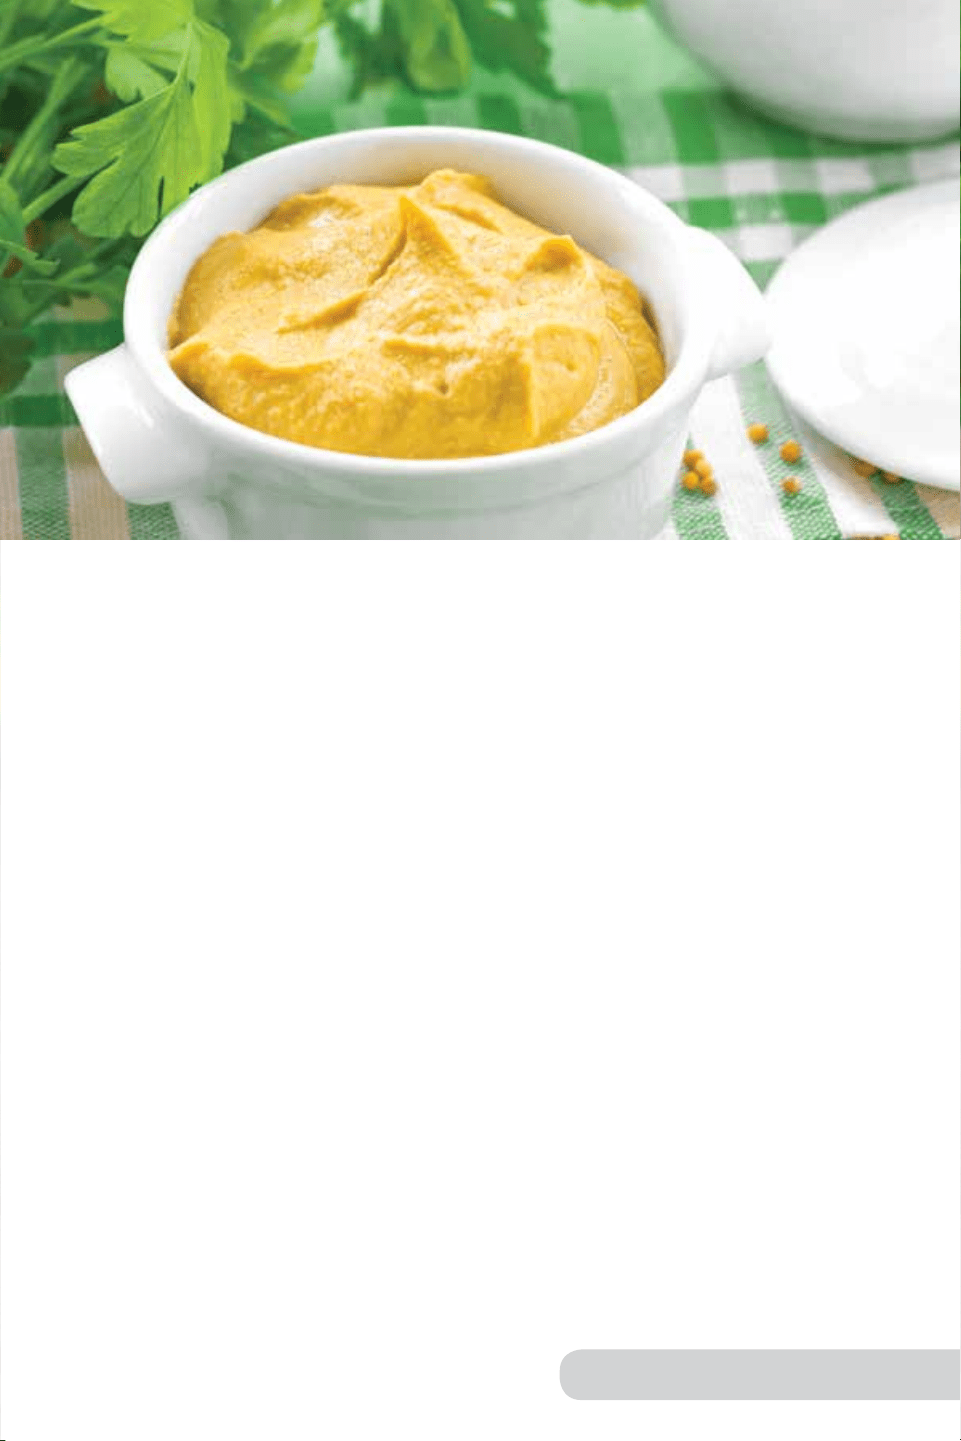

48 49
RecipesRecipes
Ginger Lime Dressing
Ingredients:
1 ounce freshly peeled ginger
Juice and zest of 3 limes
1 tablespoon sesame oil
1 (6-ounce) can coconut milk
1 teaspoon sesame seeds
Pinch sea salt
1 tablespoon sugar
¼ teaspoon cayenne pepper (optional)
Directions:
1. Combine all ingredients in blender, set to 10, and blend
for 3 minutes.
2. Refrigerate overnight.
Lid:
Plunger or Vacuum Lid
Classic Ranch Dressing
Ingredients:
1 cup mayonnaise
½ cup sour cream
½ cup buttermilk
½ teaspoon garlic powder
½ teaspoon onion powder
Sea salt and freshly ground pepper to taste
½ teaspoon dried parsley
½ teaspoon dried dill
2 tablespoons fresh dill
Directions:
1. Combine all ingredients in blender, set to 10, and blend for 1 minute.
2. Refrigerate overnight.
Lid:
Plunger or Vacuum Lid

50 51
RecipesRecipes
Soy Sesame Dressing
Ingredients:
1 cup low-sodium soy sauce
Juice and zest of 1 lemon
½ a cup of rice wine vinegar
¼ cup dark sesame oil
1 tablespoon black sesame seeds
¼ cup raw peanuts (optional)
Directions:
Combine all ingredients in blender, set to 10, and blend for 2 minutes.
Lid:
Plunger or Vacuum Lid
Tip:
Serve as a light salad dressing or use as a marinade for pork or chicken.
Classic Caesar Dressing
Ingredients:
1 egg yolk
1 tablespoon Dijon mustard
2 tablespoons lemon juice
1 teaspoon Worcestershire sauce
1 teaspoon Tabasco sauce
2 tablespoons freshly ground black pepper
2 cloves garlic
5 quality anchovy fillets
1½ cups canola oil
½ a cup of shredded Parmesan cheese
Directions:
1. Add egg yolk, mustard, lemon juice, Worcestershire, Tabasco, garlic,
and anchovies to blender. Set to 10 and blend for 1 minute.
2. While blending, incorporate canola oil in a slow and steady stream until thick
and creamy. If the dressing is too thick, add some warm water.
3. Finish by mixing in freshly ground black pepper and Parmesan cheese.
Lid:
Plunger Lid only

52 53
RecipesRecipes
Lemon Poppy Seed Dressing
Ingredients:
1 cup buttermilk
1 cup plain Greek yogurt
2 tablespoons poppy seeds
Juice and zest of 1 lemon
Sea salt and freshly ground black pepper to taste
¼ teaspoon sumac
1 bunch fresh cilantro, rinsed, shaken dry
Directions:
1. Combine all ingredients in blender, set to 10, and blend for 1 minute.
2. Refrigerate overnight.
Lid:
Plunger or Vacuum Lid
Tip:
This dressing can be used as a marinade for chicken or as a veggie dip.
Soups

54 55
RecipesRecipes
Cumin-scented Carrot Soup
Ingredients:
10 ounces peeled carrots, medium dice
1 tablespoon rice vinegar
Sea salt to taste
⅛ teaspoon ground white pepper
2 cups chicken or vegetable stock
1 teaspoon ground cumin
2 tablespoon chives, finely minced
Directions:
1. Add all ingredients except chives to blender.
2. Blend on Soup setting for 5 minutes. If needed, set blender to Soup
and blend for additional 3-4 minutes or until smooth.
3. Carefully remove Lid and serve with chives.
Lid:
Plunger Lid only
Chilled Fruit Soup
Ingredients:
1 pound fresh strawberries, hulled
½ a pound of seedless green grapes
1 honeydew, peeled, seeded
¼ cup agave nectar
Pinch sea salt
Juice and zest of 1 lemon
Directions:
1. Combine all ingredients in blender. Blend on Soup setting for 2 minutes.
2. Refrigerate overnight and serve.
Lid:
Plunger or Vacuum Lid

56 57
RecipesRecipes
Beet Soup
Ingredients:
4 large beets, peeled, chopped into 1-inch pieces
1 tablespoon extra-virgin olive oil
1 small shallot, peeled
1 tablespoon sea salt
1 tablespoon ground white pepper
1 teaspoon smoked paprika
1 liter vegetable stock or purified water
2 tablespoons chopped chives
8 ounces goat cheese, divided
Directions:
1. Add all ingredients except cheese and chives to blender and pulse 10 times.
2. Blend on the Soup setting for 5 minutes.
3. Add 4 ounces of goat cheese and pulse 3 times.
Lid:
Plunger Lid only
Tip:
Serve soup hot or cold and top with chives and remaining goat cheese.
Tomato Basil Bisque
Ingredients:
2 (28-ounce) cans Italian peeled tomatoes
1 small bunch fresh basil, leaves only
1 garlic clove
Sea salt to taste
1 tablespoon red wine
2 tablespoons extra-virgin olive oil
Pinch sugar
2 tablespoons mascarpone cheese
Directions:
1. Add tomato, garlic, red wine, sugar, and oil to blender.
2. Set blender to 10 and blend for 5 minutes.
3. Add basil and mascarpone and blend on the same setting for 1 minute.
4. Season with sea salt and serve with crusty Italian bread.
Lid:
Plunger Lid only

58 59
RecipesRecipes
Gazpacho
Ingredients:
5 pounds fresh tomatoes, cut in half, seeds removed
1 clove freshly peeled garlic
3 slices toasted rustic or sourdough bread, torn in pieces
2 large English cucumbers, split lengthwise, seeds removed
8 large green bell peppers, cut in half, seeds removed
¼ cup extra-virgin olive oil
2 tablespoons red wine vinegar
2 tablespoons Spanish sherry vinegar
Sea salt and freshly ground pepper to taste
2 tablespoons thyme, freshly chopped
Directions:
1. Add tomatoes, cucumber, garlic, and bell peppers to blender and pulse
3-4 times.
2. Add oil, vinegars, and freshly ground pepper to blender and pulse 4-5 times.
3. Add the bread and pulse 7-10 times.
4. Season gazpacho with salt and refrigerate overnight before serving.
Lid:
Plunger Lid only
Tip:
• Make sure you save the juice when removing the seeds from the tomatoes.
• You can peel the cucumbers or leave the peel on.
Potato Truffle Cauliower Soup
Ingredients:
1 large cauliflower head, cored, cut into 2-inch pieces equal in size
6 ounces Yukon Gold potatoes, peeled, medium dice
Sea salt and freshly ground white pepper to taste
⅛ teaspoon white truffle oil or extra-virgin olive oil
2-3 cups hot milk
Directions:
1. Blanch diced potatoes in boiling water for 8 minutes.
2. Add potatoes, cauliower, salt and pepper to blender. Blend on Soup
setting for 1 minute.
3. Add warm milk, replace Lid, and blend on Soup setting for 5 minutes.
4. Season with oil and salt.
Lid:
Plunger Lid only

60 61
RecipesRecipes
Desserts
Blueberry Lemon Muffins
Ingredients:
½ cup plain Greek yogurt
3 whole large eggs
Juice and zest of 1 lemon
¼ ounce honey or agave nectar
1 teaspoon vanilla extract
3 cups almond flour
1½ teaspoons baking powder
1 teaspoon baking soda
¼ teaspoon sea salt
1 cup fresh blueberries
Directions:
1. Add yogurt, eggs, lemon juice, lemon zest, honey, and vanilla
to blender.
2. Set blender to 1, add our, baking powder, baking soda, and salt and blend
for about 1 minute until ingredients are well combined.
3. Remove batter from blender and fold in blueberries.
4. Transfer batter to prepared baking cups and bake in a 350°F oven
for 25 minutes.
5. Cool and enjoy.
Lid:
Plunger Lid only
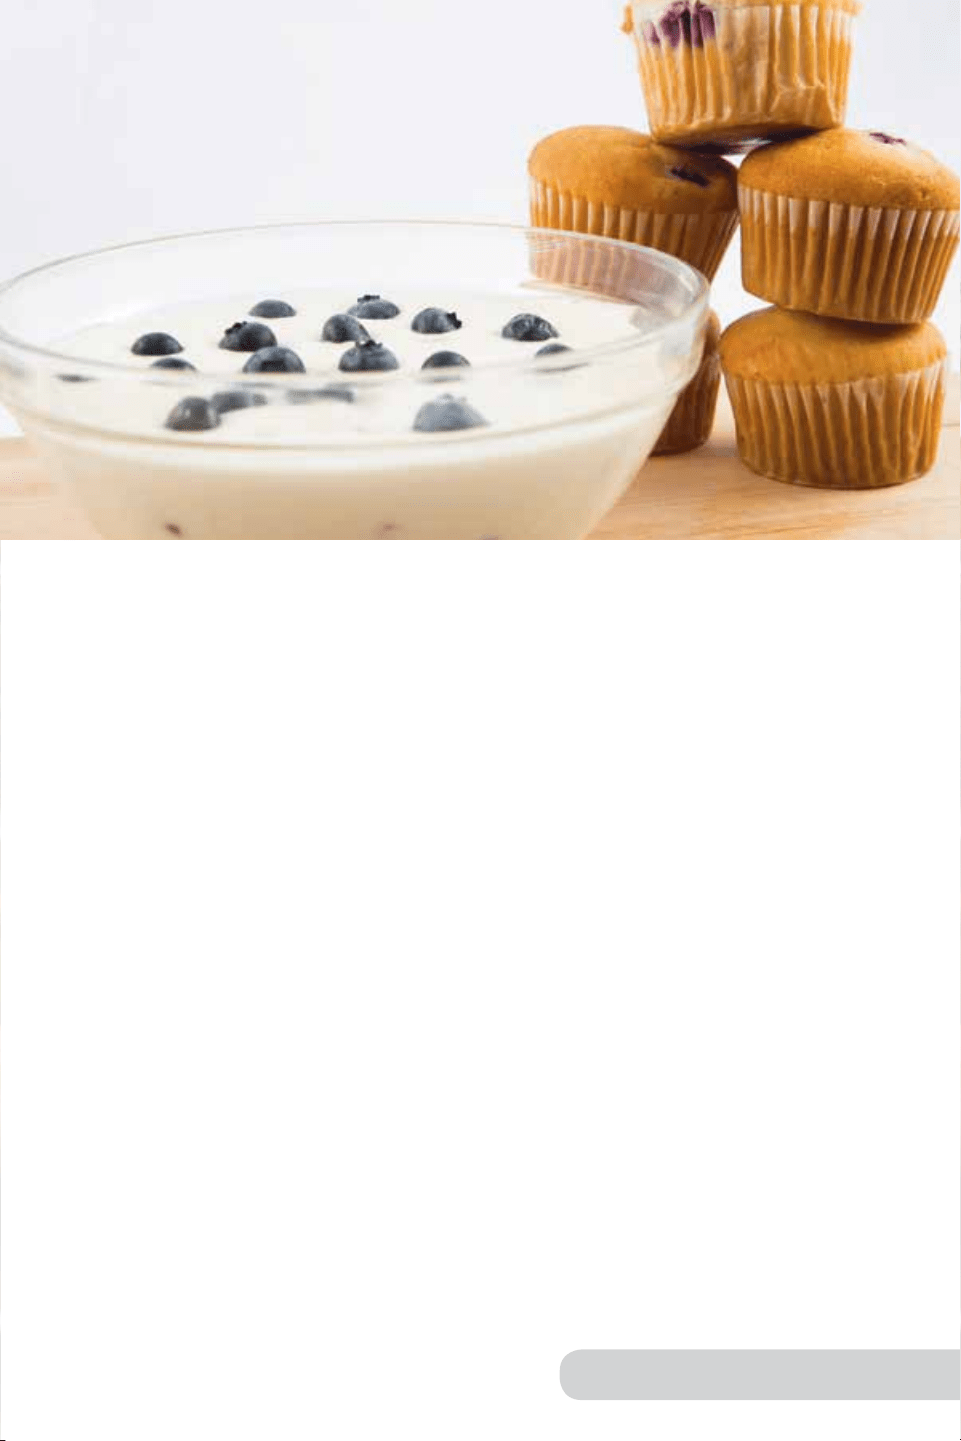
60 61
RecipesRecipes
Desserts
Blueberry Lemon Muffins
Ingredients:
½ cup plain Greek yogurt
3 whole large eggs
Juice and zest of 1 lemon
¼ ounce honey or agave nectar
1 teaspoon vanilla extract
3 cups almond flour
1½ teaspoons baking powder
1 teaspoon baking soda
¼ teaspoon sea salt
1 cup fresh blueberries
Directions:
1. Add yogurt, eggs, lemon juice, lemon zest, honey, and vanilla
to blender.
2. Set blender to 1, add our, baking powder, baking soda, and salt and blend
for about 1 minute until ingredients are well combined.
3. Remove batter from blender and fold in blueberries.
4. Transfer batter to prepared baking cups and bake in a 350°F oven
for 25 minutes.
5. Cool and enjoy.
Lid:
Plunger Lid only

62 63
RecipesRecipes
Banana Oat Pancakes
Ingredients:
1 ripe banana
1 cup steel-cut oatmeal
1 large egg
¼ cup whole milk
Pinch sea salt
1½ teaspoons vanilla extract
1 teaspoon baking powder
½ teaspoon cinnamon
1 tablespoon melted butter
½ cup chopped walnuts
Directions:
1. Add oats to blender, set to 1, and blend for 2 minutes, or until oats
are very ne.
2. Add egg and banana, set blender to 3, and blend for 30 seconds or until
smooth.
3. Add milk, baking powder, and cinnamon and blend for about 30 seconds,
until just combined.
4. Heat a frying pan on medium-high heat and add melted butter.
5. Spoon prepared pancake batter into pan and cook for 3-4 minutes.
Top pancakes with walnuts, ip, and cook for 3-4 additional minutes until
golden brown.
Lid:
Plunger Lid only
Classic Crepes
Ingredients:
2 eggs
¾ cup milk
½ cup of water
1 cup flour
3 tablespoons melted butter
Pinch sea salt
Directions:
1. Add all ingredients to blender and pulse about 10 times, until smooth.
2. Refrigerate batter overnight.
3. When ready to make, add a little bit of melted butter to a small frying pan on
medium heat.
4. Add about half of the batter to the hot pan, evenly spreading the batter
around. Cook for about 45 seconds.
5. Flip crepe and cook for an additional 20 seconds.
6. Repeat cooking process with remaining batter.
Lid:
Plunger or Vacuum Lid
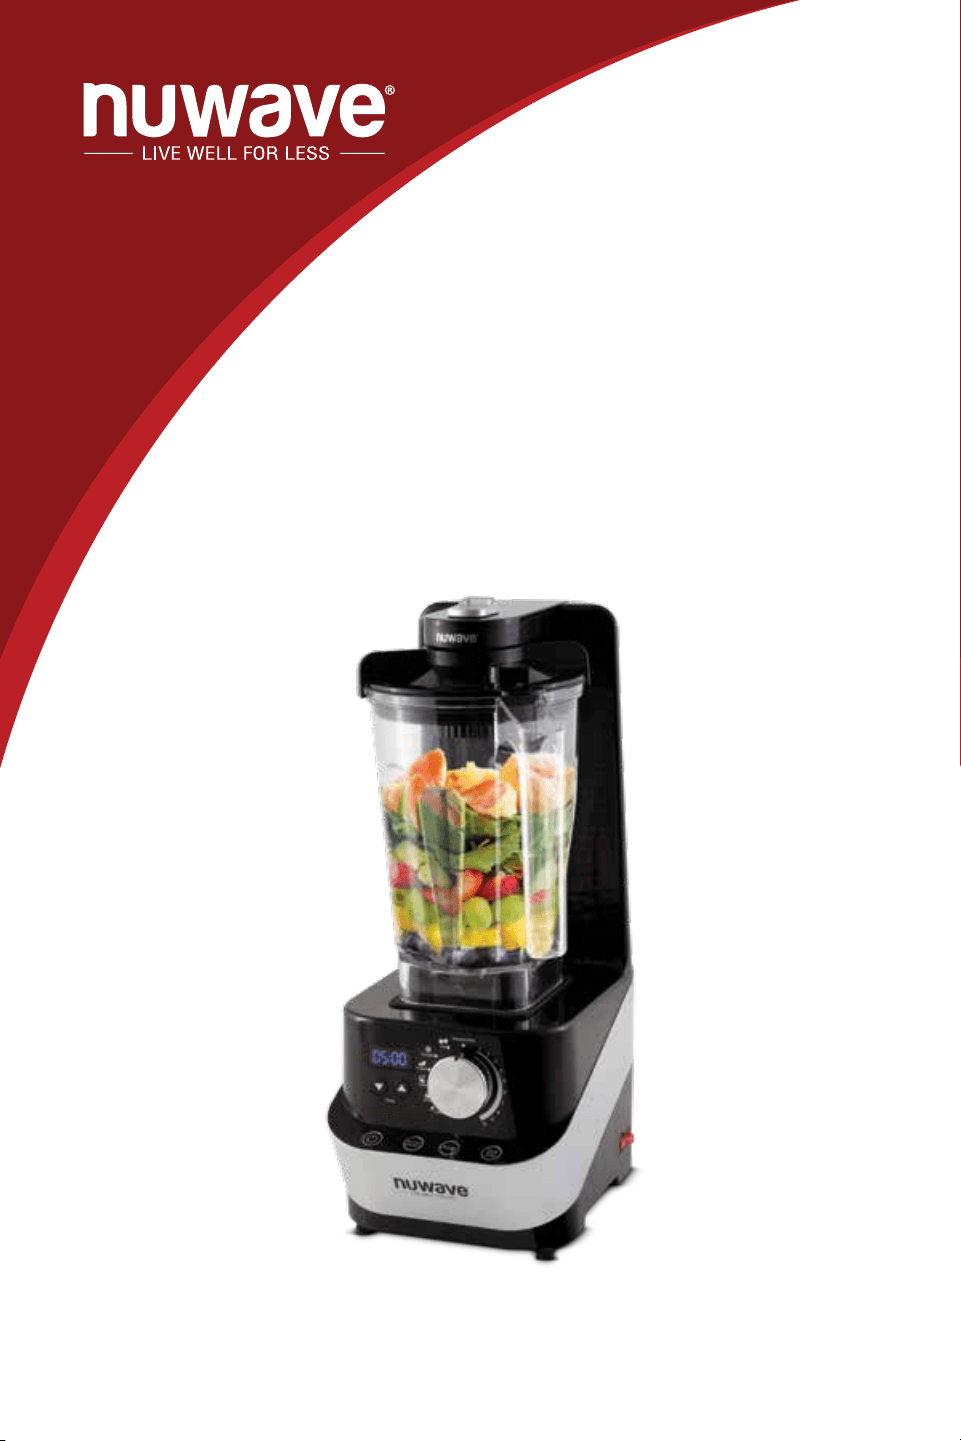
65
El Manual del Propietario
Manual del Usuario y Recetario Completo
NuWave Moxie
™
Licuadora Digital al Vacío
LEA TODAS LAS INSTRUCCIONES
ADVERTENCIA: Cuando se utilice la Licuadora Moxie siempre se deben seguir
medidas de seguridad básicas:
1. Para protegerse del riesgo de una descarga eléctrica, no sumerja la Base de la
Licuadora, el cable, el enchufe, o cualquier parte de la unidad principal en agua o
cualquier otro líquido.
2. Es necesaria una supervisión estricta cuando se use cualquier artefacto cerca
de niños. La Licuadora Moxie no está diseñada para ser utilizada por niños,
personas con capacidades físicas, sensoriales o mentales reducidas o aquellos
con falta de experiencia o conocimiento sobre este aparato.
3. Desconecte la Licuadora Moxie de la toma de corriente cuando no esté en uso,
antes de colocarle o quitarle piezas, y antes de limpiarla.
4. Evite el contacto con las partes móviles.
5. No opere la Licuadora Moxie con un cable o enchufe dañado, o si el
electrodoméstico no funciona bien, se cae o se daña de alguna forma; de ser
así, comuníquese con Servicio al Cliente al 1-877-689-2838 o envíe un correo
electrónico a help@nuwavenow.com para obtener información sobre la revisión,
reparación o ajuste.
6. NO ESTÁ DISEÑADA PARA EL USO AL AIRE LIBRE.
7. No permita que el cable cuelgue del borde de la mesa o el mostrador. Tampoco
permita que el cable entre en contacto con superficies calientes, incluso una
estufa.
8. Mantenga las manos, los utensilios y objetos extraños fuera del Vaso mientras
mezcla para reducir el riesgo de lesiones graves a personas o daños a la
licuadora. Se puede usar un raspador, pero solo cuando la licuadora NO está
en operación.
9. No la coloque sobre o cerca de un quemador caliente de gas o eléctrico, o en
un horno caliente.
10. ¡PRECAUCIÓN! Las cuchillas son filosas así que maneje la licuadora con
cuidado. No manipule las cuchillas.
11. Siempre utilice la licuadora con la Tapa y el Vaso correctamente en su lugar. La
Licuadora no funcionará si la Tapa no está firmemente en su lugar y el punto no
está alineado con el mango.
12. La alteración o modificación de cualquier parte de la licuadora o el uso de
accesorios no recomendados por el fabricante pueden causar incendios,
lesiones o daños a la propiedad.
13. No ponga líquidos calientes o hirviendo en el vaso.
14. Nunca golpee el vaso contra una superficie para aflojar los ingredientes.
Primero saque el vaso de la base de la Licuadora Moxie, luego use una
espátula de goma para sacar la mezcla del fondo del vaso.
15. No sacuda ni agite el vaso mientras está en uso.
16. Nunca retire el vaso antes de que las cuchillas de la Licuadora Moxie se hayan
detenido por completo.
17. Cuando prepare mantequillas de frutos secos o recetas con ingredientes a
base de aceite, no procese durante más de 1 minuto después de que la mezcla
comience a circular en el vaso. Mezclar por períodos más largos que esto
puede causar el sobrecalentamiento de la Licuadora Moxie.
MEDIDAS DE SEGURIDAD IMPORTANTES

66 67
El Manual del Propietario
El Manual del Propietario
Lock
Close
Open
Close
Open
Lock
Close
Open
Close
Open
OTRAS MEDIDAS DE SEGURIDAD
DESCRIPCIÓN DE PARTES
1
7
9
10
4
Tapa del Émbolo*
Parte #: 27413
Aro de Sello de la Tapa
del Émbolo
Parte #: 27418
Tapón del Émbolo
Parte #: 27414
Tapa de Vacío**
Parte #: 27412
Anillo de Junta de Tapa
de Vacío
Parte #: 27417
Tapón de Vacío
Parte #: 27415
Anillo O de la Tapa de Vacío
Parte #: 27419
Conector de Vacío
Parte #: 27420
Vaso
Parte #: 27422
La Cuchilla
Parte #: 27423
Frasco de Almacenamiento
(opcional)
Parte #: 27410
Interruptor de Vacío
Brazo de Vacío
Base de la Licuadora
Parte #: 27421
Émbolo
Parte #: 27416
1
2
3
4
5
6a
6b
6c
7
8
9
10
11
12
3
8
6a 6b
Información eléctrica
La Licuadora Moxie incluye un cable de alimentación corto para reducir
el riesgo de enredos o tropezones. Se pueden usar cables de extensión
si se tiene cuidado en su uso. Si se usa un cable de extensión:
1. La clasificación eléctrica marcada del cable de extensión debe ser al
menos tan grande como la clasificación eléctrica de la Licuadora Moxie.
2. El cable más largo debe colocarse de modo que no cuelgue sobre
la encimera o sobre la mesa donde los niños puedan tirar de él o
tropezarse involuntariamente. La Licuadora Moxie debe operarse en
una toma de corriente separada de otros aparatos debido a limitaciones
de potencia. Ciertos modelos pueden tener un enchufe polarizado
(una clavija es más ancha que la otra). Para reducir el riesgo de una
descarga eléctrica, este enchufe está diseñado para encajar en una
toma polarizada de una manera. Si el enchufe no encaja completamente
en la toma de corriente, invierta el enchufe. Si aún así el enchufe no se
ajusta correctamente, contacte a un electricista calificado. No intente
modificar el enchufe de ninguna manera.
2
11
6c
5
12
VEA CUIDADO Y MANTENIMIENTO ANTES DEL USO
GUARDE ESTAS INSTRUCCIONES:
Lea y comprenda todo el manual antes de usar la Licuadora.
1. NO quite las cuchillas de ninguna manera ni intente retirarlas para limpiarlas.
2. Apague y desconecte la Licuadora Moxie ANTES de tocar las partes
móviles o acercarse con un utensilio. También APAGUE y desconecte la
Licuadora Moxie cuando esté desatendida.
3. No utilice la licuadora si detecta sonidos o movimientos anormales. Si
un objeto duro o extraño entra en contacto con las cuchillas del vaso,
no lo sirva. Inspeccione el ensamble de cuchillas de la Licuadora Moxie
después de cada uso y, si hay piezas sueltas, dañadas o faltantes,
comuníquese con Servicio al cliente al 1-877-689-2838 o envíe un correo
electrónico a help@nuwavenow.com.
4. Siempre tenga extrema precaución cuando opere y de mantenimiento a la
Licuadora Moxie o cualquier aparato.
ADVERTENCIA: Nunca use el ensamble de cuchillas de la Licuadrora
Moxie con partes sueltas, dañadas o faltantes.
AVISO: EL NO SEGUIR CUALQUIERA DE LAS MEDIDAS DE
SEGURIDAD IMPORTANTES O LAS INSTRUCCIONES PARA UN USO
SEGURO SIGNIFICARÁ UN USO INCORRECTO DE SU LICUADORA
MOXIE QUE PUEDE ANULAR SU GARANTÍA Y CREAR EL RIESGO DE
LESIONES GRAVES.
*
La Parte # 27413 está compuesta por la
Tapa del Émbolo, el Aro del Sello de la Tapa
del Émbolo y la Tapón del Émbolo
**
La Parte # 27412 está compuesta por
la Tapa de Vacío, el Tapón de Vacío, el
Conector de vacío, el Anillo O y el Anillo
de Junta de la Tapa de Vacío.
13
13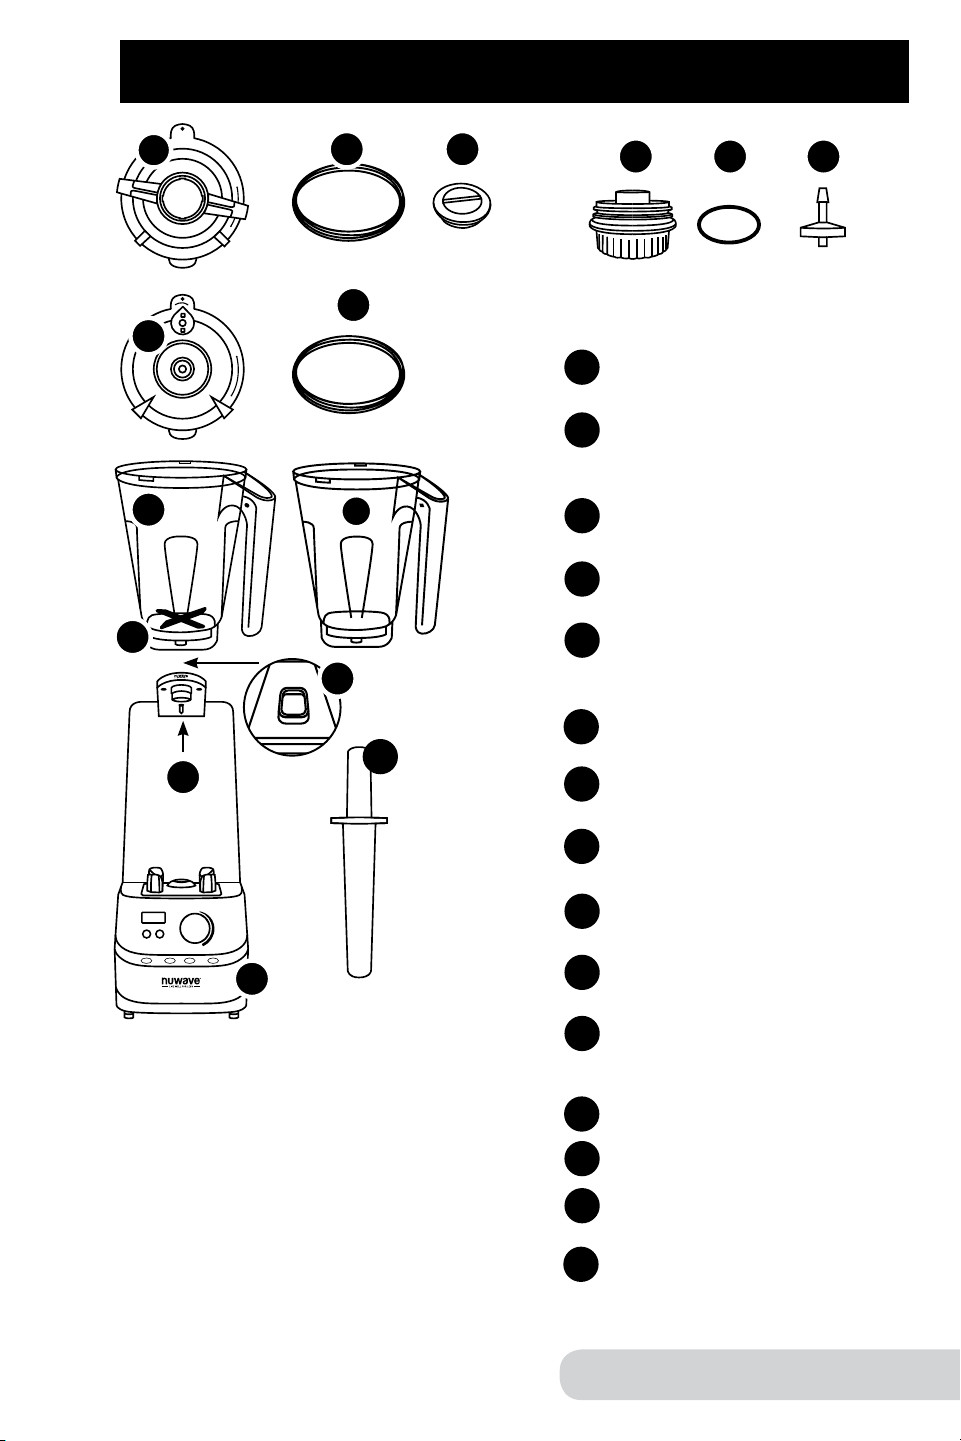

68 69
El Manual del Propietario
El Manual del Propietario
Lock
Close
Open
Close
Open
GUÍA DE MONTAJE
Ensamble de la Tapa del Émbolo
1. Alinee el punto rojo en la Tapa con el mango.
2. Presione hacia abajo la Tapa hasta que quede firmemente en su lugar.
3. El bloqueo de la Tapa tiene dos seguros
• Gire el bloqueo de la Tapa en sentido de las manecillas del reloj para
cerrar y bloquear.
• Para desbloquear, gire el bloqueo de la Tapa en sentido contrario a las
manecillas del reloj.
UnlockLock
GUÍA DE MONTAJE (Continuación)
Tapa del Émbolo
Lock
Close
Open
Close
Open
Lock
Close
Open
Close
Open
Tapón del Émbolo
Vaso
La Tapa del Émbolo y el Tapón del
Émbolo se usan cuando se agregan
ingredientes adicionales mientras
se licua.
PRECAUCIÓN
Asegúrese de que todas las piezas estén bien fijadas.
ADVERTENCIA: Como ocurre con la mayoría de los electrodomésticos, las
piezas eléctricas están en funcionamiento incluso cuando la Licuadora Moxie esté
apagada. Asegúrese de que la unidad esté desconectada durante el montaje.
Émbolo
Cuando se usa el Émbolo
Retire el Tapón del Émbolo de la Tapa antes de insertar el Émbolo.
La Tapa del Émbolo está diseñada con la abertura del orificio para que el Émbolo
no entre en contacto con las cuchillas.
Cuando no use el Émbolo, coloque el Tapón en la Tapa del Émbolo presionando
hacia abajo.
Lock
Close
Open
Close
Open
Seguros de
Bloqueo de la Tap
(1 en cada lado)
Lengüetas
del Vaso
(1 en cada lado)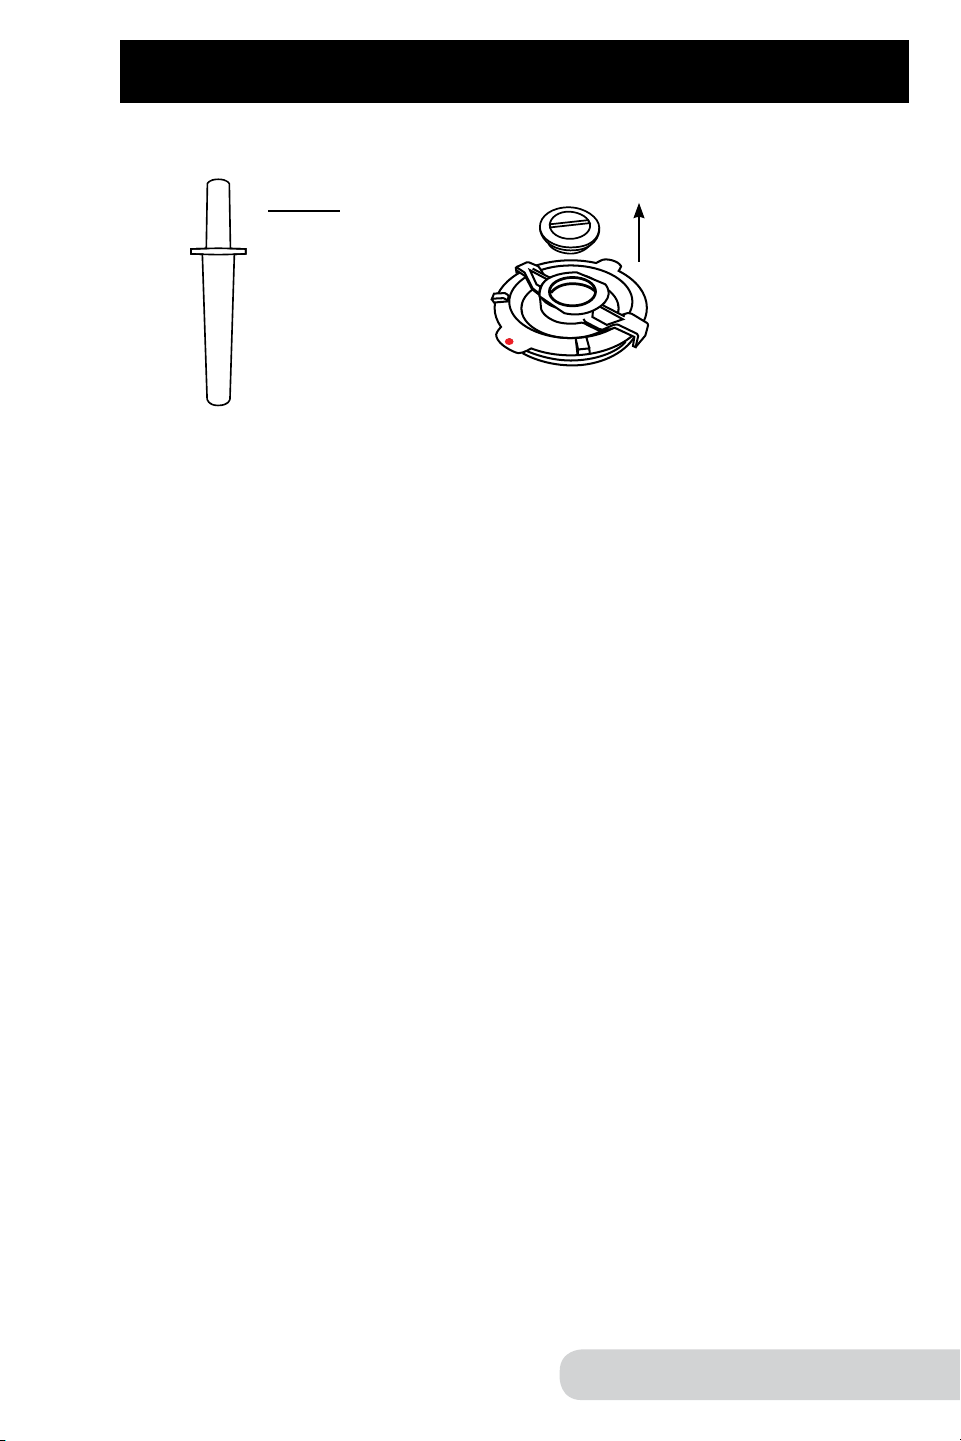

70 71
El Manual del Propietario
El Manual del Propietario
GUÍA DE MONTAJE (Continuación)
Lock
Close
Open
Close
Open
Ensamble de la Tapa de Vacío
1. Debajo de la Tapa de Vacío, asegúrese de que el Conector de Vacío esté
en su lugar y enrosque el Tapón de Vacío en la Tapa en el sentido de las
manecillas del reloj hasta que quede apretada.
2. Alinee el punto rojo (ubicado en la parte superior de la Tapa) con el mango.
3. Presione hacia abajo la tapa hasta que quede firmemente en su lugar.
• Asegúrese de girar la Válvula de Liberación a la posición de bloqueo
antes de usar la función de vacío.
• La Tapa de Vacío NO se abrirá cuando esté en la posición de bloqueo.
Brazo de Vacío
Interruptor
Ensamble del Vaso con la Tapa de Vacío
1. Levante el Brazo de Vacío.
2. Coloque el Vaso en la Base alineándolo en la parte superior de las 4
columnas de goma.
3. La Tapa de Vacío debe enroscarse firmemente en su lugar antes de su uso.
4. Empuje el Brazo de Vacío hacia abajo y presione la Tapa hasta que se haga
una conexión y se escuche un "clic".
5. Asegúrese de que la Válvula de Liberación esté en la posición de bloqueo
antes crear el vacío.
• Antes de retirar la Tapa de Vacío, gire la Válvula de Liberación a la
posición abierta.
GUÍA DE MONTAJE (Continuación)
Tapón de Vacío
Conector de Vacío
Use la Tapa de Vacío sólo cuando licue al vacío.
Tapa de Vacío
Vaso
Válvula de Escape
Lock
Lock
Close
Open
Close
Open
4 Columnas de Goma
PRECAUCIÓN
Asegúrese de que todas las piezas estén firmemente
unidas.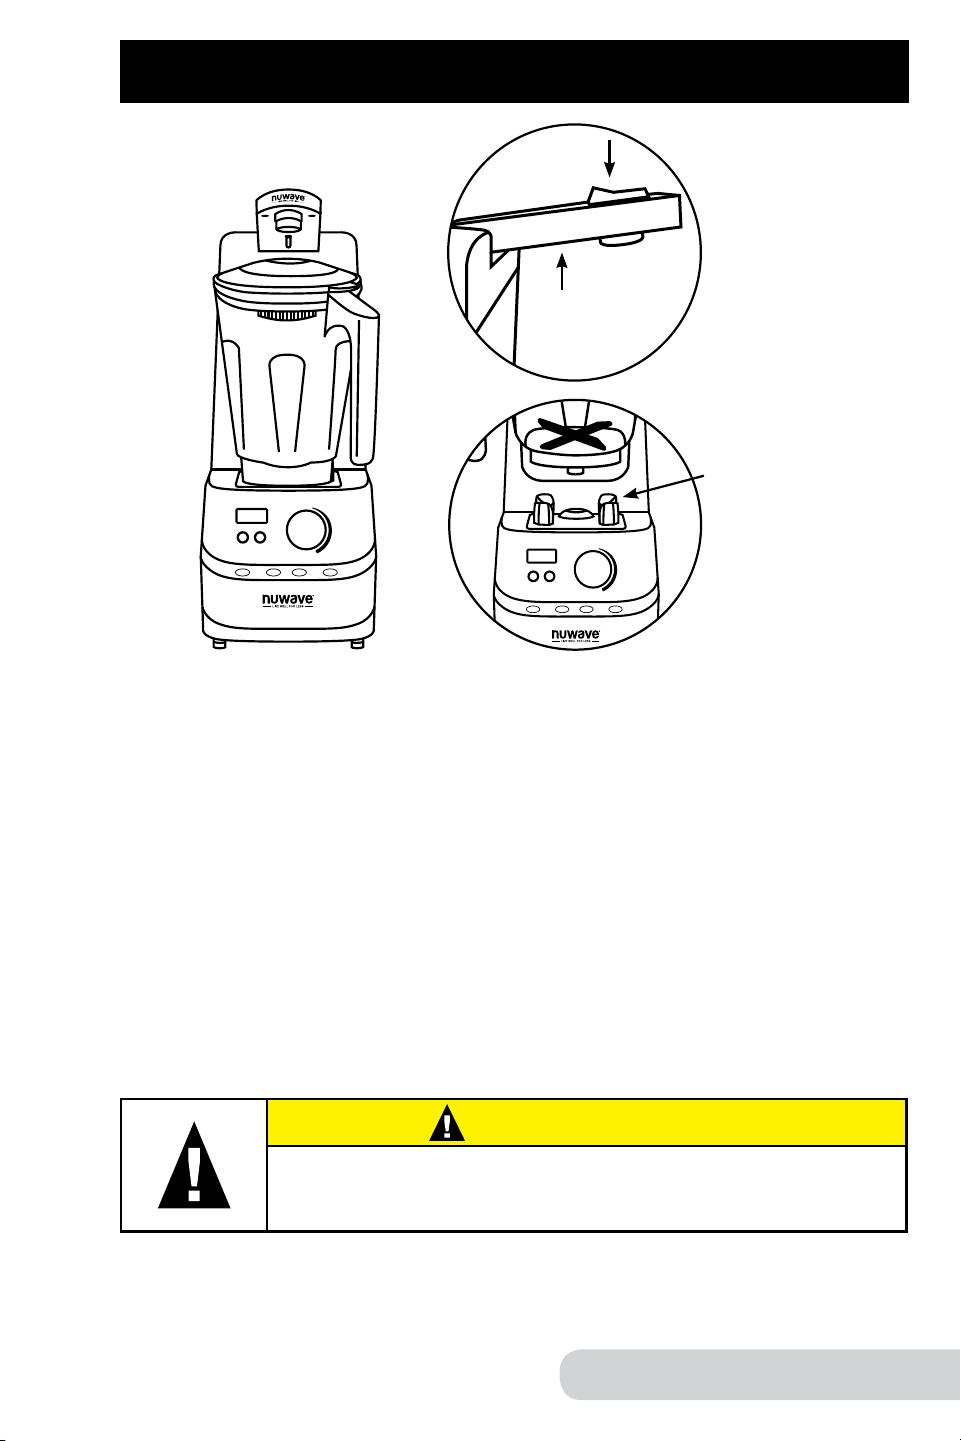
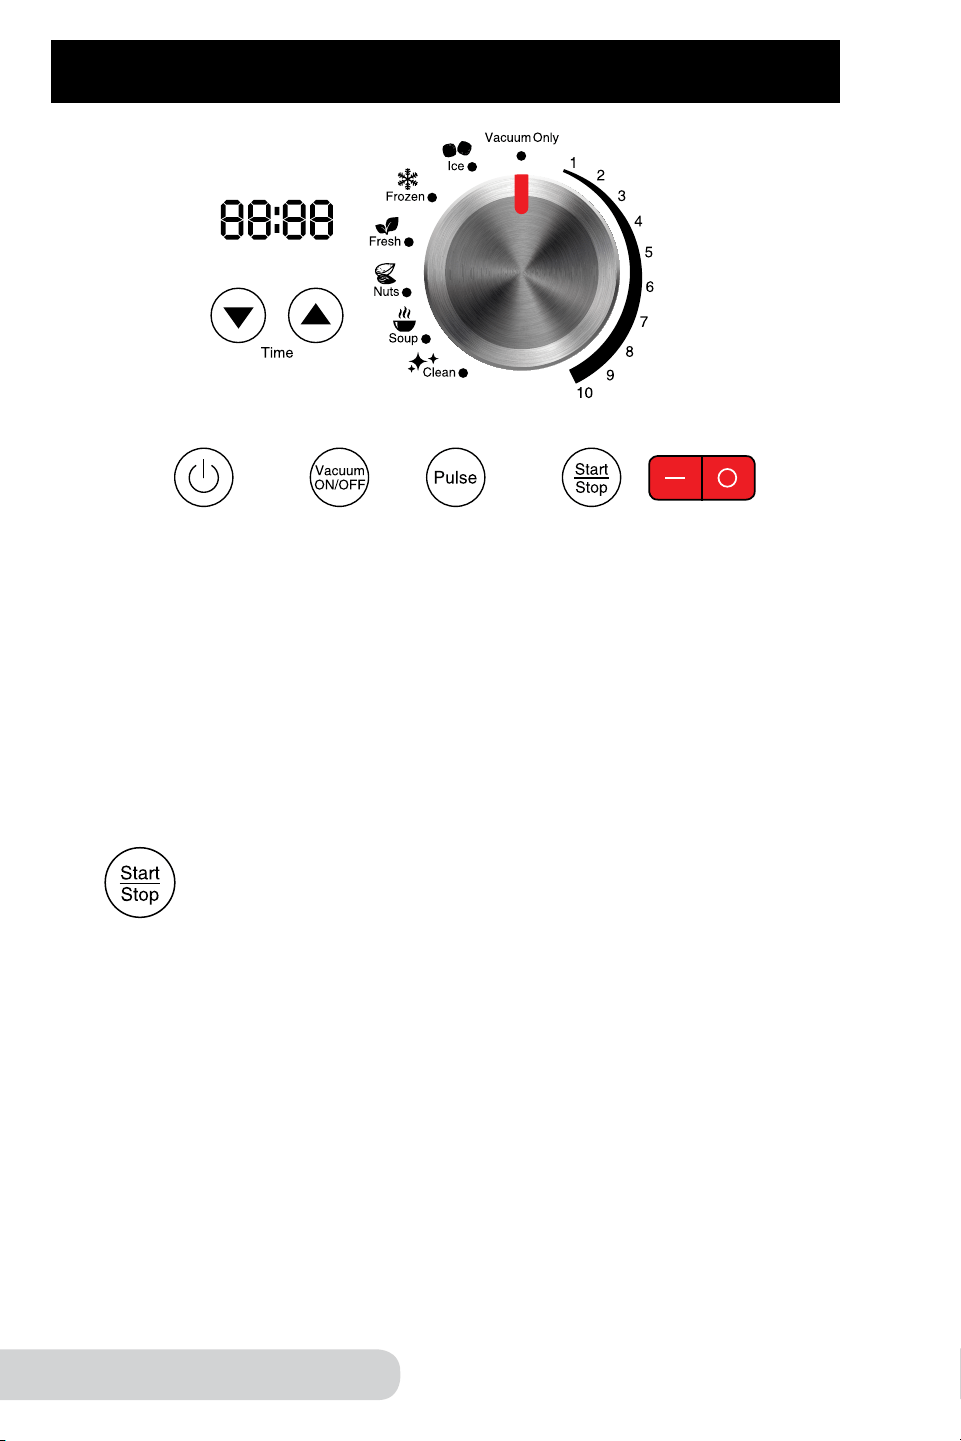
72 73
El Manual del Propietario
El Manual del Propietario
INSTRUCCIONES DE OPERACIÓN
INSTRUCCIONES DE OPERACIÓN (Continuación)
ON OFF
Botón de Encendido ON / OFF
1. Encienda el Interruptor rojo de alimentación de la Base. El
interruptor está ubicado en el lado derecho de la Base de la
Licuadora.
• El botón "Encendido" (Power) parpadeará.
2. Presione el botón "Encendido" (Power) una vez para
encender la unidad. La pantalla LCD mostrará el tiempo
predeterminado para la configuración seleccionada.
3. Presione el botón "Encendido" (Poweer) nuevamente para
apagar la unidad.
Start/Stop
1. Gire la perilla para elegir la función de mezcla adecuada.
2. Presione "Start/Stop" para comenzar a mezclar.
3. Presione "Start/Stop" nuevamente para detener la mezcla.
Configuración de la hora
Presione las flechas hacia arriba y hacia abajo para
aumentar o disminuir el tiempo en la pantalla.
• Los tiempos se muestran en minutos y segundos.
• Esto se puede hacer en todos los ajustes excepto en
vacío solamente.
Ejemplo:
Presione el botón "Encendido" (Power). Gire la perilla a "Ice".
"0:15" (15 segundos) se mostrará. Presione las flechas hacia
arriba y hacia abajo para ajustar la hora. Presione "Start/Stop".
Configuraciones Numeradas
Para la mezcla estándar, seleccione una de las configuraciones
numeradas entre 1 y 10.
1. Gire la perilla a la configuración deseada entre 1 y 10. Cuando
esté en vacío, el valor predeterminado será "2:00".
2. Ajuste el tiempo si lo desea [1] , luego presione "Start/Stop" para
comenzar a mezclar en la configuración seleccionada.
3. Ajuste la configuración del número usando la perilla en cualquier
punto mientras mezcla, si es necesario.
• La configuración más baja es # 1 (5,000 RPM).
La configuración más alta es # 10 (27,000 RPM).
Vacío
Al aspirar el aire de la licuadora, puede asegurarse de que no se
mezcle aire con sus ingredientes mientras se licuan, lo que maximiza
el valor nutricional y garantiza que las creaciones de su licuadora
permanezcan más frescas por más tiempo.
Siga estos pasos para aprovechar las capacidades de vacío de la
unidad ANTES de licuar:
1. Encienda la unidad (Presione el interruptor rojo en el costado de
la Base. Luego presione el botón "Power").
2. Seleccione la configuración deseada con la perilla.
3. Presione "Vacuum ON/OFF". El botón se iluminará en azul.
4. Presione "Start/Stop". La pantalla mostrará el tiempo
predeterminado para la configuración seleccionada.
• La unidad eliminará todo el aire del Vaso.
• Una vez que se haya eliminado todo el aire, el aparato
comenzará a mezclar automáticamente.
Ejemplo:
1. Gire la perilla a Frozen. Se mostrarán "0:35" segundos.
2. Presione "Vacuum On/Off". El botón se iluminará en azul.
3. Presione "Start/Stop". Una vez que se haya eliminado todo el aire,
la licuadora comenzará a mezclar.
Sólo al Vacío
Siga estos pasos para aprovechar las capacidades de vacío de la unidad
DESPUÉS de la licuar:
1. Gire la perilla a "Vacuum Only". "0:00" se mostrará en la pantalla LCD.
2. Presione "Start/Stop". La unidad vaciará el exceso de aire de la licuadora y
luego se apagará automáticamente. La pantalla mostrará "0:00".
1 Si se mezcla durante más de 3 minutos, use la tapa del émbolo.
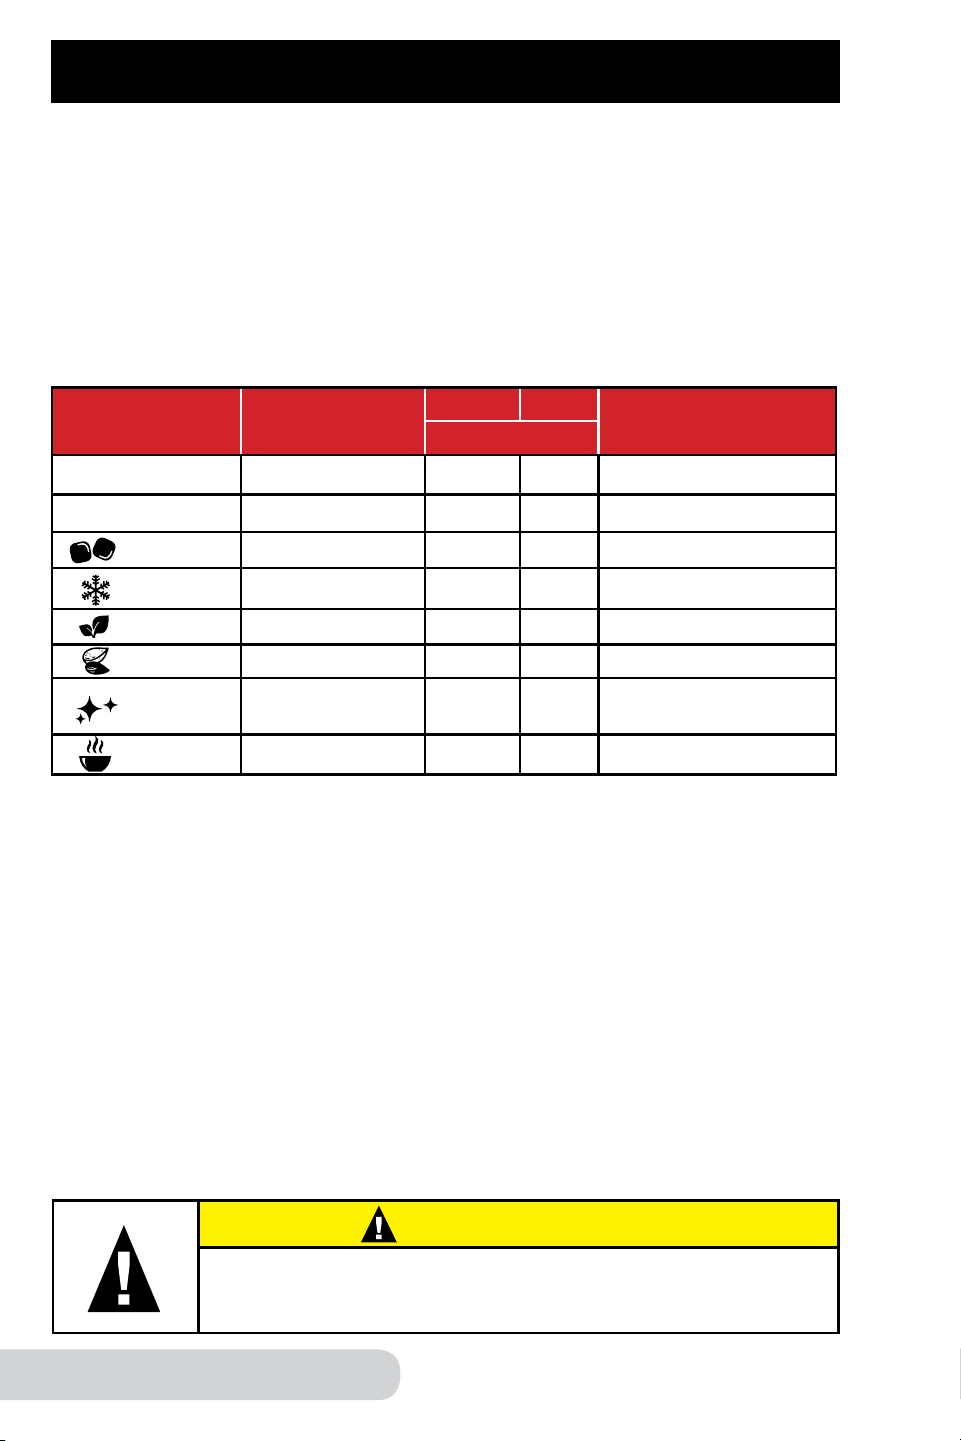
74 75
El Manual del Propietario
El Manual del Propietario
INSTRUCCIONES DE OPERACIÓN (Continuación)
Ícono
Predeterminado
Min : Seg
Min. Max.
Notas
Min : Seg
1-10 (con vacío)* 2:00 0:05 3:00 Velocidad ajustable
1-10 (sin vacío) 3:00 0:05 5:00 Velocidad ajustable
Hielo 0:15 0:05 2:00 Batido y sorbete
Congelado 0:35 0:05 2:00 Bebidas a base de hielo
Fresco 0:30 0:05 2:00 Salsas
Nueces 1:30 0:05 2:00 Atasco y extensión
Sopa 3:00 0:05 5:00
Sopa y chocolate
caliente
Limpiar** 0:15 0:05 2:00 Autolimpieza
CUIDADO Y MANTENIMIENTO
Es posible que sea necesario quitar el Anillo de Sello de la Tapa
para limpiarlo o si la pieza está gastada, dañada o necesita ser
reemplazada. Para ensamblar:
1. Alinee el interior del Anillo de Sello de la Tapa al borde.
2. Presione el Anillo de Sello en el borde para asegurarse de que esté
sellado correctamente.
3. Asegúrese de que la parte inferior del Anillo de Sello se alinee con el
lado inferior del borde.
Lock
Close
Open
Close
Open
Anillo de Sello
Émbolo y Tapa
de Vacío
Lock
Close
Open
Close
Open
Lock
Close
Open
Close
Open
Configuración de Íconos
Para tareas de mezcla más especializadas, seleccione uno de los íconos
preestablecidos con la perilla. Cada configuración de ícono tiene un
tiempo predeterminado y RPM integrados en la unidad.
1. Gire la perilla a la configuración del ícono que desee. La pantalla LCD
mostrará el tiempo predeterminado.
2. Ajuste el tiempo si es necesario, luego presione "Start/Stop" para comenzar
a mezclar en la configuración seleccionada.
• Si lo desea, aumente o disminuya el tiempo en cualquier punto
mientras licua.
*Nota:
• Cuando se mezcla durante un largo período de tiempo puede escapar vapor
de la tapa del émbolo.
• Siempre comience con líquidos fríos cuando mezcle. NO agregue líquidos
calientes a la licuadora.
• No llene el Vaso más de 3/4 de su capacidad. Para obtener los mejores
resultados, no llene más de 1.5 litros (51 fl oz) de líquido.
**Consejos para la limpieza:
• Agregue agua y 1-2 gotas de jabón líquido para platos al Vaso, colóquelo en la
base y cierre la tapa.
• Gire la perilla a "Clean". "0:15" se mostrará en la pantalla LCD. Ajuste el tiempo
si lo desea, luego presione "Start/Stop".
• Una vez que termine, retire el Vaso, enjuague bien y seque antes de usar.
Para obtener instrucciones detalladas sobre la limpieza, consulte
"Cuidado y mantenimiento".
Antes del primer uso:
Lave todas las piezas extraíbles con agua jabonosa tibia o en el lavavajillas
(sólo en la rejilla superior). El Vaso se puede lavar con la función "Clean".
Consulte "Instrucciones de Funcionamiento" para más detalles.
Lock
Close
Open
Close
Open
Lock
Close
Open
Close
Open
Lock
Close
Open
Close
Open
Desprenda y retire el Tapón de Vacío si es necesario limpiarlo. Después de
limpiar y secar la pieza, empuje el Tapón de Vacío firmemente en su lugar.
Recuerde volver a colocar la Tapa de Vacío antes del uso.
Se pueden acumular residuos y humedad dentro de la Tapa de Vacío y el Tapón
de Vacío. Limpie y seque completamente después de cada uso.
Desenrosque la Tapa de Vacío en sentido contrario a las manecillas del reloj y
lave a mano o en el lavavajillas (sólo en la rejilla superior). Asegúrese de que la
Tapa de Vacío esté bien enroscada en su lugar antes de usarla.
Vaso
Tapa de Vacío
Anillo de Sello
Conector de Vacío
Tapón de Vacío
Tapa del Émbolo
Tapón del Émbolo
Aro de Sello
Émbolo
PRECAUCIÓN
Las piezas móviles pueden calentarse con el uso
prolongado. NO TOCAR.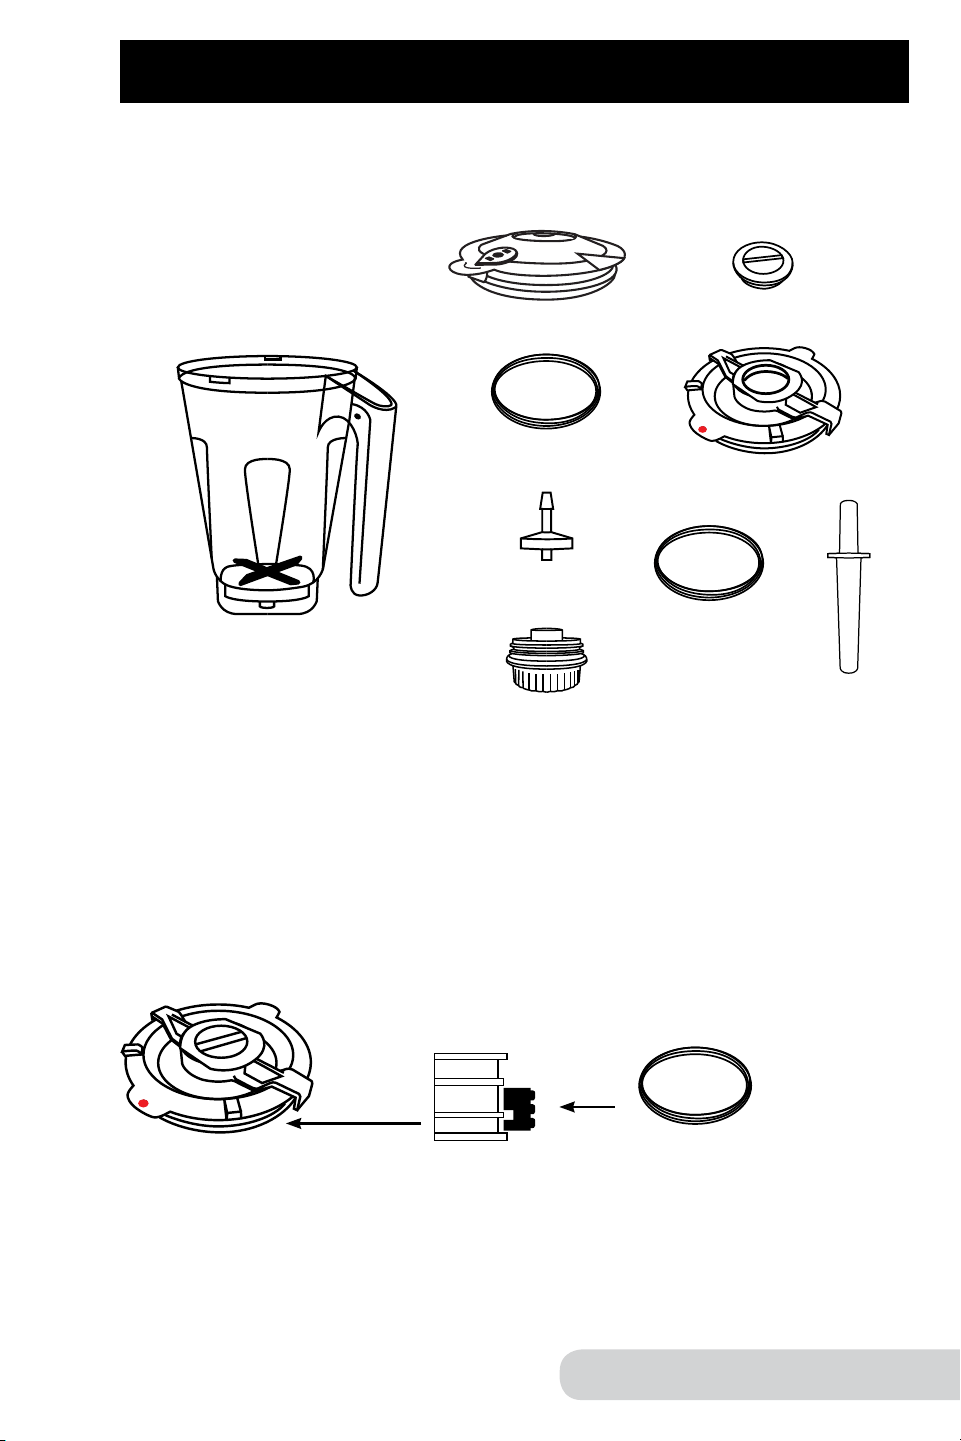

76 77
El Manual del Propietario
El Manual del Propietario
CUIDADO Y MANTENIMIENTO (Continuación)
Problema Solución(es):
La unidad no enciende:
1. El enchufe puede no estar en la toma de corriente.
Conecte la unidad.
2. El Interruptor de encendido rojo en el lado derecho
de la Base puede no estar encendido. Verifique si el
Interruptor está encendido.
La Licuadora no
funciona aún cuando
está conectada y el
Botón e Interruptor
están encendidos:
1. La Tapa del Vaso no está correctamente. Alinee el
punto rojo en la parte superior de la tapa con el mango
del Vaso y presione la Tapa hacia abajo firmemente
para asegurarla sobre el Vaso.
2. La Tapa de Vacío puede no estar bien cerrada. Alinee
los seguros de bloqueo de la Tapa con las lengüetas
del Vaso y fíjelos en él.
La Licuadora no
está funcionando
a una velocidad lo
suficientemente alta
para su receta:
1. La perilla no está en la configuración correcta. Gire la
perilla a la configuración adecuada según la receta.
2. El Vaso está sobrecargado. Reduzca la cantidad de
ingredientes.
La Licuadora no
está aspirando
el aire del Vaso:
1. "Vacuum ON/OFF" no está activado. Presione "Vacuum
ON/OFF" antes de mezclar.
2. La perilla no está en la configuración correcta. Gire la
perilla a "Vacumm Only".
3. La Válvula de Liberación en la Tapa está en la posición
abierta. Gire la Válvula de Liberación a cerrado "Lock".
4. El Anillo de Sello puede estar suelto, instalado
incorrectamente o roto. Vuelva a instalar el Anillo de
Sello correctamente. Vea el ensamble del Anillo de
Sello de la Tapa en Cuidado y Mantenimiento. Si el
Anillo de Sello de la Tapa está roto, comuníquese con
Servicio al Cliente: 1-877-689-2838 o envíe un correo
electrónico a help@nuwavenow.com.
5. La Tapa de Vacío no está asegurada al Vaso. Alinee el
punto rojo en la Tapa con el mango del Vaso y presione
la Tapa de Vacío hacia abajo firmemente sobre el Vaso.
6. Podría estar usando el Tapón del Émbolo. Asegúrese
de usar el Tapón de Vacío.
7. El Brazo de Vacío no se fijó correctamente a la Tapa.
Baje el Brazo de Vacío en la Tapa de Vacío y presione
hacia abajo hasta que escuche un "clic".
La Tapa de Vacío no
abrirá después de
aspirar el aire:
La Válvula de Liberación en la Tapa de Vacío está en la
posición de "Bloqueo". Gire la Válvula de Liberación a la
posición abierta para abrir la tapa.
SOLUCIÓN DE PROBLEMAS
No sumerja la Base del Moxie en agua. Límpiela con
una esponja o paño húmedo y séquela.
PRECAUCIÓN
El cable de alimentación debe desconectarse de la fuente
de energía antes de insertar o extraer los accesorios y
antes de limpiarlo.
La Licuadora Moxie fue diseñada con una función de apagado automático
para evitar el sobrecalentamiento durante el uso. Si la licuadora se apaga
para enfriarse se podría detectar un olor. Desconecte la unidad y espere a
que se enfríe por completo. Para evitar el sobrecalentamiento, no procese a
velocidades más altas o más bajas que no son recomendadas.

78 79
El Manual del Propietario
El Manual del Propietario
Problema Solución(es):
La Licuadora se
obstruye y no funciona
de manera eficiente:
1. Ciertos ingredientes pueden causar obstrucción. Si
usa la Tapa del Émbolo, retire el Tapón de la Tapa
e inserte el Émbolo a través del orificio. Presione
los ingredientes hacia abajo y alrededor hasta que
la mezcla se afloje alrededor del fondo del Vaso.
Si usa la Tapa de Vacío, desbloquee la Válvula de
Liberación, retire la Tapa y luego use el Émbolo para
raspar la mezcla y liberar los ingredientes.
2. Se están utilizando cantidades de ingredientes
superiores a las especificadas. No llene el Vaso por
encima de ¾ de su capacidad (1,5 litros, 51 fl oz).
3. Grandes trozos de hielo no se están licuando
adecuadamente. Use trozos de hielo más pequeños.
La mezcla licuada tiene
grumos o la textura no
es pareja:
Se ha formado una bolsa de aire (cavitación) y la mezcla
está demasiado fría o se ha solidificado en áreas y
las cuchillas están girando en la cavidad. Aumente la
temperatura reduciendo el hielo de la receta.
Se detectan ruidos o
movimientos inusuales
para el funcionamiento
normal de la licuadora:
1. El ensamble de cuchillas puede estar flojo, faltarle
una parte o estar posiblemente dañado. Apague
la licuadora y desconéctela inmediatamente. NO
desarme el ensamble de cuchillas. Llame a Servicio al
Cliente: 1-877-689-2838 o envíe un correo electrónico
a help@nuwavenow.com.
2. Es posible que objetos extraños de los ingredientes se
hayan puesto en el Vaso y emitan sonidos inusuales.
Antes de agregar ingredientes al Vaso para licuarlos,
limpie las frutas u otros ingredientes y elimine todos los
restos o cualquier otro objeto.
SOLUCIÓN DE PROBLEMAS (Continuación)
GARANTÍA LIMITADA
La Licuadora al Vacío NuWave Moxie
®
LAS GARANTÍAS DEL FABRICANTE
La Licuadora Digital al Vacío NuWave Moxie, incluyendo la Base de la
Licuadora, Vaso, Tapa del Émbolo, Tapón del Émbolo, Anillo de Sello de la Tapa
del Émbolo, Tapa de Vacío, Anillo de la Tapa de Vacío, Tapón de Vacío, Anillo O
al Vacío, Tapón de Vacío, Frasco de Almacenamiento y Émbolo, están libres de
defectos de fabricación. Todos los componentes eléctricos están garantizados
durante 5 años a partir de la fecha de compra, bajo uso doméstico normal y
cuando son operados de acuerdo con las instrucciones escritas del fabricante.
Todos los componentes eléctricos están garantizados por 1 año a partir de
la fecha de compra, bajo un uso doméstico normal y siempre que se hayan
manejado de acuerdo a las instrucciones por escrito del Fabricante
El Fabricante proporcionará las partes necesarias y mano de obra para reparar
cualquier parte de la Licuadora al Vacío NuWave Moxie el Departamento de
Servicio de NuWave, LLC. Una vez vencida la garantía, el costo de mano de
obra y las partes será responsabilidad del propietario.
LA GARANTÍA NO CUBRE
La Garantía Limitada se invalida si la reparación es hecha por un distribuidor
no autorizado o si la placa del número de serie es retirada o maltratada. El
deterioro normal del acabado, por uso o exposición, no está cubierto por esta
Garantía. Esta Garantía Limitada tampoco cubre fallas, daños o desempeño
inadecuado por accidentes, desastres naturales (tales como relámpagos),
fluctuaciones en la energía eléctrica, alteraciones, abuso, mal uso, ambientes
corrosivos, instalación inadecuada, o falla en la operación de acuerdo con las
instrucciones escritas por el Fabricante, uso no normal o comercial.
NuWave, LLC se reserva el derecho de invalidar la Garantía Limitada, donde
lo permita la ley, a los productos que hayan sido comprados a distribuidores
no autorizados.

80 81
El Manual del Propietario
El Manual del Propietario
PARA OBTENER EL SERVICIO
El propietario tendrá la obligación y responsabilidad de: Pagar por todos los
servicios y partes no cubiertas por la garantía; pagar por adelantado el envío
hacia y desde el Departamento de Servicio para cualquier pieza o sistema
devuelto bajo esta garantía; Empacar cuidadosamente el producto utilizando
el material de relleno adecuado para prevenir cualquier daño durante el
tránsito. El empaque original es ideal para este propósito.
Incluya en el empaque el nombre del propietario, dirección, teléfono durante
el día, una descripción detallada del problema y su “número RGA”. Llame
al 1-877-689-2838 o escriba a help@nuwavenow.com para obtener el RGA
(Número de Autorización de Devolución del Producto). Proporcione el modelo
del producto, el número de serie y comprobante de la fecha de compra (una
copia del recibo) cuando reclame su garantía.
OBLIGACIONES DEL FABRICANTE
La obligación del Fabricante bajo esta Garantía Limitada está limitada, hasta
lo permitido por ley, a reparar o reemplazar cualquier parte cubierta por esta
Garantía Limitada cuya revisión muestre que el defecto es por uso normal.
La Garantía Limitada aplica únicamente en los Estados Unidos y sólo para el
comprador original en los canales de distribución autorizados por el fabricante.
LA GARANTÍA LIMITADA NO PUEDE SER ALTERADA, CAMBIADA O
EXTENDIDA EXCEPTO POR UN INSTRUMENTO POR ESCRITO REALIZADO
POR EL FABRICANTE. LA SOLUCIÓN DE REPARACIÓN O REEMPLAZO
INCLUIDA EN ESTA GARANTÍA ES EXCLUSIVA. EN NINGÚN CASO EL
FABRICANTE SERÁ RESPONSABLE DE NINGÚN DAÑO RELEVANTE
O FORTUITO A ALGUNA PERSONA, SEA O NO OCASIONADO POR LA
NEGLIGENCIA DEL FABRICANTE, INCLUYENDO, SIN LÍMITE, DAÑOS POR
PÉRDIDA POR USO, COSTOS POR REEMPLAZO, DAÑO A LA PROPIEDAD,
U OTRAS PÉRDIDAS MONETARIAS.
GARANTÍA LIMITADA (Continuación)GARANTÍA LIMITADA (Continuación)
Algunos estados no permiten la exclusión o limitación de daños relevantes o
fortuitos, así que la exclusión mencionada podría no aplicar. Esta Garantía
Limitada proporciona derechos legales específicos y podría haber otros
derechos que varíen entre estado y estado.
EXCEPTO POR LO QUE YA SE EXPRESÓ DE FORMA DIFERENTE, EL
FABRICANTE NO GARANTIZA EXPRESA O IMPLÍCITAMENTE POR LEY U
OTRAS, INCLUYENDO SIN LIMITACIONES, LAS GARANTÍAS IMPLÍCITAS
DE COMERCIALIZACIÓN Y EJERCICIO PARA UN PROPÓSITO PARTICULAR
A CUALQUIER OTRA PERSONA. LEA EL MANUAL DEL USUARIO. SI
TUVIERA ALGUNA DUDA SOBRE EL FUNCIONAMIENTO O LA GARANTÍA
DEL PRODUCTO, CONTACTE A NUWAVE, LLC.
LEA SU MANUAL DEL USUARIO: Si tuviera alguna duda sobre el
funcionamiento o la garantía del producto, contacte a NuWave, LLC
al: 1-877-689-2838 o escriba a help@nuwavenow.com.

82 83
El Manual del Propietario
El Manual del Propietario
nuwavenow.com
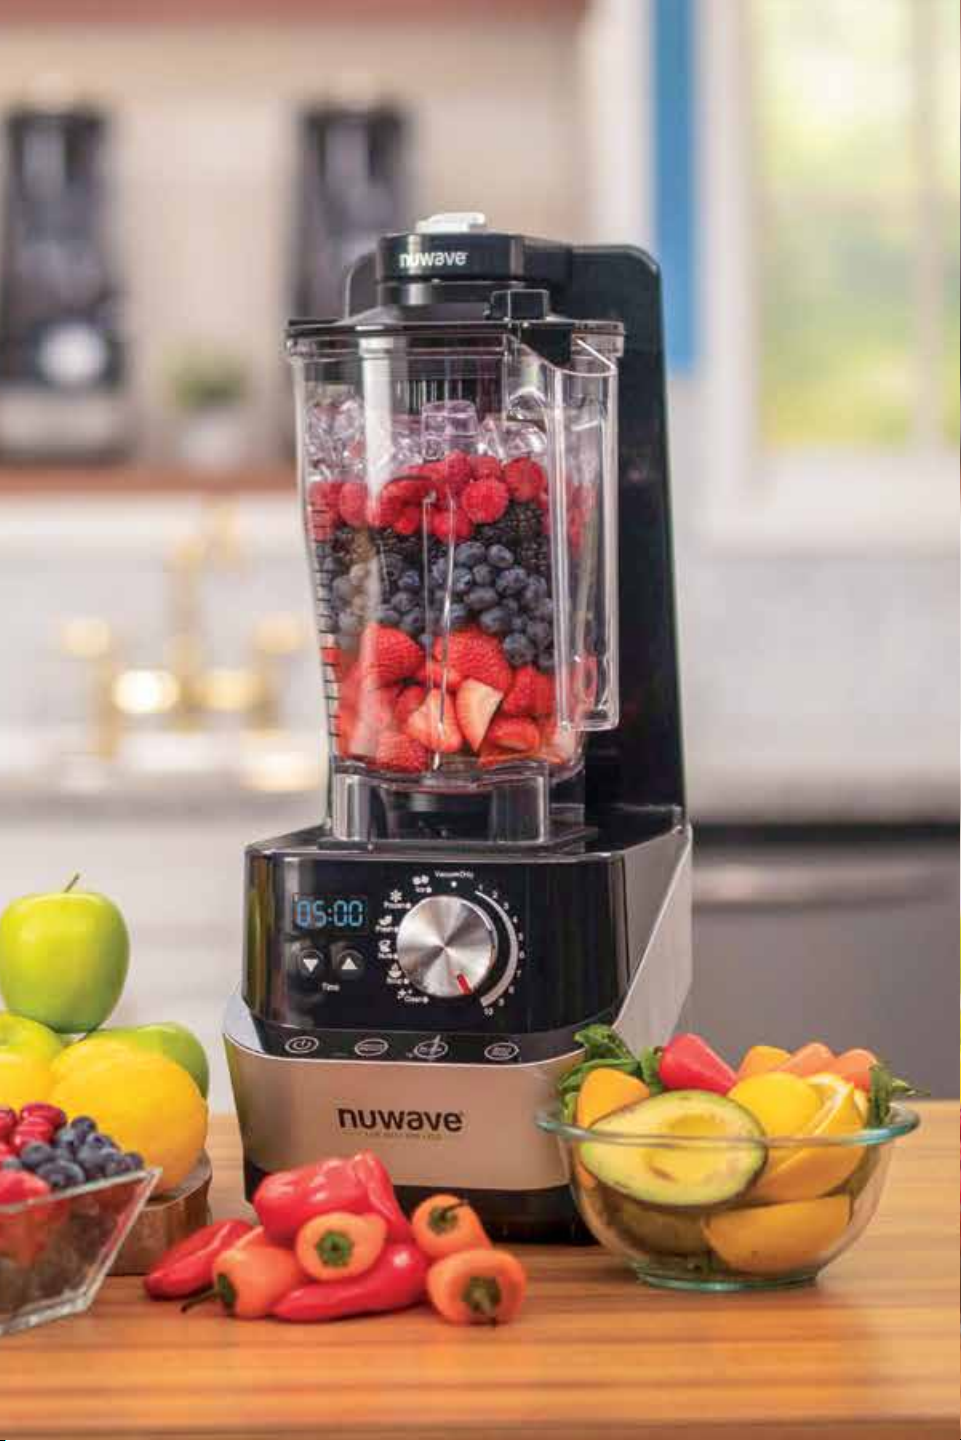
82 83
El Manual del Propietario
El Manual del Propietario
nuwavenow.com
Item No: BM 28001
Rev. 15 AA
06-08-18
Model: 28001, 120V, 60Hz, 1500 Watts
For patent information please go to: www.nuwavenow.com/legal/patent
Designed & Developed in USA by:
NuWave, LLC
1795 N. Butterfield Rd.
Libertyville, IL 60048, U.S.A.
Customer Service:
1-877-689-2838 • help@nuwavenow.com
Made in China
©2018 NuWave, LLC • All Rights Reserved.
www.nuwavenow.com
FOR HOUSEHOLD USE ONLY