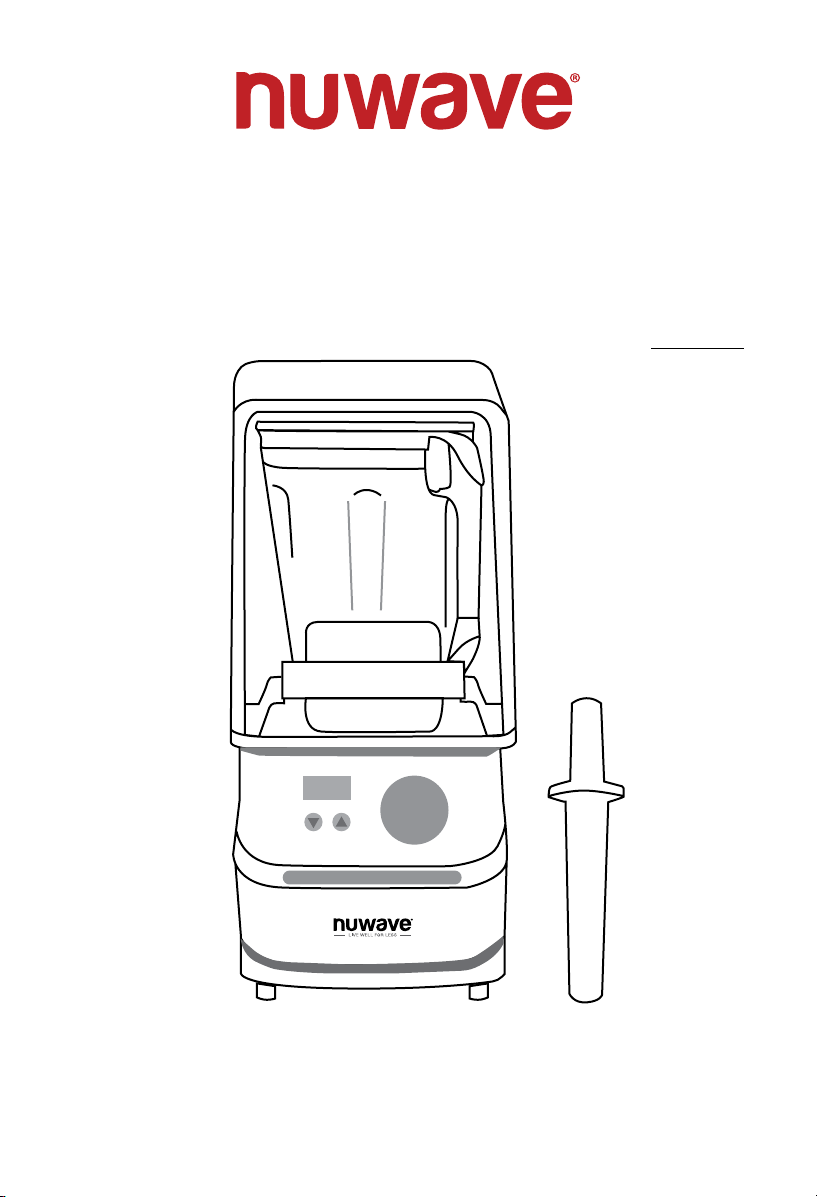
Owner’s Manual
Model 28301
Questions or Concerns?
Toll Free: 1-888-502-7807 • support@nuwavenow.com
(Mon-Fri 7:30am-4:30pm CST)
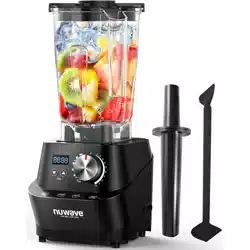
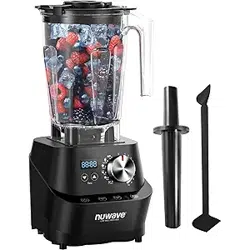
Infinity Blender
Noise Reduction
™
2
3
REGISTER
NOW!
As a special thank-you for registering your NuWave
®
Innity
Blender
™
Pro Plus, you’ll automatically receive an additional
12 months added to your limited manufacturer’s warranty!*
All you have to do is follow these simple steps.
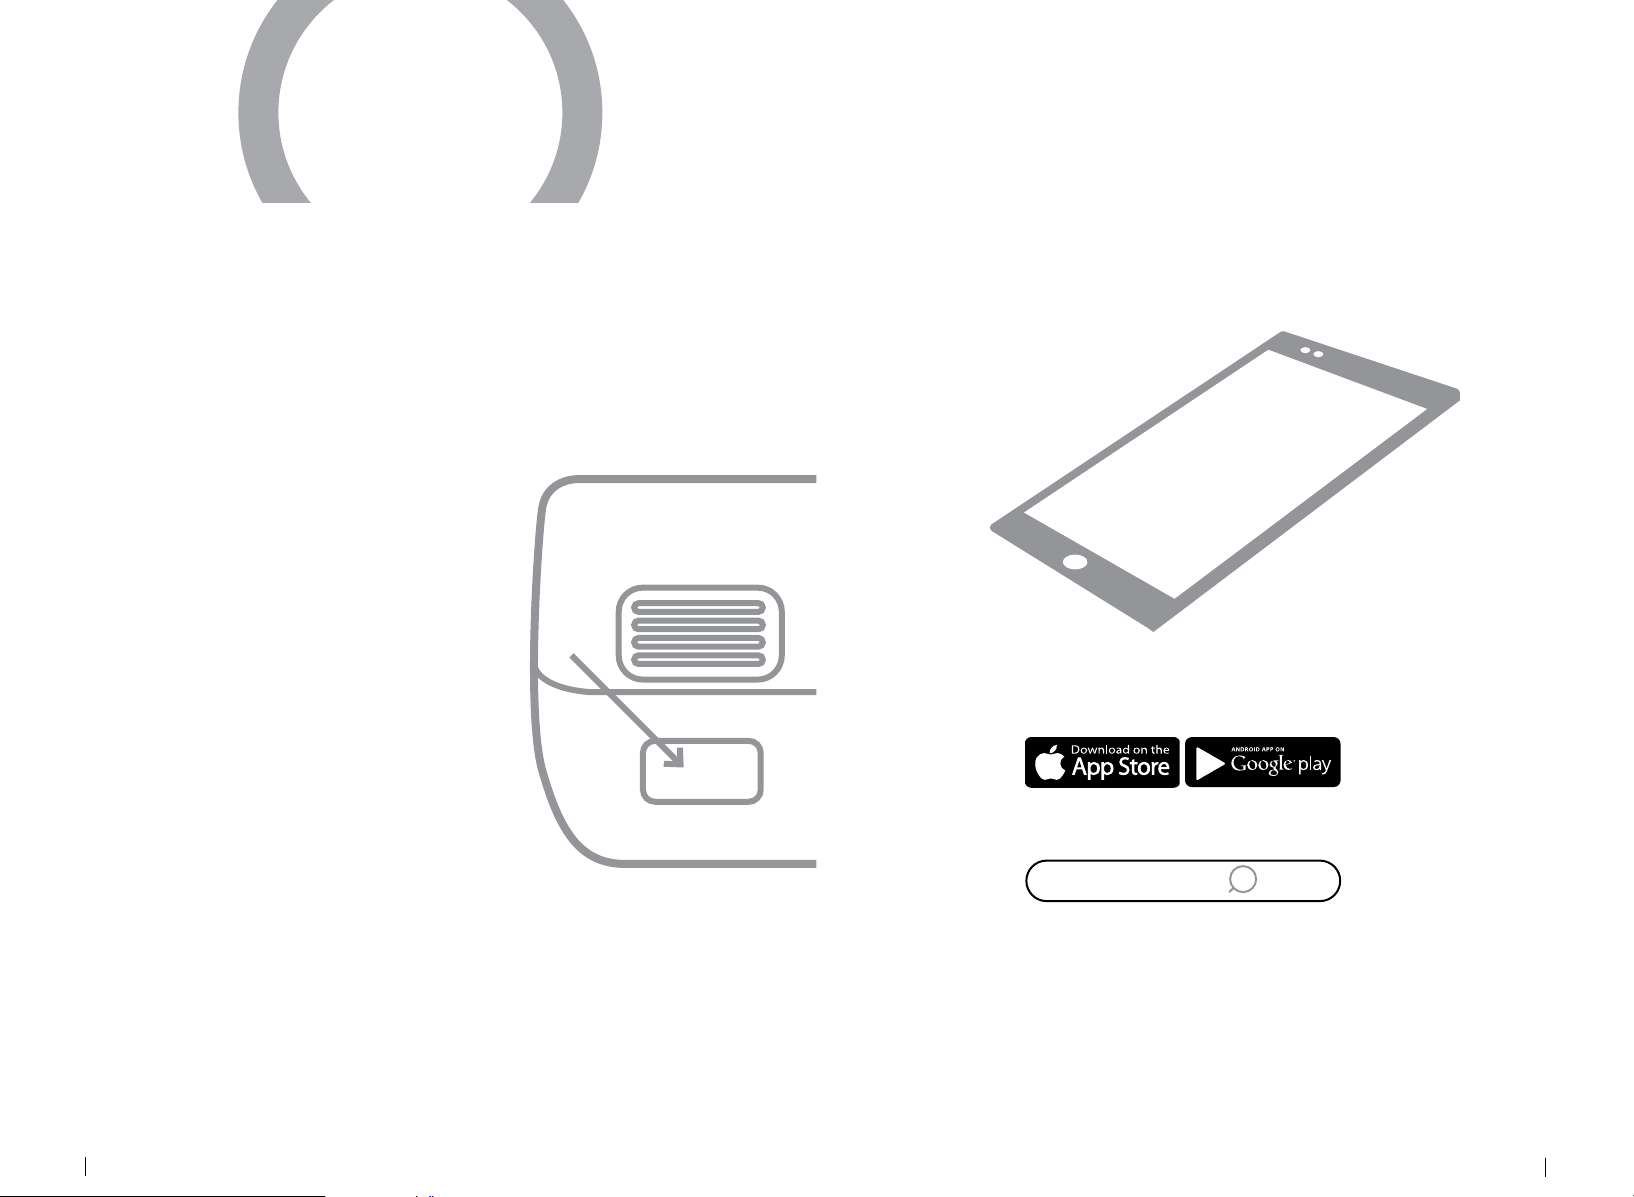
Using your smartphone or
smart device, scan the QR code
located on the back of the Innity
Blender
™
Pro Plus.
You will be directed to NuWave’s
product registration page with
your Innity Blender
™
Pro
Plus’ unique serial number
automatically entered in the
appropriate eld.
NOTE: If you do not have a
web-enabled smart device,
simply visit nuwavenow.com/
QR and manually enter in your
Innity Blender
™
Pro Plus’ serial
number.
Fill out the remaining information
and complete the optional survey.
Once you submit your
information, you will receive
a conrmation email containing
your extended warranty details.
1
2
3
4
*Register your product within 1 year of date of purchase for a free
12-month extension of your limited warranty.
12
for an additional
-month
warranty!
Open your mobile app store
(App Store, Google
™
Play).
Search for "QR code readers."
Simply download the QR code reader to your phone,
open it, scan the code and you are ready to go.
NOTE: You may need to open your downloaded QR
code reader each time you want to scan a QR code.
1
2
3
DOWNLOAD THE QR CODE
APP TO YOUR MOBILE DEVICE
QR code readers
nuwavenow.com

4
5
TABLE OF CONTENTS
IMPORTANT SAFEGUARDS
HOUSEHOLD USE ONLY • READ ALL INSTRUCTIONS BEFORE USE
ENGLISHImportant Safeguards
nuwavenow.com
Congratulations on your NuWave
®
Innity Blender
™
Pro Plus
purchase! We’re incredibly excited for you as you begin your
healthy home cooking journey with your new Innity Blender
™
.
We want to make sure you get the most out of your Innity
Blender
™
cooking experience, so we have provided detailed
instructions here in this manual for you to know all the ins and outs
to be a successful NuWave
®
home cook. We have also included
a Recipe Book which contains a variety of recipes written and
developed by our team of talented chefs.
We want every step of your NuWave
®
experience to be as easy and
rewarding as possible, so if you have any questions, comments, or
concerns, please don’t hesitate to contact our Customer Service
by calling 1-888-502-7807 or emailing support@nuwavenow.com
(Mon-Fri 7:30am-4:30pm CST).
Visit nuwavenow.com to see our other NuWave
®
products
and accessories.
#nuwavenow
Connect with us!
Welcome to the NuWave
®
Family!
Owner’s Manual
Important Safeguards ...............................................................6-8
Parts & Accessories ..................................................................... 9
Assembly Guide .................................................................... 10-11
Quick Start ............................................................................12-13
General Use ..........................................................................14-16
Cleaning & Maintenance ........................................................ 17-18
Troubleshoot Guide ................................................................19-20
Limited Warranty ....................................................................20-23
Spanish....................................................................................24-47
Replacement Parts .................................................................48-49

nuwavenow.com
6
7
IMPORTANT SAFEGUARDS
HOUSEHOLD USE ONLY • READ ALL INSTRUCTIONS BEFORE USE
important safeguards
ENGLISHImportant Safeguards
WARNING: When using the Innity Blender
™
Pro Plus, basic
safety precautions should always be followed:
1. DO NOT immerse the Blender Base, cord, plug, or any part of
the main Infinity Blender
™
Pro Plus in water or any other liquids
to protect against the risk of electrical shock.
2. ALWAYS be aware when any appliance is used near children
to ensure that the children do not play with the appliance.
The Infinity Blender
™
Pro Plus is not intended to be used
by children, people with reduced physical, sensory, mental
capabilities, or those unfamiliar with the Infinity Blender
™
Pro
Plus.
3. ALWAYS avoid contact with moving parts.
4. DO NOT operate the Infinity Blender
™
Pro Plus with a damaged
cord or plug, if the appliance malfunctions, is dropped, or
is damaged in any manner. Contact Customer Service* for
information on examination, repair, or adjustment.
5. NOT INTENDED FOR OUTDOOR USE. FOR HOUSEHOLD
USE ONLY.
6. ALWAYS make sure the Infinity Blender
™
Pro Plus is clean prior
to use.
7. DO NOT let the cord hang over the edge of the table or counter, or
allow it to come into contact with hot surfaces, such as a stove.
8. Discard the protective plastic covering the power plug before use.
9. DO NOT place or use the Infinity Blender
™
Pro Plus on or near
a hot gas or electric stovetop or burner, in a heated oven, close
to flammable materials, heating units, or in wet environments.
10. ALWAYS keep hands, utensils, and foreign objects out of the
Jar while blending to reduce the risk of severe injury to persons
or damage to blender. A scraper may be used, but only when
the blender is NOT running.
11. CAUTION! The Blades are sharp. Do not handle the Blades in
any way or attempt to remove them for cleaning.
12. ALWAYS operate the blender with the Lid and Jar correctly in
place. The Plunger Lid should be firmly put in place with the dot
properly lined up with the handle.
13. DO NOT operate the blender if abnormal sounds or motion is
detected. If a hard or foreign object comes into contact with the
Blades in the Jar, discard the objects.
14. DO NOT alter or modify any part of the blender, or use the
attachments not recommended by the manufacturer, as doing
so may cause fire, injury, or damage to property.
15. DO NOT use the Infinity Blender
™
Pro Plus for anything, or in
any manner, not intended by the manufacturer.
16. ALWAYS start with cold liquids when blending. DO NOT add
hot or boiling liquids in the Jar.
17. DO NOT fill the Jar above ¾ capacity (42oz).
18. NEVER knock the Jar against any surface to loosen stuck-on
ingredients. Always remove the Jar from the Infinity Blender
™
Pro Plus’s Base first, then use a rubber spatula to remove the
stuck-on ingredients from bottom of the Jar. Do not use metal
utensils as this can damage the Jar.
19. DO NOT shake or rattle the Jar while the blender is in use.
20. NEVER remove the Jar from the Infinity Blender
™
Pro Plus’s
Base until the blades have come to a complete stop.
21. DO NOT move the Infinity Blender
™
Pro Plus while it is in
operation. Only after the Infinity Blender
™
Pro Plus has
finished blending and has completely cooled should moving be
attempted. Always wait for the Infinity Blender
™
Pro Plus to cool
down prior to handling it.
22. ALWAYS turn off and unplug the Infinity Blender
™
Pro Plus from
the outlet when not in use, before putting on or taking off parts,
and before cleaning.
23. ALWAYS inspect the Infinity Blender
™
Pro Plus’ Blade assembly
after each use. If there are loose, damaged, or missing parts,
contact Customer Service*.
24. ALWAYS use extreme caution when inspecting or maintaining
the Infinity Blender
™
Pro Plus or any appliance.
25. NEVER operate the appliance with an external timer or
separate remote-control system.
ALWAYS KEEP THIS MANUAL
HANDY FOR FUTURE
REFERENCE.
8
9
IMPORTANT SAFEGUARDS
HOUSEHOLD USE ONLY • READ ALL INSTRUCTIONS BEFORE USE
important safeguards
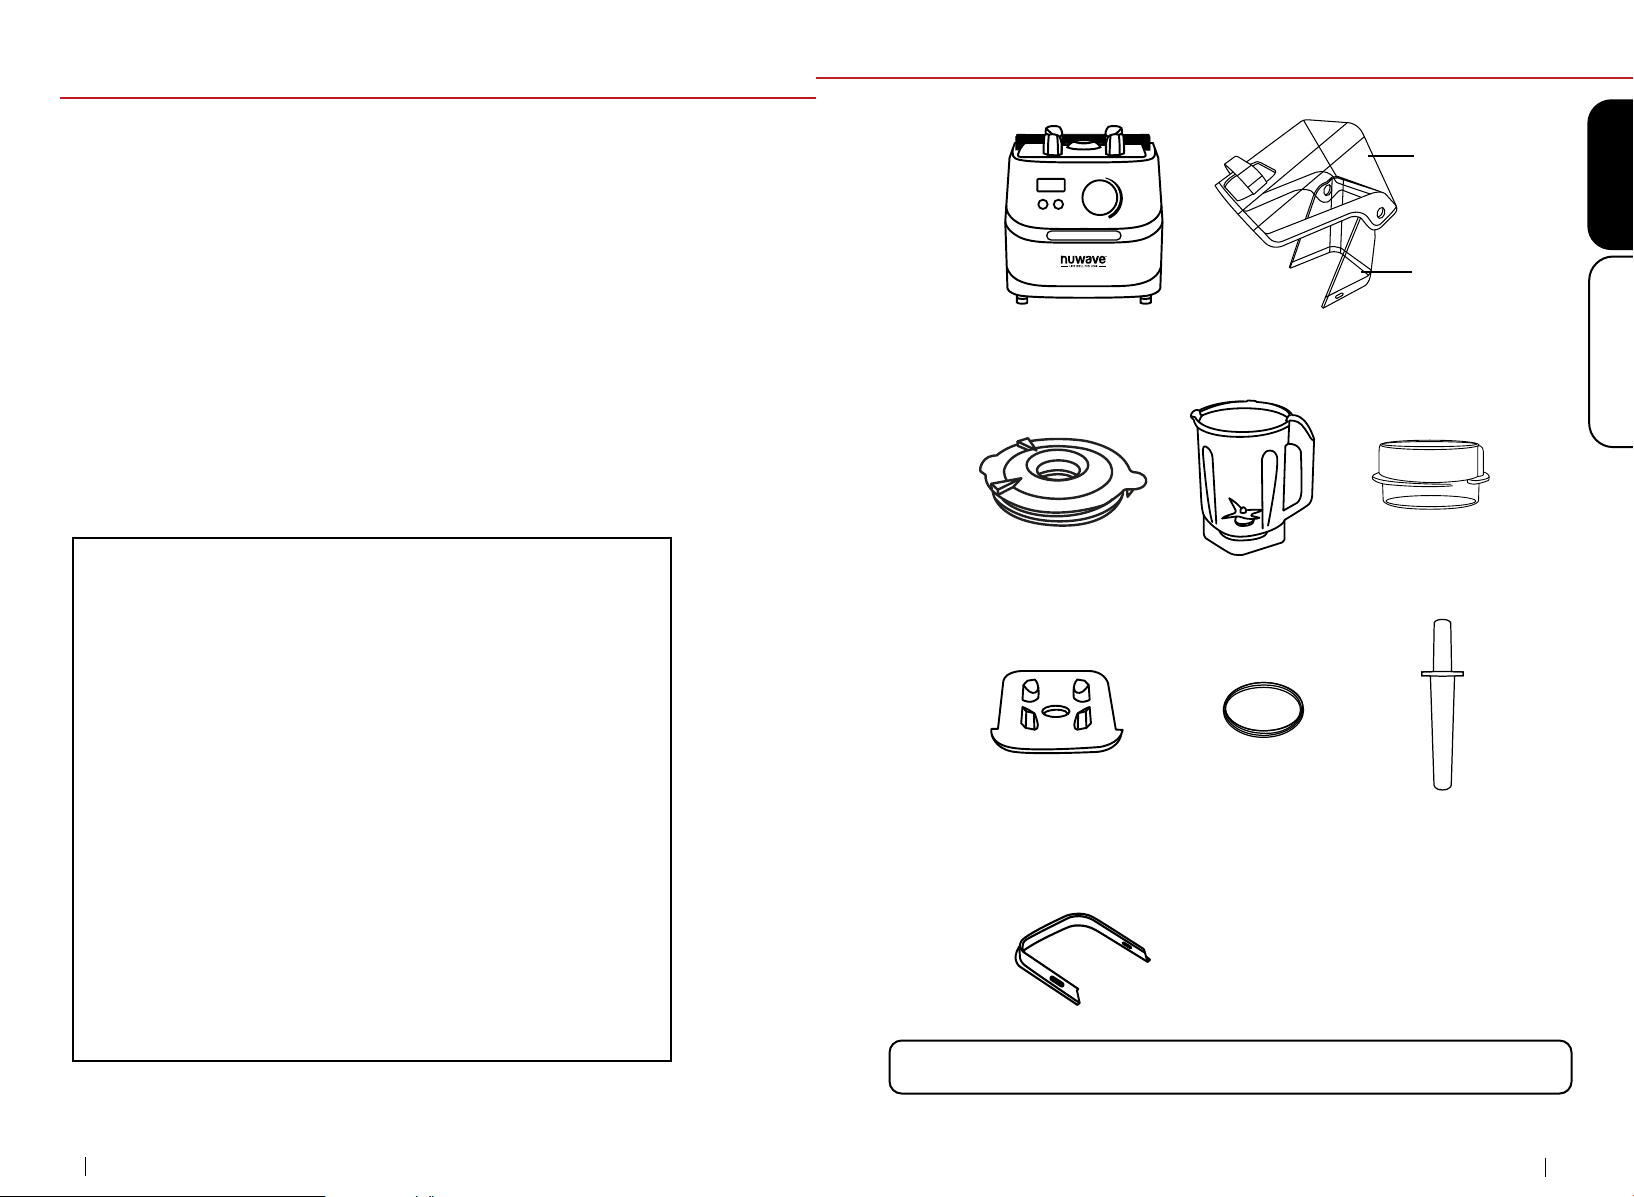
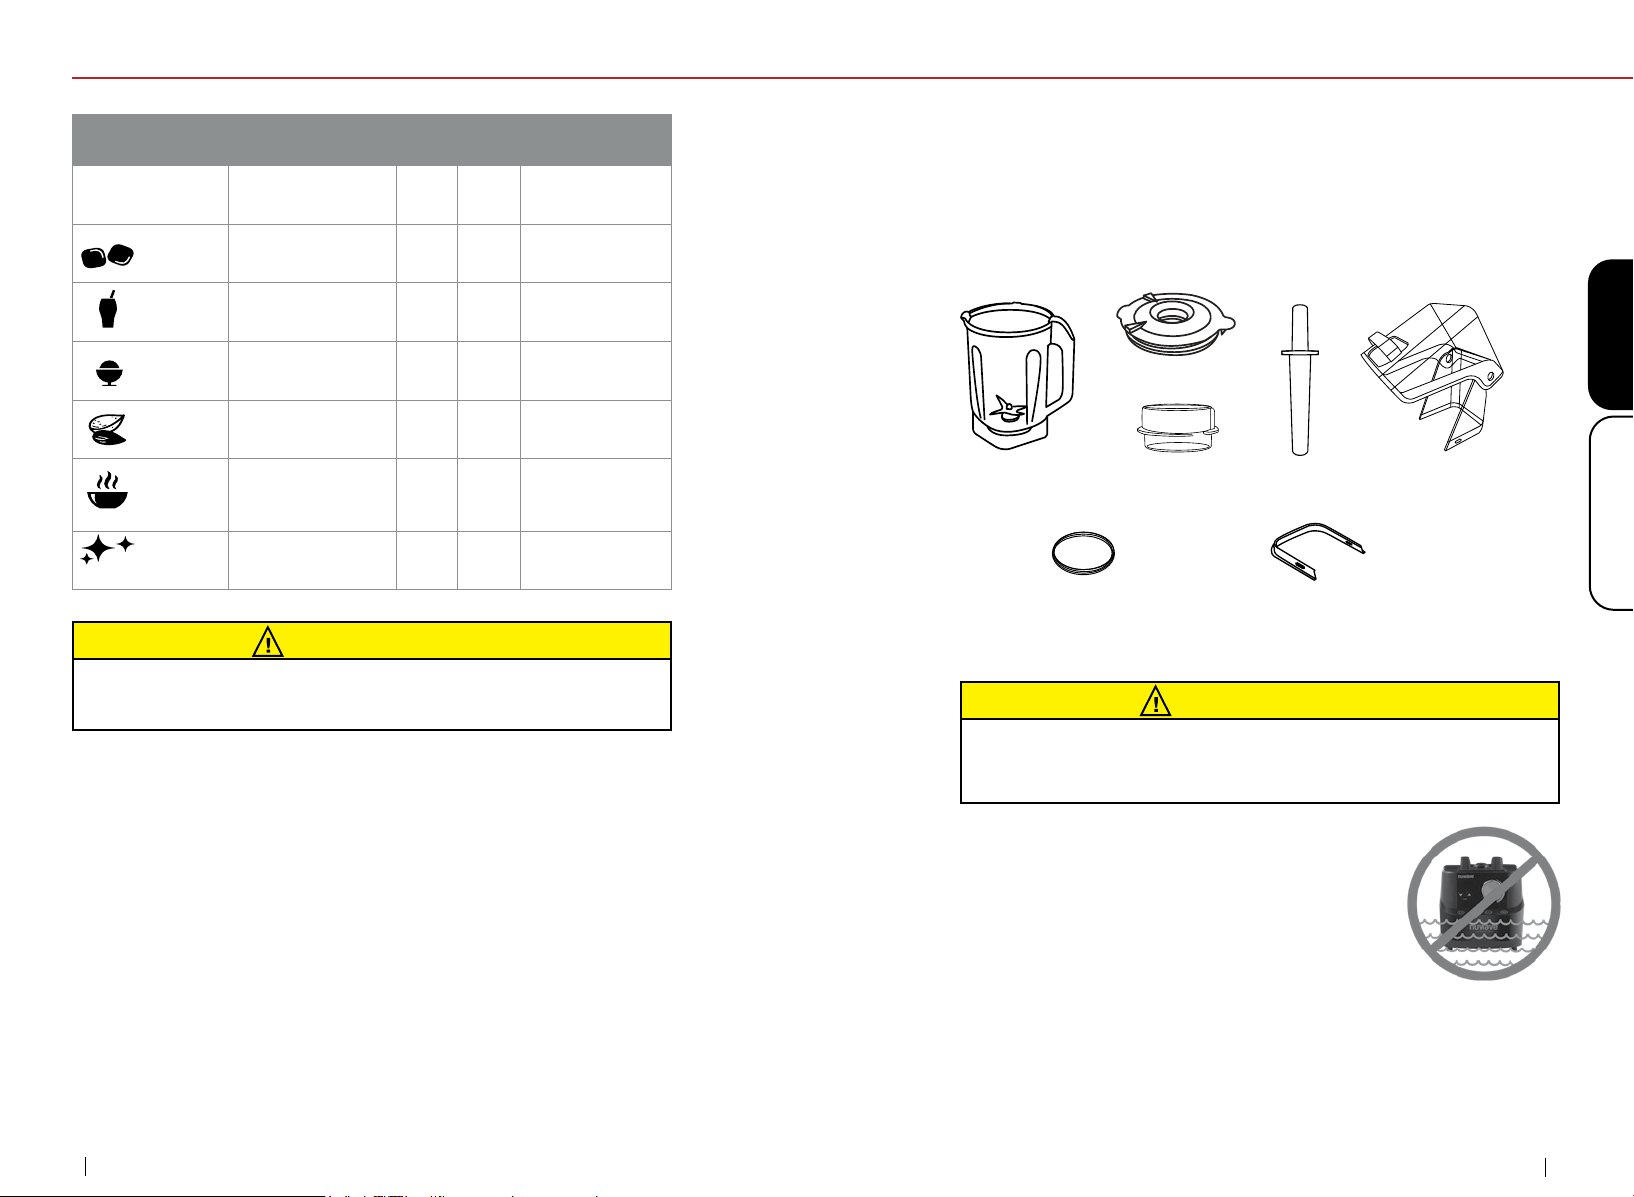
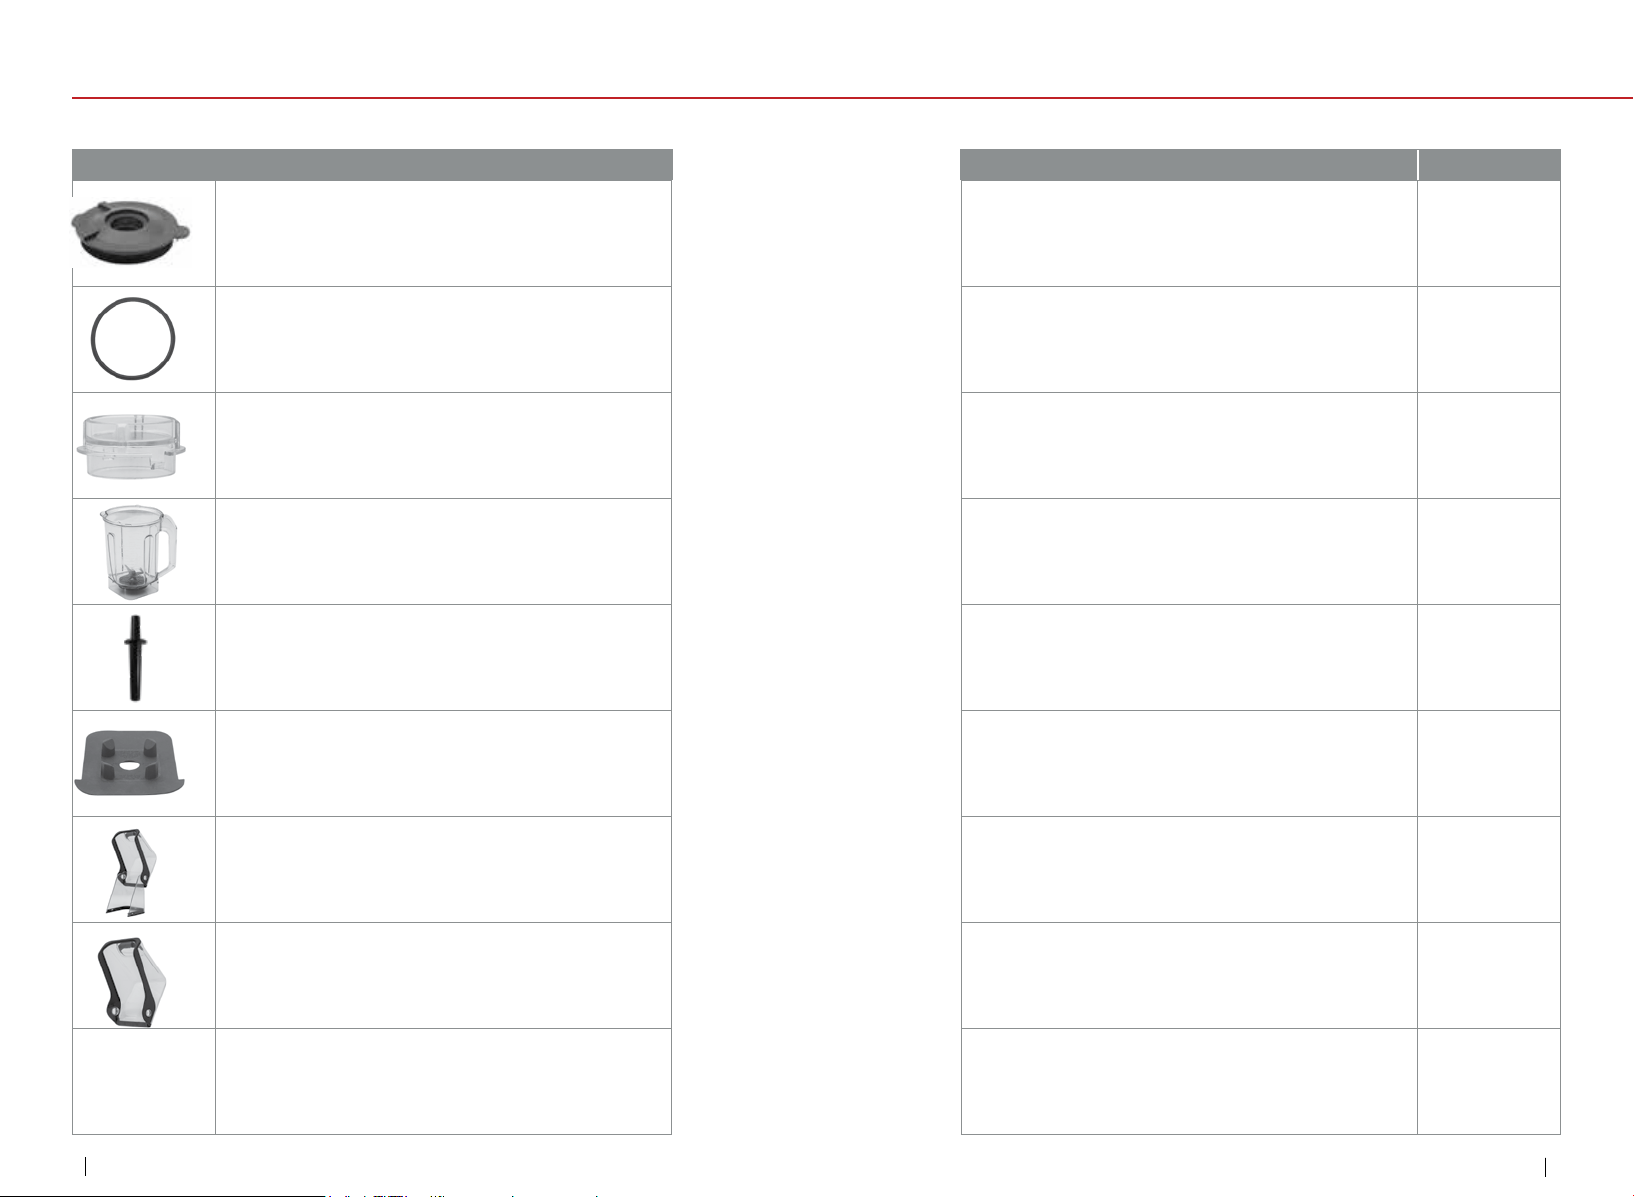
PARTS & ACCESSORIES
ENGLISHParts and Accessories
Electrical Information
A short power-supply cord (or detachable power-supply cord)
is provided to reduce the risk of becoming entangled in or
tripping over a longer cord. Longer detachable power-supply
cords or extension cords are available and may be used if care
is exercised in their use. If a longer detachable power-supply
cord or extension cord is used:
1. The marked electrical rating of the extension cord should be
at least as great as the electrical rating of the appliance.
2. The longer cord should be arranged so that it will not drape
over the countertop or tabletop where it could be pulled on
or tripped over.
3. The appliance has a polarized plug (one blade is wider
than the other). To reduce the risk of electric shock, this
plug is intended to fit into a polarized outlet only one way.
If the plug does not fit fully into the outlet, reverse the plug.
If it still does not fit, contact a qualified electrician. Do not
attempt to modify the plug in any way. If the appliance is of
the grounded type, the cord set or extension cord should be
a grounding-type 3-wire cord.
To order replaceable parts, head over to the Replaceable Parts and then call
Customer Service at 888-502-7807 or visit nuwavenow.com
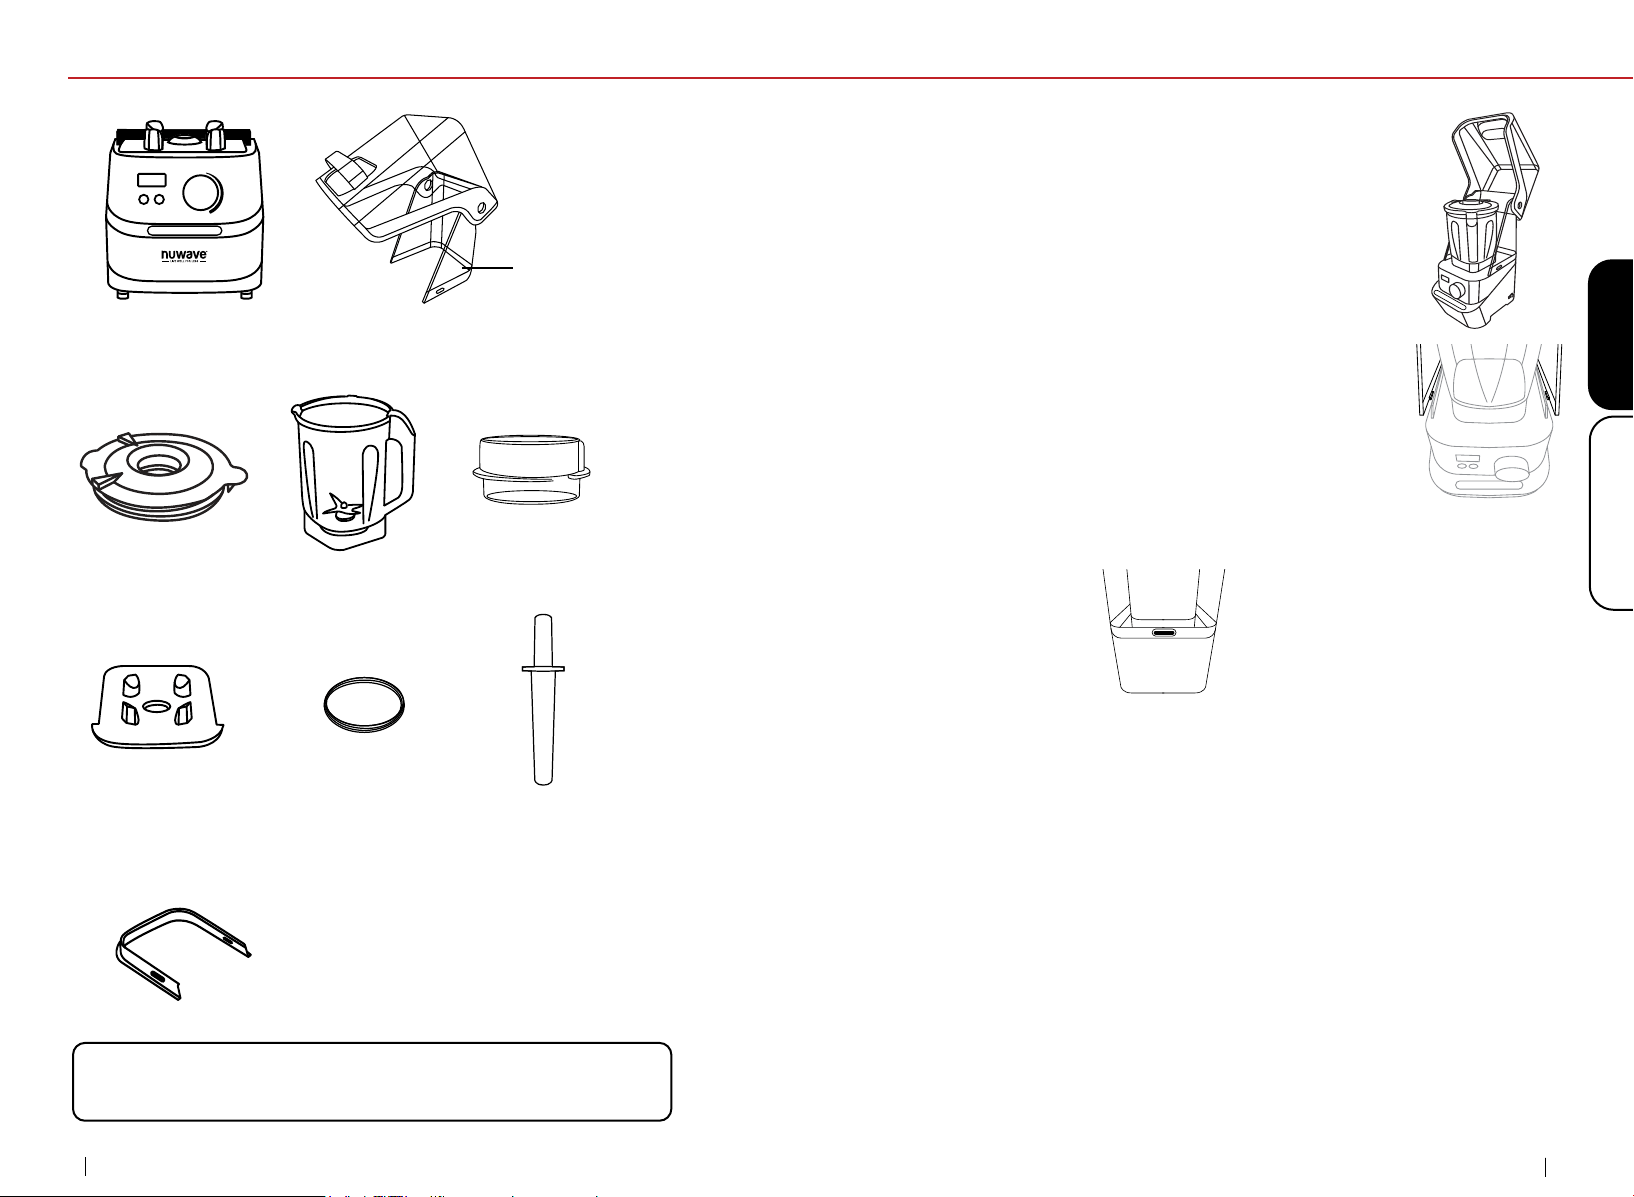
Blender Base
Part #: MRA2
Plunger Lid
Part #: MRA3
Jar with Blade
Part #: MRA1
Plunger Cap
Part #: MRA4
Back Cover
Part #: MRP3
Quiet Cover
Part #: MRA7
Door Cover
Part #: MRP2
Plunger
Part #: MRA6
Silicone Pad
Part #: MRA5
Plunger Lid Seal Ring
(comes assembled onto
Lid)
Part #: MRP1
Quiet Cover Silicone Lining
(comes assembled onto Quiet Cover)
Part #: MRP4
26. ALWAYS unplug the Infinity Blender
™
Pro Plus and contact
Customer Service* if a lot of smoke is escaping from the air
vent during operation. Note: It is normal for some smoke
to escape the Infinity Blender
™
Pro Plus when blending
for the first time. When blending for a long period of time,
steam may escape from the Plunger Cap.
27. ALWAYS have service provided by NuWave
®
LLC or a service
center authorized by manufacturer if any trouble arises during
operation.
*Customer Service Department.
1-888-502-7807 • support@nuwavenow.com
NOTICE: THE FAILURE TO FOLLOW ANY OF THE IMPORTANT
SAFEGUARDS, ADDITIONAL SAFEGUARDS, OR THE
INSTRUCTIONS FOR SAFE USE IS A MISUSE OF YOUR BRIO
THAT CAN VOID YOUR WARRANTY AND CREATE THE RISK OF
SERIOUS INJURY.
10
11
assembly guide
ASSEMBLY GUIDE
nuwavenow.com
ENGLISHAssembly Guide
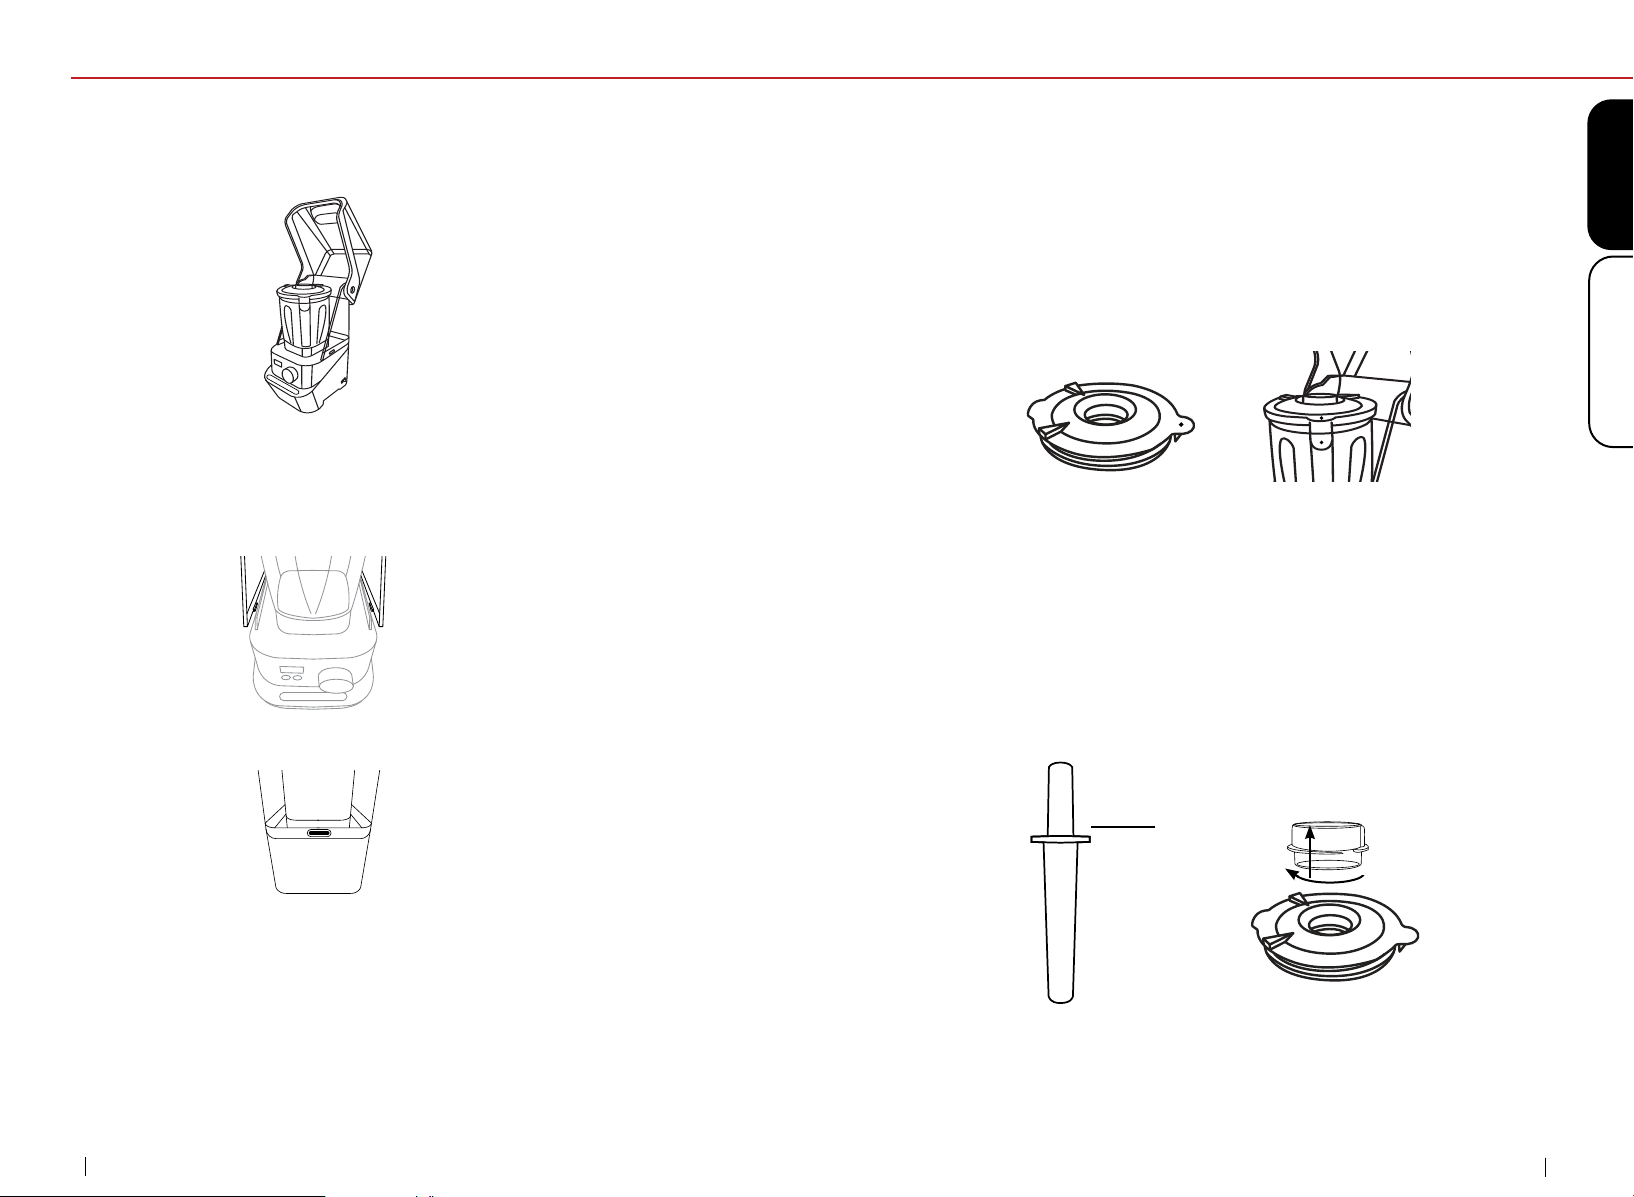
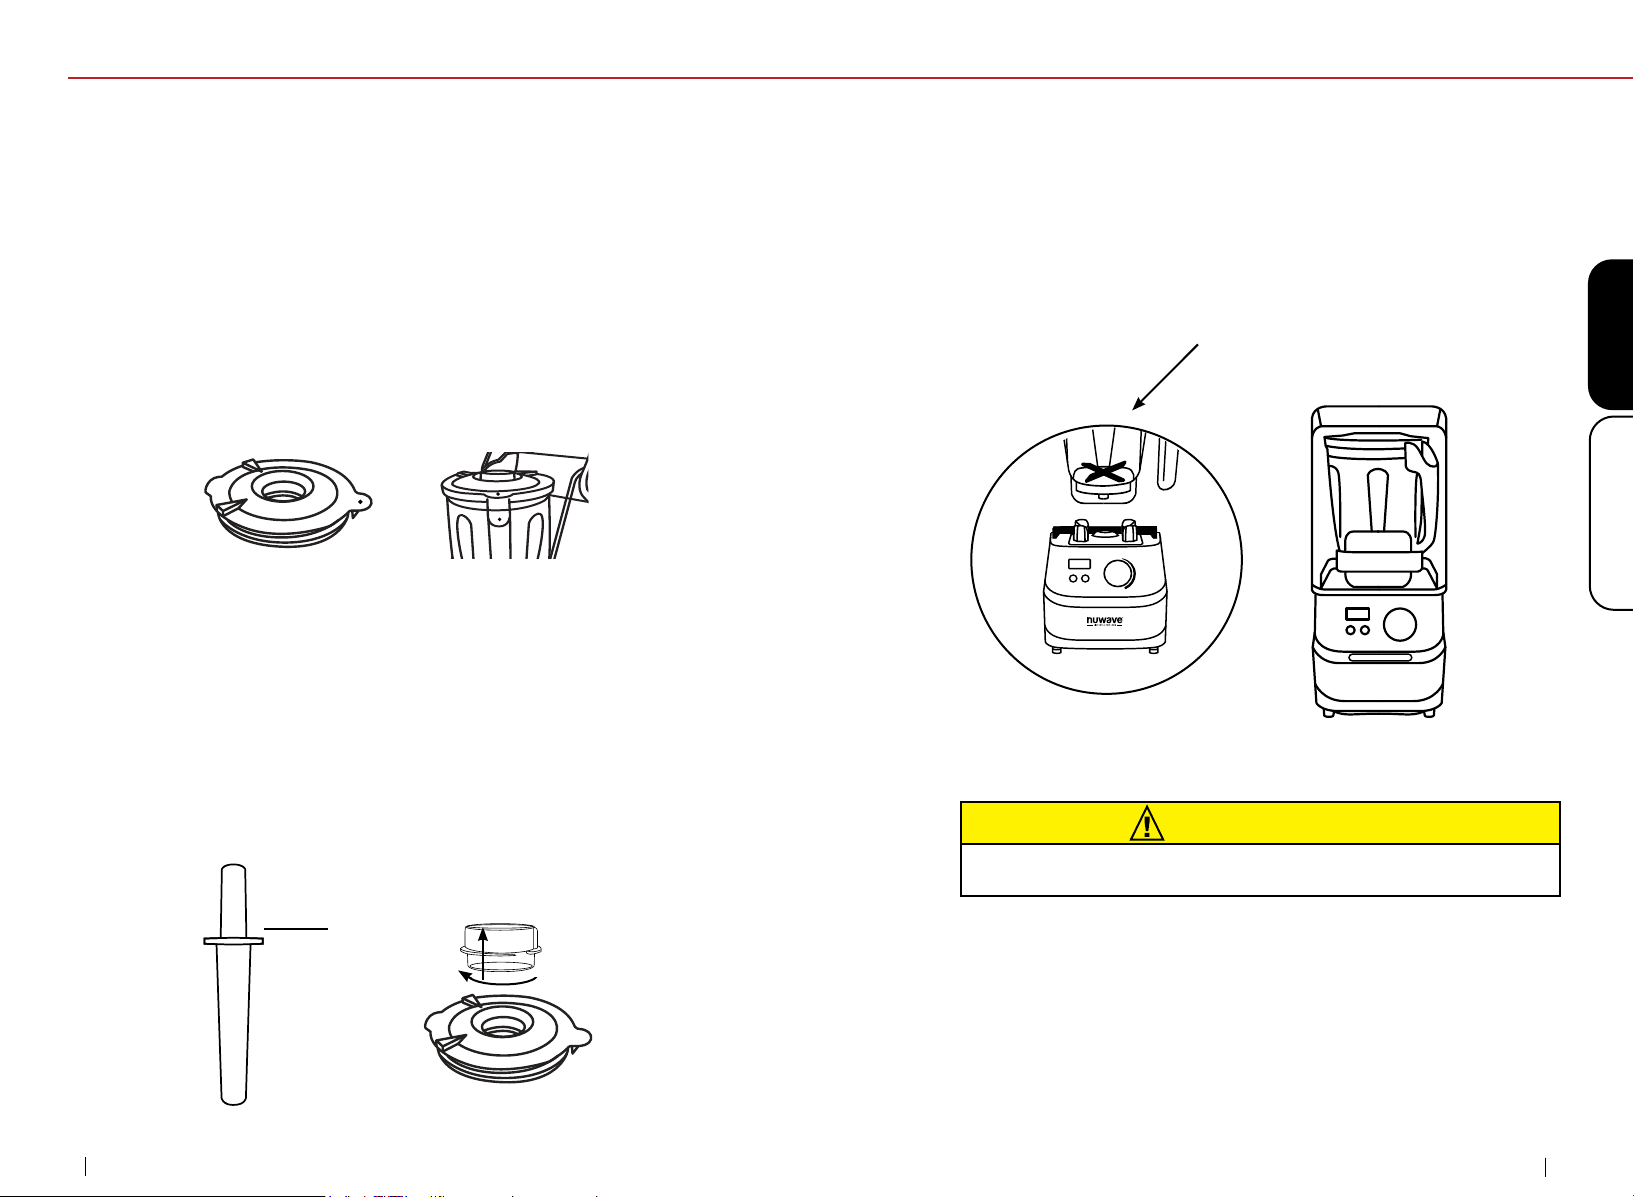
Removing the Quiet Cover
1. Turn the Innity Blender
™
Pro Plus off and unplug it from the
outlet. Lift the Door Cover handle to open the Door Cover.
2. To remove the Back Quiet Cover, apply pressure to two points
(left and right) to disengage the cover from locking tabs on the
motor plate.To avoid damaging the Quiet Cover, apply pressure
to the Back Quiet Cover frame, not the clear plastic material.
3. Disengage the 3rd lock tab located on the back of the Back Quiet
Cover.
4. To reinstall the Quiet Cover, gently spread the sides of the door
and place the door hinge cutouts over the round hinges. Secure
the hinge on the back rst before securing the sides.
Note: Do not disassemble the Quiet Cover unless it is absolutely
necessary to do so for cleaning or maintenance. If any part of the
Quiet Cover arrives broken or is not usable, contact Customer
Service to have the part(s) replaced.
Plunger Lid Assembly
1. Line up the red dot on the Plunger Lid with the handle.
2. Push down on the Plunger Lid until it sits rmly in place.
3. Align the Plunger Cap to the Plunger Lid and twist to secure.
• The Plunger Cap is removed when adding additional
ingredients while blending.
Note: The Plunger Lid Seal Ring and Silicone Pad are removable
for cleaning. Please see Cleaning & Maintenance.
Plunger
Using the Plunger
Remove the Plunger Cap by twisting it to the left to unlock it from
the Plunger Lid before inserting the Plunger.
When you are not using the Plunger, place the Plunger Cap in the
Plunger Lid and twist it to the right to lock it.
Note: The Plunger Lid’s hole is designed to be used with the
Plunger so that the Plunger cannot come in contact with the blades
when moving the ingredients.
12
13
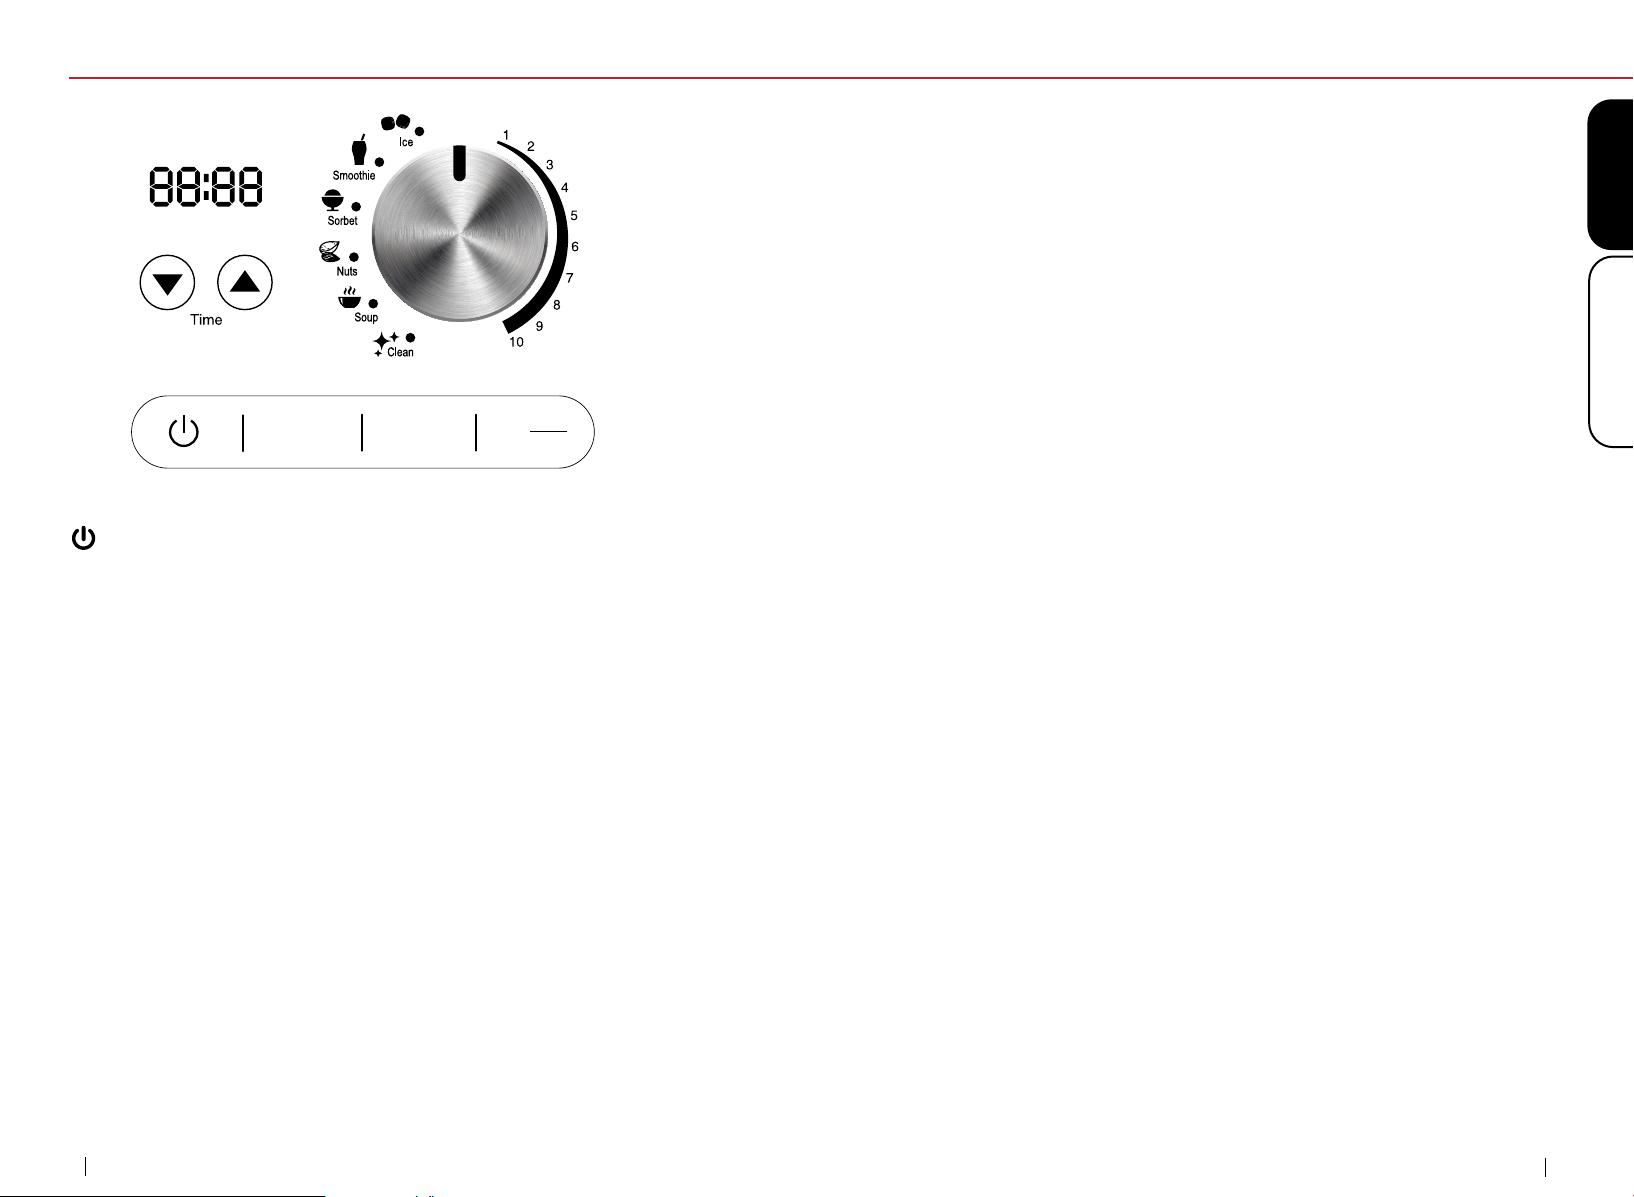
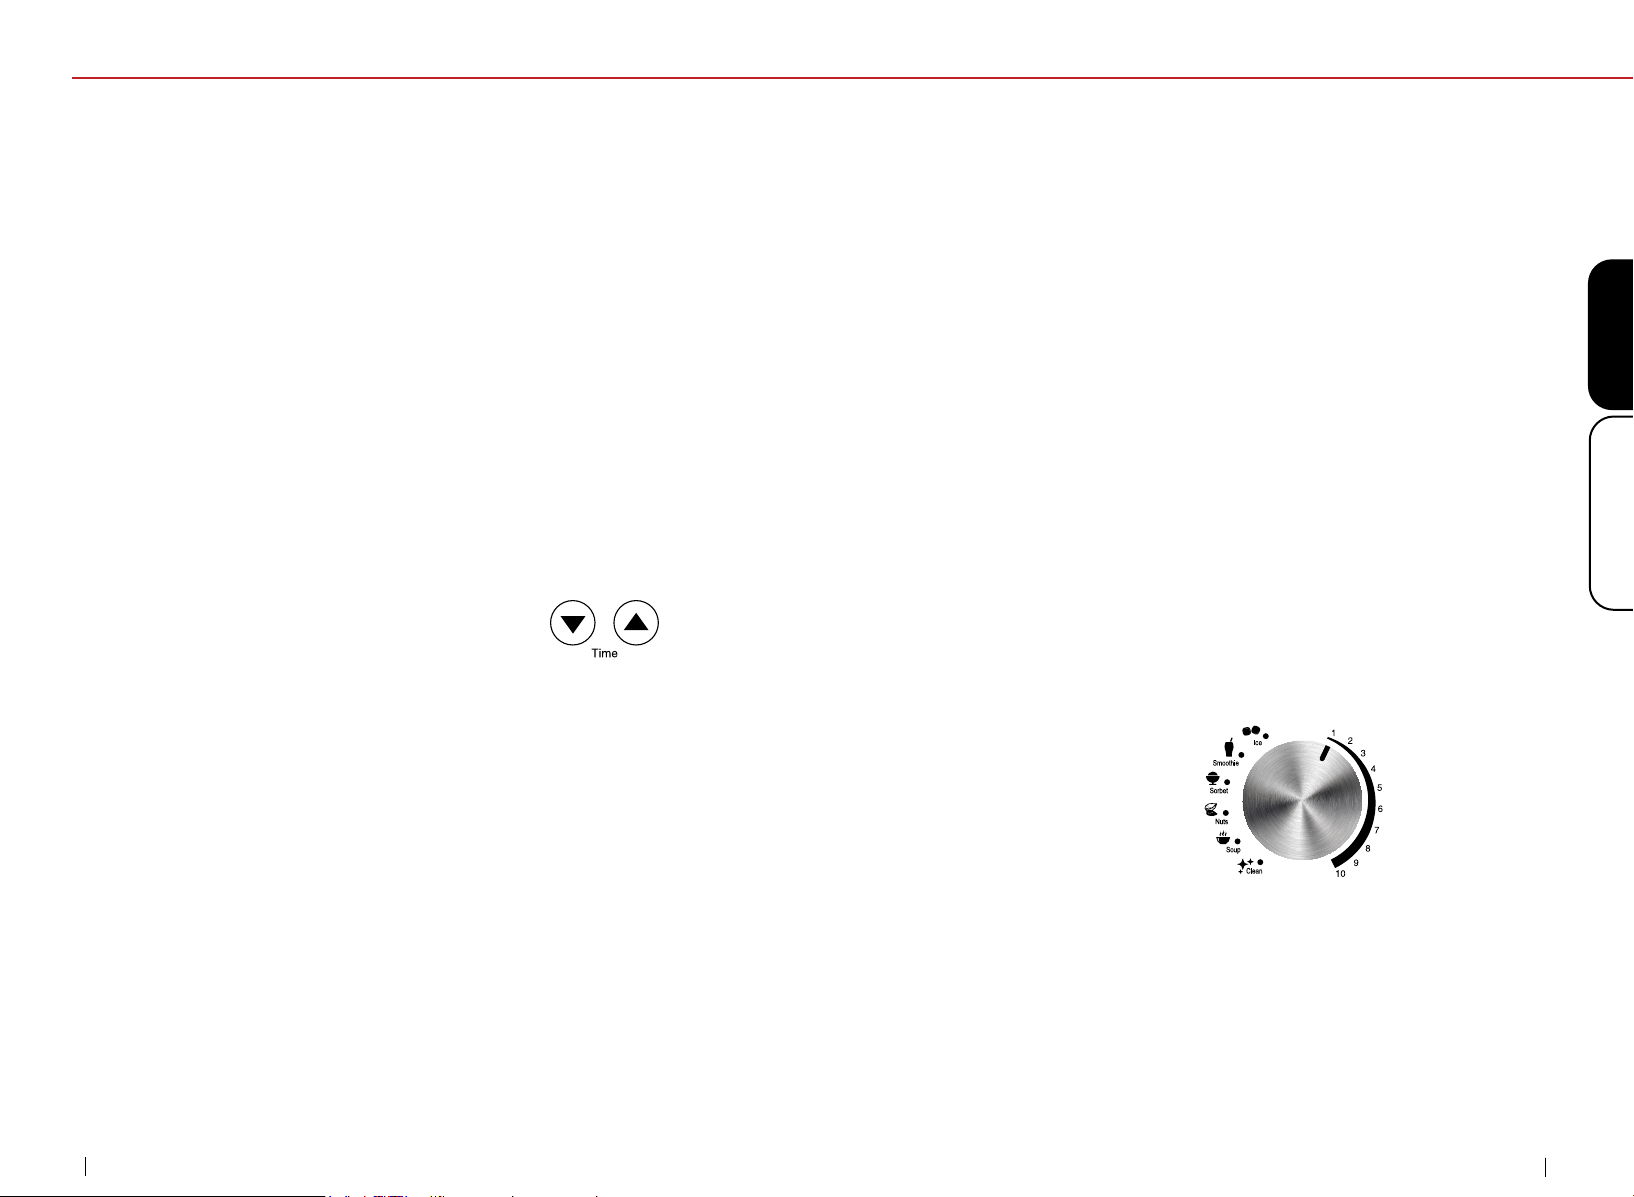
QUICK START
quick start
nuwavenow.com
ENGLISHQuick Start
: Turn the red main Power Switch, located on the right side of
the Blender Base, to ON. Press Power once to turn your Innity
Blender
™
Pro Plus on. Press Power again and then press the red
main Base Power Switch to OFF to turn your Infinity Blender
™
Pro
Plus off.
Start/Pause: Press Start/Pause to start and stop blending.
Note: Do not ll the Jar above ¾ capacity (42oz.). Please see
Instructions for more details.
Up and Down Arrows: The arrow buttons adjust the blending time.
• Set your time: The LED display will show the default time
for your selected setting. Times are displayed in minutes and
seconds. Adjustments can be made on all settings. Note:
When blending for a long period of time, liquids may become
hot and steam may escape from the Plunger Cap.
Pulse 1 & Pulse 2: Use either Pulse 1 or Pulse 2 for quick bursts
of high-powered blending. Pulse 2 has a higher RPM than Pulse
1. When using either Pulse 1 or Pulse 2, the LED display will show
the default time that you set and will remain displayed until you
change the setting.
0
Pulse
1
Pulse
2
Start
Pause
Numbered settings: The default time is 3 minutes. For standard
blending you can select from one of the numbered speed settings
between 1 and 10. Adjust to the desired time, then press Start/
Pause to begin blending.
Note: The lowest setting is #1 (5,000 RPM). The highest setting is
#10 (27,000 RPM).
Icon settings: These settings are for specialized blending tasks.
Each icon setting has the default time and RPM built in. Turn the
dial to the desired icon setting and press Start/Pause to begin
blending.
Note: Always start with cold liquids when blending. DO NOT add
hot liquids to the blender.
Cleaning your Innity Blender
™
Pro Plus Jar: Add water and
1-2 drops of liquid dish soap to your Jar, place it on the Base, and
close the Lid. Turn the dial to Clean. 00:15 will be shown on the
LED display. Adjust the time if desired, and then press Start/Pause.
Once nished, remove the Jar, rinse, and dry the Jar thoroughly
before using it again.
Note: For detailed instructions on cleaning refer to “Cleaning and
Maintenance.”

14
15
GENERAL USE
general use
nuwavenow.com
ENGLISHGeneral Use
1. Press Pulse 1 for short bursts of blending at low power (25%
Power).
• Press and hold Pulse 1 for continuous blending. The display
will show “3:00”. Once the button is released, blending will
end.
• The percentage of power used can be adjusted by holding
Pulse 1 and rotating the dial. The percentage will change in
10% increments.
2. Press Pulse 2 for short bursts of blending at high power (100%
Power)
• Press and hold Pulse 2 for continuous blending. The display
will show “3:00”. Once the button is released, blending will
end.
• The percentage of power used can be adjusted by holding
Pulse 2 and rotating the dial. The percentage will change in
10% increments.
Icon Setting
For more specialized blending tasks you
can select one of the preset icons with
the dial. Each icon setting has a default
time and RPM.
1. Turn the dial to your desired icon setting. The LED display will
show the default time.
2. Adjust the time, if needed, then press Start/Pause to begin
blending at your selected setting.
• If desired, increase or decrease the time at any point while
blending.
Notes:
• When blending for a long period of time, steam may escape from the
Plunger Cap.
• Always start with cold liquids when blending. DO NOT add hot
liquids to the blender.
• Do not fill the Jar above ¾ capacity (42oz.).
0
Getting Started
1. Turn the red main Power Switch, located on the right side of the
Blender Base, to ON.
• The Power button will flash.
2. Press Power once to turn your Infinity Blender
™
Pro Plus on.
The LED display will show the default time for the selected
setting.
3. Turn the dial to choose your desired blending function.
4. Press Start/Pause to start blending.
5. Press Start/Pause again to stop blending.
6. When the Infinity Blender
™
Pro Plus is finished blending, it will
beep 5 times and “0:00” will be displayed.
7. Press Power again and turn the red main Base Power Switch
to OFF to turn your Infinity Blender
™
Pro Plus off.
Time Setting
Use the Up and Down arrows to increase or
decrease the time on the display.
• Times are displayed in minutes and seconds.
• Blending times can be adjusted in 1-second
increments when using any setting.
Example:
Press Power. Turn the dial to Ice. “00:15” (15
seconds) will be displayed. Use the Up and Down arrows to adjust
the time. Press Start/Pause.
Numbered Settings
For standard blending, you can select your blending speed from
one of the numbered settings between 1 and 10.
1. Turn the dial to your desired setting between 1 and 10.
2. Adjust the time, if desired, then press Start/Pause to begin
blending at your selected setting.
3. Adjust the number setting using the dial at any point while
blending, if needed.
Pulse Function
The Infinity Blender
™
Pro Plus offers two Pulse functions where the
power settings are fully adjustable.
00:15
CLEANING & MAINTENANCEGENERAL USE
ENGLISHCleaning & Maintenance
general use
nuwavenow.com
16
17
Icon
Default
Min. : Sec.
Min.
Sec.
Max.
Min.
Notes
1-10 03:00 00:05 05:00 Adjustable speed
Ice 00:15 00:05 02:00 Ice-based drinks
Smoothie 00:35 00:05 02:00 Frozen drinks
Sorbet 00:30 00:05 02:00 Frozen desserts
Nuts 01:30 00:05 02:00 Jams and spreads
Soup 03:00 00:05 05:00 Soup and hot chocolate
Clean 00:15 00:05 02:00 Self-cleaning
CAUTION
Moving parts may become hot with extended use. DO NOT TOUCH.
Tips for Cleaning Your Infinity Blender
™
Pro Plus Jar:
• Add 1-2 cups of water and 1-2 drops of liquid dish soap to your
Jar, place it on the Base, and close the Lid.
• Turn the dial to Clean. “00:15” will be displayed. Adjust the time, if
desired, then press Start/Pause.
• Once finished, remove the Jar, rinse, and dry it thoroughly before
using it again.
For detailed instructions on cleaning your Infinity Blender
™
Pro
Plus see “Cleaning and Maintenance”.
Before First Use
Wash all removable parts in warm, soapy water or in the dishwasher,
top rack only. The Jar with Blade and Quiet Cover should be cleaned
by hand with warm, soapy water. The Jar can also be washed using
the Clean function. See “Instructions” for details.
Quiet Cover Cleaning
To clean the Quiet Cover, you will need to remove and replace it
as follows:
1. Lift the lid and then pull slightly outward on the sides of the
Quiet Cover to remove it from the side tabs. Pull it up to free the
Quiet Cover from the Innity Blender
™
Pro Plus.
2. Hand wash the Quiet Cover in warm, soapy water. Do not place
it in the dishwasher. Dry it thoroughly.
3. When the Quiet Cover is dry, assemble it by sliding it over the
Innity Blender
™
Pro Plus and securing the rear opening tab rst.
4. With the lip up, slightly pull the sides to allow the Quiet Cover
opening to connect with the side tabs on the motor base.
5. Ensure all tabs are engaged before using the Innity Blender
™
Pro Plus.
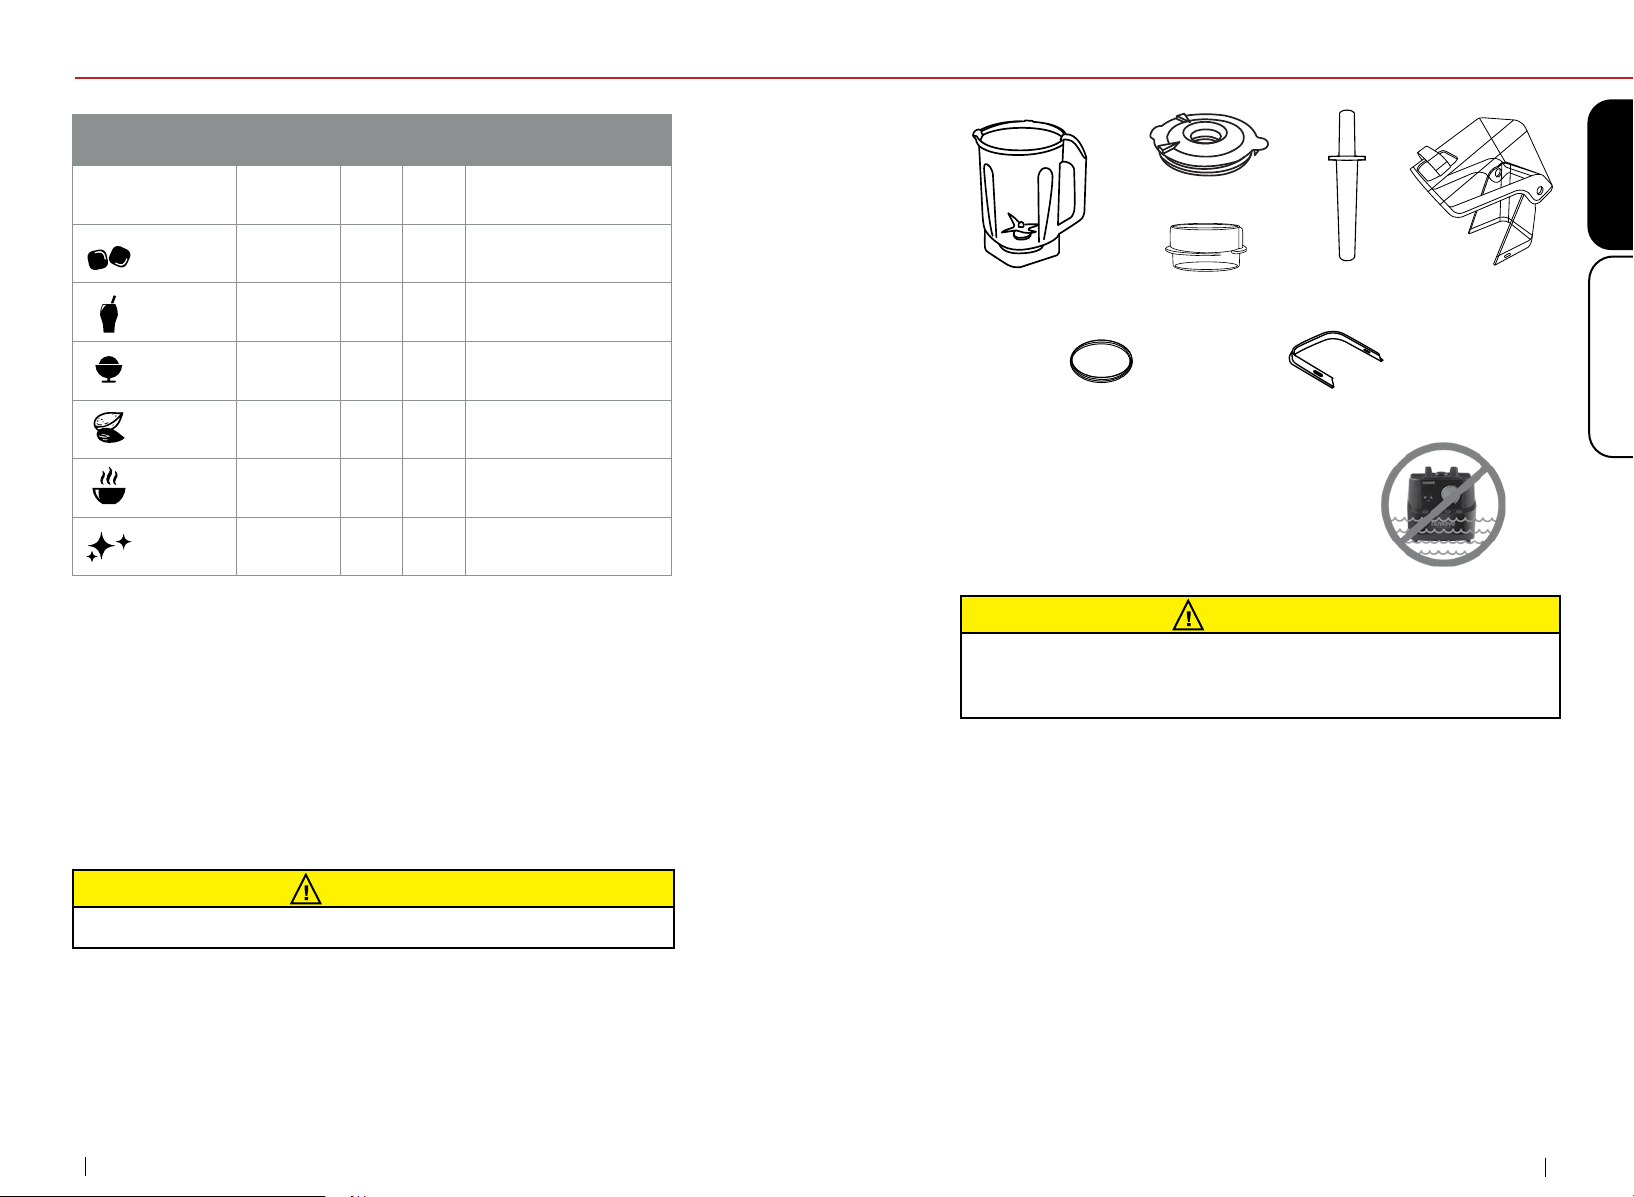
Jar with Blade
Plunger Cap
Plunger Lid
Plunger Lid Seal Ring
Quiet Cover Silicone
Lining
Quiet Cover
Plunger
Do not immerse the Blender Base in
water. Clean it with a damp sponge or
cloth and wipe dry.
CAUTION
The power cord needs to be unplugged from the power source
before inserting or removing any parts or attachments and before
cleaning.
18
19
TROUBLESHOOTING GUIDECLEANING & MAINTENANCE
cleaning & maintenance
nuwavenow.com
ENGLISHTroubleshooting Guide
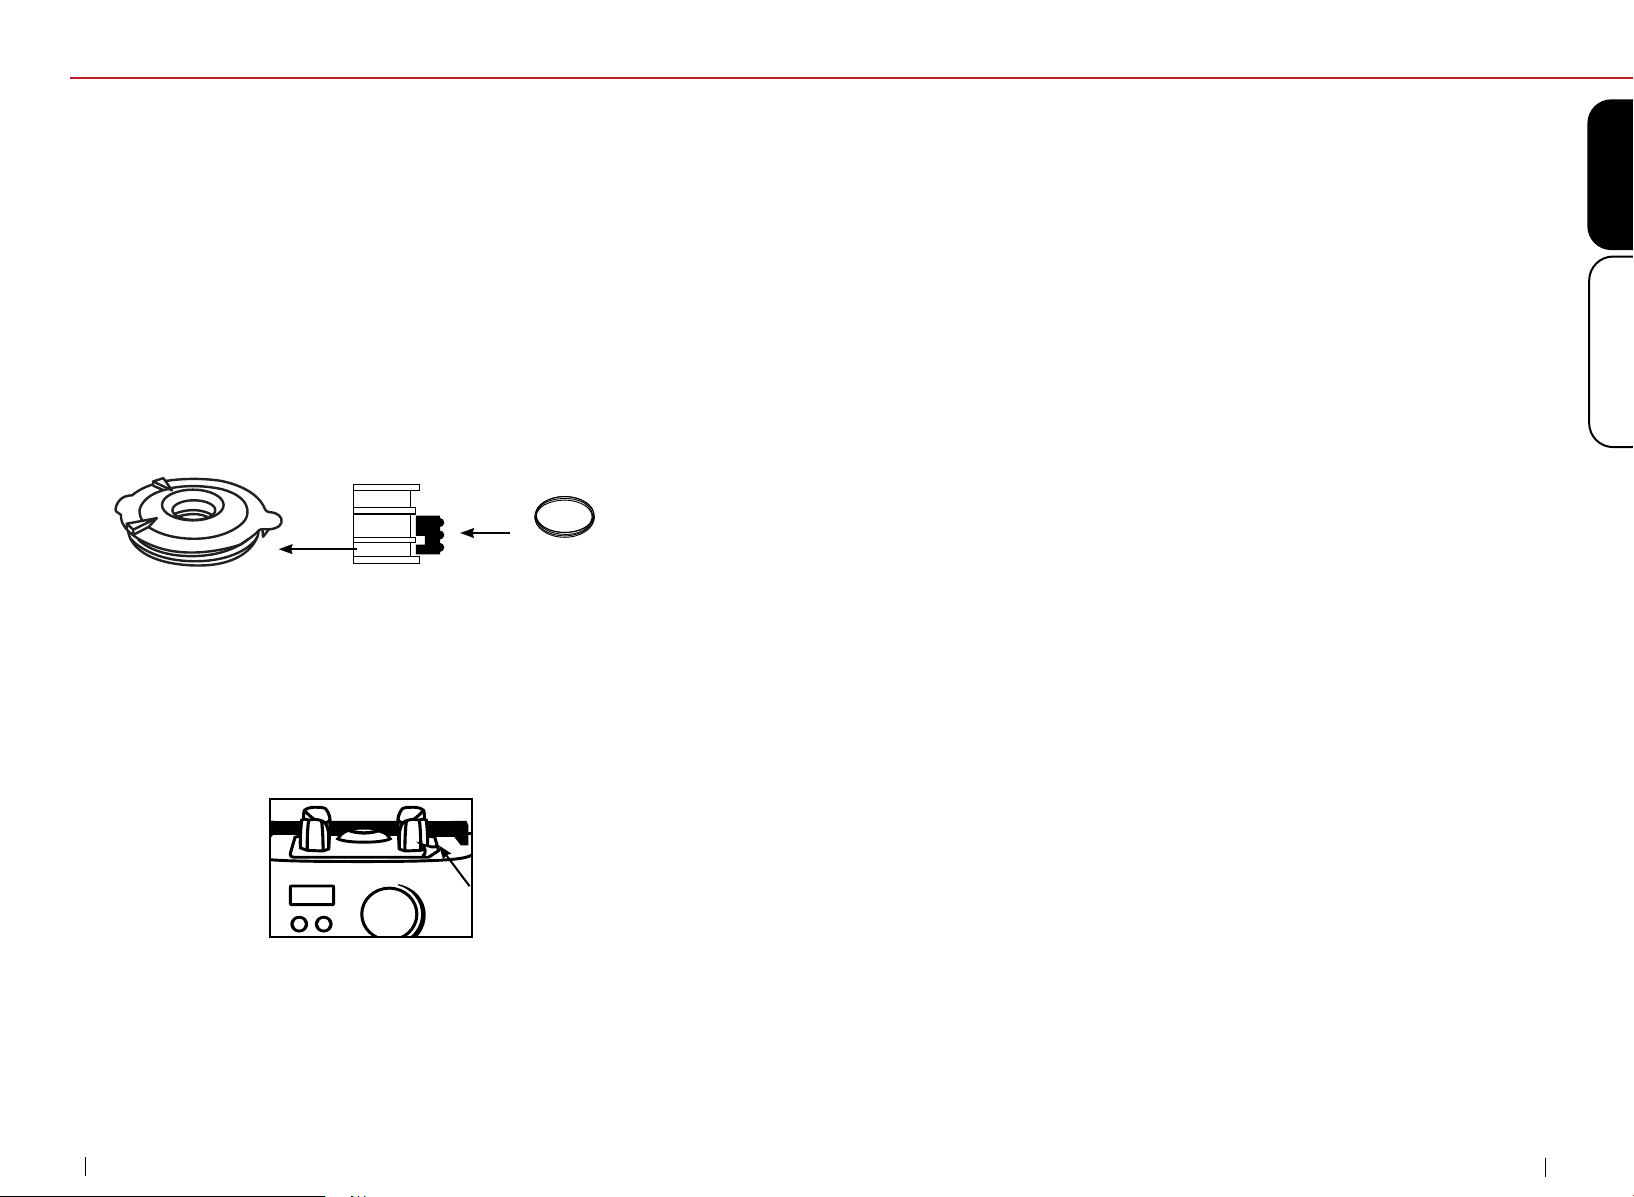
Plunger Lid Seal Ring Assembly
It may be necessary to remove the Plunger Lid Seal Ring for
occasional cleaning or to replace the part if it becomes worn or
damaged. To assemble:
1. Line the inside of the Plunger Lid Seal Ring into the rim.
2. Press the Seal Ring into the rim to ensure it is properly sealed.
3. Make sure the lower part of the Plunger Lid Seal Ring lines up
with the bottom side of the rim.
Silicone Pad Removal
It may be necessary to remove the Silicone Pad for occasional
cleaning or to replace the part if it becomes worn or damaged.
To remove:
1. Lift up one corner of the Silicone Pad.
2. The Silicone Pad is tightly secured so make sure to carefully
pull out the Pad until it is removed.
Silicone Pad Cleaning
The Silicone Pad is dishwasher-safe, top rack only. It can only also
be handwashed with warm soapy water.
Seal Ring
Plunger Lid Rim
Lift Corners
Quiet Cover Silicone Lining
The lining on the bottom of the Quiet Cover is removable and can
be washed with warm, soapy water. To attach it back onto the Quiet
Cover, align the rectangular hinges of the Silicone Lining to the
rectangular holes on the Quiet Cover.
The Innity Blender
™
Pro Plus is not turning on or working.
1. The plug may not be in the outlet. Plug the Infinity Blender
™
Pro Plus into an appropriate power source.
2. The Red Power Switch on the right side of Base may not be
on. Check to see if the Power Switch is on.
Blender is not running at a high enough speed for the recipe.
1. The dial is not on the correct setting. Turn the dial to the
proper setting based on the recipe.
2. The Jar is overloaded. Reduce the amount of ingredients
being used.
Blender is becoming clogged and not operating efficiently.
1. Certain ingredients can cause clogging. Remove the Plunger
Cap from Lid and insert the Plunger through the hole. Press the
ingredients down and around until the mixture loosens around
the bottom of Jar.
2. The amount of ingredients is greater than specified in the recipe.
Do not fill the Jar above ¾ capacity (42oz.).
3. Large pieces of ice are not mixing properly. Use smaller pieces
of ice. Use the Plunger to break up the pieces.
Blended mixture has lumps or texture is not even.
An air pocket has formed (cavitation) and the mixture is too cold
or has solidified in areas, and the Blades are spinning in the
cavity. Increase the temperature by reducing the amount of ice in
the recipe. Use the Plunger to eliminate lumps.
Noises or motions unusual for normal operation of the
blender are detected.
1. The Blade assembly may be loose, missing a part, or
damaged. Turn the blender off and unplug it immediately. DO
NOT disassemble the blade assembly. Call Customer Service:
1-888-502-7807 or email support@nuwavenow.com.
2. Foreign objects from ingredients may have been put into the
Jar and are making unusual sounds. Prior to adding your
ingredients to the Jar, clean any raw ingredients and remove
all debris or any other objects.
The Infinity Blender
™
Pro Plus was engineered with an automatic
shut-off feature to prevent overheating during use. If the blender
shuts off to cool itself down, an odor may be detected. Unplug
the Infinity Blender
™
Pro Plus and wait for it to completely cool
down. To prevent overheating, do not process foods above the
recommended speeds.

20
21
LIMITED WARRANTYTROUBLESHOOTING GUIDE
troubleshooting guide
nuwavenow.com
ENGLISHLimited Warranty
Error
Message:
Solution(s)
Er1
The NTC Temperature Sensor has short
circuted. Contact NuWave Customer Service
1-888-502-7807 or support@nuwavenow.com.
Er2
The NTC Temperature Sensor is open. Contact
NuWave Customer Service 1-888-502-7807
or support@nuwavenow.com.
Er3
Overheated NTC Sensor. Turn the Innity
Blender
™
Pro Plus off and allow it to cool. If the
Innity Blender
™
Pro Plus is not working after it
cools down, Contact NuWave Customer Service
1-888-502-7807 or support@nuwavenow.com.
The NuWave
®
Infinity Blender
™
Pro Plus Noise Reduction
Blender
THE MANUFACTURER WARRANTS
The NuWave
®
Infinity Blender
™
Pro Plus Noise Reduction Blender
is warranted to be free from manufacturer defects. This Warranty
covers original owner of this Blender for personal household use
only. This Warranty does not apply to products used for commercial,
rental or resale purposes. Motor is warranted for 5 years from the
date of purchase, under normal household use, and when operated
in accordance with the Manufacturer’s written instructions. Jar
with Blades, Plunger Lid, Plunger, Plunger Cap, Plunger Lid Seal
Ring, Quiet Cover, Door Cover, Back Cover, Quiet Cover Silicone
Lining, and Blender Base are warranted for 1 year from the date
of purchase, under normal household use, and when operated
in accordance with the Manufacturer’s written instructions. The
Manufacturer will provide the necessary parts and labor to repair
or replace any part of the NuWave Infinity Blender
™
Pro Plus High-
Performance Blender at NuWave LLC Service Department. After
the expiration of the warranty, the cost of the labor and parts will be
the responsibility of the owner.
THE WARRANTY DOES NOT COVER
The Limited Warranty is voided if repairs are made by an
unauthorized dealer and/or the serial number data plate is
removed and/or defaced. Normal deterioration of finish due to use
or exposure is not covered by this Warranty. This Limited Warranty
does not cover failure, damages or inadequate performance due
to accident, acts of God (such as lightning), fluctuations in electric
power, alterations, abuse, misuse, misapplications, corrosive-
type atmospheres, improper installation, failure to operate in
accordance with the Manufacturer’s written instructions, abnormal
use or commercial use. NuWave LLC reserves the right to void the
Limited Warranty, where allowable by law, for products purchased
from an unauthorized dealer.
TO OBTAIN SERVICE
The owner shall have the obligation and responsibility to: pay for
all services and parts not covered by the warranty; prepay the
freight to and from Service Department for any part or system
returned under this warranty; and carefully package the product
using adequate padding material to prevent damage in transit.
The original container is ideal for this purpose. Include in the
package the owner’s name, address, daytime telephone number,
a detailed description of the problem, and your “RGA number.”
Call 1-888-502-7807 or email support@nuwavenow.com to
obtain the RGA number (Return Goods Authorization number).
Provide the cooking system model & serial number and proof
of date of purchase (a copy of the receipt) when making claims
under this warranty.
MANUFACTURER’S OBLIGATION
The Manufacturer’s obligation under this Limited Warranty is
limited, to the extent allowable by law, to repairing or replacing any
part covered by this Limited Warranty which upon examination is
found to be defective under normal use. The Limited Warranty is
applicable only within the continental United States and only to the
original purchaser of the manufacturer’s authorized channels of
distribution. THE LIMITED WARRANTY MAY NOT BE ALTERED,
VARIED OR EXTENDED EXCEPT BY A WRITTEN INSTRUMENT
EXECUTED BY THE MANUFACTURER. THE REMEDY OF
REPAIR OR REPLACEMENT AS PROVIDED UNDER THIS
LIMITED WARRANTY IS EXCLUSIVE. IN NO EVENT SHALL THE
MANUFACTURER BE LIABLE FOR ANY CONSEQUENTIAL OR
INCIDENTAL DAMAGES TO ANY PERSON, WHETHER OR NOT

22
23
LIMITED WARRANTY
limited warranty
nuwavenow.com
ENGLISHLimited Warranty
OCCASIONED BY NEGLIGENCE OF THE MANUFACTURER,
INCLUDING WITHOUT LIMITATION, DAMAGES FOR LOSS OF
USE, COSTS OF SUBSTITUTION, PROPERTY DAMAGE, OR
OTHER MONEY LOSS.
Some states do not allow the exclusion or limitation of incidental
or consequential damages, so the above limitation exclusions
may not apply. This Limited Warranty gives specific legal rights,
and there may also be other rights which vary from state to state.
EXCEPT AS OTHERWISE EXPRESSLY PROVIDED ABOVE,
THE MANUFACTURER MAKES NO WARRANTIES EXPRESSED
OR IMPLIED ARISING BY LAW OR OTHERWISE, INCLUDING
WITHOUT LIMITATION, THE IMPLIED WARRANTIES OF
MERCHANTABILITY AND FITNESS FOR A PARTICULAR
PURPOSE TO ANY OTHER PERSON. READ YOUR OWNER’S
MANUAL. IF YOU STILL HAVE ANY QUESTIONS ABOUT
OPERATION OR WARRANTY OF THE PRODUCT, PLEASE
CONTACT NUWAVE LLC. DISPUTE RESOLUTION PROCEDURE.
For disputes relating to use of the website or use or purchase of a
NuWave product or service (collectively “Disputes”), you agree to first
contact NuWave LLC at (877) 689-2838 (phone), (847) 367-5486
(facsimile), or legal@nuwavenow.com (email). If we cannot resolve
your dispute informally, any and all disputes shall be submitted to
final and binding arbitration. You may start the arbitration process
by submitting in writing a demand to the American Arbitration
Association (“AAA”) and sending a copy to NuWave. NuWave will
pay all filing costs. A single arbitrator of the AAA will conduct the
arbitration in a location convenient to you or by phone.
The arbitrator’s award will be binding and may be entered as a
judgment in a court of competent jurisdiction. The arbitration will be
conducted in accordance with the provisions of AAA’s Commercial
Arbitration Rules and Mediation Procedures in effect at the time of
submission of your demand for arbitration. See https://www.adr.org/
sites/default/files/CommercialRules_Web.pdf. Except as may be
required by law as determined by an arbitrator, no party or arbitrator
may disclose the existence, content, or results of any arbitration
hereunder without prior written consent of both parties.
A. WAIVER OF RIGHT TO SUE. By agreeing to arbitration, you
understand that, to the maximum extent permitted by law, you
are agreeing to waive your right to file suit in any court, to a court
hearing, judge trial, and jury trial.
B. CLASS ACTION WAIVER. To the maximum extent permitted
by law you expressly agree to refrain from bringing or joining any
claims in any representative or class-wide capacity, including but
not limited to, bringing or joining any claims in any class action or
class-wide arbitration.
C. OPT OUT PROCEDURE. To opt out of arbitration you must
contact NuWave. To request to opt out of arbitration contact us
at legal@nuwavenow.com (email), NuWave LLC, 560 Bunker Ct.
Vernon Hills, IL 60061, U.S.A., (847) 367-5486 (fax), or (877) 689-
2838 or (224) 206-3019 (phone). You will have thirty (30) days from
the date of product delivery to opt out of arbitration with respect
to any dispute arising out of or relating to use or purchase of any
NuWave product. If more than 30 days have passed you are not
eligible to opt out of arbitration and will have waived your right
to sue or participate in a class action with respect to the dispute
arising out of your purchase or use of a NuWave product. For any
dispute arising out of your use of NuWave’s website, you have thirty
(30) days from the date you provided information to the website to
opt out of arbitration. If more than 30 days have passed you are not
eligible to opt out of arbitration and you will have waived your right
to sue and participate in a class action with respect to the dispute
arising out of your use of NuWave’s website.
D. SOME MATTERS ARE NOT SUBJECT TO ARBITRATION.
Notwithstanding the foregoing, the following shall not be subject
to arbitration and may be adjudicated only in the state and federal
courts of Illinois: (i) any dispute, controversy, or claim relating to
or contesting the validity of our intellectual property rights and
proprietary rights, including without limitation, patents, trademarks,
service marks, copyrights, or trade secrets; (ii) an action by a party
for temporary, preliminary, or permanent injunctive relief, whether
prohibitive or mandatory, or other provisional relief; or (iii) interactions
with governmental and regulatory authorities. You expressly agree
to refrain from bringing or joining any claims in any representative or
class-wide capacity, including but not limited to, bringing or joining
any claims in any class action or any class-wide arbitration.
READ YOUR OWNER’S MANUAL
If you still have any questions about operation or warranty of
the product, please contact NuWave LLC at: 1-888-502-7807
or email support@nuwavenow.com.
REGISTRESE
AHORA!
!
nuwavenow.com
24
25
Como agradecimiento especial por registrar su Innity Blender
™
Pro
Plus, ¡recibirá automáticamente 12 meses adicionales a su garantía
limitada del fabricante!*
Todo lo que tiene que hacer es seguir estos simples pasos.
Usando su teléfono inteligente o
dispositivo inteligente, escanee el
código QR ubicado en la etiqueta de
su Innity Blender
™
Pro Plus en la
parte posterior de la unidad.
Se le dirigirá a la página de registro
del producto NuWave con el
número de serie único de su Innity
Blender
™
Pro Plus que se ingresa
automáticamente en el campo
correspondiente.
NOTA: Si no tiene un dispositivo
inteligente habilitado para la web,
simplemente visite nuwavenow.
com/QR e ingrese manualmente
el número de serie de su Innity
Blender
™
Pro Plus.
Complete la información restante y
complete la encuesta opcional.
Una vez que envíe su información,
recibirá un correo electrónico de
conrmación con los detalles de la
garantía extendida.
1
2
3
4
* Registre su producto dentro de 1 año a partir de la fecha de compra para
una extensión gratuita de 12 meses de garantía limitada.
Manual Del Proprietario
Model 28301
Preguntas o Inquietudes?
Toll Free: 1-888-502-7807 • support@nuwavenow.com
(Mon-Fri 7:30am-4:30pm CST)
Infinity Blender
Noise Reduction
™

nuwavenow.com
26
27
12
!para una garantía
adicional de
meses!
Abra su tienda de aplicaciones móviles (App Store,
Google
™
Play).
Busque “lectores de códigos QR.”
Simplemente descargue el lector de códigos QR a
su teléfono, ábralo y escanee el código, ya está listo
para comenzar.
NOTA: Es posible que deba abrir el lector de código
QR descargado cada vez que desee escanear un
código QR.
1
2
3
QR code readers
MEDIDAS DE SEGURIDAD
IMPORTANTES
PARA USO DOMÉSTICO SOLAMENTE Y LEA TODAS LAS INSTRUCCIONES
ANTES DE USARLO
DESCARGUE LA APLICACIÓN QR
CODE EN SU DISPOSITIVO MÓVIL
ESPAÑOLSeguridad Importantes
SIEMPRE TENGA A LA
MANO ESTE MANUAL PARA
CONSULTARLO EN EL FUTURO.
ADVERTENCIA: Cuando se utiliza la Licuadora Innity Blender
™
Pro Plus, siempre se deben seguir las precauciones básicas de
seguridad:
1. NO sumerja la Base de la licuadora, el cable, el enchufe o cualquier
parte de la Innity Blender
™
Pro Plus en agua o cualquier otro líquido
para protegerse contra el riesgo de descarga eléctrica.
2. SIEMPRE preste atención cuando cualquier aparato sea utilizado
cerca de niños para asegurarse de que ellos no juegan con él. La
Innity Blender
™
Pro Plus no está diseñada para ser utilizada por
niños, personas con capacidades físicas, sensoriales o mentales
reducidas o aquellas que no estén familiarizadas con esta Innity
Blender
™
Pro Plus.
3. Evite SIEMPRE el contacto con las piezas móviles.
4. NO utilice la Innity Blender
™
Pro Plus con un cable o enchufe
dañado, si el aparato funciona mal, se ha caído o está dañado de
alguna manera. Comuníquese con Servicio al Cliente al 1-888-502-
7807 o envíe un correo electrónico a support@nuwavenow.com para
obtener información sobre el análisis, reparación o ajuste.
5. NO ESTÁ DISEÑADO PARA EL USO AL AIRE LIBRE. SOLO PARA
USO DOMÉSTICO.
6. Asegúrese SIEMPRE de que la Innity Blender
™
Pro Plus esté limpia
antes de su uso.
7. NO deje que el cable cuelgue sobre el borde de la mesa o el
mostrador, ni permita que entre en contacto con supercies calientes,
como una estufa.
8. Deseche el plástico protector que cubre el enchufe antes de usarlo.
9. NO coloque ni utilice la Innity Blender
™
Pro Plus sobre o cerca de
una estufa o quemador eléctrico o de gas calientes, dentro de un
horno caliente, cerca de materiales inamables, unidades de calor o
en ambientes húmedos.
10. SIEMPRE mantenga las manos, los utensilios y los objetos extraños
fuera de la Jarra mientras licua para reducir el riesgo de lesiones
graves a las personas o daños a la licuadora. Se puede utilizar una
espátula, pero sólo cuando la licuadora NO esté en movimiento.

28
29
MEDIDAS DE SEGURIDAD IMPORTANTES
PARA USO DOMÉSTICO SOLAMENTE Y LEA TODAS LAS INSTRUCCIONES ANTES
DE USARLO
medidas de seguridad importantes
nuwavenow.com
ESPAÑOLSeguridad Importantes
11. ¡PRECAUCIÓN! Las aspas son losas. No manipule las aspas de
ninguna manera, ni intente quitarlas para limpiarlas.
12. SIEMPRE utilice la licuadora con la Tapa y la Jarra correctamente en
su lugar. El Tapón del Émbolo debe colocarse rmemente en su lugar
con el punto correctamente alineado con el mango.
13. NO utilice la licuadora si se detectan sonidos o movimientos
anormales. Si un objeto duro o extraño entra en contacto con las
aspas de la Jarra, retire el objeto.
14. NO altere ni modique ninguna parte de la licuadora, ni utilice
accesorios no recomendados por el fabricante, ya que hacerlo puede
causar incendios, lesiones o daños a la propiedad
15. NO utilice la Innity Blender
™
Pro Plus para nada, o de ninguna
manera, que no sea la pretendida por el fabricante.
16. NO agregue líquidos calientes o hirviendo en la Jarra.
17. NUNCA golpee la Jarra contra una supercie para aojar alimentos
atascados. Retire siempre la Jarra de la Base de la Innity Blender
™
Pro Plus primero, luego use una espátula de goma para retirar
los ingredientes pegados en la parte inferior de la Jarra. No utilice
utensilios metálicos, ya que esto puede dañar la Jarra.
18. NO sacuda ni agite la Jarra mientras esté en uso.
19. NUNCA retire la Jarra de la Base de la Innity Blender™ Pro Plus
hasta que las aspas se hayan detenido completamente.
20. NO mueva la Innity Blender
™
Pro Plus mientras esté funcionando.
La Innity Blender
™
Pro Plus puede intentar moverse solamente
después de que haya terminado de licuar y se haya enfriado por
completo. Siempre espere a que la Innity Blender
™
Pro Plus se
enfríe antes de manipularla.
21. SIEMPRE apague y luego desenchufe la Innity Blender
™
Pro Plus
de la toma de corriente cuando no esté en uso, antes de ponerle o
quitarle piezas, y antes de limpiarla.
22. SIEMPRE inspeccione el ensamble de aspas de la Innity Blender
™
Pro Plus después de cada uso. Si hay piezas sueltas, dañadas o que
falten, comuníquese con Servicio al Cliente al 1-888-502-7807 o envíe
un correo electrónico a support@nuwavenow.com
23. SIEMPRE tome extrema precaución al inspeccionar o dar
mantenimiento a la Innity Blender
™
Pro Plus o a cualquier aparato.
24. NUNCA utilice el aparato con un temporizador externo o un sistema
de control remoto independiente.
Información Eléctrica
Se proporciona un cable de alimentación corto (o un cable de
alimentación desmontable) para reducir el riesgo de enredarse
o tropezar con un cable más largo. Los cablesde alimentación
desmontables más largos o extensiones están disponibles y se
pueden utilizar si se tiene cuidado en su uso. Si se utiliza un cable de
alimentación desmontable o una extensión:
1. La capacidad eléctrica nominal del cable de extensión debe ser al
menos igual a la del electrodoméstico.
2. El cable más largo debe colocarse de manera que no caiga sobre la
encimera o la mesa, donde se pueda tirar o provocar tropezones.
3. El electrodoméstico tiene un enchufe polarizado (un contacto es
más ancho que el otro). Para reducir el riesgo de una descarga
eléctrica, este enchufe está diseñado para entrar en un tomacorriente
polarizado de una sola manera. Si el enchufe no entra correctamente
en el tomacorriente, colóquelo al revés. Si aun así no encaja, consulte
con un electricista profesional. En ningún caso intente modicar el
enchufe. Si el electrodoméstico es del tipo con conexión a tierra, el
cable eléctrico o el cable de extensión deberá ser un cable de 3 hilos
con conexión a tierra.
25. SIEMPRE desconecte la Innity Blender
™
Pro Plus y póngase en
contacto con Servicio al Cliente* si se está escapando mucho humo de
la ventilación durante el funcionamiento. Nota: Es normal que algo de
humo escape de la Innity Blender
™
Pro Plus al licuar por primera vez.
26. SIEMPRE tome el servicio proporcionado por NuWave LLC o un
centro de servicio autorizado por el fabricante si surge algún problema
durante el funcionamiento.
Departamento de Servicio al Cliente 1-888-502-7807
support@nuwavenow.com
AVISO: EL NO SEGUIR CUALQUIERA DE LAS MEDIDAS DE
SEGURIDAD IMPORTANTES, MEDIDAS DE SEGURIDAD ADICIONALES
O LAS INSTRUCCIONES PARA UN USO SEGURO ES UN MAL USO DE
SU INFINITY BLENDER
™
Pro Plus QUE PUEDE ANULAR SU GARANTÍA
Y CREAR EL RIESGO DE LESIONES GRAVES.
30
31
partes y accesorios
nuwavenow.com
PARTES Y ACCESORIOS GUÍA DE MONTAJE
ESPAÑOLGuía de Montaje
Para pedir piezas reemplazables, diríjase a la sección
Piezas reemplazables y luego a NuWaveNow.com.
Base de la
Licuadora
Part #: MRA2
Tapón del Émbolo
Part #: MRA3
Jarra
Part #: MRA1
Tapa del Émbolo
Part #: MRA4
Contraportada
Part #: MRP3
Cubierta
Silenciosa
Part #: MRA7
Cubierta de Puerta
Part #: MRP2
Émbolo
Part #: MRA6
Almohadilla de
Silicona
Part #: MRA5
Aro de Sello
(comes assembled onto
Lid)
Part #: MRP1
Almohadilla de Silicona de Cubierta Silenciosa
Part #: MRP4
2. Para quitar la Cubierta Silenciosa posterior,
se aplicará presión en dos puntos
(izquierda y derecha) para desenganchar
la cubierta de las lengüetas de bloqueo
de la placa del motor. Para evitar dañar
la Cubierta Silenciosa, aplique presión al
Extracción de la Cubierta Silenciosa
1. Apague la Innity Blender™ Pro Plus y
desconéctela de la toma de corriente.
Levante la manija de la cubierta de la puerta
para abrirla.
marco de la Cubierta Silenciosa posterior, no al
plástico transparente.
3. Desenganche la 3ª lengüeta de bloqueo
situada en la parte trasera de la Cubierta
Silenciosa posterior.
4. Para reinstalar la Cubierta Silenciosa,
extienda suavemente los lados de la puerta
y coloque los recortes de las bisagras de la
puerta sobre las bisagras redondas. Asegure
la bisagra en la parte posterior primero antes
de asegurar los lados.
Nota: No desmonte la Cubierta Silenciosa a
menos que sea absolutamente necesario hacerlo
para la limpieza o el mantenimiento. Si alguna
parte de la Cubierta Silenciosa llega rota o no se
puede usar, póngase en contacto con Servicio al
Cliente para que se reemplacen las piezas.
32
33
guía de montaje
nuwavenow.com
GUÍA DE MONTAJE
ESPAÑOLGuía de Montaje
Ensamble de la Jarra con la Tapa
del Émbolo
1.
Coloque la Jarra en la Base alineándolo sobre las 4 Columnas
de Goma.
2. Presione la Tapa firmemente hacia abajo en la Jarra.
Plunger Lid Assembly
1. Alinee el punto rojo de la Tapa del Émbolo con el mango.
2. Alinee el Tapón del Émbolo con la Tapa del Émbolo y gire
para fijar.
• El Tapón del Émbolo se retira al agregar ingredientes
adicionales mientras licua.
3. Presione hacia abajo la Tapa del Émbolo hasta que se siente
rmemente en su lugar.
Nota: El Anillo Sellador de la Tapa del Émbolo y la Almohadilla
de Silicón son extraíbles para su limpieza. Consulte Limpieza y
Mantenimiento.
Émbolo
Using the Plunger
1. Retire el Tapón del Émbolo, girándolo hacia la izquierda para
desbloquearlo de la Tapa del Émbolo antes de insertar el
Émbolo.
2. La Tapa del Émbolo está diseñada para ser utilizada con el
agujero abierto para que el Émbolo no entre en contacto con
las aspas al mover los alimentos.
3. Cuando no esté utilizando el Émbolo, coloque el Tapón del
Émbolo en la Tapa del Émbolo y gírelo a la derecha para
bloquearlo.
ADVERTENCIA: Al igual que con la mayoría de los aparatos
eléctricos, las piezas eléctricas están vivas incluso cuando la
Infinity Blender
™
Pro Plus esté apagada.
PRECAUCIÓN
Asegúrese de que todas las piezas esténbien fijadas.

34
35
inicio rápido
nuwavenow.com
INICIO RÁPIDO
ESPAÑOLInicio Rápido
:Presione a ON el Interruptor rojo de Alimentación principal de
la Base, situado en el lado derecho de la Base de la Licuadora.
Presione Power una vez para encender la Innity Blender
™
Pro
Plus. Presione Power de nuevo y después presione a OFF el
Interruptor rojo de Alimentación principal de la Base para apagar la
Innity Blender
™
Pro Plus.
Start/Pause: Presione Start/Pause para iniciar y detener la mezcla.
Nota: No llene la Jarra por encima de ¾ de su capacidad (42oz.).
Consulte “Instrucciones” para obtener más información.
Flechas de Arriba y Abajo: Los botones de echa ajustan el
tiempo y las velocidades para licuar.
Pulse 1 y Pulse 2: Use Pulse 1 o Pulse 2 para ráfagas rápidas
de mezcla de alta potencia. Pulse 2 tiene un RPM más alto que
Pulse 1. Cuando utilice Pulse 1 o Pulse 2, la pantalla LED mostrará
el tiempo predeterminado que establece la perilla y permanecerá
mostrado hasta que se cambie la conguración.
Conguración del Tiempo: La pantalla LED mostrará el tiempo
predeterminado para la conguración seleccionada. Los tiempos
se muestran en minutos y segundos. Se pueden realizar ajustes en
todas las conguraciones.
Notas: Al mezclar durante un largo período de tiempo, los líquidos
pueden calentarse y puede escapar vapor del Tapón del Émbolo.
Conguración Numerada.
El tiempo predeterminado es de 3 minutos. Para la mezcla
estándar puede seleccionar entre uno de los ajustes de
velocidad numerados entre 1 y 10. Ajuste el tiempo deseado y, a
continuación, presione Start/Pause para comenzar a licuar.
Nota: La conguración más baja es la #1 (5.000 RPM). La
conguración más alta es la #10 (27.000 RPM).
Conguración de los Íconos: Estas conguraciones son para
funciones de mezcla especializadas. Cada conguración de ícono
tiene un tiempo predeterminado y RPM integrados. Gire la perilla
a la conguración de ícono deseada y presione Start/Pause para
comenzar a mezclar.
Nota: Comience siempre con líquidos fríos al mezclar. NO agregue
líquidos calientes a la licuadora.
Limpieza de la Jarra de su Innity Blender
™
Pro Plus: Agregue
agua y 1-2 gotas de jabón líquido a la Jarra, colóquela en la Base y
cierre la Tapa. Gire la perilla a Clean (Limpiar). Se mostrará 00:15
en la pantalla LED. Ajuste el tiempo si lo desea y, a continuación,
presione Start/Pause. Una vez que termine, retire la Jarra,
enjuáguela y séquela bien antes de usarla de nuevo.
Nota: Para obtener instrucciones detalladas sobre la limpieza,
consulte “Limpieza y Mantenimiento”.
0
Pulse
1
Pulse
2
Start
Pause
36
37
uso general
nuwavenow.com
USO GENERAL
ESPAÑOLUso General
Empezando
1. Encienda el interruptor de alimentación de la base principal
rojo. El interruptor está ubicado en el lado derecho de la base
de la licuadora.
• El botón de encendido parpadeará.
2. Presiona el botón de Encendido una vez para encender tu
Infinity Blender™ Pro Plus. La pantalla LED mostrará el tiempo
predeterminado para la configuración seleccionada.
3. Gire el dial para elegir la función de fusión adecuada.
4. Presiona Start/Pause para comenzar a mezclar.
5. Presione Start/Pause nuevamente para detener la mezcla.
Presiona el botón ON/OFF nuevamente y presiona el
Interruptor de Encendido de la Base principal rojo para apagar
tu Infinity Blender™.
Configuración de la hora
Presione las flechas hacia arriba y hacia abajo
para aumentar o disminuir el tiempo en la pantalla.
1. Los tiempos se muestran en minutos y
segundos.
2. Esto se puede hacer en todos los ajustes.
Ejemplo:
Presione el botón de encendido. Gire la perilla a
Hielo Ice. Se mostrará 00:15 (15 segundos). Presione las flechas
hacia arriba y hacia abajo para ajustar el tiempo. Presione Start/
Pause.
Configuraciones Numeradas
Para la mezcla estándar, seleccione una de las configuraciones
numeradas entre 1 y 10.
1. Gire la perilla a la configuración deseada entre 1 y 10. Cuando
esté en vacío, el valor predeterminado será 02:00.
2. Ajuste el tiempo si lo desea [1] , luego presione Start/Pause
para comenzar a mezclar en la
configuración seleccionada.
3. Ajuste la configuración del número usando la perilla en
cualquier punto mientras mezcla, si es necesario.
• La configuración más baja es #1 (5,000 RPM).
• La configuración más alta es #10 (27,000 RPM).
Presione Función
El Infinity Blender
™
ofrece dos funciones de pulso donde la
configuración de energía es totalmente ajustable.
1. Presione Pulse 1 para ráfagas cortas de mezcla a baja
potencia (25% de potencia).
• Mantenga presionado Pulse 1 para una mezcla continua.
La pantalla mostrará “3:00”. Una vez que suelte el botón,
finalizará el licuado.
• El porcentaje de potencia utilizada se puede ajustar manteniendo
presionado Pulse 1 y girando la perilla. El porcentaje cambiará en
incrementos del 10%.
2. Presione Pulse 2 para ráfagas cortas de mezcla a alta potencia
(100% Potencia).
• Mantenga presionado Pulse 2 para una mezcla continua. La
pantalla mostrará “3:00”. Una vez que se suelte el botón, la fusión
finalizará.
• El porcentaje de potencia utilizada se puede ajustar manteniendo
presionado Pulse 2 y girando la perilla. El porcentaje cambiará en
incrementos del 10%.
Configuración de Íconos
Para tareas de mezcla más especializadas, seleccione uno de los
iconos predefinidos con la perilla. Cada configuración de ícono
tiene un tiempo predeterminado y RPM incorporados en la unidad.
1. Gire la perilla a la configuración de ícono deseada. La pantalla
LED mostrará el tiempo predeterminado.
2. Ajuste la hora, si es necesario, luego presione Start/Pause
para comenzar a mezclar en la configuración seleccionada.
• Si lo desea, aumente o disminuya el tiempo en cualquier
punto durante la mezcla.
0
00:15
38
39
uso general
nuwavenow.com
USO GENERAL
ESPAÑOLUso General
Ícono
Predeterminado
Min : Seg
Min. Max. Notas
1-10* 03:00 00:05 05:00
Velocidad
ajustable
Hielo 00:15 00:05 02:00
Bebidas a base
de hielo
Zalamero 00:35 00:05 02:00
Bebidas
congeladas
Sorbete 00:30 00:05 02:00
Postres
congelados
Nueces 01:30 00:05 02:00
Atasco y
extensión
Sopa 03:00 00:05 05:00
Sopa y
chocolate
caliente
Limpiar** 00:15 00:05 02:00 Autolimpieza
Limpieza de la Jarra de su Infinity Blender
™
Pro Plus:
• Agregue agua y 1-2 gotas de jabón líquido a la Jarra, colóquela
en la Base y cierre la Tapa.
• Gire la perilla a Clean (Limpiar). Se mostrará “00:15”. Ajuste el
tiempo, si lo desea, pulse Start/Pause.
• Una vez terminado, retire la Jarra, enjuáguela y séquela bien
antes de usarla de nuevo.
Para obtener instrucciones detalladas sobre la limpieza
de su Infinity Blender
™
Pro Plus, consulte “Limpieza y
Mantenimiento”.
Antes del primer uso:
Lave todas las piezas extraíbles con agua jabonosa tibia o en el
lavavajillas (sólo en la rejilla superior).
El Jarra y Cubierta Silenciosa debe limpiarse a mano con agua tibia
y jabón. El Jarra se puede lavar con la función Clean.
Consulte "Instrucciones de Funcionamiento" para más detalles.
Jarra Tapa del Émbolo
Tapón del Émbolo
Aro de Sello
Émbolo
Almohadilla de Silicona de
Cubierta Silenciosa
Cubierta Silenciosa
PRECAUCIÓN
Las piezas móviles pueden calentarse con el uso prolongado.
NO TOCAR.
No sumerja la Base del Infinity Blender
™
en agua. Límpiela con una esponja o paño
húmedo y séquela.
PRECAUCIÓN
El cable de alimentación debe desconectarse de la fuente de
energía antes de insertar o extraer los accesorios y antes de
limpiarlo.

40
41
uso general
nuwavenow.com
USO GENERAL
ESPAÑOLUso General
Asamblea del Anillo de Sello de la Tapa
Puede ser necesario quitar el anillo de sello de la tapa para una
limpieza ocasional o para reemplazar la pieza si se desgasta o
daña. Armar:
1. Alinee el interior del anillo de sellado de la tapa en el borde.
2. Presione el anillo de sellado en el borde para asegurarse de
que esté sellado correctamente.
3. Asegúrese de que la parte inferior del anillo de sello se alinee
con el lado inferior del borde.
Anillo de Sello
Émbolo y Tapa
Limpieza silenciosa de la cubierta
Para limpiar la cubierta silenciosa, deberá quitarla y volver a
colocarla de la siguiente manera:
1. Levante la tapa y luego tire ligeramente hacia afuera en los
lados de la cubierta silenciosa para quitarla de las pestañas
laterales. Tire hacia arriba para liberar la cubierta silenciosa de
la Innity Blender
™
.
2. Lave a mano la funda silenciosa con agua tibia y jabón. No lo
coloque en el lavavajillas. Sécalo bien.
3. Cuando la cubierta silenciosa esté seca, móntela deslizándola
sobre la Innity Blender
™
y asegurando primero la lengüeta de
apertura trasera.
4. Con el borde hacia arriba, tire ligeramente de los lados para
permitir que la abertura de la cubierta silenciosa se conecte
con las pestañas laterales en la base del motor.
5. Asegúrese de que todas las pestañas estén enganchadas
antes de usar Innity Blender
™
.
Limpieza de la Almohadilla de Silicón
La Almohadilla de Silicón es apta para el lavavajillas, sólo en la
rejilla superior. También se puede lavar a mano solamente con
agua tibia y jabonosa.
Retirando la Almohadilla de Silicón
Puede ser necesario quitar la Almohadilla de Silicón para la
limpieza ocasional o para reemplazar la pieza si se desgasta o se
daña. Para eliminar:
1. Levante una esquina de la Almohadilla de Silicón.
2. La Almohadilla de Silicón está firmemente asegurada, así que
asegúrese de extraer cuidadosamente la Almohadilla hasta
quitarla.
Levantar esquinas
Forro de silicona Quiet Cover
El forro de la parte inferior de la funda silenciosa es extraíble y
se puede lavar con agua tibia y jabón. Para volver a colocarlo
en la cubierta silenciosa, alinee las bisagras rectangulares del
revestimiento de silicona con los orificios rectangulares de la
cubierta silenciosa.

42
43
guía para resolver problemas
nuwavenow.com
GUÍA PARA RESOLVER PROBLEMAS
ESPAÑOLGuia Para Resolver Problemas
El Infinity Blender
™
Pro Plus fue diseñado con una función
de apagado automático para evitar el sobrecalentamiento
durante el uso. Si la licuadora se apaga para enfriarse, puede
detectarse un olor. Desenchufe la unidad y espere a que se enfríe
completamente. Para evitar el sobrecalentamiento, no procese a
velocidades más altas o no se recomiendan tiempos más largos.
La unidad no enciende.
1. El enchufe puede no estar en la toma de corriente. Conecte
la unidad.
2. El Interruptor de encendido rojo en el lado derecho de la
Base puede no estar encendido. Verifique si el Interruptor
está encendido.
La Licuadora no funciona aún cuando está conectada y el
Botón e Interruptor están encendidos.
1. La Tapa del Jarra no está colocada correctamente. Alinee
el punto rojo en la parte superior de la tapa con el mango
del Jarra y presione la Tapa hacia abajo firmemente para
asegurarla sobre el Jarra.
La Licuadora no está funcionando a una velocidad lo
suficientemente alta para su receta.
1. La perilla no está en la configuración correcta. Gire la perilla
a la configuración adecuada según la receta.
2. El Jarra está sobrecargado. Reduzca la cantidad de
ingredientes.
La mezcla licuada tiene grumos o la textura no es pareja.
Se ha formado una bolsa de aire (cavitación) y la mezcla está
demasiado fría o se ha solidificado en áreas y las cuchillas están
girando en la cavidad. Aumente la temperatura reduciendo el
hielo de la receta.
La mezcla licuada tiene grumos o la textura no es uniforme.
1. El ensamble de cuchillas puede estar flojo, faltarle una
parte o estar posiblemente dañado. Apague la licuadora y
desconéctela inmediatamente. NO desarme el ensamble
de cuchillas. Llame a Servicio al Cliente: 1-888-502-7807 o
envíe un correo electrónico a support@nuwavenow.com.
2. Es posible que objetos extraños de los ingredientes se hayan
puesto en el Jarra y emitan sonidos inusuales. Antes de
agregar ingredientes al Jarra para licuarlos, limpie las frutas
u otros ingredientes y elimine todos los restos o cualquier
otro objeto.
Se detectan ruidos o movimientos inusuales para el
funcionamiento normal de la licuadora
1. El ensamble de cuchillas puede estar flojo, faltarle una
parte o estar posiblemente dañado. Apague la licuadora y
desconéctela inmediatamente. NO desarme el ensamble
de cuchillas. Llame a Servicio al Cliente: 1-888-502-7807 o
envíe un correo electrónico a support@nuwavenow.com.
2. Es posible que objetos extraños de los ingredientes se hayan
puesto en el Jarra y emitan sonidos inusuales. Antes de
agregar ingredientes al Jarra para licuarlos, limpie las frutas
u otros ingredientes y elimine todos los restos o cualquier
otro objeto.
Error
Message:
Solution(s)
Er1
El sensor de temperatura NTC tiene un
cortocircuito. Comuníquese con el Servicio
al cliente de NuWave al 1-888-502-7807 o
support@nuwavenow.com.
Er2
El sensor de temperatura NTC está abierto.
Comuníquese con el Servicio al cliente de
NuWave al 1-888-502-7807 o support@
nuwavenow.com.
Er3
Sensor NTC sobrecalentado. Apague el Innity
Blender
™
Pro Plus y déjelo enfriar. Si el Innity
Blender™ Pro Plus no funciona después de
que se enfría, comuníquese con el Servicio de
atención al cliente de NuWave al 1-888-502-
7807 o support@nuwavenow.com.

garantía limitada
44
45
nuwavenow.com
GARANTÍA LIMITADA
ESPAÑOLGarantía Limitada
La Licuadora NuWave Infinity Blender
™
Pro Plus de Alto
Rendimiento
LAS GARANTÍAS DEL FABRICANTE
La NuWave Infinity Blender
™
licuadora aspiradora digital de alto
rendimiento está garantizada contra defectos del fabricante. Esta
garantía cubre al propietario original de esta licuadora solo para
uso doméstico personal. Esta garantía no se aplica a los productos
utilizados con fines comerciales, de alquiler o de reventa.
El motor está garantizado durante 1 año a partir de la fecha de
compra, bajo uso doméstico normal y cuando se opera de acuerdo
con las instrucciones escritas del fabricante. El frasco, las cuchillas,
la bomba, el anillo de sello y la carcasa están garantizados por
1 año a partir de la fecha de compra, bajo uso doméstico normal
y cuando se opere de acuerdo con las instrucciones escritas
del fabricante. El fabricante proporcionará las piezas y la mano
de obra necesarias para reparar cualquier parte de la licuadora
digital de alto rendimiento para vacío NuWave Infinity Blender
™
en el departamento de servicio de NuWave LLC. Después de la
expiración de la garantía, el costo de la mano de obra y las partes
será responsabilidad del propietario.
LA GARANTÍA NO CUBRE
La garantía limitada se anula si las reparaciones son realizadas
por un distribuidor no autorizado o si la placa de datos del número
de serie se retira o borra. Esta garantía no cubre el deterioro
normal del acabado debido al uso o la exposición. Esta garantía
limitada no cubre fallas, daños o un desempeño inadecuado
debido a un accidente, actos de Dios (como rayos), uctuaciones
en la energía eléctrica, alteraciones, abuso, mal uso, aplicaciones
incorrectas, atmósferas de tipo corrosivo, instalación incorrecta, falta
de funcionamiento de acuerdo con las instrucciones escritas del
fabricante, uso anormal o uso comercial. NuWave LLC se reserva el
derecho de anular la Garantía Limitada, según lo permita la ley, para
los productos adquiridos a través de un distribuidor no autorizado.
OBTENER SERVICIO
El propietario tendrá la obligación y la responsabilidad de: pagar por
todos los servicios y piezas no cubiertos por la garantía; prepagar el
ete hacia y desde el Departamento de Servicio para cualquier parte
o sistema devuelto bajo esta garantía; y empacar cuidadosamente el
producto con material de relleno adecuado para evitar daños durante
el transporte. El envase original es ideal para este propósito. Incluya
en el paquete el nombre del propietario, la dirección, el número de
teléfono durante el día, una descripción detallada del problema y
su “número RGA”. (Llame al 1-888-502-7807) o envíe un correo
electrónico a support@nuwavenow.com para obtener el número
RGA (Número de autorización de devolución de mercancías).
Proporcione el modelo delsistema de cocción y el número de serie
y el comprobante de la fecha de compra (una copia del recibo) al
realizar reclamaciones bajo esta garantía.
OBLIGACIÓN DEL FABRICANTE
La obligación del fabricante en virtud de esta Garantía Limitada
se limita, en la medida en que lo permita la ley, a reparar o
reemplazar cualquier pieza cubierta por esta Garantía Limitada
que, al examinarla, se encuentre defectuosa en el uso normal.
La Garantía Limitada se aplica solo dentro de los Estados
Unidos continentales y solo al comprador original de los canales
de distribución autorizados por el fabricante. LA GARANTÍA
LIMITADA NO PUEDE SER ALTERADA, VARIADA O EXTENDIDA,
EXCEPTO POR UN INSTRUMENTO ESCRITO EJECUTADO
POR EL FABRICANTE. EL RECHAZO DE REPARACIÓN O
REEMPLAZO SEGÚN LO PROPORCIONADO POR ESTA
GARANTÍA LIMITADA ES EXCLUSIVO. EN NINGÚN CASO, EL
FABRICANTE SERÁ RESPONSABLE DE CUALQUIER DAÑO
CONSECUENTE O INCIDENTAL A CUALQUIER PERSONA, SEA
O NO OCASIONADO POR LA NEGLIGENCIA DEL FABRICANTE,
INCLUIDOS, SIN LIMITACIÓN, DAÑOS POR PÉRDIDA DE USO,
COSTOS DE SUSTITUCIÓN, DAÑO A LA PROPIEDAD U OTRA
PÉRDIDA DE DINERO.
Algunos estados no permiten la exclusión o limitación de daños
incidentales o consecuentes, por lo que es posible que no se
apliquen las exclusiones de limitación anteriores. Esta Garantía
Limitada otorga derechos legales especícos, y también puede
haber otros derechos que varían de estado a estado. EXCEPTO
OTRAS MANERAS QUE EXPRESAMENTE SE PROPORCIONAN
ANTERIORMENTE, EL FABRICANTE NO HACE GARANTÍAS
EXPRESAS O IMPLÍCITAS DE LA LEY O DE OTRA MANERA,
INCLUYENDO SIN LIMITACIONES, LAS GARANTÍAS IMPLÍCITAS
DE COMERCIALIZACIÓN Y EJERCICIO PARA UN PROPÓSITO
PARTICULAR A CUALQUIER OTRA PERSONA. LEA EL MANUAL
DEL USUARIO. SI TUVIERA ALGUNA DUDA SOBRE EL
FUNCIONAMIENTO O LA GARANTÍA DEL PRODUCTO,
CONTACTE A NUWAVE LLC.

garantía limitada
46
47
nuwavenow.com
GARANTÍA LIMITADA
ESPAÑOLGarantía Limitada
PROCEDIMIENTO DE RESOLUCIÓN DE CONTROVERSIAS. Para
disputas relacionadas con el uso del sitio web o el uso o la compra
de un producto o servicio NuWave (colectivamente “Disputas”),
usted acepta comunicarse primero con NuWave LLC al (877) 689-
2831 (teléfono), (847) 367-5486 ( facsímil) o legal@nuwavenow.
com (correo electrónico). Si no podemos resolver su disputa de
manera informal, todas las disputas se someterán a un arbitraje nal
y vinculante. Puede comenzar el proceso de arbitraje enviando una
solicitud por escrito a la Asociación Americana de Arbitraje (“AAA”) y
enviando una copia a NuWave. NuWave pagará todos los costos de
presentación. Un solo árbitro de la AAA llevará a cabo el arbitraje en
un lugar conveniente para usted o por teléfono.
El laudo del árbitro será vinculante y podrá presentarse como
un fallo en un tribunal de jurisdicción competente. El arbitraje
se llevará a cabo de conformidad con las disposiciones de las
Reglas de arbitraje comercial de AAA y los Procedimientos de
mediación vigentes en el momento de la presentación de su
solicitud de arbitraje. Ver https://www.adr.org/sites/default/les/
CommercialRules_Web.pdf. Salvo que lo exija la ley según lo
determine un árbitro, ninguna de las partes o el árbitro puede
revelar la existencia, el contenido o los resultados de cualquier
arbitraje a continuación sin el consentimiento previo por escrito de
ambas partes.
A. RENUNCIA DE DERECHO A DEMANDAR. Al aceptar el
arbitraje, comprende que, en la medida máxima permitida por la
ley, acepta renunciar a su derecho a presentar una demanda en
cualquier tribunal, a una audiencia judicial, un juicio con jueces y
un juicio con jurado.
B. RENUNCIA A LA ACCIÓN DE CLASE. En la medida máxima
permitida por la ley, usted acepta expresamente abstenerse de
presentar o unirse a cualquier reclamo en cualquier capacidad
representativa o de toda la clase, incluyendo, entre otros,
presentar o unir cualquier reclamo en cualquier acción de clase o
arbitraje de clase.
C. PROCEDIMIENTO DE SALIDA. Para optar por no participar en el
arbitraje, debe comunicarse con NuWave. Para solicitar la exclusión
voluntaria del arbitraje, contáctenos en legal@nuwavenow.com
(correo electrónico), NNuWave LLC, 560 Bunker Ct. Vernon Hills,
IL 60061, EE. UU., (847) 367-5486 (fax) o (877) 689 -2838 o (224)
206-3019 (teléfono). Tendrá treinta (30) días a partir de la fecha
de entrega del producto para optar por el arbitraje con respecto
a cualquier disputa que surja o esté relacionada con el uso o la
compra de cualquier producto NuWave.
Si han pasado más de 30 días, no es elegible para optar por
no participar en el arbitraje y habrá renunciado a su derecho de
demandar o participar en una demanda colectiva con respecto
a la disputa que surge de su compra o uso de un producto
NuWave. Para cualquier disputa que surja de su uso del sitio web
de NuWave, tiene treinta (30) días a partir de la fecha en que
proporcionó información al sitio web para optar por no participar
en el arbitraje. Si han pasado más de 30 días, no es elegible para
optar por no participar en el arbitraje y habrá renunciado a su
derecho de demandar y participar en una demanda colectiva con
respecto a la disputa que surge del uso del sitio web de NuWave.
D. ALGUNOS ASUNTOS NO ESTÁN SUJETOS A ARBITRAJE.
Sin perjuicio de lo anterior, lo siguiente no estará sujeto a arbitraje
y podrá ser juzgado solo en los tribunales estatales y federales de
Illinois: (i) cualquier disputa, controversia o reclamo relacionado
o que impugne la validez de nuestros derechos de propiedad
intelectual y derechos de propiedad , incluidas, entre otras,
patentes, marcas comerciales, marcas de servicio, derechos
de autor o secretos comerciales; (ii) una acción de una parte
para una medida cautelar temporal, preliminar o permanente,
ya sea prohibitiva u obligatoria, u otra medida provisional; o (iii)
interacciones con autoridades gubernamentales y reguladoras.
Usted acepta expresamente abstenerse de presentar o unirse a
cualquier reclamo en cualquier capacidad representativa o de toda
la clase, incluyendo, entre otros, presentar o unir cualquier reclamo
en cualquier acción de clase o cualquier arbitraje de clase.
LEA EL MANUAL DE SU PROPIETARIO
Si aún tiene preguntas sobre el funcionamiento o la garantía
del producto, comuníquese con NuWave LLC al:
1-888-502-7807 o envíe un correo electrónico a
support@nuwavenow.com.
48
49
REPLACEABLE PARTS
Part Name Part Description Part No.
replaceable parts
nuwavenow.com
To order replaceable parts head over to NuWaveNow.com
Jar with Blade
Plunger Lid
Plunger Lid Seal Ring
Plunger Cap
MRA3
MRP1
MRA1
Covers jar. Used for blending tasks.
Located under the rim of Plunger Lid.
Provides seal while blending.
Where ingredients are placed. Clear
container with stainless steel blades
attached inside. Caution: Do not remove
blades.
MRA4
Located on top, in center of Plunger Lid.
Removed to pour additional ingredients.
Provides opening for Plunger.
Plunger
Silicone Pad
Quiet Cover
Door Cover
MRA6
MRA5
MRA7
MRP2
Tool used through Plunger Lid to push
down and move around ingredients.
Used to reduce noise of the Blender when
it is in use.
Used to help secure the Jar onto the
Blender Base
The front of the Quiet Cover that helps
reduce noise.
BM28301
Rev. 1-OG
10-28-21
FOR HOUSEHOLD USE ONLY
120V, 60Hz, 1800 Watts
Model: 28301
Rev. 1
For patent information please go to:
www.nuwavenow.com/legal/patent
Designed in France & Developed in USA
NuWave LLC
560 E. Bunker Ct.
Vernon Hills, IL 60061, U.S.A.
Tel: 1-888-502-7807
Mon - Fri 7:30 am to 4:30 pm (CST)
Email: support@nuwavenow.com
Made in China
©2021 NuWave LLC • All Rights Reserved.