Loading ...
Loading ...
Loading ...
Operation
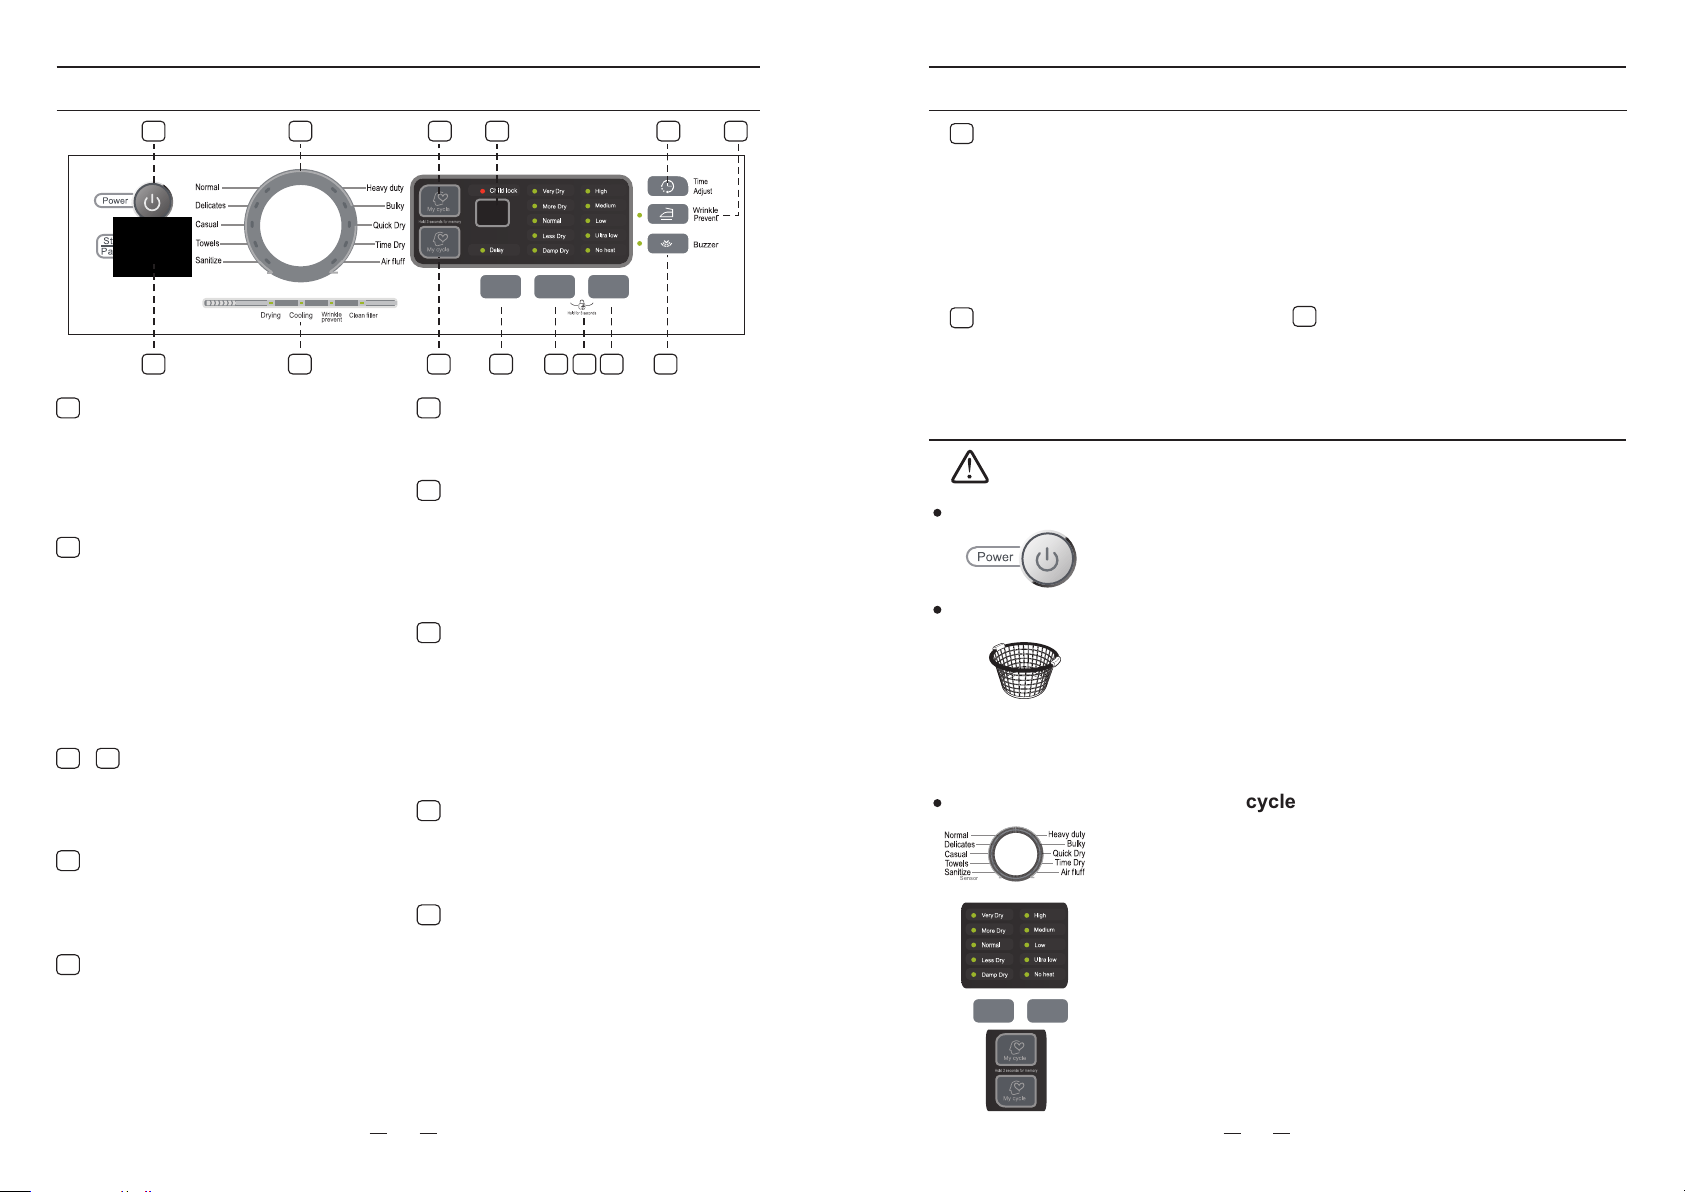
Control panel
Operation
Control Panel
Power button
Press once to turn your dryer on.
Press again to turn your dryer off.
If the dryer is left on for more than
10 minutes without any buttons being
pressed, the unit will automatically
turn OFF.
1
Cycle selector
Select your desired cycle for the
type of load.
The cycle you select determines the
heat control for the cycle.
The Quick Dry, Time Dry and Air fluff
cycles are Manual Dry cycles.
For detail, refer to page 19.
The Normal, Delicates, Casual, Towels,
Sanitize, Heavy duty and Bulky cycles
are Sensor Dry cycles.
2
Digital display
The LED digital display will show your
remaining time for cycle selected.
The LED will show selected delay time
when setting the delay time.
4
Time adjust button
This button is effective only for Manual
cycles.
Push this button to change the drying
time you prefer. Push one by one
to get your desired the setting time.
5
Wrinkle prevent button
Press once to add the Wrinkle Prevent
step into the operating program.
Press again to cancel selection.
6
Start/Pause button
Press once to start the program.
Press again to pause the program. You
can’t change any setting except add a
garment.
Press once again to restart the
program.
7
Cycle status lights
The relative light will be lit when the
dryer is in its drying program, say the
cooling LED will lit when the dryer is
operating in cooling down process.
When the whole program is finished,
the Clean Filter light will flash to
remind you to clean the filter (for detail,
refer to page 21).
8
Delay button
Delay the start of any cycle for up to 24
hours in one-hour increments.
Displayed hours indicates the time the
dry will start operation.
10
Dryness level button
Press the button to select the dryness
level. Different dryness level will result
in different drying time. For clothes to
be ironed manually, a lower dryness
level should be selected.
11
Child lock
Press the Dryness and Temp
buttons together to activate the
Child lock function.
page 21.
Press again for another 3 seconds to
deactivate the function.
All selection except the “Power” will
be out of function. For detail, refer to
12
Medium - For permanent press,
synthetics, lightweight cottons, or
items labeled Tumble Dry Medium.
Low - For lower heat than Medium to
dry synthetic or washable knit fabrics.
Ultra Low - For heat sensitive items
labeled Tumble Dry Low or Tumble
Dry Warm.
No Heat - Provides just the air cycle
without any heat.
Drying a load of laundry
To reduce the risk of fire, electric shock, or injury to persons when using your
dryer, follow basic precautions, including the following:
CAUTION
STEP 1: Power on your dryer
- Place only one wash load in your dryer at a time.
- Mixed loads of heavy and light weight fabrics will dry differently,
which may result in lightweight fabrics being dry while heavy fabrics
remain damp at the end of a drying cycle.
- Add one or more similar items to your dryer when only one or two
articles of clothing need drying. This improves the tumbling action
and drying efficiency.
- Overloading restricts tumbling action, resulting in uneven drying as
well as excessive wrinkling of some fabrics.
STEP 2: Load your dryer
- Press this “Power” button to power your dryer on.
Buzzer button
14
Press once to stop the buzzer sound.
Press again to activate the sound.
Your selection will be kept until next
pressing.
STEP 3: Select the appropriate cycle and options for the load
17
18
Temp button
Press the button to select the drying
temperature.
High - For sturdy cottons or those
labeled Tumble Dry.
13
1
2
3 4
5 6
7
8 9 10 11 13 1412
Delay
Temp
Delay
Dryness
1
2
Sensor cycles
Manual cycles
My cycle 1 & 2
Press and hold for 3 seconds to save
your favorite drying cycle.
Press once to load your favorite cycle
setting.
3 & 9
1
2
TTempemp
DrynessDryness
SensorSensor cycles cycles
Manual cyclesManual cycles
- Select the appropriate cycle by Cycle Selector according to the
cycle chart on page 19.
- Select the appropriate optional function by buttons according to the
chart on page 19.
- Your favorite drying Cycle
Once you have set the cycle selector and option function, you
can press and hold the “My Cycle 1” or “My Cycle 2” button
for 3 seconds to save this setting as your favorite cycle before
starting the unit.
The light beside the knob will flash to confirm the save with
beeps.
- You can finish this step by pressing the “My Cycle 1” or
“My Cycle 2” button once to use your favorite cycle or make
additional changes.
Loading ...
Loading ...
Loading ...