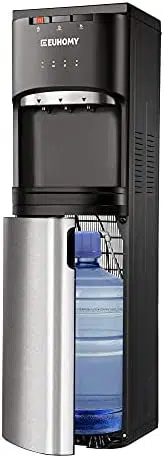
Before using the water cooler for the first time, remove all packaging material, including the plastic bag.
Befoe first time use: To prevent any internal damage, it is very important to keep refrigeration units (like this one) upright throughout their journey. Please leave it standing upright and outside the box for 24 HOURS before plugging it in.
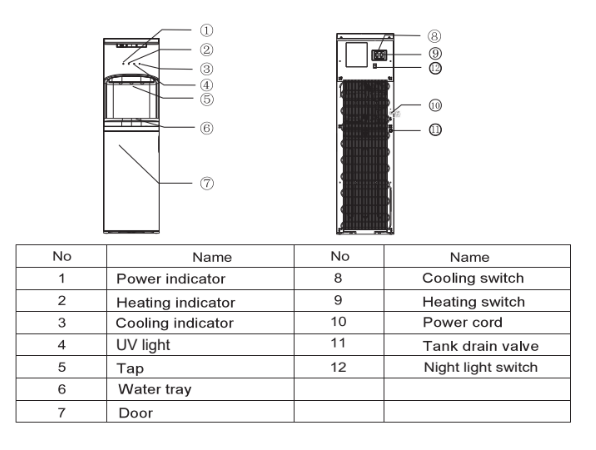
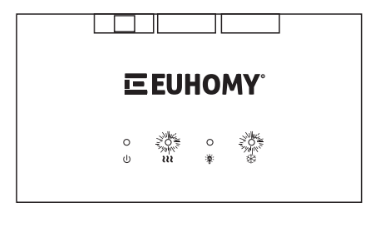
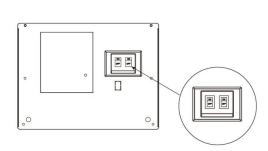
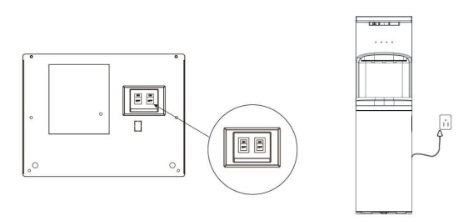
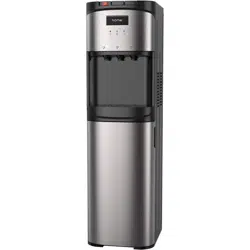
Indicator lights
Power Light
The light will illuminate when plug in the water cooler. It will keep lighting up until pull off the power cord.
Heating Indicator
This light will illuminate when the water is heating. The light will remain on while the water is heating and will turn to be green when it has reached the temperature of 185°F. As the water is dispensed, the hot tank will refill and the water will heat. This indicator light will turn to be red when the water reheats.
Cooling Indicator
This light will illuminate when the water is cooling. The light will remain on while the water is cooling and will turn to be green when it has reached the correct temperature of 50°F. As the water is dispensed, the cold tank will refill and the water will cool. This indicator light will turn to be blue when the water cools.
UV Indicator
This light will indicate when the water cooler is sanitizing the water. It automatically operates for 5 twenty (20) minutes every two (2) hours. The UV indicator will work silently, and if the UV indicator is not illuminated, the function is not operating properly.
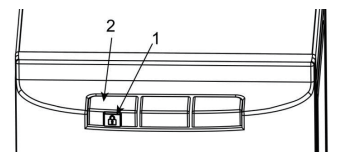
Empty bottle notice
When the water in the bottle is running out, the heating light and cooling light will flash at the same time. The lights will keep flashing until user opens the door to replace a new filled water bottle. Note: please must close the door tightly everytime after replacing the water bottle.
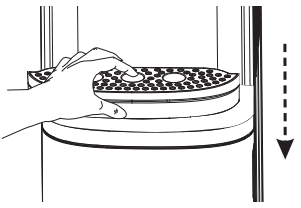
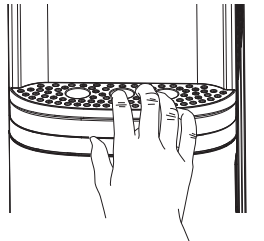
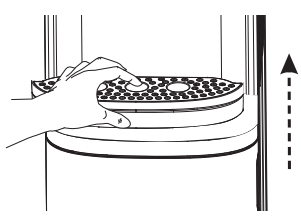
Installing and removing the drip tray
No external drain is needed, the overflow will collect here.
1. To install the drip tray, simply put it down into the area at the top of the door until it snaps into place.
2. To remove the drip tray, place your fingersin the grid of the drip tray.
3. Gently pull the drip tray upward to remove the drip tray from the door of the cooler to empty the water.
Note: The drip trap is not dishwasher safe.
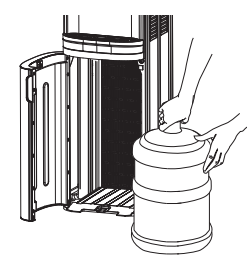
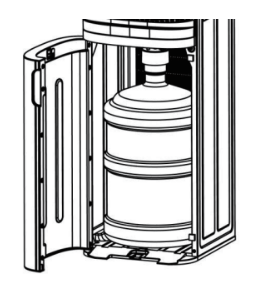
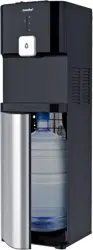
Installing the water bottle
1. Make sure the lower door is open. Open the lower door by pulling on the right side of the door. Note: the lower door is covered by a thin layer of plastic film used to protect the door during shipment. Please remove the plastic layer prior to first use.
2. Place fresh water bottle outsie of the bottle storage area.
3. Clean outside of new bottle with a cloth.
4. Remove the entire plastic cap and paper seal from the top of a brand new water bottle.
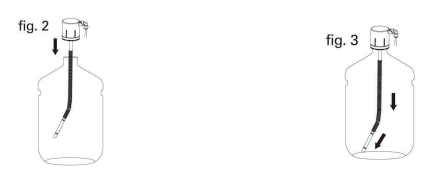
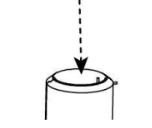
5. Bend the water straw. See the pic below.
6. Place the water straw into the water bottle. lower the straw to the bottom of the bottle and clasp the bottle cap down onto the neck of the water bottle so that the bottle cap is tightly secured to the bottle.
7. Make sure the weighted end of the water straw reaches the lowest part of the water bottle. See fig.3. Note: this method is for 3-5 gallon water bottles. Most standard shaped water bottles have a raised center at the very bottom. For maxium efficiency. make sure the water straw reaches the side of the bottle at its lowest point to ensure all of the water can be utilizied. See fig.3
8. Silde bottle into the storage area and close the lower door. Make sure that the door is closed tightly.
9. Plug cord into a properly grounded wall outlet. At this time, the pump will begin to move water from the bottle to the hot and cold tanks. It will take up to 5 minutes to fill the tanks for the first time. During this period the pump will run continuously. This is normal. The pump will stop automatically when the tanks are completely filled.
10. When the pump has stopped running and the water tanks are full, turn the hot water and cold switches to the on position. The hot and cold water indicator light will illuminate. Note: allow up to 1 hour for heating and cooling cycles to complete and water to reach the proper hot and cold temperatures. The hot and cold water indicator lights will shut off when each cycle is complete.
11. Place a glass under the water cooler spout.
12. For cold water, press downward the button and hold it until the desired amount of water has been dispensed, then release.
13. The hot water button features a child safety lock. To dispenser hot water, push the button forward and depress the hot water push button downward to begin the flow of water. You must hold the child safety lock and push the button at the same time until the desired amount of water has been dispensed and then release. The child safety lock will reset to locked condition automatically once you release the button.
Push the child safety lock forward and then press the button downward at the same time to get the water.
14. For room temperature water, press downward the button and hold it until the desired amount of water has been dispensed, then release.
Draining&cleaning
To avoid accident, cut off the power supply before operation according to the following instruction. It is recommended that the unit be cleaned and sanitized manually about every six months to prolong the life time of the machine.
To clean the outside of the unit
The machine had been disinfected before shipping from factory. Before using this machine, clean the machine by pushing the hot water button and cold water button, let about 1 liter water flow out.
The machine should be cleaned with the citri acid scale remover available from drugstore or markets place according to the instruction manual of the citri acid scale remover, and then clean it with water.
Use any neutral & non friction cloth to wash the surface of the machine. The cloth does not come with this unit. It can be purchased separately from a local store.
Draining instruction:
Press the switch to off position. Cut off the electric supply.
2. Open the lower door and remove bottle from the water cooler.
3. Remove the water straw from the water bottle.
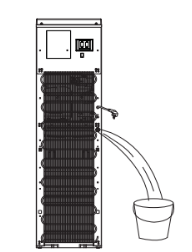
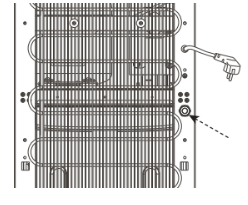
4. Place a container under the drain valve and drain valve plug which are located on the back panel. Remove the drain cover and allow the water to drain out from the water cooler. Let the water flow into the container.
Caution: Because the hot water can reach to approximately 185°F, it can cause severe burns if not handled carefully. Please be cautious while operating and cleaning. Before draining out the water, please wait at least 1 hour to let the water cool down.
5. After finish water drain out, Reinstall the drain valve cap and plug.
Cleaning instruction
Periodically the water cooler tanks must be sanitized to prevent unpleasant tastes in the water and cleaned to remove mineral deposit that can impair flow.
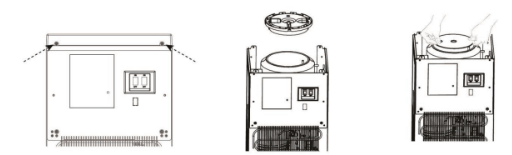
1. Unscrew the top cover and take out the cold tank lid.
2. Put the citri acid scale remover into the machine's cold tank and make sure the water can flow out of the water spout.
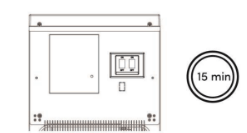
3. Plug in the power cord and turn on the heating switch. Allow the water to heat for 15 minutes.
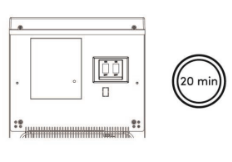
4. Turn off the heating switch and allow the citri acid scale remover to cool down for 20 minutes.
5. Using a container, drain the remaining cleaning solution from the internal water tanks from the drain valve by removing the drain cap and removing the drain plug. Discard the cleaning solution. Reinstall the drain plug and drain cap on the water cooler. Flush the system using clean water using the same procedure outlined in steps 1 through 4 above. When the rinse water stops flowing replace the drain plug and drain cap and tighten. The cleaning process is now complete.
Troubleshooting
Please check the following before having the machine repaired.
PROBLEMS
POSSIBLE CAUSES
SOLUTIONS
No hot or cold water
Over consumption of hot or cold water in short time.
No power supply
Just wait a moment, and then hot or cold water is available again.
Connect plug to socket, turn on heating or cooling switch.
No water running out from taps
Empty bottle.
Inlet of bottle supporter blocked by bottle seal.
Replace it with another bottle.
Clean out wasted paper & bottle seal, install bottle again.
Noisy operation
Did not set up the water cooler on the even ground
Place the water cooler on the even and solid ground or surface.
Q: Why is the red light (hot) and blue (cold) lights are flashing. The unit isn't cooling the water nor is it heating the water. Water comes out of the Cold and Room temperature spout. Water is trickling out of the Hot water spout. Reply
Q: Why are the first and third green lights blinking Reply