User Manual
Nebula Astro
01
English
22
Deutsch
41
Español
59
Français
77
Italiano
95
Nederlands
114
Português
133
日本語
152
한국어
171
ةي
ِ
ب
َ
ر
َ
عل

EN
01
Table of Contents
Safety Instructions 02
What’s Included 05
Overview 05
Getting Started 09
Nebula Connect App 11
Settings 12
Using the Nebula Astro 15
Specications 17
Troubleshooting 18
Notice 19
Trademarks 21
Warranty 21

EN
02
Safety Instructions
Read all instructions before you use this device. Do not make any changes or create
settings that are not described in this manual. If physical injury, loss of data, or
damage is caused by failure to follow instructions, the warranty does not apply.
Setup
•
To reduce the risk of re and/or electric shock, do not expose the device to rain or
moisture. Objects lled with liquids, such as vases, should not be placed on this device.
•
Do not place this device on soft surfaces such as tablecloths or carpets, otherwise
the device could be a re hazard.
•
Do not place this device in areas susceptible to excessive dust and dirt or near any
appliance generating a strong magnetic eld.
•
To prevent overheating, do not block or clog the ventilation openings.
•
Never place this device in a conned space. Always leave enough space around
this device for ventilation.
•
Avoid overexposing this device to direct sunlight, heat, large temperature
fluctuations, and moisture. Avoid extreme temperatures. The suitable operation
and storage temperature for this device and its accessories is 41°F to 95°F / 5°C to
35°C.
•
When this device is running for a long period of time, the surface may become hot.
If this occurs, shut it down immediately and unplug the charger. Resume operation
after the device has cooled down.
•
Always handle this device with care. Avoid touching the lens.
•
Do not allow children to handle the device without supervision.
•
Do not place heavy or sharp objects on this device.
•
To avoid electric shock, do not disassemble the device.
•
Only use attachments or accessories specied by the manufacturer.
•
Avoid extreme vibrations as they may damage the internal components.
Power Supply
•
Use only the provided power adapter.
•
Power off the device before removing the power supply from the socket.
•
Protect the power cord from being walked on or pinched, particularly at plugs,
convenience receptacles, and the point where they exit from this device.
•
Unplug this device if there are lightning storms or when unused for a long period of
time.
•
Where the power plug or an appliance coupler is used as the disconnect device, the
disconnect device shall remain readily operable.

EN
03
•
Before you make or change any connections, ensure that all devices are
disconnected from the power outlet.
•
Never touch the power cable or the power connector with wet hands.
Hearing Safety
•
To prevent hearing damage, do not listen for extended periods at high volume. Set
the volume to a safe level.
Charging
•
The charger type is DST451-150300W-K with output voltage / current of USB-C
5V / 2A. The charger should be installed near this product and should be easily
accessible.
•
This charger is for indoor use only.
•
When charging, place this device in an environment that has a normal room
temperature (ranges from 41°F to 77°F / 5°C to 25°C) and good ventilation.
•
Due to the enclosure material, this device must only be connected to a USB 2.0 or
higher.
Battery
•
Do not replace the built-in battery yourself. Contact an authorized service center to
replace it.
•
The remote control contains batteries which can be swallowed. Keep the remote
control out of the reach of children.
•
Risk of explosion! Keep batteries away from heat, direct sunlight, or re. Never
dispose of batteries by burning.
•
Remove the batteries when the remote control has not been used for a long period
of time.
•
Replace the remote control batteries only with the same or an equivalent type.
•
Batteries contain chemical substances and they should be disposed of properly.
•
Charge this device regularly. Do not store this device with a completely discharged
battery.
Cleaning
•
Use a soft, lint-free cloth. Never use liquid, gaseous, or easily flammable cleansers
to clean.
•
Do not use any liquid cleaning agents to clean the lens to avoid damaging the
coating lm on the lens.
•
Wipe the surfaces gently. Be careful that you do not scratch the surface.
•
Use lens cleaning paper to clean the lens.

EN
04
Repairs
•
Do not make any repairs to this device yourself. Only have your device repaired by
an authorized service center.
•
Improper maintenance can result in injuries to persons or damage to this device.
•
Refer all servicing to qualied service personnel.
Caution
•
Possibly hazardous optical radiation emitted from this device.
•
Do not stare directly at the operating beam. The bright light may damage your eyes.
Disclaimer
•
Make sure you place Nebula Astro on a flat, hard surface, which enables the Eye
Guard function to be activated more precisely.
•
The distance range set to activate the Eye Guard function is for reference purposes
only.
•
Keep the lens clean and free from grease, or it may affect the sensitivity of the lens.
•
The Eye Guard function is designed for protection only in case that your children
accidentally turn the projector towards themselves. DO NOT intentionally turn the
projector towards your eyes.

EN
05
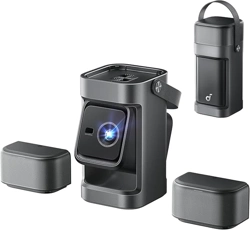
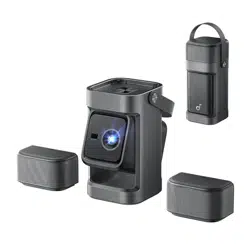
What’s Included
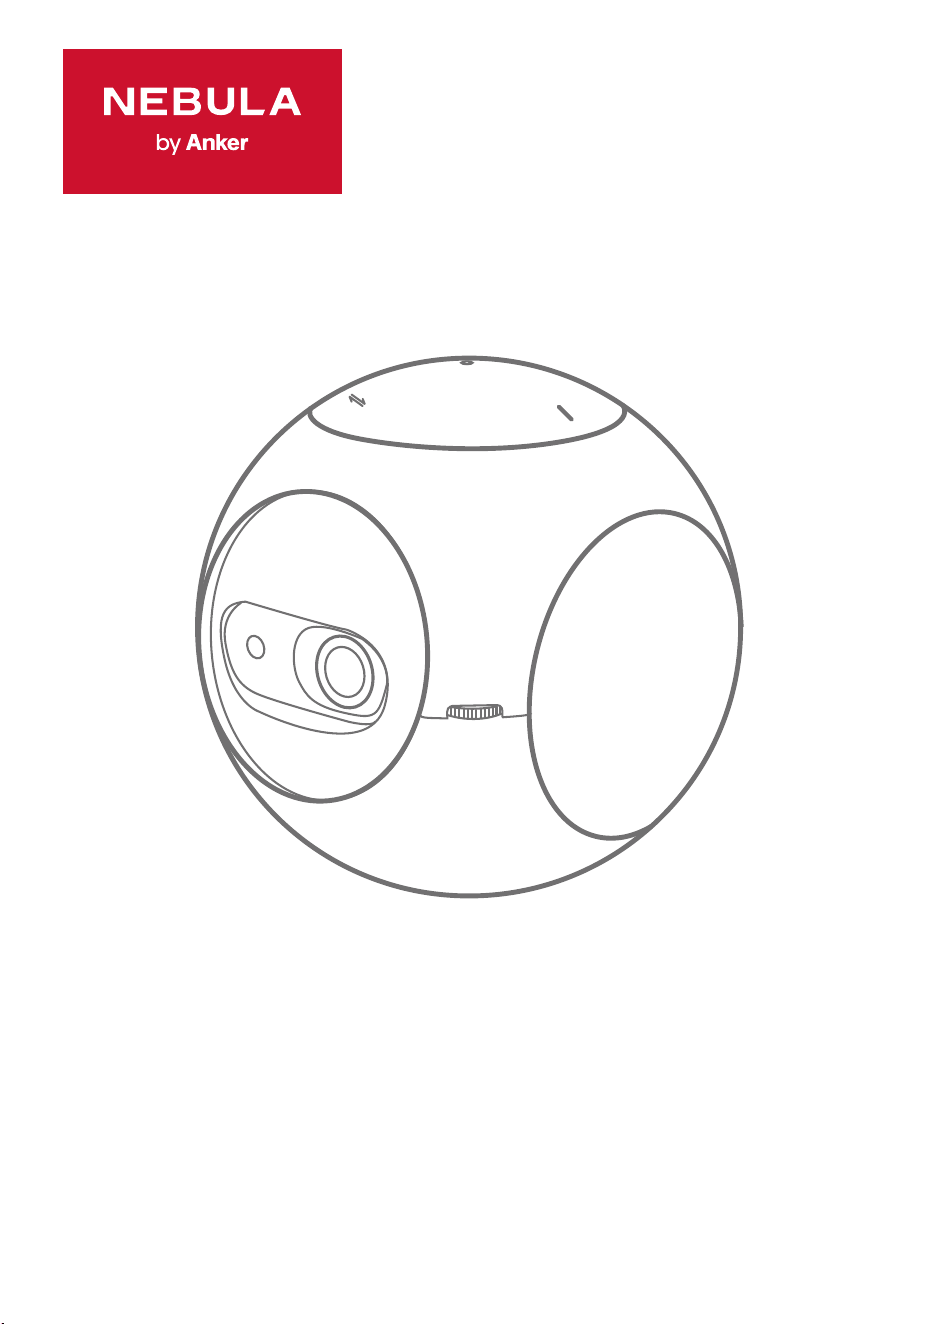
Overview
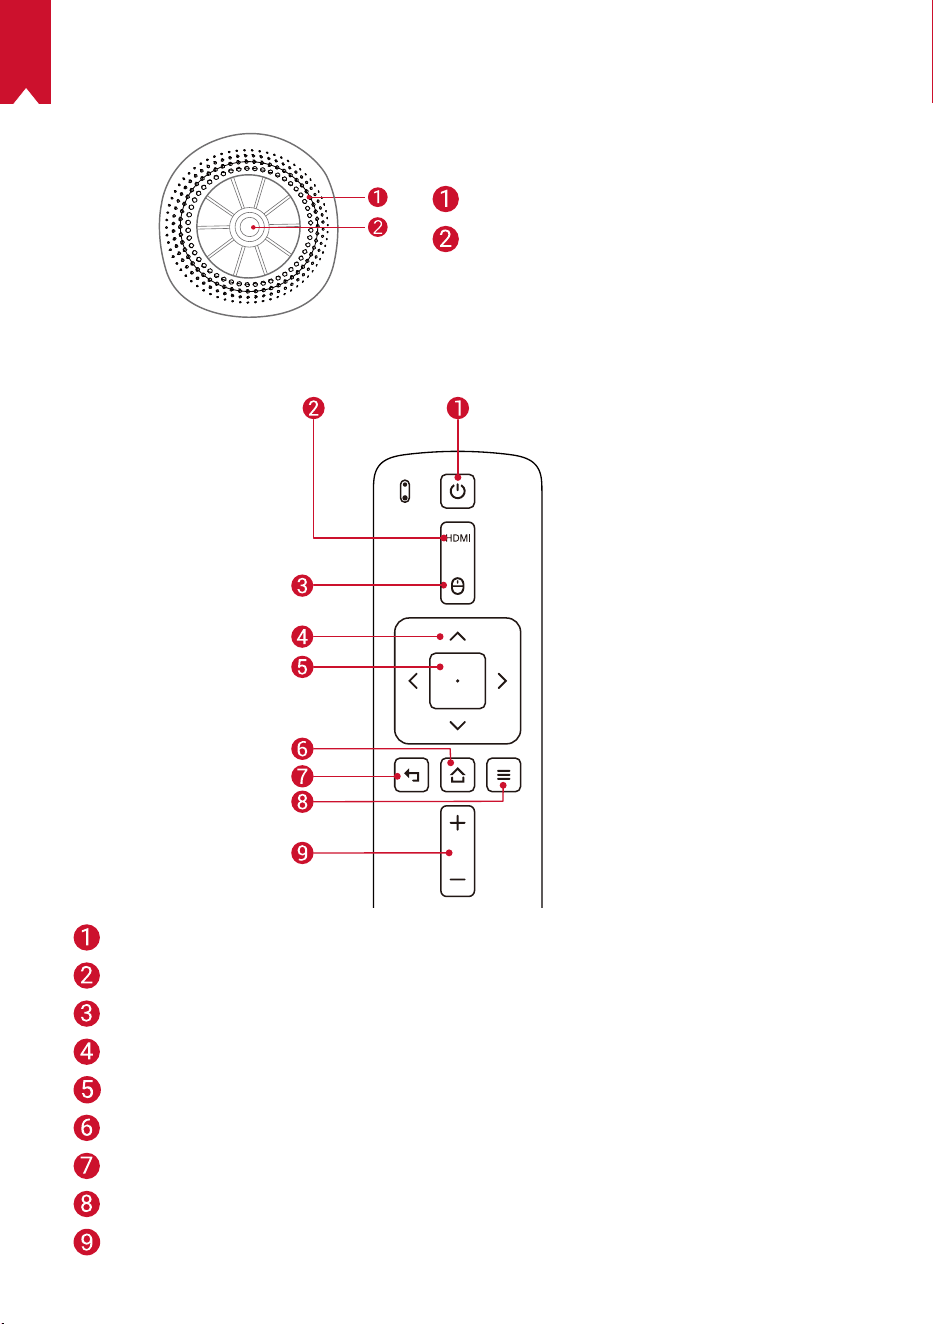
1.
Front View
4
TOF motion ensor
• The sensor will be triggered when Eye
Guard is activated
Lens
Ventilation outlet / inlet
Focus adjusting knob

EN
06
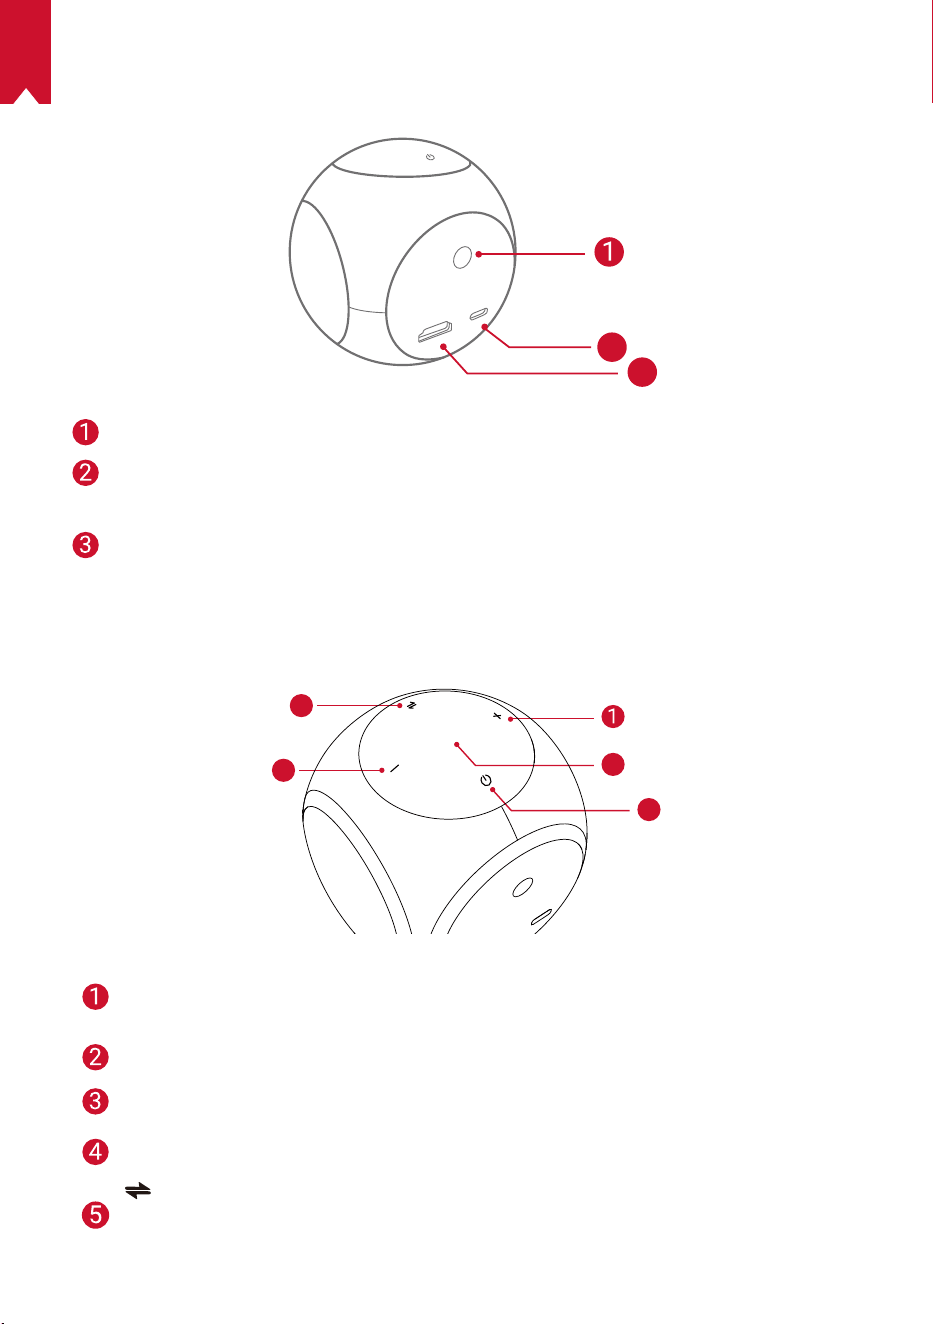
2.
Rear View
HDMI
Astro
TYPE-C
2
3
Infrared receiver
USB-C port
• Connect to power supply
HDMI
• Connect to a playback device via HDMI output
3.
Top View
5
4
3
2
Volume up
• Press to turn the volume up
LED indicator
Power button
• Press and hold for 2 seconds to power on / off
Volume down
• Press to turn the volume down
button
• Press to switch between Bluetooth speaker mode and projector mode
EN
07
4.
Bottom View
Speaker
Tripod socket
5.
Remote Control
Power on / off
Switch to HDMI connection
Mouse mode
Navigation
Conrm the selected content
Home
Back
View more options
Volume up / down

EN
08
6.
LED Indicator
LED Status Description
Breathing orange Eye Guard function is activated
Solid red Charging
Solid green Fully charged
Flashing red Low battery (< 20%) / Fault occurs
Solid blue Power on in projector or Bluetooth speaker mode
Solid orange Standby in projector mode
Flashing blue
Ready to pair / Bluetooth disconnected (Bluetooth
speaker mode)
EN
09
Getting Started
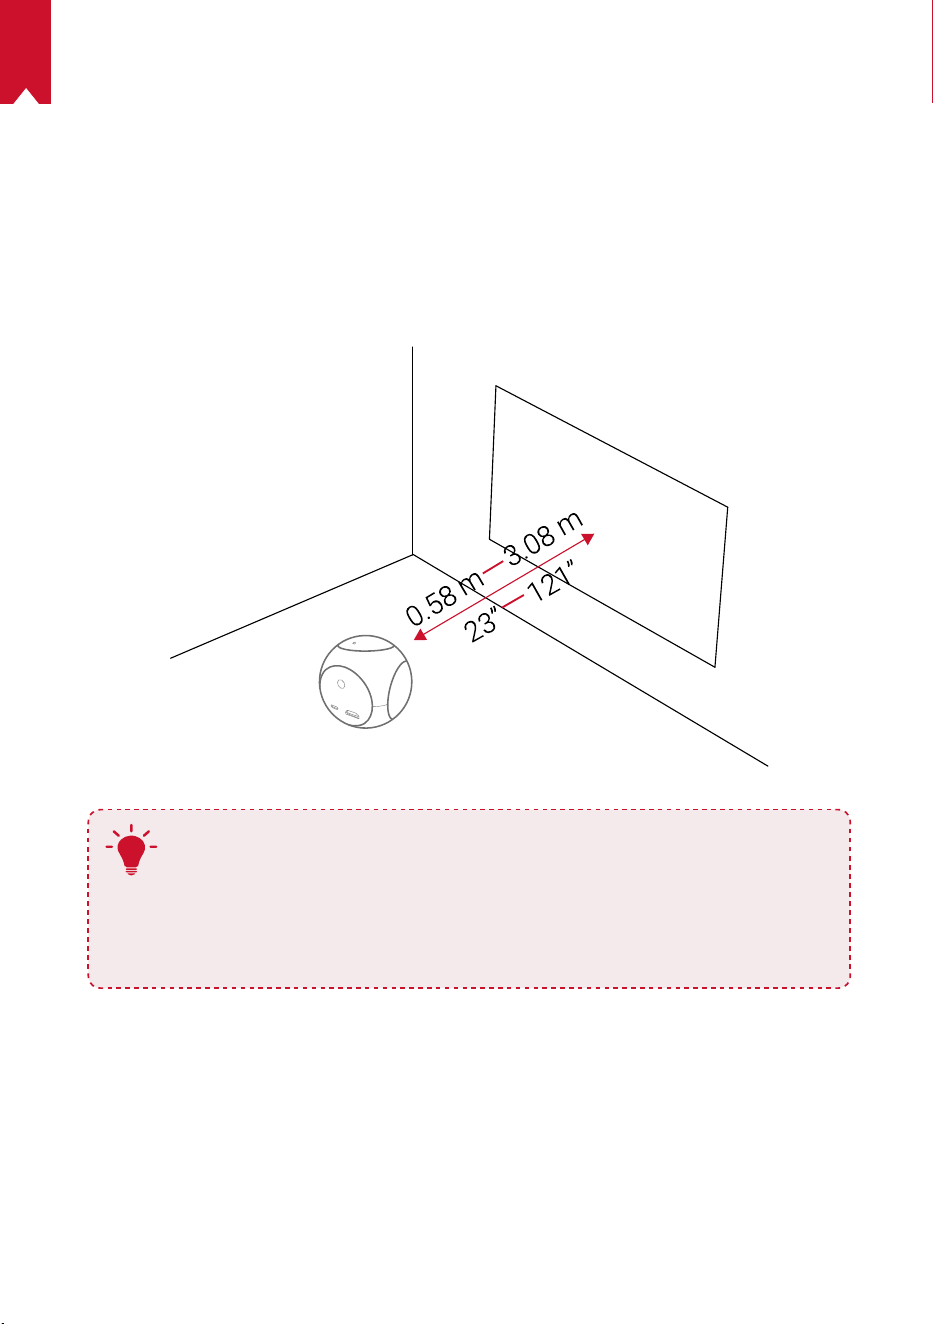
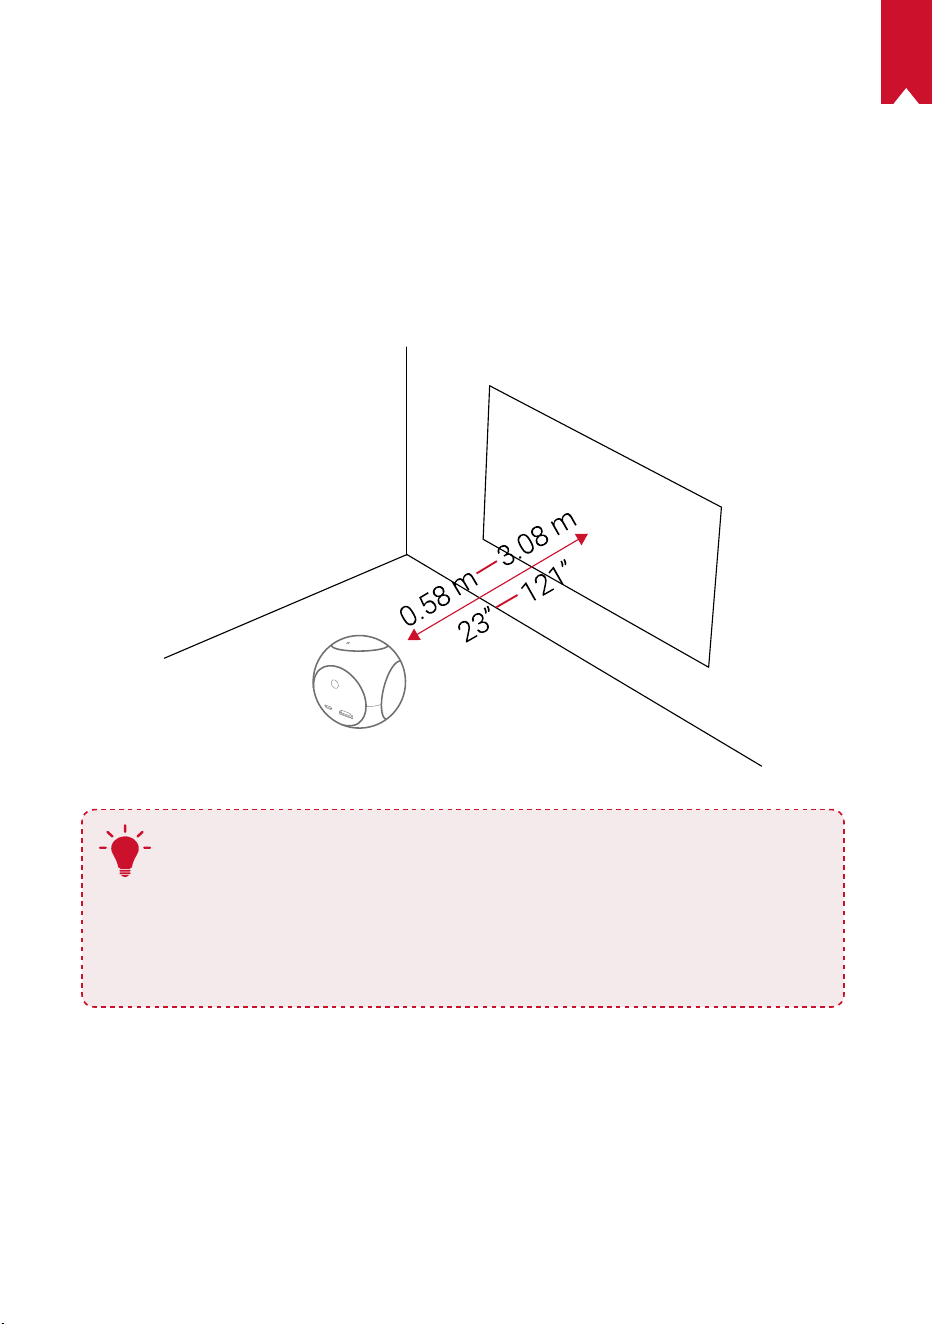
1.
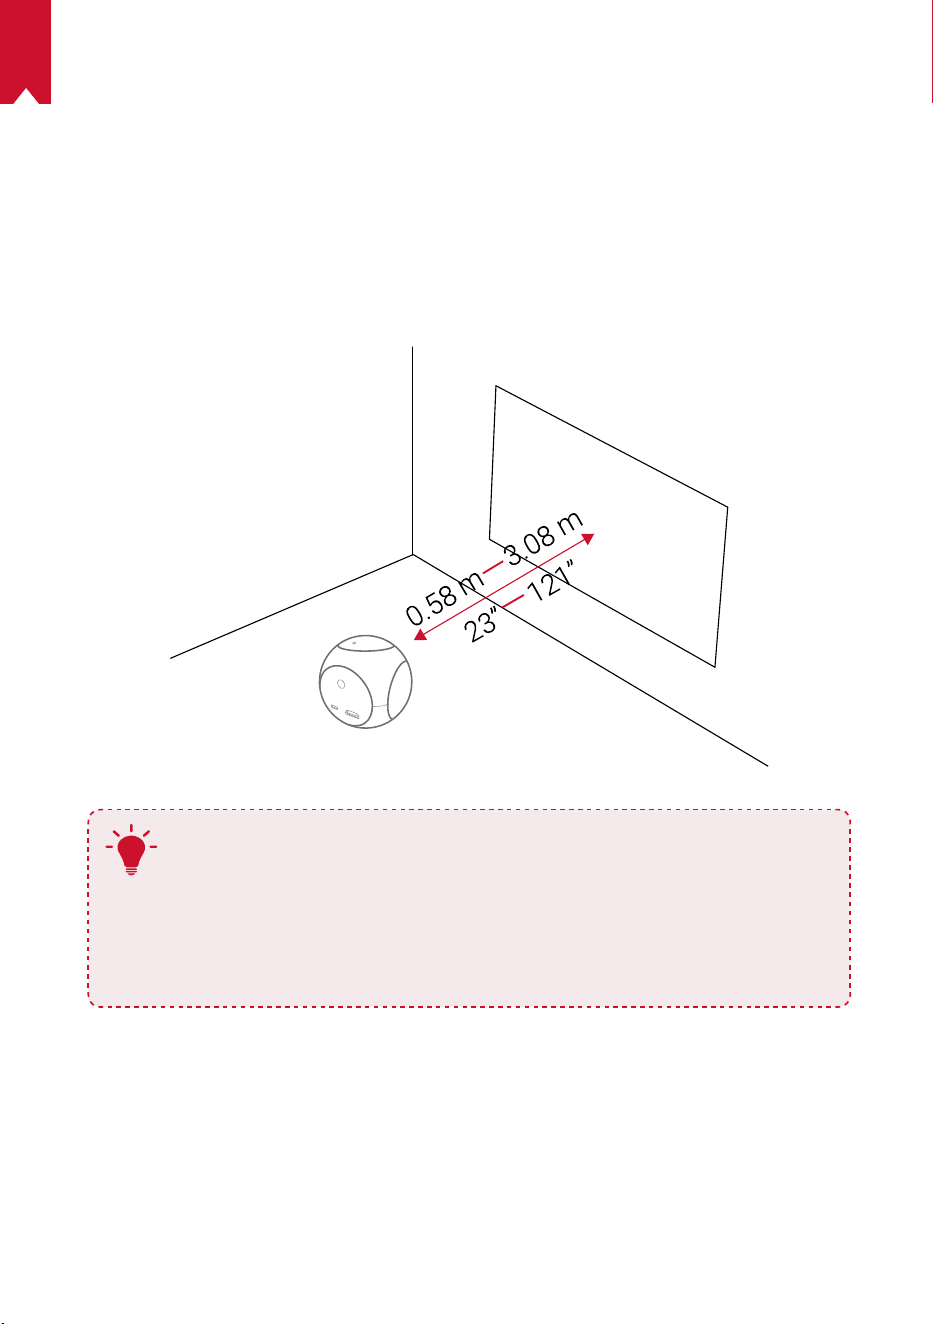
Placement
Place Nebula Astro on a stable, flat surface in front of the projection surface. For the
best results, the projection surface should be white and flat. The distance between
Nebula Astro and the projection surface must be a minimum of 0.58 meters (23
inches) and a maximum of 3.08 meters (121 inches) to get a projection image between
20 and 100 inches.
T
•
It is unnecessary to tilt Nebula Astro towards the projection surface.
You can correct the projection image with the built-in keystone
correction.
•
The distance between Nebula Astro and the projection surface
determines the projection image size. For the best result, position it
between 40 and 80 inches away from the projection surface.
2.
Prepare the Remote Control
The remote control comes with two AAA batteries.
①
Slide down to open the battery compartment.
②
To replace the batteries, slide to open the battery compartment, insert new batteries
(matching the polarity (+/-) indicated), and close the battery compartment.

EN
10
3.
Get Started
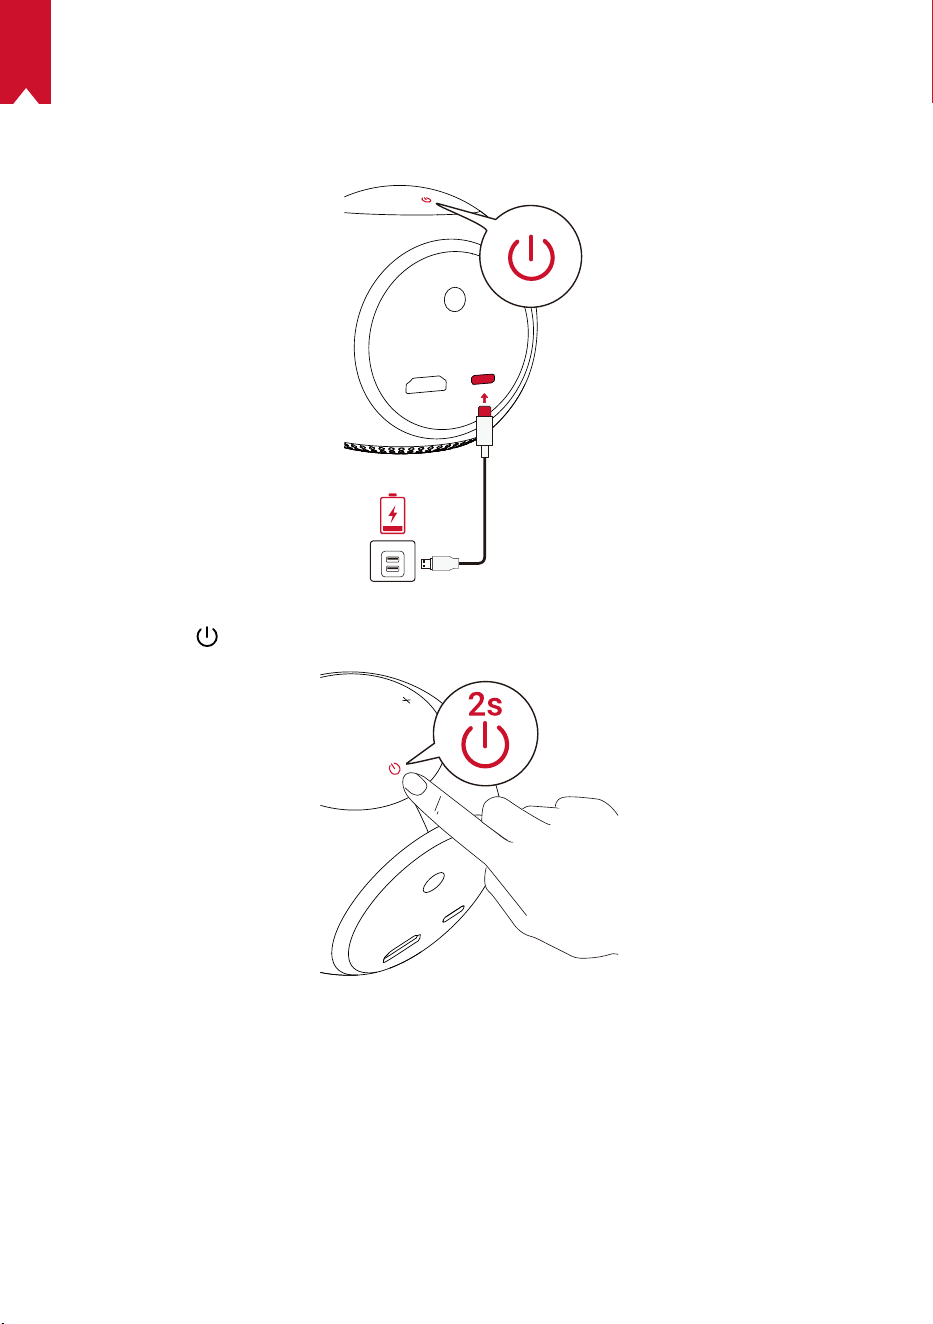
①
For first-time use, fully charge the built-in battery using the provided cable and
adapter.
②
Hold
for 2 seconds on the projector to turn it on.
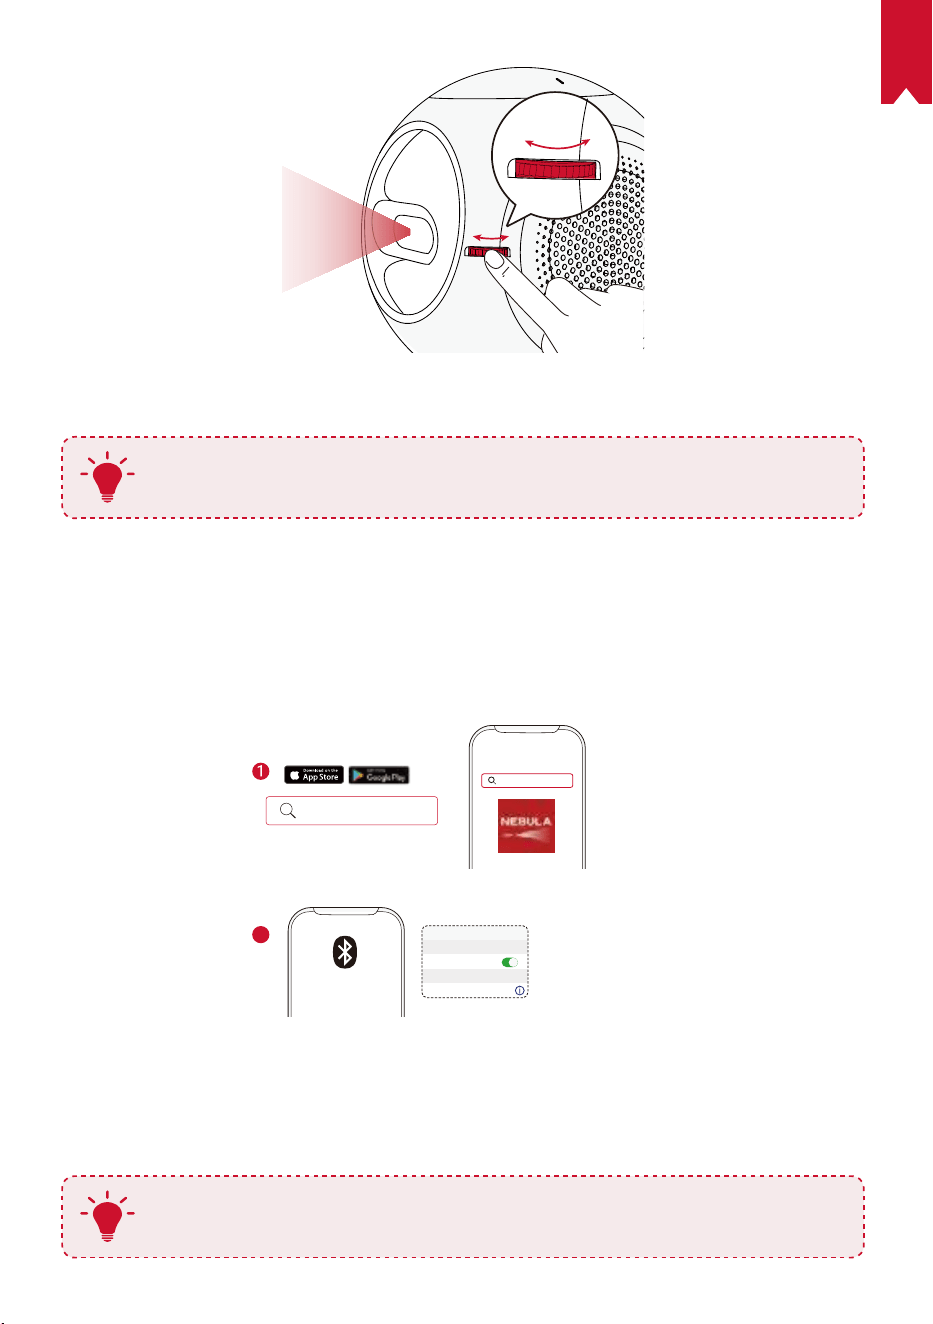
③
Turn the device towards a suitable projection surface or wall.
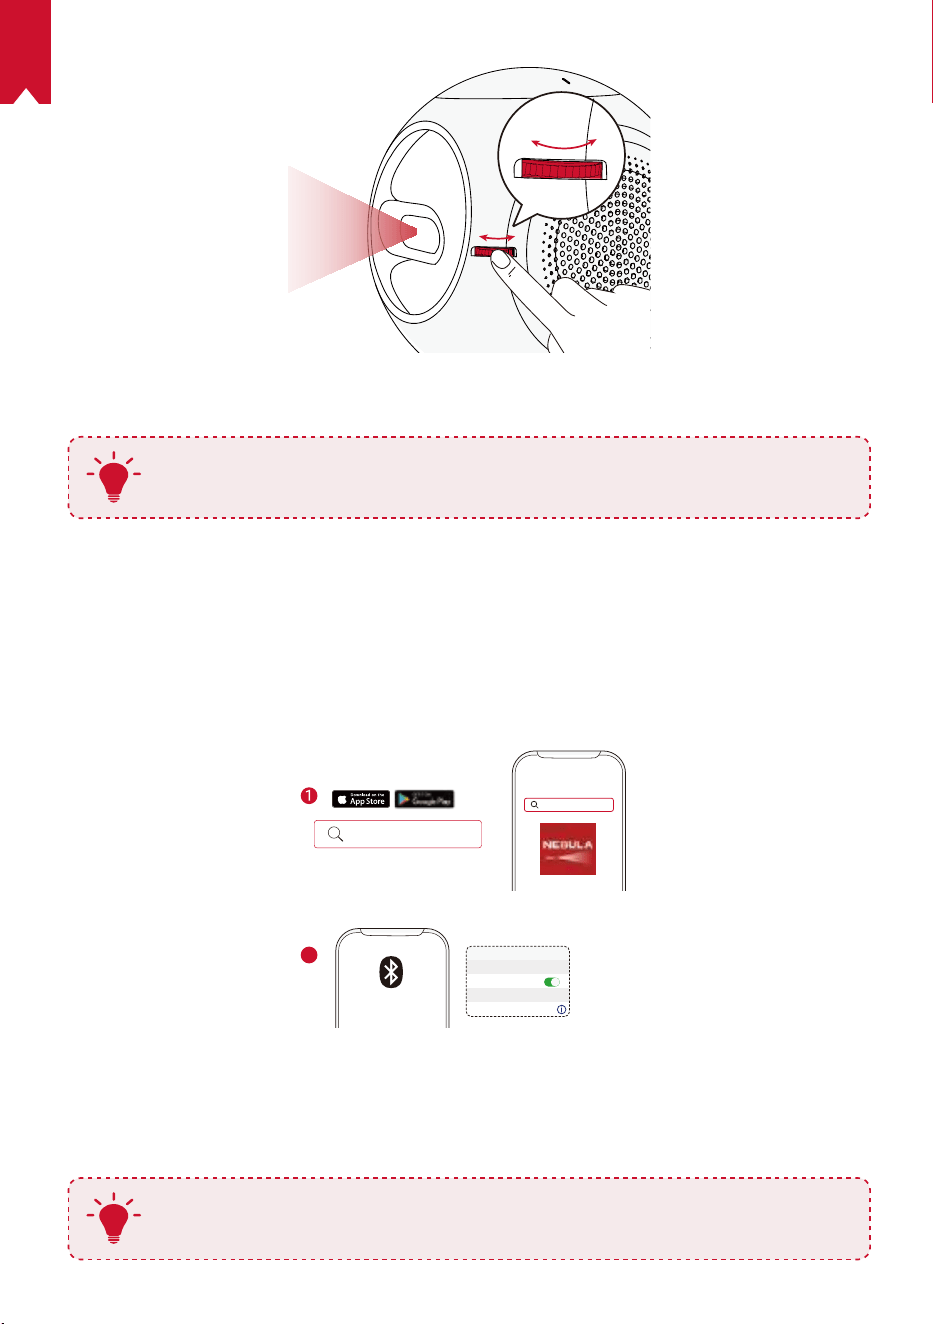
④
Rotate the knob to adjust the focus.

EN
11
⑤
For rst-time use, follow the on-screen instructions to complete the basic setup.
T
To give your Nebula Astro the fastest, safest charge, only use the provided
adapter.
Nebula Connect App
To easily control Nebula Astro, we recommend downloading the Nebula Connect app.
With this app, you can operate your mouse using your phone screen.
①
Download the Nebula Connect app from the App Store (iOS devices) or Google Play
(Android devices).
Nebula Connect
< Settings Bluetooth
Nebula-xxxxxx
Bluetooth
Connected
DEVICE
Nebula Connect
2
②
Enable Bluetooth on your smartphone.
③
Open the Nebula Connect app and select [Nebula-XXXXXX] as the device to be
connected.`
④
Follow the on-screen instructions to complete the connection setup.
T
To make your experience more enjoyable, we recommend you use the
Nebula Connect app instead of remote control.
EN
12
Settings
Go through the setup process when you power on Nebula Astro for the rst time.
Determine the distance range to trigger Eye Guard, set your name, birthday, and
password.
1.
Network
This projector can be connected to the Internet via a wireless (Wi-Fi) connection.
①
Select to access the Settings page. Select [Network] and press
.
②
Follow the on-screen instructions to complete the network connection.
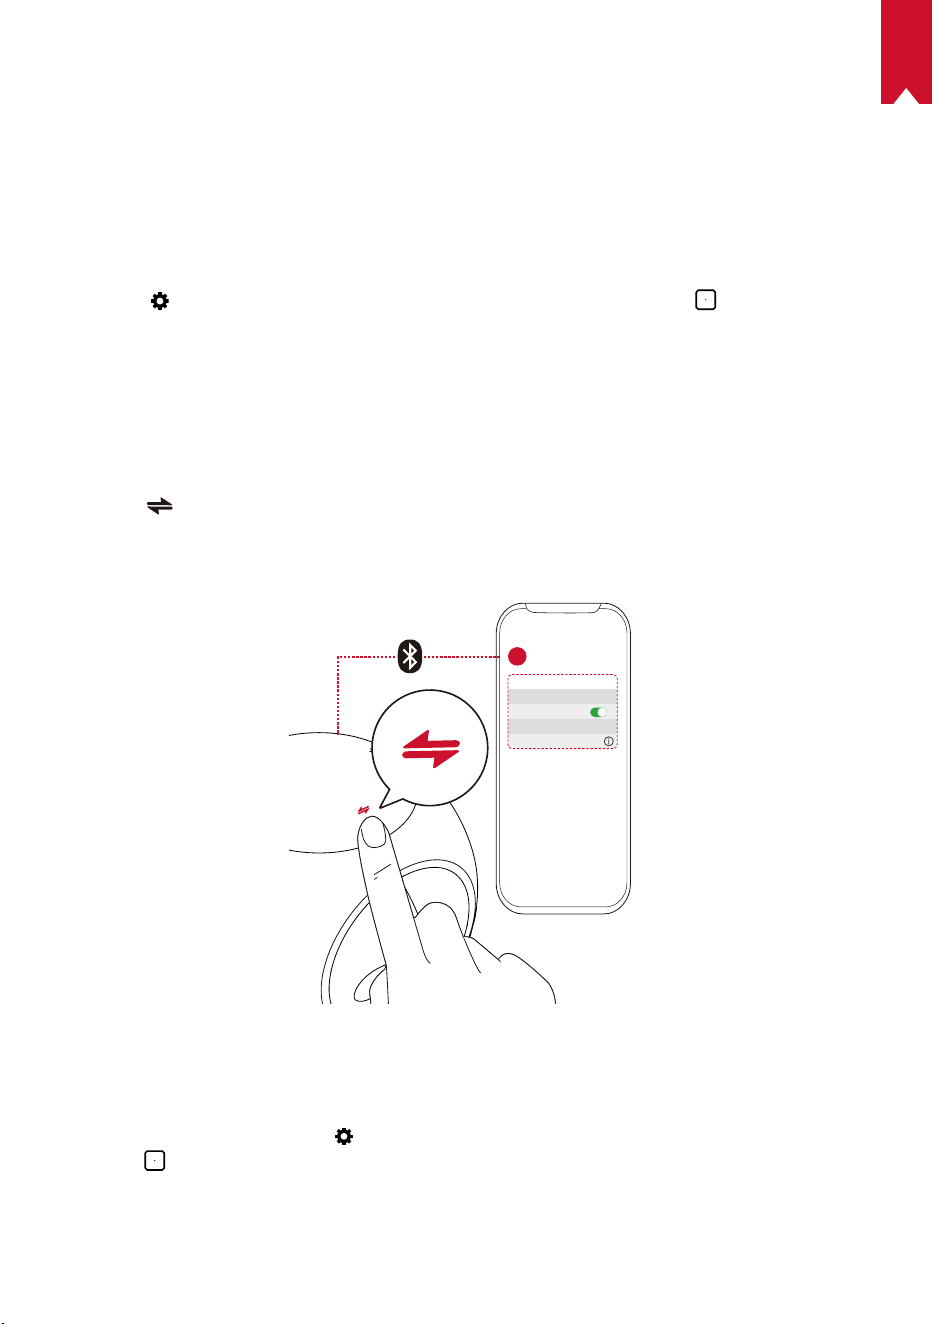
2.
Bluetooth
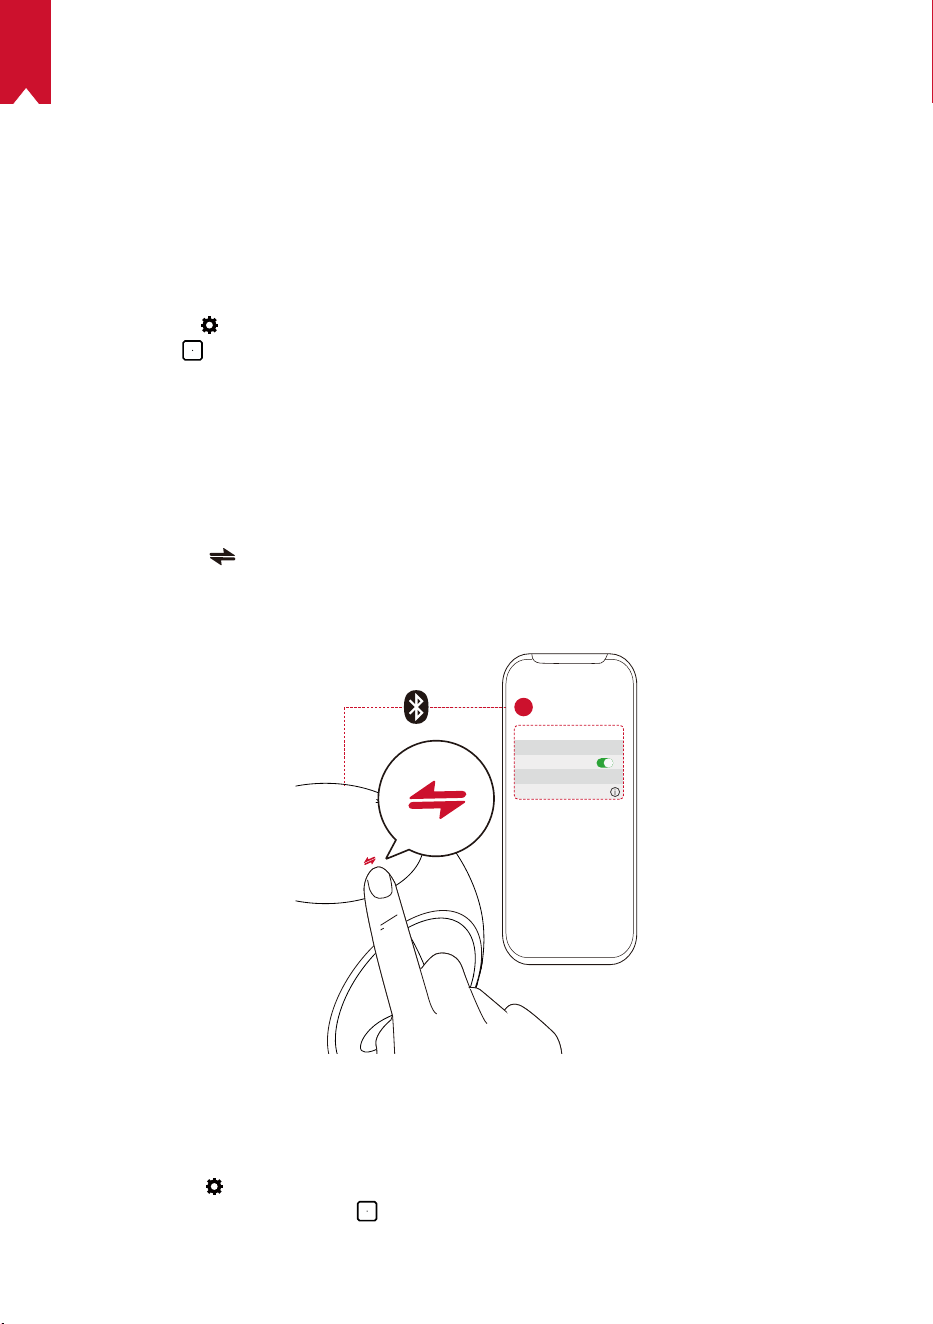
Bluetooth Speaker Mode
You can use this projector as a standalone Bluetooth speaker.
①
Press to switch to Bluetooth speaker mode.
②
Enable Bluetooth on your smartphone and select [Nebula-XXXXXX] as the device to
be connected.
< Settings Bluetooth
Nebula-xxxxxx
Bluetooth
Connected
DEVICE
2
1
Projector Mode
You can connect a Bluetooth speaker or pair of headphones to Nebula Astro while in
projector mode.
①
On the home menu, select to access the Settings page. Select [Bluetooth] and
press
. Enter the password if needed.
②
Follow the on-screen instructions to complete the Bluetooth connection.
EN
13
3.
Projector
On the home menu, select the Settings icon to access the Settings page. Select
[Projector], and press
.
[Image Mode] [Auto] / [Standard Mode] / [Battery Mode]
[Eye Comfort Mode]
[On] / [Off]
Enable or disable eye comfort mode.
[Eye Guard Tech]
[Off]: The Eye Guard function is disabled. It is set to Off by
default.
[< 20cm] / [< 40cm] / [< 60cm]
: When the projector is
set to
< 20cm / < 40cm / < 60cm
, Eye Guard Tech will be
activated and your projector will be disabled within a certain
distance.
[Auto Keystone Correction]
Enable / disable auto keystone correction.
[Projector Mode]
[Front Projection]:
The projector is located in front of the
projection surface.
[Rear Projection]:
The projector is located behind the
projection surface.
[Inverted Front Projection]:
The projector is hanging
from the ceiling in an upside down position. The image is
rotated by 180 degrees.
[Inverted Rear Projection]:
The projector is hanging
from the ceiling in an upside down position behind the
projection surface. The image is rotated by 180 degrees
and horizontally mirrored.
4.
Parental Controls
On the home menu, select to access the Settings page. Select [Parental Controls],
and press .
[Settings Password] [[On] / [Off]
[Change Password]
When
Settings Password
is set to
On, Change Password
is enabled. This option enables you to change and
reset your password. If you forget your password, try
the master code. The master code is case-sensitive
and includes serial number + Nebula by default.
(eg.: XXXXXXXXXXXNebula)
[Time Limit]
Set the time limit or time duration when your child is
allowed to access the projector daily.

EN
14
5.
Apps Control
The Apps Control enables you to show, hide or sort the app in the desired order on the
Home screen in Kids mode.
①
On the home menu, select to access the Settings page. Select [Apps Control], and
press
.
②
Press and hold
to relocate the selected app.
6.
App Manager
①
On the home menu, select to access the Settings page. Select [App Manager],
and press
.
②
Select an app and check the current version, open or force stop the app, check the
storage used or clear data, or uninstall the app.
7.
Others
On the home menu, select to nd more setting options.
[General]
[Language] Select an on-screen display language.
[Keypad Tone] Turn on / off the keypad tone.
[Automatic Sleep Interval] 5 min / 15 min / 30 min
[Background] Select a background.
[Clear Cache] Clear the cached data stored on the projector.
[Screen Mirroring] Activate screen mirroring.
[Date & Time]
[Automatic Date & Time] Enable / disable automatic date and time.
[Select Time Zone] Select time zone.
[Use 24-Hour Format] Select 24-hour format or 12-hour format.
[Upgrade]
[Check Update]
Check if it is the latest version. Follow the on-screen
instructions to upgrade the rmware version.
[About]
[Recovery] All data on the built-in storage will be erased.
EN
15
Using the Nebula Astro
1.
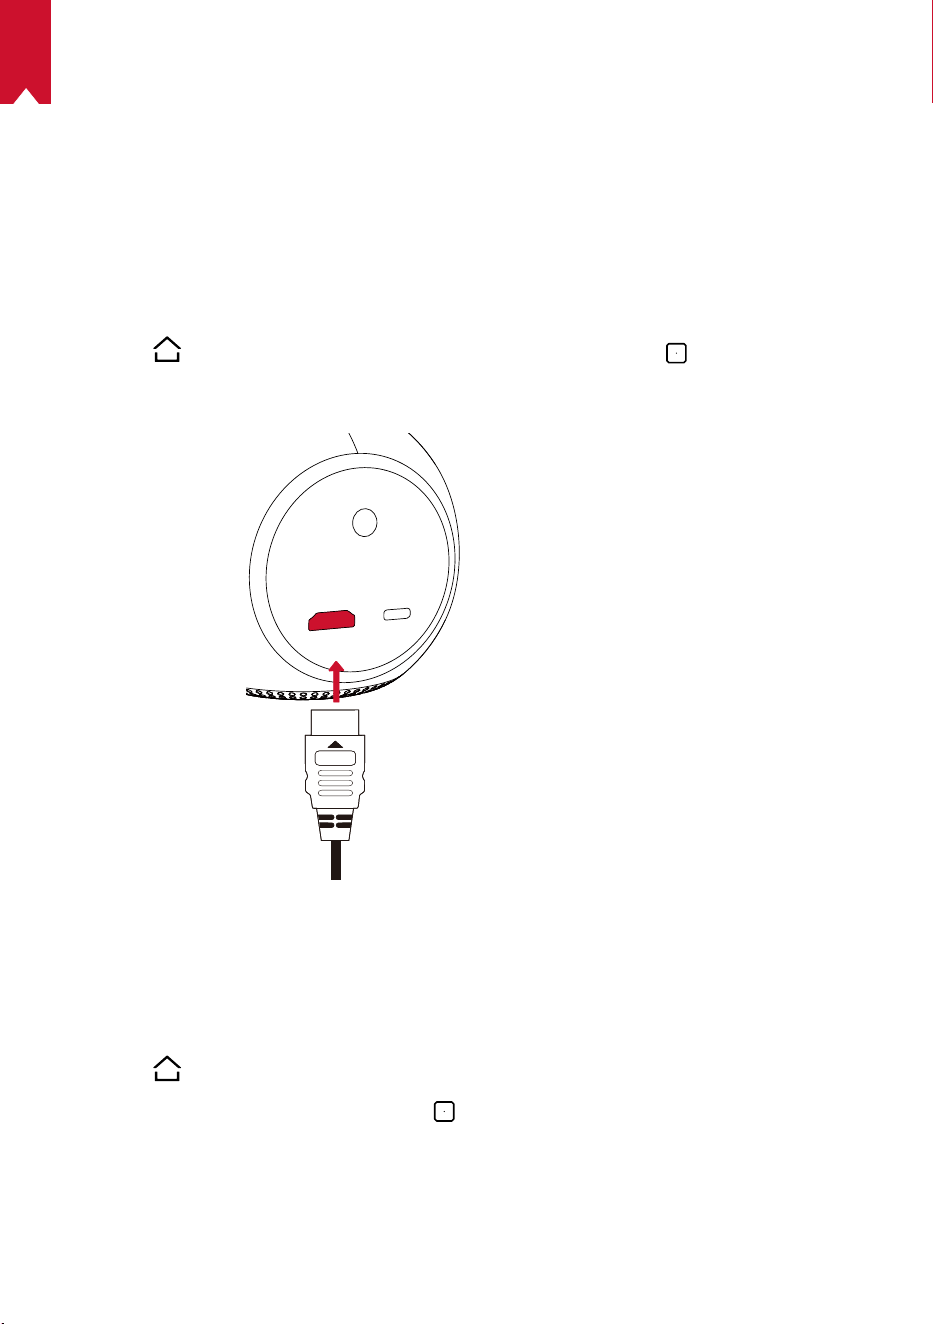
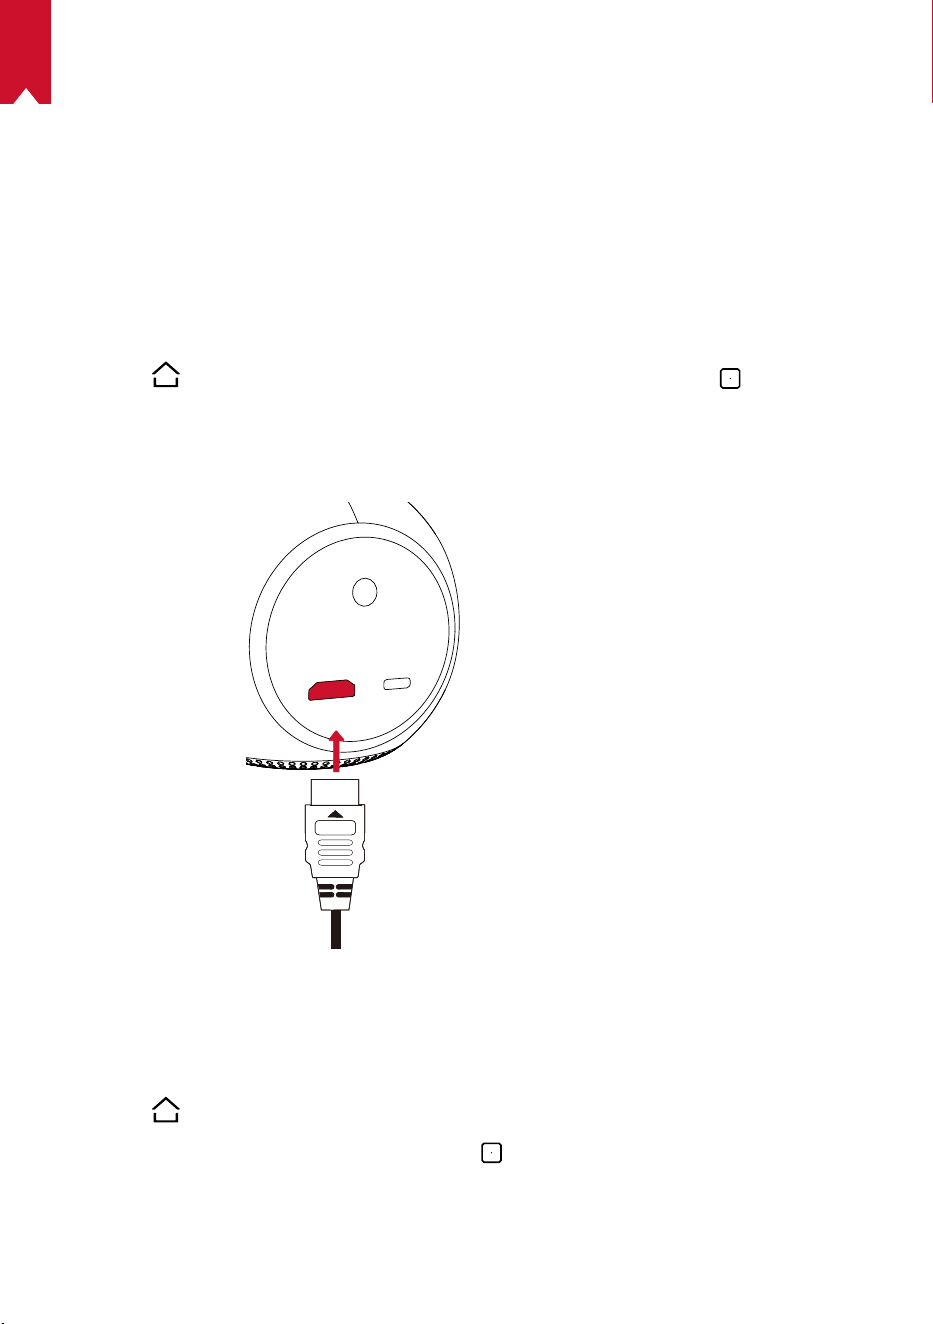
Play from HDMI Playback Devices
Nebula Astro can be connected to various HDMI playback devices such as a TV box,
TV stick, DVD player, set-top box (STB), gaming consoles, or other devices.
To play content from HDMI playback devices:
①
Connect Nebula Astro to an HDMI playback device with an HDMI cable (not
provided).
②
Press
to access the home menu, select [HDMI], and press .
• It will automatically start HDMI playback once connected to an HDMI playback
device for the rst time.
2.
Install Apps
Once connected to a wireless network, you can access online services, enjoy movies,
music and pictures, and browse online. Aside from the pre-installed apps, you can also
install additional apps from the Nebula App Store.
①
Press
to access the home menu.
②
Select an Internet service, and press
.
3.
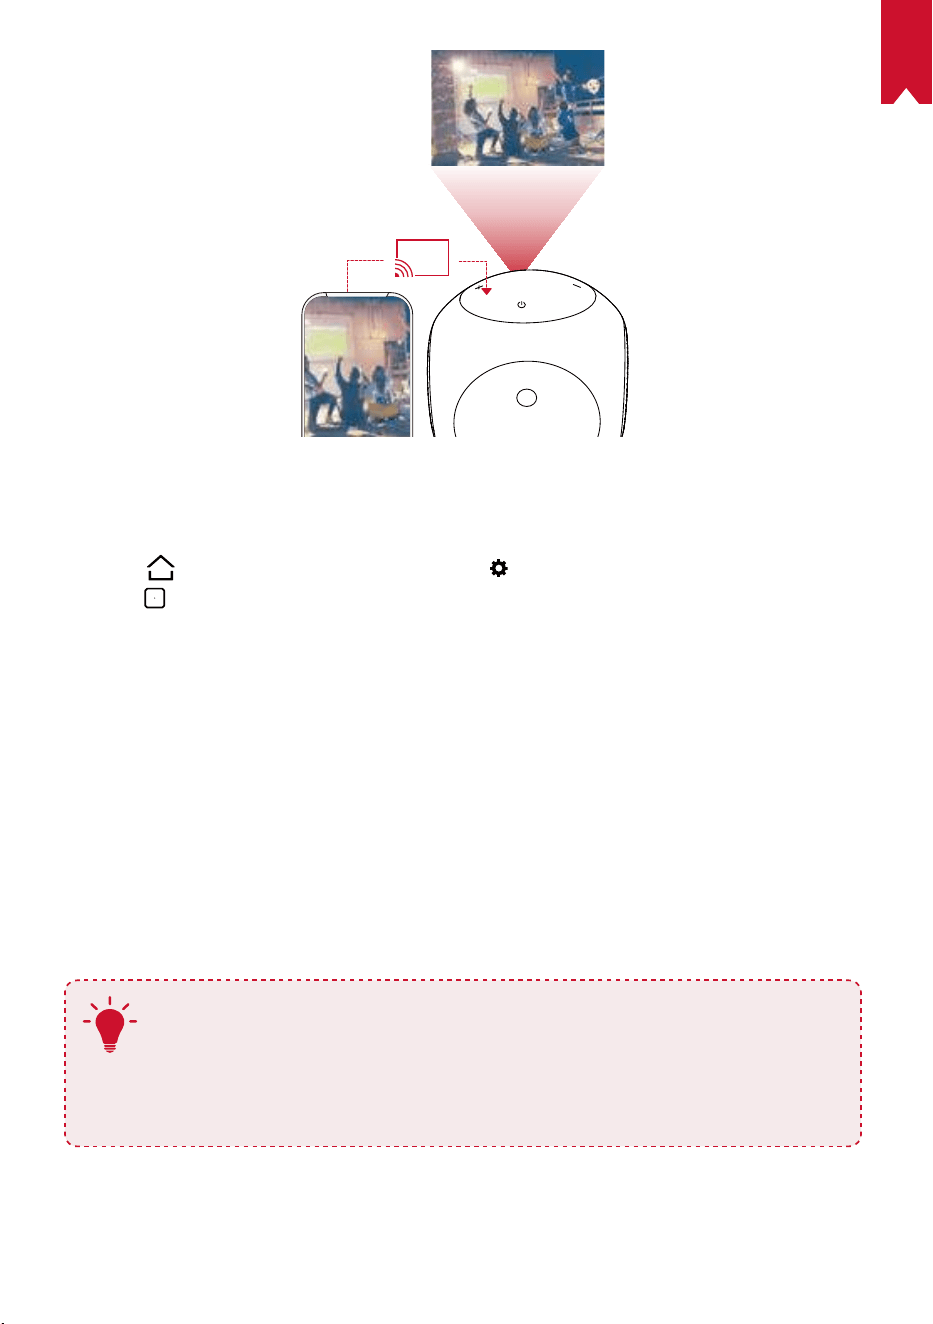
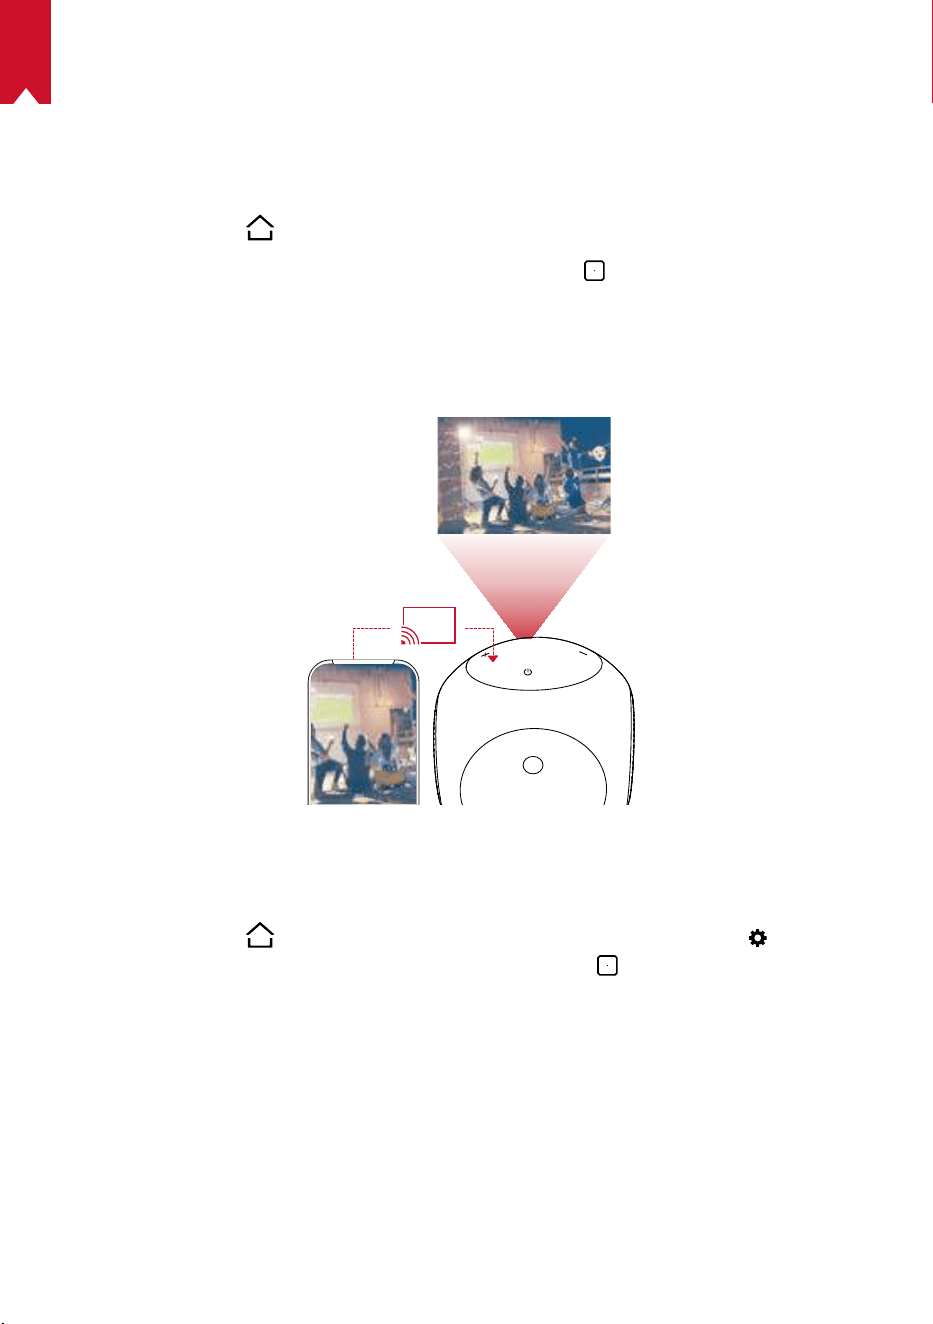
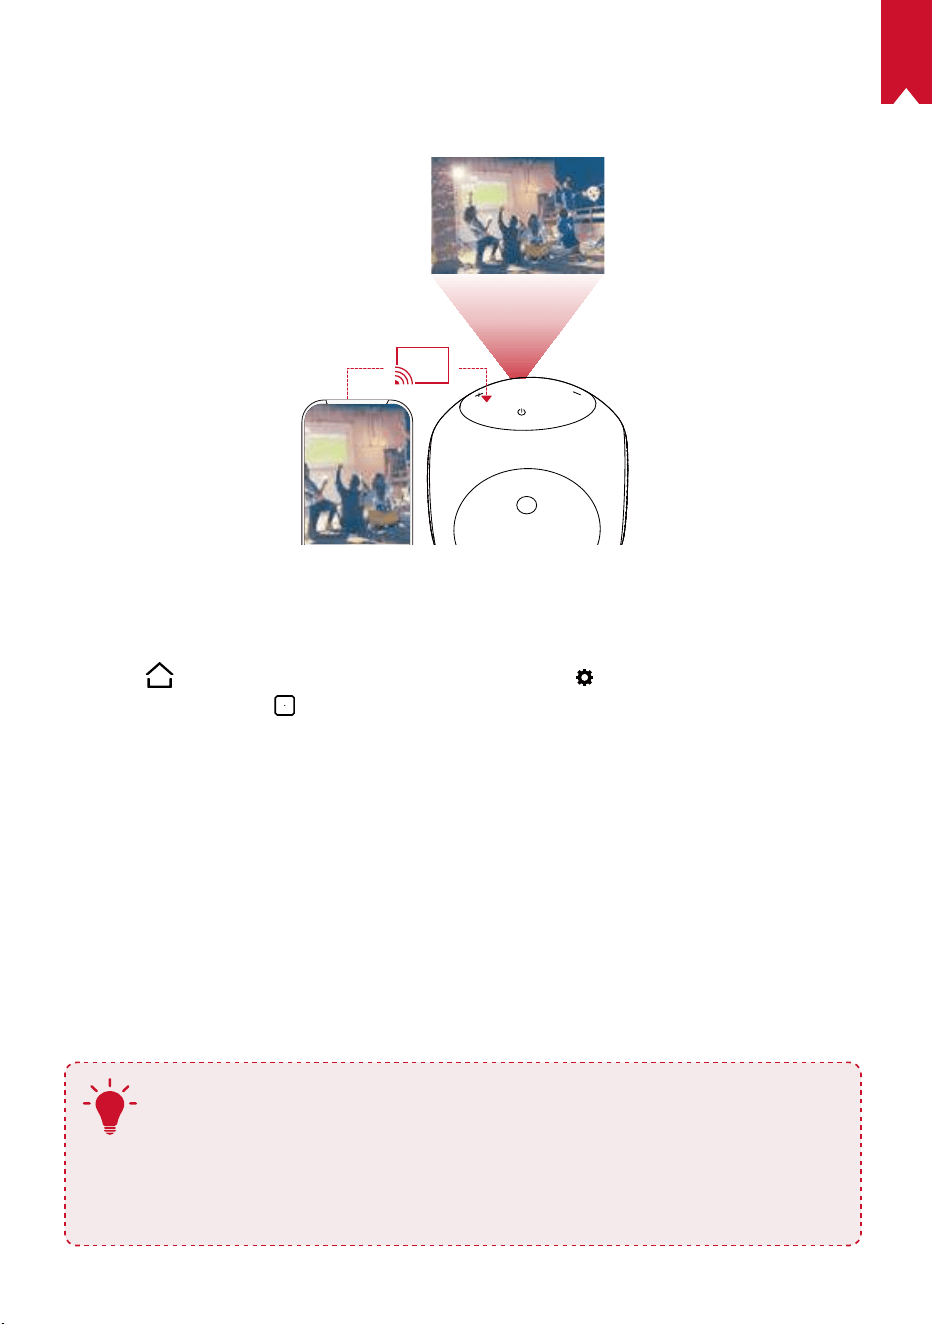
Screen Mirroring
You can wirelessly cast the screen of your smartphone or tablet onto the projection
surface.
EN
16
For Android users:
To use screen mirroring:
①
Press
to access the home menu, select > [General] > [Screen Mirroring], and
press
.
②
Follow the on-screen instructions to complete the process.
• Nebula Astro will mirror the screen of your smartphone phone or tablet.
For iOS users:
①
Open Control Center.
• On iPhone X or later or iPad with iOS 12 or later: Swipe down from the upper-right
corner of the screen.
• On iPhone 8 or earlier or iOS 11 or earlier: Swipe up from the bottom edge of any
screen.
②
Tap Screen Mirroring.
③
Select Nebula-xxxxxx from the list. Nebula Astro will mirror the screen of your
iPhone or iPad.
T
• Make sure Nebula Astro and your phone are connected to the same
network.
• Certain content cannot be cast on Nebula Astro due to copyright
restrictions. In this case, you can stream the content via the same app
installed on your Nebula Astro.
EN
17
Specications
Specifications and design are subject to change without notice.
Power supply: DC 5V
2A
Power consumption: < 10W
Standby power consumption: < 0.5W
Display technology: 0.2 in 854 x 480p DLP
Light source: RGB LED
Projection image size: 20-100 in
Resolution: 854 x 480p
Brightness: 100 ANSI Lumens
Contrast ratio: 400:1
Throw ratio: 1.3
Throw distance: 0.58 m to 3.08 m
CPU: Quad core A7
OS: Android 7.1
RAM: 1GB DDR
ROM: 8GB eMMC
Speaker drivers: 3W
Wi-Fi: IEEE802.11a/b/g/n Dual Frequency 2.4G / 5G
Bluetooth version: 4.2
USB le system: FAT32
Built-in battery type: Li-Polymer
Capacity: 3250 mAh 3.63V
Movie playtime: approximately 2.5 hours in battery mode
Music playtime: approximately 14 hours in Bluetooth speaker mode
Remote control batteries: AAA x 2
Recommended ambient temperature: 41°F to 95°F / 5°C to 35°C
Relative humidity: 15% ~ 85% (non-condensing)
Storage temperature and humidity: < 149°F / 65°C, < 90% humidity
Dimensions (H × L × W): 91.2 x 82 x 89.2 mm / 3.6 x 3.2 x 3.5 in
Weight: 370 g / 13.1 oz

EN
18
Troubleshooting
①
Could not turn on the projector with the remote control?
• Hold
for 2 seconds on the projector to turn it on.
• When powered off, you cannot use the remote control to turn it on.
②
The remote control doesn’t work?
• Make sure the batteries are already installed in the remote control.
• Replace the batteries.
③
Blurred image?
• Rotate the focus adjusting knob.
④
Cannot connect to a Wi-Fi network?
• Refresh the list of available networks and retry.
• Reboot the wireless router or the projector and retry.
⑤
How do I update the rmware?
• When a new version is detected you will be asked to reboot and update.
EN
19
Notice
This product complies with the radio interference requirements of the
European Community.
Declaration of Conformity
Hereby, Anker Innovations Limited. declares that this device is in compliance with the
essential requirements and other relevant provisions of Directive 2014/53/EU. For the
Declaration of Conformity, visit the Web site www.SeeNebula.com.
RF exposure information: The Maximum Permissible Exposure (MPE) level has been
calculated based on a distance of d=20 cm between the device and the human body. To
maintain compliance with RF exposure requirement, use product that maintain a 20cm
distance between the device and human body.
CAUTION RISK OF EXPLOSION IF BATTERY IS REPLACED BY AN INCORRECT TYPE.
DISPOSE OF USED BATTERIES ACCORDING TO THE INSTRUCTIONS
BT Maximum output power: 6.23 dBm; BT Frequency band: 2402~2480 MHz;
Wi-Fi Max Output Power: 17.42 dBm (2.4G); 17.70 dBm (5G);
Wi-Fi Frequency Band: 2412~2472 MHz (2.4G); 5150~5250 MHz, 5725~5850 MHz (5G).
5150~5250 MHz can be used indoor only.
Anker Innovations Deutschland GmbH I Georg-Muche-Strasse 3-5, 80807 Munich,
Germany
Anker Technology (UK) Ltd | Suite B, Fairgate House, 205 Kings Road, Tyseley,
Birmingham, B11 2AA, United Kingdom
Your product is designed and manufactured with high quality materials and
components, which can be recycled and reused.
This symbol means the product must not be discarded as household waste,
and should be delivered to an appropriate collection facility for recycling.
Proper disposal and recycling helps protect natural resources, human health
and the environment. For more information on disposal and recycling of this
product, contact your local municipality, disposal service, or the shop where
you bought this product.
FCC Notice
This device complies with the FCC rules, Part 15. Operation is subject to the following
two conditions: (1) This device may not cause harmful interference, and (2) This

EN
20
device must accept any interference received, including interference that may cause
undesired operation.
Warning: Changes or modications not expressly approved by the partly responsible
for compliance could void the user’s authority to operate the equipment.
Note: This equipment has been tested and found to comply with the limits for a Class
B digital device, pursuant to part 15 of the FCC Rules. These limits are designed to
provide reasonable protection against harmful interference in a residential installation.
This equipment generates, uses and can radiate radio frequency energy and, if not
installed and used in accordance with the instruction manual, may cause harmful
interference to radio communications. However, there is no guarantee that interference
will not occur in a particular installation. If this equipment does cause harmful
interference to radio or television reception, which can be determined by turning the
equipment off and on, the user is encouraged to try to correct the interference by one
or more of the following measures:
• Reorient or relocate the receiving antenna.
• Increase the separation between equipment and receiver.
• Connect the equipment into an outlet on a circuit different from that to which the
receiver is connected.
• Consult the dealer or an experienced radio / TV technician for help.
FCC Radiation Exposure Statement:
This equipment complies with FCC radiation exposure limits set forth for an
uncontrolled environment. This equipment should be installed and operated with a
minimum distance of 20cm between the radiator and your body. This transmitter must
not be co-located or operated in conjunction with any other antenna or transmitter.
Notice: Shielded cables
All connections to other computing devices must be made using shielded cables to
maintain compliance with FCC regulations.
The following importer is the responsible party.
Company Name: Fantasia Trading LLC
Address: 5350 Ontario Mills Pkwy, Suite 100, Ontario, CA 91764
Telephone: 1-909-484-1530
IC Statement
This device complies with Industry Canada licence-exempt RSS standard(s). Operation
is subject to the following two conditions:
(1) this device may not cause interference, and
(2) this device must accept any interference, including interference that may cause
undesired operation of the device."
Le présent appareil est conforme aux CNR d'Industrie Canada applicables aux
appareils radio exempts de licence. L'exploitation est autorisée aux deux conditions
suivantes:
(1) l'appareil nedoit pas produire de brouillage, et
(2) l'utilisateur de l'appareil doit accepter tout brouillage radioélectrique subi, même si
le brouillage est susceptible d'en compromettre le fonctionnement."
EN
21
This Class B digital apparatus complies with Canadian ICES-003.
Cet appareil numérique de la classe B est conforme à la norme NMB-003 du Canada.
IC RF Statement:
When using the product, maintain a distance of 20cm from the body to ensure
compliance with RF exposure requirements.
Lors de l'utilisation du produit, maintenez une distance de 20 cm du corps an de vous
conformer aux exigences en matière d'exposition RF.
Anker Innovations Limited
Room 1318-19, Hollywood Plaza, 610 Nathan Road, Mongkok, Kowloon, Hong Kong
Trademarks
HDMI, and HDMI logo and High-Definition Multimedia Interface are trademarks or
registered trademarks of HDMI licensing LLC in the United States and other countries.
The Bluetooth
®
word mark and logos are registered trademarks owned by the
Bluetooth SIG, Inc. and any use of such marks by Anker Innovations Limited is under
license. Other trademarks and trade names are those of their respective owners.
Warranty
30-Day Money-Back Guarantee for Any Reason
You may return your undamaged product and packaging within 30 days of purchase to
receive a FULL REFUND for any reason. If the reason for return isn’t quality-related, the
customer must pay for the return shipping.
12-Month Warranty for Quality-Related Issues
Nebula’s products are warrantied to be free from material and workmanship defects
for 12 months from the date of purchase. Within this period, Nebula will provide a
replacement and cover any return shipping costs for products that fail in normal use.
Please note: Any provided shipping labels must be used within 20 days from the date
they’re issued by Nebula Support.

22
DE
Inhaltsverzeichnis
Sicherheitsinformationen 23
Im Lieferumfang 26
Übersicht 26
Erste Schritte 30
Nebula Connect App 32
Einstellungen 33
Verwenden des Nebels Astro 36
Technische Daten 39
Fehlerbehebung 40

23
DE
Sicherheitsinformationen
Lesen Sie alle Anweisungen sorgfältig durch, bevor Sie dieses Gerät verwenden.
Nehmen Sie keine Änderungen oder Einstellungen vor, die nicht in diesem Handbuch
beschrieben sind. Wenn Personenschäden, Datenverluste oder Schäden auf eine
Missachtung der Anweisungen zurückzuführen sind, greift die Garantie nicht.
Einrichtung
•
Verringern Sie das Brand- und/oder Stromschlagrisiko, indem Sie das Gerät nicht Regen
oder Feuchtigkeit aussetzen. Mit Wasser gefüllte Gegenstände wie Vasen dürfen nicht
auf dem Gerät abgestellt werden.
•
Stellen Sie das Gerät nicht auf weiche Oberflächen wie Tischdecken oder Teppiche,
weil dies eine Brandgefahr darstellen könnte.
•
Platzieren Sie das Gerät nicht in übermäßig staubigen oder schmutzigen
Umgebungen und nicht in der Nähe anderer Geräte, die ein starkes Magnetfeld
erzeugen.
•
Zum Schutz vor Überhitzung dürfen die Belüftungsöffnungen nicht abgedeckt oder
verstopft werden.
•
Verwenden Sie dieses Gerät keinesfalls auf beengtem Raum. Lassen Sie zur
Belüftung stets einen angemessenen Freiraum um das Gerät herum.
•
Vermeiden Sie es, das Gerät direkter Sonneneinstrahlung, Hitze, extremen
Temperaturschwankungen und Feuchtigkeit übermäßig auszusetzen. Extreme
Temperaturen meiden. Die geeignete Betriebs- und Lagerungstemperatur für
dieses Gerät und das Zubehör liegt zwischen 5°C und 35°C.
•
Bei längerem Betrieb wird die Oberfläche des Geräts heiß. Fahren Sie es in diesem
Fall umgehend herunter und trennen Sie das Ladegerät. Wenn das Gerät abgekühlt
ist, können Sie es wieder in Betrieb nehmen.
•
Gehen Sie mit dem Gerät immer vorsichtig um. Vermeiden Sie es, das Objektiv zu
berühren.
•
Lassen Sie Kinder nicht unbeaufsichtigt mit dem Gerät hantieren.
•
Stellen Sie keine schweren oder scharfkantigen Gegenstände auf dieses Gerät.
•
Nehmen Sie das Gerät nicht auseinander,um Stromschläge zu vermeiden.
•
Verwenden Sie nur das vom Hersteller zugelassene Zubehör.
•
Vermeiden Sie extreme Vibrationen, da sonst interne Komponenten beschädigt
werden könnten.
Stromversorgung
•
Verwenden Sie ausschließlich das mitgelieferte Netzteil.
•
Schalten Sie das Gerät aus, bevor Sie das Netzteil aus der Steckdose ziehen.
•
Schützen Sie das Netzkabel, damit niemand darauf tritt oder es anderweitig

24
DE
gequetscht wird, insbesondere an Steckern, an Mehrfachsteckdosen und am
Austrittspunkt des Kabels am Gerät.
•
Trennen Sie das Gerät bei Gewittern oder längerer Nichtverwendung vom
Stromnetz.
•
Wenn ein Netzstecker oder ein Gerätekoppler als Trennvorrichtung verwendet wird,
bleibt die Trennvorrichtung einsatzbereit.
•
Vor dem Herstellen oder Ändern von Verbindungen stellen Sie bitte sicher, dass alle
Geräte vom Stromnetz getrennt sind.
•
Berühren Sie niemals das Netzkabel oder den Netzanschluss mit feuchten Händen.
Schutz des Gehörs
•
Zur Vermeidung von Gehörschäden nicht über längere Zeiträume bei hoher
Lautstärke verwenden. Stellen Sie die Lautstärke auf einen sicheren Pegel ein.
Ladevorgang
•
Das Ladegerät hat den Typ DST451-150300W-K mit einer Ausgangsspannung/
einem Strom am USB-C-Anschluss von 5 V GS/2 A. Das Ladegerät sollte in der
Nähe des Produkts installiert werden und leicht zugänglich sein.
•
Das Ladegerät darf ausschließlich in Innenbereichen verwendet werden.
•
Stellen Sie das Gerät während des Ladevorgangs in einer Umgebung mit normaler
Raumtemperatur (zwischen 5° C und 25° C) und angemessener Belüftung auf.
•
Aufgrund des Gehäusematerials darf dieses Gerät nur an eine USB 2.0-Schnittstelle
oder höher angeschlossen werden.
Akku
•
Ersetzen Sie den integrierten Akku keinesfalls selbst. Falls ein Austausch
erforderlich sein sollte, wenden Sie sich an ein autorisiertes Servicecenter.
•
Die Fernbedienung enthält Batterien, die verschluckt werden könnten. Bewahren Sie
die Fernbedienung außerhalb der Reichweite von Kindern auf.
•
Explosionsgefahr! Halten Sie die Batterien von Hitze, direkter Sonneneinstrahlung
und offenen Flammen fern. Werfen Sie Batterien niemals ins Feuer.
•
Entfernen Sie die Batterien, wenn die Fernbedienung über einen längeren Zeitraum
nicht verwendet wurde.
•
Ersetzen Sie die Batterien der Fernbedienung nur durch Batterien des gleichen oder
eines gleichwertigen Typs.
•
Batterien enthalten Chemikalien und müssen daher ordnungsgemäß entsorgt
werden.
•
Laden Sie das Gerät regelmäßig. Lagern Sie das Gerät nicht mit einer vollständig
entladenen Batterie.

25
DE
Reinigung
•
Verwenden Sie ein weiches, fusselfreies Tuch. Verwenden Sie für die Reinigung
keine flüssigen, gasförmigen oder leicht entflammbaren Reinigungsmittel.
•
Verwenden Sie keine flüssigen Reinigungsmittel zum Reinigen des Objektivs.
Andernfalls könnte die Beschichtung des Objektivs beschädigt werden.
•
Wischen Sie die Oberflächen vorsichtig ab. Achten Sie darauf, die Oberfläche nicht
zu verkratzen.
•
Verwenden Sie spezielles Objektiv-Reinigungspapier.
Reparaturen
•
Nehmen Sie keine Reparaturen an diesem Gerät vor. Lassen Sie das Gerät nur
durch ein autorisiertes Servicecenter reparieren.
•
Unsachgemäße Wartung kann zu Verletzungen und zu Schäden an diesem Gerät
führen.
•
Lassen Sie Wartungsarbeiten stets von qualiziertem Servicepersonal ausführen.
Vorsicht
•
Dieses Gerät kann potenziell schädliche optische Strahlung abgeben.
•
Blicken Sie nicht direkt in den in Betrieb bendlichen Lichtstrahl. Das helle Licht
kann Ihren Augen schaden.
Haftungsausschluss
•
Achten Sie darauf, Nebula Astro auf einer ebenen, festen Oberfläche aufzustellen,
damit die Eye Guard-Funktion präziser aktiviert werden kann.
•
Der zur Aktivierung der Eye Guard-Funktion eingestellte Abstandsbereich dient nur
zu Referenzzwecken.
•
Halten Sie das Objektiv sauber und fettfrei, anderenfalls kann die Empndlichkeit
des Objektivs beeinträchtigt werden.
•
Die Eye Guard-Funktion dient nur zum Schutz für den Fall, dass Kinder den
Projektor versehentlich auf sich selbst richten. Drehen Sie den Projektor NICHT
absichtlich in Richtung Ihrer Augen.

26
DE
IM LIEFERUMFANG
Übersicht
1.
Vorderseite
4
TOF Bewegungssensor
• Der Sensor wird ausgelöst, wenn der Eye
Guard aktiviert wird
Objektiv
Lüftungsauslass/-einlass
Fokusregler
27
DE
2.
Rückseite
HDMI
Astro
TYPE-C
2
3
Infrarotempfänger
USB-C-Anschluss
• Verbindung zur Stromversorgung
HDMI
• Mit einem Wiedergabegerät mit HDMI-Ausgang verbinden
3.
Oberseite
5
4
3
2
Lauter
• Tippen, um die Lautstärke zu erhöhen
LED-Anzeige
Ein-/Aus-Taste
• Zum Ein-/Ausschalten 2Sekunden lang gedrückt halten
Leiser
• Drücken, um die Lautstärke zu verringern
Taste
• Zum Wechsel zwischen den Modi „Bluetooth-Lautsprecher“ und „Projektor“
drücken

28
DE
4.
Unterseite
Stativgewinde
5.
Fernbedienung
Ein- / Ausschalten
Umschalten auf HDMI-Verbindung
Maus-Modus
Navigation
Bestätigen Sie den ausgewählten Inhalt
Home
Zurück
Weitere Optionen anzeigen
Lauter / leiser

29
DE
6.
LED-Anzeige
LED-Status Beschreibung
Langsames Blinken in
Orange
Die Eye Guard-Funktion ist aktiviert
Leuchtet rot Aufladen
Leuchtet grün Vollständig aufgeladen
Blinkt rot Niedriger Akkustand (< 20%) / Fehler tritt auf
Leuchtet blau
Eingeschaltet im Projektor- oder Bluetooth-
Lautsprecher-Modus
Leuchtet orange Standby im Projektor-Modus
Blinkt blau
Bereit zum Koppeln/Trennen der Bluetooth-Kopplung
(Bluetooth-Lautsprecher-Modus)
30
DE
Erste Schritte
1.
Platzierung
Platzieren Sie den Nebula Astro auf einer stabilen, ebenen Oberfläche vor der
Projektionsfläche. Die besten Ergebnisse erzielen Sie mit einer weißen und ebenen
Projektionsfläche. Der Abstand zwischen dem Nebula Astro und der Projektionsfläche
muss mindestens 0,58m und höchstens 3,08m betragen. Damit erhalten Sie
Projektionsbild von 20 bis 100Zoll.
T
•
Der Nebula Astro muss nicht in Richtung der Projektionsfläche
geneigt werden. Sie können das Projektionsbild bei Bedarf mit der
integrierten Keystone-Korrektur (Trapezkorrektur) anpassen.
•
Die Größe des Projektionsbilds richtet sich nach dem Abstand
zwischen dem Nebula Astro und der Projektionsfläche. Positionieren
Sie das Gerät 100 bis 200 cm von der Projektionsfläche entfernt, um
ein optimales Ergebnis zu erzielen.
2.
Vorbereiten der Fernbedienung
Die Fernbedienung wird mit zwei AAA-Batterien geliefert.
①
Herunterschieben, um das Batteriefach zu öffnen.
②
Zum Auswechseln der Batterien öffnen Sie die Batteriefachabdeckung, legen Sie
die neuen Batterien ein (unter Beachtung der Polarität [+/-] wie angegeben) und
schließen Sie die Batteriefachabdeckung wieder.
31
DE
3.
Erste Schritte
①
Für die erste Verwendung muss der integrierte Akku vollständig mithilfe des
mitgelieferten Kabels und Adapters aufgeladen werden.
②
Halten Sie
auf dem Projektor 2 Sekunden gedrückt, um ihn einzuschalten.
③
Richten Sie das Gerät auf eine geeignete Projektionsfläche oder Wand aus.
④
Drehen Sie den Fokusregler, um den Fokus einzustellen.
32
DE
⑤
Befolgen Sie bei der ersten Verwendung die Bildschirmanweisungen, um die
grundlegende Einrichtung vorzunehmen.
T
Verwenden Sie ausschließlich den mitgelieferten Adapter, um ein
schnellstmögliches und sicheres Aufladen Ihres Nebula Astro zu gewährleisten.
Nebula Connect App
Für die einfache Steuerung des Nebula Astro empfehlen wir, die Nebula Connect-App
herunterzuladen. Mit dieser App können Sie Ihre Maus über den Bildschirm Ihres Telefons bedienen.
①
Laden Sie die Nebula Connect-App aus dem App Store (iOS-Geräte) oder bei Google
Play (Android) herunter.
Nebula Connect
< Settings Bluetooth
Nebula-xxxxxx
Bluetooth
Connected
DEVICE
Nebula Connect
2
②
Aktivieren Sie Bluetooth auf Ihrem Smartphone.
③
Öffnen Sie die Nebula Connect-App und wählen Sie [Nebula-XXXXXX] als zu
verbindendes Gerät aus.
④
Befolgen Sie die Bildschirmanweisungen, um die Einrichtung abzuschließen.
T
Für ein noch besseres Benutzererlebnis empfehlen wir Ihnen, die Nebula
Connect App anstelle der Fernbedienung zu verwenden.
33
DE
Einstellungen
Nehmen Sie nach dem erstmaligen Einschalten des Nebula Astro die Einrichtung vor.
Bestimmen Sie den Abstandsbereich zum Auslösen des Eye Guard und legen Sie Ihren
Namen, Geburtstag und Ihr Passwort fest.
1.
Netzwerk
Sie können mit diesem Projektor über ein WLAN eine Verbindung zum Internet
herstellen.
①
Wählen Sie , um auf die Einstellungsseite zuzugreifen. Wählen Sie [Netzwerk] und
drücken Sie
.
②
Befolgen Sie die Bildschirmanweisungen, um die Verbindung herzustellen.
2.
Bluetooth
Bluetooth-Lautsprechermodus
Sie können diesen Projektor als eigenständigen Bluetooth-Lautsprecher verwenden.
①
Drücken Sie , um in den Bluetooth-Lautsprecher-Modus zu wechseln.
②
Aktivieren Sie Bluetooth auf Ihrem Smartphone und wählen Sie [Nebula-XXXXXX]
als zu verbindendes Gerät aus.
< Settings Bluetooth
Nebula-xxxxxx
Bluetooth
Connected
DEVICE
2
1
Projektor-Modus
Sie können einen Bluetooth-Lautsprecher oder einen Kopfhörer mit dem Nebula Astro
verbinden, während sich dieser im Modus „Projektor“ bendet.
①
Wählen Sie im Home-Menü, um auf die Einstellungsseite zuzugreifen. Wählen Sie
[Bluetooth] und drücken Sie
. Geben Sie das Passwort ein, falls erforderlich.
②
Befolgen Sie die Bildschirmanweisungen, um die Bluetooth-Verbindung herzustellen.
34
DE
3.
Projektor
Wählen Sie im Home-Menü das Einstellungssymbol, um auf die Einstellungsseite
zuzugreifen. Wählen Sie [Projektor] und drücken Sie
.
[Modus „Bild“] [Autom.] / [Standard] / [Batterie]
[Augen-Schonen-Modus]
[Ein] / [Aus]
Aktivieren oder deaktivieren Sie den Augen-Schonen-
Modus.
[Eye Guard Tech]
[Aus]: Die Eye Guard-Funktion ist deaktiviert. Sie ist
standardmäßig auf „Aus“ eingestellt.
[< 20cm] / [< 40cm] / [< 60cm]
: Wenn der Projektor auf <
20cm / < 40cm / < 60cm eingestellt ist, wird Eye Guard
Tech aktiviert und Ihr Projektor wird innerhalb eines
bestimmten Abstands deaktiviert.
[Autom. Keystone-
Korrektur]
Automatische Keystone-Korrektur (Trapezkorrektur)
aktivieren/deaktivieren.
[Modus „Projektor“]
[Frontprojektion]: Der Projektor bendet sich vor der
Projektionsfläche.
[Rückprojektion]: Der Projektor bendet sich hinter der
Projektionsfläche.
[Invertierte Frontprojektion]: Der Projektor hängt in
umgedrehter Position von der Decke. Das Bild wird um
180 Grad gedreht.
[Invertierte Rückprojektion]: Der Projektor hängt in
umgedrehter Position und hinter der Projektionsfläche
von der Decke. Das Bild wird um 180 Grad gedreht und
horizontal gespiegelt.
4.
Jugendschutz
Wählen Sie im Home-Menü, um auf die Einstellungsseite zuzugreifen. Wählen Sie
[Jugendschutz] und drücken Sie .
[Einstellungs-Passwort] [[Ein] / [Aus]
[Passwort ändern]
Wenn das Einstellungs-Passwort auf „Ein“ gesetzt ist, ist
„Passwort ändern“ aktiviert. Mit dieser Option können Sie
Ihr Passwort ändern und zurücksetzen. Der Mastercode
ist standardmäßig nebula+Seriennummer.
[Zeitlimit]
Legen Sie das Zeitlimit oder die Zeitdauer fest, für die Ihr
Kind täglich Zugang zum Projektor haben darf.
35
DE
5.
App-Steuerung
Mit der App-Steuerung können Sie die App in der gewünschten Reihenfolge auf dem
Home-Bildschirm im Kindermodus ein- und ausblenden oder sortieren.
①
Wählen Sie im Home-Menü, um auf die Einstellungsseite zuzugreifen. Wählen Sie
[App-Steuerung] und drücken Sie
.
②
Halten Sie
gedrückt, um die ausgewählte App zu verschieben.
6.
App-Manager
①
Wählen Sie im Home-Menü, um auf die Einstellungsseite zuzugreifen. Wählen Sie
[App Manager] und drücken Sie
.
②
Wählen Sie eine App aus. Sie können nun die aktuelle Version prüfen, die App öffnen
oder das Beenden erzwingen, den belegten Speicherplatz überprüfen oder Daten
löschen oder die App deinstallieren.
7.
Andere
Wählen Sie im Home-Menü aus, um weitere Einstellungsoptionen zu nden.
[Allgemein]
[Sprache] Wählen Sie eine Sprache für die Bildschirmanzeige aus.
[Tastentöne] Aktivieren/deaktivieren Sie Tastentöne.
[Autom. Abschaltintervall] 5 Min. / 15 Min. / 30 Min.
[Hintergrund] Wählen Sie einen Hintergrund aus.
[Cache leeren] Die im Cache des Projektors gespeicherten Daten löschen.
[Bildschirmspiegelung] Die Bildschirmspiegelung aktivieren.
[Datum und Uhrzeit]
[Datum und Uhrzeit
automatisch]
Automatische Datums- und Uhrzeitanzeige aktivieren/
deaktivieren.
[Zeitzone auswählen] Wählen Sie eine Zeitzone aus.
[24-Stunden-Format
verwenden]
Sie können die Uhrzeit im 24-Stunden-Format oder im
12-Stunden-Format anzeigen.
[Upgrade]
[Auf Update prüfen]
Prüfen Sie, ob Sie die neueste Version verwenden.
Befolgen Sie die Bildschirmanweisungen, um ein
Upgrade auf die neueste Version der Firmware
vorzunehmen.
[Info]
[Zurücksetzen] Alle Daten im integrierten Speicher werden gelöscht.

36
DE
Verwenden des Nebels Astro
1.
Abspielen über HDMI-Wiedergabegeräte
Der Nebula Astro kann an verschiedene HDMI-Wiedergabegeräte angeschlossen
werden, z.B. TV-Box oder -Stick, DVD-Player, Set-Top-Box (STB), Spielkonsolen oder
andere Geräte.
Abspielen von Inhalten über HDMI-Wiedergabegeräte:
①
Verbinden Sie den Nebula Astro über ein HDMI-Kabel (nicht im Lieferumfang
enthalten) mit einem HDMI-Wiedergabegerät.
②
Drücken Sie auf
, um auf das Home-Menü zuzugreifen, wählen Sie [HDMI] und
drücken Sie
.
• Die HDMI-Wiedergabe beginnt automatisch nach der ersten
Verbindungsherstellung mit einem HDMI-Wiedergabegerät.
37
DE
2.
Apps installieren
Sobald eine Verbindung mit einem WLAN-Netzwerk besteht, können Sie auf Online-
Services zugreifen, Filme, Musik und Bilder genießen und im Internet surfen. Neben
den vorinstallierten Apps können Sie auch zusätzliche Apps aus dem Nebula App Store
installieren.
①
Drücken Sie auf
, um das Home-Menü zu öffnen.
②
Wählen Sie einen Internetdienst aus und drücken Sie
.
3.
Bildschirmspiegelung
Sie können den Bildschirm Ihres Smartphones oder Tablets drahtlos auf die
Projektionsfläche übertragen.
Für Android-Benutzer:
Verwenden der Bildschirmspiegelung:
①
Drücken Sie auf
, um auf das Home-Menü zuzugreifen, wählen Sie >
[Allgemein] > [Bildschirmspiegelung] und drücken Sie
.
②
Befolgen Sie die Bildschirmanweisungen, um den Vorgang abzuschließen.
• Der Nebula Astro spiegelt anschließend den Bildschirm Ihres Smartphones oder
Tablets.
Für iOS-Benutzer:
①
Öffnen Sie Control Center.
• Auf iPhone X oder höher oder iPad mit iOS 12 oder höher: Streichen Sie von der
oberen rechten Ecke des Bildschirms nach unten.
• Auf dem iPhone 8 oder früher oder iOS 11 oder früher: Streichen Sie vom unteren
38
DE
Rand eines beliebigen Bildschirms nach oben.
②
Tippen Sie auf Bildschirmspiegelung.
③
Wählen Sie Nebula-xxxxxx aus der Liste. Der Nebula Astro spiegelt anschließend
den Bildschirm Ihres iPhones oder iPads.
T
• Stellen Sie sicher, dass der Nebula Astro und Ihr Smartphone mit dem
selben Netzwerk verbunden sind.
• Bestimmte Inhalte können aufgrund von Urheberrechtsbeschränkungen
nicht über den Nebula Astro ausgegeben werden. In diesem Fall können
Sie diese Inhalte jedoch über dieselbe, auf Ihrem Nebula Astro installierte
App streamen.
39
DE
Technische Daten
Änderungen der technischen Daten und des Designs ohne
Vorankündigung vorbehalten.
Stromversorgung: DC 5V
2A
Stromverbrauch: < 10W
Standby-Leistungsaufnahme: < 0,5W
Display-Technologie: 0,2 Zoll 854 x 480p DLP
Lichtquelle: RGB-LED
Projektionsbild-Größe: 20 bis 100 Zoll
Auflösung: 854 x 480p
Helligkeit: 100ANSI-Lumen
Kontrastverhältnis: 400:1
Projektionsverhältnis: 1.3
Projektionsentfernung: 0,58 m bis 3,08 m
CPU: Quad Core A7
Betriebssystem: Android 7.1
RAM: 1GB DDR
ROM: 8GB eMMC
Lautsprecher: 6W
WLAN: IEEE802.11a/b/g/n Dualfrequenz 2,4G/5G
Bluetooth-Version: 4.2
USB-Dateisystem: FAT32
Typ des integrierten Akkus: LiPo
Kapazität: 3250mAh 3,63V
Spielzeit für Filme: ca. 2,5 Stunden im Modus „Akku“
Spielzeit für Musik: ca. 14 Stunden im Modus „Bluetooth-Lautsprecher“
Batterien der Fernbedienung: AAA x 2
Empfohlene Umgebungstemperatur: 5 °C bis 35 °C
Relative Luftfeuchtigkeit: 15% bis 85% (nicht kondensierend)
Lagertemperatur und Luftfeuchtigkeit: < 65 °C, < 90 % Luftfeuchtigkeit
Abmessungen (H × L × B): 91,2×82×89,2 mm
Gewicht: 370 g

40
DE
Fehlerbehebung
①
Der Projektor lässt sich nicht mit der Fernbedienung einschalten?
• Halten Sie
auf dem Projektor 2 Sekunden gedrückt, um ihn einzuschalten.
• Wenn er ausgeschaltet ist, können Sie ihn nicht mit der Fernbedienung
einschalten.
②
Die Fernbedienung funktioniert nicht?
• Stellen Sie sicher, dass die Batterien bereits in die Fernbedienung eingelegt
wurden.
• Tauschen Sie die Batterien aus.
③
Unscharfes Bild?
• Drehen Sie den Fokusregler.
④
Sie können keine WLAN-Verbindung herstellen?
• Aktualisieren Sie die Liste der verfügbaren Netzwerke und versuchen Sie es
erneut.
• Starten Sie den WLAN-Router oder den Projektor neu und versuchen Sie es
erneut.
⑤
Wie aktualisiere ich die Firmware?
• Wenn eine neue Version gefunden wird, werden Sie aufgefordert, einen Neustart
durchzuführen und die Aktualisierung vorzunehmen.

41
ES
Tabla de contenidos
Instrucciones de seguridad 42
Contenido 45
Descripción general 45
Primeros pasos 49
AplicaciónNebulaConnect 51
Ajustes 52
UsodeNebulaAstro 55
Especicaciones 57
Solución de problemas 58

42
ES
Instrucciones de seguridad
Lea todas las instrucciones antes de utilizar el dispositivo. No realice cambios ni cree
ajustes que no estén descritos en este manual. En caso de que se produzcan lesiones,
pérdida de datos o daños por no seguir las instrucciones, no se aplicará la garantía.
Conguración
•
Para reducir el riesgo de incendio y/o descarga eléctrica, no exponga el dispositivo a
la lluvia ni a la humedad. No coloque objetos con líquidos, como por ejemplo jarrones,
sobre el dispositivo.
•
No coloque el dispositivo sobre una supercie blanda, como un mantel o una
alfombra; de lo contrario, podría suponer un riesgo de incendio.
•
No coloque el dispositivo en zonas expuestas a un exceso de polvo y suciedad, ni
cerca de cualquier aparato que pueda generar un campo magnético fuerte.
•
Para evitar el sobrecalentamiento, no bloquee ni obstruya las aberturas de
ventilación.
•
No coloque nunca el dispositivo en un espacio connado. Deje siempre espacio
suciente alrededor del dispositivo para facilitar la ventilación.
•
Evite la exposición prolongada del dispositivo a la luz solar directa, el calor, las
grandes fluctuaciones de temperatura y la humedad. No exponga el dispositivo
a temperaturas extremas. La temperatura adecuada de funcionamiento y
almacenamiento del dispositivo y sus accesorios se sitúa entre 5°C y 35°C.
•
Cuando el dispositivo se utiliza durante un periodo de tiempo prolongado,
la supercie puede calentarse. Si esto ocurre, apáguelo inmediatamente y
desenchufe el cargador. Reanude el funcionamiento cuando el dispositivo se haya
enfriado.
•
Manipule siempre el dispositivo con cuidado. Evite tocar la lente.
•
No permita que los niños manipulen el dispositivo sin supervisión.
•
No coloque nunca objetos pesados o alados sobre el dispositivo.
•
Para evitar una descarga eléctrica, no desmonte el dispositivo.
•
Utilice únicamente los accesorios especicados por el fabricante.
•
Evite vibraciones extremas, ya que podrían dañar los componentes internos.
Fuente de alimentación
•
Utilice únicamente el adaptador de alimentación suministrado.
•
Apague el dispositivo antes de extraer la fuente de alimentación de la toma de
corriente.
•
Evite pisar o doblar el cable de alimentación y preste especial atención a los
enchufes, ladrones y puntos de salida del dispositivo.

43
ES
•
Desconecte el dispositivo si hay tormentas eléctricas o cuando no lo vaya a utilizar
durante un periodo de tiempo prolongado.
•
Cuando se utiliza un conector de alimentación o un adaptador como dispositivos
de desconexión, el dispositivo de desconexión debe estar operativo.
•
Antes de realizar o cambiar cualquier conexión, asegúrese de que todos los
dispositivos estén desconectados de la toma de corriente.
•
No toque nunca el cable de alimentación ni el conector de alimentación con las
manos húmedas.
Protección auditiva
•
Para evitar daños auditivos, no utilice el producto a un volumen elevado durante
periodos de tiempo prolongados. Ajuste el volumen a un nivel seguro.
Carga
•
El tipo de cargador es DST451-150300W-K con una tensión/corriente de salida de
USB-C 5V/2A. El cargador se debe instalar cerca del dispositivo y se debe poder
acceder a él con facilidad.
•
Este cargador es solo para uso en interiores.
•
Durante la carga, coloque el dispositivo en un entorno con una temperatura
ambiente normal (entre 5°C y 25°C) y buena ventilación.
•
Debido al material de la carcasa, el dispositivo solo se debe conectar a un USB2.0
o superior.
Batería
•
No sustituya la batería integrada usted mismo. Póngase en contacto con un centro
de servicio autorizado para sustituirla.
•
El mando a distancia incluye pilas que podrían ingerirse. Mantenga el mando a
distancia fuera del alcance de los niños.
•
Riesgo de explosión Mantenga las pilas alejadas del calor, la luz solar directa o el
fuego. Nunca deseche las pilas quemándolas.
•
Extraiga las pilas si el mando a distancia no se ha utilizado durante un periodo de
tiempo prolongado.
•
Sustituya las pilas del mando a distancia solo por otras del mismo tipo o
equivalente.
•
Las pilas contienen sustancias químicas y se deben desechar correctamente.
•
Cargue el dispositivo con frecuencia. No guarde el dispositivo con la batería
completamente descargada.
Limpieza
•
Utilice un paño suave y que no deje pelusa. Nunca utilice productos de limpieza
líquidos, gaseosos o fácilmente inflamables para limpiarlo.

44
ES
•
No utilice agentes de limpieza líquidos para limpiar la lente, ya que podría dañar el
revestimiento de la lente.
•
Limpie las supercies con delicadeza. Tenga cuidado de no rayar las supercies.
•
Limpie la lente con papel de limpieza para lentes.
Reparaciones
•
No intente reparar el dispositivo usted mismo. El dispositivo se debe reparar
únicamente en un centro de servicio autorizado.
•
Un mantenimiento inadecuado podría causar lesiones a las personas o daños en el
dispositivo.
•
Delegue todas las tareas de servicio técnico al personal cualicado.
Precaución
•
Es posible que el dispositivo emita radiación óptica peligrosa.
•
No mire directamente al haz en funcionamiento. La luz brillante podría provocar
daños oculares.
Exención de responsabilidad
•
Asegúrese de colocar el dispositivo NebulaAstro en una supercie rígida y plana,
ya que esto permite que la función EyeGuard se active de forma más precisa.
•
El intervalo de distancia congurado para la activación de la función EyeGuard es
solo para nes de referencia.
•
Mantenga la lente limpia y sin grasa; de lo contrario, la sensibilidad de la lente
podría verse afectada.
•
La función EyeGuard se ha diseñado para ofrecer protección únicamente en el
caso de que los niños miren directamente al proyector de forma accidental. NO
oriente el proyector hacia sus ojos intencionalmente.

45
ES
CONTENIDO
Descripción general
1.
Vista frontal
4
Sensor de movimiento TOF
• El sensor se activará cuando se active la
función EyeGuard
Lente
Entrada/Salida de ventilación
Mando de ajuste de enfoque

46
ES
2.
Vista posterior
HDMI
Astro
TYPE-C
2
3
Receptor de infrarrojos
Puerto USB-C
• Conectar a una fuente de alimentación
HDMI
• Conectar a un dispositivo de reproducción a través de una salida HDMI
3.
Vista superior
5
4
3
2
Subir volumen
• Pulsar para subir el volumen
Indicador LED
Botón de encendido
• Mantener pulsado durante 2segundos para encender o apagar
Bajar volumen
• Pulsar para bajar el volumen
Botón
• Pulsar para alternar entre el modo de altavoz Bluetooth y el modo de proyector

47
ES
4.
Vista inferior
Toma para trípode
5.
Mando a distancia
Encender o apagar
Cambiar a conexión HDMI
Modo de ratón
Navegación
Conrmar el contenido seleccionado
Inicio
Atrás
Ver más opciones
Subir/Bajar volumen

48
ES
6.
Indicador LED
Estado de LED Descripción
Naranja intermitente Función EyeGuard activada
Rojo fijo Carga
Verde fijo Carga completa
Rojo intermitente Batería baja (<20%)/Error
Azul fijo
Encendido en modo de proyector o modo de altavoz
Bluetooth
Naranja fijo En espera en modo de proyector
Azul intermitente
Listo para emparejar/Bluetooth desconectado (modo de
altavoz Bluetooth)
49
ES
PRIMEROS PASOS
1.
Colocación
Coloque el dispositivo NebulaAstro sobre una superficie plana y estable, en frente
de la supercie de proyección. Para obtener los mejores resultados, la supercie de
proyección debe ser blanca y plana. La distancia entre el dispositivo NebulaAstro y la
supercie de proyección debe ser de 0,58metros como mínimo y 3,08metros como
máximo para obtener una imagen de proyección de entre 20 y 100 pulgadas.
T
•
No es necesario inclinar el dispositivo NebulaAstro hacia la
supercie de proyección. Puede corregir la imagen de proyección
con la función de corrección trapezoidal integrada.
•
La distancia entre el dispositivo NebulaAstro y la supercie de
proyección determina el tamaño de la imagen proyectada. Para
obtener los mejores resultados, coloque el dispositivo NebulaAstro
a una distancia de entre 1 y 2metros de la supercie de proyección.
2.
Preparación del mando a distancia
El mando a distancia incluye dos pilas AAA.
①
Deslice hacia abajo para abrir el compartimento de las pilas.
②
Para sustituir las pilas, deslice la tapa del compartimento de las pilas para abrirlo,
inserte las pilas nuevas (haciendo coincidir la polaridad [+/-] como se indica) y
ciérrelo.

50
ES
3.
Primeros pasos
①
Antes del primer uso, cargue completamente la batería integrada mediante el uso
del cable y el adaptador suministrados.
②
Mantenga pulsado
en el proyector durante 2segundos para encenderlo.
③
Oriente el dispositivo hacia una pared o supercie de proyección adecuada.
④
Gire el mando para ajustar el enfoque.
51
ES
⑤
Cuando utilice el dispositivo por primera vez, siga las instrucciones que aparecen en
pantalla para completar la conguración básica.
T
Para que el dispositivo NebulaAstro se cargue de la forma más rápida y
segura posible, utilice únicamente el cargador suministrado.
Aplicación NebulaConnect
Para controlar fácilmente el dispositivo NebulaAstro, se recomienda descargar la
aplicación NebulaConnect. Esta aplicación permite controlar el ratón a través de la
pantalla de su teléfono.
①
Descargue la aplicación NebulaConnect desde AppStore (dispositivos iOS) o
GooglePlay (dispositivos Android).
Nebula Connect
< Settings Bluetooth
Nebula-xxxxxx
Bluetooth
Connected
DEVICE
Nebula Connect
2
②
Active la conexión Bluetooth en su smartphone.
③
Abra la aplicación NebulaConnect y seleccione [Nebula-XXXXXX] como dispositivo
para conectar.
④
Siga las instrucciones en pantalla para completar la conguración de conexión.
T
Para disfrutar de una experiencia más agradable, se recomienda utilizar la
aplicación NebulaConnect en lugar del mando a distancia.

52
ES
Ajustes
Cuando encienda por primera vez el dispositivo NebulaAstro, complete el proceso
de conguración. Determine el intervalo de distancia para la activación de la función
EyeGuard y congure su nombre, fecha de nacimiento y contraseña.
1.
Red
Es posible conectar el proyector a Internet a través de una conexión inalámbrica (Wi-Fi).
①
Seleccione para acceder a la página Ajustes. Seleccione [Red] y pulse
.
②
Siga las instrucciones que aparecen en pantalla para completar la conexión de red.
2.
Bluetooth
Modo de altavoz Bluetooth
Es posible utilizar el proyector como un altavoz Bluetooth independiente.
①
Pulse para cambiar al modo de altavoz Bluetooth.
②
Active la conexión Bluetooth en el smartphone y seleccione [Nebula-XXXXXX]
como dispositivo para conectar.
< Settings Bluetooth
Nebula-xxxxxx
Bluetooth
Connected
DEVICE
2
1
Modo de proyector
Puede conectar un altavoz Bluetooth o emparejar unos auriculares con el dispositivo
NebulaAstro cuando el modo de proyector está activado.
①
En el menú de inicio, seleccione para acceder a la página Ajustes. Seleccione
[Bluetooth] y pulse
. Introduzca la contraseña, si es necesario.
②
Siga las instrucciones que aparecen en pantalla para completar la conexión
Bluetooth.
53
ES
1.
Proyector
En el menú de inicio, seleccione el icono Ajustes para acceder a la página Ajustes.
Seleccione [Proyector] y pulse
.
[Modo de imagen] [Automático]/[Modo estándar]/[Modo de batería]
[Modo Comodidad ocular]
[Activado]/[Desactivado]
Active o desactive el modo Comodidad ocular.
[Tecnología EyeGuard]
[Desactivado]: La función EyeGuard está desactivada.
Esta función está congurada como Desactivado de forma
predeterminada.
[<20cm]/[<40cm]/[<60cm]: cuando el proyecto está
establecido en <20cm/<40cm/<60cm, la tecnología
EyeGuard se activará y el proyector se desactivará a una
determinada distancia.
[Corrección trapezoidal
automática]
Active o desactive la corrección trapezoidal automática.
[Modo de proyector]
[Proyección frontal]: el proyector está situado en frente de
la supercie de proyección.
[Proyección posterior]: el proyector está situado detrás de
la supercie de proyección.
[Proyección frontal invertida]: el proyector está colgando
del techo en posición invertida. La imagen se gira 180
grados.
[Proyección posterior invertida]: el proyector está
colgando del techo en posición invertida detrás de la
supercie de proyección. La imagen se gira 180grados y
se refleja en dirección horizontal.
2.
Control parental
En el menú de inicio, seleccione para acceder a la página Ajustes. Seleccione [Control
parental] y pulse .
[Contraseña de
conguración]
[Activado]/[Desactivado]
[Cambiar contraseña]
Cuando Contraseña de conguración se congura como
Activado, Cambiar contraseña se activa. Esta opción
permite cambiar y restablecer la contraseña. De forma
predeterminada, el código maestro es nebula+número de
serie.
[Límite de tiempo]
Permite congurar el límite o la duración de tiempo durante
el que los niños tienen acceso al proyector cada día.

54
ES
3.
ntrol de aplicaciones
La función Control de aplicaciones permite mostrar, ocultar o clasicar las aplicaciones
en el orden deseado en la pantalla de inicio del modo Niños.
①
En el menú de inicio, seleccione
para acceder a la página Ajustes. Seleccione
[Control de aplicaciones] y pulse .
②
Mantenga pulsado
para cambiar la ubicación de la aplicación seleccionada.
4.
Administrador de aplicaciones
①
En el menú de inicio, seleccione
para acceder a la página Ajustes. Seleccione
[Administrador de aplicaciones] y pulse .
②
Seleccione una aplicación para comprobar la versión actual, abrirla o forzar el cierre,
comprobar el almacenamiento usado, borrar datos o desinstalarla.
5.
Otras conguraciones
En el menú de inicio, seleccione para ver más opciones de conguración.
[General]
[Idioma] Seleccione el idioma de visualización en pantalla.
[Tono del teclado] Active o desactive el tono del teclado.
[Intervalo de suspensión
automático]
5min/15min/30min
[Fondo de pantalla] Seleccione un fondo de pantalla.
[Borrar caché]
Borre todos los datos almacenados en la memoria caché
del proyector.
[Duplicación de pantalla] Active la duplicación de pantalla.
[Fecha y hora]
[Fecha y hora automática] Active o desactive la fecha y hora automática.
[Seleccionar zona horaria] Seleccione la zona horaria.
[Utilizar formato de 24
horas]
Seleccione entre el formato de 24 horas o el formato de
12 horas.
[Actualizar]
[Buscar actualizaciones]
Compruebe si está usando la versión más reciente. Siga
las instrucciones en pantalla para actualizar la versión
del rmware.
[Información]
[Recuperación]
Se borrarán todos los datos guardados en el
almacenamiento integrado.
55
ES
Uso de NebulaAstro
1.
Reproducción desde dispositivos HDMI
NebulaAstro se puede conectar con varios dispositivos de reproducción HDMI, como
TVBox, TVStick, reproductores de DVD, decodicadores (STB) y videoconsolas, entre
otros.
Para reproducir contenido desde dispositivos de reproducción HDMI:
①
Conecte el dispositivo NebulaAstro a un dispositivo de reproducción HDMI con un
cable HDMI (no incluido).
②
Pulse
para acceder al menú de inicio, seleccione [HDMI] y pulse .
• La primera vez que se establezca conexión con un dispositivo de reproducción
HDMI, se iniciará automáticamente la reproducción HDMI.Instalación de
aplicaciones
Una vez que haya conectado el dispositivo a una red inalámbrica, podrá acceder a
servicios en línea, disfrutar de películas, música y fotografías, y navegar por Internet.
Aparte de las aplicaciones preinstaladas, puede instalar otras aplicaciones adicionales
desde NebulaAppStore.
①
Pulse
para acceder al menú de inicio.
②
Seleccione un servicio de Internet y pulse
.
56
ES
2.
Duplicación de pantalla
Puede proyectar la pantalla de su smartphone o tableta en la supercie de proyección
de forma inalámbrica.
Para usuarios de Android:
Para utilizar la duplicación de pantalla:
①
Pulse
para acceder al menú de inicio, seleccione > [General] > [Duplicación
de pantalla] y pulse
.
②
Siga las instrucciones en pantalla para completar el proceso.
• NebulaAstro duplicará la pantalla del smartphone o la tableta.
Para usuarios de iOS:
①
Abra Centro de control.
• Si utiliza iPhone X o posterior, o iPad con iOS 12 o posterior: Deslice el dedo hacia
abajo desde la esquina superior derecha de la pantalla.
• Si utiliza iPhone 8 o anterior, o iOS 11 o anterior: Deslice el dedo hacia arriba desde
el borde inferior de la pantalla.
②
Toque Duplicación de pantalla.
③
Seleccione Nebula-xxxxxx en la lista. NebulaAstro duplicará la pantalla del iPhone o iPad.
T
• Asegúrese de que el dispositivo NebulaAstro y el teléfono estén
conectados a la misma red.
• Es posible que ciertos contenidos no se puedan transmitir en
NebulaAstro debido a restricciones de copyright. Cuando esto suceda,
puede transmitir los contenidos mediante la aplicación instalada en el
dispositivo NebulaAstro.
57
ES
Especicaciones
Las especificaciones y el diseño están sujetos a cambios sin previo aviso.
Fuente de alimentación: CC de 5V
2A
Consumo de energía: <10W
Consumo de energía en espera: <0,5W
Tecnología de visualización: 0,2pulg., 854×480p, DLP
Fuente de luz: LED RGB
Tamaño de la imagen proyectada: 20-100pulg.
Resolución: 854×480p
Brillo: 100 lúmenes ANSI
Relación de contraste: 400:1
Relación de proyección: 1,3
Distancia de proyección: 0,58m a 3,08m
CPU: Quad Core A7
SO: Android 7.1
RAM: DDR de 1GB
ROM: eMMC de 8GB
Diafragmas de altavoz: 6W
Wi-Fi: IEEE802.11a/b/g/n frecuencia dual 2.4G/5G
Versión de Bluetooth: 4.2
Sistema de archivos USB: FAT32
Tipo de batería integrada: polímero de litio
Capacidad: 3250mAh, 3,63V
Tiempo de reproducción de vídeo: aproximadamente 2,5horas en modo de batería
Tiempo de reproducción de música: aproximadamente 14horas en modo de altavoz
Bluetooth
Pilas del mando a distancia: AAA x 2
Temperatura ambiente recomendada: 5°C a 35°C
Humedad relativa: 15%-85% (sin condensación)
Temperatura y humedad de almacenamiento: <65°C, <90% de humedad
Dimensiones (alt. × long. × anch.): 91,2×82×89,2mm
Peso: 370g

58
ES
Solución de problemas
①
¿No puede encender el proyector con el mando a distancia?
• Mantenga pulsado
en el proyector durante 2segundos para encenderlo.
• Cuando el dispositivo está apagado, no puede usar el mando a distancia para
encenderlo.
②
¿No funciona el mando a distancia?
• Asegúrese de que las pilas estén instaladas en el mando a distancia.
• Sustituya las pilas.
③
¿Se ve borrosa la imagen?
• Gire el mando de ajuste de enfoque.
④
¿No puede conectarse a una red Wi-Fi?
• Actualice la lista de redes disponibles e inténtelo de nuevo.
• Reinicie el router inalámbrico o el proyector e inténtelo de nuevo.
⑤
¿Cómo se actualiza el rmware?
• Cuando se detecte una nueva versión, se le pedirá que reinicie el dispositivo y lo
actualice.

59
FR
Sommaire
Consignes de sécurité 60
Contenu de l'emballage 63
Présentation 63
Premierspas 67
Application Nebula Connect 69
Paramètres 70
UtiliserleNebulaAstro 73
Spécications 75
Dépannage 76

60
FR
Consignes de sécurité
Veuillez lire toutes les instructions avant d'utiliser cet appareil. N'apportez pas de
modications et ne procédez pas à des congurations qui ne sont pas décrites dans
ce manuel. En cas de lésions corporelles, de pertes de données ou de dommages pour
cause de non-respect des instructions, la garantie ne s'applique pas.
Conguration
•
Pour réduire le risque d'incendie ou d'électrocution, ne pas exposer ce produit à la pluie
ou à l'humidité. Ne pas placer d'objet rempli de liquide, tel qu'un vase, sur l'appareil.
•
Ne pas placer l'appareil sur des surfaces souples telles que des nappes ou des
tapis, car cela pourrait constituer un risque d'incendie.
•
Ne pas placer l'appareil dans des zones exposées à la poussière et à la saleté, ou à
proximité de tout appareil générant un fort champ magnétique.
•
Pour éviter une surchauffe, ne pas bloquer ou obstruer les orices de ventilation.
•
Ne jamais placer cet appareil dans un espace conné. Toujours laisser
sufsamment d'espace autour de cet appareil pour la ventilation.
•
Éviter la surexposition de l'appareil à la lumière directe du soleil, à la chaleur, aux
variations importantes de température et à l'humidité. Éviter les températures
extrêmes. La température de stockage et de fonctionnement de cet appareil et de
ses accessoires doit être comprise entre 5°C et 35°C.
•
Lorsque cet appareil est en fonctionnement sur une longue période de temps,
sa surface peut devenir chaude. Si cela se produit, l'éteindre immédiatement et
débrancher le chargeur. Attendre son refroidissement avant de le remettre en
marche.
•
Toujours manipuler cet appareil avec soin. Éviter de toucher l'objectif.
•
Ne pas laisser les enfants manipuler l'appareil sans surveillance.
•
Ne pas placer d'objets lourds ou coupants sur l'appareil.
•
Pour éviter toute électrocution, ne pas démonter l'appareil.
•
Utiliser uniquement des accessoires ou pièces de rechange spéciés par le
fabricant.
•
Éviter les vibrations extrêmes, car elles pourraient endommager les composants
internes.
Alimentation
•
Utiliser uniquement l'adaptateur fourni.
•
Mettre l'appareil hors tension avant de retirer le bloc d'alimentation de la prise.
•
Protéger le cordon d'alimentation pour éviter que quelqu'un ne marche dessus ou
ne le pince, particulièrement au niveau des ches, des prises de branchement et du
point de sortie de l'appareil.

61
FR
•
Débrancher l'appareil en cas d'orage ou lorsqu'il n'est pas utilisé pendant une
longue période.
•
En cas d'utilisation d'une che d'alimentation ou d'un coupleur d'appareils comme
dispositif de déconnexion, ce dispositif doit rester facilement accessible.
•
Avant de réaliser une connexion ou d'en modier une, s'assurer que tous les
appareils sont débranchés de la prise d'alimentation.
•
Ne jamais toucher le cordon d'alimentation ou le connecteur d'alimentation avec
les mains mouillées.
Protection de l'audition
•
Pour éviter tout dommage auditif, ne pas écouter à un volume élevé pendant une
période prolongée. Régler le volume à un niveau raisonnable.
En charge
•
Le chargeur est de type DST451-150300W-K avec un courant/ une tension de
sortie USB-C de 5V/2A. Le chargeur doit être installé à proximité de ce produit et
doit être facilement accessible.
•
Ce chargeur est destiné exclusivement à une utilisation en intérieur.
•
Pendant la charge, placer l'appareil dans un environnement avec une température
ambiante tempérée (de préférence entre 5°C et 25°C) et une bonne ventilation.
•
En raison de la composition du boîtier, cet appareil doit être connecté uniquement à
une interface USB version2.0 ou ultérieure.
Batterie
•
Ne pas remplacer la batterie intégrée vous-même. Contacter un centre de service
agréé pour la remplacer.
•
La télécommande contient des piles susceptibles d'être avalées. Tenir la
télécommande hors de portée des enfants.
•
Attention au risque d'explosion! Tenir les batteries à l'écart de la chaleur, de la
lumière directe du soleil ou du feu. Ne jamais jeter les piles au feu.
•
Lorsque la télécommande n'est pas utilisée pendant une longue période, retirer les
piles.
•
Remplacer les piles de la télécommande uniquement avec le même type de pile ou
un type équivalent.
•
Les piles contiennent des substances chimiques et doivent être mises au rebut de
façon appropriée.
•
Recharger cet appareil régulièrement. Ne pas stocker cet appareil avec une batterie
complètement déchargée.
Nettoyage
•
Utiliser un chiffon doux non pelucheux. Ne jamais utiliser de produits liquides,

62
FR
gazeux ou inflammables pour le nettoyage.
•
Ne pas utiliser d'agents liquides pour le nettoyage de l'objectif, an de ne pas
endommager le lm de protection de l'objectif.
•
Frotter les surfaces doucement. Veiller à ne pas rayer les surfaces.
•
Nettoyer l'objectif à l'aide d'un chiffon nettoyant pour objectif.
Réparations
•
Ne pas réparer cet appareil vous-même. Ne demander une réparation qu'à un
centre de service agréé.
•
Un mauvais entretien peut entraîner des blessures ou endommager l'appareil.
•
Consulter un technicien qualié pour toute révision.
Précaution
•
Le rayonnement optique émis par cet appareil est potentiellement dangereux.
•
Ne pas regarder directement le faisceau pendant le fonctionnement. La lumière
vive peut abîmer vos yeux.
Avis de non-responsabilité
•
Placer le Nebula Astro sur une surface plate et dure an que la fonction de
protection oculaire (Eye Guard) s'active avec une meilleure précision.
•
La plage de distances dénie pour activer la protection oculaire est présentée
uniquement à titre de référence.
•
Nettoyer régulièrement la poussière et les traces grasses, qui peuvent affecter la
sensibilité de l'objectif.
•
La fonction de protection oculaire n'est conçue pour offrir une protection que
dans le cas où vos enfants orienteraient accidentellement le projecteur vers eux.
N'orientez PAS intentionnellement le projecteur en direction de vos yeux.

63
FR
CONTENU
Présentation
1.
Vue avant
4
Capteur de mouvement ToF
• Le capteur se déclenche lorsque la
protection oculaire est activée.
Objectif
Entrée et sortie de la ventilation
Commande de mise au point

64
FR
2.
Vue arrière
HDMI
Astro
TYPE-C
2
3
Récepteur infrarouge
PortUSB-C
• Raccordement de l'alimentation
HDMI
• Connexion d'un périphérique de lecture avec sortie HDMI
3.
Vue de dessus
5
4
3
2
Volume Haut
• Appuyer pour augmenter le volume
Voyant LED
Bouton d'alimentation
• Maintenir appuyé pendant 2secondes pour allumer/éteindre
Volume Bas
• Appuyer pour réduire le volume
Bouton
• Appuyer pour basculer entre le mode enceinte Bluetooth et le mode projecteur.

65
FR
4.
Vue de dessous
Emplacement pour trépied
5.
Télécommande
Marche/arrêt
Passer à la connexion HMDI
Mode souris
Navigation
Conrmer le contenu sélectionné
Accueil
Retour
Afcher plus d'options
Augmenter/diminuer le volume

66
FR
6.
Voyant LED
État LED Description
Variation progressive
orange
Protection oculaire activée
Rouge fixe Charge
Vert fixe Chargement terminé
Rouge clignotant Batterie faible (<20%) ou dysfonctionnement
Bleu fixe Allumé en mode projecteur ou enceinte Bluetooth
Orange fixe Veille en mode projecteur
bleu clignotant
Prêt pour l'association/Bluetooth déconnecté (mode
enceinte Bluetooth)
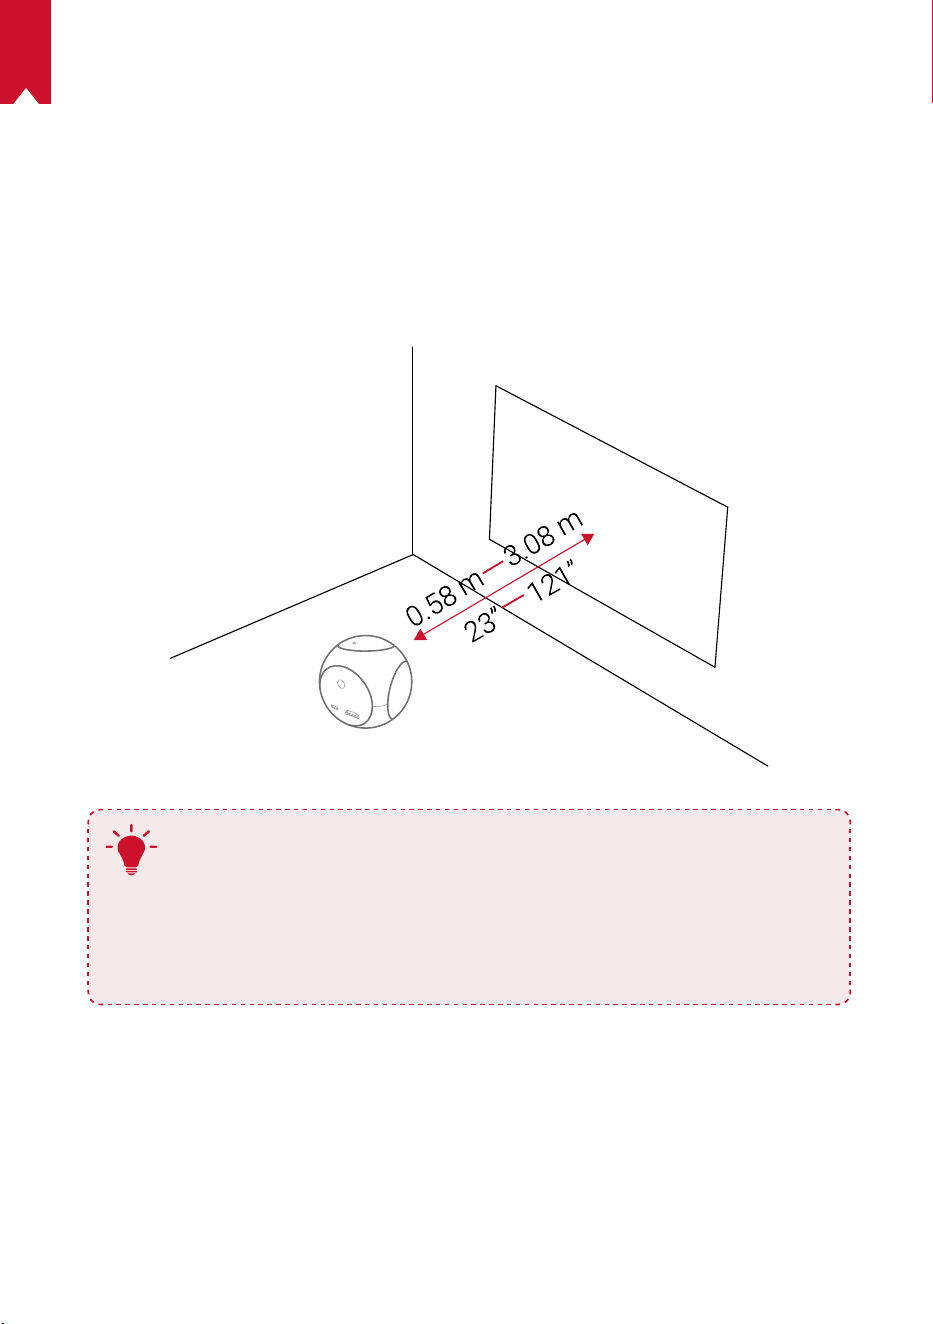
67
FR
PREMIERS PAS
1.
Placement
Placer le Nebula Astro sur une surface stable et plate, en face de la surface de
projection. Pour de meilleurs résultats, la surface de projection doit être plane et de
couleur blanche. La distance entre le Nebula Astro et la surface de projection doit être
au minimum de 0,58mètre et au maximum de 3,08mètres pour que l'image projetée
soit dans format de 20 à 100pouces.
T
•
Il n'est pas nécessaire d'incliner le Nebula Astro vers la surface de
projection. L'image projetée peut être ajustée grâce à la correction
de distorsion intégrée.
•
La distance entre le Nebula Astro et la surface de projection
détermine la taille de l'image projetée. Pour un résultat optimal,
placer le Nebula Astro à une distance comprise entre1 et 2mètres
de la surface de projection.
2.
Préparer la télécommande
La télécommande est livrée avec deux piles AAA.
①
Ouvrir le compartiment des piles en le faisant glisser.
②
Pour remplacer les piles, faire glisser le compartiment pour l'ouvrir, insérer de
nouvelles piles (en faisant correspondre la polarité [+/-] indiquée), puis fermer le
compartiment des piles.
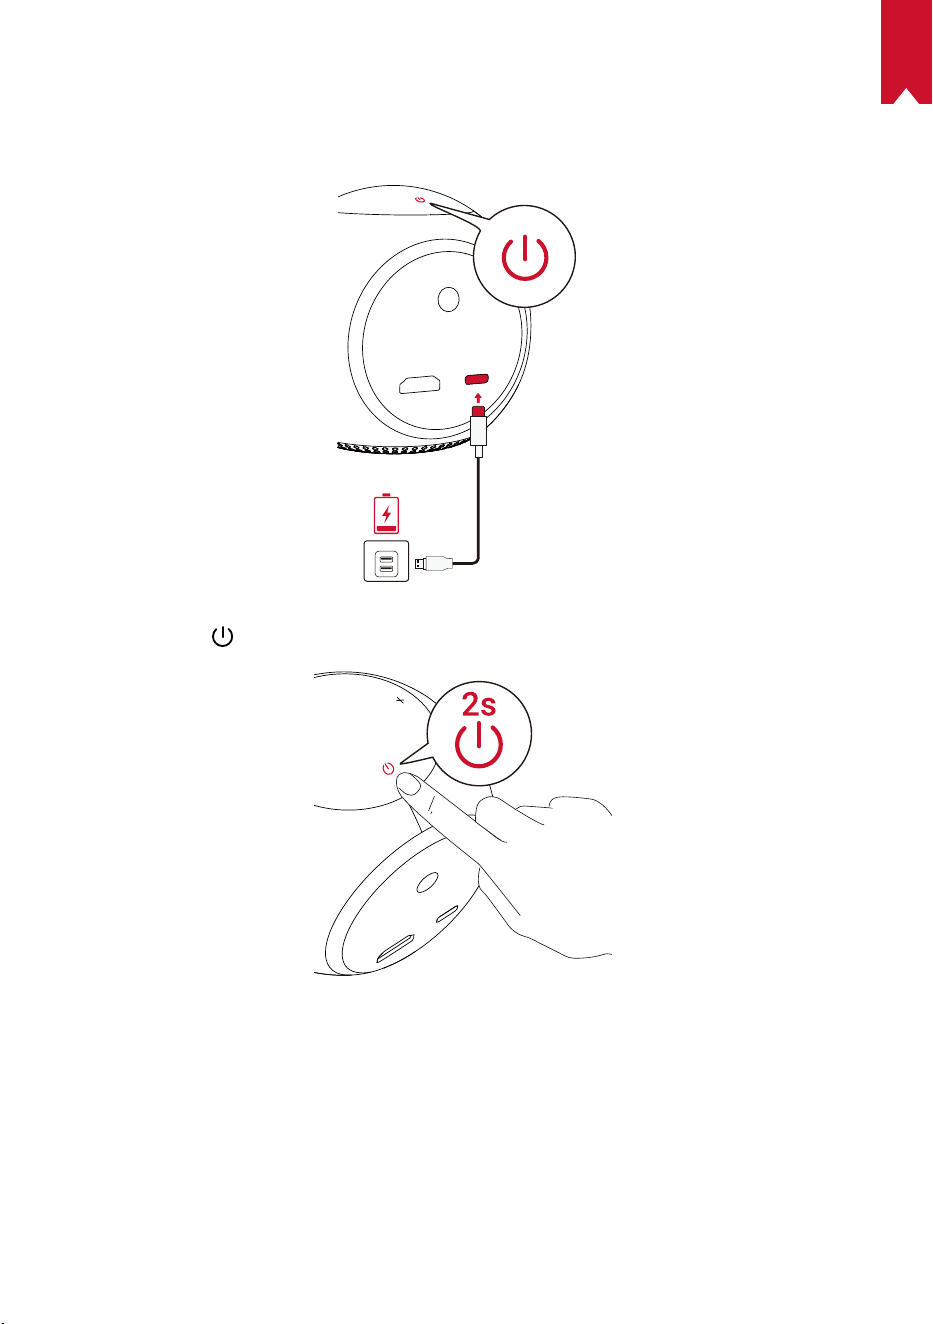
68
FR
3.
Démarrage
①
Avant la première utilisation, recharger complètement la batterie intégrée à l'aide du
câble et de l'adaptateur fournis.
② Appuy
er sur
pendant 2secondes pour mettre sous tension le projecteur.
③
Tourner l'appareil vers un mur ou une surface de projection appropriée.
④
Tourner la commande de mise au point pour l'ajuster.

69
FR
⑤
Lors de la première utilisation, suivre les instructions à l'écran pour effectuer les
réglages de base.
T
Pour permettre une charge du Nebula Astro la plus rapide et la plus
sécurisée possible, utiliser uniquement l'adaptateur fourni.
Application Nebula Connect
Pour un contrôle facile du Nebula Astro, nous vous recommandons de télécharger
l'application Nebula Connect. Cette application vous permet de contrôler le pointeur de
souris depuis l'écran de votre téléphone.
①
Télécharger l'application Nebula Connect depuis l'App Store (appareils iOS) ou
Google Play (appareils Android).
Nebula Connect
< Settings Bluetooth
Nebula-xxxxxx
Bluetooth
Connected
DEVICE
Nebula Connect
2
②
Activer le Bluetooth sur votre smartphone.
③
Ouvrir l'application Nebula Connect et sélectionner l'appareil [Nebula-XXXXXX]
pour le connecter.
④
Suivre les instructions à l'écran pour nir de congurer la connexion.
T
Pour une expérience plus satisfaisante, nous vous recommandons d'utiliser
l'application Nebula Connect au lieu de la télécommande.
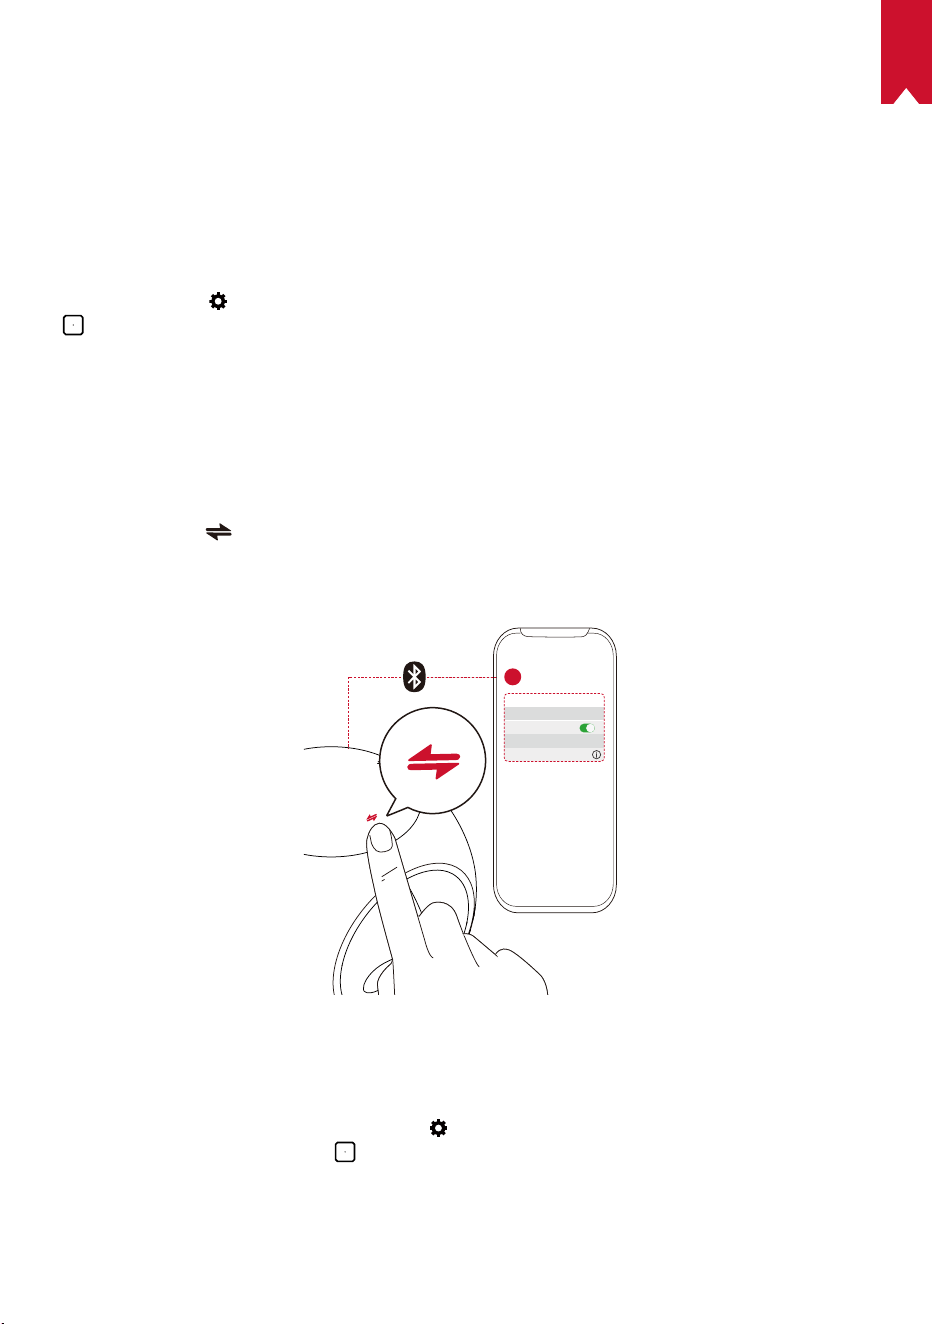
70
FR
Paramètres
Suivre le processus de conguration lors de la première mise sous tension du Nebula
Astro. Déterminer la plage de distances permettant le déclenchement de la fonction
Eye Guard, puis dénir votre nom, votre date de naissance et votre mot de passe.
1.
Réseau
Ce projecteur peut être connecté à Internet via une connexion sans l (Wi-Fi).
①
Sélectionner
pour accéder aux paramètres. Sélectionner [Réseau] et appuyer sur
.
②
Suivre les instructions à l'écran pour établir la connexion réseau.
2.
Bluetooth
Mode enceinte Bluetooth
Vous pouvez utiliser ce projecteur comme une enceinte Bluetooth autonome.
①
Appuyer sur
pour passer en mode enceinte Bluetooth.
②
Activer le Bluetooth sur votre smartphone et sélectionner l'appareil [Nebula-XXXXXX]
pour le connecter.
< Settings Bluetooth
Nebula-xxxxxx
Bluetooth
Connected
DEVICE
2
1
Mode projecteur
Vous pouvez connecter une enceinte Bluetooth ou un casque audio au Nebula Astro
lorsque celui-ci est en mode projecteur.
①
Dans le menu d'accueil, sélectionner
pour accéder aux paramètres. Sélectionner
[Bluetooth] et appuyer sur . Saisir le mot de passe s'il est demandé.
②
Suivre les instructions à l'écran pour établir la connexion Bluethooth.
71
FR
3.
Projecteur
Dans le menu d'accueil, sélectionner l'icône des paramètres pour accéder aux
paramètres. Sélectionner [Projecteur] et appuyer sur
.
[Mode image] [Auto] / [Mode standard] / [Mode batterie]
[Mode confort visuel]
[Marche] / [Arrêt]
Active ou désactive le mode confort visuel.
[Technologie de protection
oculaire]
[Désactivée] Fonction Eye Guard désactivée. Elle est
désactivée par défaut.
[<20cm] / [<40cm] / [<60cm]: Lorsque le projecteur
est déni sur <20cm/<40cm/<60cm, la technologie de
protection oculaire s'active pour que le projecteur s'éteigne
si une personne s'approche en deçà d'une certaine
distance.
[Correction auto du trapèze]
Active / désactive la correction automatique du trapèze.
[Mode projecteur]
[Projection avant]: Le projecteur est situé en face de la
surface de projection.
[Projection arrière]: Le projecteur est situé derrière la
surface de projection.
[Projection avant inversée]: Le projecteur est suspendu
au plafond, à l'envers. L'image est tournée à 180degrés.
[Projection arrière inversée]: Le projecteur est
suspendu au plafond à l'envers, derrière la surface de
projection. L'image est tournée à 180degrés et inversée
horizontalement.
4.
Commandes de contrôle parental
Dans le menu d'accueil, sélectionner pour accéder aux paramètres. Sélectionner
[Contrôles parentaux] et appuyer sur .
[Mot de passe paramètres] [Activé] / [Désactivé]
[Modier le mot de passe]
Lorsque Mot de passe paramètres est activé, l'option
Modier le mot de passe est disponible. Cette option vous
permet de modier et de réinitialiser le mot de passe. Le
code par défaut est nebula + le numéro de série.
[Limite de temps]
Dénit l'horaire ou la durée limite par jour pendant laquelle
votre enfant peut accéder au projecteur.
72
FR
5.
Contrôle des applications
Le contrôle des applications vous permet, en mode enfants, d'afcher, de masquer ou
de trier les applications sur l'écran d'accueil.
①
Dans le menu d'accueil, sélectionner
pour accéder aux paramètres. Sélectionner
[Contrôle des applications] et appuyer sur .
②
Maintenir
appuyé pour déplacer l'application sélectionnée.
6.
Gestionnaire d'application
①
Dans le menu d'accueil, sélectionner
pour accéder aux paramètres. Sélectionner
[Gestionnaire d'application] et appuyer sur .
②
Sélectionner une application pour vérier la version actuelle, ouvrir une application
ou en forcer la fermeture, vérier l'espace utilisé, effacer des données ou la désinstaller.
7.
Autres
Dans le menu d'accueil, sélectionner pour accéder à davantage d'options de
conguration.
[Général]
[Langue] Sélectionner une langue d'afchage à l'écran.
[Tonalité du clavier] Activer/désactiver la tonalité du clavier.
[Intervalle de veille
automatique]
5min / 15min / 30min
[Arrière-plan] Sélectionner un arrière-plan.
[Effacer le cache]
Effacer toutes les données en mémoire cache du projecteur.
[Recopie de l'écran] Activer la recopie de l'écran.
[Date et heure]
[Date et heure automatiques] Activer ou désactiver la date et l'heure automatiques.
[Sélectionner le fuseau
horaire]
Sélectionner le fuseau horaire.
[Utiliser le format 24heures] Sélectionner le format 24heures ou 12heures.
[Mise à niveau]
[Recherche de mises à jour]
Permet de vérier si vous disposez de la dernière
version. Suivre les instructions à l'écran pour mettre à
niveau la version du Firmware.
[À propos]
[Restauration] Toutes les données sur le stockage interne seront effacées.
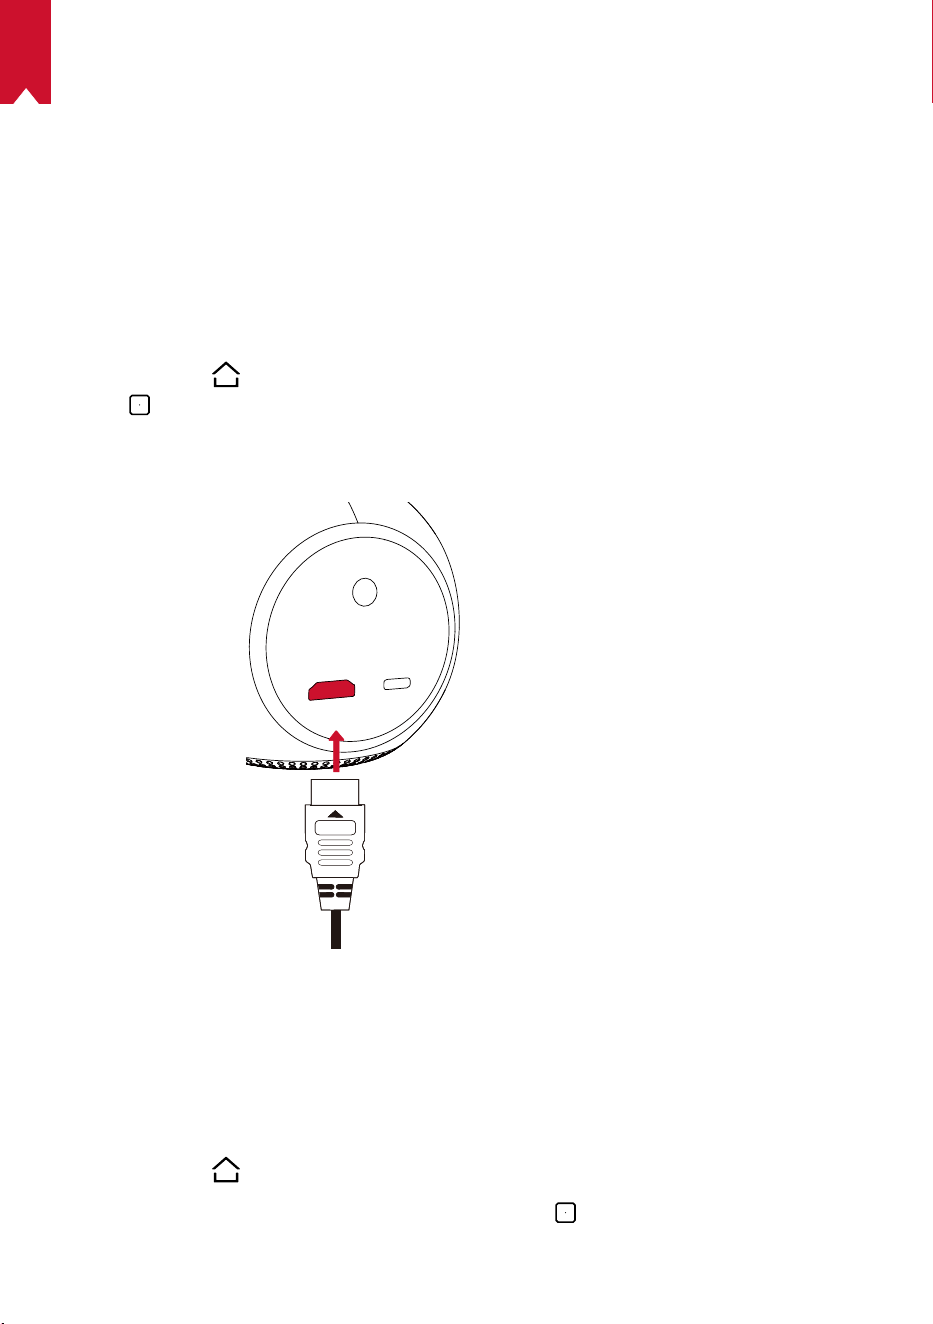
73
FR
Utiliser le Nebula Astro
1.
Lecture depuis des dispositifs de lecture HDMI
Nebula Astro peut être connecté à divers dispositifs de lecture HDMI tels que Ies
récepteurs TV, les clés TV, les lecteurs DVD, les boîtiers décodeurs, les consoles de jeux
ou autres appareils.
Pour lire des contenus depuis des dispositifs de lecture HDMI:
①
Connecter Nebula Astro à un dispositif de lecture HDMI à l'aide d'un câble HDMI (non
fourni).
②
Appuyer sur
pour accéder au menu d'accueil, sélectionner [HDMI], puis appuyer
sur
.
• La lecture via le HDMI commence automatiquement lors de la première connexion
à un dispositif de lecture HDMI.Installer des applications
2.
Installer des applications
Une fois connecté à un réseau sans fil, vous pouvez accéder aux services en ligne,
proter de lms, de musique et d'images, ainsi que naviguer sur Internet. En plus des
applications préinstallées, vous pouvez installer d'autres applications à partir de l'App
Store de Nebula.
①
Appuyer sur
pour accéder au menu d'accueil
②
Sélectionner un service Internet, puis appuyer sur
.
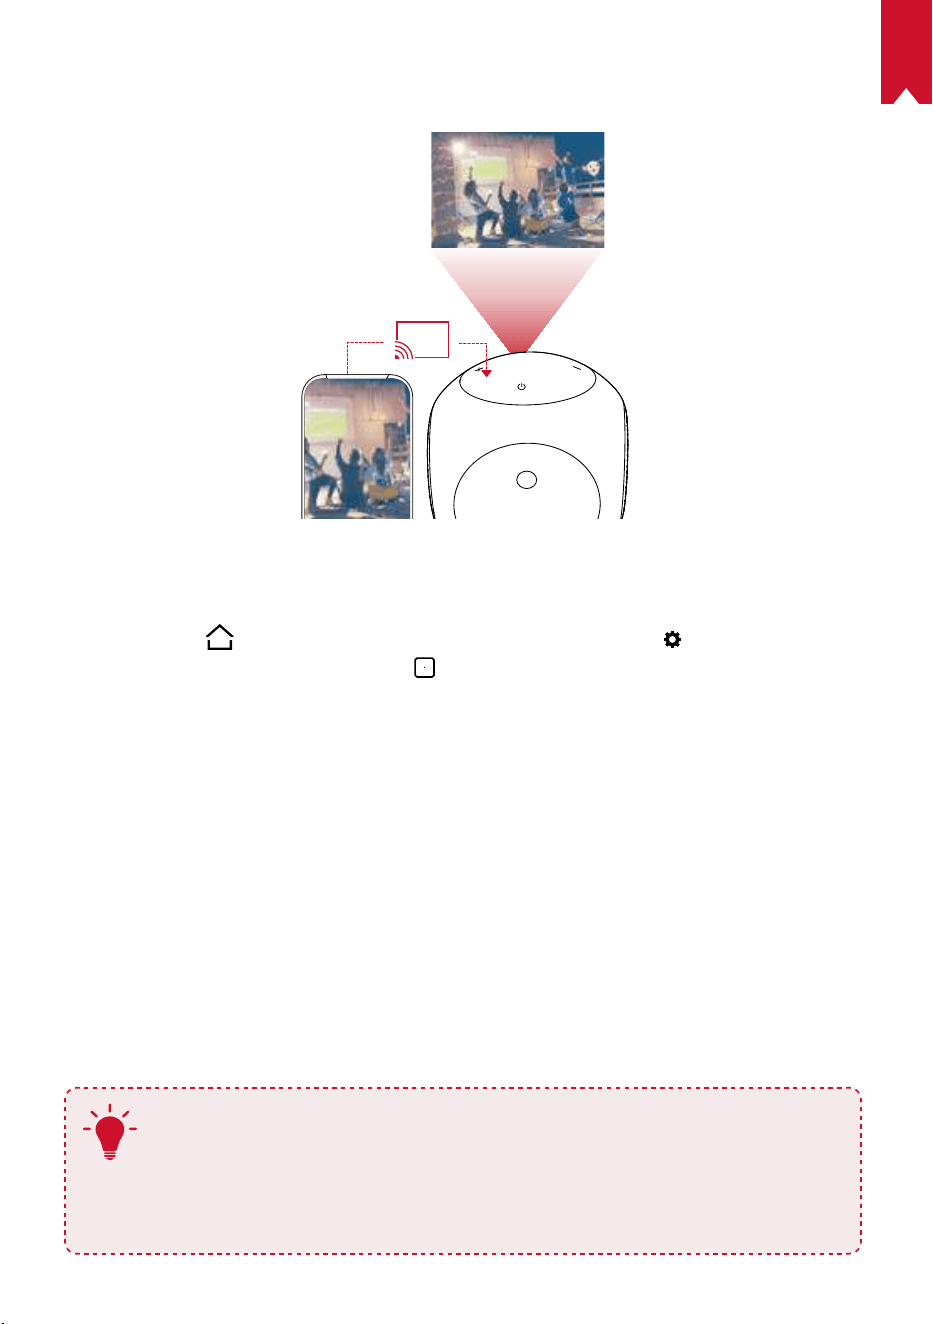
74
FR
3.
Recopie de l'écran
Vous pouvez projeter sans l l'écran de votre smartphone ou tablette sur la surface de projection.
Pourlesutilisateursd'Android:
Pour utiliser la fonctionnalité d'écran miroir:
①
Appuyer sur
pour accéder au menu d'accueil, sélectionner > [Général]>
[Recopie de l'écran] et appuyer sur
.
②
Suivre les instructions à l'écran pour terminer l'opération.
• Le Nebula Astro recopie alors l'écran de la tablette ou du téléphone portable
connecté.
Pourlesutilisateursd'iOS:
①
Ouvrir le Centre de contrôle.
• Sur un iPhoneX ou modèle ultérieur, ou sur un iPad avec iOS12 ou version
ultérieure: Balayer vers le bas depuis l'angle supérieur droit de l'écran.
• Sur un iPhone8 ou modèle antérieur, ou sur iOS11 ou version antérieure: Balayer
vers le haut depuis le bord inférieur de l'écran.
②
Appuyer sur Recopie de l'écran.
③
Sélectionner Nebula-xxxxxx dans la liste. Le Nebula Astro recopie alors l'écran de
votre iPhone ou de votre iPad.
T
• Veillez à ce que le Nebula Astro et votre téléphone soient connectés au
même réseau.
• Il est possible que certains contenus ne puissent pas être diffusés, en raison
de restrictions de droits d'auteur. Dans ce cas, vous pouvez diffuser ces
contenus via la même application installée sur votre Nebula Astro.
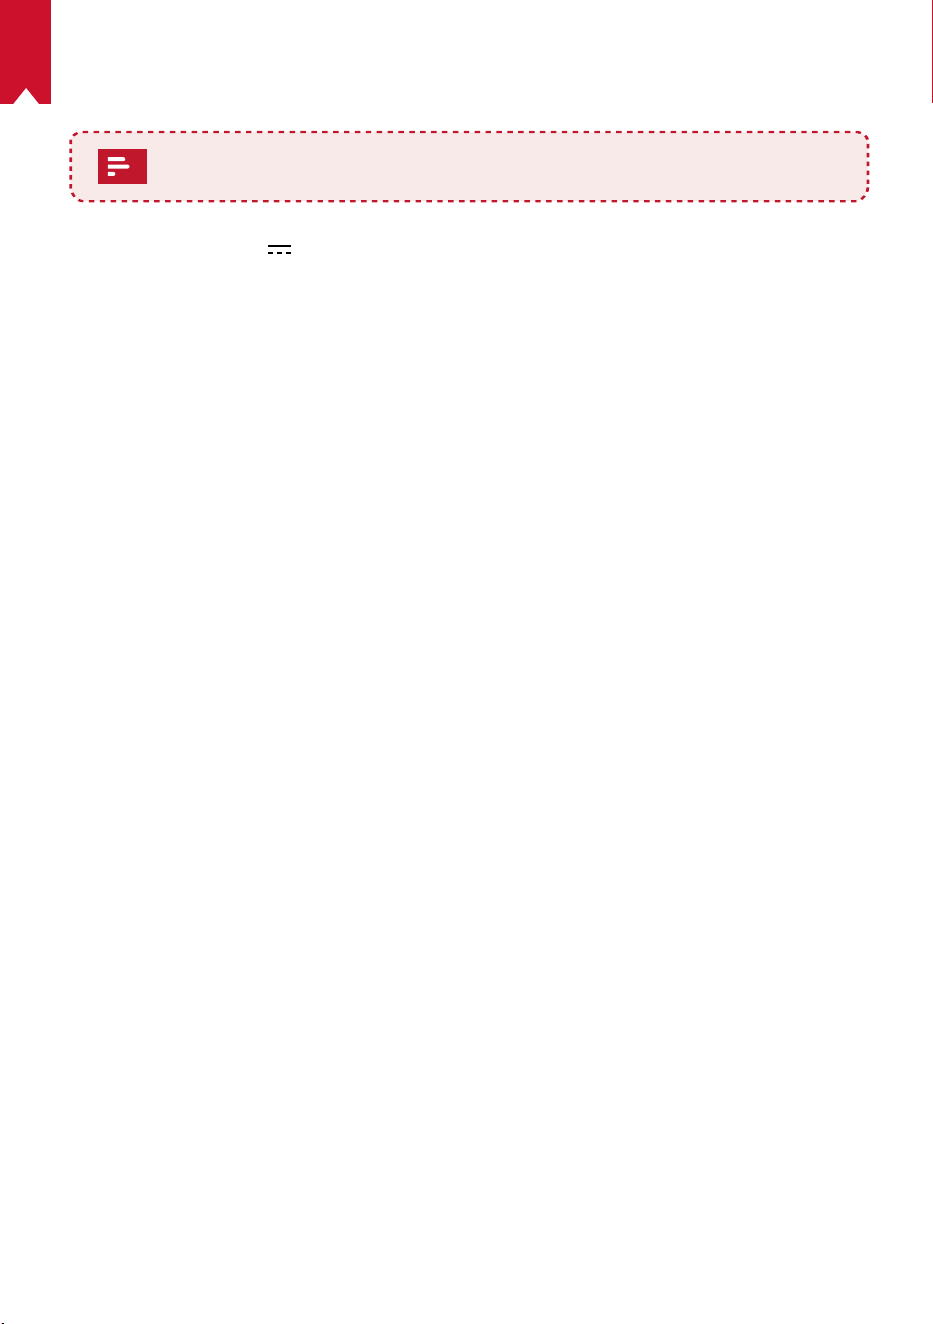
75
FR
Spécications
Les caractéristiques techniques et la conception sont susceptibles d'être
modifiées sans préavis.
Alimentation: CC 5V
2A
Consommation: < 10W
Consommation en veille: < 0,5W
Technologie d'afchage: DLP 0.2 en 854x480pixels
Source de lumière: LED RVB
Taille d'image projetée: 20 à 100pouces
Résolution: 854x480pixels
Luminosité: 100lumens ANSI
Rapport de contraste: 400:1
Rapport de projection: 1,3
Distance de projection: 0,58m à 3,08m
Processeur: Quad core A7
Système d'exploitation: Android7.1
RAM: 1Go DDR
ROM: 8Go eMMC
Enceintes: 6W
Wi-Fi: IEEE802.11a/b/g/n double fréquence 2.4G/5G
Version Bluetooth: 4.2
Système de chiers USB: FAT32
Type de batterie intégrée: Li-polymère
Capacité: 3250mAh 3,63V
Lecture de lm: environ 2,5heures en mode batterie
Lecture de musique: environ 14heures en mode enceinte Bluetooth
Piles de la télécommande: AAA x 2
Température ambiante recommandée: de 5°C à 35°C
Humidité relative: 15% ~ 85% (sans condensation)
Température et humidité pour le stockage: <65°C, humidité <90%
Dimensions(H × L × l): 91,2x82x89,2mm
Poids: 370g

76
FR
Dépannage
①
Impossible d'allumer le projecteur avec la télécommande?
• Appuyer sur
pendant 2secondes pour mettre sous tension le projecteur.
• Lorsqu'il est éteint, vous ne pouvez pas utiliser la télécommande pour allumer
l'appareil.
②
La télécommande ne fonctionne pas?
• Assurez-vous que les piles sont déjà insérées dans la télécommande.
• Remplacez les piles.
③
L'image est floue?
• Tourner la commande de mise au point pour l'ajuster.
④
Impossible de se connecter au réseau Wi-Fi?
• Actualiser la liste des réseaux disponibles et réessayer.
• Redémarrer le routeur sans l ou le projecteur et réessayer.
⑤
Comment mettre à jour le rmware?
• Quand une nouvelle version est détectée, il vous sera demandé de redémarrer et
de mettre à jour.

77
IT
Indice
Informazionisullasicurezza 78
Contenuto della confezione 81
Panoramica 81
Per iniziare 85
AppNebulaConnect 87
Impostazioni 88
Utilizzo di Nebula Astro 91
Speciche 93
Risoluzione dei problemi 94

78
IT
Informazioni sulla sicurezza
Leggere tutte le istruzioni prima di utilizzare il dispositivo. Non apportare modiche, né
creare impostazioni che non siano descritte nel presente manuale. La garanzia non si
applica in caso di lesioni siche, perdita di dati o danni causati dal mancato rispetto
delle istruzioni.
Congurazione
•
Per ridurre il rischio di incendi o scosse elettriche, non esporre il dispositivo a pioggia o
umidità. Oggetti contenenti liquidi come, ad esempio, vasi, non devono essere collocati
sul dispositivo.
•
Non posizionare il dispositivo su superci morbide, come tovaglie o tappeti, in
quanto ciò potrebbe provocare un incendio.
•
Non posizionare il dispositivo in aree soggette a polvere e sporco eccessivi o vicino
ad apparecchi che generano un forte campo magnetico.
•
Per evitare il surriscaldamento, non bloccare né ostruire le aperture di aerazione.
•
Non collocare mai il dispositivo in uno spazio ristretto. Lasciare sempre spazio
sufciente attorno al dispositivo per consentire l’aerazione.
•
Evitare di esporre eccessivamente il dispositivo alla luce diretta del sole, al calore,
ad ampie fluttuazioni di temperatura e all’umidità. Evitare temperature estreme. La
temperatura di esercizio e di conservazione adatta per questo dispositivo e i suoi
accessori è compresa tra 5°C e 35°C.
•
Quando il dispositivo è in funzione per un periodo di tempo prolungato, la sua
supercie potrebbe riscaldarsi. In tal caso, spegnerlo immediatamente e scollegare
il caricabatterie. Riprendere l’utilizzo dopo che il dispositivo si è raffreddato.
•
Maneggiare il dispositivo sempre con cura. Evitare di toccare l’obiettivo.
•
Non consentire a bambini di maneggiare il dispositivo senza supervisione.
•
Non collocare oggetti pesanti o appuntiti sul dispositivo.
•
Per evitare scosse elettriche, non smontare il dispositivo.
•
Usare esclusivamente parti o accessori specicati dal produttore.
•
Evitare vibrazioni estreme poiché potrebbero danneggiare i componenti interni.
Alimentazione
•
Utilizzare solo l’adattatore di alimentazione in dotazione.
•
Spegnere il dispositivo prima di rimuovere l’alimentatore dalla presa di corrente.
•
Evitare che il cavo di alimentazione venga calpestato o schiacciato, soprattutto in
prossimità di spine, prese di derivazione e i fori da cui tali spine o prese fuoriescono
dal dispositivo.
•
Scollegare questo dispositivo in caso di temporali o se rimane inutilizzato per un
periodo prolungato.

79
IT
•
Nel caso in cui si utilizzi la spina di alimentazione o un accoppiatore per scollegare
il dispositivo, questo resta prontamente azionabile.
•
Prima di effettuare o modicare i collegamenti, assicurarsi che tutti i dispositivi
siano scollegati dalla presa di corrente.
•
Non toccare mai il cavo di alimentazione o il connettore di alimentazione con le
mani bagnate.
Sicurezza acustica
•
Al ne di prevenire danni all’udito, evitare l’ascolto ad alto volume per periodi
prolungati. Impostare il volume a un livello di sicurezza.
In carica
•
Il caricabatterie è di tipo DST451-150300W-K con tensione/corrente in uscita di
5V/2A da USB-C. Il caricabatterie deve essere installato vicino al prodotto e deve
essere facilmente accessibile.
•
Questo caricabatterie è destinato esclusivamente all’uso in ambienti interni.
•
Durante la ricarica, posizionare il dispositivo in una stanza con temperatura
ambiente normale (compresa tra 5°C e 25°C) e ben areata.
•
Considerato il materiale utilizzato per l’involucro, il dispositivo deve essere collegato
solo a un’interfaccia USB versione 2.0 o superiore.
Batteria
•
Non sostituire autonomamente la batteria integrata. Contattare un centro di
assistenza autorizzato per la sostituzione.
•
Il telecomando contiene batterie che potrebbero essere accidentalmente ingerite.
Tenere il telecomando lontano dalla portata dei bambini.
•
Rischio di esplosione. Tenere le batterie lontano da fonti di calore, luce solare
diretta o amme. Non smaltire mai le batterie mediante incenerimento.
•
Rimuovere le batterie quando il telecomando non è utilizzato per un periodo
prolungato.
•
Sostituire le batterie del telecomando esclusivamente con batterie dello stesso tipo
o di tipo equivalente.
•
Le batterie contengono sostanze chimiche e, pertanto, devono essere smaltite
correttamente.
•
Caricare regolarmente il dispositivo. Non riporre il dispositivo con la batteria
completamente scarica.
Pulizia
•
Utilizzare un panno morbido e privo di lanugine. Per la pulizia del dispositivo, non
utilizzare mai detergenti liquidi, gassosi o facilmente inammabili.
•
Non utilizzare detergenti liquidi per la pulizia dell’obiettivo onde evitare di

80
IT
danneggiare la pellicola di rivestimento applicata sullo stesso.
•
Asciugare le superci delicatamente. Fare attenzione a non grafare le superci.
•
Utilizzare l’apposita carta per la pulizia dell’obiettivo.
Riparazioni
•
Non effettuare autonomamente riparazioni sul dispositivo. Rivolgersi a un centro di
assistenza autorizzato per la riparazione del dispositivo.
•
Una manutenzione errata può causare lesioni siche o danni al dispositivo.
•
Afdarsi a personale qualicato per tutti gli interventi di assistenza.
Attenzione
•
Possibili radiazioni ottiche pericolose emesse dal dispositivo.
•
Non ssare direttamente il fascio di luce quando il dispositivo è in funzione. La luce
intensa potrebbe danneggiare gli occhi.
Esclusione di responsabilità
•
Assicurarsi di posizionare Nebula Astro su una supercie piana rigida, in modo da
consentire un’attivazione più precisa della funzione di protezione degli occhi.
•
L’impostazione relativa alla distanza per attivare la funzione di protezione degli
occhi è esclusivamente a scopo di riferimento.
•
Mantenere l’obiettivo pulito e privo di tracce di grasso per non alterarne la
sensibilità.
•
La funzione di protezione degli occhi è progettata per fornire protezione
esclusivamente nel caso in cui i bambini puntino accidentalmente il proiettore
verso di sé. NON puntare intenzionalmente il proiettore verso gli occhi.

81
IT
CONTENUTO DELLA CONFEZIONE
Panoramica
1.
Vista anteriore
4
Sensore di movimento TOF
• Il sensore si aziona quando si attiva la funzione
di protezione degli occhi
Obiettivo
Ingresso/Uscita di aerazione
Manopola di regolazione della messa a fuoco

82
IT
2.
Vista posteriore
HDMI
Astro
TYPE-C
2
3
Ricevitore a infrarossi
Porta USB-C
• Collegare all’alimentazione
HDMI
• Collegare a un dispositivo di riproduzione attraverso l’uscita HDMI
3.
Vista dall’alto
5
4
3
2
Aumento del volume
• Premere per aumentare il volume
Indicatore LED
Tasto di accensione
• Tenere premuto per 2secondi per accendere/spegnere il dispositivo
Riduzione del volume
• Premere per abbassare il volume
Pulsante
• Premere per passare dalla modalità altoparlante Bluetooth alla modalità
proiettore
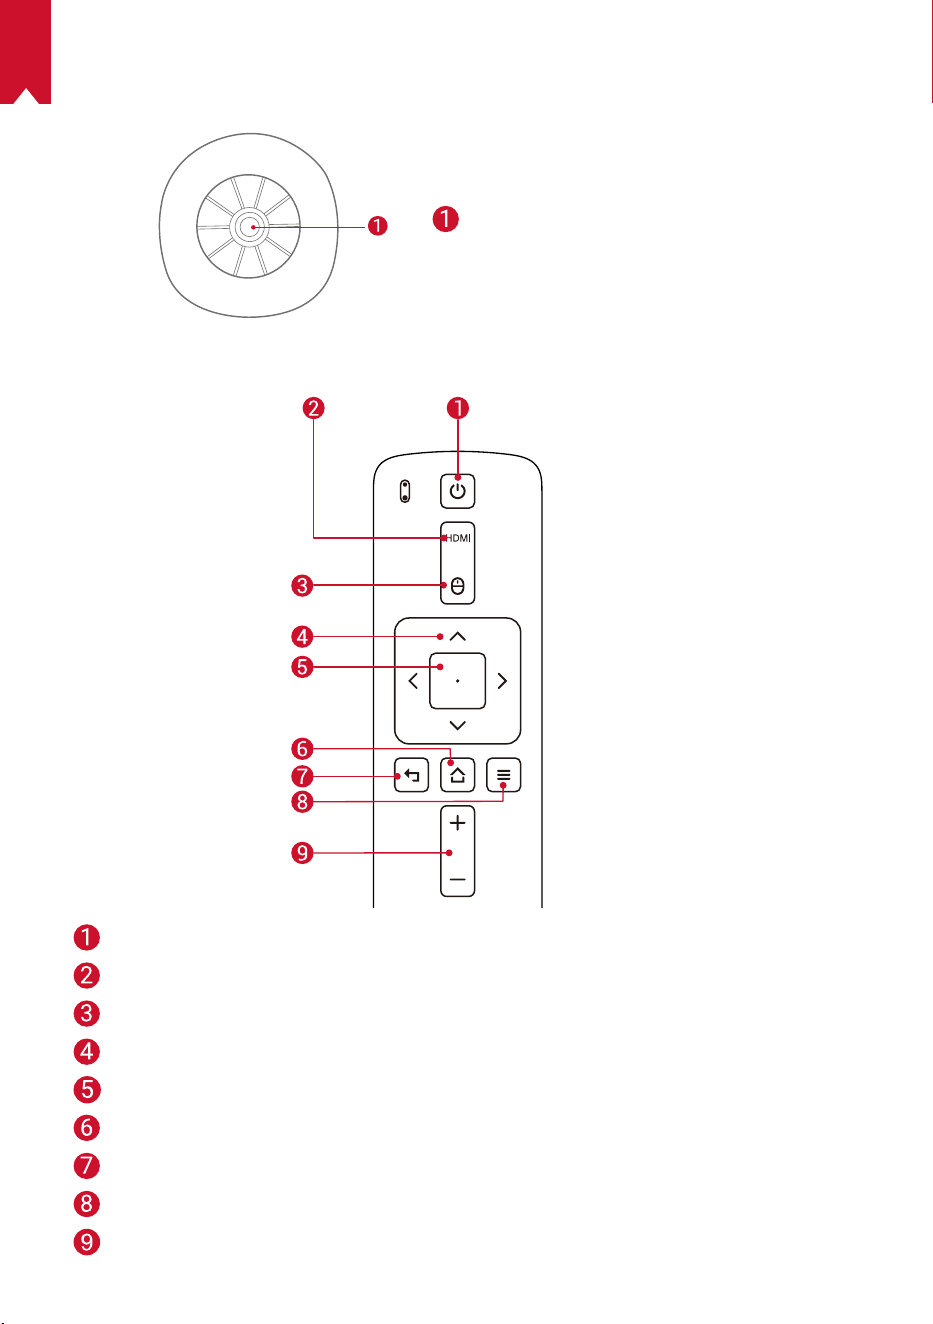
83
IT
1.
Vista dal basso
Attacco per cavalletto
2.
Telecomando
Accensione/Spegnimento
Passaggio alla connessione HDMI
Modalità mouse
Navigazione
Confermare il contenuto selezionato
Home
Parte posteriore
Visualizzare più opzioni
Aumento/Diminuzione del volume

84
IT
3.
Indicatore LED
Stato LED Descrizione
Arancione
lampeggiante
Funzione di protezione degli occhi attivata
Rosso fisso Ricarica
Verde fisso Ricarica completata
Rosso lampeggiante Batteria scarica (<20%)/Guasto
Blu fisso Attivare il proiettore o la modalità altoparlante Bluetooth
Arancione fisso Standby in modalità proiettore
Blu lampeggiante
Pronto per l’associazione/Bluetooth disconnesso
(modalità altoparlante Bluetooth)
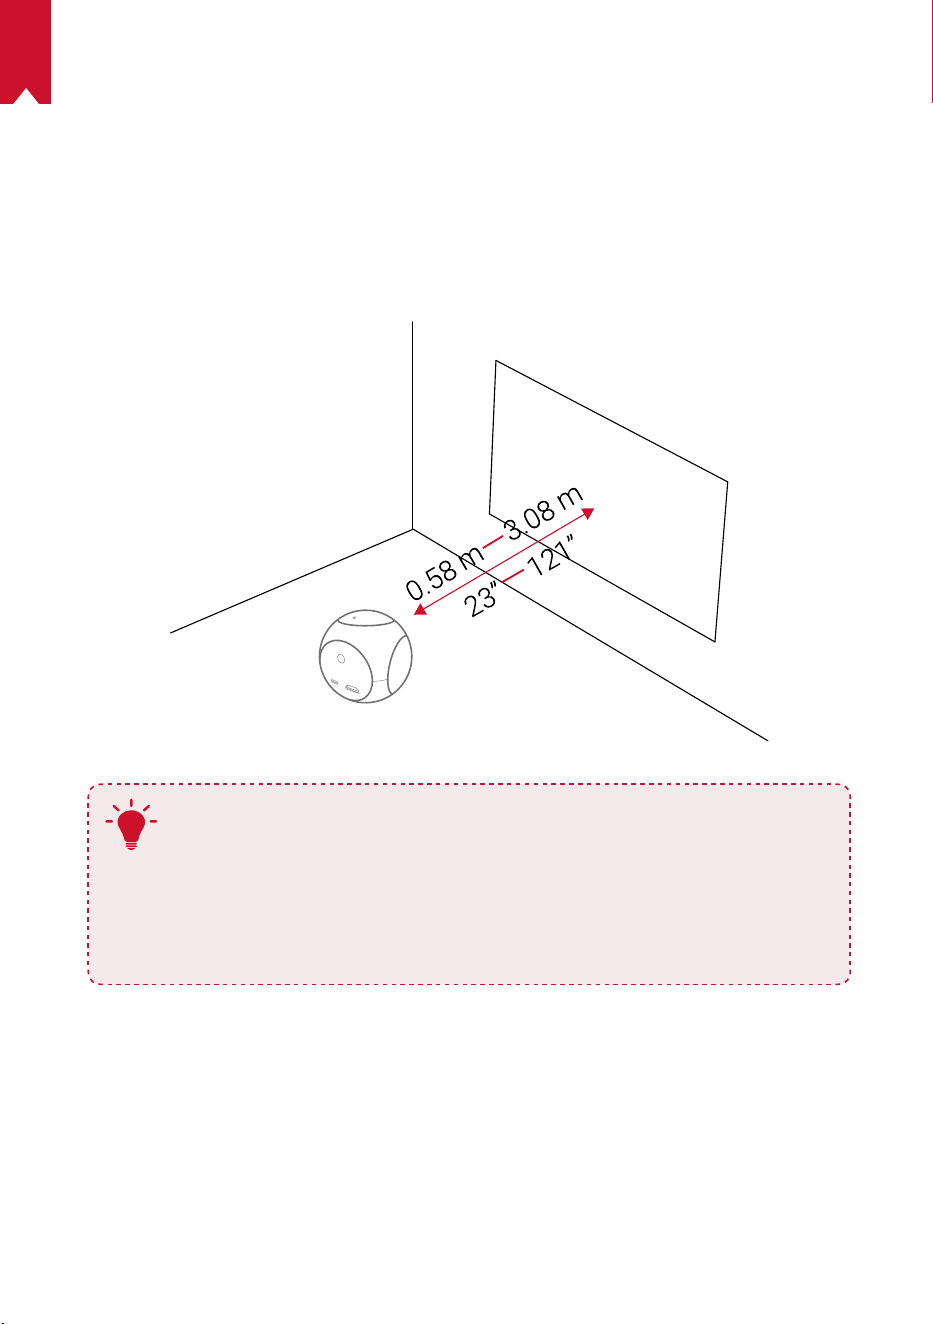
85
IT
PER INIZIARE
1.
Posizionamento
Posizionare Nebula Astro su una supercie piana e stabile, davanti alla supercie di
proiezione. Per risultati ottimali, la supercie di proiezione deve essere bianca e piana.
Per ottenere un’immagine di proiezione da 20 a 100pollici, la distanza tra Nebula Astro
e la supercie di proiezione deve essere di minimo 0,58metri e massimo 3,08metri.
T
•
Non occorre inclinare Nebula Astro in direzione della supercie di
proiezione. È possibile correggere l’immagine di proiezione usando
la correzione dell’immagine trapezoidale integrata.
•
La distanza tra Nebula Astro e la supercie di proiezione determina
le dimensioni dell’immagine di proiezione. Per risultati ottimali,
posizionare Nebula Astro a una distanza di 1-2m dalla supercie di
proiezione.
2.
Preparazione del telecomando
Il telecomando è dotato di due batterie AAA.
①
Far scorrere verso il basso per aprire il vano batterie.
②
Per sostituire le batterie, far scorrere il coperchio del vano batterie per aprirlo,
inserire le nuove batterie (facendo corrispondere la polarità (+/-) indicata) e chiudere
il coperchio del vano batterie.

86
IT
3.
Per iniziare
①
Per il primo utilizzo, caricare completamente la batteria integrata usando il cavo e
l’adattatore in dotazione.
②
Tenere premuto
sul proiettore per 2secondi per accenderlo.
③
Orientare il dispositivo verso una supercie di proiezione o una parete adatta.
④
Ruotare la manopola per regolare la messa a fuoco.
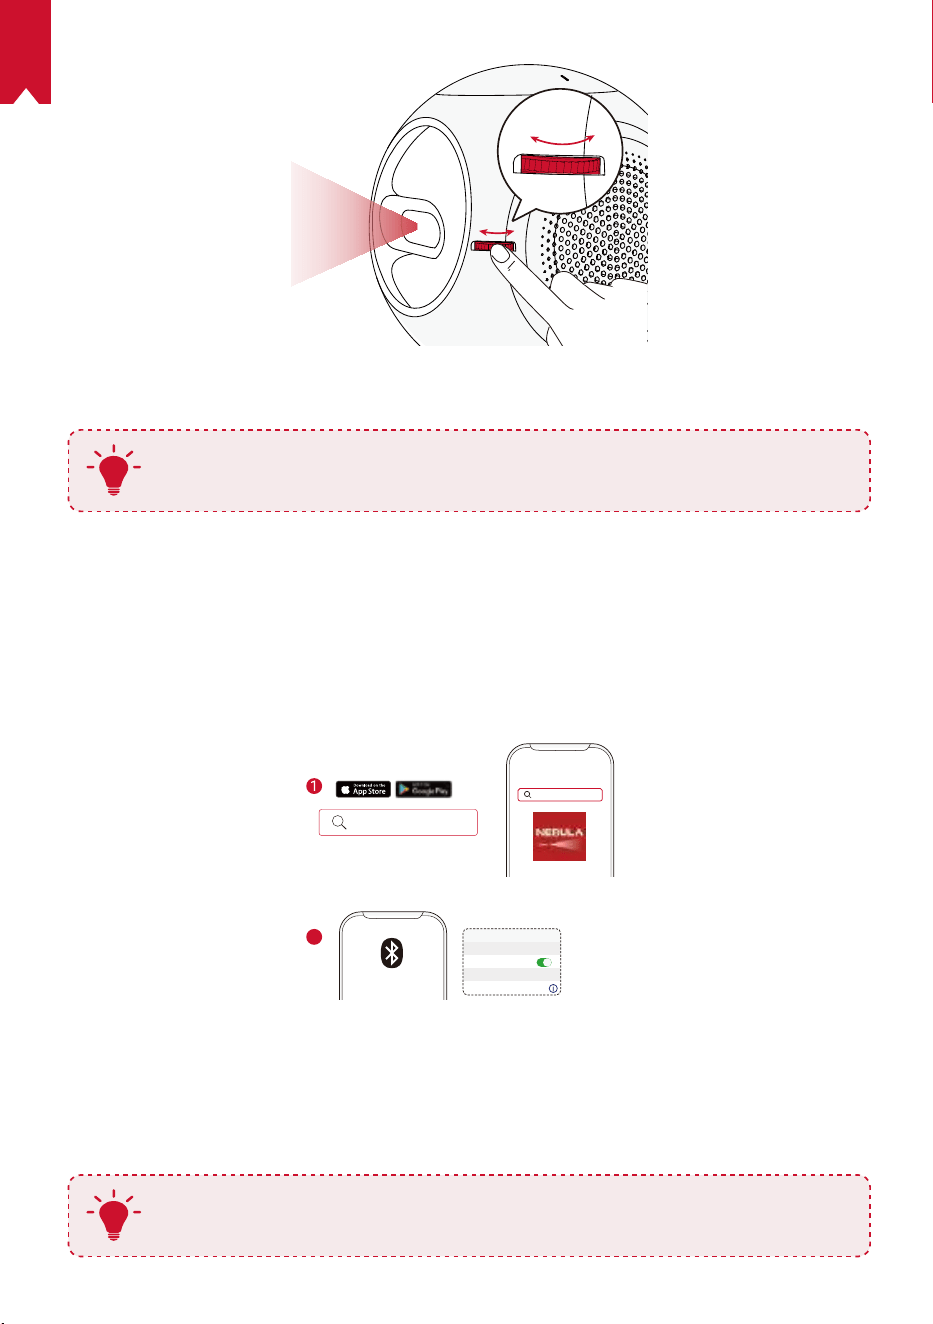
87
IT
⑤
Per il primo utilizzo, seguire le istruzioni visualizzate sullo schermo per completare
la congurazione base.
T
Utilizzare esclusivamente l’adattatore in dotazione per caricare Nebula
Astro nel modo più rapido e sicuro.
App Nebula Connect
Per controllare Nebula Astro in tutta semplicità, raccomandiamo di eseguire il
download dell’app Nebula Connect. Mediante l’app, è possibile operare il mouse
usando lo schermo del telefono.
①
Scaricare l’app Nebula Connect dall’App Store (dispositivi iOS) o da Google Play
(dispositivi Android).
Nebula Connect
< Settings Bluetooth
Nebula-xxxxxx
Bluetooth
Connected
DEVICE
Nebula Connect
2
②
Abilitare il Bluetooth sullo smartphone.
③
Aprire l’app Nebula Connect e selezionare [Nebula-XXXXXX] come dispositivo che
si desidera connettere.
④
Seguire le istruzioni visualizzate sullo schermo per completare la congurazione
della connessione.
T
Per migliorare ulteriormente l’esperienza, consigliamo di utilizzare l’app
Nebula Connect al posto del telecomando.
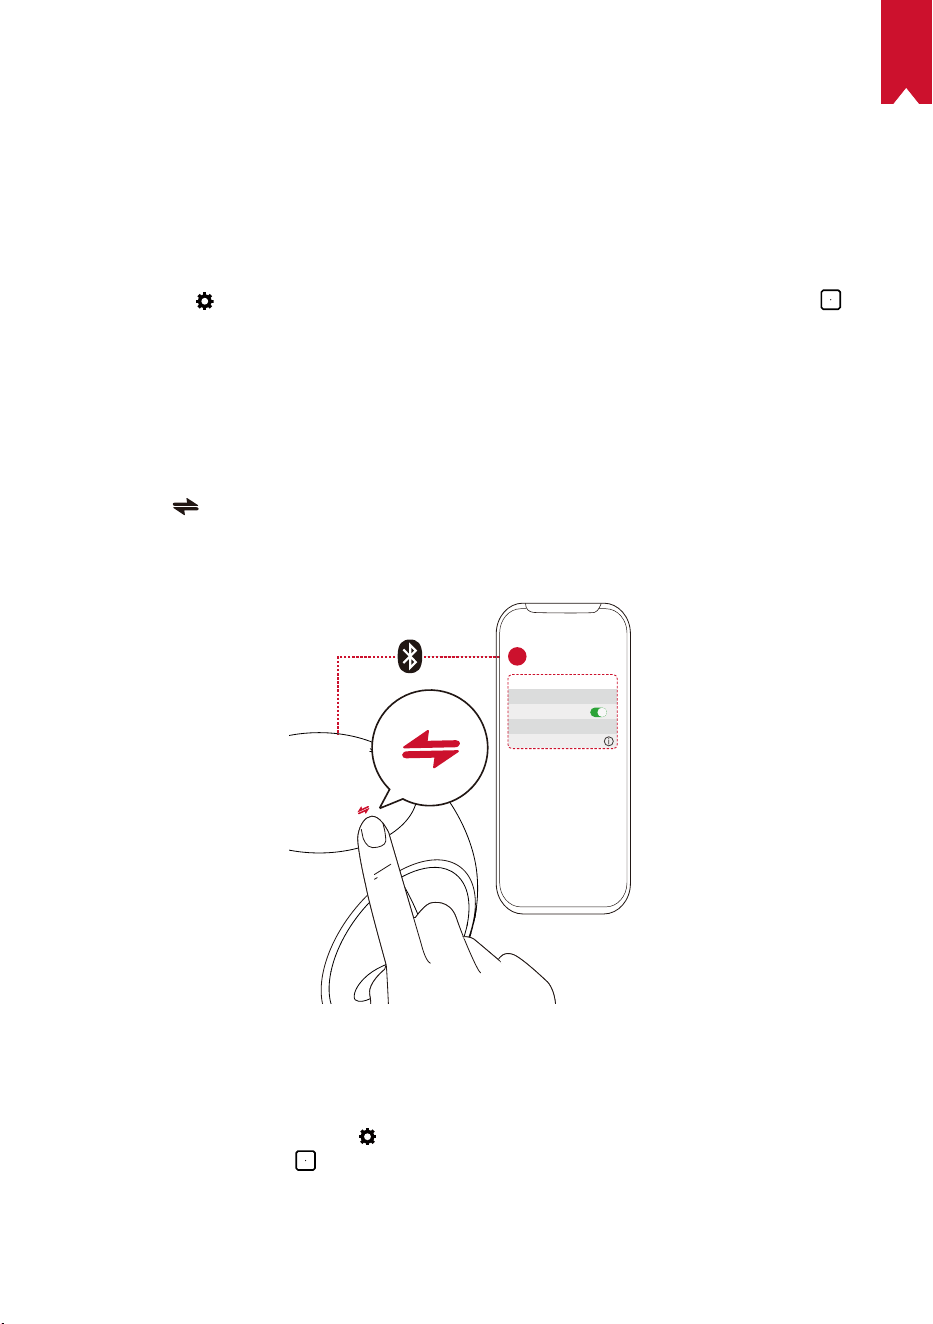
88
IT
Impostazioni
Quando si accende Nebula Astro per la prima volta, eseguire tutti i passaggi della
procedura di congurazione. Determinare la distanza di attivazione della funzione di
protezione degli occhi e impostare nome, data di nascita e password.
1.
Rete
Questo proiettore può essere connesso a Internet tramite una connessione wireless (Wi-Fi).
①
Selezionare
per accedere alla pagina Impostazioni. Selezionare [Rete] e premere .
②
Seguire le istruzioni visualizzate sullo schermo per completare la connessione alla rete.
2.
Bluetooth
Modalità altoparlante Bluetooth
È possibile utilizzare il proiettore come altoparlante Bluetooth autonomo.
①
Premere
per passare alla modalità altoparlante Bluetooth.
②
Abilitare il Bluetooth sullo smartphone e selezionare [Nebula-XXXXXX] come
dispositivo che si desidera connettere.
< Settings Bluetooth
Nebula-xxxxxx
Bluetooth
Connected
DEVICE
2
1
Modalità proiettore
In modalità proiettore, è possibile connettere un altoparlante Bluetooth o un paio di
cufe a Nebula Astro.
①
Nel menu Home, selezionare
per accedere alla pagina Impostazioni. Selezionare
[Bluetooth] e premere . Inserire la password, se richiesta.
②
Seguire le istruzioni visualizzate sullo schermo per completare la connessione
Bluetooth.
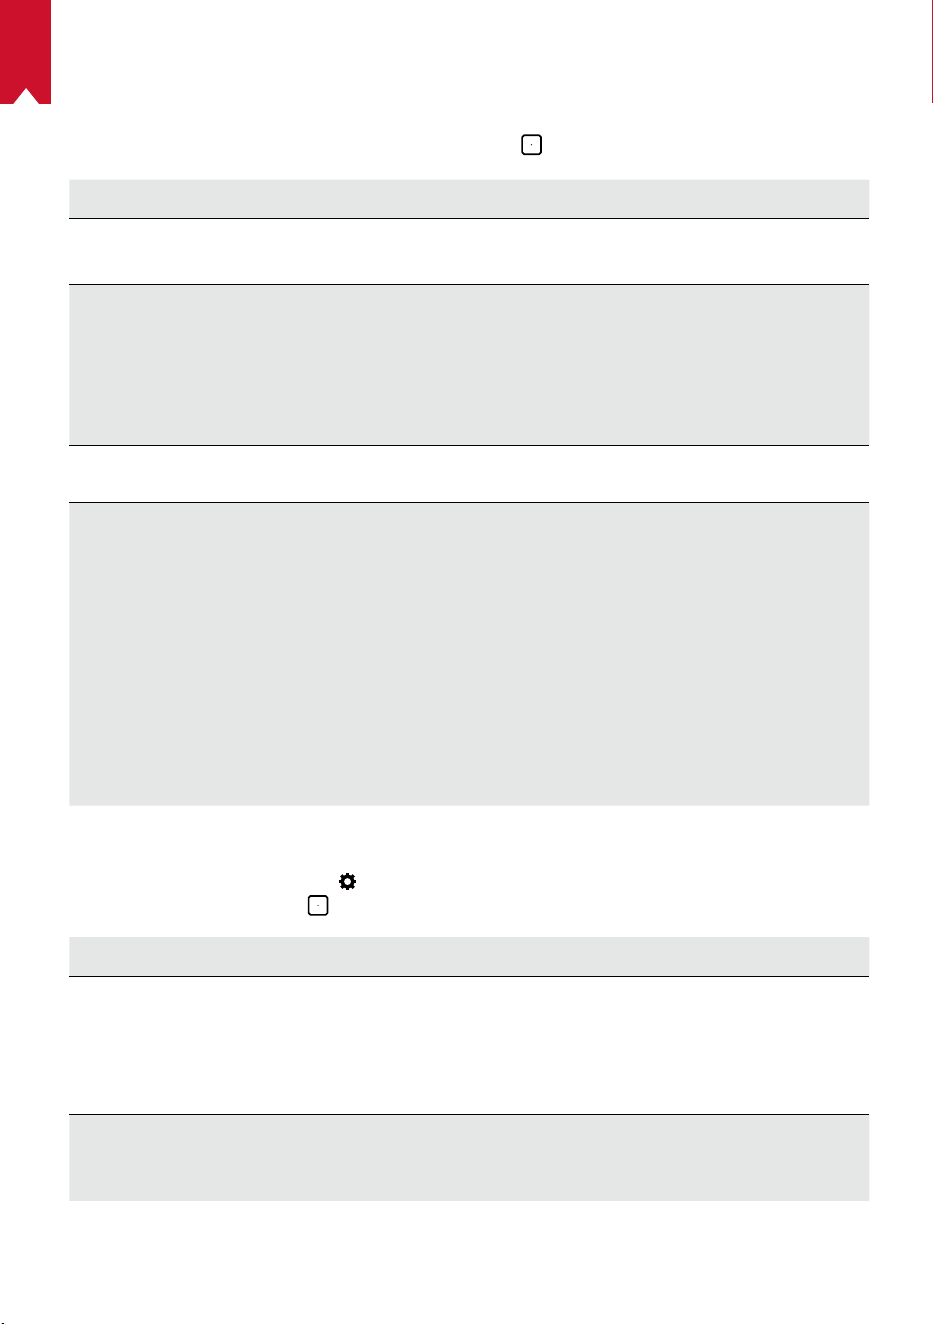
89
IT
3.
Proiettore
Nel menu Home, selezionare l’icona Impostazioni per accedere alla pagina
Impostazioni. Selezionare [Proiettore] e premere
.
[Modalità immagine] [Auto]/[Modalità standard]/[Modalità batteria]
[Modalità comfort visivo]
[On]/[Off]
Attiva o disattiva la modalità di comfort visivo.
[Tecnologia di protezione
degli occhi]
[Off]: la funzione di protezione degli occhi è disattivata. È
impostata su Off per impostazione predenita.
[<20cm]/[<40cm]/[<60cm]: quando il proiettore è
impostato su <20cm/<40cm/<60cm, la Tecnologia di
protezione degli occhi si attiva e il proiettore si disattiva
entro una specica distanza.
[Correzione immagine
trapezoidale automatica]
Consente di attivare/disattivare la correzione immagine
trapezoidale automatica.
[Modalità proiettore]
[Proiettore frontale]: il proiettore si trova davanti alla
supercie di proiezione.
[Proiettore posteriore]: il proiettore si trova dietro la
supercie di proiezione.
[Proiettore frontale capovolto]: il proiettore è appeso al
softto in posizione capovolta. L’immagine è ruotata di
180gradi.
[Proiettore posteriore capovolto]: il proiettore è appeso
al softto in posizione capovolta dietro la supercie di
proiezione. L’immagine è ruotata di 180gradi e speculare
in orizzontale.
4.
Filtri famiglia
Nel menu Home, selezionare per accedere alla pagina Impostazioni. Selezionare
[Filtri famiglia] e premere .
[Password Impostazioni] [On]/[Off]
[Modica password]
Quando Password Impostazioni è su On, l’opzione
Modica password si attiva. Questa opzione consente di
modicare e reimpostare la password. Il codice master è
nebula + numero di serie per impostazione predenita.
[Limite di tempo]
Impostare il limite di tempo o la durata dell’accesso
giornaliero dei bambini al proiettore.
90
IT
5.
Controllo app
La funzione Controllo app consente di mostrare, nascondere l’app o di assegnarne
l’ordine desiderato nella schermata Home in modalità Bambini.
①
Nel menu Home, selezionare
per accedere alla pagina Impostazioni. Selezionare
[Controllo app] e premere .
②
Tenere premuto
per riposizionare l’app selezionata.
6.
Gestione app
①
Nel menu Home, selezionare
per accedere alla pagina Impostazioni. Selezionare
[Gestione app] e premere .
②
Selezionare un’app e vericarne la versione corrente, aprire l’app o forzarne l’arresto,
controllare la quantità di memoria utilizzata dall’app o cancellarne i dati, oppure disinstallarla.
7.
Altre
Nel menu Home, selezionare per cercare altre opzioni di impostazione.
[Generale]
[Lingua]
Consente di selezionare una lingua di visualizzazione
sullo schermo.
[Toni tastierino] Consente di attivare/disattivare i toni del tastierino.
[Intervallo sospensione
automatico]
5min/15min/30min
[Sfondo] Consente di selezionare uno sfondo.
[Pulizia cache]
Consente di cancellare i dati memorizzati nella cache del
proiettore.
[Mirroring schermo] Consente di attivare il mirroring dello schermo.
[Data e ora]
[Data e ora automatiche]
Consente di abilitare/disabilitare la data e l’ora
automatiche.
[Seleziona fuso orario] Consente di selezionare il fuso orario.
[Usa formato di 24 ore] Consente di selezionare il formato 24ore o 12ore.
[Aggiornamento]
[Controlla aggiornamenti]
Consente di controllare se si dispone della versione più
recente. Seguire le istruzioni visualizzate sullo schermo
per aggiornare la versione del rmware.
[Informazioni su]
[Ripristino] Tutti i dati della memoria integrata verranno cancellati.

91
IT
Utilizzo di Nebula Astro
1.
Riproduzione da dispositivi di riproduzione HDMI
Nebula Astro può essere collegato a vari dispositivi di riproduzione HDMI, ad esempio
TV box, TV stick, lettori DVD, decoder digitali, console per videogiochi o altri dispositivi.
Per riprodurre i contenuti da dispositivi di riproduzione HDMI procedere come segue:
①
Collegare Nebula Astro a un dispositivo di riproduzione HDMI usando un cavo HDMI
(non in dotazione).
②
Premere
per accedere al menu Home, selezionare [HDMI] e premere .
• La riproduzione HDMI si avvierà automaticamente quando il dispositivo è collegato
per la prima volta a un dispositivo di riproduzione HDMI.Installazione di app
2.
Installa app
Una volta eseguita la connessione a una rete wireless, è possibile accedere a servizi
online, godersi lm, musica e foto e navigare in Internet. Oltre alle app preinstallate, è
possibile installare anche altre app dal Nebula App Store.
①
Premere
per accedere al menu Home.
②
Selezionare un servizio Internet e premere
.
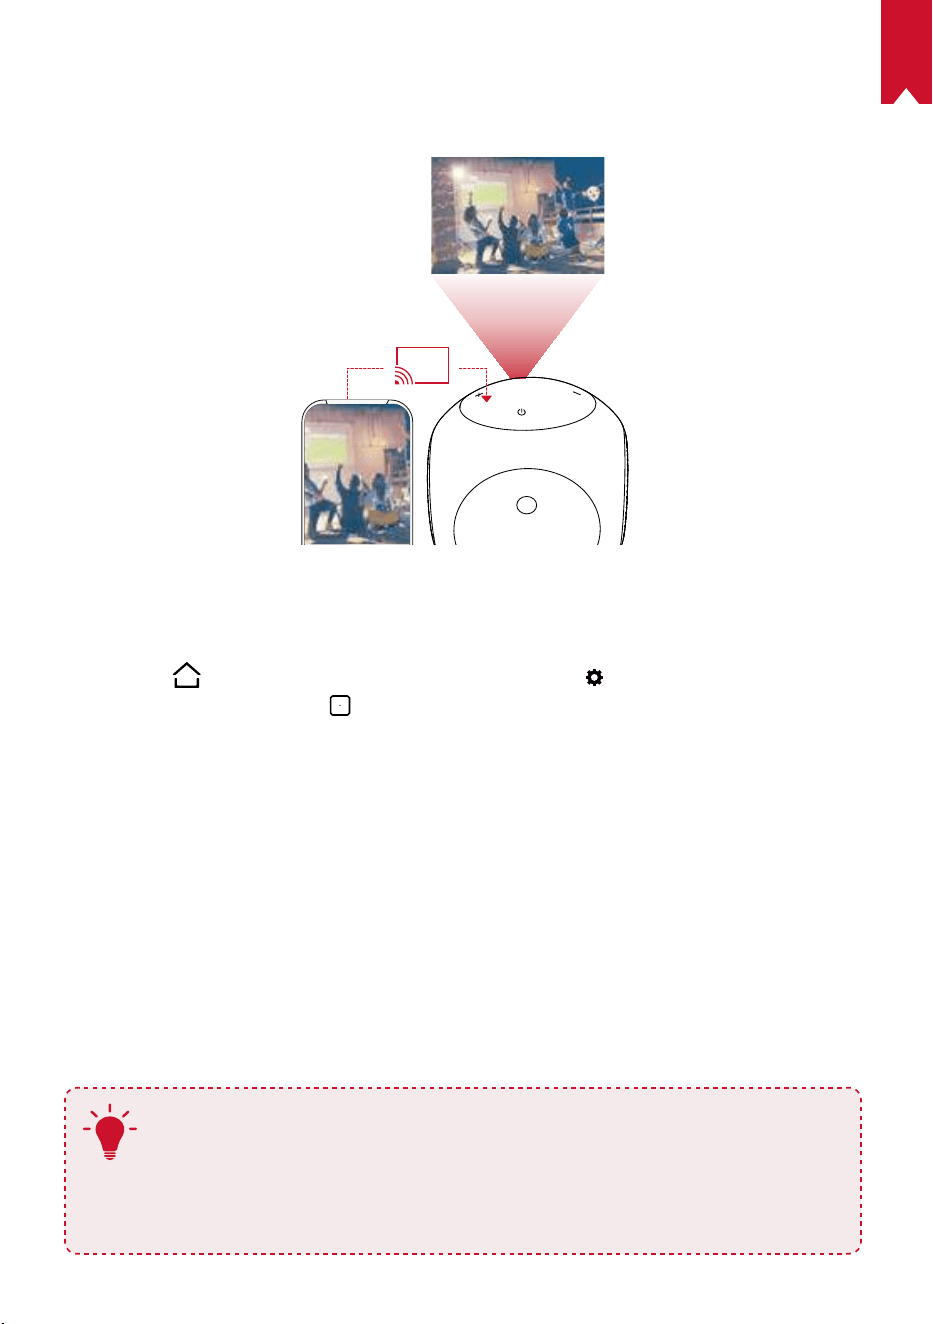
92
IT
3.
Mirroring dello schermo
È possibile trasmettere in modalità wireless lo schermo del proprio smartphone o
tablet sulla supercie di proiezione.
Per gli utenti Android:
Per utilizzare la funzione di mirroring dello schermo procedere come segue:
①
Premere
per accedere al menu Home, selezionare > [Generale] > [Mirroring
schermo], quindi premere
.
②
Seguire le istruzioni visualizzate sullo schermo per completare il processo.
• Nebula Astro proietterà lo schermo dello smartphone o del tablet.
Per gli utenti iOS:
①
Aprire Centro di controllo.
• Su iPhone X e iPad con iOS 12 o versioni successive procedere come segue:
Scorrere verso il basso dall’angolo in alto a destra dello schermo.
• Su iPhone 8 e iOS 11 o versioni precedenti procedere come segue: Scorrere verso
l’alto dal bordo inferiore dello schermo, in qualsiasi schermata.
②
Toccare Mirroring schermo.
③
Selezionare Nebula-xxxxxx dall’elenco. Nebula Astro proietterà lo schermo
dell’iPhone o dell’iPad.
T
• Accertarsi che Nebula Astro e il telefono siano entrambi connessi alla stessa rete.
• Alcuni contenuti non possono essere trasmessi con Nebula Astro a
causa delle restrizioni relative al copyright. In tal caso, sarà possibile
riprodurre i suddetti contenuti in streaming, tramite la stessa app
installata su Nebula Astro.

93
IT
Speciche
Le specifiche e il design sono soggetti a modifiche senza preavviso.
Alimentazione: CC 5V
2A
Consumo energetico: <10W
Consumo energetico in standby: <0,5W
Tecnologia display: DLP 0,2pollici, 854 x 480p
Sorgente luminosa: LED RGB
Dimensioni immagine di proiezione: 20-100pollici
Risoluzione: 854 x 480p
Luminosità: 100 ANSI lumen
Rapporto di contrasto: 400:1
Rapporto di proiezione: 1,3
Distanza di proiezione: da 0,58m a 3,08m
CPU: quad core A7
SO: Android 7.1
RAM: DDR da 1GB
ROM: eMMC da 8GB
Driver altoparlante: 6W
Wi-Fi: IEEE802.11a/b/g/n doppia frequenza 2,4G/5G
Versione Bluetooth: 4.2
File system USB: FAT32
Tipo di batteria incorporata: ai polimeri di litio
Capacità: 3250mAh 3,63V
Durata di riproduzione lm: circa 2,5ore in modalità batteria
Durata di riproduzione musica: circa 14ore in modalità altoparlante Bluetooth
Batterie telecomando: AAA x 2
Temperatura ambiente raccomandata: da 5°C a 35°C
Umidità relativa: 15%~85% (senza condensa)
Temperatura e umidità di conservazione: < 65°C, < 90% di umidità
Dimensioni (A × L × P): 91,2 x 82 x 89,2mm
Peso: 370g

94
IT
Risoluzione dei problemi
①
Impossibile accendere il proiettore con il telecomando?
• Tenere premuto
sul proiettore per 2secondi per accenderlo.
• Quando il dispositivo è spento, non è possibile utilizzare il telecomando per
accenderlo.
②
Il telecomando non funziona?
• Assicurarsi che le batterie siano già installate nel telecomando.
• Sostituire le batterie.
③
L’immagine è sfocata?
• Ruotare la manopola di regolazione della messa a fuoco.
④
Impossibile connettersi a una rete Wi-Fi?
• Aggiornare l’elenco delle reti disponibili e riprovare.
• Riavviare il router wireless o il proiettore e riprovare.
⑤
Come si esegue l’aggiornamento del rmware?
• Quando viene rilevata una nuova versione, verrà richiesto di riavviare il dispositivo
e di eseguire l’aggiornamento.

NL
95
Inhoudsopgave
Veiligheidsinstructies 96
Watziterindedoos? 99
Overzicht 99
Aandeslag 103
DeNebulaConnect-app 105
Instellingen 106
DeNebulaAstrogebruiken 109
Specicaties 112
Problemenoplossen 113
Kennisgeving 20
Handelsmerken 2
Garantie 2

NL
96
Veiligheidsinstructies
Lees alle instructies voordat u dit apparaat gebruikt. Breng geen wijzigingen aan
en maak geen instellingen die niet in deze handleiding worden beschreven. Indien
lichamelijk letsel, het verlies van gegevens of schade wordt veroorzaakt door het niet
opvolgen van instructies, is de garantie niet van toepassing.
Instellen
• Stel het apparaat niet bloot aan regen of vocht om het risico op brand en/of
elektrische schokken te beperken. Plaats geen voorwerpen gevuld met vloeistof,
zoals vazen, op dit apparaat.
• Plaats dit apparaat niet op zachte oppervlakken zoals tafelkleden of tapijten,
omdat het apparaat in dat geval brandgevaarlijk kan zijn.
• Plaats dit apparaat niet op plaatsen waar het wordt blootgesteld aan overmatig
stof en vuil of in de buurt van apparaten die een sterk magnetisch veld genereren.
• Zorg ervoor dat de ventilatieopeningen niet zijn verstopt of geblokkeerd om
oververhitting te voorkomen.
• Plaats dit apparaat nooit in een afgesloten ruimte. Laat altijd voldoende ruimte
vrij rond dit apparaat voor ventilatie.
• Zorg ervoor dat dit apparaat niet overmatig wordt blootgesteld aan direct
zonlicht, hitte, grote temperatuurschommelingen en vocht. Vermijd extreme
temperaturen. De geschikte bedrijfs- en opslagtemperatuur voor dit apparaat en
de bijbehorende accessoires is 5 ° C tot 35 ° C.
• Als dit apparaat lange tijd in gebruik is, kan het oppervlak heet worden. Als dit
gebeurt, schakel het apparaat dan onmiddellijk uit en trek de stekker van de
oplader uit het stopcontact. U kunt het gebruik hervatten nadat het apparaat is
afgekoeld.
• Ga altijd voorzichtig om met dit apparaat. Raak de lens niet aan.
• Laat kinderen niet zonder toezicht gebruik maken van het apparaat.
• Plaats geen zware of scherpe voorwerpen op dit apparaat.
• Demonteer het apparaat niet om elektrische schokken te voorkomen.
• Gebruik uitsluitend door de fabrikant gespeciceerde hulpstukken en
accessoires.
• Vermijd extreme trillingen omdat deze de interne onderdelen kunnen
beschadigen.
Voeding
• Gebruik alleen de meegeleverde voedingsadapter.
• Schakel het apparaat uit voordat u de stekker van de voeding uit het
stopcontact haalt.

NL
97
• Bescherm het netsnoer, zodat er niet overheen kan worden gelopen en het niet
beklemd kan raken, met name bij stekkers, stopcontacten en het punt waar het
snoer uit dit apparaat komt.
• Haal de stekker van dit apparaat uit het stopcontact bij onweer of wanneer het
apparaat gedurende een langere periode niet wordt gebruikt.
• Als de stekker van het apparaat of een stopcontact op een apparaat wordt
gebruikt als stroomonderbreker, dient deze stroomonderbreker eenvoudig
bereikbaar en bedienbaar te blijven.
• Zorg er voordat u aansluitingen maakt of wijzigt voor dat alle apparaten zijn
losgekoppeld van het lichtnet.
• Raak het netsnoer en de voedingsaansluiting nooit met natte handen aan.
Gehoorbescherming
• Luister niet gedurende langere perioden op een hoog volume om
gehoorbeschadiging te voorkomen. Stel het volume in op een veilig niveau.
Opladen
• Dit product wordt geleverd met een oplader van het type DST451-150300W-K
met een uitgangsspanning/-stroom van USB-C 5 V/2 A. De oplader moet in de
buurt van de apparatuur worden geïnstalleerd en eenvoudig bereikbaar zijn.
• Deze oplader is alleen geschikt voor gebruik binnenshuis.
• Plaats dit apparaat tijdens het opladen in een omgeving met een normale
kamertemperatuur (van 5 ° C tot 25 ° C) en goede ventilatie.
• Vanwege het gebruikte behuizingsmateriaal mag dit product alleen worden
aangesloten op opladers met USB 2.0 of hoger.
Batterij
• Vervang de ingebouwde batterij niet zelf. Neem contact op met een erkend
servicecentrum om de batterij te laten vervangen.
• De afstandsbediening bevat batterijen die kunnen worden ingeslikt. Houd de
afstandsbediening buiten het bereik van kinderen.
• Explosiegevaar! Houd batterijen uit de buurt van hitte, direct zonlicht of vuur.
Gooi batterijen nooit weg door ze te verbranden.
• Verwijder de batterijen als de afstandsbediening lange tijd niet is of wordt
gebruikt.
• Vervang de batterijen van de afstandsbediening alleen door batterijen van
hetzelfde of een soortgelijk type.
• Batterijen bevatten chemische stoen en moeten op de juiste manier worden
weggegooid.
• Laad dit apparaat regelmatig op. Berg dit apparaat niet op met een volledig lege
batterij.

NL
98
Reiniging
• Gebruik een zachte, pluisvrije doek. Gebruik nooit vloeibare, gasvormige of licht
ontvlambare reinigingsmiddelen om het apparaat te reinigen.
• Gebruik geen vloeibare reinigingsmiddelen om de lens te reinigen om te
voorkomen dat de coating op de lens beschadigd raakt.
• Veeg de oppervlakken voorzichtig schoon. Wees voorzichtig en zorg ervoor dat
u geen krassen maakt op het oppervlak.
• Gebruik lensreinigingspapier om de lens te reinigen.
Reparaties
• Voer zelf geen reparaties uit aan dit apparaat. Laat uw apparaat alleen repareren
door een erkend servicecentrum.
• Onjuist onderhoud kan leiden tot persoonlijk letsel of schade aan dit apparaat.
• Laat al het onderhoud over aan gekwaliceerd onderhoudspersoneel.
Let op
• Er wordt mogelijk gevaarlijke optische straling uitgezonden door dit apparaat.
• Kijk niet rechtstreeks in de lichtstraal. Het felle licht kan uw ogen beschadigen.
Disclaimer
• Zorg ervoor dat u de Nebula Astro op een vlak, hard oppervlak plaatst, zodat de
oogbeschermingsfunctie nauwkeuriger kan worden geactiveerd.
• Het afstandsbereik dat is ingesteld om de oogbeschermingsfunctie te activeren,
dient alleen ter referentie.
• Houd de lens schoon en vetvrij. Als u dit niet doet, kan dit de gevoeligheid van
de lens beïnvloeden.
• De oogbeschermingsfunctie is alleen bedoeld ter bescherming, voor gevallen
waarin uw kinderen de projector per ongeluk naar zich toe draaien. Draai de
projector NIET opzettelijk richting uw ogen.

NL
99
WAT ZIT ER IN DE DOOS?
Overzicht
1.
Vooraanzicht
4
TOF-bewegingssensor
• De sensor wordt geactiveerd wanneer de
oogbeschermingsfunctie is ingeschakeld
Lens
Ventilatie-uitgang/-ingang
Scherpstelknop

NL
100
2.
Achteraanzicht
HDMI
Astro
TYPE-C
2
3
Infraroodontvanger
USB-C-poort
• Aansluiten op voeding
HDMI
• Aansluiten op een afspeelapparaat via HDMI-uitgang
3.
Bovenaanzicht
5
4
3
2
Volume omhoog
• Druk om het volume te verhogen
Led-indicatielampje
Aan/uit-knop
• Houd 2 seconden ingedrukt om in/uit te schakelen
Volume omlaag
• Druk om het volume te verlagen
Knop
• Druk om te schakelen tussen de Bluetooth-luidsprekermodus en de
projectormodus

NL
101
4.
Onderaanzicht
Statiefaansluiting
5.
Afstandsbediening
In-/uitschakelen
Overschakelen naar HDMI-aansluiting
Muismodus
Navigatie
Geselecteerde inhoud bevestigen
Start
Terug
Meer opties weergeven
Volume omhoog / omlaag

NL
102
6.
Led-indicatielampje
Led-status Beschrijving
'Ademend' oranje Oogbeschermingsfunctie is ingeschakeld
Brandt rood Opladen
Brandt groen Batterij volledig opgeladen
Knippert rood Batterij bijna leeg (< 20%)/fout opgetreden
Brandt blauw
Ingeschakeld in projector- of Bluetooth-
luidsprekermodus
Brandt oranje Stand-by in projectormodus
Knippert blauw
Klaar om te koppelen/Bluetooth-verbinding verbroken
(Bluetooth-luidsprekermodus)
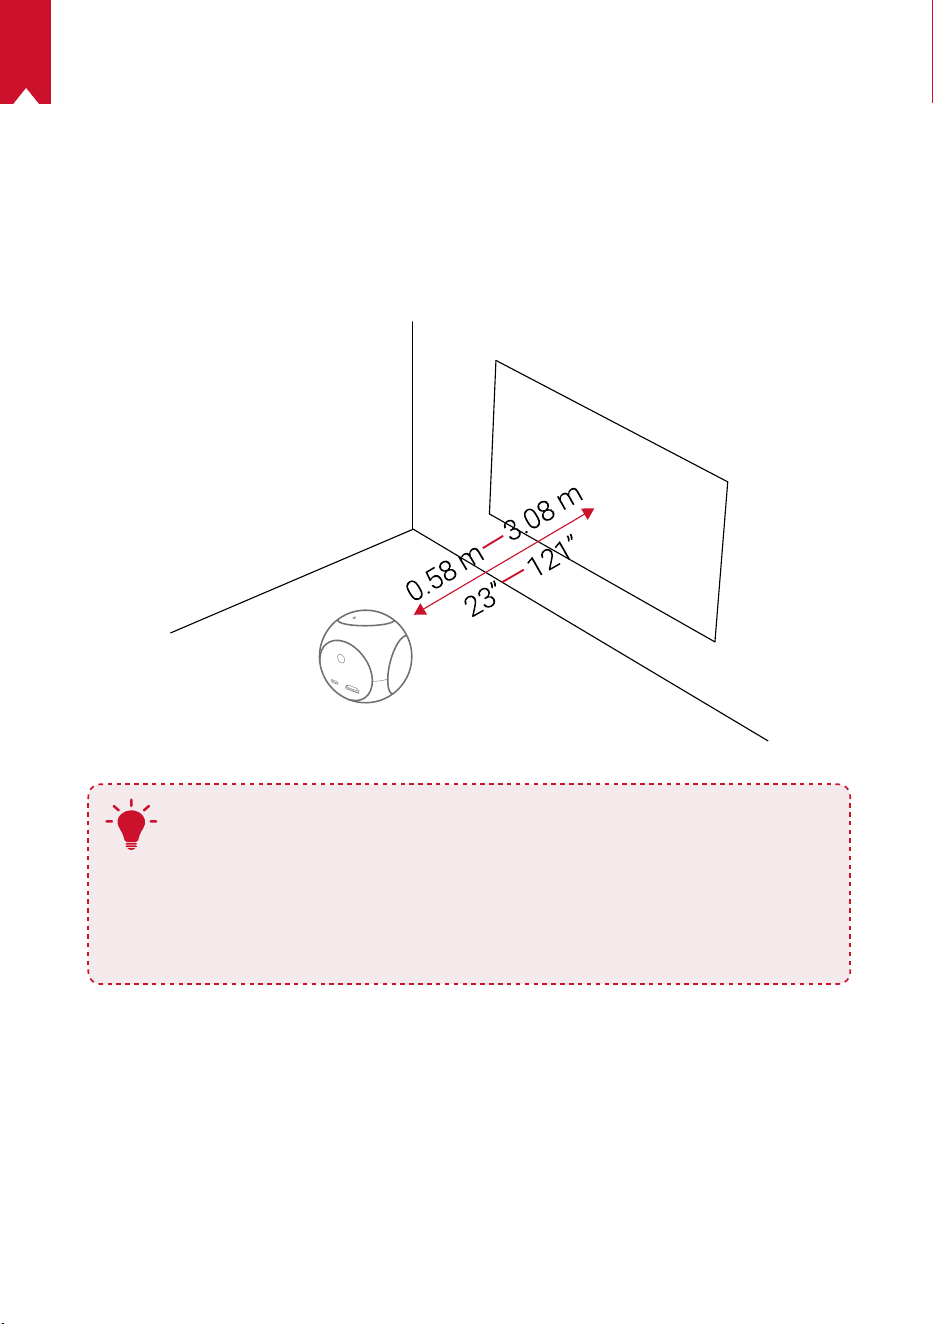
NL
103
AAN DE SLAG
1.
Plaatsing
Plaats de Nebula Astro op een stabiel, vlak oppervlak voor het projectieoppervlak.
Voor de beste resultaten moet het projectieoppervlak wit en vlak zijn. De afstand
tussen de Nebula Astro en het projectieoppervlak moet minimaal 0,58 meter en
maximaal 3,08 meter bedragen voor een projectiebeeld van 20 tot 100 inch.
T
• Het is niet nodig om de Nebula Astro naar het projectieoppervlak
te kantelen. U kunt het projectiebeeld corrigeren met de
ingebouwde trapeziumcorrectie.
• De afstand tussen de Nebula Astro en het projectieoppervlak
bepaalt de grootte van het projectiebeeld. Voor het beste resultaat
plaatst u het apparaat op een afstand van 1 tot 2 meter van het
projectieoppervlak.
2.
De afstandsbediening voorbereiden
De afstandsbediening wordt geleverd met twee AAA-batterijen.
① Schuif omlaag om het batterijvak te openen.
② Schuif om het batterijvak te openen en de batterijen te vervangen, plaats nieuwe
batterijen (plaats de batterijen in de juiste richting (+/-) zoals aangegeven in het
vak) en sluit het batterijvak.

NL
104
3.
Aan de slag
① Laad de ingebouwde batterij vóór het eerste gebruik volledig op met de
meegeleverde kabel en adapter.
② Houd op de projector 2 seconden ingedrukt om de projector in te schakelen.
③ Draai het apparaat naar een geschikt projectieoppervlak of een geschikte muur.
④ Draai aan de knop om de projector scherp te stellen.
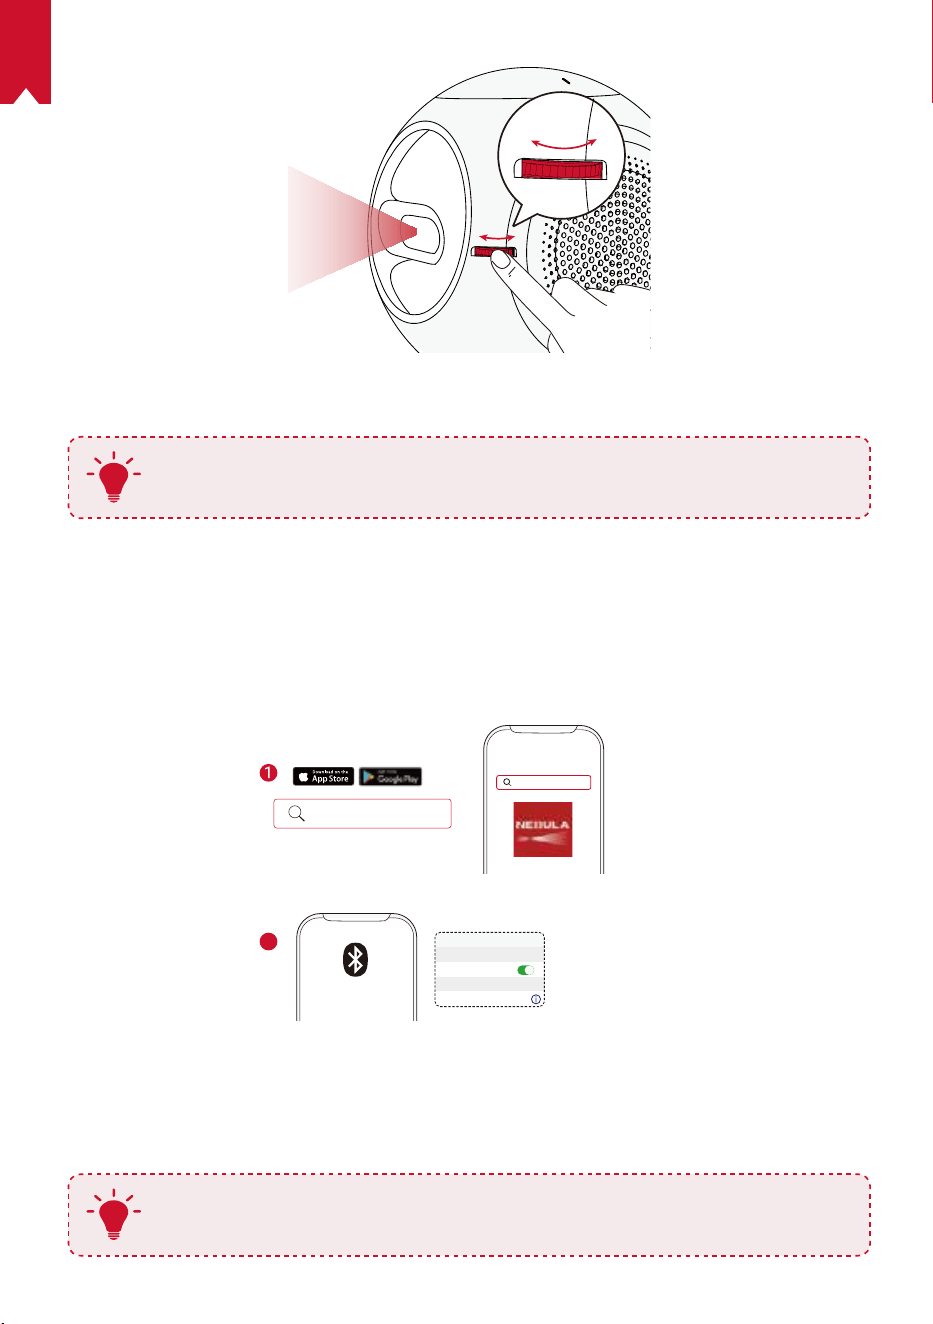
NL
105
⑤ Volg bij het eerste gebruik de instructies op het scherm om de basisinstellingen te
voltooien.
T
Gebruik alleen de meegeleverde adapter om uw Nebula Astro zo snel en
zo veilig mogelijk op te laden.
De Nebula Connect-app
We raden aan de Nebula Connect-app te downloaden om de Nebula Astro eenvoudig
te bedienen. Met deze app kunt u uw muis bedienen via uw telefoonscherm.
① Download de Nebula Connect-app uit de App Store (iOS-apparaten) of Google
Play (Android-apparaten).
Nebula Connect
< Settings Bluetooth
Nebula-xxxxxx
Bluetooth
Connected
DEVICE
Nebula Connect
2
② Schakel Bluetooth in op uw smartphone.
③ Open de Nebula Connect-app en selecteer [Nebula-XXXXXX] als het apparaat
om verbinding mee te maken.
④ Volg de instructies op het scherm om het instellen van de verbinding te voltooien.
T
Voor een optimale gebruikservaring raden we aan de Nebula Connect-
app te gebruiken in plaats van de afstandsbediening.

NL
106
Instellingen
Doorloop het instelproces wanneer u de Nebula Astro voor het eerst inschakelt.
Bepaal het afstandsbereik voor de activering van de oogbeschermingsfunctie en stel
uw naam, geboortedatum en wachtwoord in.
1.
Netwerk
Deze projector kan via een draadloze (wi-)verbinding worden verbonden met het internet.
① Selecteer
om de pagina Instellingen te openen. Selecteer [Netwerk] en druk
op
.
② Volg de instructies op het scherm om het instellen van de netwerkverbinding te voltooien.
2.
Bluetooth
Bluetooth-luidsprekermodus
U kunt deze projector gebruiken als standalone Bluetooth-luidspreker.
① Druk op om over te schakelen naar de Bluetooth-luidsprekermodus.
② Schakel Bluetooth in op uw smartphone en selecteer [Nebula-XXXXXX] als het
apparaat om verbinding mee te maken.
< Settings Bluetooth
Nebula-xxxxxx
Bluetooth
Connected
DEVICE
2
1
Projectormodus
U kunt de Nebula Astro in de projectormodus verbinden met een Bluetooth-
luidspreker of hoofdtelefoon.
① Selecteer
in het startmenu om de pagina Instellingen te openen. Selecteer
[Bluetooth] en druk op
. Voer indien nodig het wachtwoord in.
② Volg de instructies op het scherm om het instellen van de Bluetooth-verbinding te
voltooien.
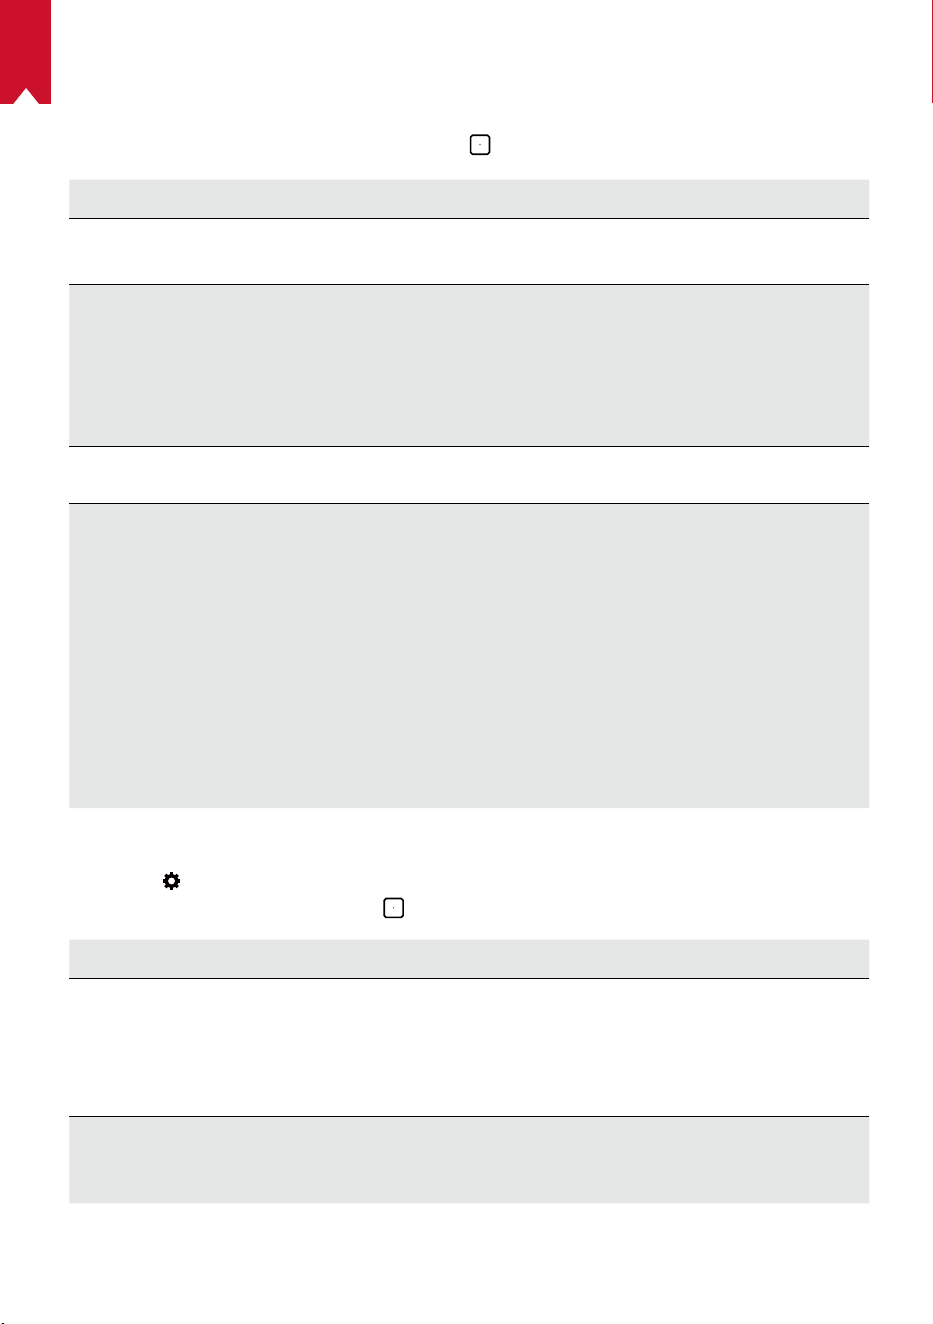
NL
107
3.
Projector
Selecteer het Instellingen-pictogram in het startmenu om de pagina Instellingen te
openen. Selecteer [Projector] en druk op
.
[Beeldmodus] [Auto] / [Standaardmodus] / [Batterijmodus]
[Oogcomfortmodus]
[Aan] / [Uit]
Schakel de oogcomfortmodus in of uit.
[Oogbeschermingste-
chnologie]
[Uit]: De oogbeschermingsfunctie is uitgeschakeld. De
functie is standaard uitgeschakeld.
[< 20cm] / [< 40cm] / [< 60cm]
: Wanneer de projector
is ingesteld op
< 20cm / < 40cm / < 60cm
, wordt de
oogbeschermingstechnologie ingeschakeld en wordt uw
projector binnen een bepaalde afstand uitgeschakeld.
[Automatische
trapeziumcorrectie]
Schakel automatische trapeziumcorrectie in of uit.
[Projectormodus]
[Projectie voorkant]: De projector bevindt zich voor het
projectieoppervlak.
[Projectie achterkant]: De projector bevindt zich achter
het projectieoppervlak.
[Omgekeerde projectie voorkant]: De projector hangt
ondersteboven aan het plafond. Het beeld wordt 180
graden gedraaid.
[Omgekeerde projectie achterkant]: De projector
hangt ondersteboven aan het plafond achter het
projectieoppervlak. Het beeld wordt 180 graden
gedraaid en horizontaal gespiegeld.
4.
Ouderlijk toezicht
Selecteer
in het startmenu om de pagina Instellingen te openen. Selecteer
[Ouderlijk toezicht] en druk op
.
[Instellingenwachtwoord] [[Aan] / [Uit]
[Wachtwoord wijzigen]
Wanneer Instellingenwachtwoord op Aan is ingesteld, is
Wachtwoord wijzigen ingeschakeld. U kunt deze optie
gebruik om uw wachtwoord te wijzigen en te resetten.
De mastercode is standaard nebula+serienummer.
[Tijdslimiet]
Stel de tijdslimiet of tijdsduur in waarop uw kind dagelijks
gebruik mag maken van de projector.

NL
108
1.
App-controle
In de kindermodus kunt u App-controle gebruiken om apps op het startscherm weer
te geven, te verbergen of in de gewenste volgorde te sorteren.
① Selecteer
in het startmenu om de pagina Instellingen te openen. Selecteer
[App-controle] en druk op
.
② Houd
ingedrukt om de geselecteerde app te verplaatsen.
2.
App-beheer
① Selecteer
in het startmenu om de pagina Instellingen te openen. Selecteer
[App-beheer] en druk op
.
② Selecteer een app om de huidige versie te controleren, de app te openen of
geforceerd te stoppen, de gebruikte opslagruimte te controleren of de gegevens te
wissen of de app te verwijderen.
3.
Overige
Selecteer
in het startmenu voor meer instellingsopties.
[Algemeen]
[Taal]
Selecteer een schermtaal.
[Toetsenbloktoon]
Schakel de toetsenbloktoon in of uit.
[Automatisch slaapinterval]
5 min / 15 min / 30 min
[Achtergrond]
Selecteer een achtergrond.
[Cache wissen]
Wis de gegevens die in de cache van de projector zijn
opgeslagen.
[Synchrone weergave]
Activeer synchrone weergave.
[Datum en tijd]
[Automatische datum en
tijd]
Schakel automatische datum en tijd in of uit.
[Tijdzone selecteren]
Selecteer de tijdzone.
[24-uursnotatie gebruiken]
Selecteer 24- of 12-uursnotatie.
[Bijwerken]
[Controleren op updates]
Controleer of de nieuwste versie van de rmware
wordt gebruikt. Volg de instructies op het scherm om
de rmwareversie bij te werken.
[Over]
[Herstel]
Alle gegevens op de ingebouwde opslag worden
gewist.
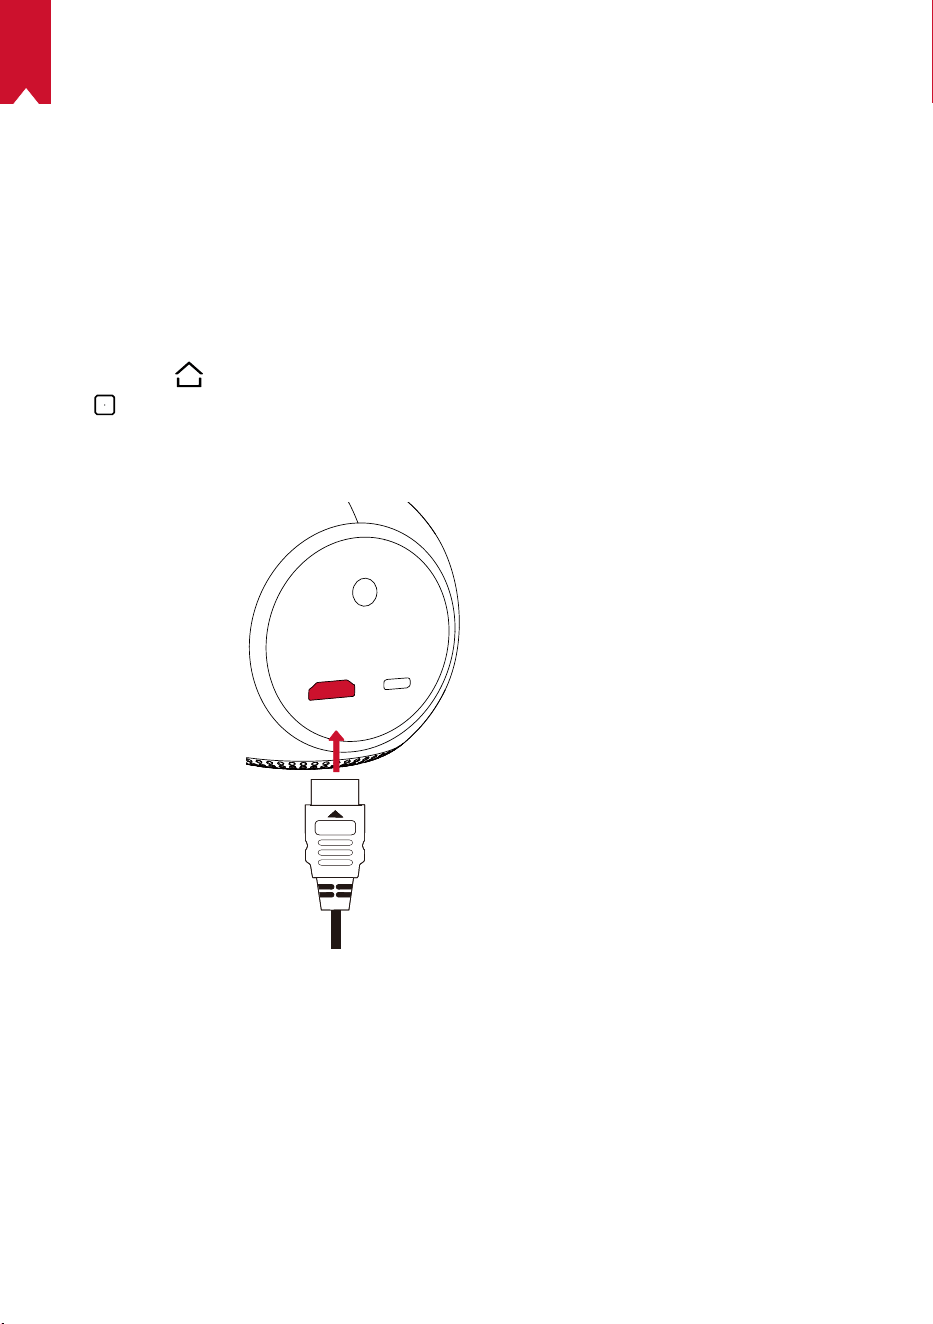
NL
109
De Nebula Astro gebruiken
1.
Afspelen vanaf HDMI-afspeelapparaten
De Nebula Astro kan worden aangesloten op verschillende HDMI-afspeelapparaten,
waaronder tv-boxes, tv-sticks, dvd-spelers, set-top boxes (STB's), gameconsoles en
andere apparaten.
Inhoud afspelen vanaf HDMI-afspeelapparaten:
① Sluit de Nebula Astro aan op een HDMI-afspeelapparaat met een HDMI-kabel (niet
meegeleverd).
② Druk op
om het startmenu te openen, selecteer vervolgens [HDMI] en druk op
.
• De Nebula Astro start het afspelen via HDMI automatisch zodra deze voor de
eerste keer is aangesloten op een HDMI-afspeelapparaat.
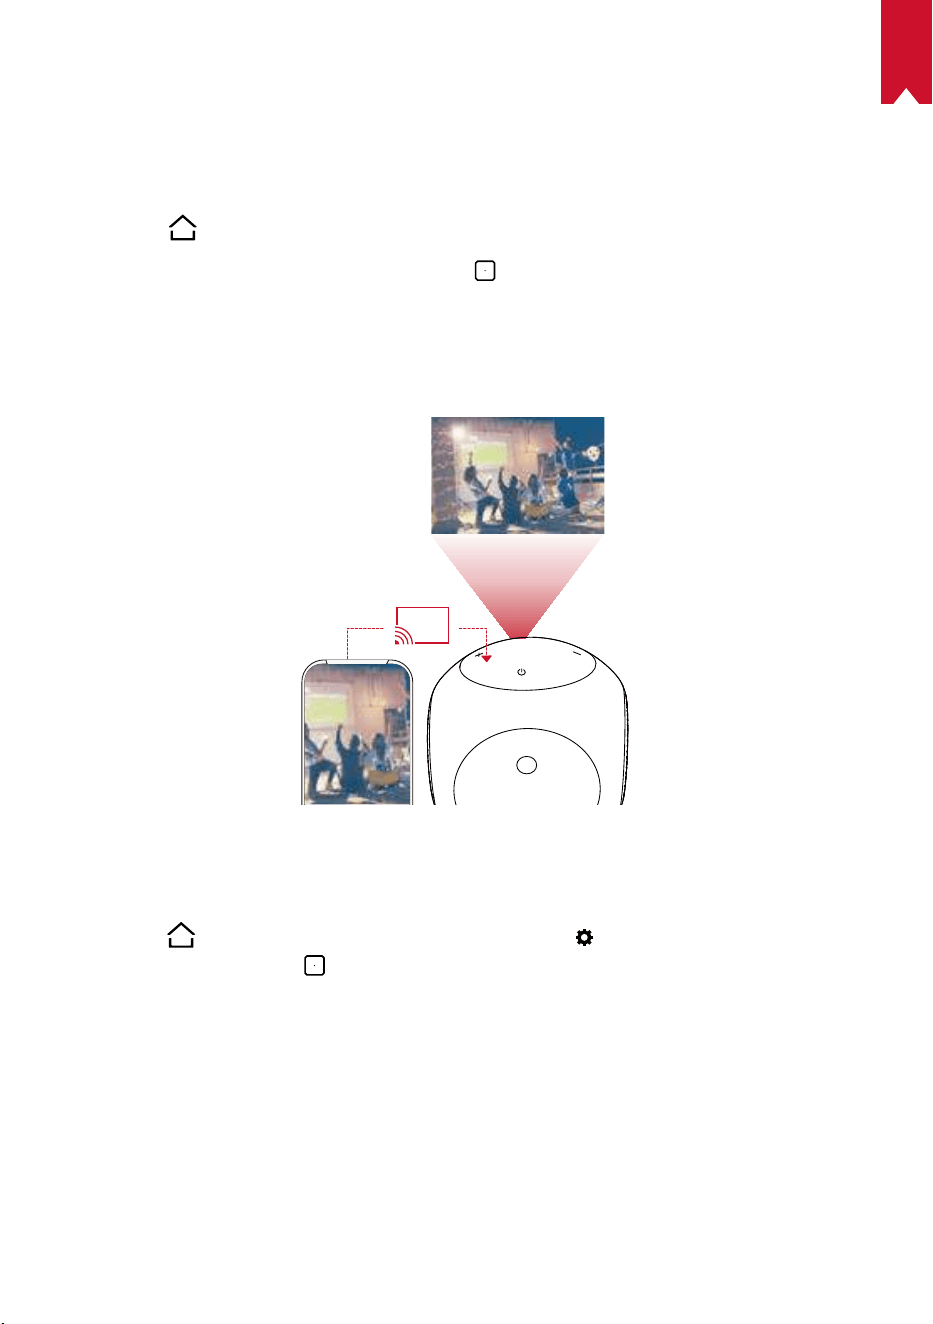
NL
110
2.
Apps installeren
Zodra de Nebula Astro is verbonden met een draadloos netwerk, hebt u toegang
tot online services, kunt u genieten van films, muziek en afbeeldingen en kunt u
online browsen. Naast de vooraf geïnstalleerde apps, kunt u ook aanvullende apps
installeren vanuit de Nebula App Store.
① Druk op
om het startmenu te openen.
② Selecteer een internetservice en druk op
.
3.
Synchrone weergave
U kunt het scherm van uw smartphone of tablet draadloos op het projectieoppervlak
casten.
VoorAndroid-gebruikers:
Synchrone weergave gebruiken:
① Druk op
om het startmenu te openen, selecteer
> [Algemeen] > [Synchrone
weergave] en druk op
.
② Volg de instructies op het scherm om het proces te voltooien.
• De Nebula Astro projecteert het scherm van uw smartphone of tablet.
VooriOS-gebruikers:
① Open het bedieningspaneel.
• Op iPhone X of hoger of iPad met iOS 12 of hoger: Veeg vanaf de
rechterbovenhoek van het scherm omlaag.
• Op iPhone 8 of eerder of iOS 11 of eerder: Veeg vanaf de onderrand van het
scherm omhoog.
NL
111
② Tik op Synchrone weergave.
③ Selecteer Nebula-xxxxxx uit de lijst. De Nebula Astro projecteert het scherm van
uw iPhone of iPad.
T
• Zorg ervoor dat de Nebula Astro en uw telefoon zijn verbonden met
hetzelfde netwerk.
• Bepaalde inhoud kan vanwege auteursrechtbeperkingen niet naar
de Nebula Astro worden gecast. Als dit het geval is, kunt u deze inhoud
streamen door dezelfde app op uw Nebula Astro te installeren.
NL
112
Specicaties
Specificaties en ontwerp kunnen zonder voorafgaande kennisgeving
worden gewijzigd.
Voeding: 5 V
2 A gelijkstroom
Energieverbruik: < 10 W
Energieverbruik in stand-bymodus: < 0,5 W
Weergavetechnologie: 0,2 in 854 x 480p DLP
Lichtbron: RGB-led
Grootte projectiebeeld: 20-100 in
Resolutie: 854 x 480p
Helderheid: 100 ANSI-lumen
Contrastverhouding: 400:1
Projectieverhouding: 1,3
Projectieafstand: 0,58 m tot 3,08 m
CPU: Quadcore A7
OS: Android 7.1
RAM: 1 GB DDR
ROM: 8 GB eMMC
Luidsprekerdrivers: 6 W
Wi: IEEE802.11a/b/g/n dubbele frequentie 2,4 G/5 G
Bluetooth-versie: 4.2
USB-bestandssysteem: FAT32
Type van ingebouwde batterij: Li-polymeer
Capaciteit: 3250 mAh 3,63 V
Afspeeltijd lms: ongeveer 2,5 uur in batterijmodus
Afspeeltijd muziek: ongeveer 14 uur in Bluetooth-luidsprekermodus
Batterijen van de afstandsbediening:
AAA
x 2
Aanbevolen omgevingstemperatuur: 5 ° C tot 35 ° C
Relatieve vochtigheid: 15% ~ 85% (niet-condenserend)
Opslagtemperatuur en vochtigheid: < 65 ° C, < 90% vochtigheid
Afmetingen (H × L × B): 91,2 x 82 x 89,2 mm
Gewicht: 370 g

NL
113
Problemen oplossen
① Kan de projector niet worden ingeschakeld met de afstandsbediening?
• Houd
op de projector 2 seconden ingedrukt om de projector in te schakelen.
• Als de projector is uitgeschakeld, kunt u de afstandsbediening niet gebruiken
om de projector in te schakelen.
② Werkt de afstandsbediening niet?
• Zorg ervoor dat de batterijen al in de afstandsbediening zijn geplaatst.
• Vervang de batterijen.
③ Hebt u last van wazig beeld?
• Draai aan de scherpstelknop.
④ Kunt u geen verbinding maken met een wi-netwerk?
• Vernieuw de lijst met beschikbare netwerken en probeer het opnieuw.
• Start de draadloze router of de projector opnieuw op en probeer het opnieuw.
⑤ Hoe kan ik de rmware bijwerken?
• Wanneer er een nieuwe versie wordt gedetecteerd, wordt u gevraagd het
apparaat opnieuw op te starten en de rmware bij te werken.

114
PT
Índice
Instruções de segurança 115
Está incluído 118
Descrição geral 118
Começar 122
Aplicação Nebula Connect 124
Denições 125
Utilizar o Nebula Astro 128
Especicações 131
Resoluções de problemas 132

115
PT
Instruções de segurança
Leia todas as instruções antes de usar este dispositivo. Não faça alterações e não crie
congurações que não estejam descritas neste manual. Se ocorrerem lesões físicas,
perda de dados ou danos devido ao incumprimento das instruções, a garantia não
será aplicável.
Conguração
•
Para reduzir o risco de incêndio e/ou choque elétrico, não exponha o dispositivo à chuva
ou a humidade. Não coloque objetos que contenham líquidos (tais como vasos) neste
dispositivo.
•
Não coloque este dispositivo em superfícies macias (tais como toalhas de mesa
ou tapetes), caso contrário o dispositivo poderá comportar um risco de incêndio.
•
Não coloque este dispositivo em áreas onde possa haver um excesso de poeira
e/ou sujidade, ou próximo de qualquer aparelho que esteja a gerar um campo
magnético forte.
•
Para evitar o sobreaquecimento, não bloqueie ou obstrua as aberturas de
ventilação.
•
Nunca coloque este dispositivo num espaço connado. Deixe sempre espaço
suciente ao redor deste dispositivo para a ventilação.
•
Evite a exposição excessiva deste dispositivo à luz solar direta, a calor, a
flutuações de temperatura extremas e a humidade. Evite temperaturas extremas.
A temperatura de funcionamento e de armazenamento adequada para este
dispositivo e os seus acessórios é entre 5°C e 35°C.
•
Quando este dispositivo permanece em funcionamento por um longo período
de tempo, a superfície pode car quente. Caso ocorra, encerre imediatamente
o dispositivo e desligue o carregador. Retome a operação após o dispositivo ter
arrefecido.
•
Manuseie este dispositivo sempre com cuidado. Evite tocar na lente.
•
Não permita que crianças manuseiem o dispositivo sem supervisão.
•
Não coloque objetos pesados ou aguçados em cima deste dispositivo.
•
Para evitar choque elétrico, não desmonte o dispositivo.
•
Utilize unicamente periféricos ou acessórios especicados pelo fabricante.
•
Evite vibrações extremas, pois estas podem danicar os componentes internos.
Fonte de alimentação
•
Utilize apenas o transformador fornecido.
•
Desligue o dispositivo antes de retirar a fonte de alimentação da tomada.
•
Proteja o cabo de alimentação para não ser pisado ou entalado, particularmente
na zona das chas, tomadas e no ponto onde o cabo sai deste dispositivo.

116
PT
•
Desligue este dispositivo durante a ocorrência de trovoadas ou quando não for
utilizado durante um período prolongado.
•
Quando for utilizada uma cha elétrica ou um acoplador para o aparelho como
dispositivo desligado, este deve permanecer sempre operacional.
•
Antes de efetuar ou alterar quaisquer ligações, certique-se de que todos os
dispositivos estão desligados da tomada elétrica.
•
Nunca toque no cabo de alimentação ou no conetor de alimentação com as mãos
molhadas.
Segurança auditiva
•
Para evitar lesões auditivas, não ouça durante longos períodos de tempo com o
volume alto. Coloque o volume a um nível seguro.
Carregamento
•
O tipo de carregador é DST451-150300W-K com saída de tensão/corrente de
5V/2A USB-C. O carregador deve ser instalado perto deste produto e deve ser de
fácil acesso.
•
Este carregador é somente para uso interno.
•
Durante o carregamento, coloque este dispositivo num ambiente com uma
temperatura ambiente normal (intervalo entre 5°C e 25°C) e boa ventilação.
•
Deviso ao material do invólucro, este dispositivo deve ser apenas ligado a um USB
2.0 ou superior.
Bateria
•
Não substitua a bateria incorporada por conta própria. Entre em contacto com um
centro de assistência autorizado para a substituir.
•
O telecomando contém pilhas que podem ser ingeridas. Mantenha o telecomando
fora do alcance das crianças.
•
Risco de explosão! Mantenha as pilhas longe de calor, da luz solar direta e de
chamas. Nunca elimine as baterias com fogo.
•
Remova as pilhas quando o telecomando não tiver sido utilizado durante um
período prolongado.
•
Substitua as pilhas do telecomando apenas pelo mesmo tipo ou equivalente.
•
As pilhas contêm substâncias químicas e devem ser eliminadas de forma
adequada.
•
Carregue este dispositivo regularmente. Não armazene este dispositivo com uma
bateria completamente descarregada.
Limpeza
•
Utilize um pano macio que não largue apos. Nunca utilize produtos de limpeza
líquidos, gasosos ou facilmente inflamáveis para limpar.

117
PT
•
Não use agentes de limpeza líquidos para limpar a lente, para evitar danicar a
película de revestimento da própria.
•
Limpe cuidadosamente as superfícies. Tenha cuidado para não riscar a superfície.
•
Use papel de limpeza de lentes para limpar a lente.
Reparações
•
Não faça reparações neste dispositivo por conta própria. O dispositivo só deve ser
reparado num centro de assistência autorizado.
•
Uma manutenção inadequada poderá resultar em lesões pessoais ou danos ao
dispositivo.
•
Se necessitar de assistência, consulte um técnico especializado.
Atenção
•
Radiação ótica possivelmente perigosa emitida pelo dispositivo.
•
Não olhe diretamente para o feixe em funcionamento. A luz brilhante pode causar
lesões nos olhos.
Isenção de responsabilidade
•
Certique-se de que coloca o Nebula Astro numa superfície lisa, dura, que permita
a ativação mais precisa da função Eye Guard.
•
O alcance denido para ativar a função Eye Guard serve apenas como referência.
•
Mantenha a lente limpa e livre de gorduras, ou poderá afetar a sensibilidade da
lente.
•
A função Eye Guard é designada apenas para proteção em caso de o projetor ser
virado acidentalmente por crianças para elas mesmas. NÃO vire intencionalmente
o projetor para os seus olhos.
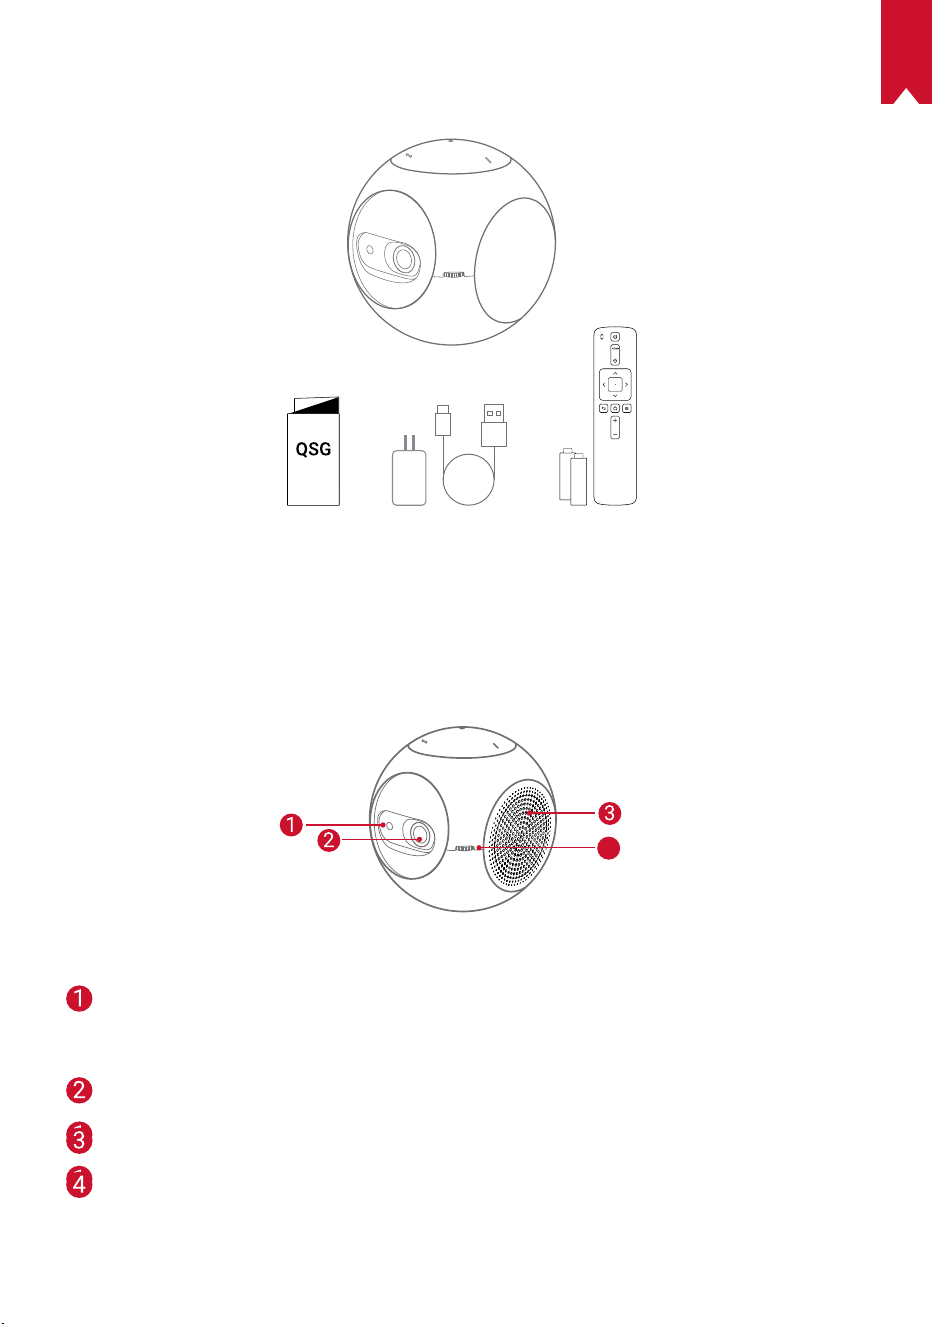
118
PT
ESTÁ INCLUÍDO
Descrição geral
1.
Vista frontal
4
sensor de movimento TOF
• O sensor será ativado quando a função
Eye Guard é ativada
Lente
saída/entrada de ventilação
botão de ajuste da focagem

119
PT
2.
Vista traseira
HDMI
Astro
TYPE-C
2
3
Recetor de infravermelhos
Porta USB-C
• Ligue a fonte de alimentação
HDMI
• Ligue um dispositivo de reprodução através da saída de HDMI
3.
Vista superior
5
4
3
2
Aumentar volume
• Prima para aumentar o volume
Indicador LED
Botão para ligar/desligar
• Prima continuamente durante 2 segundos para ligar/desligar
Diminuir volume
• Prima para diminuir o volume
Botão
• Prima para alternar entre o modo de altifalante Bluetooth e o modo de projetor

120
PT
4.
Vista inferior
cha para tripé
5.
Controlo remoto
Ligar/desligar
Mudar para a ligação HDMI
Modo de rato
Navegação
Conrmar o conteúdo selecionado
Página inicial
Voltar
Ver mais opções
Aumentar/Diminuir volume

121
PT
6.
Indicador LED
Estado do LED Descrição
Laranja intermitente A função Eye Guard está ativada
Vermelho sólido A carregar
Verde sólido Totalmente carregado
Vermelho intermitente Bateria fraca (<20%)/ocorrência de erro
Azul sólido
Ligado no modo de projetor ou no modo de altifalante
Bluetooth
Laranja sólido Em espera no modo de projetor
azul intermitente
Pronto a emparelhar/Bluetooth desligado (modo de
altifalante Bluetooth)

122
PT
COMEÇAR
1.
Localização
Coloque o Nebula Astro numa superfície estável e lisa em frente à superfície de
projeção. Para obter os melhores resultados, a superfície de projeção deve ser branca
e lisa. A distância entre o Nebula Astro e a superfície de projeção deve ter um mínimo
de 0,58 metros e um máximo de 3,08 metros para obter uma imagem entre 20 e 100
polegadas.
T
•
Não é necessário inclinar o Nebula Astro na direção da superfície
de projeção. Pode corrigir a imagem de projeção com a correção
trapezoidal integrada.
•
A distância entre o Nebula Astro e a superfície de projeção
determina o tamanho da imagem da projeção. Para obter o melhor
resultado, coloque-o entre 1 e 2 metros de distância da superfície de
projeção.
2.
Preparar o Telecomando
O telecomando é fornecido com duas pilhas AAA.
①
Deslizar para baixo para abrir o compartimento das pilhas.
②
Para substituir as pilhas, deslizar para abrir o compartimento das pilhas,
inserir as novas pilhas (correspondendo a polaridade (+/-) indicada), e fechar o
compartimento das pilhas.
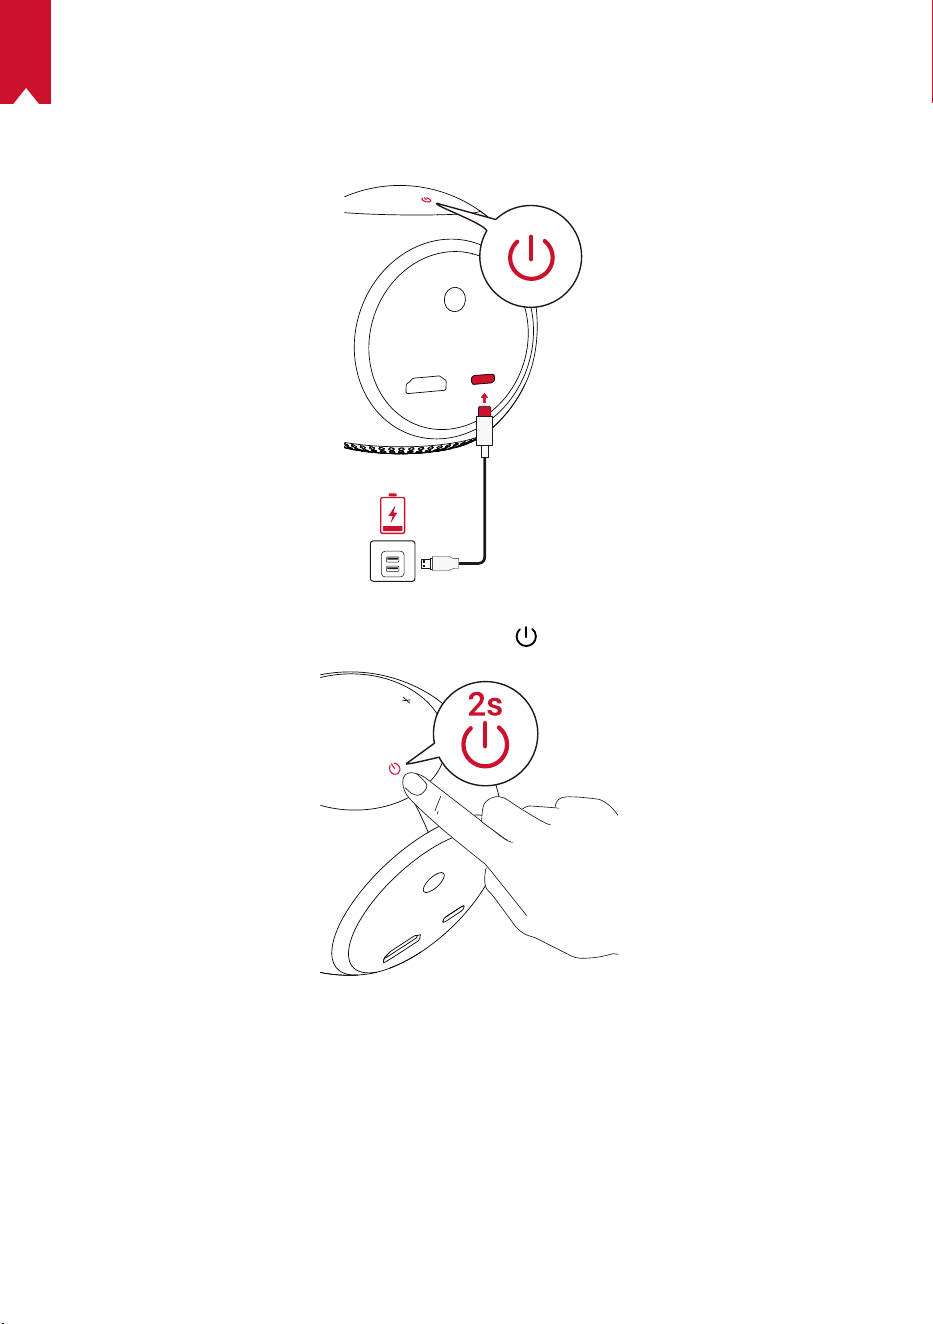
123
PT
3.
Começar
①
Na primeira utilização, carregar totalmente a bateria incorporada utilizando o cabo
e o adaptador fornecidos.
②
Manter premido durante 2 segundos o botão
no projetor para o ligar.
③
Virar o dispositivo para uma superfície de projeção adequada ou uma parede.
④
Rodar o botão para ajustar a focagem.
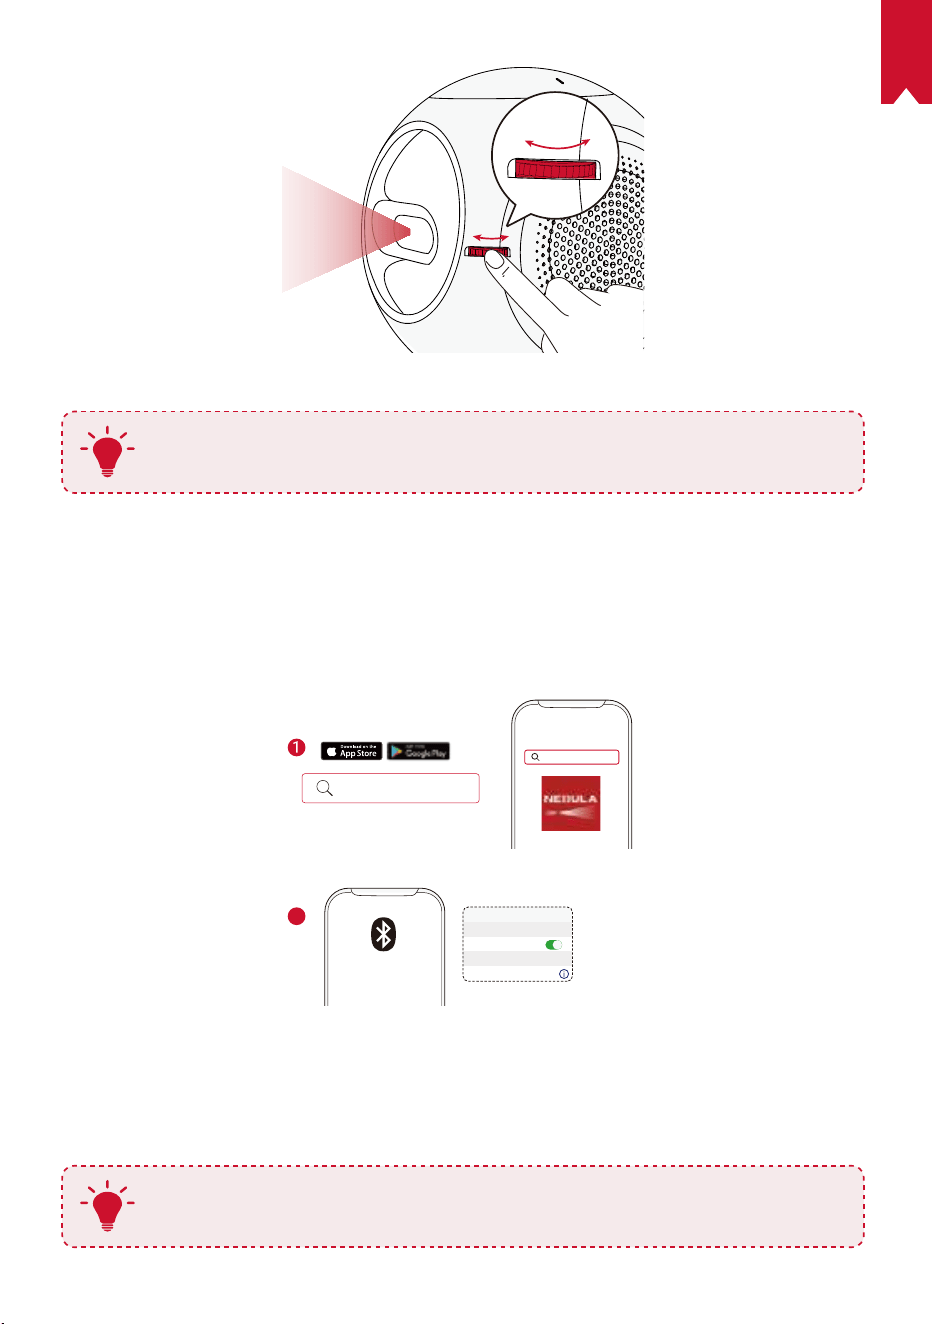
124
PT
⑤
Na primeira utilização, seguir as instruções no ecrã para concluir a conguração básica.
T
Para fornecer um carregamento mais rápido e mais seguro para o Nebula
Astro, apenas utilize o adaptador fornecido.
Aplicação Nebula Connect
Para controlar facilmente o Nebula Astro, recomendamos a transferência da aplicação
Nebula Connect. Com esta aplicação, pode operar o rato através do ecrã do telefone.
①
Transferir a aplicação Nebula Connect a partir da App Store (dispositivos iOS) ou da
Google Play (dispositivos Android).
Nebula Connect
< Settings Bluetooth
Nebula-xxxxxx
Bluetooth
Connected
DEVICE
Nebula Connect
2
②
Ativar o Bluetooth no seu smartphone.
③
Abrir a aplicação Nebula Connect e selecionar [Nebula-XXXXXX] como o
dispositivo a ligar.
④
Seguir as instruções no ecrã para concluir a conguração de ligação.
T
Para tornar a sua experiência mais agradável, recomendamos a utilização
da aplicação Nebula Connect em vez do telecomando.
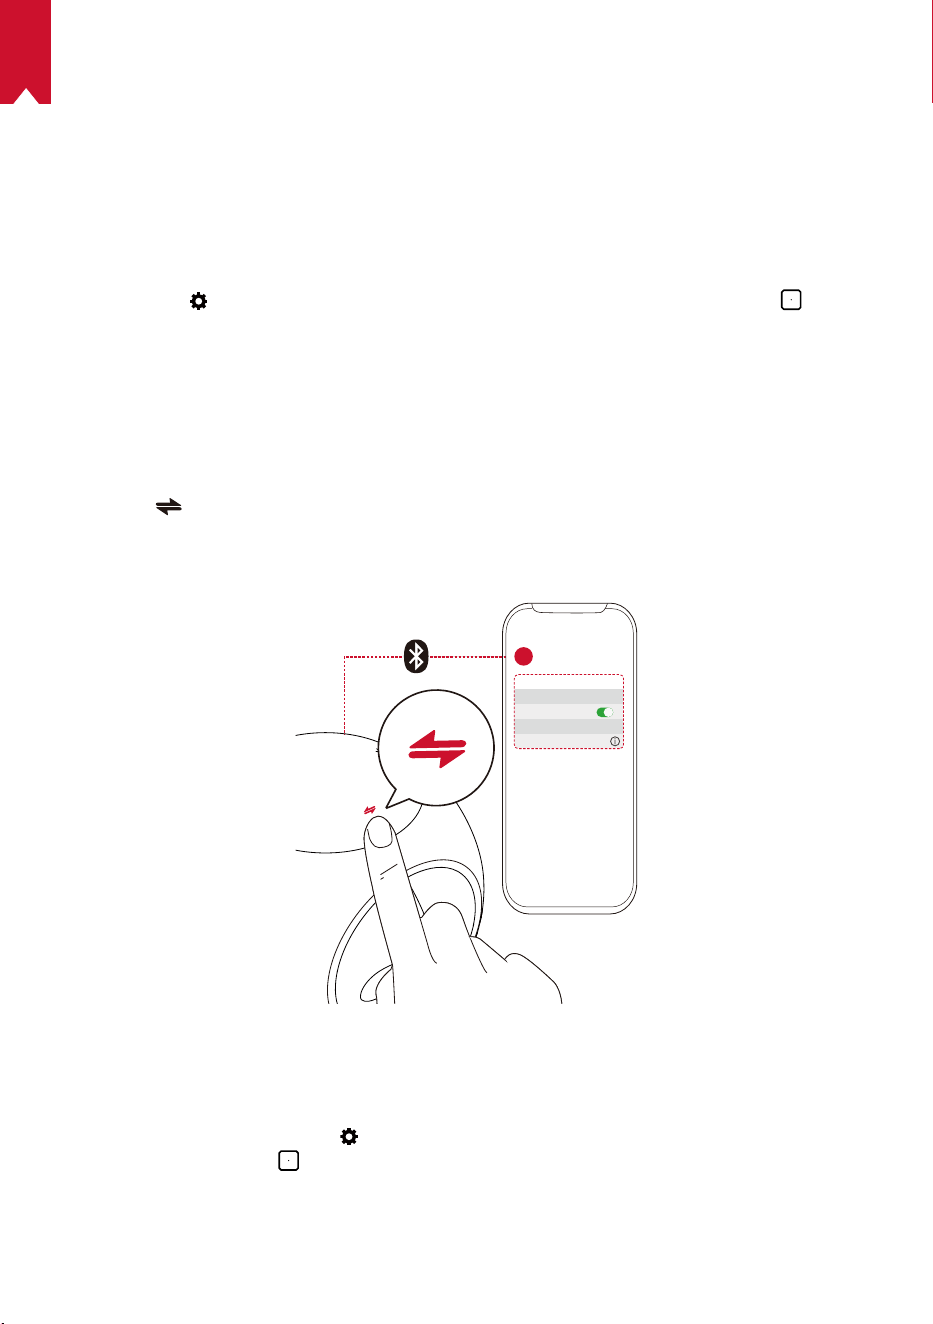
125
PT
Denições
Efetue o processo de conguração quando ligar o Nebula Astro pela primeira vez.
Determine a distância para ativação da função Eye Guard, dena o seu nome, data de
nascimento e palavra-passe.
1.
Rede
Este projetor pode ser ligado à Internet através de uma ligação sem os (Wi-Fi).
①
Selecione
para aceder à página de Denições. Selecione [Rede] e prima .
②
Siga as instruções apresentadas no ecrã para concluir a ligação à Internet.
2.
Bluetooth
Modo de altifalante Bluetooth
Pode utilizar este projetor como um altifalante Bluetooth independente.
①
Prima
para mudar para o modo de altifalante Bluetooth.
③ Ative o Bluetooth no se
u smartphone e selecione [Nebula-XXXXXX] como o
dispositivo a ligar.
< Settings Bluetooth
Nebula-xxxxxx
Bluetooth
Connected
DEVICE
2
1
Modo de projetor
Pode ligar um altifalante Bluetooth ou emparelhe uns auscultadores ao Nebula Astro
durante o modo de projetor.
①
No menu inicial, selecione
para aceder à página de Denições. Selecione
[Bluetooth] e prima . Se necessário, introduza a palavra-passe.
②
Siga as instruções apresentadas no ecrã para concluir a ligação ao Bluetooth.
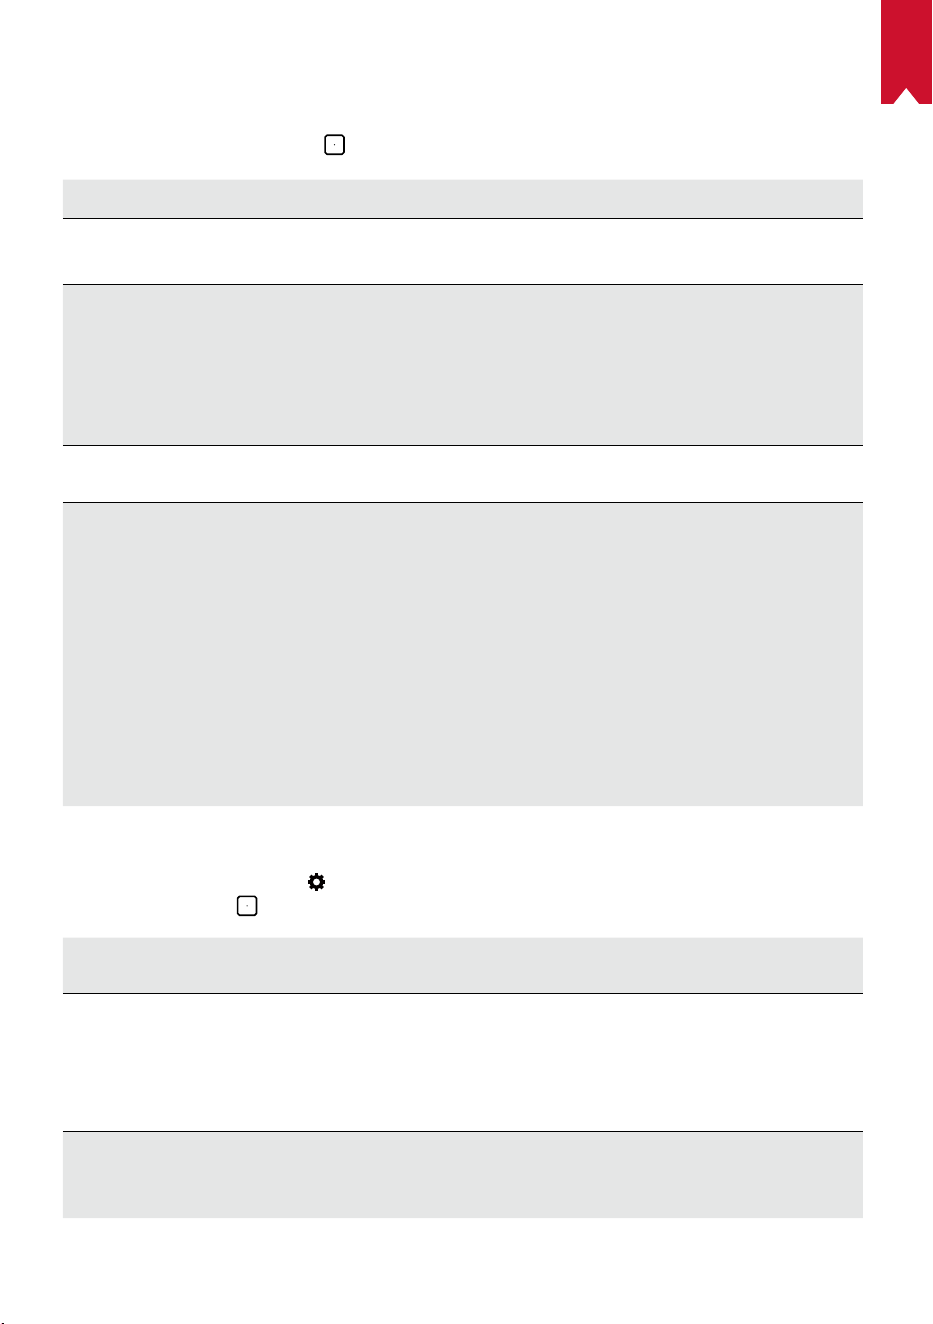
126
PT
1.
Projetor
No menu inicial, selecione o ícone das Denições para aceder à página de Denições.
Selecione [Projetor] e prima
.
[Modo de imagem] [Auto] / [Modo padrão] / [Modo de bateria]
[Modo de proteção ocular]
[Ligar] / [Desligar]
Ative ou desative o modo de proteção ocular.
[Tecnologia Eye Guard]
[Desligada]: A função Eye Guard está desativada. Está
denida como Desligada por predenição.
[< 20 cm] / [< 40 cm] / [< 60 cm]: Quando o projetor está
congurado para < 20 cm / < 40 cm / < 60 cm, a Tecnologia
Eye Guard será ativada e o projetor será desativado dentro
de uma determinada distância.
[Correção trapezóide
automática]
Ative/desative a correção trapezóide automática.
[Modo de projetor]
[Projeção frontal]: o projetor encontra-se em frente à
superfície de projeção.
[Projeção traseira]: o projetor encontra-se atrás da
superfície de projeção.
[Projeção frontal invertida]: o projetor encontra-se
pendurado no teto e numa posição invertida. A imagem é
rodada 180 graus.
[Projeção traseira invertida]: o projetor encontra-se
pendurado no teto, numa posição invertida e atrás da
superfície de projeção. A imagem é rodada 180 graus e
espelhada horizontalmente.
2.
Controlos parentais
No menu inicial, selecione para aceder à página de Denições. Selecione [Controlos
parentais] e prima .
[Palavra-passe das
Denições]
[[Ligar] / [Desligar]
[Alterar palavra-passe]
Quando a Palavra-passe das Denições está Ativada,
a função Alterar palavra-passe está ativada. A opção
permite que o utilizador altere e reponha a sua palavra-
passe. O código mestre é nebula+número de série por
defeito.
[Tempo limite]
Defina o tempo limite ou a duração do período diário em
que o seu lho tem autorização para aceder ao projetor.
127
PT
3.
Controlo de aplicações
O Controlo de aplicações permite-lhe mostrar, ocultar ou ordenar as aplicações numa
ordem pretendida no ecrã Inicial no modo de Criança.
①
No menu inicial, selecione
para aceder à página de Denições. Selecione [Controlo
de aplicações] e prima .
②
Prima continuamente o botão
para mudar o local da aplicação selecionada.
4.
Gestor de aplicações
①
No menu inicial, selecione
para aceder à página de Denições. Selecione [Gestor
de aplicações] e prima .
②
Selecione uma aplicação e verique a versão atual, abra ou force a paragem da
aplicação, verique o espaço de armazenamento utilizado ou limpe dados, ou
desinstale a aplicação.
5.
Outros
No menu inicial, selecione para ver mais opções de Denições.
[Geral]
[Idioma] Selecione um idioma de apresentação no ecrã.
[Som do teclado] Ligue/desligue o som do teclado.
[Intervalo da suspensão
automática]
5 min / 15 min / 30 min
[Imagem de fundo] Selecione uma imagem de fundo.
[Limpar a cache] Limpe a memória cache armazenada no projetor.
[Espelhamento do ecrã] Ative o espelhamento do ecrã.
[Data e Hora]
[Data e Hora automáticas] Ative/desative a data e hora automáticas.
[Selecionar o Fuso horário] Selecione o fuso horário.
[Utilizar o formato de 24
horas]
Selecione o formato de 24 horas ou de 12 horas.
[Atualizar]
[Procurar atualização]
Verique se tem a versão mais recente. Siga as
instruções apresentadas no ecrã para atualizar a versão
do rmware.
[Sobre]
[Recuperação]
Todos os dados no armazenamento incorporado serão
apagados.
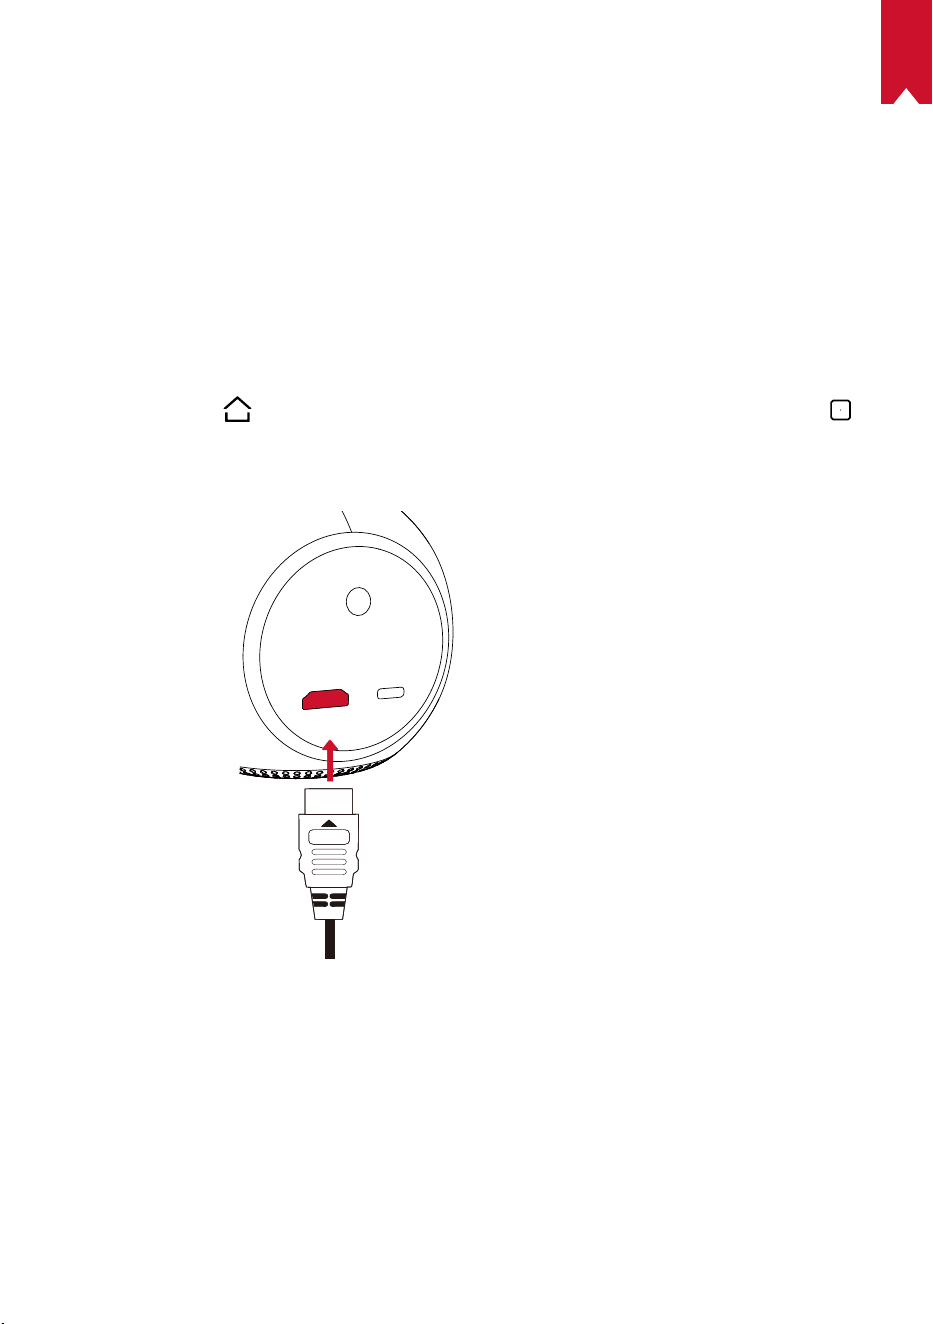
128
PT
Utilizar o Nebula Astro
1.
Reproduzir a partir de Dispositivos de reprodução por
HDMI
O Nebula Astro pode ser ligado a vários dispositivos de reprodução por HDMI como
uma TV Box, um Stick de TV, uma set-top box (STB), consolas de jogos ou outros
dispositivos.
Para reproduzir conteúdo a partir de dispositivos de reprodução HDMI:
①
Ligue o Nebula Astro a um dispositivo de reprodução por HDMI com um cabo HDMI
(não fornecido).
②
Prima o botão
para aceder ao menu inicial, selecione [HDMI], e prima o botão .
• A reprodução HDMI será iniciada automaticamente assim que for ligado um
dispositivo de reprodução por HDMI pela primeira vez.
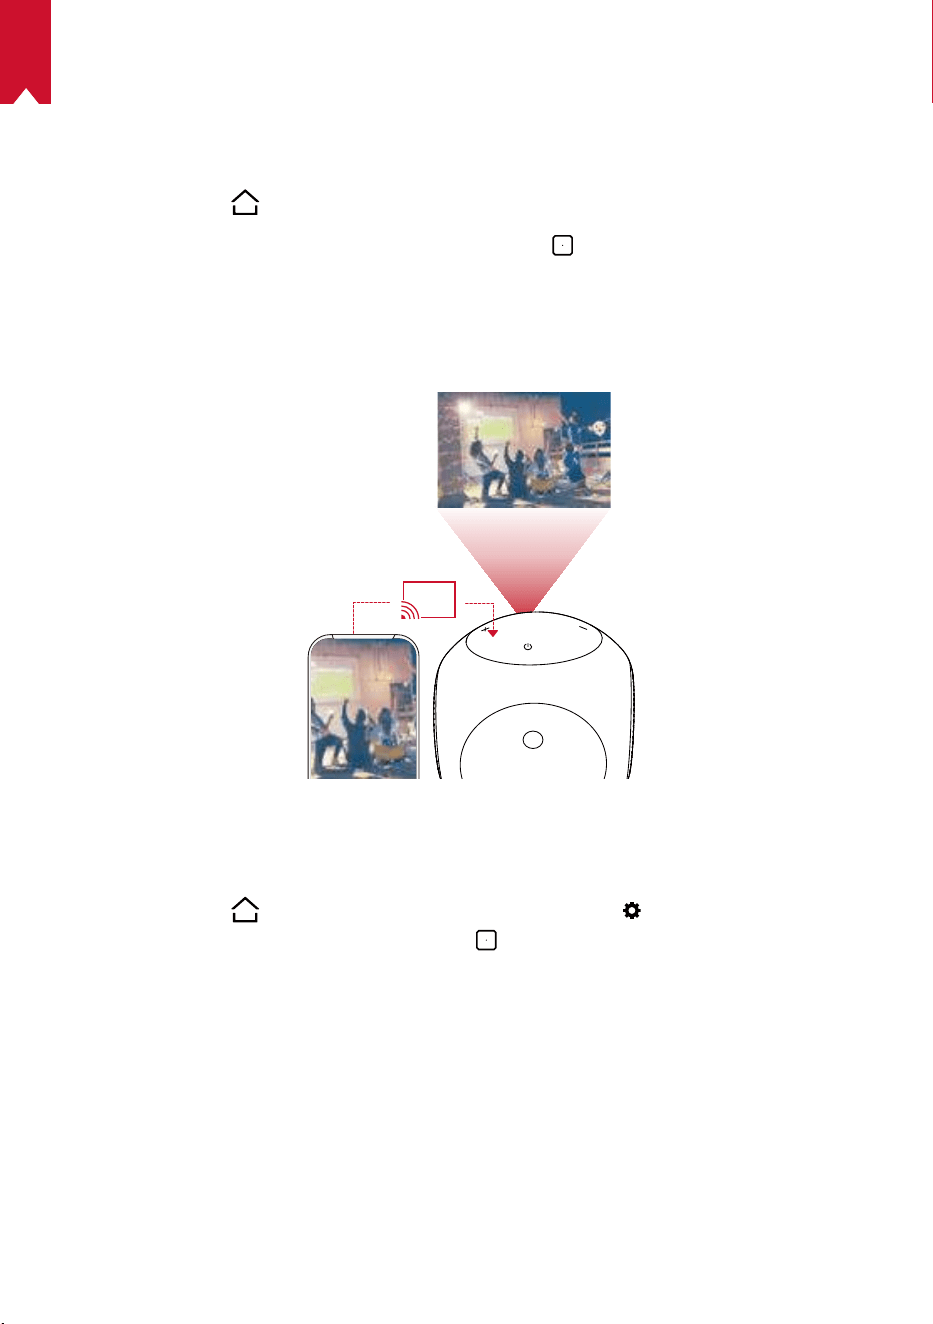
129
PT
2.
Instalar aplicações
Uma vez ligado a uma rede sem fios, pode aceder a serviços online, ver filmes e
imagens, ouvir músicas e navegar online. Para além das aplicações pré-instaladas,
também pode instalar outras aplicações a partir da loja de aplicações Nebula.
①
Prima o botão
para aceder ao menu inicial.
②
Selecione um serviço de Internet e prima o botão
.
3.
Espelhamento do ecrã
Pode projetar sem fios o ecrã do seu smartphone ou tablet para a superfície de
projeção.
Para os utilizadores de Android:
Para utilizar o espelhamento do ecrã:
①
Prima o botão
para aceder ao menu inicial, selecione > [Geral] >
[Espelhamento do ecrã], e prima o botão
.
②
Siga as instruções apresentadas no ecrã para concluir o processo.
• O Nebula Astro irá projetar o ecrã do seu smartphone ou tablet.
Para os utilizadores de iOS:
①
Abra a Central de controlo.
• No iPhone X ou mais recente ou o iPad com o iOS 12 ou mais recente: deslize
para baixo a partir do canto superior direito do ecrã.
• No iPhone 8 ou anterior ou com o iOS 11 ou anterior: deslize para baixo a partir da
margem inferior de qualquer ecrã.
130
PT
②
Toque em Projeção de ecrã.
③
Selecione Nebula-xxxxxx na lista. O Nebula Astro irá projetar o ecrã do seu iPhone
ou iPad.
T
• Certique-se de que o Nebula Astro e o seu telefone estão ligados à
mesma rede.
• Certo conteúdo não pode ser projetado no Nebula Astro devido a
restrições de direitos de autor. Neste caso, pode transmitir o conteúdo
através da mesma aplicação instalada no seu Nebula Astro.

131
PT
Especicações
As especificações e a conceção estão sujeitas a alteração sem aviso
prévio.
Alimentação: CC 5V
2A
Consumo de energia: < 10W
Consumo de energia no modo de espera: < 0,5W
Tecnologia do ecrã: 0,2 em 854 x 480p DLP
Fonte de luz: LED RGB
Tamanho da imagem de projeção: 20-100 in
Resolução: 854 x 480p
Luminosidade: 100 ANSI Lumens
Relação de contraste: 400:1
Relação de projeção: 1.3
Distância de projeção: 0,58 m a 3,08 m
CPU: Quad Core A7
Sistema operativo: Android 7.1
RAM: 1GB DDR
ROM: 8 GB eMMC
Drivers das colunas: 6W
Wi-Fi: IEEE802.11a/b/g/n 2,4G / 5G com Dupla Frequência
Versão do Bluetooth: 4.2
Sistema de cheiros USB: FAT32
Tipo de bateria incorporada: Polímero de lítio
Capacidade: 3250 mAh 3,63V
Tempo de reprodução de lmes: cerca de 2,5 horas no modo de bateria
Tempo de reprodução de música: cerca de 14 horas no modo de altifalante Bluetooth
Pilhas do telecomando: AAA x 2
Temperatura ambiente recomendada: 5°C a 35°C
Humidade relativa: 15% ~ 85% (sem condensação)
Temperatura de armazenamento e humidade: 65°C, < 90% de humidade
Dimensões (A × C × L): 91,2 x 82 x 89,2 mm
Peso: 370 g/13,1 oz

132
PT
Resolução de problemas
①
Não consegue ligar o projetor com o telecomando?
• Mantenha premido durante 2 segundos o botão
no projetor para o ligar.
• Se não estiver ligado, não conseguirá utilizar o telecomando para ligá-lo.
②
O telecomando não funciona?
• Certique-se de que as pilhas já se encontram instaladas no telecomando.
• Substitua as pilhas.
③
Imagem desfocada?
• Rode o botão de ajuste da focagem.
④
Não consegue estabelecer ligação a uma rede Wi-Fi?
• Atualize a lista de redes disponíveis e tente novamente.
• Reinicie o router sem os ou o projetor e tente novamente.
⑤
Como posso atualizar o rmware?
• Quando uma nova versão é detetada, o sistema pede para reiniciar e atualizar.

133
JP
目次
安全にご使用いただくために 134
パッケージ内容 137
概要 137
はじめに 141
Nebula Connect アプリ 143
設定 144
Nebula Astro を使用する 147
製品の仕様 150
トラブルシューティング 151

JP
134
安全にご使用いただくために
本製品を使用する前に、すべての指示をお読みください。 このマニュアルで説明さ
れていない変更または設定は行わないでください。 指示に従わなかったことが原因
で怪我、データの損失、破損が発生しても、保証の対象になりません。
セットアップ
• 火災および / または感電のリスクを軽減するため、本製品を雨や湿気にさらさない
でください。 花びんなど液体の入った物を本製品の上に置かないでください。
• 火災が発生する危険があるため、本製品をテーブルクロスやカーペットなどの上
で使用しないでください。
• 本製品をほこりや汚れが付きやすい場所や、強い磁場を発生する機器の近くに置
かないでください。
• 過熱を防ぐため、換気を妨げたり換気口をふさいだりしないでください。
• 本製品は決して狭いスペースに置かないでください。 本製品の周囲に換気のため
のスペースを常に十分に確保してください。
• 本製品が直射日光、熱、急激な温度変化、湿気に過度にさらさないよう、保護し
てください。 極端な温度を避けてください。 本製品とアクセサリの適正な動作
温度および保管温度は 5 ~ 35° C です。
• 本製品を長時間使用していると、表面が高温になる場合があります。 その際は直
ちにシャットダウンし、電源アダプタをはずしてください。 本製品の温度が下が
ったことを確認して、使用を再開してください。
• 本製品の取り扱いには常に注意が必要です。 レンズに触れないでください。
• 本製品を大人による監視なしにお子様だけで使用することがないようにしてくだ
さい。
• 本製品の上に重い物や尖った物を置かないでください。
• 感電を防ぐため、分解しないでください。
• 弊社指定の付属品およびアクセサリのみを使用してください。
• 内部の部品を損傷する恐れがあるため、激しい振動を避けてください。
電源
• 付属の電源アダプタ以外は使用しないでください。
• コンセントから電源ケーブルを取り外す前に本製品の電源をオフにしてくださ
い。
• 特にプラグやコンセント付近、出入力ポート部分で、ケーブルが踏まれたり挟ま
ったりしないようにご注意ください。
• 雷の発生時や長期間使用しない場合は、本製品のプラグを抜いてください。

135
JP
• 本製品の充電を行う際には、電源アダプタがコンセントから外されていることを
確認したうえで、ケーブルの接続を行ってください。
• 電源ケーブルや電源アダプタに濡れた手で触れないようにしてください。
再生時の安全性
• 聴覚の損傷を防ぐため、長時間、大音量で聴かないように注意してください。 音
量は適切なレベルに設定してください。
充電
• 充電器のタイプは DST451-150300W-K、出力電圧 / 電流は USB-C 5V / 2A です。
充電器は本製品の近くに置いて、すぐ利用できるようにしてください。
• この充電器は屋内使用専用です。
• 本製品を充電する際は、風通しのよい標準室温 (5 ~ 25° C) の場所に置いてくだ
さい。
• 本製品は USB 2.0 以降にのみ接続できます。
電池・バッテリー
• お客様ご自身で内蔵バッテリーの交換はしないでください。
• リモコンに付属している電池 ( 単 4 形電池が 2 本 ) を誤飲しないようご注意くだ
さい。 リモコンはお子様の手が届かない場所に置いてください。
• 電池やバッテリーは爆発の危険性があります。 電池やバッテリーを熱、直射日光、
火気から遠ざけてください。 電池やバッテリーは絶対に焼却処分にしないでくだ
さい。
• リモコンを長期間使用しない場合は、電池を取り外してください。
• リモコンの電池は、同じタイプまたは同等品とのみ交換してください。
• 電池やバッテリーには化学物質が含まれているため、適切に廃棄する必要があり
ます。
• 本製品は定期的に充電してください。 電池やバッテリーが完全に放電された状態
で、本製品を保管しないでください。
クリーニング
• 糸くずの出ない柔らかい布を使用してください。 クリーニングに液体、気体、可
燃性の洗浄剤を使用しないでください。
• レンズのコーティング膜の損傷を防ぐため、いかなるレンズクリーニング用洗浄
液も使用しないでください。
• 表面は優しく拭いてください。 表面に傷を付けないように注意してください。
• レンズのクリーニングにはクリーニングペーパーを使用してください。

JP
136
修理
• 本製品のいかなる修理もお客様ご自身ではなさらないでください。
• メンテナンスが不適切な場合は、怪我をしたり、本製品が損傷したりするおそれ
があります。
注意
• 本製品からの強い光が危険な場合があるためご注意ください。
• 動作時の光線をのぞき込まないでください。 まぶしい光により目を傷めるおそれ
があります。
免責事項
• 本製品は、平坦な場所置くようにしてください。これにより、アイガード機能が
より正確に動作します。
• アイガード機能の動作距離は、あくまで参考値となります。
• レンズに油などの汚れがないようにしてください。レンズに汚れがあると、本製
品の動作精度に影響が及ぶことがあります。
• アイガード機能は、お子様が誤ってプロジェクターを自分に向けた場合に、目を
保護することのみを目的として設計されています。 プロジェクターを故意に目に
向けないようにしてください。

137
JP
パッケージ内容
概要
1.
正面図
4
TOF
モーションセンサー
• アイガード機能をオンにすると、センサ
ーが作動します
レンズ
換気口
焦点調整ノブ

JP
138
2.
背面図
HDMI
Astro
TYPE-C
2
3
赤外線レシーバー
USB-C ポート
• 電源に接続します
HDMI
• 再生用機器に接続します
3.
上面図
5
4
3
2
音量アップ
• 押すと音量が大きくなります
LED インジケーター
電源ボタン
• 2 秒間長押しすると、電源のオン / オフの切り替えができます
音量ダウン
• 押すと音量が小さくなります
ボタン
• Bluetooth スピーカーモードとプロジェクターモードを切り替えます

139
JP
4.
底面図
三脚用ソケット
5.
リモコン
電源のオン / オフ
HDMI 接続切り替え
マウスモード切り替え
ナビゲーションボタン
決定
ホーム
戻る
その他のオプション表示
音量アップ / ダウン

JP
140
6.
LED インジケーター
LED ステータス 説明
オレンジ色でゆっく
り点滅
アイガード機能がオンで動作中
赤色で点灯 充電中
緑色で点灯 満充電
赤色で点滅 低バッテリー (20% 未満 ) / 障害発生
青色で点灯
プロジェクターモードまたは Bluetooth スピーカーモ
ードで動作中
オレンジ色で点灯 プロジェクターモードでスタンバイ中
青色で点滅
ペアリング準備完了 / Bluetooth 接続解除済み
(Bluetooth スピーカーモード )
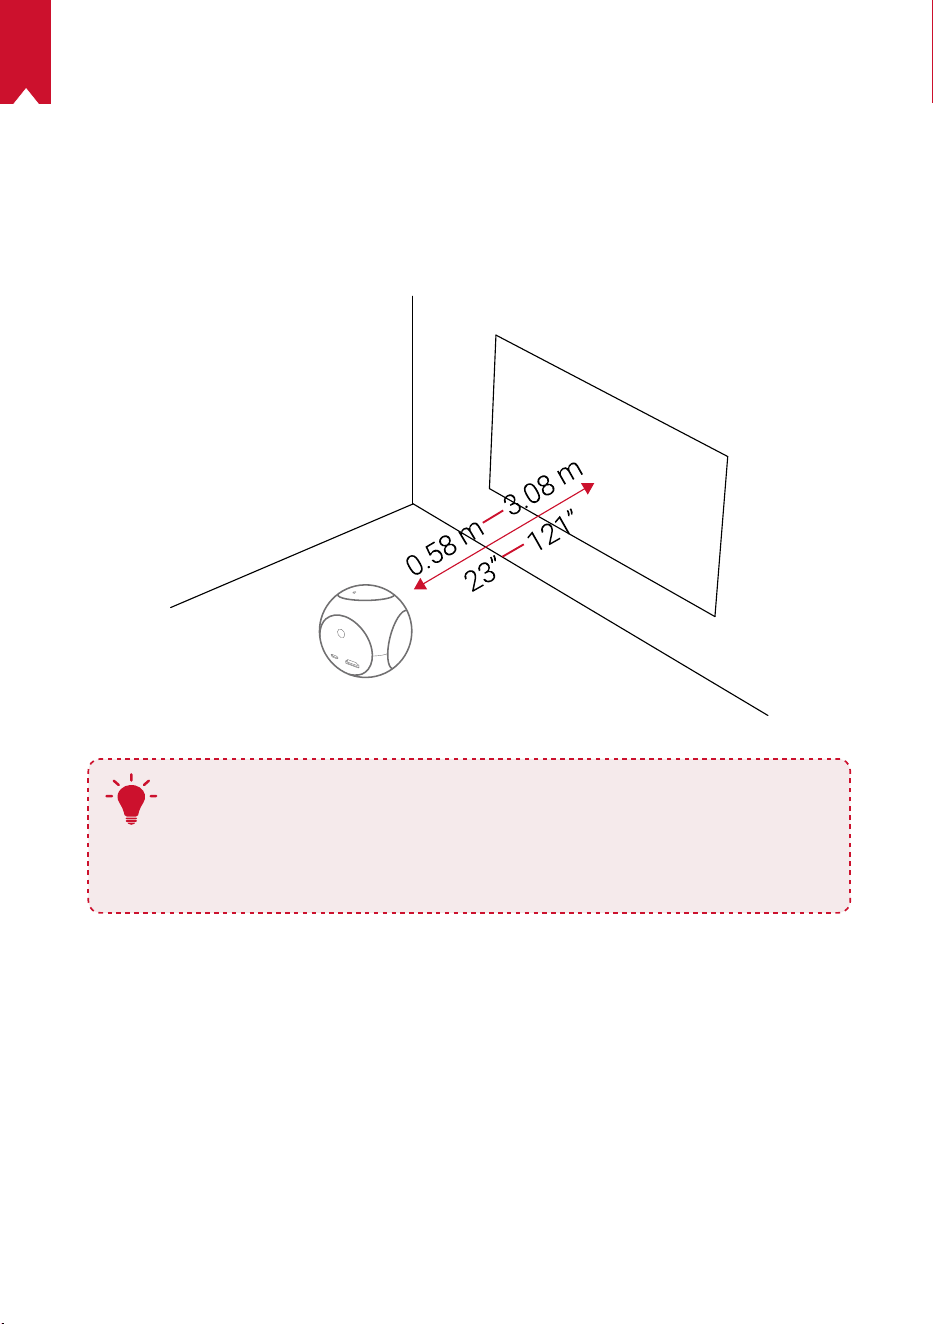
141
JP
はじめに
1.
設置
本製品を、安定した平らな面の上に置いて、投影面に向けます。 投影面が白くて平
らな場合に、最もきれいに映ります。 本製品と投影面との間は、0.58 ~ 3.08m ほど
距離をとる必要があります。これにより、20 ~ 100 インチでの投影が可能です。
T
• 本製品を投影面に向けて傾ける必要はありません。 自動台形補正
機能を使用して、投影画像を補正できます。
• 投影画像の大きさは、本製品と投影面との距離によって決まりま
す。 最もきれいに映像を映すには、本製品と投影面の距離を 1.0 ~
2.0m の範囲にしてください。
2.
リモコンの準備
リモコンには単 4 形電池が 2 本付属しています。
① 電池ケースを下にスライドして開きます。
② 電池を交換するときには、プラスとマイナスのマーク ( + / - ) に合わせて新しい電
池を挿入します。

JP
142
3.
はじめに
① 初めて使用するときは、付属のケーブルとアダプタを使用して、事前に内蔵バッ
テリーを満充電にしてください。
② 本製品の を 2 秒間長押しして、電源をオンにします。
③ 本製品を適切な投影面または壁に向けます。
④ 焦点調整ノブを回転して、焦点を調節します。

143
JP
⑤
初めて使用する際は、画面の指示に従って基本設定を完了させてください。
T
本製品を最も高速かつ安全に充電するために、付属のアダプタのみを使用
してください。
Nebula Connect アプリ
本製品の操作にあたっては、Nebula Connect アプリをダウンロードすることをおす
すめします。 このアプリでは、スマートフォンを使用して本製品を操作できます。
① App Store (iOS 機器の場合 ) または Google Play (Android 機器の場合 ) から
Nebula Connect アプリをダウンロードします。
Nebula Connect
< Settings Bluetooth
Nebula-xxxxxx
Bluetooth
Connected
DEVICE
Nebula Connect
2
② お使いのスマートフォンで Bluetooth をオンにします。
③ Nebula Connect アプリを開いて、接続先デバイスとして [Nebula-XXXXXX] を選
択します。
④ 画面の指示に従って、接続の設定を完了します。
T
より簡単に操作するには、リモコンではなく、Nebula Connect アプリを
使用することをおすすめします。
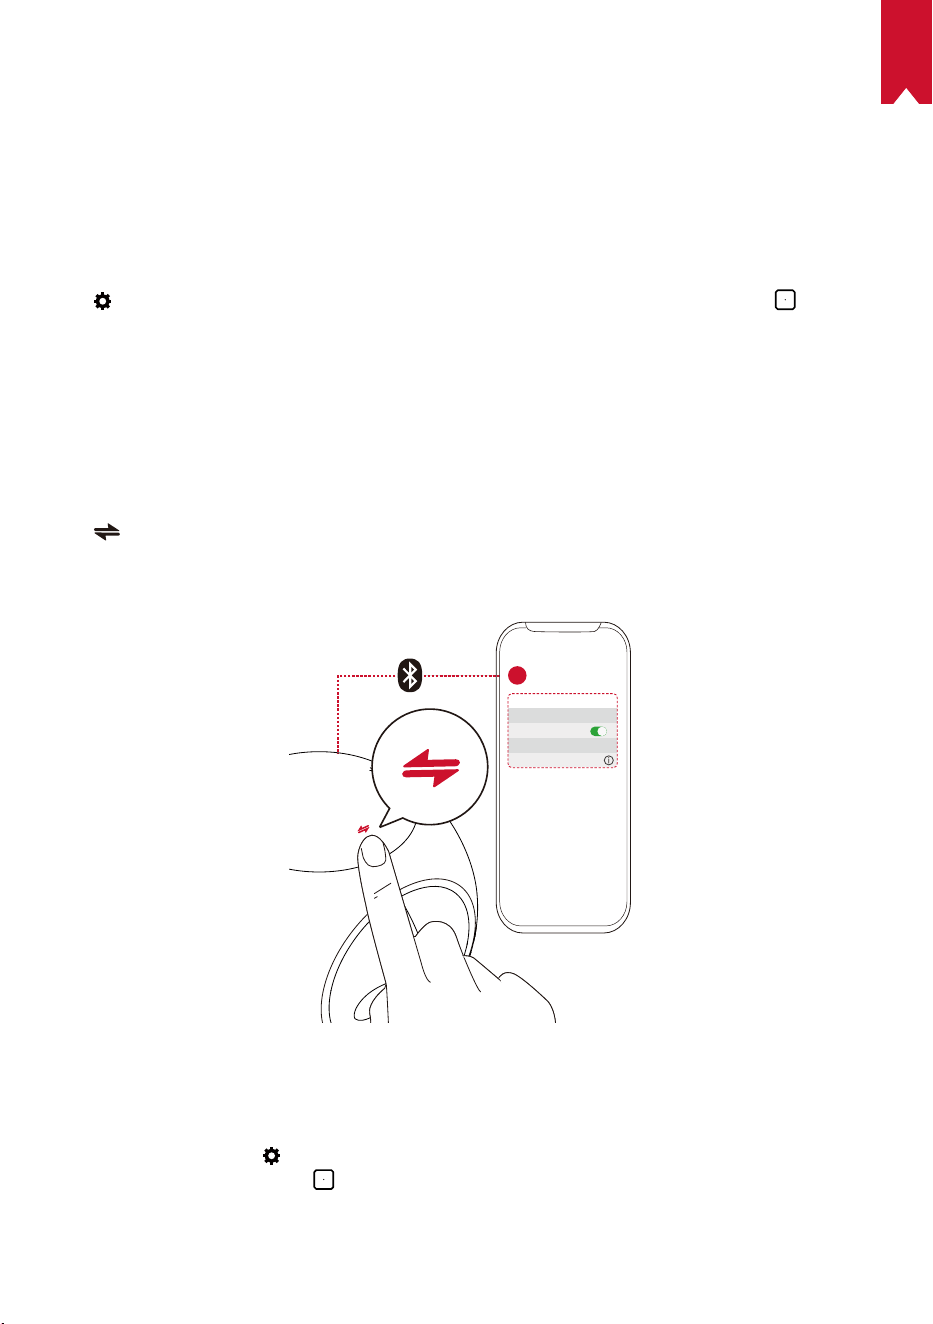
JP
144
設定
本製品を初めて起動するときは、初回セットアップを完了させてください。 氏名、
生年月日、パスワードを設定してください。アイガード機能をオンにするには、距
離範囲を設定してください。
1.
ネットワーク
本製品は、ワイヤレス (Wi-Fi) 接続を使用してインターネットに接続できます。
①
を選択して、[設定] 画面を開きます。 [ ネットワーク ] を選択して、
を押
します。
② 画面の指示に従って、ネットワーク接続を完了させます。
2.
Bluetooth
Bluetooth スピーカーモード
本製品は、独立した Bluetooth スピーカーとして使用できます。
①
を押して、Bluetooth スピーカーモードに切り替えます。
② お使いのスマートフォンで Bluetooth を有効にし、接続するデバイスとして
[Nebula-XXXXXX] を選択します。
< Settings Bluetooth
Nebula-xxxxxx
Bluetooth
Connected
DEVICE
2
1
プロジェクターモード
プロジェクターモードでは、Bluetooth スピーカーまたはヘッドフォンを本製品に接
続できます。
① ホームメニューで
を選択して、[ 設定 ] 画面を開きます。
[Bluetooth] を選択して、
を押します。 必要に応じてパスワードを入力します。
② 画面の指示に従って、Bluetooth 接続を完了させます。
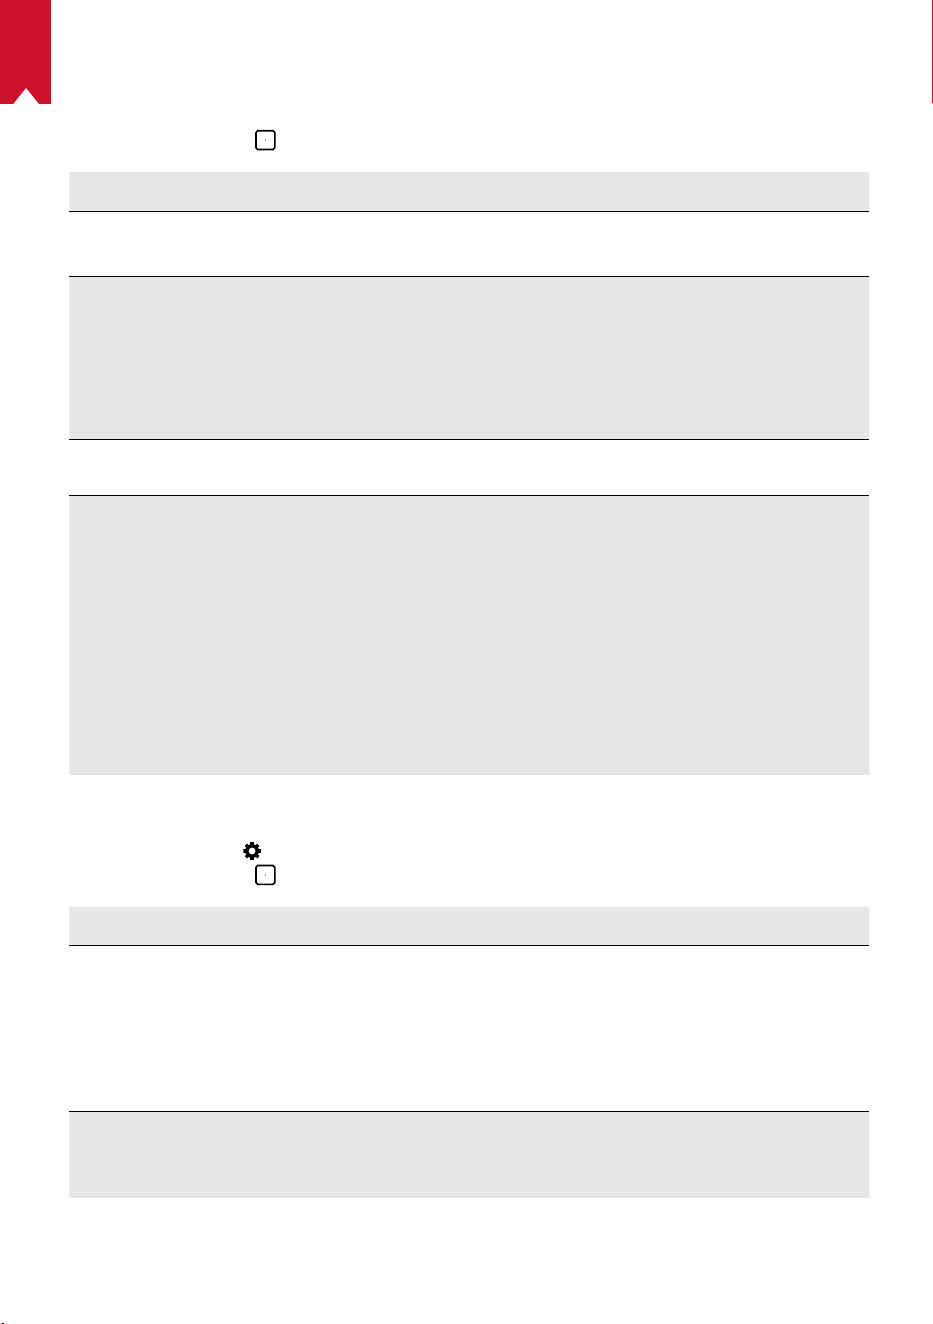
145
JP
3.
プロジェクター
ホームメニューで設定アイコンを選択して、[ 設定 ] 画面を開きます。 [ プロジェク
ター ] を選択して、 を押します。
[ 画像モード ] [ オート ] / [ 標準モード ] / [ バッテリーモード ]
[ アイコンフォートモード ]
[ オン ] / [ オフ ]
アイコンフォートモードを有効または無効にします。
[ アイガード機能 ]
[ オフ ]:アイガード機能がオフです。 デフォルトではオ
フに設定されています
[20cm 未満 ] / [40cm 未満 ] / [60cm 未満 ]:プロジェクタ
ーが [20cm 未満 ] / [40cm 未満 ] / [60cm 未満 ] に設定さ
れている場合には、[ アイガード機能 ] がオンになり、特
定の距離範囲内ではプロジェクターがオフになります。
[ オートキーストーン補正 ]
オートキーストーン補正をオンまたはオフにします。
[ プロジェクターモード ]
[ 前面への投影 ]:プロジェクターが投影面の前にある設
定です。
[ リア ( 背面 ) への投影 ]:プロジェクターが投影面の背
後にある設定です。
[ 天井への設置 : 前面への投影 ]:プロジェクターが天井
から逆さまに吊り下がっている設定です。 画像が 180
度回転します。
[ 天井への設置 : リア ( 背面 ) への投影 ]:プロジェクタ
ーが投影面の背後で天井から逆さまに吊り下がっている
設定です。 画像が 180 度回転し、左右が反転します。
4.
ペアレンタルコントロール
ホームメニューで
を選択して、[ 設定 ] 画面を開きます。 [ ペアレンタルコントロ
ール ] を選択して、
を押します。
[ パスワードの設定 ] [ オン ] / [ オフ ]
[ パスワードを変更 ]
[ パスワードの設定 ] をオンにすると、[ パスワードを変
更 ] が有効になります。 このオプションを使用すると、
パスワードの変更とリセットが可能です。 マスターコ
ードはデフォルトで 「シリアル番号 + Nebula」です。
シリアル番号は設定画面から、[ 一般 ] を開き、[ 概要 ]
にて確認できます。( 例:XXXXXXXXXXXNebula )
[ 時間制限 ]
お子様に日常的にプロジェクターの使用を許可する場合に
は、使用可能時間の制限を設定できます。

JP
146
5.
アプリコントロール
[ アプリコントロール ] を使用すると、キッズモードのホーム画面でアプリの表示、
非表示、または表示順の並べ替えを行うことができます。
① ホームメニューで
を選択して、[ 設定 ] 画面を開きます。 [ アプリコントロール ]
を選択して、
を押します。
②
を長押しして、選択したアプリの表示位置を変更します。
6.
アプリマネージャー
① ホームメニューで
を選択して、[ 設定 ] 画面を開きます。 [ アプリマネージャー ]
を選択して、
を押します。
② アプリを選択し、現在のバージョンの確認、アプリの開始 / 強制停止、使用スト
レージの確認、データの消去、またはアプリのアンインストールを行います。
7.
その他
ホームメニューで
を選択し、その他の設定オプションを表示します。
[一般]
[言語] 画面に表示する言語を選択します。
[ キー操作音 ] キー操作音のオフとオンを切り替えます。
[ 自動スリープ間隔 ] 5 分 / 15 分 / 30 分
[背景] 背景を選択します。
[ キャッシュを消去 ]
本製品に保存されているキャッシュデータを消去しま
す。
[ 画面ミラーリング ] 画面ミラーリングをオンにします。
[ 日付と時刻 ]
[ 日付と時刻の自動設定 ] 日付と時刻の自動設定をオンまたはオフにします。
[ タイムゾーンの選択 ] タイムゾーンを選択します。
[24 時間形式の使用 ] 24 時間形式 / 12 時間形式を切り替えます。
[ アップグレード ]
[ 更新の確認 ]
最新のファームウェアバージョンを使用しているかど
うかを確認します。 画面の指示に従って、ファームウ
ェアバージョンをアップグレードします。
[ バージョン情報 ]
[ リカバリ ] 内蔵ストレージの全データが消去されます。
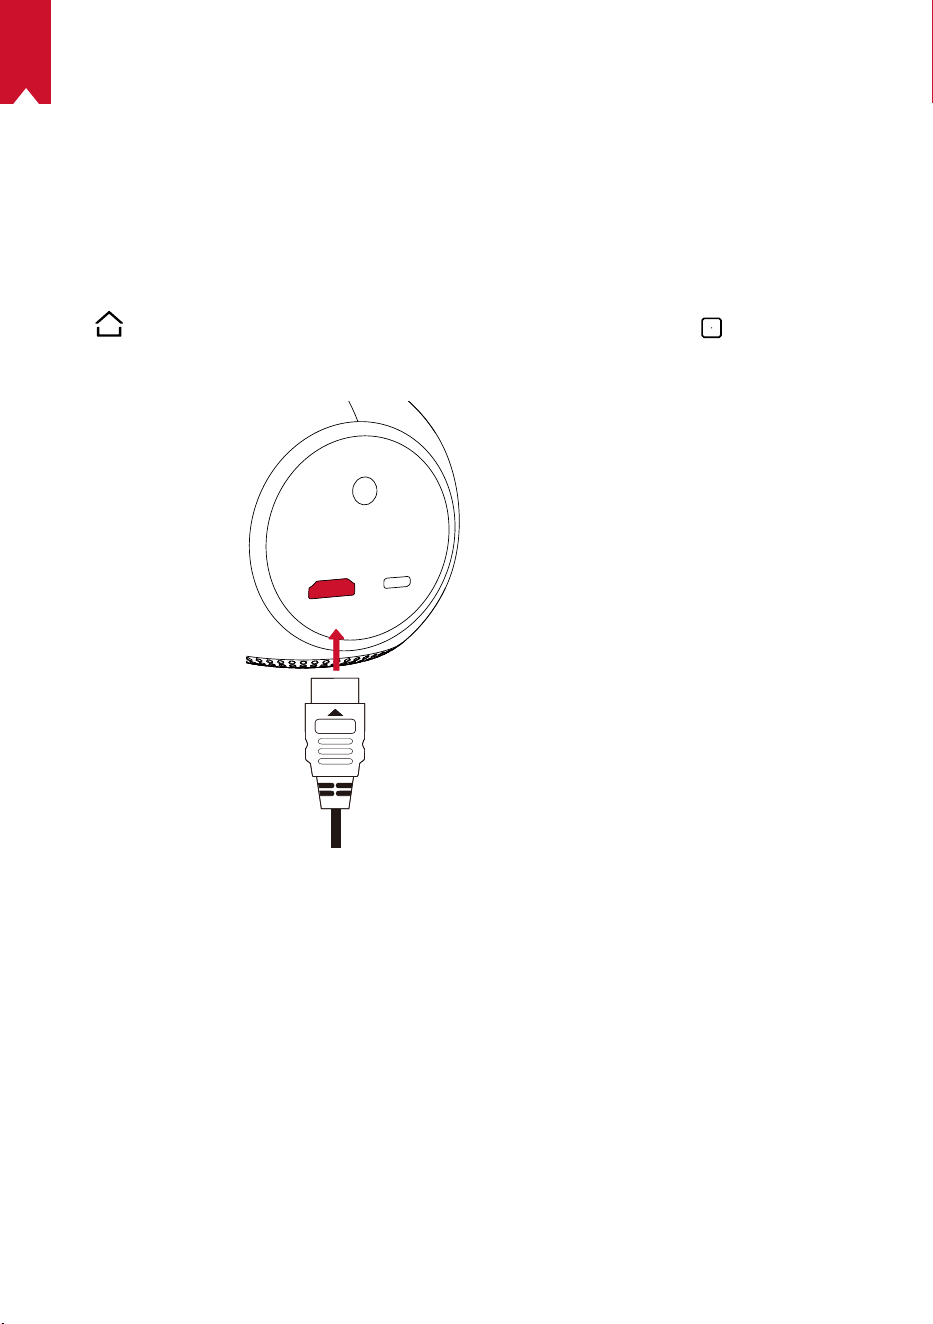
147
JP
Nebula Astro を使用する
1.
HDMI 再生機器からの再生
本製品は、TVボックス、TVスティック、DVDプレーヤー、セットトップボックス (STB)、
ゲームコンソールなど、さまざまな HDMI 再生機器に接続することができます。
HDMI 再生機器から映像を再生するには:
① HDMI ケーブル ( 別売り ) を使用して、本製品を HDMI 再生機器に接続します。
②
を押してホームメニューにアクセスし、[HDMI] を選択して、 を押します。
• HDMI 再生機器に初めて接続する場合、HDMI 再生を自動的に開始します。
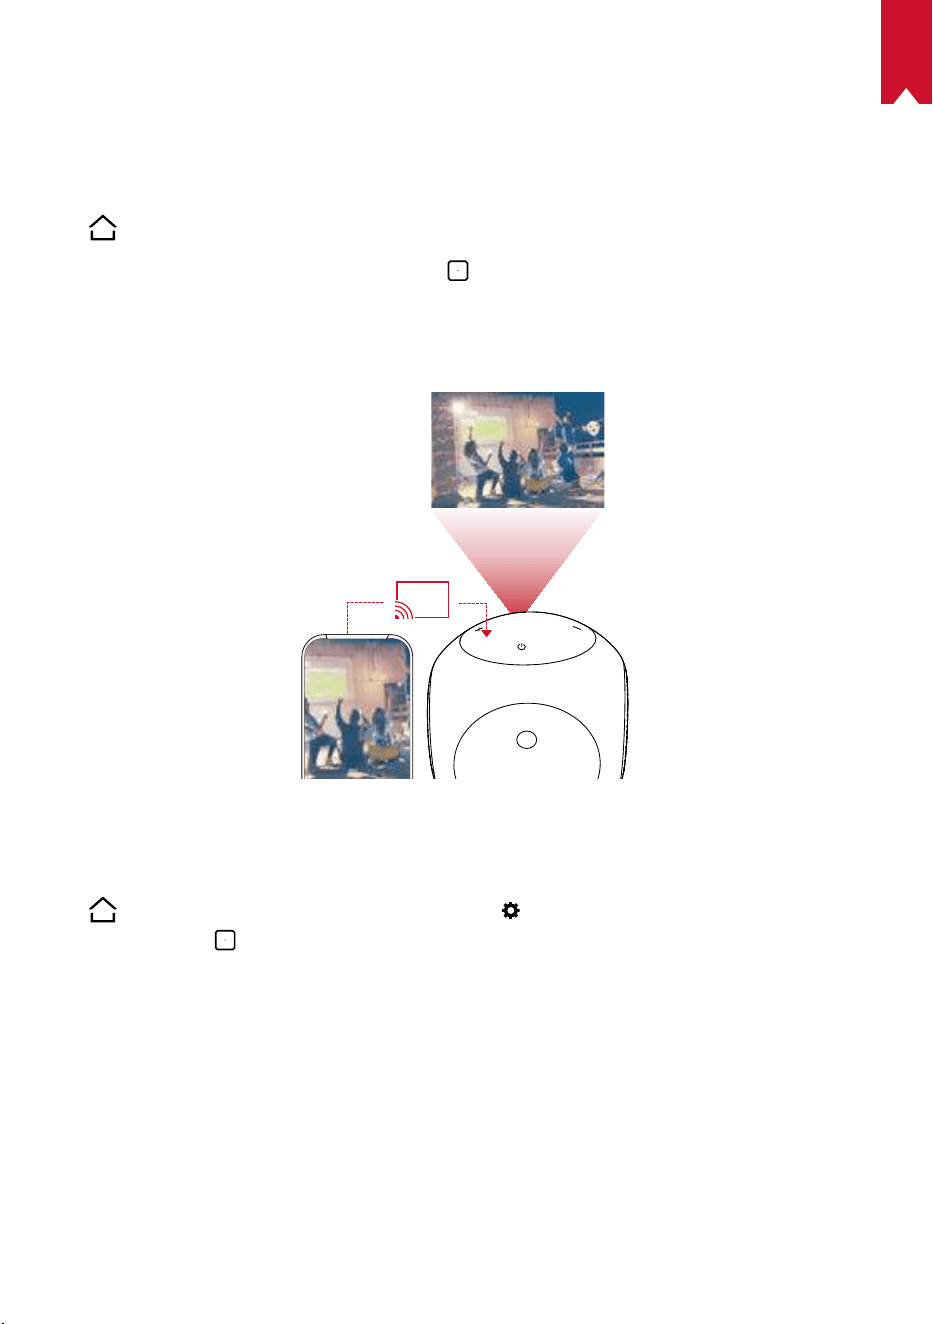
JP
148
2.
アプリのインストール
ワイヤレス (Wi-Fi) 接続を使用すると、オンラインサービスにアクセスしたり、映画、
音楽、写真を表示または再生して楽しんだり、オンラインでブラウズできます。 事
前にインストールされているアプリとは別に、Nebula App Store から他のアプリを
インストールすることもできます。
①
を押してホームメニューを開きます。
② インターネットサービスを選択して、
を押します。
3.
画面ミラーリング
スマートフォンやタブレットの画面を投影面にワイヤレスで投影できます。
Android 機器の場合:
画面ミラーリングを使用するには:
①
を押してホームメニューにアクセスし、
> [ 一般 ] > [ 画面ミラーリング ] を
選択した後、
を押します。
② 画面の指示に従って、プロセスを完了します。
• 本製品に接続されているスマートフォンまたはタブレットの画面が投影されます。
iOS 機器の場合:
① [ コントロールセンター ] を開きます。
• iPhone X 以降、または iOS 12 以降を搭載する iPad の場合:画面の右上から下
にスワイプします。
• iPhone 8 以前または iOS 11 以前の場合:画面の下端から上にスワイプします。
② [ 画面ミラーリング ] をタップします。

149
JP
③ リストで [Nebula-XXXXXX] を選択します。 本製品に、iPhone または iPad の画面
がミラーリングされます。
T
• 必ず、本製品とスマートフォンを同じ Wi-Fi ネットワークに接続してく
ださい。
• コンテンツによっては、著作権上の制限により、本製品で投影できな
い場合があります。 その場合は、本製品にインストールされている同
じアプリで、該当するコンテンツを再生できます。

JP
150
仕様
本製品の仕様およびデザインは予告なく変更されることがあります。
電源:DC 5V
2A
消費電力:10W 未満
スタンバイ時消費電力:0.5W 未満
表示技術:0.2 インチ 854 x 480p DLP
光源:RGB LED
投影画像サイズ:20 ~ 100 インチ
解像度:854 x 480p
輝度:100 ANSI ルーメン
コントラスト比:400:1
スローレシオ:1.3
投影距離:0.58 ~ 3.08 m
CPU:クアッドコア A7
OS:Android 7.1
RAM:1 GB DDR
ROM:8 GB eMMC
スピーカードライバー:3W
Wi-Fi:IEEE802.11a/b/g/n、デュアル周波数 2.4 G/5 G
Bluetooth 規格:4.2
USB ファイルシステム:FAT32
内蔵バッテリータイプ:リチウムポリマー
容量:3250 mAh 3.63V
動画再生時間:バッテリーモードで約 2.5 時間
音楽再生時間:Bluetooth スピーカーモードで約 14 時間
リモコンの電池:
AAA
x 2
推奨周囲温度:41° F ~ 95° F / 5° C ~ 35° C
相対湿度:15 ~ 85% ( 結露なし )
保管温度および湿度:温度 65° C 未満、湿度 90%未満
寸法 ( H × L × W ):91.2 x 82 x 89.2 mm / 3.6 x 3.2 x 3.5 インチ
重量:370 g / 13.1 オンス

151
JP
トラブルシューティング
① リモコンで電源をオンにすることができない。
• プロジェクターの
を 2 秒間長押しして、電源をオンにします。
• 電源がオフの場合、リモコンを使用して電源をオンにすることはできません。
② リモコンが機能しない
• リモコンに電池が入っていることを確認してください。
• 電池を交換してください。
③ 画像がぼやけている
• 焦点調整ノブを回転させて、焦点を調整してください。
④ Wi-Fi ネットワークに接続できない
• 利用可能なネットワークのリストを更新し、接続をやり直します。
• ワイヤレスルータまたは本製品を再起動し、接続をやり直してください。
⑤ ファームウェアをアップデートするには?
• 新しいバージョンが検出されると、再起動して更新を指示するダイアログ
が表示されます。
保証内容
最大 24 ヶ月保証
ご購入日から 18 ヶ月以内に製品不具合が生じた場合は、弊社カスタマーサポートで
確認後、迅速に同一の製品と交換致します ( ただし、説明書の通りに製品をご使用い
ただいた場合に限ります ) 。また Anker 公式オンラインストアに会員登録をしてい
ただくと、保証期間が 24 ヶ月まで延長されます ( 登録無料 ) 。
製品の不具合の場合、返送にかかる送料も弊社が負担致しますが、適用はご購入い
ただいた国内のみになります。

KO
152
목차
안전 지침 153
제품 구성 156
개요 156
시작하기 160
NebulaConnect앱 162
설정 163
NebulaAstro 사용 166
사양 169
문제 해결 170

KO
153
안전 지침
이 장치를 사용하기 전에 모든 지침을 읽으십시오 . 이 매뉴얼에 기재되지 않은 설정을 임의
로 변경하거나 생성하지 마십시오 . 지침을 준수하지 않아 신체적 상해나 데이터 손실 또는
손상이 발생할 경우 보증이 적용되지 않습니다 .
조립
• 화재나 감전의 위험을 줄이려면 장치를 비 또는 습기에 노출시키지 마십시오 . 화병과 같이
액체가 담긴 물체를 장치 위에 올려두지 마십시오 .
• 이 장치를 식탁보나 카펫과 같이 부드러운 표면 위에 두지 마십시오 . 화재의 위험이 있
습니다 .
• 먼지나 흙이 과도하게 쌓이기 쉬운 곳이나 강한 자기장을 생성하는 기기 옆에 장치를 두
지 마십시오 .
• 환기구를 막지 마십시오 . 장치가 과열될 수 있습니다 .
• 밀폐된 공간에 장치를 두지 마십시오 . 통풍을 위해 장치 주변에 여유 공간을 충분히 확
보하십시오 .
• 직사광선이나 열 , 급격한 온도차 및 습기에 장치를 오랫동안 노출시키지 마십시오 . 너
무 높거나 낮은 온도에 노출시키지 마십시오 . 이 장치와 부속품에 적합한 작동 및 보관 온
도는 41° F ~ 95° F/ 5° C ~ 35° C 입니다 .
• 장치를 장시간 가동할 경우 표면이 가열될 수 있습니다 . 이 경우 즉시 전원을 끄고 충전
기의 전원을 분리하십시오 . 장치의 온도가 내려가면 작동을 재개하십시오 .
• 장치를 항상 조심히 다루십시오 . 렌즈를 만지지 마십시오 .
• 어린이가 장치를 만지지 못하도록 관리 감독하십시오 .
• 장치 위에 무겁거나 날카로운 물체를 올려두지 마십시오 .
• 장치를 분해하지 마십시오 . 감전의 위험이 있습니다 .
• 제조사에서 지정한 부착품이나 부속품만 사용하십시오 .
• 심한 진동을 피하십시오 . 내부 부품이 손상될 수 있습니다 .
전력 공급 :
• 장치와 함께 제공된 전원 어댑터만 사용하십시오 .
• 소켓에서 전원 공급 장치를 제거하기 전에 장치의 전원부터 끄십시오 .
• 전원 코드 ( 특히 플러그 , 콘센트 및 장치 연결 부위 ) 를 밟거나 누르지 마십시오 .
• 장기간 사용하지 않을 때나 번개 / 폭풍 시 장치의 커넥터를 분리하십시오 .
• 전원 플러그 또는 제품 결합기를 분리 장치로 사용하는 경우 분리 장치를 즉시 작동할
수 있는 상태로 유지하십시오 .

KO
154
• 연결을 설정하거나 변경하기 전에 모든 장치를 전원 콘센트에서 분리하십시오 .
• 젖은 손으로 전원 케이블이나 전원 커넥터를 만지지 마십시오 .
청력 보호
• 높은 볼륨으로 장시간 들을 경우 청력이 손상될 수 있습니다 . 볼륨을 안전한 수준으로
설정하십시오 .
충전
• 충전기 유형은 출력 전압 / 전류가 USB-C 5V/2A 인 DST451-150300W-K 입니다 . 충전
기는 장치 주변에 설치해야 하며 쉽게 접근할 수 있어야 합니다 .
• 이 충전기는 실내 전용입니다 .
• 충전 시 장치를 상온 (41° F ~ 77° F/5° C ~ 25° C) 에 통풍이 잘 되는 곳에 두십시오 .
• 본 장치는 외장 케이스의 소재 특성상 USB 2.0 이상에만 연결해야 합니다 .
배터리
• 내장 배터리를 직접 교체하지 마십시오 . 배터리를 교체하려면 공인 서비스 센터에 맡기
십시오 .
• 어린이가 리모컨에 포함된 배터리를 삼킬 위험이 있습니다 . 리모컨을 어린이의 손이 닿
지 않는 곳에 보관하십시오 .
• 폭발의 위험이 있습니다 ! 배터리를 열이나 직사광선 또는 화기 주변에 두지 마십시오 .
배터리를 폐기할 경우 불에 태우지 마십시오 .
• 리모컨을 장시간 사용하지 않을 경우 배터리를 분리하십시오 .
• 리모컨의 배터리는 같은 종류나 동급의 배터리로 교체하십시오 .
• 배터리에는 화학 물질이 포함되어 있으므로 적절한 방법으로 폐기해야 합니다 .
• 장치를 주기적으로 충전하십시오 . 배터리가 방전된 상태로 장치를 보관하지 마십시오 .
세척
• 부드럽고 보푸라기가 없는 천을 사용하십시오 . 액체 , 기체 또는 가연성 세제로 세척하
지 마십시오 .
• 렌즈 세척 시 액체 세제를 사용하지 마십시오 . 렌즈의 코팅막이 손상될 수 있습니다 .
• 표면을 부드럽게 닦으십시오 . 표면이 긁히지 않도록 주의하십시오 .
• 렌즈 세척 페이퍼로 렌즈를 청소하십시오 .
수리
• 장치를 직접 수리하지 마십시오 . 반드시 공인 서비스 센터에 맡기십시오 .
• 장치를 올바르게 관리하지 않을 경우 상해를 입거나 장치가 손상될 수 있습니다 .
• 모든 정비는 자격을 갖춘 서비스 직원에게 의뢰하십시오 .

KO
155
주의
• 장치에서 유해한 광학적 방사가 발생할 수 있습니다 .
• 장치에서 나오는 광선을 직접 응시하지 마십시오 . 밝은 빛으로 인해 눈이 손상될 수 있
습니다 .
고지 사항
• 시각 보호 (Eye Guard) 기능이 제대로 작동할 수 있도록 Nebula Astro 를 평평하고 딱
딱한 표면에 놓으십시오 .
• 시각 보호 기능을 활성화하도록 설정된 거리는 참조용일 뿐입니다 .
• 렌즈를 기름기가 없는 깨끗한 상태로 유지하십시오 . 그렇지 않으면 렌즈의 감도가 저하
될 수 있습니다 .
• 시각 보호 기능은 어린이가 실수로 프로젝터를 정면으로 응시한 경우에만 시각을 보호
하도록 설계되었습니다 . 프로젝터를 일부러 눈 쪽으로 돌리지 마십시오 .

KO
156
제품 구성
개요
1.
정면
4
TOF 동작 센서
• 시각 보호 기능을 활성화하면 센서가 가동됩
니다 .
렌즈
통풍구
초점 조정 손잡이

KO
157
2.
후면
HDMI
Astro
TYPE-C
2
3
적외선 수신기
USB-C 포트
• 전원 연결
HDMI
• HDMI 출력부를 통해 재생 장치와 연결
3.
상단
5
4
3
2
볼륨 높이기
• 볼륨을 높이려면 누르십시오 .
LED 표시등
전원 버튼
• 전원을 켜거나 끄려면 2 초간 길게 누르십시오 .
볼륨 줄이기
• 볼륨을 낮추려면 누르십시오 .
버튼
• Bluetooth 스피커 모드나 프로젝터 모드로 전환하려면 누르십시오 .

KO
158
4.
하단
삼각대 소켓
5.
리모컨
전원 켜기 / 끄기
HDMI 연결로 전환
마우스 모드
탐색
선택된 내용 확인
홈
뒤로
기타 옵션 보기
볼륨 높이기 / 줄이기

KO
159
6.
LED 표시등
LED 상태 설명
주황색으로 점멸 시각 보호 기능 활성화
빨간색 점등 충전
초록색 점등 완충됨
빨간색으로 점멸 배터리 충전 필요 (20% 이하 )/ 고장 발생
파란색 점등 프로젝터 또는 Bluetooth 스피커 모드에서 전원 켜기
주황색 점등 프로젝터 모드에서 대기 중
파란색으로 점멸
페어링 준비 완료 /Bluetooth 연결 해제 (Bluetooth 스피커
모드 )
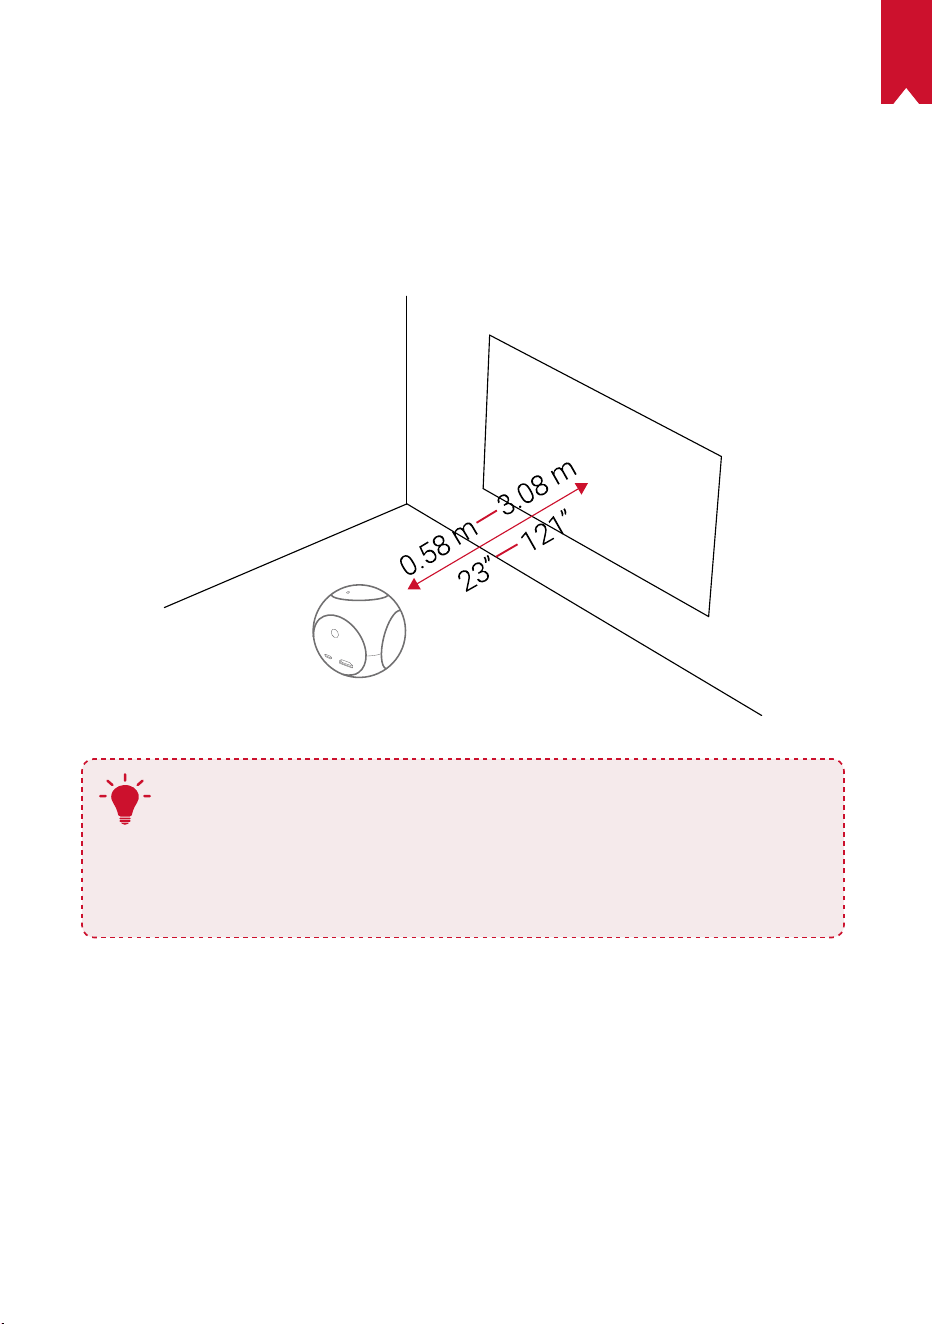
KO
160
시작하기
1.
배치
Nebula Astro 를 투사면 앞의 안정적인 평면에 두십시오 . 최상의 결과를 얻으려면 투사면이
흰색 평면이어야 합니다 . Nebula Astro 와 투사면 간의 거리는 최소 0.58 미터 (23 인치 ), 최
대 3.08 미터 (121 인치 ) 여야 하며 , 이 경우 투사 이미지의 크기는 20 인치 ~ 100 인치입니다 .
T
• Nebula Astro 를 투사면 쪽으로 기울일 필요는 없습니다 . 내장된 키스톤
보정 기능을 이용해 투영 이미지를 조정할 수 있습니다 .
• 투영 이미지의 크기는 Nebula Astro 와 투사면 간의 거리에 따라 달라
집니다 . 최상의 결과를 얻으려면 투사면에서 40~80 인치 떨어진 곳에
Nebula Astro 를 배치하십시오 .
2.
리모컨 준비
리모컨에는 AAA 배터리가 포함되어 있습니다 .
① 아래로 밀어 배터리함을 엽니다 .
② 배터리를 교체하려면 배터리함을 아래로 밀어 열고 새 배터리를 극 (+/-) 에 맞게 삽입한
후 배터리함을 닫습니다 .

KO
161
3.
시작하기
① 처음 사용하는 경우 , 제품과 함께 제공된 케이블과 어댑터를 사용하여 내장 배터리를 완전
히 충전합니다 .
② 프로젝터에서 을 2 초간 눌러 전원을 켭니다 .
③ 적당한 투사면 또는 벽을 향하도록 장치를 배치합니다 .
④ 초점 조정 손잡이를 돌려서 초점을 조정합니다 .
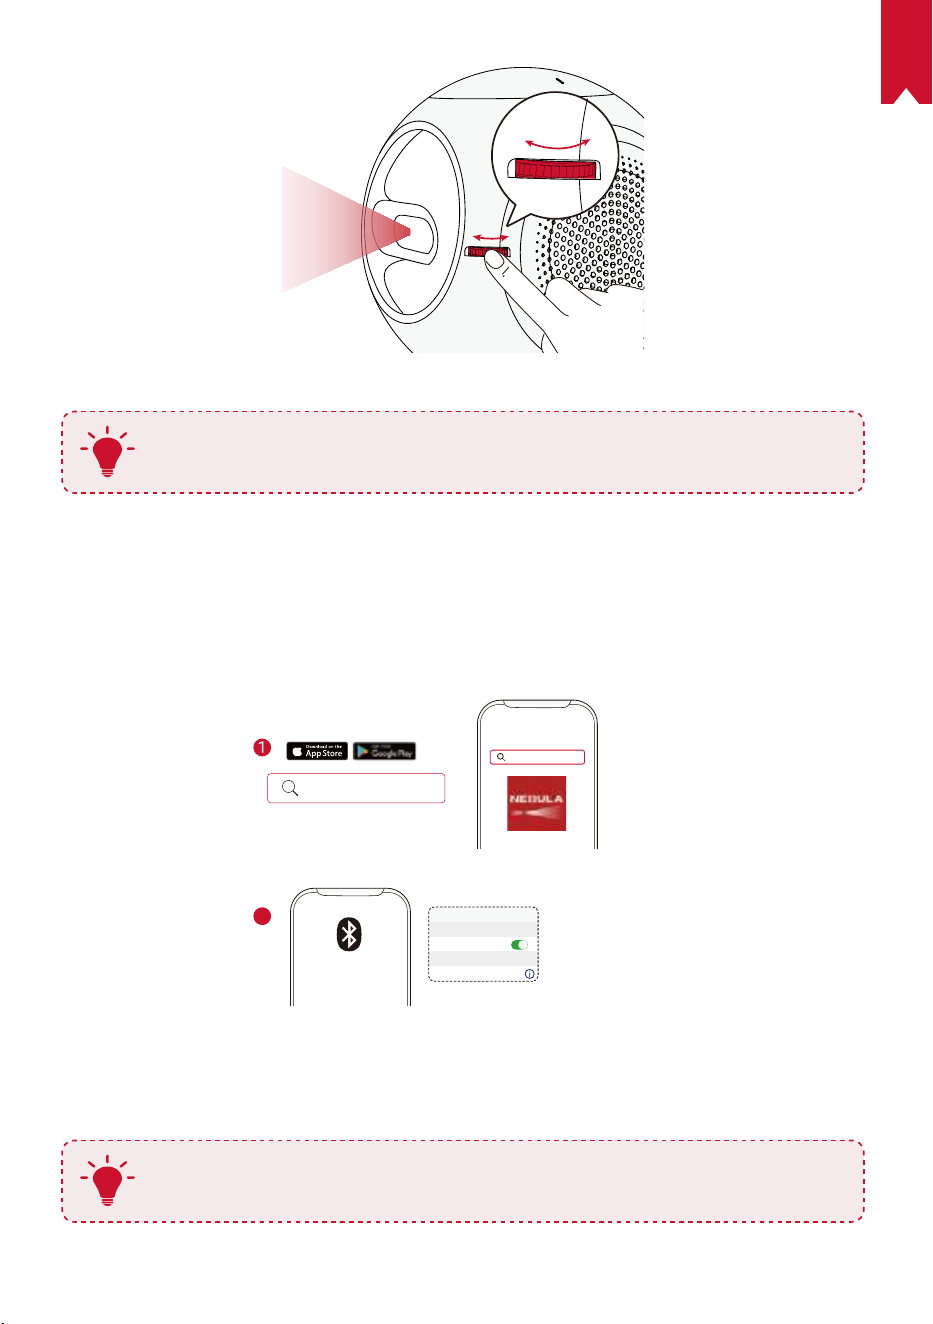
KO
162
⑤ 처음 사용하는 경우 , 화면의 지침에 따라 기본 설정을 완료합니다 .
T
Nebula Astro 를 가장 빠르고 안전하게 충전할 수 있도록 제품과 함께 제공된 어
댑터만 사용하십시오 .
Nebula Connect 앱
Nebula Astro 를 쉽게 제어하려면 Nebula Connect 앱을 다운로드하는 것이 좋습니다 . 이
앱을 사용하면 스마트폰 화면에서 마우스를 조작할 수 있습니다 .
① App Store(iOS 장치 ) 또는 Google Play(Android 장치 ) 에서 Nebula Connect 앱을 다
운로드합니다 .
Nebula Connect
< Settings Bluetooth
Nebula-xxxxxx
Bluetooth
Connected
DEVICE
Nebula Connect
2
② 스마트폰에서 Bluetooth 를 활성화합니다 .
③ Nebula Connect 앱을 열고 [Nebula-XXXXXX] 를 연결할 장치로 선택합니다 .
④ 화면의 지침에 따라 연결 설정을 완료합니다 .
T
보다 즐거운 경험을 위해 리모컨 대신 Nebula Connect 앱을 사용하는 것이 좋습
니다 .
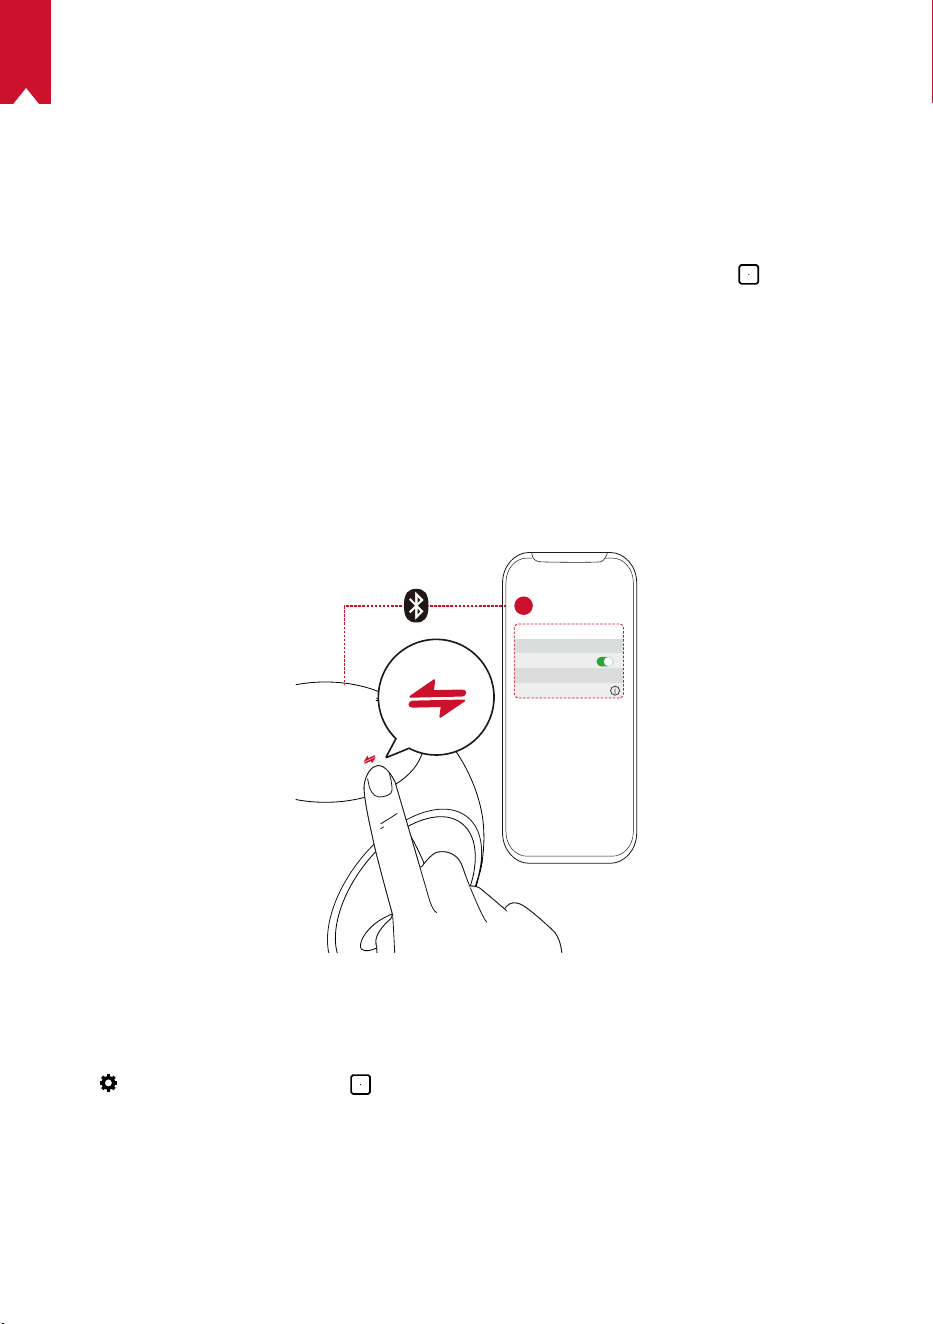
KO
163
설정
Nebula Astro 를 처음 실행하면 설정 프로세스가 진행됩니다 . 시각 보호 기능이 발동될 거리
를 선택하고 이름 , 생일 , 비밀번호를 설정합니다 .
1.
네트워크
무선 (Wi-Fi) 연결을 통해 이 프로젝터를 인터넷에 연결할 수 있습니다 .
① 톱니바퀴를 선택하면 설정 페이지가 표시됩니다 . [ 네트워크 ] 를 선택하고
.
② 화면의 지침에 따라 네트워크 연결을 완료합니다 .
2.
Bluetooth
Bluetooth 스피커 모드
이 프로젝터를 독립형 Bluetooth 스피커로 사용할 수 있습니다 .
① 화살표를 눌러 Bluetooth 스피커 모드로 전환합니다 .
② 스마트폰에서 Bluetooth 를 활성화한 후 [Nebula-XXXXXX] 를 연결할 장치로 선택합니다 .
< Settings Bluetooth
Nebula-xxxxxx
Bluetooth
Connected
DEVICE
2
1
프로젝터 모드
프로젝터 모드에서 Bluetooth 스피커 또는 헤드폰을 Nebula Astro 에 연결할 수 있습니다 .
① 홈 메뉴에서 톱니바퀴를 선택하면 설정 페이지가 표시됩니다 .
[Bluetooth] 를 선택하고
. 필요한 경우 비밀번호를 입력합니다 .
② 화면의 지침에 따라 Bluetooth 연결을 완료합니다 .
KO
164
3.
프로젝터
홈 메뉴에서 설정 아이콘을 선택하면 설정 페이지가 표시됩니다 . [ 프로젝터 ] 를 선택하고 .
[ 이미지 모드 ] [ 자동 ] / [ 표준 모드 ] / [ 배터리 모드 ]
[ 아이 컴포트 (Eye
Comfort) 모드 ]
[ 켜기 ] / [ 끄기 ]
아이 컴포트 모드를 활성화하거나 비활성화합니다.
[ 시각 보호 기능 ]
[ 끄기 ]: 시각 보호 기능이 비활성화됩니다 . 기본적으로 끄기로
설정되어 있습니다 .
[< 20cm] / [< 40cm] / [< 60cm]
: 프로젝터를 <20cm /
<40cm / <60cm 로 설정하면 시각 보호 기능이 활성화되고 , 지
정된 거리 안에 사람이 들어가면 프로젝터가 비활성화됩니다 .
[ 자동 키스톤 조정 ]
키스톤 자동 조정을 활성화 / 비활성화합니다 .
[ 프로젝터 모드 ]
[ 전면 투사 ]: 프로젝터가 투사면 앞에 위치해 있습니다 .
[ 후면 투사 ]: 프로젝터가 투사면 뒤에 위치해 있습니다 .
[ 전면 역방향 투사 ]: 프로젝터가 천장에 거꾸로 매달려 있습
니다 . 이미지가 180 도 회전됩니다 .
[ 후면 역방향 투사 ]: 프로젝터가 천장에 투사면 뒤로 거꾸로
매달려 있습니다 . 이미지가 180 도 및 수평 회전됩니다 .
4.
자녀 보호 기능
홈 메뉴에서 톱니바퀴를 선택하면 설정 페이지가 표시됩니다 . [ 자녀 보호]를 선택하고 .
[ 설정 비밀번호 ] [ 켜기 ] / [ 끄기 ]
[ 비밀번호 변경 ]
설정 비밀번호가 켜기로 설정되어 있으면 비밀번호 변경 옵션
이 활성화됩니다 . 이 옵션을 사용하면 비밀번호를 변경하거나
재설정할 수 있습니다 . 마스터 코드는 기본적으로 'nebula +
일련 번호 ' 입니다 .
[ 시간 제한 ]
자녀가 매일 프로젝터에 액세스할 수 있는 시간이나 기간을 설
정합니다 .
KO
165
5.
앱 제어
앱 제어 옵션을 사용하면 키즈 모드의 홈 화면에서 앱을 원하는 순서대로 표시하거나 , 숨기거
나 또는 정렬할 수 있습니다 .
① 홈 메뉴에서 톱니바퀴를 선택하면 설정 페이지가 표시됩니다 . [ 앱 제어 ] 를 선택하고
.
②
을 길게 눌러 선택한 앱의 위치를 변경합니다 .
6.
앱 관리자
① 홈 메뉴에서 톱니바퀴를 선택하면 설정 페이지가 표시됩니다 . [ 앱 관리자]를 선택하고
.
② 앱을 선택하고 현재 버전을 확인한 후 앱을 열거나 강제 중지하고 사용 중인 저장 용량을
확인하거나 , 데이터를 지우거나 또는 앱을 제거합니다 .
7.
기타
홈 메뉴에서 톱니바퀴를 선택하여 자세한 설정 옵션을 확인합니다 .
[일반]
[언어]
화면의 표시 언어를 선택합니다 .
[ 키패드 톤 ]
키패드 톤을 켜거나 끕니다 .
[ 자동 수면 시간 ]
5분/15분/30분
[배경]
배경을 선택합니다 .
[ 캐시 삭제 ]
프로젝터의 캐시 메모리에 저장된 데이터를 삭제합니다 .
[ 화면 미러링 ]
화면 미러링 옵션을 활성화합니다 .
[ 날짜 및 시간 ]
[ 자동 날짜 및 시간 ]
날짜 및 시간 자동 설정을 활성화 / 비활성화합니다 .
[ 시간대 선택 ]
시간대를 선택합니다 .
[24 시간 형식 사용 ]
24 시간 형식 또는 12 시간 형식을 선택합니다 .
[ 업그레이드 ]
[ 업그레이드 확인 ]
사용 중인 버전이 최신 버전인지 확인합니다 . 화면의 지침
에 따라 펌웨어 버전을 업그레이드합니다 .
[정보]
[복구]
내장된 저장소의 모든 데이터가 지워집니다 .

KO
166
Nebula Astro 사용
1.
HDMI 재생 장치에서 재생하기
Nebula Astro 는 TV 박스 , TV 스틱 , DVD 플레이어 , 셋탑 박스 (STB), 게임 콘솔 또는 기타
장치 등 다양한 종류의 HDMI 재생 장치에 연결됩니다 .
HDMI 재생 장치에서 재생하기 :
① HDMI 케이블 ( 미포함 ) 로 Nebula Astro 를 HDMI 재생 장치에 연결합니다 .
②
을 눌러 홈 메뉴를 열고 [HDMI] 를 선택한 후 .
• HDMI 재생 장치에 처음 연결되면 HDMI 재생이 | 자동으로 시작됩니다 .
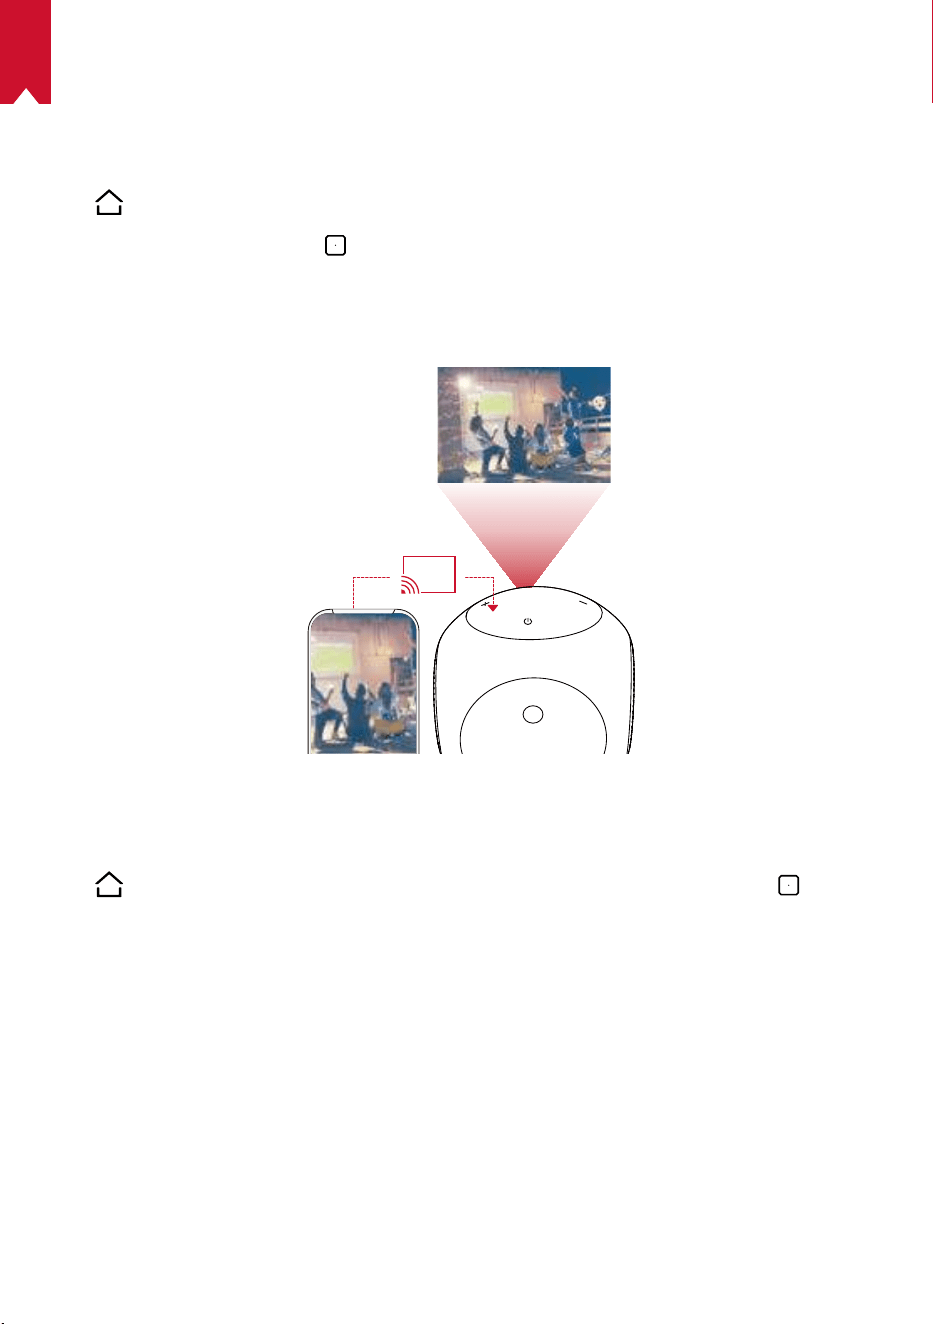
KO
167
2.
앱 설치
무선 네트워크에 연결되면 온라인 서비스에 액세스할 수 있으며 영화나 음악 , 또는 사진을 감
상하거나 온라인 검색이 가능합니다 . 출고시 설치된 앱 외에도 Nebula App Store 에서 다른
앱을 다운로드하여 설치할 수 있습니다 .
①
을 눌러 홈 메뉴를 엽니다 .
② 인터넷 서비스를 선택하고
.
3.
화면 미러링
스마트폰 또는 태블릿의 스크린을 투사면에 무선으로 투사할 수 있습니다 .
Android사용자의 경우 :
화면 미러링 사용하기 :
①
을 눌러 홈 메뉴를 연 다음 톱니바퀴 > [ 일반 ] > [ 화면 미러링 ] 을 선택하고 .
② 화면의 지침에 따라 설정을 완료합니다 .
• Nebula Astro 가 스마트폰 또는 태블릿의 화면을 미러링합니다 .
iOS사용자의 경우 :
① 제어 센터를 엽니다 .
• iPhone X 이상 또는 iOS 12 이상이 설치된 iPad: 화면 오른쪽 상단을 아래로 스와이프합
니다 .
• iPhone 8 이하 또는 iOS 11 이하가 설치된 iPad: 화면 아래쪽 가장자리를 위로 스와이프
합니다 .
② 화면 미러링을 누릅니다 .
③ 목록에서 Nebula-xxxxxx 를 선택합니다 . Nebula Astro 가 iPhone 또는 iPad 의 화면을
미러링합니다 .
KO
168
T
• Nebula Astro 와 스마트폰이 동일한 네트워크에 연결되어 있는지 확인하십
시오 .
• 특정 콘텐츠는 저작권 제한으로 인해 Nebula Astro 에 투사할 수 없습니다 .
이 경우 Nebula Astro 에 설치된 같은 앱을 통해 콘텐츠를 스트리밍할 수 있습
니다 .
KO
169
사양
사양 및 디자인은 사전 통지 없이 변경될 수 있습니다 .
전력 공급 : DC 5V
2A
소비 전력 : < 10W
대기 소비 전력 : < 0.5W
디스플레이 기술 : 0.2in 854 x 480p DLP
광원 : RGB LED
투영 이미지 크기 : 20-100in
해상도 : 854 x 480p
밝기 : 100 ANSI 루멘
명암비 : 400:1
투사율 : 1.3
투사 거리 : 0.58 m ~ 3.08 m
CPU: 쿼드 코어 A7
운영체제 : Android 7.1
RAM: 1GB DDR
ROM: 8GB eMMC
스피커 드라이버 : 6W
와이파이 : IEEE802.11a/b/g/n 듀얼 프리퀀시 2.4G/5G
Bluetooth 버전 : 4.2
USB 파일 시스템 : FAT32
내장 배터리 유형 : 리튬폴리머
용량 : 3250 mAh 3.63V
영화 재생 시간 : 배터리 모드에서 약 2.5 시간
음악 재생 시간 : Bluetooth 스피커 모드에서 약 14 시간
리모컨 배터리 : AAA x 2
권장 주변 온도 : 41° F ~ 95° F/5° C ~ 35° C
상대 습도 : 15% ~ 85%( 비응축식 )
보관 온도 및 습도 : < 149° F/65° C, < 90% 습도
치수 (H × L × W): 91.2 x 82 x 89.2 mm/3.6 x 3.2 x 3.5 인치
무게 : 370 g/13.1 oz

KO
170
문제 해결
① 리모컨으로 프로젝터를 켤 수 없습니다 .
• 프로젝터에서
을 2 초간 길게 눌러 전원을 켭니다 .
• 전원이 꺼져 있는 경우 리모컨을 사용하여 전원을 켤 수 없습니다 .
② 리모컨이 작동하지 않습니다 .
• 리모컨에 배터리가 장착되어 있는지 확인합니다 .
• 배터를 교체합니다 .
③ 이미지가 선명하지 않습니다 .
• 초점 조정 손잡이로 조정하십시오 .
④ Wi-Fi 네트워크에 연결할 수 없습니다 .
• 사용 가능한 네트워크 목록을 새로 고침한 후 다시 시도하십시오 .
• 무선 공유기나 프로젝터를 재부팅한 후 다시 시도합니다 .
⑥ 펌웨어 업데이트 방법
• 새 버전이 감지되면 재부팅 및 업데이트 요청이 표시됩니다 .

171
AR
تايوتحملا لودج
172 ةمسلا تاداشرإ
175 ةن
ّ
مضملا مزاوللا
175 ةماع ةرظن
179 مادختسا ءدب
181 Nebula Connect قيبطت
182 تادادعا
185 Nebula Astro مادختسا
188 تافصاوملا
189 اهحصإو ءاطخا فاشكتسا

AR
172
ةمسلا تاداشرإ
ريغ تادادعإ وأ تارييغت يأ ءارجإب مقت .زاهجلا اذه مادختسا لبق تاداشرا لك أرقا
ببسب ررض ثودح وأ ،تانايب نادقف وأ ،ةيدسج ةباصإ عوقو ةلاح يف .ليلدلا اذه يف ةحضوم
.نامضلا قبطني نلف ؛تاداشرا عابتا مدع
دادعا
.ةبوطرلا وأ رطملل زاهجلا ض
ّ
رعت ،ةيئابرهك ةمدص ثودح وأ/و قيرح بوشن رطخ ليلقتل
.زاهجلا اذه ىلع ،تايرهزملا لثم ،لئاوسلاب ةءولمم ماسجأ يأ عضو يغبني
زاهجلا ضرعتي دقف إو ،داجسلا وأ ةدئاملا شرافمك ةمعان حطسأ ىلع زاهجلا اذه عضت
.قيرحلا رطخل
ً
اجم دلوي زاهج يأ نم برقلاب وأ ،بارتلاو ،رابغلل ةضرعم قطانم يف زاهجلا اذه عضت
.ا
ً
يوق ا
ً
يسيطانغم
.اه
ّ
دست وأ ةيوهتلا تاحتف قلغت ،ةدئازلا ةنوخسلا عنمل
لوح ةيفاك ةحاسم نيمأت ىلع ا
ً
مئاد صرحاو .ةق
ّ
يض ةحاسم يف زاهجلا اذه ا
ً
قلطم عضت
.ةيوهتلا نامضل زاهجلا
تاجرد تاب
ّ
لقتو ،ةنوخسلاو ،ةرشابملا سمشلا ةعش زاهجلا اذهل طرفملا ضيرعتلا بنجت
ليغشتلا ةرارح ةجرد حوارتت .ىوصقلا ةرارحلا تاجرد بنجت .ةبوطرلاو ،ةريبكلا ةرارحلا
ةجرد 35 ىلإ 5 / تياهنرهف ةجرد 95 ىلإ 41 نيب هتاقحلمو زاهجلا اذهل ةبسانملا نيزختلاو
ةيوئم
فقوأ ،كلذ ثودح لاح يف .ا
ً
نخاس هحطس حبصي دق ،ليوط تقول زاهجلا اذه ليغشت متي امدنع
.زاهجلا دربي نأ دعب ليغشتلا فنأتسا .نحاشلا لصفاو روفلا ىلع هليغشت
.ةسدعلا سمل ب
ّ
نجتو .رذحب زاهجلا اذه عم ا
ً
مئاد لماعت
.مهتبقارم نود نم زاهجلا عم لماعتلاب لافطل حمست
.زاهجلا اذه ىلع ةداح وأ ةليقث ضارغأ عضت
.زاهجلا ككفت ،ةيئابرهك ةمدصل ضرعتلا ب
ّ
نجتل
.طقف ةع
ّ
نص
ُ
ملا ةكرشلا اهددحت يتلا تاقحلملا وأ تاقفرملا مدختسا
.ةيلخادلا تانوكملاب ررضلا قحلت دق اهن ةديدشلا تازازتها بنجت
ةقاطلا ردصم
.قفرملا ةقاطلا ئياهم إ مدختست
.سبقملا نم ةقاطلا ردصم ةلازإ لبق زاهجلا ليغشت فاقيإب مق
،سباوقلا دنع ةصاخ ،هيلع صرقلا متي نأ وأ ةقاطلا كلس ىلع رورملا مدع ىلع صرحا
.زاهجلا اذه نم اهدنع جرخت يتلا ةطقنلاو ،ةيقفاوتلا ذخآملاو
.ةليوط ةرتفل همادختسا مدع دنع وأ ةيدعر فصاوع دوجو لاح يف زاهجلا اذه لصفا
زاهج لظي نأ بجي ،لصف زاهجك يئابرهكلا زاهجلا نراق وأ ةقاطلا سباق مادختسا ةلاح يف
.ليغشتلل
ً
باق لصفلا

173
AR
.ةقاطلا ذخأم نع ةزهجا لك لصف ىلع صرحا ،اهرييغت وأ تيصوت يأ ءارجإ لبق
.ا
ً
قلطم نيتللبم نيديب ةقاطلا لصوم وأ ةقاطلا لبك سملت
عمسلا ةمس
توص تايوتسم ىلع ةليوط ةينمز تارتفل ىقيسوملا ىلإ عمتست ،عمسلاب ررضلا قاحلإ عنمل
.نمآ ىوتسم ىلع توصلا ىوتسم طبضا .ةيلاع
نحشلا
C عون نم USB رشابم رايت / جرخ دهج عم DST451-150300W-K وه نحاشلا عون
لوصولا لهسي ناكم يفو جتنملا اذه نم برقلاب نحاشلا بيكرت بجي .ريبمأ 2 / تلوف 5 ةردقب
.هيلإ
.طقف يلخادلا مادختسل ممصم نحاشلا اذه
41 نيب ام حوارتت( ةيسايقلا ةفرغلا ةرارح ةجردب ز
ّ
يمتت ةئيب يف زاهجلا اذه ع
َ
ض ،نحشلا ءانثأ
ةيوهتلابو )ةيوئم ةجرد 25 ىلإ ةيوئم تاجرد 5 / تياهنرهف ةجرد 77 ىلإ تياهنرهف ةجرد
.ةديجلا
رادصإ يأ وأ 2.0 رادصا نم USB ذفنمب زاهجلا اذه ليصوت بجي ،ةيواحلا داوم ببسب
.ىلعأ
ةيراطبلا
.اهلادبتس دمتعملا ةمدخلا زكرمب لصتا .كسفنب ةجمدملا ةيراطبلا لدبتست
دعب نع م
ّ
كحتلا زاهج ءاقبإ بجي .اهعتبا نكمي تايراطب ىلع دع
ُ
ب نع م
ّ
كحتلا زاهج يوتحي
.لافطا لوانتم نع ا
ً
ديعب
وأ ،ةرشابملا سمشلا ةعشأ وأ ،ةرارحلا نع ا
ً
ديعب تايراطبلا دوجو ىلع ظفاح !راجفنا رطخ
.قرحلا قيرط نع تايراطبلا نم صلختلا بنجت .رانلا
.هنم تايراطبلا ةلازإ بجي ،ةليوط ةرتفل دع
ُ
ب نع م
ّ
كحتلا زاهج مادختسا مدع ةلاح يف
.طقف هل يزاوملا وأ هسفن عونلاب دعب نع م
ّ
كحتلا زاهج تايراطب لدبتسا
.بسانم لكشب اهنم ص
ّ
لختلا بجي اذل ،ةيئايميك داوم ىلع تايراطبلا يوتحت
.ا
ً
مامت ةغراف هتيراطب تناك اذإ زاهجلا اذه ن
ّ
زخت .ماظتناب زاهجلا اذه نحشا
فيظنتلا
وأ ،ةيزاغلا وأ ،ةلئاسلا تافظنملا ا
ً
قلطم مدختست .ربولا نم ةيلاخو ةمعان شامق ةعطق مدختسا
.فيظنتلا ضرغل ةلوهسب لاعتشل ةلباقلا
فيلغتلا ءاشغب ررضلا قاحلإ ب
ّ
نجتل كلذو ،ةسدعلا فيظنتل ةلئاس فيظنت ةدام مدختست
.ةسدعلا ىلع دوجوملا
.حطسلا شدخت يك رذحلا خوت .قفرب حطسا حسما
.ةسدعلا فيظنتل تاسدعلا فيظنت قاروأ مدختسا
تاحصا

AR
174
.طقف دمتعملا ةمدخلا زكرم ىدل هحصإب مق .كسفنب زاهجلا اذه يف تاحيلصت يأ ءارجإب مقت
.زاهجلا اذهب ا
ً
ررض قحلت وأ ،صاخشا تاباصإب ةحيحصلا ريغ ةنايصلا ببستت دق
.ل
ّ
هؤملا ةمدخلا قيرفل ةنايصلا لامعأ لك لكوأ
ريذحت
.ةريطخ ةيرصب تاعاعشإ زاهجلا اذه نم ثعبنت دق
.كي
َ
نيع عطاسلا ءوضلا يذؤي دقف .ليغشتلا ةعشأ يف
ً
ةرشابم ق
ّ
دحت
ةيلوؤسملا ءخإ
Eye ةفيظو طيشنت نكمي امم ،بلصو
ٍ
وتسم حطس ىلع Nebula Astro زاهج عضو نم دكأت
.ربكأ ةقدب Guard
.طقف ةيعجرملا ضارغل وه Eye Guard ةفيظو طيشنتل هطبض مت يذلا ةفاسملا قاطن
.ةسدعلا ةيساسح ىلع رثؤت دق وأ ،محشلا نم اهولخو ةسدعلا ةفاظن ىلع ظفاح
نع ضرعلا زاهج ليوحتب كلافطأ ماق لاح يف طقف ةيامحلل Eye Guard ةفيظو ميمصت مت
.كينيع وحن ا
ً
دمع ضرعلا زاهج هيجوتب مقت .مهسفنأ وحن أطخلا قيرط
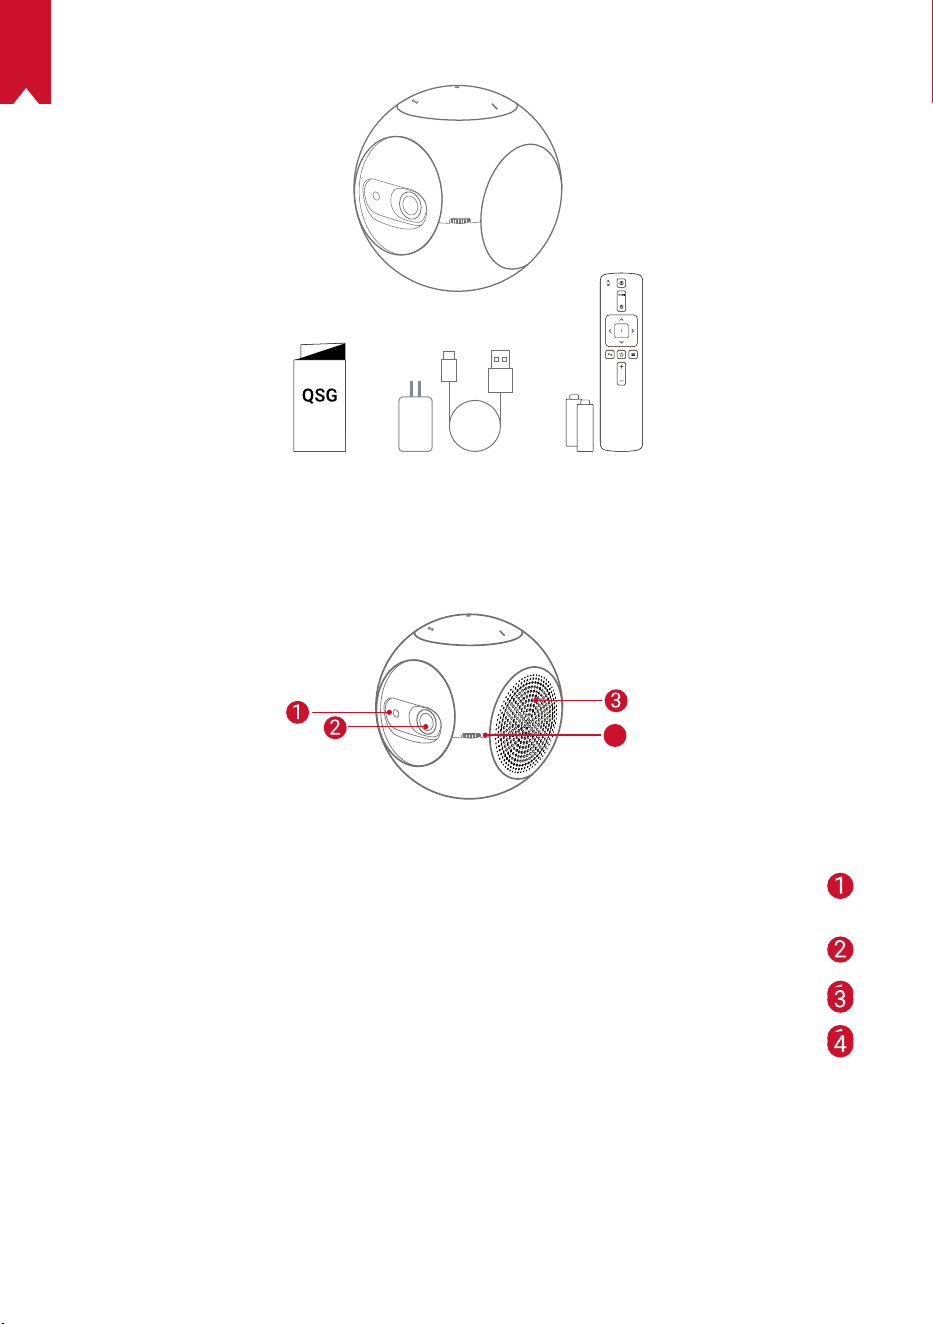
175
AR
ةن
ّ
مضملا مزاوللا
ةماع ةرظن
يماما رظنملا
4
TOF motio ensor
Eye Guard طيشنت دنع رعشتسملا ليغشت متيس
ةسدعلا
ةيوهتلا لخدم / جرخم
زيكرتلا طبض ضبقم
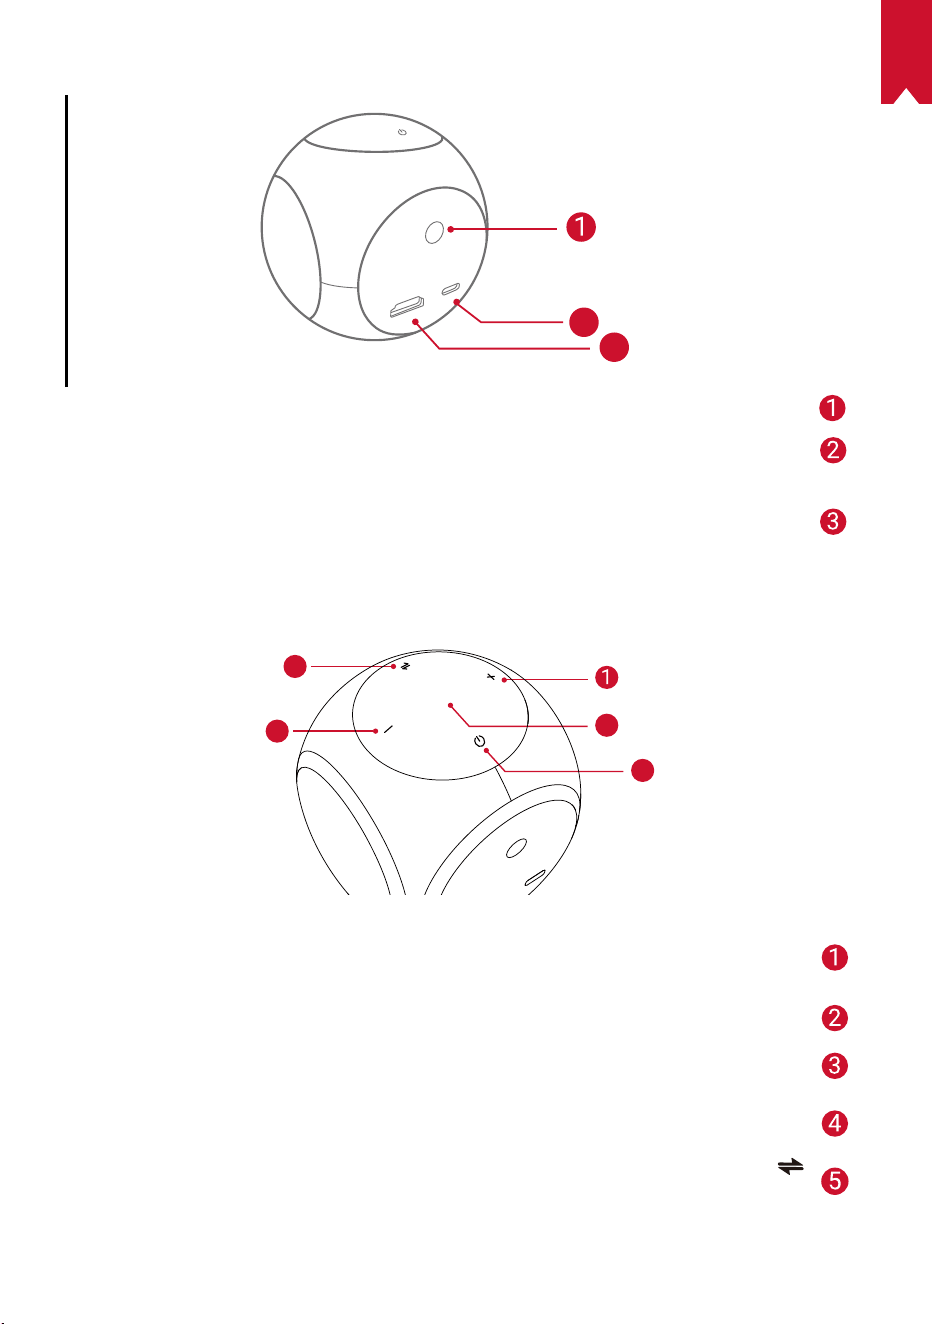
AR
176
يفلخلا رظنملا
HDMI
Astro
TYPE-C
2
3
ءارمحلا تحت ةعشا لبقتسم
USB-C ذفنم
ةقاطلا ردصمب ليصوتلل
HDMI
HDMI جرخم قيرط نع ليغشت زاهجب ليصوتلل
يولعلا رظنملا
5
4
3
2
توصلا ىوتسم عفر
توصلا ىوتسم عفرل طغضا
LED رشؤم
ليغشتلا رز
ليغشتلا فاقيإ / ليغشتلل نيتيناث ةدمل رارمتسا عم طغضا
توصلا ىوتسم ضفخ
توصلا ىوتسم ضفخل طغضا
رزلا
ضرعلا زاهج عضوو Bluetooth ةينقتب توصلا ر
ّ
بكم عضو نيب ليدبتلل طغضا
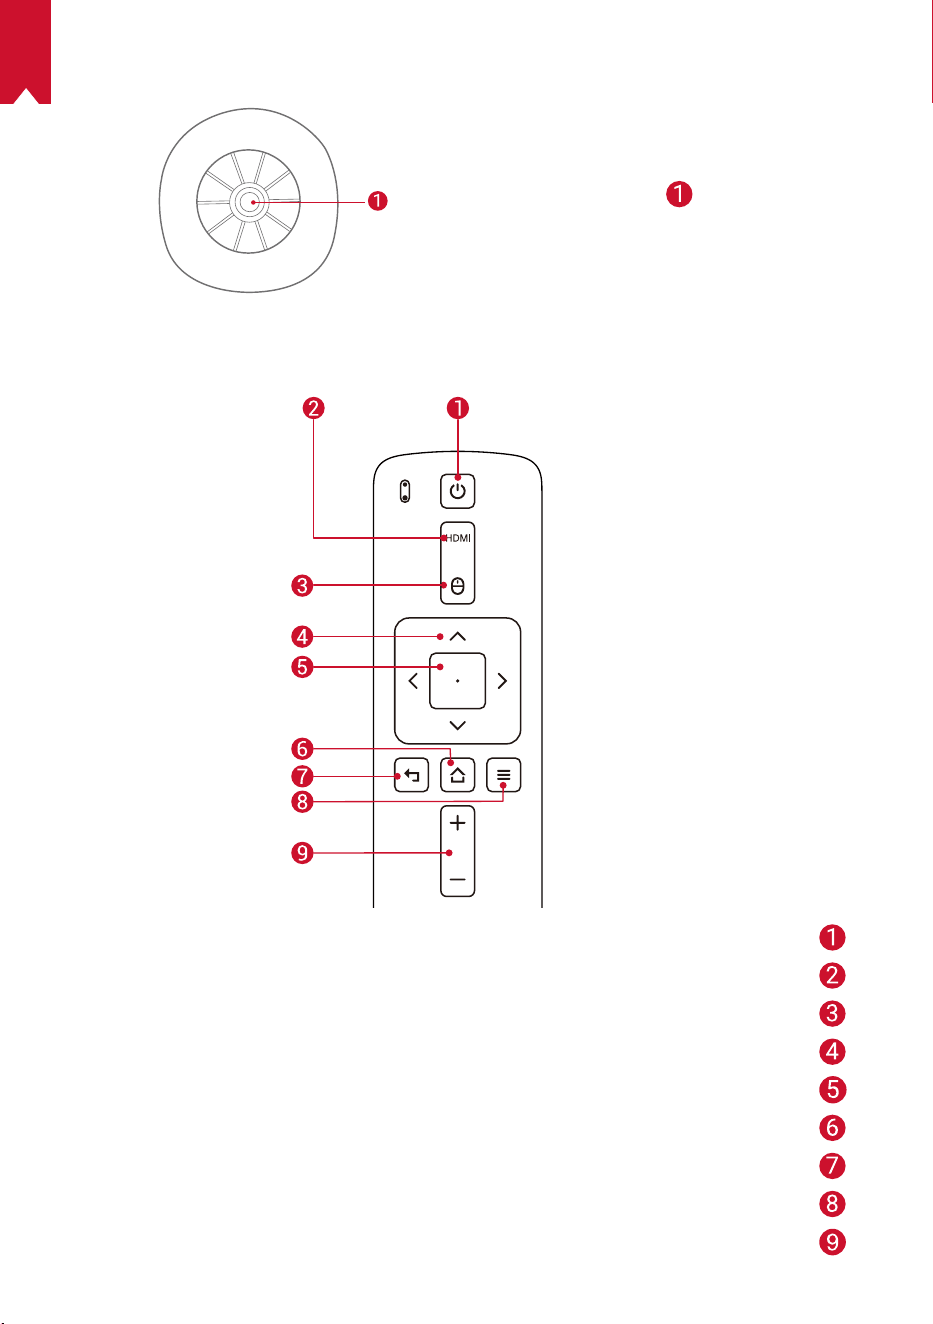
177
AR
يلفسلا رظنملا
مئاوقلا يثث لماحلا سبقم
دع
ُ
ب نع م
ّ
كحتلا زاهج
ليغشتلا فاقيإ / ليغشتلل
HDMI لاصتا ىلإ ليدبتلا
سواملا عضو
لقنتلا
ددحملا ىوتحملا ديكأت
ةيسيئرلا
ةيفلخلا ةهجلا
تارايخلا نم ديزملا ضرع
هضفخ / توصلا ىوتسم عفر

AR
178
LED رشؤم
فصولا LEDرشؤم ةلاح
Eye Guard ةفيظو طيشنت مت ضماو يلاقترب
طنحشلا
باث رمحأ
طحشلا لمتكا
تباث رضخأ
لطع ثودح / )20% <( ةيراطبلا ىوتسم ضافخنا ماو رمحأ
توصلا ربكم عضو وأ ضرعلا زاهج عضو يف ليغشتلاب مق
Bluetooth ةينقتب
تباث قرزأ ءوض
ضرعلا زاهج عضو يف دادعتسا تباث يلاقترب
ربكم عضو( Bluetooth لاصتا عطق مت / نارقل زهاج
)Bluetooth ةينقتب توصلا
ضماو قرزأ
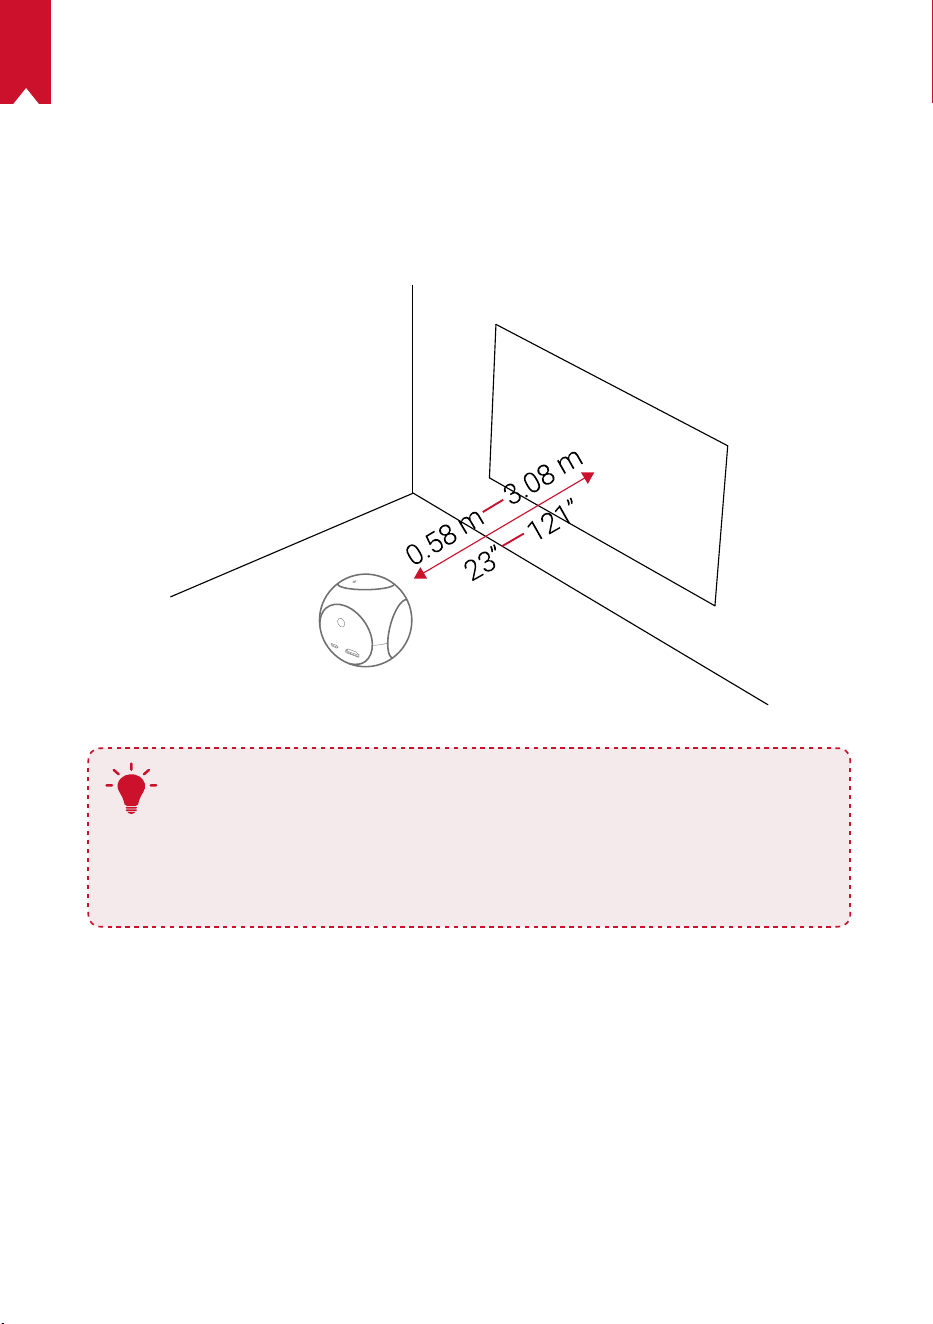
179
AR
مادختسا ءدب
زاهجلا عضو ناكم
لضفأ ىلع لوصحلل .ضرعلا حطس مامأ
ِ
وتسمو تباث حطس ىلعNebula Astro عض
نيب ةفاسملا غلبت نأ يغبني .ا
ً
ح
ّ
طسمو نوللا ضيبأ ضرعلا حطس نوكي نأ بجي ،جئاتنلا
121( ا
ً
رتم 3,08و ىندأ دحك )ةصوب 23( ا
ً
رتم 0,58 ضرعلا حطسو Nebula Astro
.ةصوب 100و 20 نيب طاقسإ ةروص ىلع لوصحلل ىصقأ دحك )ةصوب
T
ةروص حيحصت كنكمي .ضرعلا حطس هاجتاب Nebula Astro ةلام يعاد
.ةن
ّ
مضملا روحملا حيحصت ةزيم ةطساوب ضرعلا
.ضرعلا ةروص مجح ضرعلا حطسو Nebula Astro نيب ةفاسملا ددحت
80و 40 نيب حوارتت ةفاسم ىلع هعضوب مق ،ةجيتن لضفأ ىلع لوصحلل
.ضرعلا حطس نم ةصوب
دع
ُ
ب نع م
ّ
كحتلا زاهج ريضحت
.AAA مجحب نيتيراطبب ا
ً
د
ّ
وزم دع
ُ
ب نع م
ّ
كحتلا زاهج يتأي
.ةيراطبلا ةرجح حتفل لفس ريرمتلاب مق ①
قباطتت( ةديدج تايراطب لخدأو ،ةيراطبلا ةرجح حتفل ريرمتلاب مق ،تايراطبلا لادبتس ②
.ةيراطبلا ةرجح قلغأ مث ،)اهيلإ راشملا )-/+( ةيبطقلا عم
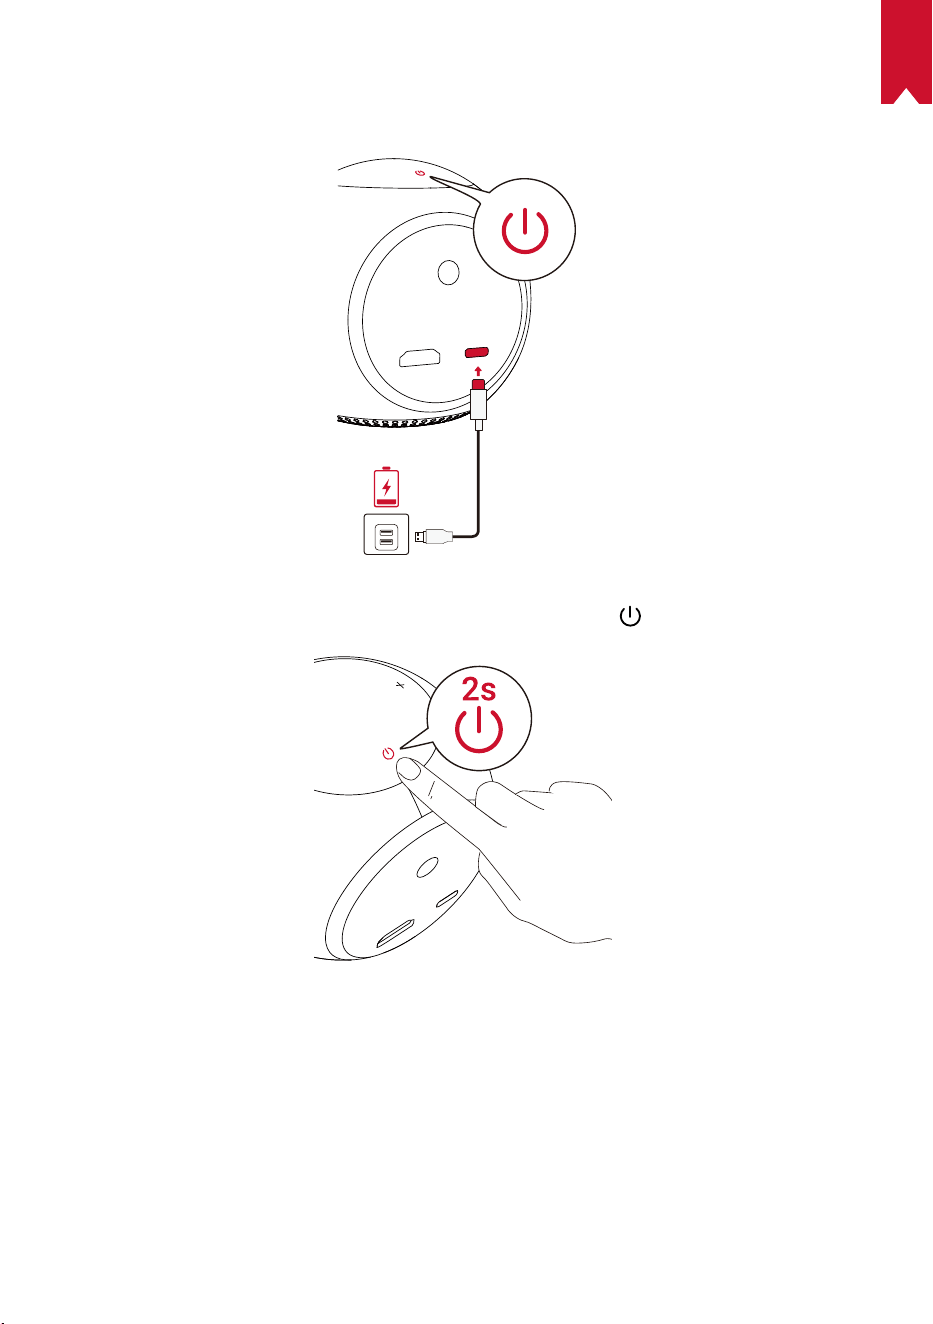
AR
180
مادختسا ءدب
ئياهملاو لبكلا مادختساب لماكلاب ةجمدملا ةيراطبلا نحشب مق ،ىلوا ةرملل مادختسا دنع ①
.قفرملا
.هليغشتل ضرعلا زاهج ىلع نيتيناث ةدمل ىلع رارمتساب طغضا ②
.بسانم طئاح وأ طاقسإ حطس وحن زاهجلا ه
ّ
جو ③
.زيكرتلا طبضل ضبقملا ريودتب مق ④
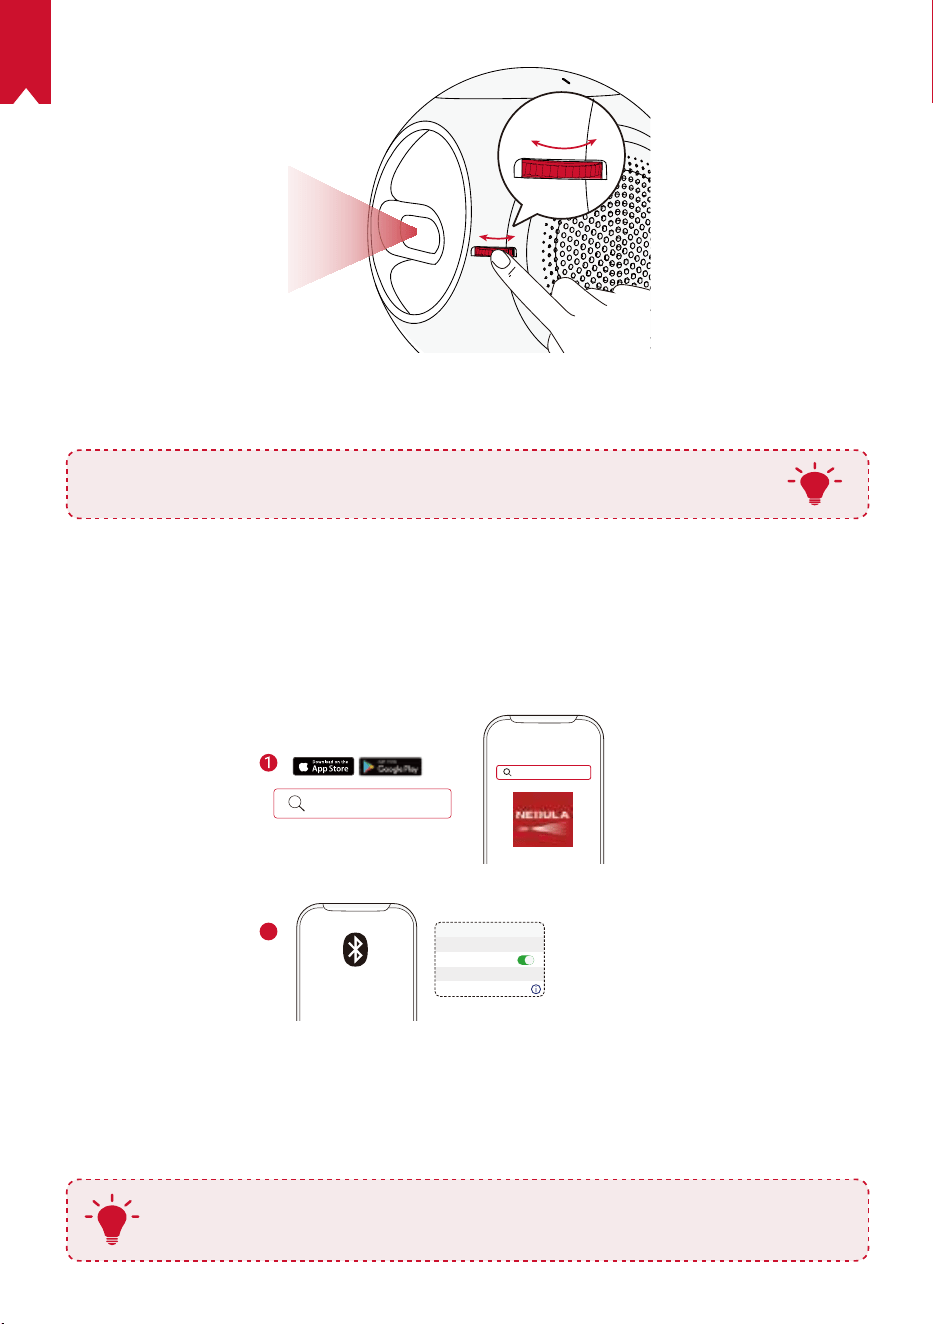
181
AR
دادعا لامك ةشاشلا ىلع رهظت يتلا تاداشرا عبتا ،ىلوا ةرملل مادختسا دنع ⑤
.يساسا
T
.طقف رفوتملا ل
ّ
وحملا مدختسا ،ا
ً
نامأ رثكأو عرسأ نحش Nebula Astro حنمل
Nebula Connect قيبطت
.Nebula Connect قيبطت ليزنتب يصون ،Nebula Astro زاهج يف ةلوهسب مكحتلل
.كفتاه ةشاش مادختساب سواملا ليغشت كنكمي ،قيبطتلا اذه مادختساب
ماظنب لمعت يتلا ةزهجل( App Store نم Nebula Connect قيبطت ليزنتب مق ①
.)Android ماظنب لمعت يتلا ةزهجل( Google Play وأ )iOS
Nebula Connect
< Settings Bluetooth
Nebula-xxxxxx
Bluetooth
Connected
DEVICE
Nebula Connect
2
.يكذلا كفتاه ىلع Bluetooth نيكمت ②
ليصوت متيل ]Nebula-XXXXXX[ ددحو Nebula Connect قيبطت حتفا ③
`.زاهجلا
.ليصوتلا دادعإ لامكتس ةشاشلا ىلع رهظت يتلا تاميلعتلا عبتا ④
T
نم
ً
دب Nebula Connect قيبطت مادختساب كيصون ،ةعتم رثكأ كتبرجت لعجل
.دعب نع مكحتلا زاهج
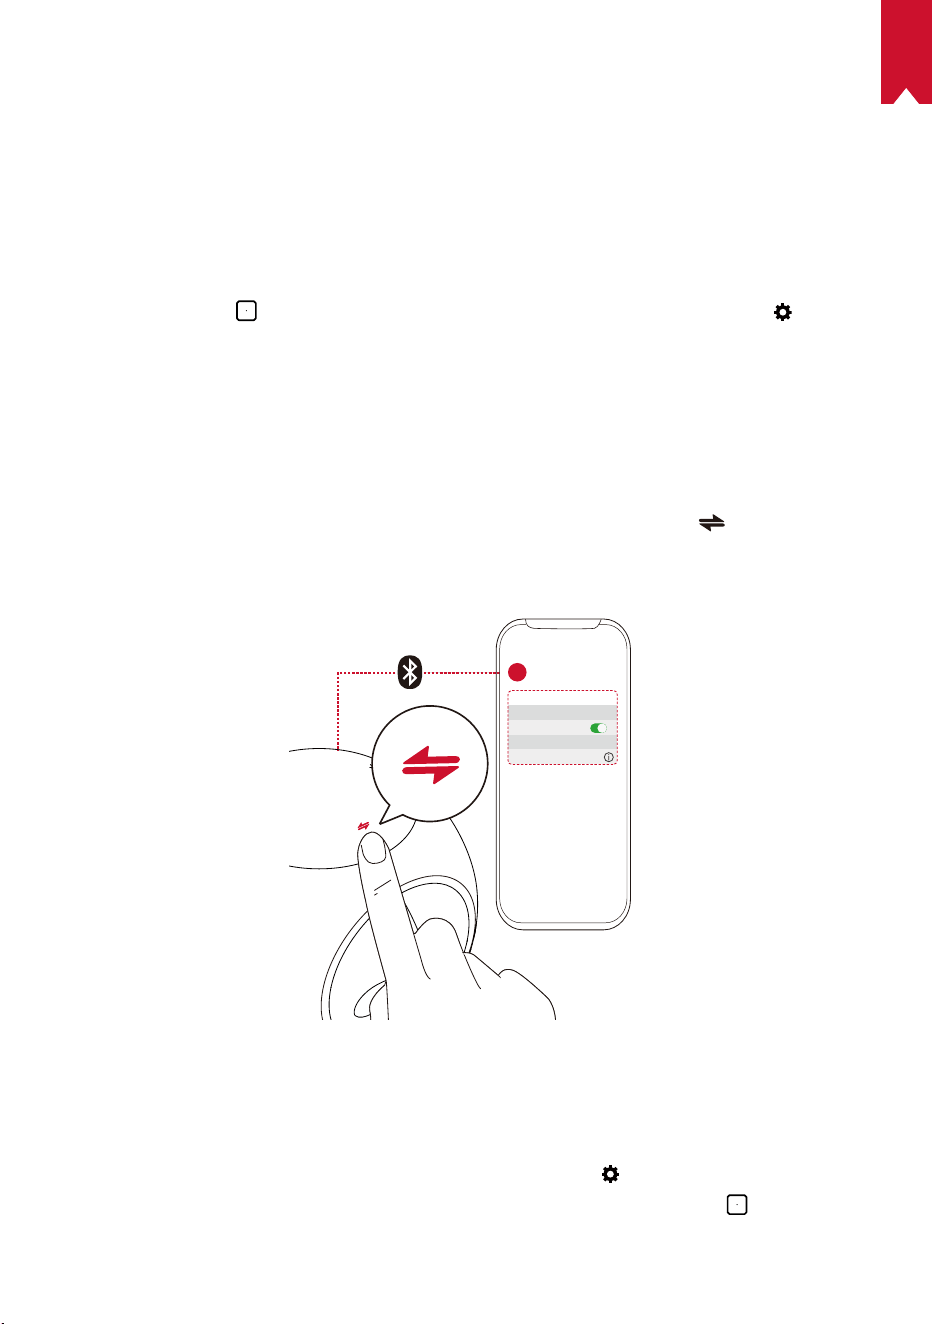
AR
182
تادادعا
ةفاسملا قاطن ددح .ىلوا ةرملل Nebula Astro زاهج ليغشت دنع دادعا ةيلمع لمكتسا
.رورملا ةملكو ،كديم خيراتو ،كمسا نييعتب مقو ،Eye Guard ليغشتل
ةكبشلا
.)Wi-Fi( يكلس لاصتا ربع تنرتناب اذه ضرعلا زاهج ليصوت نكمي
.
ىلع طغضاو ]ةكبشلا[ ددح .تادادعا ةحفص ىلإ لوصولل ددح ①
.ةكبشلا لاصتا لامك ةشاشلا ىلع رهظت يتلا تاداشرا عبتا ②
ثوتولب
Bluetooth ةينقتب توصلا ربكم عضو
.Bluetooth ةينقتب لقتسم توص ر
ّ
بكمك اذه ضرعلا زاهج مادختسا كنكمي
.Bluetooth ةينقتب توصلا ربكم عضو ىلإ ليدبتلل ىلع طغضا ①
متيل ]Nebula-XXXXXX[ ددحو ،يكذلا كفتاه ىلع Bluetooth نيكمتب مق ②
.زاهجلا ليصوت
< Settings Bluetooth
Nebula-xxxxxx
Bluetooth
Connected
DEVICE
2
1
ضرعلا زاهج عضو
قيبطتب سأرلا تاعامس نارقإ وأ ،Bluetooth ةينقتب توصلا ر
ّ
بكمب لاصتا كنكمي
.ضرعلا زاهج عضو يفNebula Astro
]Bluetooth[ ددح .تادادعا ةحفص ىلإ لوصولل
ددح ،ةيسيئرلا ةمئاقلا يف ①
.رما مزل اذإ رورملا ةملك لاخدإب مق .
ىلع طغضاو
.Bluetooth لاصتا لامك ةشاشلا ىلع رهظت يتلا تاداشرا عبتا ②

183
AR
ضرعلا ةشاش
ةشاش[ ددح .تادادعا ةحفص ىلإ لوصولل تادادعا ةنوقيأ ددح ،ةيسيئرلا ةمئاقلا يف
. ىلع طغضاو ،]ضرعلا
]ةروصلا عضو[ ]ةيراطبلا عضو[ / ]يسايقلا عضولا[ / ]يئاقلت[
]نيعلا ةحار عضو[
]ليغشت فاقيإ[ / ]ليغشت[
.نيعلا ةحار عضو ليطعت وأ نيكمت
]Eye Guard ةينقت[
ليغشتلا فاقيإ ىلإ اهنييعت متي Eye Guard ةفيظو ليطعت مت :]ليغشت فاقيإ[
.يضارتفا لكشب
مس 20 < ىلع ضرعلا زاهج طبض دنع :]مس60 <[ / ]مس40 <[ / ]مس20 <[
زاهج ليطعت متيسو Eye Guard ةينقت طيشنت متيس ،مس 60 < / مس 40 < /
.ةنيعم ةفاسم نمض كب صاخلا ضرعلا
]يئاقلتلا روحملا حيحصت[
.يئاقلتلا روحملا حيحصت ةزيم ليطعت / نيكمتل
]ضرعلا زاهج عضو[
.ضرعلا حطس مامأ ضرعلا زاهج عضو متي :]يماما ضرعلا[
.ضرعلا حطس فلخ ضرعلا زاهج عضو متي :]يفلخلا ضرعلا[
نم ضرعلا زاهج ىلدتي امدنع :]سوكعملا يماما ضرعلا[
.ةجرد 180 لدعمب ةروصلا ريودت متي .بقع ىلع ا
ً
سأر فقسلا
نم ضرعلا زاهج ىلدتي امدنع :]سوكعملا يفلخلا ضرعلا[
ةروصلا ريودت متي .ضرعلا حطس فلخ بقع ىلع ا
ً
سأر فقسلا
.ا
ً
يقفأ اهسكعو ةجرد 180 لدعمب
يلئاعلا فارشا
طغضاو ،]يلئاعلا فارشا[ ددح .تادادعا ةحفص ىلإ لوصولل
ددح ،ةيسيئرلا ةمئاقلا يف
. ىلع
]رورملا ةملك تادادعإ[ ]ليغشت فاقيإ[ / ]ليغشت[[
]رورملا ةملك رييغت[
رييغت نيكمت متي ،ليغشت ىلع رورملا ةملك تادادعإ طبض دنع
ةملك نييعت ةداعإو رييغت نم رايخلا اذه كنكمي .رورملا ةملك
مقرلا+nebula وه يسيئرلا زمرلا .كب ةصاخلا رورملا
.يضارتفا لكشب يلسلستلا
]ةددحملا ةينمزلا ةدملا[
زاهج ىلإ لوصولاب كلفطل اهيف حمس
ُ
ي يتلا ةددحملا ةينمزلا ةدملا وأ تقولا نييعتب مق
.ا
ً
يموي ضرعلا

AR
184
تاقيبطتلا يف مكحتلا
ىلع بولطملا بيترتلاب هفينصت وأ ،هؤافخإ وأ ،قيبطتلا راهظإ نم تاقيبطتلا يف مكحتلا كن
ّ
كمي
.لافطا عضو يف ةيسيئرلا ةشاشلا
،]تاقيبطتلا يف مكحتلا[ ددح .تادادعا ةحفص ىلإ لوصولل
ددح ،ةيسيئرلا ةمئاقلا يف ①
. ىلع طغضاو
.ددحملا قيبطتلا عقوم رييغتل ىلع رارمتسا عم طغضا ②
قيبطتلا ريدم
،]قيبطتلا ريدم[ ددح .تادادعا ةحفص ىلإ لوصولل
ددح ،ةيسيئرلا ةمئاقلا يف ①
. ىلع طغضاو
ققحتو ا
ً
يرابجإ هفقوأ وأ قيبطتلا حتفا مث يلاحلا رادصا نم ققحتو تاقيبطتلا دحأ ددح ②
.قيبطتلا تيبثت
ِ
غلا وأ تانايبلا حسما وأ مدختسملا نيزختلا نم
ىرخأ
.دادعا تارايخ نم ديزم ىلع روثعلل
ددح ،ةيسيئرلا ةمئاقلا نم
]ماع[
]ةغللا[
.ةشاشلا ىلع ضرعلا ةغل ديدحتل
]حيتافملا ةحول ةمغن[
.حيتافملا ةحول ةمغن ليغشت فاقيإ / ليغشتل
]نوكسلل يئاقلتلا ينمزلا لصافلا[
ةقيقد 30 / ةقيقد 15 / قئاقد 5
]ةيفلخلا[
.ةيفلخ ديدحتل
]تقؤملا نيزختلا ةركاذ حسم[
.ضرعلا زاهج ىلع اهنيزخت مت يتلا ا
ً
تقؤم ةنزخملا تانايبلا حسم
]ةشاشلا سكع[
.ةشاشلا ةقباطم طيشنتل
]تقولاو خيراتلا[
]نايئاقلتلا تقولاو خيراتلا[
.امهليطعت / نييئاقلتلا تقولاو خيراتلا نيكمتل
]ةينمزلا ةقطنملا ديدحت[
.ةينمزلا ةقطنملا ديدحتل
]ةعاس 24 قيسنت مادختسا[
.ةعاس 12 وأ ةعاس 24 قيسنت ديدحتل
]ةيقرتلا[
]ثيدحت دوجو نم ققحتلا[
عبتا .ثدحا وه همدختست يذلا رادصا ناك اذإ امم ققحتلل
جمانربلا رادصإ ةيقرتل ةشاشلا ىلع رهظت يتلا تاداشرا
.تباثلا
]لوح[
]دادرتسا[
.ةنمضملا نيزختلا ةدحو يف ةدوجوملا تانايبلا لك وحم متيس
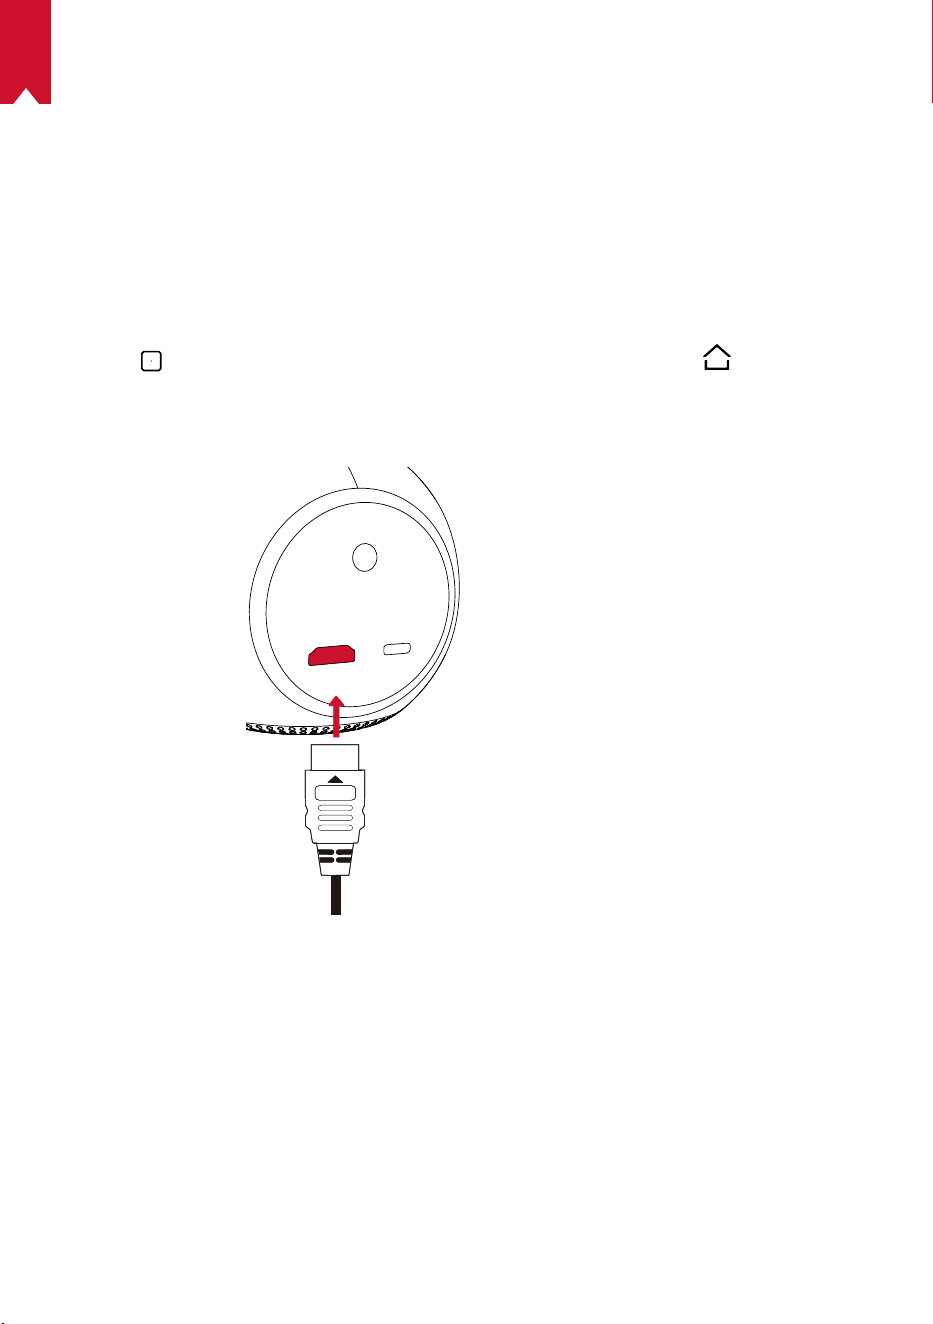
185
AR
Nebula Astro مادختسا
HDMI ـب ةد
ّ
وزملا ليغشتلا ةزهجأ نم ليغشتلا
TV لثم ةفلتخملا HDMI ـب ةد
ّ
وزملا ليغشتلا ةزهجأب Nebula Astro زاهج ليصوت نكمي
مكحتلا تادحو وأ ،)STB( ريفشتلا كف زاهج وأ ،DVD لغشم وأ ،TV stick وأ ،box
.ىرخأ ةزهجأ وأ ،باعلاب
:HDMI ـب ةد
ّ
وزملا ليغشتلا ةزهجأ نم ىوتحم ليغشتل
HDMI لبك مادختساب HDMI ـب د
ّ
وزم ليغشت زاهجب Nebula Astro ليصوتب مق ①
.)رفوتم ريغ(
.
ىلع طغضا مث ،]HDMI[ ددحو ،ةيسيئرلا ةمئاقلا ىلإ لوصولل ىلع طغضا ②
• ةرملل HDMI ـب د
ّ
وزم ليغشت زاهجب ليصوتلا درجمب ا
ً
يئاقلت HDMI ليغشت أدبيس
.ىلوا
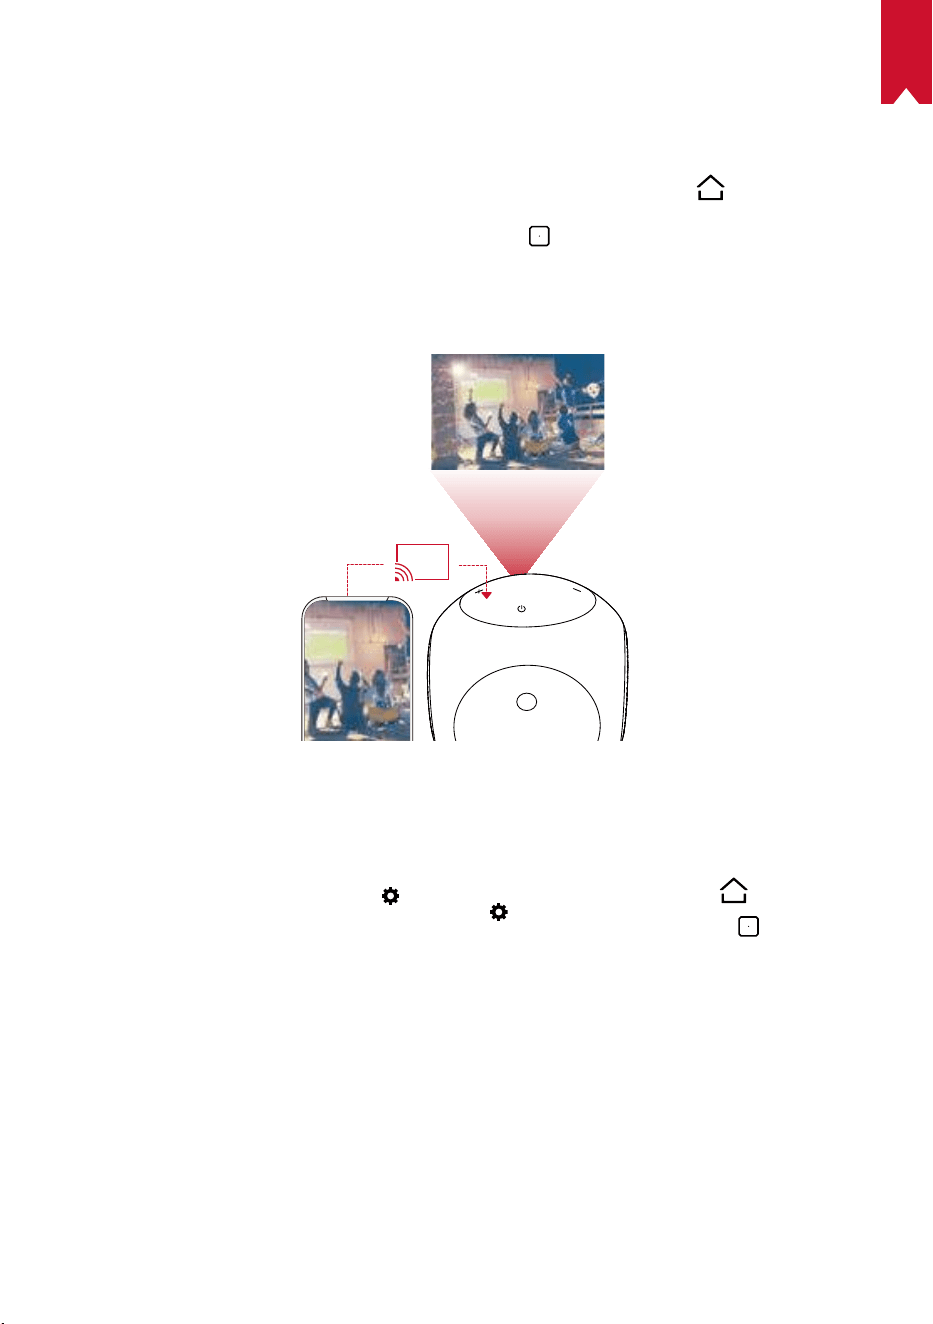
AR
186
تاقيبطتلا تيبثت
عاتمتساو تنرتنا ربع تامدخلا ىلإ لوصولا كناكمإب حبصي ،ةيكلس ةكبشب لصتت امدنع
،ا
ً
قبسم ةتبثملا تاقيبطتلا ىلإ ةفاضاب .تنرتنا ربع ح
ّ
فصتلاو ،روصلاو ،ىقيسوملاو ،مفاب
.Nebula تاقيبطت رجتم نم ةيفاضإ تاقيبطت تيبثت ا
ً
ضيأ كنكمي
.ةيسيئرلا ةمئاقلا ىلإ لوصولل
ىلع طغضا ①
.
ىلع طغضاو ،تنرتنإ ةمدخ ددح ②
ةشاشلا ةقباطم
.ا
ً
يكلس ضرعلا حطس ىلع يحوللا رتويبمكلا وأ يكذلا كفتاه ةشاش ضرع كنكمي
:Android يمدختسمل
:ةشاشلا ةقباطم مادختس
مث ،]ةشاشلا ةقباطم[ > ]ماع[ >
ددحو ،ةيسيئرلا ةمئاقلا ىلإ لوصولل قوف رقنا ①
. ىلع طغضا
.ةيلمعلا لامك ةشاشلا ىلع رهظت يتلا تاداشرا عبتا ②
•.يحوللا رتويبمكلا وأ يكذلا فتاهلا ةشاش Nebula Astro زاهج قباطي فوس
:iOS يمدختسمل
.مكحتلا زكرم حتفا ①
• :ثدحأ رادصإ وأ iOS 12 ماظنب iPad وأ ثدحأ رادصإ وأ iPhone X ىلع
.ةشاشلا نم ىنميلا ةيولعلا ةيوازلا نم لفس بحسا
• بحسا :ثدحأ رادصإ وأ iOS 11 ماظن وأ ثدحأ رادصإ وأ iPhone 8 ىلع
187
AR
.ةشاش ي ةيلفسلا ةفاحلا نم ىلع
.ةشاشلا ةقباطم ىلع طغضا ②
ةشاش ةقباطمب Nebula Astro موقيس .ةمئاقلا نم Nebula-xxxxxx ددح ③
.كب ةصاخلا iPad وأ iPhone
T
.اهسفن ةكبشلاب نيلصتم فتاهلاو Nebula Astro نأ نم دكأت
يف .رشنلا قوقح دويق ببسب Nebula Astro ىلع نيعم ىوتحم ضرع نكمي
.Nebula Astro ىلع ت
ّ
بثملا هسفن قيبطتلا ربع ىوتحملا ثب كنكمي ،ةلاحلا هذه
AR
188
تافصاوملا
.راعشإ نود نم رييغتلل ةضرع ميمصتلاو تافصاوملا نإ
ريبمأ 2 تلوف 5 رشابم رايت :ةقاطلا ردصم
طاو 10 < :ةقاطلا كهتسا
طاو 0.5 < :دادعتسا عضو يف ةقاطلا كهتسا
DLP لسكب854x 480 ةصوب 0.2 :ةشاشلا ةينقت
)قرزاو رضخاو رمحا نوللا( RGB معدي LED ءوض :يئوضلا ردصملا
ةصوب 20-100 :ضرعلا ةروص مجح
لسكب 480 x 854 :ة
ّ
قدلا
ANSI Lumens 100 :عوطسلا
400:1 :نيابتلا ل
ّ
دعم
1,3 :طاقسا ل
ّ
دعم
ا
ً
رتم 3,08 ىلإ ا
ً
رتم 0,58 نم :طاقسا ةفاسم
CPU(: Quad core A7( ةيزكرملا ةجلاعملا ةدحو
7.1 ديوردنأ :ليغشتلا ماظن
DDR تياباجيج RAM(: 1( يئاوشعلا لوصولا ةركاذ
تياباجيج 8 ةعس ROM(: eMMC( طقف ةءارقلا ةركاذ
طاو 6 :توصلا ر
ّ
بكم ليغشت جمارب
اجيج 5 / اجيج 2.4 جودزم ددرت Wi-Fi: IEEE802.11a/b/g/n لاصتا
Bluetooth: 4,2 رادصإ
USB: FAT32 تافلم ماظن
رميلوب مويثيل ةيراطب :ةن
ّ
مضملا ةيراطبلا عون
تلوف 3.63 ةعاسلا يف ريبمأ يللم 3250 :ةعسلا
ةيراطبلا عضو يف ا
ً
بيرقت تاعاس 2.5 :مليفلا ليغشت تقو
Bluetooth ةينقتب توصلا ربكم عضو يف ا
ً
بيرقت ةعاس 14 :ىقيسوملا ليغشت تقو
2 x AAA :دعب نع م
ّ
كحتلا زاهج تايراطب
ةجرد 35 ىلإ 5 نم / تياهنرهف ةجرد 95 ىلإ 41 نم :اهب
َ
صوملا ةطيحملا ةرارحلا ةجرد
ةيوئم
)فثاكت نود نم( 85% ىلإ 15% نم :ةيبسنلا ةبوطرلا
90% < ،ةيوئم ةجرد 65 / تياهنرهف ةجرد 149 < :اهتبوطرو نيزختلا ةدحو ةرارح ةجرد
ةبوطر
3.5 × 3.2 × 3.6 / مم 89.2 × 82 × 91.2 :)ضرعلا × عافترا × لوطلا( داعبا
ةصنوأ 13.1 / مج 370 :نزولاةصوب

189
AR
اهحصإو ءاطخا فاشكتسا
؟دعب نع مكحتلا زاهج مادختساب ضرعلا زاهج ليغشت رذعت له ①
.هليغشتل ضرعلا زاهج ىلع نيتيناث ةدمل ىلع رارمتساب طغضا
.هليغشتل دع
ُ
ب نع م
ّ
كحتلا زاهج مادختسا كنكمي ،ليغشتلا نع ا
ً
فقوتم زاهجلا نوكي امدنع
؟دع
ُ
ب نع م
ّ
كحتلا زاهج ل
ّ
طعت له ②
.دع
ُ
ب نع م
ّ
كحتلا زاهج يف لعفلاب ةب
ّ
كرم تايراطبلا
ّ
نأ نم دكأت
.تايراطبلا لدبتسا
؟ةحضاو ريغ ةروصلا له ③
.زيكرتلا ليدعت سبقم ريودتب مق
؟Wi-Fi ةكبشب لاصتا كيلع رذعتي له ④
.ا
ً
ددجم ةلواحملا دعأو ةرفوتملا تاكبشلا ةحئ ثيدحتب مق
.ةلواحملا دعأ مث ضرعلا زاهج وأ يكلسلا ه
ّ
جوملا ليغشت دعأ
؟ةتباثلا جماربلا ثيدحت يننكمي فيك ⑤
.ثيدحتلاو ليغشتلا ةداعإ كنم بلط
ُ
يس ،ديدج رادصإ فاشتكا دنع