
At a Glance
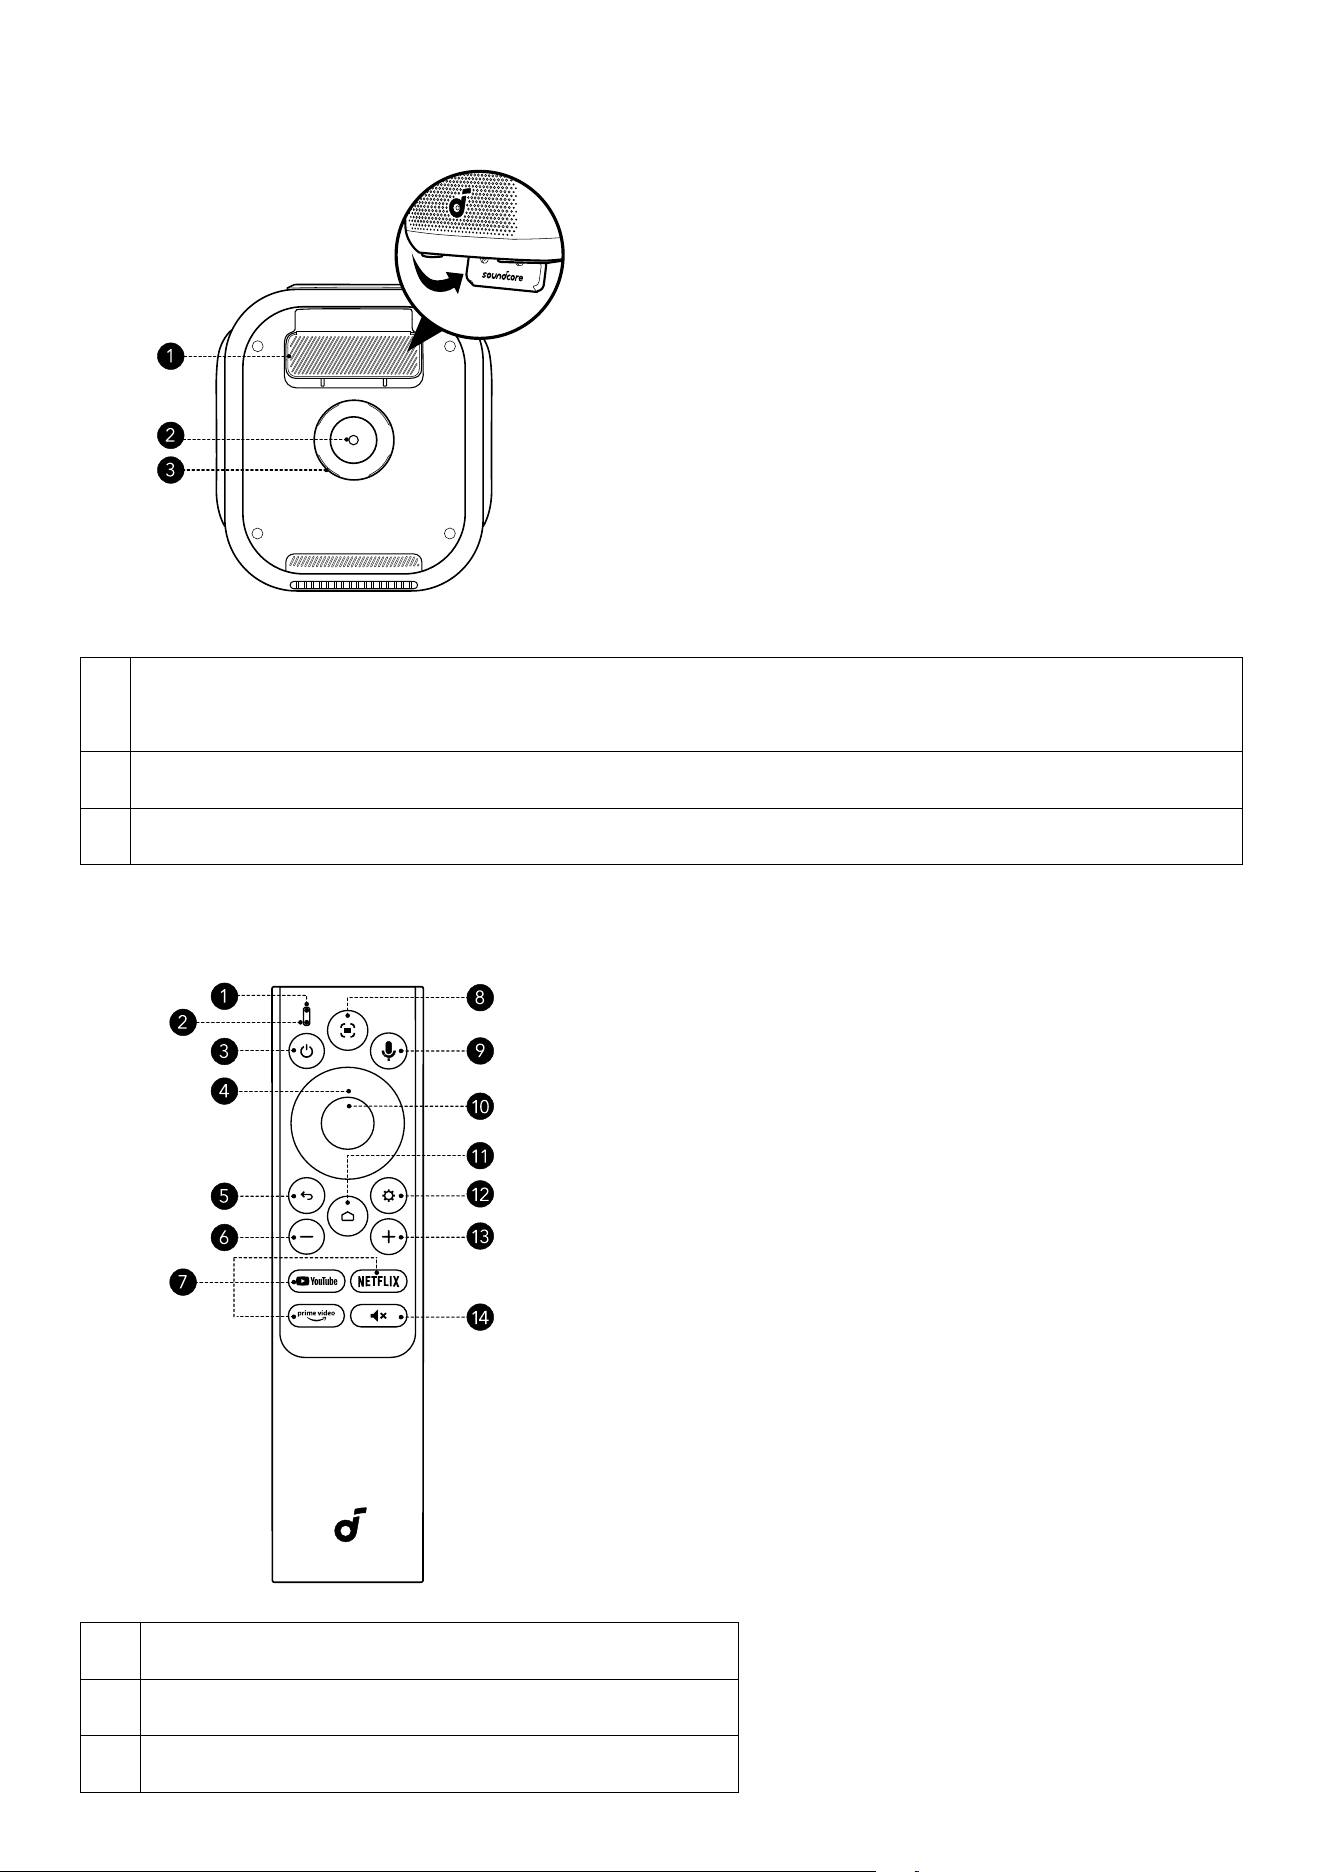
1. Front View
1 Detachable Handle
2 Lens Ring
3 Lens Assembly
4 Grip Slot
5 Air Ventilation (Inlet)
6 Camera
2. Rear View
DC IN
HDMI
USB-A AUX
Nebula P1i
1 Power Button (With light)
2 DC-In
3 HDMI (ARC) Input Port
4 USB-A port
5 AUX-Out Port
6 Infrared Receiver
7 Speaker × 2
8 Air Ventilation (Outlet)
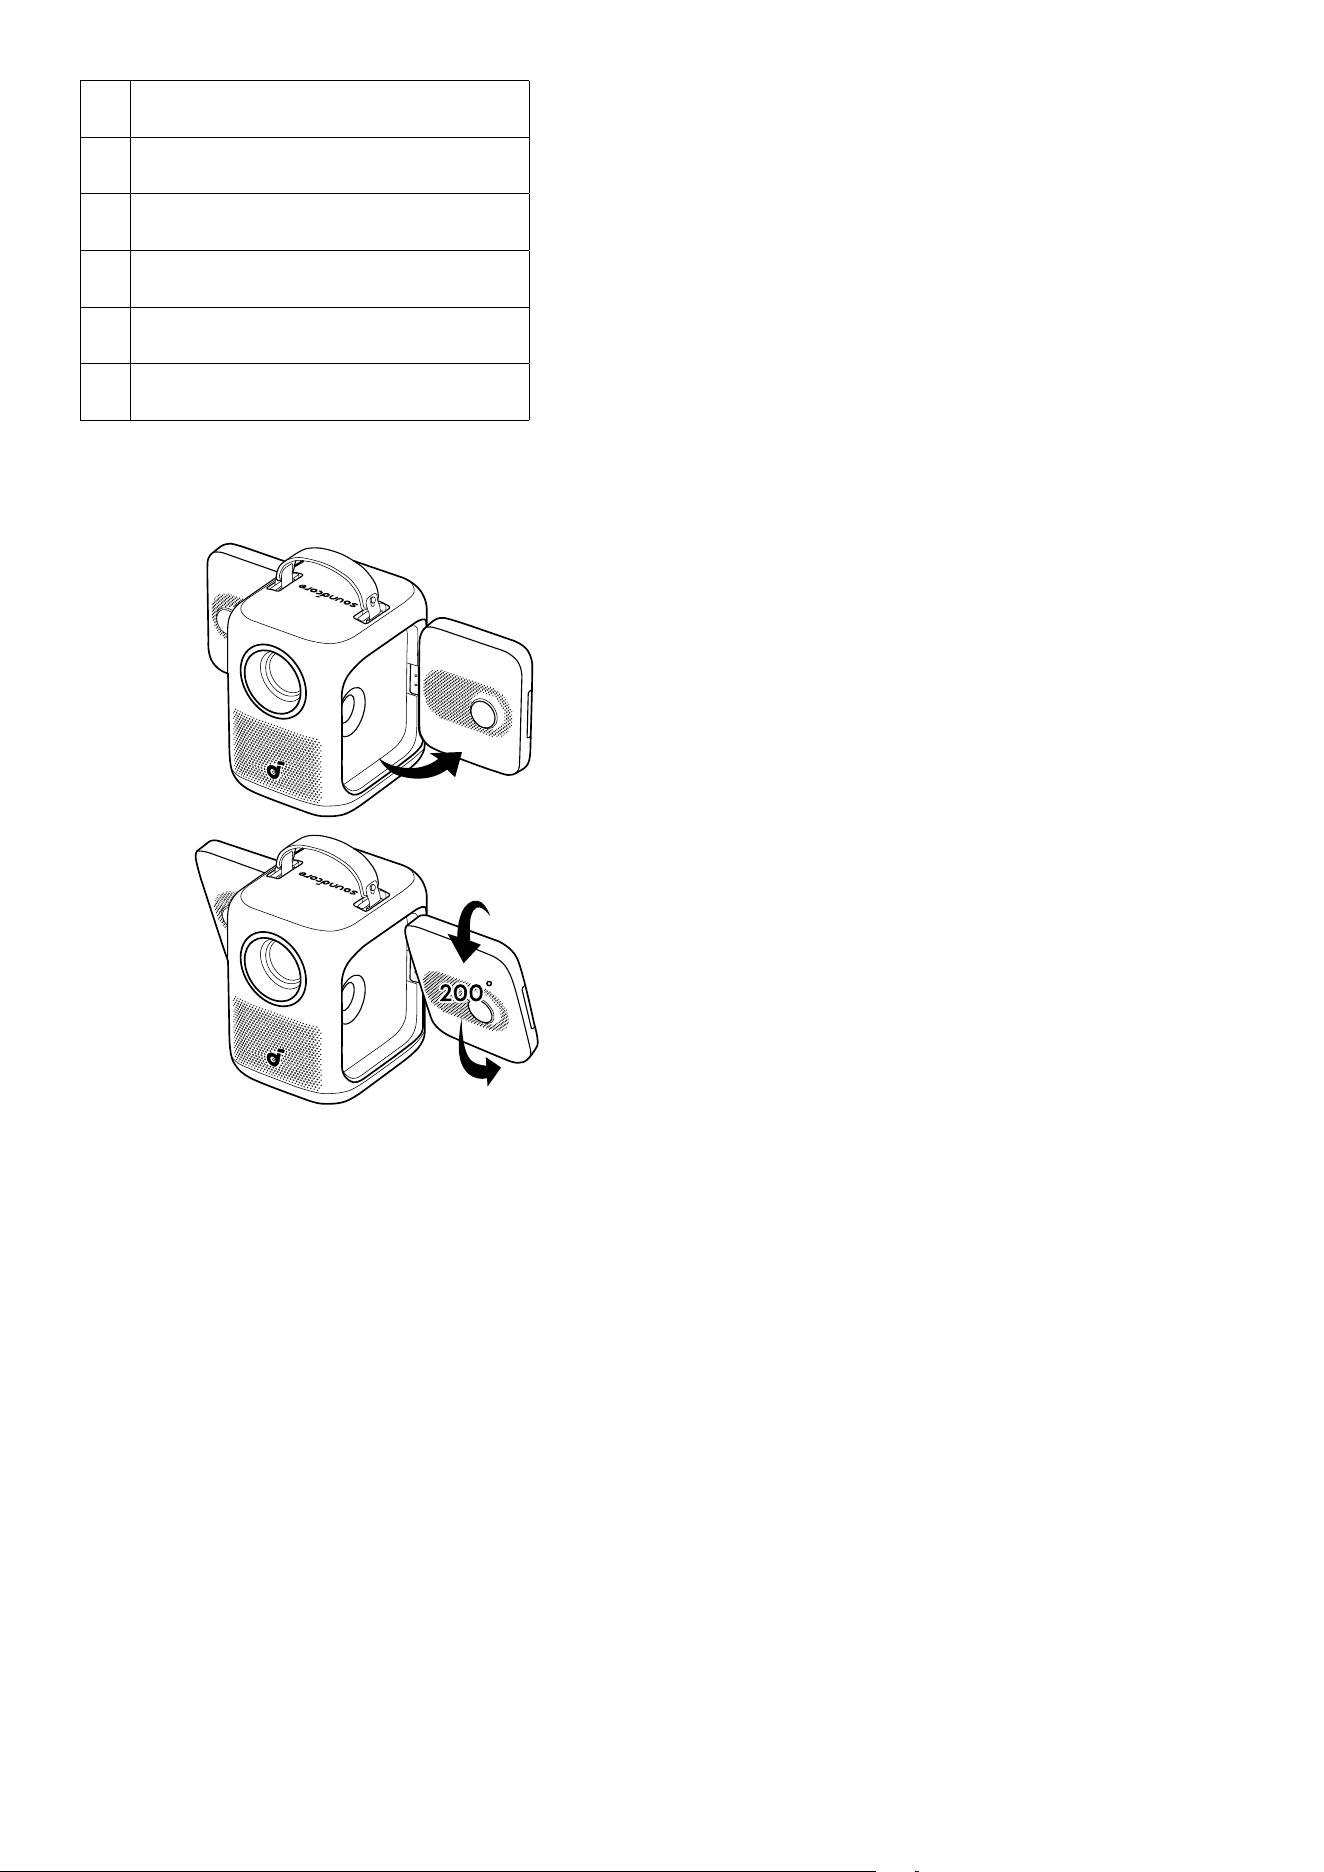
3. Side View
90˚
Speaker × 2
The two speakers can open outward at a 90-degree angle and rotate 200 degrees.
Note: Opening the speakers beyond 90 degrees or rotating the speakers beyond 200 degrees may
cause damage.
4. Bottom View
15˚
1
Adjustable Stand
(The adjustable stand supports a maximum extension angle of 15°. Exceeding this angle may
cause damage.)
2 1/4" Tripod Stand Socket
3 Quick Release Tripod Stand Mount
Remote Control
1 Indicator
2 Microphone
3 Power On / O / Standby
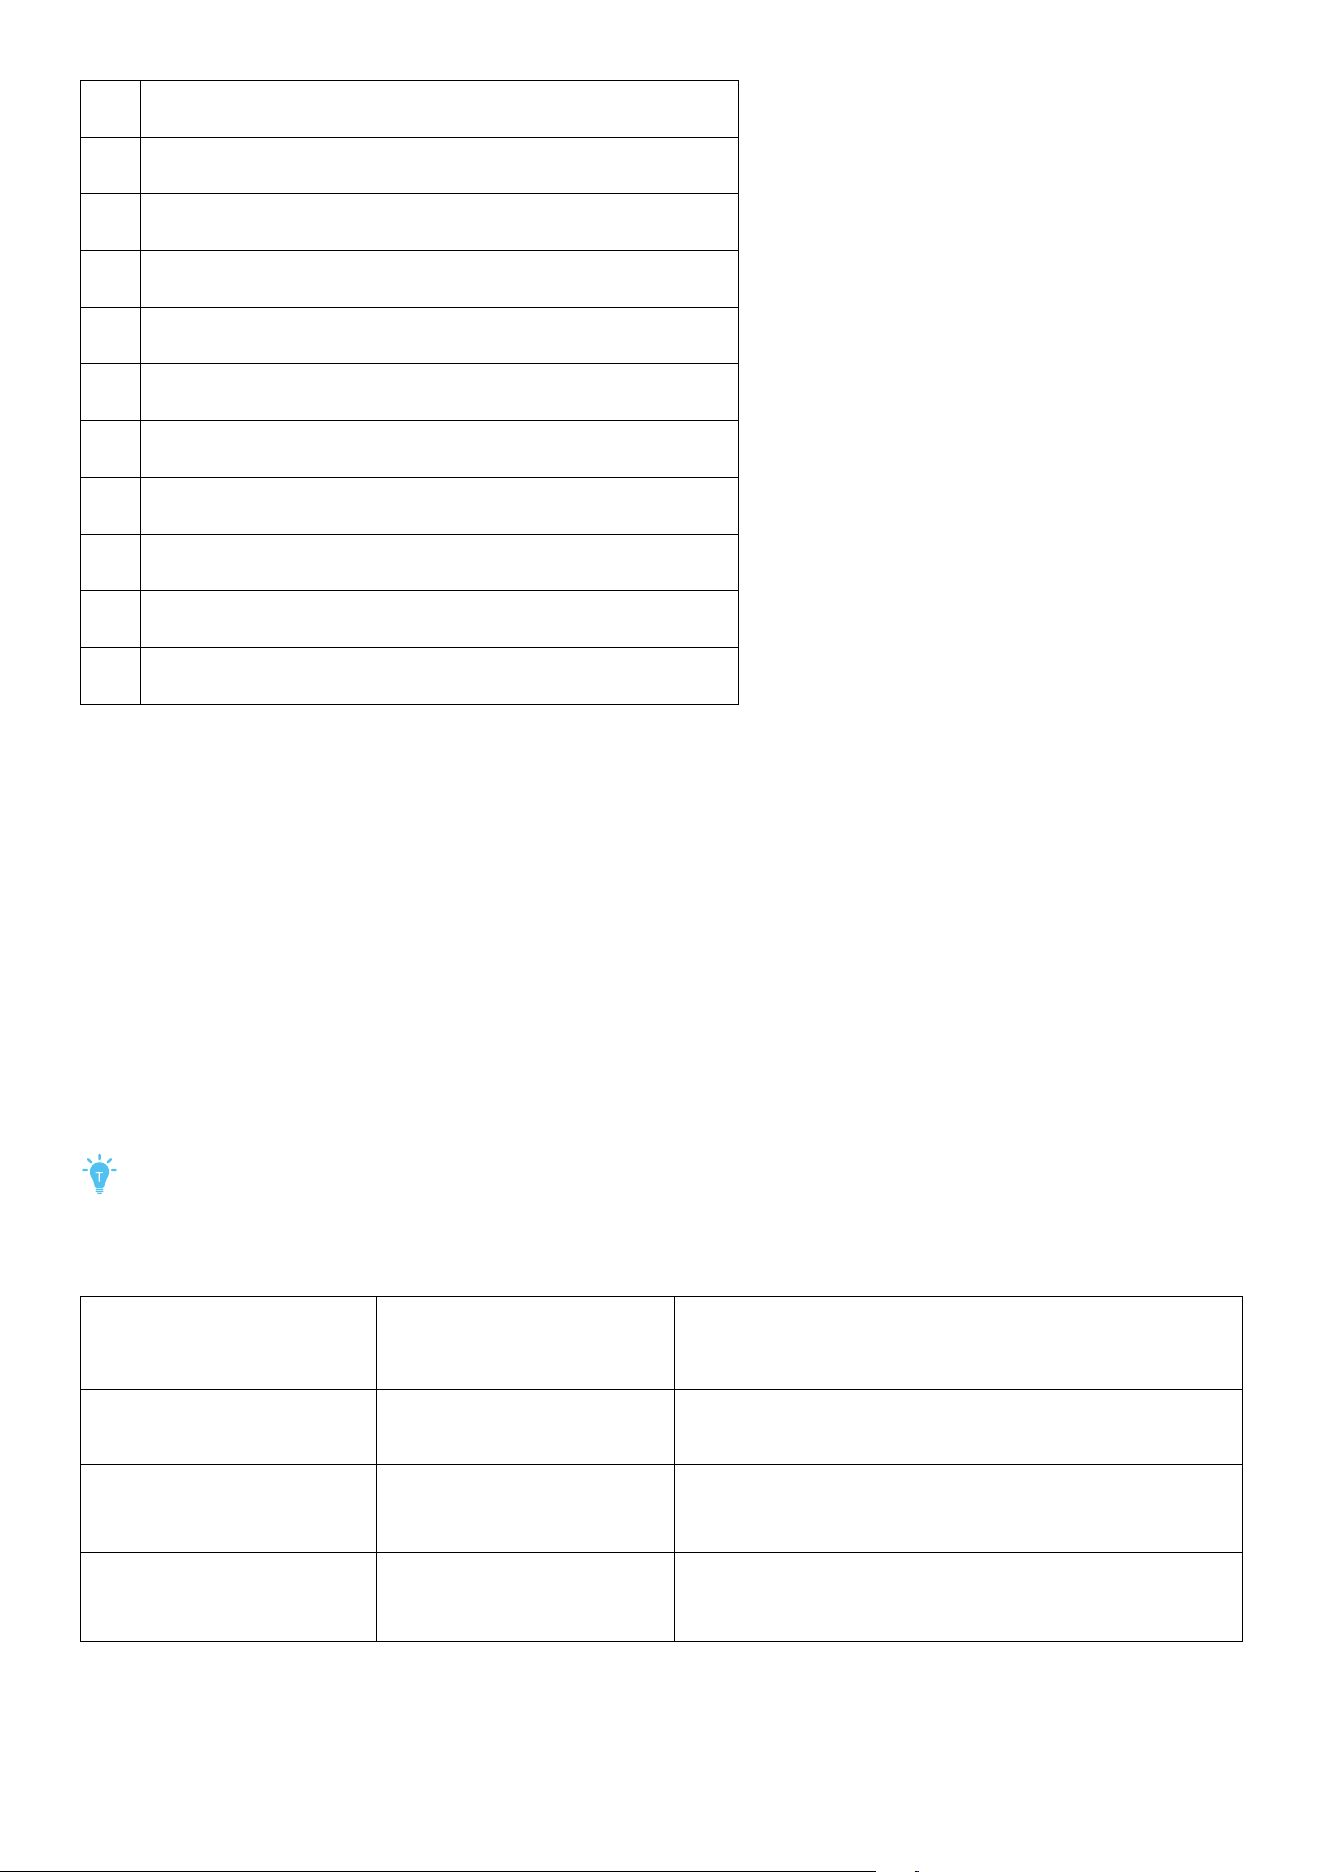
4 Navigation
5 Return
6 Decrease Volume
7 YouTube / Nelix / Prime Video
8 Auto Image Adjustment
9 Google Assistant
10 Confirm Selection / Pause / Resume
11 Menu
12 Settings
13 Increase Volume
14 Unmute Sound
Getting Started
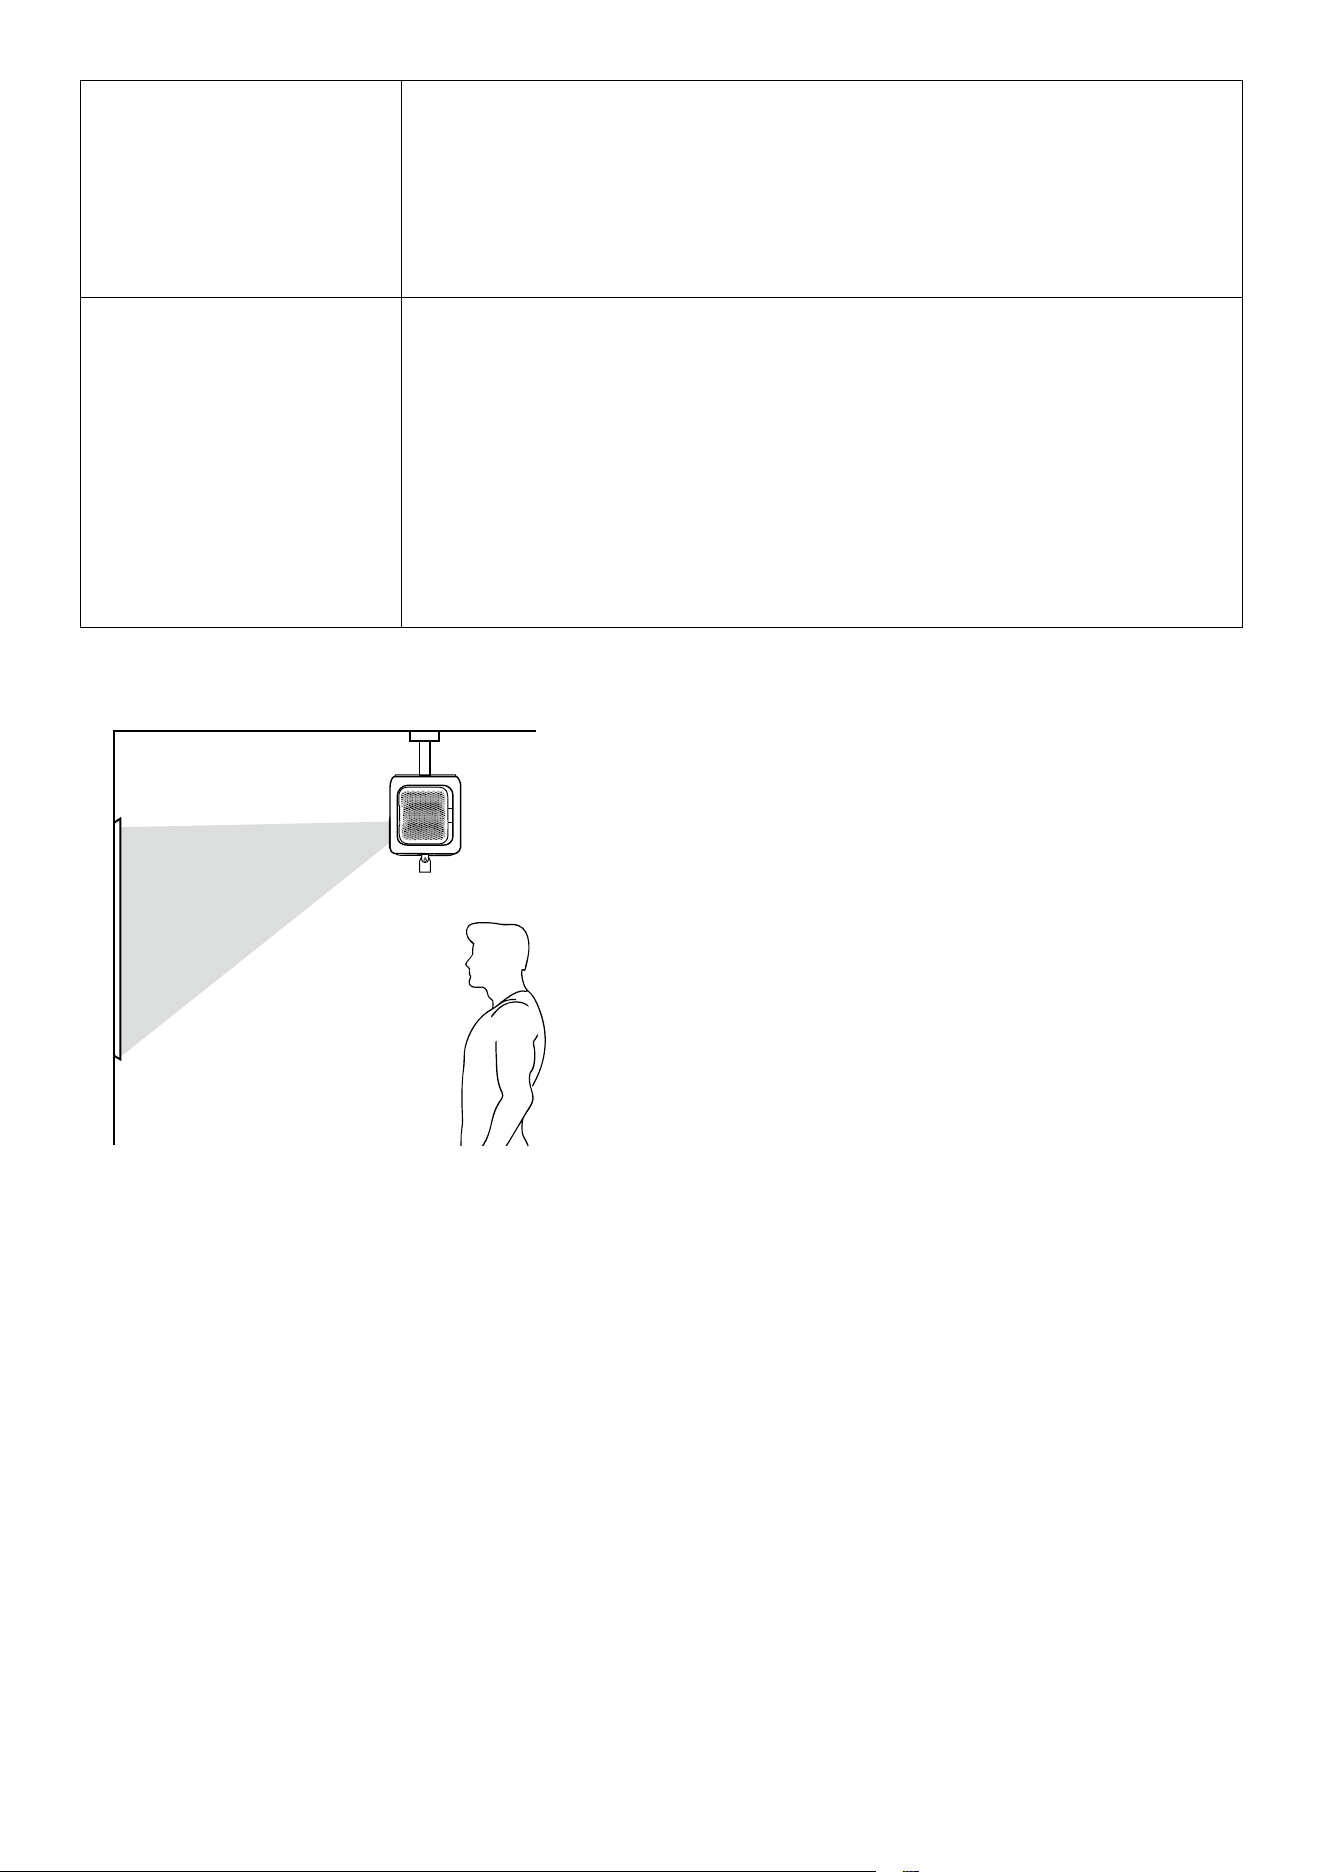
1. Position Your Projector
To achieve optimal projection quality, choose the appropriate projector position and projection
direction.
Projector Positioning:
Default: The projector is placed upright on a table or the floor. This is the most common way to position
the projector for quick setup and portability.
Projection Mode:
Front: The projector is positioned on the same side as the audience, projecting directly onto the front of
the screen.
Rear: The projector is placed behind a translucent screen, projecting the image from the rear, with the
audience positioned opposite the projector.
• To change the projection mode, aer powering on the projector, press the Settings button on
the remote control, then go to Advanced Settings > Projector Mode and select a mode.
• You can also install the projector on a tripod (sold separately).
• The distance between the projector lens and the screen determines the projection screen size.
Recommended
Projection Screen Size
(80"–120")
Projection Distance
(Throw Ratio: 1.25:1)
Recommended Scenario Type
120"
3.33 m
10.93
Completely dark room. (All lights turned o.)
(0-10 lux)
100"
2.76 m
9.06
Outdoors at night or indoors at night. (A room with
so light.)
(5-30 lux)
80"
2.21 m
7.25
Outdoors at sunset or a dimly lit room. (A room
with a bright lamp.)
(50-100 lux)
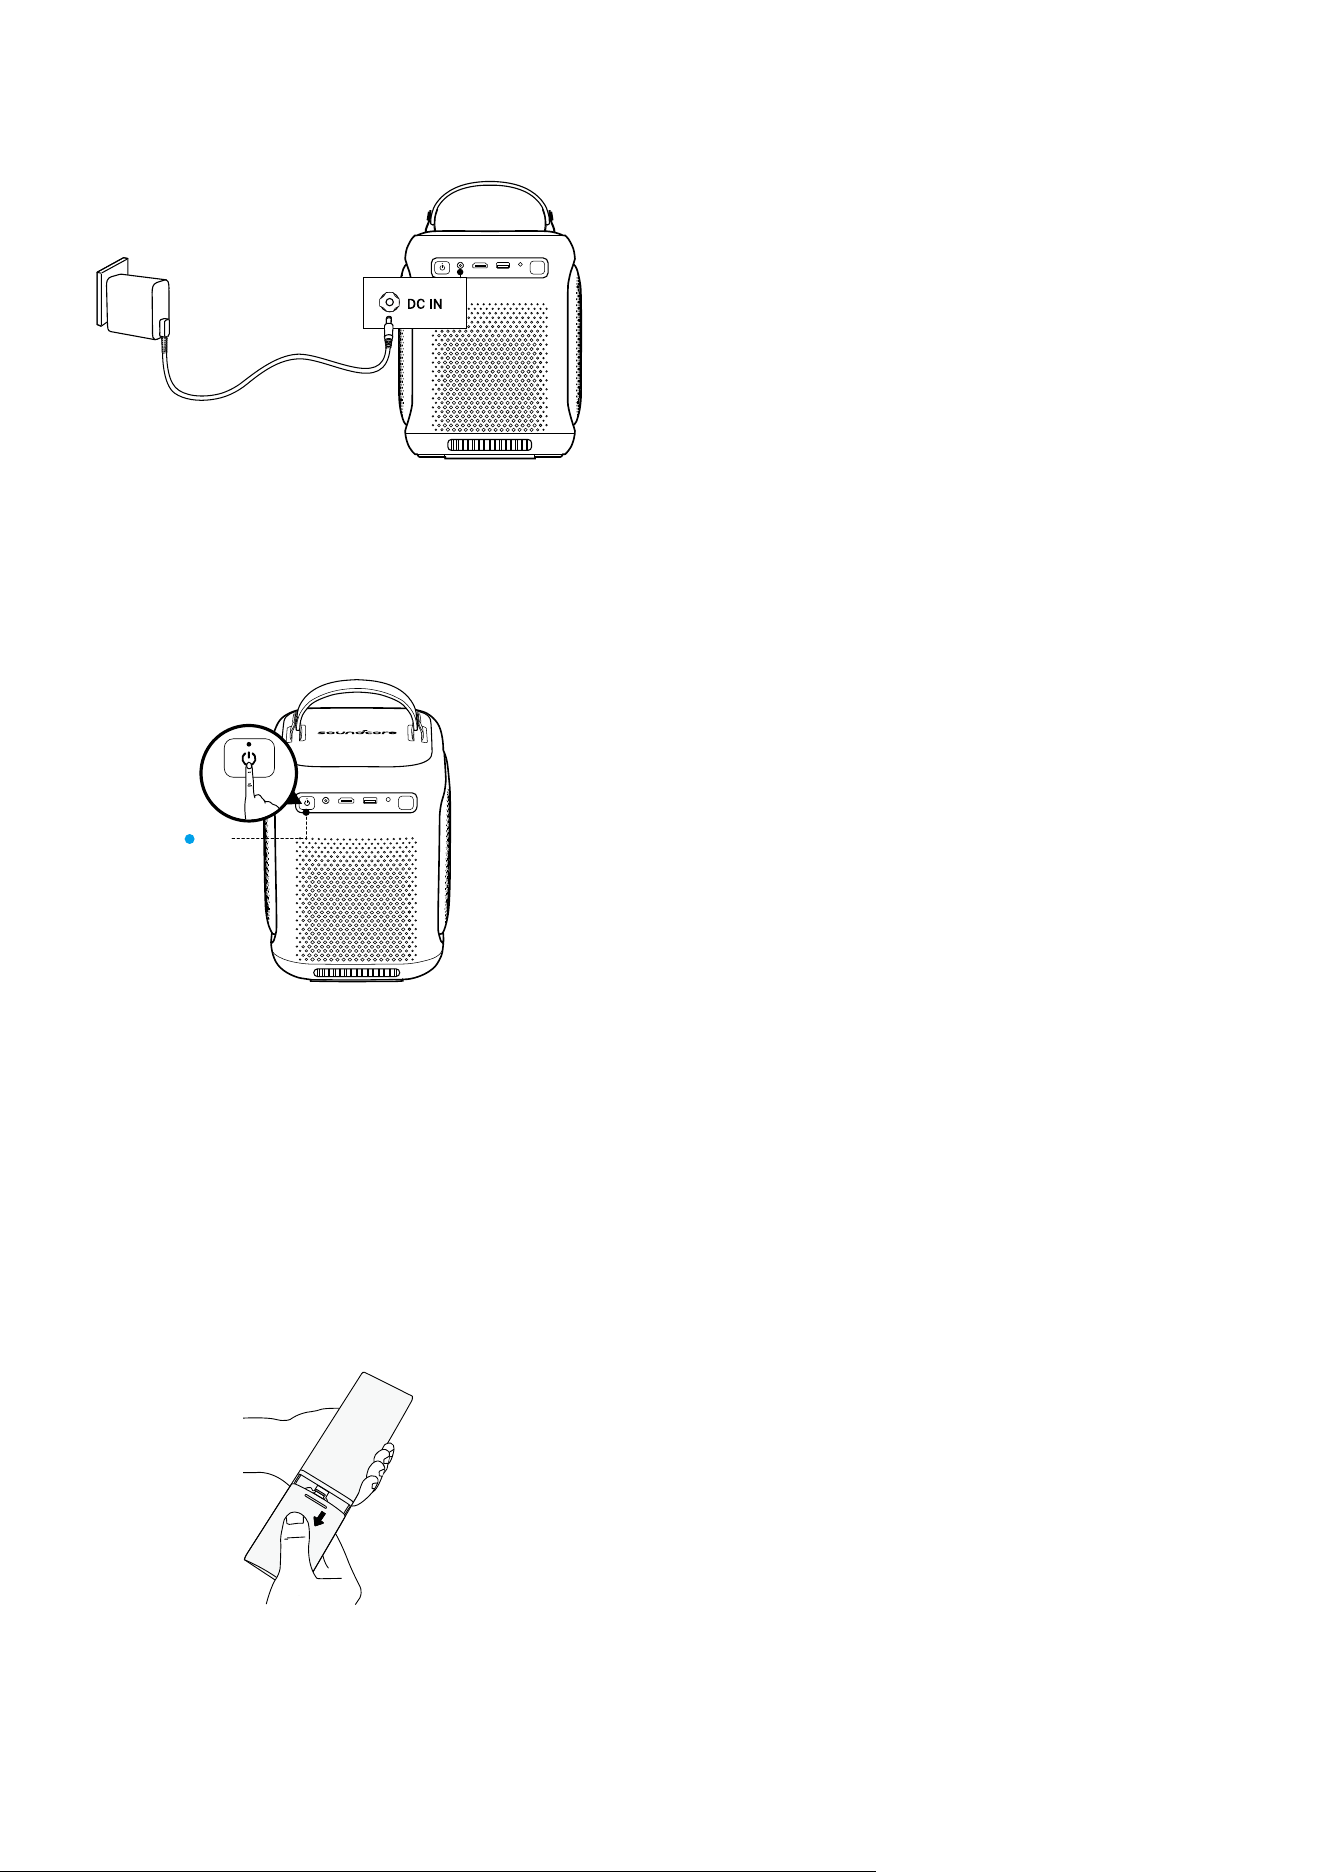
2. Connect the Projector to Power
DC IN
HDMI
USB-A AUX
Nebula P1i
Connect the adapter to power and attach the DC plug to the projector.
When successfully connected to the power supply, the indicator light on the top of the power button will
turn steady red.
3. Power Your Projector On / O
ON
DC IN
HDMI
USB-A AUX
Nebula P1i
Power On: Press the power button once.
1. Before pressing the button to power on the projector, make sure that the power button lights up red.
2. When the projector is powered on, the power button will turn steady white.
Power O:
1. Press and hold the power button for 3 seconds (wait for the on-screen prompt).
2. Confirm power o with the remote control or wait 20 seconds for automatic power-o.
Standby Mode: Short-press the power button to enter Standby Mode.
4. Prepare the Remote Control
①
For first-time use, slide to open the battery compartment and install two AAA batteries.

②
To replace the batteries, slide o the battery compartment backplate, insert new batteries (matching
the polarity (+/-) as indicated), and close the battery compartment.
The distance between the remote and the projector should not exceed 10 m / 33 .
5. Network Settings
Use the following methods to connect the projector to a wireless network.
1. Go to All Settings > Network & Internet.
2. Find the Wi-Fi list, select the network, and enter the password to connect.
6. Autofocus and Auto Keystone Correction
How to trigger auto focus:
1. Press the Auto Image Adjustment button on the remote control.
2. At startup.
3. Aer moving the projector.
Note: To modify the functions triggered by the above actions, go to All Settings > Projector > Automation.
How to peorm manual focus:
1. Go to All Settings > Projector > Focus > Peorm Manual Focus, then use the le / right buttons to
adjust the focus until the image is clear.
2. Press and hold the Auto Image Adjustment button on the remote to bring up the Quick Panel > then
select the Manual Focus > use the le / right buttons to adjust the focus until the image is clear.
How to trigger auto keystone correction:
Aer enabling Auto Keystone Correction in Settings > Projector > Automation, Auto Keystone Correction
will be triggered in the following scenarios:
1. When pressing the Auto Image Adjustment on the remote control.
2. At startup.
3. Aer moving the projector.
How to peorm manual keystone correction:
1. Go to All Settings > Projector > Keystone Correction > Peorm Manual Keystone Correction, then
adjust the image shape using the navigation buttons and follow the instructions on the screen.
2. Press and hold the Auto Image Adjustment on the remote to bring up the quick panel. Then select
Manual Keystone and then adjust the image shape using the navigation buttons.
How to peorm auto obstacle avoidance:
To enable auto obstacle avoidance, go to Setting > Projector > Keystone Correction > enable Auto
Obstacle Avoidance. Then auto obstacle avoidance will be peormed when peorming the auto
keystone correction.
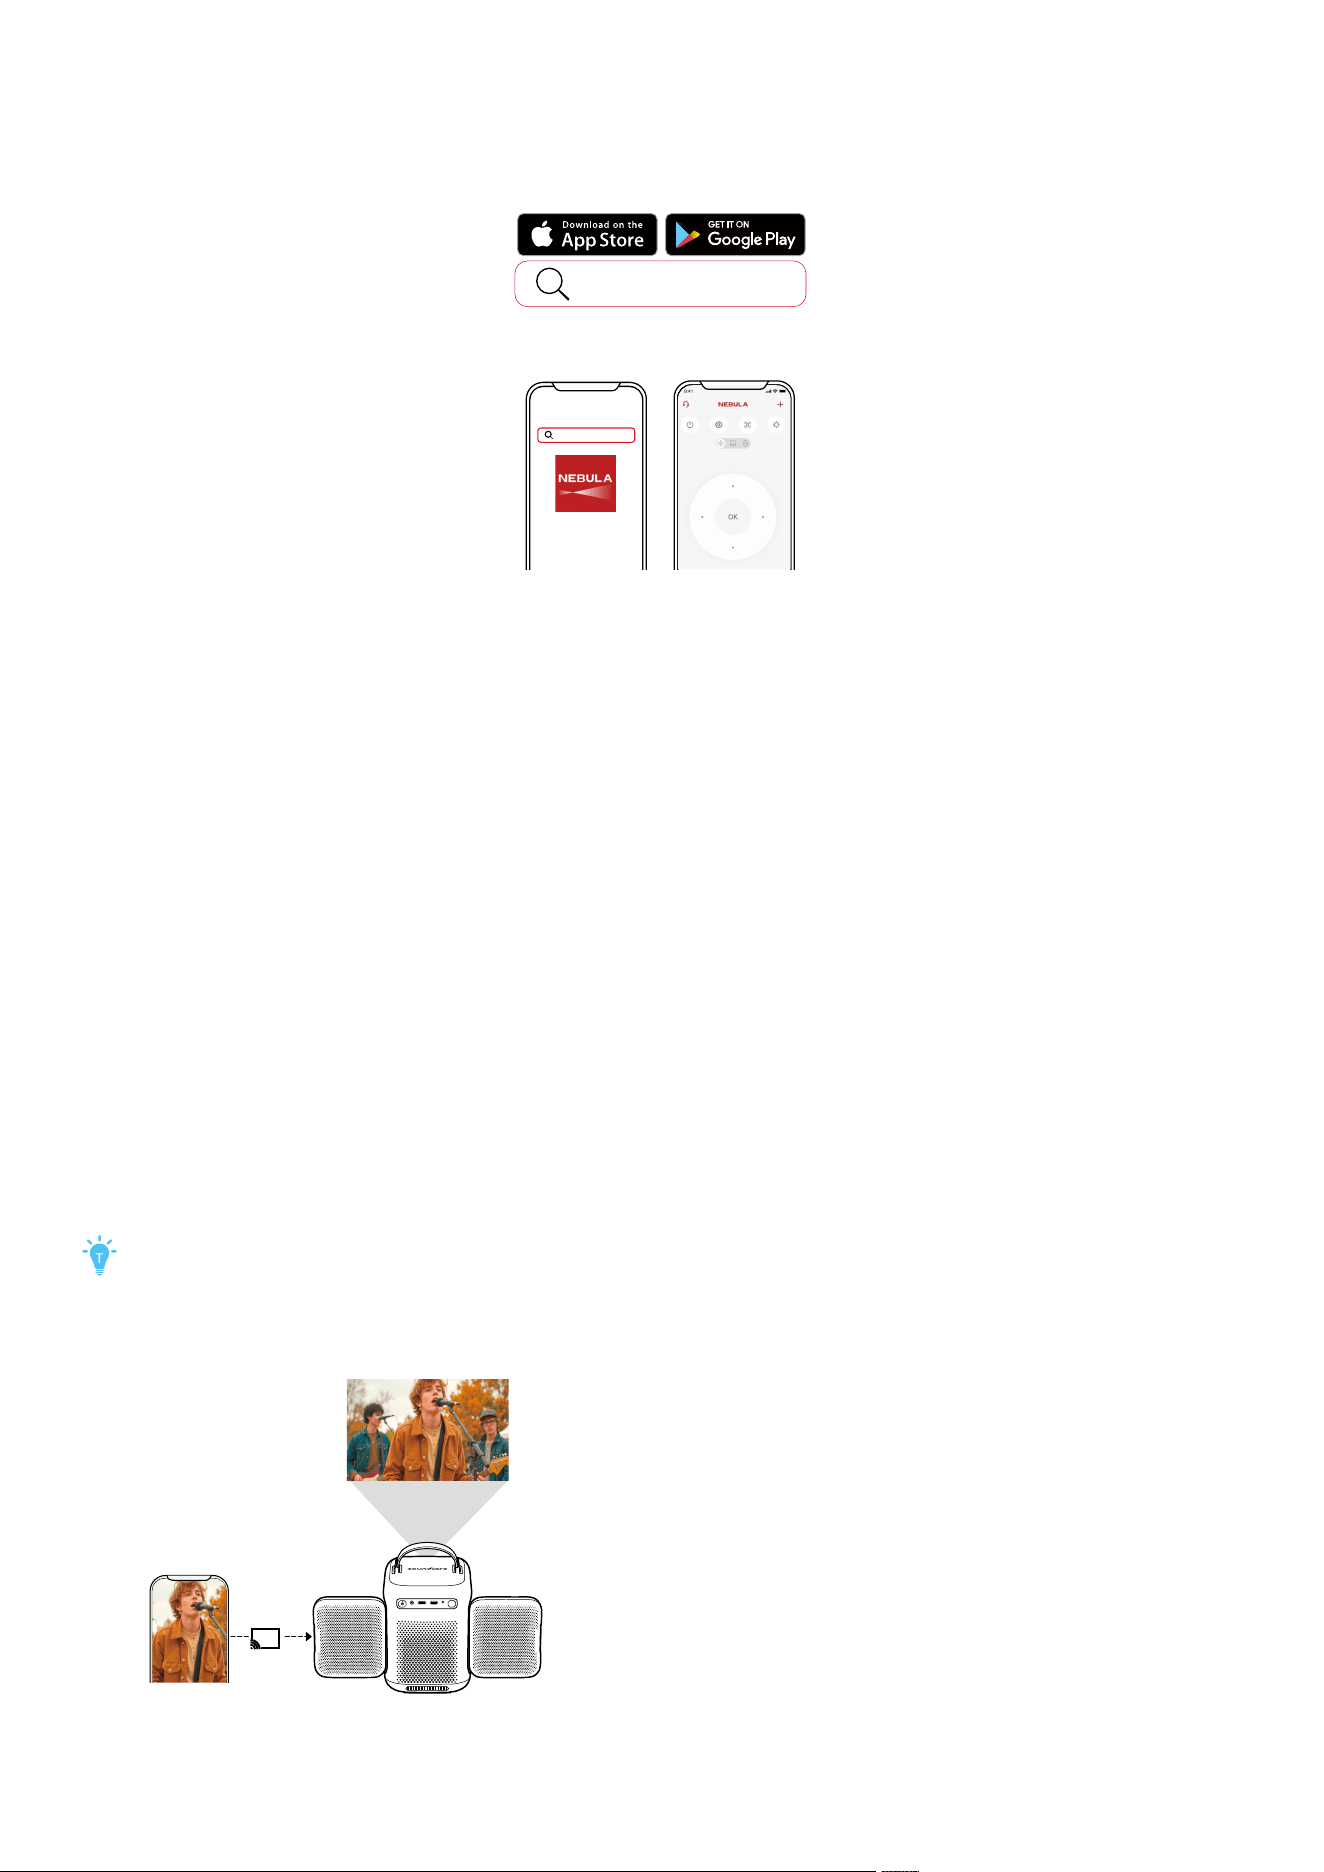
Nebula Connect App
Installation Guide
To easily control the projector, we recommend you download the Nebula Connect app.
Nebula Connect
Download theNEBULA Connectapp to
control the projector using a smartphone.
Nebula Connect
1. Download the Nebula Connect app from the App Store (iOS devices) or Google Play (Android devices).
2. Enable Bluetooth on your smartphone.
3. Open the Nebula Connect app and select 'soundcore Nebula P1i' as the device to be connected.
4. Follow the on-screen instructions to complete connection setup.
Wireless Screen Mirroring
To enable screen mirroring, make sure the projector and your phone are connected to the same wireless
network.
• For iOS devices:
1. Download and open the Nebula Cast app on your projector.
2. Open your phone's control center and tap 'Screen Mirroring'.
3. Click on 'soundcore Nebula P1i' in the device list.
• For Android devices:
1. Open the Google Home app and select 'soundcore Nebula P1i'.
2. Tap 'Cast My Screen' to start casting.
• Streaming services:
1. Enter the streaming service app and tap the cast icon.
2. Click on the name of your Nebula device in the device list: 'soundcore Nebula P1i'.
Certain content may be unavailable due to copyright restrictions.
In this case, you can install the app on your projector to stream content.
Copyrighted and DRM-protected content from streaming services like Nelix and Disney+ cannot
be mirrored.
DC IN
HDMI
USB-A AUX
Nebula P1i
Scan for More Support

Projector Indicator Light Guide
Steady White Powered On
Steady Red Powered O / Standby Mode
Flashing Red
Power Supply Abnormality
White light flashing rapidly Bluetooth Pending Connection
White light flashing slowly Bluetooth Connected
Bluetooth Speaker Mode
The projector can also be used as a Bluetooth speaker.
1. Go to All Settings > Display & Sound > Sound > Turn on the Bluetooth Speaker Mode to switch your
Nebula projector from Projector Mode to Bluetooth Speaker Mode. Alternatively, you can go to the
main page and choose Dashboard > Sound > Turn on Bluetooth Speaker Mode.
2. Enable Bluetooth on your smartphone and select soundcore Nebula P1i to use the projector as the
Bluetooth speaker.
Playing Video from HDMI/USB Devices
DC IN
HDMI
USB-A AUX
1. The projector supports connections with various HDMI playback devices such as a TV sticks, TV boxes,
DVD players, set-top box (STB), gaming consoles, or other devices.
2. With this projector, you can also enjoy music, video, and pictures that are stored on a USB storage
device (not included).
3. When using a USB flash drive, ensure that the USB drive is in FAT32 format or NTFS format (exFat format
not supported).
Play Through External Audio Devices
Connect to external sound output devices, including headphones and speakers.
DC IN
HDMI
USB-A AUX
Nebula P1i
(not included)

Pairing Remote and Bluetooth Accessories
You can connect external Bluetooth accessories to your projector, including speakers, headphones, and
keyboards.
1. Go to All Settings > Remotes & Accessories > Pair Accessory.
2. Put your Remote or Bluetooth accessory into pairing mode.
3. Select the device that you want to connect to.
System Update
To fully enhance your experience, we recommend updating the system and speakers from time to time
for the latest features.
Go to All Settings > System > About > System Update.
Basic Setup
For first-time use, follow the on-screen display instructions to complete the basic setup. Adjust settings
in the projector's Settings menu if necessary.
1. Channels & Inputs
Go to All Settings > Channels & Inputs > Inputs.
HDMI Select an HDMI playback device as the input source.
Global CEC control
When enabled, your TV and connected devices can control each other
via CEC.
Allow TV to turn o
connected devices
When enabled, powering o your TV will also power o devices connected
to your TV that support CEC.
Allow connected devices
to turn on TV
When enabled, powering on your connected devices may also power on
your TV, if your connected device supports CEC.
2. Projector Settings
On the home page, select All Settings > Projector
[Focus]
• [Start Auto Focus]: Automatically peorms Auto Focus for clear images.
• [Peorm Manual Focus]: Manually adjusts the focus for clear images.
[Keystone Correction]
• [Start Auto Keystone Correction]: Automatically corrects the image into
a 16:9 rectangle.
• [Auto Obstacle Avoidance]: When enabled, the system avoids
obstacles when peorming the auto keystone correction.
• [Peorm Manual Keystone Correction]: Manually peorm keystone
correction to turn the image into a 16:9 rectangle.
[Screen Fit]
• [Start Auto Screen Fit]: Automatically detects the screen and aligns the
image to its borders.
• [Peorm Manual Screen Fit]: Manually adjust the image to match the
screen's borders.
[Zoom] • Resize the projected image as desired.
[Automation]
• [Trigger by Remote]: Short pressing the auto image adjustment button
will trigger the selected action.
• [Trigger at Startup]: Aer startup, if the projector's placement diers
from its previous position, the selected tasks will be peormed
automatically.
• [Trigger Aer Movement]: The selected tasks will be peormed
automatically if the projector is moved while powered on.
[Advanced Settings]
[Projection Mode]: Select a way of placing the projector.
• [Auto]: Automatically detects whether the projector is inverted.
Automatically switch between these options.
• [Front]: The device is located in front of the projection suace.
• [Front Ceiling]: The device is hanging from the ceiling in an upside-
down position. The image is rotated 180 degrees.
• [Rear]: The device is located behind the projection suace.
• [Rear Ceiling]: The device is hanging from the ceiling in an upside-
down position behind the projection suace. The image is rotated 180
degrees and horizontally mirrored.
Ceiling Installation Instructions (Front-Ceiling Projection Example)
The projector includes a 1/4" tripod socket on the bottom for mounting. To install the projector on the
ceiling:
1. Use a compatible mount: Attach an adjustable ceiling-mount stand with a 1/4-inch screw thread.
2. Secure the projector: Fasten the mount screw into the socket at the bottom of the projector and
tighten firmly.
3. Adjust the angle: Tilt and align the projector so the lens points toward the wall or screen.
4. Flip the image: In the projector’s settings, select "Front Ceiling" mode to invert the image for ceiling
use.
5. Finalize setup: Adjust focus and keystone, and ensure all cables are neatly routed to prevent strain or
tangling.
When installed this way, the projector hangs upside down from the ceiling and projects the image
forward onto the wall, as shown in the illustration.
3. Display & Sound
Go to All Settings > Display & Sound.
[Picture]
[Brightness]: Adjust the brightness of the projector display.
[Picture Mode]: The projector is preset with several predefined picture modes so
that you can choose one to suit your environment and input source.
• [Standard]: Keeps natural looking colors with a balance of warm and cool tones.
• [Vivid]: Enhances contrast and saturation to make the image more vibrant and
lively, suitable for content with rich colors and dynamic visuals.
• [Movie]: Provides the best colors for watching movies.
• [Game]: Increases the brightness and response time level for playing video
games.
• [Conference]: Increases the brightness but aects the color reproduction.
[Low Noise Mode]: Reduces noise by dynamically adjusting the projection
brightness and lowering the cooling fan speed. When enabled, the brightness will
be reduced appropriately to lower fan noise.
[Common Picture Settings]
• [Black Level]: Adjusts the brightness of the darkest parts of the image. Increasing
it makes shadows lighter; decreasing it deepens dark tones for better contrast.
• [Contrast]: Adjusts the dierence between light and dark areas of the image.
• [Saturation]: Changes the intensity of the colors in the picture.
• [HUE]: Shis all colors in the image along the color spectrum. You can use it to
correct color tone or create artistic color eects.
• [Sharpness]: Enhances the clarity and definition of image details.
[Advanced Settings]: Customize expert settings to enhance image quality.
• Color Temperature
• [DNR]: Reduces noise for a clearer image.
• [MPEG NR]: Minimizes compression artifacts.
• [Gamma]: Adjusts brightness and contrast to make the image more natural and
balanced, enhancing details in both dark and bright areas.
• [Color Space]: Expands or narrows the range of displayed colors to ensure more
accurate color reproduction based on the content type or display capability.
• [Color Tuner]: Fine-tunes color peormance.
• [11 Point White Balance Correction]: Fine-tuning improves color accuracy.
[Restore Default Settings]: Resets all settings to their factory defaults.
[Sound]
[Movie]: Creates a surround-sound listening experience for watching movies.
[Music]: Enhances the treble for listening to music.
[Outdoors]: Increases volume for playing audio / video outdoors.
[Custom]: Manually set audio settings such as balance, bass, and treble.
[Turn on the Bluetooth Speaker Mode]: Enable using the projector as a Bluetooth
speaker.
[Speaker Delay]: To synchronize the sound with the image, adjust the sound delay
by 10 milliseconds for each operation.
[Expert Settings]: Customize advanced settings to enhance audio quality.
[Audio Output]
[Auto]: Automatically select the best audio output mode.
[Bypass]: Pass the digital audio signal through without processing it, allowing the
connected device to decode the audio.
[PCM]: Output audio in PCM format.
[Dolby Digital Plus]: Output audio in the Dolby Digital Plus format.
[Dolby Digital]: Output audio in the Dolby Digital format.
[Digital Output Delay]: Adjust the delay of the digital audio output to synchronize
the sound with the video.
4. Apps
1. Go to All Settings > Apps.
2. Select an app to check its current version, open or force stop it, review the storage it uses, clear its
data or cache, uninstall it, or enable/disable its notifications and permissions.
5. System
Go to All Settings > System.
[About]
Check the product information, update the system, reset the device, or
rename the device, etc.
[Date & Time]
Enable or disable automatic date and time. Manually set date and time,
select time zone, or set time format.
[Language] Select an on-screen display language.
[Keyboard] Check and manage keyboards.
[Storage]
Check the device storage.
[Ambient Mode] Set your preferences to display photos, weather, and time on your Google TV.
[Power & Energy]
Change the auto-sleep settings, turn o the current display, or set auto
power-o time when no signal is available.
[System Sounds] Turn on/o system sound notifications.
[Restart] Restart the system.
6. Others
Go to All Settings to find more setting options.
[Accounts & Profiles] Sign in to make the most of Google TV.
[Accessibility] Change the caption settings or enable accessibility service.
[Privacy] Customize your privacy preferences.
[Remotes & Accessories] Search for accessories for pairing.
[Help & Feedback] Leave your feedback on the projector or share any other ideas.

Specifications
Specifications are subject to change without notice.
Input 21V / 6.67A
Power Consumption 140W
Resolution 1920 x 1080
Aspect Ratio 16:9
Available Screen Size 40"-150"
Recommended Screen Size 80"-120"
Throw Ratio 1.25:1
Throw Distance 1.1 m-4.15 m (3.6 -13.6 )
Light Source LED
Focus
Manual focus distance range: 1.1-4m
Auto focus range: 1.6-3.2m (Camera)
Keystone Correction
Vertical: Auto(V±20°) or Manual (V±20°)
Horizontal: Auto(H±20°) or Manual (H±20°)
Speaker Output Power 10W*2
Noise ≤29dB
Wi-Fi support
Bluetooth Version Bluetooth 5.1
USB Format FAT32, NTFS
Available Operating Temperature 0-35°C (32-95°F)
Recommend Operating Temperature 25°C (77°F)
Remote Control Batteries 2* AAA batteries
OS Android TV™ OS
Input DC
Connectivity Wi-Fi 5, Bluetooth 5.1, HDMI (ARC), USB-A, AUX-out
Optical Engine Fully Sealed Optical Engine
Throw Ratio 1.25:1
Brightness 380 ANSI Lumens
RAM / ROM 2 GB / 32 GB
Speakers 10W Full-Range Speaker ×2
Resolution 1080P Full HD
Power Supply 140W High Power Integrated Power Cord
Troubleshooting
1. Fails to Power On
• Check that the adapter is properly connected to the power and that the DC plug is securely attached
to the projector.
2. Cannot Charge
• Use the included adapter to charge the projector.
• Try a dierent adapter (at least 140W) and DC-IN charging cable.
3. Cannot Connect to a Wi-Fi Network
• Place your projector within 16 / 5 m of the router and reconnect.
• Set your router to 2.4 GHz or 5 GHz and retry.
• Restart your projector and router and retry.
• Try a dierent Wi-Fi network or your phone's hotspot.
4. Blurry Image
• Slightly move the projector or press on the remote to start autofocus.
• To manually adjust the focus, go to [All Settings] > [Projector] > [Focus Settings] > [Manual Focus], and
use the le or right buttons to adjust until clear.
• Adjust the projection angle and direction as well as the height of the projector if necessary.
5. Distorted Image
• Update the firmware to the latest version via [All Settings] > [System] > [About] > [System update].
• Go to [All Settings] > [Projector] > [Image Correction] > [Peorm Manual Keystone Correction].
• Move the projector le or right, or adjust the stand if necessary.
6. No HDMI Signal
• Use a dierent HDMI cable.
• Connect your projector with another HDMI playback device.

• Connect the HDMI playback device to your TV via HDMI cable to check if the device or cable
malfunctions.
• Adjust the HDMI playback device's output resolution / frequency to be the same as the projector's.
7. How to Play Videos without Wi-Fi
• Download videos to a USB drive in FAT32 or NTFS format. For the following steps, see Play from a USB
Drive.
Accessibility & Compatibility Features
Accessibility Features
This product includes several accessibility features designed to make it easier to use for people with
visual, hearing, and mobility impairments.
Visual Accessibility
• Screen Reader Support: Works with Android TV™ built-in screen reader (TalkBack) for on-screen
content narration.
Operation:
1. Go to Settings > Accessibility > TalkBack.
2. Toggle On to enable.
3. Use arrow keys on the remote to navigate; the system will read aloud focused items.
• High Contrast Mode: Improves text and element visibility.
Operation:
1. Go to Settings > Accessibility > High Contrast Text.
2. Enable the feature for better visibility.
• Font Size Adjustment:
1. Go to Settings > Accessibility > Captions > Enable Display >Text Size.
2. Select Large or Largest for better readability.
Hearing Accessibility
• Captions and Subtitles: Supports closed captions in supported apps (e.g., YouTube, Nelix).
Operation:
1. In the streaming app, go to “Subtitles/CC” menu.
2. Select your preferred language and turn it on.
Mobility Accessibility
• Full Remote Navigation: All functions can be operated via the remote without using touch or direct
screen interaction.
• Keyboard / Mouse Support: Compatible with Bluetooth and USB input devices.
Operation:
1. Go to Settings > Remotes & Accessories > Pair Accessory.
2. Put your keyboard/mouse in pairing mode.
3. Select the device to connect.
Compatibility & Interoperability
• Operating System: Android TV™ OS, compatible with most Google Play-certified apps.
• Assistive Technology Compatibility: Works with TalkBack, screen magnifiers, switch access devices.
• Connectivity Options:
USB-A, HDMI 2.1 (ARC), AUX, Bluetooth 5.1, Wi-Fi 5.
• Supported Bluetooth Accessories: Headphones, speakers, keyboards, game controllers, screen
readers.

Quick Accessibility Shortcuts
• Enable TalkBack Quickly: Go to Settings > Accessibility > Accessibility shortcut > Enable Accessibility
shortcut, then press and hold both Back and Down buttons on the remote for 3 seconds.
• Zoom Screen:
1. Go to Settings > Accessibility > Text Scaling > Select Large or Largest.
2. Triple-tap the OK button to zoom/unzoom.
• Voice Commands: Use the microphone button on the remote to issue voice com