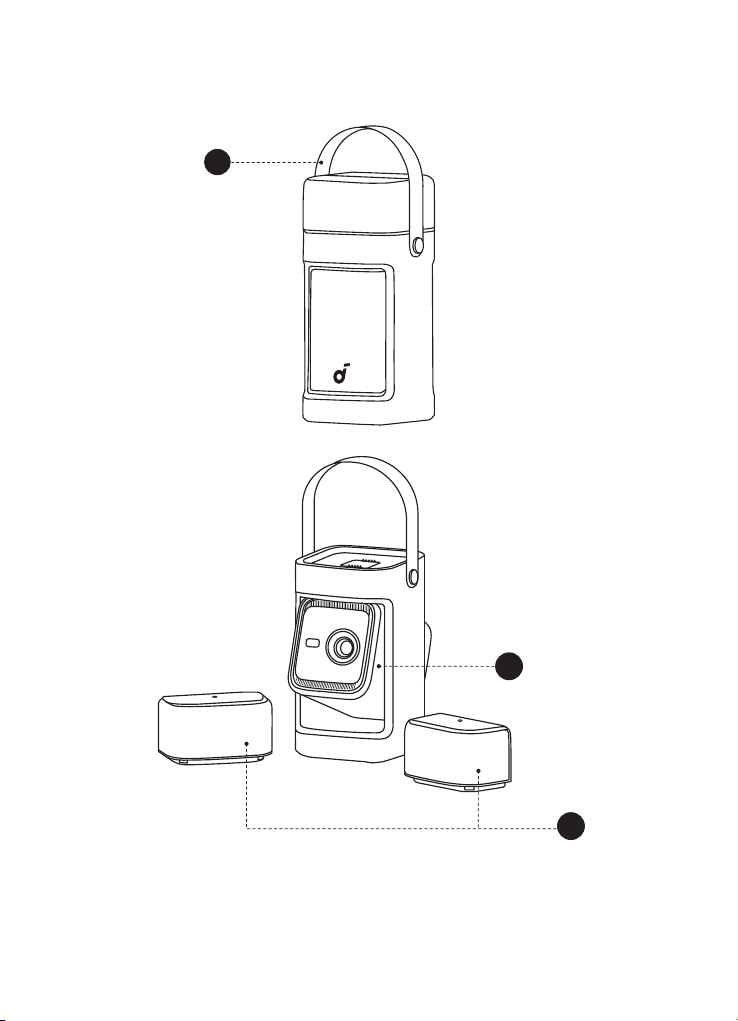
At a Glance
1
2
3
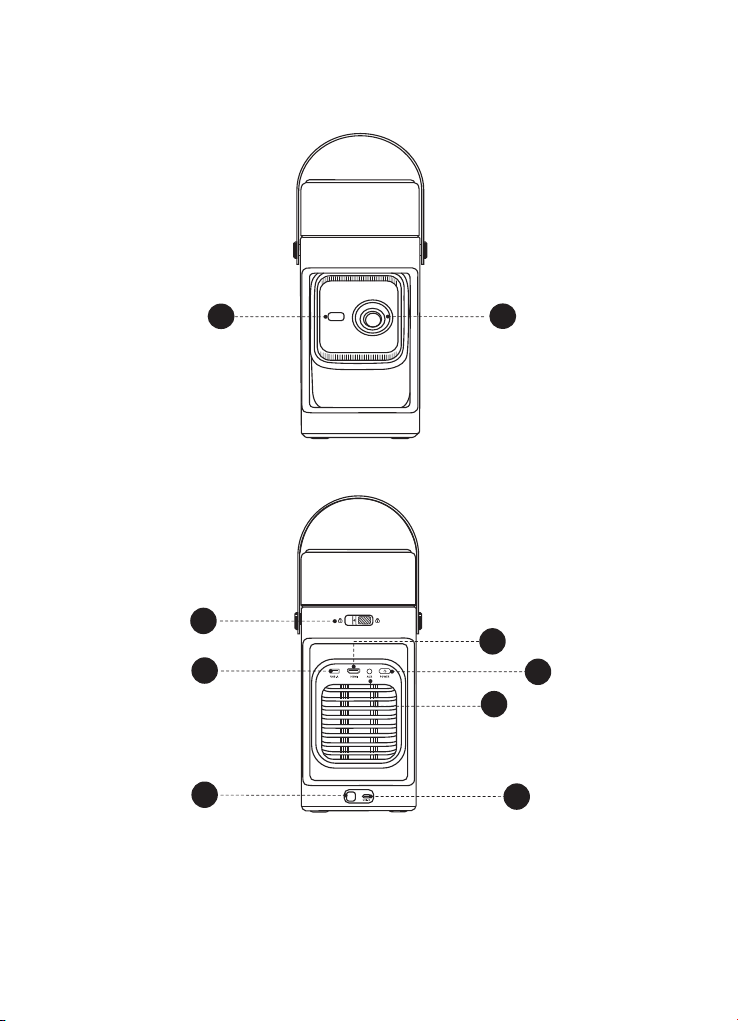
1. Front View
4
5
2. Rear View
6
7
11
9
12
8
10
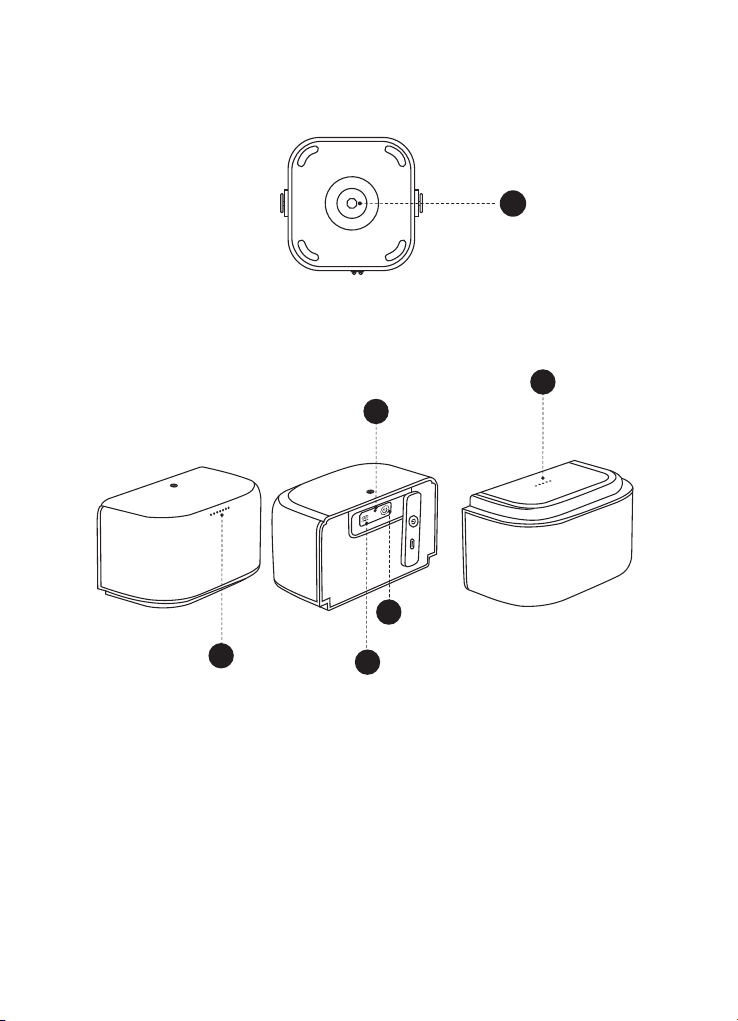
3. Bottom View
13
4. Detachable Surround Speakers
14
15
17
16
18
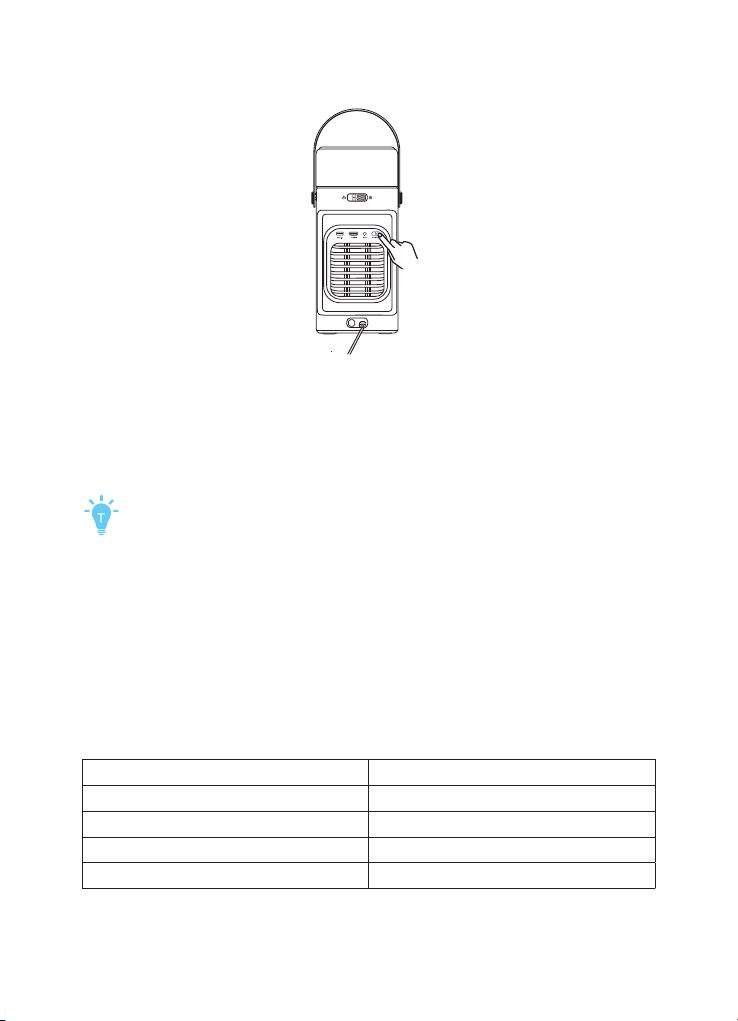
1. Handle
• If needed, remove the handle by taking out the screws at the connection point.
• Cover the screw holes with the plugs provided in the package.
2. Projector
3. Detachable Surround Speakers
4. ToF (Time of Flight) Sensor
5. Lens
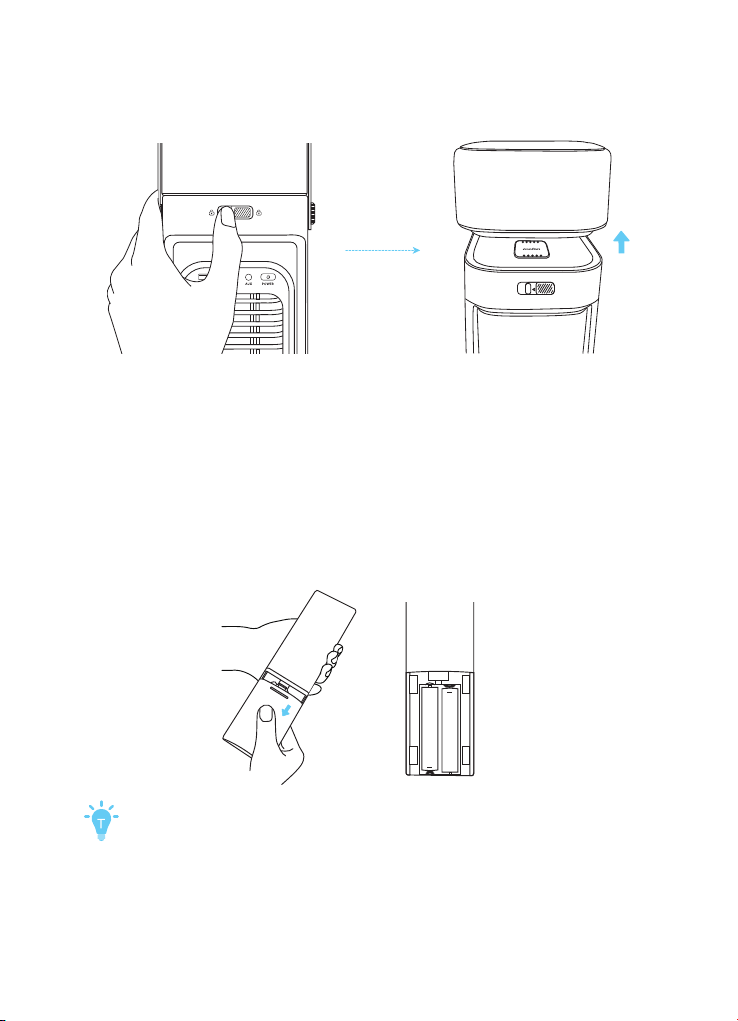
6. Speaker Unlock Switch
• Slide lef and detach both speakers.
7. USB-A Port
• Connect to a USB storage device, such as a flash drive or hard drive.

8. HDMI Port
• Connect to a playback device with HDMI output.
9. Power Button
• Press and hold to power on the projector.
• See the Power On/Of section for more information.
10. Aux
• Connect to headphones or an external speaker.
11. Infrared Sensor
12. USB-C Port
• Connect to a power outlet with the provided adapter.
13. 1/4" Tripod Socket
• The 1/4" Tripod Socket can be used to connect a tripod, stand, ceiling mount, etc.
14. Indicator Light
15. USB-C Port
• Connect the USB-C cable to charge the speakers.
16. Reset
• Insert a paperclip (not included) and hold for 2 seconds to reset the speakers.
17. Power Button
• Press once or long-press to power the speaker on.
• Press and hold for 8 seconds to power the speaker of.
18. Charging Contacts
• The speakers automatically start charging when the projector is connected to a
power source, and the speakers are attached on top.

Remote Control
1. Overview
3
9
11
12
13
7
1
2
8
4
10
5
6
14
1. Status Indicator
2. Microphone
3. Power
• Press to power on / of, switch to standby mode, or wake up.
4. Navigation
• Control the cursor on the screen.
5. Return
• Return to previous page.
6. Volume Down
• Press to reduce volume.

7. Streaming Apps
• Press to open YouTube, Netlix, or Prime Video.
8. Auto Image Adjustment
• Press to enable auto image adjustment.
• Long press to perorm manual adjustment.
9. Google Assistant
• Press and hold to talk to Google Assistant.
10. Confirm
• Press to select, pause, or resume.
11. Home
• Press to go to the home page.
12. Settings
• Press to go to settings.
13. Volume Up
• Press to increase volume.
14. Mute
• Press to mute / unmute the sound.
Getting Started
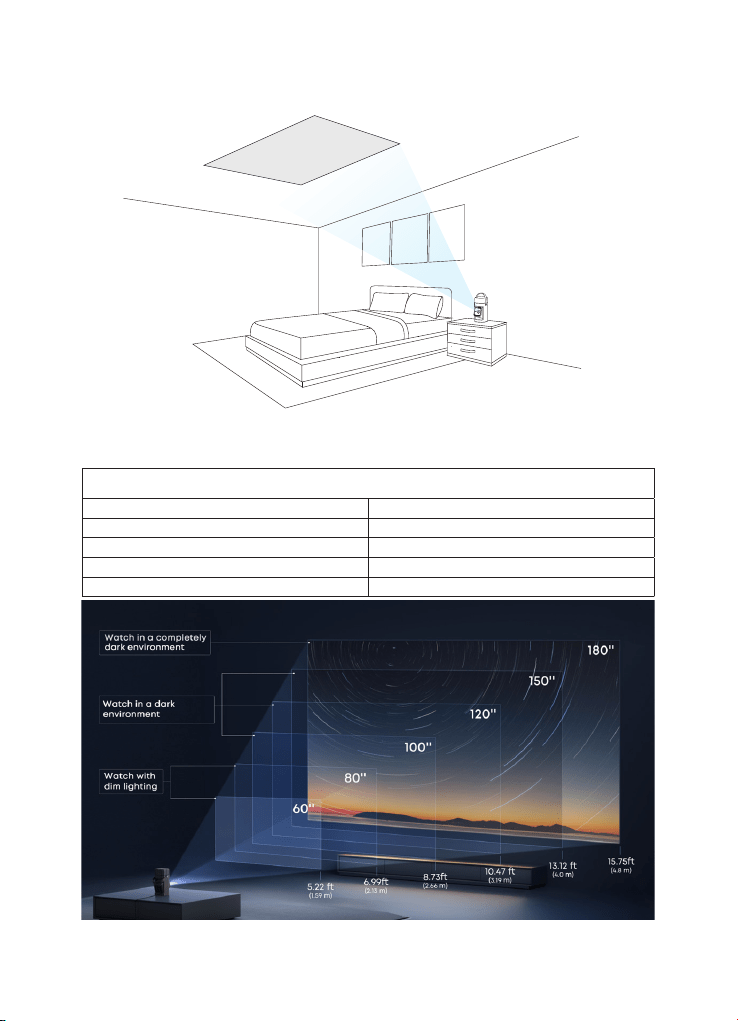
1. Position Your Projector
To achieve optimal projection quality, choose the appropriate projector position and
projection direction.
Projector Positioning:
Default: The projector is placed upright on a table or the floor. This is the most com-
mon way to position the projector for quick setup and portability.
Ceiling: The projector is mounted upside down on the ceiling. The ceiling/wall mount
kit is required. When installing the projector in this manner, it is not recommended to
keep the speakers attached to the projector.
Projection Directions:
Front: The projector is positioned on the same side as the audience, projecting direct-
ly onto the front of the screen.
Rear: The projector is placed behind a translucent screen, projecting the image from
the rear, with the audience positioned opposite the projector.
• Afer powering on the projector, press the Settings button on the projector,
then go to Advanced Settings > Projector Mode and select a setting.
• There is no need to tilt the projector toward the screen, as this device features
auto focus and auto keystone correction.
• You can also install the projector on a tripod (sold separately).
• The distance between the projector lens and the screen determines the pro-
jection screen size.
Ceiling Mode Setup:
Place the projector in its default position and project the image onto the ceiling.
Go to Settings > Projector > Keystone Correction, and enable Correction for Ceiling
Projection.
Recommended Distance Between Device and Projection Surace
60" 1.59 m / 5.22 f
80" 2.13 m / 6.99 f
100" 2.66 m / 8.73 f
120" 3.19 m / 10.47 f
150" 4.0 m / 13.12 f

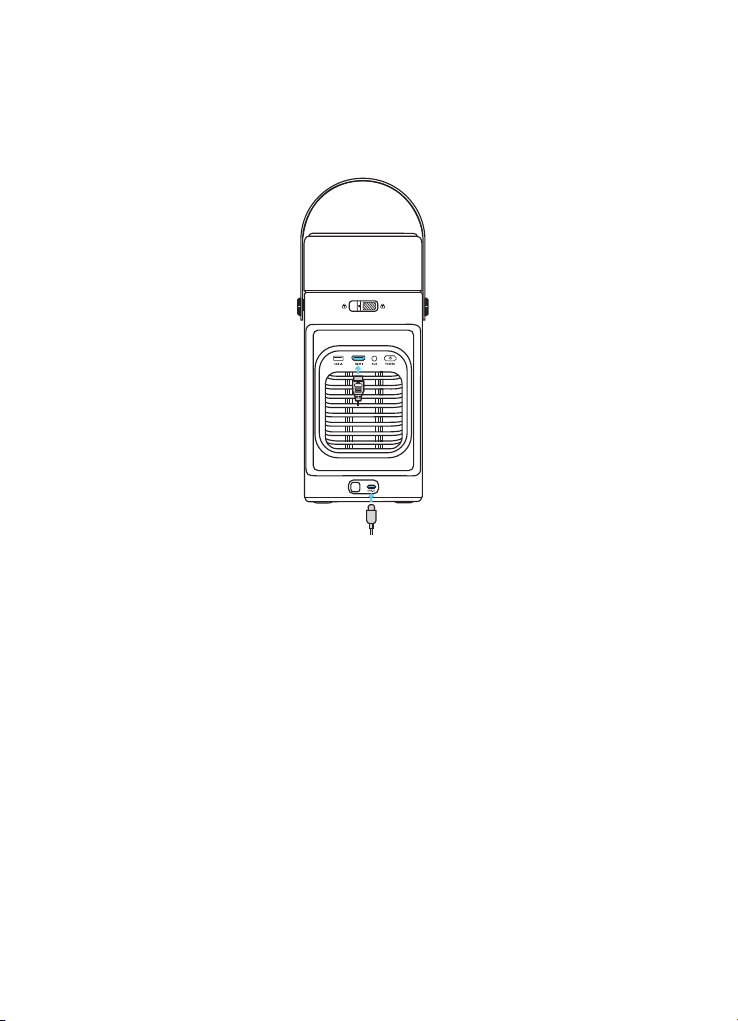
2. Connect the Projector to Power
Plug the cord into the adapter, then connect the projector to a power outlet.
The projector does not have a built-in battery. It needs to be connected to a
power source to operate and to charge the speakers.
Then tilt the projector upward until it is facing forward.
Once connected, the power button on the projector will light up red.
When using a non-oficial adapter, make sure the input power is at least
100W (20V, 5A); otherwise, the projector will not operate, and the power button
will flash red continuously.
3. Power Your Projector On/Of
• Power On:
Short-press the power button when the projector is of.
If the projector is in Standby Mode, press the power button once.
When powered on, the power button will display a steady white light.
• Power Of:
Step 1: Press and hold the power button until a prompt appears on the screen.
Step 2: Confirm power of with the remote control or wait 20 seconds for automatic
power of.
Return the projector to its factory position to power it of.
• Standby Mode: Short-press the power button to enter standby mode.
4. Using Your Speakers
First-Time Using:
1. Connect the projector to a power supply.
2. Charge the speakers. A full charge takes about 2–3 hours and provides up to 12–14
hours of playtime. There are two ways to charge them:
• Place the speakers on top of the projector, and the projector will automatically
charge the speakers (recommended).
• Alternatively, use USB-C cables to charge the speakers.
LED light guide for the speakers:
Flashing Blue Bluetooth Pairing
Steady White Bluetooth Connected
Steady Red Charging
Flashing Red Low Battery
Steady Green Fully Charged
There are two ways to use your speakers:
①
Slide the Speaker Unlock Switch to the lef and detach both speakers. Place them
on either side of the curtain, or wherever you see fit.
②
Leave the speakers locked in place on top of the projector.
Once the projector is turned on, it will automatically pair with the speakers. The in-
dicator lights on the speakers will flash blue during pairing, then turn steady white
①
Slide to open the battery compartment.
②
Insert new batteries matching the polarity (+/-) and close the battery compart-
③
Follow the on-screen instructions for initial pairing. If you missed the initial pairing
instructions, press the Google Assistant button, and you can start pairing.
.
.
DDD
DDD
when successfully connected.
5. Prepare the Remote
ment.
The distance between the remote and the projector should not exceed
10 m / 33 f.

6. Network Settings
There are two methods to connect the projector to a wireless network:
①
Press the Settings button on the remote and turn on Wi-Fi.
②
Open the Nebula Connect app, select your projector model, then go to Settings
and turn on Wi-Fi.
7. Auto Focus and Auto Keystone Correction
How to trigger auto focus:
1. Press the Auto Image Adjustment button on the remote control.
2. Automatically trigger upon powering on.
3. Automatically trigger afer moving the projector.
How to perorm manual focus:
1. Go to Settings > Projector > Focus Settings > Manual Focus Correction.
2. Press and hold the Auto Image Adjustment button on the remote to bring up the
Quick Panel > select the Manual Focus icon in the center > use the lef / right but-
tons to adjust the focus until the image is clear.
How to trigger Auto Keystone Correction:
Afer enabling Auto Keystone Correction in Settings > Projector > Automation, Auto
Keystone Correction will be triggered in the following scenarios:
1. When pressing the Auto Image Adjustment button on the remote control.
2. At startup.
3. Afer moving the projector.
How to perorm manual keystone correction:
1. Go to Settings > Projector > Image Correction > Perorm Manual Keystone Correc-
tion.
2. Press and hold the Auto Image Adjustment button on the remote to bring up the
quick panel. Then select Move & Zoom and press the Auto Image Adjustment but-
ton to switch to Focus & Keystone mode.
Nebula Connect App
1. Installation Guide
To easily control the projector, we recommend you download the Nebula Connect
app.
Nebula Connect
Download theNebula Connectapp to
control the projector using a smartphone.
①
Download the Nebula Connect app from the App Store (iOS devices) or Google
Play (Android devices).
②
Enable Bluetooth on your smartphone.
③
Open the Nebula Connect app and select Nebula P1 as the device to be
connected.
④
Follow the on-screen instructions to complete the setup.

2. Vision Fit
Use your phone to scan the projection area. The system will automatically detect the
screen or obstacles on the wall, and adjust the image to accurately fit the screen or
avoid obstacles. You can enable the feature in the app or on the projector.
• Using the App:
In the Nebula Connect app, go to My Device > Tools > Image Correction > Vision Fit.
Follow the instructions to complete the setup.
• Using the App with the Projector:
Press and hold the Auto Image Adjustment button and select Vision Fit from
the menu. Then, open the Nebula Connect app on your phone and follow the
instructions to complete the setup.
Alternatively, go to Settings > Projector > Vision Fit. Then, open the Nebula Connect
app on your phone and follow the instructions to complete the setup.
Make sure the projection screen has black edges to enable successful
recognition, and complete the screen fitting process.
Google Cast
You can wirelessly cast photos, videos, and music from your phone or tablet to your
projector.
①
Make sure the projector and your phone are connected to the same wireless
network.
②
Play a video on your streaming app, then tap the cast icon on the screen.
③
Select "Nebula P1" to play the content on your projector.
Wireless Screen Mirroring
You can mirror your phone's screen on your projector.
To enable screen mirroring, please make sure the projector and your phone are
connected to the same wireless network.
For iOS:
①
Download and open the Nebula Cast app on your iPhone.
②
Open your device's control center and tap "Screen Mirroring."
③
Select "Nebula P1" in the device list.
For Android:
①
Open the Google Home app on your phone and select "Nebula P1."
②
Tap "Cast My Screen" to start casting.
Copyrighted and DRM-protected content from streaming services like
Netlix and Disney+ cannot be mirrored.
Light Guide
Projector
Steady White Powered On
Steady Red Powered Of / Standby Mode
Flashing Red When
Powered Of
The adapter power is insuficient, and an adapter with a
power rating above 100W and a 5A cable are needed.
Speakers
Flashing Blue Bluetooth Pairing
Steady White Bluetooth Connected
Steady Red Charging
Flashing Red Low Battery
Steady Green Fully Charged
Bluetooth Speaker Mode
The projector can also be used as a Bluetooth speaker.
①
Go to All Settings > Display & Sound > Sound, then turn on Bluetooth Speaker Mode
to switch the surround speakers to Bluetooth mode.
Alternatively, you can enable Bluetooth Speaker Mode via Dashboard > Sound.
②
Enable Bluetooth on your smartphone and select Nebula P1.
Please keep the projector facing forward.
Playing Video from HDMI/USB Devices
This projector supports connections with various HDMI playback devices such as TV
sticks, TV boxes, DVD players, set-top boxes (STB), game consoles, and other devices.
With this projector, you can also enjoy music, videos, and pictures stored on a USB
storage device (including FAT32, NTFS).
Pairing Remotes and Bluetooth
Accessories
You can connect external Bluetooth accessories to your projector, including speak-
ers, headphones, and keyboards.
Pairing Remotes:
1. Go to All Settings > Remotes & Accessories > Pair More Official Accessories.
2. Follow the instructions to complete the pairing of the remote.
Pairing Bluetooth Accessories:
1. Go to All Settings > Remotes & Accessories > Pair Accessory.
2. Put your Bluetooth accessory into pairing mode.
3. Select the device that you want to connect to.
System and Speaker Update
To fully enhance your experience, we recommend updating the system and speakers
from time to time for the latest features.
System:
Go to Settings > System > About > System Update.
Speaker:
Go to Settings > Remotes & Accessories > Speaker- L / R > Accessories Update.

Troubleshooting
1. Detachable Speakers Disconnecting
a. Press and hold the speakers' Power buttons for 8 seconds to restart.
b. If the issue persists, follow these steps to reconnect:
Step 1. Settings > Remotes & Accessories > Pair More Oficial Accessories > soundcore
Surround Speaker.
Step 2. Press Continue > Forget the speaker that is disconnected > Press Yes .
Step 3. Press the Power button on each of the speakers 5 times (until the indicator
light flashes blue) > Choose lef / right speaker > Press the Pair button.
2. Projector Not Charging
a. Confirm that you are using the oficial adapter and cables.
b. When using a non-oficial adapter, make sure the input power is at least 100W
(20V, 5A); otherwise, the projector will not operate, and the power button will flash
red continuously.
3. Blurry Image
a. Ensure that the camera on the front panel is not blocked or dirty.
b. Slightly shif the projector or press the Auto Image Adjustment button on the
remote to start auto focus.
c. To manually adjust the focus, press and hold the Auto Image Adjustment button
> select Manual Focus > lef and right buttons on the remote.
d. Adjust the projection angle and direction, as well as the height of the projector, if
necessary.
e. For auto-focus to function properly, the distance between the projector and the
screen should be 1 - 4 m.
4. Auto Keystone Correction Failed
a. Ensure that the Camera / TOF on the front panel is not blocked or dirty.
b. The best automatic keystone correction distance is 1 - 4 m, horizontal ± 30° at 3 m
/ ± 10° at 4 m.
5. Eye Guard Not Working
a. Ensure that the Camera / TOF on the front panel is not blocked or dirty.
b. The Eye Guard feature works best at a distance of 0.1 - 4 m.
c. Go to Settings > Projector > Advanced Settings > Eye Guard and check if the
feature has been enabled.
6. No HDMI Signal
a. Use a diferent HDMI cable.
b. Connect your projector to another HDMI playback device.
c. Connect the HDMI playback device to your TV via an HDMI cable to check if the
device or cable is malfunctioning.
d. Adjust the HDMI playback device's output resolution / frequency to be the same
as the projector's.

Accessibility & Compatibility Features
Accessibility Features
This product includes several accessibility features designed to make it easier to use
for people with visual, hearing, and mobility impairments.
Visual Accessibility
• Screen Reader Support: Works with Android TV™ built-in screen reader (TalkBack) for
on-screen content narration.
Operation:
1. Go to Settings > Accessibility > TalkBack.
2. Toggle On to enable.
3. Use arrow keys on the remote to navigate; the system will read aloud focused
items.
• High Contrast Mode: Improves text and element visibility.
Operation:
1. Go to Settings > Accessibility > High Contrast Text.
2. Enable the feature for better visibility.
• Font Size Adjustment:
1. Go to Settings > Accessibility > Captions > Enable Display >Text Size.
2. Select Large or Largest for better readability.
Hearing Accessibility
• Captions and Subtitles: Supports closed captions in supported apps (e.g., YouTube,
Netlix).
Operation:
1. In the streaming app, go to “Subtitles/CC” menu.
2. Select your preferred language and turn it on.
Mobility Accessibility
• Full Remote Navigation: All functions can be operated via the remote without using
touch or direct screen interaction.
• Keyboard / Mouse Support: Compatible with Bluetooth and USB input devices.
Operation:
1. Go to Settings > Remotes & Accessories > Pair Accessory.
2. Put your keyboard/mouse in pairing mode.
3. Select the device to connect.
Compatibility & Interoperability
• Operating System: Android TV™ OS, compatible with most Google Play-certified
apps.
• Assistive Technology Compatibility: Works with TalkBack, screen magnifiers, switch
access devices.
• Connectivity Options:
USB-C, USB-A, HDMI 2.1 (eARC), AUX, Bluetooth 5.1, Wi-Fi 5.
• Supported Bluetooth Accessories: Headphones, speakers, keyboards, game con-
trollers, screen readers.

Quick Accessibility Shortcuts
• Enable TalkBack Quickly: Go to Settings > Accessibility > Accessibility shortcut >
Enable Accessibility shortcut, then press and hold both Back and Down buttons on
the remote for 3 seconds.
• Zoom Screen:
1. Go to Settings > Accessibility > Text Scaling > Select Large or Largest.
2. Triple-tap the OK button to zoom/unzoom.
• Voice Commands: Use the microphone button on the remote to issue voice com-
mands to Google Assistant.
Specification
Specifications are subject to change without notice.
Input USB-C 20V/5A
Power Consumption 100W
Standby Power Consumption
<
0.5W
Brightness 650 ANSI Lumens
Resolution 1920 × 1080
Light Source 4-LED
Color Gamut 124% REC.709
Native Contrast Ratio 400:1
Aspect Ratio 16:9
Throw Ratio 1.2:1
Speaker Output Power 10W x 2 ( Dolby Audio Supported )
Noise 27dB@1m
Wi-Fi WiFi5
Bluetooth Version 5.1
USB Format FAT32, NTFS
Operating Temperature 0-25°C
Audio Frequency 75-20K Hz

Connectivity: USB-C / USB-A / HDMI 2.1( eARC ) / AUX-OUT / Bluetooth / Google Cast
RAM + ROM: 2GB + 32GB
Display Technology: DLP
OS: Android TV™ OS
Default Open Ports: Wi-Fi (2.4 GHz/5 GHz)
Port Description:
1. Upon initial power-on or afer a reset, if no Wi-Fi information has beeen config-
ured, the device will begin scanning for available SSIDs.
2. In normal operating mode, the device will automatically connect to the previously
saved router SSID and password.
3. To change the Wi-Fi configuration, you can go to Settings > WiFi, or follow instruc-
tions in the manual to reset and reconfigure the network connection.