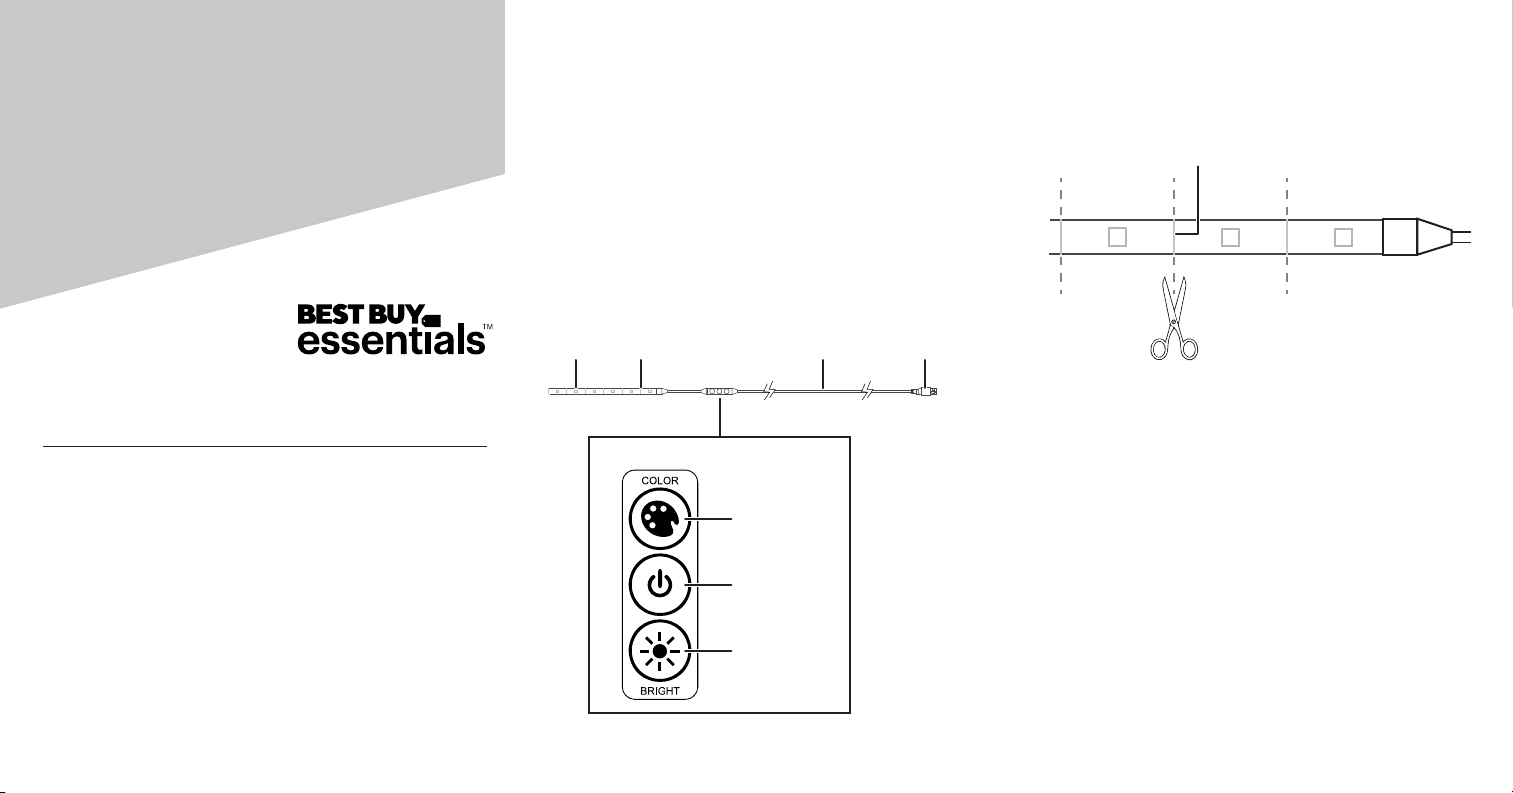
Shortening your tape light
• Use a pair of scissors to cut on a cut line. Cut lines are
about 1.3 in. (3.3 cm) apart.
Warning: Do not cut the silver solder markings. Only cut in
the center of the copper-colored pads, as shown.
Attaching your lights
1 Peel the adhesive backing o the lights, then adhere
the lights where you want them.
2 Optional: Attach the double-sided tape to the back of
the light control, then adhere it where you want it.
Notes:
• Make sure that the tape light is unrolled, otherwise it
can damage the tape light or cause a re.
• Every surface is dierent, and additional adhesive may
be used if the LED tape detaches from the surface.
Small pieces of clear tape can be used.
Connecting to power
• Place the tape light where you want it, then connect
the USB connector to your TV, computer, or other USB
power source.
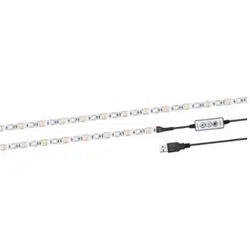
Features
• Produces custom lighting with 20 color options
• Attaches to TVs, cabinets, and other objects
• Adjust the brightness level with a multi-step dimmer
• Cuts to whatever length is needed
• Reduces eye strain from TVs and monitors
• Powered by USB
• Built and backed by Best Buy
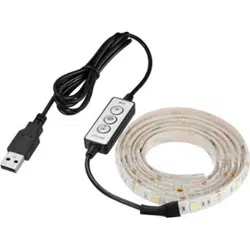
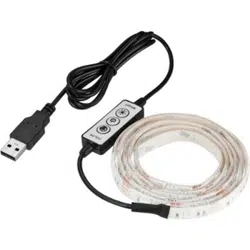
Using your tape light
USB
connector
Wire
LED
light strip
Cut
line
Change color
Turn on/o
Adjust brightness
Light controls
Cut line
Before using your new product, please read these instructions to prevent any damage.
Package contents
• LED tape light
• Double-sided tape
• Quick Setup Guide
4 ft. Full-Color
LED Tape Light
Quick Setup Guide
BE-LED4RGB19
WARNING: Unroll before use. Never plug in the LED lights when rolled up, as this can
result in product damage or a re.
BE-LED4RGB19_-C_20-0896_QSG_V1_EN_Final.ai 1 2/8/2021 2:51:03 PM
V1 ENGLISH 20-0896
Adjusting the lights
Note: If you turn o or unplug your tape light, it will remember
your last brightness and color settings.
• Press (POWER) to turn the tape light on and o.
• Press (COLOR) repeatedly to change the color
combination. There are 20 available colors including
white.
• Press (BRIGHT) repeatedly to adjust the brightness.
There are eight light levels.
Specications
• Input: 5V DC, 1A
• USB power supply (not included): 5V DC, 0.5A
minimum (1A or more recommended)
• Length: 4 ft. (1.2 m)
Troubleshooting
LEDs will not turn on.
• Press the power button to make sure that your light
is turned on, then press (BRIGHT) to increase the
brightness.
• Make sure that your lights are connected to a
working USB port or power outlet. If connected to a
computer, turn on your computer.
LEDs icker or turn on and o.
• Make sure that your lights are plugged into a
working power outlet or USB port. Try plugging into
a dierent power source.
• Make sure that the cable is not damaged.
Safety Information
• To avoid damage to the light strip, do not sharply
twist or bend the light strip 90°or more.
• Do not cut the silver solder markings. Only cut in the
center of the copper-colored pads.
• Do not plug in your lights when they are coiled.
This can generate excess heat which can damage
the product or connected device.
One-year limited warranty
Visit www.bestbuy.com/bestbuyessentials for details.
Contact Best Buy Essentials
For customer service, call 866-597-8427 (U.S. and
Canada)
www.bestbuy.com/bestbuyessentials
Best Buy Essentials is a trademark of Best Buy and its aliated
companies.
Distributed by Best Buy Purchasing, LLC
7601 Penn Ave South, Richeld, MN 55423 U.S.A.
©2021 Best Buy. All rights reserved.
BE-LED4RGB19_-C_20-0896_QSG_V1_EN_Final.ai 2 2/8/2021 2:51:03 PM