USER GUIDE
NZ AU GB IE SG HK
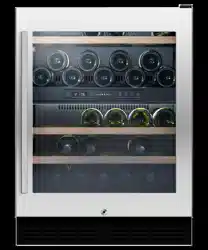
INTEGRATED
WINE CABINET
610mm INTEGRATED
RS6121VL2K1 & RS6121VR2K1


3
CONTENTS
Introduction 5
Safety and warnings 6
Before you begin 9
Control panel 10
ActiveSmart™ special features 11
Wine care 12
Using your appliance 13
Loading your wine bottles 16
Replacing carbon filter 17
Wifi connection 18
Cleaning care - exterior 19
Cleaning care - interior 20
User warnings and sounds 21
Troubleshooting 22
European directive 2012/19/EU on Waste
Electrical and Electronic Equipment (WEEE) 24
Service & warranty 25
Registration
To register your product visit our website: fisherpaykel.com/register

5
INTRODUCTION
Welcome to the family of Fisher & Paykel appliances. We hope you enjoy using this
Integrated Wine Cabinet as much as we’ve enjoyed creating it. Our team has spent
thousands of hours designing, engineering and testing this product to ensure you get the
perfect appliance for your home.
The slick design fits seamlessly into your home. Our integrated products can fit flush with
cabinetry to minimize gaps and support a cohesive, considered aesthetic. The Integrated
Wine Cabinet’s stainless steel interior and black anodised aluminium racks contrast
beautifully with its solid white oak slats.
The tinted and UV glass door is designed to both showcase and protect your wine, while
LED lighting provides full illumination whenever it’s needed.
ActiveSmart
TM
technology maintains optimum humidity with dual evaporator capability for
ultimate temperature control.
Please take a moment to register your product online. It will help us give you the best
service possible, and we’ll also let you know when we have special offers or promotions
running. Go to fisherpaykel.com/register now.
6
SAFETY AND WARNINGS
!
WARNING!
Electric Shock Hazard
Failure to do so can result in death, electric
shock, fire or injury to persons.
• Read and follow the safety and warnings
outlined in this user guide before operating this
appliance.
!
WARNING!
This appliance contains flammable
refrigerant isobutane (R600a).
R600a
READ AND SAVE THIS GUIDE
Use this appliance only for the intended purpose as described in the user guide.

7
SAFETY AND WARNINGS
WARNING!
Read entire manual. Failure to follow all guides and rules could cause personal injury or
property damage. When using this appliance always exercise basic safety precautions
including thefollowing:
z
This product has been designed for use in a normal domestic (residential environment).
z
Children should be supervised to ensure that they do not play with the appliance.
z
Children aged from 3 to 8 years are allowed to load and unload refrigerating
appliances.
z
Cleaning and user maintenance shall not be undertaken by children without supervision.
z
This appliance can be used by children aged from 8years and above and persons
withreduced physical, sensory or mental capabilities or lack of experience and
knowledge if they have been given supervision or instruction concerning use of the
appliance in a safe way and understand the hazards involved.
z
The manufacturer’s installation instructions for product and cabinetry ventilation
mustbe followed when installing the appliance.
z
To avoid hazard due to instability of the appliance, it must be fixed in accordance
withinstallation instructions.
z
Keep ventilation openings, in the appliance enclosure or the built-in structure, clear
ofobstruction.
z
Do not use mechanical devices or other means to accelerate the defrosting process,
other than those recommended by the manufacturer.
z
Do not damage the refrigerant circuit.
z
In case of damage to the refrigerant circuit, ventilate the area by opening all windows.
z
Do not operate electrical equipment or any other equipment that may produce arcs,
sparks or flames in the area. Contact your Fisher & Paykel trained and supported
service technician immediately to arrange for the appliance toberepaired.
z
It is hazardous for anyone other than a Fisher & Paykel trained and supported service
person to service thisappliance. In Queensland, Australia, the service technician must
hold a gas work license or authorization for hydrocarbon refrigerants to carry our
service or repairs which involve removal of covers.
Electrical
z
This appliance must be installed in accordance with the installation instructions
beforeuse.
z
To allow disconnection of the appliance from the supply after installation, incorporatea
switch in the fixed wiring in accordance with the local wiring rules.
z
If the power supply cord is damaged, it must only be replaced by your Fisher&Paykel
trained and supported service technician.
z
Do not use electrical appliances inside the compartments of the appliance.
z
When positioning the appliance, ensure the power cord is not trapped or damaged.
z
Do not locate multiple portable socket-outlets or portable power supplies at the rear of
the appliance.
Your appliance is designed to operate for many years without the need for service
checks. However, if your appliance is malfunctioning, have it attended to by your
Fisher&Paykel trained and supported service technician as soon as possible.

8
SAFETY AND WARNINGS
Storing wine
z
Do not store explosive substances such as aerosol cans with a flammable propellant in
this appliance.
z
Never store volatile or flammable materials in your appliance as they may explode.
Cleaning
z
Use only soap based cleaning products.
z
Use a clean microfiber cloth for cleaning the wooden racks. Do not use liquid/water on
oak racks. Ensure the racks are not too wet.
z
Avoid using anti-bacterial cleaning products on either the interior or exterior
of the cabinet as they may cause rusting of metal components and cracking of
plasticcomponents.
Disposal
z
Extreme care must be taken when disposing of your old appliance to avoid hazards:
z
The flammable refrigerant gas must be safely removed by a qualified
servicetechnician.
z
The thermal insulation foam in this appliance may contain flammable
insulationblowing gases, any exposed foam may be highly flammable andmustbe
carefully treated during disposal.
z
DANGER: Risk of child entrapment. Before you throw away your old refrigerator or
freezer, the doors and panels should be removed and the racks left inplaceso that
children may not easily climb inside.
z
Consult your local energy authority or local codes as to the best way to dispose ofyour
old appliance.
Power failure
z
In the event of a power interruption, the Wine Cabinet will automatically save the
current temperature settings. When power is recovered, the Wine Cabinet will revert to
the current temperature settings only.
z
Most power failures are corrected within a short period of time. 1 – 2 hours loss of
power will not affect the Wine Cabinet’s temperatures.
z
To avoid sudden change of temperature while the power is off, you should avoid
opening the door. For longer periods of power failure, do take steps to protect your
wine.
9
BEFORE YOU BEGIN
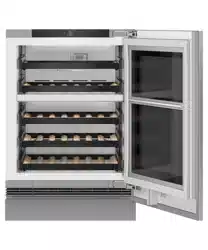
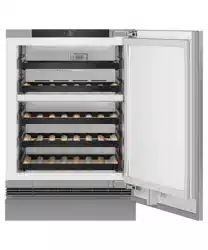
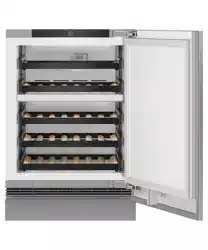
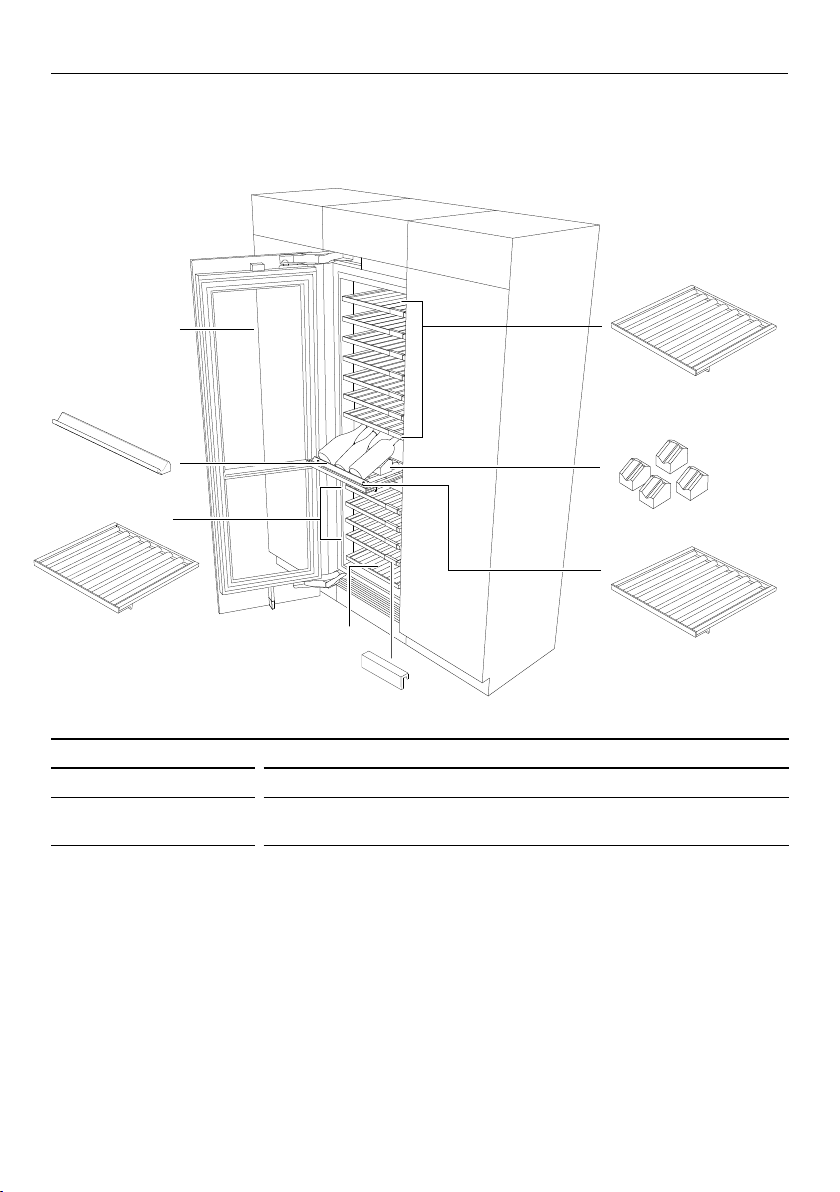
WINE CABINET COMPONENTS
Bottle racks Removable bottle racks (white oak)*
Accessories Wine display kit
Wine label kit
* Racks have different sizes. Ensure you have the correct dimensions when replacing racks,
Interchangeable
Upper bottle racks
Display rack
Display handle
UV tempered
glass door
Wine bottle labels
Bulk storage rack
Display cradles
Interchangeable
Lower bottle racks
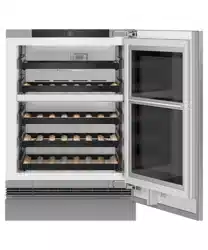
Integrated - Wine Cabinet
Easy-clean design with evenly distributed lighting and aluminum trims.

10
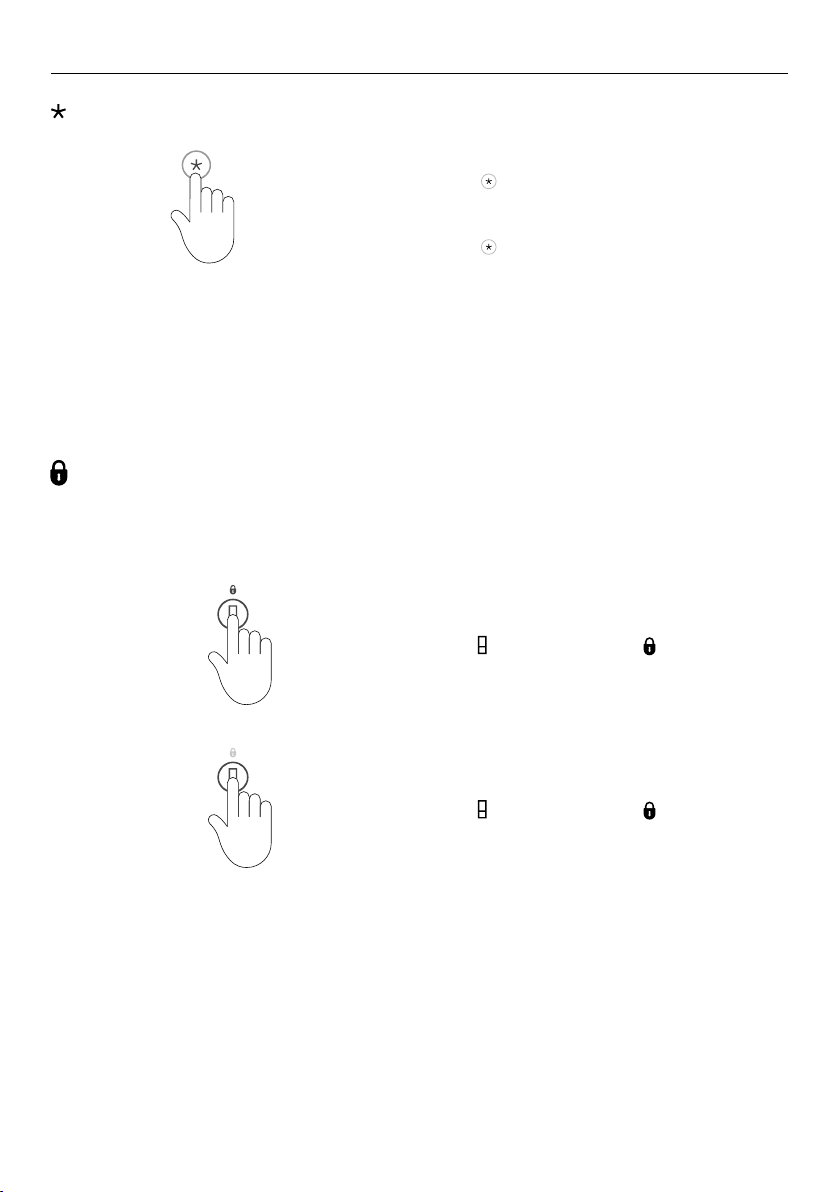
CONTROL PANEL
SmartTouch™
SmartTouch™ CONTROL PANEL FEATURES
Compartment Allows you to unlock the control panel and enable
compartment selection. Press for 4seconds to activate your
appliance for the first time.
The control panel will automatically lock when inactive for
more than 10seconds or when the door is closed. To unlock,
press for 2seconds.
Wine Mode Allows you to select the wine mode for the
selected compartment.
Key lock Illuminates to indicate that the keys on the control
panel are locked. When the door is closed the display is
automatically locked.
Sabbath mode IIluminates to indicate that Sabbath mode is activated.
WiFi
Illuminates to show wireless remote mode is enabled.
Visitfisherpaykel.com/connect for further details on using
thisfeature.
Filter indicator Illuminates to indicate that carbon filter replacement is
required.
7.0
16.0
Digital display Displays the set temperature of the compartments.
To change between Celsius and Fahrenheit on the display:
●
Press and together for 4seconds.
Colder Reduces the temperature of compartments.
Warmer Increases the temperature of compartments.
Light Mode Allows you to select the light mode for the
selected compartment.
Alarm Mute Deactivates the door alarm for 20minutes.
C
F

11
ACTIVESMART™ SPECIAL FEATURES
Variable temperature zones
The serving temperature of your wine is crucial for your taste and enjoyment, therefore
‘Wine Modes’ have been carefully designed to both care for your wine and provide the
ideal serving temperature for all wine varieties.
The separate modes allow you to adjust the temperature in both compartments
independently.
Not all wines will improve over time. Check with your wine merchant for more
information regarding the best storage conditions for your wine.
WINE MODES TYPES OF WINE TO STORE
Red
(16°C)
‘Red Mode’ is suitable for short
term storage of light, fruity and full-
bodied reds at serving temperature.
Pinot Noir, Merlot, Malbec,
Shiraz/Syrah, Chianti,
Cabernet Sauvignon,
Vintage Port.
Cellar
(12°C)
For longer term storage of all wine
varieties, ‘Cellar Mode’ provides
conditions suitable for aging wines.
All varieties.
White
(8°C)
‘White Mode’ is suitable for
short term storage of aromatic
white wines and Rose at serving
temperature.
Sauvignon Blanc,
Chardonnay, Riesling, Pinot
Gris, Viognier, Chablis,
Gewürztraminer, Rosé.
Sparkling
(7°C)
‘Sparkling Mode’ is suitable for short
term storage of all sparkling wines at
serving temperature.
Sparkling wines (eg Méthode
Champenoise, Metodo
Classico) Champagne,
Cava, Prosecco.
Light modes
Four Light Modes are available to choose from. Select a Light Mode that suits the
desired illumination of bottles as well as the surrounding environment.
1
Off
Select “Off” to turn off all compartment lights.
2
Low
‘Low Mode’ is the dimmest setting available; softly illuminating the interior of your
Integrated Wine Cabinet while allowing it to blend into the surrounding environment.
3
Display
‘Display Mode’ brightly illuminates bottles on the display rack while all other racks
remain dimly lit, bringing emphasis to those extra special bottles.
4
High
‘High Mode’ turns all compartment lights to full brightness; the perfect mode for
showcasing your wine collection.

12
WINE CARE
Having purchased our dual-zone Integrated Wine Cabinet, you can rest assured that
your wines are well cared for. Your Integrated Wine Cabinet model has been designed
to carefully consider both the maturation and ideal drinking temperature of all wine
varieties. Our Wine Modes have been created to offer guidance for the perfect storage
conditions for your wine, whilst allowing you adjustability to suit your personal needs.
Temperature
Temperature control is critical for the maturation of wines, as significant daily or weekly
temperature fluctuations can denature wines. If storage temperatures are excessively
high this can reduce the wines aromatic potential and can speed up maturation. This
can cause some wines to take on a ‘spoiled fruit’ flavouring. If storage temperatures are
excessively low, this can have the opposite effect and stunt a wine’s natural maturation
process. This can prevent a wine’s flavours from developing to their full potential.
Humidity
Optimum humidity levels are also important for the storage of cork enclosed wines,
especially for long term storage. Dry environments can lead to dried out corks
encouraging wine evaporation as well as oxygen permeation leading to oxidised wine.
As for extremely humid conditions, there is potential for mould growth on bottles and
labels.
UV-Tempered Glass Door
Light is known to be damaging to wines, particularly UV light. Light can react with wine,
creating hydrogen sulphide compounds affecting the tannins and colour. Your Integrated
Wine Cabinet has been designed to eliminate this threat by incorporating a double
UV-tempered glass door, dark interiors and dimmed LED lighting.
Vibration
Your Integrated Wine Cabinet model has been designed to have minimal vibrations,
important for optimal wine care.
Ventilation
Wine should be stored in an odour-free environment. You Integrated Wine Cabinet
model comes with an activated carbon air filter to assist with removing taint and odour
inside each compartment.
Helpful tips:
●
Follow our pre-set Wine Modes as a guideline for optimal storage and the perfect
drinking temperature.
●
For entertaining, choose from one of our four Light Modes. Light Modes will default
to Low after a certain duration to ensure the best wine care.
●
If storing wine for long durations we recommend turning the Light Mode to Off.
●
Store bottles lying flat on their sides to keep the liquid up against the cork which should
keep the corks from drying out.
●
Allow red wine to breathe. We suggest opening the bottle at least 1 hour before serving.
Alternatively, decant red wine into a decanter.

13
1
2
To selecting the compartment, press
to To increase the temperature of your
selected WINE MODE.
Press
to increase the temperature of the
selected food mode.
Press
to decrease the temperature of the
selected food mode.
USING YOUR APPLIANCE
Temperature control
At initial startup, each
WINE MODE will automatically default to the recommended
temperature setting. Once you have selected the compartment and required WINE MODE,
the temperature can be adjusted as desired. The selected setting will be saved for future
use.
Adjusting the temperature
1
Selecting the Wine Mode
Select the desired compartment.
Press
to scroll through the available
modes. The light next to the name ofthe
WINE MODE will illuminate as you scroll to
indicate which mode is selected.
C
F
14
USING YOUR APPLIANCE
1
Selecting the Light Mode
To activate/deactivate a Light Mode:
Press
repeatedly to scroll through the
available LIGHT MODE settings and select
your preferred mode.
Press
for two seconds to activate.
A blinking light indicates the current
position when scrolling through the list.
C
F
When opening the door of your product, all internal lights will illuminate to full brightness.
Upon closing the door, your appliance will remember the previously selected LIGHT MODE
Note: ‘Display’ and ‘High’ modes will default to ‘Low’ after a set duration. For longer term
storage, we recommend turning your lights to
OFF.
1
2
Allows you to disable the buttons on the control panel. Suitable when cleaning your
appliance.
Key lock
To deactivate:
Press for 2seconds. The icon will dim.
To activate:
Press
for 2seconds. The icon on the
control panel will illuminate.
Door alarm
●
If the door is left open, the alarm will beep after 60 seconds.
●
If the door remains open, subsequent beeps will sound every 30 seconds for 5 minutes.
●
If the door remains open for 5 minutes or longer, an alarm will sound continuously and
the interior compartment light(s) will turn off.

15
USING YOUR APPLIANCE
1
1
To activate:
Press
, and together for 4 seconds.
The
icon on the control panel will
illuminate. When activated, the display, all
alarms and lights are deactivated for 80
hours.
To deactivate manually:
Press
, and together for 4seconds.
Note: If you turn off your appliance
while in Sabbath mode, it will resume
automaticallyonce the appliance is switched
on again.
Sabbath mode
1
To activate:
To activate, press
once. The light above
will illuminate to indicate the refrigerator
is muted.
ALARM MUTE will deactivate after
20minutes. Press To deactivate manually,
Closing the door also deactivates the
ALARM MUTE.
Alarm mute
1
To activate:
Press
for 2seconds, a single beep will
sound to indicate key mute is activated. All
key sounds are now muted.
To deactivate:
Press
for 2seconds, a single beep will
sound.
Key mute
16
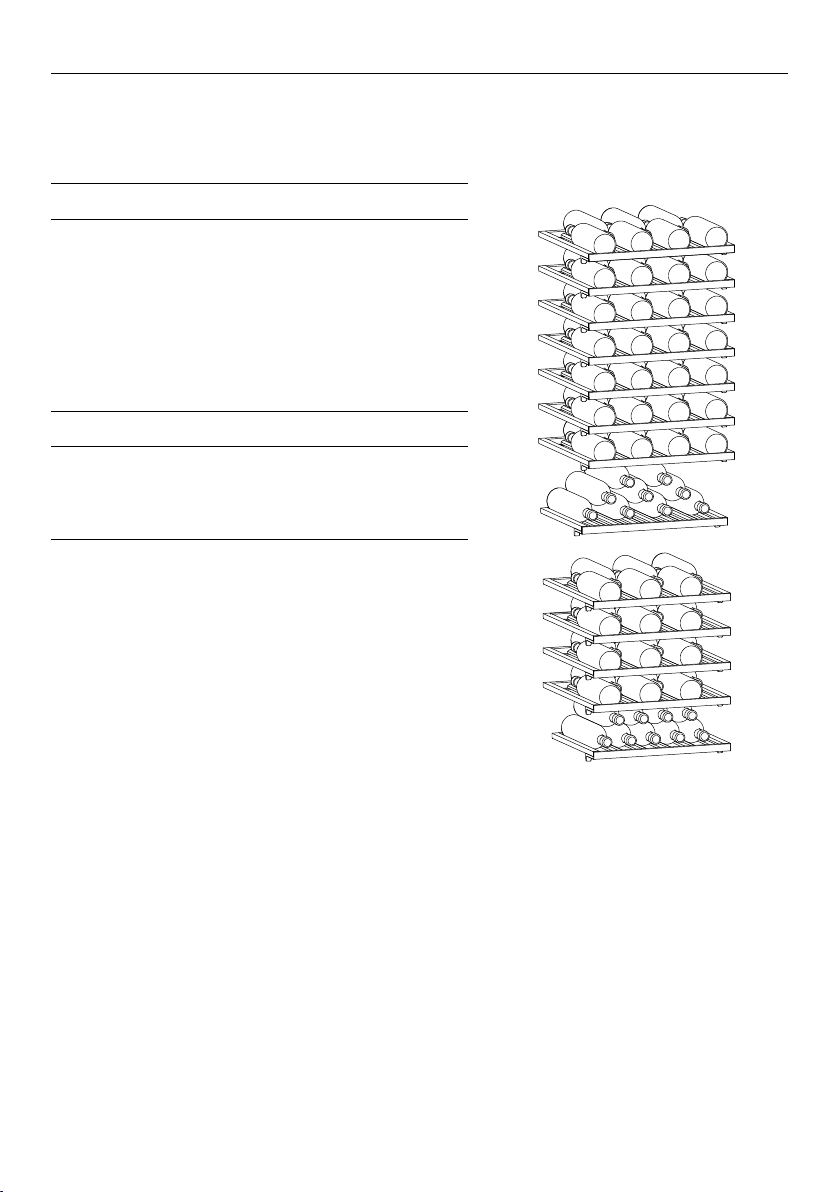
The Integrated Wine Cabinet has a recommended maximum storage capacity of 91
standard 750ml bottles. The loading arrangement outlined is recommended when using
the wine cabinet at full capacity. Racks may be removed to store larger sized bottles.
DOs
●
Before loading wine into the cabinet confirm
that all racks are secured and stable.
●
Stack wine bottles of same sizes to enable
easy access if required.
●
Only interlock wine bottles of the same size.
This ensures the first tier is stable to allow
stacking.
●
Follow the recommended loading arrangement
outlined for each rack.
DON’Ts
●
Do not load more than the recommended
number of wine bottles on each rack.
●
Do not interlock wine bottles of different sizes
that do not fit well together on a rack.
LOADING YOUR WINE BOTTLES
IMPORTANT!
●
When stacking bottles, take extra care to
avoid breakages.
●
A net or vented mat can be used between
bottles in a stack to minimise risk of
breakage. Alternatively, net sleeves can be
used to protect individual bottles.
●
Ensure the protector sleeve or mat you use
allows sufficient air flow and is odour free.
17
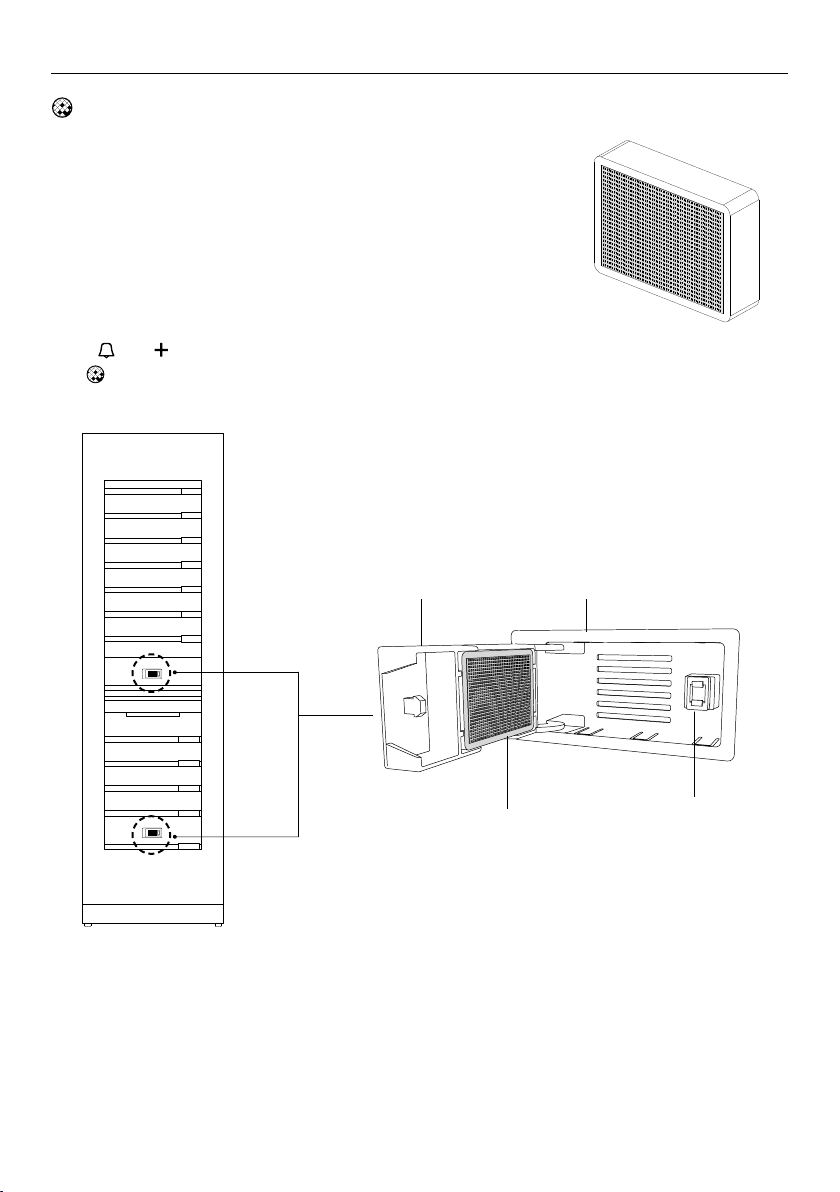
Activated carbon filters
Air quality is critical for preserving wine. Your product is
fitted with two activated carbon filters that help remove
stale, unwanted odours and replenishes with fresh air. The
filters are located internally at the bottom rear of each
compartment.
We recommend replacing the activated carbon filter every
6 months. A replacement indicator icon on the control panel
illuminates when the carbon filters needs to be replaced.
Carbon filter
REPLACING CARBON FILTER
Carbon filter
Push-open latch
Hatch
Housing
To reset the filter indicator:
Press
and together for 4 seconds.
The
on the control panel will turn off when reset.
Replacement filters can be purchased online from fisherpaykel.com or by calling Fisher
& Paykel Customer Care. Refer to Wine column installation guide for instructions on
replacing the filters.

18
WIFI CONNECTION
Your appliance can be connected to your home wireless network and operated remotely
using the FISHER & PAYKEL app.
Getting started
z
Ensure your home WiFi network is turned on.
z
You will be given step by step guidance on both your appliance and mobile device.
z
It may take up to 10 minutes to connect your appliance.
On your mobile device:
1 Download the
FISHER & PAYKEL app from www.fisherpaykel.com/connect
2 Register and create an account.
3 Add your appliance and set up the WiFi connection.

19
CLEANING CARE - EXTERIOR
Glass door
Use only mild liquid detergent dissolved in warm water and a soft cloth. Rinse with
clean water and dry with a clean, lint-free cloth.
Stainless steel door panel
Use only mild liquid detergent dissolved in warm water and a soft cloth. Rinse with
clean water and dry with a clean, lint-free cloth.
Toe kick grilles and filter
Your Integrated Wine Cabinet is fitted with a toe kick grille to protect the internal
working components. We recommend cleaning the grille.
●
The condenser coils of your Integrated Wine Cabinet require periodic cleaning by a
Fisher&Paykel trained service technician.
●
To maximize operating efficiency, keep ventilation openings clear of obstructions by
regularly vacuuming the flooring in front of your appliance.
●
More frequent cleaning may be necessary for dusty homes or those with pets sheddinghair.
Other exterior surfaces
●
We recommend to clean the magnetic door gasket every three months with a brush (eg
old toothbrush) and liquid dishwashing agent dissolved in warm water.
IMPORTANT!
●
Many commercially available cleaning products contain solvents which may attack
plastic components of your Integrated Wine Cabinet and cause them to crack.
●
Avoid using anti-bacterial cleaning products on the interior or exterior of the Wine
Cabinet, as they may cause rusting of metal components and cracking of plastic
components.
20
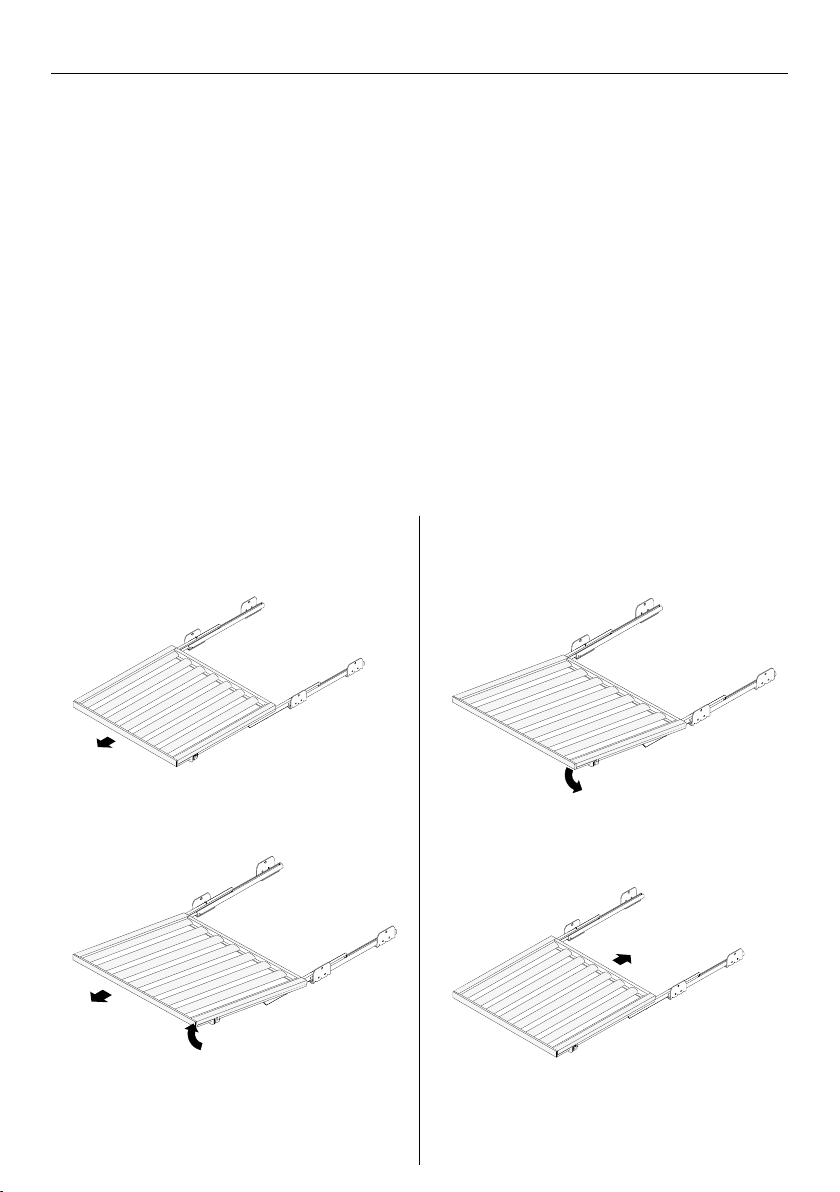
CLEANING CARE - INTERIOR
2
Extend the rack outward from the
slides. (A)
Removing the racks
1
Remove the wine bottles from the racks.
Repositioning the racks
1
Align the back edge of the rack onto
the desired support slides. (D)
3
Lift the front end of the rack. (B)
4
Pull the rack towards you to remove. (C)
2
Push the rack into the wine cabinet all
the way to the back of supportslides
until it locks in place. (E)
A
B
C
D
3
Ensure the rack is secure before use.
E
IMPORTANT!
Remove all wooden racks prior to cleaning.
●
Do not use harsh chemicals, abrasives, ammonia, chlorine, bleach, concentrated
detergents, solvents or abrasive scouring pads on any part of your appliance.
Some of these chemicals may damage your appliance.
●
Wipe interior surfaces with a mild liquid detergent dissolved in warm water and a soft
cloth. Rinse with clean water and dry with a clean, lint-free cloth.
Wooden racks
Do not use water or cleaners for general (day-to-day) cleaning as they will damage
the wood. Wine spills should be immediately wiped up to avoid rack staining. If a wine
stain has appeared, it may be spot cleaned using mild liquid detergent dissolved in
warm water and a soft cloth. Only just dampen the cloth and dab the stain to keep the
wood as dry as possible. Follow up using a damp (water only), soft cloth and then dry
thoroughly with a clean, dry cloth. If racks are heavily stained, the colour may darken
over time.
Replacement racks can be purchased through Fisher & Paykel Customer Care Centre, or
online at finsherpaykel.com (this service is available to selected markets only)

21
USER WARNINGS AND SOUNDS
Faults
●
In the unlikely event a fault occurs, 4rapid beeps will be heard and the fault
will be displayed on the control panel.
– Record the fault code displayed on the control panel and contact a
Fisher&Paykeltrained and supported service technician in order to
repair thefault. You can do this by going online to fisherpaykel.com or
bycontactingourCustomer Care Centre.
Normal appliance sounds
This wine column has been designed to have excellent energy ratings and cooling
performance. As a result, it can produce sounds somewhat different to your
oldappliance.
Normal operational sounds include:
●
Low frequency ticking sound. This is the valve that controls cooling to each
compartment. This noise will only last for a few seconds at a time.
●
Fan air flow sound. Integrateds has fans which change speed depending on demand.
During cooling periods, such as after frequent door openings, fans circulate thecoldair
in the appliance producing some air flow sound. This is quite normal.
●
Cracking or popping sounds. This may occur when the automatic defrost function
isoperating.
●
Running water sound. This is the liquid refrigerant in the system and can be heard
asaboiling or gurgling noise.
●
Humming sounds. This is the compressor running and is quite normal.
●
Other sounds may be heard for the following reasons:
– Floor uneven or weak.
22
TROUBLESHOOTING
If there is a problem with your appliance, please check the following points before
contacting your local Fisher & Paykel trained and supported service technician or
theCustomer Care Centre.
Product parts and accessories can be purchased through the Fisher & Paykel
CustomerCare Centre, or online at fisherpaykel.com (this service is available to
selectedmarkets only).
PROBLEM POSSIBLE CAUSES WHAT TO DO
Appliance does
not operate
No electricity at
poweroutlet.
Check that the plug is correctly
connected and power switched on.
Check another appliance at the
sameoutlet.
Check house fuse.
Light not
working
Light not functioning. The lighting cannot be serviced by
the user. Contact your Fisher & Paykel
dealer or trained and supported
servicetechnician.
Appliance not working. Check appliance is turned on at the wall
or at the isolating switch.
Light and
display not
working
Product in Sabbath mode.
Press
, and together for
4seconds.
Storage
compartments
too warm
Temperature setting
notcorrect.
See ‘ActiveSmart™ special features’
section of this User guide.
Frequent door openings. Minimize door openings to allow
temperature to stabilize.
Large amount of wine
has been recentlyadded.
Keep recommended bottle capacity.
Unfamiliar
noises
Cabinet not stable
orlevel.
See Installation guide supplied with
thisappliance.

23
TROUBLESHOOTING
PROBLEM POSSIBLE CAUSES WHAT TO DO
When the appliance
door is opened
4rapid beeps
sound and a code
is displayed on the
control panel
Record the code on the control
panel and contact Customer
CareCentre.
Exterior of cabinet
is warm
Note: This is normal.
Condensation on
outside of appliance
Not unusual during periods
of high humidity.
Wipe dry.
Condensation inside
compartment
Frequent or
long door openings.
Minimize door openings.
Door gasket leaking. Check and clean door gasket seal.
Not unusual during periods
of high humidity.
Wipe dry.
Door not closing tightly. Arrange items in the compartment
so door can close tightly.
Doors not aligned. Call a service technician.
Door not closing An obstruction is blocking
door closing.
Move obstruction.
Appliance not
installed correctly.
Refer to your Installation guide
supplied with this appliance to
ensure your appliance has been
installed correctly.

24
EUROPEAN DIRECTIVE 2012/19/EU ON WASTE
ELECTRICAL AND ELECTRONIC EQUIPMENT (WEEE)
EU This appliance is marked according to the European Directive 2012/19/EU on
WasteElectrical and Electronic Equipment (WEEE). By ensuring this product is
disposed of correctly, you will help prevent potential negative consequences for the
environment and human health, which could otherwise be caused by inappropriate
handling of this product.
The symbol marked on the serial plate, or on the documents accompanying
theproduct, indicates that this appliance cannot be treated as household waste.
Itshallbe handed over to the applicable collection point for the recycling of electrical
and electronic equipment. Disposal of the appliance shall be carried out in accordance
with the local environment regulations for waste disposal and ensure the refrigerant
circuit is not damaged.
For more detailed information about treatment, recovery and recycling of this product,
please contact your local city office, your household waste disposal service or your
Fisher & Paykel retailer/dealer from whom you purchased this product.

25
SERVICE & WARRANTY
For details of your manufacturer’s warranty and contacts for servicing, refer to your
separate service and warranty book provided with your appliance.
This product has been designed for use in a normal domestic (residential environment).
This product is not designed for any commercial use. Any commercial use by the
customer will affect this products manufacturer’s warranty.
Complete and keep safe for reference:
Model
Serial No.
Purchase Date
Purchaser
Dealer
City
State
Zip
Country


86024B05.20
FISHERPAYKEL.COM
© Fisher & Paykel Appliances 2020. All rights reserved.
The models shown in this guide may not be available in all markets
and are subject to change at any time.
The product specifications in this guide apply to the specific products and
models described at the date of issue. Under our policy of continuous product
improvement, these specifications may change at any time.
For current details about model and specification availability in your country,
please go to our website or contact your local Fisher&Paykel dealer.